1
Librid 3 manual
© 2015 P.V. Supa Oy
Table of Contents
........................................................................................................................8
About
this manual
........................................................................................................................9
About
Librid 3
........................................................................................................................10
Getting
started
Starting Librid
...................................................................................................................................
3
10
Closing Librid
...................................................................................................................................
3
10
Starting the...................................................................................................................................
computer
10
Shutting down
...................................................................................................................................
the computer
10
Statistics report
................................................................................................................................... 10
Controlling ...................................................................................................................................
the sounds
11
Changing receipt
...................................................................................................................................
font sizes
12
Information...................................................................................................................................
printed on receipts
13
Changing receipt
...................................................................................................................................
texts
13
Changing the
...................................................................................................................................
timers
14
Connection...................................................................................................................................
to library system, SIP server
14
........................................................................................................................15
Software
overview
Configuring...................................................................................................................................
the software
15
........................................................................................................................16
Delayed
startup
........................................................................................................................17
Language
editor
Working with
...................................................................................................................................
language files
17
Adding new...................................................................................................................................
languages
21
Using texts...................................................................................................................................
in Supa software
21
........................................................................................................................23
Receipt
testing
........................................................................................................................24
Statistics
Supa reporter
................................................................................................................................... 24
More information
................................................................................................................................... 25
........................................................................................................................26
Creating
an Exit card
........................................................................................................................27
SIP
messaging
93 - 94 Login
................................................................................................................................... 27
Librid 3 manual
2
98 - 99 SC status
................................................................................................................................... 27
23 - 24 Patron
...................................................................................................................................
status
27
63 - 64 Patron
...................................................................................................................................
information
27
17 - 18 Item...................................................................................................................................
information
28
09 - 10 Check
...................................................................................................................................
in
28
11 - 12 Check
...................................................................................................................................
out
28
29 - 30 Renew
................................................................................................................................... 28
65 - 66 Renew
...................................................................................................................................
all
28
........................................................................................................................29
Scripting
Patron script
................................................................................................................................... 29
Item script ................................................................................................................................... 29
Screen message
...................................................................................................................................
script
29
........................................................................................................................30
Settings
reference
Global settigs
................................................................................................................................... 30
Admin
......................................................................................................................................................... 30
Admin page cards
.................................................................................................................................................. 30
Disable default exit code
.................................................................................................................................................. 30
Exit cards
.................................................................................................................................................. 30
Shutdown cards
.................................................................................................................................................. 30
Authentication
......................................................................................................................................................... 30
Auto ok on max digits .................................................................................................................................................. 31
Barcode end key
.................................................................................................................................................. 31
Barcode filter
.................................................................................................................................................. 31
Barcode removed text .................................................................................................................................................. 31
Max fail count before exit
.................................................................................................................................................. 31
Max patron code length
.................................................................................................................................................. 31
Max pin code length .................................................................................................................................................. 31
Min patron code length.................................................................................................................................................. 31
Min pin code length .................................................................................................................................................. 31
Patron card reader type
.................................................................................................................................................. 31
Patron comport reader..................................................................................................................................................
parameters
32
Patron dialog type
.................................................................................................................................................. 32
Pincode authentication
..................................................................................................................................................
type
32
Pin code type
.................................................................................................................................................. 32
Show buttons in pincode
..................................................................................................................................................
dialog
32
Show library card characters
.................................................................................................................................................. 33
Use parameter for patron
..................................................................................................................................................
card script
33
Use script for patron code
.................................................................................................................................................. 33
Check in
Notify holds
One item mode
Check out
......................................................................................................................................................... 33
.................................................................................................................................................. 33
.................................................................................................................................................. 33
......................................................................................................................................................... 33
Highlight mode
.................................................................................................................................................. 33
Item mode
.................................................................................................................................................. 34
Show patron fee amount
.................................................................................................................................................. 34
Show patron name
.................................................................................................................................................. 34
Demagnetize
Librid 3 manual
......................................................................................................................................................... 34
3
Demagnetize type 1 / 2..................................................................................................................................................
/3
34
Method for audio tape ..................................................................................................................................................
/ book / ...
35
Use demagnetize
.................................................................................................................................................. 35
Device: IO
......................................................................................................................................................... 35
Comport
.................................................................................................................................................. 35
IO card type
.................................................................................................................................................. 35
Port types
.................................................................................................................................................. 35
Sensor input channel .................................................................................................................................................. 35
Sensor input high means
..................................................................................................................................................
open
35
Sensor logic type
.................................................................................................................................................. 35
Smart Bin / Drop box: Sensor
..................................................................................................................................................
Channel
36
Smart Bin: Green Light ..................................................................................................................................................
Channel
36
Smart bin: Light mode .................................................................................................................................................. 36
Smart Bin: Magnet Lock..................................................................................................................................................
Channel
36
Smart Bin: Red Light Channel
.................................................................................................................................................. 36
Smart Bin: Red light is on
..................................................................................................................................................
at default
36
Smart bin: Wait until dropped
.................................................................................................................................................. 36
Use new advantech driver
.................................................................................................................................................. 36
Device: Item barcode.........................................................................................................................................................
reader
36
Barcode reader type .................................................................................................................................................. 37
Parameters
.................................................................................................................................................. 37
Reading side
.................................................................................................................................................. 37
Stop reader when item..................................................................................................................................................
read
37
Email connection info
......................................................................................................................................................... 37
From
Port
Server
SMTP password
SMTP user
Use authentication
Use SSL
Functions
.................................................................................................................................................. 37
.................................................................................................................................................. 37
.................................................................................................................................................. 37
.................................................................................................................................................. 38
.................................................................................................................................................. 38
.................................................................................................................................................. 38
.................................................................................................................................................. 38
......................................................................................................................................................... 38
Account info functionality
.................................................................................................................................................. 38
Button type: Account info
.................................................................................................................................................. 38
Button type: Hold
.................................................................................................................................................. 38
Button type: Renew .................................................................................................................................................. 39
Must remove patron card
..................................................................................................................................................
to end session
39
Payment machine type.................................................................................................................................................. 39
Quit button type in checkout
.................................................................................................................................................. 39
Quitting automatically.................................................................................................................................................. 39
Session starting type .................................................................................................................................................. 39
Use check out button .................................................................................................................................................. 39
Languages
Default culture
Language list
Log
......................................................................................................................................................... 40
.................................................................................................................................................. 40
.................................................................................................................................................. 40
......................................................................................................................................................... 40
Server name for logging.................................................................................................................................................. 40
Magnetize
......................................................................................................................................................... 40
Magnetize type 1 / 2 / 3.................................................................................................................................................. 40
Method for audio tape ..................................................................................................................................................
/ book / ...
40
Use magnetize
.................................................................................................................................................. 40
MessageBoard
......................................................................................................................................................... 41
Show check in items .................................................................................................................................................. 41
Show check out items .................................................................................................................................................. 41
Librid 3 manual
4
Offline
......................................................................................................................................................... 41
Due date for check out.................................................................................................................................................. 41
Offline mode
.................................................................................................................................................. 41
QR Code
......................................................................................................................................................... 41
Mobile login service address
.................................................................................................................................................. 42
Mobile login service port
..................................................................................................................................................
number
42
Mobile login web site address
.................................................................................................................................................. 42
Receipt
......................................................................................................................................................... 42
Can use reading room due
..................................................................................................................................................
date
42
Check in print mode .................................................................................................................................................. 42
Check in receipt mode .................................................................................................................................................. 42
Check out print mode .................................................................................................................................................. 42
Check out receipt mode.................................................................................................................................................. 43
Due date style
.................................................................................................................................................. 43
Email receipt mode for..................................................................................................................................................
checkout
43
Footer print font
.................................................................................................................................................. 43
Footer print font size .................................................................................................................................................. 43
Header print font
.................................................................................................................................................. 43
Header print font size .................................................................................................................................................. 43
Print data
.................................................................................................................................................. 43
Text print font
.................................................................................................................................................. 44
Text print font size
.................................................................................................................................................. 44
Scheduler
Active
Open times
SIP
......................................................................................................................................................... 44
.................................................................................................................................................. 44
.................................................................................................................................................. 44
......................................................................................................................................................... 45
Ask fee items in message
..................................................................................................................................................
63
45
Code page for receiving.................................................................................................................................................. 45
Code page for sending .................................................................................................................................................. 45
Due date culture
.................................................................................................................................................. 45
Ignore supported messages
.................................................................................................................................................. 46
Library type
.................................................................................................................................................. 46
Max print line width .................................................................................................................................................. 46
No block is true for Renew
.................................................................................................................................................. 46
Protocol version
.................................................................................................................................................. 46
Renew mode
.................................................................................................................................................. 46
Starting sequence number
.................................................................................................................................................. 46
Use BL and CQ fields for..................................................................................................................................................
patron authentication
46
Use error handling
.................................................................................................................................................. 47
Use Fee Acknowledge in
..................................................................................................................................................
Checkout
47
Use sip message 63 .................................................................................................................................................. 47
Timers
......................................................................................................................................................... 47
ACS refresh time in minutes
.................................................................................................................................................. 47
Barcode delay for hybrid(ms)
.................................................................................................................................................. 47
Card remove timeout in
..................................................................................................................................................
seconds
47
Delay time before show
..................................................................................................................................................
wait in checkout and checkin (ms)
47
Error delay time in seconds
.................................................................................................................................................. 47
Error show time in seconds
.................................................................................................................................................. 48
Idle timeout in seconds.................................................................................................................................................. 48
Incomplete set info in seconds
..................................................................................................................................................
(multi check out/in)
48
Info show time in seconds
.................................................................................................................................................. 48
Login refresh in seconds
.................................................................................................................................................. 48
Sip received timeout in..................................................................................................................................................
seconds
48
Sorting arrow show time
..................................................................................................................................................
in seconds (single checkin)
48
Librid 3 manual
5
Timer for smart bin expected
..................................................................................................................................................
message
48
User interface
......................................................................................................................................................... 48
AF message type in UI .................................................................................................................................................. 48
Default currency
.................................................................................................................................................. 49
Fields to show in account
..................................................................................................................................................
info page
49
Hide flag in language selection
.................................................................................................................................................. 49
Mark special items in check
..................................................................................................................................................
in page
49
Max count to show block
..................................................................................................................................................
reason for patron
49
Show account info when
..................................................................................................................................................
check out
49
Show already error .................................................................................................................................................. 49
Show detailed buttons.................................................................................................................................................. 49
Show only special items
..................................................................................................................................................
in sorting page
49
Local settings
................................................................................................................................... 50
Audio files
......................................................................................................................................................... 50
Check out ok
Error
Hold item
Insert item
Item read
Pin button
Remember take card
Session end
Session start
Device: Rfid
......................................................................................................................................................... 51
Id for Scanner
Id for Smart Bin
Ignore security error
Reader
Use Rfid reader
Language files
.................................................................................................................................................. 51
.................................................................................................................................................. 51
.................................................................................................................................................. 51
.................................................................................................................................................. 51
.................................................................................................................................................. 51
......................................................................................................................................................... 51
Language texts
Log
.................................................................................................................................................. 50
.................................................................................................................................................. 50
.................................................................................................................................................. 50
.................................................................................................................................................. 50
.................................................................................................................................................. 50
.................................................................................................................................................. 50
.................................................................................................................................................. 50
.................................................................................................................................................. 50
.................................................................................................................................................. 50
.................................................................................................................................................. 51
......................................................................................................................................................... 52
Hide sensitive info
Save log
Pictures
.................................................................................................................................................. 52
.................................................................................................................................................. 52
......................................................................................................................................................... 52
Account info button image
.................................................................................................................................................. 52
Account info button pressed
..................................................................................................................................................
image
52
Book with arrow
.................................................................................................................................................. 52
Card image in authentication
..................................................................................................................................................
page
52
Card image in start page
.................................................................................................................................................. 52
Checkin button image .................................................................................................................................................. 52
Checkin button pressed
..................................................................................................................................................
image
52
Checkout button image.................................................................................................................................................. 53
Checkout button pressed
..................................................................................................................................................
image
53
Email button image .................................................................................................................................................. 53
Email button pressed image
.................................................................................................................................................. 53
Hold button image
.................................................................................................................................................. 53
Hold button pressed image
.................................................................................................................................................. 53
Image bin 0
.................................................................................................................................................. 53
Image bin 1
.................................................................................................................................................. 53
Image bin 2
.................................................................................................................................................. 53
Image bin 3
.................................................................................................................................................. 53
Library logo file
.................................................................................................................................................. 53
Librid 3 manual
6
Many book
.................................................................................................................................................. 53
No button image
.................................................................................................................................................. 53
No button pressed image
.................................................................................................................................................. 54
One book
.................................................................................................................................................. 54
Receipt button image .................................................................................................................................................. 54
Receipt button pressed..................................................................................................................................................
image
54
Receipt image
.................................................................................................................................................. 54
Renew button image .................................................................................................................................................. 54
Renew button pressed..................................................................................................................................................
image
54
Wait image
.................................................................................................................................................. 54
QR Code
......................................................................................................................................................... 54
Library name
.................................................................................................................................................. 54
Start from account info.................................................................................................................................................. 54
Use QR Code
.................................................................................................................................................. 54
Receipt
......................................................................................................................................................... 55
Mode
.................................................................................................................................................. 55
Pos printer name
.................................................................................................................................................. 55
Printer name
.................................................................................................................................................. 55
Use paper near end sensor
.................................................................................................................................................. 55
SIP
......................................................................................................................................................... 55
Login location code
Login user id
Login user password
Server ip address
Server port
Terminal password
Use ACS login
Sorting
.................................................................................................................................................. 55
.................................................................................................................................................. 55
.................................................................................................................................................. 55
.................................................................................................................................................. 55
.................................................................................................................................................. 56
.................................................................................................................................................. 56
.................................................................................................................................................. 56
......................................................................................................................................................... 56
Bin count
.................................................................................................................................................. 56
Bin number for special ..................................................................................................................................................
bin
56
Default sort bin
.................................................................................................................................................. 56
First bin index
.................................................................................................................................................. 56
Offline bin
.................................................................................................................................................. 56
Use special bin
.................................................................................................................................................. 56
Sorting rules
Rule
Type
......................................................................................................................................................... 56
.................................................................................................................................................. 57
......................................................................................................................................................... 57
Machine type
User interface
.................................................................................................................................................. 57
......................................................................................................................................................... 57
Display font: Default to..................................................................................................................................................
large fonts
57
Display font: Use font size
..................................................................................................................................................
button
57
Display font: Use high contrast
..................................................................................................................................................
with large fonts
57
Mouse cursor visible .................................................................................................................................................. 57
........................................................................................................................58
Language
codes
Librid 3 manual
7
About this manual
This manual covers the software part of Librid 3 self-service unit. It also has some information
about the hardware, but is not a complete guide to all hardware aspects of the unit.
This manual is valid for Librid version 3.0.8.2.
Librid 3 manual
8
About Librid 3
Librid 3 is the software running on Libmaster, Librid and Pillar self-service stations. The hardware
comes in many shapes and sizes, with different configurations, but the software is always the
same.
Librid 3 software can be configured to work with various hardware options such as RFID readers,
Barcode readers and EM demagnetizers. It can also be connected to any library management
system via SIP 2 protocol, to work seamlessly with existing library infrastructure.
Librid 3 manual
9
Getting started
This chapter covers the most basic operations and settings of the software without going into too
much detail. The rest of the manual has more specific information about all aspects of Librid 3,
including a full settings reference.
Starting Librid 3
The self-service unit should be pre-configured to start Librid automatically when it is turned on. If
Librid does not start automatically, or you have to turn it off and on again, you can start it by
double-clicking on the program icon on the desktop:
Librid 3 desktop
icon
Closing Librid 3
To close Librid 3, type the word exit on the keyboard and press <enter>. You can also use a
specific exit-card in the card reader, if one has been configured. See section Creating an Exit-card
for details.
Starting the computer
To turn on the computer in the self-service unit, turn on the main power switch. This will also by
default start Librid 3, once the computer has finished the start-up sequence.
There may be specific cases when the device should be turned on by different means. In such
case please follow the instructions given for that procedure.
Shutting down the computer
Before shutting down the computer, always close Librid first: type exit on the keyboard, or use a
specific Exit-card to shut down.
After Librid has been closed, you can turn off the computer normally. Choose Shut down or Turn
off from the Windows menu, and wait for the computer to shut down; the screen will be
completely black. It is now safe to turn off the main power switch.
Statistics report
Librid 3 comes with a separate program, Supa Reporter, which is used to access statistics. If your
environment is configured as centralized system, you will be able to access the statistics from any
workstation in the library. For standalone installations, reports must be executed on each selfservice unit separately.
Librid 3 manual
10
See chapter Statistics later in this guide for introduction to Supa Reporter. There is also a separate
manual available for more details on the reporter tool.
Controlling the sounds
Librid 3 can be configured to play sounds on various events. Sounds have to be in WAV format
files and they need to be uploaded to the database using Management Utility.
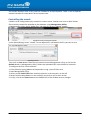
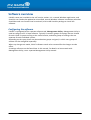
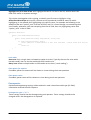
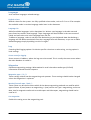
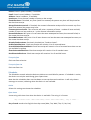
In Management Utility, go to ”Audio files” tab and click on the ”Upload” button:
Management utility, working with audio files
In the Upload dialog, select ”Librid3” as the application, and browse the file you wish to use:
Uploading audio files
Then click on Save button. Note that you need to restart Management Utility or click on the
Refresh button in Management Utility, before the uploaded files are available for selection.
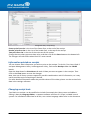
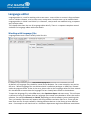
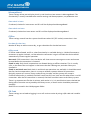
To configure the files for each device:
1. Close Librid by typing exit on the keyboard or using a specific Exit-card.
2. Start Management Utility
3. Select section Audio files from under each device in the treeview, on the left
4. Select from the drop-down lists the sound(s) you wish to use for each action.
5. Finally, click on the Save button at the bottom left of the window to save changes.
Librid 3 manual
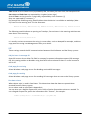
11
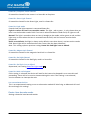
Audio files in Management Utility
The different sounds are:
Check out OK: Sound plays when library system has accepted the check-out.
Error: Sound plays when there is an error situation in the self-check.
Insert item: Sound plays when the self-check is ready to process next item
Item read: Sound plays when the self-check has identified an item
Pin button: Sound plays when PIN-code has been given
Remember take card: Sound plays when the Librid program reminds the patron to take his patron
card from the card reader
Session end: Sound plays when the check-out/in session is closed
Session start: Sound plays when the check-out/in session is started
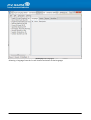
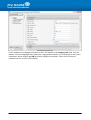
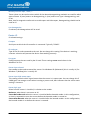
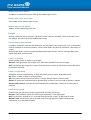
Changing receipt font sizes
Receipt font sizes are controlled via the Management Utility. To change the font sizes, first close
Librid and then open Management Utility. In Management Utility, find section Receipt under the
Librid3 branch:
Librid 3 manual
12
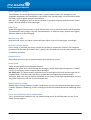
Management Utility - receipt settings
Footer print font size is the size of the footer font, at the end of the receipt.
Header print font size is the size of the header font, at the top of the receipt.
Text print font size is the size of the main text of the receipt.
Change these to what you want them to be, and then click on the Save button at the bottom left.
The changes will take effect when Librid 3 is next started.
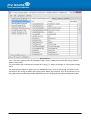
Information printed on receipts
You can choose what information you wish to print on the receipts. To do this, first close Librid 3
and open Management Utility. In Management Utility, find section Receipt under the Librid3
branch.
Open the drop-down list Print data and mark all data you want to appear in the receipts. Then
click on the Save button to save the changes.
Note, that not all library systems support all possible combinations and all information, so it may
not be possible to print everything as desired.
For more detailed information about the possible values of Print data, please see the section Print
data in the settings reference.
Changing receipt texts
Text labels on receipts can be modified to include for example the Library name and address.
Editing is done by Language Editor, a separate software tool from P.V. Supa, included in each
system. For information about how to do this, see section Language editor later in this document.
Librid 3 manual
13
Changing the timers
Various aspects of how the device works can be controlled by timers. These typically control for
how long a message is displayed on screen, or how long the patron has to respond to a question,
and so on.
Note: do not change the values beyond recommended values, for it may make the device function
incorrectly.
Timers are located in Management Utility under Librid3 branch, section Timers. To see details
about what each timer does, please see the settings reference in this document, section Timers.
Connection to library system, SIP server
Librid 3 uses the SIP2 protocol to communicate with the library system. Settings to control how the
connection is formed can be found in Management Utility, under Librid3 branch, then the machine
name, in section SIP. Please see Settings reference for details of each of these settings.
Note: If the system is working normally, do not change these settings. Incorrect settings will
prevent the device from working correctly.
Librid 3 manual
14
Software overview
Librid 3 comes pre-installed on the self-service station. It is a normal Windows application, and
should it ever need to be updated or uninstalled, normal Windows software installation procedure
should be used: use Control Panel to uninstall, and an MSI installer package to install the
software.
Configuring the software
Librid 3 is configured with a separate software tool, Management Utility. Management Utility is
used to configure all P.V. Supa software. Typically it contains groups of settings that are shared
for each Librid 3 system running on the same location, and other groups of settings that are
separate for each individual system.
Depending on the setup, there may be workstation groups assigned, in which case groups of
stations can be configured separately.
When any changes are made, Librid 3 software needs to be restarted for the changes to take
effect.
A settings reference can be found later in this manual. For details on how to work with
Management Utility, see a separate Management Utility manual.
Librid 3 manual
15
Delayed startup
It is possible to start Librid in a delay mode. This means that Librid starts up and then waits for a
given period of time, before attempting to form connections to library systems and other devices.
It can be useful for example if Librid is running on a very slow computer and is set to
automatically start at computer startup, where not all services may be up and running by the time
Librid is attempting to start.
To control the delayed startup, use a command line parameter -delay:xx, where xx is the delay
time in seconds. You can assign this parameter in the startup shortcut properties in Windows.
Note that in Windows 7 computers you have to create a new shortcut, because the one created by
the installer can not be modified.
Librid 3 manual
16
Language editor
Language editor is a tool for working with screen texts - texts visible on-screen in Supa software
such as Librid or Libretto - and in some cases receipt texts. Receipt texts can be modified with
Language editor in Librid 2 and Librid 3; in Libretto 2, receipt texts are modified using a separate
tool, Receipt editor.
This chapter describes the use of Language editor briefly. There is a separate complete manual
available for Language editor with more details.
Working with language files
Language editor main screen initially looks like this:
Main window of Language editor
By default, all language files should be saved to the database. For a new setup this may not be
the case - default language files are delivered with installation packages as XML files, located
under the program folder. If that is the case, please refer to the Language editor full user manual this introduction assumes that the language file has already been stored in the database.
To open the language file, select File menu, then Database Open sub-menu entry. This will open
a sub-menu listing all software that has language files stored in the database. Select the correct
software, for example Libretto2 or Librid3, depending on which software you are working with.
Then, yet another sub-menu will appear with all available translation files for it. There may be
more than one file for each software, allowing different devices in the library to have different
texts - for example a self-check unit at a children's department might have different translations
Librid 3 manual
17
than one used by adults.
Opening a language file from database
After a language file is opened, a list of languages can be seen on the left hand side of the main
window:
Librid 3 manual
18
List of languages from a language file
Selecting a language from the list will show translations of that language:
Librid 3 manual
19
Main working view
This is the main working view of Language Editor. In this mode you can edit the strings that are
used in the system.
The first column (Id) indicates the context of a string, i.e. where it belongs to. You cannot change
these.
The next column (Value) is where you can modify the texts. Click on any string you wish to edit
and write a new string or modify the existing one. When you are done, click on anywhere else in
the application to end editing mode. Modified texts are displayed with yellow background color:
Librid 3 manual
20
Some translations have been modified
When you are done, save changes by selecting File -> Save from the main menu.
Adding new languages
You can add a new language to the languages file in Language Editor by selecting Languages ->
Add language from the main menu. This will display a list of all languages known to Libretto 2;
you can choose any of these.
Make note of the abbreviation of the languages, in parenthesis (for example en-US for US
English). You need these to enable the languages in Management Utility (see below).
The newly added language will get values from default (English) texts; you need to provide correct
translations for all texts.
After you have translated the new language, save changes by selecting File -> Save from the main
menu.
Using texts in Supa software
After you have changed any texts and saved the language file, you must restart the Supa
application (Librid, Libretto) for the changes to take effect.
If you have added new languages, you need to select the languages using the Management Utility
application. Select the Supa software section from the treeview on the left, and then expand the
Languages section. You will see a window like this (Libretto2 selected here - choose the correct
software for your need):
Librid 3 manual
21
Selecting the languages to use
In this window, the languages available to users are defined in the Language list field, near the
bottom. Enter the language short codes here, separated by commas (,). For example in the screen
shot above, British English (en-GB) and Finnish (fi-FI) are available. These will be shown as
available choices to users of the device.
Librid 3 manual
22
Receipt testing
It is possible to print receipts to files on local machine. This allows testing printer settings and
receipt text changes remotely, without access to the physical printer. To do this, simply enter
“test” as the receipt printer name:
Test printer in settings
After restarting Librid, all receipts are printed to the “Program Data\PV-supa\Librid3\Receipts”
folder in the local computer. The receipts are printed as XPS documents, and can be viewed using
the built-in Windows XPS viewer.
Librid 3 manual
23
Statistics
Statistics from every Supa software can be generated with a separate tool, Supa Reporter. This
tool allows you to create graphical reports, either from a single device or many devices if a
centralized system is being used. It is also possible to generate the reports from a separate
computer, for example a staff station, rather than directly from a device itself.
The reports can be exported into various different formats, such as MS Excel files or PDF
documents.
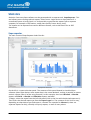
Supa reporter
The main screen of Supa Reporter looks like this:
Supa reporter main screen
On the left is a report selection panel. The contents of this panel depend on installed Supa
software (other Supa devices store report data in the same database, making it possible to create
statistic reports from all of the using one tool). In this example, there are Libretto2 -> CheckIn
reports and Librid -> CheckIn and CheckOut reports available.
To begin, select the report from the left side panel (click on the line with the desired report on it).
Then select the desired report type from the Report type list. The contents of this list also vary,
depending on what device type and report is selected. For example for Libretto 2, there are
separate reports for daily, monthly and yearly reports, as well as many others.
Librid 3 manual
24
The next list box to the right contains a list of all available computers from which data is
available. If you have a centralized system, all your devices will be listed here, otherwise just the
device you are currently on will be shown. Note that for sorters, there are separate entries for
each inlet as each inlet has its own computer.
You can select multiple devices by keeping the control button on your keyboard pressed while
clicking on the computer names. If you select more than one computer, the numbers of these will
be added up and the report will thus show total numbers of all selected computers.
Finally you need to select the timespan. You can choose freely, for example everything from the
beginning of the current year up until the present day, or just some months, or the previous year.
Once you have made your selections, click on the Run report button. This will start the report
generating process. If you have a very long time period, it may take a while until the report
appears.
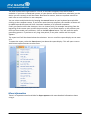
The report itself will be shown below the selections. You can scroll the report display to see more
of it.
To export the report, select the Save button just above the report display. This will open a menu
with various export formats to select from:
Various formats in which a report can be saved
More information
There is a separate manual available for Supa reporter with more detailed information about
using it.
Librid 3 manual
25
Creating an Exit card
An Exit-card is a special library card (patron card) which when placed in the reader of the selfservice unit, will close the program. This makes it more convenient to do maintenance tasks or
shut down the device.
To configure a card to function as an Exit card in Librid 3, find the Librid3 branch in Management
Utility, then section Admin. There you will find a setting Admin cards - enter the ID that is stored
on the card here, save the settings and restart Librid for the settings to take effect. Now,
whenever this card is read by Librid, the application will close.
Librid 3 manual
26
SIP messaging
Librid 3 uses SIP2 protocol to communicate with a library system. Communication is done over TCP
socket connections, where IP address and port number can be configured freely.
Following is a list of messages required for operating Librid 3.
93 - 94 Login
Librid can use message 93 to log in to the library system, if such option is selected. The library
system must respond with 94 message.
If the SIP login option is selected, this will be the first message Librid sends.
9300CNuserid|COloginpassword|CPlocationcode|
941
98 - 99 SC status
This message is used to check the status of the connection. Librid sends message 99 and expects
a response by message 98.
If SIP login (93 - 94) is NOT selected, this will be the first message Librid sends.
9900522.00
98YYYYNY50000320101102
1312162.00AO10016|AMLibrary|BXYYYNYYYNYYYNNNYY|
23 - 24 Patron status
Patron status is used to identify a patron using the Librid system. Librid sends message 23 with
patron ID (from a patron card or entered via on-screen keyboard) and patron pin code. Expected
response is message 24.
Alternatively, messages 63 - 64 can be used for Patron info.
2300020101102
24
130800AO10016|AA4321|AC|AD1234|
00620101102
131224AO10016|AA4321|AE198567|BLY|CQY|BHSEK|BV0.0|
63 - 64 Patron information
Patron information can optionally be used instead of Patron status (23 - 24). Patron information
has more information available than patron status, if the library system supports it. Librid sends
messag 63 and expects a response in message 64.
6300020121120
64
Y
Librid 3 manual
102419 Y
00020121120
AO|AA1234|AC|AD|BP1|BQ9000|AY5AZF029
102420000000000001000000000000AO|AA1234|AESupaUser|BLY|CQY|BHEUR|
27
17 - 18 Item information
This message pair is used to retrieve item information. Librid sends message 17 and expects a
response in message 18.
09 - 10 Check in
Check In of a single item. Librid sends message 09 and expects a response in message 10.
09N20120908
11095320120908
000000AP|AOSupa|AB1234567|AC|CH|BIN
101YNN20120908
110958AOSupa|AB1234|AQLocation|AJBookTitle|AA1234|
11 - 12 Check out
Check Out of a single item. Librid sends message 11 and expects a response in message 12.
11YN20120908
121NNY20120908
11110020120922
111100AOSupa|AA1234|AB12345678|AD1234|BON|BIN|
111105AOSupa|AA1234|AB12345678|AJBookTitle|AH20121009|
29 - 30 Renew
This message is used to renew an item loan. Message should identify the item. Librid sends
message 29, and expects a response in message 30. Response can either confirm or deny the
renewal.
29NN20120908
301YNY20120908
11532020120922
000000AOSupa|AA1234|AD1234|AB1234567|AJ|AC|CH|BON|
115320AOSupa|AA1234|AB1234567|AJBookTitle|AH20121009|
65 - 66 Renew all
This message is used to renew all loans of a patron. Librid sends message 65 and expects a
response in message 66. The response can either confirm or deny the operation.
6520120908
124905AOSupa|AA1234|AD1234|AC|BON|
661
1
020120908
124905AOKSupa|BMRenewedBookTitle|
Librid 3 manual
28
Scripting
Librid 3 allows scripting to modify some information for installation specific purposes. Scripting is
done in .NET C# language. All .NET functionality can be used in the script, such as logging to
external files.
Script files are compiled at Librid startup, so any changes to the scripts require restarting Librid.
Compile errors are written to Librid log – any errors prevent the scripts from being used, so be
sure to check the logs after modifying the scripts.
All script files are found from the <program data> directory, for example
C:\Program Data\PV-Supa\Librid3\
Original script files are stored in Librid 3 program files directory. They should not be modified;
they are there as originals, in case the modified ones are somehow lost or become unusable.
Patron script
Librid 3 supports modifying patron code in a script, before sending it to the library system. This
allows for example removing pre- and suffix characters from patron codes, and excluding
unwanted codes.
Patron code script is in a file named CardScript.cs.
To enable Patron script, turn on setting Use script for patron code in Management Utility.
Item script
Librid 3 supports modifying item ID’s before they are sent to the library system via SIP messages.
The script file is named ItemScript.cs.
The script does not require any settings to be turned on, it will always be used if it exists.
Screen message script
Screen message script allows modifying and translating screen messages in Librid, before
displaying them on screen. This can be used for example to translate screen messages to user
language in a case where the library system only sends screen messages in one language.
Screen message script is in a file named AfTextTranslatorScript.cs.
This script does not require any settings to be turned on, it will always be used if it exists.
Librid 3 manual
29
Settings reference
Following is a complete list of Librid 3 related settings in Management Utility. Note, that
depending on the Librid version used, some settings may not exist or may have slightly different
options available.
Global settigs
These settings affect all Librid 3 stations within the workstation group.
Admin
Librid 3 administrator settings.
Admin page cards
Card identifier (barcode or RFID) that will activate Admin page mode in Librid.
Disable default exit code
Selecting this option disables the “exit” default exit code. It will only be accepted if another exit
code has been given in Admin cards setting.
Exit cards
Barcodes / identifiers of exit cards. These can be used to exit Librid 3 software, instead of typing
”exit” on the screen. To enter multiple identifiers, separate them with a comma (,) character, for
example:
12345,23456,34567
Note: this setting was formerly named Admin cards.
Shutdown cards
Identifiers of cards to use to shut down the software and computer. To enter multiple identifiers,
separate them with a comma (,) character, for example:
12345,23456,34567
Authentication
Patron authentication related settings.
Librid 3 manual
30
Auto ok on max digits
If enabled, the pin code screen (or physical pin pad) will automatically press enter when a
maximum length of pin code is entered. If disabled, the user must press enter or OK to accept the
pin code.
Maximum length of pin code is set in Authentication -> Max pin code length setting.
Barcode end key
End key (character) from barcode reader, to indicate Librid that the barcode has been read
completely. This is configured in the barcode reader’s configuration.
Barcode filter
Allows filtering characters from barcodes. Enter a regular expression in this field, for what
characters or character sequences are to be filtered out.
Barcode removed text
This is the string that the barcode sends when a patron card is removed from the reader. Default
value is ”FREECODE” - do not change without reason. If this is set to an incorrect value, the
device will not function properly.
Max fail count before exit
Maximum number of times a patron can attempt to enter his/her pin code, before the system
requires that the patron card is removed and either the patron tries again, or is blocked if the
Block user on fail setting is enabled.
Max patron code length
Maximum number of characters in a patron ID.
Max pin code length
Maximum number of characters in a patron Pin code.
Min patron code length
Minimum number of characters in a patron ID.
Min pin code length
Minimum number of characters in a PIN code.
Patron card reader type
Select which reader type you have, for patron cards. Available options are:
Keyboard: Patron card ID is expected to come through keyboard input buffer. This is the case with
most USB connected readers.
Comport: This option is for units with patron card reader connected to a serial port (COM), such
as a Quantum reader. If this option is selected, the Patron comport reader parameters setting
Librid 3 manual
31
must also be correctly filled.
Rfid: Use this option if you use the RFID reader in the unit to read RFID tagged patron cards.
Rfid and keyboard: Select this option if you have a mix of barcode reader connected to a USB
port (keyboard input), and also want to use the RFID reader to read RFID tagged patron cards.
Rfid and comport: Select this option if you have a mix of barcode reader connected to a serial
port (COM), and also want to use the RFID reader to read RFID tagged patron cards.
Patron comport reader parameters
Set of parameters to use to establish communications with the patron card barcode reader, when
it is connected to serial port (COM). These settings should usually not be changed. At most,
change the COM port to point to correct serial port where the barcode reader is connected.
Patron dialog type
Patron card dialog type, on the touch-screen. Available values are:
Numeric: Allows only numbers.
Alphanumeric: Allows a mix of letters and numbers.
Card: No buttons are displayed on-screen, only instruction and picture to insert patron card into
reader slot.
Upper alphanumeric: Letters and numbers, where letters are all uppercase.
Pincode authentication type
None: Pin code is not checked and not even prompted from the patron.
Mandatory: Pin code is required and prompted from the patron.
Optional: Some library systems may allow login without pin code. This option makes Librid first
attempt to login with just the patron ID. If the library system responds with an OK, then the patron
can carry on checking out books. If the library system denies login, Librid will then proceed to
prompt for a pin code.
Pin code type
On-screen pin code dialog type. Available values are:
Numeric: Allows only numbers.
Alphanumeric: Allows a mix of letters and numbers.
Upper alphanumeric: Letters and numbers, where letters are all uppercase.
Show buttons in pincode dialog
If enabled, a PIN keypad will be shown on-screen for patrons to type in their pin code. If disabled,
there is no on-screen pinpad. This is usually the case when a separate physical pinpad is installed
on the device.
Note that both a physical and on-screen pinpad may exist and be used at the same time.
Librid 3 manual
32
Show library card characters
If this setting is enabled, the PIN code that a patron enters is shown as actual numbers and
characters. If disabled, dots will be shown instead to prevent other people from seeing the pin
code.
Use parameter for patron card script
When a script is used for Patron Code (see Use script for patron code), it is possible to send an
additional parameter indicating whether the patron card was read from an RFID or Barcode
reader. This may be necessary information for handling the patron card, if the patron identifiers
are stored differently in barcodes and rfid tags.
Use script for patron code
If enabled, a script is executed on patron identifier after it has been read, before sending it to
library system. This allows removing or adding characters in patron identifiers, such as check
digits for example.
CardScript will always be under the Librid program folder, and named CardScript.cs . It is C# .NET
code, and can use all available features such as variables, methods and classes, freely. This script
is compiled at Librid startup, and any errors are only caught at that point.
Check in
Settings related to checking in items.
Notify holds
If this setting is enabled, and a checked in item has a reservation to it, the user will be instructed
to place it in specified container and to confirm by pressing a button on screen.
One item mode
If enabled, only a single item can be checked in at a time. If disabled, devices with RFID reader
can be used to check in more than one item at a time, stacking them up on top of the reading
area.
Check out
Settings related to checking out items.
Highlight mode
Defines how items can be highlighted in check out page. Possible values are:
No: No highlighting is done, all items are listed as-is.
Show AF: Displays the AF text of items on top of each item
Highlight all AF items: Will highlight ANY item in the list that has ANY text in the AF-field, in SIP
check in response message (12).
Highlight latest AF item: Will highlight LAST item that has ANY text in AF-field, in SIP check in
response.
Librid 3 manual
33
Highlight only if AF item is last: Will highlight the item if it is last in the list, and has text in AFfield in SIP check in response message.
This can be used together with scripting, to identify specific texts to highlight. Using
AfTextTranslatorScript.cs script file, the text can be parsed and cleared for items for which
highlighting is not wanted, thus highlighting only specific items. For example the following script
would find the text "special_item" from the AF field, and if it is found change it to something more
user-friendly; otherwise clear out everything from the AF field, thus only highlighting items with
"special_item" in the AF field:
namespace Translator
{
public class AfTextTranslatorScript
{
public string Translate(string languageCode, string text)
{
if (text.Contains("special_item"))
return "There is a newer edition of this book available - please check with staff!";
else
return "";
}
}
}
Item mode
One item: Only a single item is allowed on reader at a time. Typically the case for units with a
barcode reader, but can also be enabled for RFID reader units.
Many item: Allows multiple books on RFID reader at one time (“stack reading”).
Show patron fee amount
If enabled, patron fee amount will be shown on screen during check out operation.
Show patron name
If enabled, patron name will be shown on screen during check out operation.
Demagnetize
EM-alarm demagnetizing settings. What method is used is based on media type (CK field)
information received from SIP response.
Demagnetize type 1 / 2 / 3
These settings control how the demagnetizing unit operates. These settings should not be
changed unless the demagnetizer is replaced.
Librid 3 manual
34
Method for audio tape / book / ...
These values can be used to select which of the above demagnetizing methods are used for which
types of items. 0 (zero) means no demagnetizing, 1 (one) means use Type 1 demagnetizing, and
so on.
Note, that for magnetic media such as audio tapes and video tapes, demagnetizing should not be
used at all.
Use demagnetize
If selected, the demagnetizer will be used.
Device: IO
IO related settings.
Comport
Serial port to which the IO-controller is connected. Typically "COM3".
IO card type
Type of the IO-card connected to the unit. Do not change this setting if the device is working;
incorrect selection will prevent the device from working correctly.
Port types
Configure ports that are used by the IO card. These settings must match those in the
Advantech.ini file.
Sensor input channel
Port number to be used to control the sensor. For Windows XP (Advantech) this is usually 16, for
Windows 7 (BioDaq) this is usually 20.
Sensor input high means open
This setting controls which signal means that the sensor is in open state. You can change this if
LibRid goes into orange screen when inserting a patron card; that indicates that the sensor state
setting is incorrect.
Sensor logic type
Select how the sensor is installed, in relation to the reader.
NoSensor when there is no sensor at all.
SensorBeforeBarcode when the sensor is installed before barcode reader. In this configuration,
an item is expected to cover the sensor before the barcode reader is turned on.
SensorAfterBarcode when the sensor is installed after the barcode reader. In this configuration,
the barcode reader is on before the sensor is covered.
Librid 3 manual
35
Smart Bin / Drop box: Sensor Channel
IO controller channel for the sensor in a Smart Bin or Drop box.
Smart Bin: Green Light Channel
IO controller channel for the Green light, used in a Smart Bin.
Smart bin: Light mode
Controls how the lights operate in connected Smart Bin:
Light is on when an item is on smartbin reader: The light - red or green - is only shown when an
item is on the Smartbin reader field. If an item is taken outside the reader field, all lights are off.
Normal: The light is turned on when an item is brought to the reader, either green or red, and the
light stays on even when the item is removed from the field, until the correct item has been
processed.
Red is on at default: Red light is always on by default, even when there is no item on the reader
field. Green light will be turned on when the correct item has been identified.
Note: This setting replaces previous setting: Smart bin: Red light is on at default.
Smart Bin: Magnet Lock Channel
IO controller channel for the magnetic latch lock in a Smart Bin.
Smart Bin: Red Light Channel
IO controller channel for the Red light, used in a Smart Bin.
Smart Bin: Red light is on at default
Deprecated, see setting Smart bin: Light mode
36
Smart bin: Wait until dropped
If this setting is selected, the device will wait for the item to be dropped in to a smart bin until
proceeding. There will be no session timeout during this wait. If the setting is not selected,
session timeout can interrupt the wait.
Use new advantech driver
This is an experimental setting to use an alternative method of initialising an Advantech IO card.
Do not change this setting!
Device: Item barcode reader
Settings related to item barcode reader.
Librid 3 manual
36
Barcode reader type
Type of item barcode reader. Available values are:
None: There is no barcode reader for items. This is the case with RFID only devices.
Comport: This option is for units with item barcode reader connected to a serial port (COM), such
as a Quantum reader. If this option is selected, the Parameters setting must also be correctly
filled.
Keyboard: Item ID is expected to come through keyboard input buffer. This is the case with most
USB connected readers.
Parameters
Set of parameters to use to establish communications with the item barcode reader. These
settings should usually not be changed. At most, change the COM port to point to correct serial
port where the barcode reader is connected.
Reading side
Select whether the barcode reader is reading from below or from atop.
Stop reader when item read
If selected, the barcode reader will be stopped after an item ID has been read. This is normally
not needed as barcode readers usually send an item ID only once. Some readers may work
differently, and this setting can be used with those.
Email connection info
These settings control the functionality to send email messages from the device. Email can only
be sent if the library system supports it and sends patron’s email addresses in SIP messages, and
if the email addresses are stored in the library system.
Email functionality also requires access to an SMTP server.
From
Name of the sender of emails, that will be used in messages. This should be something related to
the library.
Port
Port number to use to connect to the email server. Default SMTP server port is 25, or 587 for SSL
secured connections.
Server
Email server name or IP address.
Librid 3 manual
37
SMTP password
Password used to send email through the server.
SMTP user
User name used to send email through the server.
Use authentication
Enable this setting if authentication needs to be used in the email server. If the server allows
sending email without authenticating the sender, this can be disabled.
Use SSL
Enable this setting if the email server requires a secured SSL connection.
Functions
This section contains settings for the overall functionality of the device.
Account info functionality
A drop-down list to select what functions can be accessed from the Account Info page. Values are:
Can check out: There is a button to check out page, on the account info page.
Can renew: There is a button to renew page, on the account info page.
Can print receipt: If selected, account info page has printing option to allow patrons to print out
the account information.
Button type: Account info
Select if and how to enable account info.
No: there is no method in the device to show patron account information.
Print: It is possible to print a receipt with account information.
Page: There will be a separate page in the user interface, where patrons can see their account
information.
If No is selected, there will not be a button on the main screen to access account information.
With either of the other choices, an Account Info button is shown.
Button type: Hold
Select if and how reservations are visible.
No: Reservations can not be seen from the device.
Print: It is possible to print a receipt with reservations listed, but they are not shown on screen.
Page: Reservations are shown as a separate screen in the system.
Note that this functionality is dependent on the library system sending information in a standard
way that Librid can parse, in SIP communications.
Librid 3 manual
38
Button type: Renew
Select if and how Renew functionality is available.
No: There is no renew functionality available in the device.
Page: There is a separate screen on the user interface, where the patron can see a list of items he
has checked out. Patron can then select the items he wishes to renew, and the device will attempt
to renew them using SIP messages.
Print: There will only be a single button to renew checked out items. When pressed, Librid will
send a Renew All SIP message to the library system, and print a receipt if it succeeds.
Must remove patron card to end session
If this setting is enabled, the patron must remove his patron card from the reader slot in order to
end the session.
Payment machine type
If there is a payment machine connected to the self service unit, this setting is used to control
what type of payment machine it is. Currently the only supported type is iTeam.
Quit button type in checkout
No or Always. This setting controls whether or not there will be a specific Quit button in the
check out page. If No is selected, then the check out session can only be ended by removing the
patron card from the reader slot.
Quitting automatically
If this setting is enabled, the system will go back to the start screen after a check out or check in
session, ending the patron session. If disabled, the system will go back to functions page where
the patron can continue on to other operations.
Removing a patron card always ends session and reverts the system back to the start screen.
Session starting type
Select how a session is started. Available values are:
Default: Session is started by inserting a patron card to the card reader. There is no Start button
on screen.
Start from button: There are buttons on screen to start a session. When session is started by
pressing a button, patron card is requested for check out sessions.
Start from button and insert code: This is mainly for barcode/RFID hybrid Baby units. The
system will not read patron identifier until a button has been pressed on screen.
Use check out button
If enabled, there will be a Check out button on screen, in the start screen.
Librid 3 manual
39
Languages
User interface languages related settings.
Default culture
Default culture for the system. Use fully qualified culture codes, such as fi-FI or sv-FI for example.
See available codes in section Language codes later in this document.
Language list
Add all available languages in this drop down list. Write a new language in the edit area and
press Enter key to add a new language. These languages will be available in the start screen of
Librid, and must also exist in the LanguageTexts.xml file.
To delete a language, select it and press the Delete key on your keyboard. Note that deleting a
language will not delete translations from the LanguageTexts.xml document, so you can re-add a
deleted language simply by adding it to this list again.
Log
Controls global logging options. For device specific selections on what to log, see Log option in
local settings.
Server name for logging
Server name or IP address, where the logs are to be stored. This is usually the same server where
the main database is stored in.
Magnetize
EM-alarm magnetizing settings. What method is used is based on media type (CK field)
information received from SIP response.
Magnetize type 1 / 2 / 3
These settings control how the magnetizing unit operates. These settings should not be changed
unless the magnetizer is replaced.
Method for audio tape / book / ...
These values can be used to select which of the above magnetizing methods are used for which
types of items. 0 (zero) means no magnetizing, 1 (one) means use Type 1 magnetizing, and so on.
Note, that for magnetic media such as audio tapes and video tapes, magnetizing should not be
used at all.
Use magnetize
Enable this setting to use the magnetizing unit.
Librid 3 manual
40
MessageBoard
These settings allow you to display check in and check out item names in MessageBoard. This
functionality is mostly intended to be used for testing and demo purposes, not production use.
Show check in items
If selected, checked in item names and ID’s will be displayed on MessageBoard.
Show check out items
If selected, checked out item names and ID’s will be displayed on MessageBoard.
Offline
These settings control how the system should react when SIP (TCP socket) connection is lost.
Due date for check out
Number of days to add to current day, to get a due date for checked out items.
Offline mode
Is offline mode allowed, and if so, what functionality is available during it. Librid will attempt to
reconnect at regular intervals, so that when the connection is again available the device would
automatically resume regular operation.
Not used: If SIP connection is lost, the device will show an error message on screen and cannot
be used before the connection is restored.
Check in only: Only check in operations are allowed during an offline situation. This is usually
safe, as the worst that can happen is that items that don’t belong to a particular library are
checked in.
Check in and check out: Both check in and check out operations are available. It should be noted
that for check out operations, there is no way to validate a patron without SIP connection.
Basically anyone can insert a library card and any pin code, and the system will accept it.
If offline functionality is enabled, Librid will store item ID’s to a local text file when there is no SIP
connection. After the SIP connection is restored, Librid will send the items to the library system.
There is a separate text file that is written, with results in it; it is possible that items checked out
during offline situation are rejected by the library server, so these results should be processed
manually.
Both files are stored in the Librid program folder.
QR Code
These settings are related to logging in to a self-service station by using a QR code and a mobile
phone.
Librid 3 manual
41
Mobile login service address
IP address or name of the server hosting the mobile login service.
Mobile login service port number
Port number of the mobile login service.
Mobile login web site address
Address of the mobile login web site.
Receipt
Settings related to patron receipts. Librid has several receipts available: Check In receipt, Check
Out receipt, Account Info receipt and Renew receipt.
Can use reading room due date
If enabled, Librid will allow for due dates that are only hours from current time. This is sometimes
used for example in university libraries, where some books may only be loaned for a few hours at
a time.
Normally due dates are only printed and displayed as date values, but this setting makes them
appear with date and time parts.
Check in print mode
Select how the check in receipt is generated.
Normal: Librid generates the receipt itself, from data available from SIP messages.
ACS: Librid prints the receipt as it comes from the library system; all AG fields from the SIP check
in response message.
Check in receipt mode
Should the receipt printed always, or does the patron have a choice. Available values:
No: There is never a check in receipt printed.
Ask: The patron will be asked if he wants a receipt, when a check in session ends.
Always: A receipt will automatically be printed when a check in session ends by patron’s request.
Always with timeout: A receipt will automatically be printed when a check in session ends in
time-out.
Check out print mode
Controls how the check out receipt is generated. Available values are:
Normal: Librid software constructs the receipt completely in the application.
ACS: The receipt is printed as it is received from the library system, all AG fields as rows.
Normal + ACS: All AG fields will be printed, and Librid will append a constructed receipt
information as in the Normal option.
Librid 3 manual
42
Check out receipt mode
Controls how the check out receipt is printed at the end of a session:
Ask: Patron will be presented a prompt (Yes / No) asking if he wants a receipt.
Always: Receipt will be automatically printed at the end of a check out session, if any items were
checked out.
Always with timeout: A receipt will automatically be printed when a check out session ends in
time-out.
Due date style
This setting controls the font style of the due date, when it is printed as generated from Librid.
Note that this has no effect on receipts generated completely from library system (ACS).
Email receipt mode for checkout
Controls if and how an email receipt should be sent to patrons. Note that sending an email receipt
requires that the patron’s email address is available in SIP messages.
Possible values are:
No: There will be no email receipts sent.
Ask: The patron will have a choice on screen to either send an email receipt or not. This will
appear as a button at the bottom of the screen, similar to receipt printing button.
Always: An email receipt will always be sent if patron email address is available.
Note that for the email receipt to function properly, settings in Email connection info section have
to be properly set.
Footer print font
Select the font to use to print the footer of receipts.
Footer print font size
Select the font size to use to print the footer of receipts.
Header print font
Select the font to use to print the header of receipts.
Header print font size
Select the font size to use to print the header of receipts.
Print data
This dropdown allows selecting what data is to be printed on receipts. Note that this only applies
to receipts when generated by Librid software.
Date: Prints the current date on the receipt.
Time: Prints the time on the receipt.
PatronId: Prints the patron identifier.
PatronName: Prints the name of the patron.
Librid 3 manual
43
Phone: Patron’s phone number, if available.
Email: Patron’s email address, if available.
Address: Patron’s address, if available.
ItemCount: Prints the total number of items on the receipt.
FineInCheckout: If checked, any fines (total fine amount) the patron may have will be printed on
the check out receipt.
AlwaysFineInAccountInfo: If checked, the account information receipt will also contain any fines
(total fine amount) the patron may have.
SummaryInAccountInfo: This selection will print a summary of items - number of items on hold,
number of items on loan and so on - in the account information receipt.
RenewFailedItems: Will print a list of items that were attempted to renew, but renewal failed, in
the renew check out receipt.
RenewBeforeItems: Will print a list of items that are on loan but were not attempted to renew, on
the renew checkout receipt.
AlreadyCheckoutItems: Previously checked out, ”books at home”.
HoldItemsInCheckout: Check out receipt will contain a list of reserved items.
UnavailableHoldItemsInCheck: Check out receipt will contain a list of reserved items that are not
yet available for pickup.
OverdueItemsInCheckout: Check out receipt will contain a list of overdue items.
RecallItemsInCheckout: Check out receipt will contain a list of recalled items.
Text print font
Plain text font selection.
Text print font size
Plain text font size.
Scheduler
The Scheduler controls when the device or devices are available for patrons. If scheduler is active,
the device can only be used during given Open times.
Note that the scheduler does not shut down or start up the actual machines. It will only show a
message on screen, indicating when the device is not available.
Active
Select this setting to activate the scheduler.
Open times
A text string with time slots when the device is available. The string is in format
<day of week>:<start time>-<end time>[|<start time>-<end time>], <day of week>...
Day of week needs to be English short day name (Mon, Tue, Wed, Thu, Fri, Sat, Sun)
Librid 3 manual
44
Time needs to be in format xx.xx (separated by dot, not colon), 24-hour clock, for example 15.00
Start time and End time are separated by a hyphen (minus sign)
Several Times can be given for a single day, separated by a bar character (|)
Days are separated by a comma (,)
For example the following string would indicate that the device is available on weekdays (Mon Fri) from 8 in the morning until 4 in the afternoon:
Mon:08.00-16.00, Tue:08.00-16.00, Wed:08.00-16.00, Thu:08.00-16.00, Fri:08.00-16.00
The following would indicate an opening on Tuesdays, for two hours in the morning and then two
more hours in the evening:
Tue:08.00-10.00|18.00-20.00
It is usually easiest to construct the string in a text editor, such as Notepad for example, and then
copy-paste the string into Management Utility as a whole.
SIP
These settings control the SIP communications between Librid software and the library system.
Ask fee items in message 63
Some SIP servers do not allow 7th field in summary for patron information request (SIP message
63); this setting enables or disables using that field. Leave selected if there is no real reason to
turn it off.
Code page for receiving
Select Windows code page to use for decoding received SIP messages.
Code page for sending
Select Windows code page to use for encoding SIP messages that are sent to the library system.
Due date culture
What culture style is used in Due Dates. This determines how due dates are parsed when
received from the library system.
Use a culture code as specified in Appendix A.
You can also use a Regular Expression in this field, to further format date values as needed. To
use a Regular Expression, prefix the information with “format:”, for example:
format:(?<day>\d+)(?:.)(?<month>\d+)(?:.)(?<year>\d+)
Librid 3 manual
45
Ignore supported messages
This dropdown list allows ignoring when library system reports certain SIP messages as not
supported. Sometimes the information is not entirely true, and messages can be used even when
the library system reports them as not available.
Mark any / all messages in the list with a checkbox, if you want to ignore how the library system
reports the availability of those messages.
Library type
Select what type of library system is used. Please make sure to select the correct one if available.
This determines many things in the SIP communications, as different library systems use slightly
different dialects of SIP messaging.
Max print line width
Sent to the SIP server; the library system will then adjust all print-line messages accordingly.
No block is true for Renew
If this setting is selected, the library system can not deny a renew even if there is for example a
reservation for the book for another user. Typically this should be off, only for some specific cases
it should be turned on.
Protocol version
SIP protocol version to use in communications with the library system.
Renew mode
There are two options to use Renewal function:
Default: This option uses normal Renew SIP messages (29-30 and 65-66 message pairs). Always
use this if the library system supports these messages.
Use check out: This option creates separate Check in messages and Check out messages for all
renewed items. It can be used if the library system does not support the standard renew
messages. Note: this may not work as expected, as the check in and check out messages arrive in
very quick succession, and not all systems allow that.
Starting sequence number
SIP messages starting sequence number; some library systems may require SIP messages to have
a certain sequence numbering, and this setting can be used to control where the numbering starts
from.
Use BL and CQ fields for patron authentication
This is an alternative method to use, for authenticating patron ID and PIN-code. Use this if the
library system requires.
Librid 3 manual
46
Use error handling
Select this setting to enable error handling in SIP communications. Do not use this if the library
system does not implement error checking (CRC).
Use Fee Acknowledge in Checkout
Enabling this setting causes Librid to send a fee acknowledge flag in check out SIP message 11.
Value Y in BO field (“BOY”). Use this if the library system requires so.
Use sip message 63
Alternative message pair 63-64 will be used to retrieve patron information, if this setting is
enabled. Enable this if the library system returns patron information in 64 message, otherwise
leave disabled.
Timers
These timer settings control how long various states in the device last. It is possible to change the
behavior somewhat, but caution should be taken to not decrease or increase the timers too much,
as that may cause impossible scenarios where the device will cease to function correctly.
ACS refresh time in minutes
The interval at which Librid checks the SIP connection. Default value is 5 minutes.
Barcode delay for hybrid(ms)
How many milliseconds to wait for identifiers to appear from RFID reader, if an item ID has been
received from barcode reader first. Default value is 250 ms.
Card remove timeout in seconds
How many seconds will the "Please remember to take your card" reminder be shown, after a
session has ended. If the value is set to 0 (zero), the message will be shown until the library card
is removed from the reader. For other values the message is removed after the given time period,
even if there is still a library card in the reader.
Delay time before show wait in checkout and checkin (ms)
Number of millisecondsto wait for SIP message, before a "please wait" message is shown.
Error delay time in seconds
In case an error is repeated, it won’t be shown until this number of seconds has passed. The
reason is to reduce “flickering” error messages for example when an item is right on the edge of
the RFID reading area.
Librid 3 manual
47
Error show time in seconds
General time for how long will an error message be displayed on screen.
Idle timeout in seconds
If the device is idle - that is, the patron does nothing during a session - for this period of time, the
session will be automatically ended.
Incomplete set info in seconds (multi check out/in)
For how long will Librid attempt to read set information when RFID reader is used. Items will not
show up on screen during this time. Warning: do not set this timer too long, otherwise the device
will function very slowly.
Info show time in seconds
How long will the info screen be shown, at the start of a session.
Login refresh in seconds
If the SIP connection is using a login and the connection is lost, this timer controls at what interval
will the login be attempted. Login message will be sent before ACS message.
Sip received timeout in seconds
How long will Librid wait for SIP server to respond to a message.
Value 0: information received from SIP server, in 98 message.
Greater than 0: use this value, instead of what the SIP server indicates.
Sorting arrow show time in seconds (single checkin)
How many seconds will the sorting arrow be displayed on top of the item list. This only applies to
single item check in.
Timer for smart bin expected message
How long will the item be ignored on the primary reader (device) while waiting for it to appear in
the secondary reader (smart bin). During this time, the message ”Put item to smart bin” is not
shown on screen.
User interface
Settings related to some user interface elements and behaviour.
AF message type in UI
How the error page content is formed.
AF: Show text received in SIP message as-is.
Internal: Show error message as defined in Librid.
AFInternal: Combination of the two; shows text from SIP message and the text as defined in
Librid 3 manual
48
Librid.
Default currency
Currency code (text), used where ever currency is displayed, such as fines on receipts and on
screen.
Fields to show in account info page
List of possible fields and other information that can be showin in Account Info page. Note, that
not all library systems support every combination of information in this selection.
Hide flag in language selection
If selected, there will not be any flags displayed in language selection, in the UI, only names of
languages. If not selected, flags will be displayed.
Mark special items in check in page
If selected, items that belong to special sorting will be highlighted on screen.
Max count to show block reason for patron
If the user is blocked by library system, there may be several reason codes returned by library
system. This setting controls how many of those will be shown on screen.
Show account info when check out
If selected, an account info page will be shown on screen when a check out session is started.
Note that the account info page can not be shown for check in sessions, because the patron can
not be reliably identified.
Show already error
If enabled, Librid will show an error when already identified items are scanned again. For example
when checking out, if you place a book on the reader twice, there will be an error saying “This
item is already loaned”. If not enabled, there will be no such error message.
Show detailed buttons
A dropdown list to select, what buttons will be shown in Account into page as buttons. These
buttons can be used to access the main information, and there is also some information included
in the buttons themselves - for example "Holds" button will show number of hold items available
in the button, and pressing that button will then display a page with the actual hold items listed.
Show only special items in sorting page
If selected, only items belonging to special bin as per sorting rules will be shown on screen. The
screen will not be split in two, instead the whole page width will be used for item names.
Librid 3 manual
49
Local settings
These settings only affect the workstation under which they are in the Management Utility tree,
i.e. a single Librid 3 machine.
Audio files
It is possible to assign sounds to different events of the device. These sounds should be in a
normal .wav (wave) file format. System sounds provided with Windows can also be used.
Each file needs to be uploaded to the database using Management Utility, and can then be
selected from the drop-down lists in this section. Same sound can be selected to multiple devices.
Check out ok
Sound to play when swiping an item to check out.
Error
Sound to play when an error occurs.
Hold item
Sound to play when an item is returned, and the item has a hold on it in the library system.
Insert item
Sound to play when Librid is ready to accept the next item.
Item read
Sound to play when an item barcode or RFID tag has been read.
Pin button
Sound to play when a pin button is pressed in the on-screen pinpad.
Remember take card
Sound to play when displaying a message on screen, reminding the patron to take his card from
the reader.
Session end
Sound to play when a patron session ends.
Session start
Sound to play when a patron session starts.
Librid 3 manual
50
Device: Rfid
RFID reader settings. Only applies to devices that have an RFID reader installed; if the device only
has a barcode reader, these settings are not relevant.
Id for Scanner
Id number of the item RFID reader, given in the ini file. The ini file is stored in ”Program Files
\Common\PV-Supa” folder. Depending on what reader is installed, different ini files are used; for
example for Nedap readers, ”NedapS.ini” should be used.
In the ini file there is a section [Reader], with the ID like follows:
[READER]
; Port
ComPort = COM1
; Reader identification, used to identify reader when more than one reader is used
ReaderID = 1
This ID is used to differentiate readers when more than one is installed in one computer.
Id for Smart Bin
Id number of the RFID reader in the SmartBin, given in the ini file. See previous section Id for
Scanner for more information about the ini file; there should be a second section for the second
reader, with a different ID and COM port.
Ignore security error
If this setting is enabled, Librid will ignore error when attempting to set or remove RFID security
bit (AFI). If disabled, there will be an error message shown to the patron.
Reader
Select type of RFID reader that is used in the device.
Use Rfid reader
Enable this setting if there is an RFID reader in the device. Disable if the device is only using a
barcode reader.
Language files
Settings for language texts, stored in the database.
Language texts
This drop down lists all language texts uploaded to the database using Management Utility.
Select the one to use for this unit. The same language text file can be selected for multiple
devices; modifying texts in that file will then affect all devices to which it has been selected.
Librid 3 manual
51
Log
Software logging related settings.
Hide sensitive info
If enabled, Librid will mask sensitive information such as patron card numbers and PIN codes in
log, by replacing them with asterisks (*).
Save log
Select what types of information you wish to have logged.
Pictures
Images used in user interface. All images must first be uploaded to database using Management
Utility and then selected using the drop down lists in each setting. Any image can be selected for
multiple machines uploading it only once.
Note that the images are displayed on top of other content, so PNG images with transparent
background should be used.
Account info button image
Button for Account Info on the main screen.
Account info button pressed image
Button for Account Info on the main screen, in pressed (down) state.
Book with arrow
A picture of book with an arrow showing the direction to slide it. Used when a device has barcode
item reader and a sensor over which the book must be taken.
Card image in authentication page
Library card picture in authentication screen.
Card image in start page
Library card image in start screen.
Checkin button image
Button for Check in (return) on front page.
Checkin button pressed image
Button for Check in (return) on front page, pressed (down) state.
Librid 3 manual
52
Checkout button image
Button for Check out (loan) on front page.
Checkout button pressed image
Button for Check out (loan) on front page, pressed (down) state.
Email button image
Email button for receipt printing selection.
Email button pressed image
Email button for receipt printing selection, pressed state.
Hold button image
Button for Hold functionality on front page.
Hold button pressed image
Button for Hold functionality on front page, pressed (down) state.
Image bin 0
Direction arrow for sorting bin 0.
Image bin 1
Direction arrow for sorting bin 1.
Image bin 2
Direction arrow for sorting bin 2.
Image bin 3
Direction arrow for sorting bin 3.
Library logo file
Library logo picture. Shown in the upper left corner of start screen.
Many book
Picture shown in “Place items on reader”, when multiple items are allowed (RFID).
No button image
"No" choice in receipt printing, button image.
Librid 3 manual
53
No button pressed image
"No" choice in receipt printing, button image in pressed (down) state.
One book
Picture shown in “Place item on reader”, when single item mode is selected.
Receipt button image
Paper receipt choice button for receipt printing.
Receipt button pressed image
Paper receipt choice button for receipt printing, pressed (down) state.
Receipt image
Image to use for “Remember to take your receipt” display.
Renew button image
Button for renew functionality on the front page.
Renew button pressed image
Button for renew functionality on the front page, pressed (down) state.
Wait image
Wait-overlay image for situations when the software asks the user to wait for something.
QR Code
Mobile login related settings. Librid uses a QR code on the screen to enable using the system
with a mobile device.
Library name
Devices are identified by library name and MAC address; these must also be configured on the
mobile login service web application. Once this value is set and configured, do not change it – it
will make the QR login system not work.
Start from account info
If selected, the software will open account info page immediately after mobile login.
Use QR Code
If enabled (and other settings are correctly set), there will be a QR code displayed on the screen
of the self-service unit, allowing patrons to login with their mobile devices.
Librid 3 manual
54
Receipt
Patron receipt related settings.
Mode
How is the patron receipt printed. Possible values are
No: There is no patron receipt printed.
Optional: Patrons can choose to have a receipt printed or not.
Mandatory: A receipt will always be printed automatically.
Pos printer name
If specific Pos printer drivers are used, this is the name of the Pos printer as seen in Windows
printers. Pos printer drivers typically allow "paper near end" sensor to be used, unlike standard
Windows printer drivers.
Printer name
Receipt printer name, from Windows installed printers on local machine.
Use paper near end sensor
If this setting is selected AND if the printer supports it, the "paper near end" sensor status is
checked during operation. This allows sending messages to Messageboard before the printer
paper is completely out.
Typically requires Pos printer and drivers to work.
SIP
Device specific SIP server related settings.
Login location code
If the SIP server requires a location code for login messages, enter the location code here.
Login user id
If login is used for SIP connection, this is the username to use in login messages.
Login user password
If login is used for SIP connection, this is the password to use in login messages.
Server ip address
SIP server IP address, or server name.
Librid 3 manual
55
Server port
Port to use for connection. This must match what is set for SIP server.
Terminal password
This is the password for the SC unit. If this feature is not used by the ACS in the library then the
field should be zero length if it is required in the command, and can be omitted entirely if the field
is optional in the command.
Use ACS login
Select this checkbox if the SIP server requires ACS login messages.
Sorting
If the device is used for check in, these settings can be used to control the sorting of returned
items.
Bin count
Number of sorting bins available. 0 (zero) if there are no bins connected. Typical values range
from 0 to 2.
Bin number for special bin
If a smart bin is used, enter bin number of smart bin here.
Default sort bin
Default bin number, where items are sorted when no other sorting information has been given.
First bin index
Number of first bin. This value depends on SIP server, and is typically either 0 (zero) or 1 (one).
Offline bin
To which direction is the offline bin. Offline bin is used to sort items when SIP connection can not
be made, and offline functionality is enabled.
Use special bin
Selection for does the device have a special bin or not. Available values are:
No: The device does not have a special bin.
Smart bin: The device has a smart bin with RFID reader connected to it.
Sorting rules
Sorting rules stored in database. Librid 3 uses the same sorting rules system as Libretto 2. Sorting
rules are created with the same Sorting Editor tool.
Reserved items (holds) are defined by the sorting rules file, by creating a rule that has the “Hold”
Librid 3 manual
56
flag set.
Rule
Select the desired sorting rule from the drop-down list. These rules are saved to database using
Sorting Editor.
Type
This setting is used to select which type of device is in question.
Machine type
What type of self-service unit is this particular machine. Available values are:
Check out only: Only check out functionality is available.
Check in only: Only check in functionality is available.
Check out and check in: Both check in and check out functionalities are available.
User interface
User interface related settings.
Display font: Default to large fonts
If selected, the device will default to using larger fonts. Note, that high-contrast display mode is
also enabled if setting Display font: Use high contrast with large fonts 57 is enabled.
Display font: Use font size button
If selected, there will be a button on the front page to increase font sizes throughout the user
interface.
Display font: Use high contrast with large fonts
If selected, the color scheme of the user interface will also be switched to higher contrast mode,
when large fonts button is pressed.
Mouse cursor visible
If selected, mouse cursor will be visible on screen during operation. This is typically only used
when setting up the device, or during training, not in normal operating mode.
Librid 3 manual
57
Language codes
The following list contains all language codes and date formats that can be used with Supa
software.
Language code
Language name
Date format
af
Afrikaans
yyyy/MM/dd
af-ZA
Afrikaans (South Africa)
yyyy/MM/dd
am
Amharic
d/M/yyyy
am-ET
Amharic (Ethiopia)
d/M/yyyy
ar
Arabic
dd/MM/yy
ar-AE
Arabic (U.A.E.)
dd/MM/yyyy
ar-BH
Arabic (Bahrain)
dd/MM/yyyy
ar-DZ
Arabic (Algeria)
dd-MM-yyyy
ar-EG
Arabic (Egypt)
dd/MM/yyyy
ar-IQ
Arabic (Iraq)
dd/MM/yyyy
ar-JO
Arabic (Jordan)
dd/MM/yyyy
ar-KW
Arabic (Kuwait)
dd/MM/yyyy
ar-LB
Arabic (Lebanon)
dd/MM/yyyy
ar-LY
Arabic (Libya)
dd/MM/yyyy
ar-MA
Arabic (Morocco)
dd-MM-yyyy
arn
Mapudungun
dd-MM-yyyy
arn-CL
Mapudungun (Chile)
dd-MM-yyyy
ar-OM
Arabic (Oman)
dd/MM/yyyy
ar-QA
Arabic (Qatar)
dd/MM/yyyy
ar-SA
Arabic (Saudi Arabia)
dd/MM/yy
ar-SY
Arabic (Syria)
dd/MM/yyyy
ar-TN
Arabic (Tunisia)
dd-MM-yyyy
ar-YE
Arabic (Yemen)
dd/MM/yyyy
as
Assamese
dd-MM-yyyy
as-IN
Assamese (India)
dd-MM-yyyy
az
Azeri
dd.MM.yyyy
az-Cyrl
Azeri (Cyrillic)
dd.MM.yyyy
az-Cyrl-AZ
Azeri (Cyrillic, Azerbaijan)
dd.MM.yyyy
az-Latn
Azeri (Latin)
dd.MM.yyyy
az-Latn-AZ
Azeri (Latin, Azerbaijan)
dd.MM.yyyy
ba
Bashkir
dd.MM.yy
ba-RU
Bashkir (Russia)
dd.MM.yy
Librid 3 manual
58
be
Belarusian
dd.MM.yyyy
be-BY
Belarusian (Belarus)
dd.MM.yyyy
bg
Bulgarian
d.M.yyyy 'г.'
bg-BG
Bulgarian (Bulgaria)
d.M.yyyy 'г.'
bn
Bengali
dd-MM-yy
bn-BD
Bengali (Bangladesh)
dd-MM-yy
bn-IN
Bengali (India)
dd-MM-yy
bo
Tibetan
yyyy/M/d
bo-CN
Tibetan (PRC)
yyyy/M/d
br
Breton
dd/MM/yyyy
br-FR
Breton (France)
dd/MM/yyyy
bs
Bosnian
d.M.yyyy
bs-Cyrl
Bosnian (Cyrillic)
d.M.yyyy
bs-Cyrl-BA
Bosnian (Cyrillic, Bosnia and Herzegovina)
d.M.yyyy
bs-Latn
Bosnian (Latin)
d.M.yyyy
bs-Latn-BA
Bosnian (Latin, Bosnia and Herzegovina)
d.M.yyyy
ca
Catalan
dd/MM/yyyy
ca-ES
Catalan (Catalan)
dd/MM/yyyy
co
Corsican
dd/MM/yyyy
co-FR
Corsican (France)
dd/MM/yyyy
cs
Czech
d.M.yyyy
cs-CZ
Czech (Czech Republic)
d.M.yyyy
cy
Welsh
dd/MM/yyyy
cy-GB
Welsh (United Kingdom)
dd/MM/yyyy
da
Danish
dd-MM-yyyy
da-DK
Danish (Denmark)
dd-MM-yyyy
de
German
dd.MM.yyyy
de-AT
German (Austria)
dd.MM.yyyy
de-CH
German (Switzerland)
dd.MM.yyyy
de-DE
German (Germany)
dd.MM.yyyy
de-LI
German (Liechtenstein)
dd.MM.yyyy
de-LU
German (Luxembourg)
dd.MM.yyyy
dsb
Lower Sorbian
d. M. yyyy
dsb-DE
Lower Sorbian (Germany)
d. M. yyyy
dv
Divehi
dd/MM/yy
dv-MV
Divehi (Maldives)
dd/MM/yy
el
Greek
d/M/yyyy
Librid 3 manual
59
el-GR
Greek (Greece)
d/M/yyyy
en
English
M/d/yyyy
en-029
English (Caribbean)
MM/dd/yyyy
en-AU
English (Australia)
d/MM/yyyy
en-BZ
English (Belize)
dd/MM/yyyy
en-CA
English (Canada)
dd/MM/yyyy
en-GB
English (United Kingdom)
dd/MM/yyyy
en-IE
English (Ireland)
dd/MM/yyyy
en-IN
English (India)
dd-MM-yyyy
en-JM
English (Jamaica)
dd/MM/yyyy
en-MY
English (Malaysia)
d/M/yyyy
en-NZ
English (New Zealand)
d/MM/yyyy
en-PH
English (Republic of the Philippines)
M/d/yyyy
en-SG
English (Singapore)
d/M/yyyy
en-TT
English (Trinidad and Tobago)
dd/MM/yyyy
en-US
English (United States)
M/d/yyyy
en-ZA
English (South Africa)
yyyy/MM/dd
en-ZW
English (Zimbabwe)
M/d/yyyy
es
Spanish
dd/MM/yyyy
es-AR
Spanish (Argentina)
dd/MM/yyyy
es-BO
Spanish (Bolivia)
dd/MM/yyyy
es-CL
Spanish (Chile)
dd-MM-yyyy
es-CO
Spanish (Colombia)
dd/MM/yyyy
es-CR
Spanish (Costa Rica)
dd/MM/yyyy
es-DO
Spanish (Dominican Republic)
dd/MM/yyyy
es-EC
Spanish (Ecuador)
dd/MM/yyyy
es-ES
Spanish (Spain, International Sort)
dd/MM/yyyy
es-GT
Spanish (Guatemala)
dd/MM/yyyy
es-HN
Spanish (Honduras)
dd/MM/yyyy
es-MX
Spanish (Mexico)
dd/MM/yyyy
es-NI
Spanish (Nicaragua)
dd/MM/yyyy
es-PA
Spanish (Panama)
MM/dd/yyyy
es-PE
Spanish (Peru)
dd/MM/yyyy
es-PR
Spanish (Puerto Rico)
dd/MM/yyyy
es-PY
Spanish (Paraguay)
dd/MM/yyyy
es-SV
Spanish (El Salvador)
dd/MM/yyyy
es-US
Spanish (United States)
M/d/yyyy
Librid 3 manual
60
es-UY
Spanish (Uruguay)
dd/MM/yyyy
es-VE
Spanish (Bolivarian Republic of Venezuela)
dd/MM/yyyy
et
Estonian
d.MM.yyyy
et-EE
Estonian (Estonia)
d.MM.yyyy
eu
Basque
yyyy/MM/dd
eu-ES
Basque (Basque)
yyyy/MM/dd
fa
Persian
MM/dd/yyyy
fa-IR
Persian
MM/dd/yyyy
fi
Finnish
d.M.yyyy
fi-FI
Finnish (Finland)
d.M.yyyy
fil
Filipino
M/d/yyyy
fil-PH
Filipino (Philippines)
M/d/yyyy
fo
Faroese
dd-MM-yyyy
fo-FO
Faroese (Faroe Islands)
dd-MM-yyyy
fr
French
dd/MM/yyyy
fr-BE
French (Belgium)
d/MM/yyyy
fr-CA
French (Canada)
yyyy-MM-dd
fr-CH
French (Switzerland)
dd.MM.yyyy
fr-FR
French (France)
dd/MM/yyyy
fr-LU
French (Luxembourg)
dd/MM/yyyy
fr-MC
French (Monaco)
dd/MM/yyyy
fy
Frisian
d-M-yyyy
fy-NL
Frisian (Netherlands)
d-M-yyyy
ga
Irish
dd/MM/yyyy
ga-IE
Irish (Ireland)
dd/MM/yyyy
gd
Scottish Gaelic
dd/MM/yyyy
gd-GB
Scottish Gaelic (United Kingdom)
dd/MM/yyyy
gl
Galician
dd/MM/yyyy
gl-ES
Galician (Galician)
dd/MM/yyyy
gsw
Alsatian
dd/MM/yyyy
gsw-FR
Alsatian (France)
dd/MM/yyyy
gu
Gujarati
dd-MM-yy
gu-IN
Gujarati (India)
dd-MM-yy
ha
Hausa
d/M/yyyy
ha-Latn
Hausa (Latin)
d/M/yyyy
ha-Latn-NG
Hausa (Latin, Nigeria)
d/M/yyyy
he
Hebrew
dd/MM/yyyy
Librid 3 manual
61
he-IL
Hebrew (Israel)
dd/MM/yyyy
hi
Hindi
dd-MM-yyyy
hi-IN
Hindi (India)
dd-MM-yyyy
hr
Croatian
d.M.yyyy.
hr-BA
Croatian (Latin, Bosnia and Herzegovina)
d.M.yyyy.
hr-HR
Croatian (Croatia)
d.M.yyyy.
hsb
Upper Sorbian
d. M. yyyy
hsb-DE
Upper Sorbian (Germany)
d. M. yyyy
hu
Hungarian
yyyy.MM.dd.
hu-HU
Hungarian (Hungary)
yyyy.MM.dd.
hy
Armenian
dd.MM.yyyy
hy-AM
Armenian (Armenia)
dd.MM.yyyy
id
Indonesian
dd/MM/yyyy
id-ID
Indonesian (Indonesia)
dd/MM/yyyy
ig
Igbo
d/M/yyyy
ig-NG
Igbo (Nigeria)
d/M/yyyy
ii
Yi
yyyy/M/d
ii-CN
Yi (PRC)
yyyy/M/d
is
Icelandic
d.M.yyyy
is-IS
Icelandic (Iceland)
d.M.yyyy
it
Italian
dd/MM/yyyy
it-CH
Italian (Switzerland)
dd.MM.yyyy
it-IT
Italian (Italy)
dd/MM/yyyy
iu
Inuktitut
d/MM/yyyy
iu-Cans
Inuktitut (Syllabics)
d/M/yyyy
iu-Cans-CA
Inuktitut (Syllabics, Canada)
d/M/yyyy
iu-Latn
Inuktitut (Latin)
d/MM/yyyy
iu-Latn-CA
Inuktitut (Latin, Canada)
d/MM/yyyy
ja
Japanese
yyyy/MM/dd
ja-JP
Japanese (Japan)
yyyy/MM/dd
ka
Georgian
dd.MM.yyyy
ka-GE
Georgian (Georgia)
dd.MM.yyyy
kk
Kazakh
dd.MM.yyyy
kk-KZ
Kazakh (Kazakhstan)
dd.MM.yyyy
kl
Greenlandic
dd-MM-yyyy
kl-GL
Greenlandic (Greenland)
dd-MM-yyyy
km
Khmer
yyyy-MM-dd
Librid 3 manual
62
km-KH
Khmer (Cambodia)
yyyy-MM-dd
kn
Kannada
dd-MM-yy
kn-IN
Kannada (India)
dd-MM-yy
ko
Korean
yyyy-MM-dd
kok
Konkani
dd-MM-yyyy
kok-IN
Konkani (India)
dd-MM-yyyy
ko-KR
Korean (Korea)
yyyy-MM-dd
ky
Kyrgyz
dd.MM.yy
ky-KG
Kyrgyz (Kyrgyzstan)
dd.MM.yy
lb
Luxembourgish
dd/MM/yyyy
lb-LU
Luxembourgish (Luxembourg)
dd/MM/yyyy
lo
Lao
dd/MM/yyyy
lo-LA
Lao (Lao P.D.R.)
dd/MM/yyyy
lt
Lithuanian
yyyy.MM.dd
lt-LT
Lithuanian (Lithuania)
yyyy.MM.dd
lv
Latvian
yyyy.MM.dd.
lv-LV
Latvian (Latvia)
yyyy.MM.dd.
mi
Maori
dd/MM/yyyy
mi-NZ
Maori (New Zealand)
dd/MM/yyyy
mk
Macedonian (FYROM)
dd.MM.yyyy
mk-MK
Macedonian (Former Yugoslav Republic of Macedonia)
dd.MM.yyyy
ml
Malayalam
dd-MM-yy
ml-IN
Malayalam (India)
dd-MM-yy
mn
Mongolian
yy.MM.dd
mn-Cyrl
Mongolian (Cyrillic)
yy.MM.dd
mn-MN
Mongolian (Cyrillic, Mongolia)
yy.MM.dd
mn-Mong
Mongolian (Traditional Mongolian)
yyyy/M/d
mn-Mong-CN
Mongolian (Traditional Mongolian, PRC)
yyyy/M/d
moh
Mohawk
M/d/yyyy
moh-CA
Mohawk (Mohawk)
M/d/yyyy
mr
Marathi
dd-MM-yyyy
mr-IN
Marathi (India)
dd-MM-yyyy
ms
Malay
dd/MM/yyyy
ms-BN
Malay (Brunei Darussalam)
dd/MM/yyyy
ms-MY
Malay (Malaysia)
dd/MM/yyyy
mt
Maltese
dd/MM/yyyy
mt-MT
Maltese (Malta)
dd/MM/yyyy
Librid 3 manual
63
nb
Norwegian (Bokmål)
dd.MM.yyyy
nb-NO
Norwegian, Bokmål (Norway)
dd.MM.yyyy
ne
Nepali
M/d/yyyy
ne-NP
Nepali (Nepal)
M/d/yyyy
nl
Dutch
d-M-yyyy
nl-BE
Dutch (Belgium)
d/MM/yyyy
nl-NL
Dutch (Netherlands)
d-M-yyyy
nn
Norwegian (Nynorsk)
dd.MM.yyyy
nn-NO
Norwegian, Nynorsk (Norway)
dd.MM.yyyy
no
Norwegian
dd.MM.yyyy
nso
Sesotho sa Leboa
yyyy/MM/dd
nso-ZA
Sesotho sa Leboa (South Africa)
yyyy/MM/dd
oc
Occitan
dd/MM/yyyy
oc-FR
Occitan (France)
dd/MM/yyyy
or
Oriya
dd-MM-yy
or-IN
Oriya (India)
dd-MM-yy
pa
Punjabi
dd-MM-yy
pa-IN
Punjabi (India)
dd-MM-yy
pl
Polish
yyyy-MM-dd
pl-PL
Polish (Poland)
yyyy-MM-dd
prs
Dari
dd/MM/yy
prs-AF
Dari (Afghanistan)
dd/MM/yy
ps
Pashto
dd/MM/yy
ps-AF
Pashto (Afghanistan)
dd/MM/yy
pt
Portuguese
dd/MM/yyyy
pt-BR
Portuguese (Brazil)
dd/MM/yyyy
pt-PT
Portuguese (Portugal)
dd-MM-yyyy
qut
K'iche
dd/MM/yyyy
qut-GT
K'iche (Guatemala)
dd/MM/yyyy
quz
Quechua
dd/MM/yyyy
quz-BO
Quechua (Bolivia)
dd/MM/yyyy
quz-EC
Quechua (Ecuador)
dd/MM/yyyy
quz-PE
Quechua (Peru)
dd/MM/yyyy
rm
Romansh
dd/MM/yyyy
rm-CH
Romansh (Switzerland)
dd/MM/yyyy
ro
Romanian
dd.MM.yyyy
ro-RO
Romanian (Romania)
dd.MM.yyyy
Librid 3 manual
64
ru
Russian
dd.MM.yyyy
ru-RU
Russian (Russia)
dd.MM.yyyy
rw
Kinyarwanda
M/d/yyyy
rw-RW
Kinyarwanda (Rwanda)
M/d/yyyy
sa
Sanskrit
dd-MM-yyyy
sah
Yakut
MM.dd.yyyy
sah-RU
Yakut (Russia)
MM.dd.yyyy
sa-IN
Sanskrit (India)
dd-MM-yyyy
se
Sami (Northern)
dd.MM.yyyy
se-FI
Sami, Northern (Finland)
d.M.yyyy
se-NO
Sami, Northern (Norway)
dd.MM.yyyy
se-SE
Sami, Northern (Sweden)
yyyy-MM-dd
si
Sinhala
yyyy-MM-dd
si-LK
Sinhala (Sri Lanka)
yyyy-MM-dd
sk
Slovak
d. M. yyyy
sk-SK
Slovak (Slovakia)
d. M. yyyy
sl
Slovenian
d.M.yyyy
sl-SI
Slovenian (Slovenia)
d.M.yyyy
sma
Sami (Southern)
yyyy-MM-dd
sma-NO
Sami, Southern (Norway)
dd.MM.yyyy
sma-SE
Sami, Southern (Sweden)
yyyy-MM-dd
smj
Sami (Lule)
yyyy-MM-dd
smj-NO
Sami, Lule (Norway)
dd.MM.yyyy
smj-SE
Sami, Lule (Sweden)
yyyy-MM-dd
smn
Sami (Inari)
d.M.yyyy
smn-FI
Sami, Inari (Finland)
d.M.yyyy
sms
Sami (Skolt)
d.M.yyyy
sms-FI
Sami, Skolt (Finland)
d.M.yyyy
sq
Albanian
yyyy-MM-dd
sq-AL
Albanian (Albania)
yyyy-MM-dd
sr
Serbian
d.M.yyyy
sr-Cyrl
Serbian (Cyrillic)
d.M.yyyy
sr-Cyrl-BA
Serbian (Cyrillic, Bosnia and Herzegovina)
d.M.yyyy
sr-Cyrl-CS
Serbian (Cyrillic, Serbia and Montenegro (Former))
d.M.yyyy
sr-Cyrl-ME
Serbian (Cyrillic, Montenegro)
d.M.yyyy
sr-Cyrl-RS
Serbian (Cyrillic, Serbia)
d.M.yyyy
sr-Latn
Serbian (Latin)
d.M.yyyy
Librid 3 manual
65
sr-Latn-BA
Serbian (Latin, Bosnia and Herzegovina)
d.M.yyyy
sr-Latn-CS
Serbian (Latin, Serbia and Montenegro (Former))
d.M.yyyy
sr-Latn-ME
Serbian (Latin, Montenegro)
d.M.yyyy
sr-Latn-RS
Serbian (Latin, Serbia)
d.M.yyyy
sv
Swedish
yyyy-MM-dd
sw
Kiswahili
M/d/yyyy
sv-FI
Swedish (Finland)
d.M.yyyy
sw-KE
Kiswahili (Kenya)
M/d/yyyy
sv-SE
Swedish (Sweden)
yyyy-MM-dd
syr
Syriac
dd/MM/yyyy
syr-SY
Syriac (Syria)
dd/MM/yyyy
ta
Tamil
dd-MM-yyyy
ta-IN
Tamil (India)
dd-MM-yyyy
te
Telugu
dd-MM-yy
te-IN
Telugu (India)
dd-MM-yy
tg
Tajik
dd.MM.yy
tg-Cyrl
Tajik (Cyrillic)
dd.MM.yy
tg-Cyrl-TJ
Tajik (Cyrillic, Tajikistan)
dd.MM.yy
th
Thai
d/M/yyyy
th-TH
Thai (Thailand)
d/M/yyyy
tk
Turkmen
dd.MM.yy
tk-TM
Turkmen (Turkmenistan)
dd.MM.yy
tn
Setswana
yyyy/MM/dd
tn-ZA
Setswana (South Africa)
yyyy/MM/dd
tr
Turkish
dd.MM.yyyy
tr-TR
Turkish (Turkey)
dd.MM.yyyy
tt
Tatar
dd.MM.yyyy
tt-RU
Tatar (Russia)
dd.MM.yyyy
tzm
Tamazight
dd-MM-yyyy
tzm-Latn
Tamazight (Latin)
dd-MM-yyyy
tzm-Latn-DZ
Tamazight (Latin, Algeria)
dd-MM-yyyy
ug
Uyghur
yyyy-M-d
ug-CN
Uyghur (PRC)
yyyy-M-d
uk
Ukrainian
dd.MM.yyyy
uk-UA
Ukrainian (Ukraine)
dd.MM.yyyy
ur
Urdu
dd/MM/yyyy
ur-PK
Urdu (Islamic Republic of Pakistan)
dd/MM/yyyy
Librid 3 manual
66
uz
Uzbek
dd/MM yyyy
uz-Cyrl
Uzbek (Cyrillic)
dd.MM.yyyy
uz-Cyrl-UZ
Uzbek (Cyrillic, Uzbekistan)
dd.MM.yyyy
uz-Latn
Uzbek (Latin)
dd/MM yyyy
uz-Latn-UZ
Uzbek (Latin, Uzbekistan)
dd/MM yyyy
vi
Vietnamese
dd/MM/yyyy
vi-VN
Vietnamese (Vietnam)
dd/MM/yyyy
wo
Wolof
dd/MM/yyyy
wo-SN
Wolof (Senegal)
dd/MM/yyyy
xh
isiXhosa
yyyy/MM/dd
xh-ZA
isiXhosa (South Africa)
yyyy/MM/dd
yo
Yoruba
d/M/yyyy
yo-NG
Yoruba (Nigeria)
d/M/yyyy
zh
Chinese
yyyy/M/d
zh-CHS
Chinese (Simplified) Legacy
yyyy/M/d
zh-CHT
Chinese (Traditional) Legacy
d/M/yyyy
zh-CN
Chinese (Simplified, PRC)
yyyy/M/d
zh-Hans
Chinese (Simplified)
yyyy/M/d
zh-Hant
Chinese (Traditional)
d/M/yyyy
zh-HK
Chinese (Traditional, Hong Kong S.A.R.)
d/M/yyyy
zh-MO
Chinese (Traditional, Macao S.A.R.)
d/M/yyyy
zh-SG
Chinese (Simplified, Singapore)
d/M/yyyy
zh-TW
Chinese (Traditional, Taiwan)
yyyy/M/d
zu
isiZulu
yyyy/MM/dd
zu-ZA
isiZulu (South Africa)
yyyy/MM/dd
Librid 3 manual
67
- end of document -