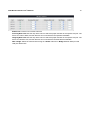
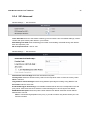
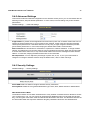
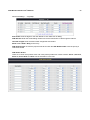
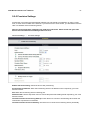
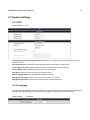
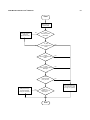
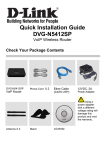
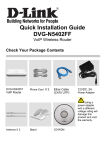
1
VoIP Fiber Optical Router User’s Manual Version 1.0 (July 2011) Contents 1. Introduction ........................................................................................................................................................ 1 1-1 Product Overview ....................................................................................................................................... 1 1-2 Hardware Description ................................................................................................................................. 2 2. VoIP Wireless Router Web Configuration ........................................................................................................ 8 2-1 Status .......................................................................................................................................................... 9 2-1-1 Current Status .................................................................................................................................. 9 2-1-2 RTP Packet Summary ...................................................................................................................... 9 2-1-3 System Information ........................................................................................................................ 10 2-1-4 Routing Table ................................................................................................................................. 11 2-1-5 LAN Client ...................................................................................................................................... 11 2-2 FXS Line Diagnostics ............................................................................................................................... 12 2-2-1 FXS Outward Test .......................................................................................................................... 12 2-2-2 FXS Inward Self Test ...................................................................................................................... 13 2-3 General Settings ....................................................................................................................................... 14 2-3-1 WAN ............................................................................................................................................... 14 2-3-2 LAN ................................................................................................................................................ 18 2-3-3 SIP.................................................................................................................................................. 20 2-3-4 SIP Advanced ................................................................................................................................. 25 2-3-5 Caller ID ......................................................................................................................................... 29 2-3-6 Hot Line .......................................................................................................................................... 30 2-3-7 Line settings ................................................................................................................................... 31 2-3-8 FAX................................................................................................................................................. 34 2-3-9 Calling Features ............................................................................................................................. 36 2-3-10 Phone Book .................................................................................................................................. 38 2-3-11 CDR Settings ................................................................................................................................ 39 2-4 Wireless Settings ...................................................................................................................................... 40 2-4-1 Basic Settings ................................................................................................................................ 40 2-4-2 Advanced Settings ......................................................................................................................... 42 2-4-3 Security Settings ............................................................................................................................ 42 2-4-4 Access Control ............................................................................................................................... 45 2-4-5 WDS Settings ................................................................................................................................. 46 2-4-6 Site Survey ..................................................................................................................................... 48 2-4-7 WPS ............................................................................................................................................... 48 2-5 Advanced Settings .................................................................................................................................... 54 2-5-1 Codec setting ................................................................................................................................. 54 2-5-2 Digit Map ........................................................................................................................................ 55 2-5-3 DTMF & PULSE ............................................................................................................................. 59 2-5-4 CPT / Cadence ............................................................................................................................... 60 2-5-5 Provision Settings .......................................................................................................................... 61 2-5-6 Caller Filter ..................................................................................................................................... 63 2-5-7 Static Route .................................................................................................................................... 64 2-5-8 QoS Settings .................................................................................................................................. 65 2-5-9 DDNS ............................................................................................................................................. 66 2-5-10 NAT Traversal............................................................................................................................... 67 2-5-11 DoS Protection Settings ............................................................................................................... 68 2-5-12 DMZ / ALG.................................................................................................................................... 68 2-5-13 IP Filtering .................................................................................................................................... 69 2-5-14 Port Filtering ................................................................................................................................. 70 2-5-15 MAC Filtering ............................................................................................................................... 70 2-5-16 Virtual Server................................................................................................................................ 71 2-5-17 UPnP ............................................................................................................................................ 71 2-6 Tools ......................................................................................................................................................... 72 2-6-1 Ping Test......................................................................................................................................... 72 2-6-2 STUN Inquiry .................................................................................................................................. 73 2-7 System Settings ........................................................................................................................................ 74 2-7-1 NTP ................................................................................................................................................ 74 2-7-2 Language ....................................................................................................................................... 74 2-7-3 Login Account ................................................................................................................................. 75 2-7-4 Backup / Restore ............................................................................................................................ 76 2-7-5 System Log .................................................................................................................................... 77 2-7-6 Save / Restart................................................................................................................................. 77 2-7-7 Software Upgrade .......................................................................................................................... 78 2-7-8 Logout ............................................................................................................................................ 78 3. Configuring the VoIP Router through IVR ..................................................................................................... 79 3-1 IVR (Interactive Voice Response) ............................................................................................................ 79 3-2 IP Configuration Settings .......................................................................................................................... 81 4. Dialing Principles ............................................................................................................................................. 83 VoIP Wireless Router User’s Manual 1 1. Introduction 1-1 Product Overview The VoIP Router is designed to carry both voice and facsimile over the IP network. It uses the industry standard SIP call control protocol so as to be compatible with free registration services or VoIP service providers’ systems. As a standard user agent, it is compatible with all common Soft Switches and SIP proxy servers. While running optional server software, the VoIP Router can be configured to establish a private VoIP network over the Internet without a third-party SIP Proxy Server. The VoIP Router can be seamlessly integrated into an existing network by connecting to a phone set and fax machine. With only a broadband connection such as an ADSL bridge/router, a Cable Modem or a leased-line router, the VoIP Router allows you to use voice and fax services over IP in order to reduce the cost of all long distance calls. The VoIP Router can be configured a fixed IP address or it can have one dynamically assigned by DHCP or PPPoE. It adopts either the G.711, G.726, G.729A or G.723.1 voice compression format to save network bandwidth while providing real-time, toll quality voice transmission and reception. VoIP Wireless Router User ’s Manual 2 1-2 Hardware Description GW-522FW Front Pannel Indicators Power: Power LED. A steady light indicates a proper connection to a power source. Prov./Alm.: A blinking light indicates the VoIP Router can not register with SIP Server or can not get the IP address. A blinking light also indicates the VoIP Router is attempting to connect with the Provisioning server. Once the service connects, the LED will turn off. The LED will light solid red if the self-test or boot-up fails. Reg.: The Register LED will turn on and continuously working when VoIP Router is connected to a VoIP service provider. The LED will flash if not connected to a service provider. WAN: When a connection is established the LED will light up solid. The LED will blink to indicate activity. If the LED does not light up when a cable is connected, verify the cable connections and make sure your devices are powered on. WLAN: A steady light indicates a wireless connection. A blinking light indicates that the VoIP Router is receiving/transmitting from/to the wireless network. LAN: When a connection is established the LED (bottom) will light up solid on the appropriate port. The LEDs will blink to indicate activity. If the LED does not light up when a cable is connected, verify the cable connections and make sure your devices are powered on. USB: This indicates that VoIP Router detects a supported 3G modem dungle or a USB device. Phone: This LED displays the VoIP status and Hook/Ringing activity on the phone port that is used to connect your normal telephone(s). If a phone connected to a phone port is off the hook or in use, this LED will light solid. When a phone is ringing, the indicator will blink. WPS: Flashing in blue as wireless router processing WPS-PBC wireless connecting progress. VoIP Wireless Router User’s Manual 3 Rear Panel 1. WLAN Switch: Switch it to power on/off wireless feature. 2. Phone Port (1-2): Connect to your phones using standard phone cabling (RJ-11). 3. USB: Connect to a 3G USB dungle or a printer. 4. LAN: 10/100M fast Ethernet. Connect to your Ethernet enabled computers using Ethernet cabling. 5. Copper WAN: 10/100M fast Ethernet. Connect to your broadband modem using an Ethernet cable. 6. Optical WAN: Insert 100M fiber optic SFP module and connect to a switch or router. Note: VoIP router allows alternative Copper or Optical WAN at the same time. If you connect Copper WAN at first that Optical WAN will not take active unless remove RJ45 cable from Copper WAN port. If you connect Optical WAN at first that Copper WAN will not take active unless remove fiber from Optical WAN port. 7. Ground: A conducting connection with the earth. Connect with the ground so as to make the earth a part of an electrical circuit using metal wire. 8. Power Receptor: Receptor for the provided power adapter. 9. Power Switch: Press down to turn-on VoIP Wireless Router. WARNING: DO NOT (1) connect the phone ports to each other (FXS to FXS) or (2) connect any phone port directly to a PSTN line (FXS to PSTN) or to an internal PBX line (FXS to PBX extension). (3) Stacking is forbidden. Doing so may damage your VoIP Router. VoIP Wireless Router User’s Manual WPS: WPS button for wireless WPS-PBC setup method. Antenna: Connect to a wireless network. Reset button: Use to restore factory default settings. Use Reset Button to restore factory default settings: 1. Press and hold the reset button for 5 seconds. 2. As Alarm indicator is blinking, please release the reset button. Factory settings will be restored. 4 VoIP Wireless Router User ’s Manual 5 GW-532FW Front Pannel Indicators Power: Power LED. A steady light indicates a proper connection to a power source. Prov./Alm.: A blinking light indicates the VoIP Router can not register with SIP Server or can not get the IP address. A blinking light also indicates the VoIP Router is attempting to connect with the Provisioning server. Once the service connects, the LED will turn off. The LED will light solid red if the self-test or boot-up fails. Reg.: The Register LED will turn on and continuously working when VoIP Router is connected to a VoIP service provider. The LED will flash if not connected to a service provider. WAN: When a connection is established the LED will light up solid. The LED will blink to indicate activity. If the LED does not light up when a cable is connected, verify the cable connections and make sure your devices are powered on. WLAN: A steady light indicates a wireless connection. A blinking light indicates that the VoIP Router is receiving/transmitting from/to the wireless network. LAN: When a connection is established the LED (bottom) will light up solid on the appropriate port. The LEDs will blink to indicate activity. If the LED does not light up when a cable is connected, verify the cable connections and make sure your devices are powered on. USB: This indicates that VoIP Router detects a supported 3G modem dungle or a USB device. Phone: This LED displays the VoIP status and Hook/Ringing activity on the phone port that is used to connect your normal telephone(s). If a phone connected to a phone port is off the hook or in use, this LED will light solid. When a phone is ringing, the indicator will blink. WPS: Flashing in blue as wireless router processing WPS-PBC wireless connecting progress. VoIP Wireless Router User’s Manual 6 Rear Panel 1. WLAN Switch: Switch it to power on/off wireless feature. 2. Phone Port (1-2): Connect to your phones using standard phone cabling (RJ-11). 3. USB: Connect to a 3G USB dungle or a printer. 4. LAN: 10/100/1000M Gigabit Ethernet. Connect to your Ethernet enabled computers using Ethernet cabling. 5. Copper WAN: 10/100/1000M Gigabit Ethernet. Connect to your broadband modem using an Ethernet cable. 6. Optical WAN: Insert 100M/1000M fiber optic SFP module and connect to a switch or router. Note: VoIP router allows alternative Copper or Optical WAN at the same time. 1. If you connect Copper WAN at first that Optical WAN will not take active unless remove RJ45 cable from Copper WAN port. 2. If you connect Optical WAN at first that Copper WAN will not take active unless remove fiber from Optical WAN port. 7. Ground: A conducting connection with the earth. Connect with the ground so as to make the earth a part of an electrical circuit using metal wire. 8. Power Receptor: Receptor for the provided power adapter. 9. Power Switch: Press down to turn-on VoIP Wireless Router. WARNING: DO NOT (1) connect the phone ports to each other (FXS to FXS) or (2) connect any phone port directly to a PSTN line (FXS to PSTN) or to an internal PBX line (FXS to PBX extension). (3) Stacking is forbidden. Doing so may damage your VoIP Router. VoIP Wireless Router User’s Manual WPS: WPS button for wireless WPS-PBC setup method. Antenna: Connect to a wireless network. Reset button: Use to restore factory default settings. Use Reset Button to restore factory default settings: 1. Press and hold the reset button for 5 seconds. 2. As Alarm indicator is blinking, please release the reset button. Factory settings will be restored. 7 VoIP Wireless Router User’s Manual 8 2. VoIP Wireless Router Web Configuration The VoIP Router allows users to configure its settings using a web interface (Web UI). You can access the Configuration Menu by opening a web-browser (e.g., Internet Explorer or Netscape Navigator) and entering the factory default LAN IP address: 192.168.8.254. Instructions Open a Web-Browser (e.g., Explorer, Navigator, Opera, FireFox). Enter the LAN port IP address in the address filed and press Enter. The default LAN port IP address is: 192.168.8.254. The log-in screen below will appear after you connect. (The factory default settings for Username and Password are left blank). The VoIP Router does not allow multiple people to configure the VoIP Router simultaneously. Please remember to logout or restart the system if you are not using the web configuration function. VoIP Wireless Router User’s Manual 9 2-1 Status 2-1-1 Current Status Status → Current Status For Port Status, it includes if each port registers to Proxy successfully, the last dialed number, how many calls each port has made since the VoIP Router is start, etc. For Server Registration Status, it shows the registration status of DDNS, STUN and FXS Represent Number. 2-1-2 RTP Packet Summary Status → RTP Packet Summary Display the information of the last call made. Press Refresh button to get the latest RTP Packet Summary. VoIP Wireless Router User’s Manual 10 2-1-3 System Information Status → System Information For WAN Port Information, it shows IP address, subnet mask, default gateway and DNS server. If you use PPPoE to obtain IP, you will know if the IP is obtained through this method. If IP address, subnet mask, default gateway is blank, it means that the VoIP Router does not obtain IP. For LAN Port Information, it shows LAN port IP, subnet mask, and the status of DHCP server. For Hardware, it shows the hardware platform and driver version. VoIP Wireless Router User’s Manual 2-1-4 Routing Table Status → Routing Table It displays routing table of VoIP Router. 2-1-5 LAN Client The DHCP Clients table displayed LAN device that has already been assigned an address from VoIP Router. You can check if the DHCP client has obtain an IP address. Status → LAN Client 11 VoIP Wireless Router User’s Manual 12 2-2 FXS Line Diagnostics 2-2-1 FXS Outward Test FXS Line Diagnostics Outward Test It allows operator to verify whether it is some problem on the cable between Phone Sets and VoIP Router. Enable: Select the lines you want to test. Enforced Test: Since the line test will interrupt a talking call, that VoIP Router will ignore the in used line. If you would like to test all the lines you select even it is in used, please tick this item. Test: Click start to test. ACO: Clear alarm indication of the last test result. VoIP Wireless Router User’s Manual 13 2-2-2 FXS Inward Self Test FXS Line Diagnostics Inward Self Test It allows operator to verify if it is some problem on the FXS chip set. Enable: Select the lines you want to test. Enforced Test: Since the line test will interrupt a talking call, that VoIP Router will ignore the in used line. If you would like to test all the lines you select even it is in used, please tick this item. Test: Click start to test. ACO: Clear alarm indication of the last test result. VoIP Wireless Router User’s Manual 14 2-3 General Settings 2-3-1 WAN WAN (Wide Area Network) Settings are used to connect to your ISP (Internet Service Provider). The WAN settings are provided to you by your ISP and oftentimes referred to as "public settings". Please select the appropriate option for your specific ISP. IP Configuration (Setting WAN Port) There are four methods of obtaining a WAN port IP address: 1. DHCP, which means a Dynamic IP (Cable Modem) 2. Static IP 3. PPPoE (dial-up ADSL) 4. PPTP Methods for using DHCP and PPPoE for obtaining an IP address may vary. If you are not familiar with creating a network connection, please contact your local ISP. After selecting the suitable option, click Accept at the bottom of the screen to save the settings. You need to save the changes and restart the VoIP Router to make the changes active. Enter “System Settings-> Save/ Restart” page then Save and Restart. Wait for about 50 seconds before the VoIP Router obtaining an IP address by the method you selected. Note: When the system has obtained a new IP address, and you are using a WAN port to enter the Web Configuration Screen, the new IP address has to be used before you can get connected to the VoIP Router. The same principle applies to the next two settings. General Settings → WAN VoIP Wireless Router User’s Manual 15 General Settings → WAN DHCP: Select this option if your ISP (Internet Service Provider) provides you an IP address automatically. Cable modem providers typically use dynamic assignment of IP Address. The Host Name field is optional but may be required by some Internet Service Providers. General Settings → WAN Static IP: Select this option if your ISP (Internet Service Provider) provides you a Static IP address. Enter the IP address, Subnet Mask and Default Gateway IP. VoIP Wireless Router User’s Manual 16 General Settings → WAN PPPoE: Select this option if your ISP requires you to use a PPPoE (Point-to-Point Protocol over Ethernet) connection. Enter the PPPoE Account, PPPoE Password and re-enter Password to confirm. General Settings → WAN PPTP: Point-to-Point Tunneling Protocol (PPTP) is a WAN connection. Enter the IP Address, Subnet mask, PPTP Server, PPTP ID and Password. VoIP Wireless Router User’s Manual General Settings → WAN WAN Link Speed: Select WAN port link speed. General Settings → WAN VoIP Connection Interface: Select a WAN interface for VoIP traffic bound with as WAN 2 is enabled. General Settings → WAN Factory Default MAC Address: The original MAC address of the VoIP Router. Your MAC Address: It is left blank as you log-in via the WAN port. Current MAC Address: It shows the current MAC Address if you ever used the different MAC address from Factory Default MAC Address. You can click Clone to automatically copy the MAC address of the Ethernet Card installed in the computer used to configure the device. Note: This is only necessary to fill the field if required by your ISP. 17 VoIP Wireless Router User’s Manual 18 2-3-2 LAN General Settings → LAN LAN IP / LAN default Gateway : Enter the LAN IP address of the VoIP Router. It is also the default gateway for DHCP clients. Subnet Make: Enter the subnet mask for DHCP clients. General Settings → LAN Enable DHCP Server: This variable is to assign the IP address for the devices connected to LAN port of the VoIP Router. IP Pool Starting Address: Enter the starting IP address for the DHCP server's IP assignment. IP Pool Ending Address: Enter the ending IP address for the DHCP server's IP assignment. IP Pool Uses Other Default Gw: Check the box to assign different default gateway for DHCP clients. IP Pool Default Gateway: Enter the new default gateway that is different from LAN IP of the VoIP Router. IP Pool Subnet mask: Enter the new subnet mask. Lease Time: Enter the length of time for the IP lease. Domain Name Server Assignment: Select Auto or Manual to get the IP address of Domain Name Server assigned by ISP or manually. Domain Name Server IP: Enter the primary and secondary IP address of Domain Name Server if Domain Name Server Assignment is Manual. Otherwise, the VoIP Router will not be able to access hosts using hostnames instead of IPs. General Settings → LAN VoIP Wireless Router User’s Manual 19 Enable Port: Tick the box to enable LAN Port Incoming Rate Limit: Use the drop-down menu to select the proper rate limit for the specific LAN port. The flow is from LAN to WAN, and the rate limit can not exceed the real upstream bandwidth. Outgoing Rate Limit: Use the drop-down menu to select the proper rate limit for the specific LAN port. The flow is from WAN to LAN, and the rate limit can not exceed the real downstream bandwidth. NAT / Bridge: Select the VoIP Router serving as a Router with NAT or Bridge between WAN port and LAN port without NAT. VoIP Wireless Router User’s Manual 20 2-3-3 SIP As there are various Proxy Server providers, according to RFC standard, it has designed the gateway to be compatible with them. If any registration problem occurs, please consult your Internet telephony Server Provider. General Settings → SIP Enable Support of SIP Proxy Server / Soft Switch: Check the box to register the VoIP Router with SIP proxy server or soft switch. ITSP Name: Enter the name of VSP General Settings → SIP FXS Representative Number registers to Proxy: Number: Enter the representative number for FXS ports. If the VoIP Router is configured to register with SIP proxy server, all the lines are using this number to call through SIP proxy server. It is the Caller ID for the called party when you make a VoIP call. If you register the VoIP Router to a SIP proxy server, then it should be the number that provided by SIP proxy server. Register: Check the box to register with SIP proxy server. User ID/Account: User ID/Account are usually the same as Number from most SIP proxy severs. Password: Enter password and re-enter to confirm. Note: Please ensure if your VoIP Service Provider allows one account for multi-port using. VoIP Wireless Router User’s Manual 21 General Settings → SIP Each line registers to Proxy independently: Number: Enter the number, text or number and text in this field. It is the Caller ID for the called party when you make a VoIP call. If you register the VoIP Router to a SIP proxy server, then it should be the number that provided by SIP proxy server. Number and User ID/Account are usually the same from most SIP proxy severs. Each line has a number. And the number of each line is not reiteration. Hunt Group Port : It allows operators to assign multi lines for a hunting group Register: Check the box to register with SIP proxy server. Invite with ID / Account: Check the box to call through SIP proxy server without registration. It is always ticked when Register is also ticked. Most VoIP Service Providers will interdict the connection without registration. User ID/Account: User ID/Account are usually the same as Number from most SIP proxy severs. Password: Enter password and re-enter to confirm. VoIP Wireless Router User’s Manual 22 General Settings → SIP Proxy Server IP/Domain: Enter the IP address or URL (Uniform Resource Locator) of SIP proxy server or soft switch. Proxy Server Port: Enter the SIP proxy server’s listening port for the SIP in this field. Leave this field to the default if your VoIP Service Provider did not give you a server port number for SIP. Proxy Server Realm: Enter the realm for SIP proxy server. It is used for authentication in a SIP server. In most cases, the VoIP Router can automatically detect your SIP server realm. So you can leave this option blank. However, if your SIP server requires you to use a specific realm you can manually enter it in. TTL (Registration interval) [10-7200 s]: The interval for VoIP Router re-report to SoftSwitch. SIP Domain: Enter the SIP domain provided by your VoIP Service Provider. (Note some SIP proxy servers might not require this.) If you enable “Uses Domain to Register”, the VoIP Router will register to the SIP proxy server with the domain name you filled in. Otherwise, the VoIP Router will register to a SIP proxy server with the IP it resolves. Use Domain to Register: Check the box to use Domain to register with SIP proxy server. The VoIP Router is registered to the SIP proxy server with IP address if un-ticked. Note: Proxy Server Realm, SIP Domain and Use Domain to Register are the parameters provided by VoIP Service Provider. If you fail to make a call, please contact your VoIP Service Provider. Bind Proxy Interval for NAT: Check the box to keep the binding exist by sending packets when the VoIP Router is behind a NAT and SIP proxy server is not able to keep the binding. Initial Unregister: Check the box to send an unregistered message initially by the VoIP Router and then it will perform a general register process. Unregister All Contacts: VoIP Router sends un-register request to SoftSwitch which the contact field filled with a start sign(*) to un-register all FXS in this VoIP Router.. Keep SIP Auth: VoIP Router keeps the last register SIP MD5 authentication information and re-use it for next register request. Support Message Waiting Indication (MWI): It is used to enable/disable Message Waiting Indication. It is available only when Voice Mail Service is available from the VoIP Service Provider. MWI Subscribe Interval: It is used to set the subscribe time for the VoIP Router to check the voice mail. VoIP Wireless Router User’s Manual 23 General Settings → SIP Outbound Proxy Support: Check the box to send all SIP packets to the destined outbound proxy server. An outbound proxy server handles SIP call signaling as a standard SIP proxy server would do. Further, it receives and transmits phone conversation traffic (media) between two communication parties. This option tells the VoIP Router to send and receive all SIP packets to the destined outbound proxy server rather than the remote VoIP device. This helps VoIP calls to pass through any NAT protected network without additional settings or techniques. Please make sure your VoIP Service Provider supports outbound proxy services before you enable it. Outbound Proxy IP/Domain: Enter the outbound proxy’s IP address or URL. Outbound Proxy Port: Enter the outbound proxy’s listening port. General Settings → SIP Enable P-Assert: Check the box to enable the caller ID protection. Privacy Type: It is used to disguise the caller ID when queried via an ITSP/Third-Party Assertion. The Privacy Type includes ‘user’, ‘header’, ‘session’, ‘none’, ‘critical’, ‘id’ and ‘history’. General Settings → SIP The rule of dialing of inviting to VoIP Service Providers may vary. That is, you have to configure different Digit Map for different VoIP Service Providers. In this filed, you can configure individual dialing plan for each VoIP Service Provider. The following examples introduce some cases. For general configuration, refer to Digit Map page. Note: Press “Add” to add an entry. Don’t forget to press “Apply” which in the above of Number Translation. VoIP Wireless Router User’s Manual 24 For example (Example in Taiwan), If Server 1 is local VoIP Service Provider you can refer to Digit Map page for general settings. If Server 2 is global VoIP Service Provider (VoIP STUN, free to dial to some cities free charge) you can set individual dialing plan for VoIP STUN in Number Translation field. Scan Code can be your dialing custom, and VoIP Dial-out is the number on the basis of the dialing rule needed by VoIP STUN. Its dialing rule is Country code + Area Code + phone number. When you make calls to Taipei through VoIP STUN, you don’t change the dialing custom, just dial 02xxxxxxxx, and the system will change the number from 02xxxxxxx to 8862xxxxxxxx. The same rule is for #2. When you make calls to UK via VoIP STUN, you’ll dial 00244xxxxxx, and the system will change it to 44xxxxxx. The settings for Server 2 appear like: If Server 3 is a VoIP Service Provider in UK, you can set individual dialing plan in Number Translation field. As you make calls to UK through this VoIP Service Provider, “Country code” should be removed and plus “0” by the system. The settings for Server 3 appear like: VoIP Wireless Router User’s Manual 25 2-3-4 SIP Advanced General Settings → SIP Advanced Listen Port UDP: Enter the VoIP Router’s listening port in this field. Leave it as default settings, unless it conflicts with ports used by other device in your network. RTP Starting Port UDP: Enter the starting port number or transmitting voice data among VoIP devices. Each line requires 2 ports. SIP Transport Protocol : UDP or TCP General Settings → SIP Advanced International Call Prefix Digit: Enter the International call prefix. Country Code: Select the desired country code from the drop-down menu or enter the country code if Other is selected. Long Distance Call Prefix Digit: Enter the long-distance prefix digit for making a long-distance call. Area Code: Enter the area code. E.164 Numbering(To Invite Proxy): This variable is followed the E.164 rule, but it depends on the SIP proxy server. Click the check box to send the number following the E.164 rule by the VoIP Router. ENUM Header Exception: Enter the prefix number that the VoIP Router sends the number without followed the E.164 rule. Note: E.164 Numbering depends on the proxy. If you fail to make a call, please contact your VoIP Service Providers. VoIP Wireless Router User’s Manual 26 General Settings → SIP Advanced Session Expiration: This field will set the time that the VoIP Router will allow a SIP session to remain die (without traffic) before dropping it. Session Refresh Request: Select UPDATE or re-INVITE to send refresh requests to the Server. Session Refresher: This determines which side of an expired call session will initiate the session refresh. uac – specifies that the Caller side will initiate the session refresh. uas – specifies that the Call receiver (the “Callee”) will initiate the session refresh. General Settings → SIP Advanced SIP Message Resend Timer Base: Select the resend timer base from the drop-down menu if response is not received within the base time. The sequence of sending is like "base time" * 2, and send again at "base time" *2 *2. The maximum resend time is four seconds. Resend action will stop when the total resend time has reached 20 seconds. Max. Response Time for Invite: Enter the maximum response time for INVITE packet. When the destination does not reply within the set time, the call is failed. General Settings → SIP Advanced VoIP failure announcement: Check the box to play a voice announcement if the VoIP Router fails to register to the SIP proxy server while FXS is off-hook. VoIP Wireless Router User’s Manual 27 General Settings → SIP Advanced VoIP Call Out Notification: Check the box to enable the function of playing a tone to notify user that the call is through VoIP. Enable Built-in Call Hold Music: Check the box to enable the function of playing music when receiving Call Hold request. Call On Hold Notification: FXS will send alert to phone set as users hang up if there is a call still held in another line. Enable Non-SIP Inbox Call: Check the box to make local calls. Local Call here means the call does not go through the Internet and if the dialed number is the extension of other line. You can un-check it to configure as all calls go through the Internet. Invite URL need ‘user=phone’: Check the box to add ‘user=phone’ as a hint that the part left to the '@' sign is actually a phone number. Reliability of Provisional Responses: Check the box to send a PRACK request during the progress of the request processing. Reliability of Provisional Responses is to ACK at every SIP packet. With this method, SIP packet will act like TCP, i.e. every packet sent will receive an ACK to make sure that packet sent has been received by other peer. Compact Form: Check the box to represent common header field names in an abbreviated form. This may be useful when SIP message is too large to be carried on and recognized by the user agent. VoIP Wireless Router User’s Manual 28 SIP Caller ID Obtaining: Select the part of the SIP packet from the VoIP Router to obtain Caller ID. There are several places where the Caller ID is located. Remote-Party-ID Display Name - It is located at SIP → Remote-Party-ID → Before [<sip:] Remote-Party-ID User Name - It is located at SIP → Remote-Party-ID → After [<sip:], Before [@] From-Header Display Name - The standard way is in SIP → Message Header → From → SIP Display info. From-Header User Name - It locates at SIP -> Message Header -> From -> SIP from address before [@]. Put Caller ID In URI: This feature is to put Caller ID in URL. The Caller ID is located in SIP → Message Header → After [From:], Before [<sip:] by default settings. It will be located in SIP → Message Header → After [<sip:], Before [@]if ticked. INVITE With Remote-Party-ID Header: Check the box to comprise the information of Remote-Party-ID in the message header of INVITE. Different format of INVITE header might cause the call not to be connected. Please consult with your VoIP Service Provider before enabling it. Callee Quick Media: VoIP Router will send RTP to remote party immediately as user answer an inbound call. FXS Hunting For Unknown Number: Select the response for an incoming call which the called number is not exist in on the VoIP Router. Disable –VoIP Router responses 404 not found. Hunt and Transit Dial –VoIP Router sends alert to an available FXS port and dial the number to PBX as the FXS port picked up by PBX. It works with SoftSwitch or IPPBX to allow a remote client reach the PBX extension for one step dial. (For virtual extension) FXS Group Hunting/ Ring Type -- VoIP Router sends alert to an available FXS port for hunting group. Enable SIP “rport”(RFC 3581): ATA puts “rport” in SIP packets for SoftSwitch to deal well as ATA put under NAT. Support URI Percent-Encoding(RFC 3986): Check the box to encode/decode the letters of the basic Latin alphabet, digits, and a few special characters which follow RFC 3986. Call Hold Compatible With RFC 2543: It is used to set the procedure of Call Hold being compatible with RFC 2543. Enable SIP ‘Allow’ Header: It is used to put “Allow” in SIP packets. The Allow header field lists the SIP requests supported by ITA when ticked. Enable SDP ‘ptime’ Attribute: It is used to put “ptime” in SDP packets when ticked. Use Redirect URI As ‘To’ Header (Receiving 3XX): It is used to change the content of ‘To’ header field when receiving 3XX. Respond ‘BUSY HERE’ while no line available for hunting: It is used to reply ‘BUSY HERE’ to the calling party while no line is available for hunting. VoIP Wireless Router User’s Manual 29 2-3-5 Caller ID General Settings → Caller ID FXS Caller ID Generation: DTMF – Sending Caller ID in DTMF signaling. FSK – Sending Caller ID in FSK signaling. FSK + TypeII – Send Caller ID in FSK signaling. As the phone set supports Call Waiting Caller ID that FXS will send third party’s number. Send Caller ID After the First Ring: Un-Ticked – FXS sends Caller ID before the first ring. Usually it is used in DTMF mode. Ticked – FXS sends Caller ID between the first and second ring. Usually it is used in FSK mode. FSK Caller ID Type: Either Bellcore, ETSI or NTT could be selected. VoIP Wireless Router User’s Manual 30 2-3-6 Hot Line General Settings → Hot Line Enable: Tick the check box to enable a line. If some lines are not used, disable them (Pause Function) to avoid unnecessary waiting when an incoming call is diverting to the line. Hot Line: Check to direct the call automatically to a pre-configured destination without any action when the FXS is off-hook. (i.e. as the user picks up the phone). When the FXS is under Hot Line mode, no other phone numbers can be dialed. Hot Line No.: Enter the number for pre-defined destination. Warm Line: Enter the time for the call to start with a pause, so the user can dial another number. The call will be automatically directed to the pre-configured destination within timeout period. FXS Group: When there is an incoming call and the gateway will automatically assign an unassigned call according to the Hunting Priority. If Port 2 does not want to be set as an assigned line to receive any inbound calls, the function can be disabled. VoIP Wireless Router User’s Manual 31 2-3-7 Line settings General Settings→ Line settings Listening Volume: Use the drop-down menu to adjust the hearing (listening) volume. Speaking Volume: Use the drop-down menu to adjust the speaking volume. Tone Volume: Use the drop-down menu to adjust the tone volume. It will apply to all tones generated by the VoIP Router including Dial Tone, Ring Back Tone and Busy Tone. FXS Current: Set the output D.C. current of FXS port. Flash Time: Enter the minimum flash time for FXS detecting. When the flash signal generated by the phone set is shorter than Min. FXS Hook Flash Time, FXS port will be on-hook.. Enter the maximum flash time for FXS detecting. When the flash signal generated by the phone set is longer than the Flash Time, FXS port will be on-hook. Polarity Reversal: Check the box to activate the generation of polarity reversal from FXS. FXS Chip Option 1: Check the box to avoid mis-detecting the loop state of a subscriber line or PBX user loop from FXS interface. In some cases, the off-hook voltage might cause the FXS interface mis-detect the idle and the active state, in order to avoid this situation, un-check this feature. VoIP Wireless Router User’s Manual 32 General Settings→ Line settings Ring (Early Media) Time Limit[10 - 600secs]: Enter the timeout to cancel a call if no one answers the phone. Enable End of Digit Tone: Check the box to activate the function of playing a “Beep-Beep” tone to notify the user that the call is in progress. Early Media Treatment: Check the box to send the one-way RTP immediately when a connection with a VoIP service provider has been set up. Loop Current Drop Trigger Time: Enter the time to avoid the line being engaged when FXS port is connected to PBX. It stops the loop current from FXS port when FXS port is playing busy tone. The setting “0” zero is to disable this function. Loop Current Drop Duration: Enter the drop duration for loop current. ROH Begin Time: As users forget hang up phone set it makes FXS play loud Howler Tone to notify users put hand set correctly. If this timer is set to be 20 seconds, that FXS play busy tone for 20 seconds then play ROH. ROH Duration: It is the maximum time for FXS play ROH, then FXS will stop play ROH and keep silence. FXS Ring Voltage: It is to set the Ring Voltage of FXS. FXS Onhook Voltage: It is to set the Onhook Voltage of FXS. VoIP Centrex Extension Digit Count: This feature is to enable and set the digit count of VoIP Centrex. The setting “0” zero is to disable this function. VoIP Centrex Digit: Enter the digit for VoIP call. If you dial VoIP Centrex Digit first, the dialing plan is according to the Digit Map; otherwise the VoIP Router will send the number which digit count is the same as VoIP Centrex Extension Digit Count. Metering Pulse Type/ Metering Pulse Period: It is used for telephony device which connected to FXS port for billing purpose. VoIP Router provide Polarity Reversal、 12k Hz and 16k Hz metering capacity. The fully support for detail Metering Pulse Period is not free charge, please contact with your vendor. VoIP Wireless Router User’s Manual 33 General Settings→ Line settings FXS / FXO Impedance: Select different impedance from the drop-down menu. Drop Inactive Call: This feature is a call drop standard for a VoIP Router to determine whether or not to hang up the phone. The VoIP Router will disconnect the call automatically to avoid keeping the line engaged if the detected volume is below the Silence Detection Threshold or the time exceeds the Drop Silent Call Timeout. Silence Detection Threshold: Enter the threshold (dB) to detect if there is voice coming from RJ-11 interface. Drop Silent Call Timeout: Enter the duration (second) for detecting if there are RTP packets receiving from IP network. Note: Improper values for above settings might cause unexpected automatic disconnection of a call. Default values are recommended. Enable IVR Option: Check the box to enable IVR function. General Settings→ Line settings Hunting/Ring: It is used to set FXS group hunting mode. There are Hunting, Simultaneous Ring and Sequential Ring. Hunting: When someone calls in by dialing FXS representative number, the system will always assign the call to the first line. Simultaneous Ring: When someone calls in by dialing FXS representative number, all FXS ports will ring at the same time. Sequential Ring: When someone calls in by dialing FXS representative number, the system will assign the call to each FXS ports in order according Sequential Ring Time. You can adjust Sequential Ring Time for the ring time of each port. VoIP Wireless Router User’s Manual 34 2-3-8 FAX General Settings → FAX Disable - Select it if you are not sending fax, but it is still accepted fax by the VoIP Router. T.38 Fax - Select it if you are using T.38 as the protocol for fax transmission. T.38 is used for reliable and efficient facsimile transmission over network. It transmits and receives FAX waveform (relaying) over the codec negotiated during call setup this bandwidth consumed is lowered. T.38 protocol also supports redundancy to get better FAX quality. T.30 Fax - Select it if you are using T.30 as the protocol for fax transmission. It transmit FAX signal as voice thus uncompressed G.711 would be the choice. (G.726 also works but not recommended). Due to this nature, T.30 always requires a SDP change (change of codec within a session, SIP Re-Invite required) after FAX tone detected by the callee. It will consume more network resources and will affect transmission quality. The VoIP Router is still able to change the protocol from T.38 to T.30 if the called party uses T.38 for fax transmission. T.30 Fax/Modem - Select it if you use it as the protocol for transmission of fax/modem over IP network. T.30 Only - Select it if you are using G.711 a-law or G.711 u-law for fax transmission. The VoIP Router won’t accept T.38 for fax transmission. T.38 Native - Select it if you are only using T.38 for fax transmission. T.30 V.152 – As GW detect FAX tone, it will change RTP codec to be T.30 codec directly without sending Re-Invite to change codec. Note: When a fax tone is detected from the call, the VoIP Router will automatically switch from voice mode to fax mode. Hence, the fax settings will be temporarily applied to a specific port which detects the fax tones, instead of its default voice settings. General Settings → FAX Switch FAX On CED Detection:VoIP Router will send FAX Re-Invite immediately as it detect FAX CED tone, that will save handshaking time between FAX machines. Restrict T.38:VoIP Router will reject T.38 Re-invite in case the FAX type contains without T.38. FAX Detection Sensitivity:To set higher value to make VoIP Router to be more sensitive. VoIP Wireless Router User’s Manual 35 General Settings → FAX High Speed Redundancy:Set redundancy packets for FAX image. It could repair FAX image for non-continuous packets lost. The higher redundancy the higher bandwidth required. Low Speed Redundancy:Set redundancy packets for FAX handshaking signaling. FAX Codec: Select G.711 a-law, G.711 u-law, or G.726 for T.30 from the drop-down menu. T.30 Bypass Payload Type: Fill correct payload type of T.30 bypass method. FAX Jitter Buffer: Enter the buffer or jitter when receiving packets. Note: When you send a fax over an IP network, the IP network needs to support fax over IP functionality (either T.38 or T.30). Please consult your VoIP Service Provider for this setting. Function Fax Detection Content of SDP of re-INVITE Receive re-INVITE with T.38 Disable No N/A Accept and change RTP to T.38 T.38 Fax Yes re-INVITE with T.38 and T.30 Accept and change RTP to T.38 T.30 Fax Yes re-INVITE with T.30 Accept and change RTP to T.38 T.30 Fax/Modem Detect CED only re-INVITE with T.30 Accept and change RTP to T.38 T.30 Only No N/A Accept and change RTP to T.38 T.38 Native Yes re-INVITE with T.38 Accept and change RTP to T.38 T.30 V.152 Yes N/A Accept and change RTP to T.38 VoIP Wireless Router User’s Manual 36 2-3-9 Calling Features General Settings → Calling Features Do Not Disturb: Check the box to reject (busy tone played) incoming calls. Unconditional Forward: Check the box to forward incoming calls to the assigned “Forwarding Number” automatically. Busy Forward: Check the box to forward incoming calls to the “Forward incoming Number” when the line is busy. No Answer Forward: Check the box to forward incoming calls to the “Forward incoming Number” after ringing timeout (configurable from 10 to 60 seconds) expires. Call Hold: Check the box to hold the call on the specific FXS port. Note: Call Transfer or Call Waiting can only be activated when Call Hold is checked.. Call Transfer: Check the box to transfer the call to another destination. Call Waiting: Check the box to accept incoming call while talking. Three-Way Calling /Service ID: It is for conference all based on Nortel Soft Switch and must work with Proxy Server that supports Three-Way Calling service. Local Mixer: It is used to enable build-in conference service when ticked. VoIP Wireless Router User’s Manual 37 Enable Call Feature Code Enable Call Feature Code: Check the box to enable the advanced function for Call Features, such as Call Pickup, Automatic Redial and Unattended transfer. Calling Feature Instructions: Call Hold: The call will be held after the FLASH button is pressed on the phone set. The VoIP Router will play music on hold (provided by your ITSP or VSP) to the remote end. Call Transfer: The call will be held after FLASH button is pressed on local phone set (the VoIP Router plays on-hold music to the remote end). Meanwhile, the local user can dial out another number after the dial tone is heard. After the handset is on-hooked, the call originally on hold will then be transferred to the new number regardless the status of the new call. If wrong number is dialed for the new call, press the FLASH button will switch back to the call on hold. Also, if the local user doesn’t hang up the phone after the new call is set up, press the FLASH button will switch between the original call and the new call. Please note that the PBX between phone sets and the VoIP Router must support FLASH features in order to use this function. If a phone set is connecting directly to the FXS port of the VoIP Router and the FLASH button does not function, please adjust the settings in “Flash Detect Time” from “Advanced Options” section. Note: The availability of the above features also depends on your VoIP network. Please also check with your service provider for these services. VoIP Wireless Router User’s Manual 38 Examples of establishing a Three-Way call: 1. 2. 3. 4. 5. 6. Phone1 dials to Phone2, Phone2 answers the call. Phone1 presses Flash then calls Phone3 (Phone2 is on hold) and Phone3 answers the call. Phone1 presses Flash to start the conference call. Or Phone1 dials to Phone2, Phone2 answers the call. Phone1 presses Flash then calls Phone3 (Phone2 is on hold) and Phone3 answers the call. Phone1 presses Flash and dial 3 to start the conference call. Note: The availability of a Three-Way call also depends on your VoIP network. Please also check with your service provider for these services. 2-3-10 Phone Book Phone Book: It is used for peer-to-peer communication. Some peer information needs to be added to this section prior to making peer-to-peer calls. You need to enter the phone number and the IP address of the remote peer. General Settings → Phone Book Gateway Name: Enter the alias of the remote peer. Gateway Number: Enter the phone number of the remote peer. IP / Domain Name: Enter the IP address or URL (Uniform Resource Locator) of the remote peer. Port: Enter the listen port of the remote peer. VoIP Wireless Router User’s Manual 39 2-3-11 CDR Settings The user can set up a CDR Server to record call details for every phone call. General Settings → CDR Send record to CDR Server: Tick the check box to enable the call detail recording. CDR Server IP / Domain: Enter the IP address of the CDR server. Port: Enter the listen port of the CDR server. RADIUS: Tick the checkbox to enable RADIUS as database and enter the information of RADIUS needed. It includes RADIUS Accounting Port, RADIUS Server Secret, RADIUS User ID and RADIUS Password. VoIP Wireless Router User’s Manual 40 2-4 Wireless Settings 2-4-1 Basic Settings Wireless Settings → Basic Settings Enable Wireless LAN Interface: Enable wireless basic settings on LAN interface. Wireless Network Name (SSID): SSID is the name of your wireless network. All wireless-equipped devices share the same SSID to communicate with each other. It must be unique to identify separated wireless network. For security, you should change the default SSID to a special ID. Wireless Channel: Select a clear and appropriate channel for your wireless network. A device on your wireless network must use a specific channel to transmit and receive data. If wireless network has overlap, change a different channel number. 802.11 Mode: The VoIP Router can operate in 2.4GHz ISM band with different speed of wireless connection, Select the wireless band of your network. 802.11b only - Allow all 802.11b compliant wireless devices to associate with the wireless AP. 802.11g only - Allow all 802.11g compliant wireless devices to associate with the wireless AP. 802.11n only - Allow all 802.11n compliant wireless devices to associate with the wireless AP. Mixed 802.11g and 802.11b - Allow a mix of both IEEE802.11g and 802.11b compliant wireless devices to associate with the wireless AP. Mixed 802.11n and 802.11g - Allow a mix of both IEEE802.11n and 802.11g compliant wireless devices to associate with the wireless AP. Mixed 802.11n, 802.11g and 802.11b - Allow a mix of both IEEE802.11n, 802.11g and 802.11b compliant wireless devices to associate with the wireless AP. Mode: The VoIP Router has ability to serve as four operating modes in wireless network separately. AP: As a wireless AP that allows wireless-equipped stations to communicate with a wired network and the other wireless network for Internet access and resources sharing. Client: As a wireless client, you are allowed to access Internet via an Access Point in infrastructure mode or build a group of wireless network for files and printer sharing in ad-hoc mode. WDS: WDS (Wireless Distribution System) mode is referred to as bridging mode to provide wireless VoIP Wireless Router User’s Manual 41 AP to AP connectivity in which allows two LAN network to make a connection without the need of a wired backbone to link them. WDS AP is deigned to communicate with a specific AP and do not accept wireless stations to access them. AP+WDS: AP+WDS mode is performing as a wireless repeating in which Access Points communicate with each other wirelessly and accept wireless stations to access them at the same time Network Type: Select network type for Access Client Mode. Infrastructure: Connect to another wireless AP or WISP. Ad hoc: Connect to another wireless Ad hoc device. Usually it is used for peer-to-peer connect mode. Channel Width: Wireless channel width for 802.11n. Select 40 MH for higher speed. Broadcast SSID: Broad AP’s SSID for convent usage. To hid SSID for more security. Enable WMM: Wi-Fi Multimedia. It provides higher priority for multimedia stream to get better quality. Enable Universal Repeat Mode: Set VoIP Router to be wireless repeat mode. Please fill the same SSID as the root AP in “SSID of Extended Interface”. SSID of Extended Interface: Enter the SSID of the root AP. Wireless Settings → Basic Settings Multiple AP: It is used for different level of clients. Such as different departments or guests. And you could assign different password for each SSID. VoIP Wireless Router User’s Manual 42 2-4-2 Advanced Settings This section introduces advanced configuration for the wireless access point. If you are not familiar with the following functions, keep the default parameters. In some cases, incorrect settings may reduce wireless performance. Wireless Settings → Advanced Settings Fragmentation: A packet can be fragmented into small units to pass over a network medium that can not support the original packet size. If you encounter a busy network, a lower value of Fragment Threshold could improve performance. If the traffic flows are not very busy, a higher Fragment Threshold provides good network performance. In most case, keeping the default value=2346 is recommended. RTS Threshold: RTS Threshold is a mechanism to implement in collision avoidance. In a large wireless network, two stations do not hear each other but can hear wireless access point. When the two send data to Access Point at the same time, it may result in data collision and a loss of messages for both wireless stations. In most case, keeping the default value=2347 is recommended. RF Output Power: You can adjust the percentage of power 100, 50, 25, 10, 5 of your VoIP Router to change the coverage of wireless network. Keep the default value, 100% to reach full range. 2-4-3 Security Settings Wireless Settings → Security Settings Select SSID: Select an SSID to configure wireless security mechanism. Security Mode: Select the encryption/authentication type: None, WPA, WPA2 and WPA / WPA2 Mixed. WPA Authentication Mode The wireless network can use WPA Authentication to verify whether a wireless device is allowed to access your Access Point or not. You can choose to use Enterprise (RADIUS) method or Personal (Pre-Shared Key). The encryption mechanism used for RADIUS and WPA-PSK is the same. The difference between the two is that WPA-PSK uses a specific characters sting like password instead of a user-authentication. VoIP Wireless Router User’s Manual 43 Wireless Settings → Security Settings Select the type of WPA-PSK (WPA-PSK, WPA2-PSK, WPA2 Mixed-PSK), choose the proper security mode according to your wireless network. WPA Authentication Mode: Select Personal (Pre-Shared Key). WPA Cipher Suite: WPA Cipher Suite is used for the configuration of WPA or WPA2 Mixed. TKIP - TKIP is the security protocol used in WPA. The length of TKIP encryption is longer than WEP encryption that increases the complexity of decoding for crackers. AES - The most powerful encryption algorithm that is commonly used in WPA. WPA2 Cipher Suite: WPA2 Cipher Suite is used for the configuration of WPA2 or WPA2 Mixed. TKIP - TKIP is the security protocol used in WPA. The length of TKIP encryption is longer than WEP encryption that increases the complexity of decoding for crackers. AES - The most powerful encryption algorithm that is commonly used in WPA. Pre-Shared Key Format: Select the Format of Pre-Shared Key. You can select Passphrase or Hex (64 characters) by entering a character string ranging from “A-Z” and “0-9”. Pre-Shared Key: Enter a key of 8-64 characters long in the Pre-Shared Key filed. Make sure this key is exactly the same on all other wireless stations. VoIP Wireless Router User’s Manual 44 Wireless Settings → Security Settings Select the type of WPA (WPA, WPA2, WPA2 Mixed), choose the proper security mode according to your wireless network. WPA Authentication Mode: Select Enterprise (RADIUS). WPA Cipher Suite: WPA Cipher Suite is used for the configuration of WPA or WPA2 Mixed. TKIP - TKIP is the security protocol used in WPA. The length of TKIP encryption is longer than WEP encryption that increases the complexity of decoding for crackers. AES - The most powerful encryption algorithm that is commonly used in WPA. WPA2 Cipher Suite: WPA2 Cipher Suite is used for the configuration of WPA2 or WPA2 Mixed. TKIP - TKIP is the security protocol used in WPA. The length of TKIP encryption is longer than WEP encryption that increases the complexity of decoding for crackers. AES - The most powerful encryption algorithm that is commonly used in WPA. RADIUS Server: RADIUS server Port - Enter the port number of the authentication RADIUS server. Keep the default value: 1812 unless the server required change to another number. RADIUS server IP Address - Enter the IP address of the authentication RADIUS server. RADIUS server key - Enter the password such as a security Key. VoIP Wireless Router User’s Manual 45 2-4-4 Access Control Wireless Settings → Access Control Disable: The VoIP Router does not response to any access rules. You are not allowed to make configuration changes on this page. Allow Listed: When Allow Listed is enabled, only those wireless clients whose MAC addresses are in the Access Control List have rights to connect to your Access Point. Deny Listed: When Deny Listed is enabled, only those wireless clients whose MAC addresses are in the Access Control List will be blocked and restricted access to your Access Point. MAC: Specify the MAC address which you want to allow/deny access your Access Point. Comment: The space is reserved for comment or notation. VoIP Wireless Router User’s Manual 46 2-4-5 WDS Settings The WDS feature can make connection wirelessly between two access points. To add one more access point, the range of the network can be extended. Wireless Settings → WDS Settings Enable WDS: Click the Enable WDS check box to enable wireless bridging and repeating operation. Encryption: Select the encryption type: WEP or WPA. Wireless Settings → WDS Settings Encryption: Select WEP 64. WEP Key Format: Select the preferred WEP Key Format according to which WEP encryption you choose. When WEP 64bits is enabled, you can select ASCII (5 characters) and Hex (10 characters). WEP Encryption Key: You can manually input key value. Type a character sting and apply changes. For a 64-bit WEP key - Enter 5 characters (ASCII sting) or 10 hexadecimal characters (“0-9”, “A-F”). VoIP Wireless Router User’s Manual 47 Wireless Settings → WDS Settings Encryption: Select WEP 128. WEP Key Format: Select the preferred WEP Key Format according to which WEP encryption you choose. When WEP 128bits is enabled, you can select ASCII (13 characters) and Hex (26 characters). WEP Encryption Key: You can manually input key value. Type a character sting and apply changes. For a 128-bit WEP key - Enter 13 characters (ASCII sting) or 26 hexadecimal characters (“0-9”, “A-F”). Wireless Settings → WDS Settings Encryption: Select WPA or WPA2. Pre-Shared Key Format: Select Passphrase or Hex format. Pre-Shared Key: Enter a password of 8-64 characters. VoIP Wireless Router User’s Manual 48 MAC: Enter the MAC addresses of one or more Access Point in this filed for WDS connection. Comment: The space is reserved for comment or notation. 2-4-6 Site Survey When wireless client mode is enabled, click the Refresh button to display any Access Point on your wireless network so that a wireless client can obtain SSID, BSSID, Channel, Type, Encryption, and Signal through scanning using this Site Survey tool. Wireless Settings → Site Survey 2-4-7 WPS Wireless Settings → WPS It allows users establish wireless connect between VoIP Router and computers via WPS(Wireless Protect Setup) method. VoIP Wireless Router User’s Manual Example for setting Wireless profile via WPS method on Windows 7. Enter [Network and Sharing Center] Click [Set up a new connection or network] Click [Connect to the Internet] 49 VoIP Wireless Router User’s Manual Click [Wireless] Select a Wireless AP. 50 VoIP Wireless Router User’s Manual Click [OK] to start setup. Enter the 8-digit PIN from VoIP Router label then click Next. 51 VoIP Wireless Router User’s Manual Type network name(SSID) then click Next. Wait for Windows 7 setting up wireless network. 52 VoIP Wireless Router User’s Manual Configuration finished, you could connect to VoIP Router at present. You could also print security key of save this profile for another computer to add this wireless network manually. R Vista and Windows○ R 7 only. Note: VoIP Router supports WPS work with Windows○ 53 VoIP Wireless Router User’s Manual 54 2-5 Advanced Settings 2-5-1 Codec setting Advanced Settings→ Codec settings Jitter Buffer: Enter the jitter of receiving packets. Silence Detection / Suppression: Check the box to enable the silence packets and send less voice data (package) during the silent period while talking. Echo Canceling: Check the box to remove echo and improve voice quality during conversation. Enable RTCP-XR (RFC 3611) : Enable RTCP-XR(RFC-3611) to report network quality. Codec: Check the box to codec for the VoIP Router to support. All codecs are selected and supported by default. You can un-check the box that is not used. Codec Priority: The priority of code for communication. Packet Interval: Select the frame size of voice package from different codec. It defines the time interval for the VoIP Router to send a RTP packet or voice packet to the receiving side. The smaller the value, the greater the bandwidth takes, and larger values might cause voice delay. Approximate Bandwidth Required: It shows the bandwidth required from different codec and packet interval. VoIP Wireless Router User’s Manual 55 2-5-2 Digit Map Digit Map supports multiple dial plans which help users to arrange least cost route. Each Proxy Server has individual dial plan which combines the original feature of Digit Map and Speed Dial. You can use “?” or “%” in the column of Scan Code and VoIP Dial-out. “?” represents a single digit, and “%” represents a wildcard. The function of the signs is to mapping the numbers between the number received from user and the replaced or modified number for actual dial out. With this function, users can easily add certain leading digits to replace a full set of numbers. There are 50 sets of leading digit entries to choose voice routing interface. Advanced Settings → Digit Map Alert if Auto fails: Check the box to play a voice announcement before calling out. It reminds the user that this call is through PSTN. Enable Pound Key ' # ' Function: Check the box to treat ‘ # ‘ as a digit and send out with other numbers when dialing. If you un-check the box and ‘ # ‘ is pressed after dialing, it will speed up the phone number detection of the VoIP Router. Default Call Route: Defines the default call route of the VoIP Router. VoIP: The call route is VoIP only. Deny: The call will be denied. Default VoIP Route Profile: Enter the Profile ID (ranging from 1-10) for the Default VoIP routing. Advanced Settings → Digit Map Test Dial No.: You have to set some rules in Digit Map Setting first and enter the number for test. Result: The gateway will show the number for VoIP Dial-out and PSTN Dial-out according to the Digit Map Setting as below VoIP Wireless Router User’s Manual 56 Advanced Settings → Digit Map Scan Code: Enter the digits for the VoIP Router to scan while user is dialing. VoIP Dial-out: Enter the actual dialing number rule for the VoIP Router to call through the Internet. User Dial Length: Enter the total number of digits that user dialed. Route: Select VoIP or Deny for this entry. VoIP Route Profile: Choose the proper Profile ID and click the VoIP Route Profile to set the priority of VoIP Route Profile VoIP Router Profile There are 10 VoIP route profiles. Each VoIP route profile provides four routes to select. Server 1, Server 2, Server 3, Phone Book and None can be selected for each route. VoIP Wireless Router User’s Manual 57 Methods of Digit Map: Method 1- Single mapping: Fill a short code into the Scan Code column, and enter the desired phone number into the VoIP Dial-out column. For example, Scan Code: 09 VoIP Dial-out: 0911888997 User Dial Length: 2 Route: VoIP VoIP Route Profile: Route # 1 Pick up the handset and dial 09, the VoIP Router will dial 0911888997 and follow Route # 1. Method 2- Multi mapping: Fill the prefix code into the Scan Code column and the format to transfer into the VoIP Dial-out column. For example, Scan Code: 2??? VoIP Dial-out: 35106??? User Dial Length: 4 Route: VoIP VoIP Route Profile: Route # 2 Pick up the handset and dial 2301. The VoIP Router will dial 35106301 and follow Route # 2. VoIP Wireless Router User’s Manual For example, Scan Code: 0% VoIP Dial-out: 1805% User Dial Length: Disable Route: VoIP VoIP Route Profile: Route # 3 Pick up the handset and dial 0423456789. The VoIP Router will dial 1805423456789 and go through Internet first and follow Route # 3. Method 3- Substitution: It helps you dial to destination that you can not dial by phone. Destination like: [email protected]. Fill in the number into the Scan Code column and enter the desired name into the VoIP Dial-out column. For example, Scan Code: 11 VoIP Dial-out: test User Dial Length: 2 Route: VoIP VoIP Route Profile: Route # 1. Pick up the handset and dial 11. The VoIP Router will dial “test” and go through Internet and follow Route # 1. 58 VoIP Wireless Router User’s Manual 59 2-5-3 DTMF & PULSE Advanced Settings → DTMF & PULSE Dial Wait Timeout: Enter the timeout duration after the user picks up the phone set. Inter Digits Timeout: Enter the timeout duration between the intervals of each key pressed. When exceeding the set timeout duration without entering further digits, the numbers entered will be dialed out. Minimum DTMF ON Length (Dial on)/ Minimum DTMF OFF Length (Dial off - between tones): This variable is to set the length of DTMF playback. DTMF Detection Sensitivity: This variable is to set the sensitivity of the telephone keys for the VoIP Router to detect the DTMF. DTMF Output Volume: Adjust the Tx volume of FXS port for DTMF Caller ID or Out of Band DTMF. Pulse Dial Mark/Space Ratio: Duration and break of pulse dial ration. FXS Pulse Detection: It allows FXS detect PULSE dial method sends from a phone set. Enable Out-of-Band DTMF: This variable is to set the method of DTMF transmission. RFC2833 or SIP Info. Note: Out-of-Band DTMF transport method varies from VoIP networks, please contact your VoIP provider for the preferred method. Enable Hook Flash Event: Select Auto, RFC2833, or SIP info for the signaling method of Hook Flash Event. Payload Type: payload type of RFC2833. Volume: Select the volume of RFC 2833 from the drop-down menu. VoIP Wireless Router User’s Manual 60 2-5-4 CPT / Cadence Advanced Settings → CPT / Cadence CPT # 1 Enable Setting 1: The CPT has a set of parameter table. Please adjust the CPT based on the local PSTN or PBX settings and requirements. Advanced Settings → CPT / Cadence FXS Ring Cadence Settings: Specify the ring cadence for the FXS port. In this field, you specify the on and off pulses for the ring. The ring cadence that should be configured differs depending on local PSTN or PBX settings and requirements. VoIP Wireless Router User’s Manual 61 2-5-5 Provision Settings Provisioning is a function that automatically updates your VoIP Router’s configuration by using a TFTP, FTP, or HTTP server located on the Internet. If you have access to such service, you will need to know the URL or IP address of the Provisioning Server. Note: Fill in the parameters needed by your VoIP Service Provider. Please check with your VoIP Service Provider about the availability of these services. Advanced Settings → Provision Settings Enable Auto Provisioning: Check the box to start provisioning. Provision Server Address: Enter the Provisioning Server’s IP address or URL required by your VoIP Service Provider. Port: Enter the Provisioning Server’s listening port. Packet Format: Use the drop-down menu to choose the packet transmitting format required by your VoIP Service Provider. Connect Provision Server During Start Up: Check the box to connect to Provisioning Server when the VoIP Router is powered on or rebooted. Connect Provision Server Periodically: Check the box to connect to Provisioning Server periodically. VoIP Wireless Router User’s Manual 62 Auto Provision Interval: Enter the time for auto provisioning. Random Offset: Enter the offset of the time for auto provisioning. Provision Retry Times: Enter the retry time if a provisioning attempt fails. Retry Interval: Enter the interval for retrying. Suspend Service: Check the box to stop VoIP call service. TFTP Source Port: Assign TFTP source port for TFTP download Note: Contact your server provider if necessary. Binding Server for Trigger: Check the box to trigger a connection between Provisioning Server and the VoIP Router. Provisioning Server will bind a port for the VoIP Router to send provision request. Binding Port: Enter the port number of Provisioning Server is used for binding. Binding Interval: Enter the interval at which the VoIP Router will keep the binding. VoIP Wireless Router User’s Manual 63 2-5-6 Caller Filter This function allows you to accept or reject any incoming call from the IP address listed in the filter rule. The call from the IP address of SIP proxy server is always accepted, despite Deny is selected or the IP address of SIP proxy server is not in the filter rule of Allow. Advanced Setting → Caller Filter Caller Filter: It is to allow or deny the filter rule. Status: It is to show the status of enable or disable. Filter IP Address: Enter the start IP address which you would like to Allow or Deny. Subnet mask: Enter the subnet mask you would like to Allow or Deny. VoIP Wireless Router User’s Manual 2-5-7 Static Route Build static routes within an internal network. These routes will not apply to the Internet. Advanced Settings → Static Route Route: Destination network of the route. Route Mask: Subnet mask to apply on destination network. Next Hop IP: The next hop IP address to the specified network. Interface: The interface attached to this route. 64 VoIP Wireless Router User’s Manual 65 2-5-8 QoS Settings Advanced Settings → QoS Enable WAN QoS : Check the box to guaranty the voice quality. Voice packets have the highest priority in IP networks, and the data transmission is distributed to less bandwidth. Downstream Bandwidth - Select the downstream bandwidth that is the same as the actual bandwidth subscribed from the drop-down menu. Upstream Bandwidth - Select the upstream bandwidth that is the same as the actual bandwidth subscribed from the drop-down menu. ToS IP Precedence: Select the precedence for signaling (data) and voice (voice data). DiffServ (DSCP): Select the number of signaling (data) and voice (voice data) values. Note: For the VoIP Router, ToS IP Precedence and DiffServ are the same function. You only select one for priority marking. VoIP Wireless Router User’s Manual 66 2-5-9 DDNS Advanced Settings → DDNS Enable Dynamic DNS: Check the box to enable DDNS function. It is only necessary when the VoIP Router is set up behind an Internet sharing device that uses a dynamic IP address and does not support DDNS. Server address: Accept the default setting or fill a correct DDNS Service FQDN. Hostname: Enter the URL of the system (or NAT) – applied from domain name registration providers (e.g. VoIPGateway01.dyndns.org). Username or Key/Password or Key: Enter the Login ID and password used to log-in to the DDNS server. Note: If the VoIP Router is set up under NAT, then enter the hostname in the NAT IP/Domain that is the same as the Hostname of the DDNS. VoIP Wireless Router User’s Manual 67 2-5-10 NAT Traversal If your VoIP Router is set up behind an Internet sharing device, you can select either the NAT or STUN protocol. Advanced Settings → NAT Traversal Enable(NAT Public IP): Check the box to use the IP address of the Internet sharing device if the VoIP Router is set up behind an Internet sharing device. Also the VoIP Router will use the IP address of the Internet sharing device as the public IP when it connects to Internet. Furthermore, some of the Internet sharing device’s type is symmetric NAT. You need to set Virtual Server or Port Mapping (Forwarding) from the Internet sharing device for the listen port and communication ports (RTP ports) of the VoIP Router. NAT IP/Domain: Enter the real public IP address of the IP sharing device or the router; or enter a true URL (Uniform Resource Locator) when DDNS is used. Please refer to the DDNS settings. Note: If you are setting a public IP in this field, it has to be a static public IP, otherwise VoIP communication may not be established properly. Please contact your ISP to check if your Internet connection has static public IP addresses. Enable STUN Client: Check the box to use the STUN protocol prevents problems from setting the IP sharing function. (Some NATs do not support this protocol.) Note: You can use the “Status STUN Inquiry” page to detect the NAT type of your Internet sharing device. If the NAT type is “Symmetric NAT,” then the VoIP Router is not able to traverse the NAT. It is not a flaw of the VoIP Router design, but rather a limitation of the STUN protocol. STUN Server IP/Domain and Port: Enter the IP address and listen port of the STUN server. You can set two STUN server IPs separated by a semicolon. VoIP Wireless Router User’s Manual 68 2-5-11 DoS Protection Settings Advanced Settings → DoS Protection Settings Enable DoS Prevention: Check the box to prevent DoS attacks from WAN. There are various types of DoS attacking. Leave settings in this field to the default if you are not familiar with it. 2-5-12 DMZ / ALG Advanced Settings → DMZ /ALG DMZ (Demilitarized Zone) allows the server on the LAN site to be directly exposed to the Internet for accessing data and to forward all incoming ports to the DMZ Host. Adding a client to the DMZ may expose that computer to a variety of security risks; so only use this option as a last resort. Enable DMZ: Check the box to enable DMZ feature. DMZ Host IP Address: Enter the IP address of that computer as a DMZ Host with unrestricted Internet access. Note: Either this function or virtual server can be selected for use in accessing external services. RTSP ALG: Enable ALG for RTSP multimedia stream. VoIP Wireless Router User’s Manual 69 2-5-13 IP Filtering Advanced Settings → IP Filtering Use IP Filters to deny particular LAN IP addresses from accessing the Internet. You can deny specific port numbers or all ports for a specific IP address. The screen will display well-known ports that are defined. To use them, click on the edit icon. You will only need to input the LAN IP address(es) of the computer(s) that will be denied Internet access. Advanced Settings → IP Filtering Enable IP Filtering: Check the box to deny particular LAN IP addresses from accessing the Internet. IP: Enter the IP address that you want to deny in this filed. TCP/UDP: Select TCP, UDP or Both that will be used with the IP address that will be blocked. Remark: Enter comments. VoIP Wireless Router User’s Manual 70 2-5-14 Port Filtering Port filtering enables you to control all data that can be transmitted over routers. When the port used at the source end is within the defined scope, it will be filtered without transmission. Note: When the port used at the source end is within the limited scope, it will be filtered without transmission. Advanced Settings → Port Filtering Enable Port Filtering: This variable is to restrict certain types of data packets by port. Port Range: Enter the port range that will be denied access to the Internet. TCP/UDP: Select TCP, UDP or Both that will be used with the port that will be blocked. Remark: Enter comments. 2-5-15 MAC Filtering MAC (Media Access Control) address filtering allows you to filter the transmission of data by network card physical address. Advanced Settings → MAC Filtering Enable MAC Filtering: Enter a MAC address to prevent the particular device from accessing the Internet. MAC: Enter a MAC address to prevent the particular device from accessing the Internet. Remark: Enter comments VoIP Wireless Router User’s Manual 71 2-5-16 Virtual Server Enable users on Internet to access the WWW, FTP and other services from your NAT. It is also known as port forwarding. When remote users are accessing Web or FTP servers through WAN IP address, it will be routed to the server with LAN IP address Advanced Settings → Virtual Server Enable Virtual Server: Check the box to enable port forwarding. WAN Port Range: Enter the port range for the WAN side. TCP/UDP: Select the communication protocols used by the server, TCP, UDP or Both. LAN Host IP Address: Enter the IP address of the device that provides various services. Server Port Range: Enter the port range used by the LAN host. Remark: Enter comments 2-5-17 UPnP Advanced Settings → UPnP Enable UPnP Server: UPnP is a network standard, enables the auto discovery the devices on the network. It only works with the device that supports UPnP VoIP Wireless Router User’s Manual 2-6 Tools 2-6-1 Ping Test Use “Ping” to verify if a remote peer is reachable. Enter a remote IP address and click “Test” to ping the remote host. The result would be shown on Result Table Tools → Ping Test 72 VoIP Wireless Router User’s Manual 2-6-2 STUN Inquiry Use “STUN Inquiry” to detect your IP sharing device’s NAT type and communication between a STUN server and client. Tools → STUN Inquiry NAT Type: It shows the NAT type of your router. STUN Server IP/Domain: Enter the IP address or URL of the STUN server for query. STUN Server Port: Enter the STUN Server’s listening port. 73 VoIP Wireless Router User’s Manual 74 2-7 System Settings 2-7-1 NTP System settings → NTP Automatically synchronize with Internet time servers: The VoIP Router should automatically sync up with time servers. First NTP time server: Select the desired domain name of a NTP server as first priority. Second NTP time server: Select the domain name of a NTP server as second priority. Current Router Time: It shows the current time of the VoIP Router. Time Zone: Select your time zone from the drop-down menu. Enable Daylight Saving: To enable/disable daylight saving time. Daylight Saving Offset: Set the current time zone offset for your location. Daylight Saving Dates: Set the start and end dates for daylight saving time. 2-7-2 Language The system provides English, Traditional Chinese, and Simplified Chinese for displaying text on web pages. Changing the language setting also changes the language for IVR (Interactive Voice Response). System settings → Language VoIP Wireless Router User’s Manual 2-7-3 Login Account System settings → Login Account Note: There are two operating levels when entering the Web UI. Logging-in as the ADMIN allows you to change all settings. A Web UI USER only has access to some settings. Password: It is highly recommended that you create a password to keep your VoIP Router secure. System settings → Login Account Port of Web Access from WAN: Enter the port number when accessing the web-based configuration utility from the WAN port. Web Idle Time Out: Enter the range of effective time when log-in the web interface. The user will be disconnected from the web page to allow others to log-in. Enable Web UI: Check the box to enable WEB access from WAN or LAN. Enable Telnet Service: Check the box to enable Telnet access from WAN or LAN. 75 VoIP Wireless Router User’s Manual 76 2-7-4 Backup / Restore Backup Configurations File System settings → Backup and Restore The current system settings can be saved as a file onto the local hard drive. Click the Backup Settings button to save your current settings to a file. Configuration File: It is to backup the all settings. Wireless Configuration File:It is to backup the Wireless settings. Configuration Template File: It is to backup the settings as template file for editing. Restore Default Settings System settings → Backup and Restore You can backup settings to a file and restore settings from that file. You also can restore all settings back to default by selecting Restore Default Configurations and click Restore. Note: You have to save settings and restart, and all settings will take effect. VoIP Wireless Router User’s Manual 77 2-7-5 System Log System settings → System log Enable: Check the box to send event notification messages across IP networks to the Server. Server Address: Enter the System Log Server’s IP address. Port: Enter the System Log Server’s listening port. Leave this field to the default if your VoIP Service Provider did not provide you a server port number for System Log Server. 2-7-6 Save / Restart Save and Reboot System settings → Backup and Restore Save All Settings: Click the Save All Settings check box and reboot the system after completing changes. The new settings will take effect after the VoIP Router is restarted. Restart: Click the Reboot button to reboot the system. VoIP Wireless Router User’s Manual 2-7-7 Software Upgrade The VoIP Router supports a software upgrade function from a remote server. Please consult your VoIP Service Provider for information about the following details. System settings → Software upgrade Upgrade Server: Select the upgrade type: TFTP, FTP, or HTTP. Software Upgrade Server IP: Enter the server’s IP address. Software Upgrade Server Port: Enter the server’s port. User Name/ Password: Enter the account information for accessing the server if needed. Directory: Enter the location of the firmware file. 2-7-8 Logout If setting or parameter has been changed, remember to save the changes before you logout the configuration menu. Logout 78 VoIP Wireless Router User’s Manual 79 3. Configuring the VoIP Router through IVR Preparation 1. Connect the power supply, telephone set, telephone cable, and network cable properly. 2. If a static IP is provided, confirm the correct IP settings of the WAN Port (IP address, Subnet Mask, and Default gateway). Please contact your local Internet Service Provider (ISP) if you have any question. 3. If you intend to operate the VoIP Router under NAT, the IP range of VoIP Router WAN Port and LAN Port IP Address should not be the same in order to avoid phone failures. IVR configuration provides basic query and setup functions, while browser configuration provides full setup functions. 3-1 IVR (Interactive Voice Response) The VoIP Router provides convenient IVR functions. Users are able to get query and setup the VoIP Router with a phone-set and function-codes without turning on the PC. Note: When finishing the setup, make sure the new settings are saved. This will enable the new settings to take effect after the system is restarted. Instructions FXS Port: Connect to telephones. To access IVR mode, passwords should be entered, “* * password #”. Alphabets to digits conversion information is provided in the PPPoE Character Conversion Table. When correct IVR passwords are entered and accepted, an indication tone can be heard indicates the system is in IVR setup mode. Enter function codes to check or configure the VoIP Router. Example: If your password is “1234”, enter * (star) * (star) 1 2 3 4 # (pound), and now you are entering IVR setup mode. Next, enter a function code to check or configure the VoIP Router. If your password is “admin”, enter * (star) * (star) * (star) 41 44 53 49 54 # (pound). Please refer to the IVR Functions Table (page 68) for available functions and codes. Once the setting or query has been completed, you can hear a dial tone. Use the same procedure to make a second query or setting. To exit IVR mode, simply hang up the phone. Example: enter “**#” (you are now in IVR mode) enter 101 (to query the current IP address) the system responds with an IP address. You can continue with more settings or queries: enter 111 (to set a new IP address) enter 192*168*1*2 (new IP address). VoIP Wireless Router User’s Manual 80 Save Settings When all setting procedures are completed, dial 509 (Save Settings) from phone keypad. Wait for about three seconds, you should hear a voice prompt “1 (one).” You can now hang up the phone and please reboot the VoIP Router to enable the new settings. To inquire about the current VoIP Router WAN Port IP address setting After completing all your settings, dial 101 from the keypad, then you can hear the system play back the current WAN Port IP address. If the system does not play back the IP address after dialing 101, this indicates that the VoIP Router currently is not connected to the Internet. Please check and make sure the cable connections, account numbers, and passwords are correct. 3-1-1 IVR Functions Table: Function Description Code 111/101 WAN Port IP address Set/Query 112/102 WAN Port Subnet Mask Set/Query 113/103 WAN Port Default Gateway Set/Query 114/104 Current Network IP Access Set/Query (1: Static IP, 2: DHCP, 3: PPPoE) 116/106 Phone Book manager IP address Set/Query 118 Restart 311/301 LAN Port IP Set/Query 312/302 LAN Port Subnet Mask Set/Query 109 Restore factory default IP address configuration 409 Restore factory default settings 509 Save settings Example / Notes Dial function code 114 and then dial 1 for a Static IP connection then setup the IP address. VoIP Wireless Router User’s Manual 81 3-2 IP Configuration Settings Static IP Settings Note: Complete static IP settings should include a static IP (option 1 under 114), IP address (111), Subnet Mask (112), and Default Gateway (113). Please contact your Internet Service Provider (ISP) if you have any question. Function Command Select a Static IP After entering IVR mode, dial 114. When voice prompt plays “Enter value”, dial 1 (to select static IP) IP address Settings After entering IVR mode, dial 111. When voice prompt plays “Enter value”, enter your IP address followed by “#”. Example: If the IP address is 192.168.1.200, dial 192*168*1*200#. Subnet Mask Settings After entering IVR mode, dial 112. When voice prompt plays “Enter value”, enter your subnet mask followed by “#”. Example: If the subnet mask value is 255.255.255.0, dial 255*255*255*0#. Default Gateway Settings After entering IVR mode, dial 113. When voice prompt plays “Enter value”, enter your default gateway’s IP address followed by “#”. Example: If the default gateway is 192.168.1.254, dial 192*168*1*254#. Save Settings and Restart To save settings, dial 509 (Save Settings). The system will save the current settings. Please restart the system. Wait for about 40 seconds for the system to restart, and then enter 101 to check whether the IP address was retained. If the system does not play back the IP address after dialing 101, this indicates that the VoIP Router currently is not connected to the Internet. Please check and make sure the cable connections, account numbers, and passwords are correct. Dynamic IP (DHCP) Settings After entering IVR mode, dial 114. When voice prompt plays “Enter value”, dial 2 (to select DHCP). Saving settings –press 509 (Save Settings). Please restart the system. After the system is restarted, press 101 to check whether or not the IP address was retained. Note: If the system does not play back the IP address, this indicates that the VoIP Router failed to communicate with a DHCP server. Please check with your DHCP server or ISP. Save Settings and Restart To save settings, dial 509 (Save Settings). The system will save the settings. Please restart the system. Wait for about 40 seconds for the system to restart, then enter 101 to check whether the IP address was retained. If the system does not play back the IP address after dialing 101, this indicates that the VoIP Router currently is not connected to the Internet. Please check and make sure the cable connections, account numbers, and passwords are correct. VoIP Wireless Router User’s Manual 82 3-2-1 Character Conversion Table: The table below provides a list of conversion codes. The first row (high-lighted) of each pair of the column lists the numbers, alphabets or symbols and the second row (high-lighted) of each pair of the column (“Input Key”) represents the codes to be entered for the corresponding numbers, alphabets or symbols. For example, to enter “admin” according to the table below, enter: 148322495451 Numbers Input Key Upper Case Input Key Lower Case Input Key Letters Letters Symbols Input Key 0 00 A 11 a 41 @ 71 1 01 B 12 b 42 • 72 2 02 C 13 c 43 ! 73 3 03 D 14 d 44 " 74 4 04 E 15 e 45 $ 75 5 05 F 16 f 46 % 76 6 06 G 17 g 47 & 77 7 07 H 18 h 48 ' 78 8 08 I 19 i 49 ( 79 9 09 J 20 j 50 ) 80 K 21 k 51 + 81 L 22 l 52 , 82 M 23 m 53 - 83 N 24 n 54 / 84 O 25 o 55 : 85 P 26 p 56 ; 86 Q 27 q 57 < 87 R 28 r 58 = 88 S 29 s 59 > 89 T 30 t 60 ? 90 U 31 u 61 [ 91 V 32 v 62 \ 92 W 33 w 63 ] 93 X 34 x 64 ^ 94 Y 35 y 65 _ 95 Z 36 z 66 { 96 | 97 } 98 VoIP Wireless Router User’s Manual 83 4. Dialing Principles The VoIP Router provides the registration for multiple VoIP Service Providers, and each VSP has a private digit map. Hence, the routing and number translation may vary. We use two part, Routing and Number Translation, to explain the dialing principle of the VoIP Router. Dialing Options 1. Dial the phone number which you want to call and press # to call out immediately. Note that if the “# (pound)” not dialed, the number will be called out after 4 seconds by default. The period between number dialed and call out is named “Inter Digits Timeout”. (Configurable from “DTMF”, default=4 seconds, see page 55). 2. If the phone number matches a rule of Digit Map Table, the phone number will be routed the assigned VSP or Phone Book according VoIP Route Profile automatically. Number Translation Phone number is dialed by user. The system will check if the phone number is matched Digit Map Table. If no matched is found from Digit Map Table, it will use the phone number to look up private digit map of the server set in VoIP Routing Profile. The system will translate the phone number to global number used to look up private digit map of the server set in VoIP Routing Profile. Start Enter a phone number (D#) Is (D#) defined in Digit Map table? No Yes Is (D#) defined in Private Digit Map Table? No Yes Translate (D#) to private number based on Private Digit Map Translate (D#) to global number based on Digit Map Table Yes Is the global number defined in Private Digit Map? No Yes Translate the global number to private number based on Private Digit Map End Dial out as defined in the first match case by SIP TA VoIP Wireless Router User’s Manual 84 Routing To achieve maximum flexibility, the number dialed will be looked up in several tables defined by the VoIP Router. If no match is found from Digit Map Table, it will then look up the number from another table and to the registered VSP. Routing Processing Flow The routing after checking Digit Map Table may be vary. The routing is accord with VoIP Route Profile. By default, Phone Book is the first route of VoIP Route Profile. The second and third route is Server 1 and Server 2. Server 3 is the last route. Each server has a Private Digit Map, and the number will be translated according the Private Digit Map before dialing out. For default setting, the number look up flow appears like: The routing after checking Digit Map Table may be vary. The routing is accord with VoIP Route Profile. By default, Phone Book is the first route of VoIP Route Profile. The second and third route is Server 1 and Server 2. Server 3 is the last route. Each server has a Private Digit Map, and the number will be translated according the Private Digit Map before dialing out. For default setting, the number look up flow appears like: Digit Map Table Phone Book Server 1 Server 2 Server 3 Assume that the route of Default Route Profile is Server 2 as the first route, Server 3 as the second route and Server 1 as the last route. The number look up flow appears like: Digit Map Table Server 2 Server 3 Server 1 VoIP Wireless Router User’s Manual 85 Start Enter a phone number (D#) Dial the number defined in Speed Dial table Yes Is (D#) defined in Speed Dial table? No Is (D#) defined in Extension table? Yes No Is (D#) defined in Phone Book table? Yes No Is (D#) defined in Phone Book Manager? Yes No Is (D#) defined in SIP proxy server? Yes No Dial out as defined in the first match case through the gateway Dial (D#) through the first available FXO port to PSTN Yes Does this gateway have an FXO port? No End