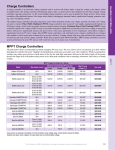
1
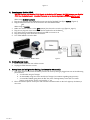
1 Instruction Manual for N-C20000 Mobile CPAP Battery Pack Included in your package: Battery Bag CPAP Lithium Ion Battery AC Charger (2 pcs) DC Power Cord & Connector Tips DC-AC Inverter (Optional) Procedures: A. Read this Instruction Manual in its entirety prior to use. Failure to follow these Procedures and observe the Cautions may result in any or all of the following: Battery shut-down, Battery damage, CPAP damage, reduced runtimes, shortened Battery life, and voided Warranty. B. Read your CPAP Manual carefully before assembling your system. You are responsible for the application (See Cautions on page 3). C. Fully Charge the Battery Charging the Battery Using a Wall outlet(see Cautions page 3). (Figure 1) 1. 2. 3. 4. Connect 2 pieces of AC Charger. Connect the AC Charger wall-plug to a wall outlet. Connect the AC Charger barrel connector to the DC IN/OUT Port (A) of Battery. Charge until Charge Indicator Light on AC Charger is Green (fully charged), Red light (charging). This could take up to 8 hours if Battery is depleted. Figure 1 Charging the Battery Using an Inverter; alternate method (Figure 2) 1. 2. 3. 4. 5. 6. 7. Make sure Inverter (optional accessory) switch is turned OFF. Start your vehicle; vehicle must be running at all times to avoid draining your vehicle battery. Plug car-plug end of Inverter into vehicle power socket. Turn inverter ON and note green run light. Connect the AC Charger wall plug to Inverter. Connect barrel connector end of AC Charger into DC IN/OUT Port (A) of Battery. Charging is complete when indicator light is Green, remove Inverter plug from socket (see Cautions on page 3). Figure 2 8/21/2013 2 D. Using the Battery Test Button (C) (See “End View of Battery” diagram below) Press the Test Button if any LED’s come on continue as described below, if no lights come on Hold the Test Button down, for up to 30 seconds, to turn Battery ON and view LED Power Meter. You should see one red or up to 4 LED lights come on, if no lights come on please go to section “I”. Note the LED’s will shut off after a few seconds, however the battery will remain on. Indicator lights are a rough estimate of Battery power level. See Cautions on page 3. E. LED Power Meter (E) When Low Power Alarm Light (D) is flashing, Battery needs to be recharged. However, we recommend charging Battery when only 2 lights are visible. Press the Test Button (C) for 1 second to view the indicator lights on the Battery. End View of Battery F. Powering a CPAP which can receive DC input (directly from battery). (Figure 3) NOTE for all ResMed products please go to section G 1. Find the appropriate Connector Tip by comparing tips to the tip of your CPAP’s AC charger. Try the tip in your CPAP’s charge port. It should go in easily; DO NOT force it. 2. Place the appropriate Connector Tip on the end of DC Power cord. 3. Connect the car plug end of the DC Power cord to the DC IN/OUT Port (B) of the fully charged Battery 4. Connect the Connector Tip, with Cable, to your CPAP. CPAP connected to Battery Figure 3 OR, if you are using an Inverter (some CPAPs only receive AC power; from wall socket) (Figure 4) Inverter has an internal fan and will over-heat if enclosed (inside a carry bag); must be allowed to breath. 1. 2. 3. 4. 5. Make sure Inverter (optional accessory) switch is in the OFF position (the dot on the switch is up). Plug the car plug end of the Inverter into the DC In/Out Port of the Battery. Turn the Inverter switch ON and confirm Green LED on inverter is on Plug the wall plug of the CPAP into the Inverter. Turn CPAP Machine switch to ON 3 Figure 4 G. Powering your ResMed CPAP. DO NOT connect your ResMed CPAP directly to the Battery (DC power); this WILL damage your ResMed CPAP (see ResMed Manual). A ResMed Converter or an Inverter (optional accessories) must be used. When Using ResMed Converter: 1. Plug the car plug end of the ResMed Converter into the DC IN/OUT Port (B) of Battery. (Figure 5) 2. Plug the barrel connector end of the Converter into the ResMed CPAP. -ORWhen using an Inverter, 1. Make sure Inverter switch is in the OFF position (the dot on the switch is up).(Figure 4, page 2) 2. Plug the car plug end of the Inverter into the DC In/Out Port of the Battery. 3. Turn the Inverter switch ON and confirm Green LED on inverter is on 4. Plug the wall plug of the CPAP into the Inverter. 5. Turn CPAP Machine switch to ON Battery--Converter--ResMed CPAP Figure 5 H. Shutting System Down: 1 2 I. Battery Reset (no led lights after holding Test button for 30 seconds): 1 2 8/21/2013 Power off the CPAP then turn off the inverter Unplug the CPAP then the inverter If no lights come on this means the battery needs to be reset by having it plugged into one of the following power sources a. A wall outlet using A/C charger b. An automobile using an inverter and the A/C charger (see cautions regarding using inverter) c. A second N/C-20000 going from the D/C out of the working battery to the D/C in of other battery using the D/C power cord with the “J” tip Once connected to power source press and hold the Test button until see the Led’s light up, the battery is now reset 4 CAUTIONS & IMPORTANT NOTES: Do not expose Battery to high heat (i.e. leave in car); this will reduce life cycles and/or damage Battery. Keep in dry environment; electronic components will corrode with exposure to moisture. For longer life, store the Battery at 80% charge, at a temperature of 50-75F, discharge & recharge every 90 days. Do not attempt to disassemble the Battery. Do not drop or crush. CPAP Batteries are compatible with most makes & models of CPAP machines; however, some are not able to receive DC power (battery power) and require the use of an (optional DC to AC) Inverter to complete the connection between the Battery and the CPAP. Check your CPAP machine’s user manual to determine if it can receive DC power. An Inverter keeps the voltage from the battery constant; because of this, some DC compatible machines may get more runtime with the (optional) Inverter, even though they are able to receive DC power. We suggest trying your connection with the Inverter, & then without the Inverter, to determine which provides the best run-time (for DC compatible CPAPs only). DO NOT leave Inverter plug connected to Vehicle Power Socket when Battery is fully charged OR when vehicle is not running. Doing so will drain your CPAP Battery or your car battery. It could also damage Battery and/or power socket. Manufacturers specifically DO NOT recommend the use of the Humidifier with this Battery. Although a humidifier can be used, the usage times will be significantly lower than expected. Multiple factors will affect the usage times, including but not limited to: device type, pressure settings, altitude, use of the humidifier, use of an Inverter or Converter (20% or more for each factor). Use of a CPAP with more than 12V may cause Battery’s internal circuitry to shut off to protect Battery from over-run. If the Battery stops functioning, reconnect to the Battery’s AC Charger to reset the internal circuitry. Use ONLY the included, factory approved, AC Charger; using any other charger will void your Warranty. DO NOT rely on the LED lights as an indicator of full charge (4 lights: 75% ~ 100%). Meter is only a rough estimate of charge level. Full charge is indicated by the GREEN light on the AC Charger. Charging your Battery directly from your Vehicle’s Power Socket using the DC Power Cord is NOT recommended, as it could possibly damage the vehicle's electrical system. If you wish to do this (at your own risk), follow these procedures: 1) start the vehicle so the Power Socket will stabilize to approximately 13 volts, 2) plug the Battery's DC Power Cord into the vehicle's Power Socket and, 3) plug DC Power Cord into the Battery. Reverse procedure to disconnect. Vehicle must be running during charging. OPTIONAL EQUIPMENT A. Using 2 Batteries to Power your CPAP 2 DC Power Cords (included with Battery Packs), M Connector Tip (included). Procedures: (All Brand CPAPs) 1. Insert M Tip into end of DC Power Cord 1. 2. Place the car plug end into the DC In/Out Port (B) of Battery 1 3. Place the end (with M Tip) into the DC In/Out Port (A) of Battery 2. Procedures: NON-ResMed CPAPs (Figure 6) Procedures for ResMed CPAPs (Figures 7 & 8) 4. Place the appropriate Connector Tip (4) Make sure Inverter is turned OFF (for your CPAP) on the end of Cord 2. 5. Insert car plug end of Inverter or ResMed 5. Connect DC Power Cord 2, car plug Converter into the DC In/Out Port (B) of Battery 2 end, into DC In/Out Port (B) of Battery 2. 5a. Plug wall plug into Inverter 6. Connect Tipped end to CPAP. 5b. Turn inverter ON. 7. Turn on your CPAP. (6) Or if using Converter, plug into ResMed CPAP. 7. Turn on your CPAP. Figure 6 Figure 7 5 Figure 8 B. Charging the Battery using Solar Panel (Optional Equipment) 1. 2. 3. Included with the Solar Panel: Solar Panel, & Charge Controller with Cable Fully charge Battery* before leaving “the Grid”, using the method outlined in Procedure C, on page 1. Connect the barrel connector from Charge Controller to DC In/Out Port (A) on Battery. Connect the other end to Solar Panel as shown (Figure 9), with the Authorized SunGuard Charge Controller Cable. Keep Battery and Solar Panel connected (charging) whenever possible, as it will take a up to 10 hours of direct sun light to fully charge a discharged Battery. Figure 9 8/21/2013