1
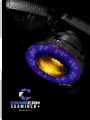
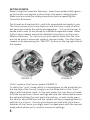
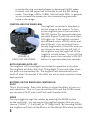
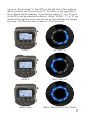
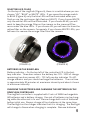
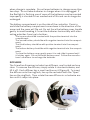
EXAMINER+
Manual V.1
Contents:
Canon Powershot G15 Camera Kit
Includes:
Battery (in camera), battery charger, neck strap, lens adapter cover, CD and manual
USB data cable, 6 ft.
8GB SDHC memory card (in camera)
Ringflash with 32 blue and 16 white LEDs
4 NiMH rechargeable batteries and charger
4 spare NiMH rechargeable batteries and case
Narrow bandpass filter (orange) and filter case
Camera to RingFlash Adapter (attached to camera)
Clear diffuser ring (attached to Ringflash)
Frosted diffuser ring
2 pair orange nylon rimmed goggles (fit over glasses)
1 pair orange all over goggles
CrimeCam Examiner Examiner manual
Case
SAFETY PRECAUTIONS
Equipped with various LEDs, the CrimeCam Examiner is a powerful tool that
can be used for both forensic and scientific applications. However, before
using the CrimeCam, one should be familiar with basic safety issues, including those regarding alternate light sources (ALS).
1. Always wear the provided safety glasses. Think of the LEDs on the
CrimeCam Examiner as ALS, and make sure when operating the Crime
Cam, everybody in the vicinity wears appropriate eye protection. The kit
includes three pairs of safety glasses. If there are more people in the
area, you will need additional safety glasses.
2. Never point the ringflash into a person’s eyes or flash near the eyes.
3. Minimize the amount of time you expose anyone to the CrimeCam
Examiner LEDs. As with all high intensity lights, longterm exposure may
be hazardous. Do not turn on the ringflash until you are ready to take the
picture, and turn it off when you are done. This will also extend your
battery life.
4. Do not attempt to remove or disassemble the ringflash, LADC-58L or
ringflash adapters from the camera. The ringflash was designed for this
camera only, and you risk damaging the threads.
5. Do not use the CrimeCam Examiner in a wet environment, neither the
camera nor the ringflash is waterproof. Store the CrimeCam Examiner in a
dry, cool environment and avoid exposing it to direct sunlight.
6. Remove batteries from the ringflash and camera if not used for more
than two weeks to prevent battery leakage.
7. When replacing ringflash batteries, replace all four at once. Do not mix
old ones with new ones.
8. Do not use any chemicals on the CrimeCam Examiner. To clean the
camera, filter or ringflash use a soft cloth.
2
EXAMINER
TABLE OF CONTENTS
Getting Started
4
Controlling the ringflash
6
mode button options
7
light button options
8
selecting led color
9
diffusers
10
general tips
11
3
GETTING STARTED
When using the CrimeCam Examiner , wear the provided safety glasses and make sure anyone in the vicinity also wears safety glasses.
Make sure you read the safety precautions before operating the
CrimeCam Examiner.
The CrimeCam Examiner kit is sold fully assembled and ready to use.
The Canon camera has many features and functions, many of which
will never be used by the casual photographer. It is up to the user to
decide which ones to use based on individual experience level. Refer
to the Canon camera manual for detailed instructions on the many
different features. To start out, you just need to know that the camera can be used in automatic mode or manual mode. Turn the Canon
camera on by depressing the “ON/OFF” button on the top right side of
the camera.
(FIGURE 1)
(FIGURE 2)
“Auto” mode on the Canon camera (FIGURE 1)
To select the “auto” mode, which is colored green on the mode dial (on
the top side of the Canon), simply turn the mode dial so that “auto”
aligns with the white mark. In the auto mode, the user does not need
to make any decisions about settings because the camera determines
the optimal settings for each particular picture. In auto mode, press
the shutter about halfway and the camera will focus, beeping twice to
indicate it is in focus. Once you familiarize yourself with the various
features of the Canon, you might want to experiment with the manual
mode which allows you to control numerous settings.
4
Manual mode “M” on the Canon camera (FIGURE 2)
(See Canon manual for complete instructions)
To select the manual mode which is marked “M”, simply turn the mode
dial so that the “M” lines up with the white mark on the left. Manual
mode allows the user to choose exposure level, aperture value, ISO and
shutter speed. These are settings that you can use to maximize the
quality of your pictures. If you have no prior experience with manual
settings, some experimentation will be needed to get familiar with
the effects of the different settings. When in manual mode, pressing
the shutter halfway will produce a number on the bottom right of the
LCD. This number can be positive, negative or zero. Zero means that
your picture is correctly exposed (i.e. has the right amount of light), a
positive number means it is overexposed (i.e. too bright), and a negative number means the scene is underexposed (not enough light). You
can then adjust the settings if you wish. In some cases, a “correctly”
exposed scene may not result in the best picture of the evidence or
whatever you are trying to photograph.
Shutter speed – Use the front dial (on front of the Canon) to
adjust the shutter speed. You can choose values from 15 to
1/4000 (which means 15 seconds to 1/4000 of a second). The
higher the number, the longer the shutter will stay open and the
more light you allow into the camera. Therefore, a setting of 15
would maximize the shutter open time. Start off with a setting
of 1/60 (meaning 1/60 of a second).
Aperture (F-stop) – To the right of the Canon LCD is a dial that
says ISO on top. Turn it clockwise to increase the F-stop, and
counterclockwise to decrease the F-stop. The values range from
F1.8 to F8.0. Start off with something like F2.5. The lower the
F-stop, the more light is let in.
Exposure compensation dial – (on the top side of the Canon, left
of the ON/OFF button) Use this dial to adjust image brightness.
By turning this dial, you can adjust the exposure from -3 to +3 in
increments of 1/3. Start off with this dial set to 0.
ISO – Choose the ISO speed with the dial to the right of the
Canon LCD. First click the upper half of the dial to select the ISO
setting mode, next rotate the ring clockwise to increase the ISO
5
or rotate the ring counterclockwise to decrease the ISO, when
finished, click the upper half of the dial to exit the ISO setting
mode. The range is 80 to 12,800. Start off with 3200. In general,
as you increase the speed, you also increase the graininess/
noise in the image.
Controlling the Ringflash
The ringflash controller is attached to
the hot shoe on the camera. To turn
on the ringflash, press the controller’s
ON/OFF button (for approximately two
seconds) (Figure 3) until the controller’s
LCD lights up. The ringflash contains
two different colors of LEDs, white and
blue (470nm). You can control the intensity (brightness) of the LEDs and you
can choose to use only the left half of
the ringflash, only the right half of the
ringflash or both halves. To turn off the
(FIGURE 3)
ringflash, press the controller’s ON/OFF
HOLD FOR 2 SECONDS
button for approximately two seconds.
Auto-Dim and Auto-Off
The ringflash LCD is backlight illuminated for operation in the dark.
The ringflash will Auto-Dim the LCD backlight 15 seconds after a button push to save battery life. The ringflash will automatically turn
itself off after 15 minutes, if the LEDs are not on and no buttons have
been pushed.
Buttons on the ringflash controller
PILOT
This is a test mode. Press this button to show the effect of your current selections. That is, if you chose blue LEDs and the FLASH mode,
you can press PILOT and it will flash with the blue LEDs.
MODE
You can toggle through the modes by pressing the MODE button
on the controller. You will see on the ringflash display that you can
choose “FLASH”, “L” (Left Half), or “R” (Right Half). By choosing FLASH,
the ringflash will flash all the Blue or all the White LEDs when you take
6
a picture. By choosing “L”, the LEDs on the left half of the ringflash
will be selected, and if you choose “R”, the LEDs on the right half of
the ringflash will be selected. If you choose neither “L” nor “R”, then
all the LEDs will be selected by default. When “FLASH”, “L” or “R” are
selected the ringflash will automatically be controlled by the camera
hot shoe. The flash duration is about 1/10 of a second.
MODE L
LEFT HALF LIT
MODE R
RIGHT HALF LIT
MODE FLASH
RING FLASHES AS PHOTO IS TAKEN
7
LIGHT
If you press the LIGHT button on the controller, for about 1 second, the
LEDs will remain continuously on (i.e. whichever ones you have selected – blue or white), rather than flashing. This is useful when you are
trying to surveil for evidence or finding the best angle for your picture.
When using an alternate light source, the angle is extremely important and different angles will yield different results. If you press the
LIGHT button again (for about 1 second), it will go back to FLASH mode,
meaning the lights you have selected will flash when you actually take
the picture. NOTE: When you are in continuous on mode (LIGHT), you
will use up your battery much faster than in FLASH mode.
LIGHT
FULL RING STAY ON CONTINUOUSLY
Intensity
The bars on the left side of the LCD indicate the intensity of the LEDs. One bar
indicates the least intensity, whereas
seven bars means maximum intensity.
By pressing the left and right arrows on
the controller, you can toggle between
the seven different intensities.
8
Selecting LED color
On the top of the ringflash (Figure 4), there is a switch where you can
choose “UV”, “BLUE” or WHITE” LEDs. If you move the orange switch
to BLUE (Figure 5), only the blue LEDs will be illuminated when you
flash or use the continuous light feature (LIGHT). If you choose WHITE,
only the white LEDs will be illuminated. If you choose BLUE, you will
want to keep the orange filter on the camera so the scene will fluoresce under the blue LEDs. If you choose UV, you will want to have the
yellow filter on the camera. Conversely, if you choose WHITE LEDs, you
will want to remove the orange filter from the camera.
(FIGURE 4)
(FIGURE 5)
Batteries in the Ringflash
Battery indicator – On the top left of the controller LCD is the battery indicator. Three bars means the battery has 70% -100% of charge
remaining, two bars means 40% - 70% left, one bar indicates 10-40%
charge remains and you should recharge the batteries. The run time
is approximately 90 minutes at maximum intensity and about 4 hours
at minimum intensify.
Charging the batteries and changing the batteries in the
ringflash controller
The ringflash controller is supplied with 2 sets of NiMH rechargeable
AA batteries and a battery charger. One set of batteries can be charging while the other set is in use. Please charge both sets of batteries
before initial use. Always charge all four batteries at the same time.
The Red light on the charger indicates that it is charging. The Red light
will change to Green when charging is complete. Remove batteries
9
when charge is complete. Do not leave batteries in charger more than
two days. Do not leave batteries in charger when it is unplugged. If
the Red light is flashing, one of more of the batteries may be inserted
improperly, is shorted or has reached end of life and can no longer be
recharged.
The battery compartment is on the side of the controller. Press in
and slide the battery compartment cover down in the direction of the
arrow and the cover will flip out. Do not force the battery cover, handle
gently to avoid breaking it. Insert the batteries horizontally with alternating polarities from top to bottom:
The top one should be inserted with the positive terminal into the
compartment.
The second battery should be with negative terminal into the compartment.
The third battery should be with positive terminal into the compartment.
The bottom battery should be with negative terminal into the compartment.
To close the battery cover, gently press it in and slide it upward until
it latches again. Do not force the battery cover! Follow the manufacturer’s directions to recharge the batteries.
DIFFUSERS
The CrimeCam Examiner includes two diffusers, one frosted and one
clear. To remove the diffuser, simply rotate it counterclockwise, and
lift it off. Each diffuser has a small red line on it (Figure 6). To insert
the diffuser onto the ringflash, line up the red mark with the “Open”
line on the ringflash. Then rotate the new diffuser in a clockwise motion until it snaps into place.
10
FIGURE 6
FIGURE 7
GENERAL TIPS
The blue LEDs are 470nm, so the BLUE setting should be selected
whenever you are trying to find or photograph bodily fluids such as
urine, semen, saliva, blood , etc. Always use the orange filter when you
are using the blue LEDs. Also, keep in mind that when photographing a fluorescing object, the angle of incidence is very important. Try
holding the camera at different angles and you will find that some
angles produce a much better result than others. The ambient light
will also affect this. For best results, the CrimeCam Examiner should
be used with the room lights dimmed. Room light off is even better.
A very dim nightlight will be handy. It will take some experimentation
to determine what the ideal lighting conditions are for the scene or
evidence you are photographing.
11
P A R T
E L I T E
O F
T H E
S E R I E S
ARROWHEAD FORENSICS
11030 Strang Line Road | Lenexa, Kansas 66215
PHONE
913.894.8388
FAX
913.894.8399
www.arrowheadforensics.com


![TTF-1 [SPT24] - Zytomed Systems](http://vs1.manualzilla.com/store/data/005793963_1-173a06c06d5648223f763723a0e98383-150x150.png)