1
OpendTect Application Management
Documentation version 4.6
Bert Bril
Copyright © 2002-2013 by dGB Beheer B.V.
All rights reserved. No part of this publication may be reproduced and/or published
by print, photo print, microfilm or any other means without the written consent of
dGB Beheer B.V. Under the terms and conditions of either of the license holders
are permitted to make hardcopies for internal use: GNU GPL Commercial
agreement Academic agreement
Table of Contents
1. Data storage
1.1. Data management
1.2. DTECT_DATA: the data access point
2. Installation
2.1. Installation Manager
2.1.1. Package manager
2.1.1.1. Utilities menu
2.1.1.1.1. Export download list
2.1.1.1.2. Rollback
2.1.1.1.3. Show log file
2.1.2. Offline installation
2.1.2.1. Package Verification
2.2. Auto-update policy
2.3. Connection Settings
3. User environment
3.1. General
3.2. Finding OpendTect
3.3. Project sharing
3.4. Madagascar processing
3.5. The GMT link
4. Application
4.1. Organization
4.2. Content
4.2.1. Installation scripts and INSTALL.txt
4.2.2. Licensing
4.2.2.1. Windows
4.2.2.1.1. Installation using a license file
4.2.2.1.2. Installation using a license server
4.2.2.2. Unix
4.2.2.3. FlexLM host IDs
OpendTect Application Management Documentation version 4.6
4.2.2.4. Vendor Daemons
4.2.3. [UNIX] User startup scripts
4.2.4. bin: Executables
4.2.4.1. Program scripts
4.2.4.2. Platform specific (lux32, lux64, mac, win32, win64) subdirectories
4.2.5. Program data
4.2.5.1. Location of Program data files
4.2.5.2. Batch Processing Hosts (BatchHosts)
4.2.5.3. Default Color tables (ColTabs)
4.2.5.4. Default user settings (odSettings)
4.2.5.5. Default available batch programs (BatchPrograms)
4.2.5.6. Default mouse button bindings (MouseControls)
4.2.5.7. Default Attribute Sets (Attribs)
4.2.5.8. The Initial survey (BasicSurvey)
4.2.5.9. OpendTect documentation (doc)
5. Running OpendTect
5.1. First Start-Up
5.2. General
5.3. OpenGL
5.4. [UNIX] OpenWorks, GeoFrame, and Petrel
5.5. Remote Batch Processing
5.5.1. Setting up BatchHosts file
5.5.2. Multi-Machine Batch Processing on Windows
5.5.2.1. Configuring BatchHosts file on Windows
5.5.2.2. Mapping Survey folder
5.5.2.3. Start the daemon on remote machines
5.5.3. Multi-Machine Batch Processing on Linux
5.5.3.1. Configuring BatchHosts file on Linux
5.5.4. Start Processing
5.6. [UNIX] The environment
5.7. Madagascar processing
2
OpendTect Application Management Documentation version 4.6
Chapter 1. Data storage
Table of Contents
1.1. Data management
1.2. DTECT_DATA: the data access point
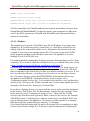
1.1. Data management
OpendTect was not designed for extensive data management; Although it may be
used for this purpose, we realize that in many cases OpendTect maintains projectstorage for data further maintained in company data stores like OpenWorks or
GeoFrame.
Users can choose to put projects on any storage area they like. In addition, large
data objects like seismic cubes can be relocated to other directories using for
example the 'Manage-Seismics' dialog. This relocation is possible because selection
of cubes is not done on basis of file name. Rather, the user specifies a name for
each cube, and the system translates this automatically into a default file name.
Later, location and file name may be changed, whilst retaining the same object ID
and name.
Seismic cubes can have a class, like Imported, Steering, and Attribute cubes. This
difference is maintained in the Object Manager, but is not apparent on the
Operating System level. In the 'Object Management File' (Seismics/.omf) the type
can be seen as in:
#Type : Steering
Currently all Seismic cubes are stored in the 'CBVS' file format, which is an
platform-specific binary format. Although the storage is platform-dependent, all
CBVS files can be read by OpendTect, fully transparently across platform
boundaries. CBVS cubes can be stored in multiple files, where the first file usually
contains most of the header info. Subsequent files belonging to the same cube can
be recognised by the ^01 , ^02 etc. in the filename. For 2D seismics, this system is
also used, now for the different lines in a line set.
3
OpendTect Application Management Documentation version 4.6
OpendTect projects can be copied on the Operating System level, at the
$DTECT_DATA level. Therefore, a command like:
cp -a $DTECT_DATA/Name1 $DTECT_DATA/Name2
will result in a fully functional new project in directory Name2 immediately. Note
that the user recognizes a survey by the directory name.
1.2. DTECT_DATA: the data access point
Installation of OpendTect usually means making available a base directory from
which the project data can be reached. The location of this directory can be set in
the user's environment as DTECT_DATA, although, especially on Windows, this will
usually be done 'behind the scenes' through a user setting ('Default DATA
directory'). Anyway, the DTECT_DATA directory must be:
•
•
reachable from every machine that needs to access the data
accessible for the users for read/write
When users create a new project (known as 'Survey' in OpendTect), they can
choose to locate the project directory on another disk than the
$DTECT_DATA directory. In that case, OpendTect will locate the directory on the
specified location and put a link in the $DTECT_DATA directory. Therefore, this
directory does not necessarily have to have a lot of disk storage available.
The directory structure is as follows:
Table 2-1. Directory structure
$DTECT_DATA
/
.omf
(user
defined name)
project_dir/
4
OpendTect Application Management Documentation version 4.6
.omf
.survey
.defs
2DGeom/
Coordinates for 2D seismic
lines
Attribs/
Attribute sets
Features/
Point-related data (Crossplot, NN training)
GMT/
Data related to the General
Mapping Tool
Locations/
Pick sets, Polygons
Madagascar/
Data related to the
Madagascar Tool
Models/
Modeling descriptions
Misc/
a.o. Sessions
NLAs/
Non-Linear Analysis models
5
OpendTect Application Management Documentation version 4.6
(usually Neural networks)
Proc/
Processing files
Seismics/
Seismic data (Imported,
attribute, ...), Wavelets
Surfaces/
Horizons, Faults
WellInfo/
Well data
6
OpendTect Application Management Documentation version 4.6
Chapter 2. Installation
Table of Contents
2.1. Installation Manager
2.2. Auto-update policy
2.3. Connection Settings
2.1. Installation Manager
7
OpendTect Application Management Documentation version 4.6
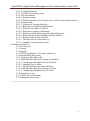
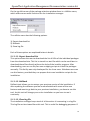
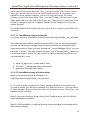
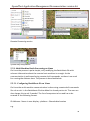
The installation manager is a wizard to install/upgrade the existing OpendTect
(Current / Previous) releases. The release type field is used to select the release
that is needed to be installed/upgraded. In the new installer, you will have the
choice as seen below:
The information following in this section deals with online installation or upgrade.
For creating offline installation packages, please see Section 2.1.2. Offline
Installation
8
OpendTect Application Management Documentation version 4.6
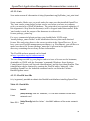
The figure above suggests to select the package type of OpendTect. To read more
about OpendTect packages type, please refer to our web-page of licensing types
(http://www.opendtect.org/index.php/download.html).
9
OpendTect Application Management Documentation version 4.6
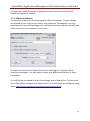
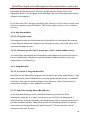
2.1.1. Package manager
The last window of the wizard is the OpendTect Package Manager (see above
figure). Multiple items can be selected from the list by checking-in or -out.
Optionally, the relevant package combination could also be selected from the top
list box.
The installation manager will automatically recognize the previously installed
version at the selected path and will prompt it in the Installed version field.
To read more about a particular item in the list, select the item by clicking on it
and read the description on to the right panel.
2.1.1.1. Utilities menu
10
OpendTect Application Management Documentation version 4.6
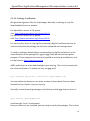
On the top left corner of the package selection window there is a Utilities menu,
which offers some useful functions for the installation manager:
The utilities menu has the following options.
1) Export download list
2) Rollback
3) Show log file.
Each of these options are explained below in details.
2.1.1.1.1. Export download list
This option allows the user to download the list of URLs of the individual packages
from the download site. This list is stored in a text file which can be used later to
download these files directly without the help of the installer program. After
downloading, user can run his/her own unzipping scripts to install the packages
manually. This facility was only developed for the Linux users. Windows users can
use this feature, provided they can prepare their own installation scripts for the
installation.
2.1.1.1.2. Rollback
Rollback tool allows you to restore your previous version of the installation. If
after updating the software you feel uncomfortable with some of the new
features and want to go back to your previous installation, you have to use this
tool. As this tool will change your entire installation so you have to use it
cautiously.
2.1.1.1.3. Show log file
The installation manager keeps track of all the action it is executing in a log file.
This log file can be viewed from this tool. This is useful for debugging purposes. If
11
OpendTect Application Management Documentation version 4.6
you face any trouble during the installation process you can send this file to
OpendTect support if needed.
2.1.2. Offline installation
You may also choose to create packages for offline installation. These packages
are created in such a way as to function cross-platform. For example, you may
download the Linux 64bit package onto a Windows machine and then transfer and
install it onto the Linux system or vice-versa.
You will need to select the OpendTect version and toggle to 'Prepare offline
installation packages'. You may either choose your download directory or leave
the default.
You will first be prompted to select the package type of OpendTect. To read more
about OpendTect packages type, please refer to our web-page describing licensing
types (http://www.opendtect.org/index.php/download.html):
12
OpendTect Application Management Documentation version 4.6
On completion of the download, you will be reminded of the location in a pop-up
window and informed of how to launch the installation package:
Windows offline pop-up info
Linux offline pop-up info
Please note: The 'Platform' option refers to the intended installation platform,
and not the platform of the machine currently being used to download the
packages (if different).
(For information on how to verify packages installed offline, please look
here: Offline Package Verification Procedure)
13
OpendTect Application Management Documentation version 4.6
2.1.2.1. Package Verification
We generate signature files for all packages. Normally, a package is a zip file
downloadable from our website.
For OpendTect version 4.4.0, please
visit: http://www.opendtect.org/relman/4.4.0/
For OpendTect version 4.6.0, please
visit: http://www.opendtect.org/relman/4.6.0/
For each zip-file, there is a zip.sig file containing a digital certificate that can be
used to verify that the package has not been tampered with during transit.
To verify a package, download the corresponding zip.sig file and place it in the
same directory as the package file. gpg (or pgp) must be used (an encryption
program). These programs are normally installed in most linux installations, and
can be found at http://www.gnupg.org.
dGB's public key has to be downloaded to your keyring. This is only necessary for
the initial verification. To obtain the key, use gpg itself:
gpg --keyserver pgp.mit.edu --search-keys "[email protected]"
You may chose any keyserver you want, as they all share data. Once you have
located our key, import it to your keyring.
Secondly, to avoid warning messages, edit the key and tell gpg that you trust it:
gpg --edit-key [email protected]
and then type "trust" as command.
Once you have our key installed, you are ready to verify the packages. This is done
14
OpendTect Application Management Documentation version 4.6
by gpg:
#bash-> gpg --verify demosurvey.zip.sig
This will check that demosurvey.zip has not changed since the file
demosurvey.zip.sig was generated in our office. A positive output may look like
this:
gpg: Signature made Thu Oct 4 08:46:01 2012 CEST using DSA key ID A02F407E
gpg: checking the trustdb
gpg: 3 marginal(s) needed, 1 complete(s) needed, PGP trust model
gpg: depth: 0 valid:
1 signed:
0 trust: 0-, 0q, 0n, 0m, 0f, 1u
gpg: next trustdb check due at 2022-03-13
gpg: Good signature from "dGB Earth Sciences B. V. (Software package
signing key) "
2.2. Auto-update policy
The auto-update policy can be defined and changed by a user. By default the
option is set to Inform when the updates are available. This can be changed
to Never check for updates if you prefer.
15
OpendTect Application Management Documentation version 4.6
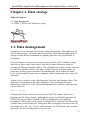
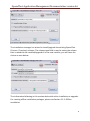
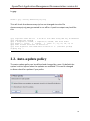
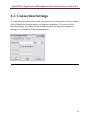
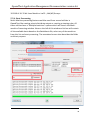
2.3. Connection Settings
To enter the proxy information, the right proxy server information must be added
in the Connection Settings before running the installation. This is done in the
following dialog. This dialog is also available directly through the Installation
Manager on clicking the Proxy Settings button.
16
OpendTect Application Management Documentation version 4.6
Chapter 3. User environment
Table of Contents
3.1. General
3.2. Finding OpendTect
3.3. Project sharing
3.4. Madagascar processing
3.5. The GMT link
3.1. General
Users need to be aware of only a few things to be able to use OpendTect. Things
become slightly more complicated when multiple users carry out shared projects.
The specific user settings and current survey are stored in the '.od' hidden
directory in the user's home directory. The file names are settings and survey,
or settings.$DTECT_USER and survey.$DTECT_USER if the DTECT_USER environment
variable is set (see project sharing).
17
OpendTect Application Management Documentation version 4.6
3.2. Finding OpendTect
For installations not on windows, users will have to be able to find OpendTect.
There is no procedure initiated by the OpendTect installation to put the startup
scripts in the user's path. Whether you want to put start_dtect in their path at
login, or set an alias for it, create a desktop link - or even other solutions, is simply
not something we take care of. Note that this is one of the reasons why
OpendTect need not be (and should preferably not be) installed by root.
3.3. Project sharing
OpendTect projects can be shared by many users. The only real obstacle in practice
would be the access permissions. There are two main strategies to get this right:
•
•
Make sure the users belong to a common (work-)group, and (on UNIX) set
their umask so that files are created with group write permission by default.
Create (a) special user id(s) for OpendTect projects. The different users can
then work under the same Operating system user ID. For this strategy to
work, an additional environment variable needs to be set: DTECT_USER.
OpendTect will automatically use other settings and allow different projects
for the same userID depending on the setting of $DTECT_USER.
The latter strategy has been used at dGB for years. At login under our 'cases' user,
the user is prompted to type his/her name, which is then used to set
the DTECT_USER environment variable.
18
OpendTect Application Management Documentation version 4.6
3.4. Madagascar processing
To enable Madagascar processing, the variable RSFROOT should be set in the
user's environment, pointing to an existing Madagascar installation.
To get the full benefit of the plugin, you should also make sure there is text
documentation in the Madagascar installation. This should be present in
$RSFROOT/doc/txt. If there is no directory $RSFROOT/doc/txt, or if it's empty, you
can run:
$RSFROOT/bin/sfdoc -t $RSFROOT/doc/txt
3.5. The GMT link
To activate the GMT link, GMT needs to be installed. The download site is
http://gmt.soest.hawaii.edu.
After installation, make sure the GMT binary directory ('bin') is in the user's PATH.
For many purposes, the user will want a PostScript viewer to be installed, too.
Make sure you have a good association for postscript files in place.
19
OpendTect Application Management Documentation version 4.6
Chapter 4. Application
Table of Contents
4.1. Organization
4.2. Content
4.1. Organization
In the OpendTect startup and initialisation scripts, the DTECT_APPL environment
variable represents the root of the installation.
OpendTect is installed by the OpendTect Installation Manager. You can install and
manage multiple release types (Stable, Development). The base directory is a
directory you choose yoursef, say /apps/OpendTect, or C:Program
FilesOpendTect. Within that directory you will have 'active' and inactive
installations. The active installation trees simply have the version as directory
name, for example '4.4.0'. Those directories contain an entire OpendTect
installation. The combination of the base directory and the version directory will
be set in the various scripts as $DTECT_APPL. In the above examples DTECT_APPL
would be /apps/OpendTect/4.4.0 or C:\Program Files\OpendTect\4.4.0.
An OpendTect application tree is organized, on both Windows and UNIX,
schematically like:
Table 1-1. Organization
$DTECT_APP
20
L
OpendTect Application Management Documentation version 4.6
relinfo/ (information
for the installation
manager)
Installation scripts and
INSTALL.txt
User startup scripts
lib/
bin/
Program scripts
lux32/, lux64/,
win32/, win64/,
and/or mac/
Executable
s
so/
Shared
libraries
plugins/
lux32/, lux64/,
win32/, win64/,
and/or mac/
libs/
data/
Default color tables
Default mouse button
bindings
Default user settings
21
OpendTect Application Management Documentation version 4.6
Default available
batch programs
icons.Default
BatchHosts (created
by sysadm if any)
Attribs/
BasicSurvey/
doc/
User
SysAdm
Programmer
ReleaseInfo
22
OpendTect Application Management Documentation version 4.6
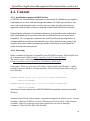
4.2. Content
4.2.1. Installation scripts and INSTALL.txt
In INSTALL.txt, the installation procedure is described. On Windows, you need to
download one or more self-extracting executables. On UNIX-type systems, you
may have to download a script: install.od or inst_pkgs.od. All scripts take no
arguments and should be easy to complete. Please read INSTALL.txt carefully.
Regarding the selection of installation directory, you should choose a directory
that is accessible on all machines that will run OpendTect (or one of its batch
programs). This is especially important for multi-machine processing (which is
indispensable for surveys of considerable size). Every machine that needs to be
used for this multi-machine processing needs to be able to access OpendTect
under the same directory name.
4.2.2. Licensing
Many commercial plugins for OpendTect use FlexLM licensing. The FlexLM enduser manual can be found at http://opendtect.org/lic/endusermanual.
The main source of information from opendtect.org
is http://opendtect.org/lic/doc/flexlm_installation_guide.html.
Some hints. There are two types of licenses: 'node-locked' and 'floating'. A nodelocked license is locked to a certain machine. Node-locked licenses have only got
lines like this:
FEATURE dTectNN lm_dgb 4.400 1-jan-2013 uncounted C42442D673EF
HOSTID=000039eb8bda
FEATURE dTectDS lm_dgb 4.400 1-jan-2013 uncounted 766915A97FB6
HOSTID=000039eb8bda
Also demo licenses (these have HOSTID=DEMO but look the same) are handled
like this.
Another kind of license files require a machine designated as license server. On this
machine, a daemon (UNIX) or service (Windows) will keep track of the licenses
available. These are typically used when OpendTect can run on multiple
computers. These license files look like this:
23
OpendTect Application Management Documentation version 4.6
SERVER ourserv 000c6e00bbb8
DAEMON lm_dgb full_path_to/lm_dgb
FEATURE dTectDS lm_dgb 4.400 1-jan-2013 4 B47BBC613640 DUP_GROUP=D
FEATURE dTectNN lm_dgb 4.400 1-jan-2013 4 3FC4443E7619 DUP_GROUP=D
The file is read like this: FlexLM needs to start a server on machine 'ourserv' with
FlexLM host ID 000c6e00bbb8. To start this server, use a program lm_dgb(.exe).
Until 1-Jan-2013 you can use 'dTectDS' and 'dTectNN' with 4 concurrent users,
version 4.4 and lower.
4.2.2.1. Windows
The normal way to specify a FlexLM license file on Windows is to simply start
OpendTect. If you did not specify a license file yet, OpendTect will ask for one.
Simply follow the instructions on the screen. Sometimes, this doesn't work (for
example if you want to use another license file). Then you can use the FlexLM
utility program available in the Windows start menu for OpendTect: 'License
Manager Tools' (LMTOOLS.exe).
Everything should be manageable from this program, although things can be a little
confusing. If you need to install on a Windows server, you should really take a look
athttp://opendtect.org/lic/doc/flexlm_installation_guide.html, in
particular http://opendtect.org/lic/doc/flexlm_inst_win.html. The main choice you
have is whether you need to install using services or with a license file. Which of
the two depends on the license file you have got and the machine you are on. If you
have a node-locked license, you always have to choose to set up using a license
file. Also demo licenses (where HOSTID=DEMO) and machines that are not
designated to be SERVER of a floating license. In the start tab, select
'Configuration using License file'. You can then select the file to use, but that often
doesn't work. Then go to the 'Utilities' tab and enter Vendor Name dgbld and select
the path to the license file. Then press 'Override Path'.
If you have a floating license, you must start the service on the machine mentioned
in the header of the license file. On that machine, start the License manager Tools.
In the start tab, select 'Configuration using services'. Then click the 'Config
Services' tab (which has now appeared). Enter a name for the service, for example
'OD-dGB lic man'. Confusing here is that the combo box is an editable field. You
have to find the path to the lmgrd.exe. This may be vendor-specific, for example,
dGB has all license-related files in a directory: C:\Program
Files\OpendTect\bin\winlm.dgb The path to the license file is something you have
chosen yourself (for example in C:\Licenses), and the normally the debug log file
24
OpendTect Application Management Documentation version 4.6
can be placed in the same directory. Now, you can press the 'Save service' button.
Then, you can start the service in the Start/Stop/Reread tab. If you want to run
OpendTect from another computer, you need to copy the license file to that
computer, and use the same utility. Now, go to the 'Utilities' tab and enter Vendor
Name dgbld and select the path to the license file. Then press 'Override Path'. That
should be enough to make the computer find the license manager service on the
remote machine.
For simple node-locked and demo licenses, there is also a menu in OpendTect, for
end-users.
4.2.2.1.1. Installation using a license file
Your main source of information is http://opendtect.org/lic/flexlm_inst_win.html.
Very often you just need to install a new license file. Then, on the local machine,
you can use the license manager tools to specify/override the license file OD is
supposed to look at. Once you have fired up the "License Manager Tools", you can
see a tab "Utilities". That one contains a button "List All Vendor Paths". There you
can see that there is a path "lm_dgb", which is the one used by OpendTect. You
can override this, if you
1. enter lm_dgb in the "vendor name" field
2. click the "..." button and select a license file
3. press the "Override Path" button
4.2.2.1.2. Installation using a license server
Again: your primary source of information is
http://opendtect.org/lic/flexlm_inst_win.html.
If you want to share a common site license amongst multiple users and/or hosts,
you can install the Flexlm license manager as a Windows service -- the equivalent
of Unix daemons. However, this does not work for demo licenses. These have to be
installed on the local host.
Note 1: One not so obvious thing is that in the 'Config services' tab, the 'Service
name' combobox is editable.
Note 2: If OD complains, it might be that the console window contains some info
about what is wrong.
25
OpendTect Application Management Documentation version 4.6
4.2.2.2. Unix
Your main source of information is http://opendtect.org/lic/flexlm_inst_unix.html.
Some remarks. Make sure you work under the same user that installed OpendTect.
The 'start.vendor_name.lmgrd' scripts can be used when you have no company
policy on start/stop of FlexLM daemons. The script takes one optional argument; if
this argument is 'stop' then the daemon(s) will be stopped rather than started. If the
'start' mode is used, the output of the daemons is redirected to
license.package_name.log.
For every commercial plugin package you should find a UNIX script
'install.package_name.license' in the installation directory that reads obtained
license files and writes those to the correct position in the OpendTect tree. If you
have your own FlexLM management procedures (e.g. FlexAdmin), you still have to
make sure that a file 'license.package_name.dat' is present in the application
directory containing the necessary license information.
The FlexLM end-user manual can be found
at http://opendtect.org/lic/endusermanual.
The two things needed by your plugin vendor to issue a license are the hostname,
obtainable on UNIX with the 'hostname' command (Windows: Start-SettingsControl panel-System, tab Network identification), and the host identification. That
identification can be obtained by running the FlexLM utility 'lmhostid'. After
installing OpendTect, the lmhostid command can be run from the UtilitiesBatchPrograms menu.
4.2.2.3. FlexLM host IDs
It is, in general, possible to obtain the FlexLM hostid before installing OpendTect:
Table 1-2. FlexLM IDs
Solaris
hostid
Linux
/sbin/ifconfig' look for 'HWAddr', i.e. the MAC address of the main
network card
Mac OS X
/sbin/ifconfig look for 'ether' - the MAC address of the main network
card
26
OpendTect Application Management Documentation version 4.6
MS
Run ipconfig /all in a DOS ('command prompt') window and look for
Windows each 'Physical address' entry, choose the main network MAC address.
For license files, additionally the host name will be required, although host names
can be changed at any time. On UNIX, this is simply the output of hostname, on
Windows the 'Host Name' from the ipconfig /all is required.
4.2.2.4. Vendor Daemons
In FLEX lm , licenses are handled by running processes. There is one process for
each vendor who has a FLEX lm -licensed product on the network. This process is
called the vendor daemon . The vendor daemon keeps track of how many licenses
are checked out, and who has them. If the vendor daemon terminates for any
reason, all users lose their licenses.
Client programs communicate with the vendor daemon through TCP/IP or UDP/IP
sockets. The client (where the application runs) and the daemon processes (the
license server) can run on separate nodes on your network. Also, the traffic
between the client and the license manager daemon is machine-independent,
allowing for heterogeneous networks. (For a more complete explanation, please
read this.)
The necessary Vendor Daemons for OpendTect can be found in the 'Vendor' subdirectory, here:
For dGB: http://www.opendtect.org/lic/Vendors/_dGB_/latest/
For ArkCLS: http://www.opendtect.org/lic/Vendors/_ArkCls_/
For SitFal: http://www.opendtect.org/lic/Vendors/_GeoInfo_/
Please select the relevant plug-in and download the package corresponding to the
architecture of the licence server.
4.2.3. [UNIX] User startup scripts
The main script the user will need to run is 'start_dtect' in the installation root.
Some power-users will also want to run the 'exec_prog' script (to start specific
command-line or batch utilities). Essentially, start_dtect takes no arguments but
arguments given will be passed to the od_main executable, which is a standard (X27
OpendTect Application Management Documentation version 4.6
)Windows and Qt application. The exec_prog script will always have a first
argument, which is the program to be executed. The rest of the arguments will be
passed to the program.
If you have the GNU debugger installed (gdb), then users will be able to send crash
reports to opendtect.org for feedback. This can be highly useful to solve problems
for users.
4.2.4. bin: Executables
4.2.4.1. Program scripts
The program scripts are called from within OpendTect or the OpendTect startup
scripts. Remote execution is always done through od_exec_rmt (UNIX only), local
execution through od_exec.
4.2.4.2. Platform specific (lux32, lux64, mac, win32, win64) subdirectories
The OpendTect executables are dynamically linked against the shared libraries in
the so/ subdirectory. Bug fixes or special-purpose updates usually consist of a
replacement in this directory.
4.2.5. Program data
4.2.5.1. Location of Program data files
Data files for the OpendTect programs are located in the 'data' subdirectory. If you
want to overrule certain defaults like a custom default empty survey, or standard
color bars, then you can make changes in this directory. Note that you have to
make these changes in every update or re-install.
4.2.5.2. Batch Processing Hosts (BatchHosts)
In the data sub directory in the installation directory you will find a file
BatchHosts_example. It is easy to see how to use this file as an example of a
BatchHosts file. If you do not place such a BatchHosts file in a location specified in
the data locations section, OpendTect will ask the Operating System for remote
host names (via the g/sethostent() type functions). This can result in a lot of
choices for the user, or none.
28
OpendTect Application Management Documentation version 4.6
See also the section on remote batch processing. Make sure remote machines
need to have a well synchronized system time.
About the 'First port' entry: the multi-machine processing processing needs a free
TCP port to do its work. It starts at a port number which is used if it's free. If not,
the program will try one higher and so forth. The starting port is by default set to
19636. If this clashes with any application (that means if that other application is
not flexible in its port allocation), overrule it.
The name of the BatchHosts file can be overridden using the environment variable
DTECT_BATCH_HOSTS_FILENAME. You can also specify a filename + full path using
the DTECT_BATCH_HOSTS_FILEPATH environment variable.
4.2.5.3. Default Color tables (ColTabs)
The ColTabs file in the data directory contains the default color tables that every
new user will get. The user can never remove these tables, but (s)he can change
the definition (only in their own environment). The format of the file is quite
simple. The only thing to explain is the concept. A color table is seen as a series of
colors (RGB, optional transparency) on a fictive measure of 0 to 1. Every color
table needs a definition of the values 0 and 1, but more colors can be defined in
between. For example, the well-known Red-white-black color scale is defined as:
2.Name:
2.Value-Color.1:
2.Value-Color.2:
2.Value-Color.3:
2.Value-Color.4:
2.Transparency.0:
2.Transparency.1:
2.Undef color:
2.Marker color:
Red-White-Black
0`255`0`0
0.25`255`200`0
0.5`255`255`255
1`0`0`0
0`0
1`0
150`200`150
0`240`0
On six lines, you see the definition of colors, format Red`Green`Blue (separated by
back-quotes). On the Value-Color lines, these are preceded by the position in the
color table, here 0, 0.25, 0.5, and 1. In the above example there is no
transparency; a simple 'full transparency in the middle' example would be:
2.Transparency.0: 0`0
2.Transparency.1: 0.5`1
29
OpendTect Application Management Documentation version 4.6
2.Transparency.2: 1`0
4.2.5.4. Default user settings (odSettings)
The default user settings are copied to the user's home directory when the user
starts OpendTect for the very first time. The file format is straightforward, for
details about what the entries mean exactly, please contact OpendTect support.
4.2.5.5. Default available batch programs (BatchPrograms)
A selection of system utilities and OpendTect batch programs will be available to
the OpendTect user through the user interface. This file defines which ones are
available, what parameters must be passed and provides info on the programs.
Also here the file format is straightforward, for details about what the entries
mean exactly, please contact OpendTect support.
4.2.5.6. Default mouse button bindings (MouseControls)
A list of standard mouse button bindings have been compiled in
the MouseControls file. The user can select one of these setups in OpendTect. If
more setups are needed, add those to this file. Even the 'new user' default can be
set. The Default: 'Default' is the OpenInventor default which is also adopted by
Landmark.
4.2.5.7. Default Attribute Sets (Attribs)
The attribute sets in this directory are available to users as initial sets. In principle,
any set created by any user can be placed in this directory to make it available for
all OpendTect users. This requires one extra step, however: addition to the Object
Management File (.omf). The .omf file needs to be edited with at text editor; an
entry similar to the existing ones should be added, but with another ID on the first
line of the entry. Alternatively, you can copy the entry as it appears in the .omf in
the user's project's Attribs subdirectory's .omf .
Plugins can put their own default attribute set in xxAttrib subdirectories.
OpendTect will scan for such directories automatically.
4.2.5.8. The Initial survey (BasicSurvey)
30
OpendTect Application Management Documentation version 4.6
This directory is copied in its entirety when a user creates a new survey (i.e. a new
project). Like all OpendTect surveys, the directory can be copied on the UNIX or
Windows level (note: make sure hidden files are copied, too!). Therefore,
companies can customize and extend initial survey contents by changing/adding
to this survey.
4.2.5.9. OpendTect documentation (doc)
The OpendTect documentation - if installed - can be reached from inside
OpendTect via the Help menu. From outside OpendTect, index.html in the
directory doc/User/base can be opened. For printing, PDF files may be available
on the opendtect.org web site.
Documentation for plugin packages may also be present in the doc/User directory.
The name of such a directory should be package_name, and a '.mnuinfo' file is
mandatory. This file contains the menu name, start url and optional a shortcut.
Open the file 'about.html' for version and contributors to the OpendTect project.
31
OpendTect Application Management Documentation version 4.6
Chapter 5. Running OpendTect
Table of Contents
5.1. First Start-Up
5.2. General
5.3. OpenGL
5.4. [UNIX] OpenWorks, GeoFrame, and Petrel
5.5. Remote Batch Processing
5.6. [UNIX] The environment
5.7. Madagascar processing
5.1. First Start-Up
There are a couple of considerations on first start-up.
The Data Access Point
This will be $DTECT_DATA
Installation of OpendTect usually means making available a base directory from
which the project data can be reached. The location of this directory can be set in
the user's environment as DTECT_DATA, although, especially on Windows, this will
usually be done 'behind the scenes' through a user setting ('Default DATA
directory').
Anyway, the DTECT_DATA directory must be:
reachable from every machine that needs to access the data
accessible for the users for read/write
(See Section 1.2 DTECT_DATA)
32
OpendTect Application Management Documentation version 4.6
Licenses
On first start-up (for example following (re-)installation), you will be prompted to
install license(s). It is vital to ensure that they are correctly installed and findable.
There are other ways to achieve this same result.
1. Soft link: Place the license in the root of the installation directory or make a link
there to where the license is located.
2. Set up an environment variable: LM_LICENSE_FILE=port@host (for multiple
entries use port@host1:port@host2:port@hostetc)
3. In Windows you see a pop-up on start up for dGB (and on usage for the ArkCLS
and SITFAL plugins) asking you to specify the license server system (this needs to
be done as Administrator to set this for all users).
In the License file you may change the host name and add a port number or
port@host to the right-hand side of the Mac address (though you may not change
the Mac address). For example:
SERVER myodtserver 00145ebc6210 3456@host
Note that this needs to be done for both the server's and the client(s) license
file(s).
Using this last option (set port@host) is very useful when circumventing Firewall
issues.
33
OpendTect Application Management Documentation version 4.6
5.2. General
There are a number of requirements to be able to run OpendTect. First of all,
OpendTect will not start without a proper OpenGL installation, which foremost
and above all means good, recent drivers. Furthermore, some minimal, reasonable
preconditions must be met (see environment). Lastly, some plugins have their
own requirements. For example, a proper SeisWorks or GeoFrame installation is
required for the ArkCls WorkStation Access plugin.
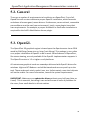
5.3. OpenGL
The OpendTect 3D graphical engine is based upon the OpenInventor clone COIN
made by SIM (http://www.sim.no, http://coin3d.org). This package in turn relies
on a proper installation of OpenGL to do its work. Some features of OpendTect,
like stereo viewing, are only available if the OpenGL implementation supports it.
The OpenGL version is 1.2 or higher on all platforms.
All mainstream graphical cards are nowadays delivered with OpenGL drivers for
windows. High end ATI Radeon- and nVidia-based cards are very well up to the
task. Those cards work nicely under Linux, too. Unfortunately, most Intel chipsets
will not be usable. For more information, consult the system requirements.
IMPORTANT: Make sure you update the drivers at least every half year (also on
Linux!). This is essential, not doing it can and will cause all sorts of problems for
the users, from small details to all-out crashes.
34
OpendTect Application Management Documentation version 4.6
5.4. [UNIX] OpenWorks, GeoFrame, and
Petrel
ARK CLS maintain a series of plugins accessing the mainstream platforms
commonly used in the industry. The ARKCLS WorkStation Access (WSA) plugin is
commonly used for import and export SeisWorks or GeoFrame data directly.
There is also a Petrel/OceanView access plugin. The WSA servers support
OpenWorks R2003 and R5000, and GeoFrame 4.0-4.4.
To use these plugins, OpendTect needs to be started from a properly prepared
environment. Essentially, OpenWorks, GeoFrame or Petrel must also be runnable
in that environment. The startup script will check for this - For OpenWorks,
the OWHOME variable is checked, for GeoFrame, GF_PATH. The full initialization
and checking sequence can be found (if the plugin is installed) in odinit.arkcls.
Starting OpendTect from a GeoFrame or OpenWorks xterm is recommended.
You will need one or more licenses for the WSA and POA connections.
5.5. Remote Batch Processing
OpendTect users need a lot of processing power. Therefore, chances are that they
want lots of processing access to other machines. The OpendTect multi-machine
batch utility provides this. It relies on remote shell execution and NFS mounting or
Windows shares to do its work.
Therefore, Unix (i.e. Linux and Mac) users should have a valid $HOME/.rhosts file
writeable by the user only (i.e. file permissions must be: -rw-r--r--). ; The Unix
systems that need to be available for processing need to have rsh or ssh enabled.
NFS or Windows network shares are needed to make the application directory and
the data directory available on all hosts that are used for processing. On Unix, in
case rsh access is not possible you can use ssh, which must then be set up with
35
OpendTect Application Management Documentation version 4.6
public key authentication without passwords.
If on Unix machines no 'BatchHosts' file is present, OpendTect calls the system
utilities of the 'hostent' (sethostent, gethostent, etc.) type to get a table of hosts
for the user to select from. How the Operating System builds the lists is
dependent on the particular system setup; most likely /etc/hosts and/or the NIS
tables are consulted. The 'hostent' functions are old and not very good up to the
task. We recommend to always create a BatchHosts file.
The program will try to use the machines that are selected when necessary. So
when a job is finished on a machine, it will see which machine from the 'used
machines' list is free (most likely the same machine) and start the next job on that
machine. Sometimes, the machine selected has problems, is down or the network
is overloaded. In any case, if the machine does not react within 5 minutes, the
program considers the machine dead. It will remove the machine from the 'used
machines' list, and allocates the job to the next machine that is selected or
becomes free. Note: the 5 minutes timeout can be overridden using the
environment variable DTECT_MM_CL_FAIL_TO, which can be used to set the
desired timeout in seconds.
This leads us to the thing that needs to be checked, on Unix-based systems. NFS
has an option to cache file attributes. This can cause NFS to report that a file is not
there when it in fact does exist. We recommend this attribute caching is turned
off, which is in fact the default on Solaris systems. On Linux, the default caching
time can be as high as 30 seconds. For mounting, we therefore recommend 'noac'
(Not available on Linux) and 'actimeo=0' as extra mount options for remote disks.
In terms of licensing, we encourage to tie any licensing to actual users working
with it. Although we have no control on plugin builders, we advocate to never
license per-cpu, per-machine and so forth. No extra licenses should be needed for
processing on remote hosts. The licensing should be per actual user and therefore
on the GUI level.
5.5.1. Setting up BatchHosts file
The BatchHosts file should actually be a text file containing the list of remote
machines and some relevant details about these machines. A BatchHosts_example
file already comes with the installation inside the OpendTect data folder, this file
36
OpendTect Application Management Documentation version 4.6
could either be renamed or its contents copied and pasted in the newly created
BatchHosts file. OpendTect will use this file to communicate to the remote hosts
and launch processes remotely on them. Follow the example file format to add
the list of remote machines and their details in the respective fields. Things are
done in a bit different way on Unix and Windows, so some of the configuration are
different on these platforms, which is mentioned in details later in the chapter.
5.5.2. Multi-Machine Batch Processing on Windows
Running Multi-Machine batch processing on Windows requires few preconfigurable steps, like adding the list and specifications of the remote hosts to
the batch hosts file, sharing the survey folder, and starting the remote_processing
service daemon on each of these remote host machines. All these steps are
clarified below.
On Windows we assume that the survey folder(DataRoot) is on a central server
and the user works from a workstation(local host) along with some other
machines connected to the network which can be used as remote hosts for
processing. The survey folder has to be shared and mapped on each of the host
machine. Then install OpendTect on all the hosts and start the daemon
service(which comes with the installation) in each of them. In case of local host
machine the daemon is not needed. Create the "BatchHosts" file on the local host
which contains information about remote host's IP-address/host names and the
mapped survey folder corresponding to each of the machines. All these sections
are explained below in details.
5.5.2.1. Configuring BatchHosts file on Windows
As mentioned earlier, the BatchHosts file has to be created and configured so that
OpendTect can communicate with the remote hosts. A BatchHosts_example file
comes with OpendTect installation and could be found in the data folder. The file
consists of a header section followed by information about the remote host
machines. The header section contains details about the remote shell, nice-level
and the port number, for Windows the port number is only used but nice-level
and remote shell are Unix specific. The structure of the remote host section is like
this.
IP-Address : Description : Platform : Survey folder.
37
OpendTect Application Management Documentation version 4.6
Each of fields are described below.
IP-Address The IP address of the machine, or the name of the machine in the
network.
Description more informative description which users see in the list of available
hosts in Multi-Machine processing window.
Platform The platform on which the local host is running, i.e "win" if the remote
host is a Windows machine.
Survey folder The full path of the survey folder along with the mapped drive. Here
';' is used in place of ':' for drives, as ':' is already used as the field separator.
Please note that the local host is automatically added to the list, so there is no
need to add the IP address of the local host here.
5.5.2.2. Mapping Survey folder
It is assumed that the survey folder is in a server which has to be shared and
mapped on all host machines to be used for multi-machine processing. So if the
survey folder is on the C drive on the server e.g. C:\Surveys then map the C drive
from this machine to other host machines by choosing an available drive letter (
like C:, D: S: etc). So the survey folder now becomes S:\Surveys or F:\Surveys on
each of the machines depending on drive letter that is used.
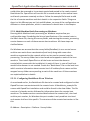
5.5.2.3. Start the daemon on remote machines
Start the daemon on every remote machine by selecting Start-menu -> programs > OpendTect-4.6.0 -> Remote Processing Service. This tool will add a notification
icon to the system tray. Once the service starts, the remote machines are ready to
be used as multi-machine processing nodes. The screen-shots below shows the
user interface of the Remote Processing Service and its notification icon in the
system tray. The service can be controlled by right-clicking on the tray icon and
selecting appropriate menu item like start, stop or exit.
38
OpendTect Application Management Documentation version 4.6
Remote Processing service
System tray notification
5.5.3. Multi-Machine Batch Processing on Linux
On Linux the process is quite simple, only modifying the BatchHosts file with
relevant information about the remote host machines is enough. As the
communication is performed using remote shell commands, so there is no need
for running the daemon here. The process is described below.
5.5.3.1. Configuring BatchHosts file on Linux
On Linux the multi-machine communication is done using remote shell commands
like rsh or ssh. In the BatchHoats file the default is already set to rsh. The user can
also change this to ssh if needed. The list of computers to be used has to be
entered in the following format.
IP Addresss : Name in user display : platform : Shared data location
e.g.
39
OpendTect Application Management Documentation version 4.6
192.168.4.10: 32 bit Linux Machine: lux32 : /dsk/d2/Surveys
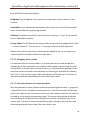
5.5.4. Start Processing
Multi-Machine processing feature could be used from several utilities in
OpendTect like creating seismic/attribute output or creating a steering cube. All
these utilities have a "Multiple machines" options which will launch the Multimachine Processing window. Now on the left of this window a list box will contain
all the available hosts based on the BatchHosts file, select any of the machines
from this list and start processing. The annotated screen-shot describes the fields
and their purpose.
40
OpendTect Application Management Documentation version 4.6
5.6. [UNIX] The environment
The environment for the programs is set in the following sequence (see
bin/init_dtect):
•
•
•
General initialisation, e.g. DTECT_APPL and possibly DTECT_DATA are
set
LD_LIBRARY_PATH and PATH are extended with one directory. In some
installations, this has been a problem because Landmark adds an incredible
amount of directories to the PATH. We think it is not unreasonable to require
the ability of adding one single directory to the executable path. Therefore,
we leave it to the system administrators to shorten the PATH to allow at least
the OpendTect binary directory to be added to the path.
The initialisation scripts for the plugin packages are automatically sourced
by init_dtect.
5.7. Madagascar processing
The Madagascar connection plugin implements a link to an existing Madagascar
installation. Thus, the installation of Madagascar is out of the scope of this
manual. Additional setup may be required, see part of the user environment.
On Windows, you can only use Madagascar in combination with Cygwin. Getting
this to work with a native Windows program like OpendTect is not always easy.
Here's how we succeeded:
•
Download the latest Cygwin installator
(http://www.cygwin.com/mirrors.html) and Madagascar sources
41
OpendTect Application Management Documentation version 4.6
•
•
•
•
•
•
•
•
•
•
•
•
•
•
•
•
•
(http://rsf.sourceforge.net/Download) in a temporary folder (C:\temp for
instance).
Extract the Madagascar sources to a folder that you rename from
"madagacar-" to "rsf".
Install Cygwin (accept the default settings) but select at least the
following packages (per section):
o Devel: gcc, libnetpbm-devel, make, mingw-runtime, subversion, swig
o Editors: vim
o Graphics: jpeg
o Interpreters: python
o Python: Numeric (numpy if available)
o X11: xorg-X11-base, libXaw(3d)-devel
Open a Cygwin session
Edit the .bashrc file to add some madagascar environment variables:
# Madagascar initialization
export RSFROOT=/usr/local/rsf
if [ -n "$PYTHONPATH" ]; then
export PYTHONPATH=${PYTHONPATH}:$RSFROOT/lib
else
export PYTHONPATH=$RSFROOT/lib
fi
export PATH=$PATH:$RSFROOT/bin
export DATAPATH=/var/tmp/
Enter the command "source .bashrc".
Copy the source to your emulated linux filesystem: "cp
/cygdrive/c/temp/rsf /usr/local".
go to this folder: "cd /usr/local/rsf"
Compile madagascar using the following successive commands:
1. "./configure". If "Checking for SCons" returns "no" the script
configure will need to be launched a second time.
2. "make"
3. "make install"
4. "make clean".
Now you can close your Cygwin terminal or test the Madagascar
installation. The testing and use of Madagascar without OpendTect will
require to start the X server ("xwin &") and set the display ("export=:0")
before opening a terminal ("xterm&").
•
In your control panel open the "System" item; Go in the "Advanced" tab,
select the "Environment Variables" option. Add a new user or system
variable of name "RSFROOT" pointing towards "C:\cygwin/usr/local/rsf" (if
cygwin was installed at its default location C:\cygwin). Accept and exit.
42
OpendTect Application Management Documentation version 4.6
This variable is setup once in the settings and does not need to be
specified after each boot.
On the next startup of OpendTect Madagascar should be available.
43