1
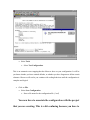
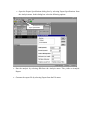
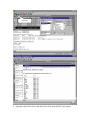
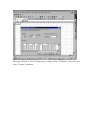
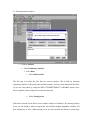
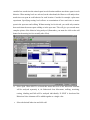
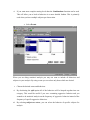
Noldus Observer
Video-Pro
Overview
J Talpos, A Heidema and RA McArthur
Neurobiology
Pharmacia & Upjohn
301 Henrietta Street
Kalamazoo, MI, 49001, USA
Why should you use these manuals, and which one is right
for you?
Members of the CNS division of Pharmacia have created two simple manuals for the
observer software system. These manuals are not intended to replace those that come with
the observer software, they are intended to act as a supplement to those that are provided.
These manuals have been created out of experience. Sometimes, the hardest part about using
a new program is figuring out the simple things like where to click. This manual walks you
through simple problems like these that you are sure to encounter. Furthermore, the observer
is a very powerful tool filled with a number of setup options. These options will greatly
affect the output of your observations. Because of this, great pains have been made to
describe the effects of certain options within the program that you will be likely to use.
You may notice that there are two different manuals contained here. The first manual
describes the process for coding single subject observations. The second manual describes
multiple subject observations. It may seem apparent when you should use which manual.
However this is not really the case. The main advantage of the multiple subject (referred to
as actors within the observer) observation setup is that is allows you to examine specific
interactions between multiple subjects. For example, if you are examining aggression and
you want to study the effects of barring teeth at another individual you will need a multiple
subject design. However, if you wanted to study the relative rate at which teeth are shone
when two animals are pair housed then it would likely be easier if you actually did a single
actor observation twice, once for each animal. If you are not sure which way will work best
for your experiment I suggest that you make two experiments in the observer and try both
methods running only a few observations. By doing this you will get a greater feel for the
advantages and the disadvantages inherent in both methods of observations.
Noldus Observer
Video-Pro
Overview
(single actor)
J Talpos, A Heidema and RA McArthur
Pharmacia & Upjohn, Neurobiology
INTRODUCTION
The Observer defines a Project as a set of files encompassing an experiment. Each of these
files is inter-related which means that they have to be kept as a single unit (Project). The
Observer therefore is made up of a series of MODULES of which the PROJECT
MANAGER is the core of the package. This module organizes and manages all the files of
your Project.
Because all files of a Project are inter-related this means that individual data files, for
example, can not be worked upon as a single unit. If you want to copy files from one
computer to another, or to archive your Project, you must copy the entire project.
An Observer Project is made up of:
1. Configuration file. This is where you first describe the experiment within the Observer
Project Manager. You begin by describing the experiment in plain text in a word
processor file. This helps you (and others) to remember what and how you did the study.
Think of it as a supplementary lab notebook. In the configuration step you also define the
way you are going to collect the data, what method you are using to time the
observations, what your independent variables or category factors are, what behaviors
you are going to measure and how those behaviors can be modified.
2. Data files. Once you have defined your experiment (and you are now COMMITTED to
this definition), you are now ready to start observing the animal (s) and coding their
behaviors. Each animal has its own file once the behaviors are coded. The location of
these files is managed through the Observer Project.
3. Analysis files. Having now coded the behaviors of all the animals in the experiment, the
Observer can do single animal or group statistics. In general you will be calculating
individual animal statistics (records) which will then be exported to Excel files and then
use a stats package such as UNISTAT to calculate the group means and variance. Again,
these files are included in and managed by the Observer Project.
Open the OBSERVER PROJECT MANAGER by clicking on the icon.
1. DEFINING THE PROJECT
•
Click on Configuration.
•
Select Design Configuration.
•
Select File > New Configuration.
The first window that appears is a mini- word processor into which you can type in your own
description of the experiment (as in notes in your lab notebook). Use this window to make all
your annotations.
•
Select Methods
•
Select Data Collection Method.
Sampling Method
There are 4 types of methods by which you can sample or code behaviors:
1. Focal: This allows you to measure both the frequency (how often it happens) and
duration (how long) of behaviors that you have defined. For example, you may want to
measure how often a rat goes to sleep in its cage AND you want to know how long the rat
has slept over the entire observation period. Focal sampling can be done with 1 or more
subjects being observed simultaneously.
2. Ad libitum: This allows you to record the frequency of behaviors for observations with
single or multiple subjects. Because only the frequency is being recorded, this data
collection method is ideal for pre-study observations when you are starting to determine
which behaviors are important for future observations.
3. Instantaneous: This method is used is used when you want to have a snap shot of defined
behavior(s) at regular intervals. Suppose you want to look at a rat once every hour to see
whether it is sleeping. This is a yes/no type of datum. This method can be used for one, or
multiple actors.
4. One-zero: Similar to instantaneous sampling except that a regular interval is defined and
you want to know whether a specific behavior (s) have occurred within that interval.
Number Of Actors.
This refers to how many subjects are being observed at the same time.
1. Single: Only one subject is being observed at a time. For example, 1 mouse in a plus
maze. However, you can use this same setting if you are going to observer a setting in
which there are multple animals but you are going to code only one at a time. An
example of this would be two animals in an open field were you were examining
frequency of behaviors but not how the animals interacted with each other.
2. Multiple: More than one subject is being observed. For example 2 rats interacting with
each other in a social interaction test. You would primaly use this sort of setup when you
are concidering interactions between the animals. For example, if you were studying the
rate at which the showing of teeth by animal A results in submission displays by animal
B, then you would use this sort of setup. Multiple observations can also be used if you
just want to code two or more animals at the same time, however this becomes very
difficult because of the extra key strokes needed. Because of this we recommend that
you use multiple observations with a single actor setup unless you are trying to observer
some sort of reciprical behavior. That is to say behaviors in which one triggers another,
like an event cascade.
•
Select Methods.
•
Select Timing Method.
Duration.
At this point you define how long the observation period lasts.
1. Open ended: no maximum duration is set for the observation. Clicking on the end button
ends the observation.
2. Maximum: A set time for observing is defined. When the
computer timer reaches that time, the file will close and save
the data. This is a way of standardizing the amount of time
allowed to observe each animal. You can, however, end the
observation before that time by clicking on the end button.
When you are working on a maximum time observation, you
can also define whether your observations are based on elapsed
or actual observed time.
1. Elapsed: Refers to the duration of the behavior throughout the
observation period of a specific length.
2. Observed: under some circumstances you may want to suspend
coding a behavior. The timing picks up again when coding
restarts. For example, a rat may have a sleeping box into which
it can disappear randomly. You may want to suspend coding of
other behaviors until the rat re-appears.
Timing
1. Resolution: Three options are available, 1.0, 0.1, and .01
second. This determines if behavior will be coded in seconds,
tenths of seconds or hundredths of seconds. The greater the
resolution (0.01 second, the more precise the measure). 1
second is generally acceptable for our behavioral observations.
2. Sample interval: This is where you determine the sampling interval time when you are
using instantaneous or one-zero sampling.
•
Select Define.
•
Select Independent Variables.
Independent Variable Name
Independent variables are categorizing names also known as
FACTORS such as gender, strain, ID, treatment type, etc.
Independent variables can have a subset of levels. For example
gender can be made up of 2 levels: Male, Female. ID is made up
of as many subjects you have such as Rat1, Rat2, Rat3. Type in
the name of an independent variable.
Data Type
The type of variable can be either a NUMBER or a CHARACTER. ID, for example could be a
numeric data type (1, 2, 3, 4, ….). It could also be a character type where you are combining
alphabetic characters as well as a number (Rat1, Rat2, Rat3, …., Rat02-15-2000). Determine
how you want to enter this type of information.
1. Character: When you choose a character data type, you can either enter the elements at
the time that you are coding (free-format) or you can set up a list (options) from which
you can pick at the time you code. For example, under Independent variable ID, you may
have a list of subjects already identified. They have been called Rat1, Rat2, Rat3, and
Rat4. Each of these can be inserted as an option list by typing them in the Options
window and then adding them. This hardwires you to these subjects and you choose them
from a pop-up list when you start to code.
a) If you don’t know what animal ID is at the time you start coding and want to
identify them at that time, then you can choose the FREE-FORMAT option that
allows you to enter the ID at the time of coding. For example, Rat1, Mickey, 4, etc.
b) You can even combine a specific list and free-format if you start off with a specific
group of animals when you set up the Project, but when the time of the experiment
arrived, you had to add more animals. Select both options and Free-format.
2. Numeric: If you choose to define the independent variable as numeric you will then be
required to enter the minimum and maximum values used.
•
Select Define.
•
Select Behaviors.
The Observer defines behaviors in terms of a general CLASS that has a series of elements.
For example, a behavioral class could be MOVEMENT. Within the behavioral class
Movement, the following elements could be defined: walking, stretching, rearing, climbing,
and falling. Another behavioral class could be POSITION. Within Position center, outer
wall, open arm, etc. would be defined as elements of this class.
Length of input code
Coding in the Observer is done primarily by pressing a key on your computer key pad. Thus,
you have to program specific keys or combination of keys to each behavior. For example, the
occurrence of the behavior walking could be coded as W (length of input code = 1), or by
pressing down more that 1 key such as CTRL W (input code = 2).
Behavioral Class Name
Define your behavioral class (Movement). When you type this in, add it to the table and
select it. The BEHAVIOURAL ELEMENTS window will now light up. Click on it and enter
the name of the elements (For example, walking).
1. Code: Select the key, or keys that will identify that behavioral element (W).
2. Definition: Write a brief definition of that behavioral element (example, Animal moves
its four paws in any direction.).
3. Type: A behavioral element can be either a STATE or a discrete EVENT. Walking is a
state behavior because it occurs often (frequency) and continues over time (duration). An
event behavior can occur with different frequency, but does not have duration. Falling,
for example is an event behavior. The DEFAULT option identifies the normally starting
behavior at the time of coding. For example, coding of the subjects could always start
when they are stretching. Each behavioral class must have an element that is the default
element. In a plus maze, for example, the default (starting) POSITION would be the rat in
the Center of the maze and the default MOVEMENT would be stretching.
4. Modifier: This function adds greater specificity to a behavioral class. For example, if you
where observing children at play then you can create modifiers which will describe their
interactions more accurately. For example, you could have a code “play”, and then a list
of modifiers such as ball, doll, jump rope which indicate what they were playing with.
Each class of modifiers is associated with a specific behavior. For example, you could
not use this list of play modifiers in conjunction with a set of codes for aggression. Each
modifier class is associated with only one behavior. Modifiers can also be used to
determine intensity of behavior. For example, you could have a behavior “cry” and then
modifiers such as “soft”, “normal”, and “loud”. Modifiers can also be used to determine
to whom a behavior is targeted. For example if you were coding aggressive behaviors is
monkeys, you might code monkey one as “hitting” and then have modifiers such as
“monkey 1” “Monkey 2”, and “monkey3.” This way you can record who the aggression
is aimed at.
•
Select Define.
•
Select Modifiers.
•
The process of defining modifiers is nearly identical as that for defining
behaviors. See those directions for information on how to define a modifier.
•
Activating the modifier.
•
A modifier must be linked to a specific behavior before it can be used. In
order to do this, reselect behavior under the define menu. Highlight the
behavioral class of interest and then click on behavioral elements. You
can now select your desired modifier. As you may have noticed, both
actors and behaviors can also be selected to use as modifiers.
•
Select Defaults.
•
Select Environment.
You can code behaviors using a variety of computers from
PC’s, MAC’s, or even hand-held computers. Select the computer
you are using in your study.
•
Select Defaults.
•
Select Keyboard Definition.
Select whether you want to distinguish between upper and
lower case.
•
Select Tools
•
Select Review Configuration.
This will give you a listing of all your definitions that you have configured for your Project.
This can be printed and included in your lab notebook for future reference.
•
Select Tools
•
Select Test Configuration.
This is an automatic error trapping that the Observer does on your configuration. It will let
you know whether you have omitted defaults, or whether you have forgotten to define certain
elements. Observer will not let you continue with coding behaviors until the configuration is
complete and logical.
•
Click on File.
•
Select Save Configuration.
•
Enter a file name for the configuration file (*.cnf)
You now have to associate the configuration with the project
that you are creating. This is a bit confusing because you have to
first create and save the configuration file AND THEN create
your Project. Noldus has presumably programmed the Observer
to work this way because this order of events allows you to use a
standard configuration for a plus maze study, for example, with
many different Projects. This set of instructions following
presumes that you want to use 1 configuration for 1 project.
Remember that in the future you have the option to share your
configuration files.
Minimize the Configuration Designer in order to get back to
the Observer Project Manager.
•
Select File.
•
Select New Project.
•
Enter the file name that you used to save your configuration file.
Open Configuration
Select the configuration file that you saved previously. Having done this a window will
immediately appear on the screen with the configuration file indicated. This is the index of
all files being managed by the Program Manager. Later, when coded data files are generated
and analysis files as well, these files will be indexed in this window.
Close the Program Manager and Configuration Designer.
2. PREPARING THE CODING ENVIRONMENT FOR VIDEO ANALYSIS
Open the OBSERVER VIDEO ANALYSIS NOT the OBSERVER EVENT
RECORDER Program by clicking on the Video Analysis icon.
A) Customization:
•
Click on File.
•
Select Open.
Select the Project that you have configured. The Video analysis program will then load the
basic video coding window.
This will include a window designated for the timer, event log and the channels. This view
can be deselected if desired.
•
Click on View.
•
Select Codes (This will open a window in which you can view your codes for
individual behaviors as well as being able to use your mouse cursor to select
behaviors.)
•
Click on Customize.
•
Select Timing.
The first time you want to start coding behaviors using the Project that you have just
configured, you will have to customize the environment under which you will be doing the
coding. All Observer coding is based upon time and it is fundamental that you establish and
standardize your time base. This will depend on whether you are coding behavior (1) “live”,
(2) off a videotape or (3) off a digitized video file on your hard drive or CD. If you are
working off a video file then you need to use the frame number as your time base. If you are
using a videotape then the internal time stamp on the tape provides the time base. Finally if
you are recording “live” then the computer’s internal clock provides the time stamp. If you
are working with a video file you must indicate the frame number option otherwise you will
be unable to call up the file.
1. Event Timing Based On: Select “Frame Number on Video File”.
2. Elapsed Time at Start of Observation: Select “Always zero”.
When the timing method has been selected for a media file, a small monitor window will
appear on the screen with a message “No media file selected”. Select the media file
containing the subjects whose behaviors are to be coded. . In all likelihood this file will be on
the CD-ROM drive. Selecting the media file will insert the file into the monitor window.
Adjust the size of the window for confortable viewing. At this point, control/logging
windows are to be placed on the screen and their position and size adjusted according to
personal preferences.
•
Click on File.
•
Select Open.
•
•
Select Media File.
Click on Customize.
•
Select Operation.
This option allows you to set whether you can change the independent variables at the
beginning or end of an observation ie, to set up and identify data files.
1. Edit Independent Variables Before Operation: Always
2. Edit Independent Variables After Operation: Never
3. Prompt for Confirmation to End Observation: On
You may now save the way that you have customized your coding window.
•
Click on File.
•
Select Save.
•
Select Customization.
Save the customization file using the ROOT file name that you have been using to define
the Project.
You may now start making your observations and coding behaviors. This can be done
immediately after the observation window has been customized or at your leisure. If you
choose to code behaviors at a later time. Close the Project by closing the Event Recorder. At
a future date you may re-open this Project in order to start coding.
3) OBSERVING AND CODING BEHAVIOURS
Open the OBSERVER VIDEO ANALYSIS Program by clicking on the Video Analysis
icon.
•
Click on File.
•
Select Open.
•
Select Project
Select the Project that you have configured. The Video analysis program will then set up the
screen that you have customized previously.
A) Initializing
Enter the name of the media file that you are about to code and set up the specifics of the
subject (s) whose behaviors you are about to code.
•
Click on File.
•
Select Open.
•
•
Select Media file
Click the green GO button
Go
1.
Select a file name. Each subject will have its own file name, so it is best to name the file
in a way that will tell you which Project the subject belongs to, and something that
describes the animals place in the Project. For example, in a plus maze study, a good file
name would be pm01 indicating that the subject was the first subject coded in a plus
maze study.
2.
Title and volume name are parameters which identify the subject more clearly. You can,
if you wish, leave these fields blank.
3.
You can also select or change the media file you wish to observe at this stage. If you
have already selected a media file as described above, this file name will also appear in
this field. The select media file option can be tricky. It will often revert to files already
used. Because of this, it is suggested that your file be selected at the beginning rather than
at this stage. If the program makes you reselect a media file, the above information will
be lost..
4.
Score existing video.
•
Click OK
Enter the INDEPENDENT VARIABLES identifying the particular subject.
Select the variables that accurately describe your subject. The variables will be the same as
those you created in the project manager. If needed, you can also type in new variables.
•
Click OK
Once you click ok, a new dialog box will be displayed which asks you to position your media
file. The phrase “position your media file” means you should cue video track to the point
where you want it to start observing. There are two ways to do this. If you know the time
when your observation begins, you can use the find time function. The digitized video time
frame can be found as the current time in the Timers Window.
Find Time Function
If you do not know the video frame number then you will need to use the video controls to
position your media files in a way similar to using your VCR.
1) To use “find time” function.
•
Select Edit, then choose video time to position your media file.
•
Enter the desired start time. Click on find. Your media file will now be positioned
at the time selected.
•
Click on Close.
•
You can now click on OK in the media position dialog box.
2) To use the video controls to position your media file.
This method is more cumbersome then the find video time method described above. The
video control panel works much like a VCR. You have functions such as play, fast forward
and rewind to use. You can use these controls to find your ideal starting position.
• When you have found the start position, click on the stop button.
•
You can now click on OK in the media position dialog box.
B) Coding
When you click on OK, another dialog box will appear. This one will ask you to “Initialize
Channels.” Click on the behavioral codes that represents the defaults of the animal being
observed. In this example stretching and center have already been defined as default
behaviors. If you haven’t defined default behaviors when defining the Project (see above)
then you must do so here. Behavioral codes have their own box. If the animal is stretching,
then choose stretching and this behavior will be coded from the beginning of the observation.
You will need to select a starting behavior for all behavioral classes.
•
Select your desired behavioral class
•
Click on your starting code (In the code box)
•
Repeat for every behavioral class
You are now ready to begin coding. Select Start, and begin coding you first observation.
Changing observation speed.
You can also select the SPEED with which the video track will play at any point during the
observation session. This is a very useful feature if you are concerned that the video is going
too fast and that you are missing behaviors. Use the mouse to slide the speed arrow to the left
or right to select your more confortable viewing speed.
Edit Observation Data
C) Mistakes and editing.
1) Selecting a behavior that is already active.
Occasionally you will select a behavior that is already active. The following error message
will appear, “This state is already active….”. PAUSE the video immediately and delete the
second state. Start the video in order to pick up coding from where you left off.
Pause
2) Editing during or after an observation.
•
Click on the “Edit observational data” button.
•
Highlight the behavior you would like to change
•
Press the appropriate code key for that behavior, or delete if you would
like to remove the code all together.
•
When done making changes click on the edit mode key to start
observations again.
If you discover that you have coded a behavior incorrectly during an observation it is
possible to edit the behavior file. You can do this either after you made your original
observation or during. It is best to edit the file during the observation, however as you have
to remember the exact time on the video file where you made your mistake. Stop the video
and use the EDIT > FIND function in order to go back to the mistake time. Click on the edit
icon. This button has a piece of paper and a pencil for its icon. In edit mode the video
controls are still active, so you can replay portions of the video file. It is also possible to click
on the behaviors and change them. Behaviors can be changed either by highlighting them,
and then pressing a key that has been linked to a behavior, or they can be deleted outright.
Once any behavioral changes have been made, click on the edit key and the observation will
continue. The observation will continue to run while you are in edit mode so you may want
to pause the observation before you start editing the file.
3) Multiple observations of the same media file.
•
Record the start time of the first observation
•
Select GO
•
Click on the down selection arrow on the File name field and select the
file to which you want to add new codes.
When coding complex behaviors it is often useful to watch the video file twice. This allows
you to concentrate on coding one behavior class at a time. In order to do this, record the time
at which you started your first observation. When you have finished your first observation
start the process of coding again. As usual select the green GO icon but rather than entering a
new file name, click on the down selection arrow of the File name field and select the file
you want to add additional codes. Follow the usual procedure for starting to code an
observation. When you are prompted to select a starting point for the observation use the edit
function and select time, then select find time. Enter the same starting time you used in the
first observation of the file. This procedure insures that you are coding the same video
segments in both observations.
4) STATISTICS
When you have finished your observations it is time to perform statistical analyses. This is
done in 2 stages. The Observer software package is used to format the information in a
manner that will allow it to be exported to a spread sheet program such as Excel to be
analyzed by Unistat.
Open the OBSERVER PROGRAM MANAGER
•
Click on File.
•
Select Open.
•
Select Project
Select the Project that you have configured. The Project manager screen will then display all
of the files related to your Project.
1) Selecting data for analysis.
•
Click on Analysis
•
Select Elementary statistics
•
Select Data
•
Select Observations
The first step is to select the files that you want to analyze. This is done by selecting
elementary statistics, followed by data and observations. You can select individual data files,
or you can select them by using the SELECT/INDEPENDENT VARIABLE option. Once
this is complete, select nesting levels under the data icon.
•
Select Nesting levels
Selection of nesting levels allows more complex analysis of behavior. By selecting nesting
levels you can design a statistics output that will consider multiple dependent variables and
their interactions at once. When nesting levels are not specified the Observer would only
consider how much time the animal spent in each location and how much time spent in each
behavior. When nesting levels are selected, on the other hand, the Observer will analyze how
much time was spent in each behavior for each location. Consider for example a plus maze
experiment. Specifying nesting levels allows an examination of how much time a mouse
spent in the open arm and walking. Without nesting levels selected, you could only examine
how much time the mouse spent walking or in the open arm. This will give you a much more
complete picture of the behavior being analyzed. (Remember, you must also click on the add
button for the nesting levels to actually take effect).
i. Select Split. When SPLIT is selected this means that each of the behavioral elements
will be analyzed separately ie, for Behavioral class Movement, walking, stretching,
rearing, climbing and falls will be analyzed individually. If SPLIT is deselected the
Behavioral class elements will be added together as a single value.
ii. Select the desired behaviors and click add.
iii. If you want more complex nesting levels then the Combinations function can be used.
This will allow you to look at behaviors in a more detailed fashion. This is primarily
used when you have multiple subjects per observation.
•
Select Events
When you are doing statistical analysis you may not want to include all behaviors and
subjects in your analysis. By using events you can select only those which are desired.
i. Choose the desired actors and behaviors
ii. By deselecting the split option all of the behaviors will be lumped together into one
category. This would be useful if you were examining aggressive behavior and you
wanted to do statistical analysis on the frequency of aggressive behavior instead of the
frequency of specific aggressive behaviors.
iii. By selecting subjects as actors, you can select the behavior of specific subjects for
analysis.
iv. By selecting Subjects as receivers you can select only those behaviors in which a
specific subject was acted on. For example, if you were studying dominance, then you
might want to see which animal was bitten the most often.
•
Events versus Nesting
These two functions are very similar, and can cause some confusion. Nesting allows you to
analyze behavior either at the level of the behavioral class (ie, movement in general or
position in general) or at the level of the individual behavioral elements (ie, walking,
stretching, climbing/rearing and sniffing). For example. If you were to nest the different
elements of movement such as walking within position, the Observer would calculate the
frequency and duration of walking within the open arm, walking within the closed arm and
walking within the center. It would also calculate the frequency and duration of stretching,
etc. in these positions. Using nesting level you are not adding or removing data, you are just
controlling how you are looking at it.
Events allow you actually to exclude data. By selecting the actors, behaviors or modifiers
that you are interested in it would be possible to select just one very specific behavior for
statistical analysis. By using the event function, you can concentrate on specific behaviors
for analysis even though more behaviors have been coded.
2) Configuring how you want to generate your RESULTS table.
i. Report layout
ii. Report format. Useful only for configurations with multiple actors and/or modifiers.
3) Generating individual statistics on each behavior.
•
Click on Analysis
•
Select Statistics
You can now select which statistics you wish to have included. In general, we are using this
module of the Observer software in order to generate individual data for each subject. Thus,
means are not averages of a group (this will later be calculated by Unistat), but rather the
mean behavior of an individual subject. Therefore, you should calculate statistics per
observation. In general the statistics to be selected are: Frequency and Mean duration.
Click on the green GO button to calculate the statistics for individual subjects.
5) EXPORTING DATA TO EXCEL
Before you try to export the file into an Excel file, review your output and look for any
calculations that do not seem right. If you find an observation that contains data that is
incorrect, it will behoove you to correct at this point. Discard the statistics you have just
performed. Return to the Project Manager and select data, then edit observational file. You
can make changes to the observation file. After you have made changes save the new file
under a different name. In case you have done something wrong, this will be critical in
returning to the original state of the file. Before re-running the statistics analysis restart the
Observer software. When this is done, follow the instructions for statistics analysis again, but
remember to exclude the file with incorrect data and to include the corrected file.
To make corrections:
•
Open Project Manager
•
Select data, then edit observational file.
•
Make any needed changes.
•
Save as a new file.
•
Re-start the observer
Repeat the process for statistical analysis.
From the Elementary Statistics or Lag Sequential Analysis modules, invoke the Statistics
dialog box by selecting Statistics from the Analysis menu. In this dialog box choose from
the group box Calculate Statistics either "Per Observation" or "Across Observations", but
not "Both".
Elementary Statistics or Lag Sequential Analysis output files can easily be imported into an
Excel spreadsheet (Version 5.0 or higher). To do so, follow these steps within The Observer:
•
Open the Export Specifications dialog box by selecting Export Specifications from
the Analysis menu. In this dialog box select the following options:
Export Specifications
•
Run the analysis by selecting GO from the Analysis menu. This yields an Analysis
Report.
•
Generate the export file by selecting Export from the File menu.
Export File
•
Open the export file in Excel and select Text Files from the File Types option.
The Import Wizard of Excel will then pop up. Simply choose "Delimited", click Next, and
select "Comma" as delimiter.
•
Click Finish.
UNISTAT ANALYSIS
1) Calculating means
Noldus Observer
Video-Pro
Overview
(multiple subjects)
J Talpos, A Heidema and RA McArthur
Pharmacia & Upjohn, Neurobiology
INTRODUCTION
The Observer defines a Project as a set of files encompassing an experiment. Each of these
files is inter-related which means that they have to be kept as a single unit (Project). The
Observer therefore is made up of a series of MODULES of which the PROJECT
MANAGER is the core of the package. This module organizes and manages all the files of
your Project.
Because all files of a Project are inter-related this means that individual data files, for
example, can not be worked upon as a single unit. If you want to copy files from one
computer to another, or to archive your Project, you must copy the entire project.
An Observer Project is made up of:
4. Configuration file. This is where you first describe the experiment within the Observer
Project Manager. You begin by describing the experiment in plain text in a word
processor file. This helps you (and others) to remember what and how you did the study.
Think of it as a supplementary lab notebook. In the configuration step you also define the
way you are going to collect the data, what method you are using to time the
observations, what your independent variables or category factors are, what behaviors
you are going to measure and how those behaviors can be modified.
5. Data files. Once you have defined your experiment (and you are now COMMITTED to
this definition), you are now ready to start observing the animal (s) and coding their
behaviors. Each animal has its own file once the behaviors are coded. The location of
these files is managed through the Observer Project.
6. Analysis files. Having now coded the behaviors of all the animals in the experiment, the
Observer can do single animal or group statistics. In general you will be calculating
individual animal statistics (records) which will then be exported to Excel files and then
use a stats package such as UNISTAT to calculate the group means and variance. Again,
these files are included in and managed by the Observer Project.
Open the OBSERVER PROJECT MANAGER by clicking on the icon.
2. DEFINING THE PROJECT
•
Click on Configuration.
•
Select Design Configuration.
•
Select File > New Configuration.
The first window that appears is a mini- word processor into which you can type in your own
description of the experiment (as in notes in your lab notebook). Use this window to make all
your annotations.
•
Select Methods
•
Select Data Collection Method.
Sampling Method
There are 4 types of methods by which you can sample or code behaviors:
5. Focal: This allows you to measure both the frequency (how often it happens) and
duration (how long) of behaviors that you have defined. For example, you may want to
measure how often a rat goes to sleep in its cage AND you want to know how long the rat
has slept over the entire observation period. Focal sampling can be done with 1 or more
subjects being observed simultaneously.
6. Ad libitum: This allows you to record the frequency of behaviors for observations with
single or multiple subjects. Because only the frequency is being recorded, this data
collection method is ideal for pre-study observations when you are starting to determine
which behaviors are important for future observations.
7. Instantaneous: This method is used is used when you want to have a snap shot of defined
behavior(s) at regular intervals. Suppose you want to look at a rat once every hour to see
whether it is sleeping. This is a yes/no type of datum. This method can be used for one, or
multiple actors.
8. One-zero: Similar to instantaneous sampling except that a regular interval is defined and
you want to know whether a specific behavior (s) have occurred within that interval.
Number Of Actors.
This refers to how many subjects are being observed at the same time.
3. Single: Only one subject is being observed at a time. For example, 1 mouse in a plus
maze. However, you can use this same setting if you are going to observer a setting in
which there are multiple animals but you are going to code only one at a time. An
example of this would be two animals in an open field were you were examining
frequency of behaviors but not how the animals interacted with each other.
4. Multiple: More than one subject is being observed. For example 2 rats interacting with
each other in a social interaction test. You would primarily use this sort of setup when
you are observing interactions between the animals. For example, if you were studying
the rate at which the showing of teeth by animal A results in submission displays by
animal B, then you would use this sort of setup. Multiple observations can also be used if
you just want to code two or more animals at the same time, however this becomes very
difficult because of the extra key strokes needed. Because of this we recommend that
you use multiple observations with a single actor setup unless you are trying to observer
some sort of reciprocal behavior. That is to say behaviors in which one triggers another,
like an event cascade.
•
Select Methods.
•
Select Timing Method.
Duration.
At this point you define how long the observation period lasts.
3. Open ended: no maximum duration is set for the observation. Clicking on the end button
ends the observation.
4. Maximum: A set time for observing is defined. When the
computer timer reaches that time, the file will close and save
the data. This is a way of standardizing the amount of time
allowed to observe each animal. You can, however, end the
observation before that time by clicking on the end button.
When you are working on a maximum time observation, you
can also define whether your observations are based on elapsed
or actual observed time.
3. Elapsed: Refers to the duration of the behavior throughout the
observation period of a specific length.
4. Observed: under some circumstances you may want to suspend
coding a behavior. The timing picks up again when coding
restarts. For example, a rat may have a sleeping box into which
it can disappear randomly. You may want to suspend coding of
other behaviors until the rat re-appears.
Timing
3. Resolution: Three options are available, 1.0, 0.1, and .01
second. This determines if behavior will be coded in seconds,
tenths of seconds or hundredths of seconds. The greater the
resolution (0.01 second, the more precise the measure). 1
second is generally acceptable for our behavioral observations.
4. Sample interval: This is where you determine the sampling interval time when you are
using instantaneous or one-zero sampling.
•
Select Define.
•
Select Independent Variables.
Independent Variable Name
Independent variables are categorizing names also known as
FACTORS such as gender, strain, ID, treatment type, etc.
Independent variables can have a subset of levels. For example
gender can be made up of 2 levels: Male, Female. ID is made up
of as many subjects you have such as Rat1, Rat2, Rat3. Type in
the name of an independent variable.
Data Type
The type of variable can be either a NUMBER or a CHARACTER. ID, for example could be a
numeric data type (1, 2, 3, 4, ….). It could also be a character type where you are combining
alphabetic characters as well as a number (Rat1, Rat2, Rat3, …., Rat02-15-2000). Determine
how you want to enter this type of information.
3. Character: When you choose a character data type, you can either enter the elements at
the time that you are coding (free-format) or you can set up a list (options) from which
you can pick at the time you code. For example, under Independent variable ID, you may
have a list of subjects already identified. They have been called Rat1, Rat2, Rat3, and
Rat4. Each of these can be inserted as an option list by typing them in the Options
window and then adding them. This hardwires you to these subjects and you choose them
from a pop-up list when you start to code.
a) If you don’t know what animal ID is at the time you start coding and want to
identify them at that time, then you can choose the FREE-FORMAT option that
allows you to enter the ID at the time of coding. For example, Rat1, Mickey, 4, etc.
b) You can even combine a specific list and free-format if you start off with a specific
group of animals when you set up the Project, but when the time of the experiment
arrived, you had to add more animals. Select both options and Free-format.
4. Numeric: If you choose to define the independent variable as numeric you will then be
required to enter the minimum and maximum values used.
Defining actors.
If you are using a multiple actor setup then you must define your actors. There are two ways
to go about doing this depending on the constraints of your experiment. If you are examining
group behavior in a lab setting and you can control which animals are present then you
should give your animals general names that can be applied over and over again. For
example, if you were examining the behavior of two rats in an open field and you were going
to run a total of 25 trails, you should not number your rats from one to fifty. If you do this
then the program will expect you to be observing 50 rats at one time. Rather you should
name your rats ratA and ratB and then use that designation for each trial. You will of course
need to be consistent in deciding which group will be A vs. B for later statistical analysis.
You may find that you are in a situation in which you don’t have this ability to
control which subjects are being included. This might be the case if you were doing a play
group study or a study in a naturalistic setting. If this is the case then it might make sense to
have very specific subject names. For example if you were watching ten children on a play
ground you may wish to enter all of there names. This still leaves you with the problem of
what you should do when not all of the subjects are present. In this case you should create a
behavioral code under define behaviors to account for the situation. This can be done by
creating an event behavior title “not present.” One this is done you can just enter the code
“not present” for any subjects you have named, but are not presently in the interaction. This
method is more complicated and time consuming, but it may be the only option available in
an uncontrolled observation.
Select Define.
Select subject.
Enter the subject name. This is the name by which you want the subject to referred.
This could be ratA, Billy, or monkey 10. Next you will need to enter the subjects
code. In this context the code is the key you will hit during an observation to signal
which animal you are about to code for. Last, you can add a definition such as “ratb
is the control group for this study,” or “ratb corresponds to group b.” When done,
click on add. You will need to repeat this process for each subject, or groups of
subjects you wish to give a name.
Select Define.
•
Select Behaviors.
The Observer defines behaviors in terms of a general CLASS that has a series of elements.
For example, a behavioral class could be MOVEMENT. Within the behavioral class
Movement, the following elements could be defined: walking, stretching, rearing, climbing,
and falling. Another behavioral class could be POSITION. Within Position center, outer
wall, open arm, etc. would be defined as elements of this class.
Length of input code
Coding in the Observer is done primarily by pressing a key on your computer key pad. Thus,
you have to program specific keys or combination of keys to each behavior. For example, the
occurrence of the behavior walking could be coded as W (length of input code = 1), or by
pressing down more that 1 key such as CTRL W (input code = 2).
Behavioral Class Name
Define your behavioral class (Movement). When you type this in, add it to the table and
select it. The BEHAVIOURAL ELEMENTS window will now light up. Click on it and enter
the name of the elements (For example, walking).
5. Code: Select the key, or keys that will identify that behavioral element (W).
6. Definition: Write a brief definition of that behavioral element (example, Animal moves
its four paws in any direction.).
7. Type: A behavioral element can be either a STATE or a discrete EVENT. Walking is a
state behavior because it occurs often (frequency) and continues over time (duration). An
event behavior can occur with different frequency, but does not have duration. Falling,
for example is an event behavior. The DEFAULT option identifies the normally starting
behavior at the time of coding. For example, coding of the subjects could always start
when they are stretching. Each behavioral class must have an element that is the default
element. In a plus maze, for example, the default (starting) POSITION would be the rat in
the Center of the maze and the default MOVEMENT would be stretching. There is also
an option entitled RECIPRICAL. This option refers to behaviors that only occur with
both subjects. For example, if you were studying mating pattern, a behavior in which two
individuals take part in at the same time then you may want to select RECIPRICAL.
When this is selected, by coding one subject for the behaviors you will code both subjects
for the behavior.
8. Modifier: This function adds greater specificity to a behavioral class. For example, if you
where observing children at play then you can create modifiers which will describe their
interactions more accurately. For example, you could have a code “play”, and then a list
of modifiers such as ball, doll, jump rope which indicate what they were playing with.
Each class of modifiers is associated with a specific behavior. For example, you could
not use this list of play modifiers in conjunction with a set of codes for aggression. Each
modifier class is associated with only one behavior. Modifiers can also be used to
determine intensity of behavior. For example, you could have a behavior “cry” and then
modifiers such as “soft”, “normal”, and “loud”. Modifiers can also be used to determine
to whom a behavior is targeted. For example if you were coding aggressive behaviors is
monkeys, you might code monkey one as “hitting” and then have modifiers such as
“monkey 1” “Monkey 2”, and “monkey3.” This way you can record who the aggression
is aimed at.
•
Select Define.
•
Select Modifiers.
•
The process of defining modifiers is nearly identical as that for defining
behaviors. See those directions for information on how to define a modifier.
•
Activating the modifier.
•
A modifier must be linked to a specific behavior before it can be used. In
order to do this, reselect behavior under the define menu. Highlight the
behavioral class of interest and then click on behavioral elements. You
can now select your desired modifier. As you may have noticed, both
actors and behaviors can also be selected to use as modifiers.
•
Select Defaults.
•
Select Environment.
You can code behaviors using a variety of computers from
PC’s, MAC’s, or even hand-held computers. Select the computer
you are using in your study.
•
Select Defaults.
•
Select Keyboard Definition.
Select whether you want to distinguish between upper and
lower case.
•
Select Tools
•
Select Review Configuration.
This will give you a listing of all your definitions that you have configured for your Project.
This can be printed and included in your lab notebook for future reference.
•
Select Tools
•
Select Test Configuration.
This is an automatic error trapping that the Observer does on your configuration. It will let
you know whether you have omitted defaults, or whether you have forgotten to define certain
elements. Observer will not let you continue with coding behaviors until the configuration is
complete and logical.
•
Click on File.
•
Select Save Configuration.
•
Enter a file name for the configuration file (*.cnf)
You now have to associate the configuration with the project
that you are creating. This is a bit confusing because you have to
first create and save the configuration file AND THEN create
your Project. Noldus has presumably programmed the Observer
to work this way because this order of events allows you to use a
standard configuration for a plus maze study, for example, with
many different Projects. This set of instructions following
presumes that you want to use 1 configuration for 1 project.
Remember that in the future you have the option to share your
configuration files.
Minimize the Configuration Designer in order to get back to
the Observer Project Manager.
•
Select File.
•
Select New Project.
•
Enter the file name that you used to save your configuration file.
Open Configuration
Select the configuration file that you saved previously. Having done this a window will
immediately appear on the screen with the configuration file indicated. This is the index of
all files being managed by the Program Manager. Later, when coded data files are generated
and analysis files as well, these files will be indexed in this window.
Close the Program Manager and Configuration Designer.
2. PREPARING THE CODING ENVIRONMENT FOR VIDEO ANALYSIS
Open the OBSERVER VIDEO ANALYSIS NOT the OBSERVER EVENT
RECORDER Program by clicking on the Video Analysis icon.
B) Customization:
•
Click on File.
•
Select Open.
Select the Project that you have configured. The Video analysis program will then load the
basic video coding window.
This will include a window designated for the timer, event log and the channels. This view
can be deselected if desired.
•
Click on View.
•
Select Codes (This will open a window in which you can view your codes for
individual behaviors as well as being able to use your mouse cursor to select
behaviors.)
•
Click on Customize.
•
Select Timing.
The first time you want to start coding behaviors using the Project that you have just
configured, you will have to customize the environment under which you will be doing the
coding. All Observer coding is based upon time and it is fundamental that you establish and
standardize your time base. This will depend on whether you are coding behavior (1) “live”,
(2) off a videotape or (3) off a digitized video file on your hard drive or CD. If you are
working off a video file then you need to use the frame number as your time base. If you are
using a videotape then the internal time stamp on the tape provides the time base. Finally if
you are recording “live” then the computer’s internal clock provides the time stamp. If you
are working with a video file you must indicate the frame number option otherwise you will
be unable to call up the file.
3. Event Timing Based On: Select “Frame Number on Video File”.
4. Elapsed Time at Start of Observation: Select “Always zero”.
When the timing method has been selected for a media file, a small monitor window will
appear on the screen with a message “No media file selected”. Select the media file
containing the subjects whose behaviors are to be coded. . In all likelihood this file will be on
the CD-ROM drive. Selecting the media file will insert the file into the monitor window.
Adjust the size of the window for confortable viewing. At this point, control/logging
windows are to be placed on the screen and their position and size adjusted according to
personal preferences.
•
Click on File.
•
Select Open.
•
•
Select Media File.
Click on Customize.
•
Select Operation.
This option allows you to set whether you can change the independent variables at the
beginning or end of an observation ie, to set up and identify data files.
4. Edit Independent Variables Before Operation: Always
5. Edit Independent Variables After Operation: Never
6. Prompt for Confirmation to End Observation: On
You may now save the way that you have customized your coding window.
•
Click on File.
•
Select Save.
•
Select Customization.
Save the customization file using the ROOT file name that you have been using to define
the Project.
You may now start making your observations and coding behaviors. This can be done
immediately after the observation window has been customized or at your leisure. If you
choose to code behaviors at a later time. Close the Project by closing the Event Recorder. At
a future date you may re-open this Project in order to start coding.
3) OBSERVING AND CODING BEHAVIOURS
Open the OBSERVER VIDEO ANALYSIS Program by clicking on the Video Analysis
icon.
•
Click on File.
•
Select Open.
•
Select Project
Select the Project that you have configured. The Video analysis program will then set up the
screen that you have customized previously.
A) Initializing
Enter the name of the media file that you are about to code and set up the specifics of the
subject (s) whose behaviors you are about to code.
•
Click on File.
•
Select Open.
•
•
Select Media file
Click the green GO button
Go
5.
Select a file name. Each subject will have its own file name, so it is best to name the file
in a way that will tell you which Project the subject belongs to, and something that
describes the animals place in the Project. For example, in a plus maze study, a good file
name would be pm01 indicating that the subject was the first subject coded in a plus
maze study.
6.
Title and volume name are parameters which identify the subject more clearly. You can,
if you wish, leave these fields blank.
7.
You can also select or change the media file you wish to observe at this stage. If you
have already selected a media file as described above, this file name will also appear in
this field. The select media file option can be tricky. It will often revert to files already
used. Because of this, it is suggested that your file be selected at the beginning rather than
at this stage. If the program makes you reselect a media file, the above information will
be lost..
8.
Score existing video.
•
Click OK
Enter the INDEPENDENT VARIABLES identifying the particular subject.
Select the variables that accurately describe your subject. The variables will be the same as
those you created in the project manager. If needed, you can also type in new variables.
•
Click OK
Once you click ok, a new dialog box will be displayed which asks you to position your media
file. The phrase “position your media file” means you should cue video track to the point
where you want it to start observing. There are two ways to do this. If you know the time
when your observation begins, you can use the find time function. The digitized video time
frame can be found as the current time in the Timers Window.
Find Time Function
If you do not know the video frame number then you will need to use the video controls to
position your media files in a way similar to using your VCR.
3) To use “find time” function.
•
Select Edit, then choose video time to position your media file.
•
Enter the desired start time. Click on find. Your media file will now be positioned
at the time selected.
•
Click on Close.
•
You can now click on OK in the media position dialog box.
4) To use the video controls to position your media file.
This method is more cumbersome then the find video time method described above. The
video control panel works much like a VCR. You have functions such as play, fast forward
and rewind to use. You can use these controls to find your ideal starting position.
• When you have found the start position, click on the stop button.
•
You can now click on OK in the media position dialog box.
B) Coding
When you click on OK, another dialog box will appear. This one will ask you to “Initialize
Channels.” Click on the behavioral codes that represents the defaults of the animal being
observed. In this example stretching and center have already been defined as default
behaviors. If you haven’t defined default behaviors when defining the Project (see above)
then you must do so here. Behavioral codes have their own box. If the animal is stretching,
then choose stretching and this behavior will be coded from the beginning of the observation.
You will need to select a starting behavior for all behavioral classes.
•
Select your desired behavioral class
•
Click on your starting code (In the code box)
•
Repeat for every behavioral class
You are now ready to begin coding. Select Start, and begin coding you first observation.
Changing observation speed.
You can also select the SPEED with which the video track will play at any point during the
observation session. This is a very useful feature if you are concerned that the video is going
too fast and that you are missing behaviors. Use the mouse to slide the speed arrow to the left
or right to select your more confortable viewing speed.
Edit Observation Data
C) Mistakes and editing.
3) Selecting a behavior that is already active.
Occasionally you will select a behavior that is already active. The following error message
will appear, “This state is already active….”. PAUSE the video immediately and delete the
second state. Start the video in order to pick up coding from where you left off.
Pause
4) Editing during or after an observation.
•
Click on the “Edit observational data” button.
•
Highlight the behavior you would like to change
•
Press the appropriate code key for that behavior, or delete if you would
like to remove the code all together.
•
When done making changes click on the edit mode key to start
observations again.
If you discover that you have coded a behavior incorrectly during an observation it is
possible to edit the behavior file. You can do this either after you made your original
observation or during. It is best to edit the file during the observation, however as you have
to remember the exact time on the video file where you made your mistake. Stop the video
and use the EDIT > FIND function in order to go back to the mistake time. Click on the edit
icon. This button has a piece of paper and a pencil for its icon. In edit mode the video
controls are still active, so you can replay portions of the video file. It is also possible to click
on the behaviors and change them. Behaviors can be changed either by highlighting them,
and then pressing a key that has been linked to a behavior, or they can be deleted outright.
Once any behavioral changes have been made, click on the edit key and the observation will
continue. The observation will continue to run while you are in edit mode so you may want
to pause the observation before you start editing the file.
4) Multiple observations of the same media file.
•
Record the start time of the first observation
•
Select GO
•
Click on the down selection arrow on the File name field and select the
file to which you want to add new codes.
When coding complex behaviors it is often useful to watch the video file twice. This allows
you to concentrate on coding one behavior class at a time. In order to do this, record the time
at which you started your first observation. When you have finished your first observation
start the process of coding again. As usual select the green GO icon but rather than entering a
new file name, click on the down selection arrow of the File name field and select the file
you want to add additional codes. Follow the usual procedure for starting to code an
observation. When you are prompted to select a starting point for the observation use the edit
function and select time, then select find time. Enter the same starting time you used in the
first observation of the file. This procedure insures that you are coding the same video
segments in both observations.
4) STATISTICS
When you have finished your observations it is time to perform statistical analyses. This is
done in 2 stages. The Observer software package is used to format the information in a
manner that will allow it to be exported to a spread sheet program such as Excel to be
analyzed by Unistat.
Open the OBSERVER PROGRAM MANAGER
•
Click on File.
•
Select Open.
•
Select Project
Select the Project that you have configured. The Project manager screen will then display all
of the files related to your Project.
2) Selecting data for analysis.
•
Click on Analysis
•
Select Elementary statistics
•
Select Data
•
Select Observations
The first step is to select the files that you want to analyze. This is done by selecting
elementary statistics, followed by data and observations. You can select individual data files,
or you can select them by using the SELECT/INDEPENDENT VARIABLE option. Once
this is complete, select nesting levels under the data icon.
•
Select Nesting levels
Selection of nesting levels allows more complex analysis of behavior. By selecting nesting
levels you can design a statistics output that will consider multiple dependent variables and
their interactions at once. When nesting levels are not specified the Observer would only
consider how much time the animal spent in each location and how much time spent in each
behavior. When nesting levels are selected, on the other hand, the Observer will analyze how
much time was spent in each behavior for each location. Consider for example a plus maze
experiment. Specifying nesting levels allows an examination of how much time a mouse
spent in the open arm and walking. Without nesting levels selected, you could only examine
how much time the mouse spent walking or in the open arm. This will give you a much more
complete picture of the behavior being analyzed. (Remember, you must also click on the add
button for the nesting levels to actually take effect).
iv. Select Split. When SPLIT is selected this means that each of the behavioral elements
will be analyzed separately ie, for Behavioral class Movement, walking, stretching,
rearing, climbing and falls will be analyzed individually. If SPLIT is deselected the
Behavioral class elements will be added together as a single value.
v. Select the desired behaviors and click add.
vi. If you want more complex nesting levels then the Combinations function can be used.
This will allow you to look at behaviors in a more detailed fashion. This is primarily
used when you have multiple subjects per observation.
•
Select Events
When you are doing statistical analysis you may not want to include all behaviors and
subjects in your analysis. By using events you can select only those which are desired.
v. Choose the desired actors and behaviors
vi. By deselecting the split option all of the behaviors will be lumped together into one
category. This would be useful if you were examining aggressive behavior and you
wanted to do statistical analysis on the frequency of aggressive behavior instead of the
frequency of specific aggressive behaviors.
vii. By selecting subjects as actors, you can select the behavior of specific subjects for
analysis.
viii. By selecting Subjects as receivers you can select only those behaviors in which a
specific subject was acted on. For example, if you were studying dominance, then you
might want to see which animal was bitten the most often.
•
Events versus Nesting
These two functions are very similar, and can cause some confusion. Nesting allows you to
analyze behavior either at the level of the behavioral class (ie, movement in general or
position in general) or at the level of the individual behavioral elements (ie, walking,
stretching, climbing/rearing and sniffing). For example. If you were to nest the different
elements of movement such as walking within position, the Observer would calculate the
frequency and duration of walking within the open arm, walking within the closed arm and
walking within the center. It would also calculate the frequency and duration of stretching,
etc. in these positions. Using nesting level you are not adding or removing data, you are just
controlling how you are looking at it.
Events allow you actually to exclude data. By selecting the actors, behaviors or modifiers
that you are interested in it would be possible to select just one very specific behavior for
statistical analysis. By using the event function, you can concentrate on specific behaviors
for analysis even though more behaviors have been coded.
4) Configuring how you want to generate your RESULTS table.
iii. Report layout
iv. Report format. Useful only for configurations with multiple actors and/or modifiers.
5) Generating individual statistics on each behavior.
•
Click on Analysis
•
Select Statistics
You can now select which statistics you wish to have included. In general, we are using this
module of the Observer software in order to generate individual data for each subject. Thus,
means are not averages of a group (this will later be calculated by Unistat), but rather the
mean behavior of an individual subject. Therefore, you should calculate statistics per
observation. In general the statistics to be selected are: Frequency and Mean duration.
Click on the green GO button to calculate the statistics for individual subjects.
5) EXPORTING DATA TO EXCEL
Before you try to export the file into an Excel file, review your output and look for any
calculations that do not seem right. If you find an observation that contains data that is
incorrect, it will behoove you to correct at this point. Discard the statistics you have just
performed. Return to the Project Manager and select data, then edit observational file. You
can make changes to the observation file. After you have made changes save the new file
under a different name. In case you have done something wrong, this will be critical in
returning to the original state of the file. Before re-running the statistics analysis restart the
Observer software. When this is done, follow the instructions for statistics analysis again, but
remember to exclude the file with incorrect data and to include the corrected file.
To make corrections:
•
Open Project Manager
•
Select data, then edit observational file.
•
Make any needed changes.
•
Save as a new file.
•
Re-start the observer
Repeat the process for statistical analysis.
From the Elementary Statistics or Lag Sequential Analysis modules, invoke the Statistics
dialog box by selecting Statistics from the Analysis menu. In this dialog box choose from
the group box Calculate Statistics either "Per Observation" or "Across Observations", but
not "Both".
Elementary Statistics or Lag Sequential Analysis output files can easily be imported into an
Excel spreadsheet (Version 5.0 or higher). To do so, follow these steps within The Observer:
•
Open the Export Specifications dialog box by selecting Export Specifications from
the Analysis menu. In this dialog box select the following options:
Export Specifications
•
Run the analysis by selecting GO from the Analysis menu. This yields an Analysis
Report.
•
Generate the export file by selecting Export from the File menu.
Export File
•
Open the export file in Excel and select Text Files from the File Types option.
The Import Wizard of Excel will then pop up. Simply choose "Delimited", click Next, and
select "Comma" as delimiter.
•
Click Finish.
UNISTAT ANALYSIS
2) Calculating means
6) SOFTWARE SUPPORT
Hopefully you will not encounter to many problems that cannot be answered by the above.
When you do encounter problems that are not addressed above, which you will, may I
suggest that you get in touch with the following individuals.
Rolf Leurink
Noldus Information Technology
Wageningen,
The Netherlands
Phone: +31-317-497677
Fax: +31-317-424496
E-mail: [email protected]
Bart van Roekel
Noldus Information Technology Inc
6 Pidgeon Hill Drive,
Suite 180
Sterling VA 20165
USA
Phone: (703) 404-5506 or 1-800-355-9541
Fax: (703) 404-5507
E-mail: [email protected]
You can also try sending questions to
[email protected]
John Talpos
616- 833-4721
[email protected]
Remember that there is a time difference when calling, it is best to try and get your problems
taken care of in the morning.