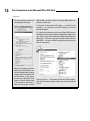
1
Chapter 1
AL
Overview from 10,000 Feet
In This Chapter
RI
▶ Deciding which of the three editions of Office for Mac 2011 to buy
▶ Installing Office 2011
TE
▶ Getting set up using the Setup Assistant
MA
▶ Removing Office 2011
O
GH
TE
D
ver the next several hundred pages, you can find out in detail about
the applications that make up the Microsoft Office for Mac 2011 suite.
But first you must decide which version of the suite you want or need (there
are three of ’em), acquire a copy of it, and then install it and find out how to
update it to ensure that you’re always running the latest and greatest (not to
mention most stable) version.
RI
So, without further ado, dig in!
PY
The Three Faces of Office for Mac 2011
CO
Microsoft Office for Mac 2011 comes in three tasty flavors:
✓ Office for Mac Home and Student 2011
✓ Office for Mac Home and Business 2011
✓ Office for Mac Academic 2011
The three editions have this in common: All three have the exact same
versions of the “big three” applications — Word, Excel, and PowerPoint —
plus a copy of Microsoft Messenger (an instant messaging, or IM, program
that you can download from the Microsoft Web site for free). The differences
between the editions lie in which features you get in addition to the big three:
10
Part I: Introduction to the Microsoft Office 2011 Suite
✓ Microsoft Office for Mac Home and Student 2011: The retail price is
$119 for a single install or $149 for a Family Pack with three installs. As
the least expensive edition, it includes the big three applications and
Messenger and nothing more. Of course, many (if not most) users need
nothing more, so unless you can find a compelling reason to spend two
or three times more money for the same three applications, this edition
is the most affordable.
Note that this edition does not include Microsoft Outlook. Outlook,
sometimes called the “Swiss army knife of personal communications
software,” combines an e-mail client with an address book, a calendar,
to-do lists, and searchable notes in a single application.
Unless you dislike the Mail, Address Book, and iCal applications that
are included with Mac OS X, you probably won’t miss Outlook much.
And, if you’re a student or a staff or faculty member in higher education,
you may qualify for the $99 single-install Academic edition, which does
include Outlook. (See the third bullet in this list.)
✓ Microsoft Office for Mac Home and Business 2011: The retail price is
$199 for a single install or $279 for a Multi-Pack with two installs. What
do you get for the additional dough? In two words: Microsoft Outlook.
What’s that, you say? You don’t know whether you need Outlook? Well
then, I suggest that you save yourself a bundle and start with the Home
and Student Edition. If you later determine that you do need Microsoft
Outlook, you can upgrade to the Home and Business edition online.
✓ Microsoft Office for Mac Academic 2011: The retail price is $99 but is
available only to higher-education students, staff, and faculty. This edition includes everything in the Home and Business edition (including
Microsoft Outlook) at half the price. But in this case you have to prove
that you’re in the field of higher education.
So there you have it — three editions for three budgets.
By the way, you don’t have to prove you’re a student (or live in a home) to
purchase the Home and Student edition for $119, but you have to prove that
you’re in the field of higher education to get the Academic edition for $99.
The bottom line: For most users, the Home and Student edition is the most
cost-effective way to acquire the big three Office applications.
Installing Office 2011
When you insert the Office 2011 DVD, you launch the Office Installer by
double-clicking it.
The first screen you see is Welcome to the Microsoft Office for Mac 2011
Installer, which informs you that in order to install Microsoft Office, you need
Chapter 1: Overview from 10,000 Feet
the username and password for an Administrator account on this Mac. If you
have no Administrator account and password handy, it would behoove you
to get one now.
This screen also recommends that you temporarily disable any virus protection applications on this computer before you continue. That’s a good idea,
so if you’re running any antivirus software, disable it before you proceed or
else it can interfere with your installation.
When you have both of the aforementioned ducks in a row (you have an
Administrator account name and password and have disabled all antivirus
software), click the Continue button.
The second screen displays the license terms. Because you must accept
these terms to use the software, you should read every word before you
even think about clicking the Continue button.
I’m only half kidding — I know that nobody reads the licensing information.
But because you’re about to enter into a legally binding agreement, I would
be remiss not to at least pretend to urge you to read every word.
When you’re done reading, click the Continue button. A sheet with three
buttons — Agree, Disagree, and Read License — appears. Assuming that
you’ve read the agreement already, I strongly suggest that you click Agree.
If you haven’t read the agreement, click the Read License button to return to
the second screen, where you can read the fine print. Or, if you read it and
disagree, click the Disagree button and the Installer quits. In other words,
unless you specify that you agree, you can’t install the software.
The next screen, labeled Select a Destination, lets you choose the destination
disk for the software installation. Click the hard disk icon in the middle of the
window to select the disk you want to install the software on, and then click
Continue.
The next screen is labeled Standard Install on [your hard drive’s name] at the
top. The Microsoft Office 2011 folder is installed in your Applications folder
by default. If you want to install the Office folder elsewhere, click the Change
Install Location button and select another destination.
Before you click the Install button, click the Customize button and deselect
any items you don’t want to install.
If you’re short on disk space, consider not installing some of the proofing
tools. By default, all languages (including Catalan, Dutch, Finnish, German, two
flavors of Portuguese, and more) are installed. To save some disk space, first
click the little triangle to the left of the words Microsoft Office 2011 to reveal
its contents, and then click the little triangle to the left of the words Proofing
Tools. Finally, deselect the check boxes for the languages you don’t need. If
11
12
Part I: Introduction to the Microsoft Office 2011 Suite
you don’t install these languages, you don’t save a ton of disk space, but why
install them if you’re never going to use them?
Now click the Install button to open an authentication window so that you
can provide an administrator name and password. Do so and then click OK.
Go get yourself some coffee or a soft drink — you have a bit of time.
When the installation is complete, the screen informs you that the installation was successful and the software was installed. D’oh. Click the Close
button and the Office Setup Assistant launches itself.
Setting Up with Setup Assistant
The Welcome to Office for Mac 2011 screen appears with the following three
options:
✓ Enter Your Product Key: Click this option and then type your product
key, which you can find in the box with your installation disc. When
you’re done, click the Continue button to see a screen acknowledging that your copy has been activated. Your product ID number also
appears on this screen with the suggestion that you store it with your
records because you’ll need it in order to register or obtain technical
support.
If you forget the product ID number or fail to write it down and “keep
it with your records,” you can find it in the About dialog box for Excel,
PowerPoint, or Word.
✓ Try Free for 30 Days: If you have a demo version of Office for Mac 2011,
click this option to use the software without a product key for as long as
30 days.
✓ Purchase a Product Key Online: Click this option and follow the
onscreen instructions to purchase a product key on the Web.
At this point, you may or may not see a screen congratulating you or encouraging you to enjoy the demo, or telling you something entirely different. Click
Continue.
A screen offers to either use your existing settings (from an earlier version
of Office for Mac) or create new settings. Click an option and then click
Continue.
Next is the Keep Office Up to Date screen, which offers two simple yes-orno options: Keep Office for Mac Up to Date and Join the Customer Experience
Improvement Program. Respond to both and then click Continue.
Chapter 1: Overview from 10,000 Feet
Before you complete this action, though, read this tip:
The DVD you just installed Office 2011 from was manufactured several months
ago (or longer). In the meantime, Microsoft may have discovered bugs in the
software and issued software updates to correct them. I recommend that
you click Yes. Office then runs the AutoUpdate application periodically and
updates your software when necessary. That way, you always receive the
benefits of updated software, which generally increase reliability and enhance
performance and even, occasionally, add a new feature or functionality. If you
choose Yes, you can specify that Office should check for updates every day,
week, or month.
If you choose not to run AutoUpdate at this time or you click the Manually
button, don’t forget to run the Microsoft AutoUpdate application manually
every few weeks by choosing Help➪Check for Updates in any of the Office
applications.
The second option determines whether you want to participate in the Microsoft
Customer Experience Improvement Program. Office then occasionally sends
information about your hardware and how you use Office (as well as information on crashes, freezes, and unexpected shutdowns) to Microsoft via the
Internet. No personal information is sent; it’s totally anonymous. Click the
radio button for Yes or No, and then click the Continue button.
Dealing with multiple versions of Office
If you have an earlier version of Office on your
hard drive when you install Office 2011, the
older version isn’t touched. You now have two
(or possibly even three or more) Office folders
in your Applications folder.
In a perfect world, all your Office documents,
both new and old, would launch the 2011 versions of Word (or other Office apps) when you
open them. But in the real world, this may or
may not be your experience.
So, I offer you this little lesson in Mac OS X file
opening mastery:
✓ To specify which version (Office for Mac
2011, 2008, 2004, or whatever) of Word,
Excel, or PowerPoint opens when you
double-click one of its document files,
single-click that document file and choose
File➪Get Info. (The shortcut is Command+I.)
✓ If you don’t see a pop-up (or drop-down,
if you prefer) Open With menu — the one
that says Microsoft Word (default) (14.0.0)
in the following figure — click the small,
gray disclosure triangle next to the words
Open With and the menu appears.
(continued)
13
14
Part I: Introduction to the Microsoft Office 2011 Suite
(continued)
The Info window should look
something like this figure:
2008 or 2004, you choose Word 12 or Word 100702 (don’t ask)
for them, respectively.
If you want all documents of this type — a .doc file in the
example — to launch this version of Word, just click the
Change All button.
Or, right-click the document and choose Open With from the
contextual menu to select a different application to open it this
time. Finally, right-click the document and then hold down the
Option key — the menu changes from Open With to Always
Open With — to launch a different application every time you
open this document.
Now click that pop-up (or dropdown) menu and select the version of the application you want
to open when you double-click
this document. In the figure,
that version is Word 2011 (also
known as Word 14.0.0), which
is the default for .doc files. To
open the document in Word
There you have it — if the wrong version of an Office application launches when you open a document, you now know how
to fix it.