1
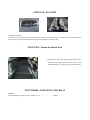
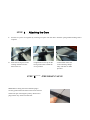
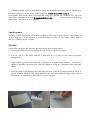
Sea Walker Inflatable Boat
CONTENTS
The following items are included:
1 boat hull
1 repair set
1 foot pump
1 plastic spanner
1 carry bag
1 Instruction Manual (warranty included)
1 seat
1 mooring rope
2 oars
Flooring: (the type of vessel you have purchased will determine what flooring is supplied. If you
purchased a timber slat model then ignore the instructions about fitting the air mat floor and
inflating the keel as your boat does not come with these options.
Timber Slat – Flooring built into the floor of boat
Air Deck – 1 x air mat floor supplied
Safety Instructions
SAFETY
INSTRUCIONS:
1. Warning! It is imperative that you observe the following instructions and safety instructions in
the user manual. Serious physical injuries or extensive material damage may otherwise occur.
2. Important ! Please put the boat together step by step and in the order stated in order to avoid
damage to the material.
3. Danger! Offshore wind and currents can pose a risk to life.
4. Danger! An unbalanced load may cause the boat to capsize.
5. Warning ! Petrol and petrol vapors are both highly flammable and explosive. If you use your
boat with a motor, care should be taken when handling and storing petrol.
6. Warning ! Your vessel is fitted with an AUSTRALIAN BUILDERS PLATE. Exceeding the
limits stated on the rating plate may result in a risk of physical injury or fundamental material
damage.
GENERAL ASSEMBLY TIPS
Tip 1: Ensure that you push the boat valve coil spring switch down and rotate it 90 degrees before inflating the
boat. This will prevent air escaping when you remove the pump connector.
Tip 2 :If a boat valve is loose or you find your boat slowly loosing air pressure then tighten the valve by turning it
clockwise with the grey plastic spanner supplied. DO NOT over tighten.
The
thethe
boat
fabric
can
improved
by undoing
the valve
andboat
putting
a small amount of Vaseline
Youseal
canbetween
also undo
valve
andand
put valve
vaselin
onalso
the be
o-ring
and between
the valve
and the
fabric
around the lip of the fabric under valve lip. The o-ring in the outer half of the valve can also be spread with Vaseline to
improve the seal.
STEP ONE: TO START
Unfold the boat hull.
Clear a level space (ensure that it is clean and that there are no sharp objects on it).Remove the boat hull from the
box and remove the plastic. Roll the boat hull out and unfold it so that it is flat.
STEP TWO: Mount the Bench Seat
Mounting the bench seat: Hook the plastic tab of the
bench into the nylon loops on each side of your
NEWPORT boat. You must do this before inflating.
STEP THREE: INFLATING THE BOAT
NOTE:
Recommended air pressure for air chambers (1-3)……………………0.25bar
Recommended air for the keel (4)………………………………………0.2bar
Remove the valve cap from the valves
.
Push the coil spring switch down on the valve and
rotate it 90 degrees. Ensure that the coil spring switch
really has jumped out. (you will feel it pop outwards).
This will stop the air escaping when you remove the
pump connector.
Attach the pump connector to the valve and turn until
it locks in place. Do not force it as it will lock into
place very easily.
Start filling the air chambers until you reach the
recommended working pressure. (or until firm if you
do not have a pressure gauge).
Now remove the pump connector and replace the
valve cap.
NOTE: Fill the keel last of all, (after the
floor)ensuring that you do not exceed the maximum
pressure of 0.2bar.
STEP FOUR: FITTING THE FLOOR
(Air Deck Floor Model only)
1.
2.
3.
4.
Lay the air mat flooring inside the boat making sure there are no creases.
Ensure the keel which lies under the floor is in a perfect parallel line with the boat (straight down the
centre).
The single piece of wood attached to the floor needs to fit tightly on the floor under the buoyancy tubes.
If you experience trouble getting this in place release some air from the buoyancy tubes.
Once in place pump the floor up in the same manner as the other tubes. Pump until the floor is solid.
STEP FIVE: INFLATE THE KEEL
1.
The air valve for the keel is located inside the boat on the floor. You will see a round hole
on the air mat floor. The valve for the keel is accessed through this hole. Attach the pump
and inflate the keel until it is at 0.2bar (or firm).
Attaching the AND
OarsATTACHING THE OAR
STEP SIX:
444 ASSEMELING
1. Join the two piece oar together by inserting one piece into the other. Push the spring loaded locking ball if
required.
2. Insert the screw(pin) on the
rotating oarlocks into the
hole on the oar.
3.Tighten.the screw cap on the
screw(pin)in order to hold the
oar in position
4 .Place both of the oars
in the retaining clamps
They will lock in under
pressure.
STEP SEVEN:
THE DRAIN VALVE
5
.
Note: Before setting sail ensure that the plug is
securely positioned in the hole on the lower transom
and do not open it during the journey. Remove the
plug to drain any water from the boat.
DEFLATING AND DISMANTLING
To release air from your boat rotate the coil spring switch anti-clockwise.
IMPORTANT: Do not release all the air from a chamber when the others are still fully inflated. This can cause
damage to your boat’s bulkhead. Release the air from all chambers then attach the pump (in deflate mode) and
pump out the remaining air from the chamber.
Note: You boat is supplied with a 2- way pump for inflating / deflating. The port for inflate / deflate is marked on
the pump next to the holes.
STORAGE
You don not have to do much to keep your NEWPORT Inflatable Boat in good condition It can get stored inflated
or deflated. If you store it outside, it should be above ground. If you store it in a cupboard or box, basement room,
attic or garage, we recommend that you choose a cool, dry place and that you clean and dry the boat beforehand.
MAINTENANCE
1. Inflate all of the air chambers and the keel until they reach working pressure. You do not need to mount the air
mat floor, the bench or the oars at this time.
2. If the boat is wet, allow it to dry; avoid exposing it to direct sunlight.
3. When it is dry, use a vacuum cleaner to remove all sand, small stones, waste or other foreign bodies from the
floor, especially from underneath the inflatable keel and the corners of the floor and tube.
4. Completely clean the boat with normal soap and water and rinse it thoroughly with fresh water.
5. Inspect the boat valves, clean them and remove any sand or foreign bodies.
6. If you notice any discharge of oil, battery acid or fuel, immediately clean the part concerned with soapy water.
REPAIR
Air leaks:
If you boat appears to be a little soft, this is not necessarily due to a leak, as temperature
fluctuations can result in pressure alteration of 0.003 bar (0.045 psi) per degree Celsius (34’F). If
the boat is inflated late in the day, the air may cool off overnight making the boat “soft” on the
following day. If there have been no temperature fluctuations, you must first determine exactly
where the leak is.
Follow these instructions:
1.
2.
3.
4.
5.
6.
Ensure that there is no sand or any foreign bodies in the boat valve.
Ensure that the valve seal is correctly positioned.
Inflate the inflating chamber.
Close the caps on all valves.
Rinse the boat with soapy water, including the area surrounding the boat valve.
Bubbles will appear where there is a leak.
7. If bubbles should appear around the boat valve, this means that this valve is loose, Tighten it by
turning it clockwise with the plastic spanner supplied. Also see the tips section on page 1.
If no bubbles form on the fabric nor around the boat valve, moisten the CLOSED valve cap with
on the
valvemust
o-ring be replaced. Please follow the following
soapy water, If bubbles now form, try
theVaseline
complete
valve
instructions if the leak is in an air chamber.
Small repairs:
Deflate your boat. Thoroughly clean the area which is to be repaired (you can use a vinyl cleaner to
do this) and dry it. If the puncture is small (less than 1/8 inch=0.3 cm), apply a small drop of
adhesive. Allow to dry for 12 hours.
Patches:
Leaks which are larger than a needle puncture can be repaired with patches.
1. Thoroughly clean the area surrounding the leak to remove all dirt and grease.
2. Cut out a piece of the repair material so that there is a 1/2 inch (1.3cm) border around the
damaged area.
3. Apply adhesive gently to the underside of the area to be repaired and around it. The adhesive
should be applied to the whole area. Allow the adhesive to dry for 2-4 minutes until it becomes
sticky.
4. Place the patch on the damaged area and apply pressure so that it is firmly positioned. Allow to
dry for 12 hours. When it is dry, apply adhesive to the area surrounding the edges of the patch to
ensure that it is completely sealed (allow to dry for 4 hours).