1
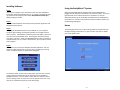
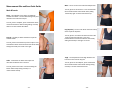
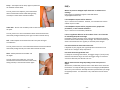
.
PLEASE READ INSTRUCTIONS BEFORE USE
Important Operating Instructions BodyMetrix™ Personal System Windows Operating System User’s Guide Intended Use: The BodyMetrix™ Personal System is only intended to be used on generally healthy adults and children (6 or older) and is not for diagnosis of disease or condition. For more information please review Page 4 of this User’s Guide. Environment: Operating Temperature: 0° to 60° Celsius Operating Humidity: 5% to 95% Operating Altitude: 0‐3500 meters Power Requirements: USB Cable 2.5 Watts, 5V, and maximum 500 mAmps Computer Requirements: Windows operating system Windows XP or later (32 or 64 bit) 1 GB RAM USB Port Device Model Number: BX2000 Personal BodyMetrix™ System User’s Guide Copyright© 2005 ‐ 2013 IntelaMetrix, Inc. - ii -
Table of Contents Indications for Use Indications for Use .................................................................................. 4 Installing Software................................................................................... 5 Using the BodyMetrix™ System .............................................................. 6 Home .................................................................................................. 6 Administrator Options........................................................................ 7 Measuring Body Fat Percentage ............................................................. 9 Analyzing Body Fat % Assessments .................................................. 11 Trends and Reviewing Progress ............................................................ 12 Body Scans ............................................................................................ 14 Interpreting Scans ............................................................................ 16 Tracking Features on Scans .............................................................. 17 (1) The BodyMetrix™ BX2000 is indicated for the measurement of localized fat layer thickness and localized muscle layer thickness. When used with BodyView™ software it can be used to estimate total body fat percentage. The BX2000 is only intended to be used on generally healthy adults and children (6 or older) and is not for diagnosis of a disease or condition. (2) The BodyView software is indicated for the calculation of estimated total body fat percentage, localized fat layer thickness, and localized muscle layer thickness. The BodyView software is indicated for calculating Body Mass Index (BMI) and for estimating Basal Metabolic Rate (BMR). The BodyView software can track changes in measurements and generate body composition reports. Contraindications FAQ’s ..................................................................................................... 22 The BodyMetrix™ BX2000 should not be used for diagnosis of disease, or in the cure, mitgation, treatment, or prevention of disease. Care and Maintenance .......................................................................... 24 Warnings & Precautions Comparing Scans .............................................................................. 18 Measurement Site and Scan Point Guide.............................................. 19 Limited 1 Year Warranty ....................................................................... 25 NEVER use the device if the device or cord is broken or damaged. NEVER use the device if the device is wet. NEVER use the device on an open sore or cut. DO NOT use abrasive or harsh chemicals to clean the device. DO NOT drop the device as it may damage it. DO NOT store the device near a heat source or subject to high temperatures, humidity, or direct sunlight as damage may be caused. ALWAYS use an antiseptic wipe or cloth with 70% isopropyl alcohol to clean the contact surface of the device. -3-
-4-
Installing Software Using the BodyMetrix™ System Step 1: Turn on your computer. Insert the CD that came with your BodyMetrix. An installer should automatically start up. If it doesn’t automatically start up explore the CD and launch the installer BodyViewPersonalSetup by double clicking on the file. Step 2: Follow normal installation wizard steps to fully install the application and BodyMetrix device drivers. Step 3: Now plug the BodyMetrix device into the USB port on your computer. The green light should go on followed by flashes of a red light and then return to green. The hardware installation wizard may appear, make sure you select use recommended driver. Attaching the driver the first time may take 1‐2 minutes. NOTE if the BodyMetrix device does not appear as connected when you try to make a measurement, you may have to restart your computer. Step 4: At this point you can start the BodyView Personal application. This will launch the application and if it is your first time, you will play a training video. An options window as shown below will appear. Before starting the BodyView software make sure the BodyMetrix is plugged into the USB port as described in the previous section. The Green light should be on to indicate the device is connected. To start the BodyView software, go to the desktop and double‐click on the BodyView Personal icon. It may take a few seconds to load the software. After it has, the Homepage will appear. Home The Home page allows user to open existing profiles by simply clicking on the Open Existing Profile button. To open a profile, click open or double‐
click on the profile name. You have the option to watch the training video, open the user’s manual, or play a technical presentation which covers the science behind the BodyMetrix System. You can view the videos and user manual at a later time by clicking on the “?” help icon on the top right of the screen. If you click exit, the software will open up to the Home page. -5-
-6-
Administrator Options Creating a New Profile
To access the Administrator options click on the Administrator label on the bottom left‐hand side of the Home page. A dialog box will appear asking for a password. The password can be changed once you have gained access. The default password is: 123 To create a new profile simply click on the Create New Profile button to display the following input screen. Enter your name, birth date, gender, weight, height in the selected measurement units (lbs & inches or kg & cm). Make sure you also select the appropriate athletic type. The athletic type options are: Elite, Athletic, and Non‐Athletic. Under the General options tab you can change from US to Metric Units, change the Measuring Mode from Beginner to Advanced, enable touch screen, and select different skins to change the color scheme. You can also change the default password by clicking Change Administrator Password and enter a new password. The Manage Profiles tab allows you to delete profiles and produce group summaries. -7-
Choosing an Athletic Type: The Athletic Type provides additional information which is used by the BodyView to correctly process the ultrasound signal. It’s important that you select the correct athletic type using the following guideline. • Elite ‐ individuals generally have good muscle definition (“six pack abs”) and little excess fat, they generally exercise regularly and can include small frame (e.g. marathon runners) to large frame individuals (body builder). You can always change the athletic type once the profile has been created. • Athletic ‐ individuals do NOT look overweight and generally exercise occasionally. Most people fall into this category. • Non‐Athletic ‐ individuals are visibly overweight. If in doubt, select the more athletic category (e.g. Elite instead of Athletic). You will have the opportunity to change the athletic type if necessary. When finished Click start to continue. -8-
Measuring Body Fat Percentage After you have selected or created a profile you will move to the Body Composition page as shown below. NOTE: The first time you use the BodyMetrix System, the software will prompt you to calibrate the device. Simply press and hold the button for a few seconds to complete the calibration process.
To make a measurement you must first select a formula to use. In most cases the default 3‐point formula is a good option. For more accurate assessments formulas with more points can be used (e.g. 7 site Jackson & Pollock) . Simply use the drop down menu as shown above to select the desired formula. The number of available formulas depends on gender and age. The anatomical points used are identical to those used when making skinfold caliper measurements. To accurately track change it is important that you always make the measurements at the same location. Before starting a new measurement you should clean the device with an antiseptic wipe. -9-
To make a measurement select the anatomical point and then click on Measure Point to begin the assessment. Step 1: Apply a dime sized amount of ultrasound gel to the center of the BodyMetrix device as shown. This is usually 2‐3 pumps of our ultrasound gel dispenser. Step 2: Place the device on the measurement site and move the device to spread the gel uniformly over an area of approximately 2 inches. When you have completed doing this, slide the device to the measurement site and press the button for 3‐5 seconds while sliding the BodyMetrix device about 1/4 of an inch to either side of the start position. When sliding the device back and forth make sure you maintain good contact with the skin. Typically you would perform the back and forth motion 2‐4 times per second or at a rate that is comfortable to do. Performing this during the measurement averages the fat thickness over the scan area and provides more consistent measurements. Please watch the training video to see the recommended technique. WARNING: STOP use if you feel any burning sensation, or has adverse skin reaction and seek medical treatment. Report incident to IntelaMetrix as soon as possible (925) 606‐7044 . Step 3: After the 1st measurement you will be asked to repeat the measurement a second time. If the two measurements differ by more then 10% then you will be asked to repeat the measurement for a third time. When completed the measured value is automatically entered in the Points List. Step 4: Repeat steps 1‐3 for each of the measurement sites. Step 5: After all measurements are complete the software will calculate and display the Body Fat Percentage. Step 6: After completing the assessment, clean the device with an antiseptic wipe. - 10 -
Analyzing Body Fat % Assessments Trends and Reviewing Progress The measurement graph displayed on the Measure Screen may look intimidating, but if you’ve ever heard an echo you’re a long way to understanding the graph and how the BodyMetrix System uses ultrasound to measure tissue thickness. You hear an echo when sound travels through air and reflects from a wall or mountain and comes back to your ear. If you time how long it takes for you to hear the echo you can calculate how far away the reflecting object is. The BodyMetrix System generates an ultrasound signal that travels through tissue and then records the reflected signal. Continuing the echo analogy, the BodyMetrix device plays the role of your mouth and your ear. Ultrasound waves travel in tissue and strong reflections occur at the boundary of different tissue types, for example, fat‐muscle and muscle‐bone. The Trends page allows you to track changes in your body weight, body composition and fat thickness at individual sites as shown below. The measured values can be added to the graph by checking the box Show Values. Dates can be adjusted using the drop down calendars. Click on the Full Report button to print or view a report. Click on the Activity Calculator button to get a more accurate estimate of your calorie burn. The graph above shows a typical measurement. The horizontal axis corresponds to the thickness or depth of tissue and the vertical axis is the reflected signal. The first peak is the fat‐muscle boundary. The smaller peaks are different interfaces which can include connective tissue, or fat in the muscle layer. The last peak is the muscle‐bone interface since ultrasound does not penetrate. It’s important to note that the BodyMetrix measures the true tissue thickness unlike calipers which measure a skin fold thickness which can be anywhere from 1 to 3 times the true fat thickness. - 11 -
- 12 -
Scans Activity Calculator The Activity Calculator is an accurate tool for calculating your activity modified Basal Metabolic Rate. The activity adjusted BMR gives an accurate estimate of the average number of calories you need to consume per day to maintain your current weight.
To use the Activity Calculator enter the number of hours per week you devote to each activity category. Note that the calculator automatically modifies the “No Activity” number of hours to add up to a complete week. Each category has a list of qualifying activities which should provide a good guide for your selection. The breakdown of activities can then be viewed by time or by calories burned. The calculator uses the Katch‐McArdle formula which estimates the metabolic rate by using only lean mass. For this reason it is important that an accurate body composition assessment is performed before using the Activity Calculator. - 13 -
The BodyMetrix System can also be used to capture cross‐sectional images of specific areas of interest. This feature can be used to accurately track fat loss and muscle gain. The scan page below shows a scan of a male bicep. The important controls on this page are the Intensity which controls how the signal is amplified, the higher the intensity the stronger the signal reflection and consequently the deeper you can image. The Maximum Depth control determines the maximum depth that will be imaged. The Scan Speed control adjusts how quickly the tissue cross‐section image is updated left to right. For long tissue scans lower the scan speed. Ideally you want to fill the tissue cross‐section screen with the full scan. To perform a scan: Step 1: Apply approximately a quarter size amount of gel to the BodyMetrix device (this is a larger amount then you would use for a single point measurement). Step 2: Place the device on the skin at the desired starting position and slide it along the skin to evenly spread the gel over the complete section that you - 14 -
want to scan. Now, slide the device back up to the starting point and repeat this back and forth motion if necessary to make sure you have a smooth and slippery track. Now, when back at the start position press the measurement button and slowly slide the device along the skin until you get to the end of the scan section. Ideally, how fast you slide the device and the scan speed are adjusted to allow the image to completely fill the Scan panel. Step 3: When the scan is complete a cross sectional image will be created that shows the tissue structure along the complete scan region. The screen below shows an example of a scan along a thigh from the midpoint to the knee. By clicking and dragging to produce a rectangle, you can determine thickness measurements which are displayed in the measurement area. Interpreting Scans It is necessary to know how to interpret a body scan to take full advantage of this feature. The image represents a cross‐sectional view through the tissue along the scan area. Interfaces are found where the signal is strong. In the color scale used for the images white represent a strong signal, then light blue, then black. So generally white areas indicate a tissue interface. In the image below, a thigh was scanned from the midpoint to near the knee cap. The first strong signal as indicated by the white feature (red track) is the interface between the fat and muscle. You can see that the fat layer varies from 12.4 to 10 mm along the thigh. For most anatomical sites, the bone interface is generally the last strong signal feature as shown for the thigh. The strong signal within the total muscle layer is the interface between the two main muscle groups in the thigh. Since the scan ends near the knee, the total muscle thickness decreases as the device is moved closer to the knee cap. Although, a good understanding of ultrasound and cross‐sectional imaging is an asset, comparing scans is an easier process and can be used to monitor change in fat and muscle directly. B ON E
- 15 -
- 16 -
Tracking Features on Scans It is possible to annotate scans and accurately measure tissue structure and thickness. The screen below shows how interfaces can be automatically tracked to highlight layers on scans. To annotate a feature, first click on the Track Interface button and then click the mouse on the feature to be tracked on the image. For example, on the image below the mouse was clicked at the center on the first white feature which is the fat‐muscle interface. The software then followed that feature to produce the first red track showing fat thickness. If satisfied with the track results, click Stop Tracking. If unsatisfied, click the mouse on other sections of the feature to force the automatic tracking to go through each click points. It is possible to track multiple interfaces to measure tissue thickness. For example, to measure muscle thickness, you can track the muscle bone interface as shown below. To save the scan, click the Save Image button when satisfied with the scan and tracked features. To remove the last track, simply click Clear Track. Comparing Scans To compare any two saved scans, simply drag the desired “Saved Image” to the display panel. If the scan was saved with tracks then they will also be displayed. To remove the tracks from a scan, uncheck the Show Tracks check box. To maximum depth displayed on the images is determined by the Maximum Depth control. To measure the thickness of a tissue layer, click on a start point and drag the mouse to an end point. The measured thickness will be displayed in the measurement panel directly below the scan. To delete a scan, select the scan to be deleted and click Delete on your keyboard. To print a report of the selected scans, click Print Report. - 17 -
- 18 -
Measurement Site and Scan Point Guide Male & Female Bicep – The midpoint of the upper arm between shoulder and elbow. The arm should hang freely and relaxed on the side of the subject. To Scan, place at midpoint, press and hold the device measurement button while slowing sliding vertically down 3‐4 inches towards the elbow. Scapula ‐ Located just below the bottom tip of the shoulder blade. To Scan, place on the bottom tip of the scapula. Press and hold the device measurement button while slowly sliding horizontally 3‐4 inches to the right. Axilla ‐ Located the site below the armpit and level with the bottom of the sternum. To Scan, place on the axilla. Press and holding the button while slowly sliding vertically 3‐4 inches towards the hip. - 19 -
Waist ‐ Locate 1 inch to the side of the belly button. To Scan, place on the waist site. Press and hold the device measurement button while slowly sliding horizontally right 3‐4 inches towards the hip. Hip (Suprailic) – Locate 1 inch above the front side tip of the top of the hip bone. To Scan, place 1 inch above the above the front side tip of the top of the hip bone. Press and hold the device measurement button while slowly sliding horizontally to the right 3‐4 inches. Thigh – The midpoint the front thigh between the knee and in line with the hip joint. To Scan, place on the midpoint, press and hold the device measurement button while slowing sliding vertically 3‐4 inches towards the knee. - 20 -
Tricep – The midpoint of the back, upper arm, between the shoulder and the elbow. To Scan, place on the midpoint, press and hold the device measurement button while slowing sliding vertically 3‐4 inches down towards the elbow. Lower Back ‐ The site over the kidneys and 2 inches to the right of the spine. To Scan, place on site. Press and hold the device measurement button while slowly sliding horizontally to the right 3‐4 inches towards the hip. Calf – Inside midpoint on the back of the calf at the point of largest circumference. To Scan, place on the site. Press and hold the device measurement button while slowly sliding vertically 2‐3 inches down towards the ankle. Chest– Halfway between the shoulder and the nipple. To Scan, place on the axillary line. Press and hold the device measurement button while slowly sliding vertically 3‐4 inches towards the nipple. FAQ’s What if my device is damaged and/or the device or software is not working? Please contact IntelaMetrix Support at 925‐606‐7044 or [email protected]. Is the BodyMetrix System safe for children? Yes, it is safe for use on children. However, it is intended to be used on children 6 years or older. Is the BodyMetrix System safe for pregnant women, people with pacemakers, or other medical conditions? Yes, it is safe to use on all healthy individuals. Is there a significant difference in the numbers of site I use or formulas for calculating Body Fat Percentage? Depending on body type there can be a few percent difference between formulas used to measure Body Fat Percentage. We recommend that you select one formula and use it regularly to accurately track changes. How often should I do assessments and scans? It depends on your program, but it generally takes a minimum of 4‐6 weeks to see a change in body composition. How much ultrasound gel should I use? For Body Fat Percentage assessments, we suggest using a 1/4 inch (5 mm) diameter sized amount of gel. For Scans we suggest using 2‐3 times that amount to effectively coat the full scan area. Will the measurements change depending on how much pressure I apply? With normal, comfortable pressures there is little effect on the measured fat thickness. To study this effect go to the scan and apply the BodyMetrix device to a point of interest and keep the button pressed while you change the applied pressure. You should see a very small shift in the fat‐muscle border. - 21 -
- 22 -
Why is the BodyView software indicating Poor Contact? The most likely reason is that you didn’t apply enough gel or the BodyMetrix was at an angle on the skin – not making full contact with the skin. Also, when sliding the device to average, it is important to maintain good contact with the skin. DO NOT be afraid to apply a little pressure. Can I override fat thickness measurements? Yes, you can. If the automatic fat thickness measured is clearly in error, you can override the automatic calculation by stopping the measurement and clicking on the appropriate peak on the Measurement data graph. Select the peak you believe is the correct fat‐muscle border. A dialog box will appear asking you to confirm. This should rarely be necessary but in some cases, clients may have scar tissue within the fat layer that can hide the correct fat‐muscle border. How is Basal Metabolic Rate (BMR) calculated? We use the Katch‐McCradle formula to calculate BMR. How do I backup my database? If you perform regular backups of all your documents then the database should automatically be saved. However, if you want to directly back up the database you need to navigate to the folder C:\Documents and Settings\All Users\Application Data\Intelametrix and copy the folder BVP to your backup storage media. DO NOT move or tamper with the database file as it may cause problem with the software for future use. What is the difference between Beginner and Advanced measurement modes? In Beginner mode, the software has you do two measurements per side, and possibly a third if there is a significant variance. In Advanced mode, you do not need to even click Measure Point, you can just position the BodyMetrix and press the measure button. Why does the waist measurement seem incorrect? It is one of the few locations where there are two layers of fat. The first layer is the superficial fat and the second layer is the deep adipose fat. The two layers are separated by a border or interface called a fascia. Sometimes the software picks the fascia instead of the actual fat‐muscle interface. The fascia is generally the first large peak in the measurement. This occurs rarely; please manually override by clicking on the second large peak on the graph. If you continue to have this problem, you may want to change the Athletic Type. For example, change from Athletic to Non‐
Athletic. - 23 -
Care and Maintenance To insure the proper care and maintenance of your BodyMetrix System, always remember to do the following: NEVER use the device if the device or cord is broken or damaged. NEVER use the device if the device is wet. NEVER use the device on an open sore or cut. DO NOT use abrasive or harsh chemicals to clean the device. DO NOT drop the device as it may cause damage to it. DO NOT store the device near a heat source or subject it to high temperatures, humidity, or direct sunlight as in may cause damage. ALWAYS use an antiseptic wipe or cloth with 70% isopropyl alcohol in between uses. Failure to do so may result in void of warranty. Symbols Manufacturer Warning Contact Us: If you have any problems with your BodyMetrix System, please contact IntelaMetrix Support: IntelaMetrix, Inc. 6246 Preston Ave. Livermore, CA 94551 USA +1 925‐606‐7044 [email protected] - 24 -
Limited 1 Year Warranty The BodyMetrix Personal System and BodyMetrix BX2000 device is warranted to be free from defects in materials and workmanship for a period of 1 year from the date of original purchase under normal use. The warranty extends only to original retail purchaser. If the product becomes defective during the warranty period, please contact IntelaMetrix, Inc. for repairs or replacement. The warranty DOES NOT cover products damaged by the following: Accident, misuse, abuse, or alteration. Servicing by unauthorized persons. Use of unauthorized accessories. Any other condition beyond our control. INTELAMETRIX®, INC. SHALL NOT BE RESPONSIBLE FOR ANY INCIDENTAL, SPECIAL, OR CONSEQUENTIAL DAMAGE RESULTING FROM THE USE OF THIS PRODUCT. ALL IMPLIED WARRANTIES INCLUDING BUT NOT LIMITED TO IMPLIED WARRANTIES OF FITNESS AND MERCHANTABILITY ARE LIMITED IN DURATION TO 1 YEAR FROM ORIGINAL PURCHASE. This warranty gives you specific legal rights, and you may also have other rights that vary from state to state. Some states do not allow the exclusion or limitation of incidental or consequential damages, or limitations on how long an implied warranty last, so the above limitations may not apply to you. - 25 -
Notes
- 26 -
Notes
For questions please call:
+1 925‐606‐7044 Or email: [email protected] IntelaMetr x
®
IntelaMetrix®, Inc. 6246 Preston Ave. Livermore, CA 94551 USA www.intelametrix.com Copyright© 2005 ‐ 2013 IntelaMetrix®, Inc. The name IntelaMetrix®, BodyMetrix™, and BodyView ™ are registered trademarks of IntelaMetrix®, Inc. Patents pending. All rights reserved. No part of this book may be reproduced in any form electronically or by mechanical means, including information storage or retrieval systems, without the expressed written consent of IntelaMetrix®, Inc. IU‐09‐036/PerWIn Rev A
- 27 -
- 28 -