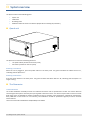
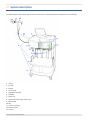
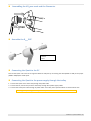
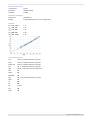
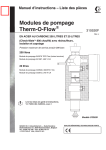
1
Quark PFT Quark CPET Quark SPIRO Manuale Utente User Manual Manuel d’utilisation Benutzerhandbuch Manual del Usuario COSMED does not assume any liability for end user interpretation of this user manual or for casual or consequential damages in connection with the provision, representation or use of this documentation. No parts of this manual may be reproduced or transmitted in any form without the expressed written permission of COSMED Srl. Each copy of the COSMED Software can only be installed on one computer. Excel is a registered trademark of Microsoft Corporation. DBIII is a registered trademark of Bordland International Inc. Lotus 123 is a registered trademark of Lotus Development Corporation. Quark User manual, XI Edition 06/2013 Copyright © 2012 COSMED COSMED Srl - Italy http://www.cosmed.com Part N. C03262-02-91 2 Table of contents Table of contents ........................................................................................................... 3 Getting started .............................................................................................................. 9 Important notices ................................................................................................................................................... 10 Intended use ........................................................................................................................................................ 10 Specific Indications for use .............................................................................................................................. 10 Description of the acronyms used in measured parameters ............................................................................. 10 Warnings ............................................................................................................................................................. 11 Contraindications ................................................................................................................................................... 13 Contraindications for the spirometry testing ....................................................................................................... 13 Absolute contraindications.............................................................................................................................. 13 Relative contraindications ............................................................................................................................... 13 Contraindications for Bronchial Provocation testing ............................................................................................ 13 Absolute contraindications.............................................................................................................................. 13 Relative contraindications ............................................................................................................................... 13 Contraindications for Exercise testing .................................................................................................................. 14 Absolute contraindications.............................................................................................................................. 14 Relative contraindications ............................................................................................................................... 14 Environmental condition of use.............................................................................................................................. 15 EMC ........................................................................................................................................................................ 16 Overview of the manual ......................................................................................................................................... 20 Introduction ........................................................................................................................................................... 21 System overview .................................................................................................................................................... 22 Quark unit............................................................................................................................................................ 22 Powering on the device ................................................................................................................................... 22 Powering off the device................................................................................................................................... 22 The flowmeter ..................................................................................................................................................... 22 Turbine flowmeter .......................................................................................................................................... 22 Pneumotach Flowsafe ..................................................................................................................................... 23 Pneumotach X9............................................................................................................................................... 23 The breathing valve ............................................................................................................................................. 24 The exercise test mask ......................................................................................................................................... 24 The canopy hood ................................................................................................................................................. 25 Paper mouthpieces .............................................................................................................................................. 25 PTE soft mouthpieces .......................................................................................................................................... 25 Antibacterial filters .............................................................................................................................................. 26 Nose clips............................................................................................................................................................. 26 The HR probe ....................................................................................................................................................... 26 The oximeter ....................................................................................................................................................... 26 The ROCC PNT ........................................................................................................................................................ 27 3 The mixing chamber ............................................................................................................................................. 27 The dosimeter ...................................................................................................................................................... 27 System warm-up ..................................................................................................................................................... 29 Installation .................................................................................................................. 31 Before starting ........................................................................................................................................................ 32 Checking the packing contents ............................................................................................................................. 32 Device packaging.................................................................................................................................................. 32 Quark Spiro standard packaging ...................................................................................................................... 32 Quark PFT standard packaging ......................................................................................................................... 32 Quark CPET standard packaging ....................................................................................................................... 32 Packaging of optional products ............................................................................................................................ 33 Turbine (ID28) Option standard packaging ....................................................................................................... 33 PNT Option standard packaging ....................................................................................................................... 34 Spiro Turbine (ID28) Option standard packaging .............................................................................................. 34 Lung Volumes module standard packaging ...................................................................................................... 34 DLCO module standard packaging.................................................................................................................... 34 Respiratory Mechanics Module standard packaging ......................................................................................... 34 CPET Module standard packaging .................................................................................................................... 34 Oximeter module standard packaging.............................................................................................................. 35 Airway Resistances module standard packaging ............................................................................................... 35 Nutritional module standard packaging ........................................................................................................... 35 Mixing chamber module standard packaging ................................................................................................... 35 Dosimeter module standard packaging ............................................................................................................ 36 Options/Accessories ............................................................................................................................................... 37 System description ................................................................................................................................................. 38 Quark installation ................................................................................................................................................... 40 Quark front panel................................................................................................................................................. 40 Quark rear panel .................................................................................................................................................. 40 Calibration cylinders............................................................................................................................................. 41 Assembling the gas regulators on the cylinder ................................................................................................. 41 Connecting the hoses to the cylinders.............................................................................................................. 42 Connecting the cylinders to the Quark ............................................................................................................. 43 Assembling the breathing valve and the flowmeter ............................................................................................. 43 Assembling the flowmeter to the handle ............................................................................................................. 44 Assembling the VO2max mask and the flowmeter................................................................................................ 45 Assemble the ROCC PNT ......................................................................................................................................... 45 Connecting the Quark to the PC ........................................................................................................................... 45 Connecting the Quark to the power supply through the trolley ........................................................................... 45 Preparing the device and the patient for exercise testing ....................................................................................... 46 Preparing the Quark ............................................................................................................................................. 46 Patient preparation .............................................................................................................................................. 46 The mask......................................................................................................................................................... 46 The HR elastic belt ........................................................................................................................................... 46 ECG electrodes ................................................................................................................................................ 47 Using a mouthpiece instead of a face mask ...................................................................................................... 48 How to contact COSMED......................................................................................................................................... 48 Complaints, feedback and suggestions............................................................................................................. 49 4 System maintenance ................................................................................................... 51 System maintenance .............................................................................................................................................. 52 Cleaning and disinfecting........................................................................................................................................ 53 Prevention of infection transmission ................................................................................................................... 53 Transmission to technicians ............................................................................................................................ 53 Cross-contamination ....................................................................................................................................... 53 Tuberculosis.................................................................................................................................................... 53 Haemoptysis and oral lesions .......................................................................................................................... 53 Other known transmissible infectious diseases ................................................................................................ 53 Disposable in-line filters .................................................................................................................................. 53 Other precautions and warnings .......................................................................................................................... 53 Introduction......................................................................................................................................................... 54 Cleaning ............................................................................................................................................................... 54 Cleaning Agents/supplies ................................................................................................................................ 54 Standard cleaning procedure........................................................................................................................... 55 Disinfection.......................................................................................................................................................... 55 Preparing the disinfecting solution .................................................................................................................. 55 The turbine flowmeter ......................................................................................................................................... 56 Cleaning the turbine........................................................................................................................................ 56 Disinfecting the turbine ................................................................................................................................... 56 Precautions to take when cleaning, disinfecting and drying the turbine ........................................................... 56 PNT X9 ................................................................................................................................................................. 56 VO2max mask and mixing chamber mask ............................................................................................................ 56 Disassembling the mask .................................................................................................................................. 56 Cleaning the mask ........................................................................................................................................... 57 Disinfecting the mask ...................................................................................................................................... 57 Sterilizing the mask ......................................................................................................................................... 58 Reassembling the mask and components ........................................................................................................ 58 Cleaning the headcap assembly ........................................................................................................................... 58 Breathing valve .................................................................................................................................................... 58 Disassembling the breathing valve................................................................................................................... 58 Cleaning the breathing valve ........................................................................................................................... 59 Disinfecting the breathing valve ...................................................................................................................... 60 Reassembly the breathing valve ...................................................................................................................... 60 Cleaning and disinfecting the RMR canopy hood and veil (option) ...................................................................... 60 Cleaning hood and veil .................................................................................................................................... 60 Disinfecting hood and veil ............................................................................................................................... 60 The mixing chamber (option): cleaning and disinfection ...................................................................................... 60 Disassembling the mixing chamber.................................................................................................................. 60 Cleaning the mixing chamber .......................................................................................................................... 61 Disinfecting the mixing chamber ..................................................................................................................... 61 Reassembling the mixing chamber. ................................................................................................................. 61 Two-way non rebreathing valve (mixing chamber option) cleaning and disinfection ........................................... 61 Cleaning and disinfecting the dosimeter nebulizer............................................................................................... 61 Routine cleaning ............................................................................................................................................. 62 Disinfection..................................................................................................................................................... 62 Sampling line maintenance (Permapure) ................................................................................................................ 63 Inspections ............................................................................................................................................................. 64 5 Replace the fuses .................................................................................................................................................... 65 Appendix ..................................................................................................................... 67 Dichiarazione di conformità .................................................................................................................................... 68 Service - Warranty .................................................................................................................................................. 69 Warranty and limitation of liability ...................................................................................................................... 69 Return goods policy for warranty or non warranty repair .................................................................................... 69 Repair Service Policy ............................................................................................................................................ 69 Privacy Information ................................................................................................................................................ 71 Personal data treatment and purposes ................................................................................................................ 71 How your personal data is treated ....................................................................................................................... 71 Consent ................................................................................................................................................................ 71 Holder of the personal data ................................................................................................................................. 71 Customer rights .................................................................................................................................................... 71 Disposing of electrical equipment ........................................................................................................................... 72 Safety and conformity ............................................................................................................................................ 73 Safety .............................................................................................................................................................. 73 EMC ................................................................................................................................................................ 73 Paramagnetic O2 analyzer ................................................................................................................................ 73 Quality Assurance............................................................................................................................................ 73 Medical Device Directive (CE mark).................................................................................................................. 73 Technical features................................................................................................................................................... 74 Flowmeter....................................................................................................................................................... 74 O2 analyzer ...................................................................................................................................................... 74 CO2 analyzer .................................................................................................................................................... 74 CO analyzer ..................................................................................................................................................... 74 CH4 analyser .................................................................................................................................................... 74 Humidity absorber........................................................................................................................................... 74 Power Supply .................................................................................................................................................. 74 Environmental Sensors .................................................................................................................................... 75 Dimension and Weight .................................................................................................................................... 75 Oximeter ......................................................................................................................................................... 75 Accuracy specifications .................................................................................................................................... 75 Calculations references ........................................................................................................................................... 76 VO2 and VCO2 ....................................................................................................................................................... 76 Anaerobic Threshold (modified V-Slope) .............................................................................................................. 76 References ...................................................................................................................................................... 76 Oxygen Kinetics .................................................................................................................................................... 76 Predicted values ..................................................................................................................................................... 77 Automatic diagnosis (algorithm) .......................................................................................................................... 78 Quality Control Messages..................................................................................................................................... 78 References .............................................................................................................................................................. 80 Spirometry ...................................................................................................................................................... 80 Dosimeter ....................................................................................................................................................... 80 Lung Volumes .................................................................................................................................................. 80 Single-Breath with Apnoea .............................................................................................................................. 80 Single-Breath without Apnoea ......................................................................................................................... 80 MIP/MEP ......................................................................................................................................................... 80 6 P0.1 ................................................................................................................................................................ 80 Resistance....................................................................................................................................................... 80 Gas Exchange .................................................................................................................................................. 80 Indirect Calorimetry ........................................................................................................................................ 81 Sub-maximal exercise testing .......................................................................................................................... 81 Oximeter......................................................................................................................................................... 81 Canopy ........................................................................................................................................................... 81 General ........................................................................................................................................................... 81 7 Getting started Important notices Intended use The COSMED Quark Series system is a modular system with multiple configurations, allowing the following measurements: Spirometry, Lung Function Testing, Cardiopulmonary Exercise Testing, Resting Metabolism. The system and its accessories are indicated for the acquisition, analysis, formatting, display, printing and storage of certain physiologic signals. It is intended to assist a clinician in the diagnosis of cardio-pulmonary disease conditions. Caution: Federal law restricts this device to be sold by the order of a physician. The device must not be intended as a monitoring device, nor as a sole means for determining a patients diagnosis but for the purpose of assisting the clinician in the diagnosis of cardio-pulmonary diseases. This equipment is intended to be used for the following applications: Formulating of a lung pathology diagnosis. Assisting with human physiology studies. Contributing to sports medicine applications. COSMED Srl is not responsible for incidents which occur due to improper use of this device. Examples include: Operation of the device by unqualified individuals. Use of the device not indicated by this manual. Not complying with the precautions and instructions described in this manual. Specific Indications for use Device model Indication for use Major clinical conditions Measured parameters Quark SPIRO Pulmonary Function testing - Age 6 to adults Spontaneously breathing patients, healthy or affected by respiratory diseases such as asthma or COPD FVC, FEV1, FEF25-75%, PEF, MVV, SpO2 Quark PFT Pulmonary Function testing - Age 6 to adults Spontaneously breathing patients, healthy or affected by respiratory diseases such as asthma or COPD FVC, FEV1, FEF25-75%, PEF, MVV, FRC, DLCO, MIP/MEP, P0.1, SpO2, Ve, RF, HR, VO2, VCO2, TGV Spontaneously breathing patients, healthy or affected by diseases limiting exercise tolerance FVC, FEV1, FEF25-75%, PEF, MVV, VO2, VCO2, Ve, RF, HR, SpO2 Cardiopulmonary Exercise testing – age 6 to adults Quark CPET Pulmonary Function testing - Age 6 to adults Cardiopulmonary Exercise testing – age 6 to adults Quark SPIRO and Quark PFT also allows the Airways Resistance Test through the interruption technique (ROCC test) for young patients from 3 to 6 years old. ROCC technique was specifically developed for young, non cooperative children, not able to perform the spirometric maneuvers. The interrupter technique is feasible and repeatable in preschool children, has a good correlation with “gold standard” techniques, and is able to detect changes in airway caliber. Description of the acronyms used in measured parameters Parameter Description Parameter Description FVC Forced Expiratory Vital Capacity P0.1 Respiratory Drive FEV1 Forced Expiratory Volume in 1 sec Ve Ventilation FEF25-75% Mid-expiratory flow between 25-75% of the FVC RF Respiratory frequency PEF Peak Expiratory Flow HR Heart Rate MVV Maximum Voluntary Ventilation VO2 Oxygen uptake FRC Functional Residual Capacity VCO2 Carbon Dioxide production 10 - Getting started - Important notices DLCO CO Diffusion Capacity SpO2 Hemoglobin saturation MIP Maximum inspiratory pressure TGV Thoracic Gas Volume MEP Maximum expiratory pressure Warnings The device, program algorithms and presentation of the measured data has been developed in accordance with the specifications outlined by the ATS (American Thoracic Society) and ERS (European Respiratory Society). Additional international references have also been applied where applicable. All bibliography references are reported in the Appendix. This User Manual has been developed in accordance with the Class IIa European Medical Device Directive requirements. Warning: To avoid risk of electric shocks, this device must be connected to sockets with protective earth. The precautions listed below should be noted before operating the device to ensure the safety of the user. 1. This User Manual should always be available as a reference when testing. 2. The following standards should be applied to ensure the accuracy of individual test results: Accessories should only be used as described in this manual. The manufacturer does not warranty any nonauthorized accessories used by the end user. The manufacturer may offer suggestions while using such accessories and the complications they could cause; Repairs or modifications of the device should ONLY be carried out by qualified and trained personnel; Environmental and electrical conditions in which the device operates should be in compliance with the specifications of this manual. In particular grounding reliability and leakage current suppression can only be assured when the device three-wire receptacle is connected to a yellow-green return connected to earth ground. Attempting to defeat the proper connection of the ground wire is dangerous for users and equipment. Equipment maintenance, inspections, disinfection and cleaning should be as described in this manual. 3. Before powering on the system, the power cords and plugs should be inspected. Damaged electrical parts must be replaced immediately by authorized personnel. 4. Large gas cylinders provided by the manufacturer or purchased by the customer must be secured with cylinder safety chains or safety stands as required by local law. 5. After removing the protective cap of the cylinder you should inspect the cylinder valve for damaged threads, dirt, oil and/or grease. Any dust or dirt should be removed and the cylinder should not be used if oil or grease is present. 6. You should ensure that the pressure regulator is chemically and physically compatible with the intended gas cylinder before installation. The regulator must be properly connected. Note the pressure gauge for the regulator. The physical condition of the regulator, threads and fittings should also be examined prior to installation. Any dust or dirt on the regulator or cylinder valve should be removed with a clean cloth. The regulator should not be installed on a cylinder valve if grease or oil is present. 7. After connecting the regulator to the cylinder you should increase the regulator output pressure to the recommended value (5-6 bars/70-90 psi). 8. The cylinder and pressure regulator must be closed before disconnecting the cylinder from the device. 9. Residue and other contaminants in the breathing circuit pose a safety risk to the patient during testing procedures. Aspiration of contaminants can be potentially life-threatening. If the recommended disposable anti-bacterial filters are not used, you must disinfect each part coming into contact with the patient and patient’s breath prior to each test. 10. The cleaning procedures and inspections in the System Maintenance section should be performed prior to each test. 11. This device should not be used in the presence of flammable anaesthetics. This is not an AP or APG device (according to the EN 60 601-1 definitions). 12. The device should not come near any heat or flame sources, flammable or inflammable liquids or gases and explosive properties. 13. The device should not be used in conjunction with any other medical device unless that device is recommended by the manufacturer. 14. The device should be used with a computer with electromagnetic compatibility, CE marking and low radiation emission displays. 15. The PC connected to the device must be compliant with EN 60601-1 by means of an isolation transformer. Getting started - Important notices - 11 16. Precautions regarding EMC should be taken prior to installation and can be noted in the section EMC. 17. Portable and mobile RF communication equipment may interfere with the performance of the device. 18. Only the cable and accessories supplied with the equipment should be used with the device. The use of accessories and/or cables other than those supplied may result in increased emissions or decreased immunity of the equipment. 19. The device should not be used adjacent to or stacked with other equipment. If this is necessary, you must verify that the device continues to operate normally in the configuration in which it will be used. 20. The graphical symbols used with the device are described below: Applied part type B (EN60601-1) Applied part type BF (EN60601-1) OFF ON Protective earth ground Alternating current Potential equalization node PC connection Connector for the RH/TA sensor TTL auxiliary input/output USB connector HR probe connector Refer to the instructions for use 12 - Getting started - Important notices Contraindications Performing forced expiratory manoeuvres involved in spirometry testing may be contraindicated in certain conditions. Contraindications for the spirometry testing Absolute contraindications For FVC, VC and MVV tests: Post-operative thoracic surgery patients. For FVC tests: Severe instability of the airways (patients with severe Emphysema). Bronchial non-specific marked hypersensitivity. Severe gas exchange impairment (total or partial respiratory insufficiency). Relative contraindications For FVC tests: Spontaneous post-pneumothorax. Arterial-venous aneurysm. Severe arterial hypertension. Pregnant with complications in the 3rd month. For MVV tests: Hyperventilation syndrome. Contraindications for Bronchial Provocation testing Bronchial Provocation testing must be executed under the direction of a physician. Testing is considered safe when executed properly in a clinical setting, but the following contraindications should be acknowledged prior to testing: Absolute contraindications Severe bronchial obstruction (decreased FEV1 in adults). Recent myocardium infarct. Recent cerebral vascular accident. Known arterial aneurysm. Incapacity for understanding the provocation test procedures and its implications. Relative contraindications Bronchial obstruction caused by performing respiratory manoeuvres. Moderate or serious bronchial obstruction (FEV1 < 1.51 in men and FEV1 < 1.21 in women). Recent respiratory infection. Recent Asthma exacerbation. Hypertension Pregnancy Epilepsy Getting started - Contraindications - 13 Contraindications for Exercise testing Absolute contraindications Acute MI (within 2 days) High-risk unstable angina Uncontrolled cardiac arrhythmias causing symptoms of hemodynamic compromise Active endocarditis Symptomatic severe aortic stenosis Decompensated symptomatic heart failure Acute pulmonary embolus or pulmonary infarction Acute noncardiac disorder that may affect exercise performance or be aggravated by exercise (eg, infection, renal failure, thyrotoxicosis) Acute myocarditis or pericarditis Physical disability that would preclude safe and adequate test performance Inability to obtain consent Relative contraindications Left main coronary stenosis or its equivalent Moderate stenotic valvular heart disease Electrolyte abnormalities Tachyarrhythmias or bradyarrhythmias Atrial fibrillation with uncontrolled ventricular rate Hypertrophic cardiomyopathy Mental impairment leading to inability to cooperate High-degree AV block Note: Relative contraindications can be superseded if benefits outweigh risks of exercise. Read carefully the exercise testing chapter. 14 - Getting started - Contraindications Environmental condition of use COSMED units should not be operated near explosive substances. Equipment should not be installed near electrical or magnetic devices such as x-ray equipment, transformers or power lines. These devices could create electrical interferences when performing testing procedures. COSMED devices are not AP or APG units (according to EN 60601-1) and should never be operated in the presence of flammable anaesthetic mixtures. COSMED equipment should be operated under normal environmental temperatures and conditions which are defined as follows [IEC 60601-1/EN 60601-1]: Temperatures range: 10°C (50°F) and 40°C (104°F). Relative humidity range: 30% to 90% (not condensing). Atmospheric Pressure range: 600 mBar to 1060 mBar. Avoid operating equipment in the presence of noxious fumes or in dusty environments. Do not place units near heat sources. Cardiopulmonary resuscitation equipment should be accessible in the case of an emergency. Adequate floor space and easy access to the patient during exercise testing is necessary. Adequate ventilation should be maintained in the room the testing is performed. Getting started - Environmental condition of use - 15 EMC Guidance and manufacturer’s declaration - electromagnetic emissions The device is intended for use in the electromagnetic environment specified below. The customer or the user of the device should assure that it is used in such an environment. Emissions test Compliance Electromagnetic environment – guidance RF emissions CISPR 11 Group 1 The device uses RF energy only for its internal function. Therefore, its RF emissions are very low and are not likely to cause any interference in nearby electronic equipment. RF emissions CISPR 11 Class B Harmonic Emission IEC 61000-3-2 Voltage Fluctuations / Flicker Emission IEC 61000-3-3 Class A The device is suitable for use in all establishments, including domestic establishments and those directly connected to the public low-voltage power supply network that supplies buildings used for domestic purposes. 16 - Getting started - EMC Complies Guidance and manufacturer’s declaration - electromagnetic immunity The device is intended for use in the electromagnetic environment specified below. The customer or the user of the device should assure that it is used in such an environment. Immunity test Test level IEC 60601-1 Electrostatic discharge (ESD) IEC 61000-4-2 Compliance level Electromagnetic environment – guidance ±6 kV contact ±8 kV air ±6 kV contact ±8 kV air Floors should be wood, concrete or ceramic tile. If floors are covered with synthetic material, the relative humidity should be at least 30%. ±2 kV for power supply lines ±1 kV for input/output lines ±2 kV for power supply lines ±1 kV for input/output lines Mains power quality should be that of a typical commercial or hospital environment. ±1 kV differential mode ±1 kV differential mode Mains power quality should be that of a typical commercial or hospital environment. ±2 kV common mode ±2 kV common mode Voltage dips, short interruptions and voltage variations on power supply input lines IEC 61000-4-11 <5% UT (>95% dip in UT) for 0.5 cycles 40% UT (60% dip in UT) for 5 cycles 70% UT (30% dip in UT) for 25 cycles <5% UT (>95% dip in UT) for 5 sec <5% UT (>95% dip in UT) for 0.5 cycles 40% UT (60% dip in UT) for 5 cycles 70% UT (30% dip in UT) for 25 cycles <5% UT (>95% dip in UT) for 5 sec Mains power quality should be that of a typical commercial or hospital environment. If the user of the device requires continued operation during power mains interruptions, it is recommended that the device be powered from an uninterruptible power supply or a battery. Power frequency (50/60 Hz) magnetic field 3 A/m 3 A/m Power frequency magnetic fields should be at levels characteristic of a typical location in a typical commercial or hospital environment. Electrical transient/burst IEC 61000-4-4 fast Surge IEC 61000-4-5 IEC 61000-4-8 Nota: UT is the a.c. mains voltage prior to application of the test level. Getting started - EMC - 17 Guidance and manufacturer’s declaration - electromagnetic immunity The device is intended for use in the electromagnetic environment specified below. The customer or the user of the device should assure that it is used in such an environment. Immunity test Test level IEC 60601-1 Compliance level Electromagnetic environment – guidance Portable and mobile RF communications equipment should be used no closer to any part of the device, including cables, than the recommended separation distance calculated from the equation applicable to the frequency of the transmitter Recommended separation distance d=1.17 P d=1.17 P 80 MHz to 800 MHz Conducted RF IEC 61000-4-6 3 Veff 150 kHz to 3V 80 MHz Radiated RF 3 V/m IEC 61000-4-3 80 MHz to 2.5 GHz 3 V/m d=2.33 P 800 MHz to 2.5 GHz where P is the maximum output power rating of the transmitter in watts (W) according to the transmitter manufacturer and d is the recommended separation distance in metres (m). Field strengths from fixed RF transmitters, as determined by an electromagnetic site surveya, should be less than the compliance level in each frequency rangeb. Interference may occur in the vicinity of equipment marked with the following symbol: Notes: (1) At 80 MHz, the higher frequency range applies. (2) These guidelines may not apply in all situations. Electromagnetic propagation is affected by absorption and reflection from structures, objects and people. a Field strengths from fixed transmitters, such as base stations for radio (cellular/cordless) telephones and land mobile radios, amateur radio, AM and FM radio broadcast and TV broadcast cannot be predicted theoretically with accuracy. To assess the electromagnetic environment due to fixed RF transmitters, an electromagnetic site survey should be considered. If the measured field strength in the location in which the device is used exceeds the applicable RF compliance level above, the device should be observed to verify normal operation. If abnormal performance is observed, additional measures may be necessary, such as reorienting or relocating the device. b Over the frequency range 150 kHz to 80 MHz, field strengths should be less than 3 V/m 18 - Getting started - EMC Recommended separation distances between portable and mobile RF communications equipment and the device The device is intended for use in an environment in which radiated RF disturbances are controlled. The customer or the user of the device can help prevent electromagnetic interference by maintaining a minimum distance between portable and mobile RF communications equipment (transmitters) and the device as recommended below, according to the maximum output power of the communications equipment. Rated maximum output power of transmitter (W) Separation distance according to frequency of transmitter (m) 150 kHz to 80 MHz d=1.17 80 MHz to 800 MHz P d=1.17 800 MHz to 2.5 GHz P d=2.33 0.01 0.12 0.12 0.23 0.1 0.37 0.37 0.74 1 1.17 1.17 2.33 10 3.70 3.70 7.38 100 11.70 11.70 23.33 P For transmitters rated at a maximum output power not listed above, the recommended separation distance d in metres (m) can be determined using the equation applicable to the frequency of the transmitter, where P is the maximum output power rating of the transmitter in watts (W) according to the transmitter manufacturer. Notes: (1) At 80 MHz and 800 MHz, the separation distance for the higher frequency range applies. (2) These guidelines may not apply in all situations. Electromagnetic propagation is affected by absorption and reflection from structures, objects and people. Getting started - EMC - 19 Overview of the manual This manual is organized in the following chapters: Getting started. Describes the intended use of the device, how to properly use it and features of the unit and accessories. Installation. Lists the steps required to properly install the device. System maintenance. Describes system maintenance procedures. Appendix. Contains information regarding the warranty, treatment of personal data, reference standards, technical features, predicted values and bibliographic references. Software and test execution are described in the Software Manual. We recommend to read both manuals before using this device. 20 - Getting started - Overview of the manual Introduction The Quark is the designed for evaluation of the cardiorespiratory system. The system can perform spirometry, lung volumes, diffusion or exercise testing. The Quark can be configured with the following modules according to the user’s needs: Quark Spiro Quark PFT Quark CPET Spirometry Lung volumes - - DLCO - - Respiratory mechanics - - CPET - Dosimeter - Oximeter Airway resistances - Nutritional (Canopy) - Mixing Chamber - Quark C12 - In the packaging Optional The Quark Spiro and Quark PFT should be configured with either the turbine flowmeter or PNT. Each module will allow the following tests to be performed: Spirometry: FVC, VC, and MVV. Lung volumes: FRC (via Nitrogen Wash-out) and Closing Volume. DLCO: Diffusion capacity (with or without apnoea or intra-breath method). Respiratory mechanics: MIP/MEP and P0.1. CPET: Breath by breath exercise testing. Dosimeter: Allows measurements to be obtained after the delivery of broncho-provocators according to standardized protocols. Oximeter: Oximetry tests. Airway Resistance: Airway Resistance via the interruption method. Nutritional (Canopy): Resting Metabolic Rate. Mixing Chamber: Exercise testing using the mixing chamber technique (ideal for sports medicine). Quark C12: Incorporates the ECG during exercise testing. Getting started - Introduction - 21 System overview The Quark consists of the following parts: Quark unit Flowmeter Breathing valve Additional external sensors and devices (temperature-humidity, HR, oximeter). Quark unit The Quark unit contains the following elements: The power switch (located on the front panel) Connectors (located on the rear panel) Powering on the device When the unit is plugged in, press the power switch on the front panel. The green led above the switch will turn on, indicating that the Quark is on. Powering off the device Press the power switch on the front panel. The green led above the switch will turn off, indicating that the Quark is no longer running. The flowmeter Turbine flowmeter The turbine flowmeter assembly consists of a bidirectional turbine and an optoelectronic reader. The reader measures infrared light interruptions caused by the spinning blade inside the turbine. The device may be used to measure a wide flow range and is not affected by ambient conditions (pressure, humidity, room temperature, exhaled gas composition). Daily calibration of the turbine is not necessary, but calibrations should be performed regularly to assure accurate measurements. There are three turbine flowmeters: ID28, ID28 Spiro and ID18. 22 - Getting started - System overview The ID28 flowmeter can be used for all tests except for RMR testing and is provided with the Quark PFT and Quark CPET modules. The ID28 flowmeter is identical to the ID28 with the absence of a sampling line. This flowmeter should only be used for spirometry testing when exhaled flow gas analysis is not necessary. This flowmeter is provided with the Quark Spiro module. The ID18 flowmeter is used for RMR testing and it is provided with the Nutritional modules. Pneumotach Flowsafe The PNT flow measurements are obtained by measuring the pressure differential between the two sides of a polyester net. The device may be used to measure a wide flow range and is not affected by ambient conditions (pressure, humidity, room temperature, exhaled gas composition). Daily calibration of the PNT is not necessary, but calibrations should be performed regularly to assure accurate measurements. The PNT should be used for spirometry testing only. Pneumotach X9 As for the Flowsafe, the X9 calculates the flow by measuring the differential pressure between the two sides of a polyester net. Getting started - System overview - 23 Differently from the Flowsafe, the X9 can be reused, after proper disinfection, must be calibrated as the turbine flowmeter and can be used for all spirometry tests. Each X9 is shipped with customized linearization tables. It is necessary to load the tables from the included USB key into the software, see section Calibration. The USB key and X9 will have the same serial number. Note: The PNT X9 must be used with the COSMED antibacterial filter. The breathing valve This breathing valve allows the breathing circuit to automatically switch between the demand valve (connected to the gas cylinder) and ambient air. This valve closes during DLCO testing to block the air going to the patient during the required apnea time. The body of the valve is made of ABS plastic with a silicone membrane used to open and close the breathing circuit. The valve is easily connected to the flowmeter and easily disassembled for disinfection. Either the patient should hold the valve or an articulated arm should can be used to support it. The exercise test mask The exercise test masks are made of silicone and may be reused after proper disinfection (see the chapter Maintenance). These blue masks are available in different sizes and should be assembled the included head cap as shown in the chapter Exercise testing. 24 - Getting started - System overview The canopy hood The canopy hood allows the patient’s exhaled air to blend with ambient air. This mixture is then inspired by a pump with a known flow and the patient’s Oxygen Consumption, CO2 production and Energy Expenditure can be calculated. Paper mouthpieces Paper mouthpieces are available for basic spirometry tests (FVC, VC, and MVV). The mouthpieces should not be used for any other testing. PTE soft mouthpieces The PTE soft mouthpieces are available for all tests other than spirometry. Getting started - System overview - 25 Antibacterial filters The use of antibacterial filters is recommended for infection control. However, regular cleaning and decontamination of lung function equipment should always be performed. Note: The use of antibacterial filters is recommended even when using disposable mouthpieces to prevent cross-contamination. Nose clips Nose clips should be used during spirometry testing to prevent respiration through the nasal passage while performing testing manoeuvres. The HR probe The HR probe consists of three parts: the elastic belt containing the transmitter and the USB receiver. The parts should be assembled as close as possible to one another to acquire the most effective communication signal. The oximeter 26 - Getting started - System overview The oximeter probe should be placed on the patient’s finger to measure oxygen saturation at rest or during exercise. The ROCC PNT The Rocc PNT allows the measurement of airway resistance by implementing the interruption technique. The mixing chamber The mixing chamber is a 8.7-litres plexiglas box, for exercise or resting tests with the classic mixing chamber technique instead of the breath by breath one. The dosimeter Getting started - System overview - 27 The dosimeter is made of a nebulizer and accessories for the bronchoprovocator to be given to the patient, for bronchoprovocation tests. Its packaging includes the nebulizer, a tubing for the Quark connection, a mouthpiece and different adapters. Its use is described in the chapter The dosimeter. 28 - Getting started - System overview System warm-up Before using the Quark the system must be warmed up for the required amount of time. The warm-up time duration depends on which test is being performed. The following table displays the warm-up time required for each test: Test Warm-up time (mins) FVC, VC, MVV - FRC 5 CV 5 DLCO 15 MIP/MEP - P0.1 - Oximetry - ROCC - CPET 5 RMR 5 During the warm-up period the device must be powered on, but the software does not need to be open. Calibration and/or testing procedures should never be performed until the warm-up period has been completed. Getting started - System warm-up - 29 Installation Before starting Before operating the Quark you should inspect the equipment and complete the product registration. Checking the packing contents When opening your product you should assure that the package contains all items listed below. If there are any missing or damaged parts you should contact Cosmed’s technical assistance. Note: Actual packaging of device and modules could differ from the one specified below depending on the actual device’s configuration. Device packaging Quark Spiro standard packaging Code Quantity Description C00971-01-04 1 Quark Spiro Unit A-662-100-001 2 Nose clips C02656-01-06 1 T/RH probe A-362-050-001 1 Power cable A-362-300-001 1 RS232 cable A-362-315-001 1 USB cable A-680-024-125 2 Time lag fuse 5x20 250V T1,25A C01788-01-36 1 PC software PFT C03262-02-91 1 User Manual C03939-02-91 1 Software manual Quark PFT standard packaging Code Quantity Description C00972-02-04 1 Quark PFT Unit C02290-01-05 1 Smart valve with hoses A-662-100-001 2 Nose clips C02656-01-06 1 T/RH probe C00600-01-11 1 3 litres calibration syringe A-362-050-001 1 Power cable A-362-300-001 1 RS232 cable A-362-315-001 1 USB cable A-680-024-125 2 Time lag fuse 5x20 250V T1,25A C01788-01-36 1 PC software PFT C03047-01-20 1 RMR Flowmeter syringe adapter C03110-01-10 1 VO2 Max Flowmeter syringe adapter C03262-02-91 1 User Manual C03939-02-91 1 Software manual Quark CPET standard packaging Code Quantity 32 - Installation - Before starting Description C00973-02-04 1 Quark CPET Unit C03400-01-04 2 ID28 turbine C02500-02-04 1 ID18 turbine C03095-01-08 1 Handle for optoelectronic reader A-662-100-001 2 Nose clips C02656-01-06 1 T/RH probe C03611-01-10 1 Mask VO2max Small C03612-01-10 1 Mask VO2max Medium C03613-01-10 1 Mask VO2max Large A-800-900-022 1 Head cap for the adult masks (L) A-800-900-023 1 Head cap for the adult masks (S, M) C00136-01-20 50 Adult paper mouthpieces C00137-01-20 50 Paediatric paper mouthpieces A-182-300-004 5 Antibacterial filters C02210-02-08 1 Permapure sample line 2m C03232-01-10 1 Ergo hose C00214-01-20 1 OD22 paediatric adapter A-661-200-071 1 Elastic belt A-661-200-070 1 HR monitor A-661-200-039 1 HR receiver A-362-315-010 1 USB extension cable C00600-01-11 1 3 litres calibration syringe A-362-050-001 1 Power cable A-362-300-001 1 RS232 cable A-362-315-001 1 USB cable A-680-024-125 2 Time lag fuse 5x20 250V T1,25A C03047-01-20 1 RMR Flowmeter syringe adapter C03110-01-10 1 VO2 Max Flowmeter syringe adapter C01790-01-36 1 PC software CPET C01788-01-36 1 PC software PFT C03262-02-91 1 User Manual C03939-02-91 1 Software manual Packaging of optional products Turbine (ID28) Option standard packaging Code Quantity Description C03400-01-04 2 ID28 turbine C03095-01-08 1 Handle for optoelectronic reader C00136-01-20 50 Adult paper mouthpieces C00137-01-20 50 Paediatric paper mouthpieces A-182-300-004 5 Antibacterial filters C02210-02-08 1 Permapure sample line 2m C00214-01-20 1 OD22 paediatric adapter Installation - Before starting - 33 PNT Option standard packaging Code Quantity Description C03600-01-05 2 PNT X9 C03095-01-08 1 Handle for reader A-182-300-004 5 Antibacterial filter C02210-02-08 1 Permapure 2m Spiro Turbine (ID28) Option standard packaging Code Quantity Description C02550-01-04 2 ID28 turbine C03095-01-08 1 Handle for optoelectronic reader C00136-01-20 50 Adult paper mouthpieces C00137-01-20 50 Paediatric paper mouthpieces A-182-300-004 5 Antibacterial filters C00214-01-20 1 OD22 paediatric adapter Lung Volumes module standard packaging Code Quantity Description C02380-01-06 1 Smart valve C00269-01-20 5 PTE ID25mm soft mouthpiece A-182-300-004 5 Antibacterial filters C03563-01-10 1 FRC hose C03564-01-10 1 Ergo hose C02226-01-20 1 Membrane for Smart Valve DLCO module standard packaging Code Quantity Description C02380-01-06 1 Smart valve C00269-01-20 5 PTE ID25mm soft mouthpieces A-182-300-004 5 Antibacterial filters C03562-01-10 1 DLCO hose C02226-01-20 1 Membrane for Smart Valve Respiratory Mechanics Module standard packaging Code Quantity Description C03268-01-08 1 Pressure line respiratory mechanics C00269-01-20 5 PTE ID25mm soft mouthpieces CPET Module standard packaging Code Quantity Description C03400-01-04 1 ID28 turbine C03611-01-10 1 Mask VO2max Small C03612-01-10 1 Mask VO2max Medium C03613-01-10 1 Mask VO2max Large A-800-900-022 1 Head cap for the adult masks (L) A-800-900-023 1 Head cap for the adult masks (S, M) C02210-02-08 1 Permapure sample line 2m 34 - Installation - Before starting C03564-01-10 1 Ergo hose C02500-02-04 1 ID18 turbine A-661-200-071 1 Elastic belt A-661-200-070 1 HR monitor A-661-200-039 1 HR receiver A-362-315-010 1 USB extension cable C03309-01-12 1 PFT input/output HR TTL cable C01790-01-36 1 PC software CPET Oximeter module standard packaging Code Quantity Description A-661-600-007 1 Oximeter Airway Resistances module standard packaging Code Quantity Description C02410-02-04 1 ROCC Unit C02420-01-08 1 PNT ROCC A-182-300-004 5 Antibacterial filters C00311-01-20 1 Silicone hose A-662-100-001 2 Nose clips Nutritional module standard packaging Code Quantity Description C02500-01-04 1 ID18 turbine C03880-01-10 1 Quark RMR bubblehood C02678-01-07 1 Canopy wrinkled tube C03886-01-10 1 Canopy vail C00965-01-04 1 Canopy unit A-182-300-004 5 Antibacterial filter C03729-01-30 1 Canopy power supply A-182-300-004 10 Antibacterial filter C00269-01-20 5 Soft mouthpiece (PTE ID25mm) A-662-100-001 2 Nose clip C01788-01-36 1 PC Software PFT C01790-01-36 1 PC software CPET Mixing chamber module standard packaging Code Quantity Description C03348-01-04 1 Mixing chamber C03189-01-05 1 Two-way non rebreathing valve A-800-900-025 1 Head support for 2-ways valve C02106-01-08 1 Head cap Large A-108-300-008 1 Wrinkled tube C02106-01-08 1 Spirometry mouthpiece adapter C02181-01-08 1 Adapter for reader C03427-01-94 1 Start up guide C02753-01-10 1 Mixing chamber mask Medium Installation - Before starting - 35 C01788-01-36 1 PC Software PFT C01790-01-36 1 PC software CPET Dosimeter module standard packaging Code Quantity Description C03560-01-11 1 Dosimeter kit C03515-01-08 1 Dosimeter tube C03482-01-08 1 Nebulizers holder C03222-01-20 2 Dosimeter adapter C03425-01-20 2 Flowsafe-antibacterial filter adapter A-862-010-001 6 DeVilbiss 646 Nebulizer A-661-919-003 10 Mouthpieces A-182-300-004 10 Antibacterial filter 36 - Installation - Before starting Options/Accessories The following options are available with the Quark system: Code Quantity Description A 860 000 004 1 Calibration cylinder (5% CO2, 16% O2, balance N2) A 860 000 005 1 DLCO cylinder (0.3% CO, 0.3% CH4, 21% O2, bal. N2) A 860 000 006 1 DLCO cyl. st. state (0.1% CO, 0.1% CH4, 21% O2, bal.N2) A 860 000 007 1 Oxygen cylinder C02900-01-04 1 Trolley (without arm) C02870-01-04 1 Arm for trolley A 870 150 005 1 Pressure regulator for cal./DLCO cylinder A 870 150 006 1 Pressure regulator for O2 cylinder C03101-01-10 1 Paediatric mask Small for RMR C03102-01-10 1 Paediatric mask Large for RMR C03103-01-10 1 Paediatric mask Large for VO2max Installation - Options/Accessories - 37 System description The Quark system consists of the main unit and its accessories. The following picture displays the correct assembly. 1. Trolley 2. PC shelf 3. Drawer 4. Printer shelf 5. Supplementary shelf 6. Cylinders 7. Quark unit 8. Location for smart valve, turbine, etc. 9. Mouse shelf 10. Arm 11. Vice for arm fixing 12. Breathing valve 13. Turbine 38 - Installation - System description 14. Antibacterial filter Installation - System description - 39 Quark installation Before operating the system you should make sure that environmental and operational conditions have been met (see Chapter 1). Quark front panel 1. Power switch 2. Led on/off 3. Gas calibration connection Quark rear panel 1. PNT/MIP-MEP/P0.1 connector 2. Permapure sampling line connector 3. Breathing valve connector 4. DLCO cylinder connector 5. O2/CO2 cylinder connector 6. Oxygen cylinder connector 7. Supplemental earthing terminal 8. Dosimeter connector 9. Medical air connector 40 - Installation - Quark installation 10. RS232 connector for PC 11. Temp/RH probe connector 12. USB connector for PC 13. Auxiliary USB connector (for HR probe) 14. Turbine connector 15. Reset button 16. Auxiliary RS232 connector (for ergometer control) 17. Oximeter/PNT ROCC connector (for PNT ROCC, an adapter is required) 18. Auxiliary TTL input/output 19. Connector for the soda lime CO2 absorber output (already connected) 20. Power cable plug 21. Soda lime CO2 absorber slot (already connected) Calibration cylinders In order to calibrate the sensors, the following calibration cylinders are required: Cylinder Recommended Gas Mixture Test Calibration O2 16%, CO2 5%, N2 Bal FRC, CV, CPET, RMR DLCO CO 0.3%, CH4 0.3%, O2 21%, N2 Bal DLCO Oxygen O2 100 % FRC, CV Cylinder can be placed into the trolley housings (option). Note: The cylinders must contain a calibration certificate which indicates the gas concentrations. Assembling the gas regulators on the cylinder Attach the gas regulator on the cylinder as shown in the following picture. The white washer should be inserted between the cylinder and the gas regulator. Installation - Quark installation - 41 Warning: The regulator should be tightly connected to avoid leaks. Note: Gas regulators have different adapters depending on the gas mixture they are created for. Assure that the proper gas regulator has been chosen for the cylinder in use. The gas regulator has an adjustable second stage that must be adjusted when used for the first time. This is necessary to protect the internal demand valve from the high pressure generated when the cylinder is opened. Connecting the hoses to the cylinders Note the following table in order to find the appropriate coloured hose for the cylinder in use (the colour represents the different connectors used at the end of the hose): Cylinder Connector colour Calibration Blue DLCO Green Oxygen White 42 - Installation - Quark installation Connecting the cylinders to the Quark Warning: The pressure knobs must be closed before connecting the cylinders to the Quark (turn counter clockwise). 1. Connect the cylinders to the Quark, making sure to match the appropriate coloured connectors. 2. Assure that the pressure adjustment knob is closed (by turning it counter clockwise). 3. Open the cylinder by turning the valve on the top of the cylinder counter clockwise and the tap under the gas regulator counter clockwise. Note: To ensure a long cylinder life, you should not force the valve to its maximum opening and you should avoid opening and closing the valve repeatedly. To close the cylinder for a short period of time you may simply close the black tap under the gas regulator. 4. Turn the pressure adjustment knob clockwise and adjust the pressure between 5 and 6 bars (70-90 psi). Cylinders should be replaced when the internal pressure falls below 10 bars (150 psi). Caution: You should always close the cylinder and the gas regulator before disconnecting the hoses from the Quark. Assembling the breathing valve and the flowmeter 1 2 3 1. Breathing valve 2. Turbine 3. Antibacterial filter Align the sampling line onto the turbine with the tooth on the smart valve. Installation - Quark installation - 43 1 2 1. Breathing valve 2. PNT Assembling the flowmeter to the handle 4 with turbine with Flowsafe 2 1 with PNT X9 5 3 1 1 1. Handle 2. Turbine ID28 3. Flowsafe 4. Antibacterial filter 5. PNT X9 Note: in order to obtain reliable measurements, the PNT X9 must be always used with the antibacterial filter. 44 - Installation - Quark installation Assembling the VO2max mask and the flowmeter Assemble the ROCC PNT 1. Occlusion valve 2. Reader 3. PNT Connecting the Quark to the PC Connect the Quark unit to the PC through the RS232 or USB port by connecting the cable (RS232 or USB) to the proper (COM or USB) Quark and PC ports. Connecting the Quark to the power supply through the trolley 1. Connect the Quark unit to the trolley through the power cable. 2. Connect the PC, monitor and printer to the trolley through their power supply cables. 3. Connect the trolley to the wall through its power cable. The trolley has a separate switch on the back of the cart. Warning: Always turn off the trolley and the Quark when not in use. Installation - Quark installation - 45 Preparing the device and the patient for exercise testing Preparing the Quark Connect the head cap, the VO2max mask and the ID28 turbine as shown in the following picture: The head cap and mask can be connected by the white clips. The turbine and HR probe should be connected to the rear panel of the Quark. If you choose to drive an ergometer with the Quark, connect the ergometer cable to the RS232 port on the rear panel of the Quark with the serial port provided in the packaging. Select the ergometer to be used before starting the test. Note: Cellular phones should be turned off to eliminate potential electrical interferences. Patient preparation The mask Fix the mask as illustrated in the picture below. Adjust the elastic bands on the head cap as necessary to eliminate possible leaks and create a tight seal around the subject’s face. The HR elastic belt To assemble the HR belt: 1. Attach the Transmitter to the elastic strap. 46 - Installation - Preparing the device and the patient for exercise testing 2. Adjust the strap to fit tightly and comfortably around the subject’s thorax. 3. Secure the strap tightly around the chest (below the nipple line) and lock the buckle. 4. You may wet the grooved electrode areas with saliva, contact lens solution or an alternative saline solution to help it stick to the subject. The transmitter should be worn against bare skin to ensure successful operation. If a transmitter is worn over a shirt, the shirt should be wet underneath the electrode area to achieve proper conductivity. To acquire the most accurate HR signal you should place the HR probe as close as possible to the HR belt. ECG electrodes Correct electrode placement is important for acquiring a successful ECG signal. Patient preparations that may be performed to improve the signal include the removal of oils, lotions and hair from the skin. 1. Shave the area in which the electrodes will be placed. 2. Using a slightly abrasive cloth, cut an X where the electrodes will be placed. 3. Rub the area with gauze that has been saturated with either ether or acetone. 4. Remove any residual with dry gauze. 5. Apply the patient cable to the electrodes and place them as shown in the following picture. Note: The patient cable and the transmitter are not water-proof. You should prevent any liquids from penetrating the area and avoid submerging the electrodes in liquid. The electrodes should be placed as follows: V1 4th intercostal space, to the right of the sternum. V2 V3 4th intercostal space, to the left of the sternum. Between V2 and V4 electrodes. V4 V5 5th intercostal space, on the midclavicular line. 5th intercostal space, on the anterior axillary line. V6 5th intercostal space, on the left midaxillary line. Limb electrodes for the arms should be placed in the subclavicular areas. Limb electrodes for the legs should be placed on the trunk at the level of the bottom rib. Installation - Preparing the device and the patient for exercise testing - 47 Warning: QRS morphology may be slightly different from the standard ECG due to the different positioning of lower limb electrodes. To reduce these differences attempt to position the LL electrode as low as possible. Using a mouthpiece instead of a face mask When performing sub-maximal tests (with ventilation values maintained at less than 100 L/min) you may use the combination rubber mouthpiece, filter and nose clip in place of the mask. Assemble the mouthpiece, filter and reader as illustrated in the following picture. Assure that no leaks are present between the patient and the mouthpiece. 48 - Installation - Preparing the device and the patient for exercise testing How to contact COSMED You may contact the manufacturer directly at the following address for information: COSMED S.r.l. Via dei Piani di Monte Savello, 37 00041 - Pavona di Albano Rome - ITALY Voice: +39 (06) 931.5492 Fax: +39 (06) 931.4580 email: [email protected] Internet: http: //www.cosmed.com Complaints, feedback and suggestions If you have any complaints, feedback or suggestions you may inform us at [email protected]. Installation - How to contact COSMED - 49 System maintenance System maintenance Any service operations not specified in this user manual should be only performed by qualified personnel in accordance with the service handbook. Rubber mouthpieces, face masks, breathing valves and the other parts are not shipped sterile. These should be disinfected before using according to the instructions in this section. All materials used in the construction of the Quark and its accessories are non toxic and pose no safety risks to the patient or operator. The device should be turned off with the power supply disconnected prior to cleaning, disinfecting and/or inspecting the device. The turbine should be disinfected regularly to ensure the accuracy of measurements. If the recommended disposable anti-bacterial filters are not used, each part which comes into contact with the patient should be disinfected prior to each test. 52 - System maintenance - System maintenance Cleaning and disinfecting The goal of infection control is to prevent the transmission of infection to patients/subjects and staff during pulmonary function testing. Cleaning and disinfecting instructions should be strictly followed to control infections and assure the safety of the patient. Aspiration of residue, particles and/or contaminated agents could be life threatening. The recommendations in the following section are retrieved from Miller MR, Crapo R, Hankinson J, et al.: General considerations for lung function testing. Eur Respir J 2005; 26:153–162. Prevention of infection transmission Transmission to technicians Prevention of infection transmission to technicians exposed to contaminated spirometer surfaces can be accomplished through proper hand washing and use of barrier devices, such as suitable gloves. To avoid technician exposure and crosscontamination, hands should be washed immediately after direct handling of mouthpieces, tubing, breathing valves or interior spirometer surfaces. Gloves should be worn when handling potentially contaminated equipment if the technician has any open cuts or sores on his/her hands. Hands should always be washed between patients. Cross-contamination To avoid cross-contamination, reusable mouthpieces, breathing tubes, valves and manifolds should be disinfected regularly. Mouthpieces, nose clips and any other equipment that comes into direct contact with mucosal surfaces should be disinfected, or, if disposable, discarded after each use. Only the portion of the circuit through which rebreathing occurs must be decontaminated between patients, or, if disposable, discarded after each use. Disposable sensors, when appropriately used, avoid the need for decontamination of sensors and mouthpieces. Tuberculosis In settings where tubercolosis or other diseases that are spread by droplet nuclei are likely to be encountered, proper attention to environmental engineering controls, such as ventilation, air filtration or ultraviolet decontamination of air, should be used to prevent disease transmission. Haemoptysis and oral lesions Special precautions should be taken when testing patients with haemoptysis, open sores on the oral mucosa or bleeding gums. Tubing and breathing valves should be decontaminated before reuse, and internal spirometer surfaces should be decontaminated with accepted disinfectants for blood-transmissible agents. Other known transmissible infectious diseases Extra precautions should be taken for patients with known transmissible infectious diseases. Possible precautions include the following: 1) reserving equipment for the sole purpose of testing infected patients; 2) testing such patients at the end of the day to allow time for spirometer disassembly and disinfection; and 3) testing patients in their own rooms with adequate ventilation and appropriate protection for the technician. Disposable in-line filters These may be an effective and less expensive method of preventing equipment contamination. The use of in-line filters does not eliminate the need for regular cleaning and decontamination of lung function equipment. Other precautions and warnings Please take the following precautions during the cleaning and disinfection activities: 1. The responsibility for handling, cleaning and decontaminating reusable medical devices should be assigned to trained, qualified individuals. System maintenance - Cleaning and disinfecting - 53 2. Appropriate protective clothing (gloves, masks, eye protection, gowns) will minimize the potential for personal exposure to blood borne and other disease-producing organisms. 3. Immediately separate and contain soiled reusable devices at the point of use and transport to the decontamination area so as to minimize risk of personal contact with contaminants. 4. A disinfectant solution is only effective if it can contact all surfaces of the items to be disinfected or sterilized. 5. Adequate ventilation is required in the disinfection area to evacuate the chemical vapors from glutaraldehyde (if used). Use lidded containers for the disinfectant solution when appropriate. The inhalation of fumes from disinfectant solutions or skin contact with liquid disinfectants can be hazardous to personnel. Warning: Particular precautions should be taken when testing patients with high risk communicable diseases (i.e. Tuberculosis, Multidrug Resistant Staphylococcus infections, etc.). When such conditions are present the clinical need for performing the test should justify the risks. When performing the disinfection: Do not use alcohol or other liquids containing Gluteraldehyde on the exterior surface of the equipment. Do not use abrasive powders or glass cleaners containing alcohol or ammonia on the plexiglas component (mixing chamber or canopy) of the equipment. Do not steam autoclave any component other then rubber reusable masks (plastic adapter and clips should be removed). Warning: Do not immerse any parts in liquid unless indicated (see following sections) Introduction Decontamination is a multi-step process that includes preparation at point of use, thorough cleaning and rinsing and a microbicidal process. Thorough cleaning and rinsing are the first and most important steps in the reprocessing of any reusable medical device. Without thorough cleaning and rinsing it might not be possible to achieve high level disinfection or sterilization of the device. The purpose of cleaning and rinsing is to remove all adherent visible soil, to reduce the number of particulates and microorganisms, and to reduce the amount of pyrogenic and antigenic material. Any organic material, lubricants, or residual cleaning agents remaining on a device can inactivate liquid chemical disinfectants/sterilants as well as protect microorganisms from destruction. The second step in decontamination is the microbicidal process which is defined as a process to provide a particular level of microbial lethality (kill). COSMED components are classified as "semi-critical" items which are devices that come into contact with intact mucous membranes. Semi-critical devices at a minimum require a high-level disinfection procedure. Sterilization is not absolutely essential. COSMED components require complete or partial disassembly for cleaning and disinfection. It is the responsibility of the user (health care personnel) for ensuring that: the cleaning methods recommended can be duplicated in their environment, that appropriate tools, and replacement parts are available and that instructions are followed correctly. Cleaning Note: Please refer to additional, specific cleaning instructions for the turbine assembly below. Cleaning Agents/supplies Mild detergents with a neutral pH (7) are recommended for cleaning. Use warm water (22°-43°c) with the mild detergent. To be effective, cleaning agents must assist in the removal of residual organic soil without damaging the device. cleaning agents should be used in the correct dilution/concentration and at the correct temperature in accordance with the cleaning agents manufacturer's directions. Cleaning supplies are very basic, usually consisting of a surgical scrub brush, chenille pipe cleaners, cotton or foam tipped applicators, soft brushes, and soft cloths. Cleaning supplies should be cleaned and disinfected or sterilized daily. Water Quality: tap water is acceptable for use in cleaning COSMED components. COSMED components should be soaked and rinsed in tap water at 22°-43°C to prevent the coagulation of solid substances onto the device and thus facilitate the removal of debris. 54 - System maintenance - Cleaning and disinfecting Enzymatic detergents with a neutral pH (7) are recommended when processing difficult-to-clean items with dried-on matter. Soaking mask and valve components in an enzymatic detergent solution can effectively remove visible debris except for lubricants thus providing an acceptable alternative to manual cleaning. Rinsing is necessary to remove all traces of detergent and extraneous debris. Standard cleaning procedure These steps are common to all the cleaning procedures Step 1 Preparation at Point of Use. The cleaning of reusable items begins soon after use. At the point of use, personnel wearing gloves and other protective attire separate disposable items or components from reusable items and discard them in appropriate receptacles. Soil is wiped from device surfaces with a moist sponge or towel. The soiled/contaminated items are then contained in a manner that will reduce the risk of personal exposure to pathogens. Items are usually placed in a basket, tray or rigid container for transportation to the processing area, usually transported in or on a cart, as hand carrying of soiled items is discouraged. Step 2 Inspection. Inspect the items for damage at all stages of handling. If damage is detected on any of the components it should be identified and documented. Complete the disinfection/sterilization process and contact technical service for replacement. Step 3 Presoak. Protective attire is required of personnel handling contaminated items. At the processing area soak or rinse the items in tap water 22°-43° C. Please note that rinse with flowing water is not possible on the turbine. If an enzyme product is required, soak for one to two minutes. Remove and examine, extend the soak time for components with dried-on matter, prolonged soaking of components may be detrimental, causing damage to the component surfaces. Refer to the detergent instructions for its usage and soak time. Step 4 Disassembly. Disassemble the item (if necessary) according to the instructions reported in the corresponding section. Step 5 Cleaning. Protective attire is required for personnel handling contaminated items. Manual cleaning must be done in a manner that protects personnel handling the devices from aerosolization and splashing of infectious material. 1. Manual cleaning of the items should be done under 22°-43°C water. Use a neutral pH (7) mild detergent. Water hardness, temperature and the type of soil affect the effectiveness of the detergents; the detergent manufacturer's instructions should be consulted. Use a small soft brush to scrub all parts. Abrasive cleaning compounds and implements can damage the items and should not be used. Additional cleaning supplies may be required to clean stubborn stains or hard-to-reach areas. 2. Items must be thoroughly rinsed with clean water to remove the detergent residuals and debris from the components. Use a flowing triple rinse cycle at a minimum with tap water. Please note that rinse with flowing water is not possible on the turbine. 3. Dry all components thoroughly using soft clean clothes or disposable paper towels. Disinfection The recommendations in this sections have been retrieved from: William A. Rutala, Ph.D., M.P.H., David J. Weber, M.D., M.P.H., and the Healthcare Infection Control Practices Advisory Committee (HICPAC): Guideline for Disinfection and Sterilization in Healthcare Facilities, 2008 (http://www.cdc.gov/hicpac/pdf/guidelines/Disinfection_Nov_2008.pdf) High-level disinfection is the recommended decontamination procedure for semi-critical devices. Devices are classified semi-critical when they touches mucous membranes or broken skin. Examples of semi-critical devices are flexible endoscopes, laryngoscopes, endotracheal tubes, respiratory therapy and anesthesia equipment, diaphragm fitting rings, and other similar devices. Preparing the disinfecting solution The recommended disinfection solutions are as follows: Sodium hypochlorite 0.5% (5000 ppm) prepared fresh for use within 24 hours. Sodium hypochlorite 1% (10000 ppm) prepared fresh for use within 30 days. The first solution can be prepared by adding 1 part household bleach (sodium hypochlorite 5.25%) to 9 parts water. The second solution can be prepared by adding 1 part household bleach to 4 parts water. System maintenance - Cleaning and disinfecting - 55 The turbine flowmeter Guidelines recommend that the turbine should be cleaned and disinfected prior to every test to ensure accurate measurements and to comply with recommended sanitation measures as follow. Cleaning the turbine Follow the standard cleaning procedure reported above, paying attention to the following: 1. For rinsing, do not use flowing water, which may damage the turbine. Rinse the turbine in a vessel, filled of clean water, shaking gently to remove the disinfectant. Do not place the turbine under running water or move the turbine while submerged. 2. For cleaning and rinsing, do not wet the sampling line. 3. Use the brush (point 1 step 5) only for the external parts of the turbine, in order to avoid damages to the turbine blade. Disinfecting the turbine 1. Disconnect the sampling tube from the reader. 2. Plunge the reader in a vessel containing the disinfectant solution for 20 minutes (see picture below) assuring that the sampling tube is not exposed to the solution (the optical flowmeter and cable are waterproof). 3. Rinse the turbine in a vessel filled with water and shake gently to remove the disinfectant (do not place the turbine under running water or move the turbine while submerged). 4. Allow the turbine to air dry (12 hours recommended depending on environmental conditions). 5. After cleaning the turbine, always calibrate prior to subsequent testing. Precautions to take when cleaning, disinfecting and drying the turbine Do not expose the turbine to high heat or to a direct flow of water. Do not expose the sampling tube or the connector on the end of the cable to any liquids. Do not use alcoholic solutions to clean the turbine. PNT X9 For cleaning and disinfecting the PNT X9 follow the same instructions as for the turbine, being careful to observe the following: Use distilled water for preparing the disinfectant solution, otherwise the calcium deposit could damage the flowmeter net Do not dry the PNT X9 with hot air which may damage the flowmeter net. VO2max mask and mixing chamber mask The face masks, adapters and other components should be cleaned and disinfected prior to every test. Sterilization can optionally be performed on the rubber mask only. High level disinfection of mask and components ensures patient safety and minimizes the risk of infection. Disassembling the mask Remove the round black turbine adapter held within mask and the clips that hold the headcap in place. 56 - System maintenance - Cleaning and disinfecting Cleaning the mask Follow the standard cleaning procedure reported above. Disinfecting the mask Step 1 Disinfection. Use only liquid glutaraldehyde disinfectant solutions approved as sterilants/disinfectants by the National Authority. Warnings The fumes of glutaraldehyde can irritate the mucous membranes of eyes, nose and throat. Some people develop allergic reactions to glutaraldehyde that can cause skin rashes, headaches and breathing difficulties. Containers of glutaraldehyde should be kept closed and in a well ventilated area. Gloves should be worn made of butyl or nitile rubber. Do not use latex rubber gloves. The concentration of glutaraldehyde in the air should not exceed 0.2 ppm. For emergency, safety or technical information about the glutaraldehyde solution contact the manifacturer. 1. Determine the required soak temperature and time of the sterilant/disinfectant and assure that these requirements are met. 2. Activate the glutaraldehyde solution by mixing the components per the manufacturers instructions. Use the concentration testing devices sold by the manufacture to determine that the solution is above the minimum effective concentration. 3. Pour the activated glutaraldehyde solution into an appropriate sized basin. 4. Completely immerse the mask and components in the basin. Assure that all channels and cavities are filled with disinfectant and that no air pockets remain within the components. 5. Cover the disinfectant soaking basin with a tight fitting lid to minimize chemical vapor exposure. Step 2 Rinsing. Adequate rinsing must follow disinfection to remove all traces of the toxic residues of the disinfectant left on the mask and components. Sterile water rinse is preferred over tap water. Tap water may contain a variety of microorganisms which could recontaminate the components. 1. Rinse 1: Fill a basin with 7-8 liters of water (preferably sterile water). Place the mask and components into the basin and thoroughly rinse all the components for a minimum of one minute. Empty basin. 2. Rinse 2: Fill a basin with 7-8 liters of water (preferably sterile water). Place the components into the basin and thoroughly rinse all the components for a minimum of one minute. Empty basin. Step 3 Hot water pasteurization: an alternative approach for disinfection (it can be performed in place of step 1 and 2). Completely immerse the device components in a hot water bath. All surfaces should be in direct contact with the hot water for 30 minutes at temperatures set between 71-76°C. Step 4 Drying. To prevent the growth of waterborne organisms, the mask and components should be thoroughly dried prior to reassembly and storage. 1. Dry thoroughly using a soft cloth (preferably sterile) or disposable paper towels. Step 5 Inspection. All components should be visually inspected for cleanliness, proper function and freedom of defects. Visual inspection provides evidence of thorough cleaning and proper functioning of all mask and components. Mask assemblies in poor working condition are hazardous to personnel and patients. 1. Visually inspect all components for cleanliness. If there are signs of residue from the detergent or disinfectant repeat the previous steps. If there are any signs of remaining stains or organic debris repeat the previous steps. If the cleaning and disinfection steps have been repeated with no improvement eliminating residual or stains etc, then dispose of the components and replace. 2. Visually inspect all components for defects. Check the rubber parts for tears, nicks, hardening or stiffening, deformation or distortion. Check the plastic parts for crazing, cracking or stripped threads. Any defective parts should be discarded and replaced. 3. Visually inspect all metal components for corrosion. Replace any metal components showing rust or chipped plated surfaces. System maintenance - Cleaning and disinfecting - 57 Sterilizing the mask Sterilization of the silicone rubber face masks can be achieved with steam sterilization. Warning: Sterilization can be performed on the rubber mask only. Do not apply sterilization on other parts. Type of Cycle: Gravity Displacement Type of Load: Wrapped Method Temperature: 132°-135°c Cycle Time: 10-15 minutes Special Notes: 1. Follow cleaning procedures as instructed prior to steam sterilization. Since the degree of sterility assurance depends on the amount of contamination of items to be sterilized, thorough cleaning procedures are essential. 2. All lubricants should be removed from components because this will interfere with steam contact. 3. Dry devices (components) reduce the potential for wet device packs after sterilization. 4. Sterilization container systems should be cleaned after each use. Reassembling the mask and components Reassemble mask and components. Use appropriate personal protective clothing to assure that you do not recontaminate the components. Cleaning the headcap assembly Clean the head cap assembly (with strap clips) by hand washing with a mild detergent. Do not use bleach. Remove the head cap from the mask, leaving the strap clips attached to the straps. Machine or line dry. Do not iron the head cap assembly. Breathing valve The breathing valve should be cleaned and disinfected every day. Disinfection prior to every test is not necessary due to filtering during test maneuvers. Disassembling the breathing valve 1. Remove the flowmeter from the breathing valve. 58 - System maintenance - Cleaning and disinfecting a b 2. Remove the demand valve (a) from the breathing valve. Unscrew the tube (b). 3. Remove the cover on the rear of the breathing valve by means of a coin. 4. Remove the membrane paying attention to its orientation (must not be replaced upside down) Cleaning the breathing valve Follow the standard cleaning procedure reported above. Do not immerse the demand valve in water. System maintenance - Cleaning and disinfecting - 59 Disinfecting the breathing valve Disinfect the parts of the breathing valve, following the instructions for turbine disinfection. Note: The demand valve cannot be disinfected. Reassembly the breathing valve Re-assemble the breathing valve, repeating the steps described for disassembling in reverse order, paying attention to the orientation of the membrane. Cleaning and disinfecting the RMR canopy hood and veil (option) Cleaning hood and veil The Canopy hood and the veil must be cleaned after every use by wiping with a soft cloth and a alcohol free solution. Disinfecting hood and veil Disinfect the parts following the instructions for turbine disinfection. The mixing chamber (option): cleaning and disinfection Note: Do not use alcohol, solvents or other abrasive substances for cleaning the mixing chamber. Disassembling the mixing chamber Depending on the mixing chamber version (squared or rounded) the proper following instructions applies: Squared mixing chamber: disassemble it by unscrewing the screws in the top cover Rounded mixing chamber: disassemble it by unscrewing the black knob on the rear side. 60 - System maintenance - Cleaning and disinfecting Cleaning the mixing chamber Follow the standard cleaning procedure reported above. Disinfecting the mixing chamber For disinfecting the mixing chamber, plunge each part in the disinfecting solution for 20 minutes (see turbine disinfection). Rinse and wipe. Reassembling the mixing chamber. After the cleaning, reassemble and carefully close the mixing chamber. Two-way non rebreathing valve (mixing chamber option) cleaning and disinfection Refer to the indications reported in the sheet shipped together with the valve. The valve must be disinfected after each usage on a patient. Cleaning and disinfecting the dosimeter nebulizer Cleaning and disinfecting should be performed after every patient. 2 1 3 4 5 To the Quark 1. Mouthpiece System maintenance - Cleaning and disinfecting - 61 2. Nebulizer (upper half) 3. Jet 4. Nebulizer (lower half, medicine reservoir) 5. Tubing Routine cleaning After every test: 1. Remove nebulizer tubing from nebulizer and from rear panel of Quark unit. 2. Remove mouthpiece. 3. Unscrew upper half of nebulizer from lower half and rinse all parts under warm water. Daily: 1. Wash all components in soapy water. If jet is clogged, use a pin to re-open the aperture. 2. Rinse with warm tap water for 30 seconds, then soak in one part white vinegar to three parts hot water for 30 minutes. 3. Rinse with warm tap water and air dry. Monthly: 1. Replace or clean tubing by following nebulizer cleaning instructions. To remove excess water from tubing, attach to the air source and allow air to pass through tubing until excess moisture is removed. Disinfection Disassemble as above. Place all the parts in the disinfectant solution for at least 20 minutes. Let them dry in air. The mouthpieces and the adapters must be disinfected only. The nebulizer components may be sterilised by autoclaving or boiling. They may also be sterilised with any germicidal agent suitable for Lexan. Always prepare fresh solution for each cleaning cycle. 62 - System maintenance - Cleaning and disinfecting Sampling line maintenance (Permapure) Do not bend, squash or deform the sampling line. Any “kink” in the sample line will reduce the internal lumen of the line and affect accuracy of measurement. Do not keep the sampling line open to the atmosphere, particularly in crowded or smoky environments. Keep the sampling line in sealed plastic bag in a dark cool and dry place. If saliva enters the tube it should be replaced immediately. Periodically grease the O-ring on the connector to ease fitting to optical flowmeter. Replace the sampling line every 100 exercise tests or 200 PFT test or every 6 months. In any case, sampling line will become discoloured (brown) with age and may cause calibration to fail. Note: ALWAYS replace sample line as the first step in troubleshooting a failed gas calibration. System maintenance - Sampling line maintenance (Permapure) - 63 Inspections The equipment requires inspections to be carried out to assure proper electrical and mechanical safety levels. The inspections are recommended after extensive use of the equipment or after a long period of storage in unfavourable environmental conditions. The insulation materials of cables, plugs and any other visible parts should also be inspected. The equipment should be turned off and adapters should be disconnected from the power supply when inspecting the materials. The turbine and breathing circuits also need to be inspected. To inspect the turbine, perform the following procedure: Verify, by inspection, that the turbine axis fits correctly and the blade is fastened on the axis (you can lightly shake the turbine to note any anomalous movement). Assure that there are no torn or broken components in the breathing circuits. 64 - System maintenance - Inspections Replace the fuses The fuses can be replaced by performing the following procedure. 1. Open the power supply cover using a screwdriver as shown in the picture above. 2. Extract the fuse holder as shown above. 3. Replace the damaged fuse(s). Note: Assure that the appropriate fuses are used when replacing previous fuses: A-680-024-125 (Time Lag Fuses 5x20 250V T1,25A) System maintenance - Replace the fuses - 65 Appendix Dichiarazione di conformità Manufacturer: Address: COSMED S.r.l. Via dei Piani di Monte Savello 37 00041 Pavona di Albano Laziale (RM) ITALY phone: +39-06-9315492 fax: +39-06-9314580 manufacturer of the following equipment: Quark Spiro Quark PFT Quark CPET declares under his sole responsibility that: the above listed equipment comply with the essential requirements of the Annex I of the Medical Device Directive 93/42/EEC; are classified in Class IIa; their design, manufacturing and final checks are performed according the Cosmed’s Quality System, conform to ISO 9001:2008 and ISO13485:2003 Norms, certified by CERMET (certificates nr. 387-A and 387-M); are CE marked according to the Medical Device Directive 93/42/EEC and certified by CERMET (certificate nr. MED 9811). The equipment conform with the following specifications: Safety: EMC: IEC 60601-1 IEC 60601-1-2 68 - Appendix - Dichiarazione di conformità Service - Warranty Warranty and limitation of liability COSMED provides a one year limited warranty from the date of the original sale of the product. COSMED products are guaranteed to be free from defect upon shipment. Liability for products covered by this warranty is limited to the replacement, repair or issuance of a credit for the cost of a defective product at the discretion of COSMED. The following conditions must exist for the warranty to apply: 1) COSMED is promptly notified in writing by the buyer upon the discovery of defect. 2) The defective product is returned to COSMED with transportation charges prepaid by the buyer. 3) The defective product is received by COSMED no later than four weeks after the last day of the one year warranty period. 4) COSMED’s examination of the defective product verifies that the defect was not caused by misuse, neglect, improper installation or an unauthorized repair or alteration. If the product is manufactured by a third-party, the warranties provided by the third-party manufacturer will be the only ones available for the buyer. COSMED hereby disclaims any warranties or liabilities arising from defects or damages to and/or caused by products manufactured by a third-party. The buyer must obtain written authorization from COSMED prior to the repair or alteration of any COSMED products. Failure to obtain a written authorization will result in a void of the warranty. The limited warranty shall not be enlarged, diminished or modified by the renderings of technical service from COSMED’s agents or employees when the product is ordered or following the use of the product(s). Return goods policy for warranty or non warranty repair Products shipped to COSMED for repair are subject to the following conditions: 1. Products may only be returned upon receiving a receipt which includes the Service Return Number (SRN) from COSMED S.r.l. 2. The SRN report and packing list should be placed on the outside of the package. 3. Returned goods must be shipped with freight and insurance charges prepaid. Collect shipments will not be accepted. 4. The following list of products is not eligible for return unless proven defective. Special order items. Expendable products. Products held over 30 days after the COSMED invoice date. Used products not in the original shipping containers. Goods which have been altered or abused in any way. 5. The following parts are not covered by warranty: - Consumables. - Fragile glass or plastic parts. - Rechargeable batteries. - Damages due to inappropriate use of the device. Repair Service Policy Goods returned to seller for non-warranty repair will be subject to conditions 1, 2, 3, 4. Returned goods requiring customs documents (Pro-forma Invoice and Customs Paper) should comply with the Italian law. The shipment must qualify as a temporary export. Any goods returned to COSMED without customs papers will not be accepted. For European Community members: The Pro-Forma invoice should include the following: Number Appendix - Service - Warranty - 69 Description of the product Quantity Serial Number Value in € Number of parcel Gross weight Net weight Reason for repair If repairs are needed, you may contact COSMED at the one of the following addresses: COSMED S.r.l. Via dei Piani di Monte Savello 37 P.O. Box 3 00041 Pavona di Albano - Rome, Italy tel. +39 (06) 9315492 fax +39 (06) 9314580 E-mail: [email protected] USA contact: COSMED USA Inc 2211 North Elston, Suite 305 Chicago IL 60614 USA Phone: +1 (773) 645-8113 Fax: +1 (773) 645-8116 email: [email protected] To ensure that you receive efficient technical service, please specify the nature of the problem as indicated on the assistance information form. You should save the original packaging in case the need to ship the unit to a technical assistance centre should arise. 70 - Appendix - Service - Warranty Privacy Information Dear Customer, We would like to inform you that your personal data is gathered and will be used by Cosmed Srl in conformity with the requirements of the Italian privacy law (Decreto Legislativo 196/2003). We believe it is important for you to acknowledge how your personal data is handled. Personal data treatment and purposes We request and process your personal data for the following purposes: a) To place an order, register a product, request a service, answer a survey, enter a contest, allow communication with us and to supply necessary authorities with the required information. b) To define your commercial profile. c) To use your commercial profile for marketing or advertising purposes. d) For necessary accounting procedures, such as emailing commercial invoices. e) To provide information to the selected business partners needed to supply your service. How your personal data is treated Your personal data will be stored in an electronic format and protected against destruction, loss, unauthorized access or use not conforming to the purposes listed above. Consent The consent to treat your personal data is optional, but if denied COSMED cannot supply the appropriate services. Holder of the personal data Personal data is held by Cosmed Srl, Via dei Piani di Monte Savello 37, Pavona di Albano Laziale (RM). Customer rights In accordance with Art.7, you may: a) Obtain confirmation of the existence and sharing of your personal data. b) Obtain information on the: updating, correction or integration of your data; deletion or transformation of your personal data; c) Deny your consent to treatment of your personal data; These rights can be exercised by a request in writing to the holder responsible for your personal data. Appendix - Privacy Information - 71 Disposing of electrical equipment The device cannot be disposed as unsorted municipal waste. Electronic equipment must be collected separately according to the European Directive 2002/96/EEC. Otherwise it can cause dangerous consequences for the environment and human health. The crossed-out wheeled bin means that the product must be taken to a separate collection when you wish to dispose of it. 72 - Appendix - Disposing of electrical equipment Safety and conformity Safety IEC 60601-1/EN 60601-1; The complete classification of the device is as follows: Class I with applied parts type B and BF Protection against water penetration: IPX1 Non sterile device Device not suitable in the presence of flammable anaesthetics Continuous functioning equipment EMC The system meets the Standard IEC 60601-1-2. Paramagnetic O2 analyzer The paramagnetic oxygen analyzer meets the requirements of the Standard IEC 68-2 (Basic Environmental Testing Procedures). IEC 68-2-27: Shock Peak acceleration: 100g (980 m/s2) Duration: Pulse shape: 6msecs Half sine IEC 68-2-6: Sinusoidal vibration Frequency range: 10Hz - 500Hz Acceleration amplitude: 1g (9.8 m/s2) Type and duration of endurance: 10 sweep cycles in each axis IEC 68-2-34: Random Vibration, Wide Band Frequency range: 20Hz - 500Hz Acceleration spectral density: Duration: 0.02 g /Hz 9 mins 2 Quality Assurance UNI EN ISO 9001:2008 (Registration n° 387-A Cermet) UNI EN ISO 13485:2003 (Registration n° 387-M Cermet) Medical Device Directive (CE mark) MDD 93/42/EEC (Notified Body 0476). Class IIa Appendix - Safety and conformity - 73 Technical features Flowmeter Type: Diameter (int.): Flow range: Volume range: Resolution: Accuracy: Resistance: ID28 turbine Bidirectional 28mm 0-16 l/s 0-300 l/min 12 ml ± 2% or 20 ml/s <0.6 cmH2O/l/s @ 14 l/s O2 analyzer Type: Response time: Range: Accuracy: Resolution: Warm-up time: Paramagnetic 120 ms 0-30% (0-100% FRC) ±0.1% 0.01% (0.03% FRC) 5 min CO2 analyzer Type: Response time: Range: Accuracy: Resolution: Warm-up time: Digital infrared 100 ms 0-10% ±0.1% 0.01% 10 min CO analyzer Type: Response time: Range: Accuracy: Resolution: Warm-up time: Infrared 200 ms 0-0.35% ±0.003% 0.001% 15 min ID18 turbine Bidirectional 18mm 0-8 l/s 0-50 l/min 3 ml ± 2% or 20 ml/s <0.7 cmH2O/l/s @ 3 l/s CH4 analyser Type: Response time: Range: Accuracy: Resolution: Warm-up time: Infrared 200 ms 0-0.35% ±0.003% 0.001% 15 min Humidity absorber Capillary of Nafion (Permapure ®) Power Supply Voltage: Power consumption: 100V-240V ±10%; 50/60Hz 100VA 74 - Appendix - Technical features Flowsafe PNT Lilly 0-14 l/s X9 PNT Lilly 28mm 0-14 l/s 1 ml ± 2% or 20 ml/s <1 cmH2O/l/s @ 14 l/s 1 ml ± 2% or 20 ml/s <1 cmH2O/l/s @ 14 l/s Environmental Sensors Temperature: 0-50°C Barometer: 400-800 mmHg Humidity: 0-100% Dimension and Weight Dimensions: 16x33x41 cm Weight: 11 Kg (weight depends on the configuration) Oximeter ARMS (70%-100%) 1.70 ARMS (60%-70%) ARMS (70%-80%) 2.16 1.90 ARMS (80%-90%) 1.80 ARMS (90%-100%) 1.34 Accuracy specifications FVC ±3.5% or 0.100L/s whichever is greater FEV1 FEF25-75% ±3.5% or 0.100L/s whichever is greater ±5.5% or 0.250L/s whichever is greater PEF MVV ±7% or ±0.420 L/s whichever is greater ±10.5% or 20 L/min whichever is greater FRC ±5% DLCO MIP/MEP P0.1 ±5% ±3% ±5% or 0.5 cmH2O whichever is greater SpO2 ±1% Ve RF ±3% ±3% HR VO2 ±2 units ±3% VCO2 ±3% Appendix - Technical features - 75 Calculations references VO2 and VCO2 "Energy Expenditure and Fuel Selection in Biological Systems: The Theory and Practice of Calculations Based on Indirect Calorimetry and Tracer Methods": M. Elia, G. Livesey, World Rev. Nutr. Diet. Basel, Karger, 1992, vol 70, pp 68-131. "Nutritional Assessment in Critical Care, A Training Handbook": Donald C. Zavala Anaerobic Threshold (modified V-Slope) The intercept of the two slopes is defined as the VO2 above which VCO2 increases faster than VO2 without hyperventilation and can be selected automatically or manually by the software. During incremental exercise above the Lactate Threshold, a net increase in lactic acid production results in an accelerated rate in VCO2 relative to VO2. When plotting these variables against each other a linear relationship is displayed. The slope of the lower component is slightly less than 1.0, whereas the upper component has a slope greater than 1.0. The intercept of these two slopes is the LT or AT point as measured by gas exchange. The increase in VCO2 in excess of that derived from aerobic metabolism must be generated from the buffering of lactic acid. This is seen in all subjects exercising at work levels above their LT. References OVS, Original V-Slope method: "A new method for detecting anaerobic threshold by gas exchange", Beaver, Wasserman, Whipp, JAP 1986, 60:2020-2027. MVS, Modified V-Slope method: "Metabolic acidosis during exercise in patients with chronic obstructive pulmonary disease", Sue, Wasserman, CHEST 1988, 94:931-938. Oxygen Kinetics “Delayed Kinetics of VO2 in the Transition from prior Exercise. Evidence for O2 Transport Limitation of VO2 Kinetics: A Review”; R.L. Hughson and M.A. Morrissey, Int. J. Sports Med. 4 (1983) 31-39 ISO 8996: Ergonomics – Determination of metabolic heat production, 1990 The following picture displays how O2 debt and O2 deficit values are calculated. 76 - Appendix - Calculations references Predicted values ERS93 Standardized Lung Function Testing: Official Statement of the European Respiratory Society, The European Respiratory Journal Volume 6, Supplement 16, March 1993. Compilation of reference values for lung function measurements in children: Ph. H. Quanjer, J. Stocks, G.Polgar, M. Wise, J. Karlberg, G. Borsboom; ERJ 1989, 2, Supp.4,184s-261s. KNUDSON 83 Changes in the Normal Maximal Expiratory Flow-Volume Curve with Growth and Anging: J. Knudson, D. Lebowitz, J. Holdberg, B. Burrows; ARRD 1983; 127:725-734 ITS Intermountain Thoracic Society: Clinical Pulmonary Function Testing, second edition (1984) pp 101, 144 LAM A survey of ventilatory capacity in Chinese subjects in Hong Kong: Lam Kwok-Kwong, Pang Shing et Al. Annals of Human Biology, 1982, vol. 9, No. 5, 459-472. Multicéntrico de Barcelona Spirometric reference values from a Mediterranean population: J. Roca, J. Sanchis, A. Agusti-Vidal, F. Segarra, D. Navajas. R. Rodriguez-Roisin, P. Casan, S. Sans. Bull. Eur. Physiopathol. Respir. 1986, 22, 217-224. Nhanes III Spirometric reference values from a sample of the general US population: John L. Hankinson, John. R. Odencrantz and Kathleen B. Fedan. Am J Respir Critr Care Med 1999, 159, 1798-187. Pneumobil (Brazil) Valores extraìdos do Programa Pneumobil/Brasil para a Tese de Doutoramento do Dr. Carlos Alberto de Castro Pereira. (Boehringer). Gutierrez (Chile) Gutierrez et Al. Reference values for Chile population Knudson, Morris and Bass The maximal Expiratory Flow-Volume curve: Knudson et al. ARRD Vol. 123, p. 659-664, 1981 Spirometric Standard for healthy non-smoking adults: ARRD Vol. 10-3, p. 57-67, 1971 Pereira (Brazil) Pereira CAC; Barreto SP; Simões JG; Pereira FWL; Gerstler JG; Nakatani J. Valores de Referência para Espirometria em uma amostra da população brasileira adulta. Jornal de Pneumologia 1992; 18: 10-22. Mallozi MC. Valores de referência para espirometria em crianças e adolescentes, calculados a partir de uma amostra da cidade de São Paulo. Valores finais publicados em : Pereira CAC; Lemle A; Algranti E; Jansen JM; Valença LM; Nery LE; Mallozi M; Gerbasi M; Dias RM; Zim W. I Consenso Brasileiro sobre Espirometria. Jornal de Pneumologia 1996; 22:105164. Scalambrini Costa F, Scueiri CEB, Silva Jr WC, Pereira CAC, Nakatani J. Valores de referência para espirometria em uma amostra da população brasileira adulta da raça negra. J Pneumologia 1996;22: 165-170. Neder JA; Andreoni S; Castelo-Filho A; Nery LE. Reference values for lung function tests. I. Static Volumes. Brazilian Journal Medical and Biological Research 1999; 32:703-17. Neder JA, Andreoni S, Lerario MC, Nery LE. Reference values for lung function tests. II. Maximal respiratory pressures and voluntary ventilation. Braz J Med Biol Res 1999 ;32:719-27 Thai Wanchai Dejsomritrutai; Khun Nanta Maranetra; Kittipong Maneechotesuwan; Nitipatana Chierakul; Jamsk Tscheikuna; Tasneeya Suthamsmai; Arth Nana; Benjamas Chuaychoo; Phunsup Wongsurakiat; Suchai Charoenratanakul; Wilawan Juengprasert; Chana Naruman: Reference Spirometric Values for Healthy Lifetime Nonsmokers in Thailand, J. Med. Assoc. May 2000 (83: 457-466) DLCO Standardized Lung Function Testing: Official Statement of the European Respiratory Society, The European Respiratory Journal Volume 6, Supplement 16, March 1993. Appendix - Predicted values - 77 Compilation of reference values for lung function measurements in children: Ph. H. Quanjer, J. Stocks, G.Polgar, M. Wise, J. Karlberg, G. Borsboom; ERJ 1989, 2, Supp.4,184s-261s. Reference Values for Residual Volume, Functional Residual Capacity and Total Lung Capacity - ATS workshop on Lung Volume measurements, official statement of the European Respiratory Society; J. Stocks, Ph. H. Quanjer: ERJ, 1995, 8, 492-506 Single Breath Oxygen Test Buist SA, Ross BB: Quantitative Analysis of the Alveolar Plateau in the Diagnosis of Early Airway Obstruction. ARRD 108: 1081, 1973 Mansell A, Bryan C, Levison H: Airway Closure in Children. JAP 33: 711-714, 1972 Buist SA, Ross BB: Predicted Values for Closing Volumes Using a Modified Single Breath Test. ARRD 107: 744-751, 1973. Rint Lombardi E, Sly PD, Concutelli G, et al. Reference values of interrupter respiratory resistance in healthy preschool white children. Thorax 2001; 56: 691-695. MIP/MEP Leo F. Black, Robert E. Hyatt: Maximal Respiratory Pressures: Normal Values and Relationship to Age and Sex, American Review of Respiratory Disease, Volume 99, 1969 Vincken W, Ghezzo H & Cosio MG (1987). Maximal static respiratory pressures in adults: normal values and their relationship to determinants of respiratory function. Bull Eur Physiopathol Resp 23: 435-439. Automatic diagnosis (algorithm) Reference: “Lung Function Testing: selection of reference values and interpretative strategies”, A.R.R.D., 144/ 1991:12021218. LLN=Pred-0.674*SD (ATS, 50° percentile) LLN=Pred-1.647*SD (ERS, 95° percentile) LLN=Pred*0.8 (80%Pred) Message interpretation Criterion Normal spirometry FVC and FEV1/FVC > LLN Obstructive abnormality (may be physiological) % Pred FEV1 >= 100 Obstructive abnormality: mild % Pred FEV1 < 100 and >= 70 Obstructive abnormality: moderate % Pred FEV1 < 70 and >= 60 Obstructive abnormality: moderately severe % Pred FEV1 < 60 and >= 50 Obstructive abnormality: severe % Pred FEV1 < 50 and >= 34 Obstructive abnormality: very severe % Pred FEV1 < 34 Restrictive abnormality: mild FVC < LLN and % Pred FVC >= 70 Restrictive abnormality: moderate % Pred FVC < 70 and >= 60 Restrictive abnormality: moderately severe % Pred FVC < 60 and >= 50 Restrictive abnormality: severe % Pred FVC < 50 and >= 34 Restrictive abnormality: very severe % Pred FVC < 34 Quality Control Messages Reference: Spirometry in the Lung Health Study: Methods and Quality Control, ARRD 1991; 143:1215-1223. Message Criterion Start faster VEXT >5% of the FVC and >150ml Blast out harder PEFT >120 msec Avoid coughing 50% drop in the flow in first second. Blow out longer FET100% <6 sec. Blow out more air Flow >0.2l/s within 20 ml of FVC 78 - Appendix - Predicted values Blow out harder dPEF<10% Take a deeper breath dFVC<200ml and 5% best FVC Blow out faster dFEV1<200ml and 5% FEV1 That was a good test No errors FVC reproducible Diff. 2 max FVC within 0.2 l FEV1 reproducible Diff. 2 max FEV1 within 0.2 l PEF reproducible Diff. 2 max PEF within 10 % MVV time too short MVV time less than 12 sec Appendix - Predicted values - 79 References Spirometry ATS/ERS TASK FORCE: STANDARDISATION OF LUNG FUNCTION TESTING, Edited by V. Brusasco, R. Crapo and G. Viegi: Standardisation of spirometry, Eur Respir J 2005; 26: 319–338 Lung function", J.E. Cotes, Blackwell scientific publications "Guidelines for Clinical Exercises Testing Laboratories", I.L. Pina, G.J. Balady, P. Hanson, A.J. Labovitz, D.W. Madonna, J. Myers. American Heart Association. 1995; 91, 912. Dosimeter Guidelines for Methacholine and Exercise Challenge Testing - 1999 Am. J. Respir. Crit. Care Med., Volume 161, Number 1, January 2000, 309-329 (Official Statement of the ATS adopted by the ATS Board of Directors, July 1999) Lung Volumes ATS/ERS TASK FORCE: STANDARDISATION OF LUNG FUNCTION TESTING, Edited by V. Brusasco, R. Crapo and G. Viegi: Standardisation of the measurement of lung volumes, Eur Respir J 2005; 26: 511-522 Single-Breath with Apnoea ATS/ERS TASK FORCE: STANDARDISATION OF LUNG FUNCTION TESTING, Edited by V. Brusasco, R. Crapo and G. Viegi: Standardisation of the single breath determination of carbon monoxide uptake in the lung, Eur Respir J 2005; 26: 720-735 Single-Breath without Apnoea Rest and Exercise Cardiac Output and Diffusing Capacity Assessed By a Single Slow Exhalation of Methane, Acetylene, and Carbon Monoxide; Ramage, Coleman and MacIntyre, CHEST 92, 1, July 1987 MIP/MEP Leo F. Black, Robert E. Hyatt: Maximal Respiratory Pressures: Normal Values and Relationship to Age and Sex, American Review of Respiratory Disease, Volume 99, 1969 Vincken W, Ghezzo H & Cosio MG (1987). Maximal static respiratory pressures in adults: normal values and their relationship to determinants of respiratory function. Bull Eur Physiopathol Resp 23: 435-439. P0.1 G.B.Drummond, J.Fischer, A.Zidulka, J.Milic-Emili: Pattern of Reduction of Ventilatory and Occlusion Pressure Response to Carbon Dioxide by Pentazocine in Man, Br. J. Anaesth. (1982), 54, 87-96 Resistance P. J. Chowienczyk, C. P. Lawson, S. Iane, R. Johnson, N. Wilson, M. Silverman, G. M. Cochrane: “A flow interruption device for measurement of airway resistance”, European Respiratory Journal, 1991, 4, 623-626 G. Liistro, D. Stanescu, D. Rodenstein, C. Veriter: “Reassesment of interrupter, technique for measuring flow resistance in human”, J. Appl. Physiol., 67(3), 933-937, 1989. Gas Exchange On line computer analysis and breath by breath graphical display of exercise function tests.”; Beaver, Wasserman, Whipp, JAP , 34(1):128-132, 1973 Measurement and analysis of gas exchange during exercise using a programmable calculator”; Sue, Hansen, Blais, Wasserman, JAP, 49(3), 1980:456-461 Principles of exercise testing and interpretation, 2nd edition”; Wasserman et Al, 1994 Clinical Exercise Testing, 3rd edition”, Jones 1988 ERS task force on standardization of clinical exercise testing. “Clinical exercise testing with reference to lung disease: indications, standardization and interpretation strategies.” J. Roca, B. Whipp, S. Anderson, R. Casaburi, J.E. Cotes, P. Palange…., ERJ 1997; 10: 2662-2689. 80 - Appendix - References Indirect Calorimetry Energy Expenditure and Fuel Selection in Biological Systems: The Theory and Practice of Calculations Based on Indirect Calorimetry and Tracer Methods”: M. Elia, G. Livesey, World Rev. Nutr. Diet. Basel, Karger, 1992, vol 70, pp 68-131 Nutritional Assessment in Critical Care, A Training Handbook”: Donald C. Zavala Sub-maximal exercise testing Cardiorespiratory Assessment of Apparently Healthy Populations”, Timothy R. McConnell, in ACSM’s Resource Manual for th Guidelines for Exercise Testing and Prescription, 4 Edition, pp. 361-366 th Franklin BA, ed. ACSM’s Guidelines for Exercise Testing and Prescription, 6 Edition Philadelphia: Williams&Wilkins, 2000:22-29 Oximeter National Lung Health Education Program (NLHEP) - Guide to prescribing Home Oxygen. By Thomas L. Petty. ERJ 2004, 23: 932-646 - ATS/ERS Task force, B. R. Celli, W. MacNee, committee members - Standard for the diagnosis and treatment of patients with COPD: A summary of the ATS/ERS position paper. Canopy Energy Expenditure and Fuel Selection in Biological Systems: The Theory and Practice of Calculations Based on Indirect Calorimetry and Tracer Methods; M. Elia, G. Livesey, World Rev. Nutr. Diet. Basel, Karger, 1992, vol 70, pp 68-131. Nutritional assessment in Critical Care, a training handbook; Donald C. Zavala Exercise Physiology - energy nutrition and human performance; William D. McArdle, Frank I. Katch, Victor L. Katch General ATS/ERS TASK FORCE: STANDARDISATION OF LUNG FUNCTION TESTING, Edited by V. Brusasco, R. Crapo and G. Viegi: General considerations for lung function testing, Eur Respir J 2005; 26: 153-161 ATS/ERS TASK FORCE: STANDARDISATION OF LUNG FUNCTION TESTING, Edited by V. Brusasco, R. Crapo and G. Viegi: Interpretative strategies for lung function test, Eur Respir J 2005; 26: 720-735. Appendix - References - 81 82 - Appendix - References www.cosmed.com COSMED srl Headquarters Via dei Piani di Monte Savello 37 Albano Laziale - Rome 00041 ITALY Phone +39 06 931-5492 Fax +39 06 931-4580 [email protected]