1
NATIONAL HEALTH AND NUTRITION EXAMINATION SURVEY III
Home Examiner’s Manual
Westat, Inc.
1650 Research Boulevard
Rockville, MD 20850
(301) 251-1500
January 1993
TABLE OF CONTENTS
Page
Chapter
1 OVERVIEW OF THE NHANES III . . . . . . . . . . . . . . . . . . . . . . . . . . . . . . . . . . . . .
1.1
1.2
1.3
1.4
Introduction and Purpose of the Survey . . . . . . . . . . . .
History of the Health and Nutrition Examination Survey
About Westat . . . . . . . . . . . . . . . . . . . . . . . . . . . . . .
Pretest and Main Survey Schedules . . . . . . . . . . . . . . .
.
.
.
.
1-1
1-8
1-10
1-11
Pretests . . . . . . . . . . . . . . . . . . . . . . . . . . . . . . . . . . . . . . . . . . . . . .
Schedule for the Main Survey . . . . . . . . . . . . . . . . . . . . . . . . . . . . . .
1-11
1-12
Sample Design . . . . . . . . . . . . . . . . . . . . . . . . . . . . . . . . . . . . . . . . . . . . . .
Personnel and Reporting Relationships . . . . . . . . . . . . . . . . . . . . . . . . . . . . . .
Advance Arrangements for a Stand . . . . . . . . . . . . . . . . . . . . . . . . . . . . . . . .
1-13
1-14
1-16
1.7.1
1.7.2
Schedule for Advance Arrangements . . . . . . . . . . . . . . . . . . . . . . . . . .
Community Outreach Activities . . . . . . . . . . . . . . . . . . . . . . . . . . . . .
1-16
1-18
Data Collection . . . . . . . . . . . . . . . . . . . . . . . . . . . . . . . . . . . . . . . . . . . . . .
1-19
1.8.1
1.8.2
.................
1-19
.................
.................
.................
1-22
1-31
1-31
Confidentiality and Professional Ethics . . . . . . . . . . . . . . . . . . . . . . . . . . . . . .
1-33
2 GENERAL OVERVIEW OF THE HOME EXAMINATION . . . . . . . . . . . . . . . . . . . .
2-1
1.4.1
1.4.2
1.5
1.6
1.7
1.8
1.8.3
1.8.4
1.9
2.1
2.2
2.3
2.4
2.5
Household Interviews . . . . . . . . . . . . . . . . . . .
Exams and Interviews in the Mobile Examination
Center (MEC) . . . . . . . . . . . . . . . . . . . . . . . .
Home Exams . . . . . . . . . . . . . . . . . . . . . . . . .
Special Studies . . . . . . . . . . . . . . . . . . . . . . . .
Introduction and Purpose of the Home Examination
Scheduling Home Exams . . . . . . . . . . . . . . . . . .
Components of the Home Examination . . . . . . . . .
SP Remuneration . . . . . . . . . . . . . . . . . . . . . . . .
Role of the Home Examiner . . . . . . . . . . . . . . . .
2.5.1
2.5.2
2.5.3
.
.
.
.
.
.
.
.
.
.
.
.
.
.
.
.
.
.
.
.
.
.
.
.
.
.
.
.
.
.
.
.
.
.
.
.
.
.
.
.
.
.
.
.
.
.
.
.
.
.
.
.
.
.
.
.
.
.
.
.
.
.
.
.
.
.
.
.
.
.
.
.
.
.
.
.
.
.
.
.
.
.
.
.
.
.
.
.
.
.
.
.
.
.
.
.
.
.
.
.
.
.
.
.
.
.
.
.
.
.
.
.
.
.
.
.
.
.
.
.
.
.
.
.
.
.
.
.
.
.
.
.
.
.
.
.
.
.
.
.
.
.
.
.
.
.
.
.
.
.
.
.
.
.
.
2-1
2-2
2-4
2-4
2-6
Medical Policy Regarding the Exam . . . . . . . . . . . . . . . . . . . . . . . . . .
Responsibilities of the Home Exam Technicians . . . . . . . . . . . . . . . . . .
Overview of Home Examiner Tasks . . . . . . . . . . . . . . . . . . . . . . . . . .
2-7
2-8
2-9
iii
.
.
.
.
.
.
.
.
.
1-1
.
.
.
.
.
TABLE OF CONTENTS (continued)
Page
Chapter
3 HOME EXAMINATION MATERIALS . . . . . . . . . . . . . . . . . . . . . . . . . . . . . . . . . .
3.1
3.2
3.3
3.4
3.5
3.6
3.7
3.8
3.9
.
.
.
.
.
.
.
.
.
3-1
3-1
3-2
3-6
3-6
3-8
3-8
3-8
3-11
4 EQUIPMENT AND SUPPLIES . . . . . . . . . . . . . . . . . . . . . . . . . . . . . . . . . . . . . . . .
4-1
4.1
4.2
Introduction . . . . . . . . . . . . . . . . . . . .
The Household Folder . . . . . . . . . . . .
The SP Card . . . . . . . . . . . . . . . . . . .
The Home Examination Form . . . . . . .
The Consent Form . . . . . . . . . . . . . . .
The Home Exam Release Form . . . . . .
The Home Exam SP Identification Form
The Home Examination Control Record
SP Identification Labels . . . . . . . . . . .
.
.
.
.
.
.
.
.
.
.
.
.
.
..
..
.
.
.
.
.
.
.
.
.
.
.
.
.
.
.
.
.
.
.
.
.
.
.
.
.
.
.
.
.
.
.
.
.
.
.
.
.
.
.
.
.
.
.
.
.
.
.
.
.
.
.
.
.
.
.
.
.
.
.
.
.
.
.
.
.
.
.
.
.
.
.
.
.
.
.
.
.
.
.
.
.
.
.
.
.
.
.
.
.
.
.
.
.
.
.
.
.
.
.
.
.
.
.
.
.
.
.
.
.
.
.
.
.
.
.
.
.
.
.
.
.
.
.
.
.
.
.
.
.
.
.
.
.
.
.
.
.
.
.
.
.
.
.
.
.
.
.
.
.
.
.
.
.
.
.
.
.
.
.
.
.
.
.
.
.
.
.
.
.
.
.
.
.
.
.
.
.
.
.
.
.
.
.
.
.
.
.
.
.
.
.
.
.
.
.
.
.
.
.
.
.
.
.
.
.
.
.
.
.
.
.
.
.
.
.
.
.
.
.
.
.
.
.
.
.
.
.
.
.
.
.
.
.
.
3-1
Introduction . . . . . . . . . . . . . . . . . . . . . . . . . . . . . . . . . . . . . . . . . . . . . . . . .
Start of Stand Procedures . . . . . . . . . . . . . . . . . . . . . . . . . . . . . . . . . . . . . . .
4.2.1
4.2.2
4.2.3
4-1
4-4
Equipment Calibration Procedures . . . . . . . . . . . . . . . . . . . . . . . . . . .
Daily Procedures . . . . . . . . . . . . . . . . . . . . . . . . . . . . . . . . . . . . . . .
End of Stand Procedures . . . . . . . . . . . . . . . . . . . . . . . . . . . . . . . . . .
4-4
4-8
4-13
5 BASIC INTERVIEWING AND COMMUNICATION SKILLS . . . . . . . . . . . . . . . . . .
5-1
5.1
5.2
5.3
5.4
.
.
.
.
5-1
5-2
5-2
5-4
6 TECHNIQUES FOR ADMINISTERING THE HOME EXAMINATION . . . . . . . . . . .
6-1
6.1
6.2
Developing Basic Interviewing Techniques
Establishing Rapport with Each Participant .
Answering the Respondent’s Questions . . . .
Maintaining Attention and Cooperation . . . .
.
.
.
.
.
.
.
.
.
.
.
.
.
.
.
.
.
.
.
.
.
.
.
.
.
.
.
.
.
.
.
.
.
.
.
.
.
.
.
.
.
.
.
.
.
.
.
.
.
.
.
.
.
.
.
.
.
.
.
.
.
.
.
.
.
.
.
.
.
.
.
.
.
.
.
.
.
.
.
.
.
.
.
.
.
.
.
.
.
.
.
.
.
.
.
.
.
.
.
.
Introduction . . . . . . . . . . . . . . . . . . . . . . . . . . . . . . . . . . . . . . . . . . . . . . . . .
Preparing for the Home Examination . . . . . . . . . . . . . . . . . . . . . . . . . . . . . . .
6.2.1
6.2.2
6.2.3
6.2.4
6.2.5
6.2.6
Review the Home Examiner’s Manual and
Test Materials . . . . . . . . . . . . . . . . . . . .
Review the Home Examination Form . . . .
Review the Testing and Lab Procedures . .
Know the Testing Equipment . . . . . . . . . .
Organize Materials . . . . . . . . . . . . . . . . .
Impression Management . . . . . . . . . . . . .
iv
.
.
.
.
.
.
.
.
.
.
.
.
.
.
.
.
.
.
.
.
.
.
.
.
.
.
.
.
.
.
.
.
.
.
.
.
.
.
.
.
.
.
.
.
.
.
.
.
.
.
.
.
.
.
.
.
.
.
.
.
.
.
.
.
.
.
.
.
.
.
.
.
.
.
.
.
.
.
.
.
.
.
.
.
.
.
.
.
.
.
.
.
.
.
.
.
.
.
.
.
.
.
.
.
.
.
.
.
.
.
.
.
.
.
.
.
.
.
.
.
.
.
.
.
.
.
6-1
6-1
6-2
6-2
6-3
6-3
6-4
6-4
TABLE OF CONTENTS (continued)
Page
Chapter
6.3
6.4
Techniques for Administering the Home Examination . . . . . . . . . . . . . . . . . . .
6-5
6.3.1
6.3.2
6.3.3
Attending Behavior . . . . . . . . . . . . . . . . . . . . . . . . . . . . . . . . . . . . . .
Use of Questions or Probes . . . . . . . . . . . . . . . . . . . . . . . . . . . . . . . .
Paraphrasing and Reflecting . . . . . . . . . . . . . . . . . . . . . . . . . . . . . . . .
6-5
6-6
6-6
Administering the Questionnaire Portion of the
Home Examination . . . . . . . . . . . . . . . . . . . . . . . . . . . . . . . . . . . . . . . . . . . .
6-7
6.4.1
6.4.2
....................
6-7
....................
....................
....................
6-10
6-19
6-28
Editing the Home Examination Form . . . . . . . . . . . . . . . . . . . . . . . . . . . . . . .
6-36
7 HOME EXAM COMPONENTS . . . . . . . . . . . . . . . . . . . . . . . . . . . . . . . . . . . . . . . .
7-1
6.4.3
6.4.4
6.5
7.1
7.2
7.3
7.4
Introduction . . . . . . . . . . . . . . . . . . . . . . . . . . . . . . . . . . . . . . . . . . . . . . . . .
Preparing for the Exam . . . . . . . . . . . . . . . . . . . . . . . . . . . . . . . . . . . . . . . . .
Conducting the Home Exam . . . . . . . . . . . . . . . . . . . . . . . . . . . . . . . . . . . . .
7-1
7-2
7-4
7.3.1
7.3.2
Introduction at the Door . . . . . . . . . . . . . . . . . . . . . . . . . . . . . . . . . .
Exam Set-Up . . . . . . . . . . . . . . . . . . . . . . . . . . . . . . . . . . . . . . . . . .
7-4
7-4
Body Measurements . . . . . . . . . . . . . . . . . . . . . . . . . . . . . . . . . . . . . . . . . . .
7-7
7.4.1
7.4.2
7.4.3
7.4.4
7.4.5
7.4.6
7.5
7.6
Types of Questions . . . . . . . . . . . . . . . . . .
Presenting the Questionnaire Sections of the
Home Examination Form . . . . . . . . . . . . . .
Probing . . . . . . . . . . . . . . . . . . . . . . . . . .
Recording Answers . . . . . . . . . . . . . . . . . .
Explaining the Measurement Process to SP’s . . .
Equipment and Supplies . . . . . . . . . . . . . . . . .
Procedures for Measuring Adult SP’s 20+ Years
Procedures for Measuring Children < 1 Year . . .
Data Form Recording . . . . . . . . . . . . . . . . . . .
Feedback to the SP . . . . . . . . . . . . . . . . . . . . .
.
.
.
.
.
.
.
.
.
.
.
.
.
.
.
.
.
.
.
.
.
.
.
.
.
.
.
.
.
.
.
.
.
.
.
.
.
.
.
.
.
.
.
.
.
.
.
.
.
.
.
.
.
.
.
.
.
.
.
.
.
.
.
.
.
.
.
.
.
.
.
.
.
.
.
.
.
.
.
.
.
.
.
.
.
.
.
.
.
.
.
.
.
.
.
.
.
.
.
.
.
.
7-7
7-8
7-15
7-22
7-25
7-27
Infant Food Frequency . . . . . . . . . . . . . . . . . . . . . . . . . . . . . . . . . . . . . . . . .
Physical Function Examination (Ages 60+) . . . . . . . . . . . . . . . . . . . . . . . . . . .
7-28
7-32
7.6.1
7-32
Physical Functioning Tests . . . . . . . . . . . . . . . . . . . . . . . . . . . . . . . . .
v
TABLE OF CONTENTS (continued)
Page
Chapter
7.7
7.8
7.9
7.10
7.11
7.12
7.13
7.14
7.15
7.16
7.17
Cognitive Testing . . . . . . . . . . . . . . . . . . . . . . . . . . . . . . . . . . . . . . . . . . . . .
7-59
7.7.1
7.7.2
7.7.3
7.7.4
7.7.5
7.7.6
7.7.7
Introduction . . . . . . . . . . . . . . .
Cognitive Tests for Older Adults
Sequence of Testing . . . . . . . . .
Motivating the Respondents . . . .
Standardized Testing Procedures .
Recording Responses . . . . . . . .
Cognitive Function - Part A . . . .
.
.
.
.
.
.
.
.
.
.
.
.
.
.
.
.
.
.
.
.
.
.
.
.
.
.
.
.
.
.
.
.
.
.
.
.
.
.
.
.
.
.
.
.
.
.
.
.
.
.
.
.
.
.
.
.
.
.
.
.
.
.
.
.
.
.
.
.
.
.
.
.
.
.
.
.
.
.
.
.
.
.
.
.
.
.
.
.
.
.
.
.
.
.
.
.
.
.
.
.
.
.
.
.
.
.
.
.
.
.
.
.
.
.
.
.
.
.
.
.
.
.
.
.
.
.
.
.
.
.
.
.
.
.
.
.
.
.
.
.
.
.
.
.
.
.
.
7-59
7-60
7-60
7-61
7-62
7-62
7-63
Selected Conditions/Medicine, Vitamin, and Mineral
Usage
............................
Cognitive Function - Part B . . . . . . . . . . . . . . . . .
Tobacco
............................
Reproductive Health . . . . . . . . . . . . . . . . . . . . . . .
Spirometry Home Examination . . . . . . . . . . . . . . .
.
.
.
.
.
.
.
.
.
.
.
.
.
.
.
.
.
.
.
.
.
.
.
.
.
.
.
.
.
.
.
.
.
.
.
.
.
.
.
.
.
.
.
.
.
.
.
.
.
.
.
.
.
.
.
.
.
.
.
.
.
.
.
.
.
.
.
.
.
.
.
.
.
.
.
.
.
.
.
.
.
.
.
.
.
.
.
.
.
.
.
.
.
.
.
.
.
.
.
.
7-68
7-71
7-74
7-76
7-84
7.12.1
7.12.2
7.12.3
7.12.4
.
.
.
.
.
.
.
.
.
.
.
.
.
.
.
.
.
.
.
.
.
.
.
.
.
.
.
.
.
.
.
.
.
.
.
.
.
.
.
.
.
.
.
.
.
.
.
.
.
.
.
.
.
.
.
.
.
.
.
.
.
.
.
.
.
.
.
.
.
.
.
.
.
.
.
.
.
.
.
.
7-84
7-84
7-102
7-108
Venipuncture . . . . . . . . . . . . . . . . . . . . . . . . . . . . . . . . . . . . . . . . . . . . . . . .
7-111
7.13.1
7.13.2
7.13.3
7.13.4
7.13.5
7.13.6
7.13.7
7.13.8
7.13.9
7.13.10
Introduction . . . . . . . . .
Equipment . . . . . . . . . .
Examination Procedures
Safety Considerations . .
.
.
.
.
.
.
.
.
.
.
.
.
.
.
.
.
.
.
.
.
.
.
.
.
.
.
.
.
.
.
.
.
.
.
.
.
.
.
.
.
.
.
.
.
.
.
.
.
.
.
.
.
.
.
.
.
.
.
.
.
.
.
.
.
.
.
.
.
.
.
.
.
Introduction . . . . . . . . . . . . . . . . . . . . . . . .
Gaining Cooperation . . . . . . . . . . . . . . . . . .
Administering the Venipuncture Questionnaire
Venipuncture Supplies . . . . . . . . . . . . . . . . .
Venipuncture Procedures . . . . . . . . . . . . . . .
Conducting the Venipuncture . . . . . . . . . . . .
Concluding the Venipuncture . . . . . . . . . . . .
Transporting and Processing . . . . . . . . . . . .
Recording Results . . . . . . . . . . . . . . . . . . . .
Bio Safety . . . . . . . . . . . . . . . . . . . . . . . . .
Conditions of Exam (Complete for all SPs)
Results of Examination . . . . . . . . . . . . . .
Home Exam Exit Questions . . . . . . . . . .
Concluding the Examination . . . . . . . . . .
vi
.
.
.
.
.
.
.
.
.
.
.
.
.
.
.
.
.
.
.
.
.
.
.
.
.
.
.
.
.
.
.
.
.
.
.
.
.
.
.
.
.
.
.
.
.
.
.
.
.
.
.
.
.
.
.
.
.
.
.
.
.
.
.
.
.
.
.
.
.
.
.
.
.
.
.
.
.
.
.
.
.
.
.
.
.
.
.
.
.
.
.
.
.
.
.
.
.
.
.
.
.
.
.
.
.
.
.
.
.
.
.
.
.
.
.
.
.
.
.
.
.
.
.
.
.
.
.
.
.
.
.
.
.
.
.
.
.
.
.
.
.
.
.
.
.
.
.
.
.
.
.
.
.
.
.
.
.
.
.
.
.
.
.
.
.
.
.
.
.
.
.
.
.
.
.
.
.
.
.
.
.
.
.
.
.
.
.
.
.
.
.
.
.
.
.
.
.
.
.
.
.
.
.
.
7-111
7-111
7-113
7-117
7-118
7-118
7-123
7-123
7-125
7-125
.
.
.
.
.
.
.
.
.
.
.
.
.
.
.
.
.
.
.
.
.
.
.
.
.
.
.
.
.
.
.
.
.
.
.
.
.
.
.
.
.
.
.
.
.
.
.
.
.
.
.
.
.
.
.
.
.
.
.
.
.
.
.
.
7-128
7-129
7-131
7-132
TABLE OF CONTENTS (continued)
Page
Chapter
8 ADMINISTRATIVE PROCEDURES . . . . . . . . . . . . . . . . . . . . . . . . . . . . . . . . . . . .
8.1
8.2
8.3
8.4
8.5
8.6
8-1
Obtaining Consent . . . . . . . . . . . . . . . . .
Sample Person Remuneration . . . . . . . . .
Using Escorts . . . . . . . . . . . . . . . . . . . .
Handling Difficult Respondent or Refusals
Non-English Speaking Examinees . . . . . .
Problem Situations . . . . . . . . . . . . . . . . .
.
.
.
.
.
.
.
.
.
.
.
.
.
.
.
.
.
.
.
.
.
.
.
.
.
.
.
.
.
.
.
.
.
.
.
.
.
.
.
.
.
.
.
.
.
.
.
.
.
.
.
.
.
.
.
.
.
.
.
.
.
.
.
.
.
.
.
.
.
.
.
.
.
.
.
.
.
.
.
.
.
.
.
.
.
.
.
.
.
.
.
.
.
.
.
.
.
.
.
.
.
.
.
.
.
.
.
.
.
.
.
.
.
.
.
.
.
.
.
.
.
.
.
.
.
.
.
.
.
.
.
.
.
.
.
.
.
.
.
.
.
.
.
.
.
.
.
.
.
.
.
.
.
.
.
.
.
.
.
.
.
.
8-1
8-1
8-1
8-2
8-2
8-3
8.6.1
8.6.2
8.6.3
8.6.4
.
.
.
.
.
.
.
.
.
.
.
.
.
.
.
.
.
.
.
.
.
.
.
.
.
.
.
.
.
.
.
.
.
.
.
.
.
.
.
.
.
.
.
.
.
.
.
.
.
.
.
.
.
.
.
.
.
.
.
.
.
.
.
.
.
.
.
.
.
.
.
.
.
.
.
.
.
.
.
.
.
.
.
.
.
.
.
.
.
.
.
.
.
.
.
.
.
.
.
.
.
.
.
.
.
.
.
.
8-3
8-4
8-5
8-5
Dress Code . . . . . . . . . . . . . . . . . . . . . . . . . . . . . . . . . . . . . . . . . . . . . . . . .
8-6
9 SAFETY PROCEDURES . . . . . . . . . . . . . . . . . . . . . . . . . . . . . . . . . . . . . . . . . . . .
9-1
8.7
9.1
9.2
9.3
9.4
9.5
Examinees With Complaints
Upset Examinees . . . . . . . .
Ill Examinees . . . . . . . . . . .
Disruptive Examinees . . . . .
.
.
.
.
.
.
.
.
.
.
.
.
.
.
.
.
.
.
.
.
.
9-1
9-4
9-5
9-7
9-7
10 QUALITY CONTROL . . . . . . . . . . . . . . . . . . . . . . . . . . . . . . . . . . . . . . . . . . . . . .
10-1
10.1
10.2
10.3
Medical Emergencies Overview . . . . . . . . . . . . . . . . . . .
First Aid Instruction for Signs of Vasovagal Reaction . . .
Safety Precautions and Prevention of Injuries in the Home
Ill Examinees . . . . . . . . . . . . . . . . . . . . . . . . . . . . . . .
Reporting and Recording Incidents and Emergencies . . . .
.
.
.
.
.
.
.
.
.
.
.
.
.
.
.
.
.
.
.
.
.
.
.
.
.
.
.
.
.
.
.
.
.
.
.
.
.
.
.
.
.
.
.
.
.
.
.
.
.
.
.
.
.
.
.
.
.
.
.
.
.
.
.
.
.
.
.
.
.
.
.
.
.
.
.
Observation . . . . . . . . . . . . . . . . . . . . . . . . . . . . . . . . . . . . . . . . . . . . . . . . .
Equipment . . . . . . . . . . . . . . . . . . . . . . . . . . . . . . . . . . . . . . . . . . . . . . . . . .
Updating Procedures and Specifications . . . . . . . . . . . . . . . . . . . . . . . . . . . . .
10-1
10-1
10-6
Appendix
A CAPI Home Examination Manual . . . . . . . . . . . . . . . . . . . . . . . . . . . . . . . . . . . . . . .
A-1
B Home Examination Form - English and Spanish Versions . . . . . . . . . . . . . . . . . . . . . .
B-1
C Answers to Frequently Asked Questions Regarding Venipuncture . . . . . . . . . . . . . . . . .
C-1
D Home Examination Fact Sheet - Spanish Version . . . . . . . . . . . . . . . . . . . . . . . . . . . .
D-1
vii
TABLE OF CONTENTS (continued)
List of Exhibits
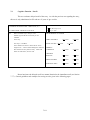
1-1
Reporting Relationships . . . . . . . . . . . . . . . . . . . . . . . . . . . . . . . . . . . . . . . .
1-15
1-2
Stand Schedule . . . . . . . . . . . . . . . . . . . . . . . . . . . . . . . . . . . . . . . . . . . . . .
1-17
1-3
Floor Plan of MEC . . . . . . . . . . . . . . . . . . . . . . . . . . . . . . . . . . . . . . . . . . .
1-23
1-4
Examination Components by Age Groups . . . . . . . . . . . . . . . . . . . . . . . . . . . .
1-27
1-4a
NHANES III Examination Components . . . . . . . . . . . . . . . . . . . . . . . . . . . . .
1-28
1-5
Estimated Number of Minutes for each Exam Component . . . . . . . . . . . . . . . .
1-29
1-6
Home Exam for NHANES III . . . . . . . . . . . . . . . . . . . . . . . . . . . . . . . . . . . .
1-32
2-1
Home Fact Sheet of the SP Brochure . . . . . . . . . . . . . . . . . . . . . . . . . . . . . . .
2-3
2-2
Home Examination Components by age group . . . . . . . . . . . . . . . . . . . . . . . .
2-5
3-1
The SP Card . . . . . . . . . . . . . . . . . . . . . . . . . . . . . . . . . . . . . . . . . . . . . . . .
3-3
3-2
Call Record Results Code . . . . . . . . . . . . . . . . . . . . . . . . . . . . . . . . . . . . . . .
3-5
3-3
MEC Examination Consent Form . . . . . . . . . . . . . . . . . . . . . . . . . . . . . . . . . .
3-7
3-4
Home Exam SP Identification Form . . . . . . . . . . . . . . . . . . . . . . . . . . . . . . . .
3-9
3-5
Home Exam Control Record . . . . . . . . . . . . . . . . . . . . . . . . . . . . . . . . . . . . .
3-10
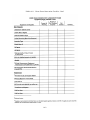
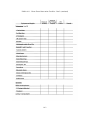
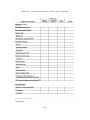
4-1
Home Exam Equipment and Supplies . . . . . . . . . . . . . . . . . . . . . . . . . . . . . . .
4-2
4-2
Home Exam Inventory Form . . . . . . . . . . . . . . . . . . . . . . . . . . . . . . . . . . . . .
4-5
4-3
Spirometry Log Sheet . . . . . . . . . . . . . . . . . . . . . . . . . . . . . . . . . . . . . . . . . .
4-9
4-4
Equipment Measurement and Calibration Log . . . . . . . . . . . . . . . . . . . . . . . . .
4-10
4-5
Home Exam Scale Standardization Form . . . . . . . . . . . . . . . . . . . . . . . . . . . .
4-11
7-1
Body Measurement Equipment Maintenance Calibration Log . . . . . . . . . . . . . .
7-11
7-2
Home Exam Scale Standardization Form . . . . . . . . . . . . . . . . . . . . . . . . . . . .
7-13
viii
TABLE OF CONTENTS (continued)
List of Exhibits (continued)
7-3
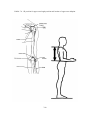
SP Position for Height . . . . . . . . . . . . . . . . . . . . . . . . . . . . . . . . . . . . . . . . .
7-18
7-4
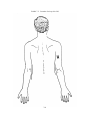
SP Position for Upper Arm length Position and
Location of Upper Arm Midpoint . . . . . . . . . . . . . . . . . . . . . . . . . . . . . . . . .
7-20
7-5
Location of Tricep Skinfold . . . . . . . . . . . . . . . . . . . . . . . . . . . . . . . . . . . . .
7-21
7-6
Correct Position for Measuring Recumbent Length . . . . . . . . . . . . . . . . . . . . .
7-24
7-7
Home Examination Form Infant Food Frequency . . . . . . . . . . . . . . . . . . . . . . .
7-29
7-8
Home Examination Form Physical Function
Examination (60+) . . . . . . . . . . . . . . . . . . . . . . . . . . . . . . . . . . . . . . . . . . . .
7-35
7-9
Measured Walk Course . . . . . . . . . . . . . . . . . . . . . . . . . . . . . . . . . . . . . . . . .
7-54
7-10
NIOSH Spirometry Log Sheet . . . . . . . . . . . . . . . . . . . . . . . . . . . . . . . . . . . .
7-90
7-11
Spirometry Form . . . . . . . . . . . . . . . . . . . . . . . . . . . . . . . . . . . . . . . . . . . . .
7-106
7-12
NHANES III Home Examination Venipuncture Protocol . . . . . . . . . . . . . . . . .
7-112
7-13
NHANES III Home Examination Hematology
Processing Protocol . . . . . . . . . . . . . . . . . . . . . . . . . . . . . . . . . . . . . . . . . . .
7-124
NHANES III Blood Processing Protocol for Home Examination
Biochemistry Specimens . . . . . . . . . . . . . . . . . . . . . . . . . . . . . . . . . . . . . . . .
7-126
9-1
Home Examination Incident/Emergency Report . . . . . . . . . . . . . . . . . . . . . . . .
9-2
10-1
Home Examination Observation Checklist - Part I . . . . . . . . . . . . . . . . . . . . . .
10-2
7-14
ix
1. OVERVIEW OF THE NHANES III
1.1
Introduction and Purpose of the Survey
The Third National Health and Nutrition Examination Survey (NHANES III) is being conducted
by the National Center for Health Statistics (NCHS) of the United States Public Health Service. Data
collection began in September l988 and will continue for approximately six years (two three-year rounds)
at 88 locations (stands) across the U.S. The main survey was preceded by three pretests which were held
between September of 1987 and March of 1988 in Los Angeles, Washington, D.C. and Tampa, Florida.
Another pretest called the "Dress Rehearsal" was conducted in October of 1988, just prior to the start of
the main survey.
Approximately 40,000 individuals two months of age and older will be randomly selected from
households across the U.S. to participate in the survey. Selected persons will be invited to take part in
the survey by completing interviews in their homes and by receiving examinations at the Mobile
Examination Center (MEC). The detailed interview includes demographic, socioeconomic, dietary, and
health-related questions. Upon completion of the interview, respondents will be asked to voluntarily
participate in additional interviews, extensive physical and dental examinations and biochemical tests, all
conducted by highly trained medical personnel in a mobile examination center (MEC).
The purpose of NHANES III is to assess the health and nutritional status of adults and children
in the United States. NCHS will use the data collected in this survey to define the normative distribution
of:
Specifically-defined diseases and other conditions of ill health;
Nutritional disorders;
Potential risk factors; and
Normative health-related measurements, such as height, weight, and blood pressure.
1-x
At the conclusion of the study, prevalence rates will be computed for blacks, Mexican-Americans, Puerto
Ricans, and other groups including whites, by age, sex, and income level. To assist in obtaining these
rates, the survey will oversample blacks, Hispanics, the elderly and children.
The diseases and other medical conditions to be studied include, but are not limited to, the
following:
Cardiovascular disease (heart disease)
Cancer
Chronic obstructive lung disease, including:
-
Asthma
-
Chronic bronchitis
-
Emphysema
Diabetes
Kidney disease and other urologic disorders
Gallbladder disease
Osteoporosis
Arthritis and related musculoskeletal conditions
-
Rheumatoid arthritis
-
Osteoarthritis
Infectious diseases
-
Immunization to childhood diseases
-
Exposure to hepatitis A or B
-
Exposure to human immunodeficiency virus (HIV)
-
Exposure to sexually transmitted diseases, such as herpes simplex 1 and 2
1-xi
Oral health problems
-
Caries
-
Periodontal disease
-
Tooth loss
-
Soft-tissue lesions
-
Trauma assessment
-
Occlusal and dentofacial characteristics
-
Tooth restoration and prosthesis conditions
Allergies
-
Certain foods, animals, insects and molds
Mental health conditions
-
Depression
Hearing loss
Retinal disease
Nutritional disorders, such as vitamin and mineral deficiencies
Risk factors are those aspects of a person’s lifestyle, constitution, heredity or environmental
exposures which may increase his/her chances of developing a certain disease or condition. Some of the
risk factors to be included in this study are:
Tobacco usage,
Alcohol consumption,
Physical activity,
Sexual practices,
Occupational exposures,
1-xii
Reproductive health, such as oral contraceptive use and breastfeeding practices,
Weight,
Dietary intake, and
Stress.
The results of this survey will benefit the American people in two important ways. First, data
on the distribution of health problems and potential risk factors in the population provide researchers with
important clues to the causes of disease development. This survey will provide data which researchers
need in order to establish hypotheses of disease causation which can be tested in future epidemiologic and
clinical research studies. Second, information collected from this survey will be compared to information
collected in previous HANES surveys and future HANES surveys in which study participants will be
asked to be examined and interviewed again. This will allow researchers to determine the extent to which
various health problems and risk factors in the U.S. population have changed over time. By identifying
the health care needs of the population, agencies of the government and private sector can establish
policies and plan research, education, and health-promotion programs which will help improve the current
health status of the population and prevent future health problems.
By computing prevalence rates for the population as a whole and for specific age-race-sex
groups (e.g., 30-35 year old white females), researchers can determine which subgroups of the population
would benefit most from specific programs and policies. For example, information collected in this survey
will help FDA decide whether to implement calcium fortification regulations for the nation’s food supply
and how best to implement the fortification program, if needed. Data from this survey will be used to
revise the growth charts which are used widely by pediatricians to monitor the growth of children.
Study participants are first interviewed at their homes and asked detailed demographic,
socioeconomic, and health-related questions. Extensive physical examinations by highly trained medical
personnel, additional health interviews, dietary interviews, and biochemical tests on biological specimens
are then conducted in specially equipped mobile examination centers (MEC’s). Persons who cannot or
will not come to the MEC for the full-scale examination are asked to undergo certain parts of the exam
at their homes.
1-xiii
In addition to using these data as a baseline for future followup studies and analysis, some
blood and urine specimens collected in this survey will be stored. Biological specimen banking will be
of value in the future as new techniques are developed to measure exposure to environmental contaminants
or disease agents or when new health problems are recognized. Biological specimen banking will be used
to permit future laboratory analyses for:
Estimating the prevalence of factors of current interest but for which acceptable testing
protocols do not yet exist (e.g., pesticides);
Estimating the prevalence of factors of emerging importance (e.g., chlamydia subtypes,
various types of non-A, non-B hepatitis); and
Conducting studies to look for the specific causes of diseases (e.g., bacteria, viruses, toxic
materials).
Four areas have been selected for special emphasis in NHANES III: Child health; health of
older Americans; occupational health; and environmental health.
Child Health. NHANES III will help researchers assess the physical and emotional health
status of children in the U.S. Communicable diseases, such as influenza, measles, and chickenpox, are
not the only causes of illness and disability in the young. The focus of the childhood component of
NHANES III will be on:
Chronic diseases (heart and lung diseases);
Allergic conditions;
Immunity to various infectious diseases;
Nutritional status;
Cognitive functioning (ability to function in the activities of daily life);
Physical growth;
Disorders of hearing and dentition; and
Blood lead levels.
1-xiv
Older Americans. The U.S. has experienced dramatic growth in the number of older people
during this century. These demographic changes have major implications related to health care needs,
public policy, and changing research priorities associated with older Americans. Recognizing this, NCHS
is working with a consortium of public health service agencies to improve information on the health of
the elderly. NHANES III is designed to fill many of the gaps in our knowledge of the health of older
people. The survey component for older persons focuses on physical health status and aspects of
functional health status. The key components for this part of the survey are:
Osteoporosis and the evaluation of lower extremity function, including risk of falls and
fractures;
Musculoskeletal function, focusing on osteoarthritis, as a major cause of disability in older
persons;
Nutrition, including the evaluation of obesity;
Cardiopulmonary diseases, which are major causes of illness and death in older persons;
Physical function (individual’s capacity for self-care);
Cognitive function (ability to function in the activities of daily life); and
Social function (ability to live independently).
Occupational Health. This component of the survey will focus on exposures in the workplace,
such as noise, chemicals, and dust which may be associated with specific health problems, such as
neurological problems, lung disease, and musculoskeletal injuries.
Environmental Health. The environmental health research topic for NHANES III focuses on
primarily studying exposure to toxic metals and chemicals, such as pesticides, by examining blood
specimens for levels of various metals and chemicals in the blood.
Westat is a survey research firm that has been awarded a contract by NCHS to carry out data
collection activities for the survey. Westat is responsible for selecting the survey sample, scheduling and
planning study procedures, developing the survey materials such as manuals and forms, hiring and training
field personnel, making advance arrangements for each stand, conducting community outreach activities,
1-xv
setting up and maintaining field offices and Mobile Examination Centers (MEC’s), scheduling and
conducting screening interviews and extended interviews in the household, conducting interviews and
physical examinations in the MEC’s, designing and carrying out quality control procedures, transmitting
data to NCHS, and shipping biological specimens to various laboratories in the U.S.
The examination and interview components of this survey have been designed in close
collaboration with the Federal agencies that will use the resulting data for program planning and regulatory
and research purposes. The following agencies have been involved in designing NHANES III:
Agencies of the National Institutes of Health, Public Health Service:
-
National Heart, Lung and Blood Institute (NHLBI),
-
National Cancer Institute (NCI),
-
National Institute of Child Health and Human Development (NICHD),
-
National Institute of Diabetes and Digestive and Kidney Diseases (NIDDK),
-
National Institute of Arthritis and Musculoskeletal and Skin
Diseases (NIAMSD),
-
National Institute of Dental Research (NIDR),
-
National Institute of Mental Health (NIMH),
-
National Institute of Neurological and Communicative Disorders and Stroke
(NINCDS), and
-
National Institute on Aging (NIA).
Other Federal Agencies:
-
Environmental Protection Agency (EPA),
-
Food and Drug Administration (FDA),
-
National Institute of Occupational Safety and Health (NIOSH), and
-
National Institute of Environmental Health and Safety (NIEHS).
1-xvi
1.2
History of the Health and Nutrition Examination Survey
The National Health Survey Act, passed in 1956, provided the legislative authorization for a
continuing survey to collect statistical data on the amount, distribution,and effects of illness and disability
in the United States. In order to fulfill the purposes of this Act, it was recognized that data collection
would involve at least three sources:
the people themselves by direct interview; clinical tests,
measurements, and physical examinations on sample persons interviewed; and places where persons
received medical care such as hospitals, clinics, and doctors’ offices.
To collect data by interview and physical exam, NCHS conducted four separate examinations
surveys between 1959 and 1976. The first Health Examination Survey (HES I) focused mainly on selected
chronic diseases of adults aged 18 - 79. HES II and HES III, conducted between 1963 and 1970, focused
primarily on the growth and development of children.
The fourth survey introduced a new emphasis: the study of nutrition and its relationship to
health status. This had become increasingly important as researchers began to discover links between
dietary habit and disease. In response to this concern, under a directive from the Secretary of the
Department of Health, Education and Welfare, the National Nutritional Surveillance System was
undertaken by NCHS. The purpose of this system was to measure changes in nutritional patterns over
time. However, a special task force recommended that the continuing surveillance system be expanded
to include clinical observation and professional assessment as well as the recording of dietary intake
patterns. Thus, the National Nutritional Surveillance System was combined with the Health Examination
Survey to form the National Health and Nutrition Examination Survey, NHANES.
NHANES I, the first cycle of the NHANES studies, was conducted between 1971 and 1974.
This survey obtained a national sample of about 21,000 persons between the ages of 1 and 74 years of
age. Extensive data on health nutrition were collected by interview, physical examination, and a battery
of clinical measurements and tests from all members of the sample.
The planning process for NHANES II was carried out in 1974 and 1975 in collaboration with
other Federal agencies. Throughout the planning stage there was continual awareness of the necessity of
making the data collection for NHANES II comparable to the first NHANES survey so that NHANES I
1-xvii
data could serve the purpose of providing a baseline for assessing changes over time. This means that
many of the same measurements had to be taken the same way on the same age segment of the U.S.
population in both surveys.
The NHANES II survey began examinations in February of 1976 with the goal of interviewing
and examining 21,000 persons between the ages of 6 months and 74 years. This survey was completed
in 1980.
In addition to NHANES I and NHANES II, a special survey of the U.S. Hispanic population,
HHANES, was undertaken to provide information on the health and nutrition status of Hispanics
comparable to that obtained for the general U.S. population. The survey was completed in 1984. A fourth
NHANES project, the NHANES Epidemiologic Followup Survey, was recently completed. This study
was an effort to conduct followup interviews with the sample population, now aged 35-84, who were
interviewed and examined in NHANES I between 1970 and 1974.
NHANES III is the third cycle in the NCHS series of surveys to collect data on the health and
nutrition of the people of the United States through interviews and physical examinations. As in previous
NHANES cycles, the survey’s primary purpose will be to produce descriptive statistics that can be used
to measure and monitor the health and nutritional status of the civilian, noninstitutionalized U.S.
populations.
The plan is to administer a household interview and a four hour examination consisting of
medical procedures, biochemical tests, and questionnaires to 40,000 sample persons aged two months and
older over a period of approximately six years. The survey will be conducted in two rounds of about three
years each in approximately 88 locations (or stands) across the country.
NHANES III will serve to collect public health data for use in evaluating the health status of
the U.S. population and determining how health status is affected by social and economic conditions. The
wide range of statistics produced will be valuable for:
Estimating the prevalence of selected diseases and conditions;
Assessing health and nutritional status;
1-xviii
Determining needs for health care;
Analyzing relationships between health measures and risk factors; and
Evaluating aspects of health and nutrition.
A number of longitudinal studies which use NHANES III data as baseline data are planned.
These studies will follow the sample persons interviewed and examined during NHANES III over a period
of years to attain measures of changes in health status and to study human growth and development in
detail.
1.3
About Westat
Westat is an employee-owned research firm founded in 1961 and located in the Metropolitan
Washington, D.C. area (Rockville, Maryland). Westat is recognized as one of the leading research firms
engaged in survey research, program evaluation, mathematical and statistical analysis, and computer
applications. Although primarily involved in conducting surveys for agencies of the Federal Government,
the company has also served local government agencies, universities, professional societies, nonprofit
institutions, and commercial enterprises.
The professional staff of more than 450 includes statisticians, epidemiologists, psychologists,
sociologists, survey managers, market research analysts, economists, and computer systems analysts with
specialized knowledge in health, labor, housing, and education. A highly trained nationwide field staff
of supervisors, interviewers, and survey assistants provides additional support to the organization.
A large number of the studies Westat manages are concerned with the health of various
subgroups of the population. The success of these projects can be attributed in part to the company’s
ability to enlist the cooperation of individuals and groups in the communities where the studies are
conducted. For instance, it may be necessary to obtain cooperation from state or local government
officials, professional associations, hospital administrators, citizen groups, and individuals.
Many of Westat’s studies in the area of health involve nationwide data collection efforts in
hundreds of different communities. For example, in 1979-80, Westat enlisted 38,000 U.S. school children
1-xix
in a study to estimate the prevalence of dental caries (cavities) and other oral health problems in that
population. A second dental survey conducted in 1986-87 involved 45,000 school children. Fourteen
teams, each with a dentist, a data recorder, and two coordinators, traveled to schools across the U.S. to
collect data from students via dental examinations and interviews.
1.4
Pretest and Main Survey Schedules
1.4.1
Pretests
Purpose of the Pretests. Before any large-scale data collection effort is started on a survey,
one or more pretests are conducted. During a pretest, field procedures and data collection instruments are
tested and evaluated, then refined by the researchers. Field procedures are carried out just as they would
be in the main study, but during the pretest a much smaller group of sample persons is selected. After
the completion of a pretest, a series of meetings is held and suggestions for improving the field procedures
and data collection instruments are incorporated into the plans for the main study. In this way, potential
problems are resolved before the main survey begins, although it is inevitable that some unanticipated
problems will arise as the study progresses.
Summary of the Pretests. Since NHANES III is so large and complex, four pretests were
scheduled from September 1987 through December 1988. The first three pretests were conducted at
different sites to evaluate the performance of the field procedures in various locations. The fourth pretest,
or "Dress Rehearsal" was conducted in October 1988 and was intended to provide a final practice of all
procedures before the main survey was initiated. Following is a summary of the pretests, the locations,
the number of sampled persons (SP’s), and the procedures tested.
1-xx
Pretest I
LOCATION: Los Angeles, California
DATE: October 1987
DURATION: Six weeks
NUMBER OF SP’s: 450
Questionnaires and interviewer field procedures (no MEC setup and no examinations)
were tested and evaluated.
Pretest II
LOCATION: Washington, D.C.
DATE: October - December 1987
DURATION: 9 weeks
NUMBER OF SP’s: 600
MEC procedures and examinations tested.
Pretest III
LOCATION: Tampa, Florida
DATE: February - March 1988
DURATION: Six weeks
NUMBER OF SP’s: 500
All office, interviewing and MEC procedures tested.
Pretest IV ("Dress Rehearsal")
LOCATION: College Park, Maryland
DATE: October 1988
DURATION: 6 weeks
NUMBER OF SP’s: 450
Final testing of all procedures
1.4.2
Schedule for the Main Survey
Data collection for the main survey of 40,000 sample persons (SP’s) began in September l988
and will be conducted in two cycles of approximately three years in length.
Field office staff,
interviewers, and two examination teams will travel to approximately 44 locations (stands) throughout the
U.S. in each cycle. The average stand size will be about 450 SP’s (within a range of 300-600 SP’s). At
any given time during the survey, examinations will be conducted at two stands simultaneously for ten
and one-half months of the year. There will be breaks of about two weeks around Christmas and about
two weeks during the summer.
1-xxi
1.5
Sample Design
A sample is defined as a representative part of a larger group. Surveys involve studying a
sample of persons rather than conducting an expensive and time-consuming census whereby every person
in the population of interest is studied. Since it is impossible to interview and examine everyone in the
U.S. for NHANES III, a representative sample is taken of the nation’s population. At the conclusion of
the study, estimates will be made of the prevalence of various health conditions and risk factors for the
entire U.S. population, based on what is learned from the sample of people studied in the survey. By
studying a representative sample of the population, it is assumed that the findings would not have been
too different had every person in the U.S. been studied. Because generalizations about the population will
be made, it is extremely important that the sample be selected in such a way that it accurately represents
the whole population.
Statisticians must calculate the size of the sample needed and take into
consideration the geographic distribution and demographic characteristics of the population such as age,
sex, race, and income.
After a decision has been made on the size and characteristics of the sample, the next step is
to determine the method of drawing the sample. For NHANES III, a multi-stage approach is being used.
Stage 1:
Sampling PSU’s.
The U.S. is divided into geographic regions called Primary Sampling Units
(PSU’s). Each PSU is a county or small group of contiguous counties. At the
home office, Westat statisticians randomly select 88 PSU’s to be included in this
study. The probability (likelihood) of a PSU being selected depends on its size
(i.e., the more people who live in the PSU, the more likely it will be sampled).
Each PSU that is selected is called a stand. Exam teams will travel to each of
the 88 stands to conduct exams and interviews in the MEC’s.
Stage 2:
Sampling BG/ED’s.
Each selected PSU is comprised of block groups (BG’s), defined by the Census
Bureau, or enumeration districts (ED’s). The home office randomly selects
BG/ED’s to be included in the study. Similar to Stage 1, the probability of a
BG/ED being selected depends on its size.
1-xxii
Stage 3:
Sampling segments.
Each BG/ED comprises segments that are clusters of homes. Segments are
randomly selected to be included in the study. The larger the segment the more
likely it is to be selected. Project staff called listers go to each segment and,
using special forms, list the addresses of all dwelling units (houses, apartments,
mobile homes) in that area.
Stage 4:
Sampling households from the field listing.
Not all households in a stand are selected for the study. Home office project staff
randomly select households from the field listings.
Stage 5:
Selecting eligible persons (screening).
Field interviewers go to each sampled household identified in Stage 2. The
interviewer administers a 10-minute screening questionnaire (Household Screener
Questionnaire) to determine the household composition and sex/race/age/ethnicity
characteristics of the household members. Depending on the characteristics of the
household, only certain households are selected for the final sample. Interviewers
have written instructions from the home office on how to conduct this stage of
sampling.
Stage 6:
Choosing Sample Persons in the selected households.
Following the screener sampling instructions, in a typical household 2-3 persons
will be selected. However, in some households we may select none and in others
as many as 10. Each individual selected for the study is called a Sample Person
(SP).
1.6
Personnel and Reporting Relationships
There are two different organizations conducting NHANES III. The National Center for Health
Statistics (NCHS) is the government agency sponsoring, and ultimately responsible for, the survey. NCHS
has contracted with Westat to conduct the field operations for the survey. NCHS staff and consultants
from both NCHS and Westat participate in staff training programs and pretest activities, and periodically
visit the field operations during the main survey.
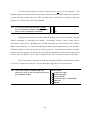
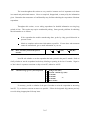
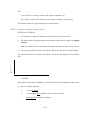
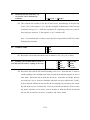
As a member of the exam team staff, you are an employee of Westat and will report directly
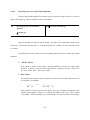
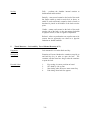
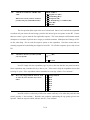
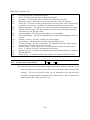
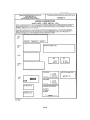
to Catherine Novak, director of MEC operations for the Westat staff. Exhibit 1-1 shows the formal
reporting relationships for the project. Renee Slobasky serves as the NHANES project director for the
Westat home office. Dr. Carla Maffeo, technical director for examinations at Westat’s home office, is
1-xxiii
Exhibit 1-1. Reporting relationships
1-xxiv
responsible for technical issues, such as how an exam procedure or biochemical test should be done.
Exam or personnel matters should be discussed with the Director of MEC operations. The MEC manager,
who is responsible for day-to-day activities of the MEC at the stand, should be consulted for such
questions as the automated system, equipment, supplies, data collection, sterilization of instruments, and
storage and shipment of data and specimens, and administrative issues.
A Stand Coordinator is also designated for each stand and will be responsible for coordinating
stand activities with the other on-site managers.
1.7
Advance Arrangements for a Stand
1.7.1
Schedule for Advance Arrangements
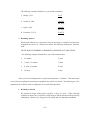
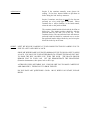
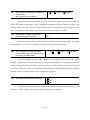
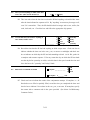
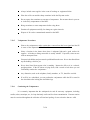
Exhibit 1-2 summarizes the schedule for a stand. Advance arrangements begin in Westat’s
home office at least ten weeks prior to the start of interviewing at a stand. Members of the advance
arrangements team study maps and familiarize themselves with the layout of a stand, location of sampled
segments, major highways and arteries, public transportation, and sites that appear appropriate for location
of the MEC. Once they have a basic knowledge of the layout of the area, they contact local officials
identified by our outreach program as prospective knowledgeable informants and make arrangements to
visit the prospective stand.
The field office is opened at least one week prior to the start of household screening and
interviewing. During that week the rental furniture and office equipment arrive, supplies shipped to the
site from the home office are unpacked, telephones are installed, and computer systems are tested. A
member of the advance arrangements team is at the stand during this period.
At least one week before examinations begin, the MEC is delivered to the prearranged site.
The MEC manager will be on hand to receive the trailers and direct their location and leveling by the
shipping firm, to oversee the hookup of electricity and plumbing lines by local contractors, and to verify
the presence of the previously arranged security. After the trailers are set up, examination staff members
unpack, calibrate and test the equipment. Medical and laboratory supplies delivered to the
1-xxv
Exhibit 1-2. Stand schedule
1-xxvi
MEC are unpacked and stored. These preparations are scheduled and managed so that the MEC is ready
for its dry run prior to the first scheduled examinations.
1.7.2
Community Outreach Activities
Westat and NCHS have developed a comprehensive and effective outreach program. This
program is directed from the Westat home office under the supervision of the Director of Advance
Arrangements, Jack Powers. Outreach activities are initiated prior to entering a stand and continue
throughout the period of interviewing and examinations.
The purpose of the outreach activities is to inform public officials and potential participants
about NHANES III. In informing public officials, regardless of whether their active support is sought,
it is hoped that by providing information the study will be recognized as a legitimate and important
research effort. The goal of outreach programs directed to potential sample persons is not only to provide
information, but to encourage them to take part in an important study.
Westat directs the outreach program to audiences at the national, regional, state and local levels.
Through Westat, public officials receive a letter from NCHS describing the survey, a fact sheet explaining
technical aspects of the study, and a brochure.
It is important to establish a positive relationship with local health officials and other
community representatives as their active support will help legitimize the survey. These persons can also
assist during advance work by providing an introduction to other community officials whose cooperation
may be important to the survey.
Westat has developed a community outreach program to be activated in each stand
incorporating various types of media. The goal is to reach as many of the target populations as possible
via radio, television and newspapers in each community. Posters and flyers, in English and Spanish, will
be distributed and posted in highly frequented areas, such as churches and community centers, shopping
centers and high-rise apartment buildings.
1-xxvii
Another purpose of the outreach program is to identify local physician’s and dentist’s offices,
or clinics, to which the examination reports of findings may be sent for those SP’s who report no regular
source of health care.
1.8
Data Collection
Data for NHANES III are collected in two phases:
Household interviews in which SP’s are asked detailed demographic, socioeconomic, and
health-related questions, and
Extensive physical examinations, dental examinations, health and dietary interviews, and
laboratory tests on biological specimens conducted in mobile examination centers
(MEC’s).
The household component and MEC component are discussed in more detail in the following
section.
1.8.1
Household Interviews
The field interviewers conduct all household interviews and schedule appointments for
examinations in the MEC.
Advance Letter. As mentioned in Section 1.5, certain households are sampled for the survey.
Before an interviewer contacts a household, the Westat home office mails an advance letter to the
household.
The advance letter is an important tool for introducing and legitimizing the study. The letter
clearly states the purpose and importance of the study, a respondent’s rights as a participant, including the
confidentiality of information given and the voluntary nature of participation, and indicates that an
interviewer will be coming to the household in the near future.
1-xxviii
Household Screening Interview. Upon arriving at a home, interviewers are instructed to show
the advance letter at the door (if the respondent has not seen or does not remember the letter), the screener
brochure, and his/her survey I.D. badge.
The Household Screener Questionnaire is administered to one eligible respondent who
lives in the selected dwelling unit who is at least 17 years of age and preferably the head
of the household. It includes an introduction, a household enumeration section (including
a series of questions identifying secondary families), eligibility criteria such as age, sex,
and race or ethnic background. The Screener takes about ten minutes to administer.
Once the interviewer has determined that at least one person in the household is eligible
to participate in the survey, s/he attempts to administer the family questionnaire, the
medical history interview and make an examination appointment. During this process,
each selected respondent receives a sample person brochure.
The screener brochure contains a brief description of the study and provides answers to
typical questions a respondent mIght have during initial contact.
The sample person brochure contains more detailed information on the extended
interview and examination component of the study. The interviewer distributes this
brochure to eligible respondents upon completion of the screening. The brochure
describes the examination to be conducted in the MEC and, like the screener brochure and
advance letter, emphasizes the purpose and importance of the study, voluntary
participation and confidentiality of the information provided. It also includes the Informed
Consent Form.
Informed Consent. Informed consent accomplishes several necessary goals for conducting
the study.
Consent form. The last page of the Sample Person Brochure contains the consent form.
The SP must sign the form as an indication of his/her willingness to participate in the
study. If the SP does not wish to sign the consent form at that time, s/he may bring the
signed form to the MEC at his/her scheduled exam time, or may have additional questions
answered at the MEC before signing the form. A refusal to sign the consent form is
considered a refusal to participate in the examination phase of the study. Examinations
will not be conducted on sample persons who do not return a signed consent form. To
participate in the household interviews, an SP only needs to give verbal consent.
For minors the signature of a parent or guardian is required on the consent form. Minors
over the age of 12 years are also asked to sign the form as an indication of agreement to
participate.
1-xxix
By signing a consent form, a person gives permission for the SP to have the extensive
physical exam in the MEC (or the home health examination). Secondly, a signed consent
form grants permission to NCHS to forward the results of the physical examination to the
SP’s personal physician/health clinic and the results of the dental examination to the SP’s
dentist/health clinic. A copy of the Home Health Exam Fact Sheet will be given to each
SP who is offered this option.
Extended Household Interviews. Two kinds of questionnaires are administered in extended
household interviewing.
The Family Questionnaire is administered to one eligible respondent in each family who
is at least 17 years of age and preferably the head of the household. Information is
collected on family relationships, demographics, health insurance, housing, and income.
It also contains instructions for within household sampling.
The Sample Person Questionnaire is administered to each sample person or an eligible
proxy. A detailed health history is collected on each sample person. The extended
interviews require about 40 minutes for each SP. There are two versions of the SP
Questionnaire, one for adults and one for youths. Information about SPs who are 2
months to 16 years old is obtained through direct interviews with a proxy such as the
child’s parent.
Exam Appointments.
Interviewers make appointments for SP’s to receive physical
examinations at the MEC. The interviewer calls the field office to obtain an exam appointment time. If
the SP agrees to the time, the information is entered into the field office Automated Survey Management
System.
English and Spanish Study Materials. The advance letter, brochures, consent form, and
household questionnaires are printed in both English and Spanish. Bilingual interviewers use the language
with which the respondent feels most comfortable.
1-xxx
1.8.2
Exams and Interviews in the Mobile Examination Center (MEC)
The MEC. Examinations and interviews are conducted in specially equipped and designed
mobile examination centers (MEC’s) each consisting of four trailers. Each trailer is approximately 45 feet
long and 8 feet wide. The trailers are drawn by detachable truck tractors when moving from one
geographic location (stand) to another. At an examination site, such as a hospital parking lot, the four
trailers are set up side-by-side and connected by enclosed passageways. At any given time during the
survey, there are two MEC’s set up at two different stands, and a third MEC is either in transit or in for
maintenance.
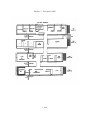
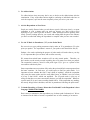
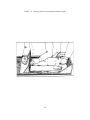
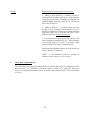
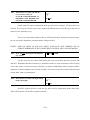
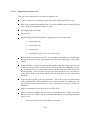
Exhibit 1-3 shows a floor plan for the MEC. The interior of each MEC is designed specifically
for this survey and incorporates many customized features. For example, the trailers were divided into
specialized rooms to assure the privacy of each study participant during the exams and interviews. Also,
the audiometry room was soundproofed and the x-ray room shielded with lead. The MEC houses all of
the state-of-the-art equipment and supplies necessary for the exams and biochemical tests conducted in
the MEC.
Exam Sessions. The MEC remains at a stand for approximately six weeks (range 4-8 weeks).
During that period, the MEC operates five days a week including weekday, evening and weekend sessions.
Two four-hour sessions are scheduled each day with 10 examinees per session.
Exam Team Responsibilities. The two exam teams travel from stand to stand to conduct the
exams and interviews in the MEC’s. There are 16 individuals on each traveling team. In addition, a local
assistant will be recruited, trained, and employed at each stand to assist the exam staff. The duties of the
exam team members are summarized below.
One coordinator directs the flow of SP’s through the MEC examination process. The
coordinator manages all SP appointments, prepares the SP examination folders, and
verifies that all exam components have been conducted and recorded before the SP leaves
the MEC.
1-xxxi
Exhibit 1-3. Floor plan of MEC
1-xxxii
Exhibit 1-3. Floor plan of MEC (continued)
1-xxxiii
One physician reviews the SP’s medical history, conducts the medical examination, and
records the results of the exam. The physician also reviews the results of the blood test
(CBC) and the ECG.
One dentist conducts the dental exam and "calls" the results to a health technician who
records the dentist’s exam findings.
One health interviewer administers questionnaires for cognitive and neurological tests and
records the results.
Two dietary interviewers administer the SP dietary questionnaire. During the interview
the interviewer records (a) a 24-hour dietary recall of the types and amounts of all foods
and beverages consumed by the SP in the last 24 hours and, on selected SP’s, (b) food
frequency information regarding how often certain types of foods were consumed by the
SP in the past month.
Four certified radiologic health technicians take and record body measurements, x-rays,
bone densitometry, pulmonary function tests (spirometry), ECG’s, and photos of the
fundus of the eye, and administer audiometry and allergy exams, and record the dental
exam findings. The duties of the health technicians are assigned on a rotating basis.
One certified ultrasonographer performs sonography of the gallbladder, and also assists
health technicians in performing selected other tests such as allergy, audiometry,
spirometry and body measurements.
Four certified medical technicians/technologists administer the phlebotomy questionnaire,
draw blood from SPs, administer Dextrol for the OGTT, conduct clinical laboratory tests
on blood and urine specimens, record the results of tests, and prepare and ship specimens
to various laboratories.
One home health technician conducts home exams.
Each MEC staff member is part of a team of professional persons with specific assignments
that must be completed in order to accomplish the overall objective of the National Health and Nutrition
Examination Survey. Each individual must be aware of and respect the job demands placed upon other
staff members, maintain an attitude of tolerance and consideration for fellow members of the team, and
willingly perform any extra tasks that may be assigned to support other staff members in the performance
of their duties. MEC staff members may be requested to perform tasks not directly related to their specific
professional skills in order to implement the overall data collection plan. Team members will rotate
periodically to prevent the introduction of bias due to "team effects" into the exam results.
1-xxxiv
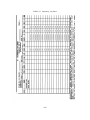
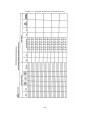
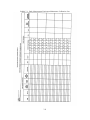
Examination Components. Each SP exam takes up to four hours. The actual length of time
depends on the age of the SP, as some exam components are only done on certain age groups (adult SP’s
tend to receive more extensive exams). Exhibit 1-4 presents a list of exam components for each age
group. Exhibit 1-5 presents an estimate of the number of minutes for each exam component.
Some blood specimens are analyzed in the MEC by the medical technicians while other
specimens are sent to various laboratories in the U.S., such as the Centers for Disease Control (CDC), and
have special storage and shipping specifications.
Sample Person Remuneration. SP’s who complete all or part of the exam in the MEC are
given a monetary token of appreciation for their time and effort. This remuneration is in addition to the
payment for transportation expenses. Adult examinees will receive $30 or $50, depending on whether they
accept an appointment at a particular time. Also adults who receive special components, such as the
Volatile Toxicants Study, will receive additional remuneration. Children will receive $30.00.
Report of Exam Findings. For each SP examined in the MEC, a report will be generated by
the automated system at NCHS summarizing the findings of the physical exam and biochemical tests. The
Report of Findings forms will be produced after the stand is closed, and mailed to the SP’s personal
physician.
The dentist completes a report of the dental exam findings which is given to all SPs.
Additionally, for SPs who are referred for immediate dental care a report is sent to the SP’s personal
dentist or clinic. If the SP does not have a personal physician, dentist or clinic, a list of community clinics
will be shown to the SP by the MEC coordinator who will encouraged the SP to choose one; the report
of the physician’s/dentist’s findings is then sent to that clinic. If the SP refuses to choose a health care
provider, the Report of Findings is sent to the SP.
Several versions of the Report of Findings are available, and are selected according to whether
the SP had abnormalities noted in any exams or in the blood tests. If indicated, SP’s with abnormal
results may be advised to seek advice from a health care provider.
1-xxxv
Exhibit 1-4. Examination components by age groups
1-xxxvi
Exhibit 1-4a. NHANES III Examination Components
1-xxxvii
Exhibit 1-5. Estimated number of minutes for each exam component
1-xxxviii
In those rare instances when the physician or dentist finds a condition that warrants immediate
attention, the physicians or dentist will contact the SP’s health care provider by telephone.
A hard copy version of the Report of Findings form is available in the event the automated
system cannot record data from an examination session.
Dry Run.
At the beginning of each stand, members of the MEC staff will devote one-half
day to calibrating instruments and practicing MEC procedures. Since the MEC will be moving from one
stand to another, it is important to check the equipment before exams begin to make sure everything is
working properly. If there are problems with any of the equipment, including the automated system, the
stand manager must be informed so that malfunctions can be repaired before the "real" exams begin. In
addition to calibrating instruments, the dry run will give MEC staff an opportunity to practice their
assigned duties, including setting up equipment and supplies, verifying instrument quality control results,
sterilizing instruments, processing examinees through the MEC, interacting with other MEC staff members
and examinees, performing exam procedures, recording exam results on the automated system, completing
required forms, and shipping data and specimens to Westat and various laboratories. All procedures in
the dry run will be completed as though the actual study were being conducted. The only difference is
that in the dry run the examinees will be volunteers who are not part of the actual sample for the main
study or pretests. To solicit volunteers from the community, someone from the field office may post an
advertisement at a local grocery store. Other volunteers may include local officials who want to see firsthand the type of exams to be conducted, field office staff, field interviewers, and MEC staff.
Problems identified during the dry run will be discussed by the MEC manager and MEC staff.
Based on the results of the dry run, certain procedures may need to be modified or additional quality
control procedures may be instituted by the home office in order to overcome or alleviate identified
problems.
1-xxxix
1.8.3
Home Exams
An examination in the home will be available for selected SP’s who are wheelchair or bed-
bound, or unable or unwilling to go to the MEC for an examination. The household interviewers will
determine when an SP should be offered the home exam, and the field office will schedule the
appointment. If the SP is reluctant to participate in a MEC exam, every attempt will be made to persuade
the SP to agree to an exam, either at the MEC or in his/her home. Because of equipment and staffing
considerations, only certain exam components can be conducted in the home. For instance, any equipment
required for the home exams must be portable and relatively compact when packed. Exhibit 1-6 lists the
exam components that are conducted in the homes of SP’s. As with the full-scale MEC exam, the
components of the exam depend on the SP’s age.
The home health technician or home examiner conducts the examination of SP’s in the home.
All tests are completed on-site with the exception of the blood tests, which are prepared and shipped from
the MEC. After completing an SP exam, the home examiner will return to the MEC with the blood tubes,
process the blood to be shipped and complete the tests that can be run in the MEC. The results are
entered into the automated system in the laboratory.
SP’s who complete the home exam are given $15 as a token of appreciation for their time and
effort. This is less than the renumeration for the MEC exam because the home exam is less extensive.
1.8.4
Special Studies
At times during the study, special projects may be implemented to obtain information about
a specific area of interest, as NHANES III provides an unusual opportunity to capture large amounts of
data in an efficient manner. The volatile toxicant study is one such special study.
Volatile Toxicants Study. The volatile toxicant study is being sponsored by the toxicology
branch of the CDC and is being conducted for one year as an additional component of NHANES III.
Extra blood and urine samples are to be collected from 45 volunteers at each stand and analyzed by CDC
for selected variables. Volunteers are paid $10 for participating in the study.
1-xl
Exhibit 1-6. Home exam for NHANES III
1-xli
Recruitment for the study is limited to days when the exam schedule is light enough to allow
the phlebotomist time to draw the extra blood. Only sample persons between the ages of 20 and 59 are
eligible for the study. The phlebotomist is responsible for recruiting sample persons at the time of the first
venipuncture.
Because the MEC itself may be a source of some of the chemicals CDC is measuring in this
study, the blood and urine samples must be collected as soon as possible after the sample person enters
the MEC.
If a sample person agrees to participate in the study, two 10 ml gray top tubes are obtained on
the first draw. If this is not possible, the sample person will be asked if a second stick can be performed.
If the SP is over the age of 40 years and will have a second venipuncture for the glucose tolerance test,
the additional blood may be drawn at that time.
The required 45 mls of urine is obtained from the urine specimen which is collected when the
sample person first enters the MEC, assuming that the first specimen is of sufficient volume to allow this.
If the required amount of urine cannot be obtained from the initial sample because of the volume needed
for the other urine tests, a second 45 ml urine sample may be collected at a later time.
The sample person is also asked to complete a self-administered questionnaire as part of the
volatile toxicants study. The phlebotomist collects the questionnaires from the coordinator at the end of
the session and mails them with the blood and urine samples to CDC twice a week on Thursday and
Sunday.
1.9
Confidentiality and Professional Ethics
All information collected for this study must be kept strictly confidential except as required by
law. Since this study is being conducted under a contract with the National Center for Health Statistics,
the privacy of all information collected is protected by two public laws: Section 308(d) of the Public
Health Service Act (42 U.S.C. 242m) and the Privacy Act of 1974 (5 U.S.C. 552a).
1-xlii
Each person working on the study must be continuously aware of the responsibility to safeguard
the rights of all the individuals participating in the study. Each study participant should be treated
courteously, not as a sample number. Never divulge names or any other information about study
participants except to the research team. Refrain from any discussions about study participants, in or out
of the MEC, which might be overheard by people not on the survey staff. All of the members of the
research team are under the same legal, moral and ethical obligations to protect the privacy of the SP’s
participating in the study.
When the study is finished, all of the collected information will be summarized by NCHS in
a report. No participant names will be included in any reported results. Neither NCHS nor Westat is
allowed to release information that would identify study participants without the consent of the
participants.
Cooperation from the public is essential to the success of survey research. Westat expends a
great deal of effort in obtaining cooperation from national, regional, state, and local officials and the
general public. It is the responsibility of each person working for Westat to build on the company’s
reputation of integrity so that we can continue to have access to study participants during current and
future studies; therefore, professional conduct both on and off the job is very important.
As you travel across the country for this study, you may find yourself to be very much in the
public eye, particularly in the smaller towns where your presence is easily recognized. Each staff member
has a responsibility to the Public Health Service and to Westat for promoting good public relations. The
Public Health Service and Westat will be judged by the actions of the staff both on and off duty;
consequently, you must be discreet in speech and actions. Your personal appearance and behavior must
be governed by these same considerations. Be aware of the customs of the area and avoid any actions
which might be interpreted unfavorably by the public, for example, parking a Westat vehicle in a
questionable location. Please be aware of your "audience" at all times and try to avoid statements or
actions that could shed an unfavorable light on Westat, the Public Health Service, or the survey.
You will be asked to sign a pledge of confidentiality before the survey begins. This pledge
states that you understand that you are prohibited by law from disclosing any information obtained while
working on the study to anyone except authorized staff of NCHS and Westat and that you agree to abide
1-xliii
by the Assurance of Confidentiality.
This chapter of the manual was designed to provide you with general information about the
study, including the advance work that Westat and NCHS completed prior to your joining the study staff.
The remainder of this manual explains in detail your responsibilities in this study.
1-xliv
2. GENERAL OVERVIEW OF THE HOME EXAMINATION
2.1
Introduction and Purpose of the Home Examination
The primary goal of NHANES III is to interview as many SP’s as possible and bring them to
the MEC for examination.
The more interview/examination data we have about SP’s, the more
confidently we can relate what we know about an SP’s health to the U.S. population as a whole.
However, we know that we will not be able to examine 100 percent of all SP’s in the MEC.
Therefore, a Home Examination component has been added to NHANES III survey.
Examination has two primary purposes:
The Home
1) to improve the response rates on some examination
components, and 2) to improve evaluations of potential examination nonresponse bias.
The Home Exam component is designed to gain information on those sample persons who are
elderly, wheelchair or bed-bound, or are unable or unwilling to go to the exam center.
Gaining
information on this particular segment of the population is crucial to the survey in view of the dramatic
growth in the number of elderly persons in the nation today. NHANES III is designed to increase the
knowledge of health status, more specifically the physical and functional health status, of those older
individuals who may in fact have the most need.
The Home Examinations will be valuable for NHANES since this will be a baseline survey
with possible future followup interviews, examinations, and mortality checks for each examinee. Thus,
it will be important to have some baseline data for as many examinees as possible. The information from
the home examination will be used to adequately assess the health of older Americans by increasing the
response rate to a core set of physical measurements. Likewise, the database for other population groups
will be increased with the inclusion of the Home Examination.
2-1
2.2
Scheduling Home Exams
The household interviewers, in collaboration with their supervisors determine when a Home
Exam is to be offered to an SP. Guidelines have been developed which provide a decision-making
framework that is to be used to standardize the approach to SPs for scheduling MEC and Home Exams.
Initially, interviewers will endeavor to make MEC appointments for all SPs identified, with one exception
-- SPs who are age 60+ and who are bedbound or in a wheelchair. Thus, interviewers have two options
when they begin field work:
1.
SPs 2-11 months and 20-59
Only offer
MEC exam
SPs 60+ and not bedbound
or in a wheelchair
2.
SPs 60+ who are bedbound
or in a wheelchair
Offer home exam
immediately after
interview
As the field period progresses, the interviewers working with the Field Manager, will employ
various nonresponse conversion strategies designed to achieve high MEC examination response rates.
Subsequent to these conversion efforts, the Field Manager will make decisions concerning offering Home
Exams to selected SPs.
For the most part, Home Exams will be conducted during the last two to three weeks of each
stand. Generally, two Home Exam visits will be scheduled per day (morning, afternoon or evening).
However, if two SPs in a household are eligible for a Home Examination, they can be scheduled for one
session while a third exam is scheduled for a second session. Whenever possible the Home Examinations
will be scheduled for times that the MEC is open for sessions. If there is a need to schedule an SP at an
alternate time, the Office Manager will consult with the MEC manager before the appointment is
confirmed with the SP.
The household interviewers will make the Home Exam appointments for selected SPs during
the household visit. After reviewing the Home Exam Fact Sheet of the SP Brochure (Exhibit 2-1) with
the SP, the interviewer will call the field office to schedule an appointment and obtain the SP’s written
consent for the examination. The interviewer specifies on the form that the consent is for the "Home"
Examination.
2-2
Exhibit 2-1. Home Exam Fact Sheet of the SP Brochure
2-3
As mentioned earlier, the household interviewers make every attempt to have SPs come to the
MEC for an exam. However, in planning a successive visit to an SP that has previously refused to give
consent for a MEC exam, the Office Manager may ask the home examiner to accompany the interviewer
on a "cold call" appointment. On a cold call appointment, the household interveiwer attempts to have the
SP consent to a Home Examination. If consent is obtained, the Home Exam is conducted at that time.
Cold call appointments usually take place during the last week of a stand.
Replicate Home Exams are to be conducted at each stand. A replicate Home Exam is an
examination of an SP that has been previously examined in the MEC and is done for purposes of quality
control for the study. Ten replicate exams are to be done per stand. They are usually scheduled for the
beginning of the field period when Home Exams are started but may be scheduled earlier if there are a
number of appointment slots available.
2.3
Components of the Home Examination
Because of the equipment and staffing considerations, the examination offered in the home is
a modified version of the MEC exam. As with the full-scale MEC examination, the components of the
exam and the time it takes to complete the exam depend on the age of the SP. Exhibit 2-2, Home
Examination Components by Age Group, lists the components administered during the Home Examination
and the time frame for each group.
2.4
SP Remuneration
SPs who complete all or part of the exam in the home are given $15.00 as a monetary token
of appreciation for their time and effort.
2-4
Exhibit 2-2. NHANES III home examination components by age group
2-5
2.5
Role of the Home Examiner
The primary focus of the home examiner is to conduct the examination in the home as
efficiently and effectively as possible. The performance of the specific exam components depends greatly
on the knowledge, skills, and abilities that are conveyed to the SP by the home examiner during the
procedure. It is essential that the impression given to the SP is one of professionalism and competence
that will elicit a positive and cooperative response from the SP.
The home examiner needs to demonstrate control of the situation at all times. There are several
steps that the examiner can follow to insure control and management of the procedure. They are:
1.
Review the Home Examination Form;
2.
Know the testing and lab procedures;
3.
Know the testing equipment;
4.
Organize material; and
5.
Practice performing the exam procedure.
These steps are discussed further in Chapter 6 of the manual.
Conducting the exam in the environment of the home is different than conducting the exam
in the MEC and therefore warrants special consideration. It is important that the setting for the procedure
be carefully selected to decrease the many variables that may affect SP performance such as the presence
of family members or friends and interruptions such as phone calls. It is the responsibility of the home
examiner to arrange for the appropriate area to set up equipment and perform the exam and to obtain and
maintain privacy for the SP. The home examiner must insure that all procedures are perceived as medical
or health focused, and that she is viewed by the SP as a representative of the health care team.
2-6
2.5.1
Medical Policy Regarding the Exam
The purpose of NHANES III is to collect data on the health of the population. The intent of
the study is not to provide medical care or treatment, and the home examiner should not offer such care.
There are several reasons for this. First of all, the examination team as a whole is not equipped to treat
medical problems. The standardized Home Exam is not like a full-scale exam that would be done in a
health professional’s office. For example, the examiners do not have access to the SP’s medical records,
which are helpful in diagnosing medical problems. Second, in most instances the home examiner will not
be licensed within the state in which the examinations are being conducted. Third, the liability insurance
obtained for the Westat examiners covers only protocol activities and not any type of treatment procedure.
Fourth, providing treatment would interfere with the primary purpose of the study, which is to collect data
on the population.
The only time medical care will be provided is when there is an immediate medical emergency.
This is discussed in Chapter 9, which covers Safety and Emergency Procedures.
Further, it is not necessary to discuss exam findings with an SP unless referral is needed. A
single examination often does not allow an adequate interpretation of findings nor provide enough
information so that specific advice can be given. The SP’s personal physician, who has the SP’s records
and is involved with his or her long-term care and follow-up, should interpret the findings (if the SP
decides to send results to him/her) and decide what to tell the SP. The SPs are encouraged to discuss
exam results with their health care providers.
Referral of examinees has been included in the MEC procedures for ethical reasons, even
though it is not one of the purposes of the study. NCHS has developed several forms for reporting test
results to examinees’ physicians.
The Report of Physical Findings I contains all findings from the NHANES III examination that
are available at the end of a two-month period. The Report of Physical Findings II contains those results
that are available beyond the two-month period, including the results of laboratory analyses performed at
the Centers for Disease Control and other NCHS contract laboratories.
2-7
These two reports are generated and mailed to the designated health care provider from NCHS
headquarters. As relevant, the report for each examinee will include the ECG tracing and results of
laboratory work. At the time this report is mailed, a card will also be sent to the examinee indicating that
the findings have been sent and reminding the examinee of the name and address of the doctor/clinic or
referral medical facility that the examinee has designated.
It is important to keep in mind that as individuals and as a health research organization we have
no control over local health care systems. Any involvement beyond routine referral is ineffective and
interferes with the purpose of the study. If the data collected during the survey indicate that substandard
care is being delivered to people in particular communities, this may provide the impetus for local health
planners to improve the delivery of health care in these areas.
2.5.2
Responsibilities of the Home Exam Technicians
The home examiner is part of the MEC examination team. The home examiner is a laboratory
technician who has been trained in all MEC exam components except X-ray and Bone Densitometry. The
Home Examiner’s responsibilities include performing both the Home Examination and selected exam
components in the MEC.
Most Home Examinations will be scheduled during the last two to three weeks of each stand.
During the first half of each stand and at other times when the home examiner is not performing home
exams, she will rotate through the other exam components on the MEC. Each day the home examiner
will report to the MEC Manager to discuss her schedule. If no Home Examinations have been scheduled,
she will be assigned to the Chief Health technician or to the Chief Laboratory technician according to the
needs of the MEC Exam team. The chief tech will assign the home examiner to a specific component
room or rooms for the session. The MEC Manager is the final arbiter if conflict should arise over the
responsibilities of the home examiner.
2-8
The home examiner may be assigned to the following components on the MEC:
Venipuncture
Hematology/Urine Processing
Blood Processing
Shipping
Body Measures
Allergy
CNS
Physical Functioning of the Elderly
Dental Recording
Spirometry
The specific procedures for performing the MEC laboratory tech and health tech functions are
given in the NHANES III Manual for Laboratory Technicians and in the NHANES III Health Technicians
Manual, respectively and will not be discussed here. The remainder of this manual will discuss procedures
specific to performing the Home Examination.
2.5.3
Overview of Home Examiner Tasks
The two primary responsibilities that the home examiner has in preparing to conduct Home
Examinations at a stand are, 1) to report directly to the MEC Manager before the morning exam session
begins to review the schedule of Home Exam appointments for the day and to plan daily activities, and
2) to call the Office Manager regularly (2-3 times per day) to obtain an updated schedule of Home
Examinations. The MEC Manager will be responsible for keeping track of your working hours, number
of appointments and workload.
2-9
The following section gives an overview of the tasks the home examiner will be expected to
perform to complete the home examination. Each of these tasks is discussed in detail in later sections of
this manual.
1.
2.
3.
On exam staff set-up day:
a.
Consult the Office Manager to obtain a schedule of Home Examinations. Give
a copy of the schedule to the MEC manager.
b.
Inventory and check all Home Exam equipment and supplies in your backpack.
If any equipment is in need of repair, notify the MEC Manager. It is essential
that the inventory and equipment check is conducted on exam set-up day and not
later in the stand to insure exam preparedness.
c.
Assist with set up of MEC exam rooms as delegated by the MEC Manager or
Chief Technicians.
On the day before a scheduled Home Examination:
a.
Review Household Folder in the Field Office.
b.
Consult the Office Manager about any special circumstances you may encounter
on the home exam visit. If necessary, the Office Manager will arrange to have
a household interviewer or the MEC Manager escort you to the SP’s home. Refer
to Chapter 8 for a discussion of using escorts.
c.
Inform the MEC laboratory staff about the scheduled Home Exam appointment(s)
and relay the I.D. number(s) for the Home Exam SP(s).
The day of the scheduled Home Exam:
a.
Check all Home Exam equipment and supplies in your backpack and obtain SP
ID labels from the MEC coordinator.
b.
Obtain from the Office Manager, the SP’s Household Folder which contains the
SP Card and the original Consent Form. Also obtain the money to be paid to the
SP, a receipt book, a Home Exam Release Form and Home Exam
Incident/Emergency Report Form.
c.
Complete the Home Exam SP Identification Form.
d.
Calibrate Home Examination equipment as necessary.
e.
Notify the MEC laboratory staff of the confirmed Home Exam appointment(s) so
that the blood processing racks can be prepared.
2-10
Performing the Home Examination:
Identify yourself and your purpose. Establish a rapport with the SP.
Obtain the SPs written consent to perform the examination, if not already obtained.
Locate an adequate area in the home to perform the examination. An area that is well
lighted, well ventilated, and quiet will help provide optimal testing conditions. A kitchen
table in a noncarpeted area will provide the best setting for venipuncture. Prepare your
equipment. Turn on the PC and allow the spirometer to warm-up for at least 10 minutes
while you perform the rest of the exam.
Perform the Home Examination components in the order that they are listed in the Home
Examination Form. However, if you are performing more than one examination in a
household, you may perform all venipunctures at the end of the last examination to assure
that the blood processing plus travel time will be done within the four hour limit.
Pack blood specimens in the cooler for transport back to the MEC.
Give the SP $15.00 for participating in the survey and have the SP sign a receipt.
In the event of an emergency for which the SP or the SP’s guardian refuses your advice
to seek emergency care, have the SP or guardian sign the Home Exam SP Release Form.
Processing Blood Specimens and Home Examination Forms:
Return to the MEC after completing the Home Examination.
Enter the results of the Home Exam phlebotomy procedures in the laboratory automation
system.
If the MEC is in session, give the blood to the laboratory techs to process.
If the MEC is not in session, process blue and red top tubes, perform hematology tests,
and enter the results of blood processing, and hematology in the laboratory automation
system.
Clean used equipment, and replace the necessary supplies in your backpack. Repack your
backpack for the next day.
Give the Home Exam SP Identification Form to the MEC Physician.
Report to the MEC Manager. If the MEC is not in session call the MEC Manager to
verify that there were no problems during the exam or in the MEC after hours.
Print the Control Record at the Field Office, and return the PC to the Office Manager.
2-11
Quality Control Activities:
The MEC Manager will occasionally accompany you on a Home Exam visit to observe
your efficiency, effectiveness, and rapport with the SP.
The MEC Manager will issue you your equipment at the beginning of the stand and check
it at the end of your stand. It is your responsibility to inventory your equipment and
supplies at the beginning of the stand, and daily when performing Home Examinations,
and to maintain and calibrate the equipment as necessary. You will report any problems
with equipment to the MEC Manager.
2-12
3. HOME EXAMINATION MATERIALS
3.1
Introduction
The home examination is conducted through the use of a Computer-Assisted Personnel
Interview -- or CAPI -- system. The small laptop PC used to conduct the spirometry component of the
examination contains the software used to administer the home examination and input data. The CAPI
User’s Manual is found in Appendix A.
This chapter provides a description of all the materials and forms needed for conducting the
Home Examination. It also provides a description of how to use the materials and forms in the field.
Most of the materials and forms will be obtained on a daily basis from the Field Office. It is the
responsibility of the home examiner to see that all of the necessary materials and forms are obtained
before leaving the field office to perform an examination in an SP’s home.
The sections below provide brief descriptions of each item. Most of these items are discussed
in more detail in other chapters of this manual.
3.2
The Household Folder
Household Folders for SPs that have scheduled Home Examination appointments will be placed
in the Field Office file drawer labeled, "Awaiting Home Examination." The Home Examiner may use the
Household Folder when preparing for the home examination. The Household Folder should not be
removed from the field office.
The Household Folder contains the following:
Address information used in locating the household dwelling unit;
Household language information to document languages spoken in the household;
A Summary of HH Work box, which is for Interviewer Use only;
The Routing form, which is for Office Use only;
3-1
Missed Structure/Missed DU Forms, which are for Interviewer Use only;
A list of the Call Record Result Codes used to record the dispositions of the survey
components as well as nonresponse reason codes to be used at the SP level of the
different components; and
The SP Card, which is used by the interviewer to record all contacts and results of
contacts with the household.
The Household Folder is also used to hold all diskettes and/or forms associated with the
household.
When the Home Examiner has completed the examination, she will return the Household Folder
to the Office Manager.
3.3
The SP Card
The SP Card (Exhibit 3-1) is used by the household interviewer scheduling a home exam and
by the home examiner assigned to conduct the home exam. The first 10 columns and the three boxes at
the bottom of the form concerning the scheduling of the Home Examination are to be completed by the
household interviewer. The last three columns are to be completed by the home examiner to record the
outcome of the Home Examination.
Instructions for completing the last three columns of the Home Exam Record are given below:
COMPLETION RESULT CODE: Enter a Home Exam Completion Code from the Call
Record Result Codes page on the Household Folder. Enter the code only when you are
finalizing your work for this task. All of the completion and reason codes for the home
exam component, as they appear on the Household Folder, are listed in Exhibit 3-2.
REASON CODE: Record one or more reasons why the home exam was not completed.
The columns labeled, "Health Related Reasons" and "Personal Reasons" lists the codes
that can be used by the home examiner.
RESULT OF HOME EXAM: Enter all information which helps to describe what
happened during a Home Exam which was not completed.
3-2
Exhibit 3-1. The SP Card
3-3
Exhibit 3-1. The SP Card (continued)
3-4
Exhibit 3-2. Call Record Results Codes
3-5
3.4
The Home Examination Form
The Home Examination Form (Appendix B) is used as a backup should the laptop PC not
function. In this event, it will be necessary to record the results of each home exam component on the
Home Examination form. The blank Home Examination Forms are kept in the Field Office. Upon
completing the home exam, the home examiner will return the completed Home Examination form to the
field office. The data from the Home Examination form will be entered into the PC when the computer
becomes operational. The specifications for completing the component sections (A-N) of the form are
given in Sections 7.4 through 7.15 of this manual.
3.5
The Consent Form
The last page of the Sample Person Brochure contains the MEC Examination Consent Form.
(Exhibit 3-3 is a copy of the MEC Examination Consent Form.) This form will be used to demonstrate
that consent to participate in the examination has been obtained from each Sample Person, that they have
been fully informed about the content of the examination and the nature of their participation, and that
the examination results may be forwarded to providers of health care. One consent form must be
completed and signed for each SP receiving the Home Examination and turned into the Field Office.
If the SP has previously signed a consent form agreeing to the Home Examination, the signed
form will be kept in the Household Folder. If the SP has not signed a consent form, the home examiner
must obtain his/her written consent upon arrival at the household before performing the examination.
Upon arrival at the SP’s home, after the introduction, refer the SP to the Home Exam fact sheet
in the SP Brochure to determine if there are any questions about the Home Examination. Ask the SP to
read, fill out and sign the MEC Examination Consent Form (if a consent form has not already been
obtained). In ink write the word "Home" on the MEC Examination Consent Form to indicate that this
is a consent for the Home Examination. Give the SP the Survey Brochure and the yellow copy of the
MEC Examination Consent Form. Place the original of the consent form in the Household Folder.
3-6
Exhibit 3-3. MEC Exam Consent Form
3-7
3.6
The Home Exam Release Form
The Home Exam Release Form is a two-part form supplied by the Field Office. It is used by
the home examiner only in the event of an emergency situation in the home where the SP or SP’s
guardian refuses the home examiner’s advice to seek immediate medical attention at an emergency care
facility. When this type of situation occurs, the home examiner should request that the SP or SP’s
guardian complete and sign the Home Exam Release Form, thereby acknowledging that the SP has refused
the home examiner’s advice and takes full responsibility for his/her action. The home examiner should
give the second copy of the Home Exam Release Form to the SP, and return the top copy to the Field
Office. Further discussion of the form as well as a sample copy, can be found in Chapter 9 which covers
safety and emergency procedures.
3.7
The Home Exam SP Identification Form
The Home Exam SP Identification Form (Exhibit 3-4) is generated from the PC at the Field
Office.
This form should be completed by the home examiner for every SP receiving a Home
Examination before leaving the field office for the SP’s home. The home examiner will give the
completed form to the MEC physician upon returning to the MEC, who will use it to contact the SP in
the event that any of the SP’s laboratory values are out of the established MEC range.
3.8
The Home Examination Control Record
The home examination Control Record (Exhibit 3-5) is a computer-generated report that details
the completion status of each component of the home examination. The Control Record is printed at the
Field Office after completion of the home examination. Copies of these reports are sent to NCHS and
to the Home Examiner’s Technical Supervisor at Westat at the end of each stand.
3-8
Exhibit 3-4. Home Exam SP Identification Form
3-9
Exhibit 3-5. Home Exam Control Record
3-10
3.9
SP Identification Labels
The SP Identification Labels are pages of self-stick labels printed with the SP’s Identification
number. They are used to label the Home Examination Control Record, and the blood specimens. The
Home Examiner must obtain the SP Identification labels from the MEC coordinator before leaving for the
SP’s home.
3-11
4. EQUIPMENT AND SUPPLIES
4.1
Introduction
All equipment and supplies used for the Home Examination must be portable and compact
when packed. A canvas backpack that has been custom tailored for the Home Exam equipment is used
as a carrying case. It will hold all of the equipment and supplies used for each Home Exam component
except the spirometry equipment, the Playmate cooler, the infant measuring board, and the cellular phone.
The spirometry equipment has its own case and should be carried separately. The infant measuring board
is equipped with a shoulder strap for carrying. The cellular phone also has its own case and the Playmate
cooler is carried separately. A list of the equipment and supplies used for the Home Examination and the
location for storage of equipment, when not in use, and extra supplies is given in Exhibit 4-1. A more
detailed explanation of the equipment used for each component is given in the specific component sections
of Chapter 7.
In general, all of the equipment (except the Playmate cooler and the infant measuring board)
used during a Home Exam visit should be packed in either the spirometer case or the backpack. The
spirometry equipment (including the 3L calibration syringe) should be kept in the field office when not
in use. The backpack and the infant measuring board should be kept in the belly compartment of the
MEC, which has been designated for storage of the Home Examination equipment and supplies. The
Playmate cooler can be kept in the MEC laboratory. Please note that the tackle box containing the
vacutainer tubes and other venipuncture supplies should also be kept in the MEC laboratory. Vacutainers
should never be stored in the belly compartment of the MEC. Equipment should not be stored in the car,
or in the home examiner’s residence.
The equipment used for the Home Exam is specific to the Home Exam and should not be
replaced with equipment used on the MEC. The home examiner should notify the MEC Manager if any
equipment needs to be replaced.
4-12
Exhibit 4-1. Home exam equipment and supplies
4-13
Exhibit 4-1. Home exam equipment and supplies (continued)
4-14
The backpack should be kept fully equipped with supplies between exams. It should be
restocked with the supplies from the Venipuncture Room, the Laboratory, the Body Measures Room, the
Spirometry Room, and the Reception Area, and the Home Exam belly compartment (see Exhibit 4-1).
4.2
Start of Stand Procedures
Most Home Examination equipment and supplies will be transported on the MEC between
stands. The PJ5 spirometer will be sent to the Field Office from NIOSH to arrive just before Exam Staff
Set-Up Day. Some supplies and equipment that are used only for the Home Exam may be sent from the
supply warehouse. At the beginning of each stand the home examiner should unpack the backpack and
the spirometer case, and complete an inventory of all equipment and supplies including those in the belly
compartment and those received from the supply warehouse using the Home Exam Inventory Form given
in Exhibit 4-2.1
Any missing materials should be reported to the MEC Manager as soon as possible.
The Home Exam Inventory Form should be given to the MEC manager when it is completed.
In addition the home examiner should perform scheduled maintenance, testing and calibration
on all equipment (see below). If any equipment is malfunctioning, the MEC Manager should be notified
immediately.
4.2.1
Equipment Calibration Procedures
4.2.1.1
Spirometry Equipment
After completing the inventory of the spirometry equipment and supplies, the home examiner
will assemble the PJ5, run calibrations and do six to eight trial blows on the system to simulate an SP
1
Please note that for supplies which are used in other compartments on the MEC, only the amount in the backpack and the
venipuncture supply box (enough for 4 exams) should be recorded. For supplies that are used exclusively for the Home Exam,
the amount in the backpack plus the amount in the belly compartment should be recorded.
4-15
Exhibit 4-2. Home exam inventory form
4-16
Exhibit 4-2. Home exam inventory form (continued)
4-17
Exhibit 4-2. Home exam inventory form (continued)
4-18
exam. Procedures for calibrating and testing the spirometry system are given in Section 7.12. Any
problems with the system should be discussed with the MEC manager and with NIOSH before dry run
day.
The testing and calibration procedures should be documented on the Spirometry Log Sheet
(Exhibit 4-3). This log should be kept with the PJ5 in the spirometer case. At the end of the stand, the
log should be photocopied and the copy should be sent to Westat. The original log sheet should be
returned to NIOSH with the spirometer at the end of the stand.
4.2.1.2
Body Measures Equipment
After completing the inventory of the Body Measures equipment, the home examiner will
calibrate the SECA Integra Model 815 Scale, the Holtain skinfold calipers, the infant measuring board,
and the portable stadiometer. Procedures for calibrating this equipment are given in Section 7.4.2. Any
problems with the equipment should be reported to the MEC Manager.
The calibration procedures should be documented on the Body Measures Equipment
Maintenance and Calibration Log and Home Exam Scale Standardization Form (refer to Exhibits 4-4 and
4-5). These logs should be kept in the back of the Home Examination Manual on the MEC. At the end
of the stand, the log should be photocopied and the copy should be sent to Westat.
4.2.2
Daily Procedures
To prepare for each examination, the home examiner will inventory all equipment and supplies,
perform equipment check and calibration procedures, pack the backpack, and fill the portable cooler with
frozen Insul-mat ice.
Each day before the home examiner leaves the MEC to travel to an SP’s home, she must
inventory all of the equipment and supplies in the backpack and the spirometer case to make sure she is
sufficiently equipped to perform at least four exams before returning to the MEC.
4-19
Exhibit 4-3. Spirometry Log Sheet
4-20
Exhibit 4-4. Equipment Measurement and Calibration Log
4-21
Exhibit 4-5. NHANES III Home Exam Scale Standardization Form
4-22
The PJ5 must be calibrated at each new location before beginning exams. It should also be
calibrated before each exam. The filter should be changed before each exam. The instructions for
performing the calibration and maintenance procedures are given in Section 7.12. All calibration and
maintenance procedures should be documented on the Spirometry Log Sheet (refer to Exhibit 4-3.)
The SECA Integra Model 815 Scale, the Holtain skinfold calipers, the portable Stadiometer,
and the infant measuring board should be checked daily; the portable stadiometer and the infant measuring
board should be calibrated every two weeks, the calipers once each week and the scale as necessary. The
equipment check and calibration procedures are given in Section 7.4.2. All maintenance and calibration
procedures should be documented on the Body Measures Equipment Maintenance and Calibration Log
and the Home Exam Scale Standardization Form (refer to Exhibits 4-4 and 4-5).
To pack the backpack the home examiner should follow the guidelines:
Pack all breakable and small item venipuncture supplies in the tackle box.
Place large equipment items in the bottom of the backpack to help balance the pack and
to prevent crushing of smaller items.
Separate supplies by component into gallon size plastic bags and, if possible, pack them
in separate compartments of the backpack.
One of the portable Playmate coolers should be filled to 1/3 its volume with frozen Insul-mat
ice to be used when transporting blood specimens from the SP’s home(s) to the MEC in hot weather. The
frozen Insul-mat ice should be taken from the freezer in the laboratory. The day before each Home
Examination, the freezer in the laboratory should be checked to make sure there is sufficient frozen Insulmat ice.
Upon returning to the MEC, all used supplies should be replaced, and the backpack should be
restocked with enough supplies to administer four examinations. Equipment should be cleaned and stored
appropriately.
4-23
4.2.3
End of Stand Procedures
At the end of each Stand, the home examiner should inventory all of the equipment and
supplies using the Home Exam Inventory Form (see Exhibit 4-2). The backpack should be fully stocked
with enough supplies for at least four home examinations. The Home Exam Inventory Form, when
completed, should be given to the MEC Manager, who will send it to the supply warehouse.
The portable scale and the portable stadiometer should be calibrated as described in Section
7.4.2.
The backpack and the infant measuring board should be stored securely in the belly
compartment of the MEC. The cellular phone should be returned to the MEC Manager. The tackle box
with the venipuncture supplies should be stored in a locked cupboard in the phlebotomy room. The
spirometry equipment should be packed in its special mailing case and sent to NIOSH in West Virginia.
NIOSH will supply preprinted, prepaid mailing labels. The MEC Manager will assist with the mailing
procedure.
Photocopies of the Spirometry Log, the Body Measure Equipment Maintenance and Calibration
Log, and the Control Record should be sent to Westat at the end of each stand.
4-24
5. BASIC INTERVIEWING AND COMMUNICATION SKILLS
5.1
Developing Basic Interviewing Techniques
The gathering of information on health-related practices, attitudes, and beliefs requires the
effective use of highly developed interviewing skills. Given that the Home Examinations are lengthy and
the questionnaire items cover some sensitive topics, the Home Examiner must know how to administer
the questionnaire portion in an efficient manner without appearing insensitive to the participant’s feelings.
While practicing the items can help Home Examiners develop familiarity with the questionnaires,
interviewing techniques can make the critical difference in obtaining the participant’s attention and
cooperation. A major emphasis of the training, therefore, is to assist home examiners in developing some
basic interviewing techniques.
Interviewing may be defined as a special kind of interpersonal communication designed to
obtain information from another person. However, communication is always a two-way process. People
who are interacting with one another must listen to as well as respond to what the other person says and
does. Thus, each person in an interaction is both a "receiver" and a "transmitter" of information. The
skills that are essential to effective interviewing are rooted in this definition of interpersonal
communication.
One training approach designed to facilitate the development and improvement of basic
communication skills is called microtraining. Specifically, microtraining is a systematic approach to the
acquisition of skills that enhance human interaction. Within the framework of structured exercises, certain
aspects of human interaction can be isolated, focused upon, and practiced. The training is designed to help
with listening, responding, questioning, and attending to participants more easily, comfortably, and
naturally. The newly acquired skills provide the necessary "tools" for communicating effectively. A
microtraining module is presented in Chapter 6 of this manual.
5-25
5.2
Establishing Rapport with Each Participant
Through training and practice, each home examiner can acquire and refine the skills of
attending, questioning, paraphrasing content, and reflecting feelings. These interviewing techniques are
invaluable for establishing rapport with the study participants. When individuals feel really listened to
and respected for who they are, they are more likely to share information on their health-related practices,
beliefs, and experiences and to cooperate in completing the exam. Hence, as the exam progresses, the use
of these skills promotes the development of a good working relationship with the respondent.
Rapport provides the foundation for successful interviewing. The quality of the information
gathered during the interview depends greatly on how comfortable the respondent is in relating to the
home examiner. In addition to the effective use of communication skills, appearance and introductory
remarks strongly influence the rapport that develops between the home examiner and the respondent.
Thus, the initial approach used with each participant at the start of the Home Exam should set the tone
for a friendly, cooperative, but professional relationship that can continue to develop throughout the entire
exam.
The respondent is much more likely to cooperate if the exam is presented as an opportunity
to express his/her views. The respondent also needs to be given certain basic information about the
general purpose of the Home Examination, the nature of the questions and exam procedures, how the
information will be used, and the length of the exam. Suggested ways to describe each portion of the
exam are given under the specific procedures for administering each subcomponent of the exam. The
home examiner’s own belief in the survey strongly influences both the manner in which this explanatory
information is presented and the respondent’s willingness to participate in the exam. Most individuals are
willing to participate in research surveys if they are convinced that the information gathered will be used
in a meaningful way and that their privacy will be protected.
5.3
Answering the Respondent’s Questions
Usually, participants follow the home examiner’s lead and respond only to the questions being
presented.
However, some participants may ask for additional information, especially during, or
immediately after, the first introduction to the exam.
5-26
Once the exam administration begins, other
individuals present questions about the items or procedures. During the cognitive and other testing
sections of the exam, some participants may interrupt the progress of the testing by making tangential
comments or inquiring about the meaning of their performance on certain tests.
At all phases of the Home Examination, the home examiner must be ready to answer respondent’s
questions as they arise. It is important to listen carefully to the questions being asked and to answer
briefly but accurately. Sometimes, however, the respondent’s questions may be tangential or irrelevant
to the exam. In this situation, a brief and tactful response must be given that will redirect the respondent
back to the item or task at hand. The Home Examiner should not volunteer more information than is
needed to answer the respondent’s specific question. Unasked-for information may be misunderstood; it
may encourage the respondent to ask additional questions or it may even confuse or bore the respondent.
Moreover, if the respondent asks a question for which the home examiner does not know the answer, it
is appropriate to state that she does not know the answer but, if the respondent wishes, she can arrange
to obtain an answer. Finally, if the respondent asks a question that pertains to the interpretation of his/her
performance on a test, the home examiner must encourage the respondent to proceed with the task in a
polite manner without giving feedback that might bias the rest of the test. Specific suggestions for this
type of questioning are given in the general procedures sections.
Some of the questions that respondents most frequently ask home examiners are the following:
How did you happen to choose me?
What difference does it make how I feel about that?
I don’t know enough about that. Why don’t you just ask me the next question?
What’s all this about anyway? and
How am I doing compared to other people on this test?
During training, home examiners have the opportunity to practice answers to these types of
questions. Practicing can facilitate the ability of home examiners to respond briefly and directly to the
many questions that respondents may raise in the actual exam situation.
5.4
Maintaining Attention and Cooperation
5-27
The Home Examination requires continued attention and cooperation to complete all of its
various subcomponents within the specified time limits. When the rapport between the home examiner
and the respondent is good, the exam progresses at a steady, fast pace. The variety of health-related topics
in the questionnaire portion, and the diversity of tasks in the cognitive and other exam sections, help to
reduce the monotony of the exam. Introducing each subcomponent as it is presented helps to maintain
the respondent’s attention during the exam. The most difficult aspect of maintaining the respondents’
cooperation is to encourage individuals to complete the cognitive tasks even when they feel discouraged
or frustrated. In these cases, it is necessary to remind the respondents that they are expected to do the best
that they can, but that no one is expected to be able to do the tasks perfectly. Respondents should be
encouraged to look at the tasks as a challenging problem to solve or game to enjoy rather than a test.
With proper reassurance, even the most frustrated respondents can be prompted to try again and to follow
through with a task. When frustration is too great to overcome, the examinee can be directed to a new
section of the exam. The training sessions provide practice for home examiners in handling difficult
respondents and refusals.
The rapport-building process begins with the home examiner’s introduction at the door and
must continue throughout the entire exam. Through acceptance and the understanding of behavior, and
by demonstrating interest in the respondent, the home examiner creates a friendly atmosphere in which
the respondent can talk freely and openly.
Occasionally, rapport may be disrupted during the exam because the respondent finds a
particular question or procedure too confrontational or personal. If this happens, the home examiner
should try to reassure the respondent that s/he may speak freely and reiterate the confidential nature of
the exam.
If a respondent refuses to answer a question after being reassured of confidentiality, s/he should
not be pressed for an answer. If a respondent refuses to answer a question, the refusal code should be
entered into the computer.
5-28
6. TECHNIQUES FOR ADMINISTERING THE HOME EXAMINATION
6.1
Introduction
This chapter is designed to familiarize the home examiner with the basic principles, techniques,
and procedures to be followed in administering the NHANES III Home Examination.
A working
knowledge of these concepts provides the essential foundation for learning how to administer the Home
Examination.
To facilitate the training, a series of short, written exercises is included in this chapter. The
primary objective of these exercises is to assist the home examiner in applying basic interviewing concepts
to the administration of the Home Examination. When completing these exercises, refer to the text as
often as necessary.
The answers to the exercises are printed on the back of the exercise pages. After completing
an exercise, the answers should be checked against the printed ones. If any questions are missed, the
appropriate section of the chapter should be reviewed until there is a complete understanding of the
subject.
A summary exercise is given at the end of the chapter. The answers to these questions are not
provided. This exercise should be completed by the home examiner and brought to training. At the
training sessions, the exercises will be collected, reviewed, and returned. It is important that all of the
exercises are completed.
6.2
Preparing for the Home Examination
In essence, two levels of preparation for conducting the Home Examination are required. On
a general level, it is essential for each home examiner to develop a working knowledge of basic
interviewing techniques. A major emphasis in training, therefore, is to impart to each home examiner an
understanding of effective communication skills. Certain skills can be taught didactically, but only
through experiential training and practice are these skills acquired and refined. Although training is
designed to maximize the acquisition of communication skills, the process of refining one’s repertoire of
6-1
interviewing techniques takes time. These skills continue to develop throughout the period of time that
each home examiner is actually conducting Home Examinations.
On another level, there are several preparatory steps which the home examiner can follow to
enhance his or her readiness to administer the Home Examination, especially the questionnaire portion of
the exam. These preparatory steps are much more concrete than the process of developing interviewing
skills. Hence, it is important to follow these steps, as delineated below, prior to administering any Home
Examinations.
6.2.1
Review the Home Examiner’s Manual and Test Materials
This manual is designed to provide detailed information on how to conduct the Home
Examination. Moreover, the manual specifies the responsibilities inherent in the role of the Home
Examiner. Reviewing this manual thoroughly, and using it as a guide for becoming familiar with the test
materials and equipment, can enhance the skills necessary for effectively and efficiently administering the
Home Examination. It is equally important to become familiar with each of the subcomponents of the
Home Examination. The following sections review steps that are helpful to follow in preparing for
administering the Home Examination.
6.2.2
Review the Home Examination Form
A familiarity with the health-related topics, and the specific items within each area, can be
achieved by practicing the Home Examination using both the CAPI system and the Home Examination
Form. This step can be repeated for the two age groups included in the sample of SP’s for the Home
Exams in order to gain confidence in administering the interview and other exam procedures. The ability
to work comfortably with the questionnaire portion of the exam enhances standardization across
participants while also maintaining their interest and cooperation in responding. Developing a smooth
presentation style is invaluable in helping respondents feel more comfortable about their participation in
the examination. It is important to keep in mind that the examination is an interactive process that
requires a genuine level of attention to be given to each participant.
The ability to attend to the
respondents as they give responses to the questions can facilitate their willingness to answer frankly and
6-2
readily to even the most sensitive questions.
This quality of attention can only be obtained by the Home Examiner who knows the
questionnaire material well. It is not recommended that any attempts be made to memorize the items; in
fact, such an approach would create a great margin for error and lack of standardization. However, a
working knowledge of the topics and the questions subsumed under each topic can enhance presentation
style and reduce awkward paper shuffling or stumbling on the part of the home examiner.
6.2.3
Review the Testing and Lab Procedures
In the same manner, it is mandatory for each Home Examiner to examine all testing materials
for the remaining portions of the examination. By studying the materials and the protocols for their
administration, the home examiner can be better prepared to handle any questions or difficulties which
may arise. Moreover, the protocols clarify the degree to which the Home Examiner should provide
encouragement or help motivate participants to cooperate during testing. In order to ensure test validity
and inter-rater reliability, it is imperative that these protocols be followed exactly.
The step-by-step procedures for the remaining tests provide a similar means of ensuring
standardization. Prior to administering any interviews, home examiners should review these specifications
to maximize their ability to conduct these tests according to protocol and to handle any problems that may
arise in gaining the cooperation of difficult SPs.
6.2.4
Know the Testing Equipment
Some Home Examination procedures and tests require the use of specialized equipment. It is
important to study the descriptive materials to fully understand how to set up and calibrate the equipment
and to administer the tests while also recording important data.
Without this understanding, it is
impossible to run a valid assessment of the variables of interest. The step-by-step procedures are designed
to help gain the necessary skills for conducting these portions of the home examination.
6-3
6.2.5
Organize Materials
The key to being ready for a day of administering Home Examinations is to organize all of the
requisite materials and to check the equipment to verify that it is in full working condition. If the
materials are arranged in a systematic fashion, the home examiner can be ready to administer the entire
Home Examination to each participant. By maintaining readily available copies of the necessary forms
and by organizing the equipment needed to conduct the other portions of the Home Examinations, the
home examiner can avoid unnecessary hassles or awkward delays in test administration. Given the time
constraints for administering the entire Home Examination, it is imperative that home examiners avoid any
disorganization that might impede the progress of conducting the examinations. Moreover, participants
appreciate staff who are able to maintain an organized and professional stance while still conveying a
friendly and relaxed manner.
6.2.6
Impression Management
The impression that the respondents form when they are approached by a Home Examiner is
very important. The primary focus of the participants will be on the appearance of the examiner. The
more positive the reaction of the participants to the Home Examiner, the greater likelihood that they will
feel cooperative.
Impression management is the effort invested by a person in controlling the kind of impression
elicited from another person.
One means of managing first impressions is by appearance. Home
Examiners should strive to dress in a neat, suitable, and inconspicuous manner and avoid extremes of any
kind. It is better to slightly overdress than to appear too casual or slovenly. Clothes should always be
clean and neat.
Another way to manage the reactions elicited from participants is through one’s behavior. It
is inappropriate to eat, drink, chew gum, or smoke while examining the participants. The Home Exam
is a long ordeal for the SP’s. Many of the SP’s included in this sample are elderly adults who may have
reservations about having strangers in their homes. Consideration for their feelings, as well as good
impression management, may ease their concerns. Speaking clearly is essential, too. Chewing gum not
only looks unprofessional but it also interferes with enunciation. Smoking while working in people’s
6-4
homes is rude and unprofessional.
Following these guidelines for appearance and behavior ensures more professionalism and, in
turn, greater willingness on the part of the respondents to participate in the Home Examination.
6.3
Techniques for Administering the Home Examination
Some aspects of the Home Examination deal with sensitive topics, thus it is important to
establish a good working relationship with each SP. Earlier in the manual, the term microtraining was
introduced to describe one approach to teaching effective communication skills. This section elaborates
on the specific skills which can be focused upon and practiced to enhance the Home Examiner’s ability
to listen, respond, question, and attend to participants while administering the Home Examinations.
6.3.1
Attending Behavior
One of the primary elements of communication is attending behavior. Generally, it involves
both listening and responding. Good attending behavior conveys respect for another by demonstrating
genuine interest in what is being said. In this way, the home examiner creates a more secure, comfortable
setting in which the participant feels "safe" to respond to the questionnaire items. Attending behavior
involves both nonverbal and verbal communication. Posture, eye contact, gestures, and facial expressions
are specific nonverbal behaviors that may influence the message being conveyed in an interaction. The
exchange of nonverbal cues is also a two-way process. Home Examiners not only need to attend to the
possible nonverbal messages which they impart to others by their mannerisms, but also they must be aware
of the nonverbal cues given to them by the participants. Attending behavior also entails verbal following
or the use of comments that flow directly from what the other person is saying without altering the
meaning of the message. Together, these skills in attending convey genuine interest in communicating
with others.
6-5
6.3.2
Use of Questions or Probes
Another communication skill that is critical to administering the Home Examination is the
effective use of questions. The NHANES III survey is designed to gather information on specific topics,
and the Home Examination itself is structured to ensure that these data are collected in a consistent,
standardized manner. The questionnaire portion of the exam contains mostly closed questions which
require only a yes/no response or simple answer. The response sets are limited in order to obtain factual
information. Other questions involve an open invitation for participants to share their thoughts, feelings
or experiences. When these responses lack clarity or completeness, the Home Examiner must be able to
use questions or probes effectively to gain further information. Types of probes are discussed in detail
in the next section of this chapter.
6.3.3
Paraphrasing and Reflecting
Two other interviewing techniques that can enhance communication are paraphrasing content
and reflecting feelings. In administering the questionnaire portion of the exam, these two techniques must
be used selectively in order not to greatly increase the overall length of the interview. Paraphrasing
content, or restating a verbal message, aids the Home Examiner in checking that each response was heard
accurately. Where verbatim responses are needed, it is important for the Home Examiner to repeat the
response exactly as it is stated. However, for open-ended questions where the content is not clear, the use
of paraphrasing can prompt the respondent to provide more information. Learning to use this skill
effectively is one of the main objectives of the training sessions.
A final interviewing technique is reflection of feelings. This skill involves selective attention
to the effective components of a communication exchange. The focus is on the feelings and emotions
conveyed rather than the content. In structured interviewing, the use of this technique must be carefully
monitored in order to avoid sessions that are more emotionally laden than factual. Being sensitive to the
respondents’ feelings is important, but the home examiner must be careful not to assume a helping role
with the participants. Although some individuals may want to delve into very personal feelings or
concerns, the home examiner has the responsibility to redirect the focus of the interview to the
questionnaire items. In the interest of time and ethics, it is inappropriate for the home examiner to take
on a counseling relationship with any of the participants.
6-6
6.4
Administering the Questionnaire Portion of the Home Examination
The Home Examiner’s task in administering the questionnaire portion of the Home Examination
is to collect accurate information on health-related topics. Proper use of the questionnaire requires an
understanding of both the particular items on the questionnaire and general interviewing principles. In
addition to the basic communication skills that were reviewed in the previous chapter, Home Examiners
should acquaint themselves with the following information and procedures for administering the
questionnaire sections of the Home Examination Form.
6.4.1
Types of Questions
The types of questions in a questionnaire can be classified in several different ways. One
classification is based on the way the home examiner records the answer to the question. "Precoded"
questions have the possible answers printed in the questionnaire or on the screen; the Home Examiner
simply marks the answer given by the respondent by placing an "X" in the box associated with the answer
category or typing the number that corresponds to the correct response. "Open-ended" questions, on the
other hand, have no preprinted answer categories; they are followed by space in which the Home
Examiner enters the exact words of the respondent’s answer. Another way of classifying questions is
based on whether or not a question is "dependent" on the answer to a previous question.
6.4.1.1
Precoded Questions
Precoded or closed-ended questions are questions in which the possible answers are given in
the questionnaire and the home examiner simply marks the answer selected by the respondent. Sometimes
the answer choices are actually read to the respondent as in the following example. (Notice that in this
example the answer choices read to the respondent are printed as part of the question.)
H3.
Were you younger than 10, 10 to 12, 13 to 15, or 16 or
older?
6-7
1
2
3
4
9
younger than 10
10-12
13-15
16+
DK
For other precoded questions, however, the answers are not read to the respondent. This
frequently happens when the possible answer choices to the questions are clearly implied by the question,
as in the following example where the "YES" and "NO" answer possibilities are printed for the home
examiner to see, but are not read to the respondent.
E1.
Are you now, or have you in the past 3 months,
been on treatment for anemia? (Include diet, iron
pills, iron shots, transfusions as treatment.)
1
2
9
Y
N
DK
Most precoded questions are written so that the printed answers cover all possible responses
without overlapping or duplicating one another.
Occasionally, however, some overlap may be
unavoidable; at other times, respondents may find that more than one of the possible answer choices
applies to their situations. As a general rule that applies unless explicit instructions are given otherwise,
the Home Examiner records only one answer at these questions. To obtain that one answer, the Home
Examiner may have to probe (see Section 6.4.3) by asking the respondent to select the answer that comes
closest to what s/he thinks or feels or that best describes the event or activity the question asks about.
Here is an example of a question in which the respondent is asked for, and the home examiner
is to record, a single answer about an event for which there might have been several reasons.
H6.
ASK SP TO LOOK AT CHART AND ASK:
What is the reason you have not had a period in the
past (ANSWER IN H5)?
6-8
SHOW CARD 1
1 pregnant now (H11)
2 breastfeeding (H11)
3 menopausal (H9)
4 on chemotherapy or radiation (H9)
5 other (H9)
6 DK (H9)
Most open-ended questions require at least a sentence or two to answer. There is, however,
a special type of open-ended question that, like the precoded question, requires only a short answer. These
questions ask the respondent for numbers such as amounts or dates. Questions that ask "How long?",
"How much?", or "When?" frequently take this form. These questions are followed by a line on which
the home examiner enters the amount given by the respondent. The following is an example.
H7.
About how old were you when you had your last
period?
______ (H9)
age
99
6.4.1.2
DK (H8)
Dependent Questions
Questions are classified as "precoded" or "open-ended" on the basis of the way the answer to
the question is recorded in the questionnaire or on the computer screen. A question is called "dependent"
if it is asked only of certain respondents. Whether or not the question is asked is "dependent" upon how
the respondent answers a previous question. "Skip instructions", which are linked to the answer categories
of the previous question, will tell you when the dependent question is to be asked and when it is to be
skipped. In the following example, the second and third questions are "dependent" on the first. If the
respondent answers the first question "YES," the home examiner would ask the dependent questions. If
the respondent answers the first question "NO", the home examiner would skip the dependent questions.
H11.
Have you had one or both of your ovaries
removed (either when you had your uterus
removed or at another time)?
1
Y
H12.
Were both ovaries removed or only one?
1
2
9
one
both
DK
H13.
How old were you when you had the (ovary/
ovaries) removed? IF EACH OVARY
REMOVED AT DIFFERENT AGE, RECORD
DATE SECOND OVARY REMOVED.
_____
age
99 DK
6-9
2
N(H14)
9
DK (H14)
6.4.2
Presenting the Questionnaire Sections of the Home Examination Form
Collecting accurate and reliable data requires that every participant hears exactly the same
questions read in precisely the same way. Even small changes in the way a question is asked can
influence the way a respondent answers, and, in the long run, affect the results obtained when researchers
combine data gathered from a large number of respondents. The basic rules for asking the questionnaire
items are designed to ensure uniformity in the way the Home Examination is administered. Home
examiners must learn these basic guidelines that are discussed below and apply them for administering
the questionnaire portion of the Home Examination Form.
6.4.2.1
Asking the Questions
Always Remain Neutral
While administering the Home Examination you must always maintain a completely neutral
attitude. As a Home Examiner, you must not allow anything in your words or manner to express
criticism, surprise, approval, or disapproval of the questions you ask or of the answers respondents give.
An important part of your role as a Home Examiner is to get the respondent actively involved
in the interview, to lead him/her to talk comfortably and freely; however, you must carefully avoid saying
or doing anything to influence the content of the respondent’s answers. No matter what topics you ask
about, no matter how strongly you agree or disagree with the respondent’s answers, and no matter how
interesting or discouraging you might find those answers to be, you must always maintain the same neutral
and professional stance during the Home Examination.
You are there to ask for and record the
respondent’s answers, not to influence them in any way.
To be a good examiner, you must be comfortable with the questions you ask. If you feel
uncomfortable with certain questions, it is likely that you will transmit something of that feeling to the
respondent and influence the answers you receive. If you are uneasy with some questions, you should
practice them repeatedly until you can ask them in a simple, straightforward, matter-of-fact way.
Occasionally, you will find a respondent who refuses to answer some questions, but usually you will find
that as long as you can deal with all of your questions in the same relaxed and professional manner,
6-10
respondents will answer without hesitation. If your feelings about any topics in the questionnaire are so
strong that you cannot hide them from respondents, you should not be working as a home examiner on
this study.
Ask All Questions in the Order They Appear in the Questionnaire
When questionnaires are designed, the order in which questions are to be asked is always
given careful attention. Questionnaire writers repeatedly review the question order to make sure that all
questions are asked in a logical sequence and to lessen the chance that a respondent’s answers to one
question will improperly influence his/her answers to another.
Given the care with which the questions have been arranged and the importance of ensuring
that respondents hear the questions in the same order, it is essential that home examiners strictly follow
the order in which questions are printed in the Home Examination Form. Never change the order in which
you ask the questions.
At times, particularly if your respondent is talking freely, you may feel that s/he has already
answered a question before you get to it. DO NOT SKIP OVER ANY SCHEDULED QUESTIONS,
EVEN THOUGH YOU THINK THERE MAY BE SOME REPETITION. If a respondent becomes
annoyed or says something like "I just told you that," you can acknowledge the repetition, but explain that
you are required to ask all of the questions. You might say something like:
"I need to make sure I have your full answer on that."
or
"I thought perhaps you might have more to say about that."
Sometimes it may be helpful to anticipate the respondent’s reaction to the repetition by saying
something like:
6-11
"You may already have mentioned this before, but let me ask this question to make sure
I have the right answer."
or
"You may have told me about this before, but let me ask this question to make sure I
have the right answer."
There is only one exception to the rule that you must always ask questions exactly as ordered
in the questionnaire. If, during an examination, you discover that you have accidentally skipped one or
more questions you should have asked, you may go back to ask the omitted question. The entire
examination is designed to follow a particular sequence, in the same way that the questionnaire sections
have a fixed order for presenting the health-related questions. For standardization purposes, it is extremely
important to adhere to the designated sequences both within and between examination subcomponents.
Ask All Questions Exactly as Worded
Read each question completely and exactly as it is printed in the questionnaire. Do not change
even a single word, since even the smallest change can affect the entire meaning of a question. For the
answers obtained by different home examiners to be combined, there must be no doubt that each
respondent heard exactly the same question before responding. If you must repeat a question because the
respondent did not hear you the first time or did not understand the question, reread the entire question.
Do not omit any parts or words you think the respondent did hear or understand the first time.
EVEN THOUGH YOU FEEL THAT THE QUESTION COULD BE WORDED MUCH
MORE SIMPLY, DO NOT IMPROVISE. EVERY WORD IS THERE FOR A PURPOSE. Emphasize
only those words that are underlined or appear in capital letters within the question. Pause only at
commas or, when answer categories are included in the question, after each answer category. Read
everything in a natural, even-toned manner.
6-12
At times respondents may ask you to define words or to explain some part of a question. If
a definition or explanation is provided in your question-by-question specifications, you may give that
explanation to the respondent. If the specifications do not provide an explanation, do not attempt one on
your own. Simply let the respondent know that s/he should answer using his/her own definition. You
might say, "Whatever it means to you--just answer that way," or "However you understand that word."
Make Every Effort So That the Respondent Does Not See the Questions
Respondents can be influenced by knowing what questions are coming next or by seeing
answer categories that are not read to them as part of a question. As noted in the section on arranging
the setting for the examination, you should attempt to sit across from your respondent during the
examination so that the respondent cannot read the Home Examination Form. When it is appropriate for
respondents to see the answer categories for a question, you will have a card showing those categories,
and the Home Examination Form will instruct you to hand the card to the respondent when you ask the
question. The questions that use cards are always clearly labeled for your guidance.
Do Not Read Answer Categories to the Respondent Unless They Are Part of the
Question
In general, you will read to the respondent only the material to the left of the answer column;
material contained in the answer column is not to be read to the respondent unless you are specifically
instructed to do so. The questions to be asked are in lower case type. Instructions, which are not read
to the respondent, are occasionally included with the question and are usually printed in all capital letters.
Normally the difference between instructions and questions to be read will be obvious.
6-13
In some questions, the answer categories are read to the respondent. At these questions, the
answer categories are actually part of the question, as in the following example.
H3.
Were you younger than 10, 10 to 12, 13 to 15, or
16 or older?
1
2
3
4
9
younger than 10
10-12
13-15
16-+
DK
In other questions, answer categories are not read to the respondent. At these questions, the
answer categories will not be part of the question and will appear only in the answer column, as in the
following example.
H5.
About how long ago was your last period?
1
2
3
4
5
6
having it now (H11)
less than 2 months ago (H11)
2-3 months
4-6 months
7-9 months
10-12 months
Discourage Unrelated Conversation
Occasionally a question may lead a respondent to begin reminiscing or to relate a lengthy story
having little or no relevance to the survey. As a home examiner, your task is to discourage such irrelevant
conversation and keep the discussion focused on the questionnaire. In some ways, that requires that you
subtly teach the respondent how to be a good respondent. If you maintain a businesslike attitude,
acknowledge answers with neutral comments such as "I see," "OK," or a simple nod of your head, and
tactfully interrupt rambling and irrelevant answers to bring the conversation back to the question you have
asked, the respondent will soon learn how to be a good respondent and provide the kinds of answers you
need. If you must interrupt a respondent, do it politely, taking care not to antagonize him/her. You might
say something like:
"That sounds very interesting, but what I need to ask is ..."
"I see what you mean, but let me repeat that last question ..."
6-14
6-15
6.4.2.2
Instructions in the Questionnaire
In addition to the questions that are to be asked of the respondent, the questionnaire also
contains various types of instructions to guide the home examiner through the administration of the
questionnaire. The home examiner must gain a familiarity with the specific instructions, which are
explained below, prior to administering the questionnaire.
Instructions Printed in Capital Letters to the Left of the Answer Column
Instructions are printed in ALL CAPITAL LETTERS to make it easy for you to distinguish
them from the questions to be read to respondents. Instructions are never read to respondents. Whenever
you see something in the questionnaire that is printed in all capital letters (that is, not a word within a
question), it is a reminder to you that the item is an instruction and is not to be read aloud. The following
is an example of this type of instruction.
H13.
How old were you when you had the (ovary/
ovaries) removed? IF EACH OVARY
REMOVED AT DIFFERENT AGE, RECORD
DATE SECOND OVARY REMOVED.
_____
age
99
DK
Skip Instructions
Skip instructions may appear associated with one or more answer categories of a question.
The skip instructions tell you where to go next in the questionnaire; usually, you will be referred to the
next appropriate question. At times, however, the skip will send you to a further set of instructions.
6-16
Here are some examples of common types of skip instructions.
A. Skip associated with a particular answer category:
H4.
Have you had a period in the past 12 months?
1
Y
2
N (H7)
9
DK (H7)
If the respondent gave a "No" answer in the example above, you would follow the number
in parentheses and go to question H7. Also, if the respondent gave a "Don’t Know" answer, you would
proceed to item H7. Note that if there is no skip instruction associated with an answer category (as in
the "Yes" answer in the example above), you simply go on to the next question in the sequence.
B. Multiple answer category skip:
H5.
About how long ago was your last period?
1
2
3
4
5
6
having it now (H11)
less than 2 months ago (H11)
2-3 months
4-6 months ^F
7-9 months
10-12 months
Instructions of this sort skip all respondents except those who answered the question with the
first two responses to the next section.
Check Items
Check items are questions asked of the home examiner rather than the respondent. They are
clearly distinguished from the questions asked of respondents by being printed in capital letters and set
off in a box with a number and the words "CHECK ITEM". Usually a check item asks you about some
specific information given by the respondent or recorded by the examiner earlier in the exam. Skip
instructions, associated with possible answers to the home examiner check question, tell you where to go
next. The following is an example of a check item.
6-17
H18.
CHECK ITEM. REFER TO H5 AND
H6. MARK FIRST APPLICABLE BOX.
1
2
3
period now or within last 2 months
in H5 (J1)
pregnant now or breastfeeding
in H6 (J1)
other (H19)
Instructional Sets in Questions
Occasionally an instruction set is printed within the questionnaire item.
This form of
instruction alerts the home examiner to specify a certain word or name as s/he reads the question.
One type of instructional set is a symbol. For example two dashes, "--", indicates that the
examiner should fill in the name of the person to which the question refers. In the proxy interview, for
example, item B2 must be read with the child’s name filled in the blank. (In the past month, did -- eat
or drink any of these foods or beverages?)
Another type of instructional set is a word or phrase enclosed in parentheses. The home
examiner must substitute the designated condition or object to which it refers. An example is given
below.
H6.
ASK SP TO LOOK AT CHART AND ASK:
What is the reason you have not had a period in
the past (ANSWER IN H5)?
SHOW CARD 1
1
pregnant now (H11)
2
breastfeeding (H11)
3
menopausal (H9)
4
on chemotherapy or radiation (H9)
5
other (H9)
6
DK (H9)
In this item, the home examiner substitutes the period of time since the SP’s last period, which
was given in answer to item H5, to complete the question.
6-18
Answer Categories Printed in the Right-Hand Column
If the answer categories are not to be read to the respondent, they will be printed in the righthand column. It is only the placement of the categories that distinguishes questions in which the answers
are to be read from those in which the answers are not to be read. The examiners must remain alert to
these differences.
Instructions on How to Record Answers
Some instructions explain how to record the answer to a question. Instructions such as
"MARK ALL THAT APPLY" or "MARK ONE BOX ONLY," "RECORD LIMITATION," "NOT
CONDITION," and "SPECIFY" all give the home examiner information on how the respondent’s answer
is to be recorded in the questionnaire.
Use of Hand Cards
Some questions can be administered more easily if the respondent has an opportunity to look
at the answer categories. For these questions, respondents are shown hand cards with the appropriate
information printed on them. Use of these cards avoids the problem of having the respondent read directly
from the Home Examination Form.
Questions which use these cards will have instructions, SHOW CARD, and indicate the card
number. Make sure the respondent receives the correct card. Only read the categories when instructed
by the question (unless the respondent is illiterate or cannot see); otherwise allow the respondent to read
the categories.
6-19
6.4.3
Probing
The quality of the interview component of the Home Examamination depends a great deal on
the examiner’s ability to probe meaningfully and successfully. Probing is the technique used by the
examiner to stimulate discussion and to obtain more information.
When a respondent’s answer is
incomplete or lacks clarity, it is necessary to probe for a more adequate response. There are a number
of reasons respondents sometimes do not answer the question fully.
In everyday social interaction, people generally speak in vague or loose terms. Thus, it is
understandable that at first respondents may not answer questions in the interview in a clear or specific
manner. It is important, therefore, to encourage respondents to express themselves in very specific,
concrete terms.
Sometimes respondents will think that they are answering a question when all they are doing
is simply repeating an answer which was already given, or simply repeating parts of the question. A
respondent can talk a great deal and still be just repeating the question in different words.
Respondents will sometimes miss the point of the question. Many times they will give
responses which seem to answer the question but which, as you can see when you look further, are not
to the point of the question and are therefore irrelevant. It is easy to be "taken in" by a respondent who
is talkative and gives a lengthy and detailed response--a response which is quite beside the point. It is
not the answer to the question asked. In most cases, a respondent gives an irrelevant response because
s/he has missed an important word or phrase in the question.
Probing, therefore, has two major functions. First, probing motivates respondents to enlarge,
clarify, or explain the reasons for their answers. Second, probing focuses the respondent’s answers so that
irrelevant and unnecessary information can be eliminated. All this must be done, however, without
introducing bias or antagonizing the respondent.
Below are some examples of answers that for different reasons fail to answer the questions
properly. Because of the answers given, each requires probing.
6-20
Examples of Answers that Require Probing:
Question:
Answer:
Do you smoke cigarettes now?
I tried to quit about a year ago.
Question:
Answer:
How long ago did you stop taking the hormone pills?
About 2-3 years ago.
Question:
Answer:
How old were you when your periods or menstrual cycle started?
I was pretty young.
The ability to use probes effectively varies as a function of how well the home examiner
understands the purpose and meaning of each question. The question-by-question specifications provide
the necessary information on the meaning of the items. Once this knowledge is familiar to the home
examiner, it will be easier to decide whether or not a respondent’s answer to a particular item is
satisfactory or requires further probing.
6.4.3.1
Probing Precoded Questions
Although open-ended questions more often require probing, you may also need to probe on
a precoded question. Many respondents will answer a precoded question in the exact words of one of the
answer categories; then your job is simple to mark the appropriate answer. Sometimes, however, a
respondent will answer using words different from those in the answer categories you read. When this
happens, DO NOT MAKE ASSUMPTIONS about what the respondent intends. If the respondent’s
answer does not clearly fit one of the provided answer categories, you must probe for a response you can
code. Sometimes the best probe for a precoded question is repeating the original question. At other times,
the best approach might be to ask, "Well, which comes closest?" and repeat all the answer categories. The
following example shows how simply repeating the question can bring out an acceptable response.
6-21
Home
Examiner:
Respondent:
Home
Examiner:
Respondent:
Would you say your health in general is excellent, very good, good, fair,
or poor?
It’s OK.
Well, would you say your health in general is excellent, very good, good,
fair, or poor?
Good.
Another situation may occur in precoded questions when the respondent gives additional
information or explains his/her choice. In this case, write down (in the blank space to the left of the
preprinted answers) relevant comments the respondent volunteers while answering a precoded question.
However, do not probe for clarifications of these comments.
Sometimes a respondent will feel that none of the precoded responses fits, or that under certain
conditions they would choose one answer, and under different conditions another. In this situation, you
should try to get the respondent to generalize by repeating the question and saying, "Just generally
speaking, is it this way or that?", or "Most of the time", or "In most cases", etc. If the respondent insists
that s/he can’t choose, be sure to write down exactly what is said, and let the office decide how to code.
For example:
Question:
How much control do you think you have over your future health; a great
deal, some, very little, or none?
Answer:
When I feel run down, I don’t have control of anything but then there are
times when I take very good care of myself and have a lot of control.
Probe:
I see. But generally speaking, how much control do you think you have
over your future health; a great deal, some, very little, or none?
Answer:
Well, I’d say some control.
6-22
6.4.3.2
Probing Open-Ended Questions
In the case of the open-ended questions calling for longer answers, the techniques of probing
must be used to the fullest, for frequently the initial answers given by a respondent will fall far short of
being specific, clear, and complete. In some cases, the main question will be followed in the questionnaire
by a specific followup question, and sometimes the main question will be followed by the term "PROBE."
Whether or not this is done, the need to probe always exists, as long as the initial answer is not fully
specific, clear, and complete.
6.4.3.3
Prompting Recall
In addition to motivating respondents to clarify or explain their answers and focusing the
respondent’s answers to minimize irrelevant and unnecessary information, probing can serve a third
function. An examiner can use probes to prompt recall. Sometimes a respondent cannot remember
exactly when an event took place. The examiner may help the respondent answer this type of question
more specifically with the use of probes.
One example is the item where the examiner asks how old the respondent was when her
periods started. The respondent may answer by stating, "I was pretty young." To prompt recall, the home
examiner might ask the following questions:
Question:
Answer:
What age were you when your periods started?
I’m not sure. It was before high school.
Question:
Answer:
Was it before or after you started junior high school?
It was in junior high--probably eighth grade.
Question:
Answer:
How old were you then?
I was around 12 or 13. (Code 12)
It is necessary to apply probes in this way only when the question calls for very specific
information. In other items, where the precise timing of an event is inconsequential, do not take extra
time to specify the answer to that degree.
6-23
6.4.3.4
Types of Probes
There are several different neutral probes which are part of normal conversations that can be
used to stimulate a fuller, clearer response.
An Expression of Interest and Understanding: By saying such things as "uh-huh"
or "I see" or "yes," the home examiner indicates that the response has been heard,
that it is interesting, and that more is expected.
An Expectant Pause: The simplest way to convey to a respondent that you know
s/he has begun to answer the question, but has more to say, is to be silent. The
pause--often accompanied by an expectant look or a nod of the head--allows the
respondent time to gather his or her thoughts. Eye contact is important here.
Repeating the Question: When the respondent does not seem to understand the
question, or misinterprets it, or seems unable to decide, or strays from the subject,
it is often useful to repeat the question. Many respondents, when hearing the
question for the second time, realize what kind of answer is needed.
Repeating the Respondent’s Reply: Simply repeating what the respondent has
said is often an excellent probe. Hearing the response just given often stimulates
the respondent to further thought.
A Neutral Question or Comment: Neutral questions or comments are often used
to obtain clearer and fuller responses. The following are some suggestions for
probing questions that may help you explore many types of insufficient answers.
PROBE TO CLARIFY:
"What do you mean exactly?"
"What do you mean by ...?"
"Could you please explain that a little? I don’t think I quite understand."
PROBES FOR SPECIFICITY:
"What in particular do you have in mind?"
"Could you be more specific about that?"
"Tell me about that? What/who/why would ...?"
6-24
PROBES FOR RELEVANCE:
"I see. Well, let me ask you again ... (REPEAT EXACT QUESTION)"
"Would you tell me how you mean that?"
PROBES FOR COMPLETENESS:
"What else?"
"What else can you think of?"
"What other reasons/things/examples, etc. can you think of?"
6.4.3.5
Probing Methods
It is very important to always use neutral probes. This means that the home examiner should
not imply to the respondent that a specific answer is expected or that a given response is unsatisfactory.
Remember, the reason for probing is to motivate the respondent to respond more fully or to
focus the answer, without introducing bias. In using probes, the potential for bias is great. Under the
pressure of the interviewing situation, the examiner may quite unintentionally imply that some answers
are more acceptable than others or may hint that a respondent might want to consider this or include that
in giving responses.
The following two examples consist of a question, an initial, incomplete or inadequate
response, and two possible probes. The first of these probes is neutral, the other is not.
6-25
Example 1:
Question:
How many times a week does -- usually eat breakfast at school?
Answer:
Oh, it varies. Some weeks he eats breakfast at school twice and other
weeks almost every day.
Neutral
Probe:
Well, how many times a week does -- usually eat breakfast at school?
Nonneutral
Probe:
Well, would you say that averages out to about 3 times a week?
Example 2:
Question:
How long has -- been receiving food or health care from WIC?
Answer:
A couple of years.
Neutral
Probe:
How many years is that?
Nonneutral
Probe:
So you’d say 2 years?
In both examples, the nonneutral probe suggests a specific answer to the respondent and thus
leads the respondent toward that answer rather than leaving the range of possible responses completely
open for the respondent to specify.
6.4.3.6
The Don’t Know (DK) Response
The "I don’t know" answer can mean a number of things. For instance:
The respondent doesn’t understand the question and says DK to avoid saying s/he
doesn’t understand;
The respondent is thinking the question over, and says DK to fill the silence and
give himself/herself time to think;
The respondent may be trying to evade the issue because s/he feels uninformed,
or is afraid of giving a wrong answer, or because the question seems too personal;
or
6-26
The respondent may really not know or really may have no opinion on the
question.
Try to decide which of the above may be the case. Don’t be in too big a rush to settle for
a "don’t know" reply. If you sit quitely, but expectantly, your respondent will usually think of something
further to say. Silence and waiting are frequently your best probes for a "don’t know." You’ll also find
that other useful probes are: "Well, what do you think?", or "I just want your own ideas on that."
If you feel the respondent has answered "don’t know" out of fear of admitting ignorance, you
may act reassuring by saying, "There’s really no right answer to this question -- we’re just interested in
your opinion."
Always try at least once to obtain a reply to a "don’t know" response, before accepting it as
the final answer. But be careful not to antagonize respondents or force an answer. If they say again that
they don’t know, proceed to the next question after coding the DK reply.
6-27
6.4.3.7
Guidelines for Probing
The following rules and examples provide further guidance to help you select probes that will
not bias respondent’s answers.
1. Don’t ask "Do you mean __________ or __________?"
Such a probe suggests only one or two possible answers, when the respondent
mayactually be thinking about other possibilities. Do use probes for clarity and specificity
when a respondent’s answers are unclear.
Example:
Question:
How much TV do you estimate you watch on an average weekday?
Answer:
Just a little, I guess.
Neutral
Probe:
Could you be a little more specific?
Nonneutral
Probe:
Do you mean one hour or only one-half hour?
2. Don’t try to sum up in your own words what someone has said, because this may suggest
to the respondent that YOUR idea of his/her response is the "right answer." Do use
probes for completeness to make certain that you’ve obtained full answers.
Example:
Question:
Have you ever had a spell or attack when you suddenly felt frightened,
anxious or very uneasy in situations when most people would be afraid?
Answer:
I felt trapped in an elevator once and started thinking I might get stuck
in it.
Neutral
Probe:
Have there been other times when you suddenly felt that way?
Nonneutral
Probe:
So you just felt frightened that one time and it hasn’t happened again?
Example:
6-28
Question:
Are you limited in any way in any activities because of an impairment or
health problem?
Answer:
Well, just like everyone else, I’ve got my limits.
Neutral
Probe:
(Pause); or "I see" (pause); or "OK, but are you limited ..."
Nonneutral
Probe:
So you’d say that you are limited because of health?
3. Don’t ask whether the respondent meant a particular thing by a certain word. This
suggests one answer, when the respondent may have had a different answer in mind. Do
use probes to clarify if a certain word is unclear.
Example:
Question:
How long ago were you last tested?
Answer:
It’s been about a year.
Neutral
Probe:
Nonneutral
Probe:
About a year? (pause) Would you say it was more or less than one year
ago when you were last tested?
So you were tested one year ago exactly?
4. When you have obtained all necessary information about the respondent and when you
have encouraged the respondent to clarify the meaning of his/her own words so that you
(and we) know exactly what s/he had in mind, only then do you have a complete answer
and only then should you stop probing. However, if at any time the respondent becomes
irritated or annoyed, discontinue probing. We do not want the respondent to refuse the
rest of the examination.
6.4.4
Recording Answers
Presenting the questions exactly as they are worded and probing in a neutral way to obtain
clear and complete answers are two very important home examiner tasks.
Answers on the Home
Examination Forms are recorded in various ways, depending on the particular subcomponent being
administered. The specifications provide information on recording important lab, body measurement,
6-29
dietary and food frequency information, as well as cognitive and physical functioning data. Below are
some general instructions for recording questionnaire responses.
6.4.4.1
Recording Answers to Precoded Questions
Answers to precoded (closed-ended) questions are easy to record. Ordinarily the answers will
be clearly shown on the questionnaire and a small box will be printed next to each of the responses. The
usual way to indicate answers given is to mark an "X" through the appropriate box, as shown in the
example below.
H6.
ASK SP TO LOOK AT CHART AND ASK:
What is the reason you have not had a period in
the past (ANSWER IN H5)?
SHOW CARD 1
1
pregnant now (H11)
2
breastfeeding (H11)
3
menopausal (H9)
4
on chemotherapy or radiation (H9)
5
other (H9)
6
DK (H9)
Sometimes, as in the following example, a precoded question will include an "other" category.
This is for an answer that cannot be classified in the given categories. In addition to marking the
appropriate box, often you will be asked to specify the actual answer in the space provided. In these
cases, it is especially important to faithfully record the response verbatim.
For example:
C2.
Do you have any problems from recent surgery,
injury, or other health conditions that might
prevent you from standing up from a chair or
walking?
1
no apparent restriction
2
presently in wheelchair
3
recent surgery
4
injury
5
bedridden
6
other health condition
7 ___________________
specify
In addition to the answer categories contained in the question, there will occasionally be a
6-30
"Don’t Know" or "DK" choice included in the list of answer possibilities. Follow the rules set out in
Section 6.4.3.6 on "Don’t Know" answers. Then, if the respondent’s final answer is "don’t know", mark
the box for "Don’t Know" as you would for the other answer categories. If a "Don’t Know" box has not
been provided and the respondent’s final answer is "don’t know", record "DK" in the answer space.
Some precoded questions contain a series of items to be asked about. In these questions, the
appropriate box must be marked for each item. For example:
B2.
In the past month, did -- eat or drink any
of these foods or beverages? Include baby
foods as well as strained and regular
table foods
a. cereal
1
Y
2
N
b. fruit
1
Y
2
N
c. yellow and orange vegetables
1
Y
2
N
d. green vegetables
1
Y
2
N
e. meat
1
Y
2
N
f. egg yolk or eggs
1
Y
2
N
g. combination meat/vegetable dinners
1
Y
2
N
h. yogurt, cottage cheese, and other cheeses
1
Y
2
N
i. bread, rolls, crackers and biscuits
1
Y
2
N
j. desserts
1
Y
2
N
k. breast milk
1
Y
2
N
l. formula
1
Y
2
N
m. cow’s milk/regular milk
1
Y
2
N
n. fruit juices such as apple juice and orange juice
1
Y
2
N
o. drinks such as Kool-aid, fruit punch and Hi-C
1
Y (L1)
6-31
2
N(L1)
6.4.4.2
Recording Answers to Open-Ended Questions
In short, open-ended questions, be careful to record your answer legibly wherever a write-in
space is provided (e.g., name of medicine, name of condition).
E4.
How long ago was your last blood
donation?
00
less than one month ago
10 months ago
no.
Again, be careful to record your answer legibly. Also make sure it conforms to whatever unit
of measure is specified in the question (i.e., if the question asks for "months", do not record the answer
in "weeks").
The following are some general rules for recording numerical answers to short open-ended
questions.
1. "NONE" Entries
If an answer of "none" is received for a question which has a "None" box, simply mark
that box. If, however, no box has been provided for a response of "none", enter a zero
(0) in the answer space. Do not use a dash.
2. Date Entries
All questions that require a date as an answer will have a line on which the answer is to
be recorded. For example:
____/____
mo. yr.
or
____/____/____
mo. day
yr.
Each "portion" of the entry must be two digits. If you are recording a month and/or day
which is represented by a digit of 1-9, precede the number with a zero. This is called
"zero-filling." When recording a year, eliminate the "19" and record the last two digits.
6-32
The following examples illustrate how you would record dates.
a. January, 1978
01/78
mo./yr.
b. October 8, 1980
10/08/80
mo./da/yr.
c. April 2, 1981
04/02/81
mo./da/yr.
d. November 5, 1979
11/05/79
mo./da/yr.
3. Rounding Answers
When whole numbers are to be entered, it may be necessary to "round off" an answer the
respondent has given you. Whenever necessary, the following rounding rule should be
used:
ENTER WHOLE NUMBERS AS REPORTED, DROPPING ANY FRACTIONS.
The following examples illustrate how you would round answers:
a.
25 months
2 years
b.
7 hours, 15 minutes
7 hours
c.
8 years, 10 months
8 years
d.
56 hours
2 days
The key word in recording answers to open-ended questions is "verbatim". This means enter
or write down everything relevant that the respondents say in their own words. The following are a few
important rules to follow when recording answers to open-ended questions:
1. Be Ready to Record
Be prepared to begin writing down responses as they are given. When recording
responses on forms, have your pencil poised when you ask the question and begin writing
immediately; otherwise you may get too far behind and lose important information.
6-33
2. Use Abbreviations
Use abbreviations where necessary but be sure to look over the abbreviations after the
examination. If any of the abbreviations might be confusing to individuals who have to
code the responses, spell out the term completely when you review your work.
3. Ask the Respondent to Slow Down
People are usually flattered when you ask them to speak a little more slowly, or repeat
something, or wait a minute until you catch up, because you "don’t want to miss
anything," or you "want to get this all down." Other techniques include speaking more
slowly yourself; reading aloud as you record; and reading back the part of the sentence
you have recorded and asking the respondent to complete what you have not recorded.
4. Use the X Mark in Parentheses ("X") as the Probe Mark
Do not write out your probing statement--simply make an X in parentheses (X) at the
point you probed. The respondent’s answer to your probe would then follow the (X).
Perhaps a few words explaining the purpose of probe marks will make clear to you why
it is so important that you use them, and use them correctly.
We assume that trained home examiners will use only neutral probes. Therefore, we
don’t need to see the words you used in probing, but we do want to see when you probed.
The respondent’s answers, mixed in with probe signs "(X)s" give us a picture of the
conversation which took place.
Some respondents answer questions fully and to the point with little encouragement from
the home examiner. In such cases, we would expect to find few probe marks. It is
important to know whether the final "I can’t think of anything", which the respondent
said, came after many probes and s/he really didn’t know, or whether it was just a form
of a lazy "I don’t know", which was unprobed. The (X) probe mark is your way of
telling us that there was some conversation between you and the respondent. Whenever
a probe mark (X) is used, some recording should follow. If the respondent says nothing,
but merely shrugs his/her shoulders, note this in parentheses following the probe mark.
5. Verbatim Recording, of Course, Means that You Should Use the Respondent’s Own
Language WORD FOR WORD
Don’t correct or summarize what respondents say; let them speak for themselves! We are
as interested in the kinds of words a respondent uses as in the meaning of an answer.
6-34
6. If You Are Interviewing in Spanish, Record Verbatim in Spanish
If you are conducting the interview in Spanish, first enter written responses verbatim in
Spanish. (Then, during your edit, you will translate the response in English.) Note that
no questionnaire items are being administered in Spanish at this time.
7. Be Sure to Include the Pronouns (He, She, It, They)!
Without them the meaning of an answer is frequently not as clear as you think.
8. Avoid Probes That Can Be Answered "Yes" or "No"
As a general rule, you should avoid probes that can be answered with a simple "Yes" or
"No" (unless, of course, you are administering a question designed to obtain a "Yes" or
"No" response). A probe mark "(X)" followed by the "Yes" or "No" answer provides no
useful information to someone reviewing the completed questionnaire. Moreover, a probe
such as "Anything else?"--which can easily be answered "No"--does not help the
respondent think through an earlier response. A probe like "What else?" on the other
hand--which requires more than a "Yes" or "No" answer--helps the respondent rethink an
earlier answer and give a more complete response. When recorded in the questionnaire,
such a probe and its answer "(X)" "That’s all. There’s nothing else." provide a reviewer
with useful information.
9. Use the White Space Available
Use all the white space available, if needed, when recording. Be sure to mark the answers
with the question number if the narrative comments are on a different part of the
questionnaire (e.g., the bottom of the page).
10. Please Give Your Own Remarks When You Feel Something Needs Explaining
It is important to put your remarks in parentheses (
) so we don’t confuse your
explanation like (respondent had trouble understanding this question), (respondent left
room for ten minutes), etc., with a respondent’s answer. Also remember to circle any
notes you make to yourself.
11. Refused Answers
If a respondent refuses to answer any given question, it is important that you record in
the margin verbatim what s/he said when refusing that question and any observations of
your own as to why the respondent refused. Put parentheses around your comments so
that your comments can be distinguished from the respondent’s.
6-35
The following examples show how an home examiner would ask and probe two questions and
how s/he would record the respondent’s answers.
Home
Examiner:
About how long has it been since you last smoked cigarettes?
Respondent:
Oh, I really don’t know. It was before the children were born.
Home
Examiner:
Respondent:
Before the children were born? Try to think back to that time. How
many years has it been since you last smoked cigarettes?
Well, Joan was born in August 1972 and I quit smoking about one year
before that. So I guess it must have been in 1971 ... 10 years.
About how long has it been since you last smoked
cigarettes? (X)
6.4.4.3
10
(
years
) less than 1 year
Errors in Recording
If it is necessary to change an answer when administering the PRINTED form of the
questionnaire, it is important to give the reason for the change as well. If the respondent changes his/her
mind after a response has already been recorded in a precoded question, draw a line through the wrong
answer and note next to it "(R.E.)" meaning "respondent error." NEVER ERASE! If you marked the
wrong answer by mistake, line it out and note ("M.E.)", meaning "my error." The following example
shows how a question would look if a respondent had just given a "Yes" answer and then changed to a
"No."
Did you ever see a doctor about it?
(R.E.) (X) Y
(X)N
If it is necessary to change an answer in a question where you were instructed to circle a
response, or in a short open-ended question where you have written a response, line out the wrong answer
with a single line and note next to it (R.E.) or (M.E.). NEVER ERASE. Then, clearly write the correct
answer next to or above the original entry. The following example shows how a question would look if
6-36
a respondent had answered "23" and you had recorded it incorrectly.
6-37
How old were you then?
(M.E.)
20
23 years old
Remember that answers should not be changed on the basis of recall. There is too much room
for error. If in doubt about the wording of a response, read it back to the respondent when you finish
recording it to check for accuracy. Finally, in recording answers to the questionnaire items, the examiner
must try to maintain some eye contact with the respondent. If the entire focus shifts to writing responses
on forms, the respondent may feel uneasy or rapport may be broken. The examiner should always keep
in mind that he/she is interacting with the respondent--not the forms.
6.5
Editing the Home Examination Form
An integral part of the interviewing process is editing. Editing entails checking the Home
Examination Form and testing data for accuracy, clarity, and completeness.
overestimated.
This step cannot be
It ranks in important with other interviewer responsibilities such as completing
examinations, following correct testing procedures, adhering to testing protocols, and carefully recording
results.
As mentioned in earlier sections of this chapter, examiners must check their work as the
examination is being conducted in order to avoid the omission of any items or tests. At the completion
of a testing session, examiners should review the questionnaire and testing portions of each Home
Examination Form to make any necessary corrections or explanations. It is important that the responses
be clearly indicated so that coders and other staff members can read and interpret all of the data.
For data collected on the printed forms, use blue pencil to edit. Never erase; simply add
corrections or comments if necessary. Always record your initials in the top right corner of the first page
of the Home Examination Form to indicate that you have completed the edit.
Although editing is not difficult and does not take long, it is an important part of an
examiner’s job. Some of the purposes of editing are:
6-38
1.
TO CATCH AND CORRECT OR EXPLAIN ERRORS AND OMISSIONS IN
RECORDING
Common errors that can be caught in editing are: omitted codes, unnecessary questions
asked, errors in circling codes, and inadequately probed response. In the pressure of the
interview situation, the interviewer may make any of these errors. Not all, but most of
them, can be corrected by the examiner if the data are edited carefully immediately after
the interview.
If you have omitted a question, do not try to correct it by guessing at the answer. Instead,
indicate in parentheses next to the omitted question that you are aware of the error:
"(omitted in error)". All question numbers which contain errors by omission or in which
you are not sure about recording practices should be written in the upper right-hand corner
of the printed copy of the questionnaire or test record form so you can discuss them with
your supervisor.
2.
TO LEARN FROM MISTAKES SO THEY ARE NOT REPEATED
There is an educational value in editing. Many examiners feel that the Question-byQuestion Specifications become more meaningful after they have conducted the first few
interviews. Following along with the Question-by-Question Specifications as you edit the
first and second interviews can be of great help to your understanding of the
questionnaire, thus improving the quality of your interviewing on the remainder of the
study, as well as catching errors. Similarly, using the Step-by-Step Specifications for
editing other portions of the Home Examination can enhance your familiarity with these
sections. Editing, therefore, is part of the overall learning process for the examiner.
3.
TO CLARIFY HANDWRITING AND WRITE OUT ABBREVIATIONS ON HARD
COPIES
The clerical aspect of editing is an obvious one. This includes checking handwriting to
make sure all the words are legible; spelling out any abbreviations that are not commonly
understood; and explaining any initials used or local terms which may not be known to
the coders in the office.
4.
TO ADD YOUR COMMENTS IN PARENTHESES, WHICH MIGHT HELP US TO
UNDERSTAND A RESPONSE OR AN INTERVIEW AS A WHOLE
Add parenthetical notes concerning the respondent, the interviewing situation, or anything
else that you feel might help in the correct interpretation of the examination. These
comments can be added at the end of the questionnaire if they pertain to the interview in
general, or noted at the appropriate points on the questionnaire or testing forms if they
refer to a specific item.
For example, if a respondent answers a question and then goes on to qualify that answer,
you will write down the reply word for word. Then if you feel that these remarks need
some clarification for the coder, put your explanation down in parentheses.
6-39
The edit should be carried out as conscientiously and thoroughly as any other part of the
examiner’s job. Since all forms must be completely edited, we expect you to spend enough time to do
a careful job. At first your editing will be more time consuming, but as you become familiar with the
Home Examination Form, this time should decrease. Examiners are paid for their editing time, and this
is payment which we believe is well spent, provided the editing is done well.
6-40
7. HOME EXAM COMPONENTS
7.1
Introduction
This chapter of the manual contains a detailed description of each of the components included
in the home examination. The sections follow in the same order as they appear in the Home Exam Form
and as they are to be performed in the SP’s home. However, as stated previously, one exception to the
order of the exam can be made. When there are 2 SPs in the same household, both venipunctures can be
done at the end of the exam.
Each component section contains the protocol, questionnaire specifications, a description of
equipment and supplies, equipment calibration and maintenance procedures, procedures for recording
results, safety procedures, and quality control.
7-41
7.2
Preparing for the Exam
The Home Examiner must perform several tasks well in advance of traveling to an SP’s home
in order to adequately prepare for a home examination. The procedure begins with tasks performed in
the field office and the MEC on the day before the scheduled examination.
On the day before a scheduled examination the Home Examiner should follow the steps given
below to prepare for an examination:
Go to the Field Office. Review the examinee’s Household Folder. Look for comments
by the interviewer that describe previous contact with the SP. Any information you find
that will help you to anticipate the condition of the examination or the SP’s attitude
toward the examination will better prepare you to conduct a successful examination.
Consult the Office Manager or the interviewer about any special circumstances you may
encounter on the home exam visit. If necessary, the Office Manager will arrange to have
a household interviewer or the MEC Manager escort you to the SP’s home.
Make sure you know the exact time of the appointment, and address of the dwelling. Do
not wait until the last minute to determine the best route to the SP’s dwelling. If
necessary, ask the household interviewer for specific directions.
Plan your schedule carefully around the exam appointment time. Allow sufficient time
for travel to the SP’s house. Allow sufficient time for travel between two consecutive
exams conducted in two different dwellings. Plan to complete your travel from the SP’s
home within the four hour time frame that has been established for processing the blood
after the venipuncture procedure is completed. Consult the Office Manager if you have
any concerns about the scheduled times for appointments and the travel time that may
be required.
Call the MEC laboratory to give them potential home examinee’s SP ID number. You
must give the lab staff the SP’s ID number in advance of the examination so that they can
label storage vials and assemble the blood processing rack for you. If you forget to tell
the laboratory about the examination, you will be responsible for labeling the vials and
assembling the rack yourself (see Section 7.13.8.)
On the day of a scheduled examination the home examiner should perform the following tasks
to prepare for the home examination:
7-42
Report to the MEC Manager to confirm your schedule of home examinations.
Check all of the home examination equipment and supplies. Your backpack should be
equipped with sufficient supplies to conduct 4 exams. (See Chapter 4 for the inventory
of home examination equipment and supplies.) All equipment must be operational.
Perform any necessary calibration or maintenance checks on the equipment. Document
the procedures in the appropriate logs. (See Chapter 4 for equipment maintenance and
calibration procedures.)
Remind the laboratory staff of the Home Examination appointment. If possible, give them
an estimated time of your return to the MEC. Make sure they have the examinee’s
correct NCHS number, so that they can label vials and assemble the blood processing
racks.
Pack the backpack and other equipment in the trunk of your car.
Obtain the Home Examination materials from the Office Manager. The materials you will
need to conduct the home examination are listed below:
-
ID badge with picture,
-
Blank Consent Form if exam is a replicate,
-
Home Exam SP Identification Form (this form can be completed prior to the
home visit and the information verified with the SP before leaving the home. It
is given to the physician upon returning to the MEC,
-
Hand Card with responses to Reproductive Health Question,
-
SP Identification labels (obtain form MEC Coordinator)
-
Sample Person Brochures,
-
Home Exam Fact Sheet,
-
Home Examiner’s Training Manual,
-
Receipt Book and SP Payment
The Home Exam SP Identification Form should be printed at the Field Office prior to
leaving for the home exam.
Place the materials in your plastic portfolio. Keep the materials organized.
Call the SP before leaving the Field Office to remind the SP of the scheduled exam and
to confirm the appointment time.
Make sure you have a map of the area in your car and
working before you leave for the SP’s home.
7-43
that your cellular telephone is
7.3
Conducting the Home Exam
7.3.1
Introduction at the Door
The Home Examiner’s introduction of herself at the door is her first opportunity to demonstrate
professionalism and to describe the purpose of the home visit in a manner that promotes a willingness to
participate on the part of the SP. Even though the appointment has been pre-arranged and scheduled, it
is important for the home examiner to initiate a positive interaction with the SP. The guidelines to be
followed during the introduction include:
1.
Tell the SP who you are and whom you represent. Give your name and explain that you
are a representative of the U.S. Public Health Service. Your identification badge will
verify this information. This badge is to be worn on the outside of your lab coat (or outer
clothing in cold weather). Keep the survey brochure available in the event that the SP
requests information about the survey again.
2.
Explain the purpose of the home visit. Use the Home Exam Fact Sheet of the SP
brochure as a reference and give it to the SP if the SP requests written information about
the exam.
3.
Keep the Introduction at the Door as brief as possible yet sufficient enough for purposes
of identification and clarification of the purpose of the visit.
An example of an introduction is as follows:
"Hello, my name is _______________ and I am a representative of the U.S. Public Health
Service. I am also a trained medical technician and I am here for the _______________ (time of
appointment) appointment with Miss/Ms./Mrs./Mr. _______________. I would like to come in now and
start the examination procedure."
7.3.2
Exam Set-Up
In preparing to conduct the exam in the SP’s home, the first consideration should be the
selection of the room. Ideally, the area should be well lighted and well ventilated. It should be as free
from interruptions as possible. The kitchen is usually the best place for adequate lighting and ventilation.
It may also have a table or counter that can be used as a hard surface for the set up of equipment and
7-44
supplies. Once the appropriate area is selected, the home examiner should set up her equipment and the
backpack in an area where it will be out of the way and not pose any safety hazards to the SP or other
people living with the SP.
When selecting an area for conducting certain portions of the exam, some specific
environmental requirements need to be considered. These are:
Body Measures
-
This part of the exam should be conducted in an area with even flooring such as flat
linoleum or wood. The scale(s) should not be put on a carpeted or tiled surface.
-
The stadiometer should be placed against a wall that does not have a large baseboard or
thick molding, or against a closed door that will not open with pressure.
-
When the baby board is used it should be placed on a hard surface such as a counter top
or table. The floor could be used if a counter or table is not available.
Physical Function Exam
-
The area selected for the physical function exam should provide enough space for the 8
foot measured walk and should be cleared of any furniture or objects that may be a safety
hazard to the SP or interfere with an accurate measurement.
Spirometry
-
The PJ5 spirometer should be placed on a hard surface, preferably a kitchen table or
counter top. Also, it should be placed at a convenient height for the SP.
Venipuncture
-
Venipuncture should be performed in a well-lighted area that is also non-carpeted.
Venipuncture equipment and supplies should ideally be set up on a flat surface, such as
a table top. There should be enough surface space available for adequate support of the
SP’s arm and for easy access to all supplies.
The sections of the home exam that specifically involve interviewing (i.e., cognitive function,
vitamin, mineral usage, etc.) should be conducted in an area that is the most comfortable for the SP and
still assures accuracy in data collection.
7-45
In summary, the home examiner should assess and select the areas that will be the most
appropriate for each of the exam components. This should be done as quickly as possible upon arrival
at the SP’s home and should involve the SP.
7-46
7.4
Body Measurements
Actual stature, weight, and body measurements including skinfolds, girths, and breadths are
collected in the MEC for purposes of assessing growth, body fat distribution, and for provision of
reference data. The Home Examination will include a sample portion of the measurements obtained in
the MEC and will be taken only on children 2 months to 11 months and adults 20 years of age and older.
The body measurement data collected in the Home Examination must still be taken as accurately as
possible to ensure quality data. The body measurement components by age to be included in the Home
Examination are:
<1 yr. 20+ yr.
Recumbent length
Height
Weight
Weight
Mid-upper arm
circumference
Mid-upper arm
circumference
Triceps skinfold
Triceps skinfold
Head circumference
7.4.1
Explaining the Measurement Process to SP’s
Take a minute to explain the measurement process to the SP since he/she will not be used to
having measurements taken in the home. Also, ask the SP to help locate an appropriate place to conduct
the measurements. Explain the following to the SP’s:
Four types of measurements will be taken on adults and 5 measurements on children.
The SP will have to remove his/her shoes and heavy outer clothes like sweaters and
jackets. Sleeves on the right arm will need to be rolled up over the shoulder. If a sleeve
is too tight to roll up, ask the SP if the shirt could be changed. If they refuse, do not
measure the arm circumference and skinfold and make a note in the comments section.
Marks will be made on the arm with a wax cosmetic pencil which is easily removed with
baby oil. These marks provide accurate locations for the measurements.
7-47
Measurements will take about 5 minutes for each household member.
A parent will be needed to help measure children.
Once the measurements have been explained to the SP, locate an appropriate place to conduct
the body measurements. The location selected should have the following characteristics:
A room with access to one wall that does not have a large baseboard or thick molding,
or use a closed door such as the back door that latches (won’t open when leaned on).
The room should have an even flooring such as flat linoleum or wood. It should not be
carpeted or tiled. The kitchen usually provides a flat surface.
If there are children to be measured, the room should have a space on which to put the
baby board such as a counter top or table. If the house does not have either, use the floor
to measure children (the tech and the parent will have to get down on the floor to take
the measurements).
It is not necessary to find one room with all these characteristics, but it will make the
measurement process go more rapidly.
7.4.2
Equipment and Supplies
The equipment and supplies necessary for body measurements are as follows:
SECA Integra model 815 scales (2)
SECA model 220 standing portable stadiometer - Baby board
Custom-crafted 3-piece stadiometer
Holtain skinfold caliper
Lufkin model Y606PM steel measuring tape
Paper insertion tape
9 volt alkaline batteries
Blue disposable towels
Cosmetic pencils (wax base)
Baby oil
Gauze
7-48
The SECA Integra model 815 scale is already assembled for use with the digital display
indicator head fitted at the back of the platform and the connecting cable stored in the compartment
underneath the head. The scale is a load cell model with a weighing range of 0-130 kg or 0-299.5 lbs.
It operates with a standard 9 V alkaline battery. In order to open the battery compartment, remove the
digital display head from the base of the scale and open the battery lid underneath the head. Connect the
battery terminals, then insert the battery and close the cover. Replace the digital display head on the base.
The reading of the scale is accurate to 200 g (0.5 lb) over the entire weighing range. If two
values are displayed alternately in the 200 g (0.5 lb) range, then the exact weight is between the two
values. Other instructions include:
If "SUP" when weighing kg appears on the display, that is the signal that the scale is
overloaded and cannot be used for this measurement.
If no weight display appears when an SP is on the scale, have the SP step off the scale,
press the ON button and wait for the display 0.0.
If - - - - appears on the display, press the ON button and wait for the display 0.0.
If "Err" appears on the display, have the SP step off the scale, press the ON button and
wait for display 0.0.
If "bAt" appears on the display, change the battery.
Two SECA scales are available for weighing an SP that may be in excess of 250 pounds.
When this situation occurs, the home examiner will be notified by the office manager and should take the
extra scale for that particular visit only.
Both scales should be handled in a careful manner and should not be dropped or thrown
around. Each scale should be calibrated at the beginning and end of each stand. Instructions for
calibrating the SECA scales are given in Section 7.4.2.1.3.
The SECA model 220 portable stadiometer has been modified for home examinations. The
stadiometer must be placed up against a bare wall without thick baseboards, or against a tightly closed
door on a flat surface. The floor piece is designed to fold out for the SP to stand on and the plastic
headpiece must be lifted and placed on the SP’s head. The two vertical measuring bars have both
7-49
centimeters and inches imprinted on them. Measurements are read in centimeters at the orange plastic line
where the two measuring bars connect. Care should be taken not to bend the stadiometer during transport
or storage. The stadiometer should be calibrated at the beginning of each stand, once every two weeks,
and at the end of each stand after all examinations. Instructions for calibrating the portable stadiometer
are given in Section 7.4.2.1.2.
The SECA model 220 portable wood stadiometer is to be used as the infant measuring board
for the home examination. This consists of the bottom "box" part of the stadiometer and the removable
headpiece. For measuring supine children, the removable headpiece will serve as the footboard. A
cardboard storage box is provided for the wood stadiometer. The wood stadiometer should be calibrated
at the beginning of each stand and once every two weeks. The procedures for calibrating the stadiometer
are given in Section 7.4.2.1.1.
Home health techs are already familiar with the Holtain skinfold calipers, Lufkin steel
measuring tape, and paper insertion tape as they are the same equipment which is used in the MEC body
measurement component. The Holtain skinfold calipers should be calibrated at the beginning and end of
each stand and once a week during each stand using the stepwedge standard. Procedures for calibrating
the Holtain calipers are given in Chapter Section 7.4.2.1.4.
If at any time, the equipment is missing or not functioning, etc., notify the supervisor. Do not
attempt to substitute other equipment for the home examination.
7.4.2.1
Equipment Calibration Procedures
7.4.2.1.1
Infant Measuring Board (Wooden Stadiometer)
a.
The infant measuring board is checked at the beginning of each stand and once every two
weeks by placing the calibration rod(s) on the board to check that the board has not been
damaged during transit. Check the reading against the known values of the calibration
rod(s) to make sure they agree.
b.
Record the reading on the Body Measurement Equipment Maintenance Calibration Log
Exhibit 7-1 under the appropriate heading. If the two readings do not agree, inform the
MEC manager.
7-50
Exhibit 7-1. Body Measurement Equipment Maintenance Calibration Log
7-51
7.4.2.1.2
7.4.2.1.3
Portable Stadiometer
a.
Calibrate the height scale at the beginning of each stand, once every two weeks, and at
the end of each stand after all examinations.
b.
Place the calibration rods separately on the floor of the stadiometer.
c.
Place the horizontal bar of the stadiometer firmly against the top of each calibration rod.
d.
Document the performance of the calibration procedure in the Body Measurement
Equipment Maintenance and Calibration Log (Exhibit 7-1).
SECA Integra Model 815 Scale
Each SECA Integra Model 815 Scale should be checked to see that it is operating properly
when the batteries are in place, and then standardized to the Toledo scale on the MEC using the
calibration weights found in the body measures room of MEC. Procedures for standardizing the SECA
scale are given below. Any problems with the scale should be reported to the MEC Manager immediately.
To standardize each SECA scale:
Perform the standardization procedures in the body measures room of the MEC.
Press the ON button of the SECA scale and wait for the display 0.0.
Place the calibration weights on the scale in increments of 25 pounds, starting with 25 and
continuing to 250.
Record the reading of the scale at each increment on the Home Exam Scale
Standardization Form (Exhibit 7-2).
If the scale reads at least one half pound off at more than three levels, inform the MEC
manager.
The Home Exam Scale Standardization Form should be kept in the back of the Home
Examination Manual on the MEC. At the end of the stand, photocopies of this form
should be sent to NCHS and Westat.
7-52
Exhibit 7-2. NHANES III Home Examination Scale Standardization Form
7-53
7.4.2.1.4
Skinfold Calipers
a.
Calibrate the Holtain skinfold calipers at the beginning and end of each stand and once
a week during each stand using the step wedge standard in the Body Measurements room
on the MEC.
b.
Zero the calipers before starting the calibration procedures. Place the step wedge standard
between the caliper arms at each of the five steps, and check that the reading on the scale
corresponds to the standard measurement.
c.
Record the measurement taken at each step on the Body Measurement Equipment
Maintenance and Calibration Log under the appropriate heading.
d.
If the calipers are 1 mm or more out of calibration at any level, use the other set of
calipers and inform the MEC manager. They will be returned to the manufacturer for
adjustment.
e.
If the calipers become too loose, inform the MEC manager.
7.4.2.2
Equipment Check and Maintenance
7.4.2.2.1
Skinfold Calipers
Before each examining session, the calipers should be "zeroed." Check to make sure the
pointer is clearly reading zero. If not, loosen the flat screw on top of the dial, turn the dial slowly and
gently until the pointer reads zero and then turn the screw tight again.
7.4.2.2.2
Weight Scale
a.
The technician assigned to the body measurement station should apply a random set of
the standard weights daily to roughly check the accuracy of the weight scales. This check
is noted in the Body Measurement Equipment Maintenance and Calibration Log.
b.
If there is any reason to believe that the scales are not accurate, do a complete
recalibration. The recording of the calibration should be recorded in the Home Exam
Scale Standardization Form and the MEC manager should be contacted.
7-54
7.4.2.2.3
Infant Measuring Board (Wooden Stadiometer)
a.
7.4.2.2.4
Portable Stadiometer
a.
7.4.2.2.5
Each day check that the upright bars fit together securely. This check is noted in the
Body Measurement Equipment Maintenance and Calibration Log.
Cleaning of Equipment
a.
At the beginning of each stand and during the stand as necessary, wipe the surfaces of
skinfold calipers, and tape measures with alcohol.
b.
Clean the equipment with alcohol at the end of each examining day.
Please note:
7.4.3
Each day check that the headpiece is operating smoothly and that the attached tape
measure has not been damaged. This check is noted in the Body Measurement Equipment
Maintenance and Calibration Log.
The Body Measurement Equipment Maintenance and Calibration Log and the Home Exam
Scale Standardization Form should be kept on the MEC in the back of the Home
Examiner’s Manual of Procedures until the end of the stand when they should be
photocopied and one copy sent to NCHS and the other to Westat.
Procedures for Measuring Adult SP’s 20+ Yrs
The Home Examination body measurement procedures for adults are designed to correspond
with the MEC procedures. In order to facilitate a smooth and rapid examination, the measurements should
be taken in the following order: weight, height, tricep skinfold, and mid-upper arm circumference. If an
SP is wheelchair bound or cannot stand without assistance, the weight and height measurements should
not be taken. Also, weight and height measurements are not taken on SP’s who are confined to their beds.
These circumstances should be noted by the technician in the comments section.
7-55
7.4.3.1
Weight
The following steps are to be followed when using one scale:
1.
Select kg measurement using the switch on the underside of the digital display.
2.
Place the scale on a flat uncarpeted surface. If such a surface cannot be located, place the
scale on the floor plate of the stadiometer.
3.
Switch on the scale by pressing the ON button. 888.8 will appear on the digital display.
4.
Have the SP remove his/her shoes and any heavy outer clothing such as sweaters, jackets,
etc.
5.
As soon as the display switches to 0.0, have the SP step on the scale with his/her feet
positioned in the center.
6.
Ask the SP to stand straight and remain still. If the SP is unable to stand unassisted, do
not attempt to hold them up. Do not take the measurement and make a note in the
comments section.
7.
The weight is indicated after a short time, approximately 4 seconds.
8.
Record the weight in kilograms.
9.
Ask the SP to step off the scale. The scale switches off automatically after 30 seconds.
If the SP’s weight is in excess of 250 pounds, the procedure for using 2 scales is as follows:
1.
Perform steps 1 through 4 (as listed above).
2.
Place the 2 scales side by side, but not touching each other. The scales do not need to
be parallel to each other. They can be angled to facilitate SP positioning.
3.
Instruct the SP to place one foot on the center of each scale platform.
4.
Ask the SP to stand straight and remain still as described above in step #6.
5.
Note the 2 weights given, following the same procedure as if one scale were used.
6.
The sum of the 2 weights should be entered in the appropriate space on the Home Exam
form.
7.
Perform step #9 as listed above.
7-56
7.4.3.2
Height
1.
Ask the SP to remove his/her shoes.
2.
Open the floorboard piece and place the stadiometer flat against a bare wall or a closed
door. Pull the sliding top bar section up and open head piece to allow the SP to step
under the head piece.
3.
Ask the SP to stand erect on the floor board with his/her back to the vertical piece of the
stadiometer and the wall. If the SP is unable to stand without assistance, do not take the
measurement.
4.
Ask the SP to evenly distribute weight on both feet. The heels are placed together with
the feet pointed slightly outward at a 65 degree angle. The arms hang freely by the sides
of the trunk with palms facing the thighs. (See Exhibit 7-3.)
5.
Position the head in the Frankfort horizontal plane and ask the SP to inhale deeply and
to stand fully erect without altering the position of the heels.
6.
Lower the headpiece snugly to the crown of the head with sufficient pressure to compress
the hair.
7.
Hold the top sliding bar in place at the junction and ask the SP to step out away from the
stadiometer.
8.
Record the measurement in centimeters (measurements printed on right side of bar) at the
orange line on the measuring bar.
7-57
Exhibit 7-3. Position for Height
7-58
7.4.3.3
Triceps Skinfold
1.
Have the SP stand erect with feet together, shoulders relaxed and arms hanging freely at
the sides. This measurement can be taken with the SP in a sitting position if they are
unable to stand. Make a note in the comments sections.
2.
Ask the SP to roll up his/her right sleeve above the shoulder.
3.
Have the SP stand erect with feet together and the right arm flexed 90 degrees at the
elbow with the palm facing up. (See Exhibit 7-4.)
4.
Stand behind the SP, palpate the shoulder and locate the upper most edge of the posterior
border of the acromion process of the scapula. Mark this location.
5.
Place the tape measure along the arm so that the " " line rests on the mark made at the
posterior border of the acromion process.
6.
Keep the tape in position and measure the distance from the acromion to the olecranon
process. The midpoint will be 1/2 this distance.
7.
Still holding the top of the tape, mark (+) the midpoint with the cosmetic pencil. This
location will be the site for the mid-upper arm circumference and the triceps skinfold.
8.
Have the SP relax the elbow so that the right arm hangs freely to the side.
9.
Stand behind the SP’s right side. Locate the mark on the posterior surface of the arm.
10. Gently grasp a fold of skin and subcutaneous adipose tissue with the thumb and fingers
approximately 2.0 cm above the marked level. The skin fold should be parallel to the
long axis of the arm. (See Exhibit 7-5.)
11. Place the jaws of the calipers over the marked point, perpendicular to the fold, and
measure the skinfold thickness to the nearest 0.1 mm while continuing to hold the
skinfold with the fingers.
12. Record the skinfold measurement.
7-59
Exhibit 7-4. SP position for upper arm length position and location of upper arm midpoint
7-60
Exhibit 7-5. Location of tricep skin fold
7-61
7.4.3.4
Mid-Upper Arm Circumference
Before the mid-upper arm circumference can be obtained, the mid-point of the upper arm needs
to be located. If the SP is wheelchair bound or cannot stand unassisted, follow the procedures for arm
circumference with the SP in a sitting position.
7.4.4
1.
Have the SP relax the elbow so that the right arm hangs freely to the side. Stand on the
SP’s right side. Place the measuring tape around the upper arm at the marked point,
perpendicular to the long axis of the upper arm. Hold the tape so that the zero end is
held below the measurement value. The tape rests on the skin surface, but is not pulled
tight enough to compress the skin.
2.
Record the upper arm circumference to the nearest 0.1 cm.
Procedures for Measuring Children <1 Yr.
Only children 2 month to 11 months will be measured for Home Examinations. The same
procedures are followed for measuring mid-upper arm circumference and triceps skinfold as used for older
SP’s. However, the measurements are taken with the child held sitting on the parent’s lap. Because the
technician’s eyes need to be level with the calipers and measuring tape to avoid parallex, these
measurements may involve kneeling on the floor next to the parent and the child. Head circumference,
recumbent length, and weight are also measured on children.
7.4.4.1
Head Circumference
This measurement is also best obtained with the parent holding the child in a sitting position.
1.
Place the paper insertion tape around the head just above the ears on each side and across
the frontal bones just above the eyebrows.
2.
Position the tape over the maximal occipital prominence at the back of the head and pull
firmly to compress the hair and underlying soft tissues.
3.
Record the measurement to the nearest 0.1 cm.
7-62
7.4.4.2
7.4.4.3
Weight
1.
Weigh the parent of the child as described in the procedures for adults.
2.
After the weight is indicated on the scale, have the parent remain standing on the scale
and press the ON button once again. The digital display will read "tArE". Wait until the
display switches to 0.0.
3.
Hand the child to the parent to hold. After a few seconds, the child’s weight will appear
on the display.
4.
Record the child’s weight in kilograms.
Recumbent Length
This measurement is best obtained as the last measurement on children since it frequently
causes some distress in small children. If possible, it may be helpful to have a third person assist with
restless children in order to take the measurement as quickly as possible while maintaining accuracy.
1.
Place the wood stadiometer flat on a table, counter, or the floor.
2.
Check to see that the footpiece is in place and sliding freely.
3.
Ask the parent to lay the child down on his/her back with his/her head up against the
headpiece.
4.
The crown of the child’s head should be pressed against the headboard and the child
should be looking straight up at the parent so that his/her head is in the Frankfort plane.
Have the parent gently hold the child’s head in this position.
5.
Hold the child’s legs by placing one hand or forearm firmly over the knees. While
holding the child in this position, slide the movable footboard to rest firmly against the
child’s heels with the toes pointing directly upward. (See Exhibit 7-6.)
6.
Record the measurement to the nearest 0.1 cm.
7-63
Exhibit 7-6. Correct position for measuring recumbent length
7-64
7.4.5
Data Form Recording
Body measurement results are recorded in Section A on page one of the Home Examination
Form. Weight is recorded in kilograms (not pounds) and height and other body measurement are recorded
in centimeters or millimeters as indicated. If for any reason, measurements are not obtained, record 000.0
in the spaces and provide an explanation in the comments section at the end of the Home Examination
Form (i.e., child was completely uncontrollable and could not be measured). Do not leave blank spaces
because it then appears that the measurement was just overlooked.
The item by item specifications for recording results of the Body Measurements component of
the home examination are given below.
Give a brief introduction to the body measurement examination.
A1.
A1.
A2.
A2.
Weight (kilograms) (All SPs)
____ ____ ____ ____ ____
00000 respondent unable to step onto scale
Item A1. should be completed for all SPs. Record the SP’s weight in kilograms in the space
provided. If the SP is unable to stand on the scale unassisted, do not take the measurement.
Mark the box labeled "00000, respondent unable to step onto scale" and make a note in Section
M2, Comments.
Standing height (cm) (ages 20 years and
over)
____ ____ ____ ____
00000 respondent cannot stand
Item A2 should be completed for SPs ages 20 years and over. If the SP is less than 20 years of
age skip to item A3. If the SP is 20 years of age or older, record the SP’s height in centimeters
to the nearest 0.1 cm. Skip to Item A5. If the SP is 20 years of age and over but cannot stand,
do not take the measurement. Mark the box labeled "0000, respondent cannot stand" and skip to
item A5.
7-65
A3.
A3.
A4.
A4.
A5.
A5.
A6.
A6.
Recumbent length (cm) (ages 11 months
and under)
____ ____ ____ ____
Item A3 is completed for SP’s ages 11 months and under. Record the SP’s recumbent length to
the nearest 0.1 cm. If for some reason you are unable to obtain the measurement. Record 000.0
in the spaces and a comment explaining the situation in Section M2 of the Home Examination
Form.
Head circumference (cm) (ages 11 months
and under)
____ ____ ____
Item A4 is completed for SP’s 11 months of age and under. Record the SP’s head circumference
to the nearest 0.1 cm. If you are unable to obtain the measurement, record 00.0 in the spaces and
provide an explanation in Section M2 of the Home Examination Form.
Triceps skinfold (mm) (All SPs)
Right Side
____ ____ ____
Comment Code: ____ ____
Comments: __________________
_____________________________
Item A5 is completed for all SP’s. Record the skinfold to the nearest 0.1 mm. If you are unable
to obtain the measurement, record 00.0 in the space provided under "Right Side". Record the
comment code which best describes the measurement was not done. Also record your own
explanation of the situation in the space provided under "Comments". The Comment Codes are
given below.
Mid-arm circumference (cm) (All SPs)
Right Side
____ ____ ____
Comment Code: ____ ____
Comments: ___________________
_____________________________
Item A6 should be completed for all SPs. Record the mid-arm circumference to the nearest 0.1
cm. If you are unable to obtain the measurement, record 00.0 in the spaces provided under "Right
side". Record the Comment code which best describes the reason the measurement was not done.
Also, record your own explanation of the situation in the space provided under comments. (See
below for comment codes.)
7-66
Comment Codes
1.
2.
3.
4.
5.
6.
7.
7.4.6
SP refused to have measurement taken
SP was crying/fighting/upset/uncooperative
Not done because of a rash or other skin
irritation/dermatosis
"Tight skin" (i.e., could not separate subcutaneous fat
from underlying muscle)
Exam interrupted (e.g., to draw blood) -- reschedule
SP visibly edematous
Skinfold too large for calipers
8.
9.
10.
11.
12.
13.
Too many folds or fat -- unable to reliably identify
site
Cast at site -- describe
Equipment malfunction (e.g., camera jammed)
Tech did not finish - had to leave room
SP unable to stand/sit straight ( due to Dowager’s
hump, scoliosis, etc.)
Exam aborted -- (e.g., SP too tired and hungry; SP
HAD TO LEAVE EXAM CENTER, ETC.)
Feedback to the SP
Many SP’s will be curious as to the results of their body measurements, especially height and
weight. It is acceptable for the home examiner to give them this information. However, it will be
necessary for the home examiner to state the height and weight measurements in inches and pounds
instead of centimeters and kilograms. The SECA scale has a switch on the bottom of the control panel
box that switches the scale from kilograms to pounds. The home examiner may do this after recording
the weight in kilograms.
In addition, the SECA stadiometer has both centimeters and feet/inches
measurements on the sliding bar. Again, first record the measurement in centimeters, then give the SP
the measurement in feet and inches. This same procedure is applicable to children’s measurements.
However, if measurements are only recorded in centimeters and/or kilograms, the technician can convert
the measurements. For calculating purposes: 1 inch = 2.54 centimeters and 1 pound = 2.2 kilograms.
7-67
7.5
Infant Food Frequency
The Infant Food Frequency section provides information on whether or not a child under the
age of one year has consumed any of the designated foods or beverages during the past month. The
respondent for this section is a parent or guardian or the person who has primary responsibility for the
infant and would be most familiar with his/her diet. Specifications for completing the items of the Infant
Food Frequency section of the examination are given below. The Infant Food Frequency section of the
Home Examination Form is given in Exhibit 7-7.
B1.
CHECK ITEM. REFER TO AGE OF SP
1
2
20 + years (C1)
under 1 year
The first item is a check item which refers to the age of the SP, not necessarily the respondent.
If the SP is 20 years or older, skip to section C1 of the Home Examination Form, after marking the
appropriate box. If the SP is under the age of one year, this section is answered by a proxy respondent.
Check the appropriate box and go on to read the introductory statement only to proxy respondents for
infants under one year of age.
SCRIPT: NOW I WOULD LIKE TO ASK WHETHER OR NOT _______ HAS EATEN CERTAIN
FOODS OR DRUNK CERTAIN BEVERAGES DURING THE PAST MONTH.
Be sure to read the introductory statement and fill in the infant’s name before asking about the
first food item on the list.
B2.
In the past month, did -- eat or drink any
of these foods or beverages? Include baby
foods as well as strained and regular table
foods.
Again, fill in the infant’s name as you are reading item B2. Emphasize the time frame, "past
month." The question requires only a "yes" or "no" response for each of the foods and beverages listed
in a-o. If the proxy respondent does not know about a certain food or beverage, add a comment to that
effect in the margin to the right of the answer column. Try to get definite answers whenever possible.
Basically, these questions focus on whether or not certain foods and beverages have been introduced
7-68
Exhibit 7-7. Home Examination Form - Infant Food Frequency
7-69
to the infant. As the initial question states, the proxy respondent should include baby foods as well as
strained and regular table foods.
Any of the following foods or beverages refer to both commercial and homemade foods and
beverages. Homemade baby foods are pureed in the blender. Since the emphasis is on the time at which
these foods and beverages are introduced, fortification or portion size is unimportant.
Repeat the first part of the question for the first two or three items (a-c). After that, it should
be sufficient to name the food or beverage and allow the proxy respondent time to answer. If the
respondent asks about a certain item, use the following specifications to clarify what the item includes:
Cereal includes commercial or homemade baby cereals and grain products such as rice cereal,
oatmeal, cream of wheat, or bran cereals. Include instant, quick cooking and long cooking. Although
grain dishes like bulgur wheat or tabouleh are less likely to be introduced in the first year, these foods
would also be included under cereal. Also include Farina, Cream of Wheat, Maypo, rolled oats, or the
like.
Fruit includes all types of fruits in all forms -- fresh, strained, frozen, canned, or pureed.
Include apples; citrus fruits such as oranges, grapefruit, tangerines, tangelos, and mandarin oranges; melons
such as cantaloupe or honeydew; peaches, nectarines, apricots; bananas or plantains; pears; cherries; and
other fruits such as strawberries, grapes, mango, papaya, and kiwi.
The next two categories cover vegetables. Include fresh or raw, frozen, canned, cooked, and
pureed vegetables and vegetable juices. Yellow and orange vegetables include acorn, butternut, and
hubbard squash, pumpkin, sweet potatoes and yams, and corn. Green vegetables include broccoli, spinach,
brussel sprouts, green beans, peas, lima beans, celery, zucchini, onions, turnip greens, or collards.
Meat is a general category for any meat or meat products commercially prepared or homemade.
Include chicken, beef, pork, ham, bacon, or sausage, veal, lamb, liver or other organ meats such as heart,
kidney, or tongue, and any seafood or fish. Include all preparations, such as boiled, poached, fried,
roasted, broiled, strained, or pureed.
7-70
Egg yolk or eggs includes eggs in any form (raw, poached, fried, scrambled) and any dishes
where egg is the primary ingredient such as quiche or frittatas. Do not include egg substitutes
Combination meat and vegetable dishes include both homemade and store bought main dishes
that contain both meat and vegetables. Include baby foods that are pureed or strained and have at least
one meat and one vegetable mixed together.
Yogurt, cottage cheese, and other cheeses include plain yogurt with fruit or syrup (regular,
lowfat, or nonfat), kefir (yogurt beverage/drink), any proceed or natural cheese, including regular, low
sodium, or lowfat, hard or soft, spread or pressurized can, ricotta cheese, or cream cheese.
Bread, rolls, cracker, and biscuits includes white or dark breads, rolls, bagels, pita, muffins,
cracker, matzo, corn or flour tortillas, and French toast.
Desserts and sweets include homemade, store bought, and packaged mixes of cakes, cookies,
pies, doughnuts, or pastries, as well as commercially prepared baby food desserts.
Breast milk, formula, and cow’s milk or regular milk are self-evident. Include lowfat, whole
milk, skim milk, buttermilk, and nonfat dry milk.
Fruit juices include apply juice and orange juice, as well as any other types of juices. Include
1005 juice; do not include juice substitutes.
Drinks such as Kool-aid, fruit punch, and Hi-C are any juice substitutes which are fruit-flavored
as opposed to 100% juice beverages. Include Sunny Delite, Tang, Hawaiian Punch, and any other drinks
with added Vitamin C.
7-71
7.6
Physical Function Examination (Ages 60+)
7.6.1
Physical Functioning Tests
The assessment of physical performance incorporates aspects of strength, mobility, freedom of
movement, balance and coordination. The physical functioning tests consist of exercises designed to
measure particular aspects of musculoskeletal strength and flexibility in a standardized manner.
Age
The Physical Function Examination will be given only to Examinees ages 60 years and above.
There is no upper age limit.
Health Status Screener
The examination begins with a health status screener to determine whether the Examinee has
any recent surgery, injury or other health conditions that might prevent him/her from standing up from
a chair or walking. When the response to this question is "yes," after you describe each test, discuss with
Examinee whether he/she should attempt the test given his/her physical problems. Do not assume an
Examinee is too physically limited to attempt a test without discussing it with him or her. Remember,
no one is automatically disqualified from the physical function examination because of physical handicaps.
7.6.1.1
Encouragement
Follow the script provided as closely as possible to describe the test and how to perform it
properly. You should not provide additional encouragement beyond the language provided by the detailed
instructions.
To some examinees, the detailed verbal instructions may seem unnecessary. It may help to say
that you are going to explain each test to the examinee in detail since this is the best way to make sure
that everyone does the test in a similar manner.
7-72
7.6.1.2
Aids
Walking aids may be used on the Measured Walk test. Aids may not be used for the Single
Chair-Stand, Repeated Chair-Stands, and Tandem-Stand tests.
7.6.1.3
Demonstrations
Demonstrate each maneuver for the participant. Remind the Examinee not to begin to do the
maneuver until after you have demonstrated it.
It is very important that the examiner demonstrate each exercise correctly (elbows parallel to
the floor during shoulder rotation, knee at 90 degree angle during hip flexion, etc.). Experience has shown
that SPs follow more closely what the examiner does rather than what she says. If the position is
demonstrated incorrectly the SP, following the example, will do the exercise incorrectly and be scored as
"Unable" even though s/he may actually have been able to perform it correctly.
If the SP indicates that s/he does not understand the exercise demonstrate it again rather than
relying on repeating verbal instructions. Repeat the demonstration only once. If the SP still does not
understand, go on to the next exercise. Do not coach the participant.
7.6.1.4
Safety Precautions and Prevention of Injuries
Obstructions that could cause accidents should be removed. The detailed protocols describe
how to safely administer the tests, including instructions on how to support the examinee if required. For
all test items where loss of balance is a possibility (e.g., Tandem Stand, Measured Walk), you should use
the following safety precautions. Position yourself standing at the examinee’s side, slightly behind
him/her. Your hands should be positioned very close to either side of the examinee’s trunk at the hip or
waist level. Be ready to place both hands on the examinee to stabilize him/her if necessary. If the
examinee loses balance, immediately hold onto the examinee with both hands at the trunk and stabilize
him/her. If the examinee begins to fall do not try to catch him/her; reach under the examinee’s shoulders
from behind and slowly ease him/her down to the floor. This will prevent the examinee and you from
becoming injured.
7-73
If this happens and the examinee is not injured, help him/her up by first having the examinee
get on his/her knees or on all fours, place a chair next to the examinee and have him/her support
himself/herself on the chair as you help lift under the shoulders. Do not try to lift the examinee alone
from the floor.
7.6.1.4.1
Cognitively Impaired SPs
Over the course of the survey, you may encounter persons who are cognitively impaired due
to stroke, Alzheimer’s Disease, mental retardation or other medical problems. This impairment may affect
the ability of these persons to move or by limiting their ability to understand instructions. Approach these
SPs in a friendly and supportive way. Attempt to draw their attention; follow your script and observe
protocols as with other SPs. This would mean re-demonstrating each motion once before coding an
"unable" and following similar time limits. Offer words of encouragement, but do not coach. If an SP
attempts an activity, score the form as you would for any other SP. If SP does not attempt because of
their impairment, score as "unable." As with other SPs, praise and thank these individuals for their efforts,
no matter how minimal. Make a note in the comments section regarding the difficulties you encountered
in the examination.
7.6.1.5
Using the Home Examination Form
The exercises will be scored by observation of the examinee’s performance using the following
four categories: fully, partially, unable and refused. The detailed protocols specify how to apply these
categories to score each exercise. The Physical Function section of the Home Examination Form is shown
as Exhibit 7-8.
(1)
Test performed fully:
Activity done completely and accurately, as requested
and demonstrated.
7-74
Exhibit 7-8. Home Examination Form - Physical Function Examination (age 60+)
7-75
Exhibit 7-8. Home Examination Form - Physical Function Examination (age 60+) (continued)
7-76
Exhibit 7-8. Home Examination Form - Physical Function Examination (age 60+) (continued)
7-77
(2)
Test performed partially:
(3)
Unable to perform test:
Examinee does not try the test either because he/she feels
it would be unsafe or knows he/she is unable to do it for
reasons related to a physical limitation or health
condition, or examinee attempts the test but can’t do it at
all (e.g., can’t get out of a chair without human help).
This would include those who cannot perform the test
due to cognitive impairment.
(4)
Refused to perform test:
Examinee refuses to perform the test or prefers not to for
reasons that are apparently not related to a physical
limitation or health condition.
7.6.1.6
Examinee attempts the activity but does not do it accurately (e.g.,
palms not pressed together, elbows not in proper position, leg
doesn’t reach chair, etc.).
Refused/Unable
If a test is not attempted because an examinee refuses or prefers not to, for whatever reason,
the examiner should clarify if the participant is refusing because of a physical limitation or health
condition that would make it impossible, inadvisable, or unsafe for them to attempt the exercise. This type
of refusal should be recorded as "unable" on the Home Examination Form. Occasionally, an SP may be
unable to perform a test because of difficulty following instructions due to cognitive impairment. This
should be scored as unable on the Examination Form. If the examinee refuses for any other reason, record
"refused" on the Home Examination Form, then make a note in the space provided about his/her reason
for refusal. If a test is attempted but the examiner or the examinee decide that the test cannot be
completed, record "unable" on the Home Examination Form.
7-78
7.6.1.7
Description of Equipment
The following is the list of equipment needed to carry out the assessment of physical
functioning of the elderly:
Armless, straightback chair;
Lock mounted in wooden block and key;
Stopwatch; and
Carpenter’s rule.
7.6.1.8
Instruction to Examinee
The examinee should be encouraged to perform each test if possible, however, they should also
be instructed not to attempt a test if they feel it would be unsafe. Tell the examinee the following:
SCRIPT: AS YOU KNOW, CERTAIN MOVEMENTS OF YOUR BODY BECOME MORE
DIFFICULT TO DO AS YOU GROW OLDER. I WOULD NOW LIKE YOU TO TRY TO
DO SEVERAL DIFFERENT MOVEMENTS OF YOUR BODY THAT INVOLVE YOUR
ARMS AND LEGS.
I WILL FIRST DESCRIBE AND SHOW EACH MOVEMENT TO YOU. THEN I’D LIKE
YOU TO TRY TO DO IT. IF YOU CANNOT DO A PARTICULAR MOVEMENT OR YOU
FEEL IT WOULD BE UNSAFE TO TRY TO DO IT, TELL ME AND WE’LL MOVE ON
TO THE NEXT ONE. LET ME EMPHASIZE THAT I WOULD LIKE YOU TO TRY EACH
EXERCISE. BUT I DON’T WANT YOU TO TRY TO DO ANY EXERCISE THAT YOU
FEEL MIGHT BE UNSAFE.
7-79
7.6.1.9
Physical Function Exam Protocol
EXAM I
1.
Check Item. Refer to Age of SP (C1.)
Refer to page one of the Home Examination Form for the SP’s age. If the SP is less than 60 years
of age, check box "1", and do not do the physical function exam. Skip to Section D of the Home
Examination Form. If the SP is 60 or more years of age check box "2", and continue to item C2.
of the Home Examination Form.
2.
Health Status Screener (C2.)
SCRIPT: NEXT I WOULD LIKE TO ASK YOU TO PERFORM SOME EXERCISES WHICH ARE
DESIGNED TO MEASURE PARTICULAR ASPECTS OF MUSCULOSKELETAL
STRENGTH AND FLEXIBILITY.
Ask each examinee:
"DO YOU HAVE ANY PROBLEMS FROM RECENT SURGERY, INJURY, OR OTHER
HEALTH CONDITIONS THAT MIGHT PREVENT YOU FROM STANDING UP FROM A
CHAIR OR WALKING?"
If the answer is "yes", record the most appropriate condition from responses 2-6 on the Home Examination
Form. If "6, other health condition is chosen" specify the health problem or condition in the space
provided. Tell the examinee who says "yes" that after you describe each test to him or her, you will
discuss whether he or she should attempt the test given his or her physical problem. If the examinee is
presently in a wheel chair that answer will take precedence over others. If no problems are mentioned
by the examinee, mark "no apparent restriction."
3.
Shoulder External Rotation (C3.)
Equipment:
None.
Description:
Each hand placed behind the neck at ear level; forearms
parallel to floor and elbows pointing out away from ears.
Assesses strength and motion in shoulders and arms.
Essential Ideas:
1.
2.
3.
4.
7-80
Head erect
Elbows out
Arms straight
Fingers touching
Administration:
The home examiner demonstrates while saying,
SCRIPT: NOW I’D LIKE YOU TO PUT BOTH HANDS BEHIND YOUR NECK AT THE LEVEL OF
YOUR EARS. KEEP YOUR ARMS PARALLEL TO THE FLOOR AND POINT YOUR
ELBOWS OUT TO THE SIDE.
Examinee performs test for both sides simultaneously;
score separately for each side; examinee should be sitting
erect or standing; examiner faces examinee to score this
test.
Scoring:
Fully - performs the shoulder external rotation as
demonstrated and described.
Partially - hand held behind neck, forearm not parallel to
floor or elbow not pointing out to the side; or hand not
held behind neck, forearm held parallel to floor and
elbow pointing out to the side; hands not behind neck,
elbow pointing out to the side and forearm not held
parallel to floor.
Unable - cannot perform any or all of the components of
the movement, or does not attempt for health or physical
reason; or due to cognitive impairment.
Refused - refuses to perform the test or prefers not to for
reasons that are apparently not related to a physical
limitation or health condition.
7-81
4.
Shoulder Internal Rotation (C4.)
Equipment:
None.
Description
Each hand placed behind the back at waist level or
higher (in the small of the back) with fingers touching in
the middle of the back near the spine. Assesses range of
motion in shoulders and arms and the ability to perform
personal hygiene activities.
Essential Idea:
Fingers touching behind small of back.
Administration:
Home examiner demonstrates while saying,
SCRIPT: NOW I’D LIKE YOU TO MOVE YOUR ARMS BEHIND YOUR BACK AND TOUCH
YOUR FINGERS TOGETHER BEHIND YOUR BACK.
Examinee performs test for both sides simultaneously;
score separately for each side; examinee should be
standing; examiner should face the back of the examinee
to score this test.
7-82
Scoring:
Fully - performs the shoulder internal rotation as
demonstrated and described.
Partially - arms moved around to the back of the trunk
but fingers unable to touch at waist level or above; or
unable to reach sufficiently around to back of trunk so
that hand is placed in the middle of the back near the
spine.
Unable - cannot reach around to the back of the trunk
past the side of the body, or does not attempt for health
or physical reason, or due to cognitive impairment.
Refused - refuses to perform the test or prefers not to for
reasons that are apparently not related to a physical
limitation or health condition.
5.
Timed Maneuver - Lock and Key Test of Manual Dexterity (C5.)
Equipment:
Lock mounted in a wooden block and key
Description
Examiner will record whether the examinee can pick up
and hold the key in order to open the lock. The
examiner will then time how long it takes the examinee
to open the lock.
Essential Ideas:
1.
2.
3.
4.
7-83
Key nesting in correct position on board.
SP’s hand by side to start
Start timing when SP moves arms toward key
End timing when bolt first appears
Administration:
Inquire if the examinee normally wears glasses for
reading. If s/he does, instruct him/her to put them on
before doing the lock and key maneuver.
Inquire if examinee uses keys (or used if s/he does not
presently use a key) with right or left hand. Unless
examinee has a major disability in the hand named,
orient the task to the preferred hand.
The examinee should hold the block with the lock flat on
his/her lap. The starting position should be with the
preferred hand by the side, not on the lap. If the
examinee desires, s/he can cradle the block with the nonpreferred hand but should be cautioned not to use the
non-preferred hand to help with the key and to keep the
block flat in the lap at all times.
SCRIPT: NEXT WE WILL BE LOOKING AT YOUR HAND FUNCTION BY ASKING YOU TO
PICK UP A KEY AND OPEN A LOCK.
SHOW ME WHICH HAND YOU WOULD NORMALLY USE TO HOLD A KEY TO OPEN
A LOCK. YOU MAY USE YOUR OTHER HAND TO STEADY THE BLOCK BUT NOT
TO HOLD THE KEY OR HELP YOU TURN THE LOCK. THE BLOCK SHOULD
REMAIN FLAT IN YOUR LAP. LET ME DEMONSTRATE THE PROCEDURE.
(Examiner demonstrates, then places lock on SP’s lap).
ALTHOUGH I WILL BE TIMING YOU, I WOULD LIKE YOU TO MOVE CAREFULLY
AND SMOOTHLY, TRYING NOT TO DROP THE KEY.
DO YOU HAVE ANY QUESTIONS? GOOD. OKAY, WHEN I SAY START, PLEASE
BEGIN.
7-84
Scoring:
Begin timing as examinee goes to pick up key.
a. Ability to pick up the key - examinee will have a
maximum of 30 seconds to pick up key. If the examinee
cannot pick up key within 30 seconds, terminate the test,
thanking him/her for trying. Mark "no" in C5a and "not
done" in C5b and C5c.
b. Ability to hold key - if examinee drops key after
picking it up or if examinee cannot maneuver key to a
position in which s/he can open lock without using the
other hand, mark "no" in C5b and "not done" in C5c.
Reassure the SP but do not repeat the test.
c. For persons able to pick up key and hold key, note
time in seconds to unlock lock in C5C. Record the time
to the nearest tenth of a second. If examinee cannot
open lock within one minute, terminate the test.
End timing when deadbolt appears or at the end of one
minute, whichever comes first.
NOTE:
If the Examinee refuses to perform the
maneuver, mark "refused" in C5a, b, and c.
6.
Check Item - Bedbound (C6.)
This item checks for a physical condition that will limit the SP’s ability to complete the exam.
Refer to item C2. If "5 bedridden" is checked in item C2., mark "1 Yes" in item C6, and skip to
item C12 of the Home Examination Form. If the SP is not bedbound, mark "2 No" and continue
to item C7.
7-85
7.
Single Chair Stand (C7.)
Equipment:
An armless, straight backed chair approximately 45
centimeters high at the front edge and 38 centimeters
deep. The seat should incline no more than a few
degrees from front to back.
Description
Ability to move forward while seated (trunk control),
ability to stand up from a standard chair without using
arms. This exercise is also used to screen for the ability
to do repeated chair stands. Walking aids such as canes,
walker or crutches may not be used.
Essential Ideas:
1.
2.
Administration:
Place the back of the chair against a wall to steady it.
Stand next to the examinee to provide assistance if s/he
loses his/her balance.
No arms if possible
SP should be seated so that feet rest on floor.
a.
If in a wheelchair or confined to a chair, ask" "CAN YOU GET UP FROM YOUR
WHEELCHAIR BY YOURSELF?" If no, mark appropriately and skip to item C11. ("By
yourself" means without assistive devices.)
b.
Use of arms to scoot forward.
Instruct the examinee to sit as far back as possible in the test chair with the feet resting on the floor
and the arms folded across the chest. Explain to the examinee:
7-86
SCRIPT: THE NEXT TESTS MEASURE THE STRENGTH IN YOUR LEGS. FIRST, WOULD YOU
PLEASE FOLD YOUR ARMS ACROSS YOUR CHEST AND MOVE FORWARD IN THE
CHAIR WITHOUT USING YOUR ARMS SO THAT YOU ARE SITTING ABOUT HALFWAY TOWARD THE FRONT OF THE SEAT.
Note: The examinee should end up with his/her knees flexed to about 100 degrees and the
back of his/her buttocks to about the middle of the chair. If he/she cannot move, say,
SCRIPT: O.K., TRY TO MOVE FORWARD USING YOUR ARMS.
c.
Stand up once.
SCRIPT: STAND UP ONCE WITHOUT USING YOUR ARMS.
If examinee cannot stand, say,
O.K., TRY TO STAND UP USING YOUR ARMS.
If examinee still cannot stand, record as unable.
7-87
Scoring:
Record on the data form:
a. Confined to wheelchair or confined to chair.
1. "Yes" - SP able to get up from chair/wheelchair by
his/her self, without assistive devices.
2. "No" - SP unable to rise from chair/wheelchair
unaided.
b. Use of arms to scoot forward
1. "Yes" - Can scoot forward without using arms. For a
"Yes" score it doesn’t matter how the scoot is
accomplished as long as the arms are not used for
support.
2. "No" - Must use arms to scoot forward.
3. "Unable to move" - Unable to move forward even
using arms.
c. Ability to stand
1. "Yes, without arms" - Can stand without using arms.
2. "Yes, with arms" - Can stand but uses arms to push
off.
3. "Unable" - Unable to stand even using arms.
4. "Refused" - Examinee refuses to try the single
chairstand.
NOTE:
If the examinee refuses to try to single chair stand or is unable to stand on his/her own without
using arms to push off, then do NOT attempt to administer the repeated chair stands.
HOWEVER, record the chair height (floor to seat) on the Home Examination Form.
7-88
8.
Repeated Chair Stands (C8.)
Equipment:
Same as for single chair stand. Stopwatch.
Description
Time required to stand up from a chair and sit down in
a chair five times. Measure time with a stopwatch.
Essential Ideas:
1.
2.
3.
Administration:
Ask the examinee to resume the sitting position he/she
was in just before standing up, with the feet resting on
the floor and the arms folded across the chest. Explain
to the examinee:
Begin timing as soon as SP begins to stand
End when SP is fully erect
SP cannot use arms
SCRIPT: PLEASE KEEP YOUR ARMS FOLDED ACROSS YOUR CHEST. WHEN I SAY "READY?
STAND", PLEASE STAND UP STRAIGHT AND THEN SIT DOWN AGAIN AT YOUR
USUAL PACE FIVE TIMES WITHOUT STOPPING IN BETWEEN AND WITHOUT
USING YOUR ARMS TO PUSH OFF. DO YOU THINK YOU CAN DO THAT FOR ME?
Examiner is positioned standing next to the examinee.
When the examinee is properly seated after practicing,
say, READY? STAND. Start the stopwatch as soon as
SP begins to stand. Stop the stopwatch when five stands
have been completed and SP is fully erect or when the
examinee can no longer continue. If the examinee stops
standing/sitting and appears to be fatigued before
completing five stands, confirm this by asking:
CAN YOU CONTINUE?
If he/she says YES continue timing. If he/she says NO,
stop the stopwatch.
7-89
Scoring:
a. - Record the time to the nearest tenth of a second.
- Record the number of stands if the examinee
completes less than five stands.
- If SP refuses to perform repeated chairstands,
check box "777" and skip to item C9.
b. Record the chair height from floor to seat.
9.
Hip Flexion and Knee Flexion (C9.)
Equipment:
Hard, straight-backed chair placed securely facing a wall
if possible.
Description
Leg is lifted up off of the ground so that thigh is at right
angle to trunk and knee is at right angle to thigh while
the examinee stabilizes himself by holding onto the chair.
One leg at a time is tested. Assesses the strength and
motion in hips and legs.
Essential Ideas:
1.
2.
7-90
Lower leg at right angle to thigh
Remember to demonstrate correctly. If examinee
is wearing skirt, adjust as necessary to
demonstrate correct leg position
Administration:
Examinee stands alongside a hard, straight-backed chair
placed securely facing a wall and holds onto the back of
the chair with one hand. Examinee lifts leg up in the air
bending at the hip and knee as described while holding
on to support.
Examiner stands beside the examinee and slightly behind
him/her to observe for possible loss of balance and for
the amount of movement demonstrated at the hip and
knee. Score one leg at a time; the order or hand used to
hold onto the chair is not important.
Examiner demonstrates the exercise and says,
SCRIPT: NOW I’D LIKE YOU TO RAISE YOUR KNEE TO MAKE A RIGHT ANGLE -- LIKE
THIS. DO NOT USE YOUR HANDS OR ARMS TO RAISE YOUR LEG.
Scoring:
Score right and left leg separately.
Fully - able to bend both hip and knee to at least 90
degrees (a right angle);
Partially - leg is lifted from floor but a 90 degree bend
is not demonstrated at both the hip and knee;
Unable - leg cannot be lifted up off floor; or refuses for
health or physical limitation, or due to cognitive
impairment;
Refused - refuses to perform the test or prefers not to for
reasons that are apparently not related to a physical
limitation or health condition.
7-91
10.
Tandem Stand (C10.)
Equipment:
Stopwatch.
Description:
Static tandem balance; the ability to stand and maintain
balance with the feet in a tandem position for 10
seconds.
Precautions:
A few Examinees will be so unsteady on their feet that
the examiner will be concerned for their safety. The
examiner should exercise extra caution with such
Examinees and be prepared to stabilize them. The
examiner should stand near the Examinee at all times to
offer support (only if needed) and to prevent loss of
balance.
Essential Ideas:
1.
2.
3.
4.
5.
Demonstrate correctly
Safeguard SP from falling
Support SP until timing begins
Begin timing when supporting arm is dropped
Feet in correct position
Administration:
1.
Tell the examinee,
SCRIPT: THIS TEST WILL ASSESS YOUR BALANCE. NOW I WOULD LIKE YOU TO TRY TO
STAND WITH THE TOES OF ONE FOOT TOUCHING THE HEEL OF THE OTHER FOOT
FOR ABOUT 10 SECONDS, WITHOUT HOLDING ON.
2.
Examiner should demonstrate the tandem position for the Examinee. The Examinee can
place the heel of either foot in front of the toes of the opposite foot, whichever is easier.
Examiner stands next to the Examinee to help him/her into the tandem position. "Cradle"
the Examinee to prevent loss of balance. Tell the Examinee:
SCRIPT: YOU MAY USE YOUR ARMS, BEND YOUR KNEES, OR MOVE YOUR BODY TO
MAINTAIN YOUR BALANCE, BUT TRY NOT TO MOVE YOUR FEET. TRY TO HOLD
THIS POSITION UNTIL I SAY STOP.
3.
When the Examinee has his/her feet in the tandem position examiner asks the Examinee
if he/she is ready. Withdraw support and start timing as you say START. Examiner
stops the stopwatch after 10 seconds or when the Examinee steps out of position.
7-92
Scoring
11.
4.
Record time to the nearest tenth of a second.
5.
If the participant cannot attain the tandem position at all, or cannot hold it long enough
to begin timing, score "unable."
6.
If the Examinee will not attempt the position but appears able, mark "refused."
Measured Walk (C11.)
If examinee has been observed to walk without the help of
another person, proceed.
If examinee has not been observed, ask "Are you able to
walk alone without holding on to another person? You
may use a cane or walker."
If yes, proceed with measured walk. If needs a cane or
walker, but these are not available, score as "No" and
end examination.
If no, mark appropriately and end examination.
Equipment:
Eight foot gait course laid out with a carpenter’s rule as
in Exhibit 7-9. Lay out the course in an area free of
furniture and with no change in flooring. Use a
doorway, the Home Exam carrying case or some other
object to mark the start and finish lines of the course.
This will provide a line-of-sight guide to the Examinee
and free him/her from having to look down at the floor
during the walk.
Stopwatch.
Description
Time required to walk an 8 foot course to nearest tenth
of a second. Total number of steps required to complete
8 foot course.
Note: Occasionally, an Examinee will be so unsteady on
his/her feet that the examiner will be concerned for the
Examinee’s safety. In all instances the examiner should
be close to the Examinee to support him/her if they
should trip or lose their balance. The examiner may
desire not to perform the test if the Examinee appears to
be in imminent danger of falling, e.g., someone who is
in a wheelchair but wants to try every test. However, as
a general rule each Examinee should be encouraged to
attempt the test. If an Examinee is too unsteady to
perform the test, but tries, the score should be recorded
as "0." If the examiner decides that the test should not
be attempted for safety reasons, this
7-93
Exhibit 7-9. Measured Walk Course
7-94
should be recorded as "0".
Walking aids may be used on this test, but Examinee
must be able to walk without assistance from another
person to perform this test. The Examinee should
preferably wear street shoes, not slippers, during the test.
If a female is wearing shoes with very high heels suggest
that she change into lower ones.
Administration:
SCRIPT: NOW I AM GOING TO TIME YOU AND COUNT YOUR STEPS AS YOU WALK THE
COURSE. I WILL BE ASKING YOU TO WALK THE COURSE TWO TIMES; PLEASE
WALK AT YOUR USUAL PACE AND STOP WHEN YOU GET BEYOND THE ENDING
POINT. THEN I WILL HAVE YOU WALK BACK. The examiner then says, READY?
BEGIN.
Have the Examinee position himself/herself at the
starting line of the course. The examiner then says,
SCRIPT: READY/BEGIN.,
and starts the stopwatch when the first foot hits the floor
across the start line.
The walk is complete when the Examinee’s foot hits the
floor across the finish line. One step is counted when
either foot is placed down on the floor, including the first
step and the step which first takes an examinee’s foot
completely across the end line. Count the number of
total steps taken with both feet during the timed walk.
7-95
Scoring:
a. If the examinee has been observed to walk without
the help of another person, mark box "1 Yes" and skip to
item C11.c. If not, mark box "2 No" and continue to
item C11.b.
b. If the examinee is able to walk using a cane or a
walker, mark box "1 Yes" and continue to item C11.c.
If Examinee is not able to walk alone without help from
another person or needs a cane or walker but these are
not presently available, mark box "2 No" and skip to
item C12.
c. Record the number of seconds to complete the walks
in Trials A and B. Record the time to the nearest tenth
of a second for trials A and/or B. If the SP refused to
complete one or both trials, mark "777, Refused" and
skip to item C12.
d. Record the total number of steps taken to complete
Trials A and B.
SCRIPT: DID YOU HAVE PAIN WHILE YOU WERE WALKING?
e. If the examinee says that s/he experienced pain on
walking, mark yes.
f. Mark the type of floor surface on which the course
was laid out.
g. If a walking aid was used, mark the type of device.
Otherwise, mark none. If you mark "4 Other" specify
the type of device used in the space provided.
12.
Limb Abnormality by Observation (C12.)
Equipment:
None
Description
This section consists of one 3-part question that is
important for recording for conditions that may limit the
completion of the exam.
Administration:
To answer this 3-part question the home examiner should
observe the SP for limb abnormalities including
paralysis, presence of a cast or amputation.
7-96
Scoring:
a.1. Paralysis - Arm: The right and left arm will be
coded separately. Check the "yes" box for right and/or
left arm if the right and/or left arm is paralyzed.
Paralysis for purposes of this study will be the loss or
impairment of motor function in the arm/leg. This
condition will limit the completeness of your examination
and is important to record. Check the "no" box for right
and/or left arm if the right and/or left arm is not
paralyzed.
a.2. Paralysis - Leg: The right and left leg will be
coded separately. Check the "yes" box for right and/or
left leg if the right and/or left leg is paralyzed. Paralysis
for purposes of this study will be the loss or impairment
of motor function in the arm/leg. Check the "no" box for
the right and/or left leg if the right and/or left leg is not
paralyzed.
b.1. Cast - Arm: The right and left arm will be coded
separately. Check the "yes" box for right and/or left arm
if the right and/or left arm has a cast on it. A cast for
purposes of this study will include a soft cast which
cannot be removed or a stiff dressing or casing made of
bandage impregnated with plaster of paris or other
hardening material, used to immobilize the arm or the
leg. This condition will limit the completeness of your
examination and is important to record. Check the "no"
box for the right and/or left arm if the right and/or left
arm has no cast applied to it.
b.2. Cast - Leg: Check the "yes" box for right and/or
left leg if the right and/or left leg has a cast on it. See
definition of cast under "Cast - Arm." This condition
will limit the completeness of your examination and is
important to record. Check the "no" box for the right
and/or left leg if the right and/or left leg has no cast
applied to it.
c.1. Amputee - Arm: The right and left arm will be
coded separately. Check the "yes" box for the right
and/or left arm if the examinee’s right and/or left arm is
amputated. Amputation for purposes of this study will
include removal of the arm from above the elbow. If
only a portion of the arm has been amputated, check the
"no" box and enter in comments (Section J6.b) which
portion of the arm has been amputated. This condition
will limit the completeness of your examination and is
important to record. Check the "no" box for the right
and/or left arm if the right and/or left arm has not been
7-97
amputated.
c.2. Amputee - Leg: The right and left leg will be
coded separately. Check the "yes" box for the right
and/or left leg if the examinee’s right and/or left leg has
been amputated. Amputation for purposes of this study
will include removal of the leg from above the knee. If
only a portion of the leg has been amputated, check the
"no" box and enter in comments (Section J6.b) which
portion of the leg has been amputated. This condition
will limit the completeness of your examination and is
important to record. Check the "no" box for the right
and/or left leg if the right and/or left leg has not been
amputated.
7-98
7.7
Cognitive Testing
7.7.1
Introduction
An additional responsibility of the home examiner is to administer cognitive tests to older
adults. The cognitive evaluation portion of the Home Examination is targeted to adults of age 60 years
and older. In order to obtain valid results, home examiners must follow as closely as possible the testing
protocols given in this manual. The step-by-step specifications for the cognitive tests provide exact
instructions to be given to the respondents. Standardized testing procedures are essential for enhancing
the reliability and validity of the results.
Since the cognitive testing portion directly follows the physical function examination for this
age group, home examiners can build upon the rapport developed earlier in the examination. Note that
Part A of the cognitive function test precedes the questionnaire portion of the Home Examination, and Part
B of the cognitive function test is administered during the questionnaire portion of the Home Examination.
Basic communication skills are necessary to facilitate the establishment of the respondent’s cooperation
for testing. Moreover, the respondent’s attention can be directed toward the cognitive tests by using an
appropriate transitional statement.
In addition to basic communication skills and standardized testing procedures, the home
examiners must familiarize themselves with the content of the cognitive tests and the sequence of testing.
Furthermore, the home examiners need to adhere to specific procedures for recording test data. Since the
cognitive tests are administered individually, it is essential for home examiners to keep careful and
accurate records of the results as each test is being administered. General information is given below on
the following topics:
cognitive tests for adults; sequence of testing; motivating the respondents;
standardized testing procedures; and recording results. More specific information is provided to home
examiners during training, and procedural details are elaborated in Sections 7.7.7, Cognitive Function Part
A, and 7.9, Cognitive Function Part B.
7-99
7.7.2
Cognitive Tests for Older Adults
Cognitive assessment of older participants who are 60 years and over entails the administration
of the following tests:
Fire Story - Cognitive Function Test - Part A
Fire Story Recall - Cognitive Function Test - Part B
The primary objective of this battery of tests is to evaluate cognitive functioning in older adults
and to screen for cognitive impairment in this age group. Proper use of these tests, which are administered
individually, requires the application of standardized testing procedures and careful adherence to the
protocols given in this manual. Since some of the older respondents may have difficulty with these tests,
the interviewer must rely on good rapport to encourage respondents to complete the tests. Again, good
communication skills are essential. The interviewer must have the ability to understand the reasons behind
a given participant’s frustration with the tests and to provide appropriate feedback to ease the frustration.
This skill is indispensable for maximizing test completion.
7.7.3
Sequence of Testing
The sequence of testing is fixed and should be strictly followed to ensure consistency across
interviews. For the eligible respondents the Cognitive Function Test - Part A of the Home Examination
is presented directly after the administration of the physical function examination. The Cognitive Function
Test - Part B is presented directly after the administration of Section E, Selected Conditions/Medicine,
Vitamin and Mineral Usage.
The cognitive testing portion can be presented to the older adults in a nonthreatening manner.
By stating the introductory statement given on the Home Examination Form (Section D), home examiners
may reduce the respondents’ test-taking anxiety. The wording of this transitional statement is important
in directing their attention toward the cognitive tests. Begin this section by stating, "Next we will be
doing a brief exercise dealing with memory. You will find it quite easy."
7-100
7.7.4
Motivating the Respondents
The interviewer provides appropriate transitional statements to direct the respondents’ attention
away from the earlier parts of the Home Examination and toward the cognitive tests. The manner in
which these statements are delivered influences the respondents’ disposition toward test-taking. Hence,
it is important to motivate the respondents to do the best that they can on these tests. Concentration is
critical to enhancing test performance. Ideally, cognitive testing is done in a room that is quiet, wellventilated, and well-lighted in order to ensure optimal testing conditions. While home environments may
vary greatly, be sure to work in a quiet area, separate from any other household members. Cognitive
testing should be done on a one-to-one basis. The presence of any other people can interfere with test
reliability.
As the respondent begins to take tests, the interviewer may provide some positive
reinforcement to encourage completion of the tests. Such comments as "That’s good" or "You’re doing
fine" are appropriate for motivating the respondents to complete each task. However, home examiners
should avoid the overuse of supportive feedback in any way that might bias the results of the testing.
Similarly, the interviewer may feel partial toward certain older respondents, especially those
who seem to encounter difficulty in taking the cognitive tests. Remember the objective is to evaluate the
functional abilities of these adults; the specific tasks involve recognition and recall memory and problemsolving. The interviewer should not prompt respondents in any way that might provide helpful hints.
Items must be presented exactly as they appear in the cognitive testing section. If the respondent does
not answer directly or appears confused, the interviewer should repeat the directions word-for-word and
wait for the respondent to answer. Note that the Fire Story cannot be repeated. If the respondent asks
for clarification or further explanation of what the task involves, home examiners should provide only the
information given in the specifications. During training, home examiners are given more specific details
on how to help SPs who have difficulty completing the cognitive tests. This section should be asked of
all SPs directly even if a proxy answers the intervening questions. All SPs, including those with
Alzheimer’s Disease, should receive this section.
7-101
7.7.5
Standardized Testing Procedures
In order to ascertain valid and reliable test results, it is imperative for home examiners to
understand fully the testing protocols. To ensure standardized testing procedures, each respondent should
receive the same introductions to the cognitive tests and the precise instructions given in the manual. The
nature of the motivational cues and positive reinforcement used by home examiners to encourage test
completion should be consistent. It is important not to show partiality toward any individuals. Basically
feedback should be limited to encouraging maximal effort and in letting respondents know that they are
doing fine.
Visual and hearing problems may require modification of test presentation to ensure that the
respondent can hear and see clearly. Always speak directly to the respondent. If an individual seems to
be having any difficulty hearing, try to speak in a lower octave and slightly louder.
In order to maximize the quality of the data, home examiners must administer the cognitive
tests with a high degree of consistency across respondents. The primary objective is to obtain results that
are directly comparable within each age group. The use of standardized testing procedures provides the
best means to ensure quality control. During training, home examiners can learn and practice the step-bystep procedures for administering the cognitive tests.
7.7.6
Recording Responses
The cognitive tests are administered individually and require accurate recording of responses
and performance evaluations while being administered. Each test requires a specific scoring method, and
home examiners must familiarize themselves thoroughly with the step-by-step procedures that detail
recording instructions for each test.
Overall, the assessment of cognitive functioning involves careful observation and accurate
recording of all relevant information. Home examiners should check the record forms upon completion
of this portion to make sure neither of the items was omitted. It is inappropriate to change or add
responses based on the interviewer’s recollection. Scoring that is altered on the basis of recall is subject
to error and violates standardized practices.
7-102
7.7.7
Cognitive Function - Part A
The cognitive function testing evaluates the respondent’s ability to learn new information rather
than the recall of information acquired in the past. Immediate and delayed memory are examined because
at least three patterns of memory loss may be seen: (1) Information is initially learned but is quickly lost;
(2) information is not initially learned and therefore cannot be recalled; and (3) information is initially
learned, but not reported, and is reported later on delayed recall.
This is a very brief test designed to give a convenient and quick sense of a person’s general
capacity to remember overall ideas. The story the respondent is asked to recall describes a real life
situation in order to interest the listener and minimize the stress of a test atmosphere. This section will
only be administered to SP’s 60 years of age or older.
COGNITIVE FUNCTION TEST - PART A (60+ yrs.)
1
2
D1. CHECK ITEM. REFER TO AGE OF SP.
D2. I’m going to read you a short story and when I’m through
I’m going to wait a few seconds and then ask you to tell me
as much as you can remember.
The story is: SLOWLY
Three children were alone at home and the house caught on fire.
A brave fireman managed to climb in a back window and carry
them to safety. Aside from minor cuts and bruises, all were
well.
less than 60 yrs. (E1)
60+ yrs.
IDEAS PRESENT IN ANSWER
THREE CHILDREN
1
present
2
HOUSE ON FIRE 1
present
2
absent
FIREMAN
CLIMBED IN
1
present
2
absent
CHILDREN
RESCUED
1
present
2
absent
MINOR INJURIES
1
present
2
absent
EVERYONE WELL
1
present
2
absent
7-103
absent
Read the story slowly with expression. Give no cues aside from reading the story. Be sure
the respondent can hear the story as it is read. After finishing the story pause for a few seconds then say:
"Please tell me the story."
While you are entering the information as the respondent recalls the story, establish an attentive,
supportive atmosphere by looking up at the SP and smiling encouragingly as he or she tries to remember
the story. Discourage the SP from irrelevant conversation that may interfere with his or her memory.
Place the questionnaire in such a way that the respondent cannot read what you are entering. Try to
maintain eye contact with the SP as much as possible to minimize the fact that you are recording what
is being said. Do not ask the SP to slow down.
The total score for recall of the story is the total number of ideas present. The highest possible
score is six. Each idea is scored as absent or present. To simplify the scoring procedure the six essential
ideas in the story have been paraphrased as follows:
A.
B.
C.
Three children
House on fire
Fireman came in
D.
E.
F.
Children rescued
Minor injuries
Everyone well
In order for an idea to be classified as present the respondent must either repeat the exact words
given in the story or make a statement which expresses that idea in a similar manner. Synonyms such
as "kids" for "children" or "house" for "home" are acceptable, as are phrases worded differently than the
actual story that mean the same thing ("everyone was all right" for "all were well"). Exact wording is not
as important as the fact that the respondent remembered the general information in the story accurately.
The general content of each idea can be described as follows:
Essential Idea
General Content of Idea
A.
Three children
There were three children.
B.
House on fire
A house was on fire.
C.
Fireman came in
A fireman came into the house.
D.
Children rescued
Children were rescued (or saved).
7-104
E.
Minor injuries
There were injuries (or cuts and bruises) but they weren’t
serious.
F.
Everyone well
The people were okay.
Detailed examples of the scoring procedure are provided below. It is useful to refer to them
on a regular basis when scoring the story. If you encounter examples of which you are still unsure after
reviewing these guidelines, discuss it with your supervisor.
A.
Three children
The fact that children were involved in the story and that there were three of them must
be correctly stated. Below are examples of how relevant responses would be scored.
Three children were in the bedroom = 1
Three boys were caught in a fire = 1
A child was in a house alone = 0
Two little girls alone in a house = 0
The children can be referred to as kids, boys, girls, etc. The exact number of children
(three) must be accurately stated.
B.
House on fire
The fact that there was a house and that it was on fire must be correctly stated. Below
are examples of how relevant responses would be scored.
Three children were alone in a house. Fire broke out. = 1
Room caught on fire = 1
The house got burnt = 1
Three children were in a house alone and caught on fire = 0
A fire broke out = 0
The words house and fire do not have to be in the same sentence; credit can be given if
the house is mentioned in the previous sentence and the location of the fire is implied in
another sentence.
Any words that refer to the fact that people were in a building are acceptable (home,
room, apartment, etc.).
7-105
C.
Fireman came in
The fact that a fireman was involved and that he came into the building must be correctly
stated. The action of the fireman can be indicated by the word "in" along with came or
went, a verb that indicates going in such as "entered," or some statement that says
someone was taken out in a way that makes it obvious that the fireman must have gone
in. Below are examples of how relevant responses would be scored.
Brave fireman entered to rescue them = 1
A fireman had to go through the back door = 1
Fireman brought them out = 1
He took them out = 1
A brave fireman rescued and took out the children = 1
The fireman came = 0
A policeman managed to climb up something = 0
A fireman opened a window and got them out = 0
A courageous fireman saved them = 0
A fireman opened a window = 0
A man came and helped the children = 0
Some good people came to the rescue = 0
A man caught them up = 0
A fireman helped them out = 0
Statements such as "took them out" or "brought them out" receive credit but phrases such
as "brought them to safety" or "took them to safety" do not receive credit because it is
not clear that the fireman went into the building.
D.
Children rescued
The fact that people were rescued and that they were children must be correctly stated.
Below are examples of how relevant responses would be scored.
The fireman saved them = 1
Brave fireman rescued them = 1
The fireman came and saved them = 1
Took them out = 1
Got them out to safety = 1
Some good people came to the rescue = 0
They managed to save themselves = 0
A fireman rescued most of the children to safety = 0
The fact that children were involved can be implied. If the word children has been
mentioned earlier, the pronoun "them" is sufficient to make it clear that the respondent
is referring to the children.
7-106
E.
Minor injuries
The fact that the children were injured but that the injuries were minor must be correctly
stated. Below are examples of how relevant responses would be scored.
All was well aside from a few cuts and bruises = 1
Other than a few scratches = 1
There were no injuries = 0
None were hurt at all = 0
The idea that the injuries were minor can be implied by adjectives such as "only a few,"
"outside of," "except for," "little," "aside from," "all but," "just some," "besides," etc. The
phrase "no major injuries" does not make it clear that there were some injuries, but they
weren’t serious; it therefore does not receive credit.
F.
Everyone well
The fact that the people were basically all right, even though they were hurt a little, must
be correctly stated. Below are examples of how relevant responses would be scored.
They were well = 1
They were okay = 1
They were all right = 1
Fortunately no one was hurt except for bruises = 1
There were cuts and bruises but everything was okay = 1
They were safe = 0
They were saved = 0
All’s well that ends well = 0
The house burned but everything was all right = 0
The children were all safe = 0
Everything turned out well = 0
They all got out well = 0
The idea that everyone was well cannot be implied by the word "safe" or "saved" which
is a restatement of "rescued." It must be clear that people were involved for credit to be
given. A general statement that everything was okay is too ambiguous.
The idea that everyone was well cannot be implied by the idea that the people only had
minor injuries (Ex.7).
A general statement that everything was okay without reference to the fact that it was
people who were all right is too ambiguous. If it is clear that it is "people" who were
okay, even if the statement is a general one, such as "all was fine", then credit can be
given.
Further guidelines and examples for scoring are given in Section 7.9.
7-107
7.8
Selected Conditions/Medicine, Vitamin, and Mineral Usage
This section of the Home Examination Form consists of a brief assessment of selected
conditions pertaining to the SP’s general health and to the use of medicines, vitamins, or minerals by the
respondent during the past 24-28 hours. A brief introduction to the section is sufficient.
SCRIPT: NOW I WOULD LIKE TO ASK YOU A FEW QUESTIONS ABOUT SELECTED HEALTH
PROBLEMS AND YOUR RECENT USE OF MEDICINES, VITAMINS, AND MINERALS.
E1.
Are you now, or have you in the past 3
months been on treatment for anemia?
(Include diet, iron pills, iron shots,
transfusions as treatment.)
1
Y
2
N
9
DK
Item E1 probes to determine whether or not the respondent has received any treatment for
anemia during the past three months. Anemia is a blood disorder that is sometimes referred to as "tired
blood" or "poor blood." Responses should include any treatment during the three-month period whether
or not the respondent is currently receiving treatments for anemia. Treatments include those that can be
self-administered on an ongoing basis (i.e., iron pills) and those which are obtained from a physician or
other health professional or clinic.
E2.
How many infections such as colds, flu,
diarrhea, vomiting, pneumonia, and ear
infections have you had in the past 4
weeks?
00
none
______ infections
no.
The second item in this section is targeted toward the assessment of the frequency of viral
and/or bacterial infections. Common types of viral and bacterial infections are named in the question to
ensure that the respondent understands the meaning of the term, "infections." The time period is limited
to the past four weeks. A calendar may be used to help the respondent focus on this particular time frame.
7-108
E3.
How many times have you donated in the
past 12 months?
00 none (E5)
______ times
no.
Item E3 asks the respondent to indicate the number of times s/he donated blood during the past
12 months. Those SPs who have not made a blood donation during the past year are skipped to item E5.
E4.
How long ago was your last blood
donation?
00
less than one month ago
______ months ago
no.
Respondents who have donated blood in the previous year are asked to indicate how many
months ago that their last blood donation occurred.
E5.
Are you currently trying to lose weight?
1
Y 2
N
Item E5 assesses whether or not the respondent is currently trying to lose weight. Only a "yes"
or "no" response is needed; the question does not probe to identify in what way the respondent is
attempting to lose weight or alter his/her appetite.
The next part of this section is concerned with the use of medicines, vitamins, or minerals
during the past 24-28 hours. Note that the introductory statement to these next three items is contained
at the beginning of Section E and does not need to be repeated. Simply continue asking these items in
the order in which they appear on the questionnaire.
7-109
E6.
Have you taken or used any antihistamine
medicines in the past 2 days?
(Antihistamines are medicines taken for
symptoms like sneezing and a runny or
itchy nose.)
1
Y 2
N
Item E6 refers to the use of antihistamines. Note that a definition is provided on the form; this
statement may be read to the respondent to clarify what medicines are to be included in the response.
Antihistamines are medicines taken for symptoms like sneezing and a running or itchy nose. The
respondent should include both prescription and nonprescription antihistamine medicines. Be sure to
emphasize the time period, which is only the past 48 hours.
E7.
Prescription medicines are medicines that
cannot be obtained without a doctor’s or
dentist’s prescription.
1
Y 2
N
Item E7 asks directly whether or not any prescription medicines have been taken in the past
24 hours. This definition is read to every respondent to emphasize that prescription medicines are those
medicines which cannot be obtained without a doctor’s or dentist’s prescription.
E8.
Have you taken any vitamins or minerals
during the past 24 hours?
1
Y 2
N
Finally, item E8 simply asks the SP to indicate whether or not s/he has taken any vitamins or
minerals during the past 24 hours.
Note that items E6-E8 require only a simple "yes" or "no" response and that the SP need not
name the particular medicine, vitamin, or mineral taken. However, if an SP volunteers any information
specifying a particular medicine, note the name(s) given in the margin to the right of the response column.
If the respondent tries to recall the name(s) of a particular medicine and is distracted by not being able
to think of or pronounce the name of the medicine, simply tell the SP that we only need to know whether
or not any antihistamine, other prescription medicine, vitamins, or minerals were taken in the specified
time periods.
7-110
7.9
Cognitive Function - Part B
This test evaluates delayed recall of the story. As with the previous test regarding the story,
this test is only administered to SPs who are 65 years of age or older.
COGNITIVE FUNCTION TEST - PART B (60+ yrs.)
1
2
F1.CHECK ITEM. REFER TO AGE OF SP.
F2.
less than 60 yrs. (G1)
60+ yrs. (F2)
Please recall that story I read you a few
moments ago and tell me as much as you can
remember
of the story.
IDEAS PRESENT IN ANSWER
THREE CHILDREN
1
present
2
The story is: SLOWLY
Three children were alone at home and the house
caught on fire. A brave fireman managed to climb in a
back window and carry them to safety. Aside from
minor cuts and bruises, all were well.
HOUSE ON FIRE 1
present
2
absent
FIREMAN
CLIMBED IN
1
present
2
absent
CHILDREN
RESCUED
1
present
2
absent
MINOR INJURIES
1
present
2
absent
EVERYONE WELL
1
present
2
absent
absent
Record and score the delayed recall in a manner identical to the immediate recall (see Section
7.7.7). General guidelines and examples for scoring are also given in the following pages.
7-111
GENERAL GUIDELINES
The context in which a statement is made can determine whether credit is given or not:
1.
Sometimes one idea is implied in a previous statement. For example, in the response "There
were three children in the house. A fire broke out", the idea "Three children" receives 1 point,
and "House on fire" also receives 1 point because "house" is implied by the first sentence and
"fire" is stated in the second. Whereas, "Fire broke out" alone, receives no credit.
2.
Sometimes two ideas must be stated together to clarify the ambiguity in one of the statements.
For example, in the response "There were some cuts, but everything was okay", the phrase
"There were some cuts (or bruises)" implies "Minor injuries" and receives 1 point. The two
statements together make it clear that "everything" refers to people or their injuries, so that
"Everyone well" also receives 1 point. Whereas, the statement "Everything was okay" alone,
without reference to people or injuries, would receive no credit. Similarly, in the response
"There were injuries, but everyone was alright", both "minor injuries" and "Everyone well"
receive 1 point. The fact that injuries were minor is implied in the statement "but everyone
was alright."
3.
Sometimes the adjectives in a statement clarify the scoring. For example, the idea that injuries
were minor can be implied by adjectives such as "little", "only a few" or "just some" when said
before "injuries". Similarly, "outside of", "aside from", "all but", "besides" or "except for" said
before "a few injuries" also receives 1 point because it implies the injuries were minor.
Whereas, the statement "There were a few injuries" alone receives no credit.
4.
Sometimes the completion of an idea is implied in a subsequent statement. For example, in
the response "A fireman came and took the children out", the idea "Children rescued" receives
1 point. "The fireman came in" also receives 1 point because "in" is implied in the statement
"A fireman came and took (the children) out." Whereas the statement "The fireman opened
a window and got them out to safety" remains ambiguous and does not necessarily imply that
the fireman came in. The first idea would receive no credit, but the second idea, "Children
rescued", would receive 1 point. Likewise, the statement "A fireman came" alone receives no
credit.
There is no penalty if the respondent adds irrelevant elaborations to the story, for example "The fireman
was a very nice man".
7-112
SAMPLE STATEMENTS
Specific Examples of Scoring
Sample Statement
Essential Idea
Score
1.
There were children in a house.
Three children
0
2.
There were 2 children in the house.
Three children
0
3.
Fire broke out (See #5).
House on fire
0
4.
There was a fire (See #5).
House on fire
0
5.
There were 3 children in the house. Fire broke
out.
Three children
House on fire
1
1
6.
The fireman came.
Fireman came in
0
7.
The fireman climbed to the top of the house.
Fireman came in
0
8.
The children were brought to safety.
Children rescued
1
9.
The children were saved.
Children rescued
1
10.
Everyone was saved.
Children rescued
1
Fireman came in
Children rescued
0
1
Minor injuries
1
Minor injuries
1
Minor injuries
1
Minor injuries
0
Everyone well
0
Everyone well
0
Minor injuries
Everyone well
1
1
Minor injuries
Everyone well
0
0
11.
The fireman saved them.
12.
The children weren’t burnt badly.
13.
They had some scratches.
14.
They just had a few injuries.
15.
They were injured.
16.
Everything was okay.
17.
All’s well that ends well.
18.
Everything was okay except for
some cuts and bruises.
19.
No one was hurt at all.
7-113
7.10
Tobacco
This section (G) consists of only four questions to determine current use of tobacco. A simple
introductory statement should be given to the SP to orient them toward this section. Briefly state the
introduction which is printed on the Home Examination form.
SCRIPT: NOW I WOULD LIKE TO ASK YOU A FEW QUESTIONS ABOUT TOBACCO USE.
G1.
How many cigarettes have you smoked in
the past 5 days?
000 none
______ cigarettes
no.
Question G1 is asked of all respondents to determine the number of cigarettes smoked in the
past five days. If the respondent gives you the number of cigarettes smoked each day, repeat the same
question and preface it by saying, "Overall, how many cigarettes did you smoke in the past 5 days?" If
the respondent gives a range, for example, 10 to 15, ask him/her to specify the best estimate for the past
5 days. If the SP uses none, mark the appropriate box and proceed to item G2.
G2.
How many pipes and how many cigars
have you smoked in the past 5 days?
000 none
_________ pipes and ________ cigars
number
number
The second item in this section is very similar to the first item only this question refers
specifically to the use of tobacco in the form of smoking pipes or cigars. Again, be sure that you obtain
the overall number of pipes and/or cigars smoked during the past five days. Specify which form of
tobacco the SP used by recording the number on the appropriate line before the word, "pipes" or "cigars."
If the respondent smoked both types, be sure to obtain the number of each type and record it on the
appropriate line. Again, if the SP smoked "none" of these, mark the correct box and proceed to the next
item.
7-114
G3.
How many containers of chewing tobacco
or snuff have you used in the past 5 days?
000 none
666 less than 1 container/package
______ containers/pkgs.
no.
Question G3 is asked of all respondents to determine how much chewing tobacco or snuff, if
any, has been used in the past five days. Again, be sure to obtain the overall number of containers or
packages used in the past five days. If the SP answers "no" to item G3, proceed to item G4. Chewing
tobacco or snuff are tobacco containing products that are taken by mouth or, rarely, by nose. The tobacco
is not burned.
G4.
How many pieces of nicotine gum have you
chewed in the past 5 days? (Nicotine gum
is a sugar-free flavored chewing gum
prescribed by a doctor to help people stop
smoking or chewing tobacco
000
none
______ pieces
no.
Question G4 asks about the use of nicotine gum during the past five days. If the respondent
asks for a definition of nicotine gum, define it as a "sugar-free flavored chewing gum prescribed by a
doctor to help people stop smoking or chewing tobacco".
7-115
7.11
Reproductive Health
The major purpose of this section is to obtain information on reproductive health and pregnancy
history from female SPs. Note that the section begins with a check item.
H1.
1
2
CHECK ITEM. REFER TO SEX OF SP.
male (J1)
female
Simply indicate the sex of the SP. For male SPs, skip to the next section; for females SPs,
proceed to item H2. Be sure to read the female respondents the introductory statement given in H2 before
asking the question.
SCRIPT: THE NEXT QUESTIONS ASK ABOUT YOUR PERIODS OR MENSTRUAL CYCLE AND
ABOUT PREGNANCY.
Note that female SPs who have not yet started their menstrual cycles are skipped to the next
section in item H2. Female SPs who give the age of first menses are skipped to item H4. Female SPs
who cannot recall the age at which menstruation began are asked item H3.
H2.
How old were you when your periods or
menstrual cycles started?
00
haven’t started yet (J1)
______ (H4)
age
99
DK (H3)
For female SPs who have started their periods, be sure to record the age in years at which
menstruation began. If an SP cannot recall her age when her periods began, ask item H3.
H3.
Were you younger than 10, 10 to 12, 13 to
15, or 16 or older?
1
2
3
4
9
younger than 10
10-12
13-15
16+
DK
Item H3 helps clarify a best estimate for the age at first menses. Read the question verbatim,
emphasizing the age groups and be sure to record which age group best estimates the SP’s age when her
menstrual cycle began.
7-116
The items throughout this section are very sensitive in nature and it is important to ask them
in a neutral and professional manner. Never act surprised, disappointed, or annoyed by the information
given. Remember that reassurance of confidentiality may facilitate obtaining the cooperation of hesitant
respondents.
Throughout this section, we are asking respondents for detailed information covering long
periods of time. This section may require considerable probing. Some general guidelines for obtaining
this information are as follows:
If the respondent has trouble remembering dates, probe by citing special historical or
personal events.
Obtain as complete and accurate information as possible. If exact dates and treatments
cannot be remembered, get as much information as you can.
H4.
Have you had a period in the past 12
months?
1
Y
2
N (H7)
9
DK (H7)
Item H4 asks whether or not the respondent has had a period in the past 12 months. Probe to
clarify whether or not the respondent has had any bleeding or spotting in the last 12 months. Negative
or "don’t know" responses necessitate a skip to item H7; otherwise ask H5.
H5.
About how long ago was your last period?
1
2
3
4
5
6
having it now (H11)
less than 2 months ago (H11)
2-3 months
4-6 months
(H6)
7-9 months
10-12 months
If necessary, provide a calendar of the past 12 months to assist the respondent in answering
item H5. Try to obtain as accurate an answer as possible. Follow the designated skip patterns precisely
to avoid asking inappropriate followup items.
7-117
H6.
ASK SP TO LOOK AT CHART AND
ASK:
SHOW CARD 1
1 pregnant now (H11)
2 breastfeeding (H11)
3 menopausal (H9)
4 on chemotherapy or radiation (H9)
5 other (H9)
9 DK (H9)
What is the reason you have not had a
period in the past (ANSWER IN H5)?
The next question (H6) requires the use of a hand card. Show Card 1 and ask the respondent
to indicate only one reason for not having a period in the interval given in response to item H5. If more
than one reason is given, mark the first applicable response. This item attempts to differentiate natural
menopause or cessation of periods due to surgery or medical treatment. Menopause and "change of life"
are the same thing. Do not read the response options to the respondent. Note that women who are
currently pregnant or breastfeeding are skipped to item H11. For all other responses given, skip to item
H9.
H7.
About how old were you when you had
your last period?
_______ (H9)
age
99
DK (H8)
Item H7 simply asks the respondent’s age in years at the time that her last period occurred.
Some respondents may remember this by a date or year. If this occurs, help the respondent convert this
to an age in years. If the respondent cannot remember her exact age, obtain a "best estimate."
H8.
Were you younger than 20, 20 to 29, 30 to
39, 40 to 44, 45 to 49, 50 to 54, or 55 or
older?
1
2
3
4
5
6
7
9
younger than 20
20-29
30-39
40-44
45-49
50-54
55 +
DK
Item H8, which is asked only of SPs who cannot recall they were when they had their last
period, provides a "best estimate." Read the item verbatim, emphasizing the age groups given in the
question. Mark the response which indicates the SP’s "best estimate."
7-118
H9.
Have you had a hysterectomy? DEFINE IF
NECESSARY:
Has your uterus been removed?
1
Y 2
N (H11)
9
DK (H11)
The next several questions (H9-H13) refer to reproductive surgery. Item H9 asks whether or
not the SP has had a hysterectomy. If the respondent is uncertain of the term, define it by asking, "Has
your uterus been removed?" Note that a tubal ligation would not be counted as a positive response to this
item. For negative or "don’t know" responses, skip to item H11; otherwise ask H10.
H10.
How old were you when you had your
(hysterectomy/uterus removed)?
_______
age
Item H10 requires the SP to recall her age in years when she had a hysterectomy. Encourage
the respondent to be as precise as possible in recalling her age at the time of surgery.
H11.
Have you had one or both your ovaries
removed (either when you had your uterus
removed or at another time)?
1
Y
2
N (H14)
9
DK (H14)
In the next question, the SP is asked whether or not she has had one or both of her ovaries
removed. An operation to remove the ovaries is called an oophorectomy. It is possible to have both
ovaries removed, only one ovary removed, or only a part of an ovary removed. If only part of an ovary
was removed, check "N", and record a comment to that effect before following the skip pattern. Negative
and "don’t know" responses require a skip as indicated to item H14.
H12.
Were both ovaries removed or only one?
1
2
9
one
both
DK
The followup question in item H12 permits a specification of whether one or both ovaries were
removed. A "DK" category is provided in case the SP simply does not know.
7-119
H13.
How old were you when you had the
(ovary/ovaries) removed?
IF EACH OVARY REMOVED AT
DIFFERENT AGE, RECORD AGE
SECOND OVARY REMOVED.
______
age
99
DK
Finally, item H13 requires information on the age at the time of surgery. If both ovaries were
removed for a given SP, and the ovaries were removed at different times, record the age at the time of
removal of the secondary ovary.
The next set of questions pertains to the use of birth control pills, both past and current usage.
Be sure to read the introductory statement before asking item H14.
SCRIPT: NOW I’M GOING TO ASK YOU ABOUT YOUR PAST AND CURRENT USE OF
FEMALE HORMONES, IN INCLUDING BIRTH CONTROL PILLS AND ESTROGEN.
H14.
Have you ever taken birth control pills for
any reason?
1
Y 2
N (H18)
For SPs who have never taken birth control pills, skip to item H18; otherwise, proceed with
item H15. Remember that these items may be considered sensitive to some women due to their religion
or for other reasons. It may be necessary, therefore, to reiterate confidentiality of their responses and the
importance of the information to our research on health. These items are specific to birth control pills and
exclude other forms of contraception.
H15.
How old were you when you began taking
birth control pills?
______
age
99
DK
Item H15 requires the SP to recall her age when she first began taking birth control pills.
Allow sufficient time for the SP to respond accurately.
7-120
H16.
How long ago did you stop taking birth
control pills or are you still taking them?
000
still taking now
1 days
_____
2 weeks
number
3 months
4 years
999 DK
This question asks whether or not the SP is still taking birth control pills, and, if not, to indicate
the number of days, weeks, months, or years ago at which she stopped taking the pill. Note that a normal
cycle of birth control pill use is to take one pill per day for approximately 21 days, followed by 7 days
when no pills are taken. Other brands of birth control pills may be taken at different intervals. It is
possible for a woman in the "no pill" phase of a cycle to report that she has stopped taking the pill.
However, since this is a normal break in the cycle of use, item H16 permits a distinction to be made.
H17.
Not counting any times when you stopped
taking them, for how long altogether (have
you taken/did you take) birth control pills?
000
less than one month
_____
1 months
number
2 years
999 DK
In item H17, allow ample time for the SP to answer the question accurately. If the SP has
started and stopped using the pill several times, ask her to try to subtract out time periods when she was
not on the pill so that her response reflects only the actual time of using oral contraceptives. Be sure to
enter the number and to indicate whether it refers to months or years of use.
H18.
CHECK ITEM. REFER TO H5 AND H6.
MARK FIRST APPLICABLE BOX.
1
2
3
period now or within last 2 months
in H5 (J1)
pregnant now or breastfeeding
in H6 (J1)
other (H19)
The next item in this section is a check item. As instructed, refer to H5 and H6 and mark the
first applicable response option. If the SP is currently having her period or has had it within the last two
months, mark the first response option, and skip to the next section. If the SP is currently pregnant or
breastfeeding, mark the second option, and skip to the next section; otherwise mark the third response and
go on to item H19.
7-121
H19.
Have you ever taken or used estrogen or
female hormones in any form? Include
pills, vaginal cream, suppositories,
injections, or skin patches.
1
Y
2
N (J1)
9
DK (J1)
Item H19 refers to the use of estrogen replacement therapy in any form. There are a number
of existing forms of hormone replacement therapy. One form is hormone pills (e.g., estrogen, premarin)
which are prescribed by a doctor and taken orally to replace female estrogen. Another form of hormone
therapy involves the use of vaginal cream or suppositories. Two other forms include the use of female
hormone injections or skin patches to replace female estrogen. Item H19 assesses whether or not a woman
has taken any of these forms of hormone replacement therapy.
Positive responses require the
administration of items H20 through H22 which are followup questions pertaining to the therapy. SPs
who respond with a "no" or "don’t know" in answer to item H19 are skipped to the next section.
H20. How old were you when you first took or
used the estrogen or female hormones?
______
age
99 DK
For those SPs who have received hormone replacement therapy, or are currently receiving
treatment, item H20 ascertains the age at which therapy began. Be sure to record the age in years when
the SP first began taking or using estrogen or hormones. Probe to determine as accurate a response as
possible. If the SP has taken two or more forms of replacement therapy, record the age at which she first
took any form of estrogen or hormones.
H21.
How long ago did you stop taking or using
the estrogen or female hormones, or are
you still taking or using them?
000
666
still taking/using now
less than 1 month ago
______
number
1 months
2 years
999 DK
Another important followup question in this series is item H21 which probes to determine how
long ago the SP stopped taking estrogen or hormones. Note that if an SP is currently or therapy,
7-122
mark the response option "still taking." Otherwise, ascertain the number of days, weeks, months, or years
ago that the SP stopped taking the hormones and enter that amount on the appropriate line. Be sure to
indicate the interval to which this number refers.
H22. Not counting any time when you stopped,
for how many years altogether did you take or use
female hormones?
00
less than one year
______
number
99
DK
Finally, item H22 requires a summation of the total number of months or years during which
female hormones were taken. If the SP has stopped and started different forms of estrogen replacement
therapy, subtract out any time during which she was not taking any form of replacement in order to obtain
an accurate response as possible. Allow sufficient time for the SP to recall this information and assist her
in any way that is helpful. Be sure to indicate "months" or "years" after entering the number on the
appropriate line.
7-123
7.12
Spirometry Home Examination
7.12.1
Introduction
Spirometry is an important component of the NHANES III home examination. Through the use
of portable spirometers, it will be possible to obtain pulmonary function information for a variety of
examinees who would otherwise not be included in the survey. NHANES III is the first of the HANES
surveys to offer spirometry in the home.
The home spirometry exam is included in the NHANES III examination for the same reasons
spirometry is part of the MEC exam: to obtain data for national estimates of the distribution of pulmonary
function, and the prevalence of impaired function and chronic obstructive pulmonary disease (COPD) in
a representative sample.
Spirometry in the home will not be obtained on children as the eligible age group is too young
to perform spirometry. However, pulmonary function tests will be obtained on all adults over 20 years of
age, thus providing the survey with additional data for an otherwise unavailable population. The
information on elderly SPs will be especially valuable as NHANES III will be the first HANES survey
to include elderly individuals over 75 years of age.
Data collected from home spirometry exams will be analyzed separately from MEC exams.
Since the equipment and testing conditions are entirely different, the home spirometry data cannot be
compared directly to data from the MEC exams, but the home examination data will provide valuable
information about pulmonary status.
This section of the Home Examination Manual has been adapted from the PJ5 Spirometer
Manual produced by NIOSH.
7.12.2
Equipment
Spirometry home examinations will be conducted with the PJ5 Spirometer. This unit features
a hand-held pneumotachograph (flow or pressure sensing device), automated calibration and operation,
7-124
computerized assessments of spirometric curves and a real time LCD display of flow vs. volume curves.
7.12.2.1
Description of Equipment and Supplies
The PJ5 Spirometer is a lightweight spirometry system with microcomputer.
The
pneumotachograph (flow device) is manufactured by TAMARAC with modifications made by the NIOSH
laboratory. The notebook computer is manufactured by COMPAQ. The unit is powered by electricity
and can be operated by battery when a power source is not available. A hand-pneumotachograph is used
to determine flow from which volume can be calculated.
The principle difference between the NIOSH PJ5 Spirometer and the NIOSH HF4 spirometer
used on the MEC is the manner in which the spirometers measure expired air. The PJ5 unit is able to
sense flow by measuring the change in pressure when air passes through a ceramic mesh. Expired
volumes from this unit are obtained through electronic integration of the flow signal with respect to time.
The HF4 spirometer measures volume by means of an optical encoder used to accurately measure the
position of the shaft which moves when air is exhaled into the spirometer, which is then used to calculate
other values. The software of both systems are very similar. With proper calibration procedures both
spirometers have been found to be very accurate and reliable systems.
NOTE: Both systems use a calculated correction for BTPS (Body Temperature and
Pressure Saturated). Tamarac recommends that 30% of the BTPS correction factor be
used to correct expiratory values.
Equipment and supplies for the PJ5 include:
-
TAMARAC (flow sensor or pneumotachograph)
Expandable cable to connect flow sensor to the computer
COMPAQ LTE (notebook computer)
AC power cord
AC adapter
Slipcase
2 3½ inch diskettes (labelled)
3 liter calibration syringe
Disposable mouthpieces
Nose clips
Thermometer for room temperature (either in degrees C or F) (It should be attached to
the flow sensors expandable cable)
7-125
-
7.12.2.2
Altimeter barometer, mercury barometer (or BP obtained from MEC)
Filters (originally used with the RIKO and cut to fit the sensor)
Needle-nose pliers (for removing filters from flow sensor)
Spirometer log sheet
Ammonia inhalants
Alcohol
Gauze pads
Facial tissue
PJ5 Home Spirometer Manual
Carrying case
Setting up the PJ5 Spirometer
The PJ5 unit will be shipped in a 25 lb. shipping case to the MEC from NIOSH at the
beginning of each stand. It should be stored at the field office, in its carrying case, which when fully
packed weighs approximately fourteen pounds.
User Installation Requirements
7.12.2.2.1.
Set-up Area
The unit requires very little space (1’ by 1’2") and should be placed on a stable surface at table
height or higher.
7.12.2.2.2.
Environmental Conditions
The spirometry testing area should be relatively dust free, private, with a stable electrical
supply, and a stable temperature which should be between 17 C and 40 C.
7-126
7.12.2.2.3.
Electrical Requirements
The instrument requires conventional electrical power (110 - 120 v). The power cord should
be plugged into a properly grounded electrical wall receptacle. If a grounded electrical wall receptacle
is not available, the unit should be operated using battery power. The battery is rechargeable, and should
be kept fully charged at all times.
7.12.2.2.4 Warm Up Period
The flow sensor should be allowed to warm up for ten minutes, with the power on, before the
unit is calibrated and used for testing purposes.
7.12.2.2.5 Spirometer Set-up
NOTE: Computer must be turned off during setup.
A.
The Computer
(1)
Open the panel on the back of the computer.
(2)
Plug the AC adapter cord into the AC adapter connector on the rear panel of the
computer (arrow up).
(3)
Plug the AC power cord into the AC adapter.
(4)
Plug the pronged connector of the AC power cord into a properly grounded AC
outlet.
7-127
B.
C.
D.
E.
Flow Sensor
(1)
Attach the external battery pack to PJ9 pin receptacle located in the back of the
computer. Secure using locking screws on the cable connector.
(2)
Attach clip end of expandable cable to rear of the flow sensor (pneumotach).
(3)
Attach other end of expandable cable to the top of the external battery pack and
secure cable using locking screws on cable connector.
(4)
Place a clean filter in front of the screen on the mouthpiece end of the flow
sensor. Make sure that it is not bunched-up and that you do not scratch the
screen when either removing or replacing the filter. (The filters are too large for
the PJ5 mouthpiece and should be cut to fit the flow sensor.)
Opening the Computer
(1)
With the front of the computer facing you, slide the latches on the sides toward
the front of the computer to release the display.
(2)
Raise the display and tilt it to a comfortable viewing position.
Power-up the Computer
(1)
Turn the power on the computer. It takes only a few seconds for the computer
to "boot." Brightness and/or contrast controls may be adjusted.
(2)
Make corrections if necessary to date and time or press ENTER key to both of
these prompts if no changes are needed.
(3)
The flow sensor will be turned on when C:\HOME> is displayed on the screen.
The message "power turned on flow sensor." will be displayed at the top of the
screen. [If missing this message the PJ5 program will power up the sensor.
Complete the session then call the NIOSH lab.]
(4)
Wait 10 minutes before starting the PJ program.
Load Disk
If a new 3½ inch diskette is to be used, fill out a label and attach it to the diskette.
(a)
The label should include study name and number (i.e., NHANE139); stand or
study location (city and state); date when diskette first used; date when diskette
last used; if more than one disk is used at one site, number disk; and the system
type and sensor code (i.e., PJ5 F9 02).
7-128
Insert labeled diskette into the drive. If inserted properly the diskette will drop into place
and the drive button will pop out.
F.
Log Sheet
A log is to be kept on all information on the disk. A new sheet is to be used with each
new disk. See Exhibit 7-10 for a copy of the Spirometry Log Sheet.
7.12.2.2.6 Start PJ5 Program
A.
About ten minutes after the computer has been turned on, type PJ5 and press the Enter
key.
B.
The temperature of the flow sensor will be displayed on the screen. At this time you
should make sure that the sensor’s internal thermometer is working. The thermometer
attached to the sensor’s expandable cable should be within 4 degrees of the temperature
displayed on the screen (internal temp).
NOTE: ‘CR’ stands for Carriage Return key or the Enter key. For example, CR=Y
means the Enter key is the same as typing Y plus the Enter key.
7.12.2.2.7 Computer Inquiries
To move from one question to another, use UP or DOWN arrows, ENTER key or TAB key.
"First Two Characters of Sensor Code (e.g., FE):"
Enter the first two characters found on the bottom of the flow device called the Sensor
Code (e.g., F8).
"Second Two Characters of the Sensor Code (e.g., 01)"
Enter the two digit code found on the bottom of the flow device called Sensor Code.
7-129
Exhibit 7-10. NIOSH Spirometry Log Sheet
7-130
"Study Name (8 chars. max):"
Enter the stand number or assigned study number when asked for Study Name (e.g.,
NHANE141).
"Your Technician ID Number"
Enter your ID Number. If you were not assigned a number use 999 until you can be
issued an ID.
"Barometric pressure (mmhg or inches):"
Enter the barometric pressure.
"Room temperature (i.e., 25): - - - - - - - - "
a.
Enter the temperature displayed on the screen. The only exception would be if
the sensor temperature (displayed temperature) is 4 degrees or more below the
thermometer temperature on the cable, then the cable temperature should be
entered.
Press the ESC key when all entries are correct.
"Wait, getting calibration data."
"Note: the flow sensor was calibrated on - - - - - - - - "
"Please check the sensor and verify this calibration date."
"If the dates do not agree, notify NIOSH CIB after testing."
The flow sensor calibration date is on the bottom of the sensor.
If the dates don’t agree, the calibration percent differences may be greater than + or - 3
percent. Complete the session, then call NIOSH.
"Wait - Generating calibration look-up table (18 sec). reading disk drive."
7-131
The program will check the hard disk drive for space available for spirometry curves.
xxxxxxxxxx
bytes free, out of xxxxxxxxxx
total bytes on disk drive c:
Room for xxxxxxxxxx
curves on disk drive c:
"Continue? (CR, Y or N):"
Press the Enter key if there is enough room on the disk to complete the session. (Allow at
least 10 curves space per subject or SP). If there isn’t enough space to complete the session, call the
NIOSH.
The following files on stand _____________ are present:
file name
date time # of curves
Save copy of data on floppy? (CR=Y or N)
Always store a copy of the data on the 3½" floppy disk. Respond Y or CR to this question.
Wait, reading disk drive
xxxxxxxxxx
bytes free, out of xxxxxxxxxx
Room for 650 curves on disk drive a:
total bytes on disk drive a:
You may change floppy in drive a: at this time and type N to try again or (CR, Y or N):
Continue? (CR, Y or N):
Press the Enter key if there is enough room on the floppy disk to complete the session. (Allow
at least 10 curves space per subject or SP). If there isn’t enough space to complete the session, change
the disk and start a new log sheet.
7-132
7.12.2.2.8 Syringe Calibration
"Do you wish to perform a syringe calibration? (CR=Y):"
Respond by pressing Enter. Syringe calibration must be done at the start of each session
or any time the computer spirometry program is started.
You need to zero the flow sensor. Make sure no air is flowing through the sensor. Type
any key when ready:"
This means that" (1) you are not holding the sensor; (2) the syringe is not connected to
the sensor; (3) no air is being blown or moved through the sensor.
A line will move across the screen as the system establishes zero.
Do not type or move sensor until the next message is displayed on the screen.
"Enter 3 liter syringe volume (i.e., 3000):"
Enter either 3 or 3000.
Attach a full syringe, then: empty the syringe into spirometer at beep, wait then
withdraw volume. Perform this maneuver 3 times within 20 seconds."
"Type any key to start syringe calibration."
The calibration screen is divided into push (empty syringe) and pull (fill syringe columns,
or time lines. Each excursion should be done at different rates (fast, medium and slow)
within the time allotted by the columns. The maneuver should be performed three times
within 20 seconds.
7-133
NOTE: The flow sensor must be kept in an upright position. Measurement errors will
occur if the sensor is titled from side to side. Nothing should obstruct the flow exiting the
sensor.
Push
Pull
Push
Pull
Push
Pull
STOP
START
"Save calibration (Y or N):"
If excursions were done without any problem which could cause incorrect calibration,
respond Y to this question.
If a problem occurred during this procedure press N and repeat the calibration.
"Repeat Syringe Calibration? (Y or N):"
The difference should not be greater than + 3%.
If not within this range repeat the syringe calibration.
If the date the flow sensor was calibrated (displayed earlier in the program and the sensor
date) is not the same, the percent differences may be greater than + or - 3%. If this
happens there would be no reason to repeat the calibration. Save all syringe calibration
data. Complete the session then call NIOSH.
"End of Session? (CR=N):"
Respond Enter to this question.
"You need to zero the flow sensor. Make sure no air is flowing through the sensor. Type
any key when ready:"
Type any key. System will check zero again. Do not type until check is complete.
7-134
Choose menu selection:
Syringe Calibration Check
Enter New Subject Data
Obtain Flow Volume Curve
Monitor Zero & Temperature
Exit Program
The Cursor will default to the "E" for "Enter New Subject Data." Press the Enter key to
begin SP or tech testing and to enter demographic information. Use the "space bar" key
to move through menu to change selection.
NOTE: "Obtain Flow Volume Curve" and "Monitor Zero & Temperature" are used
for NIOSH maintenance.
7.12.2.2.9 Patient Information
Enter New Subject Information, Sensor Temperature: 22 C
Tech ID: _____
Subject’s ID:
Replicate ID:
Subject’s Age:
Subject’s Ht:
Subject’s Sex (M or F):
Hispanic Origin (Y or N):
Race Code:
Race Codes: 0=White 1=Black 2-Asian/Pacific
3=Am Indian/Eskimo 4=Other
Shift Code: 0
Enter value followed by TAB, Enter, or UP (DOWN) arrow key.
Press Tab key to go to next field.
Press ESC key when all values have been entered correctly.
Enter patient information as requested by the computer.
Tech ID:
Tech ID will default to entry made at the beginning of the program. If no change is needed
press the TAB, Enter or UP (DOWN) arrow key. To change entry type over display.
Subject ID:
Enter subject’s assigned ID.
7-135
Replicate ID:
Enter subject’s MEC ID number. If SP is not a replicate move to next field (no response is
necessary).
Subject’s age:
Enter SP’s age.
Subject’s Ht:
Enter SP’s height (inch or cm). Use only one decimal place.
Subject’s Sex (M or F):
Enter "M" for male or "F" for female.
Hispanic Origin (Y or N):
Enter "Y" if SP is of Hispanic Origin or "N" if he/she is not of Hispanic Origin.
Race Code:
Select and enter code from display list.
Shift Code: 0
Does not apply to NHANES study. No response is necessary.
Press "ESC" when all entries are correct.
7.12.2.2.10
Spirometry Testing
Ready to perform FVC maneuver? (CR, Y or N):
Press the Enter key or "Y" plus the Enter key.
You need to Zero the flow sensor.
Make sure no air is flowing through the sensor.
Type any key when ready:
Press any key when:
You are not holding the sensor; the syringe is not connected to the sensor; no air is being
blown or moved through the sensor.
7-136
Zero:
A line will move across the screen as the system establishes zero.
Do not type or move sensor until the next message is displayed on the screen.
The technician must do 2 good maneuvers on himself/herself.
(NOTE: A clean filter should be used for each SP.)
POSITION OF SENSOR
1.
The strap may be placed on both sides of the sensor for SP’s convenience.
2.
The hands should be slipped under the strap and the sensor held in a stable and upright
position.
3.
Make sure that the SP’s free hand does not obstruct the airflow at the rear of the sensor.
4.
The results will not be correct if the sensor is held in any position to her than upright.
The spirometry maneuvers can now be performed. The screen will display the Flow-Volume
grid.
F
L
O
W
VOLUME
Instruct SP to exhale into the mouthpiece. Do not allow SPs to inhale through the flow sensor.
(1) Review coaching technique
a.
No tight clothing.
b.
A (non-rolling) chair should be placed in back of the SP.
c.
Teeth and lips around the mouthpiece.
7-137
d.
Exaggerate demonstration. " ... Our results will be different but effort should be
the same."
e.
Keep explanations short.
f.
Make sure SP gets on the mouthpiece quickly.
g.
Watch for maximum effort (both inspiratory and expiratory).
h.
Listen for fixed obstructions (tongue, teeth, etc.)
i.
All SPs should do the testing standing. (unless physically unable).
j.
Make sure the SPs mouth is wide open during inspiration.
k.
Make sure the SP does not inhale while on the mouthpiece.
l.
If SP is terminating early tell him/her that even if he/she feels empty he/she is
still getting out small amounts of air and should keep pushing and blowing. (You
only feel air coming out of the large airways not the small airways).
m.
Correcting technique should always be done in a positive manner, i.e., "You did
a great job that time, next time do just the same just blow a little harder at the
start."
(2) To abort a trial before or during a maneuver, press the space bar key.
Continue testing this subject (CR, Y or NO)"
(3) After each trial the message on the screen will read -- "Enter a Quality Code or CR to
Proceed:" The following lists are the codes and explanation which may be entered at
this time.
CODE EXPLANATION
1-
Did not understand test directions - language/communications problem
2-
Early termination of expiration
3-
Submaximal effort on expiration
4-
False start of test (do not delete)
5-
Leak e.g., mouthpiece, etc.
6-
Excessive variability of effort
7-138
7-
Insufficient inhalation to TLC
8-
Refused or could not perform additional tests
9-
Fixed obstruction (tongue, teeth, etc.)
100- SP seated for blow
Omit curves with following codes from further processing
10-
Nonspecific error, omit from further processing
11-
Extra breath at end of maneuver
12-
Cough
13-
Very submaximal effort on expiration (delete)
14-
False start of test (delete)
151620-
Is added to the ordinal TQ (technician quality code) if the review center technician determines the
curve should be omitted.
PERCENT DIFFERENCES
After the first trial the percent differences will be calculated between the best FVC, the best FEV1,
and the best PF vs the FVC, FEV1, and PF on each of the trials.
a.
Differences will not be calculated on trials with coughs or extrapolated volumes of greater
than 5%.
If an extra breath occurs at the end of the maneuver, enter the code 11 to keep the FVC from being
falsely elevated. It would be very hard to meet the reproducibility criteria with this occurrence.
(4) A minimum of 5 trials should be done on each SP. If SP’s do not have 3 acceptable curves
additional trials should be done if the SP’s results do not meet the Reproducibility criteria (see
a. below). More than 8 trials may be attempted if the health technician feels the SP will not
be overly stressed and that the SP will eventually understand the instructions.
a.
In order to meet the Acceptability criteria there must be 3 curves free of: (1) coughs;
(2) large extrapolated volume; (3) early termination; or (4) late peak flow.
7-139
b.
In order to meet the Reproducibility criteria the largest and the second largest FVC’s must
be within 5%, the largest and the second largest FEV1’s must be within 5% and the
largest and the second largest Peak Flows must be within 10%.
Elements of a Good Test
1.
Six (6) seconds duration (the computer will put a T in QF (quality factor) column if blow is
less than 6 seconds.)
2.
Free of coughs (computer will put a C in QF column and "*" the results of the trial).
3.
Acceptability
a.
2 FVCs within 5%
b.
2 FEV1s within 5%
c.
2 Peak Flows with 10%
4.
Free of early termination. The computer will put a T in QF column if the participant is
exhaling more than 20 ml of air during the last sec. of the maneuver.
5.
Reproducible Test.
a.
3 good trials, free of coughs, early termination, or extrapolated volume.
6.
Free of extrapolated volume. (Computer will put an E in QF column and "*" the results of
the trial if extrapolated volume is more than 5% of FVC).
7.
A minimum of 5 trials must be done.
8.
No more than 8 trials should be done.
7-140
7.12.2.2.11
End of Session
NO technician blows are needed.
NO syringe calibration is needed.
Syringe Calibration Check
Enter New Subject Data
Obtain Flow Volume Curve
Monitor Zero & Temperature
Exit Program
Use the Space bar key to move the cursor to "Exit Program." Press the Enter key.
Exit program (CR, Y or N):
Respond "Y".
Remove the disk from the drive (press the button under the drive to release the disk.)
Turn off the computer if not continuing with the CAPI software.
7.12.2.2.12
Cleaning (After Each Person Tested)
Remove the filter from the sensor using the needle nose pliers. Be careful not to scratch the
screen between the reducer and the flow sensor.
Clean the metal reducer (where mouthpiece attaches to the sensor) with a damp alcohol swab
(do not let any fluids run behind the screen). Be careful not to scratch the screen between the reducer and
the flow sensor.
Use a new (or clean) filter for each person tested.
7-141
7.12.2.2.13
Maintenance
Problems with the operation of the PJ5 should be reported to the MEC manager and to NIOSH
(304-291-4755) immediately. If necessary, NIOSH will send a new PJ5 spirometer to the stand.
The PJ5 spirometer requires no routine maintenance. Sterilization of the flow sensor is done
at NIOSH when the unit is returned to them at the end of the stand.
17.12.3
Examination Procedures
17.12.3.1 Preparation for the Examination
1.
Preparation of Equipment
Make sure the PJ5 can be placed on a flat, stable surface away from direct sunlight, heat
sources, sources of flammable gas and air-conditioning units. The testing area should be
relatively dust free, and private with a stable electrical supply (110-120v) and a stable
temperature which should be between 17 C and 40 C. Ask the SP for permission to set
up the equipment and for suggestions as to where the unit may be placed.
A thermometer should be used to provide accurate verification of room temperature.
Position a chair or other type of support opposite the PF5 unit to serve as a precaution in
the event the SP becomes lightheaded or faint and needs to sit down during the exam.
Place mouthpieces and Kleenex tissue near the spirometer.
As soon as you are ready, turn the power on. Perform a calibration test on the system
after the spirometer has warmed up for 10 minutes. The calibration procedure is
described in Section 7.12.2.2.8.
2.
Eligibility Criteria
Examinees aged 20 years and older are eligible for the spirometry portion of the home
examination. Exclusion criteria for the examination are also provided and need to be screened prior to
administering the spirometry procedure. The spirometry form, part of the Home Examination Form, will
be used to complete the screening questions and record the result of the spirometry exam. Refer to
7-142
Section 7.12.3.2 for a discussion of this form.
The major reasons examinees should be excluded from the exam are chest or abdominal surgery
within the past three weeks, and hospitalization for a heart problem within the past six weeks. Examinees
with either of these conditions should not receive the spirometry portion of the home exam.
3.
Preparation of the Examinee
1.
Explain the purpose of the spirometry exam to the SP and answer any questions before
beginning the exams. Stress the need for extra effort to obtain valid test results.
2.
Explain the procedure in simple language and instruct the SP in the proper placement of
the mouthpiece and blasting of air into the tube. Demonstrate a deep inspiration,
placement of the mouthpiece and blowing into the tube in a realistic manner.
3.
Ask the SP to loosen any tight clothing such as ties, belts or undergarments. Make sure
that any gum or other items are removed from the mouth, and ask the SPs to remove
loose dentures.
4.
Insert a new spirotube into the mouthpiece.
5.
Have the SP elevate the chin and extend neck slightly. Demonstrate placement of the
noseclip on the nose.
6.
Ask the SP to stand during the examination. If the SP feels unable to stand, the exam may
be obtained from a sitting position but this should be noted on the spirometry form.
7.
Have the SP do a trial exhalation. The following instructions may be helpful:
8.
(a)
"Take a great big deep breath of air as far as you can inhale."
(b)
"Put the mouthpiece into your mouth and seal your lips tightly around it."
(c)
"Blast your air into the tube as hard and fast as you can."
(d)
"Keep on blowing out the same breath of air until I tell you to stop."
Proceed with examination procedures. Active and forceful coaching is required
throughout this phase of the test. It may be necessary to review common errors with the
subject. It may be necessary to repeat the demonstration of the proper procedures.
Common errors include:
Failure to maintain an airtight seal around the mouthpiece.
7-143
Pursing the lips (as with a musical instrument).
Obstructing the mouthpiece with the tongue.
Giving up too soon, or not blowing as completely as possible.
7.12.3.2
Examination Procedures
1.
Examination Protocol
3.
1.
Administer the exclusion and screening questions on the spirometry portion of the Home
Examination Form. Questionnaire specifications are provided in the section on Recording
Data.
2.
Perform syringe calibration of the PJ5. Instructions for this procedure are found in
Section 7.12.2.2.8.
3.
Perform tech blows. The technician must produce two acceptable, reproducible curves.
Record the technician data on the log sheet.
4.
Remove the disposable filter and clean the flow sensor with an alcohol prep.
5.
Place a new filter and mouthpiece in the flow sensor.
6.
Enter SP data into the PC.
7.
Complete the spirometry test with the SP.
8.
Complete the spirometry log sheet with the SP data.
Questionnaire Specifications
The first portion of the spirometry form, PHYSICAL CAPACITY, is composed of exclusion
and screening questions. These questions are designed to exclude ineligible SPs, or to record information
about chronic and recent illnesses or conditions that may be helpful in interpreting examination data.
7-144
Each question in the PHYSICAL CAPACITY section, J1-J5, should be asked of the SP prior
to initiating the spirometry exam. Read each question exactly as written. Mark either the ‘yes’ or ‘no’ box
depending on the response of the SP. If the SP does not know the meaning of a word, do not explain or
elaborate on the word, such as bronchitis. Simply tell the SP to answer based on what the word means
to them.
Question J1. Question J1 is an exclusion question. If the SP answers ‘yes’ to chest or
abdominal surgery within the past three weeks, place a mark in the box next to ‘yes’ and
exclude the SP from the exam. Skip to the results of examination portion of the form.
If ‘no’, record on form and proceed to Question J2.
Question J2. Question J2 is also an exclusion question. If the SP answers ‘yes’ to a
hospitalization for a heart problem within the past six weeks, place a mark in the box next
to ‘yes’ and exclude the SP from the exam. Skip to the results of examination portion
of the form. If ‘no’, proceed to Question J3.
Question J3. Question J3 is a screening question. If the SP answers ‘yes’, mark the
response and try to delay conduct of the exam for approximately 30-60 minutes. If this
is not possible, obtain the exam and make sure the information regarding a recent
cigarette, heavy meal or medications is recorded properly. If "no", record the response
and proceed to Question J4. Regardless of the response, you should proceed to Question
J4.
Question J4. Question J4 is a screening question. Record the appropriate response and
proceed to Question J5. If SP does respond "yes", be sure to change the filter after the
examination is completed and before testing another SP to prevent any chance of
transmitting infections.
Question J5. Question J5 is also a screening question. Record the appropriate response,
however, as described in Question J4, be sure to change the filter element following the
exam if the SP reports a recent respiratory infection.
Results of Examination. Record the outcome of the spirometry examination in this
portion of the form.
7-145
Exhibit 7-11. Spirometry Form
7-146
Satisfactory Test
If the exam was satisfactory, i.e., 3 valid trials out of 5 or 8 trials, record whether the exam
was conducted sitting or standing. If both techniques were used, note in the Comments area
which trials were sitting and which standing. Proceed to the comments section.
Incomplete/Unsatisfactory Tests
If the exam was not completed, or was unsatisfactory in some way, such as insufficient number
of trials, i.e., less than 5 trials completed or more than 5 trials completed with less than 3 valid
trials obtained, excessive coughing or suboptimal effort, mark the box provided and proceed
to the Reasons Test Incomplete, Unsatisfactory or Not Done. A reason must be provided for
the problem test.
Test Not Done
If the exam could not be completed, that is, no trials were done, mark the box provided and
proceed to Reasons Test Incomplete, Unsatisfactory or Not Done. A reason must be provided
for the test not done.
Reasons Test Incomplete, Unsatisfactory or Not Done. A reason must be provided if
you record that the spirometry exam was incomplete, unsatisfactory or not done, otherwise
there will be no explanation for the lack of data. Reasons for invalid or incomplete tests
are defined as follows:
Responses 1-4 refer to equipment problem, coughs during the trials, poor or weak effort,
or acute illness. If the SP reported a chronic obstructive disease (COPD) such as
emphysema or bronchitis in the screening questions, mark response number 5.
Response 6 should be used for examinees who ate a heavy meal within the hour prior to
the exam. Mark this box only if the exam was not adequate. SPs who answer "Yes" but
perform well should receive no notations in this section.
Responses 7 and 8 should be used to record examinees who cannot understand the
instructions for participation and thus perform poorly. SPs who cannot speak English or
are unable to comprehend the effort required for the test and cannot complete the exam
should also be recorded in this section. Spanish translations of instructions for the
examination are available if an interpreter, such as a Household interviewer, would be
available to translate for the exam.
Response 9 should be used to record exam not completed because of insufficient time
remaining during the exam appointment, or if it was not possible to complete the test
because space in the home did not permit operation of the spirometer.
Response 10 should be used for SPs who do not cooperate with the exam, or refuse to
have the exam.
7-147
Response 11, medical exclusion, is used to record examinees excluded from the exam
because of a positive response to exclusion questions, or for other medical reasons such
as the SP became ill during the session.
Comments. Record any unusual occurrences or pertinent remarks in this section of the
form. Notes may be made in this section for any SP exam, regardless of the result of the
exam. Information such as the SP became fatigued or upset during the exam can be
helpful when the data is reviewed. You may also use this section to expand on the reason
a test was invalid or not completed.
7.12.4
Safety Considerations
7.12.4.1
Equipment Precautions
The major equipment precautions for the spirometry exam are prevention of electrical shock
during the procedure, and prevention of transmission of infection to other SPs or staff.
1.
Electrical Shock
Prevention of electrical shock for SPs and staff will be managed in two major ways:
Use of the PJ5 spirometer, which is approved by the Underwriter’s Laboratory; and
Electrical isolation of the SP from the instrument by a plastic sensor housing and a
disposable mouthpiece.
2.
Transmission of Infection
Transmission of infections between examinees in spirometry or from examinees to staff is a
remote possibility. No cases of infections transmitted through spirometry exams have ever been reported.
However, several steps have been taken to minimize even a slight possibility of infection among SPs or
staff.
Precautions to prevent transmission of infections include:
Home examiners will remove the filter immediately after each SP exam and replace it
with a clean filter. The used filter should be discarded in a biohazardous waste bag.
7-148
Disposable mouthpieces are used and discarded by the SP after each examination, also in
a biohazardous waste bag.
The SP’s mouth will always be higher than the orifice of the equipment.
SPs will be instructed to remove their mouth from the equipment when inhaling to avoid
inhalation of a potentially infectious agent.
The spirometer will be cleaned with alcohol after each use. The flow sensor is disinfected
by NIOSH when the unit is returned to them at the end of the stand.
7.12.4.2
SP Movement and Positioning
1.
Standing and Sitting Exams
Examinees should stand for the spirometry examinations. A sturdy chair should be placed
behind the SPs in the event of lightheadedness during the procedure.
Also, ammonia inhalants are kept in the home exam supplies to be available if an SP should
faint.
Examinees in wheelchairs should perform the procedure sitting in their wheelchairs. SPs should
not be removed from wheelchairs for this exam. Indicate on the comments section of the spirometry form
that the exam was conducted with the SP sitting down. Also note any examinees who become faint or
tired and must sit for the remainder of the procedure.
SPs who cannot sit or stand for this procedure should be excluded from the spirometry exam.
2.
Comprehension of Instructions
Caution should be exerted when attempting to examine SPs who are unable to comprehend the
instructions for the spirometry procedure. Failure to follow the correct procedures regarding positioning
and use of the mouthpiece may present some risk to examinees.
7-149
If the examinees do not understand English, a Spanish version of the exam instructions is
available on the MEC. If the examinee speaks a language other than Spanish, an attempt will be made
to arrange for a relative or friend who could translate for the SP. If no translator can be found, and if the
instructions cannot be communicated by the SP successfully by demonstration, the SP should be excluded
from the exam.
Examinees who appear confused and disoriented should attempt the exam, but if it is clear to
the technician that the individual is unable to understand and adequately perform the test, the examinee
should be excluded from the procedure.
7.12.4.3
Emergency Procedures
The spirometry examination should pose no risk of medical emergency to SPs. In rare cases,
an SP may hyperventilate and feel dizzy during the examination, and as mentioned previously, ammonia
capsules will be available in the event an SP becomes faint.
Examinees who feel faint should be guided into a chair and encouraged to breathe slowly and
deeply until recovered. If the examinee does not recover, or if examinees report other complaints or
illnesses, stop the examination and follow the emergency procedures as described in the Safety Procedures
portion of this manual.
7-150
7.13
Venipuncture
7.13.1
Introduction
As part of the Home Exam, a small sample of blood will be drawn. One 3 ml lavender, one
2 ml lavender, three 15 ml red top vacutainers and one 2 ml light blue (approximately 52 ml) will be
collected from adults aged 20 and over (see Exhibit 7-12). This will be the last activity of the Home
Exam so that the sample can be transported to the MEC in a cooler and processed within four hours of
the draw. If you are administering the home examination to two subjects in one household, you may
perform venipuncture on both subjects at the conclusion of the second examination.
You will be
responsible for notifying the MEC laboratory of a scheduled home exam as soon as possible in advance
of the exam. You will deliver the blood samples to the medical technicians for processing; however, when
the MEC is not in operation, you will be responsible for the processing and storage of the samples.
7.13.2
Gaining Cooperation
As a Home Health Tech you must be prepared to answer all questions and concerns the SP
poses about the venipuncture. Also, you must be prepared to convince the SP of the importance of the
venipuncture component.
In order to address subjects’ concerns effectively, you must be familiar with the following
information about the procedures to be used for the study:
Although the SP has provided much useful information in the household and individual
interviews, the successful completion of the venipuncture component of NHANES III is
critical to the success of the study. Using the blood specimen we are able to perform over
30 different biochemical tests that provide us with detailed information about the SP’s
health status -- information that would not be available to us in any other way.
7-151
Exhibit 7-12. HANES III Home Examination Venipuncture Protocol
7-152
Venipuncture causes only minimal discomfort. It is performed by a trained technician,
well-experienced in blood drawing. For adults the amount is equivalent to less than 2
tablespoons of blood. The body manufactures blood daily, and this volume of blood will
be completely replaced within 24 hours.
The supplies used for venipuncture are completely sterile, and they are used only once.
After use they are destroyed. There is absolutely no possibility of the SP’s being infected
by any blood-borne disease, such as hepatitis or HIV as a result of participating in the
venipuncture component of the NHANES III exam.
Appendix C of the manual lists answers to frequently asked questions regarding venipuncture.
Familiarize yourself with this material so that you are prepared to answer SP’s questions as clearly and
concisely as possible.
7.13.3
Administering the Venipuncture Questionnaire
Administer the Venipuncture Questionnaire prior to performing venipuncture.
The
questionnaire requests information necessary to screen the SP for venipuncture and to properly analyze
the results of the assays performed on the specimens collected. The questionnaire specifies that only
hemophilia and having received chemotherapy within the past four weeks exclude an SP from
venipuncture. The Venipuncture Questionnaire and detailed specifications for asking each questionnaire
item are given below. (Please note: the Spanish Translation of the Venipuncture Questionnaire is given
in Appendix A.)
K1.
Do you have hemophilia? This is a
hereditary blood-clotting disorder.
1
Yes(L1)
2
No
K1. This is an extremely important question since it identifies those SP’s who have been
diagnosed with hemophilia. These SP’s are to be excluded from venipuncture since the
procedure would pose a threat to their health. Ask the question exactly as it is worded,
and check one answer box. If the response is yes, follow the skip instruction and go to
L1. Tell the respondent that s/he is not eligible for venipuncture because s/he has
hemophilia. Thank the respondent for cooperating in the survey and for answering your
questions. If the response is no, go on to K2.
7-153
K2.
Within the past four weeks have you
received any cancer chemotherapy
treatment?
1
Yes(L1)
2
No(K3)
K.2 This question asks whether or not the SP has had any chemotherapy in the past four
weeks. Note, if the response is "yes," the SP is ineligible for phlebotomy; follow the skip
instructions and go to L1. Thank the respondent for cooperating in the survey and for
answering your questions. If the response is "no," continue to K3.
Note: You include the SP if 29 days or more days have elapsed since the SP’s last cancer
chemotherapy treatment.
K3.
CURRENT TIME
1
2
3
AM
PM
Noon
K.3 Record the current time and check a box to indicate if it is a.m., p.m., or noon.
K4. Including your last meal and any snacks, at
what time did you last have anything at all to eat?
_____._____
1
2
3
4
AM
PM
Noon
Midnight
1
2
3
Yesterday
Today
Before
yesterday
K4. Record the time that the SP last had anything at all to eat. Note that this is meant to
include anything at all, including such items as breath mints and chewing gum as well as
other foods. Record the time at which the SP last ate. Also probe for whether the time
was in the a.m. or p.m., at noon or midnight, and check one box to indicate this. Finally,
probe to find out whether the last time the SP ate anything was yesterday or the current
day and check one box to indicate this. If for any reason the last time the SP ate was the
day before yesterday or even earlier, write in the date on which the SP last ate beneath
the time last ate and leave boxes for "yesterday" and "today" blank.
7-154
K5.
Have you had anything to drink, other than
water after (time in item K4 above)?
1
Y
2
N(K7)
K5. This item asks when the last time was that the SP had anything to drink besides water
after the time indicated in response to K4. By "anything" we mean any beverage at all,
even if it is noncaloric. Thus, the SP should include beverages such as tea, coffee, diet
soda, club soda, etc. Check the box and follow the appropriate skip pattern.
K6.
At what time did you last have anything at
all to drink, besides water?
_____._____
1
2
3
4
AM
PM
Noon
Midnight
1
2
3
Yesterday
Today
Before
yesterday
K6. Record the time that the SP last had anything to drink except water. Check one box to
indicate whether the time was in the a.m., p.m., or noon or at midnight, and check one
box to indicate on which day the SP last had something to drink. As for K4., probe for
a complete and accurate response. If for any reason the day on which the SP last drank
was the day before yesterday or earlier, write this date in the space beneath the time and
leave the boxes for "yesterday" and "today" blank.
K7.
RESULTS OF VENIPUNCTURE
Complete ___ ___ ___ ___
Incomplete
1
2
3
AM
PM
Noon
V________ code
K7. Check one box to indicate the results of the venipuncture attempt. If complete, i.e., all
blood tubes were filled or partially filled, record the time you completed the draw and
check a box to indicate if it was done in the a.m., p.m., or at noon. If incomplete, specify
the reason with a comment code in the space provided. (See below for Phlebotomy
Comment Codes.)
7-155
Phlebotomy Comment Codes
V01
V02
V03
V04
V05
V06
V07
V08
V09
V10
V11
V12
V13
V14
V15
V99
K8.
SP refused procedure (venipuncture/Dextol).
SP ill - The SP became ill before or during the procedure.
SP fainted - The SP fainted before or during the venipuncture procedure.
Multistick required - More than one stick was required to collect the specimen.
Single stick - The tech was able to perform only one stick and the VP was unsuccessful
or partially successful due a collapsed vein, hematoma formation or other reasons.
Supplies inadequate - The supplies were either not available, malfunctioning, or expired.
Parental refusal for child - The SP’s parent(s) refused to let the technician perform the
venipuncture (on the SP, their child).
SP is hemophiliac - The SP has indicated that he is a hemophiliac.
SP on chemotherapy - The SP has indicated that he/she has had chemotherapy in the last
2 weeks.
Diabetic on insulin - The SP is a diabetic on insulin therapy.
Invalid fasting - The SP has not fasted the required amount of time.
Too late in session - The GTT questionnaire was administered too late in the session to
complete the GTT before the end of the session.
Incorrect timing - The two hour draw was successful but it did not take place with 2
hour ± 15 minutes of the SPs’ consumption of the Dextol.
Medical exclusion - The physician indicated that the procedure should not be performed.
Dry Run Protocol
Other, specify - A comment created by the technician to explain an unusual incident.
Test Specimen for HIV Antibody
1
Yes
2
No
K8. If the SP refuses to have his/her blood sample tested for HIV antibody, check box "2 No".
Please note that you are not to ask the SP if s/he wants his/her blood tested for HIV
antibody. This item is provided so that you can document the fact that some SP’s
specifically requested that their specimens not be tested for HIV. If the SP does not say
anything about HIV testing, check box "yes".
7-156
7.13.4
Venipuncture Supplies
In preparation for each home exam, assemble the following supplies in the back pack:
Tackle box (to hold small and breakable items)
B.D. vacutainers
1
1
3
1
-
2 ml lavender top tube
3 ml lavender top tube
15 ml red top tubes
2 ml light blue top tube
Vacutainer holders
Straight multisample needles (20 and 21g)
Butterfly/adapter assembly (21 and 23g with luer)
Tourniquet
2 x 2 sterile gauze pads
Latex gloves
Disposable drape sheets
3M transpore tape
Bandaids
Ammonia ampules
Puncture proof container (for needles)
Towelettes
SP ID labels
Playmate cooler
Insul-ice
Small coffee can
Small Bio-hazard bag
Small ziplock bags
7-157
Always include extra supplies in the event of breakage or equipment failure.
Place the coffee can and the sharps container inside the Playmate cooler.
Do not expose the vacutainers to extremes of temperature. Do not store them in your car
or in the belly compartment of the MEC.
Bring vacutainers to room temperature before using them.
Examine all equipment carefully for damage at regular intervals.
Dispose of all used or contaminated material at the MEC.
7.13.5
Venipuncture Procedures
Prior to the venipuncture, make certain that a consent form has been signed and the SP
is aware of the importance of the blood draw.
Select a location in the home where there is adequate light and a good surface for
supplies. A kitchen or dining room table is usually suitable. If possible, select an area
with an uncarpeted floor.
Unsupervised children and pets must be prohibited from the area. Never draw blood from
anyone holding a child or pet.
Never draw blood from anyone who is standing. Instruct the SP to sit in a relaxed,
upright position. If the SP insists on lying down, find a couch or bed where you can
comfortably conduct the venipuncture.
Any distraction, such as the telephone, family members, or TV, should be avoided.
If an SP is in a wheelchair, you can perform the venipuncture while the SP is seated in
the wheelchair after locking the wheelchair legs.
7.13.6
Conducting the Venipuncture
It is extremely important that the anticipated site and all necessary equipment, including
needles, tubes, tourniquet, etc., be kept absolutely sterile and free from contamination. Extreme caution
must be exercised throughout the collection of blood and pooling of sera so that the data are valid.
7-158
7.13.6.1
Preparation of Puncture Site
Follow the steps outlined below to prepare the puncture site:
Create a clean area by spreading a drape sheet under supplies and the SP’s arm.
Place your venipuncture equipment where it is readily available but not in danger of being
upset. Keep extra equipment within easy reach.
Thoroughly wash your hands.
Put on gloves.
Prepare and label with SP ID labels the appropriate blood collection tubes:
-
1 - 2 ml lavender top
-
1 - 3 ml lavender top
-
3 - 15 ml red top
-
1 - 2 ml light blue top (if SP is 40+ years of age)
Instruct the SP to sit down at the table. Never attempt a venipuncture on a standing SP.
Having the subject sit helps guard against any injury that might result if the subject
fainted.
Instruct the SP to extend the arm palm up and straight at the elbow and position the arm
so that the veins are readily accessible and you are able to work in a comfortable position.
Be sure that the arm is in a downward position with the elbow lower than the heart to
prevent backflow. If the SP insists on lying down, assist the SP to do so. In section L2
of the Home Exam Form, record that the SP was lying down for the venipuncture
procedure.
Inspect the arm you plan to use for venipuncture. The veins of choice are those located
in the antecubital area. Wrist and hand veins are also acceptable for venipuncture. Do
not draw blood from an arm that has a rash or open sores or one that is swollen or
edematous.
Apply the tourniquet several inches above the SP’s elbow.
Select a vein that is palpable and well-fixed to surrounding tissues. Palpate even when
the vein can be seen. If the veins do not distend rather quickly, the following techniques
may be used:
-
Have the SP open and close the hand several times.
7-159
-
Massage the arm from wrist to elbow; this forces blood into the veins.
-
Tap the area sharply with the index and second finger two or three times; this
causes the veins to dilate.
-
The arm to be used for venipuncture may be hung at the subject’s side without
a tourniquet. This will allow the veins to fill with blood to their capacity.
-
Examine the SP’s other arm. Sometimes the veins in one are larger than the
other.
If the tourniquet has been applied for more than one minute while you search for a vein,
release the tourniquet for two to three minutes. Prolonged obstruction of blood flow by
the tourniquet is unnecessary and uncomfortable for the subject, and may alter certain test
results.
Check carefully for scar tissue or the presence of tendons near the vein.
Cleanse the area with an alcohol wipe. Hold the alcohol wipe with two fingers on only
one side of the wipe, so that the other side of the wipe touches the area of the puncture
site. Cleanse the area using a circular motion beginning with a narrow radius and moving
outward so as not to cross over the area already cleansed. Repeat with a second alcohol
wipe. Dry the cleansed area using a sterile 2x2 gauze pad. The area should be
completely dry before the venipuncture is done in order to reduce the burning sensation
caused by alcohol penetrating the skin.
After the puncture site is cleansed, determine the correct needle size to be used. A 21g
or 23g butterfly needle may be used. Also a 20g or 21g multisample straight needle may
be used on obese SPs. Use the largest gauge needle possible, given the condition of the
SP’s veins.
7.13.6.2
Venipuncture Technique for the Vacutainer System with a Butterfly Needle
Open butterfly package. Do not remove needle shield.
Ask subject to make a fist.
Fix the vein about one inch below the proposed point of entry by pulling the skin taut
with the thumb of your nondominant hand.
Using the butterfly needle, approach the vein in the same direction that the vein runs,
holding the needle at a 15-degree angle to the SP’s arm. Point the bevel up so there is
less trauma to the skin and vein.
7-160
Push the needle firmly and deliberately into the vein. Blood will appear in the butterfly
tubing. Put the tape over the butterfly to hold it in place.
Quickly push the first vacutainer down the needle.
If no blood enters the tube, but no bruise is forming, probe the vein until entry is
indicated by blood flowing into the tube. If no blood enters the tube and a bruise is
forming, remove the tourniquet and the needle. Place a gauze square over the puncture
site and apply firm pressure to the puncture site for three minutes. Switch to the other
arm using a new needle. If you must use the same arm for a second try, use a different,
more distal, vein, placing the tourniquet below the first puncture site. Observe the first
puncture site for excessive bleeding or bruising. Do not attempt a second stick in the
same area if you observe excessive bleeding or bruising. Document the bleeding in item
L2 of the Home Exam Form.
Hold the tube with the tube stopper uppermost and with the tube lower than the needle
to prevent backflow through the tube. It is very important to prevent possible backflow
with its attendant possibility of adverse reactions to the sample person.
As the vacutainer tube is filling, transfer the vacutainer holder to your left (non-dominant)
hand, leaving the right (dominant) hand free to pick up and change the tubes.
Use your left hand to hold vacutainer holder steady, your right hand to pull out the filled
tube and place it in the can. Note: all tubes should be completely filled. Make sure the
tube contents do not touch the stopper or the end of the needle during the procedure.
Gently invert the lavender top and blue top tubes six times immediately to ensure proper
mixing, and place them in the rack in the cooler. Do not invert or agitate the red top
tubes.
Insert the next tube, and after it has filled, place it in the cup to keep it in an upright
position.
Remove the tourniquet after no longer than 2 minutes. If necessary (i.e., if the blood
flows more slowly), reapply the tourniquet after 2 minutes.
If this is the last tube to fill, remove the tourniquet as soon as the tube begins filling.
When the last tube has filled, remove the needle in a smooth quick motion, and after the
needle is withdrawn immediately press a clean gauze square over the venipuncture site.
Avoid heavy pressure as the needle is being withdrawn because it may cause the point of
the needle to cut the vein.
7-161
7.13.6.3
Venipuncture Technique for the Multisample Needle
Open multisample needle package and assemble vacutainer holder and the multisample
needle by screwing threaded end of needle onto the holder.
Place the first tube to be drawn into the holder, securing it slightly, but not penetrating
the stopper.
Ask subject to make a fist.
Remove sheath from needle.
The vein should be "fixed" or held taut during the puncture. Place the left thumb about
one inch below the point of entry and pull skin gently in a downward motion. (This
stretches the skin and "anchors" or "fixes" the vein.)
Hold the needle in line with the vein, with the bevel up and at 15o angle with the skin.
Push the needle firmly and deliberately into the vein. As the needle enters the vein, you
will notice a little "give."
Quickly push the vacutainer tube into holder, puncturing the stopper. Blood will be
drawn into tube. If no blood enters the tube, but no bruise is forming, probe the vein
until entry is indicated by blood flowing into the tube. If no blood enters the tube but a
bruise is forming, remove the needle. Place a gauze square over the puncture site and
apply firm pressure to the puncture site for three minutes.
HOLD ALL TUBES IN A UPRIGHT POSITION, with the stopper uppermost.
When the first tube is filled, carefully pull tube out of holder and push the remaining
tubes onto holder until last tube is in place.
Fill tubes in this order, according to the protocol.
Release tourniquet before last tube is filled.
Remove last tube from holder.
Gently remove needle and holder assembly in a smooth, quick motion, covering site with
a sterile gauze pad.
7-162
7.13.7
Concluding the Venipuncture
Have the SP place two fingers on the gauze to hold in place, then ask the SP to raise the
arm straight up, elevating the arm above the level of the heart, without bending the elbow.
The SP should remain in this position for two to three minutes to help prevent
hematomas.
Remove the last tube and discard the needle in the needle disposal unit.
Check to see that you have applied the appropriate labels to each tube collected. Each
tube must be labeled with the SP’s ID number and time of draw.
Check the venipuncture site. If it is adequately clotted, apply a bandaid or tape over the
gauze pad. Instruct the SP to remove it in no less than 45 minutes if the bleeding has
stopped. Also, suggest that the SP sit quietly for a few minutes.
If bleeding continues, keep direct pressure on the site for five minutes or more.
Closely monitor the SP for at least 10 minutes for any adverse reaction to venipuncture.
Follow first aid instructions for signs of vasovagal reaction as described in Section 9.2,
if necessary.
If for any reason the venipuncture is not successful, make one more attempt with the SP’s
verbal consent. (Two attempts are allowed in total.)
Never leave any "trash" from the venipuncture at the SP’s home. Carefully gather all
used material into the drape sheet; tape it closed and place in a small biohazard bag.
7.13.8
Transporting and Processing
Transport the blood samples from the home to the MEC in the Playmate cooler. The
samples must be kept in an upright position. If it is extremely hot, place the blue and
lavender top tubes in a second cooler to which insul-mat ice has been added.
Upon returning to the MEC enter the results of the venipuncture procedure into the
automated system, (See Section 7.13.9. below). If the MEC is not in session you will
need to process and store the blood yourself.
Check to see that a Home Exam blood processing rack has been set up. If you were
unable to notify the lab in advance of the exam, you may have to label vials and assemble
the Home Exam blood processing rack yourself. The specifications for vial type and size
are given in Exhibit 7-13. Label each vial with an SP ID label and a vial label.
7-163
Exhibit 7-13. NHANES III Home Examination Hematology Processing Protocol
7-164
Follow the specifications outlined in Exhibits 7-13 and 7-14 to process the blood. Note
that 2 ml lavender is used for hematology. The 3 ml lavender is used for lead and
glycosylated hemoglobin.
The blue top tube is to be centrifuged as soon as possible after you return to the MEC.
Then use a transfer pipette to collect the plasma and deposit it in vial 23 for fibrinogen.
Allow the red top tubes to clot for 40 minutes and process them no more than four hours
after the draw.
Centrifuge the red top tubes after they have clotted, and use a serum separator to collect
the serum.
Pool the serum from the three red tops.
Follow the specifications in the Blood Processing Protocol Exhibit 7-14 to process the
serum.
7.13.9
Recording Results
Upon returning to the MEC, immediately enter the information obtained from the Venipuncture
Questionnaire and the venipuncture procedures, i.e., tubes collected, using the laboratory automation
system. Chapter Four, Home Exam, of the Laboratory Automation Manual provides instructions for
entering the results of the Home Exam Venipuncture. If you are also responsible for processing the blood,
use the laboratory blood processing and hematology data entry procedures to record blood processing and
hematology results. (See the Blood Processing and Hematology Sections of the Laboratory Automation
Manual.)
7.13.10
Bio Safety
For the Home Exam, it is recommended that you:
Organize and examine all supplies before starting out on a Home Exam.
Protect the work surface by spreading one or two drape sheets to create a ‘clean’ area
under supplies and the SP’s arm.
Wash your hands before and after each venipuncture.
Wear gloves during the venipuncture and when handling specimens.
7-165
Exhibit 7-14. NHANES III Blood Processing Protocol for Home Exam Biochemistry Specimens
7-166
Handle needles and specimens with extraordinary care.
Keep all supplies out of the reach of any household member, particularly children.
Do not carry any food with your supplies.
Place all used needles in a puncture-proof needle box.
Place all other used supplies in a biohazard bag.
Dispose of the needle box and the biohazard bag at the MEC.
Keep all the supplies in a locked trunk and out of plain sight.
7-167
7.14
Conditions of Exam (Complete for All SPs)
This section of the Home Examination Form asks for the conditions and results of the
examination. This section must be completed for all SP’s receiving all or part of the Home Examination.
The specifications for completing the items in this section are given below.
CONDITIONS OF EXAM (COMPLETE FOR ALL SPs)
L1.
Was anyone else present during the exam?
1
L2.
Y
2
N
COMMENTS:
L1. Check one box to indicate whether or not anyone else was present during the home exam.
L2. Record any comments you have about the subject, the interviewer, or the exam in the space
for L2. For example, if the exam was translated into Spanish for a Spanish speaking SP,
record the name and the position of the translator. If there is anything unusual about the SP
or if certain physical conditions were observed such as, shortness of breath, swelling of
extremities, ambulatory problems (i.e., limp, shuffle), contractures of extremities, hearing or
visual problems, etc., record the information in a complete and specific manner. It is important
to record if there is any indication that the SP is cognitively impaired.
7-168
7.15
M1.
Results of Examination
RESULTS OF THE EXAMINATION:
1 Complete (N1)
2 Incomplete (M2)
3 Not done (M2)
M1. If all components of the examination are complete check box "1. Complete" and skip to
Section N1. Checking "Complete" will mean that every section of the examination was
attempted and successful. For Spirometry, if 5 trials were done with 3 valid trials, the
exam is considered complete. However, if fewer than 5 trials were done or if more than
5 trials were done but less than 3 of the trials were valid, the exam is coded as
incomplete.
If any components or parts thereof are refused or not completed, as previously mentioned,
then the exam is not complete. Check box "2. Incomplete" and continue to Item M2.
If all components were not done, check box "3. Not done" and continue to Item M2.
M2.
REASONS FOR INCOMPLETE EXAMINATION:
1 Examinee refused or uncooperative
2 Examinee medically excluded
3 Examinee unable to physically cooperate
4 Examinee unable to understand instructions due to language barrier
5 Examinee unable to understand exam instructions due to other reasons
6 Insufficient time available or room in household not available
7 COMMENTS: 8
When the examination is "incomplete" or "not done", Item M2 should be completed as
follows.
Check all of the reasons 1-6 which apply to the circumstances of the
examination. You must also check box "7. Comments", and complete M2.8 by recording
a comment to describe the specific circumstances of an exam which was incomplete or
not done. The definition of each reason, 1-6, is given below:
7-169
1.
Examinee refused or uncooperative - SP refused testing procedure or would not
answer questions for any reason.
2.
Examinee medically excluded - SP excluded for medical reasons (e.g.,
hemophilia, or cancer chemotherapy, chest or abdominal surgery - past 4 weeks,
myocardial infarction - past 6 weeks.)
3.
Examinee unable to physically cooperate - SP unable to do the test due to
physical reasons.
4.
Examinee unable to understand exam instructions due to language barrier - SP is
unable to understand instructions due to language problem.
5.
Examinee unable to understand instructions due to other reasons - SP is unable
to understand instructions due to cognitive impairment or any other
communication problem (except language barrier).
6.
Insufficient time available or room in household not available - No time or
appropriate room to do the test.
7-170
7.16
Home Exam Exit Questions
The last two items of the Home Examination Form ask for the SP’s reaction to the examination.
These two questions are only asked if original home examinees, not home exam replicates. Specifications
for these two items are given below.
When you have concluded the examination read the following statement to the SP: "We have
some final questions to ask you about your participation in this survey." Go to Item N1.
We have some final questions to ask you about your participation in this survey.
N1.
Do you have any comments about the interviewer who came to your house or the questions that
were asked?
No
Yes -- Specify
N1. Read the question exactly as written. If the SP has no comments, mark the box labeled
"No". If the SP has comments about the interviewer, the testing procedures or the
questions asked, mark the box labeled "Yes" and record the SPs comments in the space
provided. Record the SP’s responses verbatim.
N2.
Did you find any part of the examination unpleasant?
No
Yes -- Specify
N2. Read the question exactly as written. If the SP did not find any of the examination
unpleasant, mark the box labeled "No". If the SP tells you s/he did find part of the exam
7-171
unpleasant, mark the box labeled "Yes". Probe to find out exactly what part of the
examination the SP found unpleasant and why s/he thought it was unpleasant. Record the
SP’s reasons in the space provided. Record the SP’s responses verbatim.
7-172
7.17
Concluding the Examination
After administering the examination to an SP, the Home Examiner must perform several tasks
in the home, at the MEC and at the Field Office to conclude the examination.
After all portions of the Home Examination Form have been administered in their proper
sequence, the Home Examiner should perform the following tasks to conclude an examination in the
home:
Pack the blood specimens for transport back to the MEC.
Edit the Home Examination Form using a blue pencil, and carefully review for accuracy,
completeness and legibility.
Give the SP $15.00 for participating in the survey and have the SP sign a receipt.
Pack all equipment and materials in the backpack or Spirometer carrying case. Do not
leave any trash in the SP’s home.
Take some time to answer additional questions which the respondents may have about the
examination. It is important to leave the respondents with the impression that they have
participated in an interesting and worthwhile experience. Indicate your appreciation to
the respondents by thanking them.
The Home Examiner should perform the following tasks when she arrives at the MEC after
conducting a home examination:
Enter the results of the Home Exam phlebotomy procedures in the laboratory automation
system.
If the MEC is in session, give the blood to the laboratory techs to process. If the MEC
is not in session, process the blue and red top tubes, perform the hematology tests, and
enter the results of the blood processing and hematology procedures in the laboratory
automation system. (See Section 7.13 for specific laboratory procedures.)
Replace used supplies in your backpack. Repack your backpack for the next day’s exams.
Give the Home Exam SP Identification Form to the MEC Physician. If the MEC is not
in session, leave the form in the physician’s box outside the physician’s examination
room.
7-173
Report to the MEC Manager. If the MEC is not in session, call the MEC Manager to
verify that there were no problems during the exam or in the MEC.
After completing her tasks at the MEC, the Home Examiner should return to the Field Office
and report to the Office Manager the same day following the performance of a home examination. If the
Field Office is closed, she should report to the Office Manager as soon as possible the next day. The
following materials should be returned to the Office Manager:
the Household Folder with the SP Card;
the Home Examination Form;
the Home Exam Release Form;
the receipt for SP remuneration; and
the signed Consent Form.
7-174
8. ADMINISTRATIVE PROCEDURES
8.1
Obtaining Consent
Consent Form
For most Home Examinations except replicate exams, the Household Interviewer will obtain
written consent from the examinee when making the appointment for the Home Exam. The interviewer
will place the signed consent form in the Household Folder. The home examiner should always check
the Household Folder to verify that there is a signed consent form on file for the examinee who is to
receive the Home Exam.
In situations where the Home Exam is a replicate examination, or if the Household Interviewer
did not obtain consent for the Home Exam during the interview, the home examiner must obtain written
consent.
8.2
Sample Person Remuneration
Examinees who complete all or part of the home exam are given $15 as a token of appreciation
for their time and effort. This is less than the $30 remuneration for the MEC exam because the Home
Exam is less extensive. Receipt books will be provided by the Office Manager for maintaining a record
of payment. The SP must sign a receipt for the payment. These receipts must be turned into the Office
Manager.
8.3
Using Escorts
At the time of switching-off when the Home Exam appointment is made, the Office Manager
should note whether an escort will be needed to accompany the home examiner and inform the MEC
Manager. Also, the home examiner should review Household Folder well in advance of a scheduled
appointment to determine if an escort is needed.
8-175
8.4
Handling Difficult Respondent or Refusals
On occasion, there may be respondents who are difficult to interview and examine or who
simply refuse to participate in some portion of the interview exam. Some participants do not openly
refuse to answer a questionnaire item or take a test, but they express a hesitancy or reluctance to respond.
Experience aids in gaining an awareness for the many ways in which respondents express their
reservations. Being sensitive to the possible reasons for the lack of cooperation can facilitate working
through a difficult section of the exam.
Primarily, a respondent’s resistance can be managed by
understanding why the individual is uncomfortable with a particular question or test and by reassuring the
respondent about the concerns that are expressed. Often a refusal to answer a particular set of questions
may pivot around the sensitivity of the topic for the participant or to some particularly negative experience
related to the topic. An individual’s refusal to try a cognitive task, on the other hand, may be a function
of the lack of confidence or self-esteem or a fear of failure. Always encourage the respondent to do the
best that he/she can without worrying about having to perform the task perfectly.
The more the home examiner works with participants, the easier it becomes to handle difficult
situations. Often resistance is only a surface reaction on the part of the respondent and, with a little
encouragement and reassurance, they are willing to try a particular task or share more of their views as
the exam progresses.
8.5
Non-English Speaking Examinees
Occasionally, a respondent may prefer to speak in Spanish or a language other than English.
It is important that the respondent use the language that he/she speaks fluently and regularly. The
language of the household is determined by the Household Interviewer. It is documented on the front
cover of the Adult and Youth Household Questionnaire Form and the Home Exam Form. The home
examiner is responsible for checking the cover of the Home Exam Form for this information. If the
language marked on the form is other than English, the home examiner should consult with the Office
Manager to determine if a translator will be needed to conduct the Home Exam.
8-176
In a Spanish-speaking household the home examiner should only use the help of a Spanish
speaking Household Interviewer or another authorized staff person from the Field Office. (The staff
person from the Field Office may be a local translator or the local person who is hired to assist the Field
Office operations.) It is essential that the home examiner schedule a time prior to the home visit to meet
with the person who is to accompany her and review the Home Exam questionnaire and procedures. This
provides the translator with information that is needed to understand each Home Exam component and
to know the type of information and participation that is being sought from the SP. The Spanish version
of the Home Exam is to be used in these situations because it has been formally prepared and provides
standardization of the wording of items to ensure reliability.
In cases where the language of the household is neither English or Spanish and the SP does
not understand enough English to perform the exam and there is no one from the Field Office to translate,
the home examiner should not administer the questionnaire items or perform the Cognitive Functioning
Exam component. However, with the help of another person (i.e., household member), the remaining
procedures for other subcomponents of the Home Examination may be explained so that these sections
can be completed. It is not necessary to give lengthy explanations to the SPs as they will not have to
know that sections are being omitted. This modification can be handled in a courteous and professional
manner so that these SPs do not feel frustrated or embarrassed.
8.6
Problem Situations
Problems may arise with some examinees as they proceed through the various parts of the
Home Exam. Some of these problems may surface during the questionnaire section while others may
occur during the examination phase. Three categories of potential problem situations are described below;
these include examinees with complaints, upset examinees and ill examinees.
8.6.1
Examinees with Complaints
During the exam, the SP may complain about some part of the examination. If this occurs, it
is important to try to alleviate the SP’s concerns as soon as possible. If the complaint is about home exam
procedures it should be explained that there are standardized ways of doing things that must be followed
8-177
so that results can be combined across survey participants and that sometimes these procedures may not
seem to be the best to an individual participant. If the complaint is about what is done, or what is not
done, the home examiner should explain that the contents of the examination were very carefully
determined and that what is being measured is considered very important. It should be further explained
that even if relevant, resources did not permit measurement of other things.
Enter the substantive facts of any complaints given by an examinee in the Comments section
of the Home Examination Form and on the SP Card. This will provide a record of the complaint in case
the examinee takes some other action. Such complaints would be expected to be rare and taking followup
steps on the part of the examinee would be expected to be even more unusual.
8.6.2
Upset Examinees
One common reason why an examinee may become upset is unfamiliarity and/or fear about
what exactly is going to be done in the examination and why. Such fears and apprehensions can be
alleviated if the home examiner can explain in general terms what s/he is doing and why.
If an examinee get upset during the Home Examination, the home examiner should attempt to
identify the cause(s) of the problem, then alleviate or eliminate that problem to the extent possible. If the
cause of the problem cannot be clearly identified, it is important to try first to determine if it is
examination or non-examination based. If it appears to be related to the examination, there may be some
clues based on where in the examination process the examinee demonstrated agitation. It may then be
possible to direct the examinee to the cause by noting the immediately preceding sections of the
examination and asking whether the problem occurred then. Similarly, if non-examination based, the
home examiner can try to identify broad categories such as himself or herself, the room where the exam
is being conducted, a personal problem, a problem with another family member or something else. If
there is a "yes" response to any such categories, try to hone in on a more detailed specification of the
problem to determine what can be done or saiD to offset the problem.
8-178
One other technique that may serve to calm the examinee is to invite a relative or friend who
may live with the examinee into the room for the remainder of the examination. The examinee must first
indicate that it is okay or that s/he would prefer it. Many times, adding a familiar element to the setting
can have a moderating and calming influence.
It is possible that the home examiner may be unable to placate the examinee despite the efforts
outlined above. In this case, it may be necessary to prematurely terminate the examination, duly noting
the outcome and associated reasons why in the Comments section of the Home Examination Form and
on the SP Card. Nonetheless, every attempt should be made to try to identify the problem, reduce or
eliminate it, and then proceed with the examination. In most cases, it is expected that the home examiner
will be successful and will therefore be able to collect complete data on the examination rather than
stopping with only partial data.
8.6.3
Ill Examinees
If the examinee is ill upon arrival at the SP’s home or if an examinee suddenly becomes ill
during the examination process, it is necessary to try to determine if the examinee is too ill to effectively
participate. Many times a short rest will make the examinee feel well enough to continue. However, if
it is clear that the examinee cannot continue with the exam, the situation should be documented completely
in the Comments section of the Home Examination Form and also on the SP Card. In some situations,
the examinee may require emergency care. Procedures for handling examinees requiring emergency care
are given in Chapter 9.
8.6.4
Disruptive Examinees
If an examinee is or becomes disruptive for whatever reason (intoxicated, psychotic, belligerent,
etc.), or the home situation becomes unsafe, the home examiner should leave the home immediately and
communicate the situation to the MEC manager as soon as possible. The situation should be recorded
completely in the Comments section of the Home Examination Form and on the SP Card.
In summary, it is impossible to completely specify all of the problems that might develop
8-179
during the Home Examination phase of a particular stand. Rather than list sets of procedures for possible
rare events, this section outlines some general procedures that may be applied to a range of possible
occurrences.
One basic guideline to follow in conducting the Home Exam is to use common sense if
something happens that requires an immediate response. A second basic guideline, if less than an
immediate response is needed, is to contact the MEC Manager promptly to explain the situation. This can
be done using the cellular phone that is available for the home examiner. The MEC Manager will be in
contact with the field office and the home office at Westat and can be advised on a course of action if
necessary.
8.7
Dress Code
The dress code for the home examiner is the same as for the MEC staff. Presenting a
"professional" appearance is mandatory. Clothing must be clean, neat and inconspicuous. It is better to
slightly overdress than to appear too casual. Attire such as jeans (denim, corduroy, etc.), tee-shirts, tank
tops, etc. are unacceptable. A white lab coat is to be worn with the identification badge visible prior to
the arrival at the SP’s home and during all exam procedures.
8-180
9. SAFETY PROCEDURES
9.1
Medical Emergencies Overview
The Home Examinations are designed to be safe for all eligible SPs. However, it is possible
that an incident or medical emergency may occur when the home examiner is conducting an examination.
The following sections of this chapter give the procedures which should be followed by the home
examiner in the event that such an incident or medical emergency should occur.
Before Home Examinations begin at a stand, the home examiner should confirm with the MEC
manager that "911" can be dialed to contact emergency medical services in the area. If "911" is not
available, it is necessary to find out what central number can be called to contact local emergency medical
services.
Any incident or emergency which occurs should be fully documented in the Home Exam
Incident/Emergency Report Form (Exhibit 9-1.) Instructions for completing this form are given in
Section 9.4 of this chapter.
In the event of a medical emergency in which the SP remains conscious, the home examiner
must obtain the consent of the SP to contact emergency medical services. If the SP refuses to consent,
the SP or the SP’s guardian must be asked to sign a Home Exam Release Form (Exhibit 9-2) which states
that the SP does not wish to contact an emergency medical service for followup medical attention against
the advice of the NHANES III home examiner. If a Household Interviewer, a family member, or a
neighbor is present, they should be asked to witness the SP’s signature by signing the Release Form. The
second page of the 2-part form should be given to the SP, and the original of the form should be given
to the MEC physician.
For incidents requiring the use of emergency medical services, even if the SP was not
transported to an emergency care facility, the home examiner should meet with the MEC Physician and
the MEC Manager to discuss the incident and review the Home Examination Incident/Emergency Report
Form.
9-1
Exhibit 9-1. Home Examination Incident/Emergency Report
9-2
Exhibit 9-1. (continued)
9-3
9.2
First Aid Instructions for Signs of Vasovagal Reaction
Fainting is a partial or complete loss of consciousness due to a reduced supply of blood to the
brain for a short time.
Occasionally, a person collapses suddenly without warning.
Recovery of
consciousness almost always occurs when the victim falls or is placed in a reclining position, although
injury may occur from the fall. To prevent a fainting attack, a person who feels weak and/or dizzy should
lie down or bend over with his/her head at the level of his/her knees.
Signs and symptoms of fainting are:
1. Extreme paleness
2. Sweating
3. Coldness of the skin
4. Dizziness
5. Numbness and tingling of the hands and feet
6. Nausea
7. Possible disturbance of vision
If the SP exhibits any of these signs, proceed as follows:
Assist the SP to a safe position. Always protect the SP’s head. It is always safe to place
the SP in a prone position on the floor. Elevate the SP’s feet.
Ask the SP if s/he has any pain. Observe for signs of sweating, nausea, or vomiting.
If the SP has no pain and the symptoms pass within 5 minutes, bring the SP to a seated
position and observe for an additional 5 minutes. Do not give any liquids unless the SP
has completely revived and is sitting up. Help the SP to rise and observe for an
additional 2 to 3 minutes.
If the SP has pain, nausea, vomiting or sweating which continues for 5 minutes or more
and which is not relieved by the medication which s/he normally takes for this condition,
such as nitroglycerin for an angina attack, obtain the SP’s consent to call for emergency
medical services.
If the SP or the SP’s guardian refuses to allow you to call for emergency medical
services, ask the SP or SP’s guardian to sign a release form (see Exhibit 9-2.) Give the
SP a copy of the release form, and keep the original to give to the MEC physician.
Document the incident on the Home Examination Incident/Emergency Report Form.
Upon your return to the MEC, give the completed Home Examination Incident/Emergency
Report Form to the MEC Physician, and discuss the incident with the MEC Manager and
the MEC Physician.
9-4
If the SP faints, the home examiner should follow the procedures given below:
If the SP is not already lying down, attempt to place him/her in a prone position. If
possible, raise the SP’s feet.
Feel for the pulse and check respirations as instructed in basic CPR training.
If the SP has a palpable, regular pulse and is breathing, continue to monitor him/her for
2 to 3 minutes. If the problem is a simple faint, the SP should begin to recover within
5 minutes. After recovery, help the SP to a seated position and continue to monitor for
5 minutes. The SP should be carefully observed after recovery because fainting might be
a brief episode in the development of a serious underlying illness.
If the SP is unarousable after 2-3 minutes and is still breathing and has a pulse, call the
emergency medical service. Observe the SP carefully until the emergency service team
arrives.
If the SP has no palpable pulse and/or respirations, ask a household member to call the
emergency medical service and begin CPR immediately. Continue CPR until the
emergency medical service team arrives.
When the emergency medical service team arrives, give a brief summary of the event to
the emergency medical technician.
Do not accompany the SP to the emergency care facility.
Complete the Home Examination Incident/Emergency Report.
Immediately upon your return to the MEC, report to the MEC physician and the MEC
Manager to discuss the incident and review the Home Examination Incident/Emergency
Report form.
9.3
Safety Precautions and Prevention of Injuries in the Home
Obstructions that could cause accidents or falls in the home should be removed. The detailed
protocols in Chapter 7 describe how to safely administer the tests including instructions on how to
physically support the SP if required. For all test items where loss of balance is a possibility, the
following safety precautions should be initiated:
Position yourself standing at the SP’s side, slightly behind him/her. (With SPs that are
recovering from a stroke and may have paresis or weakness on one side, it is best to
position yourself behind the unaffected side.) Your hands should be positioned very close
to either side of the SP’s trunk at the hip or waist level. Be ready to place both hands
9-5
on the SP to stabilize him/her if necessary.
If the SP loses balance, immediately hold onto the SP with both hands at the trunk and
stabilize him/her.
If the SP begins to fall do not try to catch him/her. Reach under the SP’s shoulders from
behind and gently pull the SP back toward you. Slowly ease him/her down to the floor,
preferably by having them lean against you as a guide. You should move with the SP to
the floor and eventually position yourself on one knee. This will keep the SP and you
from becoming injured.
If an SP falls and is not injured, the home examiner should follow the steps listed below to help
the SP stand:
Utilize available help in the home;
State clearly to the SP how you will assist him/her to stand;
Have the SP get on his/her knees or on all fours;
Place a chair next to the SP;
Have the SP support himself/herself using the chair;
Assist the SP by holding him/her firmly under the shoulders to help him/her rise;
Do not try to lift the SP alone from the floor.
If the SP is injured and/or cannot get up from the floor with your assistance, obtain the SP’s
consent to call emergency medical services.
Document the incident in the Home Exam
Incident/Emergency Report. Remain with the SP until help arrives. Upon your return to the MEC, report
immediately to the MEC Manager and the MEC physician to relay information about the incident and to
review the Home Examination Incident/Emergency Report.
9-6
9.4
Ill Examinees
If, as you begin the Home Examination, you notice that the SP appears ill, you can inquire
about his/her current health condition. If the SP is feeling ill, and if this is not a usual condition for
him/her, the SP should be encouraged to notify his/her doctor of the problem.
It is important to remember that the purpose of the NHANES III study is to collect data on the
health status of the U.S. population and that the survey team is not set up to treat or manage medical
problems. The approach taken with ill examinees in the home should be the same as in the MEC.
9.5
Reporting and Recording Incidents and Emergencies
The Home Examination Incident/Emergency Report Form will be utilized to document any
occurrence involving an examinee that results in the interruption of the examination procedure due to
sudden illness or injury. An example of the form is shown in Exhibit 9-1. The first section of the form
is completed by the home examiner and should include an accurate assessment of the incident or
emergency situation and provide a detailed description of the procedures followed. It is important to be
as specific as possible with the documentation. Be sure that all handwriting is legible. To complete the
form, the home examiner should include the following information:
Month, day, year, and time of the incident or emergency;
Examinee sample identification number;
Examinee age (enter number of months or years);
Examinee sex (check either Male or Female);
Examinee symptoms (list specific symptoms separately like shortness of breath, dizziness,
chest pain, etc.);
Medical/emergency procedures followed (briefly describe what was done and the order
in which it was done; if not applicable check the "N/A" box;
Outcomes (briefly describe the outcomes of the incident/emergency by relating them to
individual procedures performed; if not applicable, check the "N/A" box);
9-7
Identification of emergency services used (list the specific name, address and telephone
number, including the area code, of the hospital ambulance service or police, fire, county
or local rescue squad used; if not applicable, check the "N/A" box);
Identification of medical facility to which examinee was taken (list the name, address and
telephone number, including the area code, where the examinee was taken; if not
applicable, check the "N/A" box); and
Signature of the home examiner.
The second part of the form is to be completed by the MEC Manager and the MEC Physician
after they have reviewed the form and discussed the incident/emergency with the home examiner. To
complete the form, the physician/MEC Manager should include the following information.
Month, day and year the physician or manager (circle either physician or manager)
contacted the examinee’s designated physician/clinic (circle either physician or clinic); if
not applicable, check the "N/A" box;
Physician examiner number;
Manager examiner number;
MEC manager signature;
Month, day, and year of signature;
Stand number; and
Location of MEC.
9-8
10. QUALITY CONTROL
The quality control for the Home Examination consists of several activities: verification of data
entry by the Quality Control Coordinator in the field office; periodic observation of home exams at each
stand; and equipment calibration, maintenance and inventories at the start of each stand and periodically
throughout each stand.
10.1
Observation
MEC Managers will observe one Home Exam in each stand unless the edit observation by
NCHS staff indicates that a problem exists. In that case, remedial action will be taken as is necessary.
MEC Managers will be asked to complete a two-part Home Exam Observation Form for each exam
observed. The observation form includes a checklist of equipment and supplies and an exam performance
assessment (Exhibit 10-1 is a copy of the form). MEC Managers will be required to provide feedback
to the home examiner after the observation.
The edit and observation forms will be sent to Westat at the end of each stand.
10.2
Equipment
All equipment and supplies will be inventoried at the beginning and end of each stand and daily
before each Home Examination. Procedures for the inventory of equipment and supplies are given in
Chapter 3 of this manual.
All necessary equipment maintenance and calibration will be completed and documented on
a regular basis as specified in Chapter 3 of this manual. The MEC Manager will periodically review the
documentation and, in addition, check the equipment before observing a Home Examination.
All equipment, maintenance, and calibration logs should be photocopied and sent to Westat at
the end of each stand.
10-1
Exhibit 10-1. Home Exam Observation Checklist - Part I
10-2
Exhibit 10-1. Home Exam Observation Checklist - Part I (continued)
10-3
Exhibit 10-1. Home Exam Observation Checklist - Part I (continued)
10-4
Exhibit 10-1. Home Exam Observation Checklist - Part I (continued)
10-5
10.3
Updating Procedures and Specifications
It is impossible in a study of this size to anticipate every situation that might arise during the
course of the fieldwork. Occasionally there will be points already covered in the Home Examiner Manual
that will need to be explained or clarified, or new points that will need to be made. Updates will be
issued in the form of Field Memos or changed pages to the Home Examiner Manual. All changes will
be numbered and distributed by the MEC Manager. If there are any questions regarding the content of
a Field Memo or changed page, it should be discussed with the MEC Manager for clarification.
10-6
APPENDIX A
CAPI HOME EXAMINATION MANUAL
10-7
1. INTRODUCTION
1.1
Background
The home examination component of NHANES III has traditionally been administered through
the use of an examination booklet and pencil for recording measurement data and SP responses.
Beginning in Year 5 of NHANES III, Computer Assisted Personal Interviewing (CAPI) will replace the
paper and pencil approach to recording the results of the home examination. The small laptop computer
that is used for conducting the Spirometry portion of the home examination now also contains the CAPI
software used to administer the home examination and input data.
The CAPI system has many advantages over the paper and pencil method of conducting the
home exam. The computer will assist you by inserting the name and gender of the SP in many of the
questions. These case specific displays are possible because information about the SP has already been
loaded into the computer software. The Home Exam software will automatically move you through the
questionnaire, displaying the next appropriate question and moving to the next appropriate section for the
SP. These programmed skip patterns are an integral part of the CAPI - Home Exam software. In
addition, CAPI software checks each answer for consistency with answers given previously during the
exam. If an inconsistent answer is entered, an error message and instructions will be displayed. Where
measurement data is entered, these data are checked against predetermined "acceptable" ranges. If a
measurement falls outside this range, a message is displayed and instructions given. Lastly, the CAPI
system will free you from most post-examination editing that is now done when returning to the Field
Office.
10-1
1.2
CAPI Development and Implementation Schedule
Development of the CAPI-Home Examination software began in the Spring, 1992. Prior to
this, CAPI software development began for the screeners and questionnaires used by the NHANES III
Field Interviewers. The following is the CAPI - Home Examination testing and implementation schedule:
July 22 - 31
September 30
October 28
November 13
CAPI Pretest
Full CAPI Training
CAPI Implementation
CAPI Implementation
Minnehaha, SD
New York, NY
Mecklenberg, NC (B. Barron)
Clayton, GA (D. Irby)
Prior to implementation of the CAPI Home Examination in the field, a one-day re-training will
occur with each home examiner individually at their respective stands.
Implementation of the CAPI system for the Field Interviewers will be staggered over the course
of the first three stands of Year 5. Implementation for the Mecklenberg, NC stand will begin on October
9; for the Clayton, GA stand on October 27; and for the Spalding, GA stand on November 27, 1992.
10-2
2. HARDWARE
2.1
Description of the Equipment
The Compaq LTE/286 computer currently provided by NIOSH for the Spirometry component
of the home exam will continue to be used for that purpose. In addition, the Compaq LTE/286 will also
contain the CAPI-Home Examination software. The CAPI equipment, or hardware, consists of the
following pieces:
2.1.1
1.
The computer. Specifically, the computer is a Compaq LTE/286. It weighs about 7 lbs
and contains all the software programs that you will need to administer the home
examination and perform the spirometry test.
2.
The adapter. This gray box converts regular electricity from the wall outlet to the lower
voltage needed to run the computer. It also automatically recharges the battery.
3.
The power cord. This cord carries current from the wall outlet to the adapter.
4.
The battery. This piece fits inside the computer and will provide power to the computer
for up to four hours without recharging. The spare battery should remain with the
computer and kept fully charged.
5.
The extension cord. The three-prong extension cord gives more flexibility when choosing
a place to set up the PC in the SP’s home.
6.
The carrying case. The carrying case comes with the PC, and has room to hold the
Compaq LTE/286, the PJ5 Spirometer, and the equipment listed above.
The Compaq LTE/286
The Compaq LTE/286 consists of many parts, such as the screen, the keyboard, disk drives,
and power sources. The following is a description of the various parts of the computer that you need to
be familiar with.
10-3
2.1.1.1
The Screen
The display screen on the Compaq LTE/286 has an adjustable viewing position. The screen
display can be adjusted for brightness and contrast with the controls which are located next to the power
switch. You may need to readjust these controls every time you turn on the computer, depending on the
lighting that is available in the room in which you will be working.
To open the computer and view the screen, place the unit on a flat surface with the hinged side
facing away from you. Pull both screen release slides towards you and lift the top of the computer. The
top of the computer will swing upward on the hinge to reveal the screen and keyboard. Position the
screen so that it is most comfortable for you.
2.1.1.2
The Keyboard
The Compaq LTE/286 has a standard typewriter keyboard. You only need to tap lightly on
the keys in order to operate the keyboard. Many of the keys are repeating keys, that is, if you hold the
key down, the letter or number will continue to appear on the screen. If you hold down any keys other
than the Control (Ctrl) and Shift keys, the computer will remember those keystrokes many times and
attempt to perform those keystrokes once you release the key. For example, if you press the number "2",
but hold down the key too long, the computer will try to enter "2" fifteen times. Remember to hit the
keys lightly.
2.1.2
Power Sources
2.1.2.1
The AC Adapter
The AC adapter provides external power to the computer and at the same time charges the
internal battery pack. To use electricity to run the Compaq LTE/286, first ensure that the ON/OFF switch
is in the "OFF" position. To connect the AC adapter and power cord:
1.
Plug the AC adapter cord into the AC adapter connector on the rear panel of the
computer.
10-4
2.
Plug the AC power cord into the AC adapter.
3.
Plug the pronged connector of the AC power cord into a properly grounded AC outlet.
Once the AC adapter is connected to the computer and to an AC outlet, the green power LED
indicator on the AC adapter lights indicating the AC adapter is on.
2.1.2.2
The Battery Pack
Electricity is the preferred source of power for the Compaq LTE/286. However, there may be
times when electricity is either not available, or there is no 3-prong outlet accessible. In these cases, the
computer will need to run on the battery. The Compaq already has been equipped with a battery. The
battery compartment is located on the left side of the computer. When the computer is plugged in, the
battery automatically recharges. The orange light on the adapter will be illuminated when the battery is
charging. When the orange light is not illuminated, the battery is fully charged. A fully charged battery
lasts for approximately 3.5 hours, however, this varies with the software being used. Always carry a fully
charged back-up battery with your equipment.
The Compaq has two low battery signals to let you know when the battery’s power is running
low. The first low battery signal will occur when the battery pack has approximately 30 minutes of its
charge remaining. The first low battery signal alerts you by (1) beeping 6 times and (2) the green
power/low battery light, located just above the keyboard, flashes once per second. The second low battery
signal occurs when the battery pack is near complete discharge. The second low battery signal alerts you
by (1) beeping 12 times and (2) the green power/low battery light flashes twice per second. If the second
low battery signal comes on, you have only 20 seconds to begin to escape from the exam and save the
data.
10-5
2.1.2.3
Charging/Recharging the Battery
To charge the battery:
2.1.2.4
1.
Make sure the computer is turned off.
2.
Connect the AC adapter to the Compaq as you would to run the computer using
electricity:
a.
plug one end of the AC adapter into the computer connector (remember the arrow
on the AC adapter jack faces up);
b.
connect the power cord to the AC adapter;
c.
plug the power cord into a 3-prong electrical outlet.
3.
Leave the computer off, and let the battery recharge. A fully discharged battery takes
approximately 6 -7 hours to recharge.
4.
The orange charge LED indicator light on the adapter should be on. Once the orange
light goes off, the battery is fully charged.
5.
Unplug the power cord first from the electrical outlet, then from the computer.
Changing the Battery
Changing the battery is very simple, however there are two precautions that must be kept in
mind:
Never remove or insert batteries when the computer is on. This can cause data loss and
may damage the computer.
Never insert any metal object (or any object other than a battery pack) into the battery
compartment -- it can cause severe damage to the computer.
To change the battery:
1.
Make sure the computer is off and disconnected from the electric outlet.
2.
Open the display screen. The battery compartment door will not open if the display
screen is closed.
10-6
3.
The battery compartment is located on the left side of the computer. Open the battery
compartment door by sliding the battery compartment latch towards you.
4.
Remove the battery pack by pulling it straight out to the left using the fabric tab attached
to it.
5.
Put the charged battery pack into the compartment -- terminal end first, so the fabric tab
remains exposed.
6.
Gently snap the battery compartment door shut.
10-7
3. CAPI SOFTWARE
3.1
Introduction
Computer software are the programs that instruct the computer what to do. CAPI-Home
Examination software has been developed to allow you to read examination questions from the computer
screen and record the data and examination results directly into the computer. CAPI software has been
programmed to follow the correct skip pattern based on the examinee’s age, sex, and language of the
exam. The software also checks the ranges of responses entered into the computer, and checks for
consistency between SP responses.
3.2
Special Keys
The CAPI system uses only a few of the special keys that appear on the keyboard: <Enter>,
<Escape>, <Delete>, <Backspace>, <Control>, and <Shift>.
3.2.1
The <Enter> Key
The <Enter> key is located on the mid-right hand side of the keyboard. Pressing this key
instructs CAPI to take the information typed on the screen and place it in the data base. Until the <Enter>
key is pressed, the information remains on the screen, but is not a part of the data base. Pressing <Enter>
will also calls up the next question or screen.
3.2.2
The <Escape> Key
The <Escape> or <Esc> key is located at the top left corner of the keyboard. The <Esc> key
performs much the same function as <Enter> in question CAPI screens: the difference is it performs these
functions on roster-type screens or comment screens.
10-8
3.2.3
The <Delete> Key
The <Delete> key, located at the top right of the keyboard, is used to move the cursor back
to a previous field on the same screen in order to correct the data. In moving backward on the screen,
all data passed through while backing up is erased and must be reentered after the correction is made.
3.2.4
The <Backspace> Key
The <Backspace> key is located at the top right of the keyboard just below the <Delete> key.
This key is used to correct errors in the same data entry field. When the <Backspace> key is pressed, the
cursor moves one space to the left, erasing the character in that space. Corrections are made by retyping
the information.
3.2.5
The <Control> Key
The <Control> key is used in combination with other keys on the keyboard. The <Control>
key is a nonrepeating key, and is located on the lower left side of the keyboard.
3.2.5.1
<Control>+<B>
The <Control>+<B> key combination is used to move back to a previous screen. All data
typed on the current screen, as well as data entered on the previous screen will be deleted. After making
the correction, press <Enter> and proceed forward again, reentering the data.
3.2.5.2
<Control>+<E>
The <Control>+<E> key combination allows you to break off an exam prior to its natural
conclusion. When the examination is restarted, the first section that has not been completed will be
brought up. If the <Control>+<E> function is used in the middle of a section, the section data previously
entered will be erased. The examination will be restarted at the beginning of that section. For this reason,
it is important to try to complete a section before using the <Control>+<E> function.
10-9
When using the <Control>+<E> function to exit from an examination, the CAPI program will
ask you if you want to leave a message about the examination. Answering "Yes" will bring up a screen
where the message can be typed. The message can be viewed at any time by using the "View Messages"
option on the main menu.
3.2.5.3
<Control>+<K>
The <Control>+<K> combination allows you to comment on any response by entering a text
comment on that screen. Press <Control>+<K> before entering a response in the data entry field on that
screen. A box will be overlaid on the screen where comments can be typed. Press <Escape> to exit the
comment field. Type the response in the data entry field, and press <Enter> to move to the next screen.
NOTE:
Comments entered using the <Control>+<K> function are entered into a comments file.
Comments are not attached to the screen where the comment was made, therefore, it is important to
identify, in the comment, the question for which the comment is being made.
3.2.5.4
<Control>+<L>
The <Control>+<L> key combination allows you to "leap over" data entry fields on a screen.
This is used for questions where multiple answers are allowed. When all appropriate answers have been
selected, <Control>+<L> is used to exit the screen. Be certain the cursor rests in an empty data entry
field prior to pressing <Control>+<L>. If the cursor rests in a data field containing information when
<Control>+<L> is pressed, that data will be lost.
3.2.6
The <Shift> Key
The <Shift> key is a nonrepeating key that is used in combination with other keys on the
keyboard. A shift key is located on either side of the keyboard.
10-10
3.2.6.1
<Shift>+<7>
The <Shift>+<7> key combination is used to indicate a "refused" response to a question or
exam. When <Shift>+<7> is pressed, a "&" will appear in the data entry field. The CAPI software reads
this as "refused" and brings up the next appropriate question or screen.
3.2.6.2
<Shift>+<8>
The <Shift>+<8> key combination is used to indicate a "don’t know" response to a question.
When <Shift>+<8> is pressed, a "*" will appear in the data entry field. The CAPI software reads this as
a "don’t know" response and brings up the next appropriate question or screen.
3.3
Screen Conventions
3.3.1
Upper/Lower Case
All the information that is read aloud to the respondent appears in upper and lower case text
on the screen. This information includes section introductions, survey questions, exam instructions, and
concluding remarks. For example, when the following question appears on the screen, it would be read
aloud since it appears in upper and lower case text:
"Do you have any problems from recent surgery, injury, or other health conditions that
might prevent you from standing up from chair or walking?"
3.3.2
Upper Case Text
Any instructions to you, or other information intended to guide you through the interview, will
appear on the screen in upper case text. Do not read aloud to the SP any text that appears in upper case.
For example, the following statement would not be read aloud to the SP since it appears in upper case:
"HAS SP BEEN OBSERVED TO WALK WITHOUT HELP OF ANOTHER PERSON?"
10-11
3.4
Types of Questions
The CAPI system uses three types of questions to collect data from the SP:
3.4.1
1.
Questions with answer categories provided;
2.
Questions requiring numerical entry;
3.
Questions with open-ended responses.
Questions with Answer Categories Provided
Many questions in the CAPI software program list the possible answers the SP is expected to
give. For these questions, the home examiner types the code number that appears to the left of the answer
which the SP gives. The simplest example of this type of question is the YES/NO question. Consider
the following question:
"Are you currently trying to lose weight?"
( )
1. YES
2. NO
To answer this question, type "1" to indicate YES or "2" to indicate NO.
Sometimes the answer categories appear as part of the question itself. For these kinds of
questions, you will read the question aloud to the SP, but you will not read the answer categories. For
example:
10-12
"How long ago was your last period?"
( )
1.
2.
3.
4.
5.
6.
HAVING IT NOW
LESS THAN 2 MONTHS AGE
2-3 MONTHS
4-6 MONTHS
7-9 MONTHS
10-12 MONTHS
CAPI displays the question in upper/lower case text while the answer categories appear in all
upper case. Remember, text that is written in all upper case should not be read aloud to the SP. To
complete this question, type the number code that appears next to the appropriate response and press the
<Enter> key.
When a question requires multiple responses, CAPI will instruct you to select all appropriate
responses. The screen will also display multiple data entry fields to accept the codes of each answer
category provided. The following is an example of a question with the multiple response option:
"REASONS SPIROMETRY TEST INCOMPLETE, UNSATISFACTORY
OR NOT DONE: CODE ALL THAT APPLY. CTRL/L TO LEAVE SCREEN.
(
1.
2.
3.
)
(
)
(
)
(
)
(
)
EQUIPMENT FAILURE
COUGHS DETECTED
EARLY TERMINATION OF EXPIRATION, INSUFFICIENT EFFORT
. . . . etc.
Pressing the <Enter> key after each entry will move the cursor to the next data entry field. After entering
all desired choices, press the <Enter> key to move the cursor to the next empty data entry field. The
<Control>+<L> key combination can now be used to exit the screen. Pressing <Control>+<L> while
the cursor rests in a data entry field that contains data will cause the data in that field to be lost.
Some questions with answer categories provided offer an "OTHER" or "SPECIFY" response
10-13
choice. If additional information is needed when this answer category is selected, CAPI prompts you to
specify your "OTHER" or "SPECIFY" answer by displaying a blank line to type the additional
information. For example:
TYPE OF FLOOR SURFACE
( )
1.
2.
3.
4.
LINOLEUM/TILE/WOOD
LOW-PILE CARPET
THICK-PILE CARPET
OTHER_________________________________________
(Specify)
For this example, the data entry line for describing the "OTHER" floor surface appears when
the "OTHER" option is selected. The cursor will be at the beginning of the data entry line. After the
additional information is typed, press <Enter> to proceed to the next question.
10-14
3.4.2
Questions Requiring Numeric Entry
The second question-type used in CAPI questionnaires require numeric entries. These questions
often are designed to obtain information such as "how much", "how often", or "when". Questions like
these are generally followed by a numeric entry field where the measurement or response is entered.
There are many types of questions that use numeric entry fields.
For example, sometimes a question requires a simple number only:
"How many cigarettes have you smoked in the past 5 days?"
(
) CIGARETTES
For these types of questions, simply enter the number which the SP gives and press the <Enter>
key.
Some questions requiring numeric entry contain decimal points. CAPI will display the position
of the decimal point. Consider:
WEIGHT (KILOGRAMS) (
. )
If the SP weighs "84.70 kg", you would type "8470" to record the correct weight. If you typed
only "847", you would have recorded that the SP weighed 8.47 kg. On this type of numeric entry, you
must account for all decimal places, even if the value to the right of the decimal is "0" or "00".
Some questions requiring numeric entries collect both quantity and unit of measure information.
Typically, these questions require you to select the quantity and then enter the unit of measure. For
example:
10-15
How long ago did you stop taking birth control pills or are you still taking them?
(
)
number
(
)
1.
2.
3.
4.
Days
Weeks
Months
Years
This type of question requires that you complete two steps in order to answer it. First, select
the quantity; then specify the unit of measure.
3.4.3
Questions with Open-Ended Responses
The final type of question found in the CAPI system are open-ended questions. This type of
question does not restrict the answer to a pre-designated list of answer categories. This type of question
enables you to record detailed answers and comments. Simply type the information you wish to record
in the field provided. Press <Enter> to transmit this information.
3.5
Error Messages
CAPI is designed to detect certain kinds of errors automatically. Whenever the CAPI system
detects an error, it displays an error message that informs you of the problem and, in some cases, instructs
you how to correct the problem. Once you have read the error message, press <Enter> to clear the
message from the screen. The cursor is automatically positioned in the data entry field for you to re-enter
the answer. The two most common types of error messages are "out-of-range" entry error messages and
inconsistent data error messages.
10-16
3.5.1
Out-of-Range Error Messages
Most questions in the CAPI system are programmed to accept only a specific range of answers.
For example, YES/NO questions accept only two responses:
1.
2.
YES
NO
When you type an answer code in the data entry field for one of these questions, CAPI checks
to ensure that you have recorded either "1" or "2". If CAPI detects any other character in the data entry
field, it will display the following error message: "RESPONSE IS OUT OF RANGE. PLEASE ENTER
A 1 OR 2."
Questions requiring input of a measurement also have a range of responses that are considered
"normal".
Measurement values that fall outside this "normal" range trigger the following warning
message: "THE VALUE ENTERED FALLS OUTSIDE NORMAL LIMITS. PLEASE RECHECK AND
REENTER THIS MEASUREMENT." Recheck the measurement. If the same measurement is entered a
second time, it will be accepted by the computer.
3.5.2
Inconsistent Data
The CAPI system is programmed check newly entered data for consistency with data previously
entered. When data is entered that is not consistent with data entered previously for other questions, the
CAPI system will indicate this by bringing up a screen explaining what caused the newly entered data to
be inconsistent. For example in the venipuncture section, if you entered the current time as "9:00 am",
then tried to enter that an SP ate his last meal at "9:30 am today", a message indicating that this time was
inconsistent with the current time will be displayed. Pressing <Enter> will remove the message screen
and bring up the data entry screen. Enter the correct information and press <Enter>. This answer will
again be checked for consistency. Should the cause of the inconsistent data be a question entered too long
ago to go back and correct, use <CTRL>+<K> to comment on the correct data before entering the
response to the current question.
10-17
4. CAPI - HOME EXAMINATION SOFTWARE
4.1
Introduction
The CAPI - Home Examination software is menu-driven system. The various components of
the software system are accessed or "called up" through the use of a series of main- and sub-menus. The
layout of this menu system is shown below:
A.
CAPI Home Examination
1.
Work on a Case
a.
Conduct Interview
1.
Start/Restart Interview
2.
Complete Section K - Venipuncture
3.
Complete Section L - Conditions of Exam
4.
Spirometry Summary Information
5.
Summary for MEC Physician/Laboratory
6.
Summary for Control Record
7.
Complete Section J - Spirometry
b.
Finalize Cases
2.
Review Cases and Dispositions
3.
Transfer Cases
4.
Enter Cold Calls - SP Data
B.
Calibrate Spirometer
C.
View Comments
D.
View Messages
10-18
4.2
The Home Examination System Menu
The Home Examination System Menu contains four options. These options are:
4.2.1
1.
CAPI Home Examination
2.
Calibrate Spirometer
3.
View Comments
4.
View Messages
CAPI Home Examination
Selection of option 1 - CAPI Home Examination brings up the Home Examiner main menu
screen. It is from the Home Examiner main menu screen that the software options related to conducting
the home examination and distributing information about that examination are found. The options
available from Home Examiner main menu are discussed in section 4.3.
4.2.2
Calibrate Spirometer
This option is used to access the NIOSH spirometry software directly. The spirometry software
is accessed directly from the CAPI system when the lung function test is performed as a part of a home
examination. The Calibrate Spirometer option is used at the beginning of a stand to calibrate the PJ5
spirometer, and at any time that it is necessary to test the functioning of the equipment.
4.2.3
View Comments
The View Comments option can be used at any time to view any <Control>+<K> comments
entered during the course of the examination. The comments made during an examination can be
reviewed by the Home Examiner and by the Quality Control Coordinator to determine if it is necessary
to modify the examination data before the data is taken off the PC.
10-19
4.2.4
View Messages
The View Messages option is used to view any messages left when the <Control>+<E>
function was used to exit an examination. After selecting option 4 - View Messages, select the SP ID
Number for the SP for whom you wish to view messages.
4.3
The Home Examiner Main Menu
The first screen of the CAPI - Home Examination software is the main menu screen. This
screen is used to access the appropriate subsections of the software used to complete all aspects of the
home exam. The options available from the main menu screen are:
4.4
1.
Work on a Case
2.
Review Cases and Dispositions
3.
Transfer Cases
4.
Enter Cold Calls - SP Data
Work on a Case
If "Work on a Case" is selected, the next screen will list all cases on the laptop, with an
indication of whether the case is completed (C1-C7), in progress (IP), or not yet worked (NW). For cases
in progress, the screen will display the section letter of the last completed section. The examiner will
select the case to work. When the case selection has been made, the Work on a Case sub-menu will be
brought up. This menu has two options:
1.
Conduct Interview
2.
Finalize Case (Nonresponse and incompletes - Section M)
10-20
4.4.1
Conduct Interview
If "1" (Conduct Interview) is selected, the following screen will appear:
4.4.1.1
1.
Start/Restart Interview
2.
Complete Section K - Venipuncture
3.
Complete Section L - Conditions of Exam
4.
Spirometry Summary Information
5.
Summary for MEC Physician/Laboratory
6.
Summary for Control Record
7.
Complete Section J - Spirometry
Start/Restart Interview
This option will take the examiner into the next section of the examination to be completed.
If the examination has not yet been started, the program will begin with Section A - Body Measures. If
all sections have been completed, the following message will be displayed: "All sections completed."
4.4.1.2
Complete Section K - Venipuncture
This option will allow the examiner to complete section K - Venipuncture at any time outside
the normal flow of the examination. Normally, section K will be brought up after section J (Spirometry).
If, however, the venipuncture component is to be performed out of sequence, selection of this option will
bring up only section K. After completion of section K, the Home Examiner main menu will be brought
up. When the home examination is restarted for the SP, the message "Venipuncture already completed"
will appear after section J (spirometry) has been completed.
10-21
4.4.1.3
Complete Section L - Conditions of Exam
The examiner can complete this section at any time after the exam has been completed. If the
nature of the comments made in this section are sensitive in nature, you may wish to complete this section
after you have left the SP’s premises. In this case, selecting option 3 - Complete Section L - Conditions
of Exam, will bring up this section for the SP. The CAPI system will not close out a case as until this
section has been completed.
4.4.1.4
Spirometry Summary Information
This screen contains all the information the home examiner needs to copy onto a hard copy
data sheet before the CAPI system is left and the spirometry software brought up. This screen will be
brought up automatically in the course of completing the home examination. This menu option gives the
home examiner another opportunity to view this data if necessary.
4.4.1.5
Summary for MEC Physician/Laboratory
This option will display two screens that contain the information that will be entered into the
MEC Laboratory system following the examination. This option also displays the SP information needed
to complete the SP Identification form for the MEC Physician. These reports can be printed on the Field
Office printer. To print the report, attach the PC to the printer using the cable connected to the printer,
call up the Summary for MEC Physician/Laboratory report, and press <Shift>+<PrtScrn>.
4.4.1.6
Summary for Control Record
This option will display two screens containing the information that will be copied onto the
hard copy Control Record following the examination. The report will list each component of the Home
Examination, and will indicate whether the component was "complete", "incomplete", or "not applicable".
This column only indicates whether the component was finished, i.e., whether all the questions were asked
and measurements taken, not what the result of those tests were. For the spirometry and venipuncture
components, a second column lists whether the tests were "complete", "unsatisfactory", or "incomplete".
10-22
This report can be printed on the Field Office printer. To print the report, attach the PC to the printer
using the cable connected to the printer, call up the Summary for Control Record report, and press
<Shift>+<PrtScrn>.
4.4.1.7
Complete Section J - Spirometry
If it is necessary to complete only the spirometry component of the home examination, option
7 - Complete Section J can be selected. Once this section has been completed, the software will return
to the Conduct Interview menu.
4.4.2
Finalize Case
If Option 2 (Finalize Case) is selected from the Work on a Case sub-menu, disposition codes
can be entered manually for cases not worked. Disposition codes used in the CAPI system are:
C1 Exam Conducted - at least 1 section complete
C2 Rescheduled
C3 Refusal
C4 Could not contact
C5 Too ill
C6 Unavailable
C7 Other (specify)
If C1 is entered, the software will check to verify that at least one of the examination
components has been completed.
10-23
4.5
Review Cases and Dispositions
This menu option will display a listing of all cases on the laptop and their current disposition.
Data cannot be entered onto this screen.
4.6
Transfer Cases
This menu option will allow field office staff to load cases onto the examiner’s laptop and
remove finalized cases.
10-24
5. SPIROMETRY SOFTWARE
5.1
Introduction
NIOSH will continue to supply the spirometry software used on the Compaq LTE/286. This
software will exist on the hard disk with the CAPI - Home Exam software. While the two software
programs cannot be fully integrated, additional programming has been added to the CAPI system to
automate movement between the two programs.
5.2
Choosing Software Options
When the Compaq LTE/286 is turned on, the screen will display the Home Examination System
menu. This menu screen contains the following options:
1.
CAPI Home Examination
2.
Calibrate Spirometer
3.
View Comments
4.
View Messages
Selecting option "2" (Calibrate Spirometer) will bring up the spirometry programming directly,
without going through the CAPI programming.
If you want to perform the spirometry test as a part of an examination, select option 1 - CAPI
Home Examination to bring up the Home Examiner main menu.
5.3
Beginning of Stand Calibration
To calibrate the PJ5 at the beginning of each stand, first connect the PJ5 flow sensor to the PJ
9-pin receptacle located at the back of the PC. Turn on the PC. Allow the PJ5 to warm up for ten
minutes. After this warm-up period, select option "2" (Calibrate Spirometer) from the Home Examination
System menu. The NIOSH spirometry software will be brought up. Upon completion of the calibration
procedure, select "Exit Program" from the spirometry menu. The Home Examination System menu will
10-25
be brought up. Press <Enter> and follow the instructions to exit from the programming and turn off the
PC.
5.4
Equipment Set-Up for Examinations
When setting up for an examination in a SP’s home, the PJ5 spirometer should be connected
to the Compaq LTE/286 before the laptop is turned on. Turning on the laptop also activates the PJ 9-pin
receptacle, turning on the spirometer. The spirometer should be allowed to warm up for 10 minutes before
beginning calibration procedures.
The PJ5 spirometer must be calibrated at the point that the CAPI home examination software
has been exited and the spirometry software called up prior to performing the spirometry test on an SP.
5.5
Performing the Spirometry Exam
After the health screening questions (J1 - J5) have been answered for the spirometry
component, the CAPI software will be exited, and the NIOSH spirometry software brought up. Although
the two software programs exist together on the hard drive, they are not fully integrated. It will be
necessary to manually copy SP information from the CAPI program to the NIOSH software. This is
accomplished through the use of a Spirometry Report screen and a newly developed form, the Home
Examination Data Form. The Spirometry report will be brought up automatically by the CAPI system
prior to accessing the NIOSH spirometry software. The report screen contains the SP information needed
to be entered into the spirometry programming. In addition, the information on the screen can be used
to complete the PJ5 Spirometry Log Sheet for NIOSH. The information on the Spirometry Report screen
should be copied onto the Home Examination Data Form.
Once the information has been copied from
the screen onto the data form, press <Enter>. The NIOSH spirometry software will be brought up
automatically. When the spirometry exam has been completed, select the "Exit Program" option from the
spirometry menu screen to return to the examination.
10-26
5.6
Back-up Diskettes
Before exiting from the NIOSH spirometry program, you will be asked to insert a diskette to
make a back-up copy of the examination data. Use the grey diskette provided by NIOSH for this purpose.
Should you accidently copy the spirometry information onto the orange Field Office diskette, you will
need to copy the data from the C-drive of the PC to the NIOSH diskette.
5.7
Recovering from Spirometry System Failures
Should a problem develop with the NIOSH spirometry software during an examination that
results in the need to re-boot the computer, it will not be possible to reenter the spirometry software from
the CAPI system. In order to restart the spirometry test for that SP, it will be necessary to use the
SETSPIRO utility program. SETSPIRO will access the NIOSH spirometry software, allowing you to
restart the spirometry procedure. To utilize the SETSPIRO program:
1.
Re-boot the PC, either by pressing <Control>+<Alt>+<Del>, or by turning off
power to the PC and turning it on again after ten seconds.
2.
At the C:> prompt, type "SETSPIRO". (If rebooting the PC brings up the main menu
screen, press <Enter> to exit to the C:> prompt.)
3.
A generic screen with one long data entry field will be brought up. The entry required
for this field is the seg/serial number, family number, and person number of the SP. For
example, if the SP information was:
Segment:
Serial:
Family:
Person:
eht
78
99999
1
1
the SETSPIRO entry would be: 78999990101.
4. The first screen of the NIOSH spirometry software will be displayed. SP information w
lli
need to be re-entered before the spirometry test can be re-started.
10-27
6. OPERATION IN THE FIELD
6.1
Start of Stand Procedures
6.1.1
Setting the PC Clock
The Compaq LTE/286 is equipped with an internal clock. To check the setting of the clock,
type "TIME" at the C:> prompt. The current time will be displayed. If the time is correct, press <Enter>.
If the time is incorrect, type the correct time on the correction line below the time display and press
<Enter>. The new time will now be displayed.
The internal clock should be checked at the start of each stand.
6.1.2
Charging the Batteries
Each PC is equipped with a rechargeable battery. In addition, each Field Office will be
supplied with an additional back-up battery and battery recharger. At the start of each stand, locate the
back-up battery and recharging unit. Plug in the recharging unit and recharge the back-up battery. The
battery contained in the PC can be recharged by attaching the AC power adapter to the PC and plugging
this into a grounded outlet. The orange low battery indicator light on the adapter will go off when the
battery is fully charged.
6.2
Field Office Procedures
6.2.1
Home Exam Materials File
The Home Exam Materials File at the Field Office will continue to contain the Home
Examination records. The Household folder and control card will be available for use in familiarizing the
home examiner with the SP. In addition, the file will contain a diskette that will be used to make a backup copy of the home examination. This diskette is orange in color so that it will not be confused with
the diskette used for the spirometry portion of the home examination.
10-28
6.2.2
Receiving Case Assignments
The Field Office will transfer case information to the Compaq LTE/286 prior to the home
examination. The information transferred will include the information currently found on the front cover
Home Examination booklet. If multiple examinations are scheduled for one day, information for all
scheduled SPs will be loaded at one time.
6.3
Cold Calls
In the case of a "cold call" home examination, SP data can be entered into the PC using the
"Enter Cold Calls - SP Data" option (option 4) from the Home Examiner Main Menu. The information
needed to complete this screen includes:
Segment,
Serial,
Family Number,
SP Number,
Sample Number (NCHS ID No.),
Name (First, Middle, Last),
Address (including zip code),
Telephone Number,
Density,
Date of Birth (age will be calculated automatically),
Sex,
Race,
Ethnicity,
Language of Interview,
10-29
Education, and
Technician ID Number.
Once this information has been entered into the appropriate data entry fields on the screen, the
main Home Examination System menu will be displayed. To begin the examination, select option 1 CAPI Home Examination.
6.4
Setting Up at the SP’s Home
All data collected from the home examination will be entered into the laptop PC. Because the
PC will be connected to the PJ5 spirometer, it will not be able to be moved once it has been set up and
the spirometer connected. For this reason, it is important to carefully consider the placement of equipment
used in the home examination. Ideally, all equipment used for the body measures component and the
measured walk portion of the physical function component should be set up as close to the laptop PC as
possible. This will enable the you to record the results of these tests and measurements with as little
inconvenience as possible.
Placement of the SP in relation to the laptop PC is also important. The SP’s chair should be
placed next to the PC, facing the Home Examiner. In this way, the Home Examiner can read the
questions from the PC screen and maintain eye contact with the SP.
6.5
The Home Examination Data Form
The Home Examination Data Form has been introduced to the Home Examination to allow you
to record measurements taken away from the proximity of the laptop PC. If, for example, the 8-foot walk
is set up in a room removed from where the PC is set up, the results of both trials of this test should be
recorded on the Home Examination Data Form. Before continuing with the exam, the results of these
measurements will need to be entered into the PC directly from the form.
The Home Examination Data Form also contains a section for recording SP data from the
spirometry report of the CAPI Home Examination software. This information is called up from the CAPI
10-30
Home Examination software, and must be manually entered into the spirometry software program prior
to conducting the spirometry exam. The data contained on this screen are also used to complete the
NIOSH Spirometry Log Sheet.
A copy of the Home Examination Data Form is contained in the Appendix A of the CAPIHome Examination Training Manual.
6.6
Backing Up Data
In order to prevent the potential loss of valuable data, you will be asked to back up your work
onto a diskette before shutting off the PC. Before turning off the power to the PC, you will be prompted
to insert a diskette into the disk drive located in the front of the laptop. When the back-up procedure is
complete, the diskette will contain a copy of all data contained on the PC. Data from home examinations,
replicate examinations, and cold calls will be backed up on orange diskettes supplied by the field office.
In addition, a standard (grey) diskette should be kept with the PC to use when exiting the computer after
use for other reasons, i.e., calibrating the spirometer, viewing comments or messages, uploading or
downloading cases at the field office, etc.
6.7
Returning to the Field Office
Upon completion of the home exam, the laptop PC is taken to the Field Office, where the data
is transferred onto the MicroVAX. A back-up copy is also made on a diskette to be kept at the Field
Office.
6.8
Distribution of Data from the Home Examination
The report functions found on the Home Examination Main Menu are used to report
information obtained from the home examination.
10-31
6.8.1
Summary for MEC Physician/Laboratory
This two-screen data summary contains the information necessary to complete the SP
Identification Form for the MEC Physician and to enter the results of venipuncture into the Laboratory
Automation System on the MEC. These screens can also be printed directly on the Field Office printer.
6.8.2
Summary for Control Record
This summary screen contains the data needed to complete the Control Record that is sent to
the Westat home office at the end of the stand. This information can also be printed directly on the Field
Office printer.
6.9
End of Stand Procedures
Before the PJ5 spirometer is sent to NIOSH at the end of the stand, the Field Office will
remove the home examination data from the hard drive in the PC. The spirometry data will be left in tact
on the hard drive. After the home examination data has been removed, the PC, flow sensor, AC adapter,
and the NIOSH (grey) back-up diskette can be packed in the shipping container and returned to NIOSH.
6.10
Handling Hardware Problems
If a hardware problem occurs in the field during a Home Examination, the examination should
be completed using the green hard copy Home Examination Booklet. Upon returning to the field office,
NIOSH should be contacted so that a second laptop PC can be sent out to the stand. Upon receipt of this
PC, the data contained in the hard copy examination booklet should be entered into the PC.
10-32
APPENDIX B
THE HOME EXAMINATION FORM
English and Spanish Versions
10-33
10-34
10-35
10-36
10-37
10-38
10-39
10-40
10-41
10-42
10-43
10-44
10-45
10-46
10-47
10-48
10-49
10-50
10-51
10-52
10-53
10-54
10-55
10-56
10-57
10-58
10-59
10-60
10-61
10-62
10-63
10-64
10-65
10-66
10-67
APPENDIX C
ANSWERS TO FREQUENTLY ASKED QUESTIONS
REGARDING VENIPUNCTURE
English and Spanish Versions
10-68
10-1
10-2
APPENDIX D
HOME EXAM FACT SHEET
Spanish Versions
10-3
10-4