1
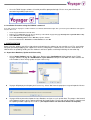
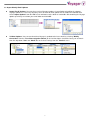
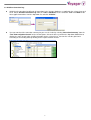
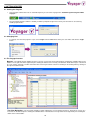
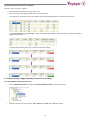
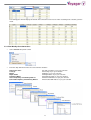
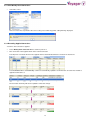
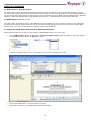
Version 2.0.0 User Manual
Table of Contents
1.
INTRODUCTION...................................................................………....................................……………..….. 03
2.
2.1
2.2
2.3
INSTALLATION…………………………………………………………………...………………………………….. 04
Recommended Requirements for PC/PRINTERS & MATERIALS……………………………………………… 04
Installation Procedure………………………………………………………………………………………………… 04
Installation Procedure using the ‘RUN AS’ command………………………………………………………... 05
3.
3.1
3.2
3.3
3.4
CONFIGURATION……………………………………………………………………………………………………. 06
Import Core Database, Update and Licence Key ….………………………………………………………………06
Import Weekly Email Updates………………………………………………………………………………………. 07
Configuring Email, Web and Proxy Setup Options……………………………………………………………….. 08
Initialise Correction Log……………………………………………………………………………………………… 09
4.
4.1
4.2
4.3
GETTING STARTED……………………………………………………………………………………………….… 10
Starting the Program……………………………………………………………………………………………..…… 10
Changing User…………………………………………………………………………………………………...……. 10
The Voyager Interface…………………………………………………………………………………………….….. 10
5.
5.1
5.2
UPDATING VOYAGER DATA………………………………………………………………………………….….. 11
Update Data (Web Service)……………………………………………………………………………………..…… 11
Update Data (Email Service)…………………………………………………………………………………...……. 11
6.
6.1
6.2
6.3
6.4
6.5
6.6
INDEX CHARTS & PUBLICATIONS…………………………………………………………….………….…….. 12
Viewing Index Charts…………………………………………………………………………………………………. 12
Searching Index Charts…………………………………………………………………………………………...…..12
Index Charts Reports…………………………………………………………………………………………….…… 12
Viewing Index Publications…………………………………………………………………………………….…….. 13
Searching Index Publications…………………………………………………………………………………..……. 13
Index Publications Reports…………………………………………………………………………………….…….. 13
7.
7.1
7.2
7.3
7.4
7.5
INDEX CHART CORRECTIONS………………………………………………………………………………….…14
The Chart Correction Summary………………………………………………………………………………...…… 14
Viewing, Printing & Applying Corrections for a Single Chart……………………………………………….…….. 14
Viewing, Printing & Applying Weekly Corrections for All Charts…………………………………………………. 16
Active & Cancelled T&P Notices…………………………………………………………………………………….. 19
Chart Corrections Reports……………………………………………………………………………………..…….. 19
8.
8.1
8.2
8.3
NOTICE TO MARINERS………………………………………………………………………………………..…… 20
NTM Section II – Chart Corrections………………………………………………………………………………….20
NTM Sections I – III – IV – V – VI……………………………………………………………………………...……. 20
Viewing & Printing Weekly Amendments to Admiralty Publications………………………………………..…… 20
9.
9.1
9.2
CATALOGUE……………………………………………………………………………………………………...….. 21
Charts……………………………………………………………………………………………………………..……. 21
Publications………………………………………………………………………………………………………...….. 21
10.
GENERAL INFORMATION………………………………………………………………………………...……..… 21
11.
11.1
11.2
BACKUP & RESTORE………………………………………………………………………………………….…… 22
Creating a Backup…………………………………………………………………………………………………..… 22
Restoring the Database………………………………………………………………………………………………. 22
12.
12.1
12.2
HELP…………………………………………………………………………………………………………………… 23
Frequently Asked Questions………………………………………………………………………………………….23
Troubleshooting…………………………………………………………………………………………………..…… 23
2
1. INTRODUCTION
The Voyager software is an automated onboard chart management system that provides the mariner with a personalised database of
charts, publications and Notices To Mariners (NTM’s) organised in a convenient folio system.
The Voyager service provides weekly Notices to Mariners (NTMs) and Tracings via Internet or Email. The Voyager Data Server
compresses the data before sending it to the user to reduce the file sizes to a minimum. The ship only receives the files relevant to its
chart outfit, further reducing the file sizes.
The Voyager service doesn't require any additional communication equipment thereby eliminating any hardware, installation and
ongoing maintenance costs. All that's required is a Windows PC, colour inkjet printer and Internet or E-mail access. The Voyager
software is installed on a Windows PC and can be updated using the following update methods.
Web Service: The Web Service requires an Internet connection as the software connects directly to our dedicated Voyager web server
database to synchronise the data and download any outstanding update files. The Web Service is by far the most intelligent and
efficient way to update Voyager.
E-mail service: The E-mail service doesn't require any complex pre-configuration as the updates can be sent to any email address.
The updates are rolled up and split into pre-set file sizes then sent to the ships current email address. The crew then simply save the
attachments and import the updates to Voyager from a folder, removable flash drive or CD.
Voyager can be installed on a second computer, which can be used as a Backup system. If Voyager is installed on a backup PC that
doesn't have Internet or email access the database can be updated via a folder, removable flash drive or CD.
IMPORTANT NOTE: Please ensure that you notify TGNS when you purchase any charts or publications from other
suppliers so that we can synchronise our central chart management database with your onboard Voyager data. This will
also ensure that the new charts are displayed in your Voyager software and the corresponding corrections are supplied
via email or web.
3
2. INSTALLATION
Voyager can be installed on a Windows PC with email or Internet access when subscribing to the Voyager web service or
E-mail service. Alternatively, Voyager can also be installed on a Windows PC without any Internet, email or network
connectivity when subscribing to the E-mail service.
2.1 Recommended Requirements for PC/PRINTERS & MATERIALS
For optimum results when viewing and printing material from TGNS Voyager please note the following:
•
•
•
•
•
•
•
•
•
•
Windows 2000 or XP Service Pack 2 / Processor 1 GHz / 1 GB Ram / 1 GB free disk space
Internet or E-mail access for updating
Adobe Acrobat Reader (Version 7.0 or later)
If printing text or monochrome NM Blocks, the minimum specification is an Ink-jet or good quality Laser Postscript printer with at
least 6 MB of memory ensuring the Postscript printer driver is installed.
For colour NM Blocks a good quality Inkjet/Laser printer with 300 dpi resolution or greater is required.
If using an inkjet printer ensure the setting is set to 'Dithered screening'
Printed colour copies should be compared with the screen image to ensure that all the colours have reproduced correctly; printer
resolution and ink density may need to be adjusted to obtain the desired results.
Ensure the colour ink cartridge is in accordance with the printer manufacturer's specifications.
Minimum paper specification for printing Colour NM Blocks is International paper size A4, thickness/weight 80 gsm.
When printing files from voyager, please disable 'Page Scaling' or 'Shrink to Fit' in printer settings and ensure the 'Fit to Page' icon
in the Adobe Acrobat print menu is switched off before printing.
2.2 Installation Procedure:
•
Log on to Windows as an administrator or as a user with administrator privileges. Please refer to section 2.3
for instructions on how to use the ‘RUN AS’ command to install Voyager as an Administrator.
•
Insert Voyager CD-Rom into the CD drive. If the ‘TGNSVoyager Setup’ does not start automatically after a few
seconds, run the ‘Setup.exe’ file from the root directory of the TGNS Voyager CD (e.g. ‘E:\Setup.exe’ if your
CD drive is ‘E’).
•
The ‘TGNSVoyager Setup’ will prompt you to install prerequisite software ‘.Net 2 Framework’ and ‘Crystal
Reports for .NET Framework 2.0’ if it is not already installed. Click ‘Accept’ to install the components.
4
•
The ‘TGNSVoyager Setup’ will then prompt you to install the Voyager software from the CD. Click ‘Next >’
select ‘I Agree’ and click ‘Next >’ again.
•
The default installation folder for Voyager is ‘C:\Program Files\TGNS\TGNS Voyager’. To install to this folder click
‘Next >’. To install to a different location click ‘Browse’ and select the desired installation folder. Click ‘OK’ and
click ‘Next >’.
•
Click ‘Next >’ to confirm the Installation and wait for the installation to complete and click ‘Close’ to exit.
•
Once the installation is complete, you can run Voyager from ‘Start\All Programs\TGNS\TGNS Voyager’.
5
•
Once the TGNS Voyager software is loaded you will be prompted to login. Please enter your full name for
correction log auditing requirements.
2.3 Installation Procedure using the ‘RUN AS’ command:
If you wish to then run Voyager as another windows user without administrative rights then you must log out of Windows and log back
in as the other user.
•
•
•
•
•
Insert Voyager CD-Rom into the CD drive.
Right click on ‘Setup.exe’ file from the root directory of the TGNS Voyager CD (e.g. ‘D:\Setup.exe’ if your CD drive is ‘D’).
Select 'Run As' from the 'Pop Up' menu.
Select 'The Following User' from the 'Run As' properties window.
Enter the Administrators 'Username' and 'Password' then click 'OK'
3. CONFIGURATION
Before using the software you will need to activate and configure the software for your specific vessel. The steps below
will guide you through applying your supplied user licence, configuring the software to use either the ‘Email Service’ or
‘Web Service’ for updating, loading the core database and latest updates and finally initialising the correction log.
3.1 Import Core Database, Update and Licence Key
•
Select ‘Import Updates’ from the ‘File’ menu. Browse to the ‘CoreDatabase’ folder located on the TGNS
Voyager software CD (e.g. ‘E:\ CoreDatabase’ if your CD drive is ‘E’) then Click ‘OK’ This folder contains the
Core Database, latest weekly update and your Licence Key.
•
Voyager will prompt you to import your Licence key. Select ‘Yes’ from the pop up message to import the licence.
•
Voyager will then proceed to import the Core Database and your vessels specific data. The progress bar located
at the bottom left corner of the software will begin the import routine. Please wait until the Import is complete and
the updating Database pop-up screen closes. (The import routine can take 10-15 minutes to complete)
6
3.2 Import Weekly Email Updates
•
Import E-mail Updates: You may have received Voyager updates via email prior to installing the software.
Voyager updates are sent every Thursday. Save all received email update files to a folder or removable disk.
Select ‘Import Updates’ from the ‘File’ menu and browse to the folder or removable disk containing the Voyager
updates previously saved from your email inbox and click ‘OK’.
•
Validate Updates: You can now check that Voyager is updated to the latest week by selecting ‘Weekly
Corrections’ from the ‘Tree-View navigation Control’ on the left-hand pane. Select the latest year and week
from the drop down ‘Year’ and ‘Week’ filter and select Tracings from the ‘Preview’ menu.
7
3.3 Configuring Setup Options
•
Configuring (E-mail Service) Update Method: If you subscribe to the email service then select ‘Setup Options’
from the ‘Tools’ menu and select ‘Email’ as your ‘Update Method’ This will disable the ‘Configure’ button. Click
‘Apply’ then click ‘OK’
•
Configuring (Web Service) Update Method: Select ‘Setup Options’ from the ‘Tools’ menu and select ‘Web
Service’ as your ‘Update Method’. Click ‘Configure’ to open the ‘Web Service Settings’ and select your Agent
from the ‘Agent’ drop down list. Select the number of weeks to look back for data. (1 week is the recommended
default requirement). Select ‘Use PDF Compression’ to enable smaller files sizes during download.
•
Configuring Proxy Server Settings: If you access the Internet through a proxy server, select ‘Use Proxy’ and
enter the required ‘Proxy Settings’
(Please contact your IT Department for the Proxy Server settings)
• Address (host name or IP address) of your proxy server machine.
• Port number the proxy server uses to accept HTTP connections (usually port 80).
• Username and Password for the Proxy Server if required.
• The proxy server must be configured to permit HTTP file downloads, and allow connections to the
Voyager Web Server http://www.tgnsvoyager.com.
Click ‘OK’ and click ‘Apply’ then click ‘OK’
8
3.4 Initialise Correction Log
•
Initialising the correction log will mark all corrections in the Voyager database as applied for the selected year and
week. Select ‘Initialise Correction Log’ from the ‘Tools > Database’ menu. Select the ‘Year’ and ‘Week’ of the
latest applied corrections from the drop down list and click ‘Initialise’.
•
You can now check the correction summary for your vessels index by selecting ‘Correction Summary’ from the
‘Tree-View navigation Control’ on the left-hand pane. Select the latest year from the drop down ‘Year’ filter to
display the status of your Index specific corrections for the selected year. You can then sort the grid view in
ascending or descending order by clicking on the required column header.
9
4. GETTING STARTED
4.1 Starting the Program
•
If the Voyager software does not run automatically then you can launch Voyager from ‘Start\All Programs\Jargoon\TGNS
Voyager’.
•
Once the TGNS Voyager software is loaded you will be prompted to login. Please enter your full name for correction log
auditing requirements.
4.2 Changing User
•
To change user when the program is open, select ‘Login’ from the ‘File’ Menu. Enter your User Name and click the ‘Login’
button.
4.3 The Voyager Interface
Browser – The TGNS Voyager database browser consists of a tree view on the left-hand pain showing the available tables in the
database and a grid view on the right hand pain showing the details of the currently selected table. Each table may be customised
to a user view by selecting a column and a filter value. This may be further sorted in ascending or descending order by clicking on
the required column header.
Tree View Navigation – The Tree-View navigation control simplifies the users browsing experience. The browser consists of a
Tree-View on the left-hand pane showing the available tables in the database and a grid view on the right hand pane showing the
details of the selected table.
10
5. UPDATING VOYAGER DATA
5.1 Update Data (Web Service)
See section 3.4 for how to configure the Web Service
This option updates the core database and downloads the NTM’s applicable to your index. The Voyager database can be
updated by selecting ‘Update Data’ from the ‘Tools’ menu.
The update will be stored separately in the configured database folder. This update will consist of all changes made to the master
database since the core database was published and all the individual specialised folios for the vessel. It is recommended that
the core database be updated weekly from Voyager Data Server to coincide with the weekly Notices to Mariners. However each
update from the Web Data Server will be cumulative so should no Internet connection be available for a period then a single
update is all that is required.
5.2 Update Data (Email Service)
See section 3.4 for how to configure the Email Service.
This function imports the Voyager email updates via a folder, removable flash drive or CD. Browse to the folder or removable flash
drive containing the Voyager updates previously saved from your email inbox and click ‘OK’. You can also import the initial
Voyager update stored in the update folder located on the Voyager CD.
11
6. INDEX CHARTS & PUBLICATIONS
Charts – This section contains your personalised active chart index organised in a convenient folio system. You can access the
properties of each chart by right clicking on the chart and selecting ‘Properties’ from the menu. You can also double click on the chart
to open the chart properties. The Chart Properties allows you to access all NTM’s and Tracings applicable to that chart and can be
printed off as and when required.
6.1 Viewing the Charts in your index
•
Expand the ‘Charts’ folder on the Tree-View Navigation control to view all folios
•
Click on any folio to display its charts in the grid view.
6.2 Searching for a chart in your index
•
Select ‘My Charts’ from the ‘Search’ Menu
•
•
In the Search window select the column to search (e.g. ChartNumber) and enter the item you wish to search for.
Click Go
6.3 Chart Index Reports
The Following Chart Index reports can be produced from the Voyager software:
Folio Details
Folio Charts
Numerical Charts
A list of all folios in your index
A list of all charts grouped in folios and ordered by consecutive number
A list of all charts order by chart number
To view these reports select the required item from the ‘Reports’ Menu
12
Publications – This table contains your personalised active publications organised into sections. You can access the properties of
each publication by right clicking on the publication and selecting ‘Properties’ from the menu. You can also double click on the
publication to open the properties.
6.4 Viewing the Pubs in your index
•
Expand the ‘Publications’ folder on the Tree-View Navigation control to view all folios.
•
Click on any folio to display its publications in the grid view.
6.5 Searching for a publication in your index
•
Select ‘My Publications’ from the ‘Search’ Menu
•
•
In the Search window select the column to search (e.g. Code) and enter the item you wish to search for.
Click Go
6.6 Publication Reports
The Following Publication Index reports can be produced from the Voyager software:
Publications
A list of all publications in your index grouped by publication sections.
To view this report select ‘Publications’ from the ‘Reports’ Menu
13
7. INDEX CHART CORRECTIONS
Chart Correction Summary – This section contains your weekly NTM’s applicable to your chart index. Your weekly NTM’s are
filtered by Year, Week and Folio and can be sorted in ascending or descending order by clicking on the required column header. You
can access the properties of each NTM by right clicking on your selection and clicking ‘Properties’ from the menu. You can also double
click on the NTM to open the NTM properties. The NTM Properties contains a link to the applicable Tracing and can be printed off as
and when required. You can also preview and print all chart corrections, tracings and blocks filtered by Year, Week and Folio number.
Please refer to the instructions below for printing index specific Tracing or Blocks.
7.1 Viewing the Chart Correction Summary
•
•
Select ‘Correction Summary’ from the ‘Tree-View navigation Control’ on the left-hand pane.
Select the latest year from the drop down ‘Year’ filter.
The status of your index specific corrections for the selected year will now be displayed.
The displayed table can be sorted in ascending or descending order by clicking on the required column header.
For each week the Correction Summary displays the total amount of chart corrections relating to the ship’s index. The amount
of corrections that have not yet been recorded as applied ‘Index Total To Do’ and the amount that have been recorded as
applied ‘Index Total Done’. There is also a status indicator that will change from ‘Incomplete’ to ‘Complete’ when all
corrections for that week have been recorded as applied.
7.2 Viewing, Printing & Applying Corrections for a single chart
7.2.1 Selecting a Chart
•
Select the relevant chart folio from the ‘Tree-View navigation Control’ on the left-hand pane.
•
Click on the required chart to make your selection.
14
7.2.2 Displaying Chart Corrections
•
Right click on the data grid and select ‘Details’
The resulting window will display a list of all corrections applicable to the selected chart along with a preview of the currently
selected correction.
7.2.3 Viewing Chart Corrections
•
•
Click on the required correction to make your selection.
Right click on the Data Grid and select ‘Details’
This method can also be used to view any associated Tracings, Blocks, Depth Tables or Cautionary Notes.
15
7.2.4 Recording Chart Corrections as applied.
To mark a chart correction as applied
•
•
View the Chart Corrections as shown in part 7.2.3
Click on the box in the applied column of the relevant correction
This will place a tick inside the box in the applied column, which indicated that the correction has been done.
The ‘ModifiedDateTime’ and ‘ModifiedBy’ column are automatically updated to show when the correction was marked as
applied and who done so.
The Correction Summary will also be updated to reflect this change.
7.3 Viewing, Printing & Applying Weekly Corrections for All Charts
7.3.1 Display Weekly Chart Correction List
•
Select ‘Weekly Corrections’ from the ‘Tree-View navigation Control’ on the left-hand pane.
•
Make the relevant selection using the ‘Year’, ‘Week’ and ‘Folio’ drop down filter controls
16
The viewing pane will now display all relevant chart corrections for the vessel’s index according to the selection you have
made.
7.3.2 View Weekly Chart Corrections
•
Select ‘Preview’ drop down control
•
From the drop down menu make one of the relevant selections:
Chart Corrections
Tracings
Blocks
Depth Tables
Cautionary Notes
Active Temporary & Preliminary Notices
Cancelled Temporary & Preliminary Notices
All chart corrections as per your selection.
All Tracings as per your selection
All Blocks as per your selection
All Depth Tables as per your selection
All Cautionary Notes as per your selection
All Active T&P Notices as per your selection
All Cancelled T&P Notices as per your selection
17
7.3.3 Print Weekly Chart Corrections
•
Select File > Print
Note: To ensure files are printed to the correct scale, please follow any printer setting warnings displayed.
7.3.4 Recording Applied Corrections
To mark a chart correction as applied
•
•
Go to ‘Weekly Chart Correction List’ as shown in part 4.5.2
Click on the box in the applied column of the relevant correction
This will place a tick inside the box in the applied column, which indicated that the correction has been done.
The ‘ModifiedDateTime’ and ‘ModifiedBy’ column are automatically updated to show when the correction was marked as
applied and who done so.
The Correction Summary will also be updated to reflect this change.
18
7.4 Temporary & Preliminary Notices
In Addition to the Weekly Corrections the Chart Correction Summary also holds sections IA – Active T’s & P’s and IA –Cancelled T’s
& P’s which give details on all Temporary & Preliminary Notices specific to your index.
7.4.1 Viewing Active T’s & P’s
This table contains all Active T’s & P’s specific to your index. This table can be sorted in ascending or descending order by clicking
on the required column header. You can access the properties by selecting the required NTM.
7.4.2 Viewing Cancelled T’s & P’s
This table contains all Cancelled T’s & P’s specific to your index. This table can be sorted in ascending or descending order by
clicking on the required column header. You can access the properties by selecting the required NTM.
7.5 Chart Corrections reports
The Following Chart Correction reports can be produced from the Voyager software:
Correction Summary
Weekly Correction List
A full chart correction summary for all charts in your index
A chart correction list for all charts in a given week
To view these reports select the required item from the ‘Reports’ Menu
19
8 NOTICE TO MARINERS
8.1 NTM Section II - Chart Corrections
This table contains a list of all available weekly NTM’s. Chart Corrections are filtered by Year, Week and Folio and can be sorted in
ascending or descending order by clicking on the required column header. You can access the properties of each NTM by right clicking
on your selection and clicking ‘Properties’ from the menu. You can also double click on the NTM to open the NTM properties. The NTM
Properties contains the NTM data and Tracing applicable to that chart if it is contained within your personalised chart index.
8.2 NTM Sections I – III – IV – V – VI
This table contains all remaining sections of the NTM filtered by Year and Week and can be sorted in ascending or descending order
by clicking on the required column header. You can open the required section by right clicking on your selection and clicking ‘details’
from the menu. You can also double click on the required section to open the PDF file.
8.3 Viewing & Printing Weekly Amendments to Admiralty Publications
Follow the below instructions to view a list of Corrections to Admiralty Publications for a chosen week.
•
Select ‘NTM Sections I - III - IV - V - VI’ from the ‘Tree-View navigation Control’ on the left-hand pane. Select the required
Year and Week from the ‘Year’ and ‘Week’ filter controls.
A list of the available Section I, III, IV, V & VI pdf files for the selected week will now be shown.
•
•
On the list of NTM Sections, click on the Section you require.
To print this section click on the ‘Print’ button in the preview window.
20
9. CATALOGUE
9.1 Charts
This table contains a full list of all available charts. The table can be filtered by any of the values and sorted in ascending or descending
order by clicking on the required column header. You can access the properties of each chart by right clicking on the chart and
selecting ‘Properties’ from the menu. You can also double click on the chart to open the chart properties. The Chart Properties allows
you to access all NTM’s and Tracings applicable to that chart if it is contained within your personalised chart index.
9.2 Publications
This table contains a full list of all available publications. The table can be filtered by any of the values and sorted in ascending or
descending order by clicking on the required column header. You can access the properties of each publication by right clicking on the
publication and selecting ‘Properties’ from the menu. You can also double click on the publication to open the publication properties.
9.3 Reports
The Following Chart Index reports can be produced from the Voyager software:
Withdrawn Charts
Replaced Charts
A list of all withdrawn charts in the Thomas Gunn chart catalogue
A list of all replaced charts in the Thomas Gunn chart catalogue
To view these reports select the required item from the ‘Reports’ Menu
10. GENERAL INFORMATION
This section contains information regarding the voyager service such as Flag State Approval documents.
21
11. BACKUP AND RESTORE
This function allows you to backup the Voyager database to a folder, removable disk or CD. Voyager can be installed on a second
computer, which can be used as a Backup system. If Voyager is installed on a backup system that doesn't have Internet or email
access the database can be restored/updated from a folder, removable disk or CD.
11.1 Creating a Backup
•
•
•
Select ‘Setup Options’ from ‘Tools’ menu to configure your backup location.
Enter the file path location of your backup folder or removable flash drive into the ‘Backup Folder’ field.
Select ‘OK’
•
Select ‘Backup’ from the ‘Tools > Database’ menu to fully backup your Voyager database.
11.2 Restoring the Database
•
Select ‘Restore’ from the ‘Tools > database’ menu to fully restore your Voyager database.
22
12. HELP
12.1 Frequently Asked Questions
Question
Answer
12.2 Troubleshooting
Problem
Solution
Fonts not being displayed in Voyager.
In order to solve this problem. Please take the following steps:
1) Open your Window Explorer and locate C:\Windows folder.
2) Go inside of that folder and locate "Fonts" folder.
3) Open that folder and find file called "NMSyms(Truetype).
4) Double click to open that file.
5) Close it and try to open Voyager again.
All symbols should be displayed correctly now
Printed Tracings and Blocks not matching
with charts.
In your Adobe Reader Screen, click "File"->"Print". On the Print screen, please
locate "Page Scaling" option. Please, set it to "None" and click OK to print
tracing or block. The tracing should be printed in the right size now. You don't
need to change these settings every time you print tracings or blocks as Adobe
Reader will remember your last choice and will print everything with Scale set
to "None".
23