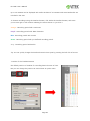
1
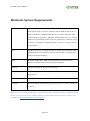
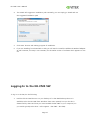
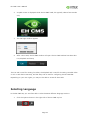
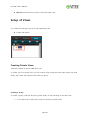
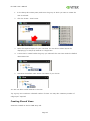
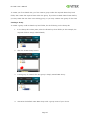
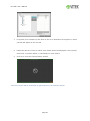
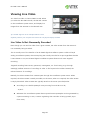
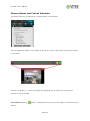
EH-CMS USER’s MANUAL (VITEK EH Series DVR Total Management SW) EH-CMS: User‟s Manual Contents Target Audience for this Document ................................................................................................................................... 6 Copyright, Trademarks and Important Information .................................................................................................... 6 Copyright ................................................................................................................................................................................... 6 Disclaimer................................................................................................................................................................................... 6 Introduction ................................................................................................................................................................................... 7 Tabs .............................................................................................................................................................................................. 7 Panes ............................................................................................................................................................................................ 8 View .............................................................................................................................................................................................. 8 Application buttons ............................................................................................................................................................... 9 What can you Do with EH-CMS?......................................................................................................................................... 9 How Can User Rights Affect Your Use of EH-CMS SW? ....................................................................................... 10 Minimum System Requirements ....................................................................................................................................... 11 Installing the EH-CMS SW ................................................................................................................................................... 12 Installation from CD ........................................................................................................................................................... 12 Logging In to the EH-CMS SW.......................................................................................................................................... 13 Selecting Language ................................................................................................................................................................. 14 Views Explained ......................................................................................................................................................................... 15 Difference between Private and Shared Views .......................................................................................................... 15 Setup of Views ........................................................................................................................................................................... 16 Creating Private Views ...................................................................................................................................................... 16 Creating a Group ............................................................................................................................................................ 16 Creating a View within the Group ......................................................................................................................... 17 Creating Shared Views ...................................................................................................................................................... 18 Creating a Group ............................................................................................................................................................ 19 Creating a View within the Group ......................................................................................................................... 20 Page 2 EH-CMS: User‟s Manual Renaming Views or Groups ................................................................................................................................................. 21 Deleting Views or Groups .................................................................................................................................................... 21 How to Add Content to Views .......................................................................................................................................... 22 Adding Individual Cameras ............................................................................................................................................ 22 Adjusting View Properties ............................................................................................................................................... 23 Maintain Image Aspect Ratio ................................................................................................................................... 24 OSD settings (All views) .............................................................................................................................................. 24 Adding Carousels ..................................................................................................................................................................... 25 Adding Static Images ............................................................................................................................................................. 27 Further Configuration ............................................................................................................................................................. 27 The Options Dialog ............................................................................................................................................................ 27 Language Options .............................................................................................................................................................. 28 Application Options ........................................................................................................................................................... 28 Viewing Live Video .................................................................................................................................................................. 29 Live Video Is Not Necessarily Recorded .................................................................................................................. 29 Views and their Content .................................................................................................................................................. 30 Selecting a view .............................................................................................................................................................. 30 Camera Names and Colored Indicators ................................................................................................................... 31 Carousel Positions ............................................................................................................................................................... 32 Enlarging Camera Positions ........................................................................................................................................... 32 Recording for IP camera ....................................................................................................................................................... 33 Create the storage folder for recording. .................................................................................................................. 33 Create Schedule profile .................................................................................................................................................... 34 Set Continuous recording profile. .......................................................................................................................... 34 Set motion recording profile. ................................................................................................................................... 35 Set Alarm in recording profile. ................................................................................................................................ 35 Set Recording quality for recording. ..................................................................................................................... 36 Page 3 EH-CMS: User‟s Manual Set Audio recording. ..................................................................................................................................................... 37 Handling Sound Notifications ............................................................................................................................................ 38 Audio (Microphones) .............................................................................................................................................................. 38 Listening .................................................................................................................................................................................. 38 Audio when Camera is in Playback Mode .............................................................................................................. 39 Digital Zoom ............................................................................................................................................................................... 39 Digital Zoom Features ...................................................................................................................................................... 39 Zoom with Mouse Wheel ................................................................................................................................................ 39 Using PTZ ..................................................................................................................................................................................... 40 PTZ Navigation Buttons ................................................................................................................................................... 40 PTZ Preset Positions .......................................................................................................................................................... 40 Manually Activating Output ................................................................................................................................................ 41 Viewing Recorded Video ...................................................................................................................................................... 42 Views of playback ............................................................................................................................................................... 43 Selecting a View ............................................................................................................................................................. 43 Video Playback Features .................................................................................................................................................. 43 Timeline Browser ............................................................................................................................................................ 43 Time Navigation.............................................................................................................................................................. 45 Speed controller of playback ................................................................................................................................... 46 Digital Zoom..................................................................................................................................................................... 46 Exporting Single Images ....................................................................................................................................................... 47 Printing Evidence ...................................................................................................................................................................... 47 Exporting in AVI and Still image ....................................................................................................................................... 48 Frequently Asked Questions about Exporting ....................................................................................................... 49 Full Screen Viewing ................................................................................................................................................................. 49 Using Multiple Windows ....................................................................................................................................................... 50 Sending a View to Secondary Display ...................................................................................................................... 50 Page 4 EH-CMS: User‟s Manual Sending a channel to a Floating Window ............................................................................................................... 51 Closing Separate Windows ............................................................................................................................................. 52 Logging Out................................................................................................................................................................................ 52 Removing the EH-CMS SW from PC. ............................................................................................................................. 52 Page 5 EH-CMS: User‟s Manual Target Audience for this Document This document is aimed at users of EH-CMS SW. This document provides detailed descriptions of EH-CMS installation, configuration, and use. It furthermore provides a number of targeted “howto” examples, guiding users through completing common tasks in EH-CMS. Copyright, Trademarks and Important Information Copyright VITEK Disclaimer This document is intended for general information purposes only, and due care has been taken in its preparation. Any risk arising from the use of this information rests with the recipient, and nothing herein should be construed as constituting any kind of warranty. VITEK reserves the right to make adjustments without prior notification. All names of people and organizations used in this document‟s examples are fictitious. Any resemblance to any actual organization or person, living or dead, is purely coincidental and unintended. Page 6 EH-CMS: User‟s Manual Introduction The SW must be installed locally on your computer. Tabs The SW has three main areas. The Live tab for viewing live video The Playback tab for viewing recorded video The Setup tab for configuring views. Page 7 EH-CMS: User‟s Manual Panes Panes give you access to the majority of the SW. exactly which panes you will see depends on your task, for example on whether you are viewing live video on the Live tab or recorded video on the Playback tab. Panes can be minimized to icons. This helps save space, and enables a better overview of the panes you use. You minimize a pane by clicking the „▲‟ in the pane's title bar. When you need to use a pane which you have previously minimized, simply click the corresponding icon in the top left corner of the SW. Pane icons from the live TAB. View The way in which video from your surveillance system‟s cameras is displayed in the EH-CMS SW is called a view. A single view may contain video from up to 64 cameras. Your SW can handle an unlimited number of views, allowing you to switch between video from various collections of cameras. Each view's layout can be customized to fit its contents. Views can be private or shared with other users. The SW also supports multiple windows and screens, allowing you to watch multiple views at a time on multi monitors. Page 8 EH-CMS: User‟s Manual Application buttons Let you select basic SW actions. from the left to right the buttons are : Virtual keyboard Options : configure language, Local path for backup/image, position of panes Log out What can you Do with EH-CMS? With the SW, you are able to: View live videos from cameras on the surveillance system. Play back recordings from cameras on the surveillance system with a selection of advanced navigation tools, including a highly intuitive timeline browser Create and switch between an unlimited number of views, each able to display images from up to 64 cameras from multiple devices at a time Views can be placed in private groups (only accessible by the user who created them) or in groups shared with other users. Create special views for widescreen monitors. Use multiple screens as well as floating windows for displaying different views simultaneously. Quickly substitute one or more of a view‟s cameras with other cameras. View images from several cameras, one after the other, in a single camera position ( a socalled carousel). Control PTZ (Pan/Tilt/Zoom) cameras. Use digital zoom on live as well as recorded images. Manually activate triggered events. Page 9 EH-CMS: User‟s Manual Manually activate external outputs (e.g. sirens or light) Use sound notifications for attracting attention to detected events. Skip gaps during playback of recordings. Print images. Export recordings (e.g. for use as evidence) in AVI (movie clip), JPEG/BMP/PNG (still image). The AVI file can include audio. Select between a numbers of language versions. Get a physical overview of the entire systems under surveillance. How Can User Rights Affect Your Use of EH-CMS SW? The rights of an individual user will determine the user‟s ability to use the EH-CMS SW features. Basically, the administrator is able to restrict a user‟s rights to the following: Access to each of the EH-CMS tabs: Live, Playback, and Setup Ability to use features on the EH-CMS tabs Ability to create views (views determine the way in which images from one or more cameras are displayed) Ability to view images from specific cameras The ability to use various features of the EH-CMS SW may therefore vary considerably from user to user. Page 10 EH-CMS: User‟s Manual Minimum System Requirements Operating System Microsoft® Windows® XP Professional (32 bit or 64 bit*), Windows Server 2003 (32 bit or 64 bit*), Windows Server 2008 R1/R2 (32 bit or 64 bit*), Windows Vista® Business (32 bit or 64 bit*), Windows Vista Enterprise (32 bit or 64 bit*), Windows Vista Ultimate (32 bit or 64 bit*), Windows 7 Professional (32 bit or 64 bit*), Windows 7 Enterprise (32 bit or 64 bit*) or Windows 7 Ultimate (32 bit or 64 bit*). * Running as a 32 bit application. CPU Intel® Core2™ Duo, minimum 2.4 GHz or higher (more powerful CPU recommended for EH-CMS SW running high number of cameras and multiple views and displays). RAM Minimum 1 GB (higher RAM recommended for SW running high number of cameras and multiple views and displays). Network Ethernet, 100 Mbit or higher recommended. Graphics Adapter AGP or PCI-Express, minimum 1024×768 (1280×1024 recommended), 16 bit colors. Hard Disk Space Minimum 100 MB free. Software Microsoft .NET 3.5 Framework with Service Pack 1 or newer, DirectX 9.0 or newer. Tip: To check which DirectX version is installed on a computer, click Start, select Run..., and type dxdiag. When you click OK, the DirectX Diagnostic Tool window will open; version information is displayed near the bottom of its System tab. If your computer requires a DirectX update, the latest versions of DirectX are available from http://www.microsoft.com/downloads/ Page 11 EH-CMS: User‟s Manual Installing the EH-CMS SW The SW must be installed on your computer before you are able to use it. Typically, you copy the .exe file from the download folder, USB stick or included CD and then double-click it to install the file on your computer. We recommend you download the latest version from our website or use the version included on your USB stick in order to obtain the most bug-free installation. Installation To install the EH-CMS software, do the following: 1. Verify that your computer meets the EH-CMS system requirements. 2. Insert the CD, wait for a short while, then click the EH-CMS installation icon. Tip: Depending on your security settings, you may receive one or more security warnings when clicking the link (Do you want to run or save this file? Do you want to run this software? or similar; exact wording depends on your browser version). When this is the case, accept the security warnings (by clicking the Run button or similar; exact button names depend on your browser version). 3. When the installation wizard starts, click „Next‟ to continue the installation and follow the steps in the installation wizard. Page 12 EH-CMS: User‟s Manual 4. The wizard will suggest an installation path. Normally, you can simply go ahead and use the suggested installation path 5. Click „Next‟ buttons and waiting progress of installation. 6. If you are installing from download or USB, you will need to install the additional 'Backend Adapter' as well. However, this step is not necessary for the earlier version of software which appears on the CD. Logging In to the EH-CMS SW To log in to the SW, do the following: 1. Double-click EH-CMS shortcut on your desktop. If no EH-CMS desktop shortcut is available, select the EH-CMS from Windows‟ Start menu (exactly how you do this is determined by where and how you have installed the EH-CMS on your computer, but you would typically select Start > All Programs > EH-CMS > EH-CMS). Page 13 EH-CMS: User‟s Manual 2. A splash screen is displayed while the EH-CMS loads; this typically takes a few seconds only. 3. The SW login window appears: 4. After a short wait, the EH-CMS window will open. The EH-CMS window has three tabs: Live, Playback and Setup. The Live tab is used for viewing live video, the Playback tab is used for browsing recorded video on PC or each device remotely, and the Setup tab is used for configuring the EH-CMS SW. Depending on your user rights, you may not be able to access all three tabs. Selecting Language In the EH-CMS SW, you are often able to select between different language versions. 1. Click the Options button in the right side of the EH-CMS top bar. Page 14 EH-CMS: User‟s Manual 2. In the Options dialog, select Language, then the required language. 3. The EH-CMS SW must be restarted in order for the change to take effect: Close your SW, then log in again to use the new language version. Views Explained The way in which video from one or more cameras are displayed in the EH-CMS SW is called a view. A view may contain video from up to 64 cameras, depending on the surveillance system to which you connect. The EH-CMS SW can handle an unlimited number of views, allowing you to switch between video from various collections of cameras. The illustration to the right provides an example of a EHCMS displaying a view, in this case with video from 10 different cameras (view is highlighted in red frame). In order to help you maintain an easy overview when you navigate between various views in your EH-CMS SW, all views are placed in folders called groups. A group can contain any number of views and, if required, subgroups. Difference between Private and Shared Views Views can be private or shared: Private views can only be accessed by the user who created them. Page 15 EH-CMS: User‟s Manual Shared views allow many users to share the same views. Setup of Views You create and manage views on the EH-CMS Setup tab. Private and shared Creating Private Views Views are created on the EH-CMS Setup tab. To create your first private view, you first create a group under the Setup tab‟s Private top-level folder, then create the required view within the group. Creating a Group To create a group under the Private top-level folder, do the following on the Setup tab: 1. In the Setup tab‟s Views pane, select the Private top-level folder. Page 16 EH-CMS: User‟s Manual 2. Click the Create New Group button: 3. A new group is created. The new group is simply named New Group. 4. Overwrite the default name New Group with a group name of your choice. You are now able to create a view within the group. Creating a View within the Group To create a view in a group, do the following: Page 17 EH-CMS: User‟s Manual 1. In the Setup tab‟s Views pane, make sure the group in which you want to create the view is selected. 2. Click the Create View button: 3. Select the required layout for your new view. You are able to select layouts for displaying up to 64 (8×8) cameras in a single view. 4. A new view is created under the group you selected. The new view carries the default name New View. 5. Overwrite the default name with a view name of your choice. You are now able to add cameras to the view. Tip: A group can contain an unlimited number of views. You may also create any number of subgroups if required. Creating Shared Views Views are created on the EH-CMS setup tab. Page 18 EH-CMS: User‟s Manual To create your first shared view, you first create a group under the required shared top-level folder, then create the required view within the group. If you have created shared views before, you may create the new view in an existing group, or you may create a new group for the view. Creating a Group To create a group under a shared top-level folder, do the following on the Setup tab: 1. In the Setup tab‟s Views pane, select the Shared top-level folder (in this example, the required folder is simply called Shared). 2. Click the Create Group button: 3. A new group is created. The new group is simply named New Group. 4. Overwrite the default name New Group with a group name of your choice. Page 19 EH-CMS: User‟s Manual You are now able to create a view within the group. Creating a View within the Group To create a view in a group, do the following: 1. In the Setup tab‟s Views pane, make sure the group in which you want to create the view is selected. 2. Click the Create New View button: 3. Select the required layout for your new view. You are able to select layouts for displaying up to 64 (8×8) cameras in a single view 4. A new view is created under the group you selected. The new view carries the default name New View: Page 20 EH-CMS: User‟s Manual 5. Overwrite the default name with a view name of your choice. You are now able to add cameras to the view. Tip: A group can contain an unlimited number of views. You may also create any number of subgroups if required. Renaming Views or Groups To rename a view or group, do the following on the Setup tab: 1. Select the required view or group in the Views pane. 2. Click the Rename button: 3. Overwrite the existing group name with a new name of your choice. Deleting Views or Groups IMPORTANT: Deleting a group will delete all views and any subgroups within the group as well. Page 21 EH-CMS: User‟s Manual To delete a view or group, do the following on the Setup tab: 1. Select the required view or group in the Views pane. 2. Click the Delete button: 3. You will be asked to confirm that you want to delete the selected view or group. How to Add Content to Views Once you have created views, you are able to add content to the views. Content can be video from individual cameras or devices, carousels for viewing images from alternating cameras in a single view position. Adding Individual Cameras To add a camera to a view, do the following: 1. In the Setup tab‟s Views pane, select the required view. When you select a view, the layout of the selected view is outlined in the main section of the EH-CMS window. Layout of selected view is outlined in main section (Indicated in red frame in this example) 2. In the Setup tab‟s System Overview pane, click the plus sign(+) next to Cameras, then the plus sign next to the required server to view a list of available cameras. Page 22 EH-CMS: User‟s Manual 3. Select the required camera from the list, and drag the camera to the required position in the view. When you have dragged a camera to a position in the view, an image from the camera will—provided a connection can be established—appear in the selected position. If a connection cannot be established, for example if the surveillance system‟s is not on recording mode, the name of the camera will be displayed in the selected position. 4. Repeat for each camera required in the view. Tip: If you want to use all of the cameras under a server, you may simply drag the required server link to the view; this will automatically place all of the server‟s cameras in the view from the selected position onwards. Make sure a sufficient number of positions are available in the view. Tip: You can easily change which cameras are included in your view: clear an individual camera position by right clicking the remove button, then drag another camera to the cleared position, or simply overwrite a position by dragging a different camera to the position. Adjusting View Properties Page 23 EH-CMS: User‟s Manual In the Setup tab‟s view Properties pane, you are able to adjust osd and camera view. Maintain Image Aspect Ratio If the check box is selected, images will not be stretched to fit the size of the camera position. Rather, images will be displayed with the aspect ratio (height/width relationship) with which they have been recorded. When viewing images with their original aspect ratio, you may see horizontal or vertical black bars appearing around the images from some cameras. If the check box is cleared, images will be stretched to fit the position in the view; this may lead to slightly distorted images, but you will avoid any black bars appearing around the images. Example: The same image viewed with Maintain Image, Aspect Ratio selected (left) and cleared (right) OSD settings (All views) Show title bar: Displays a title bar located in the top of each camera position. The title bar helpsusers quickly identify camera name, Recording Status and live indicator. Show indicator: Displays a blinking green indicator in the title bar when displayed on the Live tab. The indicator changes state every time a new image is received from the camera, Page 24 EH-CMS: User‟s Manual an effect which makes it easy to see that video is live. Often, it is evident from the video itself that it is live, but the live indicator can be advantageous at times when not much is happening in the camera's area of view. Show icon: Displays a camera icon in the top of each camera. Show name: Displays a camera name in the top of each camera. Show resolution: Displays the current image resolution at the bottom of each camera. Show date and time: Displays the current date and time at the bottom of each camera. Adding Carousels A carousel is used for displaying images from several cameras, one after the other, in a single view position. You are able to specify which cameras to include in the carousel as well as the interval between camera changes. 1. On the setup tab, drag the System Overview pane‟s Carousel to the required position in the view. When you release the mouse button over the required position, the Carousel Setup window opens. 2. In the Carousel Setup window, specify which cameras to include in the carousel by selecting required cameras in the left part of the window, then clicking the Add button to add the selected cameras to the list in the right part of the window. Page 25 EH-CMS: User‟s Manual 3. If required, move cameras up and down in the list to determine the sequence in which cameras will appear in the carousel. 4. Define the amount of time for which each camera should be displayed in the carousel; either with a common default, or individually for each camera. 5. Click OK to close the Carousel Setup window. Carousel indicator will be positioned at right bottoms at the selected channel. Page 26 EH-CMS: User‟s Manual Adding Static Images Static images can be used in views for a variety of purposes: for company logos, for including floor plans or maps in the view, for including photos of wanted persons, etc. 1. On the setup tab, drag the System Overview pane‟s Image item to the required position in the view. 2. Release the mouse button over the required position. When you release the mouse button, you are able to select the required static image file. Further Configuration The Options Dialog The Options dialog lets you control the language selection, position of navigator, timeline for playback and the path for snapshot & Backup. You access the Options dialog by clicking the Options button in the top right corner of the Smart Client window. Page 27 EH-CMS: User‟s Manual Language Options In the EH-CMS SW, you are often able to select between different language versions. 1. In the Application Options dialog, select the Language tab, then the required language. 2. The SW must be restarted in order for the change to take effect: Close your SW, then log in again to use the new language version. Application Options The Options dialog's Application tab lets you customize the general behavior and look of your SW. Information: display the version of EH-CMS SW. Application minimization: If you select Minimized button the SW will be positioned on window task bar as icon. Application maximization: Select how the SW should react when you click the Maximize button in the top right corner. If you select Maximize to full screen, the SW will cover any Windows task bar on your screen when maximized. Quit: stop to run the EH-CMS SW. Page 28 EH-CMS: User‟s Manual Viewing Live Video You view live video on the EH-CMS Live tab. When you select the EH-CMS Live tab, the SW will connect to the surveillance system server, and display live images from the cameras in the selected view. Tip: The SW supports use of multiple windows. This is especially useful if your computer has more than one physical display attached. Live Video Is Not Necessarily Recorded Even though you can see live video from a given camera, the video stream from the camera is not necessarily being recorded. This is actually one of the benefits of an IP-based digital surveillance system: Unlike old-style analog surveillance systems, where everything was usually recorded on a tape regardless whether it was relevant or not, an IP-based digital surveillance system allows much more targeted recording. Targeted recording frees security personnel, investigators, etc. from having to go through seemingly endless amounts of recordings in order to find a particular incident. Instead, the reduced amount of recordings.. Basically, live video streams from cameras pass through the surveillance system server. When required, the video stream is saved (recorded) on the server; when not required, the video stream is simply discarded. Video streams are typically saved on the server (recorded) either According to a schedule (example: every morning from 10.00 to 11.30) - or/and - Whenever the surveillance system detects special events (examples: motion generated by a person entering a room; a sensor registering that a window is being opened; input from users). Page 29 EH-CMS: User‟s Manual The surveillance system server‟s recording settings are determined by your surveillance system administrator. However, as a EH-CMS SW user, you can also start recording while viewing live video. Tip: When viewing live video on the EH-CMS Live tab, you can quickly verify whether the video stream from a camera is being recorded: Look at the yellow bar immediately above the camera‟s images. If the video stream from the camera is being recorded, the bar will display Rec. Note that you may occasionally see the Recording letters for short periods only. This is because cameras may have been configured to record only when there is motion, when a door is open, or similar, which can lead to many short periods of recordings. Views and their Content Selecting a view You are basically able to select a view for display on the Live tab as below. Selecting the required view in the Live tab‟s Views pane: You can (provided you have the necessary user rights) start recording while viewing live video. See page 61 for more information. Page 30 EH-CMS: User‟s Manual Camera Names and Colored Indicators The display item can be selected on „View Properties‟ of Setup Pane. The bar displays the name of the camera as well as the name of the device to which the camera is connected. Each bar will display Live when live images are displayed, Rec if video from the camera in question is being recorded. Live indicator (flashing green ): Changes state every time a new image is received from the camera Page 31 EH-CMS: User‟s Manual Recording indicator (solid yellow): display when the device is under recording mode. Carousel Positions A carousel is used for displaying images from several cameras, one after the other, in a single view position. If a position in one of your views contains a carousel, you will be able to recognize it by the following characteristics: It displays images from different cameras, one after the other It is marked as Carousel at position You can enlarge a carousel by double-clicking the carousel position. Enlarging Camera Positions To enlarge images from a particular camera in a view, double-click the camera position. To return to normal view, simply double-click the blue image bar again. Page 32 EH-CMS: User‟s Manual Recording for IP camera You can record the data from the IP camera which is connected to EH-CMS SW. Create the storage folder for recording. To create folder for recording Storage. 1. Go to recording item on configuration pane of setup tab. 2. Select „Storage‟ item. 3. Click „Browse‟ button. 4. Select a folder or create new folder by explore. 5. Set volume size of the folder. *Maximum volume size will be determined by free space of physical HDD driver. 6. Click „Add‟ button 7. A folder will be listed on Left top window. 8. Select the recording mode Once: stop recording when the space is not enough for recording. Overwrite: overwrite the data from oldest recording data when the space is full. 9. Select time sync mode. Wait : wait for recording on HDD when the time is differ from PC and surveillance system. Page 33 EH-CMS: User‟s Manual Delete : delete overlapped data when the time is differ from PC and surveillance system during recording. 10. Click „Apply‟ button to complete create storage folder. Create Schedule profile You can set recording parameter as Profile for recording. Set Continuous recording profile. To create profile for continuous recording 1. Click „Schedule‟ item on Configuration pane. 2. Select Add Profile 3. Input profile name and select a color for profile. The color must be identified. 4. Click „Continuous‟ item. 5. Select a camera from each device that is needed to recording. 6. Click „ OK‟ button. 7. Right click or dragging of mouse at the area of time table that are needed to apply the profile. 8. Click „Apply‟ button to complete the recording setup. Page 34 EH-CMS: User‟s Manual 9. Go to live view and check whether REC icon is displayed on view. Set motion recording profile. To create profile for motion recording 1. Click „Schedule‟ item on Configuration pane. 2. Select Add Profile 3. Input profile name and select a color for profile. The color must be identified. 4. Click „motion‟ item. 5. Select a camera from each device that is needed to recording. 6. Select areas by right click or dragging of mouse. 7. Select proper Sensitivity of motion.(10: lowest ~100: highest) 8. Set Pre/Post recording duration. 9. Click „ OK‟ button 10. Right click or dragging of mouse at the area of time table that are needed to apply the profile. 11. Click „Apply‟ button to complete the recording setup. 12. Go to live view and check whether REC Set Alarm in recording profile. To create profile for Alarm in recording Page 35 icon is displayed on view. EH-CMS: User‟s Manual 1. Click „Schedule‟ item on Configuration pane. 2. Select Add Profile 3. Input profile name and select a color for profile. The color must be identified. 4. Click „Alarm In‟ item. 5. Select an Alarm device from device list. 6. Select a camera that need to be recording 7. Set Pre/Post recording duration 8. Click „Ok‟ button. 9. Right click or dragging of mouse at the area of time table that are needed to apply the profile. 10. Click „Apply‟ button to complete the recording setup. 11. Go to live view and check whether REC icon is displayed on view. Set Recording quality for recording. You can set alternation recording quality for each profile. If you don‟t‟ select this. EH-CMS SW will record the data same as network stream. Page 36 EH-CMS: User‟s Manual If you set recording quality of profile, the SW will re code the network stream as configured quality. To set recording quality. 1. Click „Schedule‟ item on Configuration pane 2. Select one of profile on list 3. Select „Edit Profile‟ 4. Click „Recording Quality‟ item. 5. Select a camera from each device that is needed to recording. 6. Configure items(Codec, Resolution, Frame Rate…etc) 7. Click „Ok‟ button. 8. Press „Apply‟ button to apply configuration. Set Audio recording. You can record Audio data with image from IP camera. To set Audio recording. 1. Click „Schedule‟ item on Configuration pane 2. Select one of profile on list 3. Select „Edit Profile‟ 4. Click „Audio‟ item. 5. Select an Audio items from device list that need to be recording. 6. Click „ Ok‟ button. 7. Press „Apply‟ button to apply configuration. Page 37 EH-CMS: User‟s Manual Handling Sound Notifications Your SW may have been configured to notify you with a sound notification when: Events related to one or more specific cameras occur Audio (Microphones) The SW supports incoming audio: From the SW you can listen to live recordings from microphones attached to cameras. You handle audio in the Live tab‟s Audio pane. Listening To listen to live audio, select the required microphone from the Audio In list. Page 38 EH-CMS: User‟s Manual Audio when Camera is in Playback Mode If the selected camera is in playback mode, you will hear any recorded audio from that camera's default microphone and, if supported, speaker. The Live tab's Audio pane will in that case have no function. Digital Zoom The right clicks of mouse lets you use digital zoom on images from any camera displayed in the view. Your use of digital zoom will not affect any recording of the images; any recording will still take place in the camera‟s regular format. If you later wish to browse the recordings, you can use digital zoom with same action (mouse right click). Digital Zoom Features When digital zoom is enabled, you will see a Zoom ratio in the top right corner of each of the view‟s camera positions. Once you zoom in on an area of an image, you can move the other area by simply dragging of mouse. Zoom with Mouse Wheel you are able to zoom in and out using the scroll wheel on your mouse, provided your mouse is equipped with a scroll wheel. Page 39 EH-CMS: User‟s Manual Change the zoom ratio up to 10x by mouse wheel scroll. Using PTZ If your views contain PTZ (Pan/Tilt/Zoom) cameras, you can control the PTZ cameras with the Live tab‟s PTZ Control pane. PTZ Navigation Buttons Use the navigation buttons in the PTZ Control pane to move the selected PTZ camera. The Arrow buttons let you move the position of camera view. The item of „ZOOM‟, „FOCUS‟ and „Iris‟ let user can control the item manually. POSITION STEP is a distance during Pan/ Tilt works. PTZ Preset Positions You can set the preset of PTZ camera from PTZ control panel. Page 40 EH-CMS: User‟s Manual If preset positions have been defined for the selected PTZ camera already, you are able to select such positions. To set preset. 1. Move the PTZ view point by navigator arrow. 2. Select any number for preset numbering. 3. Press [SET] button to save the position. To run preset. 1. Select one of preset number on the list. 2. Press [Goto] button, PTZ camera view will move to predefined position. Manually Activating Output If external outputs have been defined on your surveillance system, for example for switching on lights or sounding a siren, such output can be activated from the EH-CMS Live tab. Select the required output in the Alarm Out pane. Then click the Active button Or user can deactivate the alarm out from the active state of Alarm out by [Inactive] button. Page 41 EH-CMS: User‟s Manual Viewing Recorded Video You view recorded video on the EH-CMS Playback tab. When you select the Playback tab, the SW will display recording time table and Playback control panel. You can follow below steps to start playback. 1. Select a Playback Tab. 2. Select a device from the recording time table. 3. Select a time for starting at Play control panel or select a start point from recording table. *The time line can be expanded up to 5 minute term when left click of mouse on time label. Right click of the mouse will compress the time line. 4. Then press the Play icon button. Page 42 EH-CMS: User‟s Manual Views of playback Selecting a View You are able to change a view during playback as select a view icon. Video Playback Features Timeline Browser The timeline browser displays an overview of periods with recordings from each devices displayed in your current view. The number of timelines displayed in the timeline browser reflects the number of cameras of device. Cameras with an audio device attached are represented by a double timeline: a timeline displaying periods with video recordings and a timeline displaying periods with audio recordings. Page 43 EH-CMS: User‟s Manual Up to 16 cameras can be displayed with audio timelines. If 16 cameras with associated audio are included in the view To browse recordings using the timeline browser, click inside the timeline browser, and move your mouse right or left without releasing the mouse button or just click it Orange : Recording period with continuous Purple : Recording period with Alarm detection. Blue : Recording period with motion Green : Recording period with pre buffered recording period. Gray : Recording period with Audio. Tip: You can quickly change the timeline browser‟s time span by pressing the left click of mouse. . Position of the Timeline Browser the default position of timeline for recording data is bottom of view. But you can change the position as vertical view at option menu. Page 44 EH-CMS: User‟s Manual Time Navigation The Playback tab‟s Time Navigation pane provides you with controls for browsing and playing back recorded image from each device. The area in the upper part of the Time Navigation pane shows the time and date of the recordings viewed. Browse Buttons. The Time Navigation pane‟s brows buttons lets you manually navigate through recordings from the devices (DVR/ IP camera data on PC server). From the left to right on browse buttons. First image : move to the first image in the data base for selected device Previous image: move to the image just before the one currently viewed. Play Reverse: Playback recordings backwards in time. Stop: stop / pause to playback the image. Forward: playback recording forward in time. Next image: move to the image just next the one currently viewed. Last image: move to the last image in the data base for selected device. Page 45 EH-CMS: User‟s Manual Speed controller of playback You can slide the indicator to control the speed of playback during play the image. From 1/64X(slowest)~ 64X(fastest). Digital Zoom Just like on the live view, the right clicks of mouse lets you use digital zoom on images from any camera displayed during playback. Your use of digital zoom will not affect any recording of the images; any recording will still take place in the camera‟s regular format. What is the difference between optical and digital zoom? With optical zoom, a camera‟s lens elements physically move to provide the required angle of view. You cannot use optical zoom when viewing recorded video, simply because you cannot move the camera‟s lens retroactively. With digital zoom, the required portion of an image is enlarged by cropping the image and then resizing it back to the pixel size of the original image—a process called interpolation. Digital zoom thus simulates optical zoom, but the digitally zoomed portion will have a lower quality than the original image. Digital zoom works equally well on live and recorded video. Page 46 EH-CMS: User‟s Manual Exporting Single Images You are able to export single still images from selected cameras. Exported images can then be saved (as bitmap/Jpg/Png images) into PC, You can only export a single image from a single camera at a time. To export: 1. Select the required view. 2. Right-click inside the required camera position; you now get access to the menu. 3. In the menu, select „snapshot‟. You can now export the file as image. Printing Evidence In playback screen, you are able to print recorded images. Select the required camera in the view. Right-click inside the required camera position. In the menu, select „Print‟, you can print the image on local or network print Page 47 EH-CMS: User‟s Manual Exporting in AVI and Still image Select the EH-CMS Playback tab. In the Playback tab‟s Backup pane, specify when the period to be covered by the export should start. You do this by typing the required date in the first Start Time field and the time in the second field. In the End Time fields, specify end date and time for the backup Select the required camera from the camera list. You must select an individual camera from the list Click the Backup button. This will open a separate Backup dialong, the dialog will list the specified start time, end time, and camera. Only relevant if you are going to backup in AVI format: If the selected camera has a microphone attached—and the surveillance system supports audio—audio from speakers attached to the selected camera is included in the export as well. If you do not want to backup audio, select Video only option. In the dialog‟s backup setting pane, select the required backup format: AVI or still image. Selected required Codec and quality for AVI format. Select format of still image when you want to backup as still image. Select OSD option for AVI and Still image, when you select this option the backup file includes this OSD text data also. Specify export destination in the backup dialog‟s Destination section. Page 48 EH-CMS: User‟s Manual Desktop : If you select Desktop, your backup file will be saved in an automatically Created Backup folder on the desktop of your PC. Local Path : If you select local Path, you are able to specify a path yourself. The backup file will be saved in the path you specify. You can also select the path on network shared folder in company. Media : If you select media, you are able to backup the file on DVD of PC. The Erase button allow to rewrite on rewritable media Click the Start backup button to begin the backup procedure. The status bar in the upper part of the backup dialog will display the status of the backup: Frequently Asked Questions about Exporting FAQ: Can I export audio too? When backup in the AVI. you are—when the surveillance system supports audio—able to include audio recorded by microphones in the backup.. When backup in the JPEG format, you cannot include audio. Full Screen Viewing To view your EH-CMS in full screen mode, click the Full Screen button near the middle of the iPIIMS top bar. In full screen mode, the SW is displayed without the top bar, without any of the panes normally located in the left side of the EH-CMS, and without any Windows taskbar. Page 49 EH-CMS: User‟s Manual Full screen mode is available when using the Live and Playback tabs, but not when using the Setup tab. To leave full screen mode and return to normal mode, press ESC or select restore screen after right click of mouse.. Using Multiple Windows The EH-CMS supports use of multiple windows. This is especially useful if your computer has more than one physical display attached. You can send live views to separate displays from the EH-CMS‟s View pane in Live tab. Sending a View to Secondary Display Sending a view to a Secondary Display will show the view in a full-screen window on another physical display (if available). The other physical display will only show the selected view, none of the Live or Playback tab‟s other features, and it can only show one view at a time. To send a view to a Secondary Display, do the following: 1. In the Live or Playback tab‟s Views pane, right-click the required view. This will bring up a menu. Page 50 EH-CMS: User‟s Manual Or select the multi monitor icon on Top bar. 2. In the menu, select Multi Monitor > Display2. If more than one secondary display is available, they will be numbered. Sending a channel to a Floating Window Sending a channel to a Floating Window will show the camera in a small separate window on your main display. The illustration to the right provides an example of a channel sent to a floating window. Note that the main EH-CMS window is immediately available behind the floating window. The floating window will only show the selected camera. You can use any number of floating windows. You are able to change the size of a floating window to suit your needs. To send a channel to a Floating Window, do the following: 1. In the Views pane, right-click the required channel. This will bring up a menu. 2. In the menu, select Float View. Page 51 EH-CMS: User‟s Manual Closing Separate Windows To close a separate view window, When it is shown on the Primary Display, as a floating window simply click the Close button in the right corner of the windows. Or on a secondary display, select the Close button after right click of mouse on separate window. Logging Out To log out of the EH-CMS SW, simply click the Log Out button in the EH-CMS top bar. Removing the EH-CMS SW from PC. To remove the Smart Client, do the following: 1. In Windows‟ start menu, select All SW, and select Uninstall in EH-CMS folder. This will open the uninstall Programs window. 2. In the uninstall Programs window, select uninstall button. Page 52