1
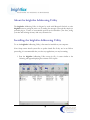
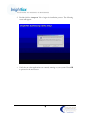
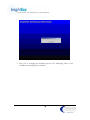
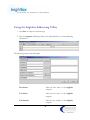
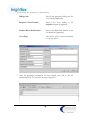
brightfax
addressing utility guide
Charles River Consultants, Inc.
331 E. 50th Street
New York, NY, USA, 10022
Phone (888)339-0000
Table of Contents
About the brightfax Addressing Utility
3
Installing the brightfax Addressing Utility
3
Using the brightfax Addressing Utility
7
2
About the brightfax Addressing Utility
The brightfax Addressing Utility is designed to work with Microsoft Outlook to assist
brightfax users in getting the most out of sending fax messages. Through this simple yet
powerful plug in, a variety of customizable options can be included to your faxes, saving
your time and ensuring accuracy with every electronic fax.
Installing the brightfax Addressing Utility
To use the brightfax Addressing Utility, it first must be installed on your computer.
Note: Setup cannot install system files or update shared files if they are in use. Before
proceeding, it is recommended that you close any applications you may be running.
1. Run the brightfax Addressing Utility setup zip file. A screen similar to the
following will appear displaying the contents of the zip file:
3
2. Double-click the ‘setup.exe’ file to begin the installation process. The following
screen will appear:
3.
Verify that no other applications are currently running on your system. Press OK
to proceed to the next screen:
4
4. Press the computer button to install brightfax Addressing Utility to the specified
destination directory. It is recommended that you do not change the destination
directory from C:\Program Files\brightfax\.
The installation program will install the appropriate files to your computer. When
complete, the following screen will appear:
5
5. Press ‘Ok’ to complete the installation process. The Addressing Utility is now
available when using Microsoft Outlook.
6
Using the brightfax Addressing Utility
1. Click New to compose a new message:
2. Press the brightfax Addressing Utility icon (indicated below), to enter addressing
information:
The following popup screen will appear:
First Name:
Enter the first name of the brightfax
recipient
Last Name:
Enter the last name of the brightfax
recipient
Fax Number:
Enter the fax number of the brightfax
recipient
7
Billing Code:
Enter in the appropriate billing code for
you company/department
Recipient’s Voice Number:
Enter in the Voice number of the
brightfax recipient (if applicable)
Sender’s Direct Dial Number:
Enter in the Direct Dial Number of the
Fax Recipient (if applicable)
Cover Page:
This field is used to enter customizable
cover page options.
3. Once the appropriate information has been entered, press OK to add the
information to the ‘To’ line in the message composition.
8
4. Continue by adding the subject, body information and attachments as you would
with any other composition,.
5. Press Send to send the message to the recipient.
Note: All material contained within is the sole property of E-Sync Networks. Any reproduction or redistribution of this material is
prohibited without the expressed written consent of E-Sync. Any reproduction of illustrations appearing on these pages is strictly
prohibited.
© 2005, E-Sync Networks
9