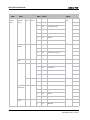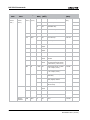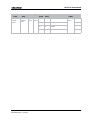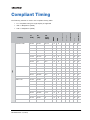
1
LCD Panel FHD551-W User Manual 020-100996-01 LCD Panel FHD551-W USER MANUAL 020-100996-01 NOTICES COPYRIGHT AND TRADEMARKS © 2012 Christie Digital Systems USA, Inc. All rights reserved. All brand names and product names are trademarks, registered trademarks or trade names of their respective holders. REGULATORY The product has been tested and found to comply with the limits for a Class A digital device, pursuant to Part 15 of the FCC Rules. These limits are designed to provide reasonable protection against harmful interference when the product is operated in a commercial environment. The product generates, uses, and can radiate radio frequency energy and, if not installed and used in accordance with the instruction manual, may cause harmful interference to radio communications. Operation of the product in a residential area is likely to cause harmful interference in which case the user will be required to correct the interference at the user’s own expense. This Class A digital apparatus complies with Canadian ICES-003. Cet appareil numérique de la classe A est conforme à la norme NMB-003 du Canada. 이 기기는 업무용 (A 급 ) 으로 전자파적합등록을 한 기기이오니 판매자 또는 사용자는 이점을 주의하시기 바라며 , 가정 외의 지역에서 사용하는 것을 목적으로 합니다 . GENERAL Every effort has been made to ensure accuracy, however in some cases changes in the products or availability could occur which may not be reflected in this document. Christie reserves the right to make changes to specifications at any time without notice. Performance specifications are typical, but may vary depending on conditions beyond Christie's control such as maintenance of the product in proper working conditions. Performance specifications are based on information available at the time of printing. Christie makes no warranty of any kind with regard to this material, including, but not limited to, implied warranties of fitness for a particular purpose. Christie will not be liable for errors contained herein or for incidental or consequential damages in connection with the performance or use of this material. The product is designed and manufactured with high-quality materials and components that can be recycled and reused. This symbol means that electrical and electronic equipment, at their end-of-life, should be disposed of separately from regular waste. Please dispose of the product appropriately and according to local regulations. In the European Union, there are separate collection systems for used electrical and electronic products. Please help us to conserve the environment we live in! Canadian manufacturing facility is ISO 9001 and 14001 certified. GENERAL WARRANTY STATEMENTS For complete information about Christie’s limited warranty, please contact your Christie dealer. In addition to the other limitations that may be specified in Christie’s limited warranty, the warranty does not cover: a. Problems or damage occurring during shipment, in either direction. b. Problems or damage caused by combination of a Product with non-Christie equipment, such as distribution systems, cameras, video tape recorders, etc., or use of a Product with any non-Christie interface device. c. Problems or damage caused by misuse, improper power source, accident, fire, flood, lightening, earthquake or other natural disaster. d. Problems or damage caused by improper installation/alignment, or by equipment modification, if by other than Christie service personnel or a Christie authorized repair service provider. e. Failure due to normal wear and tear. f. Image retention on LCD flat panels. g. Direct exposure to sunlight. PREVENTATIVE MAINTENANCE Preventative maintenance is an important part of the continued and proper operation of your product. Please see the Maintenance section for specific maintenance items as they relate to your product. Failure to perform maintenance as required, and in accordance with the maintenance schedule specified by Christie, will void the warranty. Addendum The CD included with this printed manual contains an electronic copy in English. Please read all instructions before using or servicing this product. 手 册 中 包 含的光盘,带有着中文 的电子副本,使用或维修本产品前,请仔细 查 阅 所 有的指示。 Le DC fourni avec ce manuel imprimé contient une copie électronique en français. S'il vous plaît lire toutes les instructions avant d'utiliser ou de réparer ce produit. Das CD, das mit diesem gedruckten Handbuch eingeschlossen ist, enthält eine elektronische Kopie auf in deutscher Sprache. Vor der Anwendung oder der Instandhaltung dieses Produktes lesen Sie bitte alle Anweisungen. Il CD fornito con il manuale stampato contiene una copia elettronica in lingua italiano. Si prega di leggere tutte le istruzioni prima di utilizzare o riparare questo prodotto. この印刷されたマニュアルに同梱されております CD には、日本語での説明書が入ってお ります。この製品を使用あるいは修理点検される際に、ご参照下さい。 매뉴얼과 함께 포함되어 있는 CD 에는 한글로 된 전자사본을 포함하고 있습니다 . 본 제품을 사용 혹은 서비스하기 전에 모든 지침 사항들을 읽어 보시기 바랍니다 . O CD incluído com o impresso livro contém um eletrônico cópia em Português. Por favor lido todas as instruções antes de usar ou prestando serviço esse resultado. Поставляемый в комплекте с документацией компакт-диск (CD) содержит электронную копию руководства пользователя на русском языке. Перед началом использования изделия или проведения сервиса пожалуйста прочтите все инструкции изложенные в руководстве. El DC incluido con este manual impreso contiene una copia electrónica en español. Por favor, lea todas las instrucciones antes de usar o dar servicio a este producto. Компакт диск, що постачається з цим друковане керівництво містить електронну копію українською мовою. Будь ласка, прочитайте всі інструкції перед використанням або обслуговуванням цього продукту. Table of Contents Important Safety Information . . . . . . . . . . . . . . . . . . . . . . . . . . . . . . . . . . . . . . . 1 General Safety Precautions ......................................... 1 Power Safety . . . . . . . . . . . . . . . . . . . . . . . . . . . . . . . . . . . . . . . . . . . . . . . . . . . . 1 Introduction . . . . . . . . . . . . . . . . . . . . . . . . . . . . . . . . . . . . . . . . . . . . . . . . . . . . . 3 Features . . . . . . . . . . . . . . . . . . . . . . . . . . . . . . . . . . . . . . . . . . . . . . . . . . . . . . 3 What’s In The Box? . . . . . . . . . . . . . . . . . . . . . . . . . . . . . . . . . . . . . . . . . . . . . . . 4 Controls and Indicators . . . . . . . . . . . . . . . . . . . . . . . . . . . . . . . . . . . . . . . . . . . . 5 LCD Panel Controls . . . . . . . . . . . . . . . . . . . . . . . . . . . . . . . . . . . . . . . . . . . . . 5 Indicator Lights . . . . . . . . . . . . . . . . . . . . . . . . . . . . . . . . . . . . . . . . . . . . . . . 5 Connection Panel . . . . . . . . . . . . . . . . . . . . . . . . . . . . . . . . . . . . . . . . . . . . . . 6 Remote Control ............................................... 7 Installation . . . . . . . . . . . . . . . . . . . . . . . . . . . . . . . . . . . . . . . . . . . . . . . . . . . . . . 9 Package Handling . . . . . . . . . . . . . . . . . . . . . . . . . . . . . . . . . . . . . . . . . . . . . . . . 9 Unpack the LCD Panel LCD Panel Setup . . . . . . . . . . . . . . . . . . . . . . . . . . . . . . . . . . . . . . . . . . .10 . . . . . . . . . . . . . . . . . . . . . . . . . . . . . . . . . . . . . . . . . . . . .11 Rotate the LCD Panel . . . . . . . . . . . . . . . . . . . . . . . . . . . . . . . . . . . . . . . . . . .12 Open the Connections Panel . . . . . . . . . . . . . . . . . . . . . . . . . . . . . . . . . . . . . . .12 Connect Power to the LCD Panel . . . . . . . . . . . . . . . . . . . . . . . . . . . . . . . . . . . .13 Connect a Video Source to the LCD Panel . . . . . . . . . . . . . . . . . . . . . . . . . . . . . .13 Close the Connections Panel . . . . . . . . . . . . . . . . . . . . . . . . . . . . . . . . . . . . . . .13 Install the Remote Control Batteries . . . . . . . . . . . . . . . . . . . . . . . . . . . . . . . . .14 Disconnect Power from the LCD Panel . . . . . . . . . . . . . . . . . . . . . . . . . . . . . . . .14 Operation . . . . . . . . . . . . . . . . . . . . . . . . . . . . . . . . . . . . . . . . . . . . . . . . . . . . . . 15 Turn Power On . . . . . . . . . . . . . . . . . . . . . . . . . . . . . . . . . . . . . . . . . . . . . . . . . .15 Turn Power Off . . . . . . . . . . . . . . . . . . . . . . . . . . . . . . . . . . . . . . . . . . . . . . . . . .15 Select the Input Source . . . . . . . . . . . . . . . . . . . . . . . . . . . . . . . . . . . . . . . . . . . .15 PIP . . . . . . . . . . . . . . . . . . . . . . . . . . . . . . . . . . . . . . . . . . . . . . . . . . . . . . . . . .16 PIP Sources . . . . . . . . . . . . . . . . . . . . . . . . . . . . . . . . . . . . . . . . . . . . . . . . . .16 Turn PIP On or Off . . . . . . . . . . . . . . . . . . . . . . . . . . . . . . . . . . . . . . . . . . . . .16 Adjust the PIP Source . . . . . . . . . . . . . . . . . . . . . . . . . . . . . . . . . . . . . . . . . . .16 Adjust the PIP Mode . . . . . . . . . . . . . . . . . . . . . . . . . . . . . . . . . . . . . . . . . . . .17 Adjust PIP Position . . . . . . . . . . . . . . . . . . . . . . . . . . . . . . . . . . . . . . . . . . . . .17 Swap between the Main Image and the PIP Image Swap between the Main Audio and the PIP Audio LCD Panel FHD551-W User Manual 020-100996-01 Rev. 2 (12-2012) . . . . . . . . . . . . . . . . . . . . . . .18 . . . . . . . . . . . . . . . . . . . . . . . .18 i Turn IRFM On or Off . . . . . . . . . . . . . . . . . . . . . . . . . . . . . . . . . . . . . . . . . . . . . . 18 Adjust Volume . . . . . . . . . . . . . . . . . . . . . . . . . . . . . . . . . . . . . . . . . . . . . . . . . . 18 RS-232C Control . . . . . . . . . . . . . . . . . . . . . . . . . . . . . . . . . . . . . . . . . . . . . . . . 18 Adjust Wake Up From Sleep . . . . . . . . . . . . . . . . . . . . . . . . . . . . . . . . . . . . . . . . . 19 OSD Menu . . . . . . . . . . . . . . . . . . . . . . . . . . . . . . . . . . . . . . . . . . . . . . . . . . . . . 20 OSD Menu Controls . . . . . . . . . . . . . . . . . . . . . . . . . . . . . . . . . . . . . . . . . . . . 20 Image Settings . . . . . . . . . . . . . . . . . . . . . . . . . . . . . . . . . . . . . . . . . . . . . . . 20 Image Settings (continued) . . . . . . . . . . . . . . . . . . . . . . . . . . . . . . . . . . . . . . . 21 Display Settings . . . . . . . . . . . . . . . . . . . . . . . . . . . . . . . . . . . . . . . . . . . . . . . 22 Audio Settings . . . . . . . . . . . . . . . . . . . . . . . . . . . . . . . . . . . . . . . . . . . . . . . . 23 Basic Settings . . . . . . . . . . . . . . . . . . . . . . . . . . . . . . . . . . . . . . . . . . . . . . . . 24 Basic Settings (continued) . . . . . . . . . . . . . . . . . . . . . . . . . . . . . . . . . . . . . . . 25 Advanced Settings . . . . . . . . . . . . . . . . . . . . . . . . . . . . . . . . . . . . . . . . . . . . . 26 System Status . . . . . . . . . . . . . . . . . . . . . . . . . . . . . . . . . . . . . . . . . . . . . . . . 27 Care and Cleaning . . . . . . . . . . . . . . . . . . . . . . . . . . . . . . . . . . . . . . . . . . . . . . . 29 Clean the LCD Panel Screen . . . . . . . . . . . . . . . . . . . . . . . . . . . . . . . . . . . . . . . . . 29 Clean the LCD Panel Cabinet . . . . . . . . . . . . . . . . . . . . . . . . . . . . . . . . . . . . . . . . 29 Clean the Power Cord . . . . . . . . . . . . . . . . . . . . . . . . . . . . . . . . . . . . . . . . . . . . . 29 Clean the Dust Filter . . . . . . . . . . . . . . . . . . . . . . . . . . . . . . . . . . . . . . . . . . . . . . 30 RS-232C Commands . . . . . . . . . . . . . . . . . . . . . . . . . . . . . . . . . . . . . . . . . . . . . 31 RS-232C Command Format . . . . . . . . . . . . . . . . . . . . . . . . . . . . . . . . . . . . . . . . . 31 RS-232C CMD Options . . . . . . . . . . . . . . . . . . . . . . . . . . . . . . . . . . . . . . . . . . . . 32 Compliant Timing . . . . . . . . . . . . . . . . . . . . . . . . . . . . . . . . . . . . . . . . . . . . . . . . 39 Troubleshooting . . . . . . . . . . . . . . . . . . . . . . . . . . . . . . . . . . . . . . . . . . . . . . . . . 41 Specifications . . . . . . . . . . . . . . . . . . . . . . . . . . . . . . . . . . . . . . . . . . . . . . . . . . . 43 LCD Panel . . . . . . . . . . . . . . . . . . . . . . . . . . . . . . . . . . . . . . . . . . . . . . . . . . . . . 43 Performance . . . . . . . . . . . . . . . . . . . . . . . . . . . . . . . . . . . . . . . . . . . . . . . . . . . 43 Power . . . . . . . . . . . . . . . . . . . . . . . . . . . . . . . . . . . . . . . . . . . . . . . . . . . . . . . . 44 Connections . . . . . . . . . . . . . . . . . . . . . . . . . . . . . . . . . . . . . . . . . . . . . . . . . . . 44 Environment . . . . . . . . . . . . . . . . . . . . . . . . . . . . . . . . . . . . . . . . . . . . . . . . . . . 44 Physical Parts ii . . . . . . . . . . . . . . . . . . . . . . . . . . . . . . . . . . . . . . . . . . . . . . . . . . . . . . 45 . . . . . . . . . . . . . . . . . . . . . . . . . . . . . . . . . . . . . . . . . . . . . . . . . . . . . . . . 46 LCD Panel FHD551-W User Manual 020-100996-01 Rev. 2 (12-2012) Important Safety Information Read this information thoroughly and completely before installing, adjusting, or operating the LCD panel FHD551-W. General Safety Precautions • This product is designed and manufactured to operate within defined design limits. Misuse may result in electric shock or fire. • Improper installation can result in death or serious injury! Make sure that the supports, mount, and hardware used for the LCD panel installation are adequately designed to hold the required weight and that they are installed correctly. • Fire or electrical shock hazard! Although the LCD panel meets IP56 weatherproof standards, it is not engineered to protect against continuous liquid immersion. Do not submerge the LCD panel in any type of liquid. • Never push any object into an opening at the back of the LCD panel. • Do not place objects on top of the LCD panel. • This is a class A product. In a domestic environment, this product may cause radio interference for which the user may be required to contain. • To avoid electric shock or component damage, disconnect the LCD panel from AC power before connecting other components to the LCD panel. • Fire or electrical shock hazard! Avoid condensation; do not use the LCD panel immediately after moving it from a lower to a higher temperature environment. • Do not touch the liquid from a broken LCD panel. If you have contact with the liquid, wash the area with clean water and seek medical attention immediately. • Watch for pinch points. Do not place your fingers between moving parts. • Two people are required to safely lift and install the LCD panel. • Do not push or shake the LCD panel. This may cause damage or injury. • Do not apply pressure to the front of the LCD panel. This may cause damage or injury. • If smoke or an unidentified odor comes from the LCD panel, remove the power plug from the outlet immediately and contact your dealer immediately. Do not try to repair the product yourself. • Do not block LCD panel ventilation openings. • During installation, provide a minimum of 2 in. (5 cm) spacing from the wall and 2 in. (10 cm) spacing from the ceiling and sides, to allow proper ventilation. Power Safety • DO NOT attempt operation if the AC supply and cord are not within the specified voltage and power range. • Disconnect power from the LCD panel before moving it or opening any enclosure. • Position all cables where they cannot contact hot surfaces, be pulled, or tripped over. • Do not overload power outlets and extension cords. • Do not operate if the LCD panel power cord or power outlet appear damaged. LCD Panel FHD551-W User Manual 020-100996-01 Rev. 2 (12-2012) 1 Introduction The LCD Panel FHD551-W provides high-definition resolution at 1920 x 1080 with a weather-resistant design, to allow for outdoor installation. This user manual provides data about the LCD panel, installation instructions, operation, care, and troubleshooting tips. Features • High brightness (700 nits, typ.)1 • High contrast ratio (4000:1, typ.)1 • Full HD 1920 x 1080 resolution • Optically bonded screen • Weatherproof IP56/NEMA 4 rating • Ruggedized design • Portrait or landscape orientation • DACS cooling and filtration system • On Screen Display (OSD) menu controls • Built-in speakers • Image retention frame motion (IRFM) 1. Brightness and contrast may be slightly reduced due to the protective covering on the glass of the LCD panel. LCD Panel FHD551-W User Manual 020-100996-01 Rev. 2 (12-2012) 3 Introduction What’s In The Box? Always use the accessories recommended by Christie Digital, for compatibility. Verify that you have all these items before installing the LCD panel. • LCD Panel FHD551-W • • Remote Control • (2) AAA Batteries Country-Specific Power Cord (shipped separately) • 4 Infrared Extender Cable • User Manual LCD Panel FHD551-W User Manual 020-100996-01 Rev. 2 (12-2012) Introduction Controls and Indicators This section describes the LCD panel FHD551-W controls and indicators. LCD Panel Controls The LCD panel controls are located at the back of the LCD panel. Remove the exterior and interior I/O panels for access. Button Description Power Turns the LCD panel ON and OFF. SOURCE Toggles between sources. Navigates right or increases a setting value in the OSD menu. Navigates left or decreases a setting value in the OSD menu. Navigates up in the OSD menu. Navigates down in the OSD menu. MENU/EXIT Opens the OSD menu or selects the previous menu if the OSD menu is already open. Indicator Lights The indicator lights are located at the back of the LCD panel, to the left of the LCD panel controls. Light Description Green (solid) Indicates that the LCD panel is operating normally. Green (blinking) Indicates that the LCD panel fan has failed. Orange (solid) Indicates that the LCD panel is in power saving mode. Orange (blinking) Indicates that the LCD panel is not receiving a signal. None Indicates that the LCD panel does not have power or is off. LCD Panel FHD551-W User Manual 020-100996-01 Rev. 2 (12-2012) 5 Introduction Connection Panel The connection panel is located at the back of the LCD panel. Remove the exterior and interior I/O panels for access. 6 A RS-232C In (D-Sub 9-pin) I PC Audio In (3.5 mini jack) B Component (RCA) J VGA (D-sub 15-pin) C Component Audio (RCA L/R) K DVI-D (HDCP compliant) D S-Video L HDMI 2 E Composite Video (RCA) M HDMI 1 F Audio In (RCA - S-Video/ Component Video)) N DisplayPort G Audio Out (3.5 mini jack) O AC IN (power cord) H Infrared Extender (3.5 mini jack) P Power On/Off Switch LCD Panel FHD551-W User Manual 020-100996-01 Rev. 2 (12-2012) Introduction Remote Control The remote control is not waterproof. Ref. Button Description A INFO Provides source and resolution information. B COMP Selects the component source. AV Selects the composite video source. HDMI2 Selects the HDMI 2 source. PIP Turns picture-in-picture on or off. S-V Selects the S-video source. SDI2 Not available. D SWAP Swaps between the main and PIP images. E ENTER Selects the highlighted menu choices. F SCALING Toggles between aspect ratios. FREEZE Freezes the current source image. MUTE Turns sound off. BRIGHT Adjusts brightness. CONTRAST Adjusts contrast. AUTO Auto adjustments the VGA source. SOURCE Toggles between sources. VOLUME- Decreases the audio output level. VOLUME+ Increases the audio output level. G POWER Turns the LCD panel ON and OFF. H VGA Selects the PC RGB source. DVI Selects the PC DVI source. HDMI1 Selects the HDMI 1 source. P-POSITION Toggles between picture-in-picture positions. DISPLAYPORT Selects the displayport source. SDI1 Not available. J P-SOURCE Selects the secondary sub-source. K MENU and arrow keys Opens the onscreen display (OSD) menu or selects the previous menu if already open. The arrows provide menu navigation and setting adjustment. L EXIT Close the OSD menu. C I LCD Panel FHD551-W User Manual 020-100996-01 Rev. 2 (12-2012) i To lock or unlock the remote, press Enter, Enter, Exit, Exit, Enter, Exit. 7 Installation This section provides package handling and installation instructions. Package Handling Two people are required to safely lift and install the LCD panel. Transport the LCD panel upright with the proper packaging. Do not place the LCD panel on its side. Dropping the panel or applying unnecessary force to the sides of the bezel results in permanent damage. LCD Panel FHD551-W User Manual 020-100996-01 Rev. 2 (12-2012) 9 Installation Unpack the LCD Panel Two people are required to safely lift and install the LCD panel. Save the LCD panel packaging, to move or ship the LCD panel in the future. i 1. Set the LCD panel box in an upright position. 2. Remove the banding. 3. Remove the white lock handles. 4. Lift off the top of the carton. 5. Remove the top foam cushion. 6. Remove the packing bag. 7. With two people, lift the LCD panel out of the bottom foam cushion. 8. Remove the accessory bag. 10 A Top of the carton B Top foam cushion C LCD panel D Packing bag E Accessory bag F Bottom foam cushion G Lock handle (1 of 6) LCD Panel FHD551-W User Manual 020-100996-01 Rev. 2 (12-2012) Installation LCD Panel Setup Do not install the LCD panel near any heat sources (such as; radiators, heat registers, stoves, or other apparatus that produce heat). This may cause a fire or electric shock. • Allow a minimum of 2 in. (5 cm) spacing from the wall and 4 in (10 cm) spacing from the ceiling and sides when installed. • Do not install the LCD panel at a 180° angle (screen up or screen down). • Install the LCD panel using M8 x 15 mm mounting screws. Do not install the LCD panel with screws that are longer than 15 mm or they may damage the LCD panel. • Before connecting external devices, turn the LCD panel and any connected devices OFF. After all connections are made, turn the LCD panel on before external devices. • Read the Operation Manuals of the video source equipment before making the connections. i Install the LCD panel in a shaded location, away from direct sunlight, for the best viewing experience. 1. Prepare the installation site. 2. Position the LCD panel in its permanent installation location. 3. If rotation is required, see Rotate the LCD Panel on page 12. 4. Open the LCD panel connections panel. See Open the Connections Panel on page 12. 5. Connect components, and power to the LCD panel. See Connect Power to the LCD Panel on page 13. See Connect a Video Source to the LCD Panel on page 13. 6. Close the LCD panel connections panel. See Close the Connections Panel on page 13. 7. Install the remote control batteries See Connect Power to the LCD Panel on page 13. LCD Panel FHD551-W User Manual 020-100996-01 Rev. 2 (12-2012) 11 Installation Rotate the LCD Panel Improper ventilation may shorten the operational life of the LCD panel. Rotate the LCD panel in the correct direction for a landscape or portrait orientation. Reference the arrow labels on the back of the LCD panel for the proper rotation. Open the Connections Panel To avoid risk of electric shock, do not touch the power cable with wet hands and avoid handling the power cord during electrical storms. 1. Rest the LCD panel on a soft surface with the screen down. 2. Remove 4 screws from the exterior input and output (I/O) cover. 3. Remove the external I/O cover. 4. Remove the internal I/O cover. 12 LCD Panel FHD551-W User Manual 020-100996-01 Rev. 2 (12-2012) Installation Connect Power to the LCD Panel To avoid risk of electric shock, do not touch the power cable with wet hands and avoid handling the power cord during electrical storms. 1. Insert the female end of the power cable through the plastic opening of the interior I/O cover. 2. Plug the female end of the power cable into the AC IN connector. See Connection Panel on page 6. 3. Press the power switch to the I position. Connect a Video Source to the LCD Panel i The infrared extender cable does not work in direct sunlight. 1. Insert the video source cable through the plastic opening of the interior I/O cover. 2. Plug the video source cable into the appropriate connector location. See Connection Panel on page 6. Close the Connections Panel To avoid risk of electric shock, do not touch the power cable with wet hands and avoid handling the power cord during electrical storms. 1. Hold the interior I/O cover against the LCD panel and guide the cables (power and video source) into the cable bracket. 2. Place the exterior I/O cover over the interior I/O cover and secure it with 4 screws. Insert the male end of the power cable into an AC wall socket. LCD Panel FHD551-W User Manual 020-100996-01 Rev. 2 (12-2012) 13 Installation Install the Remote Control Batteries To install the batteries, follow the instructions provided in the remote control battery compartment. Incorrect polarities may cause operator injury, battery damage, and contamination of the remote controller. Use approved AAA batteries and do not mix different battery types or strengths. The remote control is not waterproof. i To lock or unlock the remote, press Enter, Enter, Exit, Exit, Enter, Exit. 1. Remove the battery cover, by lifting the tab of the battery cover. 2. Insert two AAA batteries into the remote control. Correctly align the polarity of each battery with the polarity markings inside the remote control. 3. Close the battery cover. Disconnect Power from the LCD Panel • Hold the power connector when removing the power cable. Removing the power cable by the cord can damage the wires inside the cable and cause fire or electric shock. • To avoid risk of electric shock, do not touch the power cable with wet hands. Do not disconnect the AC power cord when Winter Mode is set to Enable. See Advanced Settings on page 26. 1. If the LCD panel is on, press Power OFF on the remote control. 2. Unplug the power cable. 3. Remove 4 screws (M6x30mm) from the exterior I/O cover. 4. Remove the external I/O cover 5. Remove the internal I/O cover. 6. Press the power switch to the O position. 7. Unplug the power cable and remove the cable from the interior I/O cover. 8. Hold the interior I/O cover against the LCD panel. 9. Place the exterior I/O cover over the interior I/O cover and secure in position using 4 screws. 14 LCD Panel FHD551-W User Manual 020-100996-01 Rev. 2 (12-2012) Operation • Do not send a static (non-moving) image to this LCD panel for long periods of time because it may cause image burn-in or image retention. • Turn the power off for 6 consecutive hours after 18 hours of usage, to avoid image retention. This section provides procedures and information for operating the LCD panel. Turn Power On 1. Verify that power is connected to the LCD Panel. See Open the Connections Panel on page 12. 2. Press Power ON on the remote control. Turn Power Off Press Power OFF on the remote control. Select the Input Source 1. Press MENU on the remote control. 2. Press to navigate to the Display Settings menu. 3. Press and then to select Select Source. 4. Press . 5. Press to select an input source: A VGA E DisplayPort B HDMI 1 F Composite Video C HDMI 2 G S-Video D DVI H Component 6. Press ENTER to save changes. 7. Press EXIT to exit the OSD menu. LCD Panel FHD551-W User Manual 020-100996-01 Rev. 2 (12-2012) 15 Operation PIP Picture-in-picture (PIP) allows a second, smaller, image to play within the main image. PIP Sources Available picture-in-picture (PIP) source images are dependent on the source of the main image. For example, if your main screen is using a VGA source, you cannot use a VGA PIP source. PIP Source Main Screen Source VGA HDMI 1 HDMI 2 DVI DisplayPort Video S-Video Component VGA - HDMI 1 - - - HDMI 2 - - - DVI - - - DisplayPort - Video - - S-Video - - Component - Turn PIP On or Off Press PIP on the remote control. Adjust the PIP Source 1. Select the source for the main image: Press the required source button on the remote control: VGA, DVI, HDMI 1, COMP, AV, HDMI 2, DISPLAYPORT, or S-V. See Select the Input Source on page 15 for source types. 2. Press PIP. 3. Select the source for the PIP image: a. Press P-SOURCE. b. Press or to select the PIP source. c. Press ENTER. See PIP Sources on page 16 for information about main image and PIP image source compatibility 16 LCD Panel FHD551-W User Manual 020-100996-01 Rev. 2 (12-2012) Operation Adjust the PIP Mode Picture-in-picture (PIP) mode adjusts the size of the PIP image that displays within the main image. 1. Press MENU on the remote control. 2. Press to navigate to the Display Settings menu. 3. Press and then to select PIP Mode. 4. Press . 5. Press to select the required PIP mode: A Side-by-Side C Medium PIP B Large PIP D Small PIP 6. Press ENTER to save changes. 7. Press EXIT to exit the OSD menu. Adjust PIP Position Picture-in-picture (PIP) position adjusts the location of the smaller image within the main image. There are two methods for adjusting the PIP position: Method 1 Press P-POSITION on the remote control until the image moves to the desired location. Method 2 1. Press MENU on the remote control. 2. Press to navigate to the Display Settings menu. 3. Press and then to select PIP Position. 4. Press . 5. Press until the image moves to the desired location: A Top-Right C Bottom-Right B Top-Left D Bottom-Left 6. Press ENTER to save changes. 7. Press EXIT to exit the OSD menu. LCD Panel FHD551-W User Manual 020-100996-01 Rev. 2 (12-2012) 17 Operation Swap between the Main Image and the PIP Image Press SWAP on the remote control. Swap between the Main Audio and the PIP Audio Press AUDIO on the remote control. Turn IRFM On or Off Use image retention frame motion (IRFM) mode to help avoid image retention from static images. This mode is recommended when static images are used for a long time. 1. Press MENU on the remote control. 2. Press to navigate to the Advanced Settings menu. 3. Press and then to select IRFM. 4. Press to set IRFM to On or Off. 5. Press ENTER to save changes. 6. Press EXIT to exit the OSD menu. Adjust Volume Press VOLUME- or VOLUME+ to increase or decrease the volume. Press MUTE to temporarily turn off all sound. To restore the sound when muted, press MUTE again. RS-232C Control The LCD panel power and OSD menu can be controlled through recommended standard-232C. See RS-232C Command Format on page 31, and RS-232C CMD Options on page 32. 18 LCD Panel FHD551-W User Manual 020-100996-01 Rev. 2 (12-2012) Operation Adjust Wake Up From Sleep When Wake Up From Sleep is set to VGA, Digital, RS232; LCD panel power consumption is >0.5 W when the LCD panel is in power-saving (sleep) mode. i When set to VGA, Digital, RS232; Wake Up From Sleep sets the LCD panel to wake up when a digital signal (HDMI, DVI, DisplayPort, or RS-232C) is sent to the LCD panel. 1. Press MENU on the remote control. The Image Settings menu displays. 2. Press to navigate to the Advanced Settings menu. 3. Press and then to select Wake Up From Sleep. 4. Press to adjust Wake Up From Sleep: • VGA Only - the LCD panel wakes up from power saving mode when it receives an active video signal from its VGA (analog) input. This is the default setting. • VGA, Digital, RS232 - the LCD panel wakes up when it receives an active signal from the VGA, HDMI, DisplayPort, DVI inputs, or an RS-232C command. • Never Sleep - the LCD panel never goes to sleep. 5. Press ENTER to save changes. 6. Press MENU to return to the previous menu or EXIT to exit the OSD menu. LCD Panel FHD551-W User Manual 020-100996-01 Rev. 2 (12-2012) 19 Operation OSD Menu The OSD menu automatically determines whether a graphics source or video source is provided. Some menu options (such as saturation or hue) are not available when a graphics source is provided because changing these options would degrade the picture quality. i The onscreen display (OSD) menu provides adjustment settings for the LCD screen. OSD Menu Controls Use the remote control to access the onscreen display (OSD) menu: 1. Press MENU. 2. Press or to scroll up and down the menu. 3. Press or to adjust a selected setting. 4. Press ENTER to save changes. 5. Press MENU to return to the previous menu or EXIT to exit the OSD menu. Image Settings Use the Image Settings menu to make common image adjustments; such as contrast and sharpness. See OSD Menu Controls on page 20 for OSD menu control information. Menu Item Scheme 20 Description Adjusts the image scheme. Options include: User, Vivid, Cinema, Game and Sport. The default is User. This option is unavailable when in Graphics mode. LCD Panel FHD551-W User Manual 020-100996-01 Rev. 2 (12-2012) Operation Menu Item Description Brightness Adjusts the picture brightness. Brightness values range from 0~100. The default is 50. Contrast Adjusts the picture contrast. Contrast values range from 0~100. The default setting is 50. Sharpness Adjusts the picture sharpness. Sharpness values range from 0~24. The default is 12. Saturation Adjusts brilliance and brightness when operating in VIDEO mode. Saturation values range from 0~100. The default is 50. This option is unavailable when in Graphics mode. Hue Adjusts the green hue when operating in VIDEO mode. Hue values range from 0~100. The default is 50. This option is unavailable when in Graphics mode. Backlight Adjusts the backlight. Backlight values range from 0~100. The default is 80. Color Temperature & Gamma Expands the Image Settings menu. See Image Settings (continued) on page 21. Image Settings (continued) Menu Item Description Gamma Adjusts gamma. Options include: OFF and 2.2. The default is 2.2. Color Temperature Adjusts the color temperature. Options include: User, 5000K, 6500K, 7500K, and 9300K. The default is 9300K. Red, Green, and Blue Gain Adjusts the color gain. To adjust this setting, set the Color Temperature to User first. Values range from 128~383. The default is 256. Red, Green, and Blue Offset Adjusts the color offset. The Color Temperature must be set to User to adjust these settings. Values range from -50~50. The default is 0. LCD Panel FHD551-W User Manual 020-100996-01 Rev. 2 (12-2012) 21 Operation Display Settings Use the Display Settings menu to make common source adjustments; such as, zoom or PIP. See OSD Menu Controls on page 20 for OSD menu control information. Menu Item 22 Description Aspect Ratio Adjusts the picture aspect ratio. Options include: Full Screen, Pillar Box, Letter Box, and Native. The default is Full Screen. Zoom Adjusts the picture zoom. The zoom ranges from 0~10. The default is 0. Auto Scan (Main) Adjusts whether auto scan is on or off. When auto scan is on, the order is: VGA, HDMI1, HDMI 2, DVI, DisplayPort, Composite Video, S-video, then Component. The default is On. Select Source Adjusts the input source. Options include: VGA, HDMI 1, HDMI 2, S-Video, Composite Video, and Component. The default is HDMI 1. PIP Mode Adjusts the picture-in-picture mode. Options include: Off, Large PIP, Medium PIP, Small PIP, and Side-by-Side. The default is Off. PIP Position Adjusts the picture-in-picture position. Options include: Bottom-Right, Top-Left, Top-Right, and Bottom-Left. The default is Bottom-Right. Aspect Ratio Adjusts the aspect ratio. Options include: Full Screen, Pillar Box and Letter Box. The default is Full Screen. Side by Side Scale Adjusts the side-by-side scale. Options include: Zoom In, Zoom Out, Main, PIP, Default, and Return. Auto Scan (PIP) Adjusts whether auto scan is on or off. When auto scan is on, the order is: VGA, HDMI1, HDMI 2, DVI, DisplayPort, Composite Video, S-video, then Component. The default is On. Select Source Adjust the picture-in-picture source. Options include; HDMI 1, HDMI 2, DVI, DisplayPort, S-Video, Composite Video, and Component. The default is VGA for Main, and Composite Video for PiP. LCD Panel FHD551-W User Manual 020-100996-01 Rev. 2 (12-2012) Operation Audio Settings Use the Audio Settings menu to adjust volume settings. Audio can also be controlled from the remote control (Adjust Volume on page 18). See OSD Menu Controls on page 20 for OSD menu control information. Menu Item Description Volume Adjusts the main volume. Volume ranges from 0~100. The default is 50. Bass Adjusts the bass level (low tones). Bass ranges from 0~20. The default is 10. Treble Adjusts the treble (high tones). Treble ranges from 0~20. The default is 10. Balance Adjusts the left and right speaker balance. The values range from 0~20. The default is 10. HDMI Audio Input Adjusts the HDMI audio input. Options include: HDMI and PC audio input. The default is HMDI. DP Audio Input Adjusts the DisplayPort audio input. Options include: DisplayPort and PC Audio Input. The default is DisplayPort. Internal Speakers Turns the internal speakers on or off. Options include: On and Off. The default is On. LCD Panel FHD551-W User Manual 020-100996-01 Rev. 2 (12-2012) 23 Operation Basic Settings Use the Basic Settings menu to make OSD menu adjustments. See OSD Menu Controls on page 20 for OSD menu control information. Menu Item Description OSD Transparent Adjusts the menu transparency level. Transparency levels ranges from 0 to 100. The default is 0. OSD Location Adjusts the menu location. Options include: up, down, left, or right. OSD Zoom Configures whether the menu zoom is on or off. The default is off. OSD Rotation Adjusts menu rotation. Options include: landscape, or portrait. The default is landscape. OSD Language Adjusts the menu language. Options include: Simplified Chinese, French, German, Italian, Portuguese, Russian, Spanish, Japanese and Korean. The default is English. OSD Timeout Adjusts the menu timeout. The timeout ranges from 5~120 seconds. The setting defaults to 30. Sleep Timer Configures the time after which the LCD panel switches to standby mode. Options include, Off, 15, 30, 60, 90 and 120 minutes. The default is OFF. Power LED Configures the LED power setting. Options include: Off, DCR, and light sensor. The default is off. Real Time Clock Expands the Basic Settings menu. See Basic Settings (continued) on page 25. 24 LCD Panel FHD551-W User Manual 020-100996-01 Rev. 2 (12-2012) Operation Basic Settings (continued) Menu Item Description Current Time Configures the current time settings. The time and date are displayed in this format Year/Month/Day Hour:Minutes Weekday. The time format is 24-hour. Timer mode Configures the power on and power off timer. Options include: • User - manually configure the alarm timer of each day. • Same Settings On All - configure the same alarm timer for every day. • Same Settings On Work Days - configure the same alarm timer for Monday to Friday. LCD Panel FHD551-W User Manual 020-100996-01 Rev. 2 (12-2012) 25 Operation Advanced Settings Do not disconnect the AC power cord when Winter Mode is set to Enable. Use the Advanced Settings menu to configure advanced features such as VGA mode. See OSD Menu Controls on page 20 for OSD menu control information. Menu Item 26 Description Auto Adjustment Forces the LCD panel to reacquire and lock to the input signal. This is useful when the signal quality is poor. This feature does not continually reacquire the signal. Options include: Yes, and No. The default is No. Image Position Adjusts the VGA mode image position. Options include: Up, Down, Left, and Right. Phase Adjusts the VGA mode phase. Phase ranges from 0~63. Clocks Adjusts the VGA mode clocks. The clocks range from 0~100. VGA ADC Settings Sets the VGA ADC setting. Options include: Default and User. The default is Default. Flesh Tone Adjusts the video mode flesh tone settings. Options include: Off, Low, Medium and High. The default is Off. IRFM Creates slight frame motion to help avoid image retention. Options include: On and Off. The default is Off. Baud Rate Adjusts the number of signaling events per second. Options include: 115200, 38400, 19200, 9600. The default is 115200. Smart Light Control Adjusts the screen brightness. Options include: Off, DCR (dynamic contrast), Light Sensor. The default is Off. LCD Panel FHD551-W User Manual 020-100996-01 Rev. 2 (12-2012) Operation Menu Item Wake Up From Sleep Description Adjusts the wake up from sleep behavior. Options include: • VGA Only - the LCD panel normally wakes up from power saving mode when it receives an active video signal from its VGA (analog) input. • VGA, Digital, RS232 - the LCD panel wakes up when it receives an active signal from the VGA, HDMI, DisplayPort, DVI inputs, or an RS232 command. • Never Sleep - the LCD panel never goes to sleep. The default is VGA Only. Temperature & Fan Status Provides the status of the thermal sensor and cooling fans. Winter Mode Adjusts Winter Mode. Options include: Enable and Disable. The default is Disable. To maintain a minimum internal temperature, the LCD screen may remain partially illuminated when set to Enable. Only enable this feature when operating temperatures are below 32°F (0°C) as power consumption is greater than 0.5 W. Factory Reset Restores all settings to their default value. Options include: No and Yes. The default is No. System Status Use the System Status menu to view the status of active sources or the latest firmware version. See OSD Menu Controls on page 20 for OSD menu control information. LCD Panel FHD551-W User Manual 020-100996-01 Rev. 2 (12-2012) 27 Care and Cleaning Electrical shock hazard! Always turn the power off and disconnect all power sources from the LCD panel before servicing. This section provides care and cleaning instructions for the LCD panel FHD551-W. Clean the LCD Panel Screen • Do not use abrasive cleaners on the LCD panel. • Do not scratch or hit the LCD panel with hard objects such as fingernails or jewelry. To remove accumulated dust, lightly wipe the surface of the LCD panel with a soft clean cloth. To remove dirt, gently wipe the surface with a soft clean cloth that is dampened with water or a nonammonia based glass cleaner. To remove water spots, gently wipe the surface with a soft clean cloth that is dampened with a 3:1 water and household vinegar solution. Clean the LCD Panel Cabinet Wipe the LCD panel cabinet using a soft cloth that is dampened with a mild liquid dish soap. Clean the Power Cord Power cord dust build-up can lead to fire or electrical shock. At regular intervals, remove the power plug from the outlet and clean off the dust. LCD Panel FHD551-W User Manual 020-100996-01 Rev. 2 (12-2012) 29 Care and Cleaning Clean the Dust Filter Do not use harsh cleaners to clean the dust filter. Clean the dust filter once a year to prevent dust build-up. In high-dust environments, the filter may require more frequent cleaning. 1. Remove 2 screws from the right side of the back of the LCD panel. 2. Remove the dust filter cover. 3. Remove the dust filter. 4. Clean the dust filter by rinsing it below running tap water. Do not scrub the filter or use harsh cleaners. 5. Place the clean dust filter back into the LCD panel. The dust filter can be wet when it is replaced. 6. Replace the filter cover and 2 screws. 30 LCD Panel FHD551-W User Manual 020-100996-01 Rev. 2 (12-2012) RS-232C Commands This section describes how to control the power and OSD menus using recommended standard-232C. RS-232C Command Format Recommended standard-232C commands use the following format: [STX] [IDT] [TYPE] [CMD] ([VALUE] or [REPLY]) [ETX] Variable No. of Bytes Description STX 1 Starting byte. Value equals 07. IDT 1 00 (Hex Num) for broadcast mode (no announcing, only for Video Wall), 01~19 (Hex Num) for single control mode. TYPE 1 Specifies the type of command: • 00: return to host (from LCD panel) • 01: read/action • 02: write 3 CMD Specifies the command. See RS-232C CMD Options on page 32. VALUE 1 Specifies the command’s parameter setting. REPLY 1 Provides the response returned by the LCD panel. ETX 1 Ending byte. Value equals 08. For example, Description Command Sent Command Received (Computer to LCD Panel) (LCD Panel to Computer) Turn LCD panel power off. 07 01 02 50 4F 57 00 08 07 01 00 50 4F 57 00 08 Turn LCD panel power on. 07 01 02 50 4F 57 01 08 07 01 00 50 4F 57 01 08 Request LCD panel power status. 07 01 01 50 4F 57 08 07 01 00 50 4F 57 XX 08 (XX = 0 when off or 1 when on) Set the LCD panel contrast to 30. 07 02 02 43 4F 4E 1E 08 07 02 00 43 4F 4E 1E 08 Request the LCD panel to use large PIP. 07 19 02 50 53 43 03 08 07 19 00 50 53 43 03 08 Reset the LCD panel display settings. 07 02 02 41 4C 4C 00 08 07 02 00 41 4C 4C 00 08 Request LCD panel serial number. 07 01 01 53 45 52 08 07 01 00 53 45 52 S(0) …S(12) 08 S(0) …S(12) = the serial number in ASCII Request LCD panel firmware version. 07 01 01 47 56 45 08 07 01 00 47 56 45 S(0) …S(5) 08 S(0) …S(5) = the firmware version in ASCII LCD Panel FHD551-W User Manual 020-100996-01 Rev. 2 (12-2012) 31 RS-232C Commands RS-232C CMD Options Main Item Power Control and Input Source Control Item Power Control Input Source Input Source Display Adjustment Display Adjustment CMD POW MIN MIN W/R W/R W/R Value (DEC) Reply (DEC) Content 00 00 Off (soft power) 01 01 On (soft power) 00 00 VGA 01 01 Digital DVI 02 02 S-Video 03 03 Composite Video 04 04 Component 09 09 HDMI 1 10 10 HDMI 2 13 13 DisplayPort CMD (HEX) Remark 50 4F 57 For advanced A/D boards. Optional. 4D 49 4E 4D 49 4E BRI W/R 0~100 Current value Back Light Brightness 42 52 49 BRL W/R 0~100 Current value Digital Brightness Level 42 52 4C BLC W/R 00 00 Off (Back Light) 42 4C 43 01 01 On (Back Light) CON W/R 0~100 Current value Contrast 43 4F 4E HUE W/R 0~100 Current value Hue 48 55 45 SAT W/R 0~100 Current value Saturation 53 41 54 COT W/R 00 00 User 43 4F 54 01 01 6500K 02 02 9300K COT 32 Type W/R LCD Panel FHD551-W User Manual 020-100996-01 Rev. 2 (12-2012) RS-232C Commands Main Item Control Item Display Adjustment Display Adjustment (cont.) (cont.) CMD COT W/R (cont.) (cont.) GAC W/R Value (DEC) Reply (DEC) Content 06 06 5000K 07 07 7500K 00 00 Off (Gamma) 01 01 2.2 (Gamma) CMD (HEX) (cont.) 47 41 43 W/R 0~255 Current value Red Gain (128~383) 55 53 52 USG W/R 0~255 Current value Green Gain (128~383) 55 53 47 USB W/R 0~255 Current value Blue Gain (128~383) 55 53 42 UOR W/R 0~100 Current value Red Offset (-50~50) 55 4F 52 UOG W/R 0~100 Current value Green Offset (-50~50) 55 4F 47 UOB W/R 0~100 Current value Blue Offset (-50~50) 55 4F 42 PHA W/R 0~63 Current value Phase 50 48 41 CLO W/R 0~100 Current value Clock 43 4C 4F HOR R Current value Horizontal Position 48 4F 52 VER R Current value Vertical Position 56 45 52 ADJ W 00 00 Auto Adjust 41 44 4A Video Mode SHA W/R 0~24 Current value Sharpness 53 48 41 PIP Adjust PSC W/R 00 00 PIP OFF 50 53 43 01 01 PIP Small 02 02 PIP Medium 03 03 PIP Large 04 04 PIP Side-by-Side 00 00 VGA PIP source selection PIN LCD Panel FHD551-W User Manual 020-100996-01 Rev. 2 (12-2012) W/R Remark 43 4F 54 USR Adjustment Other Control Type 50 49 4E 33 RS-232C Commands Main Item Control Item Other Control PIP source selection (cont.) (cont.) PIP position CMD PIN W/R (cont.) (cont.) PPO W/R Value (DEC) Reply (DEC) Content CMD (HEX) 01 01 Digital DVI 02 02 S-Video 03 03 Composite Video 04 04 Component 09 09 HDMI 1 10 10 HDMI 2 13 13 DisplayPort 00 00 PIP Position Bottom-Left 01 01 PIP Position Bottom-Right 02 02 PIP Position Top-Left 03 03 PIP Position Top-Right (cont.) 50 50 4F SWA W 00 00 Swap Main and PIP 53 57 41 Scaling ASP W/R 00 00 Native 41 53 50 01 01 Full Screen 02 02 Pillar Box 03 03 Letter Box 00 00 Zoom In 01 01 Zoom Out 00 00 115200 01 01 38400 02 02 19200 03 03 9600 00 00 MENU Key 01 01 INFO Key Baud Rate Adjustment Other Control BRA RCU W W/R W Remark 50 49 4E PIP/Main Swap ZOM 34 Type 5A 4F 4D 42 52 41 52 43 55 LCD Panel FHD551-W User Manual 020-100996-01 Rev. 2 (12-2012) RS-232C Commands Main Item Control Item Other Control Other Control (cont.) (cont.) CMD RCU W (cont.) (cont.) LCD Panel FHD551-W User Manual 020-100996-01 Rev. 2 (12-2012) Type Value (DEC) Reply (DEC) Content 02 02 UP Key 03 03 DOWN Key 04 04 LEFT Key 05 05 RIGHT Key 06 06 ENTER Key 07 07 EXIT Key 08 08 VGA Key 09 09 DVI Key 10 10 HDMI1 Key 11 11 HDMI2 Key 12 12 DISPLAYPORT Key 13 13 COMP Key 14 14 S-V Key 15 15 AV Key 18 18 SOURCE Key 19 19 P-SOURCE Key 20 20 PIP Key 21 21 P-POSITION Key 22 22 SWAP Key 23 23 SCALING Key 24 24 FREEZE Key 25 25 MUTE Key 26 26 BRIGHT Key CMD (HEX) Remark 52 43 55 (cont.) 35 RS-232C Commands Main Item Control Item Other Control Other Control (cont.) (cont.) CMD RCU W (cont.) (cont.) Scheme Selection 36 Value (DEC) Reply (DEC) Content 27 27 CONTRAST Key 28 28 AUTO Key 29 29 VOLUME+ Key 30 30 VOLUME- Key CMD (HEX) (cont.) W 00 00 Reset All 41 4C 4C KLC W/R 00 00 Un-lock Keys 4B 4C 43 01 01 Lock Keys SER R 13 bytes Read Serial Number 53 45 52 MNA R 13 bytes Read Model Name 4D 4E 41 GVE R 6 bytes Read Firmware Version 47 56 45 RTV R Current value Read RS-232C Table Version 52 54 56 RTT R Current value Read the temperature of the internal thermal sensor -198~260°F (-128~127°C) 52 54 54 RSF W 0~255 00 Read speed of Fan 0 (RPM = 40 x Reply value). 52 53 46 0~255 01 Read speed of Fan 1 (RPM = 40 x Reply value). 00 00 Wake Up From Sleep = VGA Only 01 01 Wake Up From Sleep = VGA, Digital, RS232 02 02 Wake Up From Sleep = Never Sleep W/R 57 46 53 VOL W/R 0~100 Current value volume 56 4F 4C MUT W/R 00 00 Mute Off 4D 55 54 01 01 Mute On 00 00 User SCM W/R Remark 52 43 55 ALL WFS Audio Type 53 43 4D LCD Panel FHD551-W User Manual 020-100996-01 Rev. 2 (12-2012) RS-232C Commands Main Item Other Control (cont.) Control Item Scheme Selection (cont.) CMD Type SCM (cont.) W/R (cont.) LCD Panel FHD551-W User Manual 020-100996-01 Rev. 2 (12-2012) Value (DEC) Reply (DEC) Content 01 01 Sport 02 02 Game 03 03 Cinema 04 04 Vivid CMD (HEX) Remark 53 43 4D (cont.) 37 Compliant Timing 480i = 480i@60 Hz (YPbPr) • 576i = 576i@60 Hz (YPbPr) 31.469 59.94 25.175 O O - - - O O 37.861 72.809 31.5 O O - - - O O 37.5 75 31.5 O O - - - O O 43.269 85.008 36 O O - - - O O 35.156 56.25 36 O O - - - O O 37.879 60.317 40 O O - - - O O 48.077 72.188 50 O O - - - O O 46.875 75 49.5 O O - - - O O 53.674 85.06 56.25 O O - - - O O 48.363 60.004 65 O O - - - O O 56.476 70.069 75 O O - - - O O 60.023 75.029 78.75 O O - - - O O 68.677 84.997 94.5 O O - - - O O WXGA1360 x 768 47.712 60.015 85.5 O O - - - O O 1280 x 720 44.444 59.98 64 O O - - - O O 44.772 59.86 74.5 O O - - - O O 56.456 74.78 95.75 O O - - - O O 47.776 59.87 79.5 O O - - - O O 47.396 59.995 68.25 O O - - - O O 68.633 84.837 117.5 O O - - - O O 49.306 59.91 71 O O - - - O O 49.702 59.81 83 O O - - - O O 67.5 75 108 O - - - - - O Timing VGA 640 x 480 SVGA 800 x 600 VESA XGA 1024 x 768 1280 x 768 1280 x 800 SXGA 1152 x 864 LCD Panel FHD551-W User Manual 020-100996-01 Rev. 2 (12-2012) DVI Dot Clock (MHz) VGA fV (Hz) HDMI fH (kHz) Composite • S-Video O = compliant timing for single display is supported Component • DisplayPort The following notation is used in the compliant timing table: 39 Dot Clock (MHz) VGA Component S-Video Composite 63.981 60.02 108 O - - - - - O 79.976 75.025 135 O - - - - - O 91.146 85.024 157.5 O - - - - - O 64.744 59.95 101 O - - - - - O 64.317 59.98 121.75 O - - - - - O 55.469 59.901 88.75 O O - - - O O 55.935 59.88 106.5 O O - - - O O WSXGA+ 1680 x 1050 64.674 59.883 119 O O - - - O O 65.29 59.954 146.25 O O - - - O O UXGA 1600 x 1200 75 60 162 O O - - - O O 1920 x 1080 66.587 59.93 138.5 O O - - - O O WUXA 1920 x 1200 74.038 59.95 154 O O - - - O O SDTV NTSC 15.734 29.97 13.5 - - 480i O O - - PAL 15.625 25 13.5 - - 576i O O - - 480p 31.5 60 27.03 O - O - - O O 576p 31.25 50 27 O - O - - O O 720p 1280 x 720 37.5 50 74.25 O - O - - O O 44.995 59.94 74.176 O - O - - O O 45 60 74.25 O - O - - O O 28.13 50 74.25 O - O - - O O 33.716 59.94 74.176 O - O - - O O 33.75 60 74.25 O - O - - O O 27 24 74.25 O - - - - - O 28.125 25 74.25 - - - - - - - 33.716 29 74.18 - - - - - - - 33.75 30 74.25 - - - - - - - 56.25 50 148.5 O - O - - O O 67.433 59.94 148.352 O - O - - O O 67.5 60 148.5 O - O - - O O Timing SXGA 1280 x 1024 VESA (cont.) SXGA+ 1400 x 1050 1440 x 900 HDTV 1080i 1920 x 1080 40 1080p 1920 x 1080 DVI fV (Hz) HDMI fH (kHz) EDTV DisplayPort Compliant Timing LCD Panel FHD551-W User Manual 020-100996-01 Rev. 2 (12-2012) Troubleshooting This section provides LCD panel troubleshooting information. LCD Panel Problem Correction Black dots are visible on the image • Clean the screen surface with a soft cloth. Flickering image • Remove objects that contain a magnetic field (for example; speakers, steel structures, or high-voltage lines) installed near the LCD panel. See Clean the LCD Panel Screen on page 29. • Adjust the graphic interface (PC mode) within allotted frequency parameters. Image color is abnormal • Adjust the color settings. See Image Settings on page 20. • Reset the display. • If YUV terminals are used, verify that the cables are connected correctly. The LCD Panel is not functioning correctly • Check the LCD panel temperature from the System Status menu. If the temperature is below -4°F (-20°C), move the LCD panel to a warmer location. Image ghosting is visible • Verify that the source equipment connection cables are less than 50 ft. (15 m) in length. If additional length is required, please contact your authorized dealer for a signal amplifier (not provided). Image is dark • Verify that the LCD panel is warmed up. It may take several seconds for the LCD panel to warm up after the power is enabled. • Adjust the backlight and brightness. See Image Settings on page 20. • Direct sunlight and hot conditions may cause the screen image to temporarily darken. Image is not centered • Verify that the input signal is compatible with the display. • Adjust the format of the image. See Display Settings on page 22. Image size is not correct • Adjust the image size. See Display Settings on page 22. No image • Verify that the power cord is connected properly to the power outlet and to the LCD panel. • Verify that the main power switch is set to the I position. • If the power indicator is amber, press the power button on the remote control. • If both the S-Video input and the AV2 input are connected, remove one. • Check the operating temperature. The LCD panel stops running when it overheats or when the fan(s) fails. • Check the environment temperature. The LCD panel cannot turn on when the environment temperature is below -4°F (-20°C) or above 114°F (45°C). Partial blurring of the image is visible • Remove objects that contain a magnetic field (for example; speakers, steel structures, or high-voltage lines) from the immediate vicinity of the LCD panel. • Adjust the LCD panel using the OSD menu. LCD Panel FHD551-W User Manual 020-100996-01 Rev. 2 (12-2012) 41 Troubleshooting LCD Panel Problem The remote control is not functioning Correction • Verify that the infrared extender cable is installed correctly. • Verify that the remote control is not locked. Unlock if required. See Remote Control on page 7. • Verify that the batteries are fresh and that they are installed correctly. • Make sure the remote control is aimed at the IR sensor on the back of the display. White color is not correct • Adjust the color temperature. See Image Settings on page 20. 42 LCD Panel FHD551-W User Manual 020-100996-01 Rev. 2 (12-2012) Specifications This section provides the specifications for the LCD panel FHD551-W. Specifications are subject to change. LCD Panel Specification Value Active Screen Size 54.6 in. (138.7 cm) Resolution 1920 x 1080 (16:9) Brightness (panel native) 700 cd/m2 (typ.) Contrast Ratio (panel native) 4000:1 Response Time 6.5 ms (GTG) Aspect Ratio 16:9 Driver Element a-Si TFT Active Matrix Display Colors 10-bit, 1.07 Billion Colors Pixel Pitch (H x W) 0.024 in. x 0.024 in. (0.063 cm x 0.063 cm) Pixel Arrangement RGB Vertical Stripe Horizontal Frequency 15 ~ 94 KHz (Digital) 23 ~ 92 KHz (Analog) Vertical Frequency 23 ~ 85 KHz (Digital) 49 ~ 86 Hz (Analog) Wall Mount VESA Standard 15.7 in. x 7.9 in. (40 cm x 20 cm) Performance Specification Value Auto Adjust Clock, Phase, H-Position, and V-Position Screen Scaling VGA, SVGA, XGA, WXGA, and HDTV Full Screen Display Power Management VESA DPMS, DVI DMPM, Energy Star Color Adjustment 5000K, 6500K, 7500K, 9300K, User OSD Language English, Simplified Chinese, French, German, Italian, Portuguese, Russian, Spanish, Japanese, and Korean LCD Panel FHD551-W User Manual 020-100996-01 Rev. 2 (12-2012) 43 Specifications Power i To restrict power consumption to <0.5 W during standby mode, Wake Up From Sleep must be set to VGA Only. See Adjust Wake Up From Sleep on page 19. Specification Value Power Input 100-240VAC, 4A (50/60 Hz) Normal Operation ≤ 265 W Power Off (Winter Mode Disabled) ≤ 0.5 W Power Off (Winter Mode Enabled) > 0.5 W Speaker 4Ω / 10 W x 2 Connections Specification Input Connections • RS-232C (D-Sub 9-pin) • Component (RCA) • Component Audio (RCA L/R) • S-Video • Composite Video (RCA) • Audio In (RCA - S-Video/Component Video) • Infrared Extender (3.5 mini jack) • PC Audio In (3.5 mini jack) • VGA (D-sub 15-pin) • DVI-D (HDCP compliant) • HDMI 2 • HDMI 1 • DisplayPort • AC In Output Connections • Audio out (3.5 mini jack) Environment Specification Storage Temperature Min -22°F (-30°C) ~ Max 140°F (60°C) Operating Temperature Min -4°F (-20°C) ~ Max 114°F (45°C) Humidity ~ 85% RH (max.) 44 LCD Panel FHD551-W User Manual 020-100996-01 Rev. 2 (12-2012) Specifications Physical Specification Value Dimension (W x H x D) 51.2 in. x 30.4 in. x 4.8 in. (130 cm x 77.1 cm x 12.2 cm) Net Weight 121 lb (55 Kg) Gross Weight 132 lb (60 Kg) Mounting screw size M8 x 15 mm LCD Panel FHD551-W User Manual 020-100996-01 Rev. 2 (12-2012) 45 Specifications Parts Part Number Description 142-001102-XX LCD Panel FHD551-W 142-100102-XX Flat Panel (FP) Remote Control 108-383105-XX Power Cord NA 108-390103-XX Power Cord EU 108-388100-XX Power Cord UK 108-376107-XX Power Cord JP 108-375106-XX Power Cord CN 108-392105-XX Power Cord AU 46 LCD Panel FHD551-W User Manual 020-100996-01 Rev. 2 (12-2012) *000-103397-01* ASSY TECH DOCS FHD551-W Corporate offices Worldwide offices USA – Cypress ph: 714-236-8610 United Kingdom ph: +44 118 977 8000 Eastern Europe ph: +36 (0) 1 47 48 100 Singapore ph: +65 6877-8737 Japan ph: 81-3-3599-7481 Canada – Kitchener ph: 519-744-8005 France ph: +33 (0) 1 41 21 00 36 Middle East ph: +971 (0) 4 299 7575 Beijing ph: +86 10 6561 0240 South Korea ph: +82 2 702 1601 Germany ph: +49 2161 664540 Spain ph: + 34 91 633 9990 Shanghai ph: +86 21 6278 7708 For the most current technical documentation, please visit www.christiedigital.com