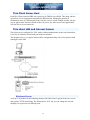
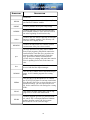
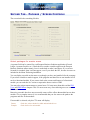
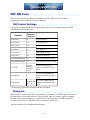
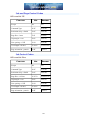
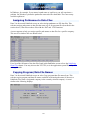
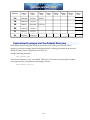
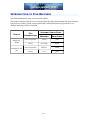
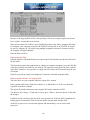
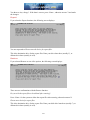
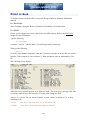
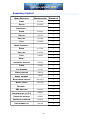
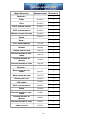
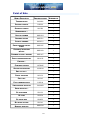
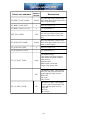
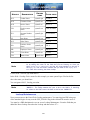
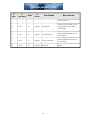
1
i
PBS Administration
Passport Business Solutions ™
Accounting and Business Software
Version 12.0
March 2011
ii
181 Waukegan Road, Suite 200
Northfield, Illinois 60093
(847) 729-7900
FAX: (847) 729-7909
www.pass-port.com
Passport Business SolutionsTM
Accounting and Business Software
Copyright Passport Software, Inc. © 2011. All Rights Reserved.
PROPRIETARY RIGHTS NOTICE: No part of this material may be reproduced or transmitted in any form or
by any means, electronic, mechanical, or otherwise, including photocopying and recording or in connection
with any information storage or retrieval system, without the permission in writing from Passport Software, Inc.
Passport Software, Inc. (“Passport” or “PSI”) have taken reasonable preventive measures to ensure the accuracy of the information contained in this manual. However, Passport makes no warranties or representations
with respect to the information contained herein; and Passport shall not be held liable for damages resulting
from any errors or omissions herein or from the use of the information contained in this manual.
AcuCorp is a trademark of AcuCorp, Inc. All rights reserved. All other tradenames, and logos are trademarks of their
respective companies.
iii
ATTENTION: ONLY LICENSEES CURRENTLY ENROLLED IN THE PASSPORT UPDATE PROGRAM (PUP) ARE
PERMITTED TO INSTALL AND USE, SUBJECT TO THE TERMS AND CONDITIONS OF THE LICENSE AGREEMENT
BELOW, THE ENCLOSED SOFTWARE.
LICENSE AGREEMENT
1. License Grant
Passport Software, Inc. (Passport) hereby grants to Licensee and Licensee accepts a non-exclusive license for the enclosed Software with
the rights, terms, and conditions as detailed in this License Agreement:
a. You may install and use the Software on a single computer system or single computer file server for your own internal business purposes
provided you (the Licensee) do not exceed the number of concurrent users licensed by Passport to access the Software. If Licensee wishes
to increase the number of licensed concurrent users, Licensee must contact Licensee's Passport Partner (your Passport Software supplier) or
Passport directly.
b. You may make backup copies of the Software as required for your own internal business purposes provided that you reproduce all copyright notices and other proprietary notices on each copy made. Backup copies may be used at any time to re-install the enclosed Software
in the event of loss, destruction, or other malfunction of the Software.
c. You may only transfer the Software and this license to a successor to the whole of Licensee's business, provided the successor agrees to
accept the terms and conditions of this agreement. If you transfer the Software, you must report to Passport the name of the new user of the
Software, and you may not retain any copies of the Software yourself once you have transferred it. No other transfers of the Software are permitted without the prior written consent of Passport Software, Inc.
Licensee shall not export or re-export, directly or indirectly (including via remote access) the Software, Documentation or other information
or materials provided by Passport hereunder, to any country for which the United States or any other relevant jurisdiction requires any export
license or other governmental approval at the time of export without first obtaining such license or approval from Passport. It shall be Licensee's responsibility to comply with the latest United States export regulations, and Licensee shall defend and indemnify Passport from and
againstany damages, fines, penalties, assessments, liabilities, costs and expenses (including reasonable attorneys' fees and court costs) arisingout of any claim that Software, Documentation, or other information or materials providedby Passport hereunder were exported or otherwise accessed, shipped or transported in violation of applicable laws and regulations. Licensee shall comply with all laws, legislation, rules,
regulations, and governmental requirements with respect to the Software, and the performance by Licensee of its obligations hereunder, of
any jurisdiction in or from which Licensee directly or indirectly causes the Software to be used or accessed. In the event that this Agreement
is required to be registered with any governmental authority, Licensee shall cause such registration to be made and shall bear any expense
or tax payable in respect thereof.
This non-exclusive license is effective for the useful life of the Software. However, this license will immediately terminate if you fail to comply
with any term or condition of this Agreement. Upon termination you must destroy all copies of the Software.
A new version of the Software replaces the version of the Software previously licensed. Use of a new Software version terminates the license
to use that part of the Software replaced by the new Software version and Licensee shall destroy or return to Passport all copies of any prior
Software version previously licensed.
EXCEPT AS STATED ABOVE, YOU MAY NOT COPY, TRANSFER, OR DISTRIBUTE THE SOFTWARE TO OTHERS, AND ANY UNAUTHORIZED COPYING,
TRANSFER, OR DISTRIBUTION SHALL AUTOMATICALLY TERMINATE YOUR LICENSE.
2. Passport Update Program
Passport makes available its subscription update service (Passport Update Program - PUP) to licensees of the Software. Only licensees having
current and up-to-date enrollment in PUP are permitted to install and use any updates. Contact your Passport Partner (your Passport Software supplier) or Passport directly to enroll in this program.
Updates to the Software made available to Licensee shall be treated for all purposes as Software under this License and all intellectual property rights therein shall be retained by Passport.
3. Passport's Proprietary Rights
The Software is copyrighted by Passport Software, Inc. and some portions of the Software are copyrighted by AcuCorp, Inc., a Micro Focus
International PLC company. All rights reserved.
Passportand its third party licensors retain all proprietary and intellectual property rights in the Software and Documentation and in any trademarks affixed to the Software or the Documentation. Licensee shall not take any action inconsistent with such title and ownership. Licensee
shall not alter or remove any printed or on-screen copyright, trade secret, proprietary or other legal notices contained on or in copies of any
Software or Documentation. LICENSEE ACKNOWLEDGES AND AGREES THAT THE SOFTWARE MAY CONTAIN CODE OR REQUIRE DEVICES THAT
DETECT OR PREVENT UNAUTHORIZED USE OF THE SOFTWARE. Licensee shall notify Passport immediately in the event of unauthorized possession or use of Software or Documentation.
Licensee is not permitted (a) to decompile, disassemble, reverse compile, reverse assemble, reverse translate or otherwise reverse engineer
the Software, (b) to use any similar means to discover the source code of the Software or to discover the trade secrets in the Software, or (c)
to otherwise circumvent any technological measure that controls access to the Software.
Updates to the Software made available to Licensee through the Passport Update Programs shall be treated for all purposes as Software
under this License and all intellectual property rights therein shall be retained by Passport.
iv
4. Limited Warranty and Disclaimers
Passportwarrants that the CD-ROM and/or other media on which the Software and User Documentation is recorded are readable by a compatible hardware system. For a period of 90 days (the Warranty Period) after the initial date of this license, if Licensee discovers any defects in
the readability of the original CD-ROM and/or other media, Licensee may return it to Licensee's Passport Partner (your Passport Software supplier) or Passport for a free replacement, which is Licensee's sole and exclusive remedy in the event of such defect[s].
EXCEPT AS SPECIFICALLY PROVIDED HEREIN, THE SOFTWARE IS NOT ERROR-FREE AND IS BEING PROVIDED "AS IS" WITHOUT WARRANTY OF
ANY KIND.
PASSPORT SOFTWARE, INC., ITS PROGRAM LANGUAGE SUPPLIERS AND OTHER VENDORS, HEREBY DISCLAIM ALL WARRANTIES, WHETHER EXPRESS
OR IMPLIED, ORAL OR WRITTEN, WITH RESPECT TO THE SOFTWARE INCLUDING, WITHOUT LIMITATION, ALL IMPLIED WARRANTIES OF TITLE, NONINFRINGEMENT, MERCHANTABILITY, FITNESS FOR ANY PARTICULAR PURPOSE, COURSE OF DEALING OR TRADE USAGE.
NO WARRANTY IS MADE REGARDING THE RESULTS OF ANY SOFTWARE OR SERVICES OR THAT ALL ERRORS IN THE SOFTWARE WILL BE CORRECTED, REGARDLESS OF THE FORM OR NATURE OF ANY CLAIM. SOME STATES DO NOT ALLOW THE EXCLUSION OR LIMITATION OF IMPLIED
WARRANTIES, AND DO NOT ALLOW A LIMITATION ON HOW LONG ANY IMPLIED WARRANTY LASTS, SO THE ABOVE LIMITATIONS MAY NOT
APPLY. NO PASSPORT EMPLOYEE, SUPPLIER, OR AGENT IS AUTHORIZED TO MAKE ANY MODIFICATIONS OR ADDITIONS TO THIS WARRANTY.
THE ENTIRE RISK AS TO THE QUALITY AND PERFORMANCE OF THE SOFTWARE IS WITH YOU. SHOULD THE SOFTWARE PROVE DEFECTIVE, YOU
ASSUME THE ENTIRE COST OF ANY NECESSARY SERVICING, REPAIR OR CORRECTION, AND ANY INCIDENTAL OR CONSEQUENTIAL DAMAGES.
IN NO EVENT WILL PASSPORT, ITS PROGRAMMING LANGUAGE SUPPLIERS AND OTHER VENDORS, DISTRIBUTORS, OR DEALERS (PASSPORT PARTNERS) BE LIABLE FOR ANY DAMAGES, INCLUDING LOSS OF DATA, LOSS OF PROFITS, OR DIRECT, OR INDIRECT, INCIDENTAL, SPECIAL, OR CONSEQUENTIAL DAMAGES RESULTING FROM ANY DEFECT IN THE SOFTWARE, EVEN IF THEY HAVE BEEN ADVISED OF THE POSSIBILITY OF SUCH
DAMAGE. SOME STATES DO NOT ALLOW THE EXCLUSION OR LIMITATION OF IMPLIED WARRANTIES OR LIABILITY FOR INCIDENTAL OR CONSEQUENTIAL DAMAGES, SO THE ABOVE LIMITATIONS MAY NOT APPLY TO YOU.
THE FOREGOING RESTRICTIONS, DISCLAIMERS AND LIMITATIONS SHALL APPLY AND REMAIN IN FORCE EVEN IN THE EVENT OF A BREACH BY
PASSPORT HEREUNDER OF A CONDITION OR FUNDAMENTAL TERM HEREUNDER, OR IN THE EVENT OF A BREACH WHICH CONSTITUTES A FUNDAMENTAL BREACH.
5. General Terms and Conditions
Nothingcontained in this Agreement shall be deemed to constitute either party as the agent or representative of the other party, or both parties as joint venturers or partners for any purpose. Licensee's supplier of the Software (referred to herein as a "Passport Partner") is an independent contractor in relation to Passport and is not an employee, agent or partner of Passport.
This License Agreement is governed by the laws of the State of Illinois and jurisdiction for any claim or controversy raised by Licensee against
Passport Software, Inc. shall only be in the Circuit Court of Cook County, State of Illinois.
If either party commences any action or proceeding against the other party to enforce or interpret this License, the prevailing party in such
action or proceeding shall be entitled to recover from the other party the actual costs, expenses and attorneys' fees (including all related
costs and expenses), incurred by such prevailing party in connection with such action or proceeding and in connection with obtaining and
enforcing any judgment or order thereby obtained.
This License and the rights and obligations hereunder, may not be assigned, in whole or in part by Licensee, except to a successor to the
whole of Licensee's business, without the prior written consent of Passport. In the case of any permitted assignment or transfer of or under
this License, this License and all of its terms and conditions shall be binding upon, and inure to the benefit of, the successors, executors,
heirs, representatives, administrators and assigns of the parties hereto.
This is the complete and exclusive statement of the License between you and Passport, and this License supersedes any prior agreements or
understanding, oral or written, with respect to the subject matter of this License.
If you have any questions regarding this License, you may contact Passport at 847-729-7900 or email to [email protected].
v
Introduction to PBS
Administration
This chapter contains the following topics:
PBS Administration Organization
Passport Support and Training
PBS Documentation
1
PBS ADMINISTRATION ORGANIZATION
The PBS Administration documentation contains information on how to set up and maintain
your Passport Business Solutions system. PBS administration is needed to support all the other
installed modules.
The chapters of this manual are informally grouped into the following:
FOR INFORMATION ON THIS
GROUP
REFER TO CHAPTERS
Software Installation
2, 3
User and menu configuration
4, 5
Company configuration and printer
setup
6, 7, 8, 9
Limiting menu access (security)
10
Designing custom Lookups
11
Data file administration
12, 13, 14
Appendices
A, B, C, D, E, F, G, H
The chapter topics are described below:
Software Installation
This section defines Passport Software requirements for the supported operating environments and
installation of Passport Software.
•
Chapter 2 - PBS Installation contains information on how to install a Passport Business Solutions system.
•
Chapter 3 - Workstation Install-Configure contains steps to install and configure a workstation
for accessing PBS.
Company Configuration
This section describes the primary set up of a company in PBS.
•
Chapter 4 - PBS Users describes how to set up users and user security in your Passport Business Solutions system. The difference between Administrative and General Users is defined.
•
Chapter 5 - PBS Menus describes custom menus in Passport Business Solutions. Custom
menus can be defined that display, on screen, only those functions that a user accesses. This
chapter tells you how to define custom menus and how to associate them with users.
2
•
Chapter 6 - Company Information describes how to set up company-wide parameters such as
the type of printers available, company account number structures and email setup.
•
Chapter 7 - More on PBS Printing describes how the Passport Business Solutions software
allows the selection of Windows printers when printing reports, lists and registers. Sections on
how to set up your laser printer to use PCL commands, how to set up a network printer, and
how to print to printers not listed on the Passport Business Solutions Printer menu are covered.
This chapter also describes how to set up your printer to use special accounting forms supported by Passport Business Solutions and image merging configuration for special forms.
•
Chapter 8 - Reformatting Account Numbers describes how to make extensive changes to your
account number or cost center structure without losing historical information.
•
Chapter 9 - Defining Multiple Companies explains how to add multiple companies into Passport Business Solutions using either a manual or an automated procedure. This chapter also
specifies how to add modules, create data files and link programs to newly defined companies.
Path File
This section describes an Passport Business Solutions administrative function of entering and
maintaining paths to PBS programs and files. This function is available from a batch or may be
available from your Windows startup menu selection.
•
Chapter 10 - Using Pathfinder covers how to use the Pathfinder program to specify the directory path of data and program files.
Lookup Design
This section describes an Passport Business Solutions Lookup customization administrative
features for PBS.
•
Chapter 10 - Lookup Design covers the adding, copying, modifying and designing of Lookups.
Data Files
This section provides necessary information on preserving and manipulating your data files.
This section will primarily be of concern to your System Administrator.
•
Chapter 12 - Backing Up Data Files contains information on the types of files that should be
copied to backup media, the frequency of the backup, the different types of backup, and the recommended procedure for backing up data files.
•
Chapter 13 - Recovery File Recovery Utilities explains how to use the export, restore, rebuild,
and extract records utilities, as well as how to reorganize a AcuCOBOL Vision ISAM file index.
•
Chapter 14 - Initializing Data Files describes how to initialize data files for all the PBS modules.
Appendices Description
The appendices provide a variety of reference information.
•
Appendix A - Error Messages provides a list of the error messages you may see while using
Passport software, including information on what action you may take in response.
3
•
Appendix B - PBS Menu and Program Names provides important information regarding the
relationship of the menu selections to the Passport Business Solutions program name. This is
useful when applying a Lookup to a specific PBS program. It may also be useful for source
code programmers and developers.
•
Appendix C - COBOL Configuration File describes the Passport Business Solutions main configuration file. The information in this file is accessed when PBS is launched and in some cases
may need to be changed. You can set up different configuration files for different users.
•
Appendix D - Adding a Lookup describes how you can provide access to a custom lookup or
add a special Lookup to the PBS system.
•
Appendix E - Glossary of Terms lists accounting and data processing terms referred to throughout the User Manuals, especially as they are used in the administration of Passport Business
Solutions software.
•
Appendix F- Conversion of A/R Ship-to’s to POS provides a means of moving ship-to information from Accounts Receivable to Point of Sale if you are converting to Point of Sale or you
are adding on the module.
•
Appendix G - ACH Direct Deposit File Specification documents the ACH file fields and how
these fields relate to the generation of an ACH file through Accounts Payable and Payroll.
•
Appendix H - Email Configuration lists the steps necessary to set up email in PBS. Email in
PBS may be used to send PDF files to customers and vendors.
4
PASSPORT SUPPORT
AND
TRAINING
Support
PBS User Manuals and on-line “Help” messages are designed to enable you to use the Passport
Business Solutions software without additional help. However, if problems or questions arise which
you cannot resolve using these materials, additional assistance may be available from your Passport
Business Solutions supplier or an independent professional in your area.
If you have unresolved issues with your Passport Business Solutions software, contact your
PBS partner or an authorized Passport Business Solutions consultant for support.
For the name and location of a PBS partner or an authorized consultant near you, contact
Passport Software at 847-729-7900.
If you wish to receive support directly from Passport Software, Inc., please call 847-729-7900
to discuss the options.
Training
Call your Passport Business Solutions reseller for training. If your reseller does not offer
training other options are available. Contact Passport Software, Inc. at 847-729-7900 for the
name of a qualified trainer in your area or training directly from Passport.
PBS Custom Software
Passport Business Solutions Custom Software
The Passport Business Solutions software was designed to meet or exceed your business and
accounting needs. However, should you wish to customize certain operations of the software,
please call your Passport Business Solutions supplier or Passport Software directly to discuss
your individual business requirements.
5
PBS DOCUMENTATION
Passport provides online User documentation and other setup documentation for Passport
Business Solutions.
If you have the Windows version of PBS, most of the documentation is accessible from the
browser window. Click on the browser button and select the document.
The following user documents are available online.
FOR INFORMATION ON THIS
REFER TO
DOCUMENTATION
Accounts Payable
AP Link
Accounts Receivable
AR Link
Check Reconciliation
CR Link
General Ledger
GL Link
Inventory Control
IC Link
Job Cost
JC Link
Order Entry
OE Link
Payroll
PR Link
Point of Sale
PS Link
Purchase Order
PO Link
Sales Analysis
SA Link
System User Manual
SY Link
Data Import Manager
DI Link
Manufacturing
Mfg_Link
PBS Administration
(this document)
Open Administration documentation menu
The additional documents are available in the psidocs folder on the PBS disk and online. To
insure that you have the latest version, select the download link below.
6
PBS Version 12 Release Notes for
the initial release of version 12.
PBS Version 12 Release 2 Notes
(dated December 30, 2009 or later)
V12Release.PDF
V12Release2.PDF
PBS Accounting and Distribution Field
Definition Guide
PBS_FDG.PDF
Manufacturing Field Definition Guide
PBSMfg_FDG.PDF
CounterPoint Interface to PBS
SYN_INT.PDF
EZ Conversion Utilities
PBS_EZ_Convert.PDF
Passport Data Query Admin doc
PDQ Admin.PDF
Passport Data Query User doc
PDQ User.PDF
7
PBS Installation
This chapter contains the following topics:
Introduction to PBS Installation
Supported Platforms
System Requirements
Installing Passport Business Solutions
Thin Client Host Installation and Configuration
Company Removal
Standard Installation Structure
Upgrading to Passport Business Solutions
PBS Versions
8
INTRODUCTION
TO
PBS INSTALLATION
Passport Business Solutions Accounting and Business software is installed on your hard disk using
an automated installation procedure. This chapter offers general information about the supported
platforms, system requirements for the operating platforms supported, and installation of the software.
PBS General Install Information
The current disk for PBS Version 12 contains the 2009 year end updates. If you have a
disk dated October 2009 or earlier, then the instructions in this chapter apply. If you
have the more recent disk, then read the V12Release2.PDF for install instructions.
Passport software is distributed on compact disk, however update installs may be available for
download.
It can be installed for single user operation onto the hard drive of a stand-alone PC running
Windows 2000, Windows XP, Windows Vista or Windows 7.
It can also be installed for single user or multi-user operation onto Windows 2000/2003/2008
Server, Novell Netware, Linux or SCO Open Server network drives.
Regardless of platform, the installation procedure creates structures (folders/directories) on
your hard drive and copies program and data files into these folders/directories in a
predetermined way. The terms, folder and directory, refer to the same structure and may be
used interchangeably. Windows jargon tends to refer to these structures as folders. Under
Linux and UNIX, these structures are generally referred to as directories.
Passport Business Solutions is installed on your hard disk into the directory or folder you name
during installation. This folder is referred to as the Passport Business Solutions top-level
directory.
In a Linux or UNIX operating environment, all files related to the Passport Business Solutions
applications are contained in the top-level directory.
In a Windows operating environment, all files except the Windows’ shortcuts and certain
license files are contained in the top-level folder.
9
SUPPORTED PLATFORMS
Passport Business Solutions software is designed to run on a broad range of popular operating
system platforms.
This table lists the supported Windows operating systems.
SUPPORTED
WINDOWS VERSIONS
M ULTI-USER CAPABILITY
W INDOWS XP
As a single user system, peer-to-peer or
2000/2003/2008 network
W INDOWS VISTA
W INDOWS 7
W INDOWS
2000/2003/2008
SERVER
On a 2000/2003/2008 network.
On a 2000/2003/2008 network.
Yes
Yes
NOVELL NETWARE 4.1 There is no support for Thin client and
AND HIGHER
XDBC server on Novell. Single User
XDBC may also have issues.
PSI and several companies have used terminal services to access PBS remotely. You may use
this option if you like, but keep in mind that Thin client offers a more efficient remote type
access and potentially with more security. When using Thin client to access PBS, you do not
require terminal services.
The table provides the supported UNIX and Linux operating systems.
SUPPORTED
UNIX/LINUX
VERSIONS*
M ULTI-USER CAPABILITY
SCO OPEN SERVER
5.06, 5.07 AND 6.0
Yes
RED HAT LINUX
Yes
MANDRAKE LINUX
Yes
SU SE LINUX
Yes
SLACKWARE LINUX
Yes
DEBIAN LINUX
Yes
CALDERA OPEN LINUX Yes
10
Thin client
Thin client for Windows, UNIX and Linux does require a Windows based workstation client.
Any of the above operating systems will run as the client.
For a host server, you can use either Windows 2000 or 2003, SCO UNIX 5.07 or Linux
GLIBC 2.3, 2.4 or 2.5. Thin client is not available for Novell. Check on availability for UNIX
and Linux.
Note
An operating system manufacturer may discontinue the support of an operating system. Therefore, after some period of time it is likely that Passport
will not be able to support PBS on an unsupported operating system. Also,
our runtime provider may discontinue support of the runtimes on unsupported
older or unpopular operating systems. If this occurs, in order for you to get
the optimum support from Passport and in order for you to be able to install
PBS updates, it may be required that you upgrade the operating system to
the latest version or possibly even move to a different operating system. We
will make every effort possible to give you advance warning of any PBS support changes in regards to a particular operating system.
11
SYSTEM REQUIREMENTS
The following are the system requirements for Passport Business Solutions.
SYSTEM
COMPONENT
W ORKSTATION
PROCESSOR
REQUIREMENTS AND
RECOMMENDATIONS
300 MHz Pentium
If your workstation is able to run the operating system with ease, then it should also
run PBS.
SERVER PROCESSOR
1 GHz Pentium
MEMORY (RAM)
128 Megabytes
HARD
DRIVE
ODBC
W ORKSTATION
2 to 3 Gigabytes is more than enough for
most working systems. Once the PBS history files grow, the requirement may grow
as well.
2000 MHz or more if using ODBC
Requires AcuXDBC with PSI System Catalog which can be purchased separately
through Passport Software, Inc.
Microsoft Office or Crystal Reports™
must be purchased separately through a
vendor of your choice.
PBS is primarily a data entry system that does not require a great deal of processing power.
However we can generally say that the more speed the processor has and the more RAM
memory on the server and workstation, the faster the application will respond.
A host of different hardware and software variables will also determine the performance of
PBS on a network. Some of these could include routers, cabling, security utilities, network
interface cards and more.
Thin Client Workstation
You can install the PBS Client on 2000, or XP Home,XP PRO, or Vista. Windows 98 and ME
are not recommended.
During the install you will have to specify the IP# and Port # of the Server Host. It is strongly
recommended that you activate the server host first.
Thin client was developed to be used on a workstation that has minimal power and performs
well when it comes to slower machines. Of course if another application running on the
computer requires a great deal of power, then this application may be more of a deciding factor
when determining the computer processing power needed than PBS.
12
Thin Client Server Host
Each Thin Client connected PBS user requires up to 5MB of server RAM. This along with the
typical base server requirements determine the RAM needed. Multiply the number of
simultaneous users by 5MB and add in the O/S base services, about 250MB, and this will give
you an approximate amount of RAM needed. Of course, any other server based applications
will also have to be accounted for.
Thin client LAN and Internet Access
Thin client can be configured for VPN, with or without authentication to the AcuConnect host.
It can also be behind a firewall with port number translation.
The diagram below is of a typical remote office configuration along with a local network both
running the same PBS.
Windows Server
AcuCorp’s Acuconnect is the technology that provides thin client. It gets activated as a service
and requires TCP/IP networking. The default port is 5632, but you can change this and run
multiple server processes on different ports.
13
UNIX/Linux
On the server the Thin Client acurcl and configuration files are installed in the PBS top-level
directory. It requires TCP/IP networking and defaults to port 5632. You can set up multiple
ports if needed. Multiple PBS users can access PBS from one port.
The SYSADMIN can optionally install the acurcl startup script in a resource script, rc, for
autostart support.
14
INSTALLING PASSPORT BUSINESS SOLUTIONS
The current disk for PBS Version 12 contains the 2009 year end updates. If you have a
disk dated October 2009 or earlier, then the instructions in this chapter apply. If you
have the more recent disk, then read the V12Release2.PDF for install instructions.
This section covers in detail the Passport Business Solution Financial and Distribution Series
installation and as well as the Manufacturing Series installation. There are several installation
sub sections. The first covers the Windows install. The SCO Open Server and Linux install
details are in a later sub section.
The instructions in this section are for the Full installation of PBS. Always install PBS in an
empty or new directory. This is done for a new installation and an upgrade from Versions 8, 9,
10.x and 11.x. This is also done if you want to add-on a module to your existing PBS
installation. The instructions for upgrading these versions or adding a module are in EZ
Convert documentation. Select EZConvert to download the PDF documentation.
Note
Before the installation of PBS, go to the PSI web site to look for additional
installation instructions at www.pass-port.com that may available. A login is
required to download updates. See your PBS provider for instructions.
While you are there, you may download the updates, but install the updates
after the main PBS install. Check back on a regular basis for new updates.
PBS Windows Financial -Distribution Series PreInstallation
Your Passport Business Solutions Financial and Distribution Series software for Windows is
designed to function in most Windows environments including Windows 2000, Windows XP
and Windows Vista workstations. You may run Passport Business Solutions on Windows
2000/2003/2008 Servers.
Novell Netware, versions 4.1 and higher, with Windows workstations will also support
Passport Business Solutions.
General Information
You must have either a PBS Version 12.0 compact disk or a download of the PBS Version 12
installation and a license file (RW.LIC). The license file will be with your PBS shipment on a
separate compact disk or sent via email. No matter how you received it, you must copy the
license file to a temporary directory before you start the installation.
The installation procedure follows similar steps, whether you are installing Passport Business
Solutions software modules for the first time, adding additional modules to an existing
installation or increasing the number of users.
Adding a Module or Increasing the Number of PBS Users
You will need a new RW.LIC file to add-on a module or increase the number of users that are
allowed in the PBS software. Contact your PBS provider for this or call 800-969-7900. Once
15
ordered, you will receive the new license via compact disk or email.
The steps to increase the number of users or add-on a module are:
0. Copy the new license file to a temporary directory.
1. Install PBS accessing the new RW.LIC license into a new directory.
Run the EZ Convert utilities to upgrade your version 12 data. Select EZConvert to download
the PDF documentation.
2. Re-install updates downloaded from the PSI web site at www.pass-port.com.
3. Re-install any customization or vertical application as needed.
If you are adding PDQ or Direct Deposit ACH for Payroll, then all you need
to do is copy the new RW.LIC into the top-level PBS directory and have
everyone restart PBS. Then those add-ons will be active.
Note
Adding a Module
4. Following the PBS install read the Post Installation Module Add-on section later in this
chapter for the additional steps.
Increasing Number of PBS Users
There are no additional steps to increasing the number of users.
PBS Financial -Distribution Windows Modules Install
Steps
When you insert the Passport Business Solutions disk into your disk drive, an auto-run feature
will start the Installation software. If the Installation does not start automatically, you may start
the procedure manually from your Windows Start menu. Please follow these steps:
Using Windows explore navigate to the disk and double click on
Default.htm
You will now see the selections on the PBS Main screen menu. You may also navigate to the
disk pbs directory and double click on setup.exe. If you downloaded the installation, unzip it
and go to the temporary directory where it is installed and double click on setup.exe.
Installing PBS Financial - Distribution Windows Modules
Follow on the instructions on the screens. During the installation, you will have the following
questions and options.The current disk for PBS Version 12 contains the 2009 year end
updates. If you have a disk dated October 2009 or earlier, then the instructions in this
chapter apply. If you have the more recent disk, then read the V12Release2.PDF for
install instructions.
16
Do you want to Install PBS Version 12.0 software?
Yes
Starts the installation of PBS
No
Cancels the installation
Locate RW.LIC License File
This is where you specify the location of license file. If the license is on a disk and you have
only one disk drive, you will have to cancel the installation, copy the license file to a
temporary directory and re-start the installation.
To find the location where the PBS is installed, click on
this button. The Choose Folder windows will display
where you can navigate to the location.
Browse
Select a different driver letter if necessary. If the
license is on a disk, then the drive letter will most
likely be “d:”.
Back
This will tell you that the license was not found. If necessary select Cancel to quit the install or browse to
another location.
Next
Once the location of PBS license is found, then click on
this button.
Cancel
Cancels the installation
If you get the message “PBS Modules License File Not Found”, then either browse to a
different directory where the license is located or cancel the installation.
Ready to Extract License Information
When you see this message, then the install program found the license in the directory you
specified.
OK
Click on OK to continue and the program will extract
the license information.
License Information Extracted
When you see this message, the program is ready to display the license.
OK
Click on OK to continue and the program will display
the license information.
License display information
The license data will display in the window. Review the license to verify that the modules, user
count, Licensee name and Partner name are correct.
17
Next
If the license is correct, click on this button.
Cancel
If the license does not appear to be correct, cancel the
installation and contact your PBS supplier.
Select PBS Installation Directory
Here you specify where PBS is to be installed. The directory must be empty. Choose the
default location if appropriate.
By default the installation program will suggest “Program Files\PSI\PBS” for the destination
folder name. This is fine for a single user install. If this is a network install you may want to use
just “PBS”.
To find the location where PBS is to be installed, click
on this button. The Choose Folder windows will display
where you can navigate to the location.
Browse
Once you have found the path, in the path field, type in
the name of the directory, normally ‘\PBS’, and the
install program will create a directory with that name
for you.
You will get the message like “The folder ‘C:\PBS’
does not exist. Do you want the folder to be create?
Select Yes to create the folder or No to choose another
location or folder name.
Back
Do not use this button.
Next
Once the location of where you want PBS installed is
determined, then click on this button.
Cancel
Cancels the installation
Software License Agreement
This displays the software license agreement. Read the agreement.
Yes
Clicking on this will indicate that you agree with the
software license agreement.
No
Clicking on this button will cancel the installation.
Select Components
You should not make any changes. The program will detect what you what is in the license
and install it. Click on the next button.
Change
Allows you to de-select or re-select any individual components of the PBS module.
18
Back
Takes you back to the Software License Agreement
screen.
Next
Takes you to the next step of the installation.
Cancel
Cancels the installation
Start Copying PBS Files (License display information)
Here you can again view the license information. You should click on the next button to begin
copying PBS files and programs to the drive.
Back
Takes you back to the select components window.
Starts the copy of PBS files and programs to the
selected drive.
Next
Cancel
You will then see an indicator that displays the name of
each program and file being installed. Wait for the
installation program to finish.
Cancels the installation. However, if you cancel PBS it
may only be partially installed and not operate properly.
Ready for Version 12.0 post-installation processing. This may take some
time. Select OK to continue...
Post-installation processing is needed for building menus and paths.
OK
Click on OK to continue.
PBS12.0 menu creation completed. (ISINST)
ISINST is the program that creates the menu.
OK
Click on OK to continue.
Serial number information.
Next the program will integrate the serial numbers into key PBS programs so that the
installation will function properly.
Next
Click on Next to continue.
Cancel
Unless you detected some problem, you should not cancel on this step.
Licensed modules have been serialized
Continue with the installation.
OK
Click on OK to continue.
19
Setup complete
The installation is finished.
Finish
Click on Finish to terminate the install program.
Post installation
Check the PSI Web site for updates and download and install the updates as needed. The web
site is www.pass-port.com.
If you have custom software or a third party application that integrates directly to PBS, it is
time to install those programs and files.
If you are using Thin client, you must install the Thin client host and Thin client workstation
installations following the PBS Financial - Distribution installation.
When starting PBS for the first time, the initial entry for the user ID field must be ‘adm’. Read
the chapters PBS Users and PBS Menus for more information on entering users and assigning
menus to general users.
You are now ready to enter Company information.
If you are upgrading data from a previous release, read the EZ Convert documentation. You
may also see the Upgrading to Passport Business Solutions section in this chapter.
Post Installation Module Add-on
If you added an application (module) to the system and you are using only company ‘00’ then
you are finished. If you are using multiple companies and you need the new module to work in
other companies, then there are a few more steps you need to do before you enter any data into
the new module for company 00.
First create a data file directory for the new application and company. For example, if the
application added is Payroll and the company is ‘01’, then create a directory of ‘PR01’. You
can either copy and rename the data files from company 00 or use the initialization utility to
create empty files. The use of the initialization utilities is covered in the Initializing Data Files
chapter in this documentation. You may read about the copy method in the next few
paragraphs.
Then copy the files from PR00 to PR01.
You will need to rename both the “.DAT” and “.vix” files. If you are not sure about this step,
contact your PBS support person. If you rename the incorrect files or perform this step
incorrectly, your PBS system may not function properly. One way to rename files is to open a
command prompt, navigate to the directory where the data files are installed and type the
following, with the assumption that the new company is ‘01’.
rename ??????00.??? ??????01.???
20
For the last step you must run the PBS pathfinder program and add the new company to the
paths. Read the Copying Program/Data File Names section in the Using Pathfinder chapter for
information on how to do this. You should copy the paths from company ‘00’.
Do the same steps for all the additional companies. Go to the Company information selection
for each company and if needed, on Field 14 select Y for the add on application. Once that is
done, then you are ready to start configuring and entering data.
Opportunistic Locking with Windows Shared Files
Microsoft has introduced a feature called Opportunistic Locking to increase performance on
Microsoft based networks. Unfortunately, this feature can cause file errors when using PBS.
Microsoft recommends disabling this feature when using their products. AcuCorp, Inc. the
makers of the runtime software used to run PBS, also recommend disabling this feature.
With Opportunistic Locking enabled, you may experience intermittent file errors when using
PBS. The file errors will occur on random files and at random times. Errors of type “39,00”
and “98,90” have been reported to PSI support.
The problems associated with Opportunistic Locking may occur on Window’s networks using
Windows XP, 2000, 2003 and 2008. There are different editions for each of these operating
systems. For a complete list of the affected operating systems, refer to Microsoft Article
296264. The list is on the bottom of the page. If you are going to use PBS on a Window’s
network that uses operating systems referenced in the list, we recommend that you disable
Opportunistic Locking.
To disable Opportunistic Locking, refer to the same article 296264 article listed above. Here
are some things we have learned about this process:
•
Always be careful when altering the registry. Refer to Microsoft’s warnings and instructions
regarding this.
•
We recommend disabling opportunistic locking on the server only, but it could be disabled on
the clients as an alternative.
•
When editing the registry, we have found that the keys need to be added to the registry. This is
the case for both the clients and the server.
•
You must reboot a system after altering the registry.
Windows Manufacturing Series Install Steps
The current disk for PBS Version 12 contains the 2009 year end updates. If you have a
disk dated October 2009 or earlier, then the instructions in this chapter apply. If you
have the more recent disk, then read the V12Release2.PDF for install instructions.
During the installation, you will have the following questions and options.
21
Do you want to Install PBS Version 12.0 manufacturing?
Yes
Starts the installation of PBS
No
Cancels the installation
Locate PBS Version 12.0
This is where you specify the location of where the PBS Version 12.0 Financial Series
software is located.
Browse
To find the location where the PBS Financial Series is
installed, click on this button. The Choose Folder windows will display where you can navigate to the location.
Select a different driver letter if necessary. If the
license is on a disk, then the drive letter will most
likely be “d:”.
Back
This will tell you that the license was not found. If necessary select Cancel to quit the install or browse to
another location.
Next
Once the location of PBS license is found, then click on
this button.
Cancel
Cancels the installation
Ready to Extract License Information
When you see this message, then the install program found the license in the directory you
specified.
OK
Click on OK to continue and the program will extract
the license information.
License Information Extracted
When you see this message, the program is ready to display the license.
OK
Click on OK to continue and the program will display
the license information.
License display information
The license data will display in the window. It will only display the Financial Series modules.
Please verify that this is the correct system where you want to install the Manufacturing
software.
Next
If the location is correct, click on this button.
22
Cancel
If the location does not appear to be correct, cancel the
installation and contact your PBS supplier.
Software License Agreement
This displays the software license agreement. Please read the agreement.
Yes
Clicking on this will indicate that you agree with the
software license agreement.
No
Clicking on this button will cancel the installation.
Select Components
On a full installation, you should not make any changes. Click on the next button.
Change
Allows you to de-select or re-select any individual components of the Manufacturing software.
Back
Takes you back to the Software License Agreement
screen.
Next
Takes you to the next step of the installation.
Cancel
Cancels the installation
Start Copying PBS Files (License display information)
Here you can may view the license information. It will display PBS Manufacturing Software in
the window.
Back
Takes you back to the select components window.
Starts the copy of Manufacturing files and programs to
the selected drive.
Next
Cancel
You will then see an indicator that displays the name of
each program and file being installed. Wait for the
installation program to finish.
Cancels the installation. However, if you cancel the
Manufacturing may only be partially installed and may
not operate properly.
Ready to Update PBS Financials Menu with PBS Manufacturing - OK to continue...
Installation processing is needed for building menus.
OK
Click on OK to continue.
23
PBS Financials Menu Update with PBS Manufacturing - Completed
Menu selections are now installed.
OK
Click on OK to continue.
Setup complete
The installation is finished.
Finish
Click on Finish to terminate the install program.
UNIX/Linux Financial and Distribution Series Install Steps
The installation of PBS for UNIX or Linux will work as either an update from Version 11.6 or
a new installation. A new installation will be needed if you are using the software for the first
time. If you are moving from a Classic (RW) product you must first install PBS 11.6, upgrade
your Classic data and then install PBS 12.0.
The instructions for adding a module or increasing the number of users to your system are in
this manual. You can also re-install PBS, if necessary, without overwriting essential data files.
You must re-apply any download patches after doing so.
Follow the EZ Convert documentation for upgrading from Version 8, 9, 10 and 11.
The Passport Business Solutions software is designed to provide full multi-user functionality
on the following UNIX/LINUX systems:
Manufacturer
Version
Linux *
GLIBC 2.3, 2.4 & 2.5
SCO Open Server
5.06, 5.07, 6.0
Check with the Linux operating system manufacturers as to the GLIBC version that is available
for purchase.
License Pre-Installation Information
The installation procedure will install the software modules that you have licensed from
Passport Software, Inc. into a directory of your choice on your UNIX or LINUX hard drive.
PBS License
RW.LIC license -You must have a valid Passport Business Solutions license file (RW.LIC) to
install a fully functional version of your Passport Business Solutions UNIX/LINUX software.
In the following paragraphs there is an explanation of what to do with this file if it is a new
install, module add-on install or if you are increasing the number of PBS users. Also, there is
an important note when using ftp to copy the RW.LIC file.
24
New Install and the License
For a new installation, the RW.LIC file was either delivered to you on a disk or as an email
attachment. For a new installation, you must copy (or move) or ftp the RW.LIC license to a
temporary directory. The copy may convert it to lower case. The file MUST be in uppercase
for the installation to run properly. When this happens rename (mv command) the file from
rw.lic to RW.LIC.
Increasing PBS User Count
You will need an updated RW.LIC file with the new user count which will be sent from
Passport via disk or email. You will need to copy or move, the new RW.LIC license file to a
temporary directory. After copying the file rename it to uppercase. The old RW.LIC should
remain in place and it will be replaced when you do the PBS installation. Install PBS using the
RW.LIC on the license disk. Re-install any updates or customization as needed.
USING FTP with the License
When copying or moving the RW.LIC file using an ftp program to the UNIX/Linux
environment, it must be converted to the standard UNIX text file format (no Carriage returns)
and the RW.LIC file name and extension must be in uppercase. After using ftp, if needed,
“move” the file to uppercase.
Module Add-On Install and the License
As with a new install if you are adding a new module, you should have a new license file
received via either disk or email. You will need to copy or move, the new RW.LIC license file
to a temporary directory. After copying the file rename it to uppercase. The old RW.LIC
license may remain in place but it will be replaced when you do the installation.
Other Pre-installation Topics
•
To do the install you will need the PBS Version 12.0 disk.
•
As an alternative the install program, files and other components, except license, needed for the
installation are available as a download from Passport’s web site. This tar file requires a large
amount of space on your hard drive. The download does not contain all the documents however. First check with your PBS provider before attempting this.
•
You must be logged on to your UNIX/LINUX console as the root user to install the Passport
Business Solutions software.
•
For a brand new installation, the install procedure will create your top-level Passport Business
Solutions directory. Do not create this directory in advance. When adding a module, install in
the directory where PBS is located.
•
After a new installation has finished, file permissions may need to be modified. As installed, the
software may only be executed by root.
•
BACKUP YOUR DATA: If you are adding on a module verify that you have a current restorable backup before you proceed with an installation.
25
•
VERY IMPORTANT CUSTOM PROGRAMMING NOTE: If you are adding on a module and
you have custom programs or a fully integrated third-party application, the custom programs
may need to be re-installed following the PBS installation. Make sure that these programs are
ready and available before you do this installation.
Note
Caution: Only an experienced UNIX or Linux system administrator should perform the PBS installation procedure.
Steps to Install PBS on SCO OPEN Server or Linux
The current disk for PBS Version 12 contains the 2009 year end updates. If you have a
disk dated October 2009 or earlier, then the instructions in this chapter apply. If you
have the more recent disk, then read the V12Release2.PDF for install instructions.
The installations for Windows vs. UNIX / Linux are on separate disks. Verify that you have the
correct disk.
The instructions for installing these versions are on the disk and are in html. Please open this
default.htm located in the root level of the PBS 12.0 Linux/Unix disk.
26
THIN CLIENT HOST INSTALLATION
AND
CONFIGURATION
The thin client technology, AcuConnect, is AcuCorp’s product. It is designed for several
purposes.
•
To allow ACUCOBOL-GTÆ programs, like PBS, running on a UNIX, Linux or Windows
server to present a full Windows graphical user interface (GUI) on PCs networked with TCP/IP.
•
To allow UNIX, Linux and Windows users to enjoy the benefits of centralized application maintenance and to adopt the performance characteristics of a ‘thin’ architecture, reducing the total
cost of ownership (TCO). Many applications perform better when deployed in a thin fashion
compared to other networking techniques such as remote file access ‘fat clients’ or distributed
processing. This is because thin client configurations execute COBOL programs on the server
where data access is local. Network traffic is greatly reduced.
•
Thin client runs within firewalls routers and can be configured to run within a Virtual Private
Network. There are different levels of login and access options to provide increased security. It
connects directly with only the accounting system and provides more security than browse and
run environments such as Remote Desktop.
•
To allow access via the Internet from remote locations.
Although designed for local and wide-area TCP/IP networks, Acucorp's thin client solution is
well-suited to low-bandwidth, high-lag connections like the Internet because it eliminates the
file I/O occurring over the network. Even dial-up performance works adequately, as long as the
connection is stable.
License Acquisition
The activation of thin client is optional and it may not be part of your installation. On a local
network you can run the PBS system without it.
The standard runtime is separate from the host Thin client AcuConnect runtime. The number of
users that can access via Thin client can be different than the number of users accessing via the
standard runtime. You could run with a single user runtime with a 5, 10, 20 or more Thin client
AcuConnect runtime.
In order to use the file utilities, you will need at least the minimum number of standard runtime
users; 1 user on Windows and 5 user on Linux or UNIX.
Check with your PBS supplier for more information on acquiring a AcuConnect Thin client
license.
Supported Operating Systems
Thin client will operate on Windows 2000, Windows 2003 and Windows 2008 servers. It will
not operate on Novell.
Thin client is recommend for SCO Open Server 5.07 and Linux GLIBC 2.3 operating systems.
27
Sample Scenario
The PBS program is operating on a Linux-based system, however, your users work at
Windows PCs or laptops. On the road, sales people or executives may want to connect to the
application from their hotel room. This can even be done with low data speed connections.
The ACUCOBOL-GT Thin Client provides a way for you to keep your PBS Linux program,
yet enable users to work in a graphical Windows environment. Users can visit your Web site to
launch the program. They never know that they are running a Linux program because all they
see is the Windows UI.
Because processing is done on the server, your users don't have to be running especially
powerful client machines to be able to work efficiently. The thin client's low bandwidth
abilities make it especially desirable for users who are out of office and using cellular
connections to laptops.
For example, if the data file for the order entry program is remote to the application, you can
use the AcuServer file system interface to give your staff access to that file.
There are certain components that need to be set up on the server. These are covered next in
this chapter.
AcuConnect Architecture and Security
The server process monitors TCP/IP connections. The thin-client AcuConnect provides an
authentication. It has a fully encrypted proprietary protocol and there are no passwords in clear
text.
There are three levels of security that you can choose.
•
By PBS passwords only
•
By client PC machine name and password
•
By client PC machine name, client authenticated user, and password.
See the Acucorp Version 8.1 documentation for security implementation details. If you do not
have this documentation, it is available upon request from the PSI support department.
In the AcuCorp html document select the following.
AcuConnect User’s Guide ->Chapter 3: distributed processing: Preparing the server -> 3.3
Establishing System Security
Windows 2000/2003/2008 Installation
PBS Version 12.0 must be installed on the server. You must have a product code and product key
to activate the Thin client license on the server.
In order to obtain the client installation download and the latest installation instructions for
Thin client go to this web site page:
http://resource.pass-port.com/thinclient/
28
IMPORTANT: Do not activate the AcuConnect with a path that has a space in it. For
example, do not use ‘Program Files/PSI/PBS’ (there is a space between Program and Files). If
your current PBS system is installed there, move the PBS directory to where there is no space
in the path and activate the AcuConnect in that directory.
Activating the Thin Client License
If you used the Windows server host installation, the license should be properly activated.
Therefore you should not have to do this step. If for any reason the licensing step of the
installation did not work properly or you need to re-license the Server host, then run the
activator.
Thin Client requires a special license. This license is separate from the standard runtime license
that gets created when you install PBS.
To activate the thin client license it must be ordered separately. To acquire a Thin client
license, contact your PBS supplier. To activate thin client you will need a Product Code and
Product Key and follow the instructions below for activation.
Windows License Activation
You must activate the Windows thin client on the server. You must be logged in as an
administrative user to do this. Go to the top-level PBS directory and run
Activator.exe
Enter the product code and product key with no spaces. Double check the numbers to verify
that they are correct.
Click on the Finish button when you have verified that the codes are correct. NEVER SELECT
THE MORE BUTTON. Cancel will exit the screen without activating a license.
Increasing the Number of Thin Client Users
In order to increase the number of users, you must do the following.
1. Locate the “acurcl.acl” file. View it with notepad or any text viewer to verify that it matches
the current number of users.
2. Copy the file to “acurcl.acl.old”
3. Run the activator.exe and using the new product code and key recreate the “acurcl.acl”.
View this file again with your text viewer to verify it has the correct number of users.
4. Stop and re-start the acurcl.exe. This will re-read the license and allow the additional users.
As an alternative you can simply re-start the server. This will stop and re-start the thin client
access as well.
UNIX/Linux License Activation
The Thin client license is activated during the installation of the AcuConnect host. If you have
to activate the license manually run the following.
./activator
29
You will be prompted to enter the product code. Enter it with no spaces and select the enter
key.
Next you will be prompted to enter the product key. Enter it as well with no spaces and select
the enter key.
Thin Client AcuConnect Utilities
The AcuConnect Utilities are used for the Thin client host setup and monitoring of users.
Following a normal installation on the host, you should not have to change any of the
configuration settings for AcuConnect. However, we have provided the following limited
instructions if you need to do some tweaking of the settings.
If you change any parameters in the files related to AcuConnect it could result in connection
no longer working. Be confident you know what you are doing before you attempt to make
changes.
If you need to add another port number access to the host server, re-install the PBS Thin Client
Windows server installation and enter a different port number using the same product code and
keys. Although you can configure a new port manually, you do not have to so.
Windows Host Server
To access AcuConnect in Windows go to the top-level PBS directory and select the following
program.
AcuConnect.exe
You will see a window like the following:
30
Service Information
You must use a port number on your server. In TCP/IP a port is the end point to the logical
(physical) connection.
On the Windows 2000, Windows 2003 Windows 2008 server there must be a service. The
service is installed and started with the PBS Thin Client server installation. To access the setup
click on the Services tab.
Alias Setup
The Alias is where the connection is defined between Thin client AcuConnect and PBS. The
Alias information is pre-configured per the AcuConnect host server installation. This setup
provides the configuration so that the client installations find the PBS server installation.
Normally you will not have to alter these Alias settings. If you want to access PBS in a
different directory, you can alter the path here.
If you do enter a new path, the AcuConnect files must be in the etc directory in order for it to
run properly.
Alias properties
When you select Open, you will see a some files in the etc directory. You must select
acurcl.ini.
The default alias name is pbsnoargs. The ‘noargs’ part of the name is short for ‘no arguments’.
Arguments are startup parameters like font name, size and other characteristics. These are all
included in the short cut on the Thin Client workstation, hence no arguments are used here.
If you want to alter theses settings or create a new alias, you will need to enter the name, the
PBS working directory path and the command line. The Alias name that refers to pbs is
31
recommended. The path is determined by the top-level PBS directory. The Command line is
always the same.
-celx cblconfi tc_log --app-host ACUSTART.acu
Here is example of the Alias properties.
Access Tab (Security)
Security and permissions are configured in the AcuAcess file, the default location is
pbs\etc\AcuAccess. Under the Access tab you can enter a New, Modify existing and Delete
and existing.
We have selected a standard default for security setting. They are the following.
Client Machine name
(*)
Client username
()
Local username
(same as client)
Password
(none)
Umask
(002)
You can modify the security as needed. Security details are covered in the AcuCorp
AcuConnect documentation. Read this documentation for instructions. If you do not have this
documentation, contact Passport support or go online to the pass-port.com partner area.
Info tab
On this tab you can select the Query button to determine who is logged onto the server via
AcuConnect. The following is a description of the columns in the Info tab window.
Column
Description
Client
The name of the client computer
User
The user login name from the client
PID
The port number that the user logged in on
32
Column
Description
Start
time
The time the user logged in
Working
directory
The PBS directory that is being access on
the host server.
This tab is useful in determining who is on the PBS system, connected via AcuConnect, when
you need to do server or PBS maintenance.
Kill
You can select the user and kill their access via AcuConnect. If you need to do this, make
certain that the user is not in the middle of entering a new master file record, transaction record
or is posting transactions. If you kill a process when the user has files open, then the PBS data
files could become corrupted and posted files could be out of sync.
Start or Stop the Windows Server Thin Client Service
You start an AcuConnect service on the host server in two ways.
You can determine the status of the port in AcuConnect. Run the AcuConnect.exe program
from the top-level PBS directory. Then select the Services tab. The services that are running
have a green circle next to the port number. The services that are stopped have a red circle. To
start the service, highlight the port a click on the Start button. To stop a service that is running,
highlight the port and click on the Stop button.
You can also start or stop a service on the server in
Control Panel -> Administrative Tools -> Services
The host service is listed as AcuConnect 7.2.2 on the installed port. Refer to the server
instructions, on your server, to start or stop the service.
UNIX/Linux Server Installation
For a UNIX or Linux installations of the host server and the latest documentation go to the
Passport web site at the following address:
http://www.pass-port.com/thinclient/
You should have a live version of PBS installed on the server before you can do these steps. If
this is a new installation you can upgrade your data before or after the AcuConnect install.
Installing Thin client will have no effect on your current runtime usage if you are running PBS
via some terminal emulation package.
Every Thin client user can share the same port, but you can run this installation multiple times
if you have a reason to run Thin Client PBS on more than one port.
Read each step completely before you do the installation.
1. Log in as root on the UNIX or LINUX console.
33
2. Create a temporary directory such as /usr/temp.
3. Copy the host sever installation to a temporary directory on your server. If needed, refer to
any additional download instructions for getting the installation on your host server.
4. To execute the AcuConnect Installation program for Passport Business Solutions™ on
Linux.
UNIX/Linux note: The cblconfi file is different than cblconfig. The cblconfi allows users to
connect with thin client and cblconfig through telnet. The cblconfi file is for connecting
through thin client.
Start or Stop the UNIX/Linux Thin Client Service
The service was started as part of the host thin client AcuConnect installation. You do not need
to start the service, unless it failed to start during installation or it was stopped for any reason.
You may need to stop the service for server maintenance. You may need to re-start the service
after server maintenance or if you rebooted the server.
When the host thin client components were installed, two scripts for either starting or stopping
the service were included as part of the installation.
In order to start or stop the service you will need to know the port number of the service. The
standard port number is 5632.
To start the service type the following at the top-level PBS directory.
./start_acuconnect????
The question marks must be substituted with the port number.
To stop the service type the following.
./stop_acuconnect????
The question marks must be substituted with the port number.
Note
When stopping a service, you will be prompted with the number
of child processes running on the server host. An existing child
process indicates that someone is in PBS at that time. If you stop
the service, then that user can not longer use PBS. If that user is
posting transactions, entering a master record or new transaction
then the files involved could become corrupted.
34
COMPANY REMOVAL
Do not remove Company 00. See Note below.
At some point you may have a company that you no longer require and you want to remove it.
In order to remove a company you must do the following steps:
00. Create a easily restorable backup of the entire PBS system.
0. Verify that all users are out of PBS.
1. For only the company that you are removing, delete the paths to the files and programs
using Path finder. Then delete the modules. See Using Pathfinder
2. Delete the directories where the data files are located.
3. Delete the company from the multi-company file. Log into any company other than the one
you are removing. Select Define multiple companies under the CTL menu. Enter the company
number and select <F3> to delete it.
Note
If you remove Company 00, then it becomes impossible to run Add
company. The structure for company 00 is used as a template to
add a company.
35
STANDARD INSTALLATION STRUCTURE
Contained within the top-level directory are numerous sub-directories organized in a specific
fashion for ease of maintenance and module integration.
The naming conventions used to label the sub-directories and many of the files are based on
module IDs and Company IDs.
Module IDs identify a particular Passport Business Solutions module in shorthand.
ID
M ODULE
AP
Accounts Payable
AR
Accounts Receivable
CR
Check Reconciliation
GL
General Ledger
IC
Inventory Control
JC
Job Cost
MF
Manufacturing
OE
Order Entry
PDF
PDF files
PR
Payroll
PO
Purchase Order
PS
Point of Sale
TB
Time & Billing
SA
Sales Analysis
RW
Common to all modules
pt
Passport PowerTools
These IDs are used to name sub-directories that contain programs and data related to a specific
module.
The Passport Business Solutions applications can be configured to process data for thousands
of individual companies. Data for each company must be maintained separately. Passport
36
Business Solutions does this by assigning a Company ID to each data file used by a specific
company. Further, these data files are stored in sub-directories labeled with the Company ID.
The installation process installs, by default, data files for Company ID 00. This is the Passport
Business Solutions default Company ID. Additional companies can be added by using the Add
Company utility which you can read about it another chapter of this manual.
The following illustrates the structure of a standard Passport Business Solutions installation:
This table describes the standard folders created and maintained by Passport Business
Solutions software:
DIRECTORY
ACH or DDP
IMAGES
LINK
DESCRIPTION
For storage of the Accounts Payable and Payroll
Direct Deposit ACH files. Examples: APACH,
PRACH
Contains Bitmap or Jpeg form files for forms
printing
Contains temporary files used by PBS.
RWPRT
Contains reports that have been printed to disk.
FONTS
Windows only - This folder contains the PSI
fonts. These are a back to the fonts that are
installed with the PBS client
Contains PDF files if you are printing forms to a PDF- printer.
PDFFIL
The PDFTXT directory holds temporary text files
that are used in the generation of PDF files.
PBS_Files
Windows only - contains links to PBS doc-
37
DIRECTORY
DESCRIPTION
umentation
RWOBJ
Contains programs that are shared by every Passport Business Solutions module.
RWPRT
Contains printed to disk reports and postings.
RWWRK
Contains temporary files used by Passport Business Solutions software. These files are cleared
out at the beginning of each business day.
RW00
RWMENU
Contains data files that are shared by all Passport
Business Solutions modules. This directory contains data for Company ID 00.
Contains the PBS menus files and may contain
custom menus if they have been created.
ptxx
The main directories are ptobj which contains
PowerTools programs, ptdat which contains the
installed PowerTools data files, ptcus that contains the global customized PowerTools data
files, ptxx which contains customized PowerTools data per company and ptwrk that contains
files for updating PowerTools to the latest version.
dixx
The ditxt and diwrk are provided as directories to
be used with the Data Import manager.
PSIBOBJ
This directory contains most of the BreakOut programs. It also contains programs for creating
PDFs.
PSIB00
This directory is for BreakOut files. It contains
the FUNCFL.DAT data file and may contain data
files (BxxxFL.DAT) for each user that has saved
BreakOut settings. The xxx represents the user
ID. It also contains files with settings for creating
PDFs.
PSLOG
Only used with Point of Sale and if you are logging access to credit card authorization.
XXOBJ
Contains programs specific to a particular module, where XX is a Passport Business Solutions
module identifier such as AR for Accounts
Receivable or GL for General Ledger.
38
DIRECTORY
DESCRIPTION
XX00
Contains data files specific to a specific module,
where XX is a Passport Business Solutions module ID. This folder contains data specific to module XX for Company ID 00. These directories
and files will only be created as they are needed
by the PowerTools program.
39
UPGRADING
TO
PASSPORT BUSINESS SOLUTIONS
Passport provides data upgrade paths from versions 8 and 9 of Great Plains Classic (formerly
RealWorld) Business and Accounting Software.
Upgrade paths are currently provided for the following versions:
RW32 Version 10.x and PBS upgrades
You can update and upgrade data from previous versions of RW32 and PBS to the latest
version. You should follow the instructions in the EZ Convert documentation. Select
EZConvert to download the PDF documentation.
Classic Upgrades
Great Plains Classic (formerly RealWorld) - DOS/Network Versions 8.00.01, 8.00.02, 8.00.03,
8.4, 8.5, 8.5.1, 8.6 and UNIX Versions versions 8.4, 8.5, 8.6. The instructions for upgrading
these versions are in EZ Convert documentation. Select EZConvert to download the PDF
documentation.
RW2000 Upgrades
Contact PBS support for consultation for upgrading.
Upgrades from Earlier Windows 32-Bit Products
Contact PBS support for consultation for upgrading.
Other Versions
Contact PBS support for consultation for upgrading.
40
PBS VERSIONS
It may be useful the know the file, program, compiler and runtime versions used to create and
run Passport Business Solutions. You may need to view version information for an object code
program to verify that the correct update version is installed on your system. This section gives
you some information on the versions and a means of determining the version if you are not
sure.
All the COBOL object code in PBS is generated and compiled based on technology developed
by AcuCorp, Inc. Since the release of RW32 Version 10, the predecessor to PBS, we have
upgraded the runtimes and compilers several times. However we have been using the very
stable Vision 4 AcuCOBOL file system since the first release.
As we upgrade runtimes, we have more features and PBS is able to run on more recently
operating systems.
With the initial release of Version 10 we used the Version 5.0.0.3 runtime and compiler. It was
possible to use a more recent compiler, but only with the -Z50 option to compile the program
to be compatible with Version 5.0.0.3.
With the 10.5 release we introduced the Version 5.2.1 runtime, but the object code was still
compiled to be Version 5.0 compliant. So you could use the 5.0.0.3 compiler or later. If you
used a more recent compiler you still had to include the -Z50 option.
With 11.2 we started using the Version 6.2 runtime. All the object code was compiled for
Version 6.2. A Version 6.2 or later compiler is required. With 11.5, 11.6 and 11.7 we used the
7.2.2 compiler and runtime.
With Version 12 we are now using the Version 8.1 runtime and compiler.
Runtime Version and License Detection
There is a command to display the version of the runtime, number of licensed users, and other
information.
in Windows, at a command prompt in the top-level PBS type the following:
wrun32 -v
In UNIX the command is:
run32 -v
Object Code Version
Knowing the version of the an object code program may be useful when determining if an
update has been applied, if you are using a custom program and more. PBS programs in
Windows vs. *nix will usually have different file dates, however the compile dates will
normally be the same. The COBOL Utility will help you determine if they are exactly the same
program or different.
41
To determine the version size and compile date of the object code, there are two slightly
different commands for Windows vs. UNIX/Linux.
Windows
As an example, from a Windows command prompt type the following:
cblutl32 -info pd00.acu
<ENTER>
The following or something similar will display for Version 11.5:
pd00.acu: size: 697369 (AA419), v7.2, RM-mode, resident (24-Jun-2007 15:02:07)
If you want to determine version information for a program under the PBS top-level directory,
include the path.
UNiX/Linux
In UNIX or Linux type the following:
cblutil -info PD00.acu
<ENTER>
What displays for Version 11.5 will be similar to the following:
PD00.acu: size: 697369 (AA419), v7.2, RM-mode, resident (12-Jul-2007 12:36:42)
42
Workstation
Install/Configure
This chapter contains the following topics:
Introduction to Workstation Install/Configure
PBS Startup
Install Adobe Acrobat Reader
PBS Thin Client Startup
Modifying the PBS Shortcuts
Windows Registry Update
Virus Scanning Software
Firewall Software
43
INTRODUCTION
TO
WORKSTATION INSTALL/CONFIGURE
The workstation installation and configuration links to, and depends on the PBS software
installed on the server. As a result, this step must be done after the server install step is
complete.
At the workstation it is assumed that you have a proper connection to the network, that you
have a drive letter mapped to the PBS server and the printers are installed that are needed for
PBS printing. Each workstation that is to use a particular printer must have that printer installed
and functional from that workstation as a Windows printer using Windows drivers. It is beyond
the scope of this document to explain these settings and procedures. Read the manuals that are
supplied by the operating system or printer manufacturer for details on this.
There are several different steps to the Workstation installation and configuration.
•
Install the PBS Startup and shortcut tuning
•
Update the Windows Registry
•
Configure the local virus scanning software so that it “trusts” PBS files. This is optional.
•
When using thin client, turn off workstation firewall product to increase performance. This is
optional.
If you are using a single-user version of PBS, then you will still need review these steps and do
the ones that are necessary. The major difference will be that the 'server based software' is
located on the local hard drive so thin client and fire-wall considerations will not apply.
44
PBS STARTUP
The User start menu items are Windows "Start " menu entries which provide access to the PBS
system via a series of short-cuts.
All PBS User and PBS Admin short-cuts require a valid Windows drive mapping to the server
where the PBS software is located.
Note
PBS will not run unless you have at least one printer installed on the workstation. You will receive a Memory access violation error if you have not
added a printer.
If PBS is installed on a network server, you must have administration privileges to run the PBS
startup installation from a Windows workstation.
To install Windows Start menu items on a local computer or workstation, from the PBS disk
Windows installation screen select:
Client Startup Installation
You may also start the install by navigating to the disk directory pbs_startup and double click
on setup.exe in that directory.
This PBS Startup will install Passport Business Solutions User menu shortcuts on the Windows
Start menu.
The installed shortcuts make use of three PBS fonts and so this will also install the new PBS
Fonts. There are two menu shortcuts for each font. The shortcut font sizes are set to optimally
work best for the workstation screen areas of 800x600 or 1024 and greater.
If you are using the Full Graphical screens, released with Version 12, the
size and colors of the Full Graphical screens are controlled by the workstation Display Properties settings.
Note
The Screen resolution on the Settings tab MUST be 1024 by 768 or larger
when using the Full Graphical screens.
The appearance tab controls the colors and font sizes. See the Windows documentation for changing these settings.
Once the startup icons have been installed to the PBS startup menu, one or more of these items
can be copied to the desktop should you want an icon on the desktop.
Note
If you are licensed for Thin client, then you must install a different startup.
For the Thin client startup installation go online to:
resource.pass-port.com/thinclient
Any of the icons can be modified should you wish to make changes to the PBS Startup
parameters.
There is also an option to add the PBS Administration utilities shortcuts to your Windows Start
menu. Use this option to install the following items on the Windows Start menu of the person
45
in your organization who will be responsible for maintenance of Passport Business Solutions
software.
The menu selections consist of:
•
Passport Business Solutions file recovery utilities for each installed module.
•
Passport Business Solutions file initialization utilities for each installed module.
•
Passport Business Solutions general utilities:
Add company
Multi-company Edit
Pathfinder
During the installation, you will have the following questions and options:
Do you want to install Passport Business Solutions Start menu items?
Yes
Starts the installation of the Start Menu Items
No
Cancels the installation
Software License Agreement
Yes
Clicking on Yes indicates that you have read the agreement and that you agree with it. and it continues the installation of the Start Menu Items
No
Cancels the installation
Find Passport Business Solutions Software
This is where you specify the location of where PBS software is located.
Browse
To find the location where the PBS is installed, click on
this button. The Choose Folder windows will display
where you can navigate to the location.
Back
Return to the Software License Agreement screen.
Next
Once the location of PBS is displaying under Destination
Folder, then click on this button.
Cancel
Cancels the installation
46
If you select a directory that does not contain PBS, you will get the Directory information window with the following message.
--------------------------------------------------------------------------
****** WARNING *******
The directory you have chosen does not contain PBS components.
Note
This install will only place START menu items for directories that
contain PBS runtime components.
Go back and select another directory or exit this installation!!!!!!
Then select the Back button and browse to another location or select the
Cancel button to cancel the installation.
Select Program Folder
Select the Next button to accept the default.
Back
To go back to the previous screen to choose a different
location
Next
To move to the next install screen.
Cancel
Cancels the installation
Ready to install PBS Start Menu Items
Select the Next button to accept the default.
Back
To go back to the previous screen to choose a different
location
Next
To install the start menu items.
Cancel
Cancels the installation
Do you want to include the PBS Admin Start Menu Items?
Yes
This will install the Administration start menu items.
No
Only the main PBS application Startup menu items will
be installed.
Setup complete
Finish
This will complete the installation.
47
Post Start-up Installation Configuration
You must enter at least one printer on the workstation. If you do not, you will get a “Memory
access violation. COBOL error at 0015be in ACUSTART.ACU” message.
If you have not already done so, read the Opportunistic Locking with Windows Shared Files
in chapter 2.
There are several start options that relate to the PBS font and the workstation Display
properties Screen area. These options are tunable and this is explained in the Modifying the
PBS Shortcuts section later in this chapter.
Once the startup icons have been installed to the PBS startup menu, one or more of these items
can be copied to the desktop should you want icons on the desktop. Do do so, Right click on
the icon and select Copy. Then right click on the desktop and select Paste. Some users may
not have the rights to do this. See your network administrator for help.
Uninstall the PBS Start Menu
To uninstall the PBS Start Menu Items use the Control Panel Workstation Add/Remove
Programs. On the workstation select
Start > Settings > Control Panel
Then select
Add/Remove Programs
Find the Passport Software Start Menu Items. It is usually in alphabetical order. Click on it to
highlight it and then select Change/Remove. You will get the question.
Are you sure you want to completely remove the selected application and
all its components?
Select Yes to uninstall the Start Menu items and the PBS Fonts. Select No keep the Start menu
items.
Yes
Uninstalls the Start Menu Items and PBS Fonts
No
Retains the installed items
Uninstalling the Start Menu Items will not remove the PBS data or programs.
48
INSTALL ADOBE ACROBAT READER
There are two reasons why you may need Adobe Acrobat Reader or Adobe Acrobat.
1. If you are saving forms to PDF for viewing and emailing or printing reports to PDF, Acrobat is
required for viewing the forms.
2. Although most of our documentation is in html, a few of our documents are in the Acrobat
PDF format.
If either reason applies, then following the PBS install we recommend that you go to every
workstation to verify that Adobe Reader or Adobe Acrobat is installed on the Workstation. Is
not, then install it.
To install Reader, go to the this site: http://get.adobe.com/reader/. Also, you may install the
Adobe Reader that we have provided on the PBS disk. It is an older version than the one
provided by Adobe, but it functions well for PDF files generated out of PBS and for our
documentation.
49
PBS THIN CLIENT STARTUP
The Thin Client (T-C) Start Menu items provide access to the PBS system through the
AcuConnect Thin Client system. There are three components to this system.
•
The server based PBS software
•
The T-C host based portion of the system located on the server
•
The T-C workstation portion of the system
The Start Menu items invoke the T-C workstation based components which then connects to
the T-C host based software and this connects to the PBS accounting system.
You must have the T-C hosting software installed and with a license that is activated on the
server. Also PBS should be installed, configured and the service should be running on the
server before you do this step. If not, then you will not be able to run PBS to test the
connection.
The PBS T-C Setup installs the startup menu selections. It also installs the T-C client
components on the workstation. During the installation you will be prompted for either the
DNS name or Server IP address and the port number. This provides the address that allows the
workstation to make the connection to the T-C hosting software on the server.
The T-C workstation software is configured to only allow access to the accounting system
only. There is no option to install Thin client access for the administrative utilities. Therefore
you will need to either access the utilities from the server by using batches in Windows, scripts
in UNIX and Linux or by being mapped to a network drive in Windows.
In order for this startup to work, you must be able to ‘ping’ the server. You should have
administrative privileges when installing the start up.
To install the T-C client software and shortcuts on the workstation you must first download it
from the PSI web site at this address:
http://resource.pass-port.com/thinclient/
Once the download is complete you may start the installation.
Font Options
There are several start options that relate to the PBS font and the workstation Display
properties, Screen area. These options are tunable and this is explained later in the Modifying
the PBS Shortcuts section of this chapter.
Uninstall the PBS Thin Client Start Menu
To uninstall the PBS Start Menu Items use the Control Panel Add/Remove Programs on the
workstation. On the workstation select
Start > Settings > Control Panel
Then select
50
Add/Remove Programs
Find the Passport Software Thin Client selection. It is usually in alphabetical order. Click on
it to highlight it and then select Change/Remove. You will get the question.
Are you sure you want to completely remove ‘Passport Software Thin
Client’ and all its components?
Select Yes to uninstall the Thin Client Workstation Components and the PBS Fonts. Select No
keep the Start menu items.
Yes
Uninstalls the Start Menu Items and PBS Fonts
No
Retains the installed items
You will get the message “Uninstall successfully complete” Click on the OK button and close
the Add/Remove Programs window.
Uninstalling the Start Menu Items will not remove the PBS server data or programs but only
the connectivity software from this workstation.
51
MODIFYING
THE
PBS SHORTCUTS
The Graphical version of PBS is a Windows application and is therefore subject to the controls
and conventions (color, font etc.) that alter the “look” of the workstation screen properties. If
you are using the Character version of the PBS, then modifying the shortcuts will have an
effect on the look of PBS.
By changing the parameters entered in the “Target” field of the Start Menu selection shortcut
you can do some fine tuning of the color, font size and other options. If you are satisfied with
the way your software is displaying, skip this section.
You may also modify the Run parameter to display PBS for either a Maximized or Normal
window.
Note
If you are using the Full Graphical screens, released with Version 12, shortcut modifications will have no effect on these screens. The size and colors
of the Full Graphical screens are controlled by the workstation Display Properties settings.
The Screen resolution on the Settings tab MUST be at least 1024 by 768 or
larger when using the Full Graphical screens.
The appearance tab controls the colors and font sizes. See the Windows documentation for changing these settings.
Font Options
When displaying text in a Windows graphical environment there are many factors that affect
how the text appears. Among them are:
•
Screen resolution (800x600, 1024x768, etc.)
•
Font selection
•
Font size
•
Windows color scheme such as ‘skin’ or ‘style’
The size of the Passport Business Solutions Windows application cannot be directly changed
with mouse dragging. Because of this, PSI has provided a set of Start Menu items for 800x600
and 1024 and up workstation Display properties Screen areas.
If you would like to experiment with font sizes, bold and italic characteristics, the following
tips will help with this. Also, if you want to take advantage of the fonts with the admin start
menu start menu items and the batch file start ups then you can modify them as well.
There is a direct relationship between the Windows Display properties Screen area and the
scalable font size used to access PBS. The Startup installation provides access to PBS on Start
- Programs - Passport Business Solutions and installs the PBS fonts. These start menu items are
set to access the PBS fonts and some default font characteristics. You can modify these characteristics.
52
Several command line parameters are available that can affect PBS display properties.
Font characteristic command line parameters
-c
To modify the display’s color scheme and box frame
characteristics
The values are:
“0” - Passport blue on gray
“1” - “Classic RealWorld” white on black
“2” - use “+”, “-” and “|” for box draw characters
“4” - use AcuCorp special BoxDraw commands
-f
To specify the font that will be used for the display
-s
To specify the font size
-b1
To specify that the font displays in bold
-i1
To specify that the font displays in italics
If a specific font is not designated in the start menu item or batch, then PBS defaults to using
the terminal font. The terminal font is fine to use, but the variety of sizes is more limited than
the Passport fonts.
We recommend that you only use the PBS fonts. Unlike other fonts, these will display Passport
Business Solutions screens outlined with line-draw characters. Other fonts will not display lines
correctly and may display @ signs or other characters where a line would normally appear.
If the workstation start menu item is set up incorrectly, you may not be
able to access Passport Business Solutions.
Note
If you attempt to use a font size that is larger than the Windows screen will
allow, slider bars will display allowing you to still view the screens. If the
font size is too small, you may not be able to see all buttons at the top of
the screen.
Start Menu Modification Example
The following is one example of accessing and modifying a start menu item:
1. From the Passport Business Solutions workstation, right click on Start and select Open.
2. You will need to navigate to the Passport Business Solutions start menu items.
There should be several menu items already installed:
PBS - Andale 800x600
PBS - Andale 1024 and up
PBS - Courier 800x600
PBS - Courier 1024 and up
PBS - Lucida 800x600
PBS - Lucida 1024 and up
53
You may choose to change or copy any of these. Note: once changed, the previous ‘system’
font will not be accessible unless you change it back. In our example we are changing the PBS
- Andale 600x800.
3. Right click on the icon and select Properties. You will view a window similar to the following:
4. Adjust the start menu item Target field parameters following the "RWC -c0" to utilize the italics.
The example below, shows a Target before and after a change. The after will have the font a
size larger and will display in italics.
Before:
"P:\pbs\wrun32.exe" -w -c CBLCONFI ACUSTART.ACU RWC -c0 -fAndale
Mono PSI Box Draw -s10 -b1
After:
"P:\pbs\wrun32.exe" -w -c CBLCONFI ACUSTART.ACU RWC -c0 -fAndale
Mono PSI Box Draw -s11 -b1 -i1
Once you have found an acceptable display setting, you may choose to modify these on all
workstations accessing Passport Business Solutions. You can copy this link/icon to the other
workstations.
Original Colors
The original or "classic colors" is an available option when running PBS. The Valid G/L
accounts screen with the original colors looks like the following.
54
If you would like to use the original colors you will have to modify the shortcut to include a c1 option. The following is a shortcut Target field with this option.
“P:\pbs\\wrun32.exe” -c CBLCONFI -w ACUSTART.ACU RWC -c1 -fAndale Mono PSI Box Draw -s10 -b1
The -c1 option is entered after the letters RWC. There needs to be a space before and after the
entry.
Administrative Shortcuts and Batch files
Any of the Passport Business Solutions shortcuts (including administrative shortcuts) can have
any of the various parameters. This also applies to the batch files.
Run Options
One of the shortcut fields is Run:. There are three options with the Run field.
OPTION
DESCRIPTION
Normal window
Normal means it is not full size of the screen
but a smaller window
Minimized
This opens PBS on the desktop. This setting is
not recommended.
Maximized
The PBS window will open maximized which
means it will be the full size of the screen.
The default shortcuts are installed with a setting of Normal window.
If you use multiple monitors, then the Normal window setting is recommended.
There is a setting in the cblconfi file that activates the run options. The setting is:
NORMALIZE_FLG Y
55
The default setting is Y. If it is set to N, then PBS will not respond to changes to the Run field
and will always start maximized.
56
WINDOWS REGISTRY UPDATE
Passport Business Solutions uses an AcuCorp Windows runtime, which has two modes for
accessing the data files. They are ‘fast’ and ‘safe’ modes. PSI has determined that the fast
mode is best for Passport Business Solutions data file access.
A registry entry is required to set a workstation to the fast access mode. From EACH
workstation, the first time you run Passport Business Solutions a new entry to the Windows
Registry will be added. In Windows 2000, XP and Vista you must have permission to change
the registry when you log in.
For any users that do not have workstation administrative privileges, it is recommended you
start Passport Business Solutions at least once on the workstation as an administrator to update
the workstation registry.
Updating the Registry
Start Passport Business Solutions, as you normally would. The registry is automatically
updated and you will receive the following message:
Windows Registry Successfully Updated!
Passport Business Solutions restart required
Close this message by clicking on the OK button or selecting the <Enter> key. Restart Passport
Business Solutions and you should no longer see this message.
Note
If you run PBS on the server, the registry on the server will be updated.
57
VIRUS SCANNING SOFTWARE
If your workstation is accessing PBS via Thin-client, you can ignore this section.
Passport Software recommends that any virus scanning software on the workstation be
configured to trust the PBS software file types. PBS is based on heavy I/O (Input/Output),
frequently opening files and reading records. When using virus scanning software can slow I/O
down. Also we have found that virus-scanning software can even cause file errors.
To configure your virus scanning software to trust our software, set it up to not scan the
following file types in the PBS directory and sub directories:
EXTENSION
FILE TYPE
*.DAT
Data file
*.VIX
data file index
*.ACU
PBS programs
It is extremely unlikely that these PBS file types would ever become infected because a virus
or Trojans need an executable program to launch them.
58
FIREWALL SOFTWARE
If you are not using Thin-client, then you can ignore this section.
We have found that firewall software that has real-time monitoring of Internet activity can
significantly effect PBS performance when accessing PBS using Thin client. The performance
degradation may vary based on the firewall software, client specifications and network setup.
If you suspect that the firewall software is having this effect, turn off the client firewall software
and if the access performance to PBS improves you will need to re-configure the firewall to
minimize the performance hit.
Note
Older operating systems, such as SCO Open Server 5.06 does not acknowledge the Thin client connection at all if operating behind a router where
port mapping or address translation is taking place.
59
PBS Users
This chapter contains the following topics:
Introduction to PBS Users
Entering Users
60
INTRODUCTION
TO
PBS USERS
This chapter explains how to set up and modify authorized users for accessing Passport Business
Solutions.
When Passport Business Solutions is started it will prompt for a User ID. In order to gain
access to any of the PBS menus, a valid User ID must be entered and authenticated against a
valid password.
At least one User ID must be defined to use your Passport Business Solutions software.
Passport recommends that one User ID be defined for each user that will be using the system.
This ID is used in various areas within the software to document changes that occur within the
system and also increases security.
User Types
Users in the Passport Business Solutions system are defined as either Administrative or General
users.
Administrative Users
Administrative users are granted complete access to the Passport Business Solutions system for all
companies that are being processed. They are allowed unlimited access in order to carry out their
responsibilities as Administrators.
•
Only Administrative users have access to the Setup menu on the Passport Business Solutions
CLT menu.
•
Only Administrative users are allowed access to the Passport Business Solutions file recovery
utilities and initialization utilities.
•
Administrative users can perform BreakOut™ maintenance for themselves and any other valid
User ID.
•
Only Administrative users can add or modify Passport PowerTools Lookups. PowerTools Lookups are only available in character mode.
•
Administrative user have access to the entire PBS menu, based on the modules that are installed
on your system, at all times.
General Users
General users are not automatically granted access to the complete Passport Business Solutions
menu system.
•
In no case are General users allowed access to User maintenance or Menu maintenance.
•
General users are not allowed to run file recovery or file initialization utilities.
•
In character mode general users can only adjust their own BreakOut settings.
•
A General users is assigned a default system menu or may be assigned a custom menu to
restrict access to Passport Business Solutions menu selections.
•
PowerTools Lookups cannot be added or modified by General users.
61
Passwords
A password is a string of characters that must be entered before a user can access or retrieve
any information stored by the software.
You use passwords to prevent unauthorized individuals from seeing sensitive information,
such as salaries in the Payroll module or financial data in the General Ledger module. Due to
the increase of identity theft, it has become necessary to require passwords for PBS systems.
It must be at least 6 characters long and must contain both numbers and alphanumeric
characters or uppercase and lowercase alphanumeric characters.
62
ENTERING USERS
The User maintenance selection is used do define the individual users that will be working with the
Passport Business Solutions software. Use this selection to define who can log into the system and
the companies, modules, and menu selections that the user will be able to access.
When you first install Passport Business Solutions, no users have been defined. When you first
log into the system, you use the startup User ID, ADM, to access the Passport Business
Solutions menu.
Set up at least one Administrative user after logging in for the first time with ADM. Defining
one administrative user will render the ADM login ID invalid. Defining only a general user
with no administration user will make the administrative functions inaccessible.
Note
After you have entered at least one Administrative user, you might want to
consider the kind of security issues that must be confronted for your particular installation. If you will be restricting access of the Passport Business
Solutions system on a user by user basis, you should read the chapter, PBS
Menus, before you set up all of your General users. Because system restrictions are defined by custom menus and each restricted user will be
assigned a custom menu, it might be appropriate to define your custom
menus before you enter your users.
Select
User maintenance from the Setup menu.
Graphical Mode
This selection is only available to Administrative users.
63
You may add new users or edit existing users on this screen.
User Maintenance List Box
The list box displays up to 6 users at a time. You may sort the users by user ID in ascending or
descending order. Click on the column name or the arrow to the right of the column name to
change the sort or use the View options. Only column names in red may be sorted.
To locate a user start typing the user ID or use the arrow keys, <PgDn>/<PgUp>, and
<Home>/<End> keys to find the order. The <F1> and <SF1> work the same as the arrow
keys.
When a user is found, to edit the record you may select <Enter>.
User Maintenance Buttons
To access the buttons you may click on them with the mouse or use the Tab key for access. When
the focus is on a key use the <Enter> key to select it. Keyboard equivalents are also available:
Button
Keyboard
Description
New
Ctrl+n
To enter a new user
Edit
Ctrl+e
To edit an existing user
Save
Ctrl+s
To save a new user or changes to an existing user
64
Save/New
Ctrl+w
This is a combination of the Save and New buttons
Delete
Ctrl+d
To delete an existing user. You MUST retain at
least one administrative user
Cancel
Ctrl+c
To cancel the addition of a user or editing a user
Exit
Ctrl+x
To exit to the menu. You may also use the <Esc>
button
Character Mode
In character mode the following screen displays:
Options
If you have existing users, you may use one of the character mode options:
<F1>
For the next user
<SF1>
For the previous user
User ID
Enter a code to identify the user. This will be the code used at startup to access the Passport
Business Solutions system. ADM is reserved for new installations only and cannot be entered
here.
Format
Up to three characters. Lower-case is converted to uppercase.
Example
Type: PSI
Change password
This field only displays in graphical mode.
Check this box if you want to change the users password. The Password and Confirm fields
must be entered after you check this box.
65
Format
Check box, checked is yes and unchecked is no. The
default is unchecked
Example
Select the <Enter> key to not change the password
Password
Enter the password that will be used by this user when logging into the Passport Business
Solutions system. Read Passwords for the password requirements.
The password displays as asterisks. If a user forgets the password, then it must be re-entered
here by an administrator. The password entered here is temporary. You must let the user know
what the password is.
If the password has been changed on this screen, the next time the user logs into PBS, he or
she will be required to enter the changed password, then enter and confirm a new password.
Format
Up to 10 characters
Example
pbs123
Confirm
Re-enter the password. This is to confirm what was entered in the Password field is what is
expected.
Format
Up to 10 characters
Example
pbs123
User type
Select a type for this user. You may define this user as an Administrative user or as a General
user
•
Administrative users are given access to all menu selections and all defined companies when
they log into the Passport Business Solutions system. They have complete access to the Setup
menu selections of User maintenance and Menu maintenance. In Character mode they may set
up BreakOutTM field controls for each user of the system and they may modify PowerTools
Lookups.
Only administrative users may access the file utilities, initialization utilities, add company utility
and the path finder utility.
•
General Users are restricted in their use of the Passport Business Solutions system. They do not
have access to Setup menu selections and they may be assigned a custom menu, defined in
Menu maintenance, to further restrict their access to companies and menu selections. See PBS
Menus for more information.
Format
Drop down list box, either Administrator or General
Example
Select Administration to define this user as an Administrative user.
Name
Enter the name of the user you are setting up. This field is required.
66
Format
Up to 25 characters.
Example
Type Passport Admin User
Address
Enter the address of this user or press <Enter> to leave this field blank. This field is optional.
Format
Up to 25 characters.
Example
Type 3801 West Lake Ave
City
Enter this user’s City or press <Enter> to leave this field blank. This field is optional.
Format
Up to 15 characters.
Example
Type Glenview
State
Enter the address of this user or press <Enter> to leave this field blank. This field is optional.
Format
2 characters.
Example
Type IL
Zip code
Enter this user’s Zip code or press <Enter> to leave this field blank. This field is optional.
Format
Up to 10 characters.
Example
Type 60026
Phone number
Enter this user’s Phone number or press <Enter> to leave this field blank. This field is optional.
Format
Up to 20 characters.
Example
Type 847-729-7900
Email address
Enter this user’s email address or press <Enter> to leave this field blank. This field is optional.
Format
60 characters.
Example
Select <Enter>
Note
The Email address and Email login fields are used for emailing PDF
invoice, statement, purchase order type documents stored under the PDFFIL
directory out to customers or vendors. See the Email Configuration appendix
for more information on setting up this feature in PBS.
67
Email login
If nothing is entered for the Email address field, then this field is skipped.
Enter this user’s email login or press <Enter> to leave this field blank. The email login is the
SMTP Authentication. If you do not know what this is, contact your Internet Service Provider
for help. This field is optional.
Format
60 characters.
Example
This field will be skipped based on no entry in the Email
address field.
Full graphical
This field determines the type of screens that the user accesses when entering data. Checked
indicates that the user accesses full graphical mode screens where unchecked indicates the
character mode screens.
In the PBS documentation the two modes are referenced as Graphical Mode and Character
Mode.
Format
Check box, checked for full graphical and unchecked for
character
Example
Select the <Space bar> to check the box
There is a setting in the cblconfi file for FULL_GRAPHICAL. This setting only effects the PBS
login screen. See the COBOL Configuration File appendix.
Graphical/Character On/Off
No matter what is selected here, from any screen on the system that is available in full
graphical mode, any user can select <Sft+F12> to toggle from Character to Full graphical or
vice versa. There are a few restrictions to this feature:
You may not switch modes when adding a record or have a record selected in Character Mode
and you not be adding or editing a record in Graphical Mode. If there are a sequence of
screens, you may only make the change on the first screen like in Print checks and post in A/P.
If you are processing data for more than one company, this is the last selection on this screen.
Make any needed changes or press <Enter> to continue.
Menu
This selection can only be entered if you are selecting a menu for a single company.
For General users, enter the custom menu for a defined custom menu or press <Enter> to
default to the full system menu. For Administrative users, this field cannot be entered.
Administrative users are automatically assigned full system access. See the User type field.
Format
Up to 8 characters.
Example
This field is skipped in this example because the user is an
Administrative user.
68
User menus (button)
This button provides access to the multi-company menu setup screen.
If you are processing data for more than one company and you are adding a new General user,
you need to access a second screen where you may define the company access that will be
made available to the user.
Make any needed changes or press <Enter> to continue.
Multi-company Access
This screen is used to define General user access in multi-company installations. Since Administrative users are automatically assigned access to all companies and all system functions, this
screen is only applicable when working with General users. See the User type field.
Access company
For each User, you may enter as many Company IDs as you have defined. The entry here for a
User will define the company information that a user may be granted access to.
Enter a valid Company ID to allow a General user access to that company’s data. Leave it
blank for "All" companies.
Format
2 characters
Example
This field is skipped in this example because the user is
defined as an Administrative user
Menu ID
Enter a valid Menu ID to selectively restrict access to this company’s information for this user.
69
Format
Up to 8 characters
Example
This field is skipped in this example because the user is
defined as an Administrative user
You may press <Enter> to default to full system access for this General user.
Make any changes or press <Enter> to continue.
Note
Full system access for General users does not include access to the User
maintenance or Menu maintenance selections. It does not include access to
the file recovery utilities or file initialization utilities. These functions are
reserved for Administrative users.
Options
You may also use one of the options:
<F1>
For the next menu access record
<F5>
Copy BreakOut settings for this user. This option is
only available in Character Mode as Breakout can only
be used in Character Mode
<F3>
Delete the company access record for this user
Copy BreakOut Settings
This option is only available in Character mode.
When <F5> is selected to copy BreakOut Settings, then you will be prompted for the following
fields:
1. Copy from User ID
Select the User ID from which you want to copy to this user to use the option:
Options
<F1>
For next user on file
Format
Up to three characters. Lower-case is converted to uppercase.
Example
Type: PSI
2. Module to copy
You may select individual modules or use the option:
Options
<F1>
For "All" modules
70
Format
Up to two characters.
Example
Select <F1> for "All"
3. Overwrite records ?
The user selected may already have BreakOut records on file. Select Y to overwrite the
existing BreakOut records for the user selected or N to merge with existing records.
Format
Y for yes or N for No.
Example
Select Y
Field number to change ?
Select <Enter> to save your entry or select <Esc> to not save.
71
PBS Menus
This chapter contains the following topics:
Introduction to PBS Menus
Menus
Creating Custom Menus
72
INTRODUCTION
TO
PBS MENUS
In Passport Business Solutions system security is established by creating a record for each authorized user and assigning one or more menu selections, defined as a custom menu, to each user. Each
user will have access to only the Passport Business Solutions menu selections that are included in
the user’s assigned menu.
This user’s access to the assigned menu is secured with a password. Passwords are unique in
the Passport Business Solutions system and may not be shared except under strict control of
the system administrator and even then may be changed by the user during login to PBS.
This chapter explains how to set up, modify, and maintain Passport Business Solutions custom
menus for any Passport Business Solutions module. Individual menu selections, entire
submenus and complete module menus can be easily enabled or disable to create menus for
your particular needs. After setting up a custom menu, it can be assigned to any number of
users.
73
MENUS
Within Passport Business Solutions, a custom menu is defined as one or a group of individual
menu selections.
For a simple example, an Accounts Payable clerk might be required to enter all company
invoices as they are received. However this same clerk may not be permitted to actually post
the vouchers that have been created.
In this case the clerk’s custom menu would allow access to the Payables Enter and Edit list
selections but would be denied access to the Payables Post selection.
Creating custom menus involves a process of choosing menu selections that will be a part of
the custom menu. When you choose a menu selection to be a part of a custom menu, you
enable it for the custom menu. When you choose not to include a menu selection as part of a
custom menu, you disable if for the custom menu.
Menu selections that are enabled on the user’s custom menu will be displayed to user. Menu
selections that are disabled on the user’s custom menu will not be displayed to user.
When you first install Passport Business Solutions, no custom menus have been defined for the
system. If you plan to restrict user access using custom menus, you may decide to create the
custom menus before you add users. You can create User IDs first, but you would need to
modify their records later to update them with the appropriate custom Menu ID.
For reports that have been printed to disk, there is an option that will restrict a user from
accessing reports that the user can not run. For this feature to function, the Protect disk
reports field in Company information must be set to Y.
Enabling/Disabling Menus
After adding a new custom Menu ID, you will be required to define the menu selections that will be
enabled for this custom menu. The <F1> and the <F3> function keys are used to enable and disable menus selections, respectively, for a custom menu. A plus sign (+) will be displayed next to an
enabled menu selection.
Entire menus or submenus can be enabled or disabled using the <F1> and <F3> function keys.
Menu Navigation
When navigating your menu and enabling and disabling menu selections, the following screen will
display.
74
When you first enter the menu screen, the words MENU BAR will be displayed above the
cursor. As you navigate the menu system, this prompt will change, providing reference to the
position of the cursor and the current active menu. This cue is useful when enabling or
disabling groups of menu selections.
KEY
DESCRIPTION
<UpArrow>
Use this key to move the cursor to the previous
menu selection. The screen will automatically
scroll if the previous selection is not currently displayed.
<DownArrow>
Use this key to move the cursor to the next menu
selection. The screen will automatically scroll if
the next selection is not currently displayed.
<PgUp>
Use this key to navigate to the previous page of
menu selections.
<PgDn>
Use this key to navigate to the next page of menu
selections.
<Enter>
If MENU BAR is displayed as the current menu
or the cursor is positioned on a submenu, use this
key to expand the menu.
<Esc>
If MENU BAR is displayed, use this key to exit
the screen. Otherwise, use this key to escape to a
higher level menu.
75
CREATING CUSTOM MENUS
Only users logged into the Passport Business Solutions system as Administrative users will have
access to the Menu maintenance selection that is used to create custom menus.
Note
If most of the selections in a module will be enabled for a custom menu,
press <F1> when MENU BAR is displayed to enable the entire menu for the
module. Then use <F3> to disable the selections that will not be enabled
for this custom menu.
Select
Menu maintenance from the Setup menu.
1. Menu ID
Enter the Menu ID that will be used for this custom menu. MENUFILE is not a valid entry as
this Menu ID is reserved for the System menu.
Format
Up to eight characters. This entry must begin with an
alphabetic character.
Example
Type: APCLERK
Options
You may also use one of the options:
<F1>
For the next user
<SF1>
For the previous user
2. Menu description
Enter a description of the menu.
Format
Up to 25 characters.
Example
Type AP Clerk Menu
76
3. Menu type
No entry is allowed in this field. It will be skipped.
Field number to change ?
Make changes or press <Enter> to continue.
If you are working with an existing custom menu, you will be asked if you want to change the
current menu selections.
Any change to menu selections?
Respond with Y or N.
If this is a new custom menu, the following screen will be displayed automatically when you
press <Enter>.
***SCREEN***
Use this screen to define the selections that will appear on the custom menu. When you are
done, press <Esc> to save the custom menu and return to the first screen.
If you attempt to exit this screen without enabling any selections you will be warned.
Menu empty. OK to delete this menu?
Answer Y or N.
If you answer Y, the current process will be halted and you will be returned to the first screen.
If you answer N, you will be allowed to continue defining the current custom menu.
Menus Following Updates or Upgrades
Menu selections may be added during an update or upgrade of PBS. When this occurs these
new selections will not be available to your users who have been assigned a menu. If you
require that your user have access to the new menu selection, you must go into Menu
maintenance and assign this selection following the installation.
77
Company Information
This chapter contains the following topics:
Introduction to Company Information
First Tab - General
Second Tab - Package / Screen Controls
Third Tab - Account Setup
Fourth Tab - Printers
Other Printer Types
PSI Printer Locator Debug Special Printing Features and Control Codes
Fifth Tab - Email Setup
78
INTRODUCTION
TO
COMPANY INFORMATION
The Company information selection enables you to record information about your company,
such as the company name, address, etc.
Company information also provides some basic options affecting the way your Passport
Business Solutions software works.
Among these options are:
•
Which modules (A/P, A/R, G/L, etc.) appear on the menu.
•
Whether to use batch controls and change logs.
•
Account number and cost center setups.
•
PBS printer controls.
•
Email setup and configuration test
The information you enter is stored in the Company File, and is shared by all Passport
Business Solutions applications. For similar information specific to individual modules, refer to
the Control Information chapter of each module’s documentation. See the PBS
Documentation section of the Introduction to PBS Administration chapter for links to the
documentation.
Installation
When you installed your PBS software, default information was automatically entered into the
Company File. Some of this information will be as you want it, and some will need changing.
For example, the installation procedure sets the company name to Installation Procedure
which you will want to change to your company’s name.
Select
Company information from the CTL menu.
79
FIRST TAB - GENERAL
Five tabs are required to enter all the necessary information. None of your entries take effect
until all the tabs have been entered and saved. These screens show either:
•
The values in company information assigned by the installation procedure (if you are installing
Passport Business Solutions software for the first time), or
•
The values that have already been set by your company.
If this is the first case, you will want to follow the instructions in this chapter to change the
default information to what is needed for your company.
If you are setting up emailing for the first time, you only need to select the Email tab, enter the
fields and run a test. No other changes to Company information is needed. What is required
will depend on your company’s needs.
In either case, the information in the examples in this chapter is for illustrative purposes only.
Be aware however that the examples in the rest of the documentation have been selected to be
consistent with the ones shown in this chapter.
Graphical Mode
The first tab displays as follows:
80
Character Mode
The first screen displays as follows:
Enter the following information:
Company report name
Enter your full company name. The name will be printed as the heading on all reports. Your
entry is centered in this field.
Format
50 characters
Example
Type: XYZ Company
Company display name
Enter the company display name that displays on most PBS screens. In Windows and Thin
client this name will also display on the title bar to the right of the company number.
This name is used on some special forms such as A/R statements.
Format
30 characters
Example
Type: XYZ Company
Address line 1
Address line 2
Address line 3
Enter the address of your company. The address is used primarily on special forms such as
payroll checks.
Format
30 characters for each field
Type:
Example
500 W. Lincoln Blvd
Suite 1005
81
Anytown, Texas 12345
on three successive lines.
Phone
Enter your company phone number. The phone number is automatically printed on certain
special forms.
Format
12 characters
Example
Type: 555-123-4567
Year 2000 Cutoff
This is a protected field and if you are not allowing protected changes, it can only be edited if
you turn on allow protected changes (See Allow protected changes field - field 7 in character
mode). Once you allow protected changes, you must exit Company information and come
back in to change this field.
Your entry here determines how the system interprets the century for dates. Entered dates are
in MMDDYY format. They are stored internally as MMDDYYYY.
During data entry, when you enter the year as two digits, your entry is compared to this cutoff
figure. If your entry is greater that this cutoff, then the year is assumed to be 19XX. If your
entry is less than this cutoff, then the year is assumed to be 20XX.
For example, if this field is set to 20, then years entered as 00 through 20 are interpreted as
2000 through 2020. Years entered as 21 through 99 are interpreted as 1921 through 1999.
You must set this field to a year that is well beyond your working date. For example, the shipdate in Order Entry and the Next Review date in Payroll Employees is usually a future date and
if the date is in another year, then this field should anticipate that. But, if you have Payroll
Employees, if should not be set beyond the oldest person in your company because the date of
birth We recommend that you set this date to 5 years beyond the current year. Setting it 10
years in advance will mean that you do not have to change it for a while.
The current default following a PBS installation and adding a new company is 20.
Batch controls
Batch processing allows accumulating transactions into a batch that can be used for transaction
entry, editing and posting. Batch control can be used with either A/P or A/R.
Batch controls must be authorized here before they can be used by any module, but they must
also be authorized in the Control information within each module where they are wanted. This
permits you to use batch controls (for example) in A/R but not in A/P. Not all modules make
use of batch controls.
Refer to the Using Batch Controls chapter in the PBS System documentation for information
on batch controls in general.
The next 2 fields are used in the company wide settings for batch controls.
82
Use batch controls Check this box to use batch controls leave it unchecked to not use them.
Format
Check box where checked is yes and unchecked is no.
Example
Check the box and then press <Enter>.
Last batch # used
This field cannot be entered if you left the previous field unchecked.
All batches, without regard to type, are assigned numbers in sequence beginning with the
number you enter here.
Format
999999
Example
Type: 23
Security
Allow protected changes
Some functions of Passport Business Solutions software contain information which can be
protected against being changed. This information is usually the type which is generated
during posting, such as historical accounting figures.
If you check this box to allow protected changes, authorized users will be able to change
protected information (after having been warned).
Format
Check box where checked is yes and unchecked is no.
Example
Check this box and then press <Enter>
If the field Allow protected changes is checked in Company information, it is possible to
override the protected change on certain fields. Protected changes are necessary to not only
maintain database integrity but to restrict certain vital account information from being
modified.
For example, if your valuation method is set for standard costing, it would not be advisable to
inadvertently switch costing methods because of the changes to the layered information that
would be effected by this change. In this instance, all associated fields would be protected, and
an override would not be allowed. However, it may be possible to override fields such as sales
amount and returned check amount.
If you perform a function on a field, and the Change not allowed message is displayed, press
<F2>. If this field is not protected, you may be able modify the field’s contents. The message
Allowing protected change will display. Once protected change has been overridden, it is not
necessary to press <F2> again. The override remains in effect for subsequent transactions
within this application and this session.
Maximum Field Security
Maximum field security is achieved when:
•
Allow protected changes is left set to unchecked and
83
•
The Company information selection is protected by a password assigned to that selection only
and known only to the system administrator.
This ensures that whenever necessary the system administrator can rapidly override change
protection on any field that permits it, without imposing any restriction on the normal use of
any other selection.
Use passwords
This field cannot be changed. Passwords are required to access PBS.
Passwords protect all or part of the software from unauthorized use. You must enter the
password as part of entering the user information. See the PBS Users chapter.
You may also assign a general menu to a user to restrict the user to certain menu selections. Se
the PBS Menus chapters.
Use change log
A change log is a report which shows all changes to records in a master file; for example the
A/R Customer file or the PR Employee file. Change logs provide an audit trail of who changed
your files, when, and how.
Check this box to use change logs for all modules, leave it unchecked to not use them. If you
choose to use change logs, each master file will have its own change log.
As changes are made to the master files, change logs grow and claim more disk space. You
can reclaim this space by purging change logs periodically. After purging change logs, a report
prints noting all changes that were purged so that you have a permanent record of these
changes.
Format
Check box, where checked is yes and unchecked is no.
Example
Check the box and then press <Enter>.
Use reformat account option Check this box to allow the reformat account number feature.
Format
Check box, where checked is yes and unchecked is no.
Example
Check the box and then press <Enter>.
Cross reference file
Use cross-reference file
Check this box to permit linking your current account numbers to other account number
structures. These may be either:
•
Those you used before upgrading from a previous release
•
Those you used prior to reformatting your account numbers
•
External (i.e. non-Passport Business Solutions) account structures.
84
Whenever you need to enter an account number on any screen, you can do so by selecting
from the cross-referenced account number structure. The system will automatically translate
your selection to current Passport Business Solutions account numbers. Refer to the External
Cross-reference chapter of the System User documentation.
Format
Check box, where checked is yes and unchecked is no.
Example
Check this box and then press <Enter>.
Scan accounts pop-up box default
If you checked the box to the Use cross-reference file field, Field #12 in character mode, you
must decide which account structure will appear in the pop-up selection window whenever the
cursor is in an account number field and you press <F8>. Although your current account
number structure may be cross-referenced to all three of the others, only one account structure
at a time can be accessed by <F8>.
If you leave the box unchecked to the previous question, <F8> is still available but only
current Passport Business Solutions account numbers are displayed.
Your drop down list choices are:
Current account
Previous account
1st external cross-reference account
2nd external cross-reference account
Enter a choice from the list above.
Format
One option from the list above.
Example
Select 1st external cross-reference account from the drop
down list and then press <Enter>.
This lets you change the format of your account number without harming or losing historical
data. There is significant flexibility provided by the ability to reformat account numbers. Refer
to the Reformatting Account Numbers chapter. Reformat accounts is not available for Point of
Sale or the manufacturing files.
Print reports from disk
For an explanation of the user features, see the Printing reports from disk chapter in the PBS
System documentation.
Protect disk reports
Select Limit access by user menu/ID to protect disk reports. Select Not protected to not protect
the reports.
85
This field ties in with the print reports from disk feature and menu maintenance. General users
that have been assigned a menu will only be able to print reports from disk that they
themselves are capable of creating. Administrative users are not affected by this selection.
After you choose to protect reports that have been printed to disk, you will then have to set up
a custom menu and assign this menu to a user. See PBS Menus for more information.
The general user who has been assigned a custom menu will only have permission to view and
print reports-from-disk that the user has permission to create. The permission is based on the
set up in the Passport Business Solutions menu maintenance. If the user has permission to print
the report TO disk, then the user has permission to view or print the report FROM disk.
Similarly, if the user cannot print the report to disk, then the user can neither view nor print the
report. The same applies to stacking reports.
Format
Drop down list
Example
Select Limit access by user menu/ID
Save registers
Check this box to save registers or leave it unchecked to not save them.
•
A checked box means that a duplicate copy of a register (a report created whenever posting
occurs) is saved to disk whenever you send the register to a physical printer at the time of original creation. This is a safety feature in case the hard copy is lost.
You can purge saved registers at any time using Purge saved registers, located on the menu
under Print reports from disk.
If you directed the register to disk upon original creation, it makes no difference on your choice
here. Only one copy is stored, which must still be printed at least once before it can be removed
from disk (by the Delete reports selection, not the Purge saved registers selection).
•
An unchecked box still allows you to direct a register to disk or to a printer but not both. If you
send it to the disk, you cannot delete it until you have physically printed it from disk at least
once.
Format
Check box, where checked is yes and unchecked is no.
Example
Check the box and then press <Enter>.
# days before warning
This field does not appear if you have chosen not to save printed registers.
Enter the maximum number of days that you wish to retain saved registers. For example, if you
enter five days a warning will appear whenever the oldest register saved is more than five days
old. The warning will display when you access the menu selections of Print a report, Stack
reports and Print a stack.
Note that registers are not automatically purged; the value you enter here only controls the
timing of your warning.
Format
999
Example
Type: 90
86
Make any changes needed and select enter to continue to the next tab.
87
SECOND TAB - PACKAGE / SCREEN CONTROLS
The second tab looks something like this:
Select packages for master menu
A separate field can be entered for each Passport Business Solutions application (General
Ledger, Accounts Payable, etc.) Check the box to make a module appear on the Passport
Business Solutions master menus, leave it unchecked to make it not appear. If you are not
licensed for a module, then it will not appear, even if you check the box, because it was never
included in the Menu file during installation.
You can display a module on the menu even though you have not installed it for the company.
If you select a module to make it appear, if the programs and data files are not installed it will
not be a functional module. If you want to look at the screens and features of a functional
module you can order the live version or request the demo version of PBS.
You may also assign custom menus to general users. To learn more about this read the PBS
Users and PBS Menus chapters. This is a most secure way of not allowing access to certain
PBS functions.
Removing a module here does not necessarily remove all the effects that module has on other
modules. For a complete removal, it is recommended that you also remove the paths to the
programs and files for that module.
If no module is selected, only the CTL menu will display.
Format
Check box, where checked is visible and unchecked is no.
Example
Check the box for each module
88
Menu type
This selection is available for Windows and Thin client only and will not be present on
Linux/UNIX installations.
On Windows computers, you may display your Passport Business Solutions application menus
in one of three different ways. Menu bar. Windows menu or Tree-view menu.
After you select or change the menu type, it will not take effect until you restart PBS.
These menu types are explained more fully in the Starting PBS, Menus and Printing chapter of
the System user documentation.
VALUE
FUNCTION
Menu bar
To display the Menu bar application menu. This
is a legacy menu type that originated with RealWorld software
Windows menu
To display the Windows application menu
Tree-view menu
To display the Tree-view application menu
If you elect to use the Tree-view or Windows menus Passport Business Solutions Access Groups and Temporary Access features will not be available to
you. For more information about these features, see the Temporary Access
and Access Groups section of the Starting PBS, Menus and Printing chapter
in the PBS System documentation.
Note
Format
Drop down list box
Example
Select Tree-view menu
Display mode
This is an outmoded option and your selection here will have little or no influence on the
functionality of the screen display. It may still be useful when using slower display monitors
such as a WYSE 60.
Dumb terminals such as WYSE 60 are no longer officially supported in Passport Business
Solutions.
Make any needed changes, or press <Enter> to continue to the second screen.
Use line 25
Graphical mode is not effected by this selection.
If you are in character mode and using a monitor, such as a WYSE 60, and it can display 25
lines, check this box. If it can display only 24 (or you do not know), uncheck it. Passport
Business Solutions Advanced Features will make use of a 25th line if it is available.
89
The selection of line 25 is a legacy hold-over of when the old style dumb terminals were the
primary method of viewing and inputting data. There may be a few users that still have these
terminals, but for modern systems you should always check this box.
Format
Check box, where checked is yes and unchecked is no.
Example
Check the box and then press <Enter>
Dumb terminals such as WYSE 60 are no longer officially supported in Passport Business
Solutions.
Make any changes or select enter to go to the third tab.
90
THIRD TAB - ACCOUNT SETUP
Account Number Definition
The fields on this tab define the format of your General Ledger account number.
You can enter information into these fields only in the add mode. To change an existing
format, refer to the Reformatting Account Numbers chapter.
The account number may contain up to seventeen characters including the characters used to
separate adjacent segments. There may be up to four segments. Some examples:
•
xxx-xxxx-xxx
•
xxxxxxxx-xxxxxxxx
•
xx-xxx-xxxxx-xxx
•
xxxxx-xxxxx-xxxxx
•
xxxx-xxx
When using multiple companies and you plan on consolidating data for these companies, you
should review the Company consolidation chapter in the General Ledger documentation
before you set up your account structure. The more similar the account structure and chart of
accounts the easier it is to link accounts between the member companies and consolidation
companies.
Account Number Minimum Format The minimum format is an account number consisting of a single segment of four characters
(xxxx). This is the main account. The main account is used to separate transactions by their
nature, such as Cash, Receivables, Inventory, Equipment, Accounts payable, Notes payable,
Equity (or capital), Sales, Purchases, Repairs, Taxes, etc. For example, 2300 may be the
account number for Notes Payable.
Although the minimum size defined for the main account is four characters, an individual
account number is not required to contain four characters. An account number of “A” or “1” is
permitted.
Account Number Maximum Format
The maximum format is four segments consisting of two cost center segments, the main
account, and a sub-account. For example, 010-123-23000-050 may mean Burlington division
(010), repairs department (123), notes payable (23000) to First National Bank (050).
Note
The Point of Sale and Manufacturing modules can only use a main and sub
account structure. Do not set up cost center segments when any of these
modules are installed for this company.
Graphical Mode
From this tab you enter these fields:
91
Character Mode
From this screen, enter the following information:
Enter the account number segments.
Account Number Segments
The first two segments can be used for divisions, departments, locations, product lines or
territory. Your company may elect to use one or two segments, or none. If one segment is
used, the default title is “department”. If two segments are used, “division” and “department”
are their respective default titles. You can change these titles if you wish.
The main account number is used for primary designations.
92
The sub-accounts are used to keep separate records in your general ledger for items that would
otherwise go in the same main account. An example of this might be separating notes payable
that are due to different banks.
Account Number Syntax Rules
Refer to the Reformatting Account Numbers chapter information for the syntax rules of
account number segments. The following is an abridged version:
•
When all the segments are used, they are in this order:
•
Cost center (first segment)
•
Cost center (second segment)
•
Main account
•
Sub-account
•
The main account segment is required and must be at least four characters long. The other segments are optional.
•
No segment may contain more than eight characters. Actual segment length, however, is determined on a case-by-case basis since 17 characters is the maximum for the entire account
number.
•
Cost center if used may consist of either one or two segments. The cost center is separated from
the main account by a punctuation character, which defaults to a hyphen (-) unless you specify
otherwise.
•
Where required, a hyphen separates the first segment of the cost center from the second, and
the main account from the sub-account. This hyphen cannot be replaced by another character.
Format Examples in This Documentation
Most examples in this documentation and user documentation have two segments.
•
The main account is four digits
•
The sub-account is three digits
•
The documentation clearly states when other account number layouts are used to illustrate a feature
For example, 100-6330-SUI might be Main Street - Payroll taxes - State Unemployment
Insurance. Note that even though the main account allows a four character alphanumeric entry,
you may use a shorter entry or (as in this example) a purely numeric one.
Upgrading from Earlier Versions
If you are upgrading from versions prior to Version 7, or have converted from another
vendor’s product, please note that it is no longer necessary or possible to represent cost centers
by sub-accounts. If you will be doing so, reformatting your account number is a necessary part
of your upgrade. See the Use reformat account option field and the Reformatting Account
Numbers chapter.
93
Main Account Segment
Enter information for the main account as follows:
Size
Enter the size of the main account number, with 4 as the minimum size and 8 as the maximum
size.
Format
9
Example
Type: 4
Alphanumeric
Enter Allow numbers and letters to designate the main account number as alphanumeric
(permitting both letters and numbers), or Allow numbers only to designate it as numeric only.
Format
Drop down list box with the choices described above.
Example
Select Allow numbers only and then press <Enter>
Fill requirement
For numeric segments, leading zeroes are automatically selected by the system and can not be
changed.
Fill is needed when data in an alphanumeric segment does not occupy all the character
positions available.
You can use leading zeros (Fill with zeros on left) or trailing spaces (Fill with spaces on right).
Leading zeros means data is stored in the segment on the right and zeros fill unused positions
on the left.
Trailing spaces means data is stored in the segment on the left and spaces fill unused positions
on the right. For example, a four character segment having the value “37” entered:
Example
Leading zeros: 0037
Trailing spaces: 37xx (where x represents a space)
Fill with spaces on right is customary, but Fill with zeroes on left is useful for segments
primarily intended to contain numbers but which may occasionally contain a letter.
Format
Drop down list box choices of Fill zeros on left or Fill
with spaces on right.
Example
In this example the field is automatically set to Fill with zeros on left because you have entered
Allow numbers only for the Alphanumeric field.
94
Suppress spaces
If you selected Fill with spaces on right at Fill requirement, you must decide here whether any
trailing spaces are suppressed—that is, whether the remainder of the account number is to be
floated to the left so as to close up the gap.
•
If you check this box, trailing spaces are suppressed. This gives a more pleasing appearance to
the individual account number; however, if your segment varies in length, a column of such
account numbers will appear ragged and difficult to read.
•
If you leave the box unchecked, trailing spaces are not suppressed and embedded blanks
appear in the account number.
If the previous field is Fill with zeros on left, this field may not be entered.
Format
Check box where checked is yes and unchecked is no.
Example
In this example the field is (Not available) because you have Allow numbers only for
Alphanumeric.
Sub account Segment
Enter information for the sub-account as follows:
Size
Enter the size of the sub-account number, with 0 as the minimum size and 8 as the maximum
size.
A value of 0 indicates that you do not use sub-accounts. The remaining sub-account fields on
this line of the screen will display (Not applicable).
Format
9
Example
Type: 3
Alphanumeric
This field has the same meaning as for the main account number Alphanumeric field described
above.
Format
Drop down list box with the choices Allow letters and
numbers or Allow numbers only.
Example
Select Allow numbers only and then press <Enter>.
Fill requirement
This field has the same meaning as for the main account number Fill requirement field
described above.
Format
Drop down list box choices of Fill zeros on left or Fill
with spaces on right.
95
Example
In this example the field is automatically set to Zeros left
because you have entered Allow numbers only for Alphanumeric .
Suppress spaces
This field has the same meaning as for the main account number Suppress spaces field
described above.
Format
Check box, where checked is visible and unchecked is no.
Example
In this example the field cannot be entered because you
have entered Allow numbers only for Alphanumeric .
Following the setup of company information, if you are using sub accounts
or cost centers, then you must enter either the sub accounts or cost centers
respectively using the menu selection Cost centers / Sub accounts. If you
are using cost centers and sub accounts, then enter the cost centers.
Note
Number of cost center segments
If the size of the main and sub-account segments (including the separator) is 16 or 17
characters, no room remains for a cost center, and this field displays as 0 and may not be
changed.
A value of 0 indicates that you do not use cost centers. The remaining fields on the screen
cannot be entered.
Enter 0, 1 or 2 for the number of cost center segments.
Format
9
Example
Type: 0
Separation character
If you have entered 0 in the preceding field, this field cannot be entered.
Enter a character to separate the cost center from the main account number.
Valid Separator Characters
Allowable values are shown in the following table.
C
HARACTER
DESCRIPTION
C
HARACTER
DESCRIPTION
!
Exclamation
mark
]
Right bracket
:
Colon
+
Plus sign
;
Semi-colon
;
Back slash
96
C
DESCRIPTION
HARACTER
C
HARACTER
DESCRIPTION
!
Exclamation
mark
]
Right bracket
#
Pound sign
/
Forward slash
<
Left care
,
Comma
>
Right care
-
Dash
&
Ampersand
^
Circumflex
(caret)
$
Dollar sign
‘
Accent grave
=
Equal sign
{
Right bracket
%
Percentage sign
}
Left bracket
?
Question mark
|
Pipeline sign
@
At sign
.
Period
’
Apostrophe
_
Underscore
(
Open parenthesis
>
Double quote
)
Close parenthesis
*
Asterisk
[
Left bracket
-
Hyphen
Format
One punctuation character chosen from the list above. The
default is a dash (-).
Example
N/A
Cost center
If you use two segments in your cost center, the default names are Division and Department
respectively. These are abbreviated Div and Dept. If you use only one segment, its default
name is Department.
Segment name
Wherever the first segment of the cost center is referenced in screen prompts, captions, and
error messages, as well as in report headings and legends, the name you assign here will be
used.
97
Enter a name for this segment, or press <F1> for the default name: Division if you use two
segments, or Department if you use one.
Format
Up to 15 characters
Example
N/A
Short name
The name which you assign here will appear as an abbreviation of the full name entered above
whenever required by space limitations.
Enter an abbreviation of this segment’s name, or press <F1> for the default abbreviation: Div if
you use two segments, or Dept if you use one
Format
Up to 10 characters
Example
N/A
Size
Enter the size of this segment. The minimum is 1. The maximum can never exceed 8. After
determining the sizes already used for main account and sub-account, the system calculates the
maximum available to you and displays the size you may choose.
Format
9
Example
N/A
Alphanumeric
This field has the same meaning as for the main account number Alphanumeric field described
above.
Format
Drop down list box with the choices Allow letters and
numbers or Allow numbers only.
Example
N/A
Fill requirement
This field has the same meaning as for the main account number Fill requirement field
described above.
Format
Drop down list box choices of Fill zeros on left or Fill
with spaces on right.
Example
N/A.
Suppress spaces
This field has the same meaning as for the main account number Suppress spaces field
described above.
Format
Check box, where checked is yes and unchecked is no.
98
Example
In this example the field is (Not available) because you have entered Allow number only for
Alphanumeric.
Segment name
Wherever the second segment of the cost center is referenced in screen prompts, captions, and
error messages, as well as in report headings and legends, the name you assign here will be
used.
Enter a name for this segment, or press <F1> for Department.
Format
15 characters
Example
In this example this line of the screen cannot be entered
because you have chosen a single-segment cost center.
Short name
The name which you assign here will appear as an abbreviation of the full name entered above
whenever required by space limitations.
Enter an abbreviation of this segment’s name, or press <F1> for Dept.
Format
10 characters
Example
N/A
Size
Enter the size of this segment. The minimum is 1. The maximum can not exceed 8. After
determining the sizes already used for main account, sub-account and cost center 1, the system
calculates the maximum available to you and displays the size you may choose.
Format
9
Example
N/A
Alphanumeric
This field has the same meaning as for the main account number Alphanumeric field described
above.
Format
Drop down list box with the choices Allow letters and
numbers or Allow numbers only.
Example
N/A
Example
In this example this line of the screen does not appear because you have chosen a singlesegment cost center.
99
Fill requirement
This field has the same meaning as for the main account number Fill requirement field
described above.
Format
Drop down list box choices of Fill zeros on left or Fill
with spaces on right.
Example
N/A
Suppress spaces
This field has the same meaning as for the main account number Suppress spaces field
described above.
Format
Check box, where checked is visible and unchecked is no.
Example
N/A
Make any needed changes, or press <Enter> to proceed to the Printers tab.
100
FOURTH TAB - PRINTERS
The basics of the PBS printing functions, options and use are covered in chapter 2 Starting
PBS, Menus and Printing of the PBS System documentation. You may want to read this first
before and after you enter the printers.
This screen is used to define printers used in the PBS system for printing reports or special
forms.
Note
Most of the fields on this screen are stored in the Company file (COMPFI).
However, the Device-name field is stored in the Printer Configuration file
(PRTCFG).
A device printer setup as in the PBS system conforms to older standards of having printers
attached directly to your local computer. But with some recent advancements now you can use
a Company information printer to access and print to a network printer.
On an operating system a print job can be anything you are printing including a report,
spreadsheet, word document and so on. The Windows operating system standard is to control
the print job with the printer driver. The driver stores the file in a print queue and sends it to the
printer as soon as it can. PBS Windows printer moves the print job through the printer driver.
However with a PBS Company information printer, operating system printer drivers are
bypassed and the print job is sent either directly to the printer or to the printer spooler.
The Company information method of printer job routing works well, but has a drawback when
printing forms with a few models of laser printers and most Inkjet printers. Most PBS form
types require PCL (printer control language) codes to properly align the form with the data. A
Windows-only printer does not accept PCL control codes and is not recommended for printing
forms through a Company information printer setup. Most Deskjet and Inkjet printers fall in
this category. For more information on PCL, read the PCL Commands section in the More on
PBS Printing chapter.
Note
When printing a report or form, every user in the PBS system will see a list
of the printers set up in Company information and they will be able to select
one the printers for the print job.
However, if the selected printer is not accessible by the user, then the
report or form will not go to this printer.
You must define at least one printer, and may define as many as twelve in Passport Business
Solutions in Windows/Thin client and fourteen in Linux/UNIX versions of Passport Business
Solutions.
Graphical Mode
The fourth tab displays the printer setup. In order to edit the printers, you must select the Edit
printers button. Then you will see a screen like the following:
101
Character Mode
A screen similar to the following screen is displayed:
Printer name
The names you assign here will appear on a printer selection menu whenever a PBS user prints
a report or a special form using Passport Business Solutions software, so use names
meaningful for selection. For example, you could assign Network, Local, Second floor, etc.
You must also use this field to setup the generation of PDF files.
102
The only restrictions on printer names are that no two printers may have the same name, and
the first character of the name must be either an upper-case letter or a numeric digit.
Enter a name for this printer, or use the option:
Blank
To delete this printer (fields may be blanked out by
pressing <Ctrl>+X).
In Windows you can also highlight the field and select
the delete key.
Format
15 characters
Example
Type: Laser Printer
In Windows the virtual printers 13 and 14 are implicitly defined as Create HTML and
Windows Printer and you can not change them. Windows Printer is available on almost all
printer selection menus. The Create HTML selection is provided on report printer selection
menus but not for special forms (invoices, checks, etc.) and audit-trail reports. The use of these
functions are explained more fully in chapter 2 Starting PBS, Menus and Printing of the PBS
System documentation.
When one user is using a printer similar to another user, then the users can
share the same Company information printer setup.
Note
For example, if user A has an HP Laser printer on his workstation and user B
is using the same type of HP laser printer on her workstation, then you can
use the same Company information printer setup for both users.
The Printer-name field and PDF Printing
All reports, certain forms and files printed to disk can be created as a PDF file. In most cases
the PDF file will display on screen.
To create PDF files you must make or alter a specific entry in the Printer-name field. The
printer-name must have -PDF- or -PDFP- as part of the name. It can be anywhere on the field
as part of the name. Here are four PDF printer name examples:
Laser X & -PDF-PDF- Generator
-PDF-PDFPWhen you select -PDF- then it will create a PDF file only. But when you select -PDFP- then it
will create both a PDF file and send the job to a printer.
-PDFP- only works on Windows operating systems where -PDF- works on UNIX and Linux as
well.
You must fill in the remaining printer fields with some data. You may use the remaining fields
to print any other special forms that cannot be created as a PDF file or for -PDFP- printing. For
103
example, A/P checks cannot be printed to PDF files, therefore to also use the same printer
selection to print checks, enter a printer meaningful to your system.
When printing a report to a -PDF- printer, then the report displays on screen in either Adobe™
Acrobat™ or Adobe Reader™, which ever is installed. If you setup a PDF printer, you should
verify that every workstation has either application installed. If not installed, the PDF file gets
created, but it can not be displayed.
If you are printing the special forms A/R invoices, statements, O/E forms or Purchase orders to
the PDF generator then individual PDF files will be created on the system for each transaction.
These files are created in the PDFFIL directory on the PBS system. Each form type has a subdirectory under that for storing the files. Here is a list of the directories.
PDFFIL\ARINVOICES
PDFFIL\MANUFACTURING
PDFFIL\OEINVOICES
PDFFIL\PSIPOS
PDFFIL\PURCHASEORDERS
PDFFIL\STATEMENTS
The alignments associated with each form are stored in the PDFFIL\ALIGNMENT directory.
The GENERAL and APREMIT directories are not currently active.
Files that have been written to these directories can be viewed and emailed from the CTL menu
selection PDF form file processing. See the PBS System documentation for additional help. To set
up emailing PDF documents, see the Email Configuration appendix.
Note
When using -PDFP- to print forms the Adobe Reader will erroneously open on
the Windows 2000, XP or Vista workstation task bar. It will have to be
closed following the print job.
This occurs on Windows 2000, XP and Vista, but not on Windows 98.
This is an issue with Acrobat Reader and PSI cannot fix this.
Do not use -PDF- and -PDFP- on the same Company Information field.
When on Vista, use Version 8.x or greater of Acrobat Reader.
Device name
A device name is a logical association to a piece of computer hardware.
When you first installed the PBS software, the installation procedure supplied a device name
for the first printer field.
The setups for UNIX /Linux printing vs. the Windows printing is different.
UNIX or Linux printing
For Linux or SCO Open Server UNIX systems the default Device- name is installed as
/dev/lp0. In some cases an asterisk will display next to the Device-name field. This is needed
104
for Thin client installations to identify the server printers vs. the local printer.
For more information see the Linux or UNIX Spooling section in this chapter and the section
Printing in a Linux or UNIX Environment in the More on PBS Printing chapter.
Printing Setup in Windows
Enter the name of a device or of a spool file, or use one of the options:
<F1>
Press <F1> to use -D LPT1
<F7>
Press <F7> to display the PSI Printer locator. A -Q
data string is needed for printing to a network printer or
a USB printer. The PSI printer locator will auto-input
this string. The details on using this are in the paragraphs below.
Type -P SPOOLER-DIRECT to call the Windows Print
Manager when you select this printer from the printer
selection screen. This option outputs directly to the
-P Windows selected printer. See the note below on the issues with
Only Device this printer type.
This printer type has potential issues. See the section a
few pages later on -P SPOOLER-DIRECT.
Format
Two lines of 64 characters each
Example
Press <F1>
When you first set up a printer the default device name for the first printer is -D LPT1.
You can enter the -Q string values manually if you know what they are, but using the Printer
locator is usually easier and often more precise.
Here are some details on each of the options:
-D LPT1
You can only use -D LPT1 for a local workstation printer.
Also, you can have several users, each with a local workstation printer, that can share the same
Company information printer setup if each printer uses the same printer type. If you select -D
LPT1, then your in the Mode field you should enter D for Local LPT1 parallel port printer. For
more information see the Direct (D) Printers section later in this chapter.
PSI Printer locator
The Windows PSI printer locator will help you identify and auto-input the -Q (windows queue)
data string.
To access the printer locator type the <F7> key. A screen similar to the following will display.
105
You have the following options in the locator window.
Selected
printer
Select the printer you want to accept for auto-input into
the device name field.
When you first bring up the PSI printer locator window
The workstation default printer will display here.
Accept
selected
printer
Click on the this button to return the -Q string to the
device name field.
Print this
page
Click on this button to test print the information about
the selected printer to that printer.
You can change the number of copies and check the
box “Use landscape orientation” if you want to print the
test page that way. The landscape and number of
copies selections only work with the locator. They will
have no effect when printing anywhere else in PBS.
Exit and Con- If you do not want to accept the printer settings, you
tinue
can exit from the locator with this button.
When you click on Accept selected printer, you will see the Device-name field auto-filled in
by the PSI printer locator. It will look something like the following screen.
106
If the Device-name you enter is not recognized by the system as a valid device, the selected
report or form will be written to a file with the name of the file matching the Company
Information. This protects you from losing a report when you accidentally define a nonexistent printer or if a printer is removed from the system. If a report or form seems to go
nowhere, (nothing happens) check the top-level PBS directory for a file with a name that
matches the Printer-name. This will not occur with a “-Q” printer, as PBS will display the
Printer locator so you can select a different printer.
Although for local parallel printers it is perfectly acceptable to use the “-Q”
option, even in single user installations. With PBS multi-user installations a
local parallel port printer can be used for forms and can be defined with the
“-D” option.
Note
For a local USB printers the “-Q” option is best.
There are different Local and Remote printer topologies as it relates to the Device-name field.
These are represented in the following table.
PRINTER
TOPOLOGY
TYPE OF STRING TO
ENTER IN THE D EVICE
NAME FIELD
LOCAL
Std port (LPTx:.
COMx:)
LPN (See note above.)
LOCAL
USB port
LPN (See note above.)
REMOTE
To a server - Novell
or Microsoft)
UNC**
REMOTE
To a peer PC
UNC**
REMOTE
To Peer Printer
LPN (See note above.)
** Depending on host O/S version and client O/S version, the UNC (Universal Naming
Convention) can be reported at the client as one of two values:
\\host_name\host_share_name
107
or
\\host_name\host_LPN
LPN note. It is better for compatibility across different versions of the Windows operating systems, that the Workstation Local Printer Name (LPN) and
the Server Share Name be made the same.
Note
Windows Print Controls
You may enter specific print controls for your printer, such as number of copies, collate,
landscape orientation, font pitch, font size and more. See the Device name Field Windows
Printing Controls section in the More on PBS Printing chapter.
-P SPOOLER-DIRECT
This option, a holdover feature from an earlier version (RW32), is no longer recommended for
use. However, we know that some systems are set up to use this printer type. If you feel it is
absolutely necessary and it is working properly, you may continue to use it for single user
workstations and where all the selectable workstation and network printers share the same type.
However, at your earliest convenience we recommend that you set up the printer with the -Q
option.
Use -P SPOOLER-DIRECT with caution. Use of this Windows Special Device
does not override other printer settings for the printer. Compression, reset,
and laser control codes will still be sent to the printer when this printer is
selected. This is fine if all of your printers share the same type.
Note
Undesirable output will result when the printer type defined in Company information and the printer selected from the Windows dialog are not compatible.
After entering the device name or using the PSI printer locator to create the -Q string you will
be at this prompt.
<N>
This is the default and accepts the entry of the device
name.
<Y>
Enter Y and then the Enter key if you want to make a
change to the device-name field.
Mode
In this field you define the print job delivery mode. You have these options:
All other printers
(S in character
mode)
Select All other printers in Windows for
printers other than a local parallel port printer.
If printing to a spooled printer, a print queue
or if the Windows printer property Spool Settings are set to spool print jobs.
Spooling also applies in Linux and UNIX,
however, you will not be able to change this
setting. The printer must be defined in the
108
UNIX/Linux cblconfig file. When you enter
the printer name to program will auto-enter S
for the mode field. If you are using Thin client
on UNIX or Linux, then you must also set up
the printers in the cblconfi file (notice the g is
missing in the file name).
Local LPT parallel
port printer
(D in character
mode)
Select Local LPT parallel port printer in this
field if the printer is attached directly to your
workstation computer parallel port. You must
use this in conjunction with -D LPT1 as
entered in the Device name field. For more
information see the Direct (D) Printers section later in this chapter.
L
Linux/UNIX Only: Type L for local printing if
your printer is attached to terminal port.
Depending on what you have entered for a device name, not all of these choices may be
available for Linux or SCO OpenServer.
Spooled (S) printers
There are differences with spooled printing for Windows and UNIX/Linux.
Windows Spooling
In Windows, enter All other printers in the Mode field under the following conditions:
•
The printer is connected to your machine and the Windows printer properties specify that output to this printer is spooled.
•
The printer is a Windows network printer and is connected to another machine on the network.
•
The printer is a Netware print queue.
•
Any situation where a software program will take control of the print job before it is printed on
the printer.
When you are using spooling and print a special form, the printer is released from the control
of PBS. Therefore the potential exists for another user to take control of a shared printer
during these print functions.
Momentary loss of printer control is introduced after printing a forms alignment and just after
printing some special forms where you are asked if the printed forms have been printed
properly. Therefore another user could send a print job between the time you print an
alignment and print the data.
Linux or UNIX Spooling
For Linux and SCO OpenServer UNIX users, enter “S” in this field for printers that are defined
as Linux or UNIX spooled printers.
109
A spooled device must be defined in the cblconfig file in the top-level Passport Business
Solutions directory. The Device-name must be identical to the DEVICE-NAME entered in the
AcuCOBOL cblconfig file.
If you are using Thin client on UNIX or Linux, the same printers must be setup in the cblconfi
file.
The entries, made in cblconfig or/and cblconfi, for Linux and UNIX are similar in concept but
differ in syntax. Entries have the following format:
LINUX
DEVICE_NAME -P lpr -Pprinter_name
UNIX
DEVICE_NAME -P lpr -s -dprinter_name
Device_name
Enter the name of this device exactly as you have entered it in the Device-name field in PBS
Company information.
Printer_name
This is the name of the spool printer that you set up in your UNIX/LINUX system.
If there is no entry in cblconfig or cblconfi for the printer device name you are using in the
company file, the report or form will be printed to a file of the printer name in the top-level
directory.
Note
When using Thin client in a UNIX/Linux environment, the printers must be
set up in two files, cblconfi and cblconfig. The first is for printing from the
character screens and the second when accessing via Thin client.
The syntax for device definition is entered in the cblconfig file and documented in the Printing
in a Linux or UNIX Environment section of the chapter called More On PBS Printing.
Direct (D) Printers
If the printer you are defining is connected directly to your computer parallel port, then you
may use an entry such as -D LPT1:, -D LPT2:, or for a UNIX server /dev/lp0 and enter “D” in
the Mode field.
Selecting D will indicate that this printer is attached directly to your computer and that output is
sent directly to the printer. This is the recommended mode for tight control when printing
special forms such as checks, invoices, and picking tickets.
Local Printers
Local mode is available only in Passport Business Solutions for Linux and SCO Open-Server.
This mode indicates that you wish to send printed output to a local printer that is attached to a
UNIX terminal.
110
If you select L, you must supply additional control codes for auxiliary ports. A screen will
display to allow entry of these codes:
Aux on and Aux off job
Local printing under UNIX requires that you enter codes for Auxiliary Port On and Auxiliary
Port Off. Consult the hardware manual of your terminal.
80-col
If this printer can print only on paper that is less than 14-1/2 inches wide (an 80-column
printer), or if you intend to use the narrower paper, check this box. If you have a Laser printer
or Deskjet printer you will want to check this box.
If this printer is capable of printing on paper at least 14-1/2 inches wide (a 132-column widecarriage dot-matrix or pin-feed printer), leave it unchecked.
When you identify a printer as being 80-column, this informs Passport Business Solutions to
use smaller print characters. Checking this box will then require you to enter the field for
printer type.
Format
Check box where checked is yes and unchecked is no.
Example
Check this box and then press <Enter>.
Type
If you use an 80-column printer, you must also specify the type of printer (because different
hardware devices use different techniques for compressing a full line of text into an 80-column
width.)
Knowing the type, Passport Business Solutions software automatically provides the special
control codes required to make the smaller print characters.
A list of available types containing some of the most frequently used printers displays:
You may not see the printer type name that matches what you have, but many printers share
certain standards. For example, the HP LaserJet IV will work for most of the newer HP
modules and often works for modules manufactured by other companies.
111
Another example, an Epson™ printer uses the same control codes as an IBM. You could
actually identify your Epson printer as an IBM and the compressed print characters would be
correctly formed.
If you cannot find your printer type on the list, try experimenting with the printer types to
determine if you can print with a smaller print. Try selecting a printer type and print a report
such as the Valid G/L Accounts List.
If you do not find a matching printer type or choose not to experiment in this way, select
Other. The next section, Other Printer Types, will provide you with a description of the Other
fields.
To determine compatibility, refer to your printer manual.
Enter the type which corresponds to your printer, or select Other.
Format
99
Example
In this example the cursor does not move to the Type column because you are not using an 80-column printer.
112
OTHER PRINTER TYPES
The following sections apply only if you selected Other for printer type, if not, you may skip to
Special Printing Features and Control Codes.
A screen appears for entry of the Compress and Normal codes. These are non-printing codes
which the software will send to the printer to switch it to compressed print mode and to normal
mode respectively.
The screen appears as follows:
Printer codes are in hexadecimal format: each code consists of a pair of digits, where a digit is
0 through 9 and A through F.
•
Some printer manuals show only escape codes (or control codes, etc.), and not the equivalent
hexadecimal codes. In these cases, convert the codes to their equivalent hexadecimal codes.
•
Although there is room for 60 characters, most printers use much shorter codes.
Enter the following printer codes:
Compress on
Compression mode should be about 15 to 17 characters per inch; if your printer has several
compression modes, use the one that comes closest to this.
Format
60 hexadecimal characters in pairs
Example
In this example the screen does not appear because you are
using a printer recognized by the system.
Compress off
Normal printing is considered to be 10 to 12 characters per inch.
Normal codes are sent to the printer to return it to normal-sized font. This is needed so that
special forms (such as checks) can be printed at full width.
113
Format
60 hexadecimal characters in pairs, with no spaces
between them
Example
N/A
If this is a laser printer, then go to the Laser control codes section.
Character Mode
After completing the screen (had you selected other for the printer type), you are asked Any
change?. Make any needed changes.
After you answer N to Any change?, you are asked Is this a laser printer? This is because laser
printers require additional control codes. If you answer Y, a window displays for entering laser
control codes.
The screen displays as follows:
Enter the following information. Refer to your printer manual for appropriate codes or contact
your supplier. You may also see the Special Forms and Laser Printers section in the More on
PBS Printing chapter.
Printer Reset Codes
Printer reset codes reset the printer’s feature settings (top margin, left margin, page size, etc.) to
their default values. These codes are sent at the start of a new print job. This ensures that the
settings of the previous print job do not interfere with the new print job. They are also sent at
the end of a print job so that the settings of that job do not remain in effect for following print
jobs.
Enter printer reset codes.
Format
60 hexadecimal characters in pairs, with no spaces
between them
114
Job control
Job control codes establish page size, page length, top margin and other settings. These codes
properly configure the printer for the print job and are sent to the printer at the start of a print
job.
Format
60 hexadecimal characters in pairs, with no spaces
between them
Font control
Font control codes set the type style, size, height and other settings. They are sent to the printer
after the job control codes.
Format
60 hexadecimal characters in pairs, with no spaces
between them
115
SPECIAL PRINTING FEATURES
AND
CONTROL CODES
Also refer to the PCL Commands section in the More on PBS Printing chapter.
If your printer supports different print styles (e.g., italics, pica, elite) you may wish to use them
for special purposes. For instance, you may want fast but low-quality printing for seldomconsulted archival reports, and at other times you may want double-strike letter-quality styles
for financial statements.
You can do this by entering the appropriate codes for your printer in the Compress and
Normal fields. Think of these as start codes and end codes respectively—they are the codes
that are sent to the printer at the start and end of each job. The names Compress and Normal
reflect their primary use, but this is far from their only use: you may enter any codes supported
by your printer. It is for this reason that the field size allows entry of as many as sixty
hexadecimal digits.
To use this feature, check the box to 80-col and select Other printer type, even if your printer
does in fact appear on the list of recognized printers.
You do not have to change the control codes every time you want to change fonts on your
printer. You can redefine the same physical device as many times as are needed for all the print
styles you wish to use. Each redefinition must have the same device-name, but a different
printer-name. The various printer names will all appear on the printer selection menu and will
all refer to the same physical device. Be aware that although you can print different reports in
different print styles, you cannot change print styles in the middle of a report.
In general, you should ensure that your end code turns off whatever you turned on by your
start code. If not, the printer will continue to use that start code for the next report (and even
after you have exited Passport Business Solutions). This may cause unpredictable results. You
should decide for each physical device what its default print style should be, and see that the
end codes restore that style.
Laser control codes
Laser
To use a special feature (such as a different font) of a Hewlet-Packard (or compatible) laser
printer when printing special forms, check the box to 80-col, select Other as the printer type,
and check the Laser box (in character answer Y to Is this a laser printer ?), after entering the
Compress and Normal codes.
For the Printer reset codes and Job control codes, enter the standard Passport Business
Solutions codes.
The standard Passport Business Solutions codes will properly position the printed information
on a letter-size special form.
The standard Passport Business Solutions font control codes enable your special forms using
the courier font that is included with all Hewlet-Packard (or compatible) laser printers.
116
However, you can use the font control codes to use an entirely different font, or to change the
style of the font to bold, italics, etc.
To properly print on a standard preprinted form, use a fixed-pitch font that prints at 10
characters per inch and 6 lines per inch. Otherwise, the printed characters will not print in the
desired location on the form.
Also refer to the PCL Commands section in the More on PBS Printing chapter.
Make any needed changes, or press <Enter> to go to the next tab.
117
PSI PRINTER LOCATOR DEBUG
The PSI Printer Locator Debug mode provides a means of identifying and handling printer
issues. Through a configuration file setup the PSI Printer locator window can displays after
selecting a Company information printer.
If you are encountering printing issues in PBS or if you have a printer that is working
inconsistently this debug mode may help you solve the problem or at least provide an
opportunity to select another printer if the initial printer call fails.
There is a on/off switch in the cblconfi file. The line for this switch is
DISPLAY-LOCAL-PRINTERS-POPUP-SCREEN
This switch accepts either a Y or N value.
Do not remove or change the other settings in the cblconfi file. See the COBOL Configuration
File appendix for information on other settings.
The value N is the default and means that the PSI Printer Locator will operate ‘silently’ for
any printing and will only display if the printer selected cannot be located or validated.
Enter Y to display the Printer Locator window every time a print output is requested. This may
be useful when you are first setting up a system and you want to guarantee a connection to
some printer.
The Printer Debug is global for every user and for every company that uses the cblconfi file. it
is possible to make copies of this configuration file for each user and/or each company. If this
has been done, you will have to modify each cblconfi.xxx file for each company or user where
this flag needs changing.
If you have the flag set to Y, then the PSI Printer Locator will display even when non “-Q”
printing is requested such as with a “-D” and in all these non “-Q” cases. It will report the
selected printer as an error since the program will not be able to locate a queue. This is
expected due to the program design which was intended to work only with “-Q” based
printing.
118
FIFTH TAB - EMAIL SETUP
If you are emailing PDF forms from PBS, you must enter data on this screen. Otherwise you
may leave the fields blank.
See the Email Configuration appendix for all the steps needed to fully implement document
emailing within PBS.
Graphical Mode
Character Mode
For this screen, enter the following information:
PBS cannot be configured for webmail providers such as aol, hotmail or gmail.
119
SMTP mail server name
Enter the name of a server which can process outgoing mail on your behalf. The PBS program
asks the server to send outgoing mail on your behalf, so the computer you name must be
running an SMTP server. Your system administrator or service provider will be able to tell you
which server or address to use for this field.
This could be either the Retrieving POP3 Server Host Name or the Sending (SMPT) Server
Host Name.
If you are not using email, select the <Enter> key to bypass this and the remaining fields on
this screen.
Format
60 characters
Example
Press <Enter>
This field is optional. If you want more information read the appendix Email Configuration.
Require authenticate
Check this box to require an email authentication or leave it unchecked to not require it.
Some email services require that a user name and password be entered to send email. If this is
the case check this box. If your email service does not require a user name and password to
send email, then do not check this box.
When Testing the server connection, the Email login name and Email login password fields
will only display if this box is checked.
Format
Check box where checked is yes and unchecked is no.
Example
Not entered in this case.
SMTP port #
This specifies the TCP/IP port number that PBS should connect to when sending email.
Enter the port number for the SMTP mail server.
Format
4 digits
Example
Not entered in this case.
The standard values for this field are 25 and 587. If you enter some other number, then you
will be asked:
Non-standard port#. Are you sure ?
Select Yes if you want to retain your entry or No of you want to change it.
Allow email address to be entered at send time
This setting only effects certain email address entry and selection options. When checking this
box, then all the options are available. When leaving the box unchecked then some of the
options are not available. This table illustrates which option is effected by this setting:
120
EMAIL OPTION
Change contact email address
Select a different contact.
(If other contacts have email addresses
and the Email documents field is
checked.)
CC (copy) yourself
Enter additional CCs
Select CC from contact file
SETTING
IS YES
Available
SETTING
IS NO
Not available
Available
Available
Available
Available
Available
Available
Not available
Available
Format
Check box where checked is yes and unchecked is no.
Example
Not entered in this case.
Default text
Enter the default text for the body of the email. You may enter up to 4 lines of text.
Format
4 lines of 60 characters each
Example
Not entered in this case.
Make any changes or select the enter key to accept the changes. To not save the changes select
the <Esc> key.
If email is active, then the following message will display:
* * * Emailing is activated * * *
If email is not active, then the following message displays:
Emailing is not activated. Please test the server connection.
Testing the Server Connection
After you have entered email server data you may use the option:
<F5>
To test the server connection.
Graphical Mode
After selecting <F5> the following screen appears:
121
Character Mode
You may enter the following:
Email login name
Enter the sending email address.
The email address from the user you are logged in as will display, if one has been entered. This
field cannot be entered if you unchecked the Require authenticate field.
Format
60 characters
Example
Not entered in this case.
122
Email login password
Enter the email password that corresponds to the entry in the Email login name field. This field
cannot be entered if you unchecked the Require authenticate field.
Format
30 characters
Example
Not entered in this case.
Email address
The address you enter here will be the From and To addresses for the test email. It may be
your own email address or any address you want to use for this test.
Format
60 characters, the default is the email address of the user
logged into PBS.
Example
Not entered in this case.
When you select the enter key, then the program will attempt to connect to the SMTP mail
server by sending an email.
Email Connected Successfully
If sending the email is successful, then the following message will appear:
Successful transmission. Closing connection.
* * * Emailing is activated * * *
Select the <Enter> key to exit the screen.
Email Connection Failed
If sending the email is unsuccessful, then the following message will appear:
Failed to connect to SMTP server
You have the following options:
<F5>
Enter
To change the port number and try the connection again
Select to print the error report
Make changes as needed and test the connection again.
Some of the possible reasons why a connection failed are:
•
The connection to the Internet is not available.
•
The required port number is different than what you entered.
•
Email is not setup or active on your workstation.
•
For the user you are logged in as, the email address is not valid on the workstation.
•
You are attempting to connect via an email method other than SMTP. PBS cannot be configured for webmail providers such as aol, hotmail or gmail.
123
See the Emailing Errors section of the Email Configuration appendix for a list of possible
WinSOCK and Marshall Software error codes. Marshall Software is a third party product that
PBS uses to send emails.
124
More On PBS Printing
This chapter contains the following topics:
Special Forms and Laser Printers
Printing Types
Windows Printer and PDF Forms List
PDF INI Files
Form File Use and Design
Aligning Forms
PCL Commands
Printing in a Linux or UNIX Environment
Device name Field Windows Printing Controls
Printer Name - Host and Share
Multiple Printer Setups Using Configuration Files
125
SPECIAL FORMS
AND
LASER PRINTERS
Special Forms is the common means of providing data and the exchange of monies to customers,
vendors and employees. Forms are usually printed and PBS Special Forms can be printed through
the Company information printers in UNIX and Linux or also through the Windows printer in Windows and thin client.
Laser printers is the most common means of printing. What makes laser printers different from
other printers, for the purposes of the PBS reports, is not the technology they use for printing, but
that they use individual paper sheets instead of continuous forms. Any adjustment that a dot matrix
(pin-feed) printer may need, the operator supplies by twisting knobs on the printer itself. For laser
printers, the PBS software provides the adjustment. Even so, it is mostly when printing on preprinted forms that this makes a significant difference. When a laser printer is being used for printing
on blank stock, it looks to PBS like any other printer.
Company information vs. Windows printer
The adjustment options are different on Company information printing vs. Windows printer.
To make the alignment adjustments the Company information sends PCL command codes to
the printer while the Windows printer sends control properties to the printer driver.
If you are using the Company information for printing and you need to do an alignment, it is
best to not use a Deskjet type printer. Destjet printers either do not accept PCL codes or they
accept limited adjustments. Most Laser printers allow a full PCL code alignment. The available
adjustments using a Windows Printer will depend on what is programmed into the driver that is
installed on the workstation.
In general printing through Company information printers takes less time than printing through
Windows printer. This is especially true if you merge a form file with Windows printer. The
benefits of using Windows printer is the following.
•
You can merge data with a form file
•
You can select any printer on the workstation. Windows only printers can not be used through
Company information printing.
Note
It Is recommended that you do not select a dot matrix type printer when
printing to Windows printer. The performance may be slow and the font size
may not line up properly on the form.
Printable Area on a Page
The printable area on a page will differ when using a Company information printer vs. a
Windows printer; even if it is the same printer. Generally, Windows printer drivers allow less
printable area on a page than PCL code printing. Therefore, if you are using a designed format
that prints fine using Company information, you may have to reduce the format lines and
columns so that it prints properly using Windows printer. When you do this, it may no longer
126
match your form. Therefore you may have to purchase custom forms in order to use Windows
printer.
With the printers we have used, 63 is the maximum amount of lines that will print using
Windows printer. Most ‘Classic’ forms are designed to allow 66 lines through a Company
information printer so if you want to use one of them, you must modify the form length and
possibly the header, lines and totals sections.
Special Form Types
You can print reports, lists, financial statements, and labels on a laser printer. Special forms
may also be printed. Examples of Special Forms include the following:
•
A/P checks
•
Payroll checks
For the most part these require pre-printed laser forms. Refer to information from your forms
suppliers regarding purchasing pre-printed laser forms.
The following special forms can print with a merged graphical file that represents the form
layout or on pre-printed laser forms from your forms supplier.
•
A/P Checks - It is required to have pre-printed check forms but you may print your logo on the
check.
•
A/R statements
•
A/R invoices
•
O/E invoices and other forms
•
P/O purchase order forms, both fixed formats and designed formats
For information on designing your form, read the Form Design section below.
The following forms in PBS software are printed on blank paper:
•
Labels in A/R, A/P, Payroll, I/C, P/S and O/E
•
Picking Tickets in O/E
•
Picking Tickets and Receipts in P/S
•
One P/S invoice type can be printed on blank (plain) paper.
•
Work Orders in I/C
The following forms may be optionally printed on blank paper:
•
Purchase orders in P/O
•
Invoices and statements in A/R. Refer to the Format Design Kit appendix in the A/R User Manual for information on user designed invoices.
•
Invoices in O/E
127
•
Customized Quarterly Reports in Payroll
Selecting a Printer Tray
To print to a specific tray, set up the printer on the workstation to default to the specific tray in
Start > Settings > Printers. Then in PBS, use the Company information <F7> setup to select
that printer. Use a device name like HP Lower Tray or something the user can identify.
128
PRINTING TYPES
General printing information is available in the PBS System documentation. If you need a
general understanding of the printing features you should read this first. There are also printer
setup instructions in the Fourth Tab - Printers section of the Company information chapter.
You should also read this.
There are five types of printing that are available for Reports, Forms, Posting reports and Print
reports from disk.
Here are five printing types.
PRINTING TYPE
DESCRIPTION
Company information
printer
This is similar to the classic legacy printer
setup but has been expanded to allow an
easier workstation and network printer configuration and to make the printer setup
process easier. See the Company information chapter for more information.
-PDF and -PDFPCompany information
printer
This is a special designation (-PDF-) for
the name of the Company information
printer that sends the print job to a PDF
file and in some cases the file is displayed.
The (-PDFP-) designation will create a file
and print the file at the same time.
A PDF file can be viewed in Adobe Acrobat or Acrobat Reader.
Windows printer
This is a standard Windows printer
spooler. It is not available in UNIX or
Linux.
Display on screen
This allows the user to view data on the
screen.
Create HTML
This creates an HTML document and displays the data in the PBS browser.
There are different options for printing depending on the operating system as seen in the two
following tables.
Windows and Thin Client Printers
This table represents the printer types that are available in Windows and Thin client:
129
COMPANY
INFORMATION
PRINTER
General
Reports
-PDF- & PDFPCOMPANY
W INDOWS
PRINTER
DISPLAY
ON
SCREEN
CREATE
HTML
INFORMATION
Yes with Classic display,
Yes, the report
PDF printer and is displayed
HTML
Yes
Yes, the report
is displayed **
Yes
Yes
Yes, but with
only A/R
Invoices, Statements, O/E
forms Purchase
Orders, Point of
Sale and Manufacturing
forms and
individual files
are created for
each transaction.* Only
immediate
invoices are displayed.
Yes, this is
available for
most forms
N/A
except for Time
and Billing.
N/A
Posting (Audit
Yes
trail) reports
Yes, the report
is displayed. **
Yes
N/A
N/A
Print reports
from disk
Yes, the report
is displayed. **
Yes
Classic display
N/A
Forms
Yes
* All other forms will print via a standard Company information printer when using a -PDFand -PDFP- printer selection. You may merge a graphical file that contains the logo, lines and
general form data with the variable form text using this feature.
** All reports are created in the RWRK directory. The contents of this directory gets deleted
the next business day when PBS is first started. In order to retain an audit trail or any report,
we recommend that you save the report to another location or print it before closing the PDF
application.
UNIX and Linux
This table represents the printer types for UNIX and Linux.:
COMPANY
INFORMATION
PRINTER
Reports
Yes
-PDF- & PDFPCOMPANY
W INDOWS
PRINTER
DISPLAY
ON
SCREEN
CREATE
HTML
INFORMATION
N/A
N/A
130
Yes with Classic display only
N/A
COMPANY
INFORMATION
PRINTER
-PDF- & PDFPCOMPANY
W INDOWS
PRINTER
DISPLAY
CREATE
HTML
ON
SCREEN
INFORMATION
Forms
Yes
Yes, but with
only A/R
Invoices, Statements, O/E
forms Purchase
Orders, Manufacturing and
individual files
are created for
each transaction*
Posting
reports
Yes
N/A
N/A
N/A
N/A
Print reports
from disk
Yes
N/A
N/A
Classic display
N/A
N/A
N/A
No
* All other forms will print via a standard Company information printer when using a -PDFand -PDFP- printer selection. You may merge a graphical file that contains the logo, lines and
general form data with the variable form text using this feature.
131
WINDOWS PRINTER
AND
PDF FORMS LIST
The following is a table that lists the forms that may be printed utilizing Windows printer, a PDF- or -PDFP- printer.
The first column indicates the form that will print using Windows printer. The second column
indicates the forms where you can merge PBS data with a Jpeg or Bitmap designed form. The
third column indicates the forms that may be sent to a PDF or PDFP printer. The fourth
column indicates the user manual name and chapter where you will find additional setup
information.
MODULE - F ORM
TYPE
DATA AND
F ORM F ILE
MERGE
PDF PRINTING
USER MANUAL
F ORM F ILE MERGE SETUP REFERENCE
ACCOUNTS PAYABLE
AP Checks - Batch
alignment and print
Yes *
N/A
N/A
AP Checks - Immediate
alignment and print
Yes *
N/A
N/A
Checks - Forms design
print
Yes *
N/A
A/P, Chapter 25
Check forms
Vendor labels alignment
No
and print
N/A
A/P, Chapter 4
Control information,
Field 21
Year-end Print 1099
forms
N/A
N/A
Invoices - Print invoices
Yes
alignment and print data
Yes
A/R, Chapter 15,
Invoice formats, General appearance
Invoices - Immediate
print alignment and print Yes
data
Yes - Will display
PDF
A/R, Chapter 15,
Invoice formats, General appearance
N/A
* Merging with a
form file is only
available when
using a user
defined form.
MICR coding is
not included
ACCOUNTS
RECEIVABLE
132
MODULE - F ORM
TYPE
DATA AND
F ORM F ILE
MERGE
PDF PRINTING
USER MANUAL
F ORM F ILE MERGE SETUP REFERENCE
Invoice format - Sample
Yes
invoice
Yes
A/R, Chapter 15,
Invoice formats, General appearance
Invoice formats - Location grid
Yes
N/A
A/R, Chapter 15,
Invoice formats, General appearance
Invoice formats - Layout
Yes
worksheet
Yes
A/R, Chapter 15,
Invoice formats, General appearance
Reprint invoices alignment and print
Yes
Yes - Will display
PDF
A/R, Chapter 15,
Invoice formats, General appearance
Statements alignment
and print
Yes
Yes
A/R, Chapter 16,
Statement formats,
General appearance
Statements html
N/A
N/A
N/A
Statement formats - samYes
ple statement
Yes
A/R, Chapter 16,
Statement formats,
General appearance
Statement formats Location grid
Yes
N/A
A/R, Chapter 16,
Statement formats,
General appearance
Statement formats - LayYes
out worksheet
Yes
A/R, Chapter 16,
Statement formats,
General appearance
Deposit slips alignment
and print
N/A
N/A
N/A
Customer Labels alignment and print
N/A
N/A
N/A
Item Labels print
N/A
N/A
N/A
Work orders alignment
and print
N/A
N/A
N/A
Quick work orders alignN/A
ment and print
N/A
N/A
INVENTORY
CONTROL
133
MODULE - F ORM
TYPE
DATA AND
F ORM F ILE
MERGE
PDF PRINTING
USER MANUAL
F ORM F ILE MERGE SETUP REFERENCE
ORDER ENTRY
Batch Invoice alignment
Yes
and print
Yes
O/E, Chapter 7,
Forms, Field 3.
Description, etc.
Instant invoice alignment and print
Yes - Will display
PDF
O/E, Chapter 7,
Forms, Field 3.
Description, etc.
Reprint invoice from hisYes
tory alignment and print
Yes
O/E, Chapter 7,
Forms, Field 3.
Description, etc.
Forms
Yes
Yes
O/E, Chapter 7,
Forms, Field 3.
Description, etc.
Fill back order form
alignment and print
Yes
N/A
O/E, Chapter 7,
Forms, Field 3.
Description, etc.
Print new PO's alignment and print
Yes
Yes
P.O, Chapter 22.
Purchase order forms
Print purchase orders
alignment and print
Yes
Yes
P.O, Chapter 22.
Purchase order forms
Print changed PO's alignYes
ment and print
Yes
P.O, Chapter 22.
Purchase order forms
Print release PO's alignYes
ment and print
Yes
P.O, Chapter 22.
Purchase order forms
Forms alignment and
print
Yes
Yes
P.O, Chapter 22.
Purchase order forms
Master information ->
Forms - test print
Yes
Yes
P.O, Chapter 22.
Purchase order forms
Yes
PURCHASE ORDER
PAYROLL
134
MODULE - F ORM
TYPE
DATA AND
F ORM F ILE
MERGE
PDF PRINTING
USER MANUAL
F ORM F ILE MERGE SETUP REFERENCE
Checks alignment and
print
Yes
N/A
N/A
Employee labels print
alignment and print
N/A
N/A
N/A
Quarterly payroll report
N/A
N/A
N/A
Quarterly report formats
N/A
-> Sample report
N/A
N/A
Year-end -> Print W-2
forms
N/A
N/A
N/A
Year-end -> Print 1099
forms
N/A
N/A
N/A
Instant invoice, receipt
and quote alignment and Yes
print
No
POS, Chapter 7,
Registers
Batch invoice, and quote
Yes
alignment and print
Yes
POS, Chapter 6,
Stores
Yes
Manufacturing html
documentation
POINT OF SALE
M ANUFACTURING
Invoices, packing slips,
acknowlegements,
quotes and product purchase orders
Yes
You are also not required to merge the data with a form file. You may choose to use Windows
printer to print to a pre-printed form.
Special forms that currently cannot be printed using Windows printer include Time and Billing
invoices.
135
PDF INI FILES
There are two INI files provided for configuration a PDF output. One is for reports
(psipbs66.ini) and the other is for forms (psipbs.ini).
INI Control Settings
The reports and forms INI file have similar options. Here are the available settings installed
with PBS that control PBS forms.
CONTROL
DEFAULT
SETTING
VAR Units
in
Unit of measure
VAR Txttop
.12
Top margin size
VAR Txtleft
.25
Left margin size
VAR Point
12
Text point size
VAR Lnspace
12
Space between lines
VAR Comp
100
Compression factor
VAR IMGLRMargin .25
Left and right image margin
VAR IMGTBMargin .25
Top and bottom image margin
VAR Title
Passport
Business
Solutions
Forms
This is the title that gets
written to the PDF file properties.
VAR Subject
*
This is the subject that gets
written to the PDF file properties.
VAR Author
This is the Author that gets
Passport Softwritten to the PDF file propware, Inc.
erties.
* This form was generated in Passport Business Solutions.
Stamp.txt
When a value is written to this file, it will produce a “watermark” on all PDF generated reports.
By default there is no setting in this file. But you could add your company name or anything
else that is text. Keep in mind this is a global file and effects reports for all PBS companies.
You may set the font size, alignment, color, transparency of the font.
Open the Stamp.txt file for additional instructions.
136
FORM FILE USE
AND
DESIGN
If you do not use PBS on Windows or Thin client, then you can ignore this section.
In this section, and throughout the PBS user manuals, we refer to the form as a file that is a
graphical image that represents the form and is in the IMAGES directory. We refer to the
format as the field by field design that may be set up in a PBS module, such as A/R Invoice
formats.
As stated in the previous section, several of the special formats allow you to merge the PBS
data with a file that contains the form design.
There are some form files provided by Passport for invoices, statements and purchase orders.
You will find them in the IMAGES directory. You can modify them as needed to make them
your own.
Form files are assigned to the format in PBS. This table shows the where form assignments are
located per the menu selections.
M ODULE
M ENU SELECTION
Accounts Payable
Master information -> Check forms
Accounts Receivable
Invoice formats -> General appearance
Accounts Receivable
Statement formats -> General appearance
Order Enter
Master information -> Forms
Purchase Order
Master information -> Control information
Purchase Order
Master information -> Forms
Point of Sale
Setup information -> Stores - Invoices only
Point of Sale
Setup information -> Registers - Invoices,
Receipts and Quotes
Manufacturing - Customer orders Invoice,
Picking Ticket and
Acknowledgement
Control information
Manufacturing - ProdControl information
uct Purchasing
When you enter the form file name per the module setup, it must be spelled exactly as the file
name with the proper extension. If you are running PBS on thin client with UNIX or Linux as
the server, then the name must be the same case as well.
See the associated user manual documentation for more details on setting up a form file with a
format.
137
Windows Printer and Form Files
When you merge a graphical image form file with data, then you must select Windows printer.
The printers defined in Company information will not merge the image form file with the PBS
data.
The printable area using Windows printer is usually smaller than the printable area using a
Company information printer. This is especially true with the laser printers with which we
tested. Because of this, you will probably have to design your format to be shorter, and
sometimes narrower, than any pre-printed form that you are currently using.
Form Design
You can use any appropriate program to design your form, as long as it can store the form in
either a JPEG or Bitmap file format.
The size of the form file will have an impact on two important variables; performance and
quality. Generally, the greater number of pixels per inch the form file contains, the greater the
quality, but the slower the printing performance becomes. The greater the number of pixels per
inch, the greater the file size. Therefore, when you design your form, we recommend that you
make it as small as possible but still maintain an acceptable quality. Making a PBS form
between 200 to 300 pixels per inch will usually be an acceptable quality.
If your printer only prints at 300 pixels per inch quality, there is no advantage to produce an
image at 1200 pixels per inch. So do not produce the form image at a quality greater than your
printer will accept.
JPEG files are a compressed file format and are always smaller than Bitmap files, even when
they both have the same number of pixels per inch. Because of compression inherent in the
JPEG’s, this file type is stored with less quality than a Bitmap. However most high and true
color images compressed with JPEG show little or no degradation when printing.
Note
In PBS, a form file will print within the margins printable area of your
printer. If a form is designed for 8.5x11 inches, but the printable area on
the page is only 8x10.5, then the PBS program will shrink the image to print
in a 8x10.5 area.
You may find it easier to modify one of the forms provided by Passport
because these are pre-designed to work with PBS. You may replace the existing image with your own image.
You may have to modify the form format to work with multiple printers or printer drivers such
as a PDF writer. The form is not sizable within PBS so each printer driver will shrink or
expand the image differently. You could also copy and modify the format to fit the form. Then
you would have a specific format for each printer. It is also possible the alignment has to be
different for each printer.
Using Windows Printer to Create PDF (Acrobat) Files
You may be able to use Windows printing with a PDF creation program. There are some
exceptions that pertain to creating PDF forms.
138
If you are printing an invoice, statement or purchase order, you should only print one at a time.
Printing multiples will put multiple customers’ invoices, etc., in the same file.
We have tested with Acrobat PDF Writer and Acrobat Distiller to produce PDF files. We prefer
PDF Writer to Acrobat Distiller. Distiller will not produce color files and the alignment of the
form to the data does not work as well.
There are other PDF generation programs like Amyuni, PDF995, CutePDF, PDF Creator and
many others. We have not tested PBS forms printing with any of these programs and results
may vary with each. Here are several variables you can change to make the data line up with
the form file:
1. Alter the printer properties. For the PDFWriter properties we made some minor alterations to the
settings, as you can see below. We accessed the properties by selecting the printer in MS Word or
similar aand then clicked on the properties button.
2. Alter or create a new jpeg or bitmap form file. You can make the form file larger or smaller as
needed. Sometimes moving the totals area up or down will make the difference.
3. Alter the format. Column and line location changes will alter the location of where the data
prints on the page and help it line up with the form.
4. Change the scaling to alter the size of the image.
139
ALIGNING FORMS
The laser printable area on a page can be different per printer model. Therefore an adjustment
has been provided to allow you to move the text up or down so that it aligns properly on a
form.
When printing a special form, after you press <Enter> at Field number to change ?, you must
mount the labels on the printer. Mount the labels and then answer Done. You must select the
printer on which the labels have been mounted.
Printing to a Company information printer
If printing on a laser printer, you are first asked to enter the top and left margins of the page
and sometimes the number of form copies or number of labels.
Next, you are asked Print alignment ?.
You can save forms by printing the alignment sample on plain paper. After printing, place the
plain paper alignment on top of a form page and hold it up to a bright light to verify the
alignment. Make any adjustments necessary and continue printing alignment samples on plain
paper until you have the correct alignment. Load the laser forms in the paper tray when you are
ready to print.
If you want a sample form with X’s and 9’s printed to check the alignment on the printer,
answer Y. A sample form will print. You are asked, Print alignment ?. You can print as many
alignment examples as you wish.
You may change the top and left margins before printing another alignment. You can enter
positive or negative adjustments in tenths or hundreths of an inch.
When the alignment is correct, answer N to the Print alignment? question. The form will then
be printed. When all forms have been printed, mount regular paper on the printer. Answer
Done when you have mounted the paper.
Printing to Windows printer
Some of the alignment steps are the same when printing to Windows Printer but there are some
exceptions.
The mechanism for the Windows alignment is different than the Company information printer
alignment. The Company information '0','0' in most cases is a different page location than
Windows printing '0''0'. This is because they use two different technologies.
When printing a form to a Company information printer, if at '0' column and "0" row, the
COBOL program determines where this is by sending precise codes to the printer. In most
programs the printing starts at three rows (print lines) from the top and the starting column
varies per program and in the case of these PCL (printer control language) codes, you can
enter either negative or positive numbers for adjusting the alignment.
140
When printing a form to a Windows printer, the form starts at relative '0' of the X-Y axis, (top
and left margin on the page) and this is the upper left corner of the page. You may not use
negative numbers for aligning a form using Window printer as by default you are starting as
far to the top and left as you can go on the page. With most Windows printer drivers, they
allow a fewer maximum total number of lines to print on a page, based on a six lines per inch
standard, as can be done with Company information PCL codes printing. For example, if you
can print 66 lines using a Company information printer setup, you may now only be able to
print 62 lines using a Windows printer driver.
The alignment for Windows printer displays default and adjusted information about the top
margin, left margin and maximum number of print lines per page.
Here is an example of the Windows printer alignment.
The program determines where the current margins occur and the maximum print lines that can
be used for printing. When you make an adjustment, greater than the default top or left margin,
then the maximum print lines may change. If this occurs, then you may have to adjust your
format accordingly.
The maximum number of printable lines will vary per printer. When doing a Windows printer
alignment, you will see the number of printable lines change when you enter a larger up/down
adjustment number. If your current format fails to align, you must modify the format to fit your
printer. If you print the same form on multiple printers and they allow a different number of
printable lines, you must design the format to the printer that allows the least number of lines.
You can adjust the number of print lines for many PBS forms, including statements, A/R
invoices, O/E forms and P/O forms. Refer to the appropriate user manual for instructions.
With some special forms you will not be able to adjust the print lines. If your printer driver will
not provide enough lines to print the form using Windows printer, then you will have to use a
Company information printer.
141
PCL COMMANDS
When you use a Company information printer, you are not utilizing the Window workstation
printer setup drivers. You are actually bypassing these drivers and printing directly to the
printer.
Because you are bypassing the windows printer driver, to print reports and special forms,
Hewlett-Packard Printer Control Language (PCL 5) commands are used to control specific
features of your laser printer. Located on the printer screen of the Company Information
selection is a list of available printers. If your printer is listed, the appropriate Printer Control
commands are automatically issued to cause your laser printer to work properly with PBS. If
your printer is not on the list of available printers, select Other (option 12) to set up your
printer. To provide the correct printer controls, you must supply certain command strings. This
will be covered in the PCL section.
Note
If your printer is not listed as one of the available printers, one of the
printers listed may work for your printer anyway. Try the available printers
listed and you may find one that matches your printer.
Standard compress and normal commands are used in printing PBS reports. The compress
codes are sent to the laser printer before printing a report to set the printing in a smaller font so
that the 132-column report fits on the 8-1/2 inch wide paper. The normal (80 column) codes
are sent after printing the report to return the printer to normal sized font. These reset the
printer to its previous state so that the next print job is not affected by your printer settings.
The remainder of this section is intended for those who require a more in-depth understanding
of the standard set of laser printer control codes used in Passport Business Solutions software
to print pre-printed forms and labels. This information is relevant if you want to set up a printer
type that is not on the list of installable printers. To use any of the laser printer features, such as
a different font, page orientation etc., it is necessary to enter an appropriate command string.
The compress and normal codes are not used to print special forms on a Hewlett-Packard or
compatible laser printer. Instead, a series of codes are used.
PCL Codes
In order to print special forms, you must enter PCL commands. These commands are used to
control various laser printer features such as margins, font selection, or other features. Each
PCL command has an associated hexadecimal value. You enter PCL commands by typing
hexadecimal digits at the appropriate screen.
For this description, the PCL commands have been divided into the following three classes:
1. Printer reset command
2. Job and page control commands
3. Font control commands
142
In the Control Information selection, however, you will note that commands are entered as
reset, job, and font control.
Note that these command lists are only a partial listing of features and functions. If you are
using an HP (or compatible) printer, refer to the PCL 5 Printer Language Technical Reference
Manual or equivalent for information on PCL commands.
Printer Reset Codes
The PCL printer reset command sets all printer feature settings to their default settings. These
default settings are printer dependent. Refer to your printer manual for these values. A reset
code should be sent to the laser printer at the start and finish of a print job. It is sent initially to
establish the printer with a default condition, and at the end to re-establish leave it in the default
condition.
This ensures that the next print job is not affected by your settings. This is particularly
important when sharing printers. Commands remain in the printer until other commands are
received or the printer is reset.
The PBS printer reset code consists entirely of the PCL reset command.
Job and Page Control Codes
Job and page control codes are sent to the printer immediately after the printer reset codes. The following table lists some of the PCL commands that are used for job and page control. For this example, they are listed in the order that they are sent to the printer. The command sequence is
determined by the sequence of the hex command string entered in the Company Information selection.
SEQUENCE
CONTROL CODE
1
Perforation Skip = Disable
2
Page Size = Letter size (see note below)
3
Top Margin = 0
4
Line Spacing = 6 lines per inch
5
Text Length = 66 lines
6
Page orientation = Portrait
Note
For the HP LaserJet Plus, the Page Length command is used because this
printer does not recognize the Page Size command: Page Length=66
Font Control Codes
The font control codes are the last group of codes sent to the printer. These codes set parameters
such as symbol set, spacing type, and typeface family.
143
SEQUENCE
CONTROL CODE
1
Symbol Set = Roman-8
2
Spacing = Fixed
3
Pitch = 10 characters per inch
4
Height = 12 point
5
Style = Upright
6
Stroke Weight = Medium
7
Typeface Family = Courier
It is necessary to use all of the above PCL commands to ensure that the correct font is selected.
PCL Commands and Special Forms
The special forms codes used for printer reset, job control, and font control are shown on the
following pages.
The codes are shown in hexadecimal format: The PCL commands are identified with the names
as shown above.
PCL commands are generally sequenced as follows: reset, command type, options (features),
and termination code. Command strings should start with X1B45 (The subscripted X indicates
HEX.).
Reset Code
Function
Hex
Decimal
Reset
1B 45
027 069
144
Job and Page Control Codes
HP LaserJet III
FUNCTION
HEX
DECIMAL
Escape
1B
027
Command Type
26 2C
038 108
Perforation skip = disable
30 6C
048 108
Page Size = letter
32 61
050 097
Top margin = zero
30 65
048 101
Line spacing = 6 LPI
36 64
054 100
Text length = 66 lines
36 36 66
054 054 102
Page orientation = portrait
30 4F
048 079
Job Control Codes
HP LaserJet Plus
FUNCTION
HEX
DECIMAL
Escape
1B
027
Command Type
26 6C
038 108
Perforation skip = disable
30 6C
048 108
Page Size = 66 lines
36 36 70
054 054 112
Top margin = zero
30 65
048 101
Line spacing = 6 LPI
36 64
054 100
Text length = 66 lines
36 36 66
054 054 102
Page orientation = portrait
30 4F
048 079
145
Font Control Codes
HP LaserJet Plus
FUNCTION
HEX
DECIMAL
Escape
1B
027
Symbol Set = Roman 8
28 38 55
040 056 085
Escape
1B
027
Command type
28 73
040 115
Spacing = fixed
30 70
048 112
Pitch = 10 CPI
31 30 68
049 048 104
Height = 12 points
31 32 76
049 050 118
Style = upright
30 73
048 115
Stroke weight = medium
30 62
048 098
Typeface family = Courier
33 54
051 084
Entering PCL Commands
To enter PCL command strings, go to the third screen of the Company information selection. The
following screen displays:
From this screen you may modify any existing printers or add an additional printer(s). At the
Field number to change ? selection, enter the appropriate number. In the example above,
notice than an HP LaserJet IV is listed. To add another printer for LPT1, enter 2. In the
146
following example, the printer assigned to LPT1 will be redefined with a different command
string. This allows the same printer to be shared with the same real device having a different
features set.
Type the following:
Myprinter
In the Printer-name field.
-D LPT1
Assumes your printer is on LPT1
D
Assumes this is a local (direct) printer
Y
80-column
12
This enables you to enter PCL commands for that
printer.
Printer codes
Printer codes are non-printing characters sent to the printer as needed to turn on or turn off various
printer characteristics, much as you would do manually by pressing a button on the printer.
Printer codes are entered only if you chose 12 for Other in the previous field. If the system
recognizes the printer it already knows the printer codes. You may however describe your
printer as Other even though it is included on the list of recognized printers. This is sometimes
advantageous when you want to set printer attributes other than the standard ones. For
instance, it your printer has a draft quality mode and a near letter quality mode, you might
define the same physical printer twice so that you could use it in either mode.
Printer codes are represented in hexadecimal format: each code consists of a pair of digits,
where a digit is 0 through 9 and A through F.
•
Some printer manuals show only escape codes (or control codes, etc.), and not the equivalent
hexadecimal codes. In these cases, convert the codes to their equivalent hexadecimal codes.
•
Although there is room for 60 characters, most printers use much shorter codes.
•
On UNIX systems, local printers are restricted to 48 characters.
•
When entering command strings, do not enter any spaces between the hex digits.
Two screens appear in succession for entry of printer codes.
Compression / Normal Screen
The following screen displays for entry of the Compress and Normal codes. This applies to
both laser and non-laser printers.
Compression printing should be about 15 to 17 characters per inch; if your printer has several
compression modes, use the one that comes closest to this. Compression mode is needed to
print 132 columns of information on 8¾ inch paper.
147
Normal printing is considered to be 10 to 12 characters per inch. Normal codes are sent to the
printer to return it to normal-sized font. This is needed so that special forms (such as checks)
can be printed at full width.
After entering your codes and answering N to Any change ?, you are asked Is this a laser
printer?. This is because laser printers require additional control codes.
Reset, Job Control, and Font Control Screen
This screen displays only if you responded that this was a laser printer.
Printer reset codes
This resets the printer’s feature settings (top margin, left margin, page size, etc.) to their default
values. These codes are sent at the start of a new print job. This ensures that the settings of the
previous print job do not interfere with the new print job. They are also sent at the end of a
print job so that the settings of that job do not remain in effect for following print jobs.
Job control codes
These are used to establish page size, page length, top margin and other settings. These codes
properly configure the printer for the print job and are sent to the printer at the start of a print
job.
148
Font control codes
This sets the type style, size, height and other settings. They are sent to the printer after the job
control codes.
After entering the desired codes and answering N to Any change ?, you are returned to the
PBS menu. You may proceed with printing. Check the alignment of your forms prior to
printing, as shown below.
149
PRINTING
IN A
LINUX
OR
UNIX ENVIRONMENT
The Linux/UNIX Company information printer setup screen differs from Windows.
The Linux/UNIX printer screen (that is, the third screen of Company information) displays a
Mode column but the available values are different than Windows. The Linux/UNIX Mode
field allows one of three values:
L
For local printing
S
For spooled printing
D
For direct printing
Depending on what you have entered for device name, not all these choices may be available.
If you select L, you must supply additional control codes for auxiliary ports.
In some cases an asterisk will display next to the Device-name field. This is needed for Thin
client installations to identify the server printers vs. the local printer.
Refer to the example below to clarify the use of these fields.
Special Forms
For special forms (such as payroll checks, customer statements, or picking tickets), or anything that
uses pre-printed forms, the operating system spooler should not be used.
Spooled Printing
If you intend to use one or more Linux/UNIX spooled printers, you need to make special
entries in Company information and must also modify the cblconfig file (used when PBS
software is started). These entries will depend on how you set up and named your printers
when your Linux or UNIX system was installed or updated.
Thin client
If you are using Thin client on Linux/UNIX the same printers must be set up in the cblconfi
file.
Naming a Spooled
Printing Device
The name you supply as the Device-name in Company information must match, exactly, the
DEVICE-NAME for the printer in the cblconfig file. As a suggestion, use PRTR01 through
PRTR13 for your spooled device names. A typical partial screen output from the printer setup
of the Company information selection is shown below:
150
Printer
name
Device
name
Mode?
80col?
Type
INVOICES
PRTR01
S
Y
Epson
When entering the device name, remember that Linux and UNIX are case sensitive.
Defining Spooled Printers in Linux and UNIX
Each printer that you have defined as “spooled” in Company information must have an entry
in the cblconfig file that resides in your PBS top-level directory. The name in the Device-name
field must match the DEVICE_NAME entry in the cblconfig file exactly for the spool printer to
function correctly.
The entries, made in cblconfig, for Linux and UNIX are similar in concept but differ in syntax.
Entries have the following format.
LINUX
DEVICE_NAME -P lpr -l -Pprinter-name
UNIX
DEVICE_NAME -P lpr -s -dprinter-name
DEVICE_NAME: Enter the name of this device exactly as you have entered it in the Devicename field in the Passport Business Solutions Company information.
printer_name: This is the name of the spool printer that you set up in your Linux/UNIX
system.
If the lpr print spooler is filtering out the printer compression codes, include the -l argument in
the cblconfig file like the Linux example above.
Note
When using Thin client in a UNIX/Linux environment, the printers must be
set up in two files, cblconfi and cblconfig. The first is for printing from the
character screens and the second when accessing via Thin client.
Spool Printer Notes
•
If you don't setup the entry in cblconfig or cblconfi (Thin client) for the printer device-name
your using in the company file, then the report will be printed to a file of that name in the toplevel directory.
•
Notice that Linux uses lpr -P and that UNIX uses lpr -s -d. You might also find that your system's spool command is not lpr. In general, this format will work for you. The objective is to
use the spooler command that will spool the output in a “quiet” manner.
•
Defining your spool printers to use the DUMB printers driver within Linux or UNIX will prevent printer driver properties from interfering with your reports and ensure that reports are sent
151
to the printer as raw data. In addition, you can modify the printer interface drivers to do or not
do form feeds as required.
•
The software does NOT do a form feed at the end of spooled reports.
You can force this in one of two ways.
1) Un-comment the following line in your cblconfig file:
PAGE-EJECT-ON-CLOSE 1
This setting in cblconfig will apply to ALL of the spool printers you have defined in the
cblconfig file.
2) Alter the spooler at the operating system level to issue a form feed when closing the
spooler. This appears to be SOP on SCO UNIX spoolers, but on Linux you need to alter the
spooler to do a form feed at end of report.
Local Printer Technical Notes
Local printing allows a printer be attached to the Auxiliary port of a dumb terminal. Refer to
your terminal hardware manual since you will need to enter the codes for Auxiliary Port On
and Auxiliary Port Off.
If any of the codes are incorrectly entered, local printing will not function properly.
The following example illustrates the entries for local printing on a Wyse 60 terminal attached
to serial port /dev/ttyla on a 386 UNIX machine. The serial printer attached to the Wyse 60 is
an 80-column printer, so compressed print was selected. The following is shown for example
only. Refer to user manual.
PRINTER
NAME
DEVICE NAME
Local Printer
/dev/ttyla
Compress
1B2104
Normal
1B2100
Aux on
12
Aux off
14
M
80-
ODE
COL?
L
Y
TYPE
Other
The Compress codes were listed in the printer manual as condensed and were shown as ASCII
27 33 04. The Normal (Expand) codes were listed in the printer manual as 10cpi and were
shown as ASCII 27 33 00. ASCII 27 is Hex 1B and ASCII 33 is Hex 21. Both 00 and 04 are
the same in ASCII and Hex. Most printer manuals list both the ASCII and Hex values for these
codes. Always enter the Hex codes for Compress and Normal. If you have questions about
converting ASCII to Hex, consult with your reseller.
152
Aux on uses the values for Transparent print mode on, listed as
<ESC d#>. Aux off uses the values for Transparent print mode off, listed as <CTRL T>. These
were also converted to Hex as shown in the sample above.
For compressed print for local printers not shown on the displayed printer list, only 48
characters may be entered for Compress and Expand codes (unlike the 60 characters available
for direct and spooled printers).
Once you enter the local printing codes into the Passport Business Solutions Company
information, you should run some test printouts (such as the Valid G/L Accounts List) to
ensure the printer is functioning properly.
When using local printing in the Passport Business Solutions software, you must not use the
keyboard until printing concludes.
153
DEVICE
NAME
FIELD WINDOWS PRINTING CONTROLS
You may want to control and send specific font print characteristics to your -Q printer. With
PBS you can do this as part of the -Q data string as part of the Device name field. This will
work for all reports and most forms.
As contained in the PCL settings, font information is sent based on the standard or other printer
Type field. So, for this scheme to work the company file must have the question “80 col?”
answered as a “No” so that Passport Business Solutions does not issue any printer control
characters.
In this scheme, the DIRECT=ON is not used, but is substituted with Font characteristics which
are fed to the Windows driver via the AcuCOBOL runtime. Here is a list of the available characteristics.
If the results you are getting is not what you want, experiment with these variables. For
example you may have to alter the font pitch in order for the print to fit on a page.
FONT
Use FONT to specify a single font name. The font name may have embedded spaces, but may
not contain double or single quotes. If the font does not exist, the closest matching font will be
chosen.
It is recommended that you use a fixed length font rather than a variable length font. If you do
not, the columns on most reports will not line up properly.
Whatever font you enter, it MUST be installed on the workstation that is going to printer the
document.
Note
The runtime does not align columns. If you are printing a report
containing columns, you should use a fixed-width font.
PITCH
This value specifies the point size of the font. Pitch does not determine the number of
characters per line. If you use a larger pitch, the characters simply appear more crowded. For
example, when printing 132 columns, a pitch of 10 will produce better character spacing than a
pitch of 12.
LINES
This specifies the lines on a page. This instruction will work for most reports.
It is recommended that you do not use this instruction for forms. The number of lines on a
page for user definable forms, like A/R Invoices, O/E Invoices, Statements, user defined
Purchase orders, are determined by the design characteristics of the form and not this
instruction. The number of lines for hard coded forms are determined by the programming.
154
COLS
Specifies the number of columns (width) on the page. This number is not validated by the
runtime or the spooler. Choose a number of columns that coordinate with the selected font and
pitch when designing the report layout.
Most PBS reports require no less and no more than 132 columns to print the data. Therefore
the usefulness of this instruction is limited.
ORIENTATION
If your printer supports this feature, ORIENTATION allows you to specify LANDSCAPE or
PORTRAIT orientation for the report. As the PBS default is Portrait, you would only want to
specify Landscape.
COPY
If your printer supports this feature, COPY allows you to specify the number of copies to print.
COLLATE=1
This specifies that multiple print copies will be collated. In order for COLLATE to have any
effect, COPY must also be set to a value greater than 1.
Examples
The following string in the Company information device name field would produce 2 copies
that are collated:
-Q \\Server\Ptr;FONT=COURIER NEW;PITCH=11;COPY=2;COLLATE=1;COLS=132
This set of instructions will print reports in landscape.
-Q \\Server\Ptr;ORIENTATION=LANDSCAPE;PITCH=9;FONT=Courier
Notice that a semicolon is used between EACH printer instruction.
If the instruction does not fit on the first line, wrap it around to the next line with NO SPACES
at the end of the first line.
There is one exception where this scheme will not work. This is in the A/P check printing. For
certain check formats, both condensed and full size printing are required. The stubs are
condensed and the check body is full sized. This type of control is written into the check
program and should not be overridden via this scheme.
155
PRINTER NAME - HOST
AND
SHARE
Depending on host operating system version and client operating system version, the UNC can
be reported at the client as one of two values:
\\host_name\host_share_name
or
\\host_name\host_LPN
Therefore it is important when the printer is hosted to make sure that the Local Printer Name (at
the host) is the same as the share name.
This way a consistent identification can be made for all clients running Passport Business
Solutions.
156
MULTIPLE PRINTER SETUPS USING CONFIGURATION FILES
You can have multiple printer setups using multiple COBOL Configuration files. You can point
multiple configuration file printer setups to the Company information Device-name field. This
could be useful if you need more than the 12 printers to which you are limited in Company
information.
There is one limitation to this type of setup. In Company information if your printer is an 80
Column type and you selected Y for the 80 Col? field, then each setup must share the printer
Type field. Therefore this may not work for your situation. But if it does, then read the
remainder of this section.
The following is an example of setting up a general printer for most PBS users. In the standard
configuration file you have this printer defined. In a different configuration file you have a
printer setup just for your Order entry users to print invoices.
First set up a printer in Company information and in the Device-name field enter PRINTER1.
The Printer name should be something that is easily recognizable by multiple users. The
Mode, 80 Col? and Type fields will depend on the both printers you are using but must be the
same for both.
Next, enter in the main cblconfi file a line like the following:
PRINTER1 -Q \\WIN2000\HP LaserJet 4MP;DIRECT=ON
You also want the PRINTER1 to go to a different printer for users of Order Entry to print
invoices. Next make a copy the cblconfi file and name it cblconfi.oe. It has the ‘oe’ extension
because we are setting up a printer to printer order entry invoices for order entry users.
Now add a line to cblconfi.oe file to access a different printer:
PRINTER1 -Q \\WIN3000\HP Laser5;DIRECT=ON
Next modify the start menu shortcuts of the order entry users to access the cblconfi.oe file.
Finally test the printing from a general users printer and then from the order entry users printer.
Select the line in Company information that has the PRINTER1 set up. The printing should go
to the different printers as defined in the configuration file.
157
Reformatting Account
Numbers
This chapter contains the following topics:
Introduction to Reformatting Account Numbers
Defining New Account Numbers
Printing Account Number Lists
Changing Files to New Structure
Restrictions, Warnings, and Ambiguities
158
INTRODUCTION
TO
REFORMATTING ACCOUNT NUMBERS
Reformatting General Ledger account numbers enables you to change the number, size, and
type of segments in your account numbers, and to rearrange the contents of the account
number character by character.
You can do this for all accounts at once, or for a range; you might even want to do it for a
single account number erroneously assigned.
You can use this feature to change the contents of account numbers without necessarily
changing the format of the account number.
All accounts in all files are changed, so that no historical information is lost by doing this. This
includes files described as inactive. It does not of course include backup files or exported files.
WARNING: The reformat account number function does not include Point of Sale files or
any files from the manufacturing modules. This is because they can only be used with the main
and sub account structure only.
This feature can only be used, and only appears on the menu, if you have previously
authorized it in Company information. If you have not done so, skip this chapter.
Reformatting Account Number Functions
Potential uses of this feature include, but are not limited to, the following:
•
Transferring cost center information from the sub-account segment of the account number
(used in earlier software versions) to the segments reserved for that purpose in current the Passport Business Solutions software.
•
Converting the accounting structure of companies you have acquired so as to comply with your
own standard.
•
Expanding your account number size to accommodate natural growth.
•
Correcting an erroneously-defined account number after transactions have accumulated for it.
How Reformat Works
If you are unfamiliar with the variety of account number formats available in Passport Business
Solutions, review the Account Number Segments section of the Company Information
chapter.
Cross-Reference File
The reformatting process is driven by the Cross-Reference file, XREFIL. Do not confuse this
with the similarly-named External Cross-Reference file (EGLFIL), also known as the Accounts
Link file.
The Cross-Reference (XREFIL) file contains a single record for each account defined in either
the CTL Valid G/L accounts file or the G/L Chart of accounts file. The Valid G/L accounts is
159
used if the Chart of accounts is not available. You cannot add records to, nor delete records
from, this file.
The Cross-Reference file is a dictionary for translating one account structure to another. Each
record on the file contains the account number before reformatting and the corresponding
account number after reformatting. The file is automatically initialized when first referenced,
with both account numbers being set to the same value.
The File initialization utility does not apply to the Cross-Reference (XREFIL) file, nor do the
regular or extended file utilities, nor the upgrade. This file is generated automatically when it
does not exist and Reformat account number is run.
Reformatting Steps
To reformat account numbers, follow these steps:
STEP
DESCRIPTION
1
Define your new account format.
2
Define which position each character of your old
account number structure will occupy in the new
account structure.
3
Build the Cross-reference file. You can do this automatically based on the information provided in the
first two steps. You can repeat this as needed for different ranges of account numbers, or even individual
accounts numbers.
4
All three of these steps are done using the Define
new account number structure selection.
5
Print out the file and ensure it is correct, using Print
account number list.
6
Apply the changes to all data files, using Change all
files to new structure. Depending on their size and on
the number of packages you have installed, this may
take as long as several hours.
7
If necessary, use Cost centers (Enter) to define new
cost centers created by the reformat, or to delete old
ones.
Account Reformatting & Account Links
When you perform an account number reformat, you can optionally retain the old account
structure in your Account Links file. This allows you to continue viewing the old account
160
number in <F8> Look-ups, and using it to interface to non-PBS systems.
Account Reformatting and Company Consolidation
Problems may arise when reformatting account numbers at the same time that company
consolidation (described in the chapter of that name in the General Ledger User Manual) is in
progress.
•
Reformatting a member company will almost certainly invalidate the consolidation, since the
Account Links file is not altered to reflect the change (the file resides with the consolidation
company not with any of the members).
•
Reformatting the consolidation company does modify the Accounts Link file but may still result
in errors, especially if an account number segment has been shortened.
If you use both functions, print and review the Consolidation Setup Verification Report after
reformatting account numbers.
Account Reformatting Layouts
If you reformat your account number so as to increase its length, you may have to review your
layouts. All PBS reports accommodate the maximum formatted account number length
(seventeen characters), but reports you have created yourself (such as invoices) may expect a
shorter account than this and may truncate your new account number.
161
DEFINING NEW ACCOUNT NUMBERS
Before proceeding, make sure you have understood the How Reformat Works section and have
read the Restrictions, Warnings, and Ambiguities section.
This selection enables you to tell the system exactly how you want your account numbers
reorganized, without yet changing any of your
Select
Reformat account number from the Ctl menu. If the Cross-Reference file does not already
exist, there will be a period of processing while it is built. The screen will display Rebuilding
XReference File... please wait.
The following menu displays:
Select Define new account number structure.
The following screen displays. This is the first of two screens required to process this selection.
162
Notice the resemblance to the corresponding screen in Company information. Enter the new
account structure in the same manner that you entered the old. Refer to the Account Number
Segments section of the Company Information chapter.
The changes that you make here will not take effect now in Company information. They will
apply (automatically) when you successfully complete the reformat process (that is, at the end
of the Change all files to new structure selection), but not until then.
It is not necessary that the new account structure be any different than the old. For instance,
you might wish to change all your main accounts in the range 7000-7999 to 8000-8999 in
order to make room for new accounts which you want in the 7000 series. This involves
changing the value of numerous account numbers without changing their format.
When the definition for the new account number is complete, press <Enter> at Field number to
change ?.
The following screen displays:
On this screen you will specify which account numbers are to be reformatted and precisely
how the old account number format is to be translated to the new account number format.
From this screen you can work with existing entries but not with new ones. The number of
entries on the file is fixed. You do not work with individual entries but with ranges.
1. Starting Account number and
2. Ending Account number
Enter the range of account numbers you wish to process.
Options
You may use one of the options:
<F1>
For the next account number on file
<SF1>
For the previous account number
<F2>
For the First starting number or Last ending number
163
You must account here for all the account numbers which you intend to include when you
come to do the Change all files to new structure selection.
However, it is not necessary to account for them all at once. If your requirements are very
complex, it may take several executions of this screen to define those requirements completely
(especially if you are using insertion characters). You may even have to do so one account at a
time.
If you do require several executions of this screen, make sure that the new account structure
you specify is the same in each case.
No harm is done if you specify a greater range of account numbers in this selection than you
ultimately utilize in the Change all files to new structure selection.
If you are changing the structure of your account number and not merely the contents, you
must include every account number. You cannot create a Chart of Accounts with some
accounts having a two-segment cost center and some a one-segment one. The system
nevertheless does not force you to enter First through Last, because you may require several
executions of this screen to define your requirements.
Format
Your current format for account numbers, as defined in
Company information
Example
Press <F2> at each field.
Old account structure
You do not enter anything into this field. It is there for your information. The program displays
a mask of an account number formatted according to your current structure. The mask show
X’s for segments defined as alphanumeric, and 9’s for those defined as numeric. Below the
mask is a row of lower-case letters (in the range of a through p). Each letter is a tag or label
which will be used (in Field #3 below) to reference that character position.
3. New account structure
This field also contains a mask, which this time has been formatted according to your new
account structure. Below the mask is a row for you to enter the contents of the new structure.
The cursor moves through this row one character at a time.
Restructuring transposes any character position of the original account number to any position
of the new account number. Characters can be discarded or even duplicated, and insertion
characters may be added at specified character positions.
•
An insertion character is an uppercase letter or a number, and is inserted exactly as it appears
on the screen into every occurrence of the account number. Note that a space is not a valid
insertion character.
•
A transposition character is one of the lower-case letters from the old account structure, and indicates that the corresponding character of each account is to be moved from the position that
letter occupies in the old structure to the position that the same letter occupies in the new structure.
Consider the following:
164
Old account number 1100-100
The following mask defines the old Format:
abcd-efg
where the lower case letters abcd represent the characters in the main account segment and efg
represent the characters in the sub-account segment.
The second segment was used as a cost center so it must be moved to a cost center segment.
The new format requires a sub-account segment set to zeros. The desired new format will
require the following mask:
efg-abcd-000
Observe that efg has been moved to the new cost center segment, abcd continues to define the
main account segment and 000 forces the sub-account segment to contain zeros.
Using the new mask and the characters from the old account number produces the following
result:
New account number 100-1100-000
Study the following table to see other examples. Each example assumes the old account
number is 1100-100.
NEW MASK
NEW ACCOUNT NUMBER
abcd-ABC
1100-ABC
ef-abcd-g
10-1100-0
Aefg-abcd-Z
A100-1100-Z
e-fg-abcd-A00
1-00-1100-A00
The program will allow you to move a character from a segment defined as alphanumeric to
one defined as numeric. You should only do this if you know that the character being moved is
in fact numeric. For instance, your old structure might include a three-character sub-account
segment which always contains one letter followed by two digits. This segment is necessarily
described as alphanumeric. Even so, it would make sense to move the second and/or third
character of this segment to a numeric segment of the new account. It would not make sense to
move the first character.
You may be aware that account number segments are stored internally as eight characters each,
even when the defined size of the segment is less than eight. This has no effect on the lettering
scheme. Only the characters actually defined are included in the mask or assigned a lower-case
letter. These are the leftmost characters for alphanumeric segments, and the rightmost ones for
numeric segments.
Enter the new edit mask.
165
Format
One character at each position. Data is entered one segment at a time. You may use <Esc> within a segment to
cancel that segment and return to the preceding segment.
Within a segment you can use <Up> to cancel that character and return to the preceding character. The separator
characters are entered automatically as you come to them.
Example
Type:abcd-gfe
Field number to change ?
Make any desired change, then press <Enter>. There will be a period of processing as the
Cross-Reference file is rebuilt.
If the cost center portion of your New account structure is not exactly the same as the
corresponding portion of the Old structure (in both format, size, and content), a screen will
appear to warn you of this. What this means is that the reformat process will create new cost
centers and/or invalidate old ones. Reformat account numbers does not update the Cost Center
file. You will have to do this yourself, after Change all files to new structure has completed.
Press any key to continue.
The following message displays as the file is rebuilt:
Rebuilding XReference file . . . Please wait.
When the build of the cross-reference file is complete the cursor returns to the CTL menu.
Note that no accounts have yet changed and only the Cross-Reference file is affected.
166
PRINTING ACCOUNT NUMBER LISTS
This selection lets you review the Cross-reference file before committing to the reformat. PBS
strongly recommends that you examine each account. Applying the mask you have defined in
the previous section to large numbers of accounts may well have resulted in account numbers
you had not anticipated. If so, correct these as described in the previous section and repeat the
process.
Select
Reformat account number from the Ctl menu. From the menu which displays, select Print
account number list.
The following screen displays:
Enter the following information:
1. Printing Sequence - account number
Choose how you want the print list to be sequenced. Enter O to have the print list sequenced
by the old account number or enter N to have the print list sequenced by the new account
number.
Format
One letter, either O or N
Example
Type: O.
2. Starting account number and
3. Ending account number
Enter the range of account numbers you wish to include in the report.
Options
You may also use one of the options:
167
<F1>
For the next account number
<SF1>
For the previous account number
<F2>
For the First starting account or Last ending account
Format
The defined format of either the old or the new account
structure (depending on which you requested in Field #1)
Example
Press <F2> at each field.
Field number to change ?
Make any desired change, then press <Enter> to print the report. Select a printer as described
in the PBS Data Entry Conventions chapter of the System User documentation.
168
CHANGING FILES
TO
NEW STRUCTURE
When you are ready to restructure your account numbers in your data files, set aside a large enough
block of time to process all the files being restructured and ensure that you have an up-to-date
backup of all the files being restructured. All installed packages are updated (but only this company).
Select
Reformat account number from the CTL menu. From the menu which appears, select Change
all files to new structure.
The system analyses the Cross-reference file to ensure that you have not inadvertently created
duplicates (for example, by truncating a character position which you mistakenly believed to
be always blank). Duplicates are checked throughout the file, not just in the range selected.
•
No two records in the new structure can have the same account number.
•
No account in the old structure can have the same number as any account in the new structure.
For instance, if you wish to interchange the first and second character of your account number,
and two of your accounts happen to be 2463 and 4263, you will encounter this restriction.
If any duplicates are found, a screen displays that information. Press <Enter> to cancel this
selection and return to the menu.
Otherwise, the following screen displays:
This screen provides a final reminder to make sure all files are backed up.
Press <Esc> to exit if you have not performed your backup or press <Enter> to continue the
restructuring process.
The following screen continues the process:
Enter the following information:
169
1. Starting account number and
2. Ending account number
Enter the range of account numbers you wish to include in the report.
Options
You may also use one of the options:
<F1>
For the next account number
<SF1>
For the previous account number
<F2>
For the First starting account or Last ending account
It is to your advantage to define the minimum range needed to enclose the desired accounts,
since this affects the processing time. It is essential that you do not include any account in this
range for which you have not previously defined the reformat mask in Define new account
number structure.
Format
The defined format of either the old or the new account
structure (depending on which you requested in Field #1)
Example
Press <F2> at each field.
3. Automatically load external cross-reference?
This field does not appear if you have not authorized the External Cross-Reference feature in
Company information.
Otherwise, your old structure is automatically saved as the previous account in the External
Cross-reference file (EGLFIL). You can also save either the old or the new account number in
either of the two external cross-reference fields of that file.
If you are restructuring your entire Chart of Accounts, Passport Software advises that you store
your old structure in one of the two external file structures. This is especially advisable if the
reformat is done following an upgrade. The effect is to put your old structure in two different
places (since the previous account is always saved).
If you subsequently run a partial reformat to correct an error in one or two accounts, you can
answer N to Field #3. This means that the chosen external account number field will still
preserve your pre-upgrade account structure, while at the same time the previous account
number field will reflect whatever the structure was previous to the most recent reformatting.
Do not assume that you can prevent the previous Account from being overlaid by going into
Company information and temporarily disabling the External Cross-Reference feature. This
will prevent EGLFIL from being processed at all, so that not even the current Account field
will be correct.
Enter Y if you wish to load one of the external cross-reference fields with either the old or the
new account structure.
Format
One letter, either Y or N
170
Example
Type:Y.
Load with Old or New account number?
This field only appears if you answered Y to the preceding.
Enter O to specify the old number is the one to be saved, or N to specify that the new number
be saved.
Format
One letter, either O or N
Example
Type:O.
Load in External cross-reference 1 or 2?
This field only appears if you answered Y to Field #3.
Enter 1 to save the number in External cross-reference field 1, or 2 to save the number in
External cross-reference field 2.
Format
One digit, either 1 or 2
Example
Type: 2
Make any desired change, then press <Enter>. No report is printed, but a running display of
the files and records being changed.
Once this process starts, it must run to completion. If it is terminated before completion, some
files will have been converted to the new account number and some will remain with the old
account number. The only reliable way to recover from that state is to restore from your
backup and start over.
When all files are processed:
•
The Company file is updated with your newly defined account number structure.
•
The Cross-reference file is initialized so as to be ready for your next reformat.
171
RESTRICTIONS, WARNINGS,
AND
AMBIGUITIES
This section explains the inherent limitations in the reformatting process.
The reformat account number function does not include Point of Sale files or any files from the
manufacturing modules. This is because they can only be used with the main and sub account
structure only.
Warnings
•
Abstain from any maintenance to either the Chart of Accounts file or to the Valid G/L Accounts
file from the time you first define the new account structure until you have completed converting all files.
•
During execution of the Change all files to new structure selection, avoid using the system altogether except for read-only processing (views, lists, and so on).
•
Since reformatting can thoroughly reshuffle the sequence of records within files, it is a good
thing to reorganize the files afterwards using Extended File Utilities.
•
Backing up the files before reformatting is recommended.
•
Do not attempt to save time by doing some packages on one computer and some on another.
You may however run different companies on different machines at the same time.
•
If you are going to transpose account numbers using the same account number, you should do
this in multiple passes. For example, you want to move existing account 1020 to existing
account 1030, and existing account 1030 to new account 1040. If you were to do this in one
reformat operation, both accounts would end up in 1040. To accomplish this correctly, you
should first reformat 1030 to 1040. Next you should reformat 1020 to 1030.
Creating Invalid Account Numbers
You can inadvertently create error conditions which are not detected by the system but which
result in erroneous accounts:
•
By moving characters from an old segment defined as alphanumeric to a new one defined as
numeric, it is possible to create a segment containing invalid data.
•
By truncating segments, or by shuffling characters around one position at a time, it is possible
to construct a numeric account segment containing nothing but zeroes, or an alphanumeric one
containing nothing but spaces. Such segments are valid as cost center segments or as subaccounts, but not as main account segments.
•
By defining different account structures in different ranges of the file (only one of which will be
posted to Company information), it is possible to create account numbers which differ from
each other only in those positions of the (internal) account number which are not defined as
part of the account structure. The resulting accounts are not perceived as duplicates by the system, but display and print identically when formatted.
•
Redefining an account structure from numeric to alpha-numeric and using sub-accounts and/or
profit centers. You will have to re-enter the sub-accounts or profit centers in the Cost center file.
172
Although they may display properly on the screen, the data is not justified correctly in the file.
You should initialize the Cost center file before you re-enter.
The program does not detect any of these errors, thereby allowing the creation of account
numbers that cannot be referenced.
Varying by Employee Account Numbers
These account numbers may occur in Payroll files for tax codes and deduction codes. In
Version 6, asterisks (*) in the sub-account segment indicated that the cost center was to be
picked up from the employee record. In the Passport Business Solutions software, tildes (~) in
the cost center segments serve the same purpose. The reformat process does not recognize
these and may convert them incorrectly. If you use this feature, check your Payroll codes after
reformatting.
It may also be necessary to verify financial statement layouts and eliminate any unexpected
warning messages.
Degenerate Account Numbers
Most account numbers in the system contain the full four segments. There are a few cases of
degenerate account numbers- that is, fields which contain only one or two segments of the
account number. These can be inherently ambiguous. The approach taken is to leave these
fields unconverted except where reasonable certainty exists about the user’s intent. Four cases
can occur:
•
Cost centers only (one or two segments) These are mostly the default cost centers which occur
in many package’s Control files.
•
They are set to blank if either the old or the new account structure does not support cost centers.
Otherwise:
•
If the cost center is within the range of accounts specified, the cost center is reformatted as it
would be for the first record in XREFIL with that cost center, if there is one. If there is not, the
field is set to null (blank or zero as appropriate to each segment).
•
If not, the field is not converted.
•
Main and sub-account only These also mainly occur in the Control file: the Scrap account, the
Default Sales accounts, etc.
•
If the old account structure did not use cost centers, there is no ambiguity. Account numbers
within the specified range are converted according to the first record on XREFIL for that main
and sub-account. This is possible because XREFIL possesses an alternate key on main and subaccount even though ACCTFI does not.
However, if the old structure did use cost centers, ambiguity is inherent.
Suppose that XREFIL specifies that: AA-BB-1246-000 becomes PP-QQ-1246-020 and
that:CC-DD-1246-000 becomes
RR-SS-1246-147
Who shall say what becomes of:Main / sub-account 1246-000?
173
If the range of records converted is First through Last, the field is converted. In the example
above, 1246-000 would become 1246-020, simply because that would be the first record
encountered in XREFIL for that main and sub-account.
Otherwise conversion is not attempted.
•
Main account only: these chiefly occur in the G/L Financial statements selections and in the
Proforma Chart of Accounts.
Conversion of these fields occurs in the same manner and under the same conditions as the
main and sub-account.
•
Sub-account only: these chiefly occur in the G/L Financial statements selections.
No conversion is attempted on these.
174
Defining Multiple Companies
This chapter contains the following topics:
Introduction to Defining Multiple Companies
Entering Program Pathnames
Entering Data File Pathnames
Install Company
Manual Multiple Company Setup
Printing Defined Companies
Forms For A New Company
175
INTRODUCTION
TO
DEFINING MULTIPLE COMPANIES
The Passport Business Solutions software can perform data processing for multiple companies
(over a thousand of them). The only practical limit on the number of companies is the amount
of disk space available. This chapter describes how to set up the software to accommodate
multiple companies.
Upon initial installation, The Passport Business Solutions software supports a single company,
and this by default is Company 00.
Once you have added your first additional company, a company selection screen displays
whenever you start up your Passport Business Solutions software. PBS uses a Multi-Company
file to contain the list of companies; it is the presence of this file which triggers the company
selection screen.
After adding your first additional company, you must explicitly enter Company 00 into the
Multi-Company file. As long as 00 was merely a default, this file did not even exist; but once
00 becomes one company among many it needs its own name and its own entry in the file.
You do this on the Ctl menu using the Define multiple companies selection.
The automatic procedure is far easier than the manual one, requiring only that you run the
automatic installation utility.
Automated Multiple Company Set Up
To begin the automated procedure, do the following:
STEP
DESCRIPTION
1
If this is your first multiple company, add 00 to the
Multi-Company File to define your current company
as Company 00 by using the instructions in the Manual Multiple Company Set Up. Once you define Company 00, return to this section and continue to the next
step.
2
Before adding any more companies, back up the contents of your PBS top-level Folder (directory). If a system crash, power failure, or other hardware problem
occurs during the following procedure, copy the
backup to this directory and restart the procedure.
3
Verify that everyone is out of PBS before start the
add company program.
176
STEP
DESCRIPTION
For Windows
Start->Programs->PBS->General Utilities->Add Company
4
For UNIX
From the PBS top-level directory system prompt,
type:
addcmp.
The following screen displays:
Enter information into the New company installation screen as follows:
*1. Company ID
Enter the Company-ID you wish to add.
Format
Two characters, consisting only of digits or letters. Spaces
are not allowed. Lowercase if valid but is converted to
uppercase.
Example
Type XC
2. Company name
Enter the name of the company. This field is required.
Format
Up to 30 characters.
Example
Type XYZ Company
3. Is this a consolidation company?
A consolidation company is used to contain business transactions from other companies. It is
described in the chapter of that name in the General Ledger user manual. Answer Y to
177
designate the company being defined as a consolidation company. Answer N if you don't want
it to be a consolidation company.
Format
One letter, either Y or N there is no default
Example
Type N and then press <Enter>
Field number to change ?
Make any desired changes, and press <Enter>.
The New company installation screen shown below displays:
Specifying Packages for Company
From the New company installation screen described above, you can link specific PBS
packages to the newly defined company so only those selected packages load when starting
PBS.
To specify a package, do the following:
1. Enter 1 to select Specify packages for company. The following screen displays:
178
2. All PBS packages display on the menu. For each package installed on your computer answer
Y to install the package for the added company. Change the default answer to N for those
packages you are not installing for the added company. For those packages which are not
installed on the system or not installed for a new company, (Not installed) will display next to
the package name.
3. When you are finished, enter N at the Any change ? prompt.
Entering Pathnames
Defined pathnames point PBS programs to the hard disk or network location of their corresponding
program files and data files. Only a few programs and data files are located in the top-level PBS
directory. Dozens of files, however, are located in subdirectories.
To see how path names are presently set up, run the Pathfinder program as described in the
Using Pathfinder chapter. Use the Assign pathnames function to see the names of the
directories where your programs and data files are located.
To enter a new path name for PBS program files or data files for the added company (from the
New company installation screen), do the following:
Enter 2 to select Enter path names (optional) to enter customized path names. You may skip
this optional section.Defined pathnames point PBS programs to the hard disk or network
location of their corresponding program files and data files. Only a few programs and data files
are located in the top-level PBS directory. Dozens of files, however, are located in
subdirectories.
To see how path names are presently set up, run the Pathfinder program as described in the
Assigning path names section of the Using Pathfinder chapter. Use the Assign pathnames
function to see the names of the directories where your programs and data files are located.
The following screen displays:
You can make entries in one or both of these selections by doing the following:
179
ENTERING PROGRAM PATHNAMES
1. Enter 1 to select Enter pathnames for programs and the following screen displays:
On a UNIX system the pathnames are entered with a forward slash (/). On Windows systems
the pathnames are entered with a backslash (\).
Notice that default pathnames display for each company you selected using Specify packages
for company from the New company installation menu. For packages that are installed on
your computer but not chosen with Specify packages for company, (Not selected) will
display next to the package name. Packages that are not installed on your computer show
(Not installed).
2. Enter an appropriate directory path names for each package. Remember not to use any special
characters such as period (.), comma (,) or less than (<) in the path.
3. When you are satisfied with the program pathnames, press <Esc>. If you are already at the
Any change? prompt, press <Enter>.
Refer to the Using Pathfinder chapter for more information on pathnames and file locations.
4. Continue on to the next section to enter data file pathnames.
180
ENTERING DATA FILE PATHNAMES
1. Enter 2 from the previous menu to select Enter pathnames for data files. The following screen
displays:
2. Enter data file pathnames in the same manner as you entered program pathnames above. However, pathnames entered here point to the data files for the added company.
3. When you are satisfied with data file pathnames, press <Esc>. If you are already at the Any
change ? prompt, then press <Enter>.
181
INSTALL COMPANY
Select Install company from the New company installation options menu, to create new files for
any new company you are creating according to the following guidelines:
•
Programs for the company are identified by the same directory pathnames as used for Company
00. These are normally in directories such as AROBJ (for Accounts Receivable) and RWOBJ
(for PBS system-wide programs). This is the most efficient way to identify program pathnames
for additional companies.
•
Data files for the company are identified by the same directory pathnames as used for Company
00, with the 00 replaced by the Company-ID that you entered earlier. For example, the A/R
data files for Company 00 are in a subdirectory named AR00.
The A/R data files for the new company (for example, VM) are placed in a directory ARVM.
The following steps are required.
1. Select Install company from the second New company installation screen. The following screen
displays:
2. No new directories or files have been created yet on your hard disk. To end the new company installation process and make no changes to the data on your system, answer N or press
<Esc> at every screen until you return to the command prompt.
3. To Continue with the new company installation process, answer Y at the Continue? prompt.
The installation of new companies begins with files being created and changes made to your
system. The following screen displays:
182
4. The arrow indicator changes direction as the program either reads or writes the path information. After paths are set up for the company, data files are created according to the data file
pathnames entered.
5. When all processing is complete, you will see a Data files and directories complete - <Esc>
= Exit message. Press <Esc> at this message. You may now install another company, or
press <Esc> to complete the procedure. Once you press <Esc> at the Company-ID field, a
screen showing the update files process displays. This screen will indicate that the SQMENU.DAT and the SQPATH.DAT are being updated. This may take several minutes. When
completed the screen will close.
6. Once the new company updating process ends, you can enter data into PBS for packages for
all newly created companies.
7. Before entering data, you may use Pathfinder to modify the layout of your hard disk if the
default layout specified by the automated process does not accommodate the company you
have defined. To do this, refer to the Using Pathfinder chapter.
183
MANUAL MULTIPLE COMPANY SETUP
You may elect to add multi-company capabilities manually. To do this, follow these
instructions.
Select
Define multiple companies from the CTL menu.
The following screen displays:
From this screen you can work with both new and existing entries. Enter the following
information:
1. Company ID
Enter the Company-ID you wish to add, change, or delete.
Options
You may also use the options described below
<F1>
For the next company on file
<SF1>
For the previous company on file
Format
Two characters, consisting only of digits or letters. Spaces
are not allowed. Lowercase if valid but is converted to
uppercase.
2. Company name
Enter the name of the company. This field is required.
Format
Up to 30 characters maximum.
184
3. Is this a consolidation company?
A consolidation company is used to contain business transactions from other companies. It is
described in the chapter of that name in the General Ledger user manual. Answer Y to
designate the company being defined as a consolidation company. Answer N if you don’t want
it to be a consolidation company.
Format
One letter, either Y or N the default is N.
Field number to change ?
Make any desired changes.
Options
For an existing entry, you may also use one of the options:
<F1>
For the next company on file
<SF1>
For the previous company on file
<F3>
To delete this company.
Deleting a company would normally be done only to recover from a previous erroneous entry
or to get rid of a consolidation company after producing the desired consolidation reports. The
only effect is to remove the company from the Multi-company file. No check is made that the
company’s existing directories, data files, or Pathfinder entries have previously been deleted. If
a valid company is deleted in error, it can simply be re-entered with no loss of data.
Press <Enter> to complete processing this company.
185
PRINTING DEFINED COMPANIES
Printing a list of companies is done from the CTL menu.
Select
Multiple companies from the Reports menu.
The following screen displays:
1. Starting company ID and
2. Starting company ID
Enter the range of companies you wish included on the report, or press <F2> for the First
starting company or the Last ending company.
Format
Two characters, consisting only of digits or letters. Spaces
are not allowed. Lowercase is valid but is converted to
uppercase.
Example
Press <F2> at each field.
Field number to change ?
Make any desired changes, and press <Enter> to print the report. Select a printer.
186
FORMS FOR A NEW COMPANY
Formats are available for A/P Checks, A/R Invoices, A/R Statements, O/E Forms and Purchase
Order Forms.
You can either export forms from one of your companies, rename the file and restore it into the
new company or you can start with the ‘standard’ formats that were provided during the
installation of PBS and restore one or more those files.
Moving Form Files from one Company to Another
Export the forms using the accounting modules' file utilities.
Copy the files into the format expected by the file utilities.
For example, for company 01 for OE, copy the OE forms file from 00 to 01 by typing the
following command from the command prompt in the PBS top-level folder:
Copy OEFRMF00.EXP OEFRMF01.EXP
After the file(s) have been copied, they may be imported (Restore from an export file) into the
selected company using the accounting modules' file utilities.
Restoring Standard Form Files
A set of export forms files that match what is installed in Company 00 are in the file named
PBSformats.zip or PBS formats.tar in UNIX or Linux. These export files can be renamed and
used for installing the forms for companies other than 00.
First, unzip this file in the PBSformats.zip files in the Passport top-level folder.
The following files will be created when the formats.zip file is unzipped:
For AP: APFRMF00.EXP
For AR: PTBFMT00.EXP
lVCFMT00.EXP
For OE: OEFRMF00.EXP
For PO: POFRMF00.EXP
These files may be used to install or to re install default forms using the appropriate accounting
module's file utilities.
To use the files for companies other than Company 00, copy the files into the format expected
by the file utilities.
For example, for company 01 for OE, copy the OE forms file from 00 to 01 by typing the
following command from the command prompt in the PBS top-level folder:
Copy OEFRMF00.EXP OEFRMF01.EXP
187
After the file(s) have been copied, they may be imported (Restore from an export file) into the
selected company using the accounting modules' file utilities.
188
Using Pathfinder
This chapter contains the following topics:
Introduction to Pathfinder
Manually Adding Companies in Pathfinder
Using Pathfinder
Assigning path names
Defining Menu Selections
Recovering from a Damaged Path File
Changing Existing Data File Path Names
Using Pathfinder for Single Companies
Company Setup Checklist
189
INTRODUCTION
TO
PATHFINDER
This chapter provides technical information needed to organize and maintain the correct
location of Passport Business Solutions programs and data files on your system.
Pathfinder, provided with your Passport Business Solutions software, is a system file locator
that points to the location of files on the disk. This utility instructs your software where to look
for the program and data files that it needs for normal program operation.
Before using Pathfinder, we recommend that you contact your software reseller for advice on
how to set up the files. You will also need to familiarize yourself with the current directory
organization (structure) of your system.
Note
If the Pathfinder information does not agree with the actual organization of
your hard disk, your software will become unusable until the discrepancy has
been resolved.
Each Passport Business Solutions system comes with default paths to data and program files. This
means that you do not have to use Pathfinder to organize your disk, since this has already been
done for you. However, if you change the location of data files after installation, you will need to
update the information by using Pathfinder.
Using Pathfinder for Single Companies
When Passport Business Solutions is initially installed, the procedure creates one company.
For each defined application, a set of empty data files is also created. The company-ID is set to
00 (zero-zero). The data files for this company are created in a separate sub-directory for each
application. For example, the Accounts Payable (A/P) files are placed in a sub-directory named
AP00. The entries, which indicate the location of these files, are installed in the Path file.
Using Pathfinder for Multiple Companies
If you are processing multiple companies, the companies that you want to process must exist in
the Multi-company file before you can use Pathfinder. This includes company 00 which does
not normally exist in the Multi-company file when it is the only installed company.
Use the Pathfinder utility in conjunction with adding companies to your Passport Business
Solutions system. If you use the manual method for adding a company, you must perform the
following steps listed in the next section.
190
MANUALLY ADDING COMPANIES
IN
PATHFINDER
Follow these steps to manually add a company:
STEP
DESCRIPTION
1
Add the company record as described in the Defining
Multiple Companies chapter.
2
Perform the steps in Using Pathfinder to Create Multiple Companies section.
3
Run the file initialization program for each application, for each company being added. Refer to the
Initializing Data Files chapter.
If you use the automatic method described in the Defining Multiple Companies chapter, the
Add company program will:
•
Add the Multi-company file
•
Update the Pathfinder files, and
•
Create empty data files.
For both manual and automatic methods of adding companies, we recommend that you install
the data files for each company and application in different subdirectories. For example, the
files for company 02 Accounts Payable could go in sub-directory named AP02.
To manually set up your disk layout (after installing Passport Business Solutions), use the Pathfinder program directly. Pathfinder assists you in determining the physical locations of the majority
of PBS program and data files.
For a description of automatic hard disk set up, refer to the Defining Multiple Companies
chapter.
For example, if the disk containing your programs has minimal free space, you could place
your data files in any directory on another disk that contains adequate free space. Alternatively,
you could divide your program and data files between various directories on various disk
locations on your network. If your system has enough memory, you could assign the locations
of some program or data files to a virtual memory disk and copy them to your hard disk,
before and after running Passport Business Solutions.
However, the most frequent use of Pathfinder is to provide information on the logical
organization of related hard disk directories, programs files, and data files of your Passport
Business Solutions software.
191
Using Top-Level Program and Data Files
For the Passport Business Solutions to run properly, some program and data files common to all
applications must reside in the PBS top-level folder (directory). These program and data files will
reside in the PBS top-level folder (directory) after the installation procedure has completed. These
following file types must reside in the top-level directory:
•
Data files, such as Help Files, that will be accessed by all companies.
•
Batch or scripts such as pbs that start the Passport Business Solutions software or utilities.
•
Programs which run first, such as addcmp, will ask for the company-ID to determine which
data files to access.
•
Invoked batch files expect driver programs, such as GL.ACU, will ask for the company-ID
before the batch file is run.
•
Menu and Screen programs will be accessed by all programs. Errors occur if you copy any of
the menu programs to some other area and then use Pathfinder to assign paths to them.
•
The general rule is that any file which may be used across companies must exist in the top-level
directory.
192
USING PATHFINDER
You must use a PBS administrative User ID to access the Pathfinder program. To activate the Pathfinder program, follow these steps:
1.
For Windows
Start->Programs->PBS->General Utilities->Add Company
For UNIX or using a command prompt
From the PBS top-level directory system prompt, type:
addcmp
2. If you are using only one company, a screen listing the installed applications displays. If you
are using multiple companies, you will first be prompted to enter the ID for the company you
wish to use. Enter the appropriate Company ID and then User ID and a screen listing the
installed applications for the company you selected appears. The following screen is an example with all the PBS applications installed:
3. All applications installed for the selected company will display in this menu. If no path
name(s) exists in the Path file for the selected company, Define menu selections will be the
only item on this menu. If path name(s) are specified in the Path file, Define menu selections
will be last on the menu.
4. Select the Passport Business Solutions application you want, or chose Define menu
selections. The following sections describe how to use these selections.
193
ASSIGNING
PATH NAMES
The Passport Business Solutions software comes installed with default path names for program
files and data files for company 00. These company 00 path names do not normally need to be
changed. However, if you create new companies, you may need to assign and verify program
and data file path names for these new companies.
If you use Define new menu selections to add new applications to an existing company, assign
and verify programs and data file path names for this company. To assign, copy, or verify a
path name for locating Passport program and data files, do the following:
Select an application (for this example we will use Accounts Payable) from the first screen in
the Pathfinder menu. A screen similar to the following displays:
Company ID
The top of this screen lists the Company-ID of the company you are about to assign path
names. For single company processing, the Company is always 00 (zero-zero).
System ID
The System ID is the 2-character abbreviation for the chosen application. For example, AP is
the system ID for Accounts Payable.
All companies access the same application programs using the same path name (for example,
all Account Payable programs use APOBJ\). However, each individual company will have its
own unique path name pointing to its own data files for a given application.
For example, company XX would have an APXX data file path name.
System-wide programs or data files such as COMPFI (Company information) are usually
grouped under separate system IDs such as SY for Passport Business Solutions system files.
Choose the SYS ID for these system-wide files. For company 00, the system-wide data files
reside in RW00.
194
Package
A package, also called an application and sometimes know as a module, is the name of the
Passport Business Solutions software group of programs associated with the system ID.
The center pop-up window contains the following menu selections or options which allow you
to modify path names:
SELECTION
DESCRIPTION
1
Assigns path names to programs, designated by
application name.
2
Assigns path names to data files designated by the
selected application name.
3
Allows you to copy program and data file path
names from a specified company to the current company.
4
Verify path names.
These menu selections are explained below:
Assigning Path Names to Programs
Enter 1 to select Assign path names to XX programs (XX is used to represent the name of the
application selected in the second screen of the Pathfinder menu). A screen similar to the
following displays:
Options
Use the following options to enter information in the program and path name columns:
<Esc>
To exit from the screen
195
<PgUp>
Move up through the program list, one page at a time
<PgDn>
Move down through the program list, one page at a time
<F3>
Deletes a program entry. No confirming prompt will
occur when deleting.
<F4>
Pressing this enters the path name from the previous
line.
<Enter>
Moves from the program column to the associated path
name column.
Program
Each entry in the Program column is a Passport Business Solutions program name (up to eight
characters). Any program not listed in the Program column is assumed to exist in the top-level
Passport folder (directory). These program names normally do not need to be changed. If you
do change these names, enter all program names in uppercase or the programs will not be
found by the Passport Business Solutions software. To display more programs for the defined
company, use the option keys.
For a list of the full name of the programs listed in this Pathfinder screen, refer to the
Initializing Data Files chapter.
pathname
Note
PBS software requires you to enter all program and data file names in
uppercase.
Additionally, use a backslash <\> to separate sub- directories in windows
installations and a forward slash </> in SCO Open Server UNIX installations.
Each entry in the path name column designates the path to the location where the program
module resides. The path name may be up to 66 characters long and has the form xxOBJ\;
where xx is the system ID for the chosen application, followed by a forward or back slash. For
example, in Windows the default path name is APOBJ\ for Accounts Payable (AP)
For any system ID (such as AP), you can assign a path name to a program from another
system ID (such as Payroll), but you should place program and data files under their proper
system ID’s.
If you have more than one company, Pathfinder path names must be assigned for all program
and data files in all companies. The programs should keep the same path name since all
companies use the same set of programs as does company ID 00, and the data files will be
assigned a new path name. If you leave the path name blank, this will indicate that the program
is located in the top-level PBS directory. This is not recommended, however.
During execution of the Passport Business Solutions programs, the program name appends to
the end of the path name you defined.
196
In Windows, for example, if you entered a path name as \apdir\new you will experience a
problem. On Windows systems the path name must end with a backslash. The correct entry
would be apdir\new\.
Assigning Pathnames to Data Files
Enter 2 in the second Pathfinder screen to select Assign pathnames to XX data files. This
selection assigns path names to data files the same way as for program files (described in the
section above). Data files are those files with the .DAT and .VIX extensions.
A screen appears to help you assign specific path names to data files for a specific company.
This screen is similar to the one shown below:
For a list of the full name of the data files listed in this Pathfinder screen refer to the Initializing
Data Files chapter. You may also run the XX UTIL (xx is the application system ID) utility for
each application.
Copying Program/Data File Names
Enter 3 in the second Pathfinder screen to select Copy program/data file names from. This
selection copies program and data file names, and their associated path names (if chosen) to
Pathfinder Files from a designated company to the currently selected company. A screen
similar to the following displays:
197
Use the Copy program/data file names from selection in conjunction with Define new menu
selection, Assign path names to XX data files, and the Verify XX path names to successfully
add a new application to a company.
For example, to add an Accounts Payable (A/P) application for company Z2, you would
perform the following steps:
STEP
DESCRIPTION
1
In Pathfinder, add an Accounts Payable (A/P) application to company Z2 using the Define new menu
selection.
2
Use Copy program/data file names from to copy the
existing A/P files and path names for company Z1 to
company Z2.
3
Use Assign path name to Accounts payable data files
to change the APZ1\ path names in company Z1 to
APZ2\path names.
4
Create the Data directories
6
Exit Pathfinder and initialize the A/P application data
files with the Accounts Payable File initialization utility.
7
Run Pathfinder again and use Verify Accounts Payable path names to verify the newly initialized data
files.
The following fields enable you to copy files from one company to another:
Copy from
Enter the 2-character company ID and the system ID from which to copy. A copying to
Company XX Sys ID AP prompt will display the target company ID and system ID.
Copy path names
Answer Y to copy the Pathfinder File for the defined company ID to a Pathfinder File for the
target company. If you wish to copy only program and data file names to the new Pathfinder
File for the target company, answer N.
Overwrite existing
Answer Y to overwrite any program or data files that already exist for the target company.
Answer N to prevent overwriting these program and data file path names.
During the copy process, the path names display on the lower part of the window. Press <F1>
to temporarily stop the copy process, or press <Esc> at any time to exit from the copy process.
198
If the company name is incorrect or no data exists for the company, a No program data files
found to copy message appears. Press <Enter> to return to the Pathfinder menu.
Verifying Path Names
Before you run Verify XX path names on an application, you must initialize the data files in
the application where the following conditions are true:
•
If an existing company has an application added to it using the Define menu selection.
•
If a newly-defined company has program or data file path names assigned to it using Assign
path names to XX programs or Assign path names to XX data files.
•
If a new company has been defined manually with mc (the manual Add Multiple Company utility).
Run the File Initialization utility for each module added. For example, to run the utility for
Accounts Payable, do the following.
For Windows
Start->Programs->PBS->General Utilities->Add Company
For UNIX
From the PBS top-level directory system prompt, type:
addcmp
To run the initialization program for each application, refer to the Initializing Data Files
chapter.
Note
If you place the newly defined company files in the same location as the
company files that you copied them from (by not using menu selections 1
or 2 to reassign path names to the program and data files), immediately initialize your data files for your new company. This initialization must be
done before running Verify XX path names.
Enter 4 to select Verify XX path names. This selection verifies that each assigned company and
associated application path names actually exist on the specified path. A pop-up window
similar to the following appears and the verification process begins immediately:
199
During the verification process each path name is checked and displays in a pop-up window.
Press <F1> to temporarily stop the verification process, or press <Esc> at any time to exit the
process. For any program and data file that cannot be found, the display stops with a Not found
message and waits for a response. Press <Enter> to continue the verification process.
Note
Maintain a list of any files that fail verification, and contact your reseller
for more information on how to replace these files.
If you have just initialized data files for a new company, a small number of data files may not
verify. This occurs because some data files are not created by the initialization procedure, but
are created as you begin processing information for the new company.
The verification process creates a line sequential log file which lists the following information:
•
All program files
•
Data files and their associated paths
•
The result of the verification for each data file
The name of this log file is XXyyPATH.LOG, where XX is the application ID and yy is the
company-ID.
The log file can be useful beyond just checking the results of a verification. Given that the file
contains the formatted path name for each program and data file, it can be modified for use as
a batch file which might copy or otherwise process those program and data files.
When the verification is complete, an error count displays along with the name of the log file.
To return to the first Pathfinder screen, press <Esc>. You can then choose another company
and/or application to assign path names.
200
DEFINING MENU SELECTIONS
You may add selected applications and associated system IDs for any company to the Pathfinder
menu. This assigns path names for program and data files to any new company.
Select
Define menu selections from the Pathfinder menu, and the following pop-up window displays:
1. System ID
Enter the Identification Code for the Passport Business Solutions application for which you
want to assign path names. For example, AP is the standard designation for the system ID for
Accounts Payable.
When defining menu selections for a new company, you need to define one for each
application that the new company uses, including SY for the system manager. The System ID
format is two characters.
2. Package Name
Enter the name of the Passport Business Solutions application associated with the system ID.
For example, the application name associated with the AP system ID is Accounts Payable. You
can define up to 37 menu selections for any given company. The application name format is
30 characters maximum.
After you enter the application name, a prompt appears asking for the Field number to change
?. If you wish to change either the System ID or the application name, enter 1 or 2
respectively. Press <Enter> to add these selections to the Pathfinder menu and then press
<Esc>. When you exit from this screen, any menu selection defined will display on the
Pathfinder menu.
You cannot delete a menu selection with an assigned path name. You must first delete the path
name, and then delete the menu selection.
201
RECOVERING
FROM A
DAMAGED PATH FILE
The hard disk organization for PBS software is contained in the Path file (PATHFILE.DAT). If
the Path File ever becomes corrupt, your PBS software becomes unusable until the file is
repaired, recreated, or restored from backup. However, it is difficult to corrupt the Path File.
If some event does occur that corrupts the Path file, provisions have been made to recover the
file. Whenever you modify the Path File with the Pathfinder program, the Sequential Path File
(SQPATH.DAT) is updated with the full contents of the Path file. The Sequential Path File
must reside in the PBS top-level directory.
If the Path file ever becomes so damaged that it cannot be successfully opened, delete
PATHFILE.DAT and PATHFILE.VIX, if they exist, and the Passport Business Solutions
software will recreate the Path file automatically from the contents of SQPATH.DAT the next
time you run your software.
If SQPATH.DAT cannot be found, Passport Business Solutions automatically exits, and you
will need to copy SQPATH.DAT to the top-level folder (directory), or restore a copy of the
PATHFILE.DAT and PATHFILE.VIX from a system backup.
When Pathfinder has completed updating the Sequential Path File, that file totally re-creates
the Path File. This insures that the Path File never contains unused space.
202
CHANGING EXISTING DATA FILE PATH NAMES
The Pathfinder procedure assumes that you are not changing the location of existing data files,
since initializing these files will erase any data they contain. To change the path names for data files
that already exist for the applications associated with a company ID, you must use Pathfinder indirectly.
For example, suppose you install the Passport Business Solutions software onto drive C. After
entering some data, you decide to move your data files to drive D. You would use Pathfinder
(for company ID 00) to assign the new data file path name. Then you would exit Passport
Business Solutions and physically copy the data files to the new path name. Refer to the
following table for a summary of these steps that outline the procedure from a command line
prompt.
For the examples in this table the current directory is assumed to be C:\PBS\AR00\CUSFIL00.DAT.
STEP
DESCRIPTION
1
Change pathfile to the following:
D:\PBS\AR00\CUSFIL
2
md D:\PBS\AR00
3
Copy C:\PBS\AR00\CUSFIL00.DATD:\PBS\AR00\CUSFIL00.DAT
203
USING PATHFINDER
WITH
MULTIPLE COMPANIES
The Passport Business Solutions software uses the same programs for multiple companies but different data files for each company. For each new company defined, you must use Pathfinder to
define both the program locations (usually the same locations as they are in now), and the data file
locations (usually a new directory).
If you do not want to use the automatic procedure for adding a new company, refer to the following
table of steps to manually add a company:
STEP
DESCRIPTION
1
Define the company ID using the Define multiple
companies selection. Refer to the Defining Multiple
Companies chapter.
2
Create another directory or directories for the data
files of the new company or companies.
3
Use Pathfinder to define menu selections for each
installed application as well as for their system files.
For Example:
Sy ID: AP Pkg: Accounts Payable
Sy ID: SY Pkg: System files
4
Use Pathfinder to set up locations for the program
and data files for each application for the new company and the system files for the new company.
The original program and data files installed by the
Passport Business Solutions Installation procedure,
are identified with company ID 00 (zero-zero). Use
the copy feature to copy path names from companyID 00 to the newly defined company ID.
5
After you use the copy feature, assign different path
names for the data files (refer to the Assigning Pathnames to Data Files to (Package Name) Data Files
section). Do not change path names for programs.
6
Initialize the data files for the new company. Refer
to the Initializing Data Files chapter. Also, refer to
the Company Setup Checklist on the next page.
204
COMPANY SETUP CHECKLIST
Follow this checklist to set up a new company:
ITEM
DESCRIPTION
1
Define the new company ID(s) using the chapter on
Defining Multiple Companies.
2
Create another directory for the new company data
files.
Use Pathfinder to do the following:
Define menu selections for each application,
including the system files.
3
Assign path names by copying the program data
filenames and path names.
If you created a new directory for this company
in the second step, assign that path name to the
data files, including the system data files.
4
Initialize new data files for each application in the
new company. Refer to the Initializing Data Files
appendix.
5
Use Pathfinder to verify the path names. This is
optional, but recommended.
6
Run the application with the new company and
define Company information. Refer to the Company
Information chapter.
205
Lookup Design
This chapter contains the following topics:
Introduction to Lookup Design
Lookup Maintenance Window
Cursor Focus in Windows
206
INTRODUCTION
TO
LOOKUP DESIGN
There are hundreds of fields throughout Passport Business Solutions where Lookups can be
accessed. Some of these fields have multiple Lookups. The Lookup features for the PBS user
are explained in the System User documentation. This chapter explains the Lookup
Maintenance features that can be used by a PBS administrator to design Lookups.
The lookups provide a new realm of possibilities for customization. The Lookup Maintenance
function (Lookup Editor) allows a Passport Business Solutions Administrative User to
customize Lookup Windows without source code. General Users can not utilize these features.
With the use of Lookup Maintenance you have opportunities to access the data that you need.
There are different Lookup functions that help you achieve the result.
•
Add, change or delete one of the columns in the Lookup
•
Create or copy a new Lookup and then modify it
•
Assign a Lookup to a PBS user
•
Assign a Lookup to a PBS program
•
Assign a default sort-by for the lookup or limit the available sort-by fields
In the Windows Passport Business Solutions with the Lookups you have the choice of using
either the Windows-based or the character-based lookups. In the UNIX or Linux Passport
Business Solutions versions, you can only use the character-based ones. In either case, you
have the power to customize the lookups as needed. The user functions of the Lookup are
documented in the System User documentation.
Multiple Lookups can be linked together to form a Linked Format Group. There are many
examples of Linked Format Groups in PBS. The user accesses other Lookups in the group
using the Next Lookup button.
A Passport Business Solutions Administrator user accesses the Lookup Maintenance function
by pressing <F7> from any lookup in Passport Business Solutions. To return to the functioning
Lookup press <Esc>.
By default the Lookup Maintenance function displays the lookup parameters for the Lookup
that was active when the <F7> was pressed. Each Lookup record in the Lookup Maintenance
function corresponds to the parameters (or attributes) of one Lookup Window. Passport
Business Solutions General users cannot access Lookup Maintenance.
Select
A Lookup from any PBS screen with the <F8> key. To access the Lookup Maintenance
window select the <F7> key.
In most cases, there is a Lookup on the field where you need it.
Note
But in the case where you have to create access to a Lookup you must do
this in Lookup Access Maintenance (different than Lookup Maintenance).
See the Appendix Adding a Lookup on how this is done.
207
208
LOOKUP MAINTENANCE WINDOW
When you first view the Lookup Maintenance window it displays the parameters for the
Lookup that was last active and the cursor is at Field number to change ?.
The Lookup Maintenance Window is divided into two sections.
Upper Section of Window
The upper section of the window, down to field 21, is the master or header data Lookup
parameters. Fields 1, 3, 4 and 5 comprise the key field in the file and can only be changed if
you are entering a new Lookup or you have copied a Lookup and you are editing it.
In the upper left corner the Path is displayed. This relates to where the Lookup file is stored on
the system. There is more information on the path and the relationship of the path to saving
and deleting Lookups later in this chapter.
Field 3 through 8 comprise the Linked Format Group fields. These are used in linking the
Lookups together forming a group. The next lookup in the group is accessed by the user using
the Next Lookup button or the <F4> key. The last Lookup Format is linked to the first forming
a loop.
Lower Section of Window
The lower section controls the Lookup column titles and fields that display.
Fields 10 through 12 and the third row of field 22 pertain to the Character-based lookups only.
All the other fields pertain to both the Windows-based and Character-based types.
Initial Available Functions
There are several functions that you can do when viewing the displayed active window.
Options
You may use one of the options:
Enter a field To modify an existing Lookup field from Field number
# at FTNC
to change ?.
<SF8>
To view the Field Lookup which is a list of the available fields along with the field numbers that can be
used in the Lookup
<F7>
to remove the current Lookup from memory. This
results in a blank record with no fields filled-in. After
selecting ESC there are some additional options (see
below)
After you select the <F7> key you have several other options for selecting a Lookup.
209
Options
You may use one of the options:
<F1>
Select the next Lookup program
<SF1>
Select the previous Lookup program
<F3>
To delete the Lookup
<SF8>
This displays a Lookup of all the Lookup records in
PBS. You can use the mouse or arrow keys to select a
find and highlight a Lookup. When the Lookup is
located select the <Enter> key (or Mouse click in Windows) and it will display in the Lookup Maintenance
window.
<C>
To Copy the Lookup. Once the Lookup is copied, you
can modify it and save it.
If you have modified or copied and added a Lookup, there are several save options. These are
documented later in this chapter.
To view the Lookup Maintenance window with no data entered select the <F7> and then the
<Ecs> key and you will see a window similar to this:
*1. Driver Program
Enter the Driver Program name.
This must be an existing valid driver name.
Format
12 characters, Normally this is module prefix (2), application (6), “.”, application suffix (3).
Example
Type apvenfil.scr
You can view all the available driver names from this field by selecting the <F8> key.
210
You will see a screen like the following:
This is itself a Lookup and functions accordingly. The columns in this Lookup are described
below.
COLUMN
DESCRIPTION
Driver
name
These are the available names you can use.
Description
This is the description of the driver.
User
If the Lookup is assigned to a PBS user, this column
will have data. If the Lookup has not been assigned to a
user this column will be blank. More information on
assigning a Lookup to a user is found later in this chapter.
PBS program
If the Lookup has been assigned to a specific PBS program, the program name will display. For a list of PBS
programs, see the Appendix in this chapter.
Format
This is the Lookup format. The use of the format field is
provided later in this chapter.
*2. Program description
Enter a description of the Lookup.
Format
25 characters
Example
A/P Vendor File - If this lookup is assigned to a user or
PBS program you could also include a reference that is
appropriate, like A/P Vendor-Mary.
211
*3. PBS User ID
Enter a valid Passport Business Solutions user ID.
This assigns a Lookup so that it “belongs” to a specific user. This field should be left blank if
you do not want to assign the Lookup to a User.
When a User ID has been assigned to a lookup it takes preference over any general lookups
that have been assigned without a User ID.
Format
5 characters - Currently PBS only allows 3 character User
ID’s.
Example
PSI
In the Custom Forms, User IDs and PBS Programs section later in this chapter there is an explanation of the relationship between the PBS User ID
field and the Next User ID field.
Note
4. PBS Program
Enter the name of the Passport Business Solutions program that calls this lookup.
This allows you to create a lookup that is unique to that Passport Business Solutions program.
You should only fill in this field if you want to assign the Lookup to a specific field in PBS.
Leaving the field blank will mean that the Lookup can be accessed in all the locations where
the Lookup has been set up. You must know the program name before you can do this
assignment.
For example by making a specific entry for APVENMNT (Vendors-Enter) you could create a
Vendor Lookup that is designed specifically for Vendor Maintenance. Consequently the
Vendor Lookup in Voucher entry and Open Item Query would remain as the ‘standard’
Lookup.
Format
12 characters
Example
Select <Enter>
Note
In the appendix PBS Menu and Program Names, you will find a spreadsheet
that indicates the program names that are linked to the Passport Business
Solutions menu selections. Use this information to help you set up the PBS
Program field.
Note
In the Custom Forms, User IDs and PBS Programs section later in this chapter there is an explanation of the relationship between the PBS Program
field and the Next PBS Prgm field.
5. Format #
Enter the Format layout number.
212
At any one PBS field, where Lookups are accessed, there may be multiple Formats. One
format can be different from another by having different columns, different sort-by and a
number of other Lookup parameters.
Each Lookup is a different Format and a group of Lookup Formats can be linked together.
This field is used, along with the Next Format field, to Link together Lookup Formats. In a
group each Format number must be unique.
When Lookups are linked together in a group the user can click on the Next Lookup button or
select <F4> to display the next Lookup Format.
With a unique Format number for each Lookup, Lookups will have the same Program name
and when they are linked to the same originating field. The result is multiple Layout windows
with different contents that can be accessible from the same field.
What you enter on the Format # field works in relationship to the entry on the Nxt Fmt (next
format) field. Read the explanation of the Nxt Fmt field to understand the relationship between
these two.
Format
12 characters
Example
Select <Enter>
The Format numbers, L1, L2 etc., can be the same for different Lookup
Format groups
Note
6. Next user ID
Enter the Passport Business Solutions User ID for the next Lookup in this loop.
If a Lookup is assigned to the user, then all user ID’s in one Linked group should be the same.
Format
5 characters, but PBS only allows 3 character User ID’s.
Example
Select <Enter>
7. Next PBS Prgm
Enter the Passport Business Solutions Program name for the next Lookup in this loop.
If a Lookup is assigned to the PBS program, then all Next Program names in one Linked group
should be the same.
Format
12 characters
Example
Select <Enter>
8. Next Fmt
Enter the Format number for the next Lookup in the Linked group.
Format
12 characters
Example
Select <Enter>
You only need to enter a value in this field if you have multiple formats for the group.
213
When making Lookup groups into loops, you should link the last Lookup
back to the first.
Note
This is not a technical requirement. You can break the loop and link to a
Lookup that is part of another chain, however there is no provision to
allow you to return to the loop you started in.
When it comes to Linking the last Lookup to the first, the PBS installed Lookups, as opposed
to adding a custom group of Lookups, have a different Next format convention.
Here is an example of how the Format and Next format fields are entered with the PBS
installed Lookups. You can add a custom Lookup Format to the end of this group as long as
you use the three dashes in the Next format field.
PBS INSTALLED
LOOKUP GROUP
ORDER
FORMAT
NEXT FORMAT
1
01
2
01
02
3
02
03
4
03
---
The first format links to the second, the second to the third, third to the fourth and the forth
format links back to the first.
Here is an example of how a custom group of Lookups should be entered.
ALL CUSTOM LOOKUP
GROUP ORDER
FORMAT
NEXT FORMAT
1
L1
L2
2
L2
L3
3
L3
L4
4
L4
L1
Because the field is 12 characters you can theoretically have billions of formats linked
together. So, there is no ‘practical’ limit on how many custom Formats you can link. If you
need more than 10 formats in a group, enter the first as L01, the second as L02 and so on.
9. Lookup Title
Enter a descriptive title for the lookup.
This Lookup Title description displays in the title bar of the Lookup Window.
Format
60 characters
Example
Vendor Lookup Including Vendor YTD Purchases
214
10. Row Position
This field only applies when the Lookups are running in Character Mode - in Windows a
separate window is opened so this does not apply.
Enter the row offset of the Lookup window box. This is the number of lines skipped from the
top of the screen to display the lookup window box.
The value is numeric that can be between 0 and 21 giving the number of rows down that the
window box will be drawn.
Format
2 numeric
Example
05
11. Column Position
This field only applies when the Lookups are running in Character Mode. In Windows Mode
the width is automatically calculated so this field does not apply.
Enter the column position of the Lookup window box. This is the number of columns from the
left where you want the lookup window box to be displayed.
The maximum width of a column is 78. The value is a numeric and can be between 2and 77
giving the number of columns across that the window box will be drawn.
Format
2 numeric
Example
02
12. Line Size
Enter the Lookup window width that will display on the screen.
The maximum size is 78. This numeric value should be between 3 and 78 giving the width of
the window box.
Format
2 numeric
Example
02
Note
The total value of Column Position and Line Size cannot exceed 80.
13. Auto Size Scr
Enter the Auto Size Screen flag.
This field is used to determine if you want to automatically size the lookup. The value Y will
auto size and N will not. This field will override Line Size.
215
If the number of records being displayed is less than the number of records in Max Scr Lines,
the Lookup will automatically be sized based on the width requirements of the displayed fields
and the number of displayed records.
Format
1 alphanumeric, either Y or N
Example
Y
14. Max Scr Lines
Enter the maximum number of lines to be displayed on the screen.
This parameter determines the height of the Lookup Window.
Format
9(2) numeric; a value between 12 and 24
Example
16
15. Max Record Lines
Enter the maximum number of records to be read into memory at one time.
Many PBS files can contain hundreds, thousands or more records. A Lookup program puts
records in RAM memory. If the Lookups were to put thousands of records in memory at one
time, the performance would be very slow. Therefore we have provided a means of limiting the
number of read records.
There are two ways of changing the number of records that are being read. You can enter a
value in this field or change the global COBOL Configuration File (cblconfi in Windows and
cblconfig in UNIX/Linux) value. When the Max Record Lines is set to a value of 9999 then the
Configuration file determines the number of read records. With any value between 10 and
1000 then the Max Record Lines field determines the number of read records.
The maximum that can be entered is 1000. If the Lookups are being used on a slow
performance machine or network, lowering this number will increase the performance.
Also lowering the global value in the Configuration file will produce the same results. But
because that is a global value it effects every file Lookup for every user on the PBS system.
See the information on setting the global value see the SET_POP_SZ field in COBOL
Configuration File appendix.
Format
Numeric; a value between 10 and 1000
Example
9999
16. Sort-by Y/N
Enter Y if you want to allow multiple sort-by fields and N if you do not.
Most PBS files have multiple sort-by fields. but some may not. Check the Field Lookup (F7) to
determine if it is available.
If you enter Y the Sort-by field on the Lookup will be accessible. If you enter N then the Sortby field will be grayed-out and not accessible.
216
Format
1 Alphanumeric: Y or N
Example
Y
17. Sort by Default
Enter the default Sort-by field number (letter).
A Sort-by must be an Indexed field within the PBS COBOL file. To view the available Indexed
fields press <F7> to display the Field Layout. The available fields will be indicated by the term
Primary Index or Alternate Index. Up to 15 Index/Sort-by fields can be available depending on
the index structure of the primary file.
Valid entries include 1-9 for fields 1-9 and A-F for fields 10-15. If this field is set to spaces, an
“N” or a zero the program will default to using index #1. Other values will give invalid results
and may partially disable the Lookup.
Format
1 Alphanumeric; 1 - 9 and A - F
Example
1
Note
For some files the Valid G/L Account number or G/L Chart of Account
number may be listed as an Alternate index field in the File Layout, but it
is not available as a Sort-by and therefore cannot be used. It is only available when it is the Primary Index like in the Valid G/L Account file.
18. Sort-by Fields
Enter the Sort-by fields to be used for this lookup.
There are default Sort-by fields that are dictated in the program and files. Entering data in Sortby Fields will override these default Sort-by fields. Leaving Sort-by Fields blank will use the
default.
These entries must be entered as a string separated by commas. Valid entries here are 1-9 for
fields 1-9 and A-F for fields 10-15.
Acceptable values include “1”-“9” or “A” to “F” for each entry in the string. The actual values
that are valid will depend on the actual indexes available through the program.
Format
10 Alphanumeric
Example
1,2,4,A,C
19. Bypass Assoc Flds
Enter Y if you do not want to access the associated fields. Enter N if you want to use the
associated fields.
There are two types of fields that a Lookup can access. These are the Primary file fields and an
Associated file fields. The Primary file fields are from the main file and are always available.
The Associated fields come from an Associated file that is linked to the Primary file. Multiple
Associated files can be linked to a Primary file. Not all Lookups will have Associated fields.
217
For example, the Customers Lookup has fields from the Primary Customer file, but it also has
fields from the Associated Sales Rep file. The Sales rep name is not part of the Customer file,
but you can select it as an Associated field and then it will display in the Lookup. At the end of
this chapter is a list of the Primary and Associated files.
Answering Y to Bypass the Associated fields will increase lookup performance since all the
Input and Output that accompanies the synchronization process will be bypassed. In most
cases the Lookups are defaulted to Y.
Selecting <F7> for the Field Lookup will give you a list of the Primary file fields and further
down the list, the Associated file fields.
Format
1 Alphanumeric, Y or N
Example
N
20. Update protection
Enter Y if you want protect this Lookup or select N if it is OK to over-write it when PSI applies
updates.
Format
1 Alphanumeric, either Y or N
Example
N
This field will automatically get set to Y when you modify or create a new Lookup.
21. View only option
Enter Y if you want this lookup to be view only or select N if you want sort-by, search and
next Lookup options to display.
Format
1 Alphanumeric, either Y or N
Example
N
22. Lookup Information
Enter the three Lookup display lines.
Be aware when entering the header, data fields and column separators, you should allow room
on the column to be able to view the data; otherwise the displayed data will be right-truncated.
A right-truncation may be fine if you do not need to see the entire field. The field length is
noted in the Field Lookup.
Line one (Header)
Enter the field names on the first (header) line. These names will display in the Lookup as the
column heading.
Format
78 Alphanumeric
Example
Vendor # Vendor Name Email 1
Place an @ symbol before each column heading if you want to use proportional fonts.
218
Line two (File Data)
Enter the data field numbers, prefaced by the caret <^> symbol or a number <#> symbol.
The caret symbol has special meaning to and indicates that the 1-3 character code after the
caret is not just alphanumeric data but is a field number and the field contents are to be placed
where the caret is located.
To make the data easier to read when using a proportional font, the number symbol is used in
replace of the caret for all numeric fields that numbers to the right of the decimal. This will
justify the decimal point and will right justify the column header as well.
The field numbers can be found in the left column of the Field Lookup. If the number in the
Lookup is 001, then enter ^1
Format
78 Alphanumeric
Example
^1 ^2 ^121
Line three (Column separator)
Enter a | or + symbol.
This row is used for the field separator symbols and is needed only when designing a character
lookup.
The pipe <|> symbol will draw vertical lines separating each column. The plus <+> symbol
will display the lookup as a grid and draw a full row and column grid so that each data element
appears to be surrounded by a box.
Format
78 either |or +
Example
|
Saving a Lookup
Field number to change ?
Once you have copied or changed a Lookup and you are ready to save it you have several
options. The PBS Lookups will allow you to save the changes so that they are global or
company specific.
There are some differences at Field number to Change from the standard PBS convention.
When you select the <Enter> key, the Lookup record Format will continue to display but with
some differences on the second row of Field 22. Depending on the type of field you entered
the following will be indicated.
•
Alphanumeric fields will display as X’s
•
Numeric fields will display as 9’s
•
Dates will display as 99/99/99
219
As a confirmation on what you entered, you can review field 22 to verify that the Header line,
File data line and, if used, Column Separators line up properly. If you entered a non-valid field
number, then the field will not display.
Options
When you select <Enter> the second time you have the following options:
Select Y to create a company specific record
or select N to not do so. If you select Y, the
Lookup gets saved in ptxx.
Create/update company specific Lookup? The first time you save a Lookup for a company, will create the directory and needed
files. Therefore you must have permission on
your system to create a directory and a file.
Select Y to create a global custom Lookup
record or select N to not save the record. If
you select Y, the Lookup gets saved in ptcus.
Create/update global
lookup?
You can also select the Esc key and no
changes will be saved. You will be returned
to the Lookup but the changes will be
removed.
When you select to create and save a global Lookup the Lookup will function in every PBS
company in the system. If you create and save a Company specific Lookup, then the Lookup
will only work for the company you are in at the time you create it.
In the upper right corner of the window the word “Path” displays. Next to this word is the
directory where the file Lookup record is stored. These locations relate to the access of the
Lookups. Here are the directories and description.
ptdat
This is where all the original non-customized lookups
are stored. When you customize a Lookup in ptdat and
save it, it gets saved in either ptcus or ptxx.
ptcus
This means that you are viewing a global customized
Lookup.
ptxx
This indicates that you are viewing a Lookup specific
to a PBS company. The xx represents the company
number.
Deleting a Lookup
You can only delete customized Lookups. You cannot delete the original Lookups that were
supplied with the PBS installation.
220
You can delete a Lookup from any location in PBS where a Lookup can be accessed, but it is
often easier to find the Lookup from the field where it is accessed.
Here are the steps to delete a Lookup.
1. Navigate to the field where you can access the Lookup and display it with <F8>.
2. Select <F7> to display the Lookup Maintenance Window. The Lookup should either display
the path as ptcus or ptxx. If it is ptdat, then you do not have a custom Lookup and it can not
be deleted. Note the driver name and any other identifying information about the Lookup.
3. Select <Esc> and then select <F8> for a list of the Lookups.
4. Find the one from the list that matches the one you want to delete and select it.
5. The Lookup record should display in Lookup Maintenance. Select <F3> to delete it.
6. To test that it is deleted, exit out of Lookup Maintenance, exit the Lookup and reselect the
Lookup with <F8>.
Lookup Access Sequence
The program determines the hierarchical sequence of which specific Lookup that is accessed,
based on what as been entered in the Lookup record. The sequence determines who, where
and which Lookup Format that is accessed and then displayed.
There are several fields in the Lookup that determine this sequence. These fields include the
PBS User ID (who), PBS Program (where) and Format.
The general scheme is to go from most specific to least specific. Assuming that you are using
the L1, L2 and so on as the convention for naming the formats, when a Lookup is accessed
using the <F8> key the following sequence applies.
The program will first check to see if data exists in the User ID field, then Program Name
field and then for a Format of L1.
It will then check to see if a Lookup is available for the User ID and a Format of L1.
Then it will check for a Lookup for the Program Name and a Format of L1.
Then it will check for a format of L1.
Finally, if none are found, it will go to the default Lookup specified for that Driver Program
in the Map Configuration.
You will need to keep this hierarchical sequence in mind when developing, modifying and
assigning your lookups.
Custom Formats, User IDs and PBS Programs
You can assign a user, program or both to a custom group of Lookup formats.
When you assign a user to a group it means that only one PBS user will access the group of
Lookups.
Here is an example of entering the Format and User ID fields when assigning a User to a
multiple Lookup formats.
221
LOOKUP
GROUP ORDER
FORMAT
NEXT
PBS
NEXT
FORMAT USER ID USER ID
1
L1
L2
PSI
PSI
2
L2
L3
PSI
PSI
3
L3
L1
PSI
PSI
In the above example, we have multiple formats. If you need only one format for the user, then
you can leave the Next format and Next User ID fields blank.
You can also assign a PBS program to a Lookup format. Here is an example of assigning a
group of Lookup formats in O/E, Orders on the customer number field.
NEXT
FORMAT
ARCUSFIL.
SCR
L1
L2
OEORDENT OEORDENT
ARCUSFIL.
SCR
L2
L1
OEORDENT OEORDENT
FORMAT
PBS
PRGM
NEXT
PBS
PRGM
DRIVER
PROGRAM
You can assign multiple or single custom formats to both a User and a Program at the same
time.
Primary and Associated Files
The following contains a list of the primary files and their associated files.
MODULE
PRIMARY
FILE
ASSOC.
FILE
AP
APACCT
ACCTFI
AP
APOPEN
VENFIL
AP
APRCUR
VENFIL
AP
APTRXF
VENFIL
AP
PURADR
VENFIL
AP
VENFIL
ACCTFI
AP
VENHIS
VENFIL
AR
ARACCT
ACCTFI
AR
ARCODS
ACCTFI
ASSOC.
FILE
ACCTFI
222
ASSOC.
FILE
ASSOC.
FILE
ASSOC.
FILE
ASSOC.
FILE
ASSOC.
FILE
MODULE
PRIMARY
FILE
ASSOC.
FILE
ASSOC.
FILE
ASSOC.
FILE
AR
AROPEN
CUSFIL
SLMFIL
ARCODS
AR
ARRCUR
CUSFIL
SLMFIL
ARCODS
AR
CUHFIL
CUSFIL
AR
CUSFIL
SLMFIL
ARCODS
ACCTFI
AR
DLVFIL
CUSFIL
AR
IVCSTA
IVCFMT
AR
PIHDRF
CUSFIL
SLMFIL
ARCODS
DLVFIL JCMSTFI
AR
RHDRFI
CUSFIL
SLMFIL
ARCODS
DLVFIL JCMSTFI
CR
CKACCT
ACCTFI
IC
CATEGF
ACCTFI
IC
ICTRKF
CUSFIL
ITMFIL
SERHIS
POHDRF
IC
INVACT
ACCTFI
IC
ITMFIL
ACCTFI
VENFIL
CATEGF SUBCAT
IC
KITFIL
ITMFIL
IC
SERHIS
CUSFIL
ITMFIL
ICTRKF
POHDRF
IC
STAFIL
ITMFIL
WHSFIL
IC
SUBCAT
CATEGF
IC
WKOFIL
ACCTFI
KITFIL
WHSFIL
ITMFIL
JC
CATFIL
VENFIL
OE
OERHDR
CUSFIL
SLMFIL
ARCODS
DLVFIL
WHSFIL
OE
ORDHDR
CUSFIL
SLMFIL
ARCODS
DLVFIL
WHSFIL
OE
HDRTRP
VENFIL
POHDRF PURADR WHSFIL
PO
POHDRF
VENFIL
RCVTRX PURADR WHSFIL
PO
POLINF
VENFIL
PO
RCVHIS
VENFIL
WHSFIL
PO
RCVTRX
VENFIL
WHSFIL
223
POHDRF
ASSOC.
FILE
ASSOC.
FILE
ICCODS
AUXFIL
ASSOC.
FILE
ASSOC.
FILE
UNITFI
STATFI
MODULE
PRIMARY
FILE
ASSOC.
FILE
ASSOC.
FILE
PO
VENITM
VENFIL
ITMFIL
PR
DEDCOD
ACCTFI
PR
EMPFIL
DEDCOD
PR
TAXCOD
ACCTFI
SY
CSHACT
ACCTFI
SY
ASSOC.
FILE
ASSOC.
FILE
ASSOC.
FILE
ASSOC.
FILE
TAXCOD
SYUSRFIL SYUSRACC
Customized Lookups and the Default Directory
Normally the customized global Lookups get saved in a file in the ptcus directory. But if
needed you can have multiple global Lookup directories by adding a parameter in the cblconfi
(Windows/Thin-Client or cblconfig (Unix/Linux) file.
Add the following parameter:
USE_PTOOLS_DIR
The first two characters of ‘pt’ are assumed. Therefore if you want to save the global Lookups
to the ptpsi directory, the parameter and setting would be:
USE_PTOOLS_DIR psi
224
ASSOC.
FILE
CURSOR FOCUS
IN
WINDOWS
There is a setting in the cblconfi file that determines the initial focus of the cursor when you
access a Lookup. This setting is
SET_POP_SEL_CTRL
The default setting when PBS is installed is Line. You have the option of the initial focus being
the first line, the sort-by field, the search by field or an auto function.
The auto function will bring the cursor to the first line if you have less than or exactly enough
lines to fit in the Window. If there are more lines than will fit, the focus goes to the search by
field.
The following is the cursor focus section from the cblconfi file:
# LOOKUP FOCUS
# Lookup focus options include:
# LINE = First line,
# INDEX = Sort-by
# SEARCH = Search field
# AUTO = Depends on number of records
SET_POP_SEL_CTRL LINE
Only the first letter of each choice is the indicator of the type.
225
Backing Up Data Files
This chapter contains the following topics:
Introduction to Backup
Backup Frequency
Choosing Backup Media
Types of Backup
Backup Rotation
Backup Logs
Labeling Backup Media
Backup Procedures
Disaster Recovery
226
INTRODUCTION
TO
BACKUP
This chapter provides an overview and introduction to the importance of system backups of
both programs and data.
To make a backup is to make a copy (duplicate) of all your data (directories, subdirectories, or
individual files etc.) to disk, tape, external drive or other backup media. These are then
normally stored off of your computer system main drive.
Backing up data and programs is one of the most important system procedures that you must
perform and should be done regularly. Backups are your insurance against corrupted data files,
software, operating system or hardware failures, or problems unrelated to your computer such
as damage from a fire that can cost you significant downtime and be very costly to your
business. Having a backup copy allows you to store your data in a secure area outside of your
computer or even away from your principal place of business and use that backup to restore
your system and be up and running again in a short time.
Note
Prior to an upgrade of any type, we strongly recommend that you perform
a full backup. This will guarantee the validity of data in the event of
installation or hardware problems that may occur during the upgrade.
Files to Include in Backup
If you prefer, you can backup the entire contents of the PBS directory. Then you are assured
that everything you need will be saved. This is the best option. It is essential if you have
custom programs with custom menu selections and custom paths. If you prefer to backup data
selectively, then we have a recommendation on the files to include.
•
Using AcuCOBOL Vision file formats, your backups should include all files ending in .DAT
and .VIX. Most files that end with .DAT will have a matching .VIX file, but not all.
•
Ensure that you include all data files stored in your subdirectories. Although your backup may
include other files, all files matching *.DAT and *.VIX should be included. Refer to the Standard Installation Structure in the PBS Installation chapter for information on these sub-directories. Most data files will have a matching .VIX file, but some do not.
•
Ensure that you have a copy of all the backup programs to enable you to back up your data.
This is necessary in case the original program is lost or unrecoverable.
•
Reports and posting registers printed to disk are in the RWPRT directory. They end with a .prt.
You may want to include these files.
•
Files in the sub-directories of the PDFFIL directory that end with .PDF may also be included. If
there are files in this directory, they should be invoices, statements, purchase orders, etc.
Backup Frequency
The frequency of your backups is relative to your individual operations.
227
Generally speaking, back up your data as often as necessary to avoid a major inconvenience or
disaster if the changes to your data were lost or unrecoverable.
It is important to remember that if all your data were lost, you would have to re-enter all the
information since your last backup. Today’s computer systems are highly reliable and rarely
have a serious failure that can't be corrected. Failures do occur, however, and having a backup
is the best protection for your valuable business information.
Passport Software recommends the following:
•
If you use your Passport Business Solutions software several hours a day, backup at least daily.
•
If you use your Passport Business Solutions software only an hour or two each day, backup at
least every other day.
•
The usual time to backup data is at the end of the work day or in the evening. This is when the
system is least active, daily transactions are complete, and the effect on system performance is
minimal.
Choosing Backup Media
Backups are usually performed using another hard drive or tape. An external hard drive will
work well but has the risk of being vulnerable to the same kinds of failures that you are doing
the backups to protect against.
Removable hard drives are often used for backups.
A media used for backup can be tapes which have the capacity of hard drives. Tape drives are
available in numerous densities and can be internal or interfaced to a port of your processor.
Other backup media can include CD-ROMs or DVDs. There are writable and re-writable
versions for each.
Types of Backup
Backups are usually categorized into the following types:
Complete
Backs up the complete PBS system including programs and files.
Full
Backs up all selected files.
Incremental
Backs up all changed or new files since the last incremental or full backup.
Differential
Backs up all changed or new files since the last full backup.
228
Each method has advantages and disadvantages. The best method to use varies from site to
site, and depends on your requirements. Consult with your reseller for the backup method that
would benefit your operations.
Backup Rotation
Before you backup you files, you usually need to format the tapes or other storage media you
will use, although formatted media is available. However, formatting does ensure media
integrity.
You need to format three complete sets (series) of backup media: series A, series B, and series
C.
The following describes a typical backup cycle:
•
The first time you backup, use series A. For the second backup, use series B. The third time
you backup, use series C. For the fourth backup, return to series A.
You rotate the backup sets: A, B, C, A, B, C, etc.
•
If a situation arises where you need to recover information, use the most recent backup. If the
information you want is not available on that backup, revert to the next backup prior to it. This
situation could arise if the most recent backup was done after data had been deleted or corrupted.
•
The third backup set (the oldest one at any given time) is a fail-safe set. It may not have information as up-to-date as you would prefer, and you may never need it, but if you do, you'll be
very happy to have it.
Backup Logs
Maintain a backup log which contains information about when your data files were backed up.
This type of log usually contains columns of information as follows:
Date
Time
Backup Series
Operator
The Date and Time column indicate when the last backup was performed. The Backup series
column shows which set of media was used. The Operator column shows the name and initials
of the person who performed the backup.
Using the log, you can easily determine if backups are done according to your frequency
requirements, which backup series is the most recent, which series to use next, and which to
use if you need to recover data.
Labeling Backup Media
Before you backup for the first time, clearly label your tapes or media as follows:
•
PBS backup series (A or B or C)
•
Media or tape #(1, 2, 3, etc.)
•
Ensure that your labels are easy to read.
229
Backup Procedures
Passport Business Solutions data files are stored on your hard disk in directories and subdirectories
which facilitate backup procedures.
In order to back up, use an operating system utility or a third party backup program. These
utilities can be automated (to an extent) by your reseller, according to your requirements.
You should discuss backup considerations and requisites with your reseller in order to effect
the best possible backup strategy and choice of backup utility for your needs.
Disaster Recovery
It is wise to provide some protection against total data loss.
Store your backup series at an off-site location to ensure that data is protected from any on-site
disaster. There are companies which specialize in providing off-site media storage services.
If another computer is available, it is wise to periodically check the integrity of your backup
program by doing a system restore. This accomplishes the following:
•
Ensures your backup process by verifying that it restores your data.
•
Ensures your backup media is reliable.
•
Ensures your staff is prepared in the event of an emergency.
It is preferred that a restore not overwrite existing data, because if the data has become
corrupted or in some way unreliable, then you will not lose your existing data. Once restored,
do a comparison to the existing data to verify matching file sizes and dates.
230
File Recovery Utilities
This chapter contains the following topics:
Introduction to File Recovery
Data File Corruption
Using File Recovery Utilities
Reclaiming Disk Space
ISAM File Recovery Utilities
Files to Maintain
Rebuilding Files
Recalculating Inventory Quantities
Relative File Utilities
Extended File Utilities
Navigation Distribution History File Backup
231
INTRODUCTION
TO
FILE RECOVERY
Only PBS administrative users can use the file utilities.
This chapter describes how to recover corrupted data files and reclaim unused disk space using the
File Recovery Utilities (export, restore and rebuild). Both ISAM (Indexed Sequential Access
Method) and relative files are included.
UTILITY
Regular file
utilities
Extended file utilities
FILE
ORGANIZATION
ACUCOBOL VISION FILES
WINDOWS
UNIX/LINUX
indexed sequential
??UTIL
??util
relative
CTLUTIL
ctlutil
indexed sequential
EXFUTL
exfutl
relative
[n/a]
[n/a]
232
DATA FILE CORRUPTION
Data file corruption occurs infrequently, but you do need to be aware of its causes and preventions.
Corrupt files can be caused for a variety of reasons. The most common reasons are:
•
Loss of power or “brownouts” while running PBS software.
•
The computer reboots while using PBS software.
•
Power surges while running PBS software.
•
The hard disk develops a surface defect.
•
Loss of connection to the server.
Never power off or reboot your computer while running PBS software. Sometimes the power
is turned off, or your computer is rebooted, by an interruption in the electrical power.
Whenever possible use backup battery power to avoid this from happening.
Never shut down your computer while PBS files are open. As a general rule, always log out of
PBS before you shut down your computer. If you are using terminal emulation, always log out
of PBS before you close the terminal emulation software.
The most import thing to know; never ever shut down your computer during a posting. If
your electricity is susceptible to power loss during severe storms or other conditions, save your
work often and post when the power loss threat has diminished.
We recommend that you use a UPS, uninterruptible power supply, to maintain power to the
server in the event of a power outage. Also, when ever possible have the workstation on a
battery backup. Laptops usually have battery backup capabilities built in.
The best and safest policy is to keep current backup copies of all Passport Business Solutions
data files. See the Backing Up Data Files chapter. If current backups are not available, you
may attempt to recover corrupted files by using the utilities described in this chapter.
Corrupted data files cannot be used reliably, and any attempt to use them causes error
messages, such as FILE ERROR 98. If you see a similar error message, or if you get unusual
results while using Passport Business Solutions software and suspect there may be a corrupted
data file, there are steps that you can take to correct.
233
USING FILE RECOVERY UTILITIES
You use these utilities for the following reasons:
•
To recover from a corrupt data file index
•
To recover from a corrupt data file
•
To reduce the size and sometimes increasing the performance of an indexed file
•
To allow transferring data to and from non-Passport Business Solutions packages. See the PBS
Field Definition Guide (PBS_FDG.PDF) for layouts of exported PBS files. The Data Import
tools may also be useful for importing from an external application. See your PBS provider for
information about and acquiring Data Import.
•
To allow user-coded data manipulations
•
To allow conversion from one file format to another
•
To allow upgrading to a new version of the software. Files are exported using these utilities.
Then:
Files which have not changed are restored to the new folder in the usual way, also using these
utilities.
Files which have changed are upgraded using utilities supplied with the upgrade kit.
Upgrading reformats the data to the new file layout and (where feasible) makes default
assumptions for new fields. Refer to Upgrade Release Notes supplied with each upgrade.
Special file conversions may need to be run.
The file recovery utilities are not intended to do the following:
•
Back up files
•
Replace Pathfinder functionality
•
Defragment your disk drive.
•
Search your hard drive for disk errors.
Recovering a Data File Index
If a data file index becomes corrupted, an error message of this general format displays:
FILE ERROR 98,00 ON CHARTF00 FILE.
CORRUPT INDEX FILE TERMINATION OCCURRED IN GLOBJ/COAADD
PLEASE WRITE THIS INFORMATION DOWN BEFORE CONTINUING.
This type of message gives the error number (98, in this case), the name of the file where the
error occurred (CHARTF00), followed by a brief explanation of the error. When this message
is displayed, all processing stops to avoid further file integrity problems.
Whenever you receive such a message, use the Rebuild a file selection as explained in this
chapter. If this fails, use the Extract all records from a file selection followed by the Remake
from an extract file selection.
234
Recovering Data Files
Sometimes the data within a file becomes corrupted. The only indication of corrupted data in a file
(versus a corrupted data file index) is missing or “garbage” data. Solving this problem can be quite
difficult and may require professional assistance. In some cases, restoring from a backup may be
your only recourse.
235
RECLAIMING DISK SPACE
Use the Export utility in conjunction with Restore to shrink a data file so to reduce the amount of
space it occupies on your hard drive, as described below.
Files can accumulate unused space in the following situations:
•
Files that are periodically purged, such as:
- Vendor History File in A/P
- Cash History in A/R
- Purchase Order Master File in P/O
- Invoice History Files in A/R
- Transaction History Files in POS
- Distribution to G/L Files
•
Files that are periodically compressed:
- General Ledger Transaction File in G/L
- Checkbook File in C/R
•
Files that may have had a large number of records deleted from the file:
- Vendor, Customer, or Item File
- Employee File
- Chart of Accounts File
In the above cases, this space is reused by further processing.
For example, if you create more vendor history, then the new vendor history uses space that
was freed up by the purge function. If you add new customers, these customers use space that
was previously allocated for customers that you deleted.
However, you may wish to reduce these files to their minimum size (i.e. the minimum size
required to hold just the data that is actually in use in the file).
In this case, use the Export a file and Restore from an export file functions to reclaim disk
space.
The Export Utility does the following:
•
Sorts the file sequentially
•
Ignores purged records
•
Converts the file to an ASCII format
•
Creates a new file with an .EXP extension to indicate that it’s an exported file.
236
Reclaiming Disk Space Steps
When you restore a file, all records from the ASCII export file are copied back to the
AcuCOBOL Vision data file. Make sure no one has entered new data in the file between the
time you export the file and restore it.
STEP
DESCRIPTION
1
Make a backup copy of the file.
2
Select Export a file.
3
Select the file you wish to export.
4
Create a new export file.
5
Select the full range of records to export (First to
Last).
6
Select Restore from an export file.
7
Select the same file.
8
Create a new data file.
9
Once the restore is complete, and you have verified
that the recreated data file is correct, delete the
export file.
237
ISAM FILE RECOVERY UTILITIES
The following section pertains to Indexed Sequential Access Method (ISAM) file types.
If you wish to run a utility function on all files for one or more packages and for one or all
companies, refer to the Extended File Utilities section.
If you wish to run a utility function on a Relative file, refer to the Relative File Utilities.
The file recovery utilities are available from the Windows Start menu if they have been
installed on your machine. From the Windows Start menu:
Click
Programs->Passport Business Solutions->File Utilities->?? File Utilities
Where ?? is the system ID of a PBS module (ap, ar, ic, etc.).
When accessing the utilities in UNIX, Linux or from a Windows command prompt, navigate to
the top-level PBS directory and type in ??util.
If prompted, enter the Company ID of the files you will be processing.
A screen similar to the following will be displayed:
For Inventory Control, the following screen displays:
238
Exporting Files
From the File recovery utilities menu, type 1 to select Export a file. A screen similar to this one
displays:
Some modules with large numbers of files (such as A/R) require two screens. Press <PgDn> to
reach the second screen.
As shown on the screen above, there are two names associated with each file: one is in English,
the other is the actual file name. For example, the software recognizes the Valid G/L Account
file as ACCTFIXX, with XX being the 2-character company code.
Enter the data as follows:
Please select file
Enter the number of the data file that you want to export. The numbers are shown to the left of
the file names.
The file selection menu shows the name by which your computer recognizes your data file. A
data file is composed of two disk files: one with a .VIX extension (index), and one with a .DAT
extension (data). An export file is a single disk file that has an .EXP extension.
Please enter device for export file
This is the drive on your computer where the export file will be created.
Enter your hard disk device letter here (usually C), or diskette drive A or B if you want the
export file created on a diskette.
The export file has the same name as the original file, but with a .EXP extension. Any change ?
then displays. If the data is correct, press <Enter>, otherwise answer Y, and make the changes.
(C) create new export file or (A) add records to existing export file ?
If you enter C (create new export file), then all the data in the previously created export file, if
any, for this particular file is destroyed, and the data records contained in the data file are
transferred to a newly created export file.
239
If you answer A (add records to existing export file), all the data in the existing copy of the
export file is retained, and the data records contained in the data file are added to the existing
export file. If there is no existing export file on the device specified, an error message is
displayed if you answer A.
You are then asked to enter the starting file key and ending file key.
The most common response for these fields is to use <F2> to indicate First and Last. This
indicates that you want to export the entire file.
Enter the exact starting and ending keys here to enable a partial export. The key has to be
entered exactly as it appears in the record, with any leading or trailing zeros and spaces.
As the file is processed, a record count displays and increments by one for each record
processed.
When the export process is complete, press <Esc>. Then export another file through the above
procedure, or press <Esc> to return to the previous menu.
Each data record is written to the export file on a separate line in ASCII format. If the last field
is alphanumeric, trailing spaces are truncated. Each record ends with a carriage return and line
feed.
Export Utility Summary
The export utility can be summarized in the following steps:
STEP
DESCRIPTIONS
1
The file is sequentially sorted.
2
The process ignores (not copied) purged records.
3
The file is converted to an ASCII format file.
4
Export creates a new file with the extension .EXP.
240
Note from the above, the .EXP file does not contain four of the original records (03009,
02005, 01003, and 04012). Only one of the four is shown to have relocated within the file.
Restoring From an Export File
From the File recovery utilities menu, type 2.
A screen similar to this one displays:
Because of the large number of files, some modules (A/R is an example) require two screens.
Press <PgDn> to reach the second screen.
Enter the data as follows:
Please select file
Enter the number of the data file to restore. The numbers are shown to the left of the file
names.
The file selection menu shows the name by which your computer recognizes your data file. A
data file is actually two disk files: one with an.VIX extension, and one with a.DAT extension.
An export file is a single disk file that has an .EXP extension on the end of its name.
Please enter device for export file
This is the disk drive where the export file to be restored resides. The export file is the file to be
copied back to your original data file.
Enter your disk device letter here (usually C), or diskette drive A if the export file is restored
from a diskette.
The export file has the same name as the original file, but the extension is .EXP. You then see
Any change ?. If the data is correct, press <Enter>, otherwise answer Y and make the changes.
(C) create new data file or (A) add records to existing data file
If you answer C (create new data file), all of the existing data records in the original file are
destroyed, and the data records contained in the export file are transferred to the original file.
241
If you answer A (add records to existing data file), all of the existing records in the original file
remain, and the data records contained in the export file are added to the original file.
Any change ?
As the file is processed, a record count displays and increments by one for each record
processed.
When the restore is complete, press <Esc>. Then restore another file through the above
procedure, or press <Esc> to return to the previous menu.
Restore Utility Summary
The Restore utility copies records from an exported file back to your original data file.
This maximizes the use of your disk space. When you use this utility in conjunction with the
export utility, you can shrink a file so that it takes up the minimum amount of disk space for
that given file. Restore reorders the records within the file itself.
Export and Restore Relationship
The following illustration shows the relationship between Export and Restore.
Restore Effect on Disk Space
The following shows the basic reorganization that occurs when you use the Restore utility:
242
Files to Maintain
Files which you periodically purge or compress can accumulate unused space within the file. When
you purge records, the information is no longer available, but the records are not physically
removed from the disk. The records are marked for deletion only. Purging records does not physically reduce the size of the file.
Note
In most modern computer systems, hard drive space is not an issue so purging files should not be necessary. If you do run out of space, rather than
purge files it is recommended that you upgrade your computer with a
newer larger hard drive rather than purge records.
An exception may be, when data becomes so old it is no longer useful.
Then purging could be use to remove old data.
To recover disk space and optimize the data file, use the Export and Restore utilities. These
two programs do the following:
•
Reduce the size of the file by physically removing all records that are flagged for deletion.
•
Reorganize the file structure for quicker access to data.
•
Alert the user to any corrupt data, and reduce the risk of future file corruption by ridding the file
of unused records.
Files (and their associated applications) that you should export and restore regularly are listed
below.
243
Customer file
A/R Open Item file 3
A/R Distribution to G/L
file 3
Invoice Header file
Invoice Line Item file
Invoice Auxiliary file
Cash History file
Customer History file
A/R
Recurring Invoice Header
file
Recurring Invoice Line
Item file
Recurring Invoice Auxiliary file
P/I History Header file
P/I Line Item file
P/I History Auxiliary file
A/P
Vendor file
A/P Recurring Transaction file 1
A/P Open Item file (after
month-end) 3
A/P Check file
A/P Distribution to G/L
file 3
Vendor History file 3
Memo Transaction file 1
PO
P/O Auxiliary file
P/O Master Header file 3
P/O Master Line file 3
P/O Master Distribution
file 3
P/O Transaction Header
file
P/O Transaction Distribution file 3
Receivings History file 3
Change Transaction
Header file 1
Change Transaction Line
file 1
Change Transaction Distribution file *
G/L
G/L Transaction File 3
I/C
PR
Item file 3
Layer file 3
I/C Distribution to G/L
file 3
Inventory History file
Layer file (only if using
LIFO/FIFO)
I/C Distribution to G/L
file 3
Change Item file
Stocking Item file
Selling Item file
Change Stock Item file
Change Selling Item file
Kit file
Work Order Cost file
Component file
Serial Unit file
Status file 3
Employee file 3
PR Distribution to G/L
file 3
PR History file 3
QTD History file 3
YTD History file 3
Special Sale Price file
Order Header file
Order Line Item file
Invoice History file
O/E
Quote Header file
Quote Line Item file
Quote Auxiliary file
CR
Checkbook file
244
1
JC
Job Master file
Job Detail file 3
Holding file 1
J/C Distribution to G/L
file 4
PS
Transaction Header file 3
Transaction Line file 3
Transaction Comments
file
Transaction Payments
File
Transaction Serial/Lot
file 1
Notes:
1This file might be very lightly used or not at all.
2Only if LIFO or FIFO costing is used.
3This is a heavily used file.
4 Only if direct costs and/or billings are entered in J/C.
NADIST (Navigator Distribution File) Recovery after File Initialization
When posting and writing to the NADSIST file a backup file is always being
written as well. Therefore if the original NADIST file becomes corrupt you
may initialize it and use the file utilities to restore the back up file. See
the Initializing Data Files chapter for more info on initializing a file.
Note
You will find the back up in the RWxx directory of the company where
you want to do a recovery. The name of this file is BKUNADxx.DAT. Copy
the file to the top level PBS and change the name to NADISTxx.EXP and
used the file recovering utilities to restore it. If you have run some distributions since the file was initialized, then be sure "Add records to existing data file".
245
REBUILDING FILES
Before rebuilding a file, Passport Software recommends backing up your data files and
then verifying your data files are backed up. The reason for doing this is that you must
have a backup from which to restore in case any difficulties arise in rebuilding the files.
Rebuild a file performs similarly to the combined Export/Restore utilities. Rebuild erases
the.VIX portion of the file and scans the .DAT portion of the file. After it scans the data
records, it re-creates the .VIX, making a pointer for every record in the .DAT file.
The distinction between Rebuild and Export/Restore is that you use Rebuild only to repair a
corrupt .VIX file, while Export/Restore should be used periodically for file maintenance.
Some times a .VIX file can become so corrupted that it cannot be rebuild. When attempting a
rebuild, if you get error messages, like 98,01, you may rename the .VIX file to .sav and then
run the rebuild.
From the File recovery utilities menu, type 3. You then see a screen similar to this one shown
for S/Y:
Because of the large number of files, some modules (A/R is an example) require two screens.
Press <PgDn> to reach the second screen.
As the screen shows, there are two names for each file: one in English, the other a computer
abbreviation. For example, your computer recognizes the Valid G/L account file as
ACCTFIXX, (00 would be used for company 00. If you are using multiple companies, then the
2-character code for the company will appear instead.
Enter the data as follows:
Please select file
Enter the number of the data file you want to rebuild. The numbers are shown to the left of the
file names.
You then see Any change ?. If the data is correct, press <Enter>, otherwise answer Y and make
the changes.
246
The file is then rebuilt. As the file is processed, a record count displays and increments by one
for each record processed.
When the rebuild operation is complete, press <Esc>. Then rebuild another file using the above
procedure, or press <Esc> to return to the previous menu.
Rebuild Example
The following two illustrations show the relationship of customer records and the effects of the
Rebuild utility.
Export/Restore & Rebuild Comparison
The following table compares the export/restore and rebuild utilities.
EXPORT/RESTORE
REBUILD
247
Purpose
To shrink data files.
To repair a corrupt
.VIX file.
When
to use
Use regularly for
file maintenance.
Use only when an
.VIX file has
become corrupt.
How it
works
This is a two-step
process. Export
creates an .EXP file,
erasing .DAT
records marked for
deletion. Restore
erases the .VIX file,
and recreates it from
the .EXP file. The
.VIX is created from
the data in the .EXP
file.
Rebuild is a onestep procedure. It
erases the .VIX file,
then scans the .DAT
file and builds a
new .VIX file with
information for each
record in the .DAT
file.
.DAT is stripped of
deleted records.
New .VIX free of
pointers to deleted
.DAT records.
The .VIX is
repaired. This
occurs even if the
.VIX is missing.
Any records marked
for deletion are
removed.
Result
Extracting All Records
Use Extract all records from a file when Rebuild a file fails due to extreme file corruption.
Extract all records from a file dumps the records to an export file in the sequence that they
appear in the data file (unlike Export a file which writes the records in the record key sequence
using the index file). Using a text editor, it may be possible to locate and correct corrupt
records in the export file. If you are not familiar with editing data in export files, you should
contact your Passport Business Solutions supplier for assistance.
From the File recovery utilities menu, type 4. A screen similar to the following displays:
248
Because of the large number of files, some packages (A/R is an example) require two screens.
Press <PgDn> to reach the second screen.
There are two names for each file: one in English (descriptive), the other a computer file name.
For example, your computer recognizes the Valid G/L account file as ACCTFIXX. 00 would
be used for company 00. (If you are using multiple companies, then the 2-character code for
the company will appear instead.)
Enter the data as follows:
Please select file
Enter the number of the data file that you want to extract. The numbers are shown to the left of
the file names.
The file selection menu shows the name by which your computer recognizes your data file. But
a data file is actually two disk files: one with an.VIX extension on the end of its name, and one
with a.DAT extension. An export file is a single disk file and has an.EXP extension on the end
of its name.
If the file you wish to extract is not displayed, it cannot be extracted using this utility.
Please enter device for export file
This is the drive on your computer where the export file is created.
Enter your hard disk device letter here (usually C), or diskette drive A or B if you want the
export file created on a diskette.
The export file has the same name as the original file, but the extension is.EXP.
You then see Any change ?. If the data is correct, press <Enter>, otherwise answer Y and make
the changes.
Each data record is written to the export file on a separate line. If the last field is alphanumeric,
trailing spaces are truncated. Each record ends with a carriage return and line feed.
As the file is processed, a record count displays and increments by one for each record
processed.
249
When the extract is complete, press <Esc>. Then extract another file through the above
procedure, or press <Esc> to return to the previous menu.
250
RECALCULATING INVENTORY QUANTITIES
The following selections appear only for Inventory Control.
This selection enables you to set several quantity-type fields (such as quantity on hand) in the
Item File and Stocking Status to correct amounts.
These fields are updated during posting in Order Entry, Purchase Order, Inventory Control and
Point of Sale. If posting is interrupted by power failure or equipment failure, inaccurate
quantities could result in the Item File and the Status File.
From the File recovery utilities menu, select Recalculate inventory quantities.
The following screen displays:
Only quantities that are updated are displayed as follows:
1. QUANTITY COMMITTED and QUANTITY ON BACK ORDER display if Order Entry is in
use and Backorder Control was selected in the I/C Control File.
2. QUANTITY ON ORDER displays if Purchase Order is in use.
3. QUANTITY ON HAND displays only if LIFO or FIFO costing is being used. (QUANTITY ON HAND is set from the Layer File.)
4. QUANTITY ON WORK ORDER displays only if kits are used and there are incomplete
work orders on file.
You are then asked, Are you sure you want to do this ?.
Answer Y or N.
If you answer N, the file recovery utilities menu appears. If Y, the quantity fields displayed in
the Item and Status files are set based upon data in O/E, P/O, I/C, and A/R, as appropriate. The
screen displays the number of the item that is being processed.
If any quantities are corrected, the Inventory Recalculation Exception Report prints.
251
Rebuild Item Keywords
This selection allows you to rebuild the item keyword file by reading the item description, subcategory, and vendor item number that are stored in the Inventory Control item file.
Rebuild Serial Keywords
This selection allows you to rebuild the item serial keyword file by reading the item serial
numbers that are stored in the Inventory Control item serial file.
Recalculate History Quantities
This selection is a utility that is designed for installations that have upgraded from version 7.x.
It reads existing item and status information to recreate history quantities.
Create New Inventory History
This selection is a utility that is designed for installations that have upgraded from version 6.x.
It creates an inventory history by using existing item and status information, and offers the
choice of using average or replacement costs.
252
Ending File Recovery Utilities
To end File Recovery Utilities or Recalculate Inventory Quantities, press <Esc> from the File
Recovery Utilities menu. The operating system prompt displays.
253
RELATIVE FILE UTILITIES
The following section applies to Relative file organizations, as opposed to ISAM.
•
Relative files do not allow access to data by record key, so they do not have an index. This in
turn means they have no .VIX file at the operating system level.
•
Relative files typically have very few records, often only one.
•
Passport Business Solutions uses this file structure primarily for each module’s control information, although a few other parameter files are also organized in this way.
Exported relative files, like ISAM files, have a .EXP extension.
This utility provides a convenient alternative to the traditional method: using PrtScrn to make a
record of Control information prior to doing an upgrade, then re-entering the information by
hand after doing the upgrade.From the Windows Start menu:
Click
Programs->PBS->File Utilities->Cntrl File Utilities
If prompted, enter the two character ID of the Company you are working with.
The following screen displays:
1. through 12. [file name]
Enter Y for each file you wish to export or restore. The default is N to ignore that file.
This utility services all Passport Business Solutions modules, unlike the ISAM utility (which
has a separate version for each module). This means that you will see more files on the screen
than you probably want. Ignore the ones that do not apply.
13. Select utility functions
Enter Y at either the Export or the Restore sub-field. You must choose one or the other, but not
both.
254
This utility is restricted to exporting and restoring the files. Recovering corrupt data is not the
intent.
Please enter device for the export file
Enter the drive to which you wish to export, or from which you wish to restore, the selected
file(s).
Any change ?
Enter Y if you wish to re-enter the entire screen, or N to process the selected file(s)
When processing is complete, you will be so informed. Press <Esc> to return to the command
line prompt.
255
EXTENDED FILE UTILITIES
The extended file utilities enable you to run more than one utility function on all files for one or
more modules. You can choose one company or all companies (if running multiple companies).
You should be familiar with the operation of the file utilities described earlier in this chapter,
prior to using the extended file utilities. From the Windows Start menu:
Click
Programs->PBS->File Utilities->Extended File Utilities
When accessing the extended file utilities in UNIX, Linux or from a Windows command
prompt, navigate to the top-level PBS directory and type in exfutl and select <Enter>.
For the manufacturing extended file utilities type in exmutl and select <Enter>.
The following screen displays:
Enter the following information:
1. Company to process
Enter the 2-character company, or press <F5> for All companies.
2. through 13.
Answer Y for each package you want to select for file recovery processing or press <Enter>
for N. All the files are processed for each package that you select.
14. Select utility functions
Select which processing functions to perform on the packages selected above. The functions
are performed in the sequence listed for each package that you selected (one company at a
time, if all companies were selected).
Note
You may not select both Extract and Rebuild. These functions are currently
not available.
Answer Y for each file recovery function, or press <Enter> for N.
256
You then see Any change?. If the data is correct, press <Enter>, otherwise answer Y and make
the changes.
Export
If you select the Export functions, the following screen displays:
You are requested to Please enter the device for export files:
This is the destination drive for the export files. Enter your drive letter here (usually C), or
diskette drive letter (usually A or B).
Restore
If you selected Restore as one of the options, the following screen displays:
There are two confirmations with the Restore function:
Do you wish the export files to be deleted after restoring?.
Press <Enter> for the system to delete the export files after restoring, otherwise answer N.
Please enter device for export files:
This is the destination drive for the export files. Enter your disk drive letter here (usually C), or
diskette drive letter (usually A or B).
257
For the selections
For all selections, a message appears informing you that the results will be stored in log file
EXFUTLxx.LOG. Refer to the Log file print section.
If you selected any function, except just Rebuild (which skips to the following question), the
prompt Any change ? appears. If the data is correct, press <Enter>, otherwise answer Y, and
make the changes. Press <Esc> to return you to the first screen.
You are then asked, OK to continue?. Answer Y to continue, or N to return to the first screen.
Processing
As each file is processed, the selected function and the file name are displayed. The record
count displays and increments by one as each record is processed.
Press <Esc> to interrupt processing. Processing interrupts when the system has completed the
current function on the current file. Cancel further processing ? displays. Answering N
resumes processing. Answering Y terminates processing.
When processing is terminated, press <Esc>.
The export files built have the same name as the original files, but with a .EXP. extension.
Log file print
The log file contains the results of the entire procedure and is stored in a log file in the toplevel directory. The digits in the file name (e.g., 01) increment each time the extended file
utilities are run (EXFUTL01.LOG).
System-Wide Files
System-wide files are only exported or restored when selecting <F5> for all companies.
System-wide files include POPFIL. PDFMST, PDFLOG, MLTCMP, SPOOLF, SYUSRFIL,
STKFIL and RPTDSC.
You may also use the System File Utilities to export and restore these files.
258
NAVIGATION DISTRIBUTION HISTORY FILE BACKUP
The navigation distribution history file (NADIST) is an important file in PBS. In many cases
when you generate a distribution while posting, this file gets updated. At the same posting time
a backup text file (BKUNAD) is also generated. This file contains all the same data that an
export of NADIST would contain. The backup text file can be used to restore the navigation
distribution history file if that file ever got corrupted.
The first step with any corrupted file is to rebuild it. If that does not work, then you must
restore the backup file. Do these steps if you are in company 00:
•
Initialize the NADIST file using syinit. Select the Navigator distr. file only.
•
Restore from the backup file by copying the BKUNAD00.DAT, located in the RW00 directory,
to the top-level PBS directory.
•
Rename the file to NADIST00.EXP.
•
Run the system files utilities (syutil) for company 00 to restore the Navigator dist file.
259
Initializing Data Files
This chapter contains the following topics:
Introduction to Initializing Data Files
System Files
Accounts Payable
Accounts Receivable
Check Reconciliation
General Ledger
Inventory Control
Job Cost
Order Entry
Purchase Order
Payroll
Point of Sale
Sales Analysis
Time and Billing
260
INTRODUCTION
TO
INITIALIZING DATA FILES
This section enables you to initialize one or more data files of a particular package.
Initialize means to create a new data file. When you initialize a data file that already exists, any
information in it is completely erased and the file is recreated.
This function is included in case you need to initialize data files.
If you suspect you have a corrupted data file, do not initialize it or attempt other recovery
actions without first checking with your PBS supplier. Also, see the Administrative instructions
related to the File Recovery Utilities chapter. In some situations it may be better to restore a
backup of a data file rather than initializing it.
CAUTION
Note
Do not use this function unless you really want to initialize a data file. Any
data file initialized has the information completely erased. If you have to initialize a data file, you may want to make a copy of the file or even the
entire PBS directory before doing so.
CAUTION
261
SYSTEM FILES
If you use the multi-company feature, be aware that file initialization in the System Manager
can do one thing that the other packages cannot; it can initialize files that encompass all
companies. Almost all PBS files are specific to a particular company, but there are a few that
are exceptions. Initializing one of these files affects all companies. You will be warned when
you attempt to do this.
You must be an administrative user of Passport Business Solutions in order the run the file
utilities. Refer to the PBS Users chapter for more information.
To Initialize System data files, execute the PBS initialization function.
For Windows
Start->Programs->Passport Business Solutions->Init Utilities->SY Initialization
For UNIX/Linux
Type the following:
cd /usr/pbs
or replace “/usr/pbs” with the name of your PBS top-level directory.
Then type the following:
syinit
If you are using multiple companies, enter the 2-character company-id. If the company is
correct, answer Y. When prompted, enter a PBS Administrative User ID.
The following screen displays:
Answer <Y> for each file you want to initialize, or press <Enter> to default to <N> to skip
initializing a file.
262
File name
as shown on
screen
Internal name
(pathfinder)
1.
Company
file
COMPFI
Contains the Company information
data.
2.
Cost center
file
PFCTFI
Contains the list of cost centers or
profit centers.
3.
Valid G/L
acct file
ACCTFI
Contains the valid General Ledger
accounts.
4.
Cash
accounts
file
CSHACT
Contains the cash accounts.
5.
Batch control file
BTCHFL
Contains a list of the batches currently defined.
6.
Laser print
param file
LASPRM
Contains parameters associated
with laser printers.
REPTNO
This file is a quick index to reports
printed to disk. The report number
is used as the relative key of the
record.
If you select Y to initialize this
file, you will be prompted to Enter
disk report number. Enter the starting number for reports printed to
disk.
EGLFIL
Equates your current account structure to any of three other structures. This file is also referred to
as the <External Cross-Reference
file> and the <External General
Ledger file>.
It is not to be confused with the
<Cross-reference file>, which is
used in reformatting account
numbers and does not appear on
this screen.
#
7.
8.
Report
number file
Account
links file
Description
9.
Access file
ACCESS
When using the Menu-bar menu
type the Access groups function
may be used to move around the
system rapidly.
10.
Utility file
UTILFL
Under the Utility menu selection
you may enter access to other appli-
263
cations.
11.
Label formats file
LBLFMT
This is the label format file.
12.
Label dictionary file
ICDICT
The label dictionary file.
13.
Label lock
file
LBLLCK
This is the label lock file.
14,
Bank file
BNKACT
Bank accounts file.
15.
Reason
code file
RSNFIL
Reason codes file.
16.
Navigator
distribution
file
NADIST
This file contains the history of all
posted distributions in the system.
See note below on restoring the
NADIST file.
MLTCMP
This file spans all companies.
Initializing it will affect not just
your company but every company
in the system.
Contains a list of companies.
SPOOLF
This file spans all companies.
Initializing it will affect not just
your company but every company
in the system.
There is one record for each
spooled file.
STKFIL
This file spans all companies.
Initializing this file will affect not
just your company, but every company in the system.
17.
Multi-company file
18.
Spooled
print file
19.
Report
stack file
20.
Printer
codes file
CODFIL
This is the printer codes file. I you
initialize it and you are running multiple companies it could effect
other companies.
21.
Email log
file
PDFLOG
This is a log of each PDF form
when it has been emailed or recreated via a reprint.
22.
PDF
master file
PDFMST
This file contains a list of the PDF
files that have been generated
while printing PDF forms.
264
23.
Help GraphHELPGUI
ical PBS
This file has the links to the help
for the graphical screens.
24.
User Help
File
This file contains user definable
links to help.
USRHLPGUI
Field number to change?
Make any desired changes, then press <Enter> to initialize the files selected. Once processing
is complete, the program returns to the operating system.
NADIST (Navigator Distribution File) Recovery after File Initialization
Note
When posting and writing to the NADSIST file a backup file is always being
written as well. Therefore if the original NADIST file becomes corrupt you
may initialize it and use the file utilities to restore the back up file. You
will find the back up in the RWxx directory of the company where you
want to do a recovery. The name of this file is BKUNADxx.DAT. Copy the
file to the top level PBS and change the name to NADISTxx.EXP and used
the file recovering utilities to restore it. If you have run some distributions
since the file was initialized, then be sure "Add records to existing data
file".
Other File Initializations
Cross-reference file
The <Cross-reference file> is used in reformatting account numbers and does not appear on the
System initialization screen. In order to create new Cross-reference settings you can just reenter the data. If you prefer, you can delete the Cross-reference file from the top-level PBS
directory and PBS will re-create an initilized file when you access Reformat account number
from the Ctl menu. The file name is XREFFILxx.DAT and XREFILxx.vix with xx representing
the company number. You must delete both the ‘.DAT’ and ‘.vix’.
BreakOut Files
BreakOut files are stored in the PSIB00 directory. BreakOut settings are stored per user in a file
named BxxxFL.DAT and BxxxFL.vix with the xxx representing the PBS User ID. Unexpected
BreakOut settings may occur and it is not always easy to find and fix the setting. If that occurs,
you can delete the BreakOut file that contains all the BreakOut settings for the user. The
BreakOut file gets automatically re-created when the user accesses the BreakOut utility from a
PBS field via the <F12> key or clicking on the BreakOut button on the Tool bar. You must
delete both the ‘.DAT’ and ‘.vix’ parts of the file.
Never delete the FUNCFL.DAT file from the PSIB00 directory.
If you prefer not to lose all the user’s BreakOut settings, you may export the BreakOut file,
delete unneeded entries in the file and then restore it. To do this use the System File Utilities.
265
ACCOUNTS PAYABLE
To Initialize Accounts Payable data files, execute the Passport Business Solutions initialization
function.
You must be an administrative user of Passport Business Solutions in order the run the file
utilities. Refer to the PBS Users chapter for more information.
For Windows
Start->Programs->Passport Business Solutions->Init Utilities->AP Initialization
For UNIX
Type the following:
cd /usr/pbs
or replace “/usr/pbs” with the name of your PBS top-level directory.
Then type the following:
apinit
If you are using multiple companies, enter the 2-character company-id. If the company is
correct, answer Y. When prompted, enter an administrative User ID.
The following screen displays.
When this screen is first displayed, all its fields are blank. The cursor moves through each field
in sequence until all have been traversed. You may then change any field.
Answer <Y> for each file you want to initialize, or press <Enter> to default to <N> to skip
initializing a file. At any field (including “Field number to change ?”), you may use one of the
options:
266
Options
<F1>
To set all fields to Y. After the first use of this option,
this key functions as a toggle; alternating between setting all fields to Y and to N.
<F2>
To initialize all files marked “Yes”, without waiting to
reach “Field number to change ?”. You will be asked to
confirm that you want to do this.
Format
One letter at each field, either Y or N. The default is N.
Example
Press <Enter> at each field. This displays as “Skipped”.
Data Files
The following table lists all the entries on the screen and provides a description of each file.
The internal name of the file is given; this is useful when relating the file name to several
features described in the this manual (pathfinder; file utilities).
#
File name as
shown on
screen
Internal
name (pathfinder)
Description
1.
A/P notesl
APNOTF
Notes you have entered in the various A/R selections which allow
notes
2.
A/P accounts
file
APACCT
Contains all the G/L accounts
which you have designated as
accounts payable accounts
3.
A/P control
file
APCTLF
Parameters that define the basic
structure of your A/P module
4.
Vendor
master file
VENFIL
Contains relevant vender information such as name, address, discount terms and year-to-date
statistics.
CNGVEN
This file is used to log any changes
or deletions which are made to the
vendor file. It may be selectively
purged after the Change Log is
printed.
PURADR
Contains one record for each shipto address to which goods are delivered or at which services are performed.
5.
Change vendor file
6.
Purchasing
address file
267
7.
A/P transaction file
APTRXF
This is a transaction file for payables transactions. The file is
purged each time payables is
posted.
8.
A/P transaction distribution file
TRXDIS
Used to track the general ledger distributions for unposted payables
entries.
9.
A/P transaction lock
file
APTLCK
Protects the A/P transaction file
10.
A/P open
item file
APOPEN
Contains all of the open items
(transactions that are currently outstanding for each vendor
11.
Open item
adjustment
transaction
file
ADJTRX
Contains adjustment transactions
for open items
12.
A/P open
adjustment
lock file
ADJLCK
Protects the A/P open item file.
13.
Void check
file
VOICCK
Contains all of the void check transactions that are current for each
vendor.
14.
A/P check
file
APCHKF
Contains check records. The file is
purged when the checks are posted.
15.
A/P check
lock file
CHKLCK
Protects the A/P check file.
16.
A/P distributions to
G/L file
APDIST
Used to generate the A/P Distribution to G/L Report. If the G/L
module is used, this file is the input
to the G/L interface program. This
file would normally contain all of
the detailed G/L distributions for
one month or accounting period.
17.
A/P recurring
file
APRCUR
Contains one record for each recurring payable by vendor.
18.
Vendor history file
VENHIS
Contains information on all vendor
open items and payments to vendors.
268
19.
Report paramNSFLCK
eter file
Protects the returned checks file.
20.
Vendor contact file
Additional contacts for vendors.
21
General selecGENLCK
tion lock file
A general lock file.
22
Check forms
file
APFRMF
Contains user defined check and
check stub formats.
23
Memo transaction file
TRXMEM
Contains memo transactions
24
Vendor 1099
miscellaneous
file
APFAUX
Contains 1099 miscellaneous information used for year-end reporting
25
Vendor 1099
miscellaneous
lock file
1099LK
The 1099 miscellaneous lock file.
PCOFIL
Field number to change ?
Make any needed changes. Press <Enter> to initialize the selected files. Files not selected are
not affected. It is not required that any file be selected.
There will be a period of processing as the files are processed, and then the program closes.
Select <Esc> to cancel the operation.
269
ACCOUNTS RECEIVABLE
To Initialize Accounts Receivable data files, execute the Passport Business Solutions
initialization function.
You must be an administrative user of Passport Business Solutions in order the run the file
utilities. Refer to the PBS Users chapter for more information.
For Windows
Start->Programs->Passport Business Solutions >Init Utilities->AR Initialization
For UNIX
Type the following:
cd /usr/pbs
or replace “/usr/pbs” with the name of your PBS top-level directory.
Then type the following:
arinit
If you are using multiple companies, enter the 2-character company-id. If the company is
correct, answer Y. When prompted, enter an administrative User ID.
For space reasons, two screens are needed to contain all the files. You can switch between the
two screens as needed. No files are initialized until you have approved both screens.
The following screen appears first:
When this screen is first displayed, all its fields are blank except the first one. The cursor
moves through each field in sequence until all have been traversed. You may then change any
field.
270
Answer <Y> for each file you want to initialize, or press <Enter> to default to <N> to skip
initializing a file. At any field (including “Field number to change ?”), you may use one of the
options:
Options
<F1>
To set all fields to Y. After the first use of this option,
this key functions as a toggle; alternating between setting all fields to Y and to N.
PgUp
To return to the first field on the screen, if not there
already.
PgDn
(1) To proceed to the last field on the screen, if not
there already. (2) If already at the last field or at “Field
number to change ?”, to proceed to the second screen,
preserving all existing settings on the first screen.
Format
One letter at each field, either Y or N. The default is N.
Example
Press <Enter> at each field. This displays as “Skipped”.
Data Files
The following table lists all the entries on the screen and provides a description of each file.
The internal name of the file is given; this is useful when relating the file name to several
features described in the this manual (pathfinder; file utilities).
FILE NAME
INTERNAL
#
AS SHOWN
ON SCREEN
NAME
PATHFINDER
1.
A/R control
ARCTLF
Parameters that define the basic
structure of your A/R module
2.
A/R notes
file
ARNOTF
Notes you have entered in the various A/R selections which allow
notes
3.
A/R
accounts file
ARACCT
Contains all the G/L accounts
which you have designated as
accounts receivable accounts.
4.
A/R codes
file
ARCODS
Contains the tax codes, terms
codes, and ship-via codes used in
the A/R module
SLMFIL
Lists all active sales representatives. Used in customers,
invoices, miscellaneous charges,
and commissions due report printing. Omitted if you specified (in
5.
Sales rep file
DESCRIPTION
271
A/R Control information) that you
do not use sales reps.
6.
Ship-to file
SHPFIL
Contains one record for each shipto address to which goods are delivered or at which services are performed.
7.
Goods
/Services file
GDSSVC
Contains one record for each item
or service entered through
Goods/Services
8.
Invoice
stations file
IVCSTA
Contains one record for each invoicing station
9.
A/R
Customer
file
CUSFIL
Contains relevant customer information such as name, address,
credit status, shipping methods, discount terms, tax status, and yearto-date statistics
CNGCUS
This file is used to log any changes
or deletions which are made to the
customer file. It may be selectively
purged after the Change Log is
printed.
10.
Change customer file
11.
Customer hisCUHFIL
tory file
Contains information on all fullypaid open items which have been
purged from the A/R open item
file.
12.
Cash
history file
KSHHST
Contains payment history.
13.
A/R open
item file
AROPEN
Contains all of the open items
(transactions that are currently outstanding for each customer).
14.
Open item
lock file
AROLCK
Protects the A/R open item file.
15.
Cash
receipts file
CSHTRX
This is a transaction file for cash
receipts. It is purged when cash
receipts are posted.
16.
Cash
receipts lock
file
CSHLCK
Protects the cash receipts file.
272
17.
Cash application file
CSHAPL
Contains a record for every invoice
to which cash is applied during
cash receipts processing.
18.
Returned
checks file
NSFTRX
Contains information on checks
that have been returned.
19.
Returned
checks lock
file
NSFLCK
Protects the returned checks file.
20.
Returned
checks application file
NSFAPL
Contains a record for every invoice
to which cash was applied during
the original cash receipts processing.
21.
Returned
checks
charges file
NSFCHG
Contains a record of bank and customer charges charged because of
a bad check.
22.
Misc
charges trans
file
SLSTRX
This is a transaction file for Miscellaneous charges transactions.
The file is purged each time miscellaneous charges are posted.
23.
Misc
charges lock
file
SLSLCK
Protects the miscellaneous charges
transaction file.
24.
Misc
charges dist
file
SLDTRX
Used to track the general ledger distributions for unposted miscellaneous charges entries.
25.
Report
parameter
file
ARRPTP
When you are entering the parameters to use in printing various
reports, you can choose to save
them. If you do, they are contained
in this file.
COMFIL
Contains a record for every sale for
which a commission exists. Not
present if you do not use sales representatives or do not pay them on
commission.
ARDIST
Used to generate the A/R Distribution to G/L Report. If the G/L
module is used, this file is the input
to the G/L interface program. This
file would normally contain all of
the detailed G/L distributions for
one month or accounting period.
26.
27.
Commissions
due file
A/R distributions to
G/L
273
28.
Finance
charges file
FCHTRX
Contains a record of finance
charges assessed against a customer in a given period. This file is
purged when finance charges are
posted.
29.
Finance
chrgs lock
file
FCHLCK
Protects the finance charges file.
30.
Invoice format file
IVCFMT
Contains the complete descriptions
of your invoice formats.
31.
Invoice format lock file
FMTLCK
Protects the invoice format file.
32.
Invoice
header file
PIHDRF
Contains one record for each regular invoice.
Field number to change ?
Make any needed changes.
Press <Enter> from a blank “Field number to change” to proceed to the next screen or select
<Esc> to cancel.
Continue to answer <Y> for each file you want to initialize, or press <Enter> to default to <N>
to skip initializing a file. The cursor will move through each field in turn, and you will be able
to correct any errors from “Field number to change?”. You may also use the options:
274
Options
To set all fields to Y. After the first use of this
option, this key functions as a toggle; alternating
between setting all fields to Y and to N.
To initialize all files marked “Yes”, without waiting to reach “Field number to change ?”. You will
be asked to confirm that you want to do this.
(1) To return to the first field on the screen, if not
there already. (2) If already at the first field or at
“Field number to change ?”, to return to the previous screen. This is not the same as <Esc>, since
all your settings on the second screen are preserved.
To proceed to the last field on the screen, if not
there already.
<F1>
<F2>
PgUp
PgDn
Format
One letter at each field, either Y or N. The default is N.
Example
Press <Enter> at each field. This displays as “Skipped”.
INTERNAL
#
FILE NAME
NAME
AS SHOWN
ON SCREEN
PATHFINDER
(
DESCRIPTION
)
33.
Invoice line
item file
PILINF
Contains one record for
each line item for each regular invoice.
34.
Invoice auxiliary file
PIAUXF
Contains any overflow
data on invoices: multi-line
notes, comments, and miscellaneous ship-to
addresses.
35.
Invoice lock
file
PIILCK
Protects the Invoice file.
36.
Statement forPTBFMT
mat file
Contains the complete
descriptions of your statement formats.
37.
Statement forSFMLCK
mat lock file
Protects the statement format file.
38.
Recurring bill
header file
Contains one record for the
header for each recurring
bill.
RHDRFI
275
39.
Recurring bill
line item file
RLINFI
Contains one record for
each line item on each
recurring bill.
40.
Recurring bill
aux file
RAUXFI
Contains additional description for recurring bill line
items, plus comments and
miscellaneous deliver-to
addresses for recurring
bills.
41.
Invoice hist
header file
IHSHDR
Contains one record for the
header for each
historical invoice.
42.
Invoice hist
line file
IHSLIN
Contains one record for
each line item for each historical invoice.
IHSAUX
Contains additional description for historical invoice
line items, plus comments
and miscellaneous deliverto addresses for historical
invoices.
43.
Invoice
history aux
file
44.
Standard bill
file
STDBIL
Contains one record for
each standard bill line
item, plus a single record
for each standard bill
header.
45.
Standard bill
aux file
STDAUX
Contains the additional
description for standard
bill line items.
46.
Statement
printer ctl file
TPRCTL
Contains additional information about each printer
for use in printing invoices
and statements.
47.
Invoice
printer lock
file
PRTLCK
Protects the printer
printing invoices.
48.
Taxes open
item file
TXOPEN
One record per invoice for
unreceived or new sales
tax reporting.
49.
Invoice hist
serial file
IHSSER
Serial numbers for items in
invoice history (O/E only)
276
50.
Customer conCONFIL
tact file
Additional contacts for customers
51.
Recurring
sales file
ARRCUR
Contains recurring sales
transactions
52.
Prepaid cash
transaction
file
PPCTRX
Contains prepaid cash “N”
type records
Field number to change ?
Make any needed changes. Press <Enter> to initialize all files selected (on either screen). There
will be a period of processing as files are
initialized, then the operating system prompt will reappear.
Unlike most Passport Business Solutions selections, this selection allows you to initiate
processing (using <F2>) without waiting to reach Field number to change ?, but you can only
do this from the second screen.
277
CHECK RECONCILIATION
To Initialize Check Reconciliation data files, execute the Passport Business Solutions
initialization function
You must be an administrative user of Passport Business Solutions in order the run the file
utilities. Refer to the PBS Users chapter for more information.
For Windows
Start->Programs->Passport Business Solutions >Init Utilities->CR Initialization
For UNIX
Type the following:
cd /usr/pbs
or replace “/usr/pbs” with the name of your PBS top-level
directory.
Then type the following:
crinit
If you are using multiple companies, enter the 2-character company-id. If the company is
correct, answer Y. When prompted, enter an administrative User ID.
The screen displays as follows:
Answer <Y> for each file you want to initialize, or press <Enter> to default to <N> to skip
initializing a file.
Data Files
The following table lists all the entries on the screen and provides a description of each file.
The internal name of the file is given; this is useful when relating the file name to several
features described in the this manual (pathfinder; file utilities)
278
FILE NAME
#
AS SHOWN
ON SCREEN
INTERNAL
NAME
(
DESCRIPTION
PATHFINDER
)
1.
C/R
account file
CKACCT
This file contains the checking
accounts maintained in Check Reconciliation.
2.
C/R notes
file
CKNOTF
This file contains the notes you
have entered.
3.
C/R control
file
CKCTLF
Contained within this file are
parameters that define your check
reconciliation structure.
4.
Checkbook
file
CKBOOK
This file includes all checkbook
items, including checks, deposits,
adjustments, and balance forward
entries.
5.
Checkbook
transactions
file
CHKTRX
This is a work file for checkbook
transactions. The file is purged
each time checks are posted.
6.
Checkbook
lock file
CRCLCK
This file locks the checkbook file
that contains posted transactions
during reconciliation.
7.
Checkbook
distributions
file
CHKDST
This file is used to track the general ledger distributions for
unposted C/R entries.
CRDIST
This file contains one record for
each G/L distribution generated by
the C/R package for posted C/R
entries. It is used to generate the
C/R to G/L Distributions Report
and (if the PBS General Ledger
package is used) this file is the
input to the G/L interface program.
This file would normally contain all
of the detailed G/L distributions for
one month or accounting period.
8.
C/R distributions to
G/L file
Field number to change ?
Make any needed changes. Press <Enter> to initialize the selected files. Files not selected are
not affected. It is not required that any file be selected. There will be a period of processing as
the files are processed, and then the program closes.
Select <Esc> to cancel.
279
GENERAL LEDGER
To Initialize General Ledger data files, execute the Passport Business Solutions initialization
function.
You must be an PBS administrative user in order to use this utility. Refer to the PBS Users
chapter for more information.
For Windows
Start->Programs->Passport Business Solutions->Init Utilities->GL Initialization
For UNIX
Type the following:
cd /usr/psi
or replace “/usr/psi” with the name of your PBS top-level directory.
Then type the following:
glinit
If you are using multiple companies, enter the 2-character company-id. If the company is
correct, answer Y. When prompted, enter an administrative User ID.
The following screen will appear:
Note
Files 32, 33, and 34 can be initialized only if the company you are working
with is a consolidation company. Refer to the Company Consolidation chapter in the System User documentation.
When this screen is first displayed, all its fields are blank except the first one. The cursor
moves through each field in sequence until all have been traversed. You may then change any
field.
280
Answer <Y> for each file you want to initialize, or press <Enter> to default to <N> to skip
initializing a file. At any field (including Field number to change?), you may use one of the
options:
Options
<F1>
To set all fields to Y. After the first use of this option,
this key functions as a toggle; alternating between setting all fields to Y and to N.
<F2>
To initialize all files marked Yes, without waiting to
reach Field number to change ?. You will be asked to
confirm that you want to do this.
Format
One letter at each field, either Y or N. The default is N.
Example
Press <Enter> at each field. This displays as Skipped.
1. G/L control file (GLCTLFXX)
(where xx = Company ID)
This file contains a number of parameters that define your general ledger structure. Each
parameter defines specific values to be used in other programs.
2. G/l notes file (GLNOTFXX)
This file contains all the notes you have entered in the various G/L selections which allow
notes, except for notes entered through Distributions, which are not saved after posting.
3. Accounting period file (PRDFILXX)
The Accounting Period file defines all of the accounting periods in the fiscal year and
designates the current and reporting periods.
4. Cost center (or sub account) group file (GRPFILXX)
This file contains one record for each cost center group defined.
5. G/L codes file (GLCODSXX)
This file contains the G/l codes for budget types.
6. Chart of accounts file (CHARTFXX)
The Chart of Accounts file defines all of the accounts to be used by General Ledger, and
contains basic data about each account.
7. Chart of accts chg log (CNGCOAXX)
This file records changes to the Chart of Accounts record, and the record after the change was
made. This file will be used only if the change log feature is used.
8. Budget file (BUDGETXX)
This file contains budgets you have entered through the Budgets selection.
281
9. Budgets chg log file (CNGBDGXX)
This file records changes to the Budget records. This file will be used only if the change log
features are used.
10. Comparatives file (CMPRTVXX)
This file contains comparatives you have entered through the Comparatives selection.
11. Comparatives chg log file (CNGCMRXX)
This file records changes to the comparative records. This file will be used only if the change
log feature is used.
12. Distributions trans file (GNJTRXXX)
This file contains transactions entered using G/L or interfaced from other modules. This file is
cleared when distributions (entries) are posted.
13. Distribution notes file (GJNOTFXX)
This file contains the notes you have entered through the
Distributions selection for entries which have not yet been posted. (When distribution entries
are posted, the notes are not saved.)
14. Distributions lock file (GNJLCKXX)
This file is used to protect the Distributions file.
15. Recur journal trans file (GLRCURXX)
This file contains recurring transaction information from which distributions entries are created
periodically.
16. Std journal trans file (STJTRXXX)
This file contains standard journal transactions (entries).
17. Std journal lock file (STJLCKXX)
This file is used to protect the Standard Journal Transaction file.
18. Gen ledger trans file (TRXFILXX)
This file contains records from General Journal, distributions, and Standard Journal
transactions after they are posted. It is the permanent G/L file.
19. Gen ledger lock file (TRXLCKXX)
This file is used to protect the General Ledger Transaction file.
20. Fin stmnt layout file (LAYOUTXX)
The Financial Statement Layout file contains the instructions that determine the appearance of
each financial statement.
21. Fin stmnt specs file (FSSPECXX)
The Financial Statement Specification file contains one record for each statement to be printed.
282
22. Fin stmnt passing file (FSPASSXX)
This file is used to carry control information for statement printing.
23. Fin stmnt text file (TXTFILXX)
The Finish Statement Text file contains text that is to be printed on financial statements.
24. Fin stmnt BSNI file (GLBSNIXX)
The Financial Statement BSNI file contains the calculated balance sheet net income data.
25. Fin stmnt work file (FSWORKXX)
This is a temporary work file used to produce financial statements.
26. Fin data col layout file (LAYCOLXX)
The Financial Data Column Layout file contains the instructions that determine how the
transaction file data is extracted.
27. SAF layout file (SAFLOFXX)
This is a work file used in automatically generating standard financial statement layouts for the
source and application of funds reports.
28. Proforma account file (PROCOAXX)
The Proforma Account file contains the data records which will allow you to use a
standardized balance sheet and operating statement from any chart of accounts.
29. Gen journal header file (MLTRXHXX)
The General Journal header account file contains General Journal header data for each journal
entry number.
30. Gen journal trans file (MLTRXDXX)
The General journal trans file contains multi-line transaction records for General Journal.
31. Gen journal lock file (MLTLCKXX)
This file is used to protect the General Journal Transaction file.
32. Company consol mbr file (MEMSPCXX)
This file defines all member companies of consolidations and contains the cost center
designation to be used for each member company.
33. Company consol lock file (CCNLCKXX)
This file is used to protect the Company Consolidation selection from other users in a multipleuser system.
34. Consol account link file (ACTLNKXX)
This file defines the links between the chart of accounts in each member company and in the
consolidation company. It also contains a description of each account linked.
283
Field number to change ?
Make any needed changes. Press <Enter> to initialize the selected files. Files not selected are
not affected. It is not required that any file be selected. There will be a period of processing as
the files are processed, then the program closes.
Select <Esc> to cancel.
284
INVENTORY CONTROL
Initialize Inventory Control data files, execute the Passport Business Solutions initialization
function.
Only a authorized PBS administrative user can use this utility. Refer to the PBS Users chapter
for more information.
For Windows
Start->Programs->Passport Business Solutions ->Init Utilities->IC Initialization
For UNIX
Type the following:
cd /usr/psi
or replace “/usr/psi” with the name of your PBS top-level
directory.
Then type the following:
icinit
If you are using multiple companies, enter the 2-character company-id. If the company is
correct, answer Y. When prompted, enter an administrative User ID.
The first screen displays as follows:
Answer <Y> for each file you want to initialize, or press <Enter> to default to <N> to skip
initializing a file.
Data Files
A brief description of each data file is listed below:
285
1.Alternate Items file (ALTITM)
This file contains alternate items you have defined for use with Inventory, Order Entry, or
Accounts Receivable.
2.Change Item file (CNGITM)
This is a log of the changes made to the Item file. It is needed only if the Change Log is used.
3.Component file (CMPFIL)
This file contains information for each kit component on a work order.
4.Component Cost file (CMPCST)
This file contains cost information for each kit component on a work order.
5.I/C Codes file (ICCODS)
This file contains the pricing codes, commission codes, and taxable codes.
6.I/C Control file (ICCTLF)
This file contains a number of parameters and default values. It also includes the control
information for the saved formats for certain reports and import selections.
7.I/C Dist to G/L file (ICDIST)
This file is used to generate the I/C Distribution to G/L Report and contains the debit and credit
distributions that can be interfaced to G/L, if using.
8.Inventory Account file (INVACT)
This file contains all inventory accounts to which I/C activity may be distributed.
9.Inventory Lock file (INVLCK)
This file is used to protect the Inventory Transaction file.
10.Inventory Transaction file (INVTRX)
This file contains the transactions entered using Inventory (or those that came from O/E, or
A/R). The transactions remain in this file until removed during posting.
11.Item file (ITMFIL)
Each item of merchandise that is contained in inventory is identified in the Item file.
12.Item Notes file (ICNOTF)
This file contains one record for each item note you have entered.
13.Keyword file (CKEYWF)
This file contains the keywords for each item, as well as all bar code information.
14.Kit file (KITFIL)
This file contains the definitions for each kit.
286
15.Kit lock file (KITLCK)
This file is used to protect the Kit file.
16.Label file (ILBFMT)
This file contains one record for each item label format that you set up.
17.Label Lock file (ILBLCK)
This file is used to protect the Label file.
18.Layer file (LAYFIL)
This file contains the LIFO/FIFO detail history records (layers).
19.Physical Count Trx file (ICPHXF)
This file contains the physical count transactions created using Physical count, when using the
expanded physical count method. The transactions remain in this file until removed during the
adjustment creation process.
20.Price file (PRCFIL)
This file contains all warehouse-specific prices, sale prices, and contract prices for items, as
well as alternate selling unit information.
21.Serial file (ICTRKF)
Each serial number associated with an inventory item is contained in this file, along with its
related information. Lot numbers and historical detail for lot items are also stored in this file.
22.Serial Transaction file (ICTKXF)
This file contains serial transactions produced by entering inventory transactions for serialized
items using Inventory (or those that came from O/E). It also contains transactions entered
directly through Serial numbers. The serial transactions remain in this file until removed during
the posting of the respective functions.
23.Status file (STAFIL)
This file contains the records of quantities, costs, and prior period data for each item for each
warehouse.
24.Status Data Load file (LODSTA)
This file contains the load requests entered using Status load file.
25.Warehouse file (WHSFIL)
This file contains the warehouse codes.
26.Work Order file (WKOFIL)
This file contains information on all work orders entered.
27.Work Order Cost file (WKOCST)
This file contains cost information on all work orders entered.
287
28.Work Order Lock file (WKOLCK)
This file protects the Work Order file.
29.Inventory History file (ITXHIS)
This file contains historical information on past Inventory transaction.
30.Category file (CATEGF)
Item categories are stored in this file.
31.Sub-category file (SUBCAT)
This file contains item sub-category types.
32.Units file (UNITFI)
Item units are stored in this file.
Field number to change ?
Make any changes or use one of the options:
<PgDn>
For the next screen
<F1>
To set all files to Y.
The second screen of the Initialize I/C feature appears after the completion of field #32, or
using <PgDn>, and appears as follows:
Continue to answer <Y> for each file you want to initialize, or press <Enter> to default to <N>
to skip initializing a file.
33. Work Order history header (WKOHDR)
This file contains information on all work orders header entered.
34. Work Order history line (WKOLIN)
This file contains all Work Order files in use.
288
35. Serial keyword (SKEYWF)
This file contains information on alphabetical order of terms used in the I/C manuals.
36. Serial History (SERHIS)
The serial units history information are stored in this file.
37. Warranty codes (ICREFM)
This file contains types of warranty codes.
38. Coverage types (COVFIL)
Types of coverage are stored in this file.
39. Item sequence (ITMNUF)
This file contains information on all item sequence.
40. Status code (STAFIl)
Status codes are stored in this file.
41. Quick Work Order (QIKWRK)
This file contains all the quick W/O in use.
42. Temporary item file (TMPITM)
Temporary items are stored in this file.
43. Kit used lock file (KUSLCK)
This file protects a working file.
44. Work order used lock file (WUSLCK)
This file protects a working file.
Field number to change ?
Make any needed changes, or use one of the options:
<PgUp>
For the previous screen
<F1>
To set all files to Y
<F2>
To initialize the files
<Esc>
Cancel and close the program
289
JOB COST
To Initialize Job Cost data files, execute the Passport Business Solutions initialization function.
To use this utility you must be a PBS administrative user to use this utility. Refer to the PBS
Users chapter for more information.
For Windows
Start->Programs->Passport Business Solutions->Init Utilities->JC Initialization
For UNIX or Linux
Type the following:
cd /usr/psi
or replace “/usr/psi” with the name of your PBS top-level
directory.
Then type the following:
jcinit
If you are using multiple companies, enter the 2-character company-id. If the company is
correct, answer Y. When prompted, enter an administrative User ID.
The following screen displays:
When this screen is first displayed, all its fields are blank except the first. The cursor moves
through each field in sequence until all have been traversed. You can then change any field.
Options
Answer <Y> for each file you want to initialize, or press <Enter> to default to <N> to skip
initializing a file. At any field (including Field number to change ?), you can use one of the
options:
290
<F1>
To set all fields to Y. After the first use of this option,
this key functions as a toggle, alternating between setting all fields to Y and to N.
<F2>
To initialize all files marked Yes, without waiting to
reach Field number to change ?. You will be asked to
confirm that you want to do this.
Format
One letter at each field, either Y or N. The default is N.
Example
Press <Enter> at each field. This displays as Skipped.
File and Description Table
The following table lists all the entries on the screen and provides a description of each file.
Cross-references are given to the Job Cost User manual chapters where the contents of the file
are described. In addition, the internal name of the file is given. This is useful when relating the
file name to several features described in this manual (pathfinder, file utilities).
#
FILE
NAME
SHOWN
ON
SCREEN
J OB COST
INTERNAL FILE
M ANUAL
NAME (PATHCHAPTER
FINDER )
REFERENCE
DESCRIPTION/CONTENTS OF FILE
1
Job Cost
Control file
Control InforJCCTLF
mation
Parameters defining your job cost structure
2
Job Master
file
Job Descriptions
MSTFIL
Full definition and specification of eachjob. Contains the identifying description record for each
job and one or more cost item records, providing
the component parts of each job
3
Job Master
Change Log
file
Job Descriptions
CNGMST
Used to log changes or deletions made to the
Job Master file. Can be selectively purged after
the Change Log is printed. If you are not using
the change log function (per the Company file),
no data is put into this file
4
Additional
Description
file
Job Descriptions
DESCFL
Additional description you can enter for the job
header records or job cost item records
5
Cost Category file
Cost Categories
CATFIL
Master list of cost categories that areused on all
your jobs
6
Job Detail
file
Job Descriptions
Complete record of all cost and billing transactions entered for jobs. These transactions stay
in the Job Detail file until you specifically
request to save them in another file (the Holding
file or Inactive Job Detail file) or purge them
DTLFIL
291
FILE
#
NAME
SHOWN
ON
SCREEN
J OB COST
INTERNAL FILE
M ANUAL
NAME (PATHCHAPTER
FINDER )
REFERENCE
DESCRIPTION/CONTENTS OF FILE
All transactions entered directly in Job Cost and
all transactions for jobs that were entered
through other Passport Business Solutions modules
7
Cost Transaction file
Costing; Get
Costs
CSTTRX
Temporary file for cost entries (transactions).
Can be entered directly in the Job Cost module
or interfaced into Job Cost from other Passport
Business Solutions modules via the Get costs
function. When cost transactions are posted,
they are deleted from this file at the same time
8
Cost Transaction Lock
file
Costing; Get
Costs
CSTLCK
Protects the Cost Entry file during posting of
cost transactions
9
Billing and
Payment
Transaction
file
Billing and
Payment
BLPTRX
Temporary file for billing and payment entries
(transactions) entered directly in Job Cost. File
is purged each time such transactions are posted
10
Billing and
Payment
Lock file
Billing and
Payment
BLPLCK
Protects the Billing Entry file during the posting
of billing and payment transactions
11
Activity
Transactions
file
ACVTRX
Temporary work file for activity transactions. Is
completely purged each time activity transactions are posted. Activity transactions are
another term for completion estimate transactions
12
Activity
Transactions
Lock file
ACVLCK
Protects the Activity Entry file during posting of
activity transactions.
Completion
Estimates
Completion
Estimates
13
Billing and
Job Cost DisPayment;
tribution file
Costing‘
JCDIST
Used only if you are not using all three of the
PBS A/R, A/P, and PR modules. In this case, it
holds all general ledger distributions resulting
from cost transactions and billing and payment
transactions entered directly in Job Cost. Can
be selectively purged at any time.
14
Inactive Job
Master file
MSTFIX
Saves jobs that have been closed, and that you
want to remove from your active files and store
for later use or review
Utilities
292
FILE
#
NAME
SHOWN
ON
SCREEN
J OB COST
INTERNAL FILE
M ANUAL
NAME (PATHCHAPTER
FINDER )
REFERENCE
DESCRIPTION/CONTENTS OF FILE
15
Inactive Job
Detail file
Utilities
DTLFIX
Saves the detailed transactions for the jobs
saved in the Inactive Job Master file
16
Inactive
Description
file
Utilities
DESCFX
Saves the additional description for the jobs
saved in the Inactive Job Master file
HLDFIL
Temporarily saves or holds detailed transactions
(from the Job Detail file) for jobs that are still
active. Allows you to temporarily keep detailed
transactions not current in a separate file, so
they will not be included with the current detail
17
Detail Holding file
Utilities
Field number to change?
Make any needed changes. Press <Enter> to initialize the selected files. Files not selected are
not affected. It is not required that any file be selected. There will be a period of processing as
the files are processed, and then the program closes.
Select <Esc> to cancel.
293
ORDER ENTRY
To Initialize Order Entry data files, execute the Passport Business Solutions initialization
function.
You must log in as a PBS administrative user to use this utility. Refer to the PBS Users chapter
for more information.
For Windows
Start->Programs->Passport Business Solutions->Init Utilities->OE Initialization
For UNIX
Type the following:
cd /usr/pbs
or replace “/usr/pbs” with the name of your PBS top-level directory.
Then type the following:
oeinit
If you are using multiple companies, enter the 2-character company-id for the files you wish to
initialize. If the company is correct, answer Y. When prompted, enter an administrative User
ID.
The following screen appears:
Answer <Y> for each file you want to initialize, or press <Enter> to default to <N> to skip
initializing a file.
OE Data File Descriptions
A brief description of each data file is listed below:
1. O/E control file (OECTLF)
This file contains a number of module parameters and default values for Order Entry.
294
2. O/E Notes file (OENOTF)
This file contains all the notes you have entered in the various O/E selections that allow notes.
Notes associated with either orders, quotations, or recurring orders.
3. O/E Form file (ORFRMF)
This file contains definitions for forms that can be printed from orders. The predefined invoice
forms that are supplied with O/E are contained in this file, as well as any new forms that you
may define.
4. Order header file (ORDHDR)
This file contains a record for each unbilled order, unposted invoice, credit memo, quote, or
RMA. If back order control is used, incomplete orders (those that contain back ordered items)
remain in the file until back orders are filled.
5. Order line item file (LINITM)
This file contains a record for each line item associated with a specified order, invoice, credit
memo, quote, or RMA. It is used to produce all order reports and is purged when the
associated order, invoice, credit memo, quote, or RMA is removed from the Order Header file.
6. Order line serial file (OETKXF)
This file contains a record for each serial number or lot number associated with a specific line
item on a particular order, invoice, credit memo, or RMA.
7. Invoice lock file (INVLCK)
This file is used to protect the Order files.
8.Recurring order header file (OERHDR)
These files contain order header and line item detail for recurring orders that may be used
repeatedly for creation of regular orders.
9.Recurring order line item file (LINITM)
This file contains order line item detail for recurring orders.
10.Label format file (ELBFMT)
This file contains one record for each COD and shipping label format that you set up.
11. Labels lock file (ELBLCK)
This file protects the Label Format file.
12.Immediate invoice lock file (IMILCK)
This file protects order files.
13. E.D.I. audit file (EDIAUD)
This file protects the E.D.I. audit file.
14. Invoice forms parameter (OEFPAR)
This file saves the parameters for printing forms.
295
Field number to change?
Make any needed changes. Press <Enter> to initialize the selected files. Files not selected are
not affected. It is not required that any file be selected. There will be a period of processing as
the files are processed, and then the program closes.
Select <Esc> to cancel.
296
PURCHASE ORDER
To Initialize Purchase Order data files, execute the Passport Business Solutions initialization
function.
You must log in as a administrative user authorized to use PBS software. Refer to the PBS
Users chapter for more information.
For Windows
Start->Programs->Passport Business Solutions->Init Utilities->PO Initialization
For UNIX
Type the following:
cd /usr/psi
or replace “/usr/psi” with the name of your PBS top-level directory.
Then type the following:
poinit
If you are using multiple companies, enter the 2-character company-id for the files you wish to
initialize. If the company is correct, answer Y. When prompted, enter an administrative User
ID.
The following screen displays:
When this screen is first displayed, all its fields are blank. The cursor moves through each field
in sequence until all have been traversed. You can then change any field.
Options
Answer <Y> for each file you want to initialize, or press <Enter> to default to <N> to skip
initializing a file. At any field you can use one of the options:
297
<F1>
To set all fields to Y. After the first use of this option,
this key functions as a toggle, alternating between setting all fields to Y and to N.
<F2>
To initialize all files marked Yes, without waiting to
reach Field number to change ?. You will be asked to
confirm that you want to do this.
Format
One letter at each field, either Y or N. The default is N.
Example
Press <Enter> at each field. This displays as Skipped.
File and Description Table
The following table lists all the entries on the screen and provides a description of each file.
Cross-references are given to the chapter(s) where the contents of the file are described. In
addition, the internal name of the file is given; this is useful when relating the file name to
several features described in the PBS Administration documentation (pathfinder; file utilities).
#
1
SCREEN
FILE
NAME
P/O control
file
PURCHASE
ORDER
INTERNAL FILE
M ANUAL
NAME
CHAPTER
REFERENCE
DESCRIPTION
Control InforPOCTLF
mation
Contained within this file are a number of
parameters that define your purchase order
structure. Each parameter determines a specific
procedure to be used in other modules.
2
Delivery
location file
Deliver-to
Locations
WHSFIL
Contains locations and addresses where items
are to be stocked and received. It is the same
file used in Inventory Control, where it is called
the Warehouse File. If you are using Inventory
Control, both modules will use the same file.
3
Vendor
item file
Vendor
Items;
Set Up Vendor Item File
VENITM
Contains the vendors you do business with and
the items they provide. Vendor item records contain data about the vendor and the item.
4
P/O master
hdr file
Purchase
Orders
POHDRF
Contains one header record for each purchase
order.
5
P/O master
line file
Purchase
Orders
POLINF
Contains line items associated with a specific
purchase order.
6
P/O master
dist file
Purchase
Orders
PODIST
Contains distribution records associated with a
specific line item.
298
#
SCREEN
FILE
NAME
PURCHASE
ORDER
INTERNAL FILE
M ANUAL
NAME
CHAPTER
REFERENCE
DESCRIPTION
7.
P/O auxiliary file
Purchase
Orders
AUXFIL
Contains special messages or manually entered
deliver-to addresses associated with purchase
order header records, and additional descriptions that have been entered for line item records.
8
Pre-purchase lock
file
Pre-purchase
Processing
PRELCK
Used to ensure that only one user issues purchase order numbers or prints the purchasing
worksheet at a time.
9
P/O trans
hdr file
Purchase
Orders
HDRTRX
Contains one header record for each purchase
order transaction.
10
P/O trans
line file
Purchase
Orders
LINTRX
Contains line items associated with a specific
purchase order transaction.
11
P/O trans
dist file
Purchase
Orders
DISTRX
Contains distribution records associated with a
specific purchase order transaction line item record.
12
P/O trans
notes file
Purchase
Orders
LNNOTF
Contains the notes associated with P.O. line
items.
13
P/O trans
lock file
Purchase
Orders
PCHLCK
Used to protect the Purchase Order Transaction
Files.
14
Chng trans
hdr file
Changes to
Purchase
Orders
CNGHDR
Contains header records of purchase orders that
have been changed.
15
Chng trans
line file
Changes to
Purchase
Orders
CNGLIN
Contains line items associated with a specific
purchase order that has been changed.
16
Chng trans
dist file
Changes to
Purchase
Orders
CNGDIS
Contains distribution records associated with a
specific purchase order line item that has been
changed.
17
Chng trans
notes file
Changes to
Purchase
Orders
CNNOTF
Contains the notes associated with change P.O.
line items.
18
Chng trans
lock file
Changes to
Purchase
Orders
CNGLCK
Used to protect the Change Transaction Files.
299
PURCHASE
ORDER
INTERNAL FILE
M ANUAL
NAME
CHAPTER
REFERENCE
#
SCREEN
FILE
NAME
19
Receiving
trans file
Receivings
RCVTRX
For receiving transactions. When you receive
items, they are entered into this file, and are
cleared when posted to the permanent files.
20
Receiving
trans lock
file
Receivings
RCVLCK
Used to protect the Receiving Transaction File.
21
Receivings
history file
Receivings
RCVHIS
Contains the receivings information after it has
been posted. Receivings records remain on file
until purged by the user.
22
Price adjust- Adjust
ment file
Receivings
PRCADJ
Contains the adjustments to prices entered for
items received. When these adjustments are
posted as the new prices, this file is cleared.
23
Price adjust
lock file
Adjust
Receivings
PRCLCK
Used for multi-user systems, and prevents users
from doing incompatible actions while processing price adjustments.
24
Release
trans file
Releases
RELTRX
Contains release transactions that have been
entered for blanket purchase orders.
25
Release
trans lock
file
Receivings
RELLCK
Used to protect the Release Transaction File
26
Prepurchase
order
Pre-purchase
processing
PREFIL
Contains issued purchase order numbers prior to
processing.
27
PO Messages
Purchase
Order Messages
POMSGS
Contains messages entered for Purchase
Orders.
28
Vendor
Item Srch
Vendor Items
VENKEY
Holds search receiving transactions.
29
Receiving
serial
Receivings
RCSTXF
Holds serial receiving transactions
30
PO Notes
Purchase
Orders
PONOTF
Holds notes entered for Purchase Orders
31
PO Form
File
Purchase
Order Forms
POFRMF
Contains user-defined forms templates.
300
DESCRIPTION
Field number to change?
Make any needed changes. Press <Enter> to initialize the selected files. Files not selected are
not affected. It is not required that any file be selected. There will be a period of processing as
the files are processed, and then the program closes.
Select <Esc> to cancel.
301
PAYROLL
To Initialize Payroll data files, execute the Passport Business Solutions initialization function.
You must log in as a administrative user authorized to use PBS software.
Under Windows, Select
Start->Programs->Passport Business Solutions->Init Utilities->PR Initialization
Under Linux/UNIX
Ensure you are logged in as a user authorized to use PBS software. Refer to the PBS Users
chapter for more information.
Type the following:
cd /usr/pbs
or replace “/usr/pbs” with the name of your PBS top-level
directory.
Then type the following:
prinit
If you are using multiple companies, enter the 2-character company-id for the files you wish to
initialize. If the company is correct, answer Y. When prompted, enter an administrative User
ID.
The following screen displays:
When this screen is first displayed, all its fields are blank except the first one. The cursor
moves through each field in sequence until all have been traversed. You may then change any
field.
302
Answer <Y> for each file you want to initialize, or press <Enter> to default to <N> to skip
initializing a file. At any field (including “Field number to change ?”), you may use one of the
options:
Options
<F1>
To set all fields to Y. After the first use of this option,
this key functions as a toggle; alternating between setting all fields to Y and to N.
PgUp
To return to the first field on the screen, if not there
already.
PgDn
(1) To proceed to the last field on the screen, if not
there already. (2) If already at the last field or at “Field
number to change ?”, to proceed to the second screen,
preserving all existing settings on the first screen.
Format
One letter at each field, either Y or N. The default is N.
Example
Press <Enter> at each field. This displays as “Skipped”.
Enter the following information:
1.PR control file (PRCTLF)
Contained within this file are a number of parameters that define your payroll structure. Each
parameter provides information used by the Payroll system in its normal operation.
2.Deduction code file (DEDCOD)
Each possible earning other than wages and each deduction (other than withholding taxes,
garnish amounts, loan repayments and union dues) are entered in this file along with
parameters that define the accounting procedures to which each deduction/earning code is
subject.
3.Tax code/table file (TAXCOD)
This file contains all of the tax codes and tables.
4.Employee file (EMPFIL)
This file contains all information pertinent to all employees and non-employees who receive
compensation through the Payroll module.
5.Employee notes files (PRNOTF)
This file contains all the notes you have entered in the various Payroll selections that allow
notes.
6.Change employee file (CNGEMP)
This is a log of changes to the Employee File and who made them.
303
7.Time trans file (TIMTRX)
This is the main working file of the Payroll system. It is used for entry of time worked by your
employees.
8.Time trans dist file (TIMDIS)
This field is used to temporarily store distributions to general ledger for the time worked
entered in the previous file.
9.Time trans lock file (TIMLCK)
This file is used to protect the Time Transaction File, so that two users cannot post Time
Worked entries at the same time.
10.Check file (CHKFIL)
This file is used to track payroll checks from the moment they are printed until they have been
posted.
11.PR dist to G/L file (PRDIST)
This file contains one record for each General Ledger distribution generated by the Payroll
module. It is used to generate the Payroll Distribution to G/L report and, if the Passport
Business Solutions General Ledger module is used, this file is the input to the General Ledger
interface program. This file normally contains all of the detailed G/L distributions for one
month or accounting period.
12.PR history file (KHISFIL)
This file contains detail for each check that was paid, one record per transaction. It is used to
produce the Payroll History Report, Union Dues Report, and Employee Meals Report, as well
as other reports.
13.QTD history file (QTDHIS)
This is a permanent file containing quarter-to-date totals for each employee and is used for tax
reporting as well as various employee reports.
14.YTD history file (YTDHIS)
This is a permanent file containing, for each employee, one record for every earning and/or
deduction category that the employee is subject to during the year.
15.Manual PR trans file (MANTRX)
This file is used to record manual adjustment payroll transactions.
16.Manual PR dist file (MANDIS)
This file is used to record any General Ledger distributions associated with manual payroll
adjustments.
17.Manual trans lock file (MANLCK)
This file is used to protect the Manual PR Transaction File.
304
18. Void P/R check trans file (VDPCHK)
This file is used to record payroll check information to allow the user to void a check.
19. Void P/R check master file (VDMTRX)
This file is used to store payroll check detail information to be used during the void checks
functions.
20. Void P/R check work file (VDMWRK)
This file is used to temporarily store payroll data during the void check processing.
21.Federal auxiliary file (EMPFAU)
This file contains federal information used in printing W-2 forms for each employee.
22.State auxiliary file (EMPSAU)
This file contains state information used in printing W-2 forms for each employee.
23.Auxiliary lock file (AUXLCK)
This file is used to protect the Auxiliary File.
24.Extended field file (EXDATA)
This file contains the user-defined extended field definitions.
25.Employer extended info file (EMPREX)
This file contains the user-defined extended employer information used for magnetic media
reporting.
26.Employee extended info file (EMPEXT)
This file contains the user-defined extended employee information used for magnetic media
reporting.
27.Magnetic media lock file (MAGLCK)
This file is used to protect the Magnetic Media Format File.
28.Mag general information file (MAGGNA)
This file contains the customized magnetic media General Appearance information.
29.Magnetic media format file (MAGFMT)
This file contains the customized magnetic media report formats.
30.YTD state/city history file (SCDHIS)
This file contains the year to date history for state and city taxes.
31. Payroll report format file (RPTMFT)
This file contains the user defined customized report formats.
32. Payroll report lock file (RPTLCK)
This file is used to protect the Payroll Report file.
305
Field number to change ?
Make any needed changes.
Press <Enter> from a blank “Field number to change” to proceed to the next screen or select
<Esc> to cancel.
Continue to answer <Y> for each file you want to initialize, or press <Enter> to default to <N>
to skip initializing a file. The cursor will move through each field in turn, and you will be able
to correct any errors from “Field number to change?”. You may also use the options:
Options
<F1>
<F2>
PgUp
PgDn
To set all fields to Y. After the first use of this
option, this key functions as a toggle; alternating
between setting all fields to Y and to N.
To initialize all files marked “Yes”, without waiting to reach “Field number to change ?”. You will
be asked to confirm that you want to do this.
(1) To return to the first field on the screen, if not
there already. (2) If already at the first field or at
“Field number to change ?”, to return to the previous screen. This is not the same as <Esc>, since
all your settings on the second screen are preserved.
To proceed to the last field on the screen, if not
there already.
Format
One letter at each field, either Y or N. The default is N.
Example
Press <Enter> at each field. This displays as “Skipped”.
33. Multi-city multi-state file (MCSFIL)
This file contains information about those employees who are liable for taxes to more than one
state and/or to more than one city.
306
34. Jurisdictions file (MJRFIL)
This file contains miscellaneous jurisdiction information for federal and state reporting
requirements.
35. Employee DDA file (EMPDDA)
This file contains bank account information for each employee.
36. Payroll positive pay format file (PRFRMF)
This file contains positive pay file formats.
307
POINT
OF
SALE
To Initialize Point of Sale data files, execute the Passport Business Solutions initialization
function.
For Windows
Start->Programs->Passport Business Solutions->Init Utilities->PS Initialization
For UNIX
Ensure you are logged in as a user authorized to use PBS software. Refer to the PBS Users
chapter for more information.
Type the following:
cd /usr/pbs
or replace “/usr/pbs” with the name of your Passport top-level directory.
Then type the following:
psinit
If you are using multiple companies, enter the 2-character company-id for the files you wish to
initialize. If the company is correct, answer Y. When prompted, enter an administrative User
ID.
The following screen displays.
When this screen is first displayed, all its fields are blank. The cursor moves through each field
in sequence until all have been traversed. You may then change any field.
Answer <Y> for each file you want to initialize, or press <Enter> to default to <N> to skip
initializing a file.
Format
One letter at each field, either Y or N. The default is N.
Example
Press <Enter> at each field. This displays as “Skipped”.
308
The following table lists all the entries on the screen and provides a description of each file.
The internal name of the file is given; this is useful when relating the file name to several
features described earlier this manual (pathfinder; file utilities).
FILE NAME AS
INTERNAL
#
SHOWN ON
SCREEN
(PATHFINDER
)
1.
P/S control file
PSCTLF
This file contains parameters that
define the basic operation of your
Point of Sale module
2.
Alias items file
ALIITM
This file contains alias item
numbers that refer to I/C items and
P/S services.
3.
Credit card file
CCRDFI
Customer credit card information is
contained in this file.
NAME
DESCRIPTION
4.
Contract pricing file
CNTRPC
This file maintains special pricing
for specific customers. Special pricing can be offered for a certain
item or service or an entire category of items or services.
5.
Customer
restrictions file
CRDHLD
Customer payment restrictions are
maintained in this file.
DRWFIL
When drawers are opened, they are
added to this file. During posting,
closed drawers are removed from
this file.
OVRRID
This file contains all price or credit
overrides that are done during transaction processing. This information
is moved to history during posting.
POSCMT
Line item and transaction comments that are entered during transaction processing are stored in this
file.
POSHDR
This file contains one record of
bill-to/ship-to and related information for each unposted transaction
POSLCK
This file is used to protect transaction files during processes that
require exclusive use of certain
Point of Sale files.
6.
Drawer file
7.
Override file
8.
Trx/line
commnt file
9.
10.
Trx header file
Trx lock file
309
11.
Trx line file
POSLIN
This file contains line items information for unposted transactions.
12.
Trx payment
file
POSPAY
This file contains unposted payments.
13.
Sales summary
file
POSSUM
This file keeps a cumulative history
of sales to report by category, by
customer, by item, by sales rep and
by sales volume.
14.
Services file
POSSVC
This file stores services that your
company offers.
15.
Payout file
POTFIL
This file contains a record for each
payout that occurs during transaction processing.
16.
Payment codes
file
PSCODS
This file contains Point of Sale payment codes for cash, credit cards,
checks, etc.
17.
Ship-to
addresses file
PSSHIP
This file contains alternate ship-to
addresses for customers.
18.
Posted payments file
PSTPAY
This files stores payments that
were made during transaction processing and have been posted.
19.
Register file
REGIFI
This file contains information
descriptive of registers used during
transaction processing.
20.
Comment history file
SHSCMT
This file stores line item and transaction comments that were entered
during transaction processing and
have been posted.
21.
Header history
file
SHSHDR
This file contains one record of historical bill-to/ship-to information
for each posted transaction.
22.
Line item history file
SHSLIN
This file contains historical line
item information for posted transactions.
23.
Payment history file
SHSPAY
This file contains historical payment information of posted transactions.
24.
Special sale
price file
SPCSAL
This file stores special sale prices
that apply to specific items or serv-
310
ices and for entire categories of
items for a specific period of time.
25.
Store file
STORFI
This file contains information specific to the operation of each store.
26.
User file
USERFI
This file contains information specific to users of the Point of Sale
module.
27.
Serial transaction file
PSTKFX
This file contains the serial and lot
number transaction information.
28.
Serial history
file
SHSSER
This file contains the serial and lot
number transaction history information.
29.
Layaway comments history
file
LWYCMT
This file stores line item and transaction comments for canceled or
forfeited layaway transactions.
30.
Layaway
header history
file
LWYHDR
This file stores header information
for canceled or forfeited layaway
transactions.
31.
Layaway line
history ifle
LWYLIN
This file stores line information for
canceled or forfeited layaway transactions.
32.
Layaway payment history
file
LWYPAY
This file stores payment information for canceled or forfeited layaway transactions.
33.
Layaway serialization/lot
LWYTRK
tracking file
This file stores item serial and lot
information for canceled or forfeited layaway transactions.
Field number to change ?
Make any needed changes.
Press <Enter> to initialize all selected files. There will be a period of processing as files are
initialized, then the program will close.
Press <ESC> to cancel the operation.
311
SALES ANALYSIS
To Initialize Sales Analysis data files, execute the Passport Business Solutions initialization
function.
You must be logged in as an administrative user authorized to use Passport software. Refer to
the PBS Users chapter for more information.
For Windows
Start->Programs->Passport Business Solutions->Init Utilities->SA Initialization
For UNIX
Type the following:
cd /usr/pbs
or replace “/usr/pbs” with the name of your Passport top-level directory.
Then type the following:
sainit
If you are using multiple companies, enter the 2-character company-id for the files you wish to
initialize. If the company is correct, answer Y. When prompted, enter an administrative User
ID.
A screen similar to this appears:
Answer <Y> for each file you want to initialize, or press <Enter> to default to <N> to skip
initializing a file.
The following table lists all the entries on the screen and provides a description of each file.
Cross-references are given to the chapter[s] where the contents of the file are described. In
addition, the internal name of the file is given; this is useful when relating the file name to
several features described in this (pathfinder; file utilities).
312
#
SCREEN FILE
NAME
SALES ANALYSIS
M ANUAL
CHAPTER
REFERENCE
INTERNAL
FILE
NAME
DESCRIPTION
1.
Saved report file
Common Features
SARPTP
Stores saved report
selection parameters
2.
Customer comparative file
Customer
Comparatives
CUSCMP
Contains historical
information on sales
by customer
3.
Cust comparative
control file
Control Information
SACTLR
Contains parameters
needed to interface
to A/R for obtaining
the customer comparative reports.
4.
Item comparative
file
Item Comparatives
ITMCMP
Contains historical
information on sales
by item
SACTLC
Contains parameters
needed to interface
to I/C for obtaining
the item comparative
reports.
5.
Item comparative
control file
Control Information
Field number to change?
Make any needed changes. Press <Enter> to initialize the selected files. Files not selected are
not affected. It is not required that any file be selected. There will be a period of processing as
the files are processed, and then the program closes.
Select <Esc> to cancel.
313
TIME
AND
BILLING
To Initialize Professional Time and Billing data files, execute the Passport Business Solutions
initialization function.
For Windows
Start->Programs->Passport Business Solutions >Init Utilities->TB Initialization
For UNIX
Ensure you are logged in as an administrative user to use PBS file utilities. Refer to the PBS
Users chapter for more information.
Type the following:
cd /usr/pbs
or replace “/usr/pbs” with the name of your PBS top-level
directory.
Then type the following:
tbinit
If you are using multiple companies, enter the 2-character company-id for the files you wish to
initialize. If the company is correct, answer Y. When prompted, enter an administrative User
ID.
For space reasons, two screens are needed to contain all the files. You can switch between the
two screens as needed. No files are initialized until you have approved both screens.
Two screens are required for all the files in this module. The following appears first:
When this screen is first displayed, all its fields are blank except the first one. The cursor
moves through each field in sequence until all have been traversed. You may then change any
field.
314
Answer <Y> for each file you want to initialize, or press <Enter> to default to <N> to skip
initializing a file. At any field (including “Field number to change ?”), you may use one of the
options:
Options
<F1>
To set all fields to Y. After the first use of this option,
this key functions as a toggle; alternating between setting all fields to Y and to N.
PgUp
To return to the first field on the screen, if not there
already.
PgDn
(1) To proceed to the last field on the screen, if not
there already. (2) If already at the last field or at “Field
number to change ?”, to proceed to the second screen,
preserving all existing settings on the first screen.
Format
One letter at each field, either Y or N. The default is N.
Example
Press <Enter> at each field. This displays as “Skipped”.
Data Files
The following table lists all the entries on the screen and provides a description of each file.
The internal name of the file is given; this is useful when relating the file name to several
features described in the earlier in this manual (pathfinder; file utilities).
#
FILE
NAME AS
SHOWN
ON
SCREEN
1.
Action file
2.
Advance
billing file
INTERNAL
NAME
PATHFINDER
DESCRIPTION
ACNFIL
Contains the action codes and
descriptions.
ADVBFL
Contains one record for each billing on account which has not yet
been fully used to “pay” for WIP
during billing.
3.
Advance
billing
account file
ADVACT
Contains the advance billing
account numbers, description, statement type and comments. These
accounts must also exist in the
Valid G/L Accounts File.
4.
Advance
billings
used file
ADVBHF
This file contains a record for each
use of a billing on account to “pay”
for a WIP during billing.
315
5.
Change
client file
CHGCLI
Contains one record made for each
change made to the client file.
6.
Client file
CLIFIL
Contains relevant client information such as name, address, billing method, discount terms, tax
status, and period /year-to-date statistics. (Whenever a new client is
entered, a record is created both
the Client File in PTB and Customer File in A/R.)
7.
Client
notes file
TCNOTF
Contains notes you have entered
for clients.
8.
Client rate
file
CLRFIL
This file may be used to enter
client-specific billing rates for
staff.
COSTHF
Contains cost information for nonbillable “by the hour” services and
non-billable “cost plus” expenses
from posted time and expense
sheets.
9.
Cost history file
10.
Current
matter file
CURMAT
For each client, the matter to which
periodic advance billing retainers
are to be applied is entered in this
file.
11.
Expense
file
EXPFIL
This file contains one record for
each expense code entered through
Expenses.
12.
Fixed fee
file
FIXTRX
Contains one record for each fixed
fee billing, contingent fee billing,
and billing adjustment that has not
been invoiced.
13.
Fixed fee
history file
FFCHSF
Contains time and expense history
for fixed fee matters.
14.
Invoice file
TBINVC
Contains one record for each
invoice.
15.
Invoice format file
BLLFMT
This file contains the complete
descriptions of the header areas,
line items areas, and footer areas
of your invoice formats.
316
16.
Invoice format control
file
BILLCK
This file contains the General
Appearance information for your
invoice formats.
17.
Invoice format lock
file
BLFMLK
This file protects the Invoice Format File.
18.
Invoice history file
BLHIST
This file contains the history information for posted invoices.
19.
Invoice history auxiliary file
BLHAUX
This file contains the billing
descriptions for posted invoices.
20.
Invoice
posting
lock file
21.
Matter file
MATFIL
Contains basic information about
each matter undertaken for each
client.
22.
Matter
notes file
TMNOTF
Contains notes you have entered in
matters.
23.
PTB control file
TBCTLF
Parameters that define the basic
structure of your T/B module
24.
Report
parameter
file
TBRPTB
When you are entering the parameters to use in printing various
reports, you can choose to save
them. If you do, they are contained
in this file.
25.
Retainer
file
RETFIL
The file contains one record for
each retainer.
26.
Service file
SVCFIL
Contains the service description,
period/year-to-date fields and
accounts.
27.
Staff file
STFFIL
Contains information about the
staff including rates.
28.
Time &
expense
header file
TBHDRF
This file contains one record foe
each time & expense sheet.
29.
Time &
expense
line file
TBLINF
This file contains one record for
each service or expense line
entered on a time & expense sheet.
This file protects the billing files
during invoice posting.
317
30.
Time &
expense
auxiliary
file
TBAUXF
This file contains billing descriptions entered for billable lines on
the time & expense sheets.
31.
Time &
expense
lock file
TBFLCK
This file is used to protect the time
& expense files during posting.
32.
Void
invoice file
TBVOID
This file contains one record for
each voided invoice.
Field number to change ?
Make any needed changes or select the <Esc> key to cancel.
Press <Enter> from a blank “Field number to change” to proceed to the next screen.
Continue to answer <Y> for each file you want to initialize, or press <Enter> to default to <N>
to skip initializing a file. The cursor will move through each field in turn, and you will be able
to correct any errors from “Field number to change?”. You may also use the options:
318
Options
To set all fields to Y. After the first use of this
option, this key functions as a toggle; alternating
between setting all fields to Y and to N.
To initialize all files marked “Yes”, without waiting to reach “Field number to change ?”. You will
be asked to confirm that you want to do this.
(1) To return to the first field on the screen, if not
there already. (2) If already at the first field or at
“Field number to change ?”, to return to the previous screen. This is not the same as <Esc>, since
all your settings on the second screen are preserved.
To proceed to the last field on the screen, if not
there already.
<F1>
<F2>
PgUp
PgDn
Format
One letter at each field, either Y or N. The default is N.
Example
Press <Enter> at each field. This displays as “Skipped”.
INTERNAL
#
FILE NAME
NAME
AS SHOWN
ON SCREEN
PATHFINDER
(
DESCRIPTION
)
33.
WIP file
34.
WIP accounts
file
35.
WIP auxiliary
file
WIPFIL
This file contains one record for each unbilled service (for matters whose
service billing terms are
“by the hour”) and for
each unbilled expense (for
matters whose expense billing terms are “cost plus”).
WIPACT
Contains the work-in-process account number,
description and comment.
These accounts must also
exist in the Valid G/L
Accounts File.
WIPAUX
This file contains any additional description entered
for work-in-process items,
plus any notes.
319
36.
WIP history
file
WIPHIS
Work-in-process history
information for posted
invoices
37.
WIP history
auxiliary file
WIPHAF
Work-in-process billing
descriptions from posted
invoices.
Field number to change?
Make any needed changes. Press <Enter> to initialize the selected files. Files not selected are
not affected. It is not required that any file be selected. There will be a period of processing as
the files are processed, and then the program closes.
Select <Esc> to cancel.
320
Help Access Maintenance
This chapter contains the following topics:
Introduction to Lookup Design
Lookup Maintenance Window
321
INTRODUCTION
TO
HELP ACCESS MAINTENANCE
Most fields in Passport Business Solutions have help. This includes both the graphical screens
and the character screens. This chapter documents entering edit the access to help for the
graphical screens.
Help for the graphical screens is in html format. Passport provides help for all the graphical
screens. Help, as it is installed, is accessible via the Internet from one of Passport's servers.
There is also a local installation of the PBS help which you may have done for your system.
You could modify the local PBS help, but it is recommended that you create your own. After
you create your html help file, there is a means of modifying the link so that it accesses your
help file.
This chapter describes how you enter the link to your help files. It does not tell you how to
generate html files, enter help text or create bookmarks and links. There are various
applications you can use to generate html and they should all have their own user
documentation. We recommend that you review the documentation provided with the
application.
If you are using PBS via Thin client, then you must not alter the path to help.
Viewing the help for a graphical field or screen is accessed by selecting <Ctrl+F1> or clicking
on Help from the menu at the time of the screen.
We have provided a maintenance screen where you may link to your own help. The remainder
of this chapter describes this screen.
322
HELP ACCESS MAINTENANCE
Select
<Ctrl+F6> from any graphical screen or field on a graphical screen for which you have created
your own help. You will see a screen like the following:
You may use one of the button options:
New
Ctrl+n
Enter a new help link
Edit
Ctrl+e
To modify the existing link to the help file
Delete
Ctrl+d
Remove the existing link to the help file
Exit
Ctrl+e
Exit the help maintenance screen
Save
Ctrl+s
To save changes to a new or modified help link. Saving
the record auto-generates the Absolute address field
Cancel
Ctrl+c
To cancel changes or cancel a new help link entry
Most of the fields cannot be entered manually because they are auto-generated when you
select the Save button. The fields you can enter are explained first. The fields you cannot enter
are documented at the end.
There are three fields that you can enter:
HTM file:
Enter the name of the html file. You may also have to enter additional path information.
At the end of the line you may also enter a bookmark linking it to a location in the help file.
323
Format
256 characters
Location:
Enter the location of the help. Do not enter the full address here. The program will autogenerate part of the help file path when the Save button is selected.
You have three options.
Options
PBS Web site
To access the help from Passport's web site.
PBS Local
To access the PBS help locally. Local PBS
help requires a separate installation. See the
install documentation for this.
User defined help
local
Select this for accessing your help
A default path is generated when the Save button is selected. The path varies depending on
which option you choose and where PBS is installed. Here is an explanation of each:
•
PBS Web site: This points to the PBS documentation on a web site. This is the default location
for PBS help following a standard installation. This is the only option if you have Thin client.
•
PBS Local: There is an optional install that allows the PBS help to be installed locally on the
server. Local help is the only option if your workstation does not have Internet access. It is
usually faster than the online help but not as up-to-date.
•
User defined help local: This is the option you use if you want to write your own help. You
should place the help in a directory under the top-level PBS directory. When the Save button is
selected it will enter the path automatically. Here is an example of a path for AR help where the
name of the file is APHELP.HTM and PBS Version 12.0 is installed on an Q drive in the PBS
directory.
file:///Q:/PBS/USERHelpHTM/1200/AR/AR.HTM
Following the saving of this entry the main fields will look something like this:
The directories of USERHelpHTM/1200/AR are not created automatically on the server. You
must manually add these directories to your system.
Format
Drop down list box
Comment:
This is an optional field. Enter a comment about your help. This comment does not display
when the user selects help.
Format
256 characters
324
Pre-view
After you have saved the help access record, you may test the access to the html file and
bookmark (if used) using this button.
Auto-generated Fields
There are some fields that you cannot modify because they are auto-generated when you save
the record. Here is a description of these fields.
F IELD
DESCRIPTION
Sys ID:
This is the PBS application
Program
ID:
This is the name of the program
Screen
ID:
This is the name of the screen, usually the same as the program name.
Control
ID:
This is the number that makes the field or screen selection different from other fields on the screen.
This is the version number of PBS. This allows for different
PBS Verhelp for different versions. The program is reading the first
sion:
four numbers of the xxVERS file to determine the version.
Absolute
address
This is the auto-generated address after you enter HTM File:
and Location fields.
325
Error Messages
This appendix contains the following topics:
PBS Error Message General Rules
Specific Error Messages
326
PBS ERROR MESSAGE GENERAL RULES
When you are using Passport Business Solutions error messages may display for various
reasons.
For example, if you were to enter alphabetic characters into a numeric field, a message would
display indicating that the data entered is invalid for the type of field.
This chapter provides a reference for the more common Passport error messages.
Depending on your computer and operating system, some error messages may display
differently from what is listed in this chapter. The message on any one PC might not have the
same wording as the message on a PC from a different manufacturer.
The following error messages are listed alphabetically, not by error type. When you receive an
error message, look up the applicable message on the list and proceed accordingly.
Each error message consists of three parts. The message header, listed first, contains the text of
the error message which you will see on the screen. Listed next, is the situation which
describes the circumstances or conditions that generated the error. Finally, is the handling.
which provides information on how to resolve the error. If applicable, you will be referred to
the appropriate manual for more information.
Where the handling of an error is Get technical hardware support, you should contact your
hardware reseller or other local independent source. Passport Software, Inc. does not provide
support or advice on resolving hardware problems.
Where the error handling is Get technical software support, you should contact your software
reseller or local, independent source first. If you require further assistance, contact Passport’s
Support Department.
In this chapter, “***” in an error message represents a place where a word is substituted,
depending on what function you are using at the time. Words like “CUSTOMER”,
“VENDOR”, or “EMPLOYEE” will appear where “***” occurs in an error message. For
example, if you are using a selection dealing with customers, the message below would read
CUSTOMER NOT ON FILE.
It is not the intention of this chapter to cover every error message which may be generated.
There are thousands of possible error messages in the PBS modules; but the cause and solution
to the majority of these are obvious in relation to the screen on which they are shown. The
messages shown in this chapter are generic examples and messages caused by operating
system and hardware problems.
327
SPECIFIC ERROR MESSAGES
*** NOT ON FILE
Situation:Information that you are attempting to find is not on file (vendor, customer, etc.).
Handling:Ensure that the required information is on file before you attempt to use it.
All 999’s in a field on a print-out or on the screen
Situation:A number has exceeded its allowed maximum size.
Handling:Enter the information as two or more smaller transactions instead of one large
transaction.
If you feel that the field size is consistently too small to handle your transactions, contact PSI
support and request a system enhancement or customization.
Bad Command Or File Name
A command was issued that cannot be executed. Check your system manual for the correct
command.
Beep
Situation:Occasionally you will hear a beep from your computer when you are entering
information. This indicates:1) you entered too many characters or 2) you entered information
in an incorrect format. For example, you tried to enter letters where numbers should have been
entered.
Handling:Refer to your online help, via F8, or the Passport User Manual for the maximum
number of characters that can be entered and the required format.
Calculation overflow
Situation:An arithmetic calculation in the program has resulted in an answer that is too large for
the field where it should be placed.
Handling:Refer to the applicable chapter in the User Manual. If necessary, obtain technical
software support.
Cannot Enter More Than *** Distributions
Situation:You are trying to enter more distributions than are allowed on the screen.
Handling:Rearrange your distributions or break up the transaction.
In most places you will have to entry many distributions before this message will occur.
Cannot Exceed Amount Remaining
Situation:You tried to enter a distribution amount which exceeds the amount remaining to
distribute. The program is enforcing a rule that requires the sum of the distributions to be
exactly equal to the transaction amount. The amount remaining to distribute is shown at the
bottom of the screen.
328
Handling:Enter an amount equal to or less than the amount remaining to distribute.
Change not allowed
Situation:You are attempting to make a change where changes are not allowed.
There are many cases where a field’s contents are either fixed once entered or are determined
or calculated by other processes in the system. While these fields are displayed on screen, their
are often reasons why the contents can not or should not be changed.
Handling:Refer to your Passport User Manual for instructions. Refer also to the specific rules
for the field or the System manual for the Overriding Protected Changes section in the manual.
*** Transactions Must Be Entered Through The Other Passport Module
Situation:You are trying to add transactions in Job Cost, but in your Job Cost Control File you
have specified interfacing from A/P, PR, and G/L.
Handling:Use the other packages for entering transactions or change your control file settings.
Entry must be alphabetic
Situation:You have entered non-alphabetic characters in a field that accepts only letters.
Handling:Enter only alphabetic letters (A through Z).
Entry must be numeric
Situation:You have entered non-numeric characters in a field which accepts only numbers.
Handling:Enter only numeric characters (only 0 through 9, a decimal point, and a minus sign
are allowed - commas are not allowed).
Entry must be positive
Situation:You have entered a negative number in a field which accepts only positive numbers.
Handling:Enter a positive number.
FILE ERROR - 30
Situation:This is usually a hardware error; however, this error could be as simple as a bad disk.
Handling:Retry the operation. If you receive the error message again, obtain technical
hardware support. If your hardware is functioning correctly and you still receive this error,
obtain technical software support.
FILE ERROR - xx
Situation:This is usually a hardware or operating environment error.
Handling:Retry the operation you were doing. If the error message persists, obtain technical
hardware support. If your hardware checks out OK and you still get this error, obtain technical
software support. Many of the errors 30, xx you may encounter will require System
Administration help. If a kernel parameter needs changing, consult your system administrator.
The following lists some of the conditions that can cause an error 30,xx:
329
2 No such file or directory
13 Permission denied
Handling:Verify that you have the correct level of permissions
24 Too many open files
Handling:In UNIX or Linux increase NFILES in your kernel configuration
27 File too large
Handling:In UNIX or Linux increase ULIMIT in your kernel configuration
28 No space left on device
Handling:You have reached the limits of your hard drive or file system
30 Read only file system
Handling:Verify that you have the correct level of permissions
46 No record locks available
Handling:In UNIX or Linux increase NFRLCK in your kernel configuration
FILE ERROR - 34
Situation:The disk is full.
Handling: Notify your system administrator that you are having disk space problems. It will be
necessary to remove files from the disk to free up some space. The first files you can remove
are any with extensions of .EXP or .LNK. Next, print all reports from disk and then delete
them. If this does not remedy the situation, contact technical software support.
FILE ERROR - 35
Situation:A data file could not be found or is not on the disk.
Handling:Refer to the Pathfinder chapter and verify path names. Obtain technical software
support.
FILE ERROR - 41
Situation:This usually indicates that an indexed file has been corrupted.
Power surges or sags, static electricity, and lightning, strikes, can cause data file corruption. If
the computer looses power while running a program, data files may be damaged.
It is important that you do not exit Passport until you receive either the END OF
PROCESSING or EXIT message.
Handling:There are two possible remedies for a corrupted data file:
1. Consult one of the File Recovery Utilities chapters in this manual for instructions on repairing or
rebuilding damaged data files.
2. Using the most recent daily backup of your data files, re-enter all transactions necessary to
bring those files up-to-date.
330
If neither of the above resolve the problem, obtain technical software support.
FILE ERROR - 98
Situation:This indicates that a file index is corrupted or, in a multi-user environment, that a user
did not properly exit the software.
Handling:Use the file utilities to rebuild the file in place. Refer to the File Recovery Utilities
chapter of this manual.
In a Windows 2000 or 2003 server environment you may have an Opportunistic Locking
problem. In chapter 2 of this manual there is more information on turning off Opportunistic
Locking on either the server (or the workstation) along with a link to a Microsoft web site for
help in modifying the registry.
Sporadic General File Errors 98-90, file errors 39-01,
“Heavy Usage” messages, etc.
Some of situations that may cause these sporadic problems are the following.
Situation: Virus on the system
Handling: Run virus detection software and remove the virus
Situation: Virus software
Handling: Set up the virus detection program to not scan files that have a .DAT, .vix or .acu
extension.
Situation: Peer to Peer working improperly
Handling: Have the system administrator check the cabling, network cards and PBS access.
Situation: Memory problem on server
Handling: Check the server for memory usage and add memory if needed.
Situation: Network problems
Handling: Check cabling, network cards and replace as needed
Situation: Network card setting (Full duplex, 10/100)
Handling: Adjust the card for optimum settings
Situation: Hard drive problem
Handling: Install a second hard drive and copy PBS to the new drive or put PBS on a different
server.
Situation: Ops Locks turned on for both Server and Workstation
Handling: Remove the Ops Locking for either the workstation, the server or both
Invalid entry - try again
Situation:You have entered information that is invalid for the field you are working in.
Handling:Check the associated user manual to find out what is acceptable for this field.
Normal processing should not be affected by this message.
331
Maximum Daily Changes Exceeded For Use
Situation:You are using the Change Log feature (specified in the Company File) and you have
exceeded the maximum number of changes.
Handling:Print the Change Log and answer Y to the purge question, then resume making
changes.
Memory access violation in AcuStart
Situation:You are attempting to start PBS and you get the Memory access violation error.
Handling:Install a printer on the workstation. At least one printer is required to start PBS.
You have exceeded the licensed number of users for ACUCOBOL-GT.....
The number of users currently running PBS is equal to the maximum number of users for
which you are licensed and at least one more user is attempting to log onto the PBS system.
Handling:You will have to wait until another user logs off before you can use PBS. If this
happens frequently, you should consider purchasing a System Manager or Thin client upgrade
that allows for a greater number of concurrent users. Contact your reseller for assistance.
Next Cost Category In Use At Another Station - Try Again
Situation:You pressed <F1> to obtain the next cost category, but you cannot use it while
another is using it.
Handling:Wait until the other user is finished with the cost category, or go on to another.
Next Transaction In Use At Another Terminal - Try Again
Situation:You pressed <F1> to display the next transaction, but another user is working on it.
Handling:Wait until the other user is finished with it, then try again; or go on to another
transaction.
No *** In Range
Situation:This message indicates that there is no information in the range you specified. For
example, if you asked to print customers from numbers 100 to 200 and there are no customers
with numbers between 100 and 200, this message will display.
Handling:Enter different starting and ending limits, or refer to your Passport User Manual for
more detailed instructions.
No *** On File
Situation:This indicates that there is nothing of this type on file.
Handling:Enter the missing information.
If you are using the menu bar style menu, you can temporarily access another function to add
the information. Refer to the Starting PBS, Menus and printing chapter of the System User
manual.
332
If you are using the Windows or the Tree-view system menus you can start PBS and run
another concurrent usage of the system. This will not effect the user count. However, with
UNIX, Linux and Thin client when you run another PBS session, you are using an additional
user to do so.
Not enough memory, program not found for:***
or
Program missing or not in path file.
Situation:A program could not be loaded into memory.
Handling:If you attempted to run a menu selection from a PBS module you do not have,
remove that module from the master menu in Company information.
If the module is supposed to be installed, make certain that Pathfinder has the correct path
entered.
The program may not be installed. Verify that the program is there.
Make sure you have the Windows, Linux or UNIX system permissions set so the user can
access the directory or program.
Not processed
Situation:This message usually appears after you press <Esc> while entering information. The
information you have already entered on this screen is not processed (saved).
Some functions have more than one screen for entering information. In some cases, <Esc>
does not affect the information already entered on the previous screens.
Posting out of balance
Situation:This appears if you attempt to post general ledger entries that cause one or more
accounting period totals to be out of balance.
Handling:Check the entries you are attempting to post to make certain that they are the correct
amounts and that they are being assigned to the proper accounting periods. Make any
corrections necessary.
Printer Not Available… or Workstation printer not found
Situation:If the Printing occurring…please wait message is displayed and no printing occurs,
Printer not available…message displays after a delay of 30 seconds. If you get the Workstation
printer not found message, click on the OK button and select a different printer. In either case
one of following is likely:
•
The printer is off-line or powered off.
•
No printer is no longer connected to your system.
•
The printer is not correctly defined in Company information.
Handling:
•
Correct the situation, then press <F1> to resume printing.
333
•
If the PSI Printer locator display, you can select a different printer if one is available.
•
Press <Esc> to cancel printing, then go to Company information and define the printer (page 722).
Procedure Error…
Situation:Either the operating system software or a PBS program has an error in it.
Handling:If it is an operating system error, contact your operating system support for help with
this. If it is a PBS program error obtain technical software support from Passport.
If it is a critical PBS program error, PBS development will make every attempt to fix the
problem in a timely manner. If the error is not critical, PBS development will attempt to get the
issue fixed before the next release of the software. In general a critical problem involves
corrupt or incorrect auto-generated system data, but PBS development retains to right to
determine what a critical error is vs. a non-critical error.
Reenter Distributions For New Trans Amount
Situation:You have changed the transaction amount after the distributions have been entered.
Handling:Reenter the distributions for the new transaction amount.
Handling:Enter a zero retainage amount or change the transaction amount.
Someone is currently working with ?????? Can’t post now
Situation:You are attempting to post.
Handling:One or more people are currently in the entry screen which prevents you form
posting. Have that person(s) exit the entry screen and you should be able to post.
This order is currently being added
or
Invoice is incomplete. Change not allowed
Situation:Another user is currently adding the O/E order or A/R invoice.
Handling:Allow him to finish adding the order or invoice before you change it.
If no other user is adding the order, the message resulted because of a problem during entry
such as a power loss or reboot. In this case delete the order and re-enter it.
This Selection Is Not Allowed For Your System
Situation:You have selected a report that prints A/P, Payroll, A/R or Inventory Control
transactions, but the Job Cost Control file specifies that you are not interfacing with that
particular Passport package.
Handling:Try another selection.
334
This Selection Not Allowed With Inactive Files
Situation:In Job Cost you were using the inactive Job Cost files and tried to perform a function
that could modify them.
Handling:When using inactive files, you can only perform inquiries and print reports.
Too long, enter in format ***
Situation:You are attempting to enter too many digits in a field.
Handling:When entering the information, follow the exact format shown in the on-line help or
in the PBS User Manual.
Too Many Duplicates - Cannot Proceed
Situation:You are attempting to save or restore transaction detail, and the file cannot contain all
the duplicated key information.
Handling:Purge some of the transaction detail records and retry the action that generated this
message.
Total percentage can’t be more than 100%
Situation:The percentages you have entered in individual fields total more than 100%.
Handling:Reenter the correct percentages.
Unable To Purge Change Log
Situation:Purging the Change Log requires exclusive use of the Change Log File, and this is
being used at another terminal.
Handling:Wait until no one else is using the Change Log File, then retry.
Utility (Close or Re-open Jobs)
Situation:In Job Cost you tried to close a job that has unposted billing transactions on file.
Handling:Post the billing transactions, then close the job.
Situation:You tried to close a job that has unposted cost transactions on file.
Handling:Post the cost transactions, then close the job.
Warning - Distributions Are Out Of Balance
Situation:Your distribution amounts do not total the transaction amount.
Handling:Enter distribution amounts which total the transaction amount.
Warning:This Transaction Already On File - Enter Anyway?
Situation:The job, cost item, date, employer/vendor, document number, and amount are the
same as those in an existing transaction.
335
Handling:Answer Y or N. If you select Y, the transaction is accepted but some of the
information will be a duplicate to another transaction. If you select N, you can either change
the transaction or you can use <Esc> to cancel it.
Work File Is Full
Situation:There is not enough space available on your disk for the work file necessary to create
this report.
Handling:Clean up your disk by deleting any obsolete or unnecessary files, then retry the
operation. Refer to the File Utilities chapter.
If this happens consistently, then you may want to upgrade your hard drive to a larger
capacity.
Reference Modifier Range Error...
Situation This usually indicates missing data in the company file.
Handling: Set up the Company information.
Spooler sub system app has encountered a problem
Situation: This message may display in Windows and the printers are setup to work only under
DOS.
Handling: Set up the workstation printers without the use of DOS.
File error 41 on COMPFI
Situation: This may indicate the company file was initialized.
Handling: Enter Company information.
Printing to a dot matrix printer does no allow an alignment
Situation: You are not able to use the alignment to line up the data to the form when printing
through a printer in Company information.
Handling: Purchase a Laser printer or select Windows printer when printing the form.
Error 115 during the move data process
Situation: During the installation of PBS in Windows this error message displays, It indicates
either a permissions problem, or that someone is in the software. If it occurs on the POPFIL, it
is because someone is in the software.
Handling: Install the software as an administrative user or make sure everyone is out of the
system before you begin the installation.
Uninstall shield already running
This can occur during a PBS Windows installation and it indicates that you are not an
administrative users.
Lines display as strange characters
Situation: In Windows the fonts have not been installed on the workstation.
336
Handling:; Install the fonts manually or run the PBS workstation installation and it will install
the fonts. You should be logged in as an administrative user to this.
A file needed is protected by another function. Cannot run your selection
Situation: This appears after the PBS license screen on a windows network when the client
does not have rights to the folders/files to where the software is installed.
Handling: Allow full control for PBS users.
Situation: It also may appear if the software is missing the LINK, RWWRK or RWPRT folders.
Handling: Create the directories under the top-level PBS directory. Allow the permissions for
using these directories.
Situation: It may also display if directories and/or files are read-only.
Handling: Make the files read-write.
Situation:You are adding a company in PBS and this message displays.
Handling:Someone is logged into PBS. Get everyone out and then add your company.
Check or other form does not print until you answer Yes to the question,
“Are the *form type* just printed OK?”.
The Company information mode flag needs to be changed to S for the printer that was
selected.
Unable to print to a USB printer via -D LPT1
Situation: USB Printers are NOT direct local printers. They are considered network printers,
even though attached to the PC. They cannot be accessed using a port name like LPT1.
Handling: Use the F7 printer locator in Company information to setup a USB printer.
Last Check prints slowly
Situation: It takes 5 to 10 minutes to print the last check. This usually occurs under Windows
XP. It happens when the Company information printer is setup to use LPT1 or -D LPT1.
Handling: Setup the company printer using the F7 printer locator.
File in use at another station
Situation: This will occur after restoring PBS from a CD backup.
Handling: Switch the Read-only permissions to Read/Write for all the files and programs that
you restored.
Reference modifier range error in SCREEN2
Situation: On an entry screens after an upgrade from the Classic version this message displays.
It may indicate that the company file was not entered. This is caused when an account number
is trying to be displayed, but the account number definition has not been entered.
Handling: Enter the Company information
337
Missing data from reports when entering specific date ranges.
System reporting that dates are out of range when they look ok.
Account numbers and cost centers not looking correct.
Printer names not displaying properly
Situation: After an upgrade, this may indicate the Company file (Company information) was
upgraded from 8.x or 9.x instead of being manually entered.
Handling: Initialize the Company file and re-enter it.
338
PBS Menu and
Program Names
This chapter contains the following topics:
Introduction to PBS Menu and Program Names
Menu/Program Lists
339
INTRODUCTION
TO
PBS MENU
AND
PROGRAM NAMES
This appendix provides important information regarding the relationship of the menu selections
to the Passport Business Solutions program name. This information is useful when you want to
copy a Lookup so that it can be assigned to a specific PBS screen. The program names along
with the associated menu selection is needed if you want to assign a lookup to a specific
Passport Business Solutions program.
Although this is not a complete list of the Passport Business Solutions programs, it should help
you determine the name to enter into the Lookup Maintenance fields PBS Program and Next
Program. See the Lookup Design chapter for more information on when and how you should
enter this information.
In the following lists we have provided the menu selection, associated program name and a
reference to menu hierarchy. The list is organized by module with Accounts Payable being the
first.
The first column is the menu selection. The second is the program name. The third column
relates to menu hierarchy which is 1=main menu selection and 2=sub menu selection.
When there is no main menu program name it is because the main menu selection has
correspondinga sub menu selections. Then the sub menu selections will have program names.
340
MENU/PROGRAM LISTS
The following lists the menu selections, program names and menu hierarchy for the PBS
system.
When using Passport PowerTools the program name, in the PBS program or Next PBS Prgm
fields, is prefaced by the module letters. For example, if the program is Vendor maintenance
(VENMNT), then the name that is entered in Lookup maintenance is “APVENMNT”.
341
Accounts Payable
M ENU SELECTION
VENDORS
PROGRAM NAME HIERARCHY
VENMNT
PAYABLES...
ENTER
1
1
TRXENA
2
TRXENB
2
POST
TRXENB
2
IMPORT
VCHIMA
2
EDIT
RECURRING
LIST
PAYABLES...
ENTER
EDIT
SELECT
LIST
FOR USE
SELECTION
USE
LIST
SELECTED
OPEN
1
RAPENT
2
RAPLST
2
RAPSEL
2
RAPREG
2
LCKRAP
2
ITEMS...
1
VIEW
VENINQ
2
MODIFY
ADJENT
2
ADJENB
2
POST
ADJENB
2
PURGE
PRGAPO
2
EDIT
PREPARE
LIST
PAYMENTS...
1
SELECT
A GROUP OF VOUCHERS
GENSEL
2
SELECT
INDIVIDUAL VOUCHERS
VCHSEL
2
VOUCHERS FROM PAYMENT
VCHDEF
2
CLRSEL
2
DEFER
CLEAR
SELECTIONS/DEFERRALS
342
M ENU SELECTION
PRE-CHECK
PRINT
PROGRAM NAME HIERARCHY
WRITING
REPORT
PRECHK
2
CHECKS AND POST
PAPREA
1
VOID
CHECKS...
ENTER
EDIT
LIST
POST
1
VDCENT
2
VDCREG
2
VDCREG
2
REPORTS...
AGED
1
OPEN ITEMS
OPNSCN
2
ACCOUNTS
APACTL
2
DISBURSEMENTS
PROJECTION
CSHPRJ
2
CSHREQ
2
VHSCHK
2
APFRMP
2
G/L
ADSRPT
2
OPEN ITEM EDIT
LIST
ADJREG
2
PAPREA
2
VHSENT
2
TRXENB
2
PRECHK
2
PJVRPT
2
PURCHASES/DISCOUNTS
VENANL
2
PURCHASING
ADRLST
2
A/P
CASH
CASH
REQUIREMENTS
CHECK
REGISTER
F ORMS
DISTRIBUTIONS
MODIFY
TO
NON-AP/MANUAL
CHECK
REGISTER
OPEN
PAYABLES BY DATE
PAYABLES
EDIT LIST
PRE-CHECK
WRITING
REPORT
PURCHASES
JOURNAL
ADDRESSES
RECURRING
PAYABLES EDIT
LIST
RAPLST
2
RECURRING
SELECTION LIST
RAPREG
2
343
M ENU SELECTION
VENDOR
VENLOG
2
VHSENB
2
VENLBL
2
NUMVEN
2
ALPVEN
2
CHECK EDIT LIST
VDCREG
2
VENDOR INVOICES
VHSENA
1
CHANGE LOG
VENDOR
HISTORY
VENDOR
VENDORS
VENDORS
VOID
VIEW
PROGRAM NAME HIERARCHY
LABELS
BY VENDOR
#
BY VENDOR NAME
YEAR-END...
CLOSE
AYCLOS
2
RP1099
2
RP1099
2
AP1099
2
FORMS
M1099A
2
1099'S
AP1099
2
APCLOS
1
A YEAR
BRIEF 1099
F ULL 1099
REPORT
REPORT
PRINT 1099
FORMS
MAGNETIC 1099
CLOSE
YEAR FOR
CLOSE
MASTER
1
A PERIOD
INFORMATION...
CONTROL
INFORMATION
PURCHASING
A/P
ADDRESSES
ACCOUNTS
CHECK
FORMS
1
ACTMNT
2
ADRMNT
2
APACTM
2
APFRMM
2
UTILITY...
1
PURGE
TEMPORARY VENDORS
PRGTMP
2
PURGE
VENDOR HISTORY
VHSENC
2
344
Accounts Receivable
M ENU SELECTION
PROGRAM NAME
HIERARCHY
CUSTOMERS
CUSMNT
1
CASH
RECEIPTS...
ENTER
EDIT
LIST
POST
CASH
APPLICATION WORKSHEET
RETURNED
CSHENA
2
CSHENB
2
CSHENB
2
WRKSCN
2
CHECKS...
ENTER
EDIT
1
LIST
POST
1
NSFENA
2
NSFENB
2
NSFENB
2
INVOICES...
ENTER
1
IVCMNA
2
IPARMS
2
LCKFMT
2
POST
LCKPI
2
REPRINT
IMRSCN
2
EDIT
PRINT
LIST
INVOICES
RECURRING
BILLS...
ENTER
EDIT
SELECT
USE
LIST
FOR USE
SELECTED
STANDARD
BILLS
1
RCRMNU
2
RPARMS
2
RCRMNU
2
RCRUPD
2
STDHDR
1
MISCELLANEOUS
CHARGES...
ENTER
EDIT
LIST
1
SLSENA
2
SLSENB
2
345
M ENU SELECTION
PROGRAM NAME
HIERARCHY
POST
SLSENB
2
RECURRING
SALES...
ENTER
EDIT
SELECT
LIST
FOR USE
SELECTION
USE
LIST
SELECTED
F INANCE
1
RARENT
2
RARLST
2
RARSEL
2
RARREG
2
LCKRAR
2
CHARGES...
1
CALCULATE
CALFCH
2
MODIFY
CALFCH
2
CALFCH
2
CALFCH
2
EDIT
LIST
POST
OPEN
ITEMS...
1
CALCULATE
PAST DUE
AMOUNT
CHANGE
APPLY -TO
DUE DATE
#
OR
PURGE
MANPSTD
2
CNGANO
2
PRGENT
2
VIEW...
1
CUSTOMERS
CUSINQ
2
INVOICES
VEWIVC
2
INVOICE HISTORY
IHSINQ
2
RECURRING
BILLS
VEWRCB
2
STANDARD
BILLS
VEWSTB
2
REPORTS,
CUSTOMER...
STATEMENTS
BY
BY
CUSTOMER
#
CUSTOMER NAME
1
LCKSFM
2
NUMCUS
2
ALPCUS
2
346
M ENU SELECTION
CHANGE
CUSTOMER
HISTORY
CUSTOMER
REPORTS,
A/R
LOG
LABELS
CUSLOG
2
CUHIST
2
CUSLBL
2
1
ARACTL
2
AGESCN
2
HISTORY
CSHHIS
2
PROJECTION
PROSCN
2
COLSCN
2
COMDUE
2
G/L
RDSRPT
2
PAID OPEN ITEMS
PRGENT
2
GSVLST
2
HISTORY
HPARMS
2
PTR CTL STATIONS
IVSTAL
2
ITEMS
OPNEDT
2
JOURNAL
ARSJNL
2
REPS
SLMLST
2
TAX DUE EDIT LIST
TXOCHG
2
TXOEXC
2
DLVLST
2
VIALST
2
STDLST
2
PCTLLI
2
TCDLST
2
TRMLST
2
ACCOUNTS
CASH
CASH
COLLECTIONS
COMMISSIONS
DISTRIBUTIONS
GOODS
INVOICE
OPEN
SALES
SALES
SALES
DUE
TO
AND SERVICES
INVOICE
SALES
HIERARCHY
GENERAL...
AGING
F ULLY
PROGRAM NAME
TAX EXCEPTION
REPORT
SHIP-TO
ADDRESSES
SHIP-VIA
STANDARD
BILLS
STATEMENT
PTR CTL STATIONS
TAX
CODES
TERMS
347
M ENU SELECTION
PROGRAM NAME
DEPOSITS...
PREPARE
1
DEPPRP
2
SLIPS
DEPPRT
2
SUMMARY
DEPRPT
2
DEPOSITS
DEPOSIT
DEPOSIT
HIERARCHY
VIEW
CUSTOMER
HISTORY ...
1
CUSTOMER
CUHDTE
2
CUSTOMER
CUHDOC
2
HISTORY BY
DATE
HISTORY BY
DOC #
MASTER
INFORMATION...
1
A/R
ACCOUNTS
ARACTM
2
BANK
ACCOUNTS
BNKMNT
2
INFORMATION
RCTMNT
2
GSVMNT
2
IVSTAM
2
SLMMNT
2
DLVMNT
2
VIAMNT
2
PCTLMN
2
TCDMNT
2
TRMMNT
2
CONTROL
GOODS
INVOICE
AND SERVICES
PTR CTL STATIONS
SALES
SHIP-TO
REPS
ADDRESSES
SHIP-VIA
STATEMENT
PTR CTL STATIONS
TAX
CODES
TERMS
INVOICE
GENERAL
FORMATS...
APPEARANCE
HEADER
LINE
AREA
ITEM AREA
TOTALS
AREA
VERIFY
1
FMTMNU
2
FMTMNU
2
FMTMNU
2
FMTMNU
2
FMTMNU
2
348
M ENU SELECTION
PROGRAM NAME
HIERARCHY
FMTMNU
2
COPY
CPYFMT
2
DELETE
CPYFMT
2
PRTGRD
2
WORKSHEET
PRTLWS
2
SPECIFICATIONS
FMTLST
2
SAMPLE
INVOICE
LOCATION
LAYOUT
F ORMAT
STATEMENT
GENERAL
FORMATS...
PTBMNU
2
AREA, FIRST PAGE
PTBMNU
2
FIRST PAGE HEADER
AREA
PTBMNU
2
PTBMNU
2
PTBMNU
2
AREA, FIRST PAGE
PTBMNU
2
FIRST PAGE FOOTER
AREA
PTBMNU
2
PTBMNU
2
PTBMNU
2
PTBMNU
2
COPY
PTBCPY
2
DELETE
PTBCPY
2
FMTGRD
2
WORKSHEET
FMTLWS
2
SPECIFICATIONS
PTBLST
2
HEADER
AREA, ADDITIONAL
PAGES
CLOSING
F OOTER
COPY
1
APPEARANCE
HEADER
COPY
GRID
F OOTER
AREA
AREA, ADDITIONAL
PAGES
VERIFY
SAMPLE
STATEMENT
LOCATION
LAYOUT
F ORMAT
GRID
UTILITY...
LOAD A/R
PURGE
OPEN ITEMS
CUSTOMER HISTORY
1
OLOAD
2
CUHPRG
2
349
M ENU SELECTION
SET
PROGRAM NAME
HIERARCHY
CUSTOMER ACCOUNT
BALANCES
CUSBAL
2
CLOSE
RPCLOS
1
A PERIOD
350
Check Reconciliation
M ENU SELECTION
CHECKING
ACCOUNTS
CHECKBOOK
CKAMNT
1
1
CBENTR
2
LCKCBK
2
POST
LCKCBK
2
CHECKS/DEPOSITS
CKXFER
1
CHKINQ
1
BNKREC
1
EDIT
VIEW
HIERARCHY
ENTRIES...
ENTER
TRANSFER
PROGRAM NAME
LIST
CHECKING INFORMATION
RECONCILE
BANK STATEMENTS
REPORTS...
ACCOUNT
1
ACTIVITY
CHECKBOOK
CHECKBOOK
CHECKING
LIST
ACCOUNTS
DISTRIBUTIONS
TO
G/L
RECONCILIATION
CONTROL
INFORMATION
ACTSEL
2
PRTCBK
2
CBKLST
2
CKALST
2
CKDRPT
2
RECRPT
2
KCTMNT
1
UTILITY...
CLOSE
CHECKING
ACCOUNTS
COMPRESS
CLEARED
ENTRIES
LOAD
CHECKBOOK
RESET
CHECKING
ACCOUNTS
1
CLSCKA
2
CMPRSE
2
CBKENT
2
SYNCCK
2
SET-UP:
CLEAR ENTRIES
SETCBK
2
SET-UP:
PURGE ENTRIES
SETCBK
2
351
M ENU SELECTION
SET-UP:
SET LAST BALANCE
PROGRAM NAME
HIERARCHY
SETCBK
2
352
System (Ctl)
M ENU ITEM
COMPANY
PRINT
INFORMATION
HIERARCHY
COMPMN
1
REPORTS FROM
DISK...
PRINT
PRINT
PROGRAM NAME
1
A REPORT
DESPOL
2
LIST OF REPORTS
DSKLST
2
STACK
REPORTS
RPTSTK
2
PRINT
A STACK
DESPOL
2
REPORTS
DESPOL
2
SAVED REGISTERS
DESPOL
2
CENTERS /
ACCOUNTS
PFCTMN
1
ACCTMN
1
CSHACM
1
DELETE
PURGE
COST
VALID G/L
CASH
SUB
ACCOUNTS
ACCOUNTS
BATCH
TOTALS...
ENTER
BATCHEN
2
LIST
BATCHLS
2
BATCHLO
2
BATCHPR
2
BATCHLC
2
COMPANIES
SWCHCO
1
MULTIPLE COMPANIES
MCOMNT
1
CONTROL
REGISTER
PURGE
RESET
LOCK COUNT
SWITCH
DEFINE
1
SETUP...
1
MENU MAINTENANCE
MNUMNT
2
USER MAINTENANCE
USRMNT
2
REPORTS...
CASH
ACCOUNTS
1
CSHACL
353
2
M ENU ITEM
MULTIPLE
COST
COMPANIES
CENTERS /
ACCOUNTS
VALID G/L
ACCOUNT
SUB
ACCOUNTS
PROGRAM NAME
HIERARCHY
MCOLST
2
PFCTLI
2
ACCTLI
2
LINKS...
1
ENTER
EGLADD
2
LIST
EGLLST
2
CONVMEN
1
REFORMAT
ACCOUNT
NUMBER
354
General Ledger
M ENU SELECTION
CHART
OF ACCOUNTS
PROGRAM NAME
HIERARCHY
COAADD
1
BUDGETS...
1
ENTER
BDGMNT
2
GENERATE
BDGGROW
2
PURGE
BDGPRG
2
COMPARATIVES...
1
ENTER
CMPRVMN
2
PURGE
CMPRVPR
2
GENERAL
JOURNAL...
ENTER
EDIT
LIST
POST
RECURRING
SELECT
LIST
FOR USE
SELECTION
USE
LIST
SELECTED
STANDARD
2
MLTRXLS
2
LCKML
2
1
RGLENT
2
RGLLST
2
RGLSEL
2
RGLREG
2
LCKRGL
2
JOURNAL...
ENTER
EDIT
MLTRXEN
JOURNAL...
ENTER
EDIT
1
LIST
POST
1
SJMENA
2
SJMENB
2
SJMENB
2
DISTRIBUTIONS...
ENTER
EDIT
LIST
1
GJMENA
2
GJMENB
2
355
M ENU SELECTION
PROGRAM NAME
HIERARCHY
POST
GJMENB
2
INTFAC
2
ACTINQ
1
GET
DISTRIBUTIONS
VIEW ACCOUNTS
REPORTS...
ACTUALS,
BUDGETS
PARATIVE
SOURCE
TAX
1
&
COM-
CROSS REFERENCE
AND AUDIT SCHEDULES
TRIAL
W ORKING
BALANCE
TRIAL BALANCE
CORRECTING
ENTRIES
BDGCMPM
2
SRCXRF
2
GLLEDMN
2
TRIALB
2
GLWORK
2
ACTCOR
1
F INANCIAL
STATEMENT LAYOUTS...
ENTER
EDIT
LIST
TEXTS
SAMPLE
STATEMENTS
COPY
MAKE PROFORMA
MAKE SAF
VERIFY
LAYOUTS
LAYOUTS
RESEQUENCE
F INANCIAL
ENTER
LAYOUTS
FSLMNT
2
FSLEDT
2
TXTMNT
2
FSLSAM
2
FSLMNU
2
PROLAYO
2
FSLSAF
2
VERLAY
2
FSLMNU
2
STATEMENTS...
SPECIFICATIONS
CLEAR
SELECTIONS
GENERALIZED
PRINT
LAYOUTS
1
SELECTION
SPECIFICATIONS
LIST
1
FSSMNT
2
FSSMNT
2
FSSMNT
2
FSSLST
2
356
M ENU SELECTION
PRINT
FINANCIAL STATEMENTS
CLOSE
PRINT
POST
PROGRAM NAME
HIERARCHY
STMNTS
2
FISCAL YEAR...
1
CLOSING REPORT
YREND
2
CLOSING ENTRIES
YREND
2
UTILITY...
SPREADSHEET
1
EXTRACT
EXTCSV
2
LOAN PAYMENTS
CALAMO
2
RECALC
2
GENERAL
LEDGER
COMPRS
2
CHART OF ACCOUNTS
SETUP
2
SETUP
2
SETUP
2
SETUP
2
SETUP
2
PROCOAP
2
SETUP
2
CALCULATE
RECALCULATE
ACCOUNTS
SUMMARIZE
COPY
SET
UP VALID G/L
ACCOUNTS
SET
UP CHART OF
ACCOUNTS
ADD SUB
ACCNT
CNTR
/ CST
REMOVE SUB
ACCNT
CNTR
DEFINE PROFORMA
/ CST
CHT OF
ACCTS
SET
BEGINNING BALANCES
REPORTS (LISTS)...
BUDGETS
BUDGETS
CHANGE LOG
BUDGET
TYPES
COMPARATIVES
COMPARATIVES
CHANGE
LOG
CHART
OF ACCOUNTS
1
BDGLST
2
BDGLOG
2
BCDLST
2
CMPRVLS
2
CMPRVLO
2
COALST
2
357
M ENU SELECTION
PROGRAM NAME
HIERARCHY
OF ACCOUNTS
CHANGE LOG
COALOG
2
ACCNT / C ST CNTR
GROUPS
GRPLST
2
TXTLST
2
CHART
SUB
TEXTS
MASTER
INFORMATION...
ACCOUNTING
PRDMNT
2
TYPES
BCDMNT
2
INFORMATION
GCTMNT
2
ACCNT / C ST CNTR
GROUPS
GRPMNT
2
BUDGET
CONTROL
SUB
1
PERIODS
COMPANY
CONSOLIDATION...
1
ENTER
MEMBER COMPANIES
CONMNU
2
PRINT
MEMBER COMPANIES
CONMNU
2
CONMNU
2
CONMNU
2
AND CONSOLIDATE
CHART
CONMNU
2
ACCOUNTS MANUALLY
CONMNU
2
CONMNU
2
CONMNU
2
CONMNU
2
CONMNU
2
LINK
ACCOUNTS AUTOMATICALLY
GENERATE
CONSOLIDATED
CHART
LINK
LINK
PRINT
LINK EDIT LIST
COPY
VERIFY
LAYOUTS
CONSOLIDATION
SETUP
CONSOLIDATE
ENTRIES
358
Inventory Control
M ENU SELECTION
PROGRAM NAME
HIERARCHY
ITEMS
ITMMNT
1
STATUS
STAMNT
1
INVENTORY...
1
ENTER
INVENA
2
IMPORT
ICINVU
2
INVENB
2
INVENB
2
EDIT
LIST
POST
SERIAL
NUMBERS...
ENTER
EDIT
LIST
POST
1
ICSTXM
2
ICSTXP
2
LCKINV
2
VIEW...
INVENTORY
1
HISTORY
ITEMS
LOT
NUMBERS
ITXINQ
2
ICITMI
2
ICLOTI
2
SERIAL
HISTORY
SERINQ
2
SERIAL
NUMBERS
ICSERI
2
ORDER HISTORY
WKOVEW
2
WKOINQ
2
W ORK
W ORK
ORDERS
REPORTS...
ABC
ABCANL
2
CDSRPT
2
HISTORY
ITXRPT
2
TURNOVER
TRNSCN
2
ITMLOG
2
ANALYSIS
DISTRIBUTIONS
INVENTORY
INVENTORY
ITEM
1
TO
G/L
CHANGE LOG
359
M ENU SELECTION
ITEMS
#
BY ITEM
OR DESC
LABELS
LABEL
LOT
LAYOUTS
NUMBERS
PHYSICAL
COUNT WORKSHEET
PRICE
LIST
PURCHASING
STATUS
STATUS
ADVICE
#
BY ITEM
BY ITEM DESCRIPTION
PROGRAM NAME
HIERARCHY
NUMITM
2
ILBPRT
2
ILBLST
2
ICLOTP
2
CNTWRK
2
ICPRCO
2
PURADV
2
STALST
2
STALST
2
STOCK
STATUS
STKSTA
2
USAGE
REPORT
USGRPT
2
VALUATION
REPORT
VALRPT
2
VALUATION
BY DATE
VALDAT
2
REPORTS,
KITS...
KITS
KITS
PRICE/COST
COMPLETED W/O
EDIT
LIST
INCOMPLETE
WORK
ORDERS
1
KITLST
2
KITCST
2
CWOLST
2
WKOINC
2
W ORK
ORDER EDIT LIST
WKOLST
2
W ORK
ORDER HISTORY
WKOHIS
2
WHEREU
2
W HERE-USED
REPORTS,
SERIAL...
1
SERIAL
NUMBER EDIT LIST
ICSTXP
2
SERIAL
NUMBERS BY CUSTOMER
ICSRCP
2
SERIAL
NUMBERS BY ITEM
ICSRIP
2
360
M ENU SELECTION
PROGRAM NAME
HIERARCHY
SERIAL
NUMBERS BY VENDOR
ICSRVP
2
SERIAL
NUMBERS ON LOAN
ICSRLP
2
ICFLRP
2
ICSLCP
2
ICSLIP
2
F LOORING
REPORT
LOANS/RENTALS
BY CUS-
TOMER
LOANS/RENTALS
REPORTS,
BY ITEM
MASTER INFO...
CATEGORIES
1
CATRPT
2
COMLST
2
TYPES
COVRPT
2
ACCOUNTS
INVACL
2
ITMNLS
2
PCDLST
2
STATLS
2
UNITS
UNITLS
2
W AREHOUSES
WHSLST
2
ICWTYP
2
COMMISSION
COVERAGE
INVENTORY
ITEM
CODES
SEQUENCE
PRICE
CODES
STATUS
W ARRANTY
CODES
PROGRAMS
PRICES...
PRICE
1
LIST
ICPRCO
2
ITEM
PRICES
ICPRCM
2
SALE
PRICES
ICSALM
2
ICCONM
2
PRCCNG
2
CONTRACT
GROUP
PRICES
PRICE CHANGES
KITS...
1
ENTER
KITMNT
2
COPY
KITCPY
2
RESEQUENCE
KITSEQ
2
361
M ENU SELECTION
W ORK
ORDERS...
ENTER
EDIT
COMMIT
PROGRAM NAME
LIST
INVENTORY
HIERARCHY
1
WKOENT
2
WKOLST
2
WKOQTY
2
PRINT
WORK ORDERS
WKONEW
2
ISSUE
WORK ORDERS
LCKWKO
2
PRINT
ISSUED WORK
ORDERS
WKOPRT
2
QUICK
WORK ORDERS
QIKENB
2
COMPLETED
WORK
ORDERS...
ENTER
EDIT
CLOSE
LIST
WORK ORDERS
ITEM
1
CWOENT
2
CWOLST
2
LCKCWO
2
LABELS...
LAYOUT
1
ILBENT
2
ILBLST
2
ILBGRD
2
TEST
ILBTST
2
PRINT
ILBPRT
2
COPY
ILBCPY
2
LAYOUT
LIST
LOCATION
PHYSICAL
GRID
COUNT...
1
CREATE
ICPHXM
2
ENTER
ICPHXM
2
REMOVE
ICPHXM
2
IMPORT
ICPHXU
2
W ORKSHEET
ICPHXP
2
ICPHXM
2
CREATE
ADJUSTMENTS
362
M ENU SELECTION
MASTER
PROGRAM NAME
INFORMATION...
CONTROL
HIERARCHY
1
CCTMNT
2
CODES
PCDMNT
2
ACCOUNTS
INVACM
2
COMMNT
2
W AREHOUSES
WHSMNT
2
CATEGORIES
CATEGM
2
SUB-CATEGORIES
SUBMNT
2
UNITS
UNITMN
2
ITMNUM
2
STATMN
2
TYPES
COVMNT
2
PROGRAMS
ICWTYM
2
CPCLOS
1
INFORMATION
PRICES
INVENTORY
COMMISSION
ITEM
CODES
SEQUENCE
STATUS
CODES
COVERAGE
W ARRANTY
CLOSE
A PERIOD
UTILITY...
PURGE
1
CONTRACT PRICES
ICCONM
2
PURGE
INVENTORY HISTORY
PRGITX
2
PURGE
INACTIVE ITEMS
ICITMU
2
SALE PRICES
ICSALM
2
SERIAL NUMBERS
ICSPGU
2
STALOD
2
LODLST
2
STALOD
2
ITMCPY
2
PURGE
PURGE
STATUS
LOAD REQUESTS
STATUS
LOAD LIST
STATUS
COPY
LOAD
ITEMS
363
Job Cost
M ENU SELECTION
JOB
PROGRAM NAME
DESCRIPTIONS...
COST
1
ENTER
HDRMNT
2
COPY
JOBCPY
2
CSTMNT
1
ACTJOB
1
ITEMS FOR JOBS
ACTIVATE
JOBS
COSTING ...
ENTER
EDIT
LIST
POST
BILLING
HIERARCHY
1
CSTENT
2
CSTENB
2
CSTENB
2
AND PAYMENT...
ENTER
EDIT
LIST
POST
INSPECTION
WORKSHEET
COMPLETION
ESTIMATES...
ENTER
F AST
ENTER
EDIT
LIST
POST
1
BLPENT
2
BLPENB
2
BLPENB
2
ACVWST
1
1
ACVENT
2
FSTACT
2
ACVENB
2
ACVENB
2
VIEW...
COST
CATINQ
2
VTRINQ
2
JTRINQ
2
ACCOUNTS
GLINQ
2
JOBS
JOBINQ
2
CATEGORIES
COSTS BY
VEND/EMP /CUST
COSTS
G/L
1
BY JOB
364
M ENU SELECTION
PROGRAM NAME
REPORTS...
A/P
1
ELILST
2
BLPENB
2
BPCRPT
2
BPJRPT
2
CATLST
2
ACVENB
2
CATANL
2
EDIT LIST
CSTENB
2
BY JOB
TRXMNU
2
JDSRPT
2
TRXMNU
2
ACVWST
2
JOBLOG
2
CLOSING
CLSRPT
2
STATUS
STARPT
2
SUMMARY
SUMRPT
2
JOBS
JOBLST
2
LABANL
2
TRXMNU
2
ITEMS FOR PAYMENT
BILLING
AND PAYMENT
EDIT LIST
BILLINGS/PAYMENTS
CUST #
BY
BILLINGS/PAYMENTS
JOB #
BY
CATEGORIES
COMPLETION
ESTIMATES
EDIT LIST
COST
CATEGORY ANALYSIS
COSTING
COSTS
DISTRIBUTIONS
TO
G/L
INVENTORY
INSPECTION
JOB
WORKSHEET
CHANGE LOG
JOB
JOB
JOB
HIERARCHY
LABOR
ANALYSIS
PAYABLES
PAYABLES
BY JOB
#
BY VENDOR
#
TRXMNU
2
BY EMPLOYEE
#
TRXMNU
2
TRXMNU
2
PERFORMANCE
PRFRPT
2
PROFITABILITY
PFTRPT
2
PAYROLL
PAYROLL
BY JOB
#
365
M ENU SELECTION
CLOSE
A PERIOD
INACTIVE
HIERARCHY
JPCLOS
1
JOBS...
1
VIEW COSTS BY
VEND/EMP /CUST
VTRINQ
2
JTRINQ
2
JOBS
JOBINQ
2
ITEMS FOR PMT
REPORT
ELILST
2
BPCRPT
2
BPJRPT
2
TRXMNU
2
TRXMNU
2
CLOSING REPORT
CLSRPT
2
STATUS REPORT
STARPT
2
SUMMARY REPORT
SUMRPT
2
LABANL
2
TRXMNU
2
VIEW
COSTS BY JOB
VIEW
A/P
BILLINGS/PMTS
#
BILLINGS/PMTS
COSTS
JOB
JOB
LABOR
BY CUST
#
BY JOB
BY JOB REPORT
INVENTORY
JOB
PROGRAM NAME
REPORT
ANALYSIS REPORT
PAYABLES
BY JOB
REPORT
#
PAYABLES
#
TRXMNU
2
PAYROLL
#
TRXMNU
2
TRXMNU
2
BY VENDOR
REPORT
BY EMPLOYEE
PAYROLL
BY JOB
REPORT
#
PERFORMANCE
REPORT
PRFRPT
2
PROFITABILITY
REPORT
PFTRPT
2
INFORMATION
JCTMNT
1
CATMNT
1
CONTROL
CATEGORIES
UTILITY...
CLOSE
A YEAR
1
JYCLOS
366
2
M ENU SELECTION
CLOSE
OR RE-OPEN JOBS
GET
COSTS
PURGE/SAVE/RESTORE
DETAIL
PURGE/SAVE/RESTORE
JOBS
VIEW
SAVED DETAIL
PROGRAM NAME
HIERARCHY
CLSOPN
2
JCINTF
2
PSRDTL
2
PSRJOB
2
JTRINQ
2
367
Order Entry
M ENU SELECTION
PROGRAM NAME
ORDERS...
1
ENTER
EDIT
HIERARCHY
LIST
OPMENA
2
OPMENB
2
E.D.I.
ORDER IMPORT
EDIIMP
2
E.D.I.
ORDER EXPORT
EDIEXP
2
E.D.I.
STATUS REPORT
OPMENE
2
RECURRING
ORDERS...
ENTER
EDIT
SELECT
USE
LIST
FOR USE
SELECTED
BACK
1
ROEMNU
2
ROELST
2
ROEMNU
2
ROEPST
2
ORDERS...
1
BACK
ORDERS BY CUSTOMER
BOCUST
2
BACK
ORDERS BY ITEM
BOITEM
2
BOFILL
2
BOFORM
2
PIKTIK
1
F ILL BACK ORDERS
(REPORT)
F ILL
BACK ORDERS
PICKING
(FORM)
TICKETS
LABELS...
SHIPPING
COD
LABELS
LABELS
1
SLBPRT
2
CLBPRT
2
BILLING ...
SELECT
FOR BILLING
CANCEL
SELECTIONS
EDIT
SELECT
LIST
RENTALS
1
BLMENA
2
BLOUNS
2
OPMENB
2
ORDMNU
2
368
M ENU SELECTION
PROGRAM NAME
INVOICES...
HIERARCHY
1
PRINT
BLMENU
2
POST
BLMENU
2
E.D.I.
INVOICE EXPORT
BLMENU
2
E.D.I.
STATUS REPORT
BLMENU
2
POSTED INVOICES
BLMENU
2
OEBATO
1
REPRINT
F ORMS
VIEW...
F ULL
FULINQ
2
ORDINQ
2
FOR AN ITEM
ITMVUE
2
HISTORY BY CUSTOMER
INQCUS
2
HISTORY BY
INVOICE
INQINV
2
HISTORY BY ITEM
INQITM
2
ORDER INQUIRY
ORDERS
ORDERS
INVOICE
INVOICE
INVOICE
1
REPORTS...
1
BACK
ORDERS BY CUSTOMER
BOCUST
2
BACK
ORDERS BY ITEM
BOITEM
2
EDIT LIST
OPMENB
2
LABELS
CLBPRT
2
OPMENE
2
OEFRMP
2
CUHRPT
2
HISTORY BY
INVOICE
INHRPT
2
HISTORY BY ITEM
ITHRPT
2
ELBLST
2
BILLING
COD
E.D.I.
STATUS REPORT
F ORMS
INVOICE
HISTORY BY CUSTOMER
INVOICE
INVOICE
LABEL
LAYOUTS
369
M ENU SELECTION
ORDER
EDIT LIST
ORDERS
SHIPPING
LABEL
LABELS
HIERARCHY
OPMENB
2
OEORDP
2
SLBPRT
2
FORMATS...
LAYOUT
1
ELBENT
2
ELBLST
2
ELBGRD
2
TEST
ELBTST
2
COPY
ELBCPY
2
LAYOUT
LIST
LOCATION
MASTER
PROGRAM NAME
GRID
INFORMATION...
CONTROL
INFORMATION
F ORMS
1
ECTMNT
2
OEFRMM
2
370
Purchase Order
M ENU SELECTION
PROGRAM NAME
HIERARCHY
ISSUE P.O.#'S
PREMNU
1
PURCHASE
ORDERS...
ENTER
EDIT
PRINT
LIST
P.O.'S
NEW
POST
CHANGES
TO
PRINT
LIST
CHANGED
P.O.'S
POST
PRINT
PURCHASE ORDERS
PRE-PURCHASE
2
PCHMNB
2
PCHPRT
2
PCHMNB
2
1
CNGMNA
2
CNGMNB
2
CNGMNB
2
CNGMNB
2
PURPRT
1
ORDERS...
PURCHASING
ADVICE
ENTER
EDIT
PCHMNA
P.O.'S...
ENTER
EDIT
1
LIST
1
PREMNU
2
PRE-PO
2
OCONLS
2
RECEIVINGS...
ENTER
RCVENT
2
F AST ENTER
FSTRCV
2
RCVENA
2
RCVENA
2
CLRUNI
1
EDIT
LIST
POST
CLEAR
1
UNINVOICED RECEIVINGS
PRICE
ADJUSTMENTS...
ENTER
EDIT
LIST
1
PRCENT
2
PRCENA
2
371
M ENU SELECTION
PROGRAM NAME
HIERARCHY
POST
PRCENA
2
RELEASES...
ENTER
EDIT
PRINT
LIST
P.O.'S
RELEASE
POST
1
BLNENT
2
BLNMNU
2
BLNPRT
2
BLNMNU
2
F ORMS...
NEW P.O.'S
1
FORMS
CHANGE P.O.'S
PRINT P.O.'S
FORMS
FORMS
RELEASE P.O.'S
FORMS
POBATO
2
CPOBAT
2
PPOBAT
2
RPOBAT
2
VIEW...
G/L
1
OGLINQ
2
ITMINQ
2
ITVINQ
2
ORDERS
PCHINQ
2
BY ITEM
PITINQ
2
RECEIVINGS
RCVINQ
2
VENDORS
VNDINQ
2
VITINQ
2
ACCOUNTS
INVENTORY
ITEMS
ITEMS
FOR A VENDOR
PURCHASE
PURCHASES
VENDORS
FOR AN ITEM
REPORTS...
BLANKET
ORDERS
CASH
DISBURSEMENTS
PROJECTION
CHANGED P.O.'S
EDIT LIST
CLOSED P.O.'S
DELIVER-TO
LOCATIONS
1
BLNLST
2
CSHDSB
2
CNGMNB
2
PRTCLS
2
POWLST
2
372
M ENU SELECTION
PROGRAM NAME
HIERARCHY
EXPSHP
2
FOLSHP
2
F ORMS
POFRMP
2
OPEN P.O.'S
PRTOPN
2
ODSSEL
2
PRCENA
2
ADRLST
2
ADVICE
PREMNU
2
WORKSHEET
PREMNU
2
EXSRPT
2
EXPEDITE
SHIPMENT
F OLLOW-UP
PAST DUE
SHIPMENTS
P.O.
PRICE
DISTRIBUTION
ADJUSTMENTS EDIT
LIST
PURCHASING
ADDRESSES
PURCHASING
PURCHASING
RECEIPTS
IN EXCESS OF
QTY ORD
RECEIVINGS
EDIT LIST
RCVENA
2
RECEIVINGS
HISTORY
POHIST
2
BLNMNU
2
PRTUNI
2
PRTUNK
2
ITEMS
VENCVI
2
ITEMS, BRIEF
VITPRT
2
RELEASES
EDIT LIST
UNINVOICED
RECEIVINGS
UNKNOWN
VENDOR
VENDOR
MASTER
PRICES
INFORMATION...
DELIVER-TO
1
LOCATION
POWMNT
2
ADDRESSES
ADRMNT
2
ITEMS
VITMNT
2
P.O.MESSAGES
MSGMNT
2
OCTMNT
2
POFRMM
2
PURCHASING
VENDOR
CONTROL
INFORMATION
F ORMS
UTILITY...
1
373
M ENU SELECTION
PROGRAM NAME
HIERARCHY
CLOSE
CLSPOS
2
PURGE P.O.'S
POPURG
2
VITCPY
2
VITDEL
2
VILOAD
2
ICLOAD
2
VITUPD
2
COPY
VENDOR ITEMS
DELETE
VENDOR ITEMS
LOAD
VENDOR
LOAD
SET
ITEMS
VENDOR IN
I/C
ITEMS
374
Payroll
M ENU SELECTION
PROGRAM NAME
HIERARCHY
EMPLOYEES
EMPMNT
1
WRKSHT
1
ATTENDANCE
TIME
WORKSHEET
WORKED...
ENTER
EDIT
LIST
1
TIMMNA
2
TIMMNB
2
STANDARD
PAYROLL
TIMMNC
1
CALCULATE
PAYROLL
LCKTIM
1
LCKPCK
1
CHECKS
ADJUSTMENTS...
ENTER
EDIT
LIST
POST
VOID
1
MANMNA
2
MANMNB
2
MANMNB
2
CHECKS...
1
SELECT
VDIENT
2
SELECT
VDRENT
2
VDPREG
2
VDPREG
2
INDIVIDUAL
CHECKS
A RANGE OF
CHECKS
EDIT
LIST
POST
REPORTS,
EMPLOYEE/EMPLOYER...
1
CHECK REGISTER HISTORY
REGSCN
2
DEDUCTIONS/EARNINGS,
EMPLOYEE
DEDRPT
2
DISTRIBUTIONS
PDSRPT
2
EMPLOG
2
EMPLBL
2
EMPLOYEE
TO
G/L
CHANGE LOG
EMPLOYEE
LABELS
375
M ENU SELECTION
PROGRAM NAME
HIERARCHY
EMPNUM
2
EMPLOYEES
EMPALP
2
EMPLOYEE
HISSCN
2
HISEXP
2
EXDLST
2
MLSRPT
2
MULTI-CITY
MCSLST
2
UNION
UNNRPT
2
WCPRPT
2
RPT401
2
EMPLOYEES
BY EMPLOYEE
#
BY EMPLOYEE
NAME
PAYROLL HISTORY
EMPLOYER
PAYROLL
EXPENSE
EXTENDED
FIELD DEFINITIONS
MEALS
EXPENSE
AND MULTISTATE INF
DEDUCTIONS
W ORKERS'
401(K)
COMPENSATION
CONTRIBUTIONS
REPORTS, GENERAL...
ANNUAL
REPORTS
MEDIA)
(MAG
1
LCKMAG
2
DEDLST
2
MEDIA REPORT
LIST
MAGPRT
2
QTD/YTD TIME WORKED
(BY CITY)
HRCRPT
2
QTD/YTD TIME WORKED
(BY STATE)
HRSRPT
2
PAYROLL
QLBPMN
2
QUARTERLY REPORTS
(MAG MEDIA)
LCKMAG
2
TAXLST
2
TAXRPT
2
941 PREP. REPORT
PRT941
2
DEDUCTIONS/EARNINGS
DEDMNT
1
DEDUCTIONS/EARNINGS
LIST
MAGNETIC
QUARTERLY
TAX
TABLES
YEAR-END
PAYROLL
376
M ENU SELECTION
TAX
TABLES
PROGRAM NAME
HIERARCHY
TAXMNT
1
QUARTERLY
REPORT FORMATS...
LOCATION
QLBGRD
2
WORKSHEET
QLBLWS
2
APPEARANCE
QLBMNU
2
QLBMNU
2
QLBMNU
2
AREA
QLBMNU
2
SPECIFICATIONS
QLBLST
2
VERIFY
QLBMNU
2
QLBMNU
2
COPY
QLBCPY
2
DELETE
QLBCPY
2
LAYOUT
GENERAL
HEADER
TOTALS
SAMPLE
GRID
AREA
EMPLOYEE
F ORMAT
1
AREA
REPORT
MAGNETIC
MEDIA
FORMATS...
GENERAL
MAGMNU
2
FORMATS
MAGMNU
2
SPECIFICATIONS
MAGMNU
2
VERIFY
MAGMNU
2
MAGMNU
2
COPY
MAGMNU
2
DELETE
MAGMNU
2
APPEARANCE
RECORD
F ORMAT
1
SAMPLE
REPORT
YEAR-END...
1
ENTER W-2
INFORMATION
AUXENT
2
PRINT W-2
INFORMATION
AUXLST
2
AUXENT
2
MAGW2S
2
PRINT W-2
FORMS
MAGNETIC W-2
FORMS
377
M ENU SELECTION
PRINT 1099
INFORMATION
PRINT 1099
FORMS
MAGNETIC 1099
CLOSE
FORMS
A YEAR
PROGRAM NAME
HIERARCHY
NEMRPT
2
FM1099
2
M1099S
2
PYCLOS
2
DEFINE
EXTENDED
FIELDS...
1
ENTER
EXDMNT
2
PURGE
EXDPRG
2
PCTMNT
1
CONTROL
INFORMATION
UTILITY...
PURGE
PAYROLL TRANSACTIONS
PRE-NOTE ACH
REPORT
FILE AND
1
VDPPRG
2
PRENOT
2
378
Point of Sale
M ENU SELECTION
PROGRAM NAME
HIERARCHY
TRANSACTIONS
POSMNA
1
PSPIKS
1
PSSHPS
1
PICKING
TICKETS
SHIPPING
LABELS
MANAGEMENT...
OPEN
DRWOPN
2
STATUS
DRWSTA
2
A DRAWER
DRWCLS
2
DRAWER WORKSHEET
DRWSHT
2
DRWOSR
2
DRWACT
2
PRCOVR
2
A DRAWER
DRAWER
CLOSE
PRINT
OVERAGE/SHORTAGE
REPORT
DRAWER
PRICE
1
ACTIVITY REPORT
OVERRIDE REPORT
PRICING ...
CONTRACT
SPECIAL
END
SALE PRICES
2
SSPRCM
2
1
PSINVS
2
LIST
PSEDIT
2
TRANSACTIONS
LCKPOS
2
INVOICE HISTORY
POSMNH
1
INVOICES
EDIT
POST
SALES
BY
HISTORY ...
1
HISCUS
2
ITEM
HISITM
2
SALES REP
HISREP
2
SALES VOLUME
HISVOL
2
RBDSUM
2
CUSTOMER
BY
BY
BY
CNTRMN
OF DAY ...
PRINT
VIEW
PRICES
1
REBUILD
HISTORY
379
M ENU SELECTION
REPORTS,
PROGRAM NAME
GENERAL...
HIERARCHY
1
BACK
ORDERS BY CUSTOMER
SBOCUS
2
BACK
ORDERS BY ITEM
SBOITM
2
PSHSSC
2
PSTRMU
2
PSEDIT
2
INVOICE
OPEN
HISTORY
TRANSACTION
REPORTS
TRANSACTION
REPORTS,
PRICES...
CONTRACT
SPECIAL
PRICES
CNTRLS
2
SSPRCL
2
SETUP ...
1
STORES
STORLS
2
REGISTERS
REGILS
2
USERS
USERLS
2
TCDLST
2
PSCODL
2
TAX
CODES
PAYMENT
REPORTS,
ALIAS
1
SALE PRICES
REPORTS,
ALIAS
EDIT LIST
CODES
MASTER...
ITEMS BY ALIAS
1
#
ITEMS BY ITEM/SVC
#
CUSTOMER
RESTRICTIONS
SERVICES
SHIP-TO
SETUP
ADDRESSES
ALALIL
2
ALITML
2
CHLDLS
2
PSSVCL
2
SHIPLS
2
INFORMATION...
CONTROL
1
PSCTMN
2
STORES
STORMN
2
REGISTERS
REGIMN
2
INFORMATION
380
M ENU SELECTION
PROGRAM NAME
HIERARCHY
USERS
USERMN
2
TCDMNT
2
PSCODM
2
TAX
CODES
PAYMENT
MASTER
CODES
INFORMATION...
ALIAS
CUSTOMER
ITEMS
RESTRICTIONS
SERVICES
SHIP-TO
ADDRESSES
1
ALIMNT
2
CHLDMN
2
PSSVCM
2
SHIPMN
2
UTILITY...
PURGE
CONTRACT PRICING
PURGE
SPECIAL SALE
PRICES
PURGE
QUOTES
1
CNTRPG
2
SSPRCP
2
PSQPRG
2
381
Sales Analysis
M ENU SELECTION
PROGRAM NAME
F AST ANALYSIS REPORTS...
CUSTOMER
1
CUSTMRF
2
CUSVOLF
2
CUSTYPF
2
FOR AN ITEM
ITMCUSF
2
FOR A SERVICE
SVCCUSF
2
ITEM
ITEMSFA
2
CATEGORY
ITMCATF
2
SALES VOLUME
ITMVOLF
2
CUSITMF
2
REP , ACTUAL
SLSACTF
2
REP , RESPONSIBLE
SLSMANF
2
FOR A CUSTOMER
CUSSVCF
2
STATE
STATEFA
2
ZIPCODF
2
CUSTOMER
SALES VOLUME
CUSTOMER
CUSTOMERS
CUSTOMERS
ITEM
ITEM
ITEMS
TYPE
FOR A CUSTOMER
SALES
SALES
HIERARCHY
SERVICES
ZIP
CODE
POS SALES ANALYSIS....
CUSTOMERS
ITMCUSP
2
REP , ACTUAL
SLSACTP
2
FOR A CUSTOMER
CUSITMP
2
FOR A SERVICE
SVCCUSP
2
FOR A CUSTOMER
CUSSVCP
2
SALES
ITEMS
1
CUSTOMERS
SERVICES
FOR AN ITEM
CUSTOMER
COMPARATIVES...
LOAD
CUSTOMER COMPARATIVES
ENTER
CUSTOMER COMPARATIVES
1
CCLOAD
2
CCFMNT
2
382
M ENU SELECTION
TRANSFER
CUST COMPARATIVE DATA
MONTHLY
EXISTING
MONTHLY
QUARTERLY
NEW
EXISTING
QUARTERLY
YEARLY
EXISTING
YEARLY
ITEM
LOAD
NEW
NEW
PROGRAM NAME
HIERARCHY
CCXFER
2
CCMONL1
2
CCMONL
2
CCQTRL1
2
CCQTRL
2
CCYEAR1
2
CCYEAR
2
COMPARATIVES...
1
IALOAD
2
ENTER
IAFMNT
2
TRANSFER
IAXFER
2
IAMONL1
2
IAMONL
2
IAQTRL1
2
IAQTRL
2
IAYEAR1
2
IAYEAR
2
ITEM COMPARATIVES
ITEM COMPARATIVES
ITEM COMPARATIVE DATA
MONTHLY
EXISTING
MONTHLY
QUARTERLY
NEW
EXISTING
QUARTERLY
YEARLY
EXISTING
YEARLY
CUSTOMER
NEW
REPORTS...
CUSTOMER
2
CUSTMR
2
CUSVOL1
2
SALES VOLUME
NEW
CUSVOL
2
TYPE EXISTING
CUSTYP1
2
CUSTYP
2
NEW
SALES VOLUME EXISTING
CUSTOMER
CUSTOMER
1
CUSTMR1
EXISTING
CUSTOMER
CUST
NEW
CUSTOMER
TYPE NEW
383
M ENU SELECTION
CUSTS
FOR AN ITEM EXISTING
CUSTOMERS
FOR AN ITEM
NEW
CUSTOMER SIC
EXISTING
CUSTOMER SIC
ITEM
HIERARCHY
ITMCUS1
2
ITMCUS
2
CUSSIC1
2
CUSSIC
2
REPORTS...
ITEM
1
ITEMS1
2
NEW
ITEMS
2
BY SLS VOLUME
EXISTING
ITMVOL1
2
BY SALES VOLUME
NEW
ITMVOL
2
BY CATEGORY EXISTING
ITMCAT1
2
EXISTING
ITEM
ITEMS
ITEMS
ITEMS
NEW
PROGRAM NAME
ITEMS
BY CATEGORY NEW
ITMCAT
2
ITEMS
FOR A CUST EXISTING
CUSITM1
2
CUSITM
2
ITEMS
FOR A CUSTOMER
NEW
SERVICE
REPORTS...
CUSTS
FOR A SERVICE
EXISTING
1
SVCCUS1
2
CUSTOMERS
SVCCUS
2
SERVICES
CUSSVC1
2
CUSSVC
2
FOR A SERVICE
NEW
FOR A CUST
EXISTING
SERVICES
SALES
FOR A CUSTOMER
NEW
REP REPORTS...
SALES
SALES
1
REP , RESPONS.
EXISTING
SLSREP1
2
REP , RESPONSIBLE
NEW
SLSREP
2
384
M ENU SELECTION
SALES
REP , ACTUAL EXISTING
SALES
REP , ACTUAL NEW
LOCATION
SALES
TERRITORY NEW
STATE
EXISTING
STATE
ZIP
NEW
CODE EXISTING
ZIP
CONTROL
HIERARCHY
SLSACT1
2
SLSACT
2
REPORTS...
TERRITORY EXISTING
SALES
PROGRAM NAME
CODE NEW
1
SLSTER1
2
SLSTER
2
STATE1
2
STATE
2
ZIPCOD1
2
ZIPCOD
2
INFORMATION...
1
A/R
INTERFACE CONTROL
INFO
SCTMNTA
2
I/C
INTERFACE CONTROL
INFO
SCTMNTI
2
385
Professional Time & Billing
M ENU SELECTION
PROGRAM NAME
PROFESSIONAL TIME &
BILLING (TB)
TIME
0
CLIENTS
CLIMNU
1
MATTERS
MATMNT
1
AND EXPENSES...
ENTER
1
TMEENT
2
LCKTME
2
POST
LCKTME
2
RESEQUENCE
LCKTME
2
EDIT
LIST
VIEW...
WIP
INVOICE
HISTORY
1
WIPINQ
2
VEWDRV
2
BILLING ...
WIP
HIERARCHY
SELECTION WORKSHEET
WIPWST
2
WIPSEL
2
CURMNT
2
BILLING
RTBMNU
2
FEE BILLING
FXBMNU
2
CNBILL
2
BILADJ
2
LCKBIL
2
SELECT WIP
CURRENT
FOR BILLING
MATTERS
RETAINER
F IXED
CONTINGENT
BILLING
1
FEE BILLING
ADJUSTMENTS
EDIT
LIST
INVOICES...
VOID
1
PRINT
LCKBFM
2
POST
LCKBIL
2
INVOICES...
ENTER
1
VINENT
386
2
M ENU SELECTION
EDIT
LIST
POST
REPORTS,
CLIENT...
BY
#
BY
CLIENT
CLIENT NAME
CHANGE
CLIENT
LOG
HISTORY REPORT
REPORTS,
ADVANCE
LCKVIN
2
LCKVIN
2
1
NUMCLI
2
ALPCLI
2
CLILOG
2
CSERPT
2
1
ADVLST
2
REPORT
TBASCN
2
EDIT LIST
LCKBIL
2
CMBSCN
2
MATTERS
CURLST
2
HISTORY REPORT
IHSDRV
2
MATLST
2
MATNXT
2
SEHRPT
2
SSERPT
2
ACCOUNTING REPORT
TMARPT
2
AND EXPENSES EDIT
LIST
LCKTME
2
UNBLST
2
INVOICES EDIT
LIST
LCKVIN
2
SELECTION WORKSHEET
WIPWST
2
BILLINGS LIST
BILLING
COMBINED
AGING REPORT
CURRENT
INVOICE
MATTERS
MATTER
NEXT ACTION
REPORT
SERVICE/EXPENSE
HIS-
TORY
STAFF
TIME
HIERARCHY
GENERAL...
AGING
TIME
PROGRAM NAME
HISTORY REPORT
UNBILLED WIP
VOIDED
WIP
LIST
REPORTS,
MASTER INFORMATION...
1
387
M ENU SELECTION
PROGRAM NAME
HIERARCHY
ACTIONS
ACNLST
2
ADVACL
2
ADVANCE
BILLING
ACCOUNTS
CLIENT
RATES BY CLIENT
CRCLST
2
CLIENT
RATES BY STAFF
CRSLST
2
EXPENSES
EXPLST
2
PARTNERS
PARLST
2
PCTLLI
2
SVCLST
2
NUMSTF
2
BY NAME
ALPSTF
2
ACCOUNTS
WIPACL
2
PRINTER
CONTROL LIST
SERVICES
STAFF
STAFF
WIP
REPORTS,
BY
#
PRODUCTIVITY ...
CLIENT
ANALYSIS
SERVICE
STAFF
ANALYSIS
ANALYSIS
1
CLIANL
2
SVCANL
2
STFANL
2
REPORTS,
PROFITABILITY ...
CLIENT
CLIPFT
2
EXPENSE
EXPPFT
2
MATTER
MATPFT
2
SERVICE
SVCPFT
2
STAFF
STFPFT
2
INVOICE
FORMATS...
LOCATION
1
FMTGRD
2
WORKSHEET
FMTLWS
2
APPEARANCE
BLLMNU
2
AREA, FIRST PAGE
BLLMNU
2
LAYOUT
GENERAL
HEADER
1
GRID
388
M ENU SELECTION
COPY
PROGRAM NAME
HIERARCHY
BLLMNU
2
BLLMNU
2
BLLMNU
2
AREA, FIRST PAGE
BLLMNU
2
FIRST PAGE FOOTER
AREA
BLLMNU
2
BLLMNU
2
SPECIFICATIONS
BLLLST
2
VERIFY
BLLMNU
2
BLLMNU
2
COPY
BLLCPY
2
DELETE
BLLCPY
2
FIRST PAGE HEADER
AREA
HEADER
AREA, ADDITIONAL
PAGES
LINE
F OOTER
COPY
F OOTER
ITEM AREA
AREA, ADDITIONAL
PAGES
F ORMAT
SAMPLE
MASTER
INVOICE
INFORMATION...
ACTIONS
1
ACNMNT
2
ADVACM
2
CLRMNT
2
EXPENSES
EXPMNT
2
PARTNERS
PARMNT
2
SERVICES
SVCMNT
2
STAFF
STFMNT
2
WIPACM
2
TBCLOS
1
TCTMNT
1
ADVANCE
BILLING
ACCOUNTS
CLIENT
WIP
ACCOUNTS
CLOSE
CONTROL
RATES
A PERIOD
INFORMATION
UTILITY...
PURCH
COST HISTORY
LOAD WIP
OPEN ITEMS
1
PRGCST
2
LODWIP
2
389
M ENU SELECTION
PROGRAM NAME
HIERARCHY
ADVANCE BILLINGS
LODADV
2
CLIENT ACCOUNT BALANCES
SETBAL
2
LOAD
SET
390
COBOL Configuration
File
This chapter contains the following topics:
Introduction to the COBOL Configuration File
Modifying the File
391
INTRODUCTION
TO THE
COBOL CONFIGURATION FILE
The COBOL configuration file determines several key system values and they are read and
applied when logging into Passport Business Solutions.
This file controls values for several standard COBOL settings and several PowerTools
settings.There are several COBOL configuration files in a PBS installation.
In Windows you have the cblconfi (main file), cblconfi.fu (for file utilities), cblconfi.in (for
initialization utilities), cblconfi.pbsp (for the original popups) and cblconfi.pth (for the
pathfinder utility.)
In UNIX and Linux you have cblconfi (Thin client), cblconfi.pbsp (Thin client original
popups), cblconfig (character-based) and cblconfig.pbsp (character-based with original
popups).
These file are all located in the top-level PBS directory.
There are several sections to the configuration file. Below is a list of the standard settings for
the main PBS configuration file and grouped by the sections of Display options, File settings,
Printer options and PowerTools settings. The second column is the default setting and the third
is a description of each.
392
File Settings
CONFIG FILE VARIABLE
FULL_GRAPHICAL
USE_SCN
DEFAULT
SETTING
DESCRIPTION
Y
This applies to Windows and Thin
client only.
Provides the graphical user interface
features for the login screen ONLY.
Options are Y to use full graphical or
anything but Y to not use it.
See the Full graphical field in PBS
users for the main setting.
G
This applies to Windows and Thin
client only.
This is the switch for using either the
graphical user interface or character
based screens. The G is the graphical
representation of screens and fields
and the C is the character representation. This setting is not to be
confused with the FULL_GRAPHICAL setting above which only
effects the login and the Full graphical setting in User maintenance.
This sets the full graphical fields visually to three dimensions. To turn off
this setting add a # to the left of the
line.
WIN32_3D to "1"
(allowed)
If you are not set for Full graphical in
the User maintenance, then this field
has not effect on the Full Graphical
screens.
ICON
NORMALIZE_FLG
P1.ICO
(Blank)
This setting applies to Windows and
Thin client only.
This setting determines the icon that
displays in the upper left corner of
PBS when it is running. Do not
change this setting.
The choices are Y or (blank).
If (blank), then the program will open
maximized (full window). When set
to Y it opens normal (small window).
393
CONFIG FILE VARIABLE
DEFAULT
SETTING
DESCRIPTION
Select N to use Tab as Enter and Y
to use Tab as Escape.
USE_TAB_AS_ESC
N
The tab key can function like either
the Escape key or the Enter key. The
Tab = Escape key is the standard for
the older Classic, RW32 and early
PBS versions. The Tab key = Next
field is a Windows standard for moving from one field to the next.
This setting only effects the Character mode screens and does not
effect the full graphical screens
which always allow the tab key to go
to next field.
The following group of five flags are
the default font settings. These settings are used if you start PBS with
the batch.
Also, these settings are used if there
are no settings found in the start
menu shortcut. Start menu shortcuts
normally have these settings
FONT_NAME
Lucida
Console
PSI Box
Draw
Default Font. You can use the other
fonts installed by the PBS startup and
you can also use the system Terminal
font.
If you want the batch startup to look
like it did in older versions of PBS
and RW32 use the Terminal font and
set the Bold to 0. Adjust the font size
to 11.
FONT_SIZE
12
Default font size
BOLD_STATE
1
1= Bold and 0 = Not bold
ITALIC_STATE
0
1= Use italics and 0 = No italics
FIXED_PITCH_STATE
1
The fixed or variable pitch state. The
option is 1 for fixed pitch or 0 for variable pitch.
256
We recommend that you never
change this setting. This field determines how many files can be opened
MAX-FILES
394
CONFIG FILE VARIABLE
DEFAULT
SETTING
DESCRIPTION
at one time. If this setting is
decreased or removed, you may start
getting error messages like
File error 94,10 on XXXXX file
4
The PBS system defaults to the AcuCOBOL Vision 4 data file format.
You should never change this setting
unless you are an experienced developer of PBS. The other option is 5 for
the AcuCOBOL Vision 5 file types.
USE-SAFE-READ-MODE
N
When set to Y this switch forces the
AcuCorp runtime to read the records
in a safe mode. The N is the fast
mode. We prefer the fast mode
because the safe mode opens and
closes files more slowly, thus slowing the PBS system.
COMPRESS-FILES
1
The # symbol in front of the setting
determines that this setting is not
being used. Do not change this.
WINDOWS_PRINTING
Y
Windows or Thin Client only.
This is a flag for using Windows
Printing for forms.
1
Windows or Thin Client only. This
makes the selection of a Windows
printer faster. Rather than put all the
drivers in memory, it is only putting
the driver name into memory.
N
Used only in Windows or Thin
Client. When set to Y, this will allow
you to use the PSI Printer locator utility on every field in PBS where you
can access the Company information
printers. This may be useful if you
are trouble-shooting a printer problem.
V_VERSION
WINPRINT-NAMES-ONLY
DISPLAY-LOCAL-PRINTERSPOPUP-SCREEN
The remaining fields all relate to PowerTools settings.
USE_COLOR
11
This is a PowerTools setting. This is
set to 11 for Windows and 13 for
UNIX and Linux. Do not change this
setting.
395
CONFIG FILE VARIABLE
USE_PTOOLS
GUI_MODE_SW
DEFAULT
SETTING
DESCRIPTION
Y
This sets the flag to either use the
PowerTools Lookups or use the original popups (pre 10.5). It is defaulted
on installation to Y. If you want to
use the original lookups you can set it
to N.
There is a configuration file and
batch/script that are already set to
use the old popups. Type pbsp at the
DOS prompt or in UNIX/Linux and
the old popups will be accessed without having to change the configuration file.
1
This PowerTools flag only effects the
Lookups in Windows. PowerTools
can be used in character or Windows
Lookup modes. There are two options
for this switch. The number ‘1’ indicates that the Windows lookups are
used and ‘0’ indicates that the PowerTools character lookups are used.
The default in character-based UNIX
and Linux is ‘0’. The default for Thin
Client is ‘1’ for all environments.
The SET_POP_SZ switch effects the
Windows style PowerTools Lookups
only and relates to a performance
issue.
SET_POP_SZ
2
The setting corresponds to number of
records being accessed by the lookup
at one time. This will affect the
number of records being accessed
when using the page up, page down
or the arrow keys or buttons. The settings and number of records you can
access include: x=11, y=17, z=32,
1=100, 2=200, 3=300, 4=400, 5=500,
6=600, 7=700, 8=800, 9=900 and
A=1000.
The default for this field is 200 records. Although it is typed as 200 in
the configuration file, only the first
number is actually read and just the
number ‘2’ is the same.
396
CONFIG FILE VARIABLE
DEFAULT
SETTING
DESCRIPTION
If you are running a slower computer
and you find the access to the Lookups is a little sluggish, then set the
size to a smaller number of records
accessed and the performance should
improve.
Note: you can also tune the record
access for individual Lookups. If only
one or a few. Lookups are causing an
issue, then see the Lookup Design
chapter for more information.
SET_POP_ID
N
This setting is used in the PowerTools character lookups only and is
defaulted to ‘N’. When set to Y a column displays on the left side of the
lookup that displays a number for
each line. To use the line you can
enter the number rather than moving
to the item with the arrow keys and
then selecting the item with <Enter>.
SET_OS
W
The default setting is W for windows.
Lucida
Console
PSI Box
Draw
Any valid font name could be used,
but a mono-spaced font will provide a
more accurate display
PT_MENU_FONT_NAME
PT_MENU_FONT_SIZE
10
Font size range is 8 - 14
PT_MENU_BOLD_STATE
1
0 is not bold and 1 is
SET_POP_SEL_CTRL
LINE
The Lookup focus refers to the where
the cursor first lands when a Lookup
is displayed. The Lookup focus
options include:
# LINE = First line,
# INDEX = Sort-by
# SEARCH = Search field
# AUTO = This depends on number
of records. If there are more records
than will fit in the window, then the
focus is on the INDEX (Sort-by). If
they are the same as or less than the
number that will fit in the Window,
then the focus is on the LINE.
397
CONFIG FILE VARIABLE
PT_MENU_FONT_NAME
DEFAULT
SETTING
DESCRIPTION
Tahoma
Any valid font name could be used,
but a mono-spaced font will provide a
more accurate display.
PT_MENU_FONT_SIZE
9
Font size range 8 - 14
PT_MENU_BOLD_STATE
0
0 is not bold and 1 is
USE_GUI_PANEL
PT_SCR_FONT_NAME
YES
Tahoma
Yes uses the Graphical User Interface for PowerTools. No uses the
character based PowerTools interface.
Any valid font name could be used,
but a mono-spaced font will provide a
more accurate display.
PT_SCR_FONT_SIZE
9
Font size range 8 - 14
PT_SCR_BOLD_STATE
1
0 is not bold and 1 is
PT_LU_FONT_TYPE
PT_LU_LIST_COLOR
Small
The default is large.
This setting is not active and you
must remove the pound symbol to
make it active.
Options include
Small=Small system font
Large=Large system font
WT
The default is white. This setting is
not active and you must remove the
pound symbol to make it active.
White=WT
CN=Cyan
YW=Yellow
WT
The default is white. This setting is
not active and you must remove the
pound symbol to make it active.
White=WT
CN=Cyan
YW=Yellow
398
MODIFYING
THE
FILE
For most situations you will never need to change the COBOL configuration file. But, in the
case where certain settings need to be different per user then you will need to change this file.
If you require different PowerTools settings per workstation in a Passport Business Solutions
environment, you must first copy the COBOL configuration file, rename it and then modify the
Windows or shortcut, batch or script so that it accesses the new file.
All the Passport Business Solutions shortcuts, batches and scripts, including administrative
utilities, access a cblconfi configuration file. You can copy any cblconfig file to a new name.
Then you can modify the shortcut, batch or script to gain access to the new configuration
file.To change a configuration file, simply copy and rename it, then modify the line that you
need.
For example, one of the users may want to access the character Lookups from their
workstation. To do this copy the cblconfi to cblconfi.new. Then in the cblconfi.new change the
following field.
GUI_MODE_SW 1
to
GUI_MODE_SW 0
Save the file.
Then at the workstation go to
START > PROGRAMS > PBS
Right click on the shortcut that the user prefers and select the properties. The target field will
look something like the following.
P:\ PBS\wrun32.exe -w -c CBLCONFI ACUSTART.ACU RWC
To access the new configuration file change the line to be the following.
P:\ PBS\wrun32.exe -w -c CBLCONFI.NEW ACUSTART.ACU RWC
Any change to the configuration file requires a restart of Passport Business Solutions.
Note: There are different ways to modify shortcuts and this can vary depending on operating
system and other variables. The above procedure is one way to get it done.
399
400
Adding a Lookup
This appendix contains the following topics:
Introduction to Adding a Lookup
Getting to Lookup Access Maintenance
Lookup Access Maintenance
401
INTRODUCTION
TO
ADDING
A
LOOKUP
For any field validated against a PBS data file a Lookup or PopUp window can be added to
assist users with viewing, selecting and entering valid data.
Passport Business Solutions Lookup and PopUp windows are “attached” to input fields
without modification to application source code. Instead, they are added using the LookUp
Access maintenance program while running Passport Business Solutions.
Any input field in Passport Business Solutions can have a Lookup or PopUp window attached,
but the window used is dependent on the data that displays and the data that is returned to the
field. For example, in most cases it would not make sense to attach a Window that displays and
returns item information to the customer number field in Customers (Enter). There is the
exception of the various Notes Lookups. The Notes Lookup is used for viewing only and not
for returning data back to a field.
Lookups access the Passport Business Solutions data via Passport PowerTools drivers.
Passport PowerTools utilizes a table-based method of storing the design and other Lookup
parameters. Along with these tables there are driver programs that interpret the table data.
There are drivers for every file or set of files, being accessed by a Lookup in Passport Business
Solutions. The Passport Business Solutions Lookups can be customized by Passport Business
Solutions administrative users only using Lookup Maintenance.
Note
Lookup Maintenance is the program where a Lookup can be modified. Lookup
Access Maintenance is used to assign a Lookup to a field.
Lookup Access Maintenance is described in this appendix. Lookup Maintenance is described in the chapter Lookup Design.
Also, if you have a new data file with a new maintenance screen you may need to add a
Lookup(s) to the screen. See your PBS supplier for instructions on where to add the file access,
if applicable.
402
GETTING
TO
LOOKUP ACCESS MAINTENANCE
There is a very specific and somewhat hidden method of getting to Lookup Access
Maintenance. Passport Business Solutions can be set up to use either the older character-based
PopUp Windows or the newer Lookup Windows. The Lookup Access Maintenance is only
available when Passport Business Solutions is set in the configuration file to use the characterbased PopUps. There is a special cblconfi.pbsp (Windows) and cblconfig.pbsp (UNIX/Linux)
that have been set up to use the PopUps. There is a batch and script that has been installed that
will utilize this configuration file.
If you prefer you can modify a configuration file to get to Lookup Access
Maintenance. The ‘USE_PTOOLS’ flag in the cblconfi (Windows) and cblconfig
(UNIX/Linux) files that will have to be set to N. Be sure it set them back to
Y when you are finished.
Note
From a command prompt type:
pbsp
Here are the steps on how you get to Lookup Access Maintenance.
•
Press <F8> to display the character-based style PopUp window. If a help window displays, skip
the next step.
•
Press <F8> to display the standard PBS help window. The PBS help window must always be
displayed first in order to access the Lookup Access maintenance window.
•
Press <F3> followed by <F2> and Lookup Access Maintenance will display. When you press
<F3> the message “Change not allowed” will display. This is meant to deter individuals who
are not supposed to be modifying these definitions. Pressing <F2> overrides the message.
The PopUp maintenance screen is described in more detail below.
403
LOOKUP ACCESS MAINTENANCE
The Lookup Access maintenance window provides a means of attaching and removing
PopUp/Lookup windows to Passport Business Solutions ™ input fields. Here is an example of
the window.
Display Fields
Notice that the information displayed at the top of the window identifies the input field where
the PopUp window is attached.
Unless otherwise indicated, most of the displayed information will not be relevant for entering
the Lookup access record.
The displayed portion of the screen contains the following fields.
POPMNT called from
This is the location from which the PopUp maintenance was called.
The first two characters refer to the module. The next 6 to 8 characters refer to the program
name.
Next you will see one of two characters, IN or CN. The IN means that it is an input field and
CN means that it is from Field number to change.
The next two numbers refer to the row and column where the field is located on the screen.
The last number is the field length.
404
PopUp key type
This indicates the type of key used to locate the attached PopUp window. Two types are
possible:
1.SCRN-PARAM - the first 11 characters of the screen parameter will be the key.
2.SCRN-PARAM-ID - the screen parameter ID will be the key.
The SCRN-PARAM-ID as a “3 digit field which allows the data lookup functions to handle
multiple definitions of the same field.” For example, select Reports from the CTL menu and
then select Cash Accounts from the submenu. The starting and ending account number fields
use SCRN-PARAM-ID = 001.
PopUp key
This is the key used to store this PopUp program definition and its pass data and this is stored
in the file.
Enterable Fields
1. PopUp program name
This is the name of the PopUp window you want to attach to the field. If the program name is
left blank, the PopUp will be removed (detached) from the field.
If there is no PopUp program name for this field and you are going to use a PowerTools driver
for this field, then enter PTOOLS as the program.
Format
5 characters
Example
Type: PVENNN
2. PopUp pass data
Enter pass data for the Lookup or PopUp.
This is data that is passed into the PopUp window program. This data will need to be in a
specific format depending upon how the PopUp program or PowerTools Lookup program was
designed. Pass data is usually needed for filtering. It can also be used for sorting.
Here is a filtering example. In order to filter out only the ship-to’s for one customer, the
program needs to know which customer number has been entered. This is done with the a RL,
Retrieve Literal, string of data. This data includes the field row, column and size. For the shipto example, the RL data for finding the customer number field is “RL,11,20,12”. The
customer number field is located on row 11, column 20 and the field length is 12.
Sorting Pass data is only relevant when using the original PopUps (version 10.4 and earlier).
Sorting for the Lookups is determined in the Lookup Maintenance screen and is covered in the
Lookup Design chapter. Here is a sorting example. The vendor PopUp window was designed
to sort by vendor number or name (text) by setting the pass data to either “N” or “T”. This
way, the same PopUp can be used on the vendor number or name field in Vendor
405
Maintenance. The letters “N” and “T” were chosen to standardize so that they could also be
used in the customer and item PopUp windows, which were design with similar functionality.
Format
22 characters
Example
Type: RL,06,17,06
3. Record type
Normally this will have an entry of ‘P’ for PowerTools Lookup. If you a custom driver or want
to revert back to the older PopUp for the field you are on, then make sure that the field is
blank.
Format
1 character
Example
Type: P
4. Lookup driver name
Some fields may not have a Popup window but they have a PowerTools Lookup Window. In
cases like this, the PowerTools driver name is entered in this field. If you have driver created
by Passport for a custom file not found in Passport Business Solutions, you will have to enter
the driver name in this field. An example is in G/L Master information > Budget types, Field 1
Budget type. As you can see the PowerTools driver name is glbudtyp.scr.
Format
12 characters
Example
Type: arcuhfil.scr
5. Lookup pass data
Some PowerTools driver Lookups can filter out certain data. In most cases it is used for
filtering data or returning certain values. In can also be used for a third RL (Retrieve Literal)
number.
There is an example in PR > Employees Field 34. The pass data is S and you can only view
the state tax codes. The city and Federal tax codes are filtered out. On field 35 it is using the C
which only allows city tax codes.
Format
25 characters
Example
Type: S
Field number to change ?
You have the following options at FNTC.
Enter
Esc
Saves the new Lookup access record or saves the
changes to the record and exits the window back to the
Help window and exits the window back to the Help
window.
Removes the new Lookup access record or removes the
changes made to the record and exits the window back
to the Help window.
406
Testing Lookup Access
When you test the access to a character-based PopUp window, return to the input field and
press <F8>.
If you are testing a PowerTools Lookup window, you will need to log back into Passport
Business Solutions using a configuration file with the following setting ‘USE_PTOOLS = Y’.
As an alternate to testing a PowerTools Lookup you can have two concurrences of Passport
Business Solutions open at the same time. One will have the USE_PTOOLS set to N and the
other set to Y. This will allow you to enter or edit Popup Access Maintenance in one and test it
in the other.
Notes Lookups
There are several Lookups available for notes. These have not been added to the system but
can be added where needed.
For example, when entering an Order in O/E, the user many want to view the notes for the
customer for which the order is being added. Customer notes can have specific delivery
instructions, current billing status and much more information that is valuable at the time the
order is entered.
We have provided notes Lookups for A/R Customers, A/R Invoices, A/P Vendors, C/R
Accounts, G/L Account Number, I/C Items, O/E Orders, P/O Purchase Orders,PR Employees
T/B Clients and TB Matters.
Steps to Add a Notes Lookup
This section describes how you add a Notes Lookup to a field where no Lookup has been
assigned previously.
Determine the location (Field #) from which you would like to access the Notes Lookup. In
this example I am entering a Notes Lookup from Field Number to Change ? In Vendors, Enter.
Note
You can setup a Lookup on a field where another lookup has not been preassigned. However, if you prefer you can replace an existing Lookup.
Log into PBS with the pbsp batch/script and navigate to the field.
Start the Lookup Access Maintenance for that field as explained earlier in this chapter.
Enter PTOOLS in field 1. PopUp Program name.
In the field 2. Popup Pass Data you must enter the ‘filtering’ or RL information for the lookup
based on another field on the screen. In this example it is RL,05,25,06. This is because the
field being filtered on is the Vendor # and the location of Vendor # is Row 05, Column 25 and
the field is 06 characters long. Here is a list of the available Lookups and fields that you need
for filtering.
407
M ODULE
DRIVER
DESCRIPTION
NAME
FILTER FIELD
A/P
Vendor Notes
synotefi.apn
Vendor #
A/R
Customer Notes
synotefi.arc
Customer #
A/R
Invoice Notes
synotefi.ari
Invoice #
C/R
Cash Account
Notes
synotefi.crn
Cash Account #
G/L
Account Number
Notes
synotefi.gln
GL Account #
I/C
Item Notes
synotefi.icn
Item #
O/E
Order Notes
synotefi.oen
Order #
P/O
Purchase Order
Notes
synotefi.pon
P.O. #
P/R
Employee Notes
synotefi.prn
Employee #
T/B
Client Notes
synotefi.tbc
Client #
T/B
Matter Notes
synotefi.tbm
Matter #
Note
Determining the RL filtering data for the PopUp Pass Data field is made easier by setting the cursor on the field that you are filtering on. Here you
select Lookup Access Maintenance and the last three numbers at the end of
the PopUp key line are the RL numbers that you need for the PopUp Pass
Data field when entering the Notes Lookup.
For the field 3. Record type field enter P.
In the field 4. Lookup Driver name for this example you enter synotefi.apn. Find in the list
above the name you should use.
You can ignore field 5. Lookup pass data.
Note
To do a search-by for a date field you must enter the date in this format.
“MMDDYY”. The lookup assumes the year to be in the 2000’s. If searching
for a date in the 1900’s enter the date in this format “MMDDYYYY
Lookup Maintenance
Next you must access the PowerTools Lookup maintenance. You must log into PBS using one
of the standard logins. In any case the USE_PTOOLS flag in the cblconfi file must be set to Y.
You must be a PBS administrative user to access Lookup Maintenance. From the field that you
added the Notes Lookup first select the Lookup and then select <F7>.
408
Field 21 allows you to turn the search and sort by functions off which removes them from the
lookup window. No other changes should be made to the Note Lookup maintenance screen.
409
Glossary of Terms
This appendix defines terms as they are used in Passport
Business Solutions software, and is not intended to replace a
good accounting dictionary, computer dictionary, or English
dictionary.
410
Access
The right to enter or make use of. The process of a computer obtaining data from, or placing
data into, mass storage.
Accounting
The collection, classification, summary and analysis of financial information within a business.
The rules governing this process.
Accounts
Records in which the results of financial transactions are kept. Used to evaluate the financial
status of a business or activity at any given moment. The main types of accounts are Assets,
Liabilities, Owners’ Equity, Revenue, and Expenses. Example: The various accounts are
summarized in the financial statements. Businesses or individuals with whom you have a
relationship that involves the exchange of money or credit. Example: XYZ Company has 300
customer accounts. See Chart of Accounts
Accounts Payable
The financial records of the money owed by a business to its creditors for goods or services
received, including a record of payments made to those creditors. Also, the actual dollar
amount owed. Example: XYZ Company has accounts payable to 270 creditors. A current
liability account in General Ledger summarizing the amount of money a business owes its
vendors. Example: Our Accounts Payable account in the General Ledger shows that we owed
our vendors a total of $56,238. 07 on the last day of the month.
Accounts Receivable
The financial records of the money owed to a business by its customers, including a record of
payments received from those customers. Also the actual dollar amount owed. Example: We
show an accounts receivable of $1,243. 24. A current asset account in General Ledger
summarizing the amount of money owed to a business by those to whom the business has sold
goods or services on credit or on account.
Accrual
A system of accounting that shows all revenue earned during a given period and all expenses
incurred in the period, even if no money has yet changed hands. Accrual accounting is more
complex than cash accounting, but yields a more accurate evaluation of a company’s financial
condition. The intent of the accrual system is to match revenue earned with the expenses costs
associated with the earning of that revenue.
Accrue
To increase or accumulate, as by natural growth or as by interest on capital. To come about as
a natural consequence.
Accumulate
To perform a repeated arithmetic operation into one field, such as adding several figures, one
at a time, into a final total field. Example: 3+4=7, 7+5=12, 12+2=14. Final total field contains
411
the figure 14. In PBS General Ledger, the option of adding amounts in specified accounts
instead of printing those amounts on the statement. Example: The company’s five cash
accounts were accumulated and then the total of the five printed on the balance sheet. To
amass or gather; pile up; collect.
Adjustment
In accounting, the updating of the general ledger account balances usually at the end of the
accounting period. For example, the apportionment of previously unrecorded income and
liabilities. Example: Before XYZ Company’s accountant closed the books for June, some
previously unrecorded income was entered as an adjustment. A correction to an error in an
account. Accounting rules do not allow general ledger entries to be erased. If an entry is found
to be wrong, an adjustment must be made to cancel the incorrect entry and record the correct
entry.
Age
The number of days that have passed since the date associated with a document. For example,
the age of an invoice is simply how many days old it is, using the invoice date or the due date
as the base beginning date.
Allocate
To distribute according to plan.
Alphanumeric
Computer or written characters that are either numbers, letters, or symbols. Example: An
alphanumeric keyboard has letters, numbers and special symbols, such as #, $and @. See
Numeric
Analysis
The breakdown of anything into clearly defined and understandable parts, and the study of the
relationship of the parts to the whole. Example: An analysis of the general ledger sales
accounts showed a sharp drop in sales after the ad campaign ended.
Application
The act of putting something to a specific use. Refers to software that solves specific problems.
Passport Software’s application software, PBS, applies the capabilities of computers to solve
accounting problems.
Apply-to Number
A number given a document, such as an invoice, so that other documents, such as checks or
credit memos, may be applied to the original document. In order to assign payments and make
adjustments to a particular document, the PBS modules utilize an apply-to number. Example:
Number 3406 is the apply-to number for the $100 payment from the Ace Company for the
popsicles they bought from us on Invoice # 3406.
ASCII
Abbreviation for American Standard Code for Information Interchange, a very common
standard for representing characters as patterns of bits; for example, A is represented by
412
01011010. It is a widely accepted convention for representing characters, such as letters, digits,
and special characters like the asterisk inside the computer. This convention includes the order
of the characters that is, the order in that they are sorted. For instance, digits come before the
upper case letters, that come before the lower case letters. It is called the ASCII Code,
pronounced "askee". See Bit
Assets
Economic resources owned by a business that are expected to benefit future operations. Assets
include monetary items, such as cash and accounts receivable from customers, as well as nonmonetary physical items, such as inventories, land, buildings and equipment. Assets may also
include non-physical rights, such as those granted by patent, trademark or copyright, as long as
some monetary value can be assigned to them. See Current Assets, Fixed Assets
Audit Trail
A path of accounting information that can be followed either forward or backward. A piece of
accounting information usually comes from somewhere, or is going somewhere. Part of this
information for example, a document number is used to track where it came from, or where it
is going. The path made by tracking this information is the audit trail.
Average
The figure that results from adding a quantity of figures and dividing their sum by the number
of figures added together. For example 3. 5 is the average when 1, 2, 3 and 8 are added
together and divided by 4. 1+2+3+8 = 14, divided by 4 number of figures = 3. 5.
Backup
A copy or duplicate of a computer files. A PBS function that allows you to create a sequential
file that contains ASCII text from one of your working files. This function is also referred to as
export. To copy or duplicate the contents of a drive, onto another drive or other media.
Backup Drive
The drive that serves as an identical copy (mirror) of the original drive. If the original drive is
destroyed, damaged or in any way made unusable, the backup can be used to recover the data.
Balance
Anything that remains or is left over. The difference between the debits and credits in an
account; the account balance. To compare and reconcile or make equal the sums of the debits
and credits in one or more account, as is done on a balance sheet, as with a balance sheet. See
Balance Sheet
Balance Forward
The balance showing at the bottom of a ledger page when the page is full and is then brought
forward to the top of the next page. In PBS modules, the term is applied to Balance Forward
Customers, who are customers whose payments apply to their account as a whole, rather than
to specific invoices. Statements for Balance Forward Customers show detailed transactions
only for the current period. For all prior periods only the unpaid balance shows. Compare with
Open Item Customers In PBS Check Reconciliation, the term means the balance in an account
as of a certain date. A balance forward amount is a lump-sum dollar amount, obtained by
413
adding together several individual dollar amounts. All these specific amounts are placed in the
account on or before a specified date called the balance forward date.
Balance Sheet
A financial statement listing the assets, liabilities and equity of the organization at the end of a
financial period. The balance sheet always shows an equality between assets and the sum of
the liabilities and equity. This follows the basic accounting formula: Assets = Liabilities +
Equity. See Assets, Equity, Financial Statement
Billing
A bill, statement or notice informing a debtor of an amount owed. The action of sending out
bills, statements or notices or otherwise informing debtors of amounts owed. Example: Our
billing is done each morning.
Bills
Documents invoices informing customers of amounts owed. The accumulated indebtedness of
a person or company, represented by individual invoices or summary statements of money
owed to creditors.
Bit
Short for binary digit, the smallest unit of information on a computer. A single bit can hold
only one of two values: 0 or 1. A byte is composed of eight consecutive bits. See Megabyte
Block
A fixed number of characters stored and transferred as a single unit by the computer. A block
commonly contains 512 characters, although some computers use different size blocks.
Bug
An error in a program that prevents it from operating properly. See Object Program
Budget
A statement of all the money or resources available to an activity within a specified period of
time and a breakdown of how it will be spent or allocated. The amount of money in an
activity’s budget is normally based on a calculation of what the activity needs to function or
achieve its purpose. In PBS modules, the targeted or anticipated net change in the balance of a
given account during a given period. Example:If our current Accounts Receivable balance is
$63,000. 00, and our expected or planned balance at the end of the period is $84,000. 00, our
A/R budget is $21,000. 00.
Byte
A byte is composed of eight consecutive bits. See Bit
Cash
Funds received as payment for goods and services sold, or disbursed as payments for goods
and services received; or money deposited in the bank or held as currency. Cash is the most
liquid of all assets, as compared to other types of assets, such as stocks, bonds, accounts
receivable or inventory.
Cash Receipt
414
Money received as payment for goods or services. When a customer sends a check to a
business to pay for an item, a cash receipt transaction occurs, in that case the business receives
payment and, in exchange, the customer is relieved of indebtedness. A payment in advance of
receiving goods and services is also a cash receipt.
Cash Receipt Transaction
The record of the receipt of a payment from a customer.
cblconfi
The standard COBOL configuration file for Windows and Thin client (Windows, Linux and
UNIX). There are settings in this file that are needed for running PBS. In some cases the
settings in this file may be altered by the system administrator.
cblconfig
The standard COBOL configuration file for Linux and UNIX. There are settings in this file that
are needed for running PBS. In some cases the settings in this file may be altered by the system
administrator. It may be necessary to set up the printers in the cblconfig file.
Change Log
In PBS modules, a report that shows all changes made to records on a master file, along with
the date of the change and the initials of the user who made the change. The Change Log is
optional. Use of the Change Log must be specified in the Company information. See the
Company Information chapter.
Character
One of a set of symbols, such as a letter, a number, or a special symbol, such as? (question
mark), / (slash), + (plus) or: (colon).
Charge
To set or ask a specific amount as a price. To hold financially liable; demand payment from.
To postpone payment on a service or purchase by recording it as a debt. An entry to any
account recording a debt.
Chart of Accounts
A list of General Ledger accounts that have been assigned classification numbers so that each
account may be easily identified. A chart or listing of all the accounts for the five major
account types. See Accounts
Check Reconciliation
Bringing into agreement the balance of your checkbook and the balance shown on your bank
statement.
Clear
To mark a transaction as having been recognized and recorded by the bank. For example, you
wrote a check that was received by your bank, who recognized your check as valid and
transferred money from your checking account to the bank that the payee deposited it in. At
415
that point, the check cleared and your bank reduced your account balance accordingly. The
check will appear on your next bank statement.
Clearing Account
An account whose function is to hold a balance that is temporary and that will be cleared out
by a second financial transaction that is known to be occurring soon. This second transaction is
certain to occur and will reverse out the first transaction from the clearing account. The
clearing account never appears on financial statements. See Accounts
Client
The workstation where the user inputs data into PBS. The server is where the data is stored.
See Thin client
Code
A system whereby letters, numbers and other symbols are arbitrarily assigned a meaning. The
set of instructions in a computer program.
Comparative
The balance at the end of the prior fiscal year or accounting period, to be used as a comparison
to the ending balance of the current fiscal year or accounting period. Example: The
comparative to our A/P balance of $24,820. 00 at the end of May, 1986, is $22,640. 00, that
was the balance at the end of May, l985.
Compensation
Money given or received as an exchange for work done, as in an employer-employee
relationship.
Compiler
A tool used by a programmer that accumulates source programs to generate an object program.
See Object Program, Source Program
Compress
To shorten the number or length of records or blocks to save storage space on a disk by
eliminating gaps, empty fields, redundancies or data that is no longer needed. In the PBS
General Ledger module, the purpose of the compress function is to reduce storage space taken
by existing data on a disk and also speed up other General Ledger functions. See Compression
Code
Compression Code
A one-character code that specifies whether the Summarize General Ledger function in the
G/L module will consolidate all transactions for a single day, or for a single accounting period,
or will retain full transaction detail. The values for the code are: D = date compression; P =
period compression; and N = no compression. See Compress and Code
Configuration
A group of machines that are connected together and organized to operate as a system. The
action of connecting parts of a computer system together to work as a whole.
Consolidation
416
A strengthening or making firm. Compression into a compact mass. A becoming solid or firm.
A combination or merging. In PBS accounting software, the action of combining the
accounting records of a parent company and its subsidiaries or a group of related companies in
order to show the financial activity of the entire group of companies. See also Multi-Company
Consolidation
Control File
A file you set up when you first start using a PBS module. This file holds information that
specifies how you want the PBS module to run in the day-to-day use of it. Every PBS module
has a control file. The system control is set up in the Company information.
Corrupt
Containing errors or alterations. Ruined or destroyed, as in a corrupt data file, index, or disk.
To change the original form.
Creditor
A person or firm to whom money or its equivalent is owed.
CRT
Abbreviation for Cathode Ray Tube. The picture tube of a computer, in that a beam of
electrons that used to be called a cathode ray is controlled and directed to produce a display on
the screen. In modern usage, the word monitor or display is used instead.
<Ctrl>
A key on a keyboard that modifies the action of other keys, to provide a quick way of issuing
commands to a program. Abbreviation for Control.
Current Assets
Assets that will be exchanged or used within a relatively short period of time, usually under
one year. Examples are cash and inventory. Differs from Fixed Assets, that have a long life, or
will not be exchanged or used up for a long time, such as land or machinery. See Assets, Fixed
Assets
Cursor
A flashing or stationary rectangle or thin line of light, used to indicate where the next character
will appear on the computer screen when you make an entry on the keyboard.
Customer
A person or organization who buys goods or services from a business, especially on a regular
basis.
Data
Information that a computer uses to do work. Most of the data used by your PBS programs
comes from your entry of it into the computer. Data is stored in files where programs locate the
information needed.
Data Base
417
The information available to a computer and its programs. Example: The files within the PBS
System module and the data they contain about valid G/L accounts, cost centers, multiple
companies, users, etc. make up a Data Base. A vast and continuously updated file of data on a
particular subject.
Data File
A collection of similar or related items of information recorded on a disk, having a specific
name and significance. A data file is similar to a file folder in a file cabinet. An area on a disk
or diskette that has a name and contains or can contain data.
Data File Disk
The disk upon which data files reside. SeeDisk
Debit
An entry that signifies an increase in an asset or expense account, or a decrease in a liability,
owner’s equity or revenue account. An entry of an amount in the debit or left-hand side of a
ledger. To record the fact of a customer receiving goods or services on the customer’s account
and the Accounts Receivable general ledger account.
Debit Memo
An adjustment to an account that increases a customer’s indebtedness. In this case, the term
applies to a customer account, not a general ledger account. Issuing a debit memo creates
general ledger account entries, but these are not called debit memos.
Debt
An obligation or liability to pay. Something owed, such as money, goods or services.
Deduction
A subtraction. The thing that is or may be deducted or subtracted. In PBS Payroll, a prearranged subtraction from pay that is connected to specific employees. Example: Mr. Smith
has a $20 per week deduction for health insurance.
Default
The value or action taken by a computer program in the absence of any specific choice entered
by the person using the program. PBS restricts this term to a value that appears in a field when
the screen is presented to you, and that may be selected by pressing <Enter>. In many other
cases, a preselected or precalculated value for a field is offered as an option and may be
entered by pressing <F2>. Some fields have both.
Demonstration Data Files
Data files that come with the demonstration versions of the software modules and that contain
data to be used in sample runs of the software.
Depreciation
A decrease or loss in value because of wear and tear caused by use over time. In accounting,
an allowance made for such a loss.
Device
418
Something designed for a particular purpose, especially a machine. In computers and with PBS
utilities, the word device usually applies to a disk drive.
Directory
A list of files contained on a disk.
Directory Scan
The process performed by the computer of searching through a directory in order to find the
entry for a particular file.
Disbursement
An amount paid. The journal recording payments made is often called the Disbursements
Journal.
Discount
To deduct or subtract an amount from a cost or price. To deduct interest from a loan before
making it. The amount or percent deducted from the price.
Discount Date
The last day upon that payment may be made with a discount, after that the full price must be
paid. A discount is often offered by a vendor for prompt payment of invoices. The number of
days allowed for payment with a discount is known as the discount days.
Disk
A storage device consisting of a flat circular plate of aluminum, coated with a magnetic
material. See Disk Drive
Disk Device Code
The number or letter that designates a disk drive; for example, disk drive C or F. It is used to
specify which disk will be read from or written on.
Disk Drive
A device usually consisting of a motor and a read/write head that enables data to be stored on
and written onto and retrieved from disks. The motor spins the disk while the read/write head
moves over the surface of the disk, reading or writing data.
Distribution
In the PBS A/P, A/R, Payroll and Job Cost modules: The act of allocating transaction amounts
to G/L accounts. An amount allocated to a G/L account.
Distribution Media
CD ROMs or DVDs upon which programs have been prerecorded for distribution to customers
or users. See Media
Document
A written or printed paper bearing the original, official or legal form of something, that can be
used to furnish evidence or information. The physical record of a transaction. It is generally
419
thought of as a business paper that summarizes what occurred and provides evidence of the
transaction. Examples are invoices, checks, credit memos, shipping bills and statements.
Double Entry Bookkeeping
A method used in accounting to check the accuracy of information entered into journals and
ledgers. Under this system, for every transaction recorded the total dollar amount of debits
must equal the total dollar amount of credits, and each total must equal the amount of the
transaction. Example: Someone buys a television. The total price is $400. 00, $20. 00 of that is
sales tax. The double entry process would be:
Debit:
CASH
$400.00
Credit:
SALES
$380. 00
Credit:
SALES TAX
If the debits and credits in a journal or ledger aren't equal, you know immediately that there has
been an error in entry.
Drive Capacity
The total storage or memory space in a drive, usually expressed in or megabytes M or Mb,
gigabytes G or Gb or Terabytes. Example: A 160 gigabyte hard drive.
Driver
A program that controls a device. Every device, whether it be a printer, disk drive, or
keyboard, must have a driver program. Many drivers, such as the keyboard driver, come with
the operating system. For other devices, you may need to load a new driver when you connect
the device to your computer. In Windows environments, drivers often have a.DRV extension.
A driver acts like a translator between the device and programs that use the device. Each
device has its own set of specialized commands that only its driver knows. In contrast, most
programs access devices by using generic commands. The driver, therefore, accepts generic
commands from a program and then translates them into specialized commands for the device.
The Company information printer setup often refers to printer drivers for Windows printers.
Due Date
The date on that payment is due. The number of days allowed before an invoice must be paid
is specified in the terms of the sale. See Terms
Earn
To gain or deserve salary, wages or other reward for one’s services, labor or performance. To
produce interest or some other return as profit.
Edit
To make changes, additions, deletions, or rearrangements, or to change data in any manner
before making it permanent posting. See Transaction File, Edit List
Edit List
420
A list of transactions in a temporary file. You use it to check the accuracy of your data so that
you can make corrections before the transactions are made permanent posted. See Transaction
FileEdit List
<Enter>
The key on most keyboards that is used to end an entry. The <Enter> key is pressed at the end
of the entry to inform the computer that the entry is complete. Some keyboards show this as
the Return key.
Equity
The difference between the value of a company’s assets and its liabilities; the company’s
current net value. This value is considered to be claimable by the owners of the company;
therefore, it is also called owner’s equity. See Assets, Balance Sheet
Error Message
A message that tells you when an error has occurred and tells you what it is. An error usually
prevents the function from continuing until it is corrected. This is often accompanied by a beep
sound from the computer.
<Esc>
The key on most keyboards used to Quit or Escape. To abandon whatever you are now doing
and return to what you were doing before. In general, four levels of escape are possible:
Escaping from an interior segment of a segmented field returns you to the first segment of that
field. Escaping from any field of a screen except the first returns you to the first field of the
screen. Escaping from the first field of a screen returns you to the previous screen. Escaping
from the PBS main menu returns you to the operating system prompt. Within a box or window,
escaping avoids having to select a choice from that window by returning to the field from
which that window was invoked. Within a running display, escape is available as soon as a
process has terminated, and returns you to the screen from which you initiated that process.
Exchange
The barter or trading of money, property or services in return for like items of equal or similar
value.
Expenses
The financial cost or price spent to perform some activity or produce something. The total bills
one is committed to paying or has already paid.
Export
To create a sequential file that contains ASCII text from one of your working files. This
function once was referred to as Backup. The opposite of export is not import but restore. See
File Recovery Utility, Restore
Export File Device
The particular drive letter that contains the hard drive used to store exported files.
Export File Device Identifier
421
The letter or alphanumeric character used to designate that hard drive the export drive is in; for
example, Drive C. See Export File Device
Export Procedure
The procedure you follow to export your files. See File Recovery Utility
Export Program
A computer program that runs the export function. See File Recovery Utility
Field
A portion of a record containing one piece of information. See Record and File
Field Number
The number associated with a particular data field on the video screen. Example: In the
Customers function the field number for Customer Number is 1.
File
A collection of documents, records, cards or data arranged in an accessible order usually
alphabetically or numerically. Examples: Personnel records, inventory records, customer
address records, etc. A container, cabinet, shelf or similar arrangement that holds such data. In
a computer, a file is a collection of related records. A file can contain data or programs.
Example: All customer records are in the Customer file. See Field, Record and File
File Key
A field in a record that identifies the record. This identification is defined by the programmer
and cannot usually be changed without deleting and reentering the record.
Example: In the Customer file, the file key is the customer number, and the number for each
customer is different. In this way the computer can find the exact customer the user wants. See
Record and File, Field
File Maintenance Function
A function that allows the user to add, delete, change, inquire into or print the records in a file.
File Protection
The method that restricts access to data while the data is used or accessed by someone else.
File Recovery Utility
A program that allows the user to export, restore or recover his data files.
File Usage Map
A chart found in PBS Technical Reference Manuals that shows the data files used by each
program.
Finance
The technology of the management of money and other assets. The area of business concerned
with maintaining the inflow of money to be greater than the outflow of money.
Finance Charge
422
The amount of money charged for borrowing money or extending credit. Example: XYZ
Company gives customer Bill Smith 30 days to pay for some lumber. After 30 days, XYZ
Company will add a finance charge to the amount of money Bill Smith still owes for this
lumber.
Financial Statement
A report showing financial data about the state and results of the operations of a business.
There are many kinds of financial statements, the main ones being the Profit and Loss
Statement also called Income Statement and the Balance Sheet. See Balance Sheet, Profit and
Loss Statement
Fiscal
Of or pertaining to finances in general.
Fiscal Year
A twelve-month period used by a company for its own accounting or financial purposes. The
fiscal year may or may not be the same as the regular calendar year. Many companies use the
calendar year ending December 31 for their fiscal year. Other companies find it convenient to
choose a fiscal year that ends during a slack season, rather than during a busy or peak season.
In this way, the fiscal year would correspond to the natural annual cycle of business activity for
such companies. Still other companies find it convenient to choose the same fiscal year as most
government agencies, that begins October 1 and ends September 30 of the following year.
Example: Happy Valley Ski Resort’s fiscal year runs from July 1 to June 30. Thus the books
can close during the slow season.
Fixed Assets
Assets that have a long life or will not be exchanged or used up for a long time, such as land or
machinery. Differs from current assets, that are exchanged or used within a relatively short
period of time, usually under one year. See Assets, Current Assets
Fixed-Fee Job
A method of charging a customer for a job. The customer pays a fixed price, no matter how
much it costs the contractor. Example: The Smiths sign a contract to have their house built for
$135,000. A strike by the plumbers’ union causes delays and the finished house costs the
contractor $138,000. The Smiths still pay $135,000.
Floppy Disk
A diskette. This is a type of computer file storage media generally seldom used by the
computer industry because it has a small capacity. Called floppy because it is made of flexible
plastic, rather than rigid metal. When available, floppy disks can usually be inserted and
removed from the computer as the user desires.
Form Feed
The operation of a printer that advances a continuous form to the top of the next page.
Format
423
A predetermined arrangement of characters, fields, lines, punctuation, page numbers, etc. All
those things that determine form. Example: When entering a date in a PBS function, entry is
done using the MMDDYY format. The exact way that information is arranged on a printed
page-- for example, an invoice. A/R offers many ways to arrange billing information on a
printed invoice--a large set of formats to choose from each time you print one. The way a
particular model of computer places information on a disk. Example: Computers made by one
company usually can't read information from disks that come from another brand of computer.
This is because the format is different. This computer uses an IBM format. A program supplied
with a computer operating system to prepare a disk to be used by that model of computer.
Function
An operation that a PBS module performs, such as the Customers function or the Sales
function.
Function Keys
Designated keys on the computer keyboard that serve a special function defined by the
program being used. A function key can be a single key, or two keys pressed simultaneously.
<Esc>, <F1>, and <F2> are examples used in PBS software. With the use of these keys the
computer performs certain processing steps without the user having to enter instructions in
detail. Example: In a PBS module, a program might prompt you to Press<F2> for totals. This
means that when you press the <F2> key, the software displays the totals for the account,
customer, vendor, etc.
Garnish
A legal proceeding in that a portion of an employee’s wages are given to a creditor instead of
to the employee, in payment of the employee’s debts. Such amounts withheld from employee
wages.
General Contractor
A contractor who enters into a contract directly with the person requesting and paying for the
work. Also a contractor who takes full responsibility for completion of a project. A person
wanting a building constructed will enter into an agreement with a general contractor, rather
than with each sub-contractor. The general contractor will then hire the sub-contractors for
specific parts of the job. Also called prime contractor, to distinguish from a sub-contractor.
General Journal
A book of original entry for the daily recording of miscellaneous transactions that do not
belong in the four main specific types of journals. The four special journals that are used with
the general journal are: Sales journal, Purchases journal, Cash receipts journal, and Cash
payments journal. Example: Correcting and adjusting transactions and depreciation are all
recorded in the General Journal; compare with Journal.
General Ledger
A book in that the monetary transactions of a business are recorded in their final form. From
the General Ledger, all the company’s financial transactions can be summarized and printed in
financial statements. A type of software that sets up and handles all the functions related to
keeping a General Ledger.
424
These functions usually include setting up a Chart of Accounts, posting journals and producing
financial statements. See Chart of Accounts, Posting, Journal and Financial Statement
General Ledger Account Number
A number that identifies a General Ledger account. See Sub-account
GLIBC
The G portion is short for GNU or G not UNIX. This is a UNIX compatible software systems
developed by the Free Software Foundation. The philosophy behind GNU is to produce
software that is non-proprietary and is used in Linux operating systems.
The LIB part of GLIBC refers to the word Library. A library is a collection of programs.
The C library, developed in the “C” programming language, defines the system calls and other
basic operating system facilities. See Linux
Graphical User Interface
A program interface that takes advantage of the computer's graphics capabilities to make the
program easier to use. Well-designed graphical user interfaces can free the user from learning
complex command languages.
Gross Margin
The difference between the selling price and the cost of the items being sold. It is the gross
margin because it does not take into account other operating expenses, such as rent, telephone,
etc. Example: The hammers purchased at $15. 00 each are sold at $25. 00 each. The gross
margin is $10. 00.
GUI
See Graphical User Interface
Hard Disk
A computer disk made of a rigid material, such as aluminum. It can be either fixed or
removable. Common sizes are 5-1/4, 8 and l4. Hard disks have greater storage capacities and
process data faster than floppy disks. See Disk Drive, Disk
Hardware
All the physical components of the computer system that can be seen and touched. Examples
of hardware are racks, keyboards, circuit boards, monitors, printers, etc.
Header
The head or title at the beginning of a page of a printed document. In the PBS software, a
record that serves to identify a sales order, a purchase order or a job. It is called a header
because it comes at the head of the remaining job or order information. The header is followed
by the cost item or line item records. Examples: In Job Cost the job header includes the name
of the job, the customer, the price of the job, etc. In Order Entry the order header includes the
customer’s name, address, payment terms, etc.
Hexadecimal
425
Hex A numbering system using 16 numerals:0, l, 2, 3, 4, 5, 6, 7, 8, 9, A, B, C, D, E, and F.
Compare this with the decimal number system, that uses 0-9, and with the binary system, that
uses only 0 and 1. Hexadecimal numbers are complex and require a full chapter in a math or
computer book. Programmers use hexadecimal numbers to convert binary numbers into
something they can read more easily. Example: A programmer writes FF in hexadecimal to
represent an 8-bit byte of all 1s. Someone familiar with hexadecimal knows that the number
being represented is 11111111 in binary.
High Speed Printer
A printer that operates at a speed closer to the very high speed of the computer.
Home Position
The upper left hand corner of the screen is the home position for the cursor. See Cursor
HTML
Short for HyperText Markup Language, the authoring language used to create documents on
the World Wide Web. With HTML defines the structure and layout of a Web document by
using a variety of tags and attributes. In PBS some of these tags and attributes are used when
generating HTML reports.
Income
The total money that a company or business receives from all sources as a result of business
transactions. What a person receives, such as money or a useful exchange, as a result of
services rendered, a job done, interest on investments, profit from the buying and selling of
something, etc.
Income Statement
See Profit and Loss Statement
Increment
To increase. A small increase in quantity. In mathematics, a small increase or decrease. In
computers, to increase a number, usually by 1.
Indebtedness
The state of being morally, socially or legally obligated to another to repay something.
Something owed to another.
Index
An easily-accessed list of codes that tells the computer where to find the records of a data file.
Each entry in the index contains the key to the corresponding data record, plus a number that
informs the computer of the record’s actual location. Indexes are kept in order according to the
key, for quick access by simply specifying their keys. Example: If the File Key is Customer #,
then the index contains a list of all the Customer #’s, along with the locations of the customer
data records. Example: Customer #000001 is stored at disk location 302, #000002 at location
506, #000003 at location 37, etc. See Key, Indexed File. An ordered reference list of the
contents of a document, typically containing names and subjects, usually listed in alphabetical
order along with their page numbers.
426
Indexed File
An indexed file consists basically of two parts: the main data file in that each record has its
own key and an index to this data file. See Index, Key Compare to Relative File and
Sequential File.
INI
This is a file type that is typically ASCII text and contains various configuration options,
sometimes set into sections. The sections are usually designated by a term in square brackets
(e.g., [section title]) followed by single lines listing the various configuration options.
With PBS there are two INI files for configuring PDF output. You can read about configuring
these files in the PDF INI Files section of the More on PBS printing chapter.
Initialize
To take the steps necessary to make a disk ready for storing data. In PBS software, the
program that places empty data files on a disk, or re-creates an existing file erasing its contents
in the process.
Input
The data or instructions that are entered into the computer for processing. To enter data or
instructions. Information or data transferred or to be transferred from an external storage
medium into the internal storage of the computer. Examples: A diskette with information on it
or a stack of paper with information to be keypunched.
Installation
The act of moving data files and programs to a drive, setting up, connecting or adjusting for
use.
Integrity
Completeness or wholeness. In PBS applications the word is used in the context of the data
integrity report. This report is used to check the integrity of data files to see if any data has
been lost.
Intensity
The brightness of the characters on the screen. As used in high or low intensity. This means
some characters will appear brighter more intense on the computer screen than others do. This
is to help the user identify and find data on the screen.
Interest
The amount of money charged or paid for the use of another’s money. A charge for a financial
loan, usually a percentage of the amount loaned.
Interface
An electronic device that arranges data and controls the transmission of data between a
processor and an I/O device. A program that brings data from one software module to another.
To link a processor with another piece of equipment, such as a printer. To bring data from one
software module to another.
427
Inventory
An itemized list of articles, materials or possessions on the premises or in stock, showing
quantity, description, cost and other details. The physical goods located on the premises of a
business or stored in a warehouse. A software module that performs the functions of tracking
inventory and inventory information. See Item
Invoice
A complete list of the merchandise, goods or services delivered to the buyer by the seller. It
usually shows quantity, price, shipping charges and any other costs or discounts. A bill.
I/O
Abbreviation for Input/Output. Describing all the activities of getting data into and out of the
computer.
Item
A single thing in a list. A single piece of merchandise in an inventory.
Journal
The journal is sometimes called the book of original entry. The unit of organization of the
journal is the transaction entry and these are recorded in time sequence. A single transaction
may have many debits and credits all to different general ledger accounts. The general ledger is
organized by account. Transferring entries from the journal to the general ledger is called
posting. Each debit and credit of a journal entry is copied into the ledger under its appropriate
account heading. The journal and ledger entries are then cross-referenced with each other’s
page numbers. See Ledger, General Ledger, and Compare with General Journal
Key
A field in a record that makes that record unique from all others in the file and identifies it.
Example: In a Customer file there is a separate record for each customer that is identified by
the customer’s number. In this case the customer number is the key. In some cases keys are not
unique, but simply serve to retrieve the record. Example: The customer name.
Kilobyte
Abbreviated KB or K. A kilobyte is equal to 1,024 bytes. Example:8 kilobytes = 8,192 bytes
Computer memory and storage capacity is measured in bytes. It is more convenient to deal
with the numbers involved by using the unit of measurement called the kilobyte or megabyte.
See Bit, Byte, Megabyte
Labor Burden
The expenses incurred for workers in addition to their actual wages. It includes such things as
the employer’s share of FICA social security, federal and state unemployment insurance tax,
workers’ compensation insurance premiums, employer-paid union contributions, etc. The
words burden and overhead are defined in this glossary as the same. However, labor burden is
often treated separately from other types of overhead.
Layout
428
The overall plan, design or format. In the General Ledger module, this refers to a financial
statement layout. This is the list of codes and accounts that define exactly how a particular
financial statement is to be printed.
Legend
An explanatory caption accompanying things like maps, illustrations and reports. A code
found in a financial statement layout in the PBS General Ledger module that results in the
printing of the date and column headings.
Ledger
In accounting, the book of final entry where the transactions of a business, previously entered
in a journal or daybook book of original entry are finally posted under specific accounts. These
accounts are usually listed in the following order: Assets, Liabilities, Equity, Income and
Expenses. See Journal, General Journal
Left Justified
A group of characters or line of text is left justified when it is aligned with the left margin; that
is, there are no spaces between the left margin and the first character of the line. See Right
Justified
Liabilities
The sum of debts one owes to others. The total of financial claims or potential claims against a
person, company or business. The total of financial claims made or able to be made against a
corporation. This includes claims for payment to vendors, wages, taxes accrued, etc. One of
these claims by itself would be a liability.
Line Feed
The keyboard or printer function that feeds or advances a document one line at a time.
Example: a printer, advancing the paper one print line up.
Link
To gather or unite two or more separately written, assembled or compiled programs or routines
into a single, more inclusive program.
Linux
Pronounced lee-nuks or lin-nucks. An open source operating system that runs on a number of
hardware platforms. The Linux kernel was developed mainly by Linus Torvalds and is usually
available at no cost or a very small cost from various software developers that have added their
own distinctions to the operating system. Linux has many similarities to UNIX. See GLIBC
Literal
An actual value permanently stored in a program. This is done by the programmer entering
what the value. Example: The literal JOE in a COBOL program would cause the characters J O
E to be stored in the program.
Local computer/workstation/client
429
This is the computer where Passport Business Solutions is running. This is where the data entry
takes place and where the printing is started.
In networks, local refers to files, devices, and other resources at your workstation. Resources
located at other nodes on the networks are remote.
In the case of a client, the software runs on the server and not the workstation, but the result is
similar in that the user accesses PBS from the workstation.
Local printer name
Also known as LPN, this is the name of the printer as shown on the local, client Windows
workstation. The printer can be attached to the workstation or be a printer on the network.
Printers can usually be added, edited and accessed via the client Start menu.
Local printing
This is printing done to a device that is attached to the local computer. Local printing can be to
local “DOS” ports LPTx: or COMx:, or it can also be to USB ports which are not supported in
DOS.
Lock File
A file used to prevent another sensitive file from being accessed by a second user while a
critical operation is taking place on the file. Compare with Record Lock
Locking Capability
Refers to the existence of programs in a system that prevents a user from accessing a file while
another has access to it. See Lock File
LPN
See Local printer name
Main Menu
A menu that lists the functions of a module available to the user. Example: Customers, Sales,
and Cash receipts are selections on the A/R main menu.
Maintain
To keep things up to date. PBS software has many functions that maintain data. Example:
Using the Customers function, you can add, change, view, delete or print customer records.
These actions allow you to maintain the customer data.
Master File
A permanent file where the main type of reference data for a module is stored. Example: In the
Accounts Receivable module, the Customer file is a master file. Compare with Transaction File
Master Menu
A menu that lists the modules available to the user. Example: If Job Cost (J/C), Accounts
Receivable (A/R) and Accounts Payable (A/P) are on your computer, each is listed on the
Master Menu. See Menu
MB
430
Mb or M Abbreviation for Megabyte. Mega stands for one million, so megabyte literally
means one million bytes. However, the exact number of bytes in a megabyte is actually
1,048,576.
Media
The physical object upon that data can be stored. For example; magnetic tape, hard disks, CDROMs, DVDs, etc.
Megabyte
A unit of measurement for memory or storage. A megabyte is 1,048,576 1,024 X 1,024 bytes.
This is the same as 1,024 kilobytes. See Bit and Kilobyte
Memory
A collection of electronic circuits in that data is stored. Each binary digit is stored as an
electrical signal within the circuits. Memory is classified as read-only or read/write, and its size
is measured in kilobytes or megabytes. See Read Only and Read/Write
Menu
A list of choices presented by the computer software to the user. These choices are usually
programs or specific program functions. The menu is displayed on the screen, where a number
or letter represents each option. There are three menu types in PBS; the Menu bar, Windows
menu and the Tree-view menu.
Merchandise
Products, goods, commodities and the like, that may be bought or sold. To buy, sell or
exchange goods and services.
Minimum File Size
The least amount of space used to store a file on a disk. This space is determined by the
hardware and operating system being used. The minimum file size for any program file or data
file normally varies from 1Kb to l6Kb depending on the hardware and operating system. No
matter how small a file is, it takes up at least that much space on the disk.
Mode
The current method of operation. The current state of a device. Example: Output mode
Module
A part of a program, a whole program or a group of programs designed to fit together with
other similar parts. Example: The various parts of the program that make up the Vendors
function are modules, and the function itself is a larger module of the Accounts Payable
module.
MS-DOS
An operating system written by Microsoft Corporation for a variety of l6/32-bit computers.
Literally, Microsoft Disk Operating System.
Multi-Company Consolidation
431
In PBS General Ledger, the function that combines the General Ledgers of a group of
companies into one General Ledger. This step is usually done for companies where one or
more parent-subsidiary relationships exist. Each company in the group of such relationships
maintains its own financial records and produces its own financial statements. However, the
group of companies also operate as a single economic entity and so combined or consolidated
financial statements are prepared. Multi-company consolidation enables this. See
Consolidation
Multi-User
Refers to a computer system set up so that more than one person can use the same programs at
the same time from different terminals. All users can access the same files except when a file
has been protected. See File Protection
Net
The amount remaining after all necessary deductions or losses have been accounted for, as a
company’s net profits. The amount designated on an invoice as the final amount. The final
amount on a check paying a bill after all discounts have been deducted; or on a payroll check
the final earnings amount after all taxes and other deductions have been removed.
Net Current Assets
See Working Capital
Net Worth
The residual value of an economic entity that can be realized by the owner[s] after all claims
by creditors have been fully satisfied.
Numeric
Pertaining to data that consists only of numbers, rather than letters and numbers. See
Alphanumeric
Object Program
A program that has been translated from a source program, by means of a compiler, into a
form directly understandable by a computer or runtime. The computer uses the object program;
the programmer creates it with the source program. See Source Program, Runtime, Compiler
One-Character Code
A code whose values consist of only one character. Example: In Accounts Receivable the
customer’s balance method is a one-character code: B for Balance Forward or O for Open
Item.
On-Line
The situation in the operation of the system that its peripheral equipment is under the control of
the main computer. Example: When a printer is being used to print data from the computer, it is
said to be on-line. When it is switched over to be used independently as a typewriter, it is offline. Available for use by the computer. Example: The printer is plugged into the computer and
the power is on. The printer is then on-line. The programs and data files residing on those disks
that are actually in the computer disk drives.
Operating System
432
A set of programs provided by the computer manufacturer that act as a go-between for the user
between the computer and the application software. When the user wishes to run a program or
perform a task, he informs the operating system, that then instructs the computer on what task
it should perform. Example: The user goes through the computer’s operating system to start an
application program. The operating system starts the application software so that the user can
handle his accounting.
Operational Data Files
Data files that are on-line and actively available for use by the computer. Data files used by the
user in his daily activities on the computer.
Output
Results produced by a computer. To transfer information from a computer to an output device,
such as a printer or to view the data on the screen.
Owner’s Equity
See Equity
Owner
The function from which an access group is built, or the function from which another is
temporarily accessed.
Parentheses Control Code
In the PBS General Ledger module, the Chart of accounts function allows the user to enter a
one-character code to define the use of parentheses on financial statements. The code specifies
whether debit or credit values for an account constitute a non-typical balance. If the balance in
an account is non-typical, then it is enclosed in parentheses. Example: Cash is usually a debit
balance account, so its parentheses control code would be C for credit. This means that when
the cash account has a credit balance, the dollar amount will appear in parentheses on financial
statements to indicate that this balance is not typical.
Password
A group of characters that uniquely identifies the user of a system and that controls his or her
access to the system. Example: A password is created called William. In combination with the
PBS custom menu, this password is defined so the user of the password can enter accounts
receivable transactions, but cannot make changes to the Customer file.
Password Protection
Access to programs and data on a computer controlled by passwords.
Patch
A change made to a program to correct a mistake or change its operation.
Payable
Requiring payment. The area of a business’s accounting dealing with transactions requiring
payment by the business: Payables, or Accounts Payable.
Payment
433
Something of value given in return for goods or services.
Payroll
Literally, the roll to be paid. A list of employees receiving wages for a given period, showing
the amount due to each, as well as the total sum to be paid out. The total sum of money to be
paid out to employees at a given time.
PC
Abbreviation for Personal Computer.
PCL
Abbreviation of Printer Control Language. See Printer control language
Percent of Profit
The proportion or amount of the total profit that can be attributed to a particular item or
customer. Example:20% of our profits last year came from sales of our new roller skates.
Percent of Sales
The proportion or amount of the total sales that can be attributed to a particular customer’s item
or salesman. Example: Bill Smith produced 15% of our sales.
Period-to-date
A period of time from the first day of the present period, up to and including the current date.
Used as a period of time to encompass the amount of sales, the quantity of items sold, etc.
Example: The period-to-date sales are $15,000. Example: If the current period began June 1
and today is June 20, then sales period-to-date would be all sales made from June 1 to June 20.
Peripheral
An input, output or storage device connected to the computer, such as a printer, a monitor, etc.
Perquisite
A payment or benefit received in addition to regular wages or salary. A tip, gratuity. A benefit
expected as one’s due. Picking Ticket
A list of inventory items to be gathered and prepared for shipment, usually listed in order of
bin location in the stockroom or warehouse.
Point of sale
Point of sale refers to the place and time at which goods are being purchased or services
delivered. An invoice available at that time and place is called a point of sale invoice. This is in
contrast to an invoice that is available some time after the actual sale and that must be mailed to
the customer. For example, an invoice available to a patient at the end of a doctor’s office visit
is a point of sale invoice.
Point of Sale also refers to the PBS module for doing these types of transactions.
Posting
434
In accounting this means to place records into the General Ledger. In PBS software, this means
transferring transaction data into the permanent files. In order to affect previously posted
information, new adjusting transactions must be entered and posted; previously posted data
cannot be changed directly.
Prerequisite
Required as a prior condition to something.
Print
To have a printer write out the information requested. You may also have the option to display
a report. In this case the information is shown on the computer screen, rather than being
printed.
Print reports from disk
The function of selecting and then causing to be printed reports that have earlier been saved on
disk.
Print to disk
An option available in PBS software where reports can be directed to be saved on disk for later
printing.
Printer
The device that prints on paper data received from a computer.
Printer control language
Printer Control Language (PCL) was developed by Hewlett Packard and used in many of their
laser and ink-jet printers to control certain printer settings and options.
The most common setting used by PBS are font controls.
Printer share name
This is the name assigned to the printer which is shown in the Windows list of “shares”. This
name can be distinct from the Local Printer Name. It is better for compatibility across different
versions of the Windows operating systems that the Local Printer Name (LPN) and the Share
Name be made the same.
Process
To work on perform calculation with, sort data. Example: To process payroll records, you enter
employee information, such as employee number, pay rate, hours worked, etc. into the
computer. The computer processes the data performs calculations, such as computing taxes
and payroll deductions, and then prints pay checks.
Processor
The computer component that does processing. The combination of memory and a
microprocessor that makes up the thinking part of a computer, in contrast to the data storage
devices. The processor works on input and produces output.
Profit
435
The increase in the net worth of a business in an accounting period. The return received from a
business after all the operating expenses have been subtracted from the income.
Profit and Loss Statement
A statement showing the net profit or loss for a given period. A financial statement that shows
the gross income for all goods or services sold, less all costs involved in producing those
goods or services. This is normally calculated for a given time period, such as a month, quarter
or year. Also called an Income Statement. See Financial Statement
Cost Center
A part of a business that generates its own income and incurs its own expenses, that you
choose to break out separately for accounting purposes. Example: One store in a chain of
stores generates its own income through sales to its customers, and incurs its own expenses,
such as its employees’ wages and telephone and utility bills. A conceptual rather than physical
part of a company could also be a cost center. Example: In a company, one cost center could
be Industrial Product Sales and another could be Home Product Sales.
Profit Recognized
See Recognized Profit
Prompt
A message displayed on the screen that tells the user what to do next or what his current
options are.
Prorate
To distribute expenses, profits, or other money, in ratio to a predetermined rate or percent.
Example: The total cost of the party was prorated over all the merry-makers.
Purchase
To obtain in exchange for money or its equivalent; buy. That which is bought.
Purchase Order (P.O.)
A form that is used as an aid to purchasing goods or services. It requests the purchase of items
or services. The form states the item, quantity, description and expected cost. Once approved,
this form can be sent to the vendor. Later, you can compare it to the goods received and to the
vendor’s invoice, to authorize payment and ensure that the correct item was received. An order
from a customer for goods or services.
Purge
To delete data from a file. Once the data is purged, it cannot be recovered. Example: The
Distributions to G/L function allows you to purge the distribution data, thus assuring it is not
added to your General Ledger a second time [double posted].
Queue
To line up. In computer science, queuing refers to lining up jobs for a computer or device. For
example, if you want to print a number of documents, the operating system (or a special print
spooler) queues the documents by placing them in a special area called a print buffer or print
436
queue. The printer then pulls the documents off the queue one at a time. Another term for this
is print spooling.
Quotation
A quotation is similar to an invoice in appearance. The main difference is that the sale has not
been agreed upon yet, so the quotation is a proposed agreement about what services or goods
will be sold and for what price.
Reboot
To restart a computer by reloading the operating system.
Receivable
Awaiting or requiring payment. The part of a business’s accounting system that handles
receivables, usually called Accounts Receivable.
Recognized Profit
In the Job Cost module, recognized profit is the amount of profit that you recognize for
accounting purposes in a period. It differs from estimated or expected profit. Recognize is an
accounting term meaning to record in your General Ledger. When profit is recognized, it then
shows up on your P&L Statement, and not before. Using the Percentage Completion method
of accounting for a job, profit is recognized based on the percent of the job that is complete at
the end of an accounting period. This differs from the Completed Project method of
accounting, where the entire profit is recognized all at once, when the job is 100% complete.
Example: Although Job #3 is not complete by Dec. 31, our profit based on current estimates is
$30,000, so we will enter a recognized profit transaction for that amount.
Re-configure
To change from one configuration to another. See Configuration
Record and File
A complete set of information. Records are composed of fields, each of which contains one
item of information. A set of records constitutes a file. See Field
Record Lock
A method used in multi-user computer systems to protect data files. For example, one user is
making changes to the G/L account record. Another user will be allowed to use this account
during this time, but if he makes changes, the record will only be updated if these changes do
not conflict with the changes made by the first user. This allows one user to post sales, for
example, while another user is updating various customer records with new zip codes.
This differs from earlier versions of PBS software. In earlier versions, if one user was making
changes to a record, no other users could use this record until the first user was completely
done with it.
Re-initialize
To bring a file or device back to its original empty state. See Initialize
Register
437
A formal or official recording of financial transactions. A book of such entries.
Reimbursement
A repayment. Paying back or compensating a person for money spent or for losses.
Relative File
A file with relative organization. In a relative file, each record is accessed using a number
value that specifies the record’s numerical position in the file. In other words, the computer
tracks the location of the first record in the file and keeps the location of all the other records
relative to the first record. Example: The first record is at location 51 in the file. Another is
stored at location 54, 3 locations after the first record; therefore, its numerical position in the
file relative to the first record is Compare with Indexed File, Sequential File
Remote printing
This is done to a printer attached to a remote computer. It can be either a server (client to hostserver) or a peer PC (client to host peer-PC) or to a remote peer-printer. In the case of printing
to a remote host computer - server or peer-PC, the printer is identified using the UNC
(Universal Naming Convention) for the printer. This will have the form: \\HOST_
NAME\HOST_QUEUE_NAME
Restore
A program utility that restores an exported file. All the data contained in the exported file will
be transferred to the restored file. See Export, File Recovery Utility
Restore Program
A utility program that restores an exported file.
Retained Earnings
The stockholders’ equity derived from retaining keeping within the business profits from the
business. The accumulated profits of a corporation from its inception, minus any losses or
dividends.
Revenue
The total income of an organization, derived from all sources, usually calculated for a specific
time period. A portion of this total income.
Right Justified
A line of text or a group of characters is right justified when it is aligned with the right margin
or right hand boundary of a field or page; that is, there are no spaces between the right margin
and the last character of the line of text or group of characters.
Rounding
Also, to round-off, round-up or round-down. The action of raising or lowering a fractional
number to its next significant digit as a convenience in arithmetic calculations. For example,
the number 3. 78 could be rounded up to 3. 80 or to 4. 00, depending on how much precision
is wanted in the result.
Routine
438
An alternate word for a program, or a part of a program that performs a clearly defined
function.
Run
To execute a program on a computer. When a microprocessor carries out the instructions of a
program, the program is said to run.
Running Balance
A transaction or account balance that is re-totaled each time a new entry is made.
Runtime
A special intermediary program that interprets the instructions in a COBOL object program and
causes the computer to execute them. See Object Program
Salary
A fixed compensation paid to an employee on a regular basis.
Sale
The exchange of property, products or services for a specified amount of money or its
equivalent. A special price, lower than normally charged for an item, to generate more
business.
Sales Journal
See General Journal
Sales Tax
A tax levied by a city or state government that is added to the retail price of an item and
collected from the buyer by the seller. The seller is then required to pass this tax on to the
government tax agency.
Scrolling
A screen can display only a certain number of lines or rows of characters at one time, usually
24 or 25. The computer can keep many more in memory. To bring additional data into view, a
line of characters is removed from the top of the screen and a new line is added to the bottom
or vice versa. When this action is repeated continuously, it gives the illusion of text moving
past the screen.
Select
To choose a function from a menu or submenu. Example: It is possible to select the function,
Vendors, from the Accounts Payable menu of the Accounts Payable module.
Sequential File
A file whose organization is like a simple list of records, in that the first record is the one that
was placed there first, and the last is the one that was placed there last. Example: If the first
record in the file is at location 1, then the second record placed in the file is at location 2, third
at 3, etc. This differs from a relative file, in that the location of the record is determined by its
439
record number. In a sequential file, the record number is determined by its location. Compare
with Indexed File and Relative File
Shipping
The action of transporting goods from a supplier to a customer.
SMTP
This is the Internet mail transfer protocol. It is the main protocol used to send electronic mail
on the Internet, consisting of rules for how programs sending mail should interact with
programs receiving mail.
Full form Simple Mail Transfer Protocol
Software
The term applied to all application and utility programs that can be used on computers.
Source Code
The instructions for a computer written by a programmer but not yet compiled See Compile
and therefore not yet executable by the computer. No matter what the language is, the source
code must be turned into object code that the computer can then execute. Compare with Object
Code, See Runtime In the PBS General Ledger module, a six-character code that is used to
identify where a General Ledger transaction originated. Example: CSHJNL for Cash Journal.
The source code is used by the Source Cross Reference Report function. See Source Cross
Reference Report
Source Cross Reference Report
A PBS General Ledger function that provides a listing of transactions grouped by their Source
Code. Its purpose is to allow easy reference to original journals and registers. See General
Journal
Source Program
A program written in a programming language, such as COBOL, that must be translated
through the use of a compiler into an object program. The object program will normally be in a
language directly understood by the computer or an intermediary runtime program. Compare
to Object Program. See Runtime
Spooling
This word is from the acronym SPOOL that stands for Simultaneous Peripheral Operations OnLine. Spooling is a technique that allows a report to be printed on the printer at the same time
that another program is running. Instead of a report going directly to the printer, it is saved as a
disk file. These disk files are lined up in a queue on a first-spooled first-printed basis. When the
printer is available, the report is printed and at the same time some other program can be run.
Spooler
A program, usually part of the operating system of the computer, that controls the spooling of
reports and the printing of spooled reports.
Spooling
440
Acronym for Simultaneous Peripheral Operations On-Line. Spooling refers to putting jobs in
a buffer, a special area in memory or on a disk where a device can access them when it is
ready. Spooling is useful because devices access data at different rates. The buffer provides a
waiting station where data can rest while the slower device catches up.
The most common spooling application is print spooling. In print spooling, documents are
loaded into a buffer (usually an area on a disk), and then the printer pulls them off the buffer at
its own rate. Because the documents are in a buffer where they can be accessed by the printer,
you can perform other operations on the computer while the printing takes place in the
background. Spooling also lets you place a number of print jobs on a queue instead of waiting
for each one to finish before specifying the next one.
Standard Journal
In the PBS General Ledger module, a function that allows the user to add, change, inquire,
delete or print an edit list of recurring journal transactions. This function allows use of either
permanent or variable transactions. A permanent transaction is one for that the dollar amount
remains the same in each period, such as a rent or mortgage payment. A variable transaction is
one that occurs every period, but at varying dollar amounts, such as utilities and phone
expense. Compare with General Journal
Starting File Key
The value of the file at which a File recovery utility procedure begins. See File Recovery
Utility, File Key
Statement
A listing of a customer’s account that shows the current amount due. It includes a summary of
the type and amount of all transactions that occurred during a specific time period, usually a
month. A report summarizing the financial activity of a business. Financial Statements have
standard formats and present financial information in pre-defined ways. See Profit and Loss
Statement, Balance Sheet
Stock
A supply of materials kept for current or future use. The total merchandise that a merchant has
on hand to sell. Shares issued by a corporation representing fractional ownership in the
corporation.
Storage
A device such as a hard drive capable of receiving data and retaining it for an indefinite period
of time and supplying the data to the processor.
String
A connected sequence of characters. Example: The characters J, O and E are connected to
form the string JOE.
Sub-account
In PBS modules, account numbers are divided into as many segments, of which there may be
as many as four. All but the main account are optional. Sub-accounts are a finer division of
441
accounts if Account 400 were Office Expense, 400-011 might be Paperclips. In earlier versions
of the Classic products (versions prior to PBS), sub-accounts were used as cost centers.
Sub-menu
A menu that is subordinate or junior to a main menu. Enter, Edit list, Post and Import are
submenu selections of the Payables menu in Accounts Payable. See Menu
Support
The staff of a computer or software company whose job it is to help you with questions and
problems.
Supporting Schedule
A type of financial statement showing the details of one particular financial area, used to
supply evidence or additional data for a more general financial statement. See Financial
Statement
System
An interrelated collection of things working together as a unit for a common purpose. A
computer is a system composed of a processor and peripherals. A software module is a system
of interrelated programs.
SYSAdmin
Also know as the System Administrator or Systems Administrator. An individual responsible
for maintaining a multi-user computer system, including a local-area network (LAN). Typical
duties include:
•
Adding and configuring new workstations
•
Setting up user accounts
•
Installing system-wide software
•
Performing procedures to prevent the spread of viruses
•
Allocating mass storage space
Systems Software
A set of programs supplied by the manufacturer of the processor. Systems software consists of
an operating system and utilities. Systems software is a collection of computer programs that
control the overall operation of the computer and perform such tasks as assigning places in
memory to programs and data, and controlling the overall input/output of the system.
T-C
See Thin Client.
Taxes
A non-voluntary contribution for the support of a government, required by law of persons,
groups and businesses. See Sales Tax
Terminal
442
A monitor or terminal is a piece of hardware that provides a computer user with a way to
communicate with the computer input and the computer a way to communicate with the user
output.
Terminal Emulation Software
Software that displays character-based software, usually on a Windows workstation.
Terms
The exact conditions or stipulations that specify how goods and services are to be paid for.
Some common terms are: Net 30, meaning the amount owed must be paid in 30 days. 2/10 net
30, meaning the amount due must be paid in 30 days, but if it is paid within 10 days, there will
be a 2% discount. Discount payment terms are often offered to encourage prompt payment.
Text
A type of data that looks like common printed material, in contrast to coded or strictly
numerical data. The data on this page is text.
Thin Client
A client or workstation designed to be especially small so that the bulk of the data processing
occurs on the server. In can also result in a overall faster system.
With the special AcuCOBOL runtimes it is also a means of displaying Linux or UNIX server
installations of PBS on workstations in more of a Graphical User Interface.
Throughput
A measure of the productive work done by a device. Example: The throughput of a printer is
the number of pages per minute it can print.
Transaction
A business event. A single exchange between two businesses, two financial entities, or two
parts of one business or financial entity. Abbreviated to trans or trx.
Transaction File
In PBS software a data file in that records are kept temporarily. A transaction file is used to
store the results of data entry, so that this data can be reviewed and edited before posting.
There is one exception: the PBS General Ledger Transaction file is a master file; its data is
permanent. See Posting, Edit, Edit List, Compare with Master File.
Trial Balance
A report showing the debit and credit sides of a double entry accounting system. The sum of
the debits should equal balance with the sum of the credits, or there is an error.
UNC
Short for Universal Naming Convention or Uniform Naming Convention, a PC format for
specifying the location of resources on a local-area network (LAN). UNC uses the following
format:
\\server-name\shared-resource-pathname
443
Uninvoiced receivings
A shipment of goods that you have received, but have not received the invoice from the
vendor.
Universal Naming Convention
See UNC
UNIX
Pronounced yoo-niks. A popular multi-user, multitasking operating system developed at Bell
Labs in the early 1970s. Created by just a handful of programmers, UNIX was designed to be a
small, flexible system used exclusively by programmers. Due to its portability, flexibility, and
power, UNIX has become a leading operating system for servers. The PBS software runs on
SCO Open Server UNIX.
USB
Short for Universal Serial Bus, an external bus standard that supports data transfer rates of 12
Mbps. A single USB port can be used to connect up to 127 peripheral devices, such as mice,
modems, keyboards and printers.
Utilities
Programs that are usually supplied by the computer manufacturer as part of the system
software. Utilities are not part of the operating system, but are used on an as-needed basis.
Example: The COPY and SORT utilities.
Value
The quantity or symbol contained in a field, as opposed to the name of the field or its location
in memory. Example: A field on the screen may be named CUSTOMER TYPE; but for one
customer the field’s value might be E, and for another customer its value might be B.
Variable Journal Entry
In the Standard Journal function in the PBS General Ledger module, any entry made to the
same account for different amounts each period.
Variance
The difference between some comparison amount and the actual amount. A variance can be
shown as an amount $1,000 over or as a percentage -2%. Example: The difference between the
estimated cost of a job and the actual cost of the job, or the difference between last year’s
ending account balance and this year’s.
Vendor
Any person or company engaged in selling something. A supplier of goods or services.
Version
A revision of the PBS system and in some cases an individual PBS module. This includes the
individual module program and its documentation. This is sometimes referred to as the release
level. Example: Version 12.05.
View
444
To observe on the computer’s screen. A PBS function to view information without making any
changes to it.
VPN
(pronounced as separate letters) Short for virtual private network, a network that is constructed
by using public wires to connect nodes (computers or other devices with a unique addresses).
For example, there are a number of systems that enable you to create networks using the
Internet as the medium for transporting data. These systems use encryption and other security
mechanisms to ensure that only authorized users can access the network and that the data
cannot be intercepted.
Word Processor
A software module designed specifically to type, edit and print text for such things as letters,
magazines, books, etc.
Work File
A file in which data is temporarily stored for use by a single program. Once the program is
finished, the file is no longer of use. PBS work files are created in the folder/directory
RWWRK.
Working Capital
The current monies or assets of an individual or company, after deducting current liabilities,
that are available to be put to work by the individual or company. Also called Net Current
Assets.
W-2 Form
An employer reports an employee’s total earnings and total taxes withheld on a W-2 Form at
the end of the year. Also called the Wage and Tax Statement. The employer sends a copy of
this W-2 Form to the IRS and gives several copies to the employee. The employee uses it to fill
out the individual tax return required by the IRS and state and local agencies.
445
Conversion of A/R
Ship-to’s to POS
This appendix contains the following topics:
Introduction to Conversion of A/R Ship-to’s to POS
Exporting the A/R Data
Converting the Data into POS
446
INTRODUCTION
POS
TO
CONVERSION
OF
A/R SHIP-TO’S
TO
The Point of Sale module does not share the same A/R ship-to (deliver-to) file that A/R
invoicing and Order Entry uses. Point of Sale has a separate ship-to file.
If you are converting to using Point of Sale or you have a need to move ship-to information
from A/R ship-to’s (deliver-to) to the Point of Sale Ship-to file we have a utility that makes this
conversion easy. Also, this utility will allow you to run the conversion multiple times,
appending existing ship-to information in POS.
There are fewer fields in the Point of Sale Ship-to file than exist in the A/R ship-to. Therefore
some of the data is lost during the conversion. These fields include the Tax exempt no, Ship
zone, Contacts, Phone numbers and E-mail addresses. The Point of Sale Ship-to file does not
require these fields so losing this data will have no effect.
The conversion process includes exporting the A/R Deliver-to file and then running the POS
data conversion utility. These steps are outlined in the next two sections of this appendix.
447
EXPORTING
THE
A/R DATA
This section describes the export of the A/R Ship-to (deliver-to) file.
To use the PBS file utilities you must be a PBS administrator. There is a batch and script that
you may run.
From a command prompt type:
arutil
Or in Windows, if the administration menu has been installed on your workstation, you can
select
Start>Programs>Passport Business Solutions>File utilities>A/R File utilities
Log into the utility. If you are using multiple companies, you must first enter the company
number. Then you must enter your User ID and Password (if passwords are used on your
system).
Select
1. Export a file
Select
5. Deliver-to file (DLVFILxx)
If Windows, enter a drive letter. If UNIX or Linux you will not have to do this step.
Select C to create a new file.
Select F2 for the Starting (first) and Ending (last) records.
Select Enter
The number or records exported will display and you will see the message
Export completed - <Esc> = return to file selection menu
Then exit the utility by selecting the <Esc> key three times.
448
CONVERTING
THE
DATA
INTO
POS
This section describes how to convert the export A/R Ship-to (deliver-to) file into the POS
ship-to file.
To use this utility you must be a PBS administrator. There is a batch and script that you may
run.
From a command prompt type:
artops
Log into the utility. If you are using multiple companies, you must first enter the company
number. Then you must enter your User ID and Password (if passwords are used on your
system).
If you want to convert a file from one company to another you must rename to company
portion of the file name first.
Select
1. Convert the AR deliver to file
Select
1. Ship-to file (PSSHIPxx)
If Windows, enter a drive letter. If UNIX or Linux you will not have to do this step.
Select C to create a new file if you want to delete all existing ship-to’s in POS or if the file is
empty or select A to add records to the existing data file.
The number of records converted will display and you will see the message.
Conversion completed - <Esc> = return to file selection menu
Then exit the utility by selecting the <Esc> key three times.
This completes the conversion of Ship-to data from Accounts Receivable to Point of Sale.
449
ACH Direct Deposit
File Specifications
This appendix contains the following topics:
Introduction to ACH Direct Deposit File Specifications
ACH Field Details by Record Type
Use of Fields for Immediate Origin Options
450
INTRODUCTION TO ACH DIRECT DEPOSIT FILE
SPECIFICATIONS
ACH processing involves paying vendors and employees via a file generated during a check
run in Accounts Payable and Payroll by submitting the file to your bank. It is also know as
direct deposit.
For more information on the setup of this feature see the appendix Implement ACH and
Positive Pay in the A/P or P/R User documentation.
There is a standard ACH file format as determined by NACHA that the bank personnel expect
when processing electronic payments.
This appendix provides the technical details on the contents of an ACH file.
An ACH file is a fixed length 94 byte length text file. There are 6 record types in an ACH file.
Each record type is written to a separate line. The structure and number of lines for each record
type is the following:
RECORD
TYPE INDICATOR
NUMBER
Header 1
1
1
Header 2
5
1
Lines
6
One line per payment to
employee or vendor
Batch control
8
1
File batch
9
1*
RECORD
DESCRIPTION
OF RECORDS
PER FILE
* An ACH file must have at least 10 lines. If there are less than 10 lines, additional “9” records
(all 9s) are generated to make up the difference. These lines are for filler purposes only.
The first digit on each line is the record type indicator. The next section provides the field by
field details for each record type.
451
ACH FIELD DETAILS
BY
RECORD TYPE
Each record type has a different set of fields. In this section of the chapter each record type is
documented. For each field the position, size, status and field name and data origin is
provided.
Record Type 1 - Header 1
The following is the technical information for the record 1 ACH fields.
F
P
IELD
OSITION
1
1
1
required
Record type
Program - always “1"
2
2-3
2
required
Priority code
Program - always “01"
3
4-13
10
required
Immediate destination
Bank accounts screen 1/ field 5
ABA routing
4
14-23
10
required
Immediate origin
Bank accounts screen 2/ field 4
ACH imm-origin tax id/ no.
5
24-29
6
required
File creation date
System date
6
30-33
4
optional
File creation time
System time
SIZE
S
TATUS
FIELD NAME
DATA ORIGIN
7
34-34
1
required
File ID modifier
If multiple files are created on
same day, this starts as “A”,
incrementing through the alphabet
8
35-37
3
required
Record size
Program - always 094
9
38-39
2
required
Blocking factor
Program - always 10
10
40
1
required
Format code
Program - always 1
11
41-63
23
optional
Imm destination
name
Bank accounts screen 1, field 2
Bank name
12
64-86
23
optional
Imm origin name
Bank accounts screen 2, field 3
Imm origin name
13
87-94
8
optional
Reference code
Always “zeros”
452
Record Type 5 - Header 2
The following is the technical information for the record 5 ACH fields.
F
P
IELD
OSITION
1
01
1
required
Record type
Program - always “5"
2
2-4
3
required
Service class code
Program - always “200" indicates a mix of DR/ CR
3
5-20
16
required
Company name
Bank accounts screen 2/ field 1
ACH company name
4
21-40
20
optional
Discretionary data
Not used
5
41-50
10
required
Company identification
Bank accounts screen 2/ field 2
ACH company tax id/ no
6
51-53
3
required
Standard entry code
If P/R: “PPD”
If A/P: “CCD”
Company entry
description
Dt:(Check date in P/R and Trx
date in A/P)
or
If P/R: “Payroll”
If A/P: “A/P”
7
54-63
SIZE
10
S
TATUS
required
FIELD NAME
DATA ORIGIN
8
64-69
6
required
Company date
If P/R: The Payroll control file
period ending date in
YYMMDD date format
If A/P: it uses the system date
9
70-75
6
required
Effective entry date
Payment (check) date from the
Open item or Time transaction
file
10
76-78
3
required
Reserved
Blanks
11
79-79
1
required
Originator status
code
Program - always “1"
453
F
P
IELD
OSITION
12
80-87
SIZE
8
S
TATUS
required
FIELD NAME
DATA ORIGIN
Originating bank ID
If the immediate origin is your
company as indicated in the
Bank accounts screen 2 / field
3, then it is from the Bank
accounts screen 1/ field 5 Bank
Routing.
If the immediate origin is your
bank it uses the Bank accounts
screen 2/ field 4 ACH immediate origin tax ID/no
13
88-94
7
required
Batch number
Program - always “1”
Record Type 6 - Lines
The following is the technical information for the record 6 ACH fields.
F
P
IELD
OSITION
1
1
2
3
2-3
4-11
SIZE
1
2
8
S
TATUS
required
required
required
FIELD NAME
DATA ORIGIN
Record type
Program - always “6"
Transaction code
22= CR checking account
23= Pre-note CR checking
account
27 = DR checking account
28= Pre-note DR checking
32= CR savings account
33= Pre-note CR savings
Receiving bank ID
If P/R: Based on the employee’s
Banks code entered on the
employee direct deposit record it
uses the bank routing number
and bank name.
If A/P: Vendor’s bank routing
number comes from a Banks record via the vendor record Bank
code field.
454
F
P
IELD
OSITION
4
12-12
SIZE
1
S
TATUS
required
FIELD NAME
DATA ORIGIN
Check digit
Included from Field 3 above
5
13-29
17
required
Receiving bank
account #
If P/R: Employee bank account
number from employee direct
deposit file (includes check
digit)
If AP: Vendor bank account
number from the Vendor file.
6
30-39
10
required
Amount
Amount to pay from the Open
item or Time transaction file
7
40-54
15
optional
Individual ID Information
P/R: Employee number
A/P: Vendor number
8
55-76
22
required
Individual name
P/R: Employee name
A/P: Vendor name
9
77-78
2
optional
Optional data field
Not used
10
79-79
1
required
Addenda record
Program - always “0". No
addenda is used
Trace number
This is a constructed number
that consists of record 5/ field
12 bank routing number + the
sequential number
11
80-94
15
required
Record Type 8 - Batch Control
The following is the technical information for the record 8 ACH fields.
F
P
IELD
OSITION
1
01
1
required
Record type
Always “8"
2
02-04
3
required
Service class code
Always “200"- DR & CR
SIZE
S
TATUS
FIELD NAME
455
DATA ORIGIN
F
P
IELD
OSITION
SIZE
S
FIELD NAME
TATUS
DATA ORIGIN
3
05-10
6
required
Entry count
Calculated: It is the number of
detail records in this batch. Add
1 for every detail record 6
4
11-20
10
required
Entry hash
Calculated: Sum of record 6/
field 3 receiving bank ID
number (excludes check digit)
5
21-32
12
required
Total DR amount
Sum of total debits of record 6
6
33-44
12
required
Total CR amount
Sum of total credits of record 6
7
45-54
10
required
Company identification
Same as field 5/ record 5
This is from Ctl Banks screen 2/
field 2 Company-ID
8
55-73
19
optional
Message authentication
Blanks
9
74-79
6
required
Reserved
Blanks
10
80-87
8
required
Originating Bank ID
From record 5/ field 12
11
88-94
7
required
Batch Number
Same as record 5/ field 13
Record Type 9 - File Batch
The following is the technical information for the record 9 ACH fields.
F
P
IELD
OSITION
1
1
1
required
Record type
Program - always “9"
2
2-7
6
required
Batch count
Program - always “1”
3
8-13
6
required
Block count
Calculated: add 1 for every 10
records
4
14-21
8
required
Entry count
Calculated: Number of record 6
SIZE
S
TATUS
FIELD NAME
456
DATA ORIGIN
F
P
IELD
OSITION
SIZE
S
TATUS
FIELD NAME
DATA ORIGIN
records on file.
5
22-31
10
required
Entry hash
Sum of record 6 field 3 receiving bank ID code (excludes
check digit)
6
32-43
12
required
Total debit entry
Sum of all DR amounts on record 6 field 6
7
44-55
12
required
Total credit entry
Sum of all CR amounts on record 6 field 6
8
56-94
39
required
Reserved
Blank
457
USE
OF
FIELDS
FOR
IMMEDIATE ORIGIN OPTIONS
Immediate origin is the last business entity to handle the ACH file before it reaches the final
destination where the ACH file is processed and the payments are made.
The use of the ACH fields vary depending on the immediate origin settings. The two options
are
•
Your company is the immediate origin
•
Your bank is the immediate origin
This part of the appendix documents which fields are being used in both circumstances.
The Company’s Bank is the Processing Bank
This is the most common circumstance. In this case your company is the immediate origin.
These data variables are produced when the Ctl Banks record screen2 / field 3 Is immediate
origin your company is set to Y.
R
ECORD
TYPE
F IELD
NUMBER
1
3
1
4
1
1
12
5
3
5
5
ACH F ILE
F IELD
NAME
DATA ORIGIN
This is your bank. This is the ABA
Immediate bank routing number which comes
destination from the Ctl Banks screen 1/ field 5
ABA Routing.
This is usually your company’s Federal Tax ID number from Ctl Banks
Immediate screen 2/ field 4 ACH imm-origin
origin no.
tax id/no. This could also be the
DUNS code or any other unique designation as required by your bank.
This is your company’s bank name
Destination
from Ctl Banks screen 1/ field 2
name
Bank Name.
This is from Ctl Banks screen 2/
Immediate
field 3 Imm-origin name. Note that
origin name
this is usually your company’s name.
Company
This is from the Ctl Banks screen2/
name
field 1 ACH Company name.
This comes from Ctl Banks screen 2/
field 2: ACH Company tax id/no. It
is usually the same as Immediate
Origin from ACH file record 1/ field
Company
4. It normally contains your comID
pany’s Federal Tax ID, preceded by
a “1". Your bank contact person
must instruct what goes in this field
458
5
12
and which digit to precede the
number.
This is the same as record 1/ field 3.
Originating It is your bank’s ABA routing
bank
number from the Ctl Banks screen 1/
field 5. It excludes the check digit.
The Company’s Bank is not the Processing Bank.
Usually this means the Federal Reserve will process the ACH file. In this case the immediate
origin is your bank. This procedure is followed when the Ctl Banks record screen2 / field 3 Is
immediate origin your company is set to N.
In data below the ACH record type, ACH field number, ACH field name and where the data
originates is provided.
R
ECORD
TYPE
1
1
1
1
5
5
F IELD ACH F ILE
N
F IELD
W HERE THE DATA ORIGINATES
UMBER
NAME
This is the processing bank’s ABA
routing number. This comes from the
Immediate
3
Ctl Banks screen 1/ field 5 ABA routdestination
ing #. Note that the processing bank
is NOT your company’s bank.
This is the receiving bank’s ABA
routing number from Ctl Banks
Immediate
4
screen 2/ field 4, ACH Imm-Origin
origin
ABA routing no. IT MUST BE your
bank’s ABA number.
This is the processing bank name
Destination
11
entered in Ctl Banks screen 1/ field 2
name
Bank Name. This is NOT your bank.
This is the receiving bank’s name
Immediate from Ctl Banks screen 2/ field 3
12
origin name Imm-origin name. This is your
bank’s name.
This is your company’s name from
Company
3
Ctl Banks screen 2/ field 1 ACH
name
Company name.
From Ctl Banks screen 2/ field 2:
ACH Company tax id/ no. This
Company
usually contains your company’s Fed5
ID
eral Tax ID preceded by a “1". Your
bank contact person must instruct
what goes in this field.
459
5
12
When Ctl Banks screen 2/ field 3 is
N for the question Is Immediate
Origin your company? use the bank
Originating routing number from Ctl Banks
bank
screen 2/ field 4 Immediate Origin
tax id/ no. This is the same as record
1/field 4 but excludes the first position.
460
Email Configuration
This appendix contains the following topics:
Introduction to Email Configuration
Email Configuration
Emailing Errors
461
INTRODUCTION
TO
EMAIL CONFIGURATION
If you are using a -PDF- or a -PDFP- printer in Company information to print specific PBS
form types, then you are generating PDF files.
For more information on the user functions of emailing and viewing PDFs, see the System
User documentation chapter PDF Form File Processing.
This appendix identifies what needs to be configured in PBS in order to email PDF forms to
customers or vendors.
The following is s list of forms that may saved as a PDF so therefore may be emailed:
APPLICATION
Accounts Receivable
Batch, immediate, and reprinted invoices
Accounts Receivable
Statements
Order Entry
Batch, immediate and reprinted invoices
Purchase Order
Pre-defined and user-defined new,
changed, released and all purchase orders
Point of Sale
Batch invoices, credit memos and payments
Customer Orders
Packing lists, acknowledgements and
invoices
Product Purchasing
Purchase orders
You must have an email address for each PBS user who will be emailing from PBS as well as
SMTP connection settings before you can implement email in PBS.
462
EMAIL CONFIGURATION
In order for emailing PDF files to function properly, there are several areas within PBS that
require a setup. Here is a table of those areas and the fields:
APPLICATION
Ctl
Setup information
User maintenance
Email address
Email login
Ctl
Company information
All fields on screen 4
AP
Vendors (Contacts) *
Email
Email documents?
AP
Vendors *
Default contact
(accessed via field 4)
AR
Customers (Contacts) *
Email
Email documents?
AR
Customers *
Default contact
(accessed via field 4)
* If you are not emailing Purchase orders, then you do not have to set up Vendors and Vendor
contacts. The vice versa is true if you are not emailing any customer documents.
Here are some more details on the email setup:
User Maintenance
Enter an email address and email login in User maintenance for each user that is going to
email PDF forms from PBS. Read the PBS Users chapter for more information on entering the
Email address and Email login fields. You must know the users email address and SMTP
authentication in order to make these entries.
There is no place to save email passwords in PBS. Therefore each PBS user who emails
PDF files must know their own email password in order to email PDFs.
Company information
In Company information, on the fourth screen, Fifth Tab - Email Setup, you must enter the
server host name and other email fields.
463
Within Company information there is an option to test your email connection. You must test
the connection for the user for which you are logged into PBS.
Read the Company information chapter for more information on entering the fourth screen
(email fields) and testing the email server connection.
Vendor/Customer Contacts
You may enter customer or vendor email addresses on-the-fly if you want, but having them
pre-entered in a contact file is a convenience.
You may email forms to vendor and customer contacts. The email addresses are stored in the
vendor or customer contact files.
If you are going to stack and email PDFs it is essential that you have a contact set up for
emailing. The two essential fields required for emailing are E-mail (email address field) and
Email documents (set it to Y).
If you have more than one contact with an email address, then the Email documents? field
determines which contact to use. Even if you only have one contact, set the field to Y or you
will have to enter an email address for the customer. If you have more than one customer
contact set up for email, you can CC the other contacts the PDF file.
For information on entering contacts, go the Accounts Payable user documentation and read
the Vendors chapter. For A/R contacts read the Accounts Receivable documentation chapter
called Customers.
If the Company information field Allow email addresses to be entered at send time is set to
N, then you must enter a contact email address.
Customers/Vendors
You should set up a default contact for each customer or vendor who will be emailed PDFs.
When this is done, you will not have to enter the email address each time you select a form.
For information on entering vendors go the Accounts Payable user documentation and read
the Vendors chapter. For entering A/R customers read the Accounts Receivable documentation
chapter called Customers.
If the Company information field Allow email address to be entered at send time is set to
N, then you must have a default contact for the vendor or customer. If set to Y the user can
enter an email address, when emailing one at a time, at send time. When stacking PDFs to be
emailed, the default contact field must be entered.
Stacking PDFs
When stacking PDFs, in addition to the Company information and User fields, you must have
the following fields setup for customers or vendors.
Customers > Default contact
Customers (Contacts) > Email and Email documents?
464
Vendor > Default contact
Vendors (Contacts) > Email and Email documents?
465
EMAILING ERRORS
There are potential error codes that could occur if the PBS email is not set up properly so that a
connection cannot be made or the email provider is down. There are standard errors and errors
specifically from Marshall Software. Marshall Software is a third party product that PBS uses
to send emails.
WINSOCK Error Codes
WINSOCK (short for Windows Socket) is a Microsoft Windows DLL program that provides
the interface to TCP/IP services, essentially allowing Windows to use Web browsers, FTP
programs, and others. It allows you to send data to and from the Internet.
The following table contains the standard WINSOCK error codes and descriptions:
ERROR
CODE
Message
10004
Interrupted system call.
10009
Bad file number.
10013
Permission denied.
10014
Bad address.
10022
Invalid argument.
10024
Too many open files.
10035
Would block socket in non-blocking mode. Resource
temporarily unavailable.
10036
Blocking call operation already in progress.
10037
Operation already completed.
10038
Not a valid socket.
10039
Destination address required.
10040
Message too large for buffer.
10041
Protocol mismatch.
10042
Protocol option invalid.
10043
Protocol not supported.
10044
Socket type not supported.
10045
Socket operation not supported.
10047
Socket address family not supported.
466
ERROR
Message
CODE
10048
Socket address already in use.
10049
Socket address not available or not valid.
10050
Network error.
10051
Cannot reach network.
10052
Connection dropped.
10053
Connection timed-out or aborted.
10054
Connection reset by remote host.
10055
Out of buffer space.
10056
Socket already connected.
10057
Socket not connected.
10058
Socket functionality shut down.
10060
Timed-out attempting to connect.
10061
Connection refused by remote host.
10064
Host is down
10065
No route to host
10091
Network not yet ready.
10092
WINSOCK doesn't support requested version.
10093
Sockets not initialized. Call WSAStartup.
11001
Host does not exist.
11002
Host not found. Try again.
11003
Non-recoverable error has occurred.
11004
No data is available.
Marshall Software Error Codes
The following are the error codes and descriptions from Marshall Software. The letters SEE
indicate that it is a Marshall Software error.
ERROR CODE
1 SEE_EOF
End of file (socket has been
closed).
467
ERROR CODE
4 SEE_IS_BLOCKING
Socket is currently blocking.
7 SEE_INVALID_SOCKET
Invalid socket
8 SEE_TIMED_OUT
Socket timed out awaiting data.
9 SEE_NO_SOCK_ADDR
No socket address.
12 SEE_NO_HOST
No host name.
14 SEE_ABORTED
The DLL has been corrupted.
18 SEE_CANNOT_CREATE_
SOCK
Cannot create socket.
30 SEE_ALREADY_CONNECTED
Already connected to server.
31 SEE_BACK_OVERFLOW
Response buffer has overflowed.
32 SEE_BAD_ADDRESS_CHAR
Bad character in email address.
34 SEE_CANNOT_ATTACH
Cannot access DLL.
35 SEE_CANNOT_OPEN
Cannot open file (for read).
36 SEE_CONNECT_ERROR
Error attempting to connect.
37 SEE_EMPTY_ADDRESS
EMPTY email address.
38 SEE_FROM_NULL_ARG
Required 'From:' argument is
NULL.
39 SEE_MISSING_AT_CHAR
Missing '@' character in email
address.
40 SEE_MISSING_FROM
Missing 'From:' email address.
41 SEE_MISSING_LEFT
Missing '<' delimiter in email
address.
43 SEE_MISSING_RIGHT
Missing '>' terminating email
address.
44 SEE_NOT_CONNECTED
Not connected to server.
45 SEE_NO_RECIPIENTS
Must have at least one recipient.
46 SEE_NO_SERVER
Cannot find SMTP/POP3 server.
47 SEE_NULL_POINTER
Unexpected NULL pointer.
49 SEE_SMTP_ERROR
SMTP returned error.
50 SEE_EMAIL_NULL_ARG
SMTP/POP3 server not specified.
51 SEE_SOCK_READ_ERROR
Socket read error.
468
ERROR CODE
52 SEE_SOCK_WRITE_ERROR
Socket write error.
53 SEE_TOO_MANY_AT_CHARS
Too many '@' symbols in email
address.
55 SEE_CANNOT_ALLOC
Cannot allocate memory.
56 SEE_NOT_SERVER
57 SEE_NO_APOP_TIMESTAMP
POP3 server did not provide a
timestamp.
58 SEE_SMTP_ONLY
Must be connected to SMTP
server.
59 SEE_POP3_ONLY
Must be connected to POP3 server.
60 SEE_OBSOLETE_PARAMETER Parameter is obsolete.
61 SEE_USER_NULL_ARG
Expecteced USER name not specified.
62 SEE_PASS_NULL_ARG
Required POP3 password argument
missing.
63 SEE_POP3_ERROR
Error returned by POP3 server.
64 SEE_MSG_NBR_RANGE
Message number out of range.
65 SEE_FILENAME_NULL_ARG
Required filename is missing.
66 SEE_EMAIL_PATH_NULL_
ARG
Required file path is missing.
67 SEE_CANNOT_CREATE
Cannot create file.
68 SEE_BUFFER_NULL_ARG
Required buffer is missing.
69 SEE_BUFFER_SIZE_ARG
Buffer size argument is not positive.
70 SEE_ATTACH_PATH_NULL_
ARG
Attachment argument is missing.
71 SEE_NOT_ATTACHED
SEE not attached. Must call seeAttach first.
72 SEE_ALREADY_ATTACHED
seeAttach already called.
73 SEE_CHAN_OUT_OF_RANGE
Channel number out of range.
74 SEE_BAD_KEY_CODE
Bad key code (2nd argument in
seeAttach)
75 SEE_NO_SUCH_FILE
No such file.
469
ERROR CODE
76 SEE_PATH_NOT_ALLOWED
Filename only - path not allowed.
98 SEE_EXPIRED
Evaluation version expired.
99 SEE_INTERNAL_ERROR
Internal SEE error.
1 SEE_CANNOT_COMPLY
Cannot comply. Not always an
error.
1 SEE_NO_ERROR
470
Index
*
*** not on file
328
447
access, definition
411
account links
account reformatting and
\
\, defined
A/R ship-to's to POS, introduction to
conversion of
417, 421
2
2 No such file or directory
330
8
8 version upgrade
40
account number
maximum format
91
minimum format
91
segments of
92
syntax rules for
93
account numbers
9
9 version upgrade
160
40
1
creating invalid
172
defining new
162
13 Permission denied
330
degenerate
173
24 Too many open files
330
introduction to reformatting
159
27 File too large
330
printinig lists of
167
28 No space left on device
330
uses, reformatting
159
variying by employee
173
3
30 Read only file system
330
4
Account numbers and cost centers not 338
looking correct
account reformatting
46 No record locks available
330
1099LK
269
A
A file needed is protected by another
function.
328
A file needed is protected by another
function. cannot run your selection
337
1
and account links
160
and company consolidation
161
layouts for
161
account setup, third tab
91
accounting, definition
411
accounts
defined
adminstration
411
introduction to
1
accounts payable files, initialize
266
ADVACT
315
Accounts Payable, defined
411
ADVBFL
315
accounts receivable files, initialize
270
ADVBHF
315
Accounts Receivable, defined
411
age, defined
412
accrual, defined
411
aligning forms
140
accrue, defined
411
alignment, company information printer 140
ACCTFI
263
alignment, Windows printer
140
accumulate, defined
411
ALIITM
309
ACH field details by record type
452
all 999’s in a field on a print–out or on 328
the screen
ACH file specifications, introduction to 451
ACNFIL
315
ACTLNK
283
ACVLCK
292
addcmp, functions of
191
adding
companies in pathfinder, manually
adding a lookup
191
401
addon a module, steps to
15
add-on module installation
20
add-on users installation
21
ADJLCK
268
ADJTRX
268
adjustment, defined
412
administration organization
administrator, system
2
442
2
all records, extracting
248
allocate, defined
412
allow protected changes ?
83
alphanumeric, defined
412
ALTITM
286
analysis, defined
412
APACCT
267
APACH
37
APCHKF
268
APCTLF
267
APDIST
268
APFAUX
269
APFRMF
269
APNOTF
267
APOBJ
38
APOPEN
appendices, description of
268
3
Automated Multiple Company Set Up 176
AUXFIL
299
application, defined
412
AUXLCK
305
apply–to number, defined
412
average, defined
413
APRCUR
268
APTLCK
268
back order, defined
413
APTRXF
268
backing up data files
226
ARACCT
271
backup
ARCODS
271
defined
413
ARCTLF
271
files to include in
227
ARDIST
273
frequency of
227
are the *form type* just printed OK?
337
introduction to
227
ARNOTF
271
logs for
229
38
media, choosing
228
AROLCK
272
media, labelling
229
AROPEN
272
procedures
230
ARRCUR
277
rotation of
229
ARRPTP
273
types of
228
AROBJ
ASCII
defined
assets, defined
B
backup drive, defined
413
412
bad command or file name
328
413
balance forward, defined
413
balance sheet, defined
414
413
assigning
pathnames to data files
197
balance, defined
pathnames to programs
195
batch controls, company information use 82
pathnames, overview of
194
Beep
328
asterisk next to device-name field
104
BFLCK
318
audit trail, defined
413
BILLCK
317
3
billing, defined
414
cblconfig, defined
415
bills, defined
414
CCNLCK
283
bit, defined
414
CCRDFI
309
BLFMLK
317
change log, defined
415
BLHAUX
317
change not allowed
329
BLHIST
317
changing
BLLFMT
316
existing data file path names
203
block, defined
414
files to new structure
169
BLPLCK
292
character, defined
BLPTRX
292
characters, valid separator
BNKACT
264
charge, defined
415
BreakOut files
265
chart of accounts, defined
415
BTCHFL
263
CHARTF
281
BUDGET
281
check prints slowly, last
337
budget, defined
414
check reconciliation files, initialize
278
bug, defined
414
check reconciliation, defined
415
checklist, company setup
205
checklist, for company setup
205
cannot enter more than *** distributions 328
CHGCLI
316
cannot exceed amount remaining
328
CHKDST
279
cash receipt transaction, defined
415
CHKFIL
304
cash receipt, defined
414
CHKLCK
268
cash, defined
414
CHKTRX
279
CATEGF
288
choosing backup media
228
CATFIL
291
CKACCT
279
cblconfi, defined
415
CKBOOK
279
cblconfi, PBS configuration file
391
CKCTLF
279
C
calculation overflow
328
4
415
96
CKEYWF
286
file
CKNOTF
279
code, defined
clear, defined
415
codes
clearing account, defined
416
client, defined
416, 429
416
laser control
116
PCL printer reset
143
printer reset
114
CLIFIL
316
CLRFIL
316
codes, PCL
142
CMPCST
286
CODFIL
264
CMPFIL
286
COMFIL
273
CMPRTV
282
commands, entering PCL
146
CNDBDG
282
commands. PCL
142
CNGCMR
282
companies
CNGCOA
281
in pathfinder, manually adding
191
CNGCUS
272
using pathfinder for multiple
190
CNGDIS
299
using pathfinder for single
190
CNGEMP
303
using pathfinder with multiple
204
CNGHDR
299
CNGITM
286
CNGLCK
299
CNGLIN
299
CNGMST
291
CNGVEN
267
CNNOTF
299
CNTRPC
309
COBOL configuration file, introduction 392
to
COBOL configuration, modifying the 399
5
company consolidation, account refor- 161
matting and
company information
chapter topics
fifth tab in
78
119
first tab
80
introduction to
79
printer alignment
140
use batch controls
82
year 2000 cutoff
82
company information fourth tab -
101
printers)
company information PDF setup
103
company information vs Windows
printer
126
conversion of A/R ship-to's to POS,
introduction to
copying
program/data file names
company removal
35
447
corrupt, defined
197
417
company setup checklist
205
comparative, defined
416
index, recovering
234
comparison, export/restore & rebuild
247
recovering
235
compensation, defined
416
corruption, data file
233
COMPFI
263
cost center, defined
436
Compiler
416
COSTHF
316
Complete backup defined
228
COVFIL
289
compress, defined
416
CRCLCK
279
compression / normal screen PCL codes 147
CRDHLD
309
compression code, defined
416
CRDIST
279
configuration, defined
416
create new inventory history
252
CONFIL
277
creating custom menus
connection failed, email
123
creating invalid account numbers
172
creditor, defined
417
consolidation, account reformatting and 161
company
consolidation, defined
416
control codes, laser
116
corrupted data file
CROBJ
76
38
cross–reference
file, described
159
control codes, special printing features 116
and
CRT, defined
417
control file, defined
417
CSHACT
263
control language, printer
435
CSHAPL
273
143, 145
CSHLCK
272
CSHTRX
272
control PCL codes, job and page
6
CSTLCK
292
data, defined
417
CSTTRX
292
debit memo, defined
418
CUHFIL
272
debit, defined
418
CURMAT
316
debt, defined
418
current assets, defined
417
debug, printer locator
118
cursor, defined
417
DEDCOD
303
CUSCMP
313
deduction, defined
418
CUSFIL
272
default, defined
418
customer, defined
417
defining
CVTRX
292
D
damaged path file, recovering from a
202
data base, defined
417
data file
corruption
233
index, recovering corrupted
234
path names, changing existing
203
data file descriptions, OEINIT
294
data file disk, defined
418
data file, defined
418
data files
backing up
226
check reconciliation
278
information on
3
inventory control
285
recovering corrupted
235
using top–level program and
192
7
multiple companies
175
new account numbers
162
pathfinder selections
201
defining multiple companies, chapter top-175
ics
degenerate account numbers
173
deleting a Lookup
220
demonstration data files, defined
418
depreciation, defined
418
DESCFL
291
DESCFX
293
descriptions, OEINIT data file
294
design, form
138
design, form file
137
device name field controls
154
device, defined
418
device, naming spooled printing for
UNIX and Linux
150
differential backup defined
228
direct deposit file specifications
451
direct printers
110
directories
PDFFIL
drive, defined
419
disk device code, defined
419
disk space
common
RWOBJ
disk
38
37
directories, common
reclaiming
236
restore effect on
242
disk space steps, reclaiming
237
disk, defined
419
245
di directories
38
distribution file restore, navigator
FONTS
37
distribution history backup, navigation 259
LINK
37
distribution media, defined
419
PBS_Files
37
distribution, defined
419
PSIB00
38
DISTRX
299
PSIBOBJ
38
dixx directories
pt directories
38
document, defined
RW00
38
documentation overview
RWMENU
38
double entry bookkeeping, defined
420
drive capacity, defined
420
RWPRT
37-38
38
419
6
RWWRK
38
driver, defined
420
XX00
39
DRWFIL
309
XXOBJ
38
DTLFIL
291
directory scan, defined
419
DTLFIX
293
directory, defined
419
due date, defined
420
disaster recovery, steps for
230
disbursement, defined
419
earlier versions, upgrades from
discount date, defined
419
earn, defined
420
discount, defined
419
EDIAUD
295
8
E
93
edit list, defined
420
edit, defined
420
effect on disk space, restore
242
EGLFIL
159, 263
ELBFMT
295
ELFLCK
295
email configuration, introduction to
462
email connection failed
123
email setup, fifth tab
119
emailing errors
466
EMPDDA
307
EMPEXT
305
EMPFAU
305
EMPFIL
303
employee account numbers, varies by
173
EMPREX
305
EMPSAU
305
Ending File Recovery Utilities
253
entering
pathnames
179
pathnames for data files
181
pathnames for programs
180
PCL commands
146
users
63
entry must be
alphabetic
329
numeric
329
9
positive
329
environment, printing in Linux and
UNIX
150
equity, defined
421
error 115 during the move data process 336
error message, defined
421
error messages, list of
326
errors, emailing
466
examples in this manual, format
93
exchange, defined
421
EXDATA
305
existing data file path names, changing 203
expenses, defined
421
EXPFIL
316
export
and restore relationshop
242
file device identifier, defined
421
file device, defined
421
file, restoring from an
241
procedure, defined
422
program, defined
422
utility, summary of
240
export, defined
421
export/restore & rebuild comparison
247
exporting files
239
extended file utilities
256
extracting all records
248
F
file in use at another station
337
failed, email connection
123
file index, recovering corrupted data
234
FCHLCK
274
file key, defined
422
FCHTRX
274
file maintenance function, defined
422
features, special printing
116
file names, copying program/data
197
FFCHSF
316
file pathnames, changing existing data 203
field details by record type, ACH
452
file protection, defined
field number, defined
422
file recovery utilities
field, defined
422
chapter topics
231
fifth tab - email setup
119
defined
422
introduction to
232
file
422
cross–reference
159
ISAM
238
recovering from a damaged path
202
using
234
restoring from an export
241
file restore, navigator distribution
file corruption, data
233
file usage
file descriptions, OEINIT data
294
file design, form
137
file error
map, defined
245
422
file utilities
extended
256
254
– 30.
329
relative
– 34
330
file, defined
– 35
330
files
– 41
330
backing up data
226
– 98
331
check reconciliation data
278
– xx
329
exporting
239
file error 30
329
rebuilding
246
file error 41 on COMPFI
336
recovering corrupted data
235
File error 94,10 on XXXXX file
395
to maintain
243
10
422, 437
to restore regulary
243
using top–level program and data
192
account number maximum
91
files to include in backup
227
account number minimum
91
files to new structure, changing
169
examples in this manual
93
files,data
3
format
format, defined
423
finance charge, defined
422
forms and laser printers, special
126
finance, defined
422
forms for a new company
187
financial statement, defined
423
forms list, Windows printer
132
firewall software and PBS
59
forms, aligning
140
fiscal year, defined
423
fourth - printers, tab
101
fiscal, defined
423
fourth tab - printers
101
fixed assets, defined
423
frequency, of backups
227
fixed–fee job, defined
423
FSPASS
283
FIXTRX
316
FSSPEC
282
floppy disk, defined
423
full backup defined
228
FMTLCK
274
FULL_GRAPHICAL
393
font control PCL codes
function keys
defined
149
HP laserjet plus
146
function, defined
sequence
143
functions not reached from menu
FONTS
defined
424
424
3
37
functions, reformatting account number 159
form design
138
G
form feed, defined
423
garnish, defined
424
form file design
137
GDSSVC
272
form files, windows printer and
138
general contractor, defined
424
form types, special
127
general installation information, PBS
general journal, defined
11
9
424
General Ledger account number,
defined
425
general ledger files, initialize
280
General Ledger, defined
424
GENLCK
269
GLBSNI
283
GLCODS
281
GLCTLF
281
GLIBC, defined
425
GLNOTF
281
GLOBJ
38
GLRCUR
282
GNJLCK
282
GNJNOTF
282
GNJTRX
282
Graphical User Interface, defined
425
gross margin, defined
425
GRPFIL
281
H
hard disk, defined
425
hardware
defined
425
HDRTRX
299
header, defined
425
help
maintenance in PBS
Help maintenance
323
321
12
help maintenance
323
HELPGUI
265
hexadecimal, defined
425
high speed printer, defined
426
history backup, navigation distribution 259
HLDFIL
293
home position, defined
426
HTML, defined
426
I
I/O, defined
428
ICCODS
286
ICCTLF
286
ICDICT
264
ICDIST
286
ICNOTF
286
ICOBJ
38
ICPHXF
287
ICREFM
289
ICTKXF
287
ICTRKF
287
IHSAUX
276
IHSHDR
276
IHSLIN
276
IHSSER
276
ILBFMT
287
ILBLCK
287
IMAGES
37
IMILCK
295
immediate origin options, use of fields 458
for
income statement, see profit and loss
statement
426
income, defined
426
increase number of user, steps to
15
order entry files
294
payroll files
302
point of sale files
308
purchase order files
297
sales analysis files
312
system files
262
increment, defined
426
initialize, defined
incremental backup defined
228
initialzation
indebtedness, defined
426
index, defined
426
initialze time and billing files
314
index, recovering corrupted data file
234
input, defined
427
indexed file, defined
427
install company
182
introduction to
427
261
installation
information
company
78
add-on module
20
first tab, company
80
add-on users
21
introduction to company
79
defined
PBS general installation
9
PBS
427
9
ini files, pdf
136
PBS on UNIX/Linux
24
INI, defined
427
PBS on Windows
15
PBS startup
45
initialize
accounts payable files
266
PBS thin client startup
50
accounts receivable files
270
standard PBS structure
36
check reconciliation files
278
thin client on Windows 2000/2003
28
general ledger files
280
thin client UNIX/Linux server
33
inventory control files
285
Installing Passport Business Solutions
job cost files
290
integrity, defined
427
intensity, defined
427
13
15
interest, defined
427
INVLCK
interface, defined
427
invoice is incomplete.
334
invoice, defined
428
INVTRX
286
ISAM file recovery utilities
238
item, defined
428
to conversion of A/R ship-to's to POS 447
ITMCMP
313
to data file initialization
261
ITMFIL
286
to defining multiple companies
176
ITMNUF
289
to email configuration
462
ITXHIS
288
to file recovery
232
IVCFMT
274
to pathfinder
190
IVCSTA
272
introduction
Lookup design
to backup
to company information
to PBS administration
to PBS menu and program names
207, 322
227
79
1
286, 295
J
340
JCCTLF
291
61
JCDIST
292
to reformatting account numbers
159
JCOBJ
38
to the COBOL configuration file
392
job and page control PCL codes
to PBS users
workstation installation
44
Introduction to
PBS menus
73
introduction to
143, 145
job control PCL codes
description of
148
HP laserjet plus
145
job cost file and description table
291
451
job cost files, initialize
290
INVACT
286
journal, defined
428
invalid account numbers, creating
172
inventory control files, initialize
285
key, defined
428
inventory quantities, recalculating
251
KHISFIL
304
inventory, defined
428
kilobyte, defined
428
ACH file specifications
14
K
KITFIL
286
KITLCK
287
KSHHST
272
KUSLCK
289
L
link
defined
429
links
account reformatting and account
160
LINTRX
299
labelling backup media
229
Linux and UNIX printers, setting up
150
labor burden, defined
428
linux and UNIX spooling
109
laser control codes
116
lists
laser printers, special forms and
126
LASPRM
263
literal, defined
429
LAYCOL
283
LNNOTF
299
LAYFIL
287
Local computer, defined
429
LAYOUT
282
local printer name
430
local printer technical notes for UNIX
and Linux
152
local printers
110
local printing, defined
430
locator debug, printer
118
lock file, defined
430
locking capability, defined
430
LODSTA
287
logs, backup
229
layout
defined
428
layouts
account reformatting
161
LBLFMT
264
LBLLCK
264
ledger, defined
429
left justified, defined
429
legend, defined
429
liabilities, defined
429
line feed, defined
429
lines display as strange characters
336
LINITM
295
LINK
37
15
printing account number
167
Lookup
deleting a
220
design
206
maintenance in PBS
209
saving a
219
Lookup access maintenance
404
manual, format examples in this
lookup access maintenance, getting to
403
191
Lookup access sequence
221
manually adding companies in pathfinder
Lookup maintenance
209
master file, defined
430
master menu, defined
430
MATFIL
317
introduction
207, 322
Lookups
custom formats, user IDs and PBS pro-221
grams
93
maximum
daily changes exceeded for use
primary and associated files
222
program names
340
maximum field security
LPN
430
MB, defined
430
LWYCMT
311
MCSFIL
306
LWYHDR
311
media
LWYLIN
311
choosing backup
228
LWYPAY
311
defined
431
LWYTRK
311
labelling backup
229
megabyte, defined
431
M
format, account number
332
91
83
MAGFMT
305
Memory access violation in AcuStart
332
MAGGNA
305
memory, defined
431
MAGLCK
305
MEMSPC
283
main menu, defined
430
menu and program names, PBS
339
maintain, defined
430
menu navigation
maintain, files to
243
menu selections
MANDIS
304
MANLCK
304
menu, defined
431
MANTRX
304
menu/program list
341
manual multiple company setup
184
16
defining
74
201
menus
multiple companies
creating custom
76
manually adding in pathfinder
204
enabling or disabling
74
using pathfinder for
190
following updates or upgrades
77
menus, PBS
merchandise, defined
MFOBJ
74
431
38
minimum
file size, defined
format, account number
multi–user, defined
431
91
432
N
NADIST
264
names
changing existing data file path
203
copying program/data file
197
verifying path
199
Missing data from reports when entering 338
specific date ranges
naming spooled printing devices for
Linux and UNIX
150
MJRFIL
307
navigation distribution history backup
259
MLTCMP
264
navigator distribution file restore
245
MLTLCK
283
net worth, defined
432
MLTRXD
283
net, defined
432
MLTRXH
283
new account numbers, defining
162
new company, forms for a
187
new structure, changing files to
169
mode
defined
module add-on, installation
module, defined
module, steps to addon a
431
20
431
15
MS-DOS
Next Cost Category In Use At Another 332
Station – Try Again
next transaction in use at another terminal – try again
332
no *** in range
332
defined
431
no *** on file
332
MSTFIL
291
normal screen, compression
147
MSTFIX
292
NORMALIZE_FLG
393
Not
333
multi–company consolidation, defined 431
17
not enough memory, program not found
for
***
OENOTF
OEOBJ
333
not enough memory, program not
found...
333
Not processed
333
notes
local printer technical - UNIX and
Linux
295
152
38
OERHDR
295
OETKXF
295
one–character code, defined
432
on–line, defined
432
operating system, defined
432
operating systems supported
10
433
NSFAPL
273
operational data files, defined
NSFCHG
273
opportunistic locking
NSFLCK
269, 273
NSFTRX
21
order entry files, initialize
294
273
ORDHDR
295
number lists, printing account
167
ORFRMF
295
number uses, reformatting account
159
other printer types
113
output, defined
433
numbers
creating invalid account
172
overview, software installation
defining new account
162
OVRRID
309
degenerate account
173
owner, defined
433
introduction to reformatting account
159
owner’s equity, defined
433
varies by employee account
173
P
numeric, defined
432
O
P.O.
package/screen controls, second tab
2
436
88
object program, defined
432
page control PCL codes, job and
145
OECTLF
294
page, printable area on a
126
OEFPAR
295
parentheses control code, defined
433
OEINIT
data file descriptions
Passport Business Solutions, installing
294
18
15
password
Lookup window maintenance in
209
defined
433
start menu uninstall
50
protection for
433
thin client startup installation
50
password, user
66
workstation installation
43
patch, defined
433
PBS data files
path file, recovering from a damaged
202
PBS menu and program names
path names, changing existing data file 203
pathfinder
3
339
introduction to
340
PBS menus
72
37
for multiple companies, using
190
PBS_Files directory
for single companies, using
190
PC, defined
434
introduction to
190
PCHLCK
299
manually adding companies in
191
PCL
435
PCL codes
142
using
with multiple companies, using
189, 193
204
pathnames
job and page control
143, 145
printer
and data files
197
and programs
193
and special forms
144
assigning
194
entering
146
changing
203
PCOFIL
269
verifying
199
PDF (Acrobat) files, using Windows
printer to create
138
pdf ini files
136
PDF, company information setup
103
payable, defined
433
payment, defined
433
payroll files, initialize
302
payroll, defined
434
PBS
firewall software
59
installation on UNIX/Linux
24
19
PCL commands
147
PDFFIL
142
37
PDFLOG
264
PDFMST
264
PDFs, stacking
464
PDFTXT
37
POSPAY
310
percent of profit, defined
434
POSSUM
310
percent of sales, defined
434
POSSVC
310
period–to–date, defined
434
post installation, windows
peripheral, defined
434
posting out of balance
333
perquisite, defined
434
posting, defined
434
PFCTFI
263
POTFIL
310
PIAUXF
275
PPCTRX
277
PIHDRF
274
PRACH
37
PIILCK
275
PRCADJ
300
PILINF
275
PRCFIL
287
POCTLF
298
PRCLCK
300
PODIST
298
PRCTLF
303
POFRMF
300
PRDFIL
281
POHDRF
298
PRDIST
304
point of sale files, initialize
308
PREFIL
300
point of sale, defined
434
PRELCK
299
POLINF
298
prerequisite, defined
435
POMSGS
300
PRFRMF
307
PONOTF
300
print reports from disk, defined
435
38
print to a USB printer problem
337
print to disk, defined
435
print, defined
435
printable area on a page
126
POOBJ
POS, introduction to conversion of A/R 447
ship-to's to
POSCMT
309
POSHDR
309
POSLCK
309
POSLIN
310
20
20
printer
reset codes
114
reset codes described
148
reset PCL codes
143
printer alignment. company information 140
printer control language
435
printer location, PSI
105
printer locator
105
printer locator debug
118
Printer names not displaying properly
338
printer not available...
333
printer PCL codes
147
printer share name, defined
435
printer technical notes, local
152
printer tray, selecting a
128
printer types, other
113
printer, defined
435
printers
direct
110
local
110
more on
125
printers, fourth tab
101
printers, Thin client UNIX/Linux
150
printing
account number lists
167
defined companies
186
features, special
116
in a Linux and UNIX environment
150
UNIX or Linux
104
printing device, naming a spooled
150
21
printing to a dot matrix printer does no 336
allow an alignment
printing, spooled in Linux and UNIX
150
PRNOTF
303
PROBJ
38
procedure error...
334
procedures, backup
230
process, defined
435
processor, defined
435
PROCOA
283
profit and loss statement, defined
436
profit recognized, defined
436
profit, defined
435
program and data files, using top–level 192
Program missing or not in path file.
333
program/data file names, copying
197
prompt, defined
436
prorate, defined
436
PRTLCK
276
PSCODS
310
PSCTLF
309
PSI printer locator
105
PSIB00
38
PSIBOBJ
38
PSLOG
38
PSOBJ
38
PSSHIP
310
PSTKFX
311
PSTPAY
310
PTBFMT
275
ptxx directories
38
PURADR
267
Purchase Order (P.O.) , defined
436
purchase order files, initialize
297
purchase, defined
436
purge, defined
436
Q
QIKWRK
289
QTDHIS
304
quantities, recalculating inventory
251
queue, defined
436
quotation, defined
437
R
RAUXFI
276
RCSTXF
300
RCVHIS
300
RCVLCK
300
RCVTRX
300
reboot, defined
437
rebuild comparison, export/restore &
247
rebuild item keywords
252
rebuild serial keywords
rebuilding XReference file . . . Please
wait
166
recalculating
history quantities
252
inventory quantities
251
receivable, defined
437
reclaiming disk space
introduction to
236
steps in
237
recognized profit, defined
437
re–configure, defined
437
record lock, defined
437
record, defined
437
records, extracting all
248
recovering
data file index
234
data files
235
from a damaged path file
202
recovery utilities
introduction to file
232
ISAM file
238
using file
234
reenter distributions for new trans
amount
334
337
252
reference modifier range error in
SCREEN2
rebuild, illustration of
247
Reference Modifier Range Error...
336
rebuilding files
246
22
reformatting
and account links, account
160
and company consolidation, account 161
layouts, account
161
steps to
160
reformatting account numbers
chapter contents
158
introduction to
159
uses of
159
REGIFI
310
register, defined
437
registry update for Windows
57
reimbursement, defined
438
re–initialize, defined
437
relationship, export and restore
242
relative file
defined
438
utilities for
254
release, defined
444
RELLCK
300
RELTRX
300
remote printing, defined
438
removal, company
REPTNO
requirements, system
35
263
12
reset codes, printer
114
reset PCL codes, printer
143
23
reset, job control, and font control
screen PCL codes
148
restore program, defined
438
restore utility
effect on disk space
242
relationship, export and
242
summary of
242
restore, defined
438
restore, navigator distribution file
245
restoring an export file
241
retainage, defined
438
retained earnings, defined
438
RETFIL
317
revenue, defined
438
RHDRFI
275
right justified, defined
438
RLINFI
276
rotation, backup
229
rounding, defined
438
routine, defined
438
RPTLCK
305
RPTMFT
305
RSNFIL
264
rules, account number syntax
93
run, defined
439
running balance, defined
439
runtime, defined
439
RW00
38
segments, account number
RW32 upgrade
40
select, defined
RW2000 to PBS
40
selection
RW2000 upgrades
40
RWMENU
38
separator characters, valid
RWOBJ
38
sequential file, defined
439
RWPRT
37-38
SERHIS
289
RWWRK
38
S
defining menu
92
439
201
96
setting up automated multiple company 176
setting up Linux or Unix printers
150
SACTLC
313
setup checklist, company
205
SACTLR
313
SFMLCK
275
SAFLOF
283
shipping, defined
440
salary, defined
439
447
sale, defined
439
ship-to's to POS, introduction to conversion of A/R
sales analysis files, initialize
312
Sales Journal, defined
439
sales tax, defined
439
SAOBJ
38
SARPTP
313
saving a Lookup
219
SCDHIS
305
screen controls /package, second tab
88
screen, PCL codes for compression / nor-147
mal
scrolling, defined
shortcut modifications
administrative
55
SHPFIL
272
SHSCMT
310
SHSHDR
310
SHSLIN
310
SHSPAY
310
SHSSER
311
simple mail transfer protocol
440
single companies, using pathfinder for 190
439
SKEYWF
289
second tab, package/screen controls
88
SLDTRX
273
security, maximum field
83
SLMFIL
271
24
SLSLCK
273
spooler, defined
440
SLSTRX
273
SPOOLF
264
SMTP
440
spooling
software
defined
software installation overview
440
2
Someone is currently working with
?????? Can’t post now
334
source code, defined
440
source cross reference report, defined
440
source program, defined
440
space
reclaiming disk
236
restore effect on disk
242
SPCSAL
310
special form types
127
special forms
and spooler
special forms and laser printers
150
126
special forms. PCL commands
and
144
special printing features
116
specifying packages for company
178
spooled printing device for Linux and
UNIX, naming a
150
spooled printing, in UNIX or Linux
150
Spooler sub system app has encountered 336
a problem
25
linux and UNIX
109
windows
109
spooling, defined
440
stacking PDFs
464
STAFIL
287
STAFIl
289
standard journal, defined
441
start menu modification
53
start service, UNIX/Linux thin client
34
starting file key, defined
startup installation for PBS
441
45
statement, defined
441
STDAUX
276
STDBIL
276
steps, reclaiming disk space
237
steps, reformatting
160
STFFIL
317
STJLCK
282
STJTRX
282
STKFIL
264
stock, defined
441
stop service, UNIX/Linux thin client
34
storage, defined
441
STORFI
311
string, defined
441
table, job cost files and descriptions
291
structure, changing files to new
169
TAXCOD
303
taxes, defined
442
sub–accounts
defined
441
TBAUXF
318
SUBCAT
288
TBCTLF
317
sub–menu, defined
442
TBHDRF
317
TBINVC
316
summary
export utility
240
TBLINF
317
restore utility
242
TBOBJ
38
support
TBRPTB
317
442
TBVOID
318
supporting schedule, defined
442
T-C
442
SVCFIL
317
TCNOTF
316
defined
syntax rules, account number
SYSAdmin
93
442
system
defined
442
system administrator
442
system files, initialize
262
System reporting that dates are out of
range when they look ok
338
system requirements
442
terminal, defined
442
terms, defined
443
text
defined
443
defined
443
27
PBS startup installation
50
recommended platforms
11
119
service start on a Windows server
33
394
supported server operating systems
27
tab
Tab key usage
443
installation and configuration
T
company information fifth
terminal emulation software, defined
thin client
12
systems software, defined
technical notes, local printer for UNIX 152
and Linux
26
UNIX/Linux Server installation
33
transaction, defined
443
UNIX/Linux service start
34
tray, selecting a printer
128
UNIX/Linux service stop
34
trial balance, defined
443
Windows 2000/2003 installation
28
TRXDIS
268
150
TRXFIL
282
91
TRXLCK
282
334
TRXMEM
269
TXOPEN
276
TXTFIL
283
Thin client UNIX/Linux printers
third tab, account setup
this order is currently being added
this selection is not allowed for your sys-334
tem
this selection not allowed with inactive 335
files
types
throughput, defined
443
of backup
228
TIMDIS
304
other printers
113
time and billing files, initialze
314
TIMLCK
304
TIMTRX
304
unable to purge change log
335
TMNOTF
317
UNC, defined
443
TMPITM
289
Uninstall PBS start menu
too long, enter in format ***
335
uninstall shield already running
336
too many duplicates – cannot proceed
335
uninvoiced receivings, defined
444
top–level directory, files in
192
UNITFI
288
top–level program and data files, using 192
universal naming convention, defined
444
total percentage can’t be more than
100%
335
UNIX
TPRCTL
276
transaction file, defined
443
transaction must be entered through
other Passport module
329
types, special forms
127
U
and Linux printing
150
defined
444
UNIX and Linux
environment, printing in a
UNIX spooling, linux and
27
50
150
109
UNIX/Linux PBS installation
UNIX/Linux printers, Thin client
24
150
upgrade
from earlier DOS/Network products
for single companies
190
using top–level program and data files 192
using Windows printer
40
to create PDF files
138
from earlier Windows 32-Bit products 40
USRHLPGUI
265
to PBS
40
UTILFL
263
to PBS from Classic Version 8
40
utilities
to PBS from Classic Version 9
40
defined
444
to PBS from RW32 V10
40
extended file
256
to PBS from RW2000
40
file recovery
231
ISAM file recovery
238
relative file
254
using file recovery
234
upgrading
account numbers from earlier versions 93
USB, defined
444
use batch controls, company information 82
utility (close or re–open jobs)
335
use of fields for immediate origin
options
458
utility summary, export
240
utility summary, restore
242
USE_SCN
393
USE_TAB_AS_ESC
394
user types
61
USERFI
311
users, entering
63
users, steps to increase the number of
15
using
file recovery utilities
234
using pathfinder
193
chapter topics
189
for multiple companies
190
28
V
valid separator characters
96
value, defined
444
variable journal entry, defined
444
variance, defined
444
varying by employee account numbers 173
VDMTRX
305
VDMWRK
305
VDPCHK
305
vendor, defined
444
VENFIL
267
VENHIS
268
VENITM
298
VENKEY
300
verifying pathnames
199
version, defined
444
versions, upgrades from earlier
93
view, defined
444
virtual private network
445
VOICCK
268
VPN, defined
445
W
W–2 Form, defined
445
warning
distributions are out of balance
335
this transaction already on file – enter 335
anyway ?
warnings in reformatting accounting
numbers
WHSFIL
172
287, 298
WIN32_3D to "1"
393
window in PBS, help maintenance
323
window in PBS, Lookup maintenance 209
Windows font print controls
Windows printer, company information 126
vs.
Windows registry update
windows spooling
109
Windows-only print
101
WIPACT
319
WIPAUX
319
WIPFIL
319
WIPHAF
320
WIPHIS
320
WKOCST
287
WKOFIL
287
WKOHDR
288
WKOLCK
288
WKOLIN
288
word processor, defined
445
work file is full
336
work file, defined
445
working capital, defined
445
workstation installation
43
workstation, defined
429
WUSLCK
289
154
Windows printer
to create PDF files, using
138
Windows printer alignment
140
windows printer and form files
138
29
57
X
XREFIL
265
XREFIL file
159
Y
year 2000 cutoff, company information
82
You have exceeded the licensed number 332
of users for ACUCOBOL-GT.....
YTDHIS
304
30