1
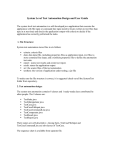
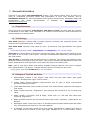
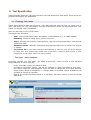
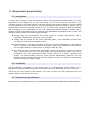
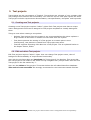
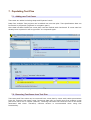
User Manual TestLink version 1.7 © 2004 - 2007 TestLink Community Permission is granted to copy, distribute and/or modify this document under the terms of the GNU Free Documentation License, Version 1.2 published by the Free Software Foundation; with no Invariant Sections, no Front-Cover Texts, and no Back-Cover Texts. The license is available in "GNU Free Documentation License" homepage. Table of Contents 1.1. Overall structure...................................................................................................................... 4 1.2. Terminology.............................................................................................................................4 1.3. Example of TestLink work flow.............................................................................................. 4 2.1. Creating Test Cases................................................................................................................. 6 Test Case - Active Attribute.......................................................................................................6 2.2. Removing Test Cases...............................................................................................................7 2.3. Requirements relation.............................................................................................................. 7 3.1. Using keywords....................................................................................................................... 8 3.2. Keyword Creation....................................................................................................................8 3.3. Assigning Keywords................................................................................................................8 3.4. Filter by Keyword.................................................................................................................... 8 4.1. Introduction..............................................................................................................................9 4.2. Availability.............................................................................................................................. 9 4.3. Requirements Specification..................................................................................................... 9 4.4. Requirements......................................................................................................................... 10 4.4.1. Import requirements....................................................................................................... 10 4.4.2. Requirements to Test Case relation............................................................................... 10 4.4.3. Requirement based Report............................................................................................. 11 5.1. Creating new Test projects.................................................................................................... 12 5.2. Edit and delete Test projects.................................................................................................. 12 6.1. Creating a new Test Plan....................................................................................................... 13 6.2. Builds..................................................................................................................................... 13 6.3. Deleting TestPlans................................................................................................................. 13 7.1. Adding new Test Cases..........................................................................................................14 7.2. Removing Test Cases from Test Plan....................................................................................14 7.3. Priority................................................................................................................................... 15 7.4. Test execution assignment..................................................................................................... 15 8.1. General...................................................................................................................................16 8.2. Navigation..............................................................................................................................16 8.2.1. Filtering Test Cases........................................................................................................16 8.2.2. Define a tested build...................................................................................................... 16 8.2.3. Tree menu...................................................................................................................... 16 8.3. Execution............................................................................................................................... 17 8.3.1. Test Status...................................................................................................................... 17 8.3.2. Insert Test results........................................................................................................... 17 10.1. Metrics of Active Build....................................................................................................... 20 10.2. General Test Plan Metrics....................................................................................................20 10.3. The Overall Build Status......................................................................................................21 10.4. Query Metrics...................................................................................................................... 22 10.5. Blocked, Failed, and Not Run Test Case Reports...............................................................22 10.6. Test Report...........................................................................................................................23 10.7. Charts................................................................................................................................... 23 10.8. Total Bugs For Each Test Case............................................................................................23 11.1. Account settings...................................................................................................................24 11.2. Role Permissions..................................................................................................................24 11.2.1. User Roles.................................................................................................................... 24 11.2.2. Rights Definitions........................................................................................................ 25 11.3. 12.1. 12.2. 12.3. 12.4. 12.5. 12.6. Test Plan Assignment.......................................................................................................... 26 Import/Export Keywords..................................................................................................... 27 Export/Import Test Project.................................................................................................. 28 Import/Export Test suite...................................................................................................... 29 Just one test case.................................................................................................................. 30 All test cases in test suite..................................................................................................... 31 Import/Export Software Requirements................................................................................ 31 1. General information TestLink is web based Test Management system. This manual should serve as source for users to understand processes, terms and organization of work with TestLink. See to Installation manual for more information about system requirements, installation steps and configuration. The latest documentation is available on www.teamst.org or testlink.sourceforge.net. 1.1. Overall structure There are three cornerstones: Test Project, Test Plan and User. All other data are relations or attributes for this base. First, definition of a couple of terms that are used throughout the documentation and testing world. 1.2. Terminology Test Case describes a testing task via steps (actions, scenario) and expected results. Test cases are the fundamental piece of TestLink. Test Case Suite organizes Test cases to units. It structures Test Specification into logical parts. Test Case Suite were called components and categories in TL 1.6 and earlier. Test Plan are created when you'd like to execute test cases. Test plans can be made up of the test cases of one or many Test projects. Test Plan includes Builds, Milestones, test assignment and Test results. Test Project is something that will exist forever in TestLink. Test project will undergo many different versions throughout their life times. Test project includes Test Specification with Test Cases, Requirements and Keywords. Users within the project has defined role. User: each TL user has a Roles, that defines available TestLink features. See more in chapter User Administration. The picture 1 shows common activity according to user roles. Test project was called Product in TL 1.6 and earlier. 1.3. Example of TestLink work flow 1. Administrator creates a Test Project “Fast Food” and two users Adam with rights “Leader” and Bela with rights “Senior tester”. 2. Leader Adam imports Software Requirements and for part of these requirements generates empty Test cases. 3. Tester Bela describes a test scenario of these Test cases that are organized according to Test Suites. 4. Adam creates Keyword: “Regression” and assignes this keyword to ten of these test cases. 5. Adam creates a Test Plan “Fish & Chips”, Build “Fish 0.1” and add Test Cases with keywords “Regression”. 6. Adam and Bela execute and record the testing with result: 5 passed, 1 failed and 4 are blocked. 7. Developers make a new build “Fish 0.2” and Bela tests the failed and blocked test cases only. Exceptionaly all these five Test cases passed. 8. A manager of this team would like to see results. Administrator explains him that he can create account himself on the login page. Manager do it. He has default “Guest” rights and could see results and Test cases. He can see that everything passed in overal report ;-) and problems in build “Fish 0.1” in a report for particular Build. But he can change nothing. Illustration 1: Functionality overview 2. Test Specification TestLink breaks down the test case structure into Test Suites and Test cases. These levels are persisted throughout the application. 2.1. Creating Test Cases Tester must follow at least this structure: Test Suite and test case. At first you create one or more Test Suites for your Test project. You can fill description which can be printed then. Test Suites can include other Test Suites. User can also copy or move Test Cases. Test Cases has next parts: • Title: could include either short description or abbreviation (e.g. TL-USER-LOGIN) • Summary: should be really short; just for overview. • Steps: describe test scenario (input actions); can also include precondition and cleanup information here. • Expected results: describe checkpoints and expected behaviour a tested Test project or system. • The numeric ID of a test case is assigned automatically by Test Link, and can not be changed by users. This ID is system wide, means when a test case is created a global counter is used, independent of test project where test case is created. Test Case - Active Attribute If several versions of a Test Case Active/Inactive, to use in this way: • • • can exist, it would be useful to have a new attribute Every Test Case version is created ACTIVE An Inactive Test Case Version will not be available in "Add Test Cases to Test Plan", this can be useful for Test Designers. They can edit or change the TC Version and only when he/she decide is completed => change Status to ACTIVE, will be available to be included an used in a Test Plan. Once a TC Version has been linked to a Test Plan, and have results, it can't be turned INACTIVE. Illustration 2: What you see in test case specification Illustration 3: What you see when trying to add test cases to a test plan As you can note, the number near test project name (in this example: toaster_xl5) is 2, but the test project has 3 test cases. Test case TC1 is not counted, because is inactive. 2.2. Removing Test Cases Test cases and Test Suites may be removed from a Test Plant by users with lead permissions. This operation may be useful when first creating a test plan since there are no results. However, removing test cases will cause the loss of all results associated with them. Therefore, extreme caution is recommended when using this functionality. 2.3. Requirements relation Test cases could be related with software/system requirements as n to n. The functionality must be enabled for a Test project. User can assign Test Cases and Requirements via link Assign Requirements in the main screen. 3. Keywords 3.1. Using keywords Keywords were created to give users another level of depth when categorizing test cases. Keywords serve as a collection of Test cases with some attribute within a Test specification. You can use it to define e.g. • Regression or Sanity set • Reviewed Test cases • Set of test cases valid for one platform 3.2. Keyword Creation At this time keywords can only be created by users with the mgt_modify_key rights. These rights are currently held only by Leaders. Once a keyword or grouping of keywords have been created users may assign them to test cases. 3.3. Assigning Keywords Keywords may be assigned to test cases either from the assign keyword screen (in batch) or via the test case management (individually). 3.4. Filter by Keyword Users have the ability to filter by Keywords for: Search Test Cases in Test Specification. Add groups of Test cases in a Test case Suite (Test plan). Execute test screen. 4. Requirement based testing 4.1. Introduction To prove that a system is built as specified, testers use requirement based testing. For every requirement, they design one or more test cases. At the end of the test execution a test manager reports on the tests that are executed and the requirements that are covered. Based on this information the client and the various stakeholders decide whether a system can be transferred to the next test phase or can go live. To ensure that a system is built as specified, test managers use a combination of risk and requiremetn-based testing to ensure that a system is build as specified from the customer and stakeholders perspective. As a result, this complete testing delivers the following advantages: Linking risks and requirements will reveal vague or missing requirements. This is especially interesting for risks with a high priority. Testing can be focused on the most important parts of an information system first: covering the risks with the highest priority. Communicating in the same language as the client and the stakeholders. This makes it easier to report on the status of the test project. Beside that a better founded decision can be made whether to invest more in testing or take the risk. The risks and their priority make negotiating on the test project in times of pressure easier. What risks have to be covered within this test project and which ones can be postponed. Risk and requirement-based testing results in a better controlled test project. The communication with the client and the stakeholders improved. The test manager begins testing with risks with the highest priority. The process is streamlined and the end result is higher quality. 4.2. Availability The functionality is available on Test project level. I.e. Administrator should enable it for a specified Test project (Edit Test project link in Main window). Otherwise links are not shown. There are two user levels for this feature. The most of roles can view requirement but not modify. Refer to User section for more. 4.3. Requirements Specification Requirements are grouped to one or more System/Software/User Requirement Specifications. Illustration 4: Dependencies between requirement related objects Create a document with Requirements: 1. Click Requirements Specification in Main window. The List of Requirement Specification window is shown. 2. Press Create button to create a document. 3. Adjust Title, Scope and eventually Count of Test cases. The last parameter is used for statistics. Use only if you have a valid Requirement document but not all requirements are available at the moment in TestLink. Default value 'n/a' means that the current count of requirements in a specification is used. 4. Press Create button to add data to database. You can see the title of your new created document in the table of List of Requirement Specification window. 5. Click the title of document for next work. The Requirement Specification window is shown. Each Requirement Specification has own statistics and report related to included data. All Specifications can be printed using the "Print" button in the "Requirement Specifcation" window. Administrator can define company, copyright and confident text via configuration files. 4.4. Requirements Each requirement has Title, Scope (html format) and Status. Title must not be unique and has max. 100 characters. Scope paramter is text in HTML format. Status can have vale VALID or NOT_TESTABLE. A NOT_TESTABLE requirements are not counted to metrics. Requirements could be created/modified or deleted manually via TestLink interface or imported as CSV file. 4.4.1. Import requirements TestLink support two types of CSV. The first 'simple' is composed from title and scope in each row. The second 'Export from Doors' try to detect header and chooses correct fields. Import compare titles and allow to solve conflicts. There are three ways: update, create requirements with same title and skip adding the conflicted ones). 4.4.2. Requirements to Test Case relation Test cases are related with software/system requirements as * to *. I.e. you can assign more Test cases to one Requirement and more requirements could be covered by one Test Case. User can assign Requirements to Test Cases via the Assign Requirements link in the Main window. A coverage of Test Specification could be view via pressing the button Analyse in the Requirement Specification window. 4.4.3. Requirement based Report Navigate to Reports and Metrics menu. There is Requirements based Report link. Requirements in currect Requirement Specification and Test Plan are analysed for this report. All the latest result of test cases (available in Test Plan) are proceeded for each requirement. The result with the highest priority is applied for the requirement. Priority from the highest are: Failed, Blocked, Not Run and Passed. Example of requirement coverage A requirement is covered by three Test Cases. Two of them are included in the current Test Suite. One passed and one was not tested for the Build 1. Now Requirement has overall result: Not Run. Second test case was tested with Build 2 and passed. So Requirement passed too. 5. Test projects Test projects are the cornerstone of TestLink. Test projects are releases of your company that may change their features and functionality over time but for the most part remain the same. Test project includes requirements documentation, test specification, test plans1 and keywords. 5.1. Creating new Test projects Creating a new Test project requires "admin" rights. Each Test project must have a unique name. Background colors can be assigned to Test project templates to visually distinguish them. Things to note when creating a new poduct: • Deleting Test projects from the system is not recommended as this either orphans a large number of test cases or deletes the test cases from the system. • Test plans represent the testing of a Test project at a certain point in time. Consequently, test plans are created from Test project test cases. • TestLink supports importing CSV data into a Test project. This is explained further in the Import section, below. 5.2. Edit and delete Test projects Edit Test projects requires "admin" rights. User can change Test project name, color of background and availability of requirements functionality. User with the privileges also can inactivate the Test project if it's obsolete. This cause that the Test project is not visible in list within the top navigation bar (except admin who see such Test project in the list marked by '*'. User can also delete a Test project. This action delete also all related data from database. This action is not reversible. We strongly recommend to use inactivate instead of delete. 1 Older version TL have independent Test projects and Test Plans. This is configurable for back compatibility. 6. Test Plans Test plans are the basis for test case execution. Test plan contains name, description, collection a chosen test cases, builds, test results, milestones, tester assignment and priority definition. 6.1. Creating a new Test Plan Test Plans may be created from the “Create test plan” page (link “Create Test Plan”) by users with lead privileges. Test plans are made up of test cases imported from Test Specification at a specific point of time. Test plans can be created by users with lead privileges. Test plans may be created from other test plans. This allows users to create test plans from test cases that at a desired point in time. This may be necessary when creating a test plan for a patch. In order for a user to see a test plan they must have the proper rights. Rights may be assigned (by leads) in the define User/Project Rights section. This is an important thing to remember when users tell you they can't see the project they are working on. 6.2. Builds An user with lead privileges could follow the link “Build management” in the main page. Builds are a specific release of software. Each project in a company is most likely made up of many different builds. In TestLink execution is made up of both builds and test cases. If there are no builds created for a project the execution screen will not allow you to execute. The metrics screen will also be completely blank. Each build is identified via title. It includes description (html format) and two states: • Active / Inactive – defines whether the build is available for TestLink functionality. Inactive build is not listed in both execution and reports pages. • Opened / Closed – defines if Test Results can be modified for the build. Builds can be edited (via link under a build title) and deleted (by click on the appropriate “bin” icon) in the table of existing builds. 6.3. Deleting Test Plans Test Plans may be deleted by users with lead privileges. Deleting Test Plans permanently deletes both the test plan and all of its corresponding data, including test cases (not in Test Specification), results, etc. This should be reserved only for special cases. Alternatively, Test Plans may be deactivated on the same page, which supresses display on selection menus in the “main” page. 7. Populating Test Plan 7.1. Adding new Test Cases Test cases are added including Steps and Expected result. Data from multiple Test projects can be added into one test plan. Test Specification data can be filtered by keywords (adjusted in navigation pane). Once data has been linked into a test plan it will be marked with checkmark. If a test case has already been imported it will be ignored if it is imported again. Illustration 5: Frame for Adding test cases into Test Plan Illustration 6: Frame for modifying content of test cases within Test Plan 7.2. Removing Test Cases from Test Plan Test cases and Test suites can be removed from a test plan by users with Leader permissions from the "Remove test cases" page. Removing data may be useful when first creating a test plan since there are no results. However, removing test cases will cause the loss of all results associated with them. Therefore, extreme caution is recommended when using this functionality. Tree on left pane, show only the test cases present in test plan. 7.3. Test execution assignment Test execution assignment affects both the execution and metrics screens. In the execution screen users have the ability to sort the executable test cases by the ones they have been assigned. In the main metrics screen there is a table that shows the remaining test cases by tester. If there are no test case tester assigned it defaults to none. A Tester can also see a metrics of own executed tests in main page if these metrics are enabled (see Installation manual). 7.4. Priority TestLink gives users with Leader rights the ability to assign ownership and priority to test cases. General Risk is done at the Test suite level. Risk levels are low, medium, high and Importance levels are 3, 2, 1. Users can rank the combinations of risk and importance (L1, L2, L3, M1, H2, M3, H1, H2, H3) as priority A,B,C. Assigning risk, importance, ownership, and priority are all optional and will default to priority B in the metrics screen. This feature needs update to allow Importance assignment to particular Test cases. 7.5. Milestones Test leader can define percentage of finished tests with respect to defined date. The current solution expected a defined priorities. Illustration 7: Test leader can define one or more milestones for a Test Plan 8. Test Execution 8.1. General Test execution is available when: 1. A Test Specification is written. 2. A Test Plan is created. 3. Test cases are added to Test Plan. 4. A Build is created. 5. The Test plan is assigned to testers (otherwise they cannot navigate to this Test Plan). Select a required Test Plan in main page and navigate to the 'Execute tests' link. Left pane serves for navigation in Test Case Suite via tree menu, filtering and define a tested build. 8.2. Navigation The navigation pane consists from a 'Filter & Settings' box and a tree menu with Test Case Suite. 8.2.1. Filtering Test Cases This table allows the user to filter test cases for smart navigation before they are executed. • Tester: Users can filter test cases by their tester. • Keyword: Users can filter test cases by keyword. Keywords are set either using the Create/Edit/Delete Test Cases or by the Assign Keywords To Multiple Cases. Keywords can only be created, edited, or deleted by leads but may be assigned to test cases by testers. • Result: Users can filter test cases by results. Results are what happened to that test case during a particular build. Test cases can pass, fail, be blocked, or not be run. 8.2.2. Define a tested build Users can filter test cases by builds. Builds are the basic Component for how test cases are tracked. Each test case may be run once and only once per build. Builds can be created by leads using the Create New Build page. 8.2.3. Tree menu The tree menu in navigation pane includes Test Case Suite colored by results. Menu colored: By default the tree will be sorted by the results for the defined build that is chosen from the dropdown box. Example TC colored according to the build User selects build 2 from the dropdown box and doesn't check the "most current" check box. All test cases will be shown with their status from build 2. So, if test case 1 passed in build 2 it will be colored green. Second possibility Last result is that menu is colored according to the latest test result. Example TC colored according to the latest result User selects build 2 from the dropdown box and this time checks the "most current" check box. All test cases will be shown with most current status. So, if test case 1 passed in build 3, even though the user has also selected build 2, it will be colored green. 8.3. Execution 8.3.1. Test Status Execution is the process of assigning a result (pass, fail, blocked) to a test case for a specific build. 'Blocked' test case is not possible to test for some reason (e.g. a problem in configuration disallows to run a tested functionality). 8.3.2. Insert Test results Test Results screen is shown via click on an appropriate Test Suite or Test Case in navigation pane. The title shows the current build and owner. The colored bar indicate status of the test case. Yellow box includes test scenario of the test case. Illustration 8: Frame with several results of one Test Case Illustration 9: User can select to print only the last result Illustration 10: The last result could be printed only The indication that the test case was updated or deleted in test Specification is not supported from 1.5 version. Updated Test Cases: TL 1.0.4 version has indication by flag, that is missing in 1.6 version. If users have the proper rights they can go to the “Update modified test case” page through the link on main page. It is not necessary for users to update test cases if there has been a change (newer version or deleted). 9. Custom Fields Custom field definitions are system wide, i.e., you can not define to custom fields with same field ID. After you have created a Custom Field, you need to assign it to the Test project, were do you want to use it. (this follows Mantis model). Custom field has been implemented using a mix functionality from Mantis (http://www.mantisbt.org/) and dotproject (http://www.dotproject.net/) models. Show / Enable Attributes show on design: Custom field will be displayed during test case specification enable on design: User will be able to assign/change custom field value during test case specification show on execution: Custom field will be displayed during test case execution enable on execution: User will be able to assign/change custom field value during test case execution. Value assigned will be save. Example 1. Custom Field : Additional Notes Type : string applicable to test suites, to be edited ONLY during test case specification, but useful to be seen during test execution. show on design enable on design show on execution enable on execution = = = = YES YES YES NO Example 2. Custom Field : Operation System Type : list applicable to test cases, to be edited ONLY during test case EXECUTION, USELESS during test case DESIGN. show on design enable on design show on execution enable on execution = = = = NO NO YES NO 10. Test Reports and Metrics Test Reports and Metrics are accessed by clicking the “Results” or “Test reports and Metrics” links on the main page. Reports and Metrics are based on the currently selected Test Plan. Currently, there are no reports which compile results across multiple test plans. Be sure you have selected the correct test plan on the main page before viewing the Results page. The page that is displayed to the user includes: The left pane is used for navigating to each report and operating controls which effect how reports behave and are displayed. The right pane will be populated with instructions on how to use the controls and how each report is produced. There are two controls : Active Build The only report which is effected by the “Active Build” is the “Metrics of Active Build” report – a report which displays the current status of the test plan for that specific build. Report format All test reports (except charts) can be displayed in 1 of 3 ways : 1. “normal” - report is displayed in web page 2. MS Excel – report exported to Microsoft Excel 3. HTML Email – report is emailed to user's email address There are currently 10 seperate reports to choose from, their purpose and function are explained below. 10.1. Metrics of Active Build This report shows the detailed results for a particular build defined by the “Active Build” control. It only takes into account executions performed on the selected build. The following tables are displayed: Results by top level Test Suites Lists the results of each top level suite. Total cases, passed, failed, blocked, not run, and percent completed are listed. A “completed” test case is one that has been marked pass, fail, or block. Results for top level suites include all children suites. Results by Test Suite Lists metrics for all suites in test plan, not just top level suites. Results By Keyword Lists all keywords that are assigned to cases in the current test plan, and the results associated with them. 10.2. General Test Plan Metrics This page shows you only the most current status of a test plan by test suite, owner, and keyword. The most “current status” is determined by the most recent build test cases were executed on. For instance, if a test case was executed over multiple builds, only the latest result is taken into account. “Last Test Result” is a concept used in many reports, and is determined as follows : 1) The order in which builds are added to a Test Plan determines which build is most recent. The results from the most recent build will take precendence over older builds. For example, if you mark a test as “fail” in build 1, and mark it as “pass” in build 2, it's latest result will be “pass”. 2) If a test case is executed mulitple times on the same build, the most recent execution will take precedence. For example, if build 3 is released to your team and tester 1 marks it as “pass” at 2PM, and tester 2 marks it as “fail” at 3PM – it will appear as “fail”. 3) Test cases listed as “not run” against a build are not taken into account. For example, if you mark a case as “pass” in build 1, and don't execute it in build 2, it's last result will be considered as “pass”. The following tables are displayed : Results by top level Test Suites Lists the results of each top level suite. Total cases, passed, failed, blocked, not run, and percent completed are listed. A “completed” test case is one that has been marked pass, fail, or block. Results for top level suites include all children suites. Results By Keyword Lists all keywords that are assigned to cases in the current test plan, and the results associated with them. Example : Keyword Total Passed Failed Blocked Not run Completed [%] P3 1128 346 47 55 680 39.72 P2 585 372 25 31 157 73.16 P1 328 257 6 51 14 95.73 Results by owner Lists each owner that has test cases assigned to them in the current test plan. Test cases which are not assigned are tallied under the “unassigned” heading. Example: Tester Dominika Total Passed Failed Blocked Not run Completed [%] 579 217 34 47 281 51.47 Mohammad 246 82 9 2 153 37.80 unassigned 35 19 0 1 15 57.14 Ken 289 110 1 21 157 45.67 Mallik 430 269 5 18 138 67.91 Ali 227 123 28 13 63 72.25 Mike 24 22 0 0 2 91.67 Alex 272 155 1 36 80 70.59 10.3. The Overall Build Status Lists the execution results for every build. For each build, the total test cases, total pass, % pass, total fail, % fail, blocked, % blocked, not run, %not run. If a test case has been executed twice on the same build, the most recent execution will be taken into account. 10.4. Query Metrics This report consists of a query form page, and a query results page which contains the queried data. Query Form Page: User is presented with a query page with 4 controls. Each control is set to a default which maximizes the number of test cases and builds the query should be performed against. Altering the controls allows the user to filter the results and generate specific reports for specific owner, keyword, suite, and build combinations. keyword – 0->1 keywords can be selected. By default – no keyword is selected. If a keyword is not selected, then all test cases will be considered regardless of keyword assignments. Keywords are assigned in the test specification or Keyword Management pages. Keywords assigned to test cases span all test plans, and span across all versions of a test case. If you are interested in the results for a specific keyword you would alter this control. owner – 0->1 owners can be selected. By default – no owner is selected. If an owner is not selected, then all test cases will be considered regardless of owner assignment. Currently there is no functionality to search for “unassigned” test cases. Ownership is assigned through the “Assign Test Case execution” page, and is done on a per test plan basis. If you are interested in the work done by a specific tester you would alter this control. top level suite - 0-> n top level suites can be selected. By default – all suites are selected. Only suites that are selected will be queried for result metrics. If you are only intested in the results for a specific suite you would alter this control. Builds – 1->n builds can be selected. By default – all builds are selected. Only executions performed on builds you select will be taken into account when producing metrics. For example – if you wanted to see how many test cases were executed on the last 3 builds – you would alter this control. Keyword, owner, and top level suite selections will dictate the number of test cases test plan are used to computate per suite and per test plan metrics. For example, if owner = “Greg”, Keyword=”Priority 1”, and all available test suites – only Priority 1 assigned to Greg will be considered. The “# of Test Cases” totals you will see on the be influenced by these 3 controls. from your you select test cases report will Build selections will influence if a case is considered “pass”, “fail”, “blocked”, or “not run”. Please refer to “Last Test Result” rules as they appear above. Press the “submit” button to proceed with the query and display the output page. Query Report Page: The report page will display: 1. the query parameters used to create report 2. totals for the entire test plan 3. a per suite breakdown of totals (sum / pass / fail / blocked / not run) and all executions performed on that suite. If a test case has been executed more than once on multiple builds – all executions will be displayed that were recorded against the selected builds. However, the summary for that suite will only include the “Last Test Result” for the selected builds. 10.5. Blocked, Failed, and Not Run Test Case Reports These reports show all of the currently blocked, failing, or not run test cases. “Last test Result” logic (which is described above under General Test Plan Metrics) is again employed to determine if a test case should be considered blocked, failed, or not run. Blocked and failed test case reports will display the associated bugs if the user is using an integrated bug tracking system. 10.6. Test Report View status of every test case on every build. If a test case was executed multiple times on the same build – the most recent execution result will be used. In this report, “?” signifies a test case that was not run on a build. It is recommened to export this report to Excel format for easier browsing if a large data set is being used. 10.7. Charts This report page requires your browser have a flash plugin. It uses flash technology provided by http://www.maani.us to display results in a graphical format. “Last test Result” logic is used for all 4 charts that you will see. The graphs are animated to help the user visualize the metrics from the current test plan. The four charts provide are : 1. Pie chart of overall pass / fail / blocked / and not run test cases 2. Bar chart of Results by Keyword 3. Bar chart of Results By Owner 4. Bar chart of Results By Top Level Suite The bars in the bar charts are colored such that the user can identify the approximate number of pass, fail, blocked, and not run cases. 10.8. Total Bugs For Each Test Case This report shows each test case with all of the bugs filed against it for the entire project. This report is only available if a Bug Tracking System is connected. 11. User Administration 11.1. Account settings Every user on the system will also be able to edit their own information via the Account settings window (link Personal in menu bar). TestLink allows users with administrator rights to create, edit, and delete users within the system. However, TestLink does not allow administrators to view or edit user's passwords. If users forget their passwords there is link on the login screen, that will mail the user their password based upon their user name and the email address they entered. 11.2. Role Permissions TestLink is built with 6 different default permission levels built in. Changing of these rights is handled by the user administration link which is accessible by admins. These permission levels are as follows: • Guest: A guest only has permission to view test cases and project metrics. • Test Executor: A tester outside of the company that only has permissions to run tests allotted to them. (initially in 1.0.4 – otester). • Test Designer: A user can fully work with Test Specification and Requirements. • Test Analyst: A tester can view,create, edit, and delete test cases as well as execute them. Testers lack the permissions to manage test plans, manage Test projects, create milestones, or assign rights. (initially tester, senior tester). • Test Leader: A lead has all of the same permissions as a Tester but also gains the ability to manage test plans, assign rights, create milestones, and manage keywords. • Admininstrator: An admin has all of the same permissions as a lead but gains the ability to manage Test projects. Note: Test plan related features needs also assign a Test Plan to be available. See Test Plan Assignment. 11.2.1. User Roles There are predefined user roles. Adminstrator gives appropriate ability to modify data within TestLink. Each user has assigned just one of these roles. If you view the table you will see rows for each of the permissions levels (guest ,tester, senior tester, leader, admin). The column next to the row holds all of the different rights levels which will be defined below. These levels have been determined as standard for the use but they are free to be edited or define a new roles (for experienced administrator). The user table contains a foreign key that points to the appropriate permission level in the rights table. Role List of Rights Permissions Guest mgt_view_tc, mgt_view_key, tp_metrics Browse data only. Test Executor tp_execute,tp_metrics Execute test only. (Tester) Test Analyst tp_execute, tp_metrics, tp_create_build, mgt_view_tc, mgt_modify_tc, mgt_view_key, (Senior mgt_view_req Tester) Edit Test Specification, execute tests, create build. Test Designer tp_metrics, mgt_view_tc, mgt_modify_tc, mgt_view_key, mgt_modify_req, mgt_view_req Edit Test Specification and Requirements. Test Leader tp_execute, tp_create_build, tp_metrics, All Test Plan permissions, tp_planning, tp_assign_rights, mgt_view_tc, edit Test Specification mgt_modify_tc, mgt_view_key, mgt_modify_key, and execute tests. mgt_view_req, mgt_modify_req Admin tp_execute, tp_create_build, tp_metrics, tp_planning, tp_assign_rights, mgt_view_tc, Everything possible. Only mgt_modify_tc, mgt_view_key, mgt_modify_key, this role can maintain mgt_view_req, mgt_modify_req, Test projects and users. mgt_modify_product, mgt_users Table 1: Role description 11.2.2. Rights Definitions Next tables list keywords used for definition of role abilities. Right Description mgt_view_tc Viewing Test Specification (Test Suites and Test Cases) mgt_modify_tc Edit Test Specification (create, modify, delete, order, move, and copy both Test Suites and Test cases) mgt_view_key Viewing keywords mgt_modify_k Modifying keywords ey mgt_modify_pr Create,edit and delete Test projects oduct mgt_view_req View requirements mgt_modify_re Create,edit, associate and delete requirements q Table 2: Test project related Rights Right tp_execute Description Ability to execute test cases (insert test results) tp_create_buil Ability to create builds d tp_metrics Viewing metrics tp_planning create, edit, delete Test Plans, assign risk/ownership, milestones, edit Tes Case Suite tp_assign_right Assigning the rights to view projects s Table 3: Test Plan related Rights 11.3. Test Plan Assignment Users can see only assigned Test Plans. In order to gain test plan permissions a user with lead or admin status must give them rights through the “Define user/project rights” link under “Test Plan Management”. All users in the system will by default not have permissions to view newly created test plans (except for the test plan creator who can give themselves permissions at creation). Zero test plan permissions means that users will not see any Test Plans in the Test Plan dropdown box on main screen. There is a table with Test Plan rights (i.e. which users can see which Test plan). This table is made up of a combined user id and project id. The main page contains code which checks to see if the logged in user has the appropriate permissions (and then shows the allowed projects. It is not recommended that this be hacked with. 12. Import and Export data TestLink supports several ways to share data. Item Keyword File format CSV What you get All test project’s keywords XML Test project XML All test suites and test cases. You can choose if export also assigned keywords. Test suite XML Test suite details, All test cases and child test suites and test cases. You can choose if export assigned keywords. Test case XML Two types of exports can be done: - Just one test case - All test cases in test suite. You can choose if export assigned keywords. Requirement CSV (*) Only import is supported for this format. CSV DOORS (*) XML Table 4: Items that can be exported/imported Limitation: Attached files are not exported. 12.1. Import/Export Keywords Illustration 11: Keywords frame includes buttons for import and export Example of CSV composes “Keyword;Notes”: Klyngon;Klyngon keyword notes Moon rocks;Moon rocks keyword notes Example of XML with keywords: <?xml version="1.0" encoding="UTF-8"?> <keywords> <keyword name="Klyngon"> <notes> <![CDATA[Klyngon keyword notes]]> </notes> </keyword> <keyword name="Moon rocks"> <notes> <![CDATA[Moon rocks keyword notes]]> </notes> </keyword> </keywords> 12.2. Export/Import Test Project User can import or export Test project include Description of the project, Test Specification and Keywords. The next two pictures show tree menu with data and the same data as XML file. <?xml version="1.0" encoding="UTF-8"?> <testsuite name=""> <details><![CDATA[]]></details> <testsuite name="Communications"> <details><![CDATA[<p>Communication Systems of all types</p>]]></details> <testsuite name="Handheld devices"> <details><![CDATA[]]></details> <testcase name="10 G shock"> <summary><![CDATA[]]></summary> <steps><![CDATA[]]></steps> <expectedresults><![CDATA[]]></expectedresults> </testcase> <testcase name="Gamma Ray Storm"> <summary><![CDATA[]]></summary> <steps><![CDATA[]]></steps> <expectedresults><![CDATA[]]></expectedresults> </testcase> </testsuite> <testsuite name="Subspace channels"> <details><![CDATA[<p>Only basic subspace features</p>]]></details> <testcase name="Black hole test"> <summary><![CDATA[]]></summary> <steps><![CDATA[]]></steps> <expectedresults><![CDATA[]]></expectedresults> </testcase> </testsuite> </testsuite> <testsuite name="Holodeck"> <details><![CDATA[]]></details> <testcase name="Light settings"> <summary><![CDATA[]]></summary> <steps><![CDATA[]]></steps> <expectedresults><![CDATA[]]></expectedresults> </testcase> </testsuite> <testsuite name="Propulsion Systems"> <details><![CDATA[]]></details> <testsuite name="Main engine"> <details><![CDATA[]]></details> <testcase name="Emergency stop"> <summary><![CDATA[]]></summary> <steps><![CDATA[]]></steps> <expectedresults><![CDATA[]]></expectedresults> </testcase> </testsuite> </testsuite> </testsuite> 12.3. Import/Export Test suite XML Example – Test Suite without keywords <?xml version="1.0" encoding="UTF-8"?> <testsuite name="Handheld devices"> <details><![CDATA[]]></details> <testcase name="10 G shock"> <summary><![CDATA[]]></summary> <steps><![CDATA[]]></steps> <expectedresults><![CDATA[]]></expectedresults> </testcase> <testcase name="Gamma Ray Storm"> <summary><![CDATA[]]></summary> <steps><![CDATA[]]></steps> <expectedresults><![CDATA[]]></expectedresults> </testcase> </testsuite> XML Example – Test Suite with keywords <?xml version="1.0" encoding="UTF-8"?> <testsuite name="Handheld devices"> <details><![CDATA[]]></details> <testcase name="10 G shock"> <summary><![CDATA[]]></summary> <steps><![CDATA[]]></steps> <expectedresults><![CDATA[]]></expectedresults> <keywords> <keyword name="Klyngon"> <notes><![CDATA[Klyngon keyword notes]]></notes> </keyword> </keywords> </testcase> <testcase name="Gamma Ray Storm"> <summary><![CDATA[]]></summary> <steps><![CDATA[]]></steps> <expectedresults><![CDATA[]]></expectedresults> <keywords> <keyword name="Klyngon"> <notes><![CDATA[Klyngon keyword notes]]></notes> </keyword> <keyword name="Moon rocks"> <notes><![CDATA[Moon rocks keyword notes]]></notes> </keyword> </keywords> </testcase> </testsuite> 12.4. Just one test case Example of XML file: <?xml version="1.0" encoding="UTF-8"?> <testcases> <testcase name="Black hole test"> <summary> <![CDATA[<p>This procedure must be done once a week, with this safety device disabled:</p> <ol><li>X45HH</li><li>YY89-000-JI</li></ol>]]> </summary> <steps><![CDATA[ <p>Preset bias to 0</p> <p>Enable <strong>long range</strong> communications control</p> <p>Simulate black hole interference</p>]]> </steps> <expectedresults><![CDATA[ <table width="200" cellspacing="1" cellpadding="1" border="1"> <caption>Main Results</caption> <tbody> <tr><td>Spin value</td><td>9.9</td></tr> <tr><td>Opposite Angle</td><td>18 rad</td></tr> <tr><td> </td><td> </td></tr> </tbody> </table>]]> </expectedresults> <keywords> <keyword name="Moon rocks"> <notes><![CDATA[Moon rocks keyword notes]]></notes> </keyword> </keywords> </testcase> </testcases> 12.5. All test cases in test suite <?xml version="1.0" encoding="UTF-8"?> <testcases> <testcase name="10 G shock"> <summary><![CDATA[]]></summary> <steps><![CDATA[]]></steps> <expectedresults><![CDATA[]]></expectedresults> </testcase> <testcase name="Gamma Ray Storm"> <summary><![CDATA[]]></summary> <steps><![CDATA[]]></steps> <expectedresults><![CDATA[]]></expectedresults> </testcase> </testcases> 12.6. Import/Export Software Requirements CSV file includes “Identifier of document, title, description”. Example of CSV file: ENG-0001,Terrestrial Propulsor, ENG-0002,Main Deflector,"<p>Main deflector bla, bla, bla.</p>" Example of XML file: <?xml version="1.0" encoding="UTF-8"?> <requirements> <requirement> <docid><![CDATA[ENG-0001]]></docid> <title><![CDATA[Terrestrial Propulsor]]></title> <description><![CDATA[]]></description> </requirement> <requirement> <docid><![CDATA[ENG-0002]]></docid> <title><![CDATA[Main Deflector]]></title> <description><![CDATA[<p>Maindeflector bla, bla, bla.</p>]]></description> </requirement> </requirements> Revision History: # Description 0.x Documents for TL 1.5 and update for TL 1.6 Date 2005 Author M. Havlat A. Morsing F. Mancardi 1.0 Converted to OO2 format; 2005/03/12 M. Havlat 1.1 Minor update; FIX 372, 352 2006/02/14 M. Havlat 1.2 Updated as draft for TL 1.7 2006/11/17 M. Havlát 1.3 Removed TL 1.6 terms 2007/03/01 F. Mancardi 2007/09/06 M. Havlát Added initial information about Custom Fields 1.4 Added content and updated Franciscos “jumpstart_manual” and tl_file_format. General style cleanup and update.


![TestLink - User Manual - Testlink 1.9.14 [DEV] (Padawan)](http://vs1.manualzilla.com/store/data/006906305_1-b1cb8391a8e611571cffb8021f43e1a8-150x150.png)