1
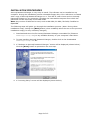
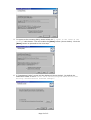
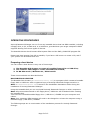
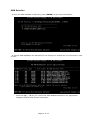
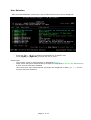
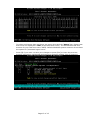
Active@ Password Changer v.3.0 Copyright © 1998-2005 Active@ Data Recovery Software LSoft Technologies Inc. USER’S MANUAL PRODUCT OVERVIEW....................................................................................................1 SYSTEM REQUIREMENTS................................................................................................1 INSTALLATION PROCEDURES ..........................................................................................2 OPERATING PROCEDURES ..............................................................................................5 Preparing a boot device ...............................................................................................5 Program start ...........................................................................................................8 Logical Drive Selection ................................................................................................8 SAM Selection ........................................................................................................ 10 User Selection ........................................................................................................ 11 Password Reset and changing account parameters............................................................. 12 PRODUCT OVERVIEW Active@ Password Changer lets you reset local user passwords and change Windows login security restrictions on Windows NT / 2000 / XP / 2003 systems: this is useful when the Administrator’s password is forgotten or lost, or when the Administrator’s user account has been disabled or locked out. You can also use Active@ Password Changer to specify which days of the week and times of day a user can log on to the computer (or to remove that kind of restrictions): this is useful, for example, if you want to define what hours your child can logon to the computer. The software has a simple user interface. It supports multiple hard disk drives, and can detect multiple SAM databases (i.e. account and password databases) if multiple Operating Systems are installed on the computer. The software displays the list of local users, and lets you select the user whose password you want to reset or whose account parameters you want to change. The account parameters that you can change include: • ‘Account is disabled’, • ‘Account is locked out’, • ‘User must change password at next logon’, • ‘Password never expires’. The demo version of the software finds the SAM database or databases, and lets you view the list of users and the particular user attributes. The commercial version actually resets passwords and changes attributes. SYSTEM REQUIREMENTS Active@ Password Changer runs on the following hardware: - AT compatible CPU with 386 or greater processor - 640 Kb of RAM - 1.44 Mb floppy disk drive or CD-ROM drive - EGA 640x480 or better screen resolution The software can display and change the password and account settings that are: - Created by Windows NT, Windows 2000 Workstation, Windows 2000 Server, Windows XP (32 and 64 bit), or Windows 2003(32 and 64 bit). - Stored on FAT16 / FAT32 / NTFS / NTFS5 file systems. Page 1 of 13 INSTALLATION PROCEDURES Active@ Password Changer is very easy to install. The software can be installed on any computer. During the installation process a bootable floppy disk, CD or USB drive is created with a copy of Active@ Password Changer on it. This disk is used to boot and run Active@ Password Changer on any computer (including the inaccessible computer from which the password is to be retrieved) in the DOS mode. Note: Any version of DOS can be used, such as MS-DOS, PC-DOS, DR-DOS, FreeDOS or OpenDOS. The following steps will guide you through the installation process: (Note: During these installation steps, clicking the [Back] button (when available) takes the user to the previous installation step(s) for any necessary changes.) 1. Download and Save the file Active@ Password Changer executable file (filename: PwdChanger-Setup.EXE) to any suitable directory on your computer’s hard drive. 2. To start installing Active@ Password Changer, double-click on the downloaded PwdChanger-Setup.EXE file. 3. A “Welcome to Active@ Password Changer” screen will be displayed (shown below). Click the [Next] button to proceed to the next step. 4. A “Licensing Policy” screen will be displayed (shown below). Page 2 of 13 5. To agree to the Licensing Policy terms select the “I agree to the terms of the license” radio button. This will enable the [Next] button (shown below). Click the [Next] button to proceed to the next step. 6. A “Destination Folder” screen will be displayed (shown below). By default the destination folder is set to “<Your Drive Letter>\Program Files\Active Data Recovery Software\Active Password Changer”. Page 3 of 13 7. Click the [Browse] button to select a different installation Destination Folder. After confirming the Destination Folder, click the [Next] button to proceed to the next step. 8. A “Select Components” screen will be displayed (shown below). There will be four components displayed which are selected by default. 9. Select the components which you would like to install and click the [Next] button to proceed to the next step. Selecting ‘Bootable Disk Creator’ will start the disk creator wizard at the end of the installation. Selecting the ‘Bootable ISO image for CD-ROM’ will save an ISO image of Active@ Password Changer in the installation Destination Folder. (Creating a bootable CD is explained in a later section.) 10. A “Start Installation” screen will be displayed (shown below). You can click the [Back] button to change any installation information or click the [Next] button to start the installation process. 11. The installation process is quick. Upon successful completion of the installation, an installation successful screen will be displayed (shown below). If you do not intend to create a Bootable Disk with a copy of Registered Active@ Password Changer, un-select the ‘Run Bootable Disk Creator’ and click the [Finish] button. Page 4 of 13 OPERATING PROCEDURES Active@ Password Changer can run from any bootable device that has DOS installed, including a floppy drive, a CD, a flash card, or a USB drive, provided that your target computer’s BIOS supports booting from these types of devices. The bootable device should contain DOS system files and the PWD_CHNG.EXE program file. Please note that booting from CD is possible, if you have a CD burner to create a CD, and if your system can be booted from CD. Preparing a boot device You can create a boot device in any one of three ways: 1. The Bootable Disk Creator to create a bootable floppy drive or USB drive; 2. The software ISO Image to create a bootable CD or DVD; 3. In MS DOS mode / Windows 9x / Windows XP. These three methods are described below: BOOTABLE DISK CREATOR The Bootable Disk Creator (BootableDiscCreator.exe) is a program which creates a bootable floppy disk or USB drive with a registered copy of Active@ Password Changer saved on it. Note: BootableDiscCreator.exe is saved in the installation destination folder during the installation of Active@ Password Changer. Using this bootable disk you can run/install Active@ Password Changer on other computers. Note: All previous data stored on the floppy drive / USB drive will be deleted while creating the bootable disk. Just insert the created bootable floppy drive / USB drive / CDROM into your computer and reboot. Note: Your computer BIOS settings will need to be changed to re-boot the computer using a bootable floppy / USB drive / CDROM. The following steps are in continuation of the installation process for Active@ Password Changer. Page 5 of 13 1. If you intend to create a bootable disk, select the ‘Run Bootable Disk Creator’ option and click the [Finish] button to finish the installation process and to start the Bootable Disk Creation process. 2. A “Bootable Disk Creator” screen will be displayed (shown below). 3. Select the removable drive to format from the ‘Removable’ drop down list. You can either select a Floppy Disk Drive or USB drive from the drop down list. 4. To add support for USB or CD-ROM drives, select the appropriate checkboxes under ‘Additional Drivers’ (shown below). 5. Ensure that a floppy disk or USB drive is inserted in the selected Removable drive. 6. Click the [START] button. The disk creation process will start. The screen (shown below) will be displayed with a progress bar. To interrupt or to discontinue disk creation click the [STOP] button. Page 6 of 13 7. The following screen is displayed upon successful completion of disk creation. The bootable disk contains the Active@ Password Changer installation files and USB/CDROM support files if selected. 8. Click the [CLOSE] button to complete the disk creation process. BOOTABLE CD CREATION FROM ISO IMAGE 1. The Active@ Password Changer installation process saves an ISO image of Active@ Password Changer in the destination installation folder. The name of the ISO image file is Pwd-changer-boot-cd.iso. 2. Using the ISO image of Active@ Password Changer, and using CD Burning Software such as Nero or Roxio Easy CD Creator you can create a Bootable CD with a registered copy of Active@ Password Changer. Note: Do not use Widows Explorer to save the ISO image to the CD. Windows XP Explorer does not create a bootable CD. You must use software that can burn an ISO image to a CD. IN MSDOS MODE / WINDOWS 9x / WINDOWS XP • Prepare a bootable floppy disk with DOS / Windows. If you do not already have a bootable floppy, you can prepare such a disk in any of the following ways: o o If you boot to MS-DOS or to the Command Prompt mode of Windows 95/98, insert a blank floppy and type: C:\> FORMAT … and follow the instructions on the screen A: /S Or, if you boot in Windows 95/98/ME, go to the "Control Panel" then "Add/Remove Programs", then switch to the tab labeled "Startup Disk", click the "Startup Disk..." button, and follow the instructions Page 7 of 13 o • Or, if you boot in Windows XP, insert a blank floppy, right-click on the A: drive in Explorer (under My Computer), choose "Format...", check the "Create an MSDOS startup disk" option and click the "Start" button Copy the Active@ Password Changer (PWD_CHNG.EXE) to the bootable floppy disk. Program start • • Boot from the floppy, USB drive or CD/DVD-ROM. Active@ Password Changer program starts automatically. o If not run Active@ Password Changer by typing this command, along with [Enter]: A:\> PWD_CHNG.EXE • • Press the [1], [2] or [3] key for the action you want to perform. Press [Esc] to exit the program. Logical Drive Selection - If you chose the first option on the Options screen you may select a particular volume to scan for a SAM database. Page 8 of 13 - Press the [0]…[9] key to select a particular volume to be scanned, or the [A] key to scan all volumes Press [Enter] to perform the default action (scan all volumes). Page 9 of 13 SAM Selection - If only one SAM database is detected, press [ENTER] to get users information: - If several SAM databases are detected you will be asked to choose the one you want to view or edit: - Press the [0] … [9] key for a particular SAM database based on the appropriate database location and volume information. Page 10 of 13 User Selection - After the SAM database is scanned, a list of defined local users will be displayed: - Press the [0] … [9] key to display information for a specific user Press [PgUp] or [PgDown] to scroll the list of users. Please note: - The primary (built-in) Administrator is displayed in Cyan, - Other users who have Administrator privileges are displayed in Green; or, Dark Green if their account has been disabled - Users who don't have Administrator privileges are displayed in White; or, Grey if their account has been disabled Page 11 of 13 Password Reset and changing account parameters - After you select a specific user account you can see the account information: - Active@ Password Changer shows the account's current settings in one column and the recommended settings in another; If you want to accept the recommended settings, and clear the password, just press [Y] to do that. You can also choose to change the new settings to something other than the recommended default values. To do this, use the Up and Down arrows keys to select a setting to be changed, and press the [Space] bar to enable or disable it. - To view and change permitted logon days and hours press the [PgDn] key: Page 12 of 13 - To select and choose days and hours use arrow keys and the [Space] bar. Please note that hours are displayed in GMT (Greenwich Mean Time). You should take that into account for your local time zone. NOTE: Default Windows system accounts do not have the option for “permitted logon hours”. - Press [Y] if you want to save your changes or press [Esc] to leave the previous account information unchanged and return to previous window (List of accounts) Page 13 of 13