1
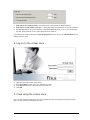
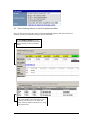
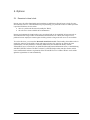
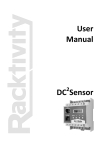
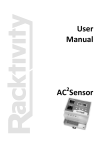
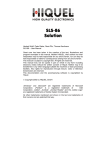
User Manual
Virtual Clock
GET nv • Antwerpsesteenweg 107 • B-2390 Oostmalle • www.get.be
Member of the Primion Group • www.primion.de
Table of Contents
Virtual clock................................................................................. 3
1.
2.
3.
4.
5.
About the virtual clock ............................................................. 3
Parameter settings .................................................................. 3
2.1 Authorisation Management ................................................ 3
2.2 The resources in Company settings..................................... 5
Log on to the virtual clock......................................................... 6
Clock using the virtual clock ...................................................... 6
4.1 View clocking actions in the Corrections window ................... 8
Options .................................................................................. 9
5.1 Decentral virtual clock ...................................................... 9
Copyright statement
Copyright © 1999-2007 GET nv. All rights reserved.
No part of this publication may be reproduced, or recorded in a
storage and retrieval system, or made public, in any form or by any
means, be it electronic, mechanical, or by photocopying, recording or
otherwise, without the prior written permission of GET nv.
Despite every care taken in the compilation of this manual, GET
cannot be held liable for any damage whatsoever sustained as the
result of a publication error.
This book makes reference to registered trademarks. The text does
not display these names with their trademark symbols because they
merely refer to the products in question. Under no circumstance
should this be construed as an attempt to infringe upon the rights of
the trademark holder.
Version 3/12/2007
Virtual Clock
ii
Virtual clock
1. About the virtual clock
The traditional method of recording time worked, i.e. by producing a badge at a badge reader terminal, is
making way for what is known as the virtual terminal. This is the case particularly in offices, where most
people have a PC, and therefore have easy access to the local network.
In this case we can replace the badge reader with a process of logging on to the web application and
registering there.
Additionally, you can use traditional badge readers and virtual clocks alongside each other. Using the
Virtual clock option, you can, for example, give people who work at home the possibility of recording
their working times, and requesting information using their PCs.
The Virtual clock can also be used at sites with a very small number of employees, while the main
building continues to use traditional badge readers.
The online virtual terminal is simply an extension of the standard web interface modules. You can log on
to the "virtual terminal" using an alternative URL, i.e. a web page in order to register a clocking action.
This means there is direct communication between the web browser and the XTremis web application
server.
2. Parameter settings
2.1 Authorisation Management
2.1.1 Security profile
In the Security profiles tab of the Authorisation Management window, create a security profile for the
employees who will be using the virtual clock. To this new security profile, you can assign the security
objects described in chapter “Security objects” on page 4 :
Virtual Clock
3
2.1.2 Security objects
Security objects are added to security profiles in the Authorisation Management window. Afterwards,
these security profiles are linked to certain employees (see the Authorisation Management manual).
Please note:
You cannot use the Authorisation Management window unless you have purchased the
Authorisation Management of features option. If this option is not installed, everyone in your
company will be able to open all application windows, and query and update data. This manual
assumes that this option is installed.
There are two security objects related to the Virtual clock web page.
Clock via the virtual clock (8300)
To log on and clock using the virtual clock.
Logon to virtual clock with badge (8310)
To log on to the virtual clock using a badge reader linked to the terminal. To clock you will also need
security object 8300.
2.1.3 User roles and user role categories
In the Authorisation Management window, tab User roles, create a user role for the virtual clock. Link
the security profile you have just created (see chapter “Authorisation Management
Security profile” on page 3) to this user role. In the Users tab, you then assign the user role category and
user role to the employees who will be using the virtual clock to record clocking actions:
Virtual Clock
4
2.2 The resources in Company settings
In the Company settings window, in the System parameters tab, enter whether or not certain items
should be visible to users.
You can set the following system parameters for the virtual clock web page:
Class
XTremisWeb
Resource
BookTimeLimit
XTremisWeb
OverviewTimeLimit
XTremisWeb
VirtualTerminalSafetyCode
Function
This parameter specifies for how
many seconds the Time left time
bar appears in the first page (after
you have logged on)
This parameter specifies for how
many seconds the overview page
(containing information on your
clocking actions for the day) is
shown if you do not click the link
Click here to return to the logon
screen.
Value 1: the virtual clock is
displayed with safety code.
Value 0: the virtual clock is
displayed without safety code.
In the XTremisWeb tab in the Company Settings window, you will see a clearer visual overview of all
the system parameters related to the XTremis web pages. Scroll down a little and you will see the
parameters relating to the virtual clock:
Virtual Clock
5
•
•
•
Time-out for first window (clock): corresponds with system parameter ‘BookTimeLimit’.
Time-out for second window (overview): corresponds with system parameter ‘OverviewTimeLimit’.
Use security code: if the system parameter ‘VirtualTerminalSafetyCode’ is set to 1 this field will be
checked; if the parameter is set to 0 this field will not be checked.
If you change one of these settings in the System parameters tab, the value in the XTremisWeb tab also
changes, and vice versa.
3. Log on to the virtual clock
1)
2)
3)
4)
Open the logon page for the virtual clock.
In the User name text box, enter your XTremis user name.
In the Password text box, enter your XTremis password.
Click OK.
4. Clock using the virtual clock
Once you have logged on using your user name and password, the second page will be shown. In this
page, you can record the actual clocking action.
Virtual Clock
6
In the Logged on text field, you will see your
personnel number and name. In the Time of
clocking text field, today's date and the time at
which you logged on is shown.
The Time left time
bar indicates how
much time you have
left to enter the code
and clock. When the
time is up the
registration is
cancelled and you
must log in again if
you wish to register.
The time you are
given is set globally
using the
‘overviewTimeLimit’
parameter.
If the system parameter
‘VirtualTerminalSafetyCod
e’ has value 1, XTremis
gives you a new code
every time you log on;
you will have to retype
this code in the Enter
your code here text box.
In the Function key drop-down list
box, you can select a function key.
Employees can use function keys to
enter information or consult
information when clocking in or out.
E.g. employees can use a function
key to indicate that they are leaving
on a business trip, going to see the
doctor, have been called in to do
extra work ... You can define which
function keys are available to each
employee when he uses the virtual
clock.
In the Information section, you will
see an overview of the clocking actions
which have already taken place and a
number of balances.
You can specify, per employee, which
balance are shown when the employee
clocks, in the Totals on badge reader
field in the Personnel data/ Overview
of employees / Time attendance
screen.
Once you have clocked, you will see an overview page which you use to confirm the clocking action:
Virtual Clock
7
4.1 View clocking actions in the Corrections window
Once you have clocked using the virtual clock the Corrections windows (both the web and GUI
windows) will show you that the clocking action has taken place:
In the Clocking actions row, the
arrow pointing downwards indicates
that a clocking in action has taken
place.
In the Clocking actions sub tab you will
see more details: in this example we see a
clocking out action at 17:03, which has
been recorded without a function key, using
the virtual clock.
Virtual Clock
8
5. Options
5.1 Decentral virtual clock
In most cases, the online functionality and operations are sufficient to allow all users to clock. In some
environments, however, a decentralised set up can potentially give problems because no offline operation
is provided. Problems can arise when:
• there is a problem in the network (usually the WAN);
• the web server is not available due to maintenance.
In many environments the situations above are exceptional and can be controlled. In large networks, or
environments with a large number of decentralised environments over a WAN, this can give rise to
problems because employees cannot register clocking actions as long as the web server is not available.
To resolve this issue, you can use the Decentral virtual clock module. Functionally, this module works in
exactly the same way as the online version (the same web pages, the same log on options, the same
confirmations). The only difference is that this module does not communicate directly with the
XTremisWeb server, but with a PC on which IIS (Microsoft Internet Information Server) is installed along
with IBCU (BLITS) software. The IBCU software is a BLITS (badge reader network) solution, which
issues confirmations and stores registrations if the XTremisWeb server is offline. When it comes online
again the registrations are sent automatically.
Virtual Clock
9