1
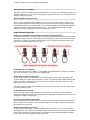
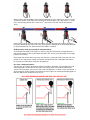
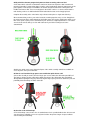
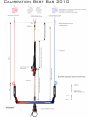
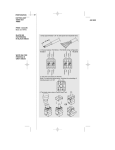
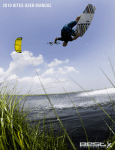
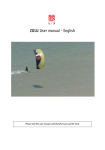
BEST KITEBOARDING
USER MANUAL
Thank you for purchasing a Best kite. Please read this manual carefully and in its entirety before
using your new Best kite.
WARNING
Kiteboarding/kitesurfing/snowkiting are extreme sports. They have numerous inherent risks and
dangers, and pose substantial risk of cuts, scrapes, bruises, broken bones, loss of limbs, loss of
vision, paralysis, and other serious, permanent and disabling injuries and death to the rider and
others. Some of the sources of these risks include but are not limited to:
•
•
•
•
•
•
•
•
Being lifted by the kite and then dropped or slammed into the ground, snow, trees, rocks,
buildings, piers, jetties and/or other structures or surfaces.
Being dropped or slammed into other people and/or property.
Contact with kite lines under tension, and/or watercraft.
Drowning.
Underwater conditions and/or objects such as sharp shells, broken glass, sand bars, shoals,
reefs, oyster beds, and/or concrete.
Contact with sea life such as sting rays, sharks, sea turtles, jelly fish, etc.
Weather conditions and/or changes in weather conditions such as increasing or decreasing
wind, waves, updrafts, lightning and/or water spouts.
Equipment performance. Kiteboarding is a new sport. Kiteboarding equipment and safety
gear are NOT 100% reliable. Safety designs and features are often new and unproven. Kites
may behave unfavorably and unpredictably. Lines can twist, tangle, or break, resulting in
serious injury and/or loss of control of the kite.
When using this product, you are responsible for your own safety and the safety of others around you.
Never use this product as a flying device. Never touch flying lines when the kite is in use.
RELEASE OF LIABILITY AND ASSUMPTION OF RISK
DO NOT USE THIS PRODUCT UNLESS YOU AGREE WITH THE
FOLLOWING TERMS AND CONDITIONS:
Before using this product, the purchaser/user has carefully reviewed, understood and agrees to
comply with the terms of this User Manual. Use of this product and any of its components involves
certain inherent risks, dangers and hazards, which can result in serious personal injury or death. The
purchaser/user of this product understands that the seller is not responsible for any damage to
property or injury caused by negligent operation of this product by the purchaser/user, and the
purchaser/user releases the seller from all such liability. In the event of your death or incapacity, this
Agreement shall be effective and binding upon your heirs, next of kin, executors, administrators,
assigns and representatives.
The purchaser/user of this product expressly assumes the risk of any and all bodily injury, death
and/or liability which may result from the purchaser or user’s participation in kiteboarding. The
purchaser/user agrees to hold Ride Best, LLC harmless from any and all liability, and waive and
release any and all claims or potential claims against Ride Best, LLC and any of its respective agents,
affiliates, subsidiaries, employees, instructors, officers, directors, shareholders, suppliers and
manufacturers in the event of any such bodily injury or death which may result from the purchase
and/or use of Ride Best LLC (d/b/a Best Kiteboarding) products.
© 2010 RIDE BEST, LLC, d/b/a BEST KITEBOARDING
Redline Performance Bar:
Product Description:
The Redline Performance Bar combines the best features and safety systems from our 09 bar lineup
into one unbeatable bar. With safety and set-up options simple enough for the absolute beginner to
understand yet with enough versatility and hardcore build quality to satisfy even the most demanding
experienced rider, it's guaranteed to set the standard for years to come.
The Redline Performance Bar uses our new 'Click-it' chickenloop quick-release, simply push up on
the ergonomically shaped self locking cuff to activate the Redline safety and instantly depower your
kite. Rebuilding the chickenloop after activation is just as easy, just push the chickenloop line home
and snap the outer cuff shut.
With an integral swivel sitting on top of the chickenloop assembly untwisting your lines and swapping
between hooked-in and unhooked riding just got a whole lot easier. This is the perfect bar for riders of
all levels who demand the most reliable and predictable safety system but still need all the features
our previous bars have had to offer.
A dual-depower center line with integral moulded stopper allows you to trim the bar position, taking
the strain so you can concentrate on your next move. The Redline safety system passes directly
through the center of the stopper ball, providing a safety override regardless of how you use the
stopper.
A dual front line safety set-up ensures that your kite depowers safely and lands ready to be
relaunched as quickly as possible. Riders who require to completely kill their kite can opt to use the
rear line OSR handles instead of the chickenloop mounted Redline safety. Advanced riders can
choose to use the suicide leash connection by clipping their safety over the chickenloop line.
Flying lines are 700lb rated, colour coded for easy set-up and proven to offer incredibly low stretch
and amazing durability; the rear flying lines can be trimmed to allow compensation for your preferred
bar position or when using the bar with kites from previous product years. An above the bar pull-pull
trim strap provides easy depower trimming in flight.
One bar for all kites, the Standard has been set.
Redline Performance Bar Features:
A one piece, injection moulded quick release with push-to-release outercuff ensures reliable and easy safety system activation.
With no mechanical internal parts there's nothing to foul to inhibit safe
operation, ensuring reassembly is just as fast and as easy as activation.
A drop forged alloy bar center replaces the swaged center bushings
used on previous bars. With an oversized, smooth polished and
elliptically flared center hole depower line wear is almost completely
eliminated on the Redline Performance Bar. The new design also allows
the EVA bar grip to run right up to the center hole, making unhooked kite
control just that little bit more secure than before.
Our 3 into 1 Dual Depower stopper ball allows for all flying lines to pass
through it giving you all the benefits of our well established stopper ball
design bars as well as the safety and bypass functionality of our
previous Redline bar design.
We have replaced the older snap-gate Karabiner design and replaced it
with a lower profile, easier to hook and unhook spring gate design.
Because the spring gate is self-tensioning and made from heavy
chromed stainless, it'll be as smooth after a full season's use as it was
the day you purchased it.
The Redline safety leash connects you directly to the front lines of your
kite, allowing you to completely depower your kite. The Redline safety
overrides the depower stopper ball automatically whenever you drop the
bar or activate the 'Click-it' QR.
A low friction swivel, shaped with male/female fit for the underside of the
bar, helps to keep everything locked in placed when unhooking and
makes untwisting your lines easier than ever before. Designed to be
easy to clean the new swivel can be flushed out after use and stripped in
seconds for a full service should it ever become necessary.
The Redline Performance bar comes with adjustable back line trim. A
short rear leader line positioned inside the bar end floats has 3 different
knot locations allowing you to trim the rear line lengths to balance the
L&R rear line lengths or to optimize your bar for different kites
How does the 'Click-it' quick release work?
The chickenloop is comprised of 3
main parts, outer cuff, swivel and
chickenloop housing. The chickenloop
housing is a composite moulded part
that consists of a main body part with
a small, flexible hinged section.
The swivel is made of two parts that
are screwed together over the
extended neck of the chickenloop
housing.
Sliding the outer cuff down over the
chickenloop housing and swivel holds
the chickenloop line captive by means
of an incredibly simple 3D lock and
key. The outer cuff is retained in this
position by a low tolerance snap fit.
The release pressure of the QR is
defined by the snap fit between outer
cuff and chickenloop housing; this is
completely independent of flying line
tension and does not increase with
increased front line tension.
The chickenloop line is retained within the chickenloop housing by a simple 3-dimensional fit between
the parts. The hinged section is moulded in the 'open' position so that very little load is required to
separate the lock and key parts upon release.
How does this differ from other push to release systems?
The 2010 QR has been designed from the ground up to be as simple as possible, there are no
mechanical parts, no metal load bearing surfaces, no pivots and no requirement for complex reassembly. The parts fit together in such a way that contamination with salt and sand makes no
difference to activation of the QR and it can be reassembled with the kite still partially powered due to
the simplicity of the design and easy ergonomics of the chickenloop parts.
Unlike many push-to-release systems the 'Click-it' QR can still be activated even if you have managed
to wrap a flying line over your depower lines. The action of the QR is not inhibited by wrapping the
depower lines with your flying lines as the QR cuff does not need to extend past the swivel.
Additionally the swivel itself is smooth sided with an upwards taper so that if you were unlucky enough
to wrap your line around the top of the swivel they will simply slide off. Should you manage to wrap
your flying lines around the QR cuff the QR will still function as intended.
What is the maximum activation load for the QR?
The QR has been designed to release with less than 7 kg of upwards force; this release force has
been tested significantly beyond a 150kg static load. Manufacture tolerances between moulded parts
may cause the maximum release force to vary by +/- 5% in use.
What is the maximum safe working load for the chickenloop?
The chickenloop assembly has exceeded a 350kg static load test; it has not been tested beyond this
range. Maximum load holding ability may vary with age and we recommend replacing the Dualdepower rope at least once every 12 months. Competition freestyle riders or riders who kite more than
500 hours per year may need to replace their chickenloop assembly more frequently than this.
How is the QR resistant against fouling?
The QR is designed so that the presence of sand and salt within the body of the chickenloop housing
makes no difference to its function. The simplicity and geometry of the lock-and-key mechanism that
retains the chickenloop line allows for a wide range of dimensional tolerance within the QR.
The release ball and chickenloop housing contact surfaces which support the entire front line load are
very wide tolerance accuracy parts that require only a loose fit together to function. Further to this they
are moulded in a semi-open position to help facilitate rapid release of the chickenloop line upon
activation.
We recommend only that your rinse your QR with water before storing your bar with the QR left open
in between uses.
What is the depower set-up?
The Redline Performance Bar uses an above the bar 'pull-pull' trim-strap, this gives you 22cm of on
the fly depower adjustment in addition to the 55cm available through bar travel.
The Redline Performance Bar additionally includes back line adjustment knots within the bar end
floats; these allow you to fine tune the trim of your kite before you launch the kite. Users must never try to
adjust the back line knots during flight serious injury could occur due to loss of steering control.
What safety features are built into the bar?
The Redline Performance Bar uses a similar Redline safety system to the 2009 Redline bar.
You attach to the Redline safety by clipping your leash into the bypass ring below the chickenloop;
this remains unchanged from previous years. Once clipped into the Redline safety if you drop the bar
or activate the chickenloop mounted QR the kite will switch to maximum depower instantly. Once fully
depowered your kite will slowly fall to the edge of the window, taking up a position on one wingtip and
await your relaunch.
The Redline safety system depowers the kite by pulling in on both front lines simultaneously; this
does not completely kill the kite, or remove 100% of the power. The kite remains partially powered
and ready for relaunch unless leashed to a single rear OSR handle.
The Redline safety system automatically overrides the dual-depower line stopper ball, so will function
regardless of the position of the stopper ball.
Both back lines have 'OSR' handles allowing you to self land your kite in an emergency.
How has the Dual-depower stopper changed for 2010?
The Redline Performance Bar has a new stopper ball designed to
manage all three line parts beneath the bar. The Redline safety and
both left and right hand depower lines pass through the stopper.
When the bar is pushed against the stopper the depower lines are
caught between the inside of the bar bushing and the tapered base of
the stopper; this limits bar movement and helps reduce apparent back
line tension making it easier to ride all day.
The Redline passes directly through the middle of the stopper and its
passage is unaffected by the action of the stopper on the Dual
depower-lines. The Redline safety functions regardless of the position
of the bar and stopper.
The locking feature of the stopper can be overridden by simply giving
the bar a firm push upwards, or by sliding the stopper upwards with
your hand at any time. Dropping the bar or activating the 'Click-it' QR will also override the action of
the depower stopper.
How do the bar component parts differ from
previous models?
The bar center and bushing is a new one piece
aluminium forging. The center bushing easily
accommodates the dual depower and Redline
safety lines and has a wide, flared center that
replaces the stainless bushings of previous bar
designs.
Depower line wear has almost been completely
eradicated by swapping to this new part and
selecting a new, smooth braided and coated
dual depower line from our European flying line
supplier.
What are the bar tubes made from?
The bar tubes are made from a stiff and light,
spiral wound carbon and glass fibre composite.
What are the bar ends made from?
The smooth shaped bar ends are made with a
composite reinforced plastic; these are glued
and screwed to the bar.
The new bar grip is a textured EVA. The EVA
covers almost the entire length of the bar and
extends up onto the bar ends replacing the
previous 'bar end bumper pads' to provide
exceptional comfort for unhooked riding and kitelooping.
What spare parts are available?
Trim strap, depower line, different length chickenloop lines, outer cuffs and chickenloop housing parts
will all be available as accessory parts. All moving parts on the 2010 bar are user serviceable and can
easily be replaced in the field.
What line lengths does the bar use?
The bar comes equipped with 20m flying lines and a set of four 3m extension lines. The extension
lines are supplied separate from the flying lines on their own winder. We strongly recommend using
the 20m line length for all current kite models. The 3m extension will be useful in light wind situations
and when using the bar with kites from 2009 or before. (The overall flying line length is partially
compensated for by using longer leader lines than in previous years.)
Redline Performance Bar FAQ:
Q. How do I reassemble the chickenloop after activation the quick release?
A. Hold the chickenloop in one hand so that the hinged section points towards your free hand, (hold in
left hand in example). Take the chickenloop line and insert it into the channel on the underside of the
chickenloop assembly, push upwards until the hinge closes. Then pull the cuff down over the main
body of the assembly until you here it click shut.
Q. What bar sizes are available?
A. 45, 50 and 55cm bars are available. A compatibility chart detailing what bar sizes best suit which
sizes of all current kites can be found on the following page.
Q. How does the swivel actually work?
A. The swivel is made in two halves which are screwed together and fit over the main body of the
chickenloop QR. The contact areas between these parts are smooth moulded and fitted with two low
friction, replaceable, bearing inserts. These parts can be replaced at any time should you feel the
performance of your swivel decrease.
The swivel extends vertically from the Click-It QR cuff towards the trim strap, and can easily be spun
by hand to unwind your lines.
Q. What flying lines are used?
A. We have retained the excellent flying lines from last year's bar. However we have uprated the
sleeving and replaced the leader and dual-depower lines with higher specification rope from the same
company who supplies the flying lines.
Q. Can I trim my back lines while flying?
A. No. Trying that will most likely result in you crashing your kite at high speed and possibly injuring
yourself. Under no circumstances, not even with assistance from a helper, should you ever attempt
this. Always land your kite first.
Q. What leashing options do I have?
A. There are two safety options- standard 'Redline leash' and 'Suicide Leash'. To use the standard
safety option you connect directly to the Redline safety ring beneath the chickenloop cuff as detailed
below. Either unhooking and dropping the bar or activating the 'Click-it' QR will engage the Redline
safety causing your kite to depower and fall from the sky.
Advanced riders who are willing to trade maximum depower for faster relaunch can choose to rig the
suicide leash option, shown below. The suicide leash effectively gives a two stage release. 1st stage
nd
leaves the kite fully powered after a crash, the 2 stage releases the kite onto the dual front line
safety.
In this instance you open and then clip the karabiner over the chickenloop line and into the bypass
leash ring. Attaching in this way removes the safety depower completely and a downed kite will retain
its shape and hold most of its power until the 'Click-it QR' is activated.
Q. What features have you included for unhooked riding?
A. The Redline Performance Bar features a new bar center and chickenloop assembly that have a
male-female fit when the bar is pulled all the way down. This ensures your chickenloop is in the right
position for re-hooking.
The bar grip now extends all the way to the ends of the bar, covering the inside of the bar ends. This
provides a soft contact point, making one-handed, unhooked tricks more comfortable and replaces
the separate bar-end bumpers featured on the 2009 bars.
Q. Is there a Kookproof option?
A. By the time you read this the Kookproof option should be in production. The front flying lines will
come rigged with a small knot in the end of the sleeved loop at the end of both the 20m and 3m
sections. This knot allows you to use the ends of the front flying lines as either a 'loop' (standard) or a
'knot' (Kookproof). Riders wishing to rig Kookproof need to replace the standard front bridle pigtails on
their kites with the new Kookproof accessory set.
Q. My swivel has become progressively more resistant to turning, what can I do?
A. No matter which swivel we used with the new bar we knew from experience that it would need
replacing eventually. Foreign matter ingress into the swivel slowly break down the performance of the
part regardless of the design used. With this in mind we designed a brand new swivel part for the
Redline Performance Bar. It uses no metal parts in the friction surfaces so cannot corrode and the
main bearing surfaces are lubricated with Teflon loaded bushes that can be simply replaced.
Complete disassembly of the swivel takes only a minute and requires a single 3mm allen key.
We recommend that you rinse your swivel out under a running tap after every session. Simply flush
the swivel out from above and below where the Redline enters the housing, twisting the swivel as you
flush it out speeds up the process and will return your swivel to its original performance. Your swivel
can also be rinsed out during a session with salt water if you feel the bearing has become
contaminated.
Should your swivel ever become jammed all parts of the swivel assembly and QR are available an
accessory items from your local dealer.
Q. How far can I bend the hinge open to reassemble the quick release cuff?
A. At no time should you need to force the hinge open to reassemble the chickenloop and QR cuff.
The hinge is designed to flex sufficiently to allow reinsertion of the chickenloop line and lockball
directly without opening the hinge by hand. Forcing the hinge open by hand can deform the part and
potentially lead to breakage or failure of the QR.
Q. what size is the chickenloop?
A. The chickenloop comes in two sizes. A standard 28cm size is provided with the bar. An increased
size 32cm loop is available as an accessory item for riders who prefer a larger a loop to facilitate
easier hooking and unhooking.
Q. How easy is it to fit a new chickenloop?
A. Replacement of the chickenloop can be performed in seconds. Simply bend and remove the
retaining pin, shown below left, then pull the remaining small loop downwards from below. When
inserting the replacement part it may help to thread a thin line over the closed loop end and pull it
back into the moulded part from above.
Q. Which size bar is best for my kite?
A. The 2010 kite/bar compatibility chart is given below. The stated options are given as an indication
of 'best fit'. Any kite 'can' be flown on any bar but performance may be compromised by choosing
those options indicated as NOT RECOMENDED
2010 Bar calibration chart is on page following.
Requests for further information and additions should be forwarded to [email protected]