1
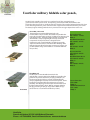
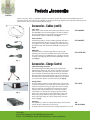
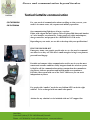
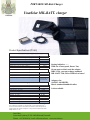
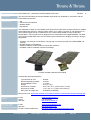
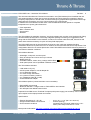
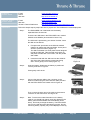
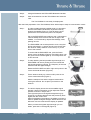
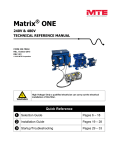
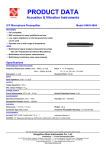
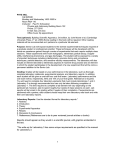
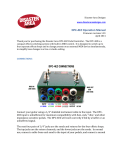
2009 military Catalog
Foldable Solar Panels
Power and Communication where ever you need it
Batteries and cable accessories sold separately.
UnatSolar
Stavnsholt Gydevej 97, DK-3460 Birkerod, Denmark
Phone : +45 7020 8628, Email: [email protected] www.unatsolar.eu
UnatSolar military foldable solar panels,
UnatSolar's P3 portable solar panels are a product line of solar-energized power
generators for mobile power needs. Incorporating solid state, thin-film, PowerFLEX™ solar
technology, the P3 provides an excellent choice for situations that require lightweight, durable, silent
power. Re-charge batteries, power communication equipment and mobile electronics, plus reduce
the battery logistic challenge with the P3. It provides silent energy independence to the user.
P3-62 watt
P3 62 Watt, 12V or 24 V
The UnatSolar 62-watt Portable Power Pack solar
module offers a unique solution for reliable and portable solar
power for charging battery packs, PC's, lighting, low-ampage 12/24
volt appliances, etc. The P3-62 weighs less than 4.5 pounds and
when folded is compact, lightweight and easily stored and
transported. The P3 product line is designed for low
maintenance and rugged durability. The SAE plug provides
simple attachment to a load. Includes built-in blocking diode.
Built-in grommets allow for hanging, mounting or laying in any
position. (NOTE: charge control device is recommended with
this product)
Desert Camo Tan
P/N 16013a - 12 Volt
MOQ - 5
Woodland Camo Green
P/N 16014a - 12 Volt
MOQ - 5
Black
P/N 16015a - 12 Volt
MOQ - 5
Desert Camo Tan
P/N 16016a - 24 Volt
MOQ - 5
Woodland Camo Green
P/N 16017a - 24 Volt
MOQ - 5
Black
P/N 16018a - 24 Volt
MOQ - 5
P3-30 watt
P3 30 Watt, 12V
The UnatSolar 30-watt Portable Power Pack solar
module offers a unique solution for reliable and portable solar
power for Sat phones, GPS, battery charging, notebook's, etc.
The P3-30 weighs less than 2.5 pounds and when folded is
compact, lightweight and easily stored and transported. The P3
product line is designed for low maintenance and rugged
durability. The SAE plug provides simple attachment to a load.
Includes built-in blocking diode. Built-in grommets allow for
hanging, mounting or laying in any position. (NOTE: charge
control device is recommended with this product)
UnatSolar
Stavnsholt Gydevejwebsite:
97, DK-3460
Birkerod,
Denmark
www.globalsolar.com
- email:
[email protected]
Phone : +45 7020 8628, Email: [email protected] www.unatsolar.eu
Desert Camo Tan
P/N 16005
MOQ - 5
Woodland Camo Green
P/N 16006
MOQ - 5
1
Various accessory cables are available to enable connection from the solar panels to many different types of
electronic devices. The solar charge controllers and battery packs help regulate power input from the solar panels
into electronic devices creating a more efficient charge.
5 Piece Accessory Kit
The 5 Piece Accessory Kit is included with every
SUNLINQ solar pack, but is also sold separately. Each
cable has a standard SAE Trailer plug on one end that
plugs directly into the solar panel. The accessory kit
includes; one 12V CLA receptacle, one 12V CLA plug,
one 4 inch 2.5mmID barrel plug, one set of battery
clamps and one 8 foot extension cable. (Fig.1)
Fig. 1
Fig. 2
Fig. 3
Fig. 4
CLA Barrel Jack Adapter
The Barrel Jack Adapter cable is a 6 inch, 18 AWG zip
cord cable with a 7-10 Amp rating. It has a 2.5mmID
barrel jack on one end and a 12V CLA receptacle on the
other. This adapter can be used with the OEM-40 and
OEM-42 modules as well as other adapter cables with
2.5mmID x 5.5mmOD barrel plug connectors. (Fig. 2)
SAE Barrel Plug Adapter
The Trailer Plug Adapter is a 4 inch, 18AWG zip cord
cable. It has a standard SAE two prong connector on
one end and a 2.1mmID x 5.5mmOD barrel plug on the
other end. This adapter cable can be used with the P3
product line and the SUNLINQ line of products. The SAE
plug connects directly to the solar panel and the barrel
plug connects to various electronic devices and battery
packs. (Fig. 3)
Barrel to Barrel Adapter
The Barrel to Barrel Adapter is a 4 inch, 18AWG zip cord
cable. It has a 2.5mmID x 5.5mmOD barrel jack on one
end and a 2.1mmID x 5.5mmOD barrel plug on the
other end. This adapter cable can be used with the
OEM-40 and OEM-42 modules and adapts to various
electronic devices. (Fig. 4)
UnatSolar
Stavnsholt Gydevej 97, DK-3460 Birkerod, Denmark
Phone : +45 7020 8628, Email: [email protected] www.unatsolar.eu
P/N 22700
P/N 28000
P/N 28001
P/N 28002
Various accessory cables are available to enable connection from the solar panels to many different types of
electronic devices. The solar charge controllers and battery packs help regulate power input from the solar panels
into electronic devices creating a more efficient charge.
Accessories - Cables (cont'd)
SAE Y-Cable
Need more power? Use this SAE Y-Cable to parallel two or even
four SUNLINQ or P3 solar packs together. The SAE Y-Cable has
two-prong SAE plugs on each 3 foot leg and at the end of a 1
foot trunk. This cable is a 18AWG zip cord. (Fig.1)
Fig. 1
Fig. 2
Fig. 3
Extension Cable
The Extension Cable is an 8 foot, 16AWG, jacketed cable with a
two-prong SAE Trailer plug on each end. This cable connects
to any of the accessory cables available in the 5 Piece Accessory
Kit and then plugs directly into the SUNLINQ or P3 solar pack.
(Fig. 2)
iPOD Cable
The iPOD Cable is a jacketed cable with a two-prong SAE
Trailer plug on one end and an iPOD connection on the other.
This cable connects to any iPOD that uses a docking connector
to charge. The SAE plugs directly into the SUNLINQ or P3 solar
pack. (Fig. 3)
P/N 28003RC
P/N 28007RC
P/N 22700-6RC
Accessories - Charge Control
Fig. 4
Fig. 5
7Amp Solar Charge Controller
The 7 Amp Charge Controller protects your 12V lead acid
batteries from overcharge. This charge controller is to be used
with any Global Solar solar product over 12W and can handle
up to 100 Watts of Solar Power. With the attached SAE Trailer
plug the 7 Amp Solar Charge Contoller can connect directly to
the solar panel and the remaining SAE Trailer plug can connect
to any one of the cables in our 5 Piece Accessory Kit. (Fig. 4)
Voltage Limiter
The 14.5 Voltage Limiter is a high performance solar voltage
controller designed to connect to Global Solar portable solar
modules and provide energy to applications where voltage
limits are required. Unregulated solar panels have output
voltages that range anywhere from 14-28 volts or higher.
Such voltage can damage the charging input of sensitive
devices. The 14.5 Voltage Limiter regulates the solar panel
fluctuating voltage input by capping the voltage below a
max peak on the output in order to safely charge sensitive
devices. (Fig. 5)
myBattery
The myBattery is universal rechargeable battery, which include
AC/DC adapter, adapter kit, w/carry pouch
(8 adapters for most electric devices). Voltage output from 5-19 volt
UnatSolar
Stavnsholt Gydevej
DK-3460 Birkerod,
Denmark
website:97,
www.globalsolar.com
- email:
[email protected]
Phone : +45 7020 8628, Email: [email protected] www.unatsolar.eu
P/N 14598
P/N 16707
P/N
Sat-Un-35000
4
Power and communication beyond borders
Tactical Sattelite communication
P/N: TACCOM700
PN: TACCOM500
For your needs of communication when travelling or what you ever your
needs is in remote areas, aid, response and military operations
Our communication flight boxes is in two versions.
Either with a bgan/Thrane Explorer 700 or Explorer500, bluetooth handset
or 2 wire handset, extra batteries, 2 solar panels, all cables and adapters,
charge controller, and prepared for a IBM/LENOVO T60 series.
Depending on your needs, we are able to develop with your specifications.!
FIRST RESPONDER KIT
Emergency teams, cost guards, special units etc etc. also need to communicate where ever they are. This box is small enough to bring it on a plane as
personal hand bagage.
Portable and compact video communication tool for use in even the most
remote and extreme conditions. Fully integrated and also wireless system
is ideal for off-site communication such as construction sites, manufactoring floorss, defence operations and in-field media correspondence.
Pair this video-system with one of the TACCOM-boxes you can work
independant enywhere
For people with “smaller” needs the new Iridium 9555 can be the right
solution. To be recharged with our small solar panels.
Airtime for any solution is to be included with our 24/7 support line
.
UnatSolar
Stavnsholt Gydevej 97, DK-3460 Birkerod, Denmark
Phone : +45 7020 8628, Email: [email protected] www.unatsolar.eu
PORTABLE Mil-Batt-Charger
UnatSolar MIL-BATT. charger
Product Specifications (P3-62)
Electrical Characteristics*
P3 Product Number
Nominal System Voltage Rating
Nominal Rated Power (watts) at STC
Nominal Rated Voltage at MPP (VDC) at STC
Nominal Rated Current (amps)
Open Circuit Voltage (volts)
S h o r t C i r c u i t C u r r e n t ( a mp s )
P 3 - 62
12V / 24V
62
20 / 40
3.1 / 1.6
31 / 65
4.2 / 2.1
Thermal Characteristics
T e mp er at u re Coe f f i c i e n t f o r Po we r ( % / C )
T e mp er at u re Coe f f i c i e n t f o r V o l t a g e ( % / C )
T e mp er at u re Coe f f i c i e n t f o r Voc ( % / C )
Cell Temperature Operating Range
- 0 .6
- 0 .5
- 0 .4
- 400 F to 1760 F /
- 400 C to 800 C
Dimensions and Weight
Length, in (mm)
Width, in (mm)
Thickness, in (mm)
Length, in (mm)
Width, in (mm)
Thickness, in (mm)
Folded
Un f o ld ed
Weight
Weight, lb (kg)
Power to weight ratio watt/lb (watt/kg)
14.5 (368)
8.5 (216)
1.4 (36)
Staying behind or .......
With our 62 watt panel, Desert Tan,
Green camo or black, and the adapter
MRC-135A, you can recharge standard
MIL-BATT. 390, 590 or 2590 in few hours.!
Adapters for:
AN/PRC-148 MBITR,
Harris standard handheld radios
is also available
52.5 (1333)
30 (762)
0 . 1 ( 2 . 5)
3.1 (1.41)
20 (44)
*Data at Standard Test Conditions (STC)
STC: irradiance level 1000W / m2, spectrum AM 1.5 and cell temperature 25o C
The thin film solar material in this module can increase in power with exposure to
sunlight. Expose the module to sunlight for 3-4 days for best measurement results.
Rating tolerance +/- 15%
UnatSolar
Stavnsholt Gydevej 97, DK-3460 Birkerod, Denmark
Phone : +45 7020 8628, Email: [email protected] www.unatsolar.eu
.
ACCREDITED SOLUTION
EXPLORER® 700 – UnatSolar P3-62W Foldable Solar Panel
Document Name:
EXPLORER 700 – UnatSolar P3-62W Foldable Solar Panel
Revision:
Introduction:
This document describes the P3-62W foldable solar panel from UnatSolar in connection with the
EXPLORER 700 terminal.
Typical Users
► Aid
► Government and defence
► Disaster Relief
► Expeditions
Product Description:
The UnatSolar P3-62W 12 Volt portable power pack solar module offers a unique solution for reliable
and portable solar power for charging battery packs, PC’s, lighting, low-amp 12-volt appliances, etc.
The P3-62W weighs around 3 pounds and is very compact when folded for easy storage and
transportation. The P3 product line is designed for low maintenance and rugged durability. The SAE
plug provides simple attachment to a load. Built-in grommets allow for hanging, mounting or laying in
any position.
► Compact, can easily fit in a backpack, carrying bag or in the front pocket of the EXPLORER 700
soft bag
► Durable design for transporting
► Weather resistant, performs well in hot and cold conditions
► Available in black, woodland or desert camouflage
P3-62W unfolded in Black and Woodland
P3-62W solar panel specifications:
Typical Power at STC
Nominal Operating Voltage
Nominal Rated Current
Weight
Dimensions, unfolded
Dimensions, folded
Max power to weight ratio
:
:
:
:
:
:
:
62 Watt
20 Volts
3.1 Amps
3.1 lb (1.4 kg)
52.5" x 30" x 0.1" (1333 x 762 x 2.5 mm)
14.5" x 8.5" x 1.4" (368 x 216 x 36 mm)
20 Watt/lb (44 Watt/kg)
More product info: http://www.unatsolar.eu/images/UnatSolar-P3-62%20watt%20spec%20sheet.pdf
UnatSolar contact
details:
E-mail
Phone
Web site
mailto:[email protected]
+45 7020 8628
http://www.unatsolar.eu
Thrane & Thrane
contact details:
E-mail
Web site
Thrane & Thrane Distributors
mailto:[email protected]
http://www.thrane.com
http://www.thrane.com/Contact/Distributors.aspx
Accredited Solution
EXPLORER 700 – P3-62W Foldable Solar Panel
Page 2/4
A
Tested on products:
EXPLORER 700
Instructions:
How to connect the P3-62W solar panel to EXPLORER 700 terminal:
1.
2.
3.
4.
2.04
Unfold the P3-62W solar panel and point it towards the sun for optimal charging
Plug one end of the 8 foot extension chord to the EXPLORER terminal DC input
Connect the SAE plug to the P3-62W solar panel
The EXPLORER terminal will automatically be powered on and start charging once it is
connected to the solar panel.
Folding instructions for the P3-62W solar panel:
Step 1:
Fold one side of the panel down the hingefold, active solar cells to the inside.
Figure 1.
Step 2:
Starting at the end away from the cable, fold
the panel along its hinge-folds.
Figure 3.
Step 3:
Then wrap the flap around until both the hook
and loop sides of the Velcro are lined up.
Figure 4.
Step 4:
Lastly, press the Velcro together to secure the
fold unit.
Figure 5.
It is recommended to set the Power Up Mode in the EXPLORER 700 to Manual, so it does not power
up automatically each time the solar panel is connected. Please refer to next page.
Accredited Solution
EXPLORER 700 – P3-62W Foldable Solar Panel
Page 3/4
Step 1:
Press the
▼ button.
Step 2:
Press the ▼ button until
SETTINGS appear.
Press OK.
Step 3:
Press the ▼ button until POWER UP MODE
appears. Press the OK button.
Step 4:
Press the ▼ button once and select MANUAL by pressing OK.
Maintenance:
► Make sure that there is no dirt or moisture inside the connector.
► When disconnecting a device from the panel, do not pull on the cable; always hold onto the
connector.
► Keep the front of the panel clean. Do not expose to sharp objects. The panel can be cleaned with
a wet cloth and a mild soap solution when necessary.
You can preserve power by following below guidelines:
► Point the EXPLORER antenna carefully to obtain best possible signal strength.
► Upgrade the EXPLORER 700 software version to 2.04 or latest software release (Advanced Power
Management).
► Switch OFF the EXPLORER 700 when not used for more than 30 min.
► Turn OFF the interfaces you have no plans of using (please refer to EXPLORER 700 User Manual,
Chapter 4).
► Set Backlight to Timed (is set to 10 seconds by default).
Need more power?
► Spare EXPLORER 700 battery (part no. TT-3686P).
Notes:
Although the P3-62W may be used to power other electronic devices the P3-62W has been
optimized to power the EXPLORER 700 terminal. Other electronic devices may be charged at the
consumer’s own risk.
UnatSolar is a registered supplier to armies worldwide. For more information please refer to:
http://www.armedforces-int.com/companies/unatsolar.asp
Tested:
Test performed:
#1
Charging in direct sunlight while being on-line with the EXPLORER 700 terminal and
the EXPLORER Bluetooth Handset ready to receive an incoming call. Total charge
time 2 hours and 40 min.
Information in this document is subject to change without notice and
does not represent a commitment on the part of Thrane & Thrane A/S.
© 2008 Thrane & Thrane A/S. All rights reserved. Printed in Denmark.
Accredited Solution
EXPLORER 700 – P3-62W Foldable Solar Panel
Page 4/4
ACCREDITED SOLUTION
EXPLORER® 700 – UnatSolar TACCOM700
Document Name:
EXPLORER 700 – UnatSolar TACCOM700
Revision:
A
Introduction:
This document describes the Tactical Communication 700 (TACCOM700) from UnatSolar that are
self contained within the hard case for ease of transport and quick deployment making it ideal for
temporary deployment in remote areas, as well as emergency preparedness applications where high
speed Internet connectivity and voice communications are a requirement.
In addition the TACCOM700 includes extra universal batteries and solar panels for complete
independence of power grid infrastructure.
Typical Users:
► First responders
► NGO / disaster relief
► Government
► Defense
Product Description:
The TACCOM700 is watertight, dustproof, chemical resistant and corrosion proof, designed for fitting
an EXPLORER 700 terminal. It is a turnkey integrated package consisting of a rugged hard case,
along with the EXPLORER 2-wire Handset, as well as 30’ network cable with LAN, Phone/Fax and
power interconnects necessary for quick and easy field deployment.
The EXPLORER terminal is secured within the lid of the case, while the integrated leveling
mechanism allows one to place the unit in an outdoor environment while the case is kept closed. This
configuration allows for convenient placement of the EXPLORER terminal while remaining indoors, in
most adverse weather conditions.
TACCOM700 features:
► Watertight, crushproof, and dust proof
► Easy to transport and can be sets up in minutes
► Battery back-up
► Available in Black, Yellow, Gray, Orange & Olive Drab
► Solar panel power source (available in different colors)
The TACCOM700 includes:
► LAN cable 6.6 ft (2 m)
► AC/DC power adapters + travel adapter kit
► 2 x 62 Watt solar panels
► 2 x Solar Charge Controllers
► 2 x 5 pieces accessory cable kit
► 2 x myBatteries (200 Wh in total)
► Power distribution adapter
TACCOM700 options (customized foam to accommodate):
► EXPLORER 700 terminal
► Bluetooth Handset + charger cable or EXPLORER 2-wire Handset
► HP Officejet H470 Mobile Printer Series
Prepared for an IBM Lenovo ThinkPad T60 laptop with power supply (not included). Can be modified
upon request to other laptop brands and models.
Specifications:
► Exterior Dimensions (L x W x D)
► Weight w/EXPLORER & Accessories
► Environmental conditions
:
:
:
24.4 x 19.7 x 11.6” (62 x 50 x 29,5 cm)
49.8 lbs (22,6 kg)
Immersion MIL-STD-810F, Method 512.4 A 1meter (3.281 feet) immersion for 1 hour
More product information http://www.unatsolar.eu/images/UNATSOLAR%20tactical-700.pdf
Accredited Solution
EXPLORER 700 – UnatSolar TACCOM700
Page 2/5
UnatSolar
Contact details:
E-mail
Phone
Web site
mailto:[email protected]
+45 7020 8628
http://www.unatsolar.eu
Thrane & Thrane
Contact details:
E-mail
Web site
Thrane & Thrane Distributors
mailto:[email protected]
http://www.thrane.com
http://www.thrane.com/Contact/Distributors.aspx
Instructions:
Follow this simple step-by-step instruction to prepare the TACCOM700 for instant deployment.
Step 1:
The EXPLORER 700 is delivered with the battery
separated from the terminal.
There are two SIM slots in the EXPLORER 700, marked
USIM #1 and USIM #2 (#2 reserved for future use).
The SIM card is provided by your Airtime Provider. Insert
the SIM card as follows:
a. First press the eject button at the SIM slot marked
USIM #1 to release the SIM card holder. Use a pen or
similar to press the button (Figure 1a).
The SIM card holder is a small plastic frame designed
to hold the SIM card. Take the SIM card holder out
and place the SIM card in the holder, with the printed
side visible.
b. Insert the holder with the SIM card into the USIM #1
slot. Place the holder with the printed side facing
down. Press gently until it clicks (Figure 1b).
Step 2:
Figure 1a.
Figure 1b.
Insert the battery. Make sure the battery is positioned
correctly as shown in Figure 2.
Press gently until it locks.
Figure 2.
Step 3:
Connect the antenna cable to the connector on the
antenna module using the short antenna cable provided
with the EXPLORER 700. Please refer to Figure 3a.
Figure 3a.
Then connect the other end of the cable to the antenna
connector on the transceiver. See Figure 3b.
Step 4:
Accredited Solution
Figure 3b.
Note: To ensure accurate information on the battery
capacity you should fully charge, then fully discharge the
battery (until the EXPLORER 700 automatically shuts
down), and finally recharge the battery. The EXPLORER
700 can be used during the discharging process, but the
remaining battery capacity may not be displayed correctly.
EXPLORER 700 – UnatSolar TACCOM700
Page 3/5
Step 5:
Charge all batteries and EXPLORER Bluetooth Handset.
Step 6:
Pack all accessories into the TACCOM700 and close the
case.
The TACCOM700 is now ready for deployment.
After the initial preparation of the TACCOM700, follow below steps to setup a communication center:
Step 1:
In order to obtain the best possible signal, it is important
that the EXPLORER 700 antenna is pointed correctly
towards the satellite (Figure 4). This will ensure good
performance and minimize the power consumption.
Set up the EXPLORER 700 outdoors (10m / 33ft antenna
cable included) where it has a clear line-of-sight to the
satellite, i.e. not blocked by objects like buildings, trees,
passing cars etc.
The EXPLORER 700 must be placed in such a way that
during transmission, no person should come closer than
the minimum safety distance of 40 inches (1 m) to the
front of the antenna.
To switch-ON the EXPLORER 700, push the Power
button next to the display (Figure 5) and hold it down until
the green Power indicator lights up. It normally takes one
or two seconds.
Step 2:
Figure 5.
To help obtaining the best possible signal strength, the
EXPLORER 700 uses a pointing sound to indicate the
signal strength during pointing. The frequency of the tone
increases with the signal strength.
Rotate the EXPLORER 700 left or right until it points in the
correct horizontal direction (Figure 6).
Step 3:
Figure 4.
Figure 6.
Tilt the antenna slowly up or down until it points in the
correct vertical direction (Figure 7).
Hold the transport lock and the support bracket while
moving the antenna. Do not place your hands on the
antenna.
Figure 7.
Step 4:
The built-in display shows the current satellite signal
strength. Use this information to fine-adjust the antenna
position as shown in step 2 and 3.
If the right most part of the signal strength bar is grey
(Figure 8), it indicates that the level has previously been
higher than the current level.
When fine-adjusting the antenna, the display may take a
while to update the signal strength. Wait a second or two
after each move to make sure the display is updated.
When you have the highest signal strength you can
obtain, press OK on the keypad (Figure 9).
Accredited Solution
EXPLORER 700 – UnatSolar TACCOM700
Figure 8.
Figure 9.
Page 4/5
Step 5:
Connect the computer to the one of the LAN interfaces on
the EXPLORER 700 terminal (Figure 10).
Figure 10.
Step 6:
The TACCOM700 is now ready to make and receive calls,
access the Internet, send and receive e-mails, run video
conferences, stream live video, access you corporate
network, etc.
Step 7:
There are four ways to recharge the EXPLORER 700. All
four power sources can be connected directly to the DC
input.
Figure 11.
► EXPLORER AC/DC power adapter
► P3-62W solar panel
► myBattery (adapter tip C, 19V)
► Car cigarette lighter outlet (both 12V & 24V supported)
The default behavior of the EXPLORER terminal is to power up automatically when applying external
power. You may want to change the setting in the terminal, so that the EXPLORER is only powered if
the Power button is pressed manually.
This will enable charging and maintenance of the battery without having to manually switch-OFF the
terminal each time.
Manual power up can be configured under SETTINGS from the EXPLORER display and keypad.
Step 1:
Press the ▼ button.
Step 2:
Press the ▼ button until SETTINGS appear.
Press OK.
Step 3:
Press the ▼ button until POWER UP MODE appears.
Press the OK button.
Step 4:
Press the ▼ button once and select MANUAL and press
OK.
You can preserve power by following below guidelines:
► Point the EXPLORER antenna carefully to obtain best possible signal strength.
► Upgrade the EXPLORER terminal firmware to latest software release.
► Switch-OFF the EXPLORER terminal when not used for more than 15 min.
Note:
Do not attempt to charge the myBatteries from a car battery, this may damage the circuitry in the
myBattery. This will require a special adapter.
If the TACCOM700 includes a HP inkjet printer it is strongly recommended to close the valve before
airfreight. Simply open the valve when it arrives at the destination to relieve the pressure.
Information in this document is subject to change without notice and
does not represent a commitment on the part of Thrane & Thrane A/S.
© 2008 Thrane & Thrane A/S. All rights reserved. Printed in Denmark.
Accredited Solution
EXPLORER 700 – UnatSolar TACCOM700
Page 5/5