1
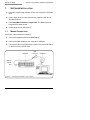
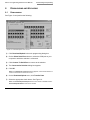
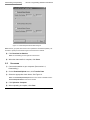
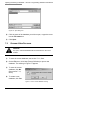
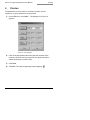
KTD-411
Digiplex® IV Programming Software
© 2003 GE Interlogix, Video Systems Group
All Rights Reserved.
Any GE Interlogix, Video Systems Group,
software supplied with GE Interlogix, Video
Systems Group, products is proprietary
and furnished under license and can be
used or copied only in accordance with the
terms of such license.
This document contains proprietary
information that is protected by copyright.
No part of this document may be
reproduced or transmitted in any form or
by any means without the prior written
permission of GE Interlogix, Video
Systems Group.
The information contained in this
document is subject to change without
notice. GE Interlogix, Video Systems
Group, in keeping pace with technological
advances, is a company of product
innovation. Therefore, it is difficult to
ensure that all information provided is
entirely accurate and up-to-date. GE
Interlogix, Video Systems Group, accepts
no responsibility for inaccuracies or
omissions and specifically disclaims any
liabilities, losses, or risks, personal or
otherwise, incurred as a consequence,
directly or indirectly, of the use or
application of any of the contents of this
document.
For the latest product specifications, visit
GE Interlogix, Video Systems Group,
online at www.GE-Interlogix.com or
contact your Kalatel sales representative.
For technical support before and after installation, call 800-469-1676.
Technical support is available 24 hours a day, 7 days a week.
Call:
Fax:
Web:
Tech Support 800-469-1676 (6 A.M. – 5 P.M. PST Monday through Friday)
Tech Support 541-740-3589 (all other times)
Main
800-343-3358 or 541-754-9133
Tech Support 541-752-9096 (available 24 hours a day)
Main
541-754-7162
www.GE-Interlogix.com
1036512C / September 2003
TABLE OF CONTENTS
BEFORE YOU BEGIN ............................................................... 5
1
SOFTWARE INSTALLATION ................................................. 6
1.1 MAKING CONNECTIONS ............................................. 6
2
SYSTEM SETUP................................................................. 7
3
CAMERA SETUP ................................................................ 8
4
PROGRAMMING MONITORS .............................................. 10
4.1 MONITOR SETUP ..................................................... 11
4.2 ARMING CAMERAS .................................................. 12
4.3 MONITORS’ SEQUENCE SETUP ................................. 13
5
4.3.1
Sequences 1 – 6 ........................................................ 13
4.3.2
Sequence 7................................................................ 15
GROUPS......................................................................... 16
5.1 GROUP SETUP ........................................................ 16
5.2 GROUP SEQUENCE SETUP ....................................... 17
6
DOWNLOADING AND UPLOADING ...................................... 19
6.1 DOWNLOADING ....................................................... 19
6.2 UPLOADING ............................................................ 20
7
OPENING AND SAVING A DATABASE ................................. 21
7.1 OPENING AND SAVING AN EXISTING DATABASE.......... 21
7.1.1
Save ........................................................................... 21
7.1.2
Open .......................................................................... 21
7.2 OPENING A NEW DATABASE .................................... 22
8
PRINTING ....................................................................... 23
KTD-411 Programming Software User Manual
Table of Contents
BEFORE YOU BEGIN
Read these instructions before installing or operating this product.
Note: This installation should be made by a qualified service person and should conform to
local codes.
This manual provides installation and operation information. To use this
document, you must have the following minimum qualifications:
• A basic knowledge of CCTV systems and components
• A basic knowledge of electrical wiring and low-voltage electrical
hookups
Use this product only for the purpose for which it was designed.
Customer Support
For assistance in installing, operating, maintaining, and troubleshooting
this product, refer to this document and any other documentation
provided. If you still have questions, contact Technical Support:
GE Interlogix, Video Systems Group
Call: 800-469-1676
Fax: 541-752-9096
Note: You should be at the equipment, ready with details before calling Technical Support.
Conventions Used in this Manual
Boldface or button icons highlight command entries. The following
WARNING, CAUTION, and Note statements identify potential hazards:
* WARNING:
Improper use of this equipment can cause severe bodily injury or
equipment damage.
** CAUTION:
Improper use of this equipment can cause equipment damage.
Note: Notes contain important information about a product or procedure.
* This symbol indicates electrical warnings and cautions.
** This symbol indicates general warnings and cautions.
1036512C / September 2003
5
Before You Begin
1
KTD-411 Programming Software User Manual
SOFTWARE INSTALLATION
1)
Insert the programming software CD into your computer’s CD-ROM
drive.
2)
If the installer does not open automatically, select the CD drive in
Windows Explorer.
3)
Click Install Matrix Switcher Programmer. The Matrix Switcher
Programmer Installer opens.
4)
Follow the on-screen instructions.
1.1
MAKING CONNECTIONS
See Figure 1 and perform the following:
1)
Connect the supplied cable to the DB9 adapter.
2)
Connect the DB9 adapter to your computer’s COM port.
3)
Connect the cable to the RS232 port on the back of the KTD-440 or
on the front of the KTD-447 card.
KTD-440
DB9
connector
COM port
Cable to
RS232
port
Figure 1. Connecting the switcher to your computer
6
1036512C / September 2003
KTD-411 Programming Software User Manual
2
1)
Software Installation
SYSTEM SETUP
To open the software, double-click the KTD-411 Programming
Software desktop icon. The K Matrix Switcher Programmer dialog
box appears. See Figure 2.
Figure 2. Matrix Switcher Programmer main dialog box
Note: If the desktop icon is unavailable, click Start on the task bar, point to
Programs, Kalatel, Matrix Switcher, and then click KTD-411 Programming
Software.
2)
Click System Setup.
The System Setup
dialog box appears. See
Figure 3.
3)
Type the highest
camera address and the
number of monitors in
your system.
4)
Click Done.
1036512C / September 2003
Figure 3. Enter the system information
7
Camera Setup
3
KTD-411 Programming Software User Manual
CAMERA SETUP
1)
On the K Matrix Switcher Programmer dialog box (Figure 2), click
Camera Setup. The Camera Setup dialog box (Figure 4) appears.
2)
Click the BNC Number of the camera you want to set up.
Figure 4. Camera Setup dialog box
3)
Type the number of the BNC connector on the back of the chassis
to which the camera will be connected. See Figure 5.
Note: Remote switcher BNC mapping is not supported.
8
4)
In the Camera Title field, type a camera title.
5)
In the Video Loss field, click None. A drop-down arrow appears in
the field.
1036512C / September 2003
KTD-411 Programming Software User Manual
Figure 5. BNC video input connector numbers (
Camera Setup
)
6)
Click the arrow to select None, Sync, Low, Medium, or High
sensitivity.
7)
Repeat steps 2 through 6 for all cameras in the system.
To clear camera setup information
• One camera: click the camera number to highlight the row, then
click Clear Selection.
• A group of cameras: simultaneously press the Ctrl key and click on
the number fields of the cameras you would like to clear, then click
Clear Selection.
• All cameras: click Clear All.
8)
Click Save Camera Setup.
9)
Click Close.
1036512C / September 2003
9
Programming Monitors
4
KTD-411 Programming Software User Manual
PROGRAMMING MONITORS
Note: If any of your monitor numbers are unavailable, adjust the number of monitors you
typed in section 2, System Setup. See Figure 3.
• If you want all monitors to share the same settings, click Select All
Monitors. All monitor icons will display as active. The Select All
Monitors button will change to Deselect All. See Figure 6.
Note: Click Deselect All if you want to deselect all monitors.
• If you want one or multiple monitors to have different settings, click
on the number of each monitor . The selected monitor icons will
appear as active.
Note: You must click the monitor number, not the area above the number.
Click Monitor(s) Setup to begin programming the selected monitor(s).
The Programming Monitor dialog box appears.
Figure 6. Monitor Programming dialog box showing 43 available monitors
10
1036512C / September 2003
KTD-411 Programming Software User Manual
4.1
Programming Monitors
MONITOR SETUP
See Figure 7 and perform the following:
1)
On the Programming Monitor dialog box, click the Monitor Setup
tab.
2)
Set the monitor parameters.
Note: The Universal Dwell time is for monitor and group sequences.
3)
Click Save Mon. Setup.
Note: If you click Close or another tab in the Programming Monitor dialog box
without saving changes, a warning dialog box appears. Settings will be lost if you
do not save them.
Figure 7. Monitor Setup tab
1036512C / September 2003
11
Programming Monitors
4.2
KTD-411 Programming Software User Manual
ARMING CAMERAS
See Figure 8 and perform the following:
Figure 8. Arming Cameras tab
1)
Click the Arming Cameras tab in the Programming Monitor dialog
box.
2)
All cameras are armed by default:
• To disarm one camera, click the camera number, then click
Disarm.
• To disarm multiple cameras, simultaneously press the Ctrl key and
click each camera number, then click Disarm.
• To disarm all cameras, click Disarm All.
12
1036512C / September 2003
KTD-411 Programming Software User Manual
3)
Programming Monitors
Click Save Armed Cameras.
Note: If you click Close or another tab in the Programming Monitor dialog box
without saving changes, a warning dialog box appears. Settings will be lost if you
do not save them.
4.3
MONITORS’ SEQUENCE SETUP
4.3.1
SEQUENCES 1 – 6
Each monitor or group of monitors can use one of six sequences
(1 through 6) with up to 32 steps each. To set up a sequence of camera
views for the selected monitor(s), see Figure 9 and perform the following:
1)
Click the Monitors’ Sequence Setup tab of the Programming
Monitor dialog box. Armed cameras are displayed in the box on the
left.
2)
Select the desired Sequence Number.
3)
Click on the camera to appear first in the sequence. The camera
will display as active.
4)
In the Sequence Step Dwell Time drop-down menu, select how
many seconds (1 – 30) the camera is to remain on the monitor.
5)
Click Add To Sequence. The camera number and its dwell time
appear in the box on the right.
6)
Repeat steps 3 through 5 until you enter all desired cameras in the
sequence.
1036512C / September 2003
13
Programming Monitors
KTD-411 Programming Software User Manual
Figure 9. Monitors’ Sequence Setup tab for sequences 1 – 6
• To add a camera in the middle of a sequence, position the pointer
over the step you wish to change and click it. Follow steps 3
through 5. The new camera will be added, and all cameras below it
will move down one step.
• To remove a camera from the sequence, position the pointer over
the step and click it. Click Delete From Sequence.
7)
Click Save Sequence.
8)
Repeat steps 2 through 7 to set up other sequences (1 – 6).
14
1036512C / September 2003
KTD-411 Programming Software User Manual
4.3.2
Programming Monitors
SEQUENCE 7
Sequence 7 always begins at camera 0 and runs up to the camera
assigned in the Highest Camera Number box (see Figure 10).
See Figure 10 and perform the following:
Figure 10. Monitors’ Sequence Setup tab for sequence 7
1)
Select Sequence Number 7.
2)
In the Highest Camera Number box, enter the number of the
camera at which the sequence will end.
Note: If the Saved Dwell Time is not appropriate, click the Monitor Setup tab and change
the Universal Dwell (you must click Save Mon. Setup).
3)
Click Save Sequence.
4)
Click Close.
1036512C / September 2003
15
Groups
KTD-411 Programming Software User Manual
5
GROUPS
5.1
GROUP SETUP
You can program groups of cameras to appear on specific monitors in a
sequence. Thirty-two groups can be programmed into twelve sequences.
See Figure 11 and perform the following:
1)
Click Group Setup in the main programming dialog box (Figure 6).
The Groups dialog box appears.
2)
Click the Group Setup tab.
3)
Select a group number.
Figure 11. Group Setup tab
16
1036512C / September 2003
KTD-411 Programming Software User Manual
Groups
4)
In the Group Name box, type a name for the group.
5)
In the Site Alarm Number box, type the number of the site alarm
that will call up this group when the alarm is activated.
6)
Click in the Site Number field corresponding to each monitor and
type the number of the camera to appear.
7)
Click Save Group.
8)
Repeat steps 3 through 7 for additional groups.
5.2
GROUP SEQUENCE SETUP
See Figure 12 and perform the following:
Figure 12. Group Sequence Setup tab
1036512C / September 2003
17
Groups
KTD-411 Programming Software User Manual
1)
Click the Group Sequence Setup tab.
2)
Select a sequence number.
3)
In the Sequence Step Dwell Time drop-down, type or select a
dwell time (1 – 30) for the first group in the sequence.
4)
Click in the Group Number field for Step 1 and type the number of
the group to appear first in the sequence.
5)
Press Enter or click in the next Group Number field. The group
name that you programmed in Group Setup appears.
Note: If you enter a group number for a group that has not been set up, the default
name and Dwell Time appear.
6)
To change the group in a given sequence step, click in the Group
Number field of the step you want to change, delete the current
information, and type the new group number.
7)
To delete a group, click the Step number to activate the row and
press Delete.
8)
Click Save Sequence.
9)
Repeat steps 2 through 7 for successive sequences.
10)
18
Click Close.
1036512C / September 2003
KTD-411 Programming Software User Manual
Downloading and Uploading
6
DOWNLOADING AND UPLOADING
6.1
DOWNLOADING
See Figure 13 and perform the following:
Figure 13. Download/Upload menu choices
1)
Click Download/Upload in the main programming dialog box.
2)
On the Select Serial Port submenu, select the COM port on your
computer to which the switcher is connected.
3)
Click Connect To Serial Port to connect to the switcher.
4)
The Connected to Switcher dialog box appears.
5)
Click OK.
Note: If the No Switcher Card Found warning appears, ensure that the switcher is
turned on and that all connections are sound.
6)
On the Download/Upload menu, click Transfer Data.
7)
Select the appropriate check boxes. See Figure 14.
Note: The Download/Upload Sequences check box remains unavailable until the
Download/Upload Monitors check box is selected.
1036512C / September 2003
19
Downloading and Uploading
KTD-411 Programming Software User Manual
Figure 14. Download/Upload Switcher Data dialog box
Note: Monitors, group data, and cameras can be uploaded or downloaded separately. The
download or upload process will take longer if all check boxes are selected.
8)
Click Download to Switcher.
Note: The downloading process might take a few minutes.
9)
6.2
When the data transfer is complete, click Close.
UPLOADING
1)
Connect the switcher to your computer. (See section 6.1,
Downloading.)
2)
On the Download/Upload menu, click Transfer Data.
3)
Select the appropriate check boxes. See Figure 14.
Note: The Download/Upload Sequences check box remains unavailable until the
Download/Upload Monitors check box is selected.
4)
Click Upload to Computer.
5)
When uploading is complete, click Close.
20
1036512C / September 2003
KTD-411 Programming Software User Manual
Opening and Saving a Database
7
OPENING AND SAVING A DATABASE
7.1
OPENING AND SAVING AN EXISTING DATABASE
7.1.1
SAVE
1)
On the file menu, click Save Database As…. The dialog box in
Figure 15 appears.
Figure 15. Save As dialog box
2)
Enter a file name in the File Name field.
3)
Select a folder in which to save the file.
4)
Click Save.
7.1.2
OPEN
1)
On the file menu, click Open. The dialog box in Figure 16 appears.
1036512C / September 2003
21
Opening and Saving a Database
KTD-411 Programming Software User Manual
Figure 16. Open dialog box
2)
Click the name of the database you wish to open, or type the name
into the File name box.
3)
Click Open.
7.2
OPENING A NEW DATABASE
CAUTION:
Any open, unsaved databases will be erased when a new one is
created.
1)
To save the current database, see section 7.1.1, Save.
2)
On the File menu, click New (Factory Defaults) to open a new
database. The warning in Figure 17 appears.
3)
To save the current
database, click No.
(See section 7.1.1,
Save.)
4)
To create a new
database, click Yes.
Figure 17. Save current database warning
22
1036512C / September 2003
KTD-411 Programming Software User Manual
8
Printing
PRINTING
The parameters for any number of cameras, monitors, monitor
sequences, or group sequences can be printed.
1)
On the File menu, click Print…. The dialog box in Figure 18
appears.
Figure 18. Print dialog box
2)
Click on the appropriate buttons and type the numbers of the
monitors, cameras, monitor sequences, and group sequences
whose parameters you wish to print.
3)
Click Print.
4)
Click Exit. The main programming window appears.
1036512C / September 2003
23
Troublingshooting
24
KTD-411 Programming Software User Manual
1036512C / September 2003