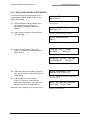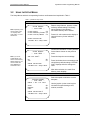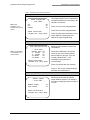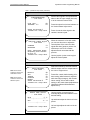
1
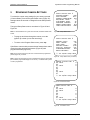
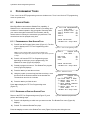
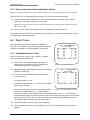
CyberDome Series
© 2003 Kalatel, a GE Interlogix company
All Rights Reserved.
Any GE Interlogix, Kalatel division, software supplied
with GE Interlogix, Kalatel division, products is
proprietary and furnished under license and can be used
or copied only in accordance with the terms of such
license.
This document contains proprietary information that is
protected by copyright. No part of this document may be
reproduced or transmitted in any form or by any means
without the prior written permission of GE Interlogix,
Kalatel division.
The information contained in this document is subject to
change without notice. GE Interlogix, Kalatel division, in
keeping pace with technological advances, is a company
of product innovation. Therefore, it is difficult to ensure
that all information provided is entirely accurate and upto-date. GE Interlogix, Kalatel division, accepts no
responsibility for inaccuracies or omissions and
specifically disclaims any liabilities, losses, or risks,
personal or otherwise, incurred as a consequence,
directly or indirectly, of the use or application of any of
the contents of this document.
For the latest product specifications, visit GE Interlogix,
Kalatel division, online at www.kalatel.com or contact
your GE Interlogix, Kalatel division, sales representative.
This equipment has been tested and
found to comply with the limits for a
Class A digital device, pursuant to part
15 of the FCC Rules. These limits are
designed to provide reasonable
protection against harmful interference
when the equipment is operated in a
commercial environment. This
equipment generates, uses, and can
radiate radio frequency energy and, if
not installed and used in accordance
with the instruction manual, may cause
harmful interference to radio
communications.
You are cautioned that any changes or
modifications not expressly approved by
the party responsible for compliance
could void the user's authority to
operate the equipment.
For technical support before and after installation, call 800-469-1676.
Technical support is available 24 hours a day, 7 days a week.
Call:
Fax:
Web:
Tech Support
Tech Support
Main
Tech Support
Main
www.kalatel.com
800-469-1676 (6 A.M. – 5 P.M. PST Monday through Friday)
541-740-3589 (all other times)
800-343-3358 or 541-754-9133
541-752-9096 (available 24 hours a day)
541-754-7162
1032476D / January 2003
CyberDome Series Programming Manual
Table of Contents
TABLE OF CONTENTS
BEFORE YOU BEGIN ...........................................................................................................4
1 INTRODUCTION .............................................................................................................5
2 ACCESSING PROGRAMMING MENUS ..............................................................................6
2.1
2.2
INITIATING ACCESS WITH THE KEYPAD ...................................................................6
2.1.1
Using a KTD-405..............................................................................................................6
2.1.2
Using a KTD-404/304 or KTD-400/300............................................................................7
ADVANCING TO THE MAIN PROGRAMMING MENU (ALL KEYPADS).............................8
3 PROGRAMMING CAMERA SETTINGS ...............................................................................9
3.1
NAVIGATING THE SETUP MENUS ...........................................................................9
3.2
USING THE SETUP MENUS ..................................................................................10
4 PROGRAMMING PRESET POSITIONS AND AREAS...........................................................17
4.1
PRESET TITLE ASSIGNMENT AND EDITING ............................................................17
4.2
PROGRAMMING TITLED AREAS ............................................................................18
4.3
VIDEO/PRIVACY BLANKING .................................................................................19
5 REVIEWING CAMERA SETTINGS ...................................................................................20
6 PROGRAMMING TOURS ...............................................................................................21
6.1
6.2
SHADOW TOURS.................................................................................................21
6.1.1
Programming a New ShadowTour.................................................................................21
6.1.2
Reviewing an Existing ShadowTour ..............................................................................21
6.1.3
Editing a Previously Programmed ShadowTour ............................................................22
PRESET TOURS .................................................................................................22
6.2.1
Programming Preset Tours............................................................................................22
6.2.2
Linking Preset Tours ......................................................................................................23
7 EXITING PROGRAMMING MODE....................................................................................24
8 SETTING ELECTRONIC AUTOPAN LIMITS AND ACTIVATING AUTOPAN ............................25
8.1
USING A KTD-405.............................................................................................25
8.2
USING A KTD-404/304 OR KTD-400/300...........................................................25
BEFORE YOU CALL TECHNICAL SUPPORT ..........................................................................26
INDEX ..............................................................................................................................27
1032476D / January 2003
3
Before You Begin
CyberDome Series Programming Manual
BEFORE YOU BEGIN
Read these instructions before installing or operating this product.
Note: This installation should be made by a qualified service person and should conform to local codes.
This manual provides installation and operation information. To use this document, you must have the
following minimum qualifications:
A basic knowledge of CCTV systems and components
A basic knowledge of electrical wiring and low-voltage electrical hookups
Intended use
Use this product only for the purpose for which it was designed; refer to the product specification and user
documentation.
Customer Support
For assistance in installing, operating, maintaining, and troubleshooting this product, refer to this
document and any other documentation provided. If you still have questions, please contact Kalatel
Technical Support and Sales:
GE Interlogix, Kalatel division
Call: 800-469-1676
Fax: 541-752-9096
Note: You should be at the equipment and ready with details before calling Technical Support.
Conventions Used in this Manual
Boldface or button icons highlight command entries. The following WARNING, CAUTION, and Note
statements identify potential hazards that can occur if the equipment is handled improperly:
* WARNING:
Improper use of this equipment can cause severe bodily injury or equipment damage.
** CAUTION:
Improper use of this equipment can cause equipment damage.
Note: Notes contain important information about a product or procedure.
* This symbol indicates electrical warnings and cautions.
** This symbol indicates general warnings and cautions.
4
1032476D / January 2003
CyberDome Series Programming Manual
1
Introduction
INTRODUCTION
This manual contains programming instructions for the CyberDome® series cameras. The most common
CyberDome programming options and screen sequences are illustrated. Notations indicate where options
may differ among camera models.
Kalatel’s Digiplex controller keypads are used to enter settings for the CyberDome cameras. There are
three basic models of keypad: the KTD-405, KTD-404/304, and KTD-400/300. The KTD-405 and
KTD-404/304 provide joystick control and the KTD-400/300 uses arrow keys to control directions. Refer to
the appropriate keypad manual for more information.
1032476D / January 2003
5
Accessing Programming Menus
2
CyberDome Series Programming Manual
ACCESSING PROGRAMMING MENUS
If you are using a KTD-405 keypad to program your system, follow the instructions in section 2.1.1. If you
are using a KTD-404/304 or KTD-400/300, follow the instructions in section 2.1.2.
2.1
INITIATING ACCESS WITH THE KEYPAD
2.1.1 USING A KTD-405
To access the programming mode begin at the normal operating display shown in Figure 1 and perform
the following.
1)
2)
) until the Enter
Press and hold the enter key (
Programming Code display (Figure 2) appears.
At the code entry display, enter the programming
access code 9,5,1,seq.
CAMERA 000
MONITOR 01
Figure 1. KTD-405 normal operating display
ENTER PROGRAMMING
CODE:
Figure 2. KTD-405 Enter Programming Code display
1=SWITCHER/MPLX
3=CAMERA/RCVR
3)
2=ALARMS
EXIT
At the first menu display (Figure 3), press 3.
Figure 3. KTD-405 first menu display
4)
5)
At the enter site number display (Figure 4),
press 1.
At the camera/receiver display (Figure 5), enter
the site number of the camera you are
programming.
Note: If the menu does not appear on the monitor, confirm
that you are entering an existing camera/site number.
Subsequent menus display on the monitor screen.
The initial programming screen displays the start-up
menu (Figure 6), which includes software version
information.
1=CYBERDOME
3=AUXILIARY
2=PTZ
BACK
Figure 4. KTD-405 enter site number display
ENTER CYBERDOME SITE
NUMBER _ _ _
BACK
Figure 5. KTD-405 camera/receiver display
CYBERDOME DAY-NITE
-- SITE 0000 -D: A00A8MOD MMDDYY
T1: A0008MST MMDDYY
T2: A0008MST MMDDYY
C: A00A8MOC MMDDYY
ID: XXXXXXXX
HOLD <SEQ> 3SEC-EXIT
<ALARM>-HLP<SEQ>-NEXT
Figure 6. Start-up menu
Proceed to section 2.2.
6
1032476D / January 2003
CyberDome Series Programming Manual
Accessing Programming Menus
2.1.2 USING A KTD-404/304 OR KTD-400/300
To access the programming mode begin at the
normal operating display shown in Figure 7 and
perform the following.
1)
2)
Press and hold the set key until the code
entry display (Figure 8 or Figure 9,
depending on the keypad being used)
appears.
At the code entry display, enter the access
code 9,5,1,seq.
CAMERA 000
MONITOR 01
Figure 7. KTD-404/304 and KTD-400/300 normal
operating display
CAMERA 000 (CODE)
MONITOR 01 (----)
Figure 8. KTD-400/300 code entry display
ENTER PROGRAMMING
CODE:_
Figure 9. KTD-404/304 code entry display
3)
At the first menu display (Figure 10 or
Figure 11, depending on the keypad being
used), press 4.
1=SWTCH 2=PTZ 3=ALRM
4=CYBER
SEQ=EXIT
Figure 10.
KTD-400/300 first menu display
1=SWTCHR 2=RCVR 3=ALARMS
4=CYBERDOME
SEQ=EXIT
Figure 11.
4)
5)
At the enter site number display (Figure 12),
enter the site number of the camera you are
programming.
At the CyberDome monitor display
(Figure 13), press 1 to confirm that the
proper site is displaying, or press 0 to enter
keypad menus for older CyberDomes.
Subsequent menus display on the monitor screen.
1032476D / January 2003
KTD-400/300 first menu display
ENTER CYBERDOME SITE
NUMBER 000 SEQ=EXIT
Figure 12. KTD-400/300 and KTD-404/300 enter
site number display
DOES THE MONITOR DISPLAY
SITE 000? 1=YES 0=NO
Figure 13. KTD-400/300 and KTD-404/304
CyberDome monitor display
7
Accessing Programming Menus
The initial programming screen displays camera model
information (Figure 14).
Press 1 to continue to the start-up menu (Figure 15), which
displays software version information.
Proceed to section 2.2.
CyberDome Series Programming Manual
CYBERDOME Day-Nite
-- SITE 0000 --
PRESS <1> TO
CONTINUE
Figure 14. Camera model Display
CYBERDOME DAY-NITE
-- SITE 0000 -D: A00A8MOD MMDDYY
T1: A0008MST MMDDYY
T2: A0008MST MMDDYY
C: A00A8MOC MMDDYY
ID: XXXXXXXX
HOLD <SEQ> 3SEC-EXIT
<ALARM>-HLP<SEQ>-NEXT
Figure 15. Start-up menu
2.2
ADVANCING TO THE MAIN PROGRAMMING MENU (ALL KEYPADS)
After the start-up menu displays, press seq to advance to the
main programming menu, the Program Select menu (Figure 16).
Note: Option 3 of the Program Select menu for some camera models displays
“Titles,” not “Titles/Areas.”
PROGRAM SELECT
-- SITE 0000 -SETUP
<1>
PRESETS
<2>
TITLES/AREAS
<3>
CURRENT STATUS <4>
TOURS
<5>
ENTER SELECTION:
<ALARM>-HLP<SEQ>-NEXT
Figure 16. Program Select menu
8
1032476D / January 2003
CyberDome Series Programming Manual
3
Programming Camera Settings
PROGRAMMING CAMERA SETTINGS
The CyberDome cameras are operable when installed. If the factory default settings for the camera are
acceptable, it is not necessary to reprogram the camera. Default settings for the setup features are
available on the help screen for the Clear Memory menu (Table 1, page 10).
To enter the setup menus, press 1 from the Program Select menu (Figure 16). (See section 2 to access
the Program Select menu.)
3.1
NAVIGATING THE SETUP MENUS
To accept the settings displayed on the current menu and advance to the next menu,
press seq (KTD-404/304 or -400/300) or ►► (KTD-405).
To return to the preceding menu, press 1st (KTD-404/304 or -400/300) or ◄◄ (KTD-405).
To select a setting, press the keypad number that corresponds with the choice in the menu.
To view related help at any point during programming, press alarm.
Some menus require the use of the arrow keys (KTD-400/300 or KTD–404/304) or joystick (KTD405).
1032476D / January 2003
9
Programming Camera Settings
3.2
CyberDome Series Programming Manual
USING THE SETUP MENUS
The Setup Menus and their corresponding functions are illustrated and explained in Table 1.
Table 1. CyberDome setup menus
Clear Memory / Return to Factory Defaults
CLEAR MEMORY
-- SITE 0000 -Note: Depending on the
camera model, option
<2> displays either
”Clear Titles,” or “Clear
Titles/Areas”
CLEAR SETUP
<0>
CLEAR PRESETS/TOURS <1>
CLEAR TITLES/AREAS <2>
ENTER SELECTION:
<ALARM>-HLP <SEQ>-NEXT
ARE YOU SURE?
NO
YES
Press 0, 1, or 2 to advance the display to
clear the memory for the indicated
feature.
Confirm the restoration of factory defaults
for the feature chosen on the previous
menu.
CLEAR MEMORY
-- SITE 0000 -Note: If you chose
CLEAR SETUP, and
want to view the factory
default settings for your
camera model, then
press alarm at this
confirmation menu.
Restore setup features, presets, or titles
to factory default settings. Previously
stored settings in the camera’s
nonvolatile memory will be erased.
Press 0 to keep the current settings.
<0>
<3>
ENTER SELECTION:
<ALARM>-HLP <SEQ>-NEXT
Press 3 to delete the current settings and
reload factory default settings. “PLEASE
WAIT” displays while the settings are
reset.
After either selection, the main Clear
Memory menu displays.
Set Autopan Speed
AUTOPAN SPEED
-- SITE 0000 -PRESS ← OR → TO TEST
SLOW
MEDIUM
FAST
<0>
<1>
<2>
Select the speed at which the camera
autopans.
Use the joystick (or the arrow keys) to
test the three speed settings: slow,
medium, and fast.
ENTER SELECTION:1
<ALARM>-HLP <SEQ>-NEXT
10
1032476D / January 2003
CyberDome Series Programming Manual
Programming Camera Settings
Table 1. CyberDome setup menus (continued)
Set Auto Return Mode
AUTO RETURN
-- SITE 0000 --
Note: The “home”
position is defined as
preset 0. The “tour”
position is defined as
the last tour operated.
DISABLE
INACTIVITY→TOUR
INACTIVITY→HOME
INACTIVITY→AUTO
<0>
<1>
<2>
<3>
ENTER SELECTION:0
<ALARM>-HLP <SEQ>-NEXT
TIME BEFORE RETURNING
-- SITE 0000 -INCREASE
DECREASE
<↑>
<↓>
ENTER TIME: 05m 00s
<ALARM>-HLP <SEQ>-NEXT
Set the camera to automatically return
after a period of inactivity to a
preprogrammed tour, “home” position, or
to autopan mode.
To auto return to a tour press 1, a home
position press 2, or to autopan press 3.
To disable the auto return feature,
press 0.
Set the period of inactivity (return time)
referenced in the Auto Return menu.
Use the joystick (or arrow keys) to
increase or decrease the return time in
15-second increments up to 5 minutes,
and then by 1-minute increments up to 60
minutes.
The minimum return time is 15 seconds.
The maximum return time is 60 minutes.
Set Azimuth Indicator
Note: The azimuth
indicator is not available
for all camera models.
AZIMUTH INDICATOR
-- SITE 0000 -DISABLED
ENABLED
SET NORTH
<0>
<1>
<SET>
ENTER SELECTION:0
<ALARM>-HLP <SEQ>-NEXT
Set the azimuth indicator, which enables
a direction indicator to be displayed on
the monitor screen.
To enable this feature, press 1. To
calibrate the indicator, point the camera
north and press the set key. “NORTH
SETTING SAVED” flashes briefly on the
screen to confirm the setting.
To disable this feature, press 0.
1032476D / January 2003
11
Programming Camera Settings
CyberDome Series Programming Manual
Table 1. CyberDome setup menus (continued)
Adjust Day/Night Switch Level
Note: The day/night
switch is not available
for all camera models.
DAY/NIGHT SWITCH LEVEL
-- SITE 0000 -SWITCH LEVEL CHOICES:
0: MANUAL SWITCHOVER
1-4: LIGHTER THAN DUSK
5: DUSK/DAWN
6-9: DARKER THAN DUSK
ENTER LEVEL <1-9>:
<ALARM>-HLP <SEQ>-NEXT
Set the level at which the camera’s
infrared filter automatically switches in
and out at dawn and dusk. The light level
switch-point is adjustable, but should be
set only during dawn/dusk conditions.
Select 0 to manually activate the switch.
If this option is selected, contact the
factory for proper keypad setup.
Adjust Electronic Zoom Setting
Set the electronic zoom on the camera.
The factory default setting is 4X.
ELECTRONIC ZOOM
-- SITE 0000 -Note: The number of
electronic zoom settings
available varies among
camera models.
1X
4X
12X
<1>
<2>
<3>
To test each zoom setting, press 1, 2, or
3, and then press the zoom in or zoom
out key (+ zoom – key for the KTD-405).
ENTER SELECTION:
<ALARM>-HLP <SEQ>-NEXT
Adjust Exposure Control Setting
EXPOSURE CONTROL
-- SITE 0000 -Note: Exposure control
is not available for all
camera models.
AUTO IRIS
MANUAL IRIS
MAN/RETURN TO AUTO
Set the method the camera uses to adjust
to different light levels.
<0>
<1>
<2>
ENTER SELECTION:2
<ALARM>-HLP <SEQ>-NEXT
Press 0 to enable the camera to
automatically adjust to different light
levels. The iris open key (+ iris key for
the KTD-405) toggles the electronic
shutter, and the iris close key (iris – key
for the KTD-405) toggles backlight
compensation for image enhancement.
Press 1 to allow manual control of the iris
using the iris open and iris close keys
(+ iris – key for the KTD-405).
Press 2 to allow manual control of the iris
after it returns to auto mode upon pan/tilt
movement.
12
1032476D / January 2003
CyberDome Series Programming Manual
Programming Camera Settings
Table 1. CyberDome setup menus (continued)
Set Image Stabilizer Mode
The image stabilizer mode compensates
for slight unsteadiness or bouncing in the
camera’s movements.
IMAGE STABILIZER
-- SITE 0000 -ON
OFF
MANUAL
Note: Image
stabilization is not
available for all camera
models.
<1>
<2>
<3>
Press 1 to turn on the image stabilizer.
Press 2 to turn off the image stabilizer.
ENTER SELECTION:
<ALARM>-HLP <SEQ>-NEXT
Press 3 to allow manual activation of the
image stabilizer. Contact technical
support for proper keypad setup.
Adjust Lens Initialization Duration
LENS INITIALIZATION
-- SITE 0000 -MANUAL ONLY <1>
4
HOURS
<2>
8
HOURS
<3>
16 HOURS
<4>
24 HOURS
<5>
Note: Lens initialization
is not available for all
camera models.
ENTER SELECTION:
<ALARM>-HLP <SEQ>-NEXT
Set the duration between camera lens
initializations.
During lens initialization, the camera
zooms in and out to find the optimal
home position for the lens. If you are
running a ShadowTour™, lens
initialization every 24 hours is
recommended.
Press 1 to initialize the lens manually.
Press 2 − 5 to set the duration between
automatic lens initializations.
Adjust Preset Speed
Set the speed at which the camera
travels between presets. This setting is
used when calling up presets manually or
in a tour.
PRESET SPEED
-- SITE 0000 -NORMAL SPEED
FAST SPEED
<0>
<1>
ENTER SELECTION:1
<ALARM>-HLP <SEQ>-NEXT
1032476D / January 2003
13
Programming Camera Settings
CyberDome Series Programming Manual
Table 1. CyberDome setup menus (continued)
Enable or Disable Proportional Speed and Quik Spin
PROPORTIONAL SPEED
-- SITE 0000 -DISABLE
ENABLE
<0>
<1>
ENTER SELECTION:0
<ALARM>-HLP <SEQ>-NEXT
The proportional speed feature
decreases the pan/tilt speed of the
camera to provide better tracking when
the camera switches to digital zoom. This
helps reduce pan/tilt overshoot when
zooming in on objects far from the
camera.
Press 0 to disable proportional speed.
Press 1 to display the Feature Enable
menu.
QUIK SPIN
-- SITE 0000 -DISABLE
ENABLE
<0>
<1>
Quik Spin automatically rotates the
camera 180° when the bottom tilt limit is
reached. This feature enables tracking of
a target passing directly under the
camera.
Press 0 to disable Quik Spin.
ENTER SELECTION:0
<ALARM>-HLP <SEQ>-NEXT
FEATURE ENABLE
-- SITE 0000 -CALL TECH SUPPORT TO
ENABLE QUICK SPIN AND
PROPORTIONAL SPEED.
Press 1 to display the Feature Enable
menu.
Because of licensing agreements, you
must register prior to enabling Quik Spin
and Proportional Speed.
Register online at
http://www.kalatel.com/cyberdomecode
or call Technical Support.
<ALARM>-HLP <SEQ>-NEXT
14
1032476D / January 2003
CyberDome Series Programming Manual
Programming Camera Settings
Table 1. CyberDome setup menus (continued)
Adjust Shutter Speed
NTSC screen
SHUTTER SPEED
-- SITE 0000 -1/1000s
<0>
1/250s
<1>
1/60s
<NORMAL>
<2>
1/15s
<3>
1/8s
<4>
1/4s
<DARK>
<5>
ENTER SELECTION:2
<ALARM>-HLP <SEQ>-NEXT
Note: Shutter speed
adjustment is not
available for all
camera models.
Press the number that corresponds with
the desired speed to set the shutter
speed.
During pan/tilt operation, shutter speed is
1/60 of a second. In low or bright light,
shutter speed can be adjusted to
enhance the video image while the
camera is in a stationary position.
PAL Screen
SHUTTER SPEED
-- SITE 0000 -1/1000s
<0>
1/215s
<1>
1/50s
<NORMAL>
<2>
1/12s
<3>
1/6s
<4>
1/3s
<DARK>
<5>
ENTER SELECTION:2
<ALARM>-HLP <SEQ>-NEXT
Enable or Disable Site Number Display
SITE NUMBER DISPLAY
-- SITE 0000 -DISABLE
ENABLE
<0>
<1>
Enable or disable the display of the
camera site number in the upper lefthand corner of the monitor screen.
Press 0 to disable site number display.
Press 1 to enable site number display.
ENTER SELECTION:0
<ALARM>-HLP <SEQ>-NEXT
1032476D / January 2003
15
Programming Camera Settings
CyberDome Series Programming Manual
Table 1. CyberDome setup menus (continued)
Set Synchronization Mode
Set the video signal to be synchronized
either to the AC input voltage (line lock)
or to the camera’s internal clock.
SYNCHRONIZATION
-- SITE 0000 -LINE LOCK
INTERNAL 2:1
<0>
<1>
ENTER SELECTION:1
<ALARM>-HLP <SEQ>-NEXT
VERTICAL PHASE ADJUST
-- SITE 0000 -FORWARD
BACKWARD
<↑>
<↓>
NOTE: ADJUSTING PHASE
REQUIRES OSCILLOSCOPE
OR KTS-56
<ALARM>-HLP <SEQ>-NEXT
Press 0 to select line lock and advance to
the Vertical Phase Adjust menu.
Press 1 to set the video signal to the
camera’s internal crystal.
When the camera is in line lock mode,
you can use this menu to adjust the
vertical phase of the camera’s video
signal with that of another camera. An
oscilloscope or KTS-56 V-Phase
adjustment tool can assist with this
process.
Use the joystick (or the arrow keys) to
adjust the vertical phase.
Adjust White Balance
Note: Some camera
models do not have the
white balance menu.
Note: Some camera
models do not have the
DEFAULT option.
WHITE BALANCE
-- SITE 0000 -DEFAULT
<0>
ATW
<1>
INDOOR
<2>
OUTDOOR
<3>
MANUAL
<4>
ENTER SELECTION:0
<ALARM>-HLP <SEQ>-NEXT
MANUAL WBAL ADJUST
-- SITE 0000 -BLUE
<↑ ↓>
......|..............
RED
<← →>
...........|.........
<ALARM>-HLP <SEQ>-NEXT
16
Select the method by which the camera
shifts its output colors to compensate for
the color of a light source.
Press 0 for a static, default setting; 1 for
auto-tracing (white balance is adjusted
while the image changes); 2 for a static
indoor setting; 3 for a static outdoor
setting; or 4 to make manual adjustments
(displays the Manual White Balance
adjust menu).
Use the joystick (or arrow keys) to
manually adjust the white balance to the
desired setting.
Up and down adjust the blue level in the
picture.
Left and right adjust the red level in the
picture.
1032476D / January 2003
CyberDome Series Programming Manual
4
Programming Preset Positions and Areas
PROGRAMMING PRESET POSITIONS AND AREAS
CyberDome cameras can store up to 32 (numbered 00 – 31) or 64
(numbered 00 – 63) preset positions, depending on the camera
model. To enter preset positions, perform the following.
1)
Navigate to the Program Select menu (Figure 16).
2)
Press 2. The Preset Programming menu (Figure 17)
displays.
3)
Move the camera to the desired position.
4)
Enter a two-digit number to indicate the preset position
(00 – 63 or 00 – 31). Use a number that is equal to or
greater than the lowest unused number indicated on the
screen.
PRESET PROGRAMMING
-- SITE 0000 -MOVE CAMERA TO TARGET,
ENTER PRESET NUMBER:-THEN PRESS <SET>
LOWEST UNUSED NUM: 00
<ALARM>-HLP <SEQ>-NEXT
Figure 17. Preset Programming menu
Note: Preset numbers 62 and 63 are reserved for autopan limit settings.
5)
Press the set key. A message displays for 2 seconds to confirm that the preset position has been
stored.
6)
Repeat steps 2 through 4 for all additional preset positions to be stored.
7)
Press seq to return to the Program Select menu (Figure 16).
Note: If you are going to reprogram a large number of existing presets, clearing those presets stored in memory is recommended.
4.1
PRESET TITLE ASSIGNMENT AND EDITING
To assign on-screen titles for the first 16 preset positions (00 – 15)
perform the following.
1)
Navigate to the Program Select menu.
2)
Press 3. The Edit Titles menu (Figure 18) displays.
EDIT TITLES
-- SITE 0000 -PRESET TITLES
AREA TITLES
<0>
<1>
ENTER SELECTION:
<ALARM>-HLP <SEQ>-NEXT
Note: For some camera models, the first menu to appear is Preset Titles
(Figure 19).
3)
Press 0. The Preset Titles menu (Figure 19) displays.
4)
Enter the preset number (00 – 15) of the preset title to be
edited.
5)
The title entry menu (Figure 20) displays.
6)
The display location for the title can be moved up and down
on the screen. To set the location, confirm that the cursor
(arrow) is in the far left position (under the left caret). Use the
joystick (or arrow keys) to move the position of the title up and
down. (The title cannot be moved from left to right.)
1032476D / January 2003
Figure 18. Edit Titles menu
PRESET TITLES
-- SITE 0000 -ENTER PRESET NUMBER:-<00-15>
<ALARM>-HLP <SEQ>-NEXT
17
Programming Preset Positions and Areas
CyberDome Series Programming Manual
Figure 19. Preset Titles menu
7)
To enter or edit the title move the cursor to the right (inside
the carets). Use the joystick (or arrow keys) to scroll to the
desired alphanumeric character.
8)
When the title is set, press seq to return to Preset Titles
(Figure 19).
9)
Press seq once more to return to Edit Titles (Figure 18) or
Program Select menu (Figure 16), depending on your
camera model.
00<
↑
>
USE ←,→,↑,↓ TO ENTER
TITLE AND LOCATION
<ALARM>-HLP <SEQ>-NEXT
Figure 20. Title entry menu
4.2
PROGRAMMING TITLED AREAS
Some CyberDome models can display a title over a selected area of their pan/tilt routines.
To program a titled area, perform the following.
1)
Navigate to the Edit Titles menu (Figure 18).
2)
Press 1. The Assigning Area Titles menu (Figure 21)
displays.
3)
Use the keypad to enter the number of the area to be titled
and programmed. The second Assigning Area Titles menu
(Figure 22) displays.
4)
To define the boundaries of an area, use the joystick (or
arrow keys) to pan/tilt the camera to the upper left corner of
the desired area.
5)
Press the clear key. Three stars display in the upper left
corner of the screen to confirm the entry.
ASSIGNING AREA TITLES
-- SITE 0000 -ENTER AREA NUMBER:
<00-15>
LOWEST UNUSED AREA:
<ALARM>-HLP <SEQ>-NEXT
Figure 21. Assigning Area Titles menu
6)
7)
Use the joystick (or arrow keys) to move the camera to the
lower right corner of the desired area.
Press the set key.
The title entry menu (Figure 20) displays. To assign and edit area
titles, perform the following.
ASSIGNING AREA TITLES
-- SITE 0000 -TO DEFINE AN AREA, MOVE
CAMERA TO UPPER LEFT
CORNER AND PRESS <CLR>
THEN TO LOWER RIGHT
CORNER AND PRESS <SET>
<ALARM>-HLP <SEQ>-NEXT
1)
Confirm that the cursor (arrow) is under the left caret.
2)
To move the display location for the title up or down on the
screen, move the joystick up and down (or use the arrow
keys). (The title cannot be moved from left to right.)
3)
To enter or edit the title move the cursor to the right (inside the carets).
4)
Move the joystick up and down (or use the arrow keys) to scroll to the desired alphanumeric
character.
18
Figure 22. Assigning Area Titles menu
(continued)
1032476D / January 2003
CyberDome Series Programming Manual
Programming Preset Positions and Areas
5)
Move the joystick right and left (or use the arrow keys) to move to the next character or edit the
previous character.
6)
When the title is complete, press seq to return to the Assigning Area Titles menu (Figure 21 and
Figure 22).
7)
Press seq to return to the Edit Titles menu (Figure 18)
8)
Press seq to return to the Program Select menu (Figure 16).
4.3
VIDEO/PRIVACY BLANKING
When programming areas, it is possible to define an area that should not be shown on the monitor(s) for
privacy or security reasons. When the camera enters that specified area, the assigned title appears on
the monitor, but the monitor screen is blanked out. To activate this option, begin the title of the area with a
question mark (?).
1032476D / January 2003
19
Reviewing Camera Settings
5
REVIEWING CAMERA SETTINGS
To review the current setup settings for your camera, press 4
(“Current Status”) from the Program Select menu (Figure 16).
Settings cannot be entered or changed from the Setup Status
menus.
The typical Setup Status menus are shown in Figure 23 and
Figure 24.
Note: For inactive features for a given camera model, that feature status reads
as N/A.
To page up and down through the menus, move the
joystick up or down (or use the arrow keys).
To return to the Program Select menu, press seq.
CyberDome cameras with preset and area features have status
menus that show programmed presets (Figure 25) and
programmed areas (Figure 26).
Note: Some cameras include only the menu screens that show programmed
presets (Figure 25), not areas.
CyberDome Series Programming Manual
SETUP STATUS CAM: 0
AUTOPAN SPEED:
MED
AUTO RETURN:
ON-T
AZIMUTH INDICATOR: OFF
DAY/NIGHT LEVEL:
5
ELECTRONIC ZOOM:
4x
EXPOSURE CONTROL:
AI
IMAGE STABILIZER:
N/A
LENS INITIALIZTN:
MAN
Figure 23. Setup Status menu
SETUP STATUS CAM: 0
PRESETS FAST:
PROP. SPEED:
QUIK SPIN:
SHUTTER SPEED:
SITE NO. DISPLAY:
SYNCHRONIZATION:
WHITE BALANCE:
↑↓
OFF
ON
OFF
1/60
OFF
INT
AUTO
-PG UP/DN <SEQ>-NEXT
Figure 24. Setup Status menu (continued)
Note: In Figure 25 and Figure 26 “TITLE” indicates that a preset or area is titled
(the actual text programmed displays on the screen). “X” indicates that a preset
or area is programmed.
PRESET STATUS CAM: 0
00 TITLE
X
01
X
02 TITLE
X
03
04
05
06 TITLE
X
07
↑↓ -PG UP/DN <SEQ>-NEXT
Figure 25. Preset Status menu
AREA STATUS CAM: 0
00
01 TITLE
X
02 TITLE
X
03
04
X
05
X
06
07 TITLE
X
↑↓ -PG UP/DN <SEQ>-NEXT
Figure 26. Area Status menu
20
1032476D / January 2003
CyberDome Series Programming Manual
6
Programming Tours
PROGRAMMING TOURS
Tours 1 and 2 in the PTZ programming menu are shadow tours. Tours 3 and 4 in the PTZ programming
menu are preset tours.
6.1
SHADOWTOURS
Most CyberDome cameras have ShadowTour capability. A
ShadowTour is a tour that the camera “learns” by recording up to
4 minutes of manual operation. Use a keypad to manually direct
your camera through the desired PTZ movements, and the
camera stores in memory the movements you performed. This
recorded tour can be replayed at any time.
6.1.1 PROGRAMMING A NEW SHADOWTOUR
1)
Press 5 from the Program Select menu (Figure 16). The first
menu to display is the PTZ Tour Programming menu
(Figure 27).
Note: For some camera models, the first menu to display is the
ShadowTour menu (Figure 28). If this is the case for your camera, proceed
to step 3.
2)
Press 1 or 2 from the PTZ Tour Programming menu,
depending on which tour you are programming. The
ShadowTour menu (Figure 28) displays.
3)
Press 0 to program a new tour. The ShadowTour program
menu (Figure 29) displays.
4)
Press the set key to start the tour timer.
5)
Using the joystick (or arrow keys) and the zoom keys, move
the camera to the desired locations for the shadow tour.
The maximum tour time is 4 minutes.
6)
Press the set key to finish the tour.
Press seq to display the PTZ Tour Programming menu
(Figure 27).
PTZ TOUR PROGRAMMING
-- SITE 0000 -TOUR 1 Shadow Tour <1>
TOUR 2 Shadow Tour <2>
TOUR 3
<3>
TOUR 4
<4>
ENTER SELECTION:
<ALARM>-HLP <SEQ>-NEXT
Figure 27. PTZ Tour Programming menu
TOUR 1
Shadow Tour
-- SITE 0000 -NEW TOUR
EDIT TOUR
PLAY
<0>
<1>
<2>
ENTER SELECTION:
<ALARM>-HLP <SEQ>-NEXT
Figure 28. ShadowTour menu
TOUR 1
Shadow Tour
-- SITE 0000 -MAX TOUR TIME: 4 MINS.
1) PRESS <SET> KEY TO
START TIMER
2) MOVE CAMERA THROUGH
DESIRED TOUR
3) PRESS <SET> KEY TO
STOP TIMER
<ALARM>-HLP <SEQ>-NEXT
6.1.2 REVIEWING AN EXISTING SHADOWTOUR
Return to the PTZ Tour Programming menu (Figure 27), and
perform the following steps.
Figure 29. ShadowTour program menu
1)
Press 1 or 2 depending on which tour you want to review. The ShadowTour menu (Figure 28)
displays.
2)
Press 2. The selected ShadowTour plays.
Press the seq key to return to the ShadowTour menu (Figure 28) at any time during the tour.
1032476D / January 2003
21
Programming Tours
CyberDome Series Programming Manual
6.1.3 EDITING A PREVIOUSLY PROGRAMMED SHADOWTOUR
Note: If you are going to edit several tours, clearing those tours stored in memory and programming new tours is recommended.
Return to the PTZ Tour Programming menu (Figure 27), and perform the following steps.
1)
Press 1 and then press the set key. The currently stored ShadowTour begins to play. Use the
joystick (or arrow keys) to edit the tour at any point.
Note: When the first edit is made, the entire previously-programmed tour from that point forward is deleted and replaced
with the new tour edits.
2)
When you finish editing, press set to return to the ShadowTour menu (Figure 28).
Press seq to return to the PTZ Tour Programming menu (Figure 27) or the Program Select menu (Figure
16), depending on the camera model.
6.2
PRESET TOURS
Most CyberDome cameras have preset tour capability. A
preset tour is composed of a group of preset positions that the
operator can program to be linked together in a sequence.
6.2.1 PROGRAMMING PRESET TOURS
Each tour consists of a string of up to 16 steps, or presets,
which are programmed by the user.
1)
From the PTZ Tour Programming menu (Figure 27),
select the tour to be edited. The Tour Programming
menus display (Figure 30 and Figure 31).
2)
Navigate through preset, speed, and dwell time using the
joystick (or arrow keys).
3)
For each step programmed, the following information
must be entered:
The preset number (0 – 63).
The dwell time at each step (1 – 31 seconds). The default
dwell time is 2 seconds.
TOUR 3 PROGRAMMING
-- SITE 0000 -STEP PRESET SPEED DW
01
>00
2. 05
02
01
3
08
03
02
2
10
04
03
2
05
05
04
3
05
06
05
2
10
<ALARM>-HLP <SEQ>-NEXT
Figure 30. Tour Programming menu
TOUR 3 PROGRAMMING
-- SITE 0000 -STEP PRESET SPEED DW
11
-05
12
-08
13
-10
14
-05
15
-05
16
22
3
12→
<ALARM>-HLP <SEQ>-NEXT
Figure 31. Tour Programming menu (cont.)
The speed at which the camera moves between presets.
There are four speed settings: 0, 1, 2 (slow, medium,
fast–as per autopan), and 3 (maximum speed). The default speed is 3. If 0, 1, or 2 are selected,
press the set key while in the speed column to cause a dot to appear by the number (see the speed
setting of step 01 in Figure 30). This option overrides the auto zoom and maintains the camera’s
zoom position while traveling to the next preset position.
4)
To clear information from any step, press the clear key.
5)
To finish programming a tour, press the seq key. The PTZ Tour Programming menu (Figure 27)
displays.
22
1032476D / January 2003
CyberDome Series Programming Manual
Programming Tours
6.2.2 LINKING PRESET TOURS
Tours 3 and 4 (preset tours) can be linked together, so that when tour 3 ends, tour 4 begins immediately.
Note: Tours 1 and 2 (ShadowTours) cannot be linked.
1)
From the PTZ Tour Programming menu (Figure 27), press 3 to enter the Tour 3 Programming menu
(Figures 30 and 31).
2)
Use the joystick (or arrow keys) to scroll to line 16.
Note: For a tour to be linked, a preset must be entered for line 16.
3)
Press the set key anywhere on that line except the speed column. An arrow at the end of the line
indicates that the tours are linked (see line 16 of Figure 31).
4)
To unlink a tour, go to line 16 and press the set key. The arrow indicating a link no longer displays.
5)
Press the seq key twice to return to the Program Select menu (Figure 16).
1032476D / January 2003
23
Exiting Programming Mode
7
CyberDome Series Programming Manual
EXITING PROGRAMMING MODE
To exit CyberDome from any menu display in programming mode, press and hold the seq key until the
keypad beeps.
24
1032476D / January 2003
CyberDome Series Programming Manual
8
Setting Electronic Autopan Limits
SETTING ELECTRONIC AUTOPAN LIMITS
AND ACTIVATING AUTOPAN
When in autopan mode, the camera repeats a back and forth motion. If you are using a KTD-405 to
program your system, perform the instructions in section 8.1 to program the autopan motion. If you are
using a KTD-404/304 or KTD-400/300, skip to section 8.2.
8.1
USING A KTD-405
To set the limit for the left turn-around point as well as the tilt and zoom positions for the autopan, perform
the following.
1)
Position the camera at the desired left limit.
2)
Tilt and zoom the camera into the desired position.
3)
Press store.
Note: Do not attempt to enter a preset number. The preset number 62 is reserved for the left autopan limit and is
automatically entered when you perform step 5.
4)
Press
5)
Press store again. The Store Preset Number displays on the keypad.
.
To set the limit for the right autopan, perform the following procedure.
1)
Position the camera at the desired right limit and press store.
Note: Do not attempt to enter a preset number. The preset number 63 is reserved for the right autopan limit and is
automatically entered when you perform step 3.
2)
Press
.
3)
Press store again. The Store Preset Number displays on the keypad.
To activate the autopan, press and hold tour until the keypad beeps. The camera initiates the pan
motion.
8.2
USING A KTD-404/304 OR KTD-400/300
1)
Position the camera at the desired left limit.
2)
Tilt and zoom the camera into the desired position.
3)
Move the joystick to the left while holding down the zoom in and zoom out keys, or press the
key (depending on the type of keypad being used).
4)
Position the camera at the desired right limit.
5)
Move the joystick to the right while holding down the zoom in and zoom out keys, or press the
key (depending on the type of keypad being used).
To activate autopan, push autopan. The camera initiates the pan motion.
1032476D / January 2003
25
Before You Call Technical Support
CyberDome Series Programming Manual
BEFORE YOU CALL TECHNICAL SUPPORT
Please review this chart of common problems before you call technical support. Thank you.
Problem
An area I want to blank from
viewing still appears on the monitor.
Probable Cause
Failure to create a properly titled
area.
Solution
Define the “area” that encompasses
the space you do not want to
appear on the monitor. When
defining and titling the area, begin
the title of the area with a question
mark (?). (See sections 4.2 and 4.3
for more information on
programming titled areas and
video/privacy blanking.)
Note: Area Titling and Video/Privacy
Blanking are not available for all camera
models.
Reprogrammed presets, tours, or
autopans do not function as
programmed.
Previously programmed information
may affect operation.
Clear the memory for the feature
you are reprogramming. Program
the new settings. (See section 3,
Table 1, for information on the Clear
Settings menu.)
CyberDome Series Programming Manual
Index
INDEX
Areas
Assigning ..................................................... 18
Programming ............................................... 18
Titles, Assigning........................................... 18
Auto Return Mode, Setting .............................. 11
Autopan
Activating ..................................................... 25
Limits, setting ............................................... 25
Setting as auto return mode ........................ 11
Speed, Setting ............................................. 10
Azimuth Indicator, Setting ............................... 11
Controller keypads............................................. 5
Day/Night Switch Level, Adjusting................... 12
Default camera settings............................... 9, 10
View ............................................................. 10
Electronic Zoom Setting, Adjusting ................. 12
Exposure Control Setting, Adjusting................ 12
Factory camera settings .............................. 9, 10
View ............................................................. 10
Factory Defaults, Return to ............................. 10
Help Screens, Accessing................................... 9
Image Stabilizer Mode, Setting ....................... 13
Lens Initialization Duration, Adjusting ............. 13
Memory, Clear ................................................. 10
Pan/tilt overshoot
Reducing.......................................................14
Presets
Programming ................................................17
Setting as auto return mode .........................11
Speed, Adjusting ..........................................13
Title Assignment ...........................................17
Privacy Blanking...............................................19
Programming Menus, Accessing .......................6
Proportional Speed, Enabling or Disabling ......14
Quik Spin, Enabling or Disabling......................14
Setup Menus ......................................................9
Shadow Tours ..................................................21
Shutter Speed
Adjusting .......................................................15
Control ..........................................................12
Site Number Display, Enabling or Disabling ....15
Synchronization Mode, Setting ........................16
Tour
Setting as auto return mode .........................11
Tours, Programming ........................................21
Video Blanking .................................................19
White Balance, Adjusting .................................16