1
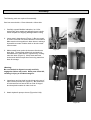
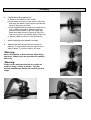
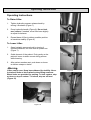
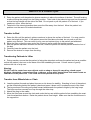
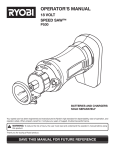
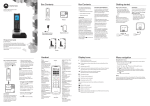
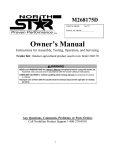
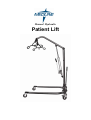
Manual Hydraulic
Patient Lift
User Instruction Manual
This manual contains important safety and maintenance instructions.
Please read it carefully before using your patient lifter and refer to it
as often as needed for safe and efficient use.
If you have questions regarding the safe use and or assembly, maintenance,
or specifications of your patient lifter, you should call Customer Service at
1-800-MEDLINE.
For service and repair, remember your authorized Medline Dealer is able to
provide the assistance needed.
Save this manual for future reference.
-WarningUsing other manufacturers’ parts on the Medline Industries, Inc. products
is unsafe and may result in serious injury to patient and or attendant.
Use only Medline Industries, Inc. parts. Medline Industries, Inc. parts are
NOT interchangeable with other manufacturers’ products. Replace any
worn parts immediately.
Specifications
Base
Adj. U
Max Weight Capacity
400Lbs.
Lift-range of Boom
28"-73"
Width of Base
23"-28.5"
Length of Base
42"
Base Clearance
5.5"
Assembly
The following tools are required for assembly:
One hex wrench with a 17mm side and a 19mm side.
1. Carefully unpack Medline Industries, Inc. Lifter,
swivel bar/6 point cradle and adjusting lever handle.
Check all parts for shipping damages before using
2. Insert mast in base sleeve (Figure 1). Be sure notch
on end of mast fits over bolt in bottom of mast sleeve.
Mast must lock into position in base sleeve, making it
impossible to rotate. Double check to be sure mast
cannot rotate.
3. Make certain boom points in the same direction as
base legs. Thread mast safety lock and stud into
threaded hole in mast sleeve. Tighten firmly, locking
mast into base (Figure 2). Keep mast and base
locked at all times except when removing mast from
base for storage.
Figure 1
Figure 2
-WarningBe sure the bolt is aligned correctly and fully
engaged or failure may result. Worn parts could fail,
resulting in injury to resident/caregiver.
4. Insert boom end into hole in yoke hinge at the top of
mast. Fasten bolt and nut (Figure 3). Be certain hex
of bolt head fits into formed hex on side of hinged
and that plastic washer is under lock nut.
Figure 3
Figure 4a
5. Attach hydraulic pump to boom (Figure 4a & 4b).
Figure 4b
Assembly
6.
Cradle/Swivel Bar Attachment
a. Remove nut and bolt from cradle
b. Hold cradle in position at the end of the boom
and align the holes of the pin and cap with the
holes in the boom end fork
c. Insert supplied bolt and washer through boom
fork, cradle cap and pin. Washers must be
placed on the outside of the fork under bolt
head and under the nut (Figure 5a, 5b & 5c).
Place nut on bolt, and secure tightly (Figure 6).
d. Swivel cradle to check for free movement
7.
Attach adjusting lever handle into base
Figure 5a
8.
Wheel locks are provided on two casters for
parking. To lock casters, step on cam lever on
side of caster. To unlock, step on off lever.
-WarningNever lock wheels or block wheels when lifting
someone. Wheel locks are provided for parking
lifter only
-WarningInside center attachment points on cradle are
used for slings, chains or straps. The four
outside attachments points are used for 4-point
slings.
Figure 5b
Figure 6
Figure 5c
Operating Instructions
Operating Instructions
To Raise Lifter:
1.
Tighten hydraulic pressure release knob by
turning it clockwise (Figure 7).
2.
Pump hydraulic handle (Figure 8). Do not lock
rear casters. If needed, move lifter base slightly
to adjust for balance.
3.
Expand base of lifter to widest possible position
to maximize stability (Figure 9).
Figure 7
To Lower Lifter:
1.
Open hydraulic pressure knob by turning it
counter-clockwise, not more than a quarter turn
(Figure 7).
2.
Guide descent of the patient. Push gently on the
patient’s knees to attain correct sitting posture
while lowering.
3.
After patient reaches seat, push down on boom
to slacken straps or chains.
-WarningLifters can tip over. Keep base widened for stability. Never
lock wheel locks or block wheels when lifting someone.
Wheel locks are provided for parking. To lock casters, step
on lever on top of casters. To unlock, step on off lever.
(Figure 10)
Figure 10
Figure 8
Figure 9
Regular maintenance of lifters and accessories is necessary to assure proper and safe operation.
Maintenance & Care
1.
2.
3.
4.
5.
6.
7.
8.
9.
10.
Base & Wheels
Base s even and level
(all four wheels are on the floor)
Wheel bolts are tight
Wheels swivel and roll easily
Base Adjustment
Base locks securely, all parts are present
Base opens and closes smoothly
Check spreader lock and all hardware for wear
Mast
Mast fully engaged and locked into mast sleeve
Inspect for bends or defects
Inspect all bolts and nuts for wear
Boom
Inspect all bolts and nuts for wear
Inspect to ensure the boom is centered
between the base legs
Cradle
Check hanger post for wear or damage
Check sling attachments for wear
Swivel Bar
Check nut at bottom of swivel bar
hook and eye hook on boom wear
Check for 2 plastic washers between nut of swivel
bar hook and underside of swivel bar assembly
Pump Assembly
Pump handle and valve work smoothly
Check for oil leakage, a light film is normal,
but not to the point of dripping
Slings and hardware
Check metal parts for wear or damage
Check slings and web for wear.
Lubrication
Oil all pivot joints, including:
Top of mast where boom attaches
Pump handle hinge
Use a light grease to lubricate base
adjustment lockplate and all rotating hardware
Wheel and swivel bearings
Cleaning
Use a mild soap to clean
Apply auto or appliance wax
Keep painted surface clean from oil
Initially
Before
Each Use
X
X
X
X
X
X
X
X
X
X
X
X
X
X
X
Bi-Monthly
X
X
X
X
X
X
X
X
X
X
X
X
X
X
X
X
X
X
X
X
X
X
X
X
Warnings and Cautions
Do not wash under pressure. Do not wash slings with bleach. Bleach will damage material.
Note – Hydraulic Pump
1. Use pump to raise boom to position for lifting patient.
2. DO NOT lift up on end of boom to position for lifting patient
as this causes air to be drawn in under ram, preventing pump from lifting when handle is pumped.
3. DO NOT press down hard on handle when bottom of stroke is reached.
4. It is common occurrence after a few hours of non-use for the boom to lower with no weight suspended
from the end of the boom. This is not a faulty pump.
5. If trouble develops, please call Medline Industries, Inc.
PLEASE DO NOT OPERATE THIS EQUIPMENT WITHOUT FIRST READING AND UNDERSTSTANDING THIS
MANUAL. IF YOU ARE UNABLE TO UNDERSTAND THE WARNINGS, CAUTIONS AND INSTRUCTIONS;
CONTACT MEDLINE INDUSTRIES TECHNICAL SUPPORT OR A QUALIFIED MEDLINE INDUSTRIES
DEALER BEFORE ATTEMPTING TO USE THIS EQUIPMENT-OTHERWISE INJURY OR DAMAGE MAY
RESULT.
Slings: Slings may become damaged during washing and drying. Always make sure you check your
slings before each use. Bleached, torn, cut, frayed, or broken slings are dangerous and should not be
used. Altering slings is dangerous and may cause serious injury.
Warning!! After each laundering, inspect sling(s) thoroughly for wear, tears, and loose stitching.
ONLY qualified personnel MUST perform maintenance.
Maintenance: Check all parts for shipping damages before using. In case of damage, DO NOT operate
patient lifter. Contact your local HME Dealer for further instructions.
The Medline Industries Inc. patient lift is NOT a transport device. It is intended to transfer an individual
from one resting surface to another (such as a bed to a wheelchair). Moving a person suspended in a sling
over ANY distance is NOT recommended. The lifter is NOT designed for use as an equipment hoist.
NEVER use the lifter to lift or transfer anything other than a patient. This can result in damage to the lift.
Transferring: DO NOT attempt any transfer without approval of the patient's physician, nurse, or medical
attendant. Thoroughly read the instructions in the owner's manual, observe a trained team of experts
perform the lifting procedures, and then perform the entire lift procedure several times with proper
supervision.
Use common sense in all lifts. Special care MUST BE taken with people with disabilities who cannot
cooperate while being lifted. Use restraints only with physician's prescription.
Before moving a patient from a stationary object (wheelchair, commode or bed), slightly raise the patient
off the stationary object and check all sling hardware for secure attachment to include object (wheelchair,
commode or bed), slightly raise the patient off the stationary object and check all sling hardware for secure
attachment to include swivel bar and straps. If any attachment is not correct, lower the patient and correct
the problem. Then raise the patient and check again.
While transferring the patient, keep the patient suspended in a sling attached to lift. DO NOT roll the caster
base over objects such as raised carpet bindings, doorframes, or any uneven surfaces or obstacles that
would create an imbalance of the patient lift. This could cause the patient lift to tip over. Use steering
handles on the mast at ALL times to push or pull the patient lift.
DO NOT use any kid of material (such as a plastic back incontinence pad or seating cushion) between the
patient and sling material. This may cause the patient to slide out of the sling during transferring
If the patient is in a wheelchair, secure the wheel locks in place to prevent the chair from moving forward or
backwards.
Medline Limited Warranty
Your Medline Product is warranted to be free of material defects in materials and workmanship for a
period of Three (3) years from the date of purchase. In the event of a defect or failure covered by this
warranty, contact us at 1-800-MEDLINE. Medline will, at its option, repair or replace your Medline
product. This warranty does not extend to damage or failure occurring as a result of owner misuse or
negligence, normal wear and tear, or other causes unrelated to the manufacture and design of the
product. This express warranty is Medline’s sole and exclusive warranty and your sole remedy in the
event of default or failure. Medline is not responsible for any consequential or incidental damages or
costs arising from use of the warranted products, or any defect therein or failure thereof. Medline
disclaims all other warranties including but not limited to the implied warranties of merchantability and
fitness for a particular purpose.
How to Use a Patient Lifter
Transfer from Bed
A. If the patient needs support and is in a hospital bed, raise the side rails and have the patient hold onto
the rails. Raise the level of the bed to the highest position before moving the patient onto the sling.
This will reduce strain on the assistant’s lower back. Also, when the patient is ready to be raised,
lower the side rails and the level of the bed. This will decrease the distance you have to elevate the
patient.
B. To place the sling under the patient the instructions are as follows.
1. Place the folded sling behind the patient’s back. Carefully roll the patient onto his side.
2. Pull the leg loops forward and under patient’s thighs.
3. Cross the loops.
Warning –
Pulling sharply on sling may cause the patient to fall forward resulting in injury.
Always stand in front of the patient when placing or removing the sling.
C. Roll the base as far under the bed as possible locating the cradle over the patient. Be careful not to
lower the frame onto the patient. Before lifting the patient, be sure the lifter arm is centered over the
patient. Remember, when lifting the patient, the parking brake should not be used.
WarningTo reduce the risk of tipping over, spread the adjustable base legs to their widest position before
lifting anyone.
Beware of obstructions under the bed that can cause the wheels to stop and the lift to tip over.
D. When both sides of the sling are attached to their particular sides of the cradle, raise the patient
slowly. If the patient is in the hospital bed, it will help to raise the head of the bed. Repositioning of
the patient may be necessary to ensure that a safe sitting position is attained as the patient is raised.
WarningCheck to make sure that the sling is properly connected to the cradle. If the sling attachments are
NOT properly connected, lower the patient back onto the bed to correct this problem.
When lifting, ALWAYS keep patient centered over the base and facing the assistant who is operating
the lift.
How to Use a Patient Lifter
E. Raise the patient until the patient’s gluteus maximus is above the surface of the bed. The self-leveling
cradle will bring the patient into the sitting position. Take hold of the patient’s legs and turn the patient
so that his legs dangle off the side of the bed. Do not push or pull the patient off of the bed. If you
need more room, lower the bed.
F. Take hold of the steering handles then move the lifter away from the bed. Move the patient into
position over the seat of a locked wheelchair.
Transfer to Bed
A. Raise the lifer until the patient’s gluteus maximus is above the surface of the bed. You may need to
lower the height of the bed. If the patient cannot be lifted above the bed, do not push or pull the
patient onto the bed. This can result in a tip over and serious injury to the patient and assistant!
B. Move the lifter so that the open end of the U-base is as far under the bed as possible.
C. After the patient has been centered on the bed, rotate the patient so that the patient faces the foot of
the bed.
D. Carefully lower the patient onto the bed.
E. Remove the chains or straps from the sling.
Transferring Patients in Lifter
A. During transfer, ensure that the patient is facing the attendant and keep the patient as low as possible
so that the patient’s feet rest on the base of the lifter straddling the mast. A lower center of gravity
reduces the risk of a tip over.
WarningDO NOT roll the caster base over objects such as shag or deep pile carpeting, raised carpet
bindings, thresholds, unpaved surfaces, outdoors, or any other obstructions that would create an
imbalance of the patient lift. This could cause the patient lift to tip over.
Transfer from Wheelchair or Chair
A. Lean the patient forward and place his arms on his knees for stability. Standing in front of the patient,
put the folded sling behind the patient’s back and press it down until it touches the seat of the chair.
B. The leg sections of the sling are pulled forward and beneath the patient’s thighs by the long loops.
The loops are then crossed one loop through the other loop.
C. Attach the sling to the cradle.
D. Move the lifter base around the chair and under the leg rest with the patient’s feet straddling the mast.
Lock the wheelchair brakes. Raise the patient above seat height. Make sure that the footrests are in
the up position.
How to Use a Patient Lifter
WarningWheelchair locks MUST be in a locked position before lowering the patient into the wheelchair for
transport.
Transfer to Wheelchair or Chair
A. The adjustable base legs (with patient) are spread until they are in their widest position.
B. The wheelchair is moved into position.
WarningWheelchair locks MUST be in a locked position before lowering the patient into the wheelchair for
transport.
C. The patient is positioned over the seat with his back against the back of the chair.
D. Begin to lower the patient slowly into the chair.
E. To position push gently on the knees of the patient with your right or left hand while simultaneously
lowering the patient into the chair.
Other alternatives for positioning the patient further back into the chair are as follows:
A. Raise the patient so that the patient is just touching the seat.
B. Pull up on the top and back of the sling with left hand.
C. Complete lowering the patient into the chair.
D. Raise the patient and repeat steps B-C if necessary.
E. Unhook the sling from the cradle or the chains or straps attached to sling.
Removing Sling from Under Patient
Note: It is not necessary to remove the sling unless desired by the patient.
A. Remove the armrests from the chair if possible (optional). Disconnect the sling from the lifter.
B. Stand in front of the patient, lean the patient forward and place his arms on his knees for stability. Pull
the sling flaps to the side, out from under patient’s thighs.
C. Still standing in front of patient, reach back and pull the sling up from behind the patient. Reposition
the patient into the chair.
Lifting Patient from Floor
A. Position lifter behind the patient with a pillow over the base to support the patient’s head and neck.
The lifter should be positioned with the lifter arm centered over the patient.
B. Lower the cradle so that the chains or straps reach the hooks of the sling or cradle.
C. Raise the patient’s knees and attach the sling to the cradle.
D. Lift the patient up above the floor. Turn the patient to face the attendant and place the patient’s feet
on the base of the lifter straddling the mast for extra stability.
E. Place a pillow on the base support legs.
www.Medline.com
© 2008 Medline is a registered trademark of Medline Industries, Inc.
Manufactured for Medline Industries, Inc., Mundelein, IL 60060 USA
Made in China 1-800-MEDLINE