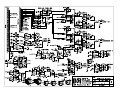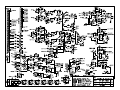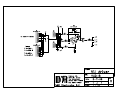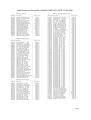
1
file: airmixman.lwp
mixing consoles
AIRMIX
User Manual
Airmix manual page 1
AIRMIX MANUAL
ž
CONTENTS
1.0
2.0
3.0
4.0
5.0
6.0
7.0
8.0
9.0
10.0
11.0
12.0
13.0
INTRODUCTION
SYSTEM DESCRIPTION
MIC/LINE INPUT SECTION
TRIPLE INPUT SECTION
TELCO MODULE
MASTER SECTION
JUMPER SETTINGS
INSTALLATION
SPECIFICATIONS
SICO REMOTE UNIT
QUESTIONNAIRE
PRODUCT SAFETY
CONFORMITY STATEMENT
D&R ELECTRONICA WEESP BV
Rijnkade 15B,
1382 GS Weesp
The Netherlands
Phone:+31 (294) 418014
Fax: +31 (294) 416987
Website: http//www.d-r.nl
E-mail: [email protected]
Airmix manual page 2
Page 3
Page 4
Page 7
Page 11
Page 16
Page 21
Page 32
Page 34
Page 37
Page 38
Page 39
Page 41
Page 42
1.0
Dear client,
Thank you for choosing the Airmix console.
The Airmix is designed by specialists in the field of radio broadcast and is intended to be used
as an 24 hour "On-Air" console as well as a production console.
We are confident that you will be using the Airmix for many years to come, and wish you
much success.
We always value suggestions from our clients, and we would therefore be grateful if you could
complete and return the questionnaire included at the back of this manual, once you have
become familiar with your Airmix. We will certainly learn from your comments, and very
much appreciate your time doing this.
With kind regards,
Duco de Rijk
PRESIDENT
Airmix manual page 3
2.0 SYSTEM DESCRIPTION
D&R Quality.
D&R has been the largest manufacturer of mixing consoles and signal processors in the
Netherlands for 25 years. More than 80% of the total production is exported world-wide,
a market which demands excellent price and high quality standards.
D&R products are used in studio's and live performances, both of which require 100%
reliability, which is the result of 23 years of research, design and manufacturing.
These high standards of reliability are also to be found imbedded in the new line of broadcast
mixers, which is particularly important for this type of product, required to work around the
clock.
Airmix Quality.
The high standard of quality of the Airmix is demonstrated by the welded steel RF screening
and sturdy housing, the heavy duty power supply, its modular approach and locking IDC
connectors mounted on high quality double sided, plated through, glass epoxy printed circuit
boards.
The signal paths are electronically switched using C-Mos logic, and 'Fet' components ensuring
reliable and smooth switching.
High quality 100mm faders control the new redesigned " dbx" VCA's. Switching is performed
by isolated encapsulated reed relays guaranteeing many years of trouble free smooth
switching.
Airmix flexibility.
The Airmix is a specially designed poduction/ On-Air broadcast console. Although the design
has been carefully budgeted, no compromises has been made in either quality or features,
particularly in the areas of VCA control, switching, signalling, fader start/stop and
communication.
A 'Self-Op' switch instantly resets the Airmix to be used by the announcer himself.
This is the D.J. mode whereby the logic circuitry in the Airmix helps to prevent the D.J. from
making mistakes causing possible feedback, which is an annoying sound anywhere in the audio
chain, or listening to the wrong source.
The Airmix is fully modular, which means flexibility in the configuration. The Triple input
modules as well as the Telco input modules can be placed anywhere in the chassis.
A partially loaded Airmix can be completed using low cost 'blind modules'.
Airmix manual page 4
SYSTEM DESCRIPTION
The Airmix is a complete and self contained piece of hardware, requiring no additonal items in
order to be operated. All relevent functions are built-in, such as fader start/stop (pulse
or continuously selectable). There is also no need for complex mic-on/cough switching to the
announcer booth, a stereo jack, a led and a simple push-button switch complete this task.
The optional SiCo unit is a nice looking alternative with many extra's for Cough switching and
monitoring. The Meter hood can accept five 9 1/2" signal processors, such as limiters, the
special D&R timer/clock, and/or specialised functions for broadcast stations.
Built-in stereo headphone amps.
The Airmix contains built-in amps for the announcer, guests and the D.J., no additional amps
are needed.
Clear layout.
Most all of the switches have led indicators, large illuminated CUE and ON switches and the
front panels are angled for visibility.
All similar functions in the triple input channels are grouped and colour coded, with additional
fader knobs available for personalised channel colour coding.
Example:
Microphone channels - red fader knobs
Telephone channels - grey fader knobs
Stereo channels - black fader knobs
Radio communication.
On the basis that there is no radio without communication, the Airmix has extensive
possibilities for signalling and communications. Every microphone channel has its own
signalling and talkback circuitry, and all outputs can also be connected to the talkback
circuitry.
The announcer/technician/producer/director can communicate with the announcer booth,
guests, monitoring system, all connected Telco modules, auxilliaries, either individually or in
any combination.
A very intelligent Cue system connects every activated Cue switch with each other to create a
transparant and intuitive communication system. It will be explained in detail further in this
manual.
Signalling.
It is extremely important in broadcast to know whether a microphone channel is active.
Every channel has a red light signalling available on the remote connector.
The Airmix has two external connections for ON-AIR signalling to control an external relay
activating high voltage ON-AIR lamps.
!! NEVER CONNECT 115-230 VOLT LAMPS DIRECTLY TO THE ON-AIR
SIGNALLING OUTPUTS IN THE MASTER SECTION!!
Airmix manual page 5
SYSTEM DESCRIPTION
Broadcasting Options.
In designing the Airmix, D&R decided to make the system as flexible for the operator as
possible, and the Airmix can therefore be used in many ways.
There are many jumper settings which can be set to suit your own needs. The Airmix can be
used in a traditional manner with separate control and announcer rooms, or in a more open
way, whereby announcing and engineering control are carried out in one room. A self-op set
up, or a combination of several set ups is possible.
More than one Broadcast Studio
There are numerous monitor facilities in the Airmix, for external sources as well as internal.
The control monitors (and meters) can be switched to follow the control room for separate
(stereo) sources.
These features mean that the Airmix is specially suited to work in a studio-complex
environment, where there is more than one studio/control room being used for broadcast.
In this situation, the Airmix is capable of being the main On-Air console, due to the three main
outputs it contains, which are fully transformer balanced.
Separate Compressions for Mono and Stereo Outputs.
All three main outputs have their own inserts to accept signal processors such as the D&R
compressor/limiters.
A significant feature of the Airmix is that separate compression can be set for mono and stereo
outputs. For example, a higher compression can be set for the mono main output, for AM
portables or car radios, and a lower compression set for the main stereo outputs.
Special Recording Outputs.
The Airmix has two separate stereo recording outputs which can be set to either 0 dBu or -10
dbV, according to the recording equipment being used.
Stereo Peak Metering.
In order to achieve a good balance between spoken words and music, it is important to be
able to read the recording level accurately. The Airmix has thirty-seven segment peak reading
ledbargraphs, with logarithmic scaling and one led per 0.5dB in most critical sections of the
scale.
SUMMARY.
Whilst using the Airmix, you will discover its many 'hidden" features, and will continue to
appreciate its extensive capabilities.
Airmix manual page 6
3.0 MIC/LINE INPUT SECTION
GAIN MIC
This gain control adjust the incoming signaallevel on the mic input.
MIC
MIC input selector switch between Mic-input or Line-A/B input.
When the Led is illuminated the mic-input is activeted.
GAIN LINE
This gain control adjust incoming line levels.
LINE A/B.
A/B input selector. When line B is selected, the red Led is
illuminated. In this position, the remote outputs are not
activated.
MONO L/R.
With both left and right switches activated, the stereo signal
will be mixed to mono on both outputs.
with only Mono L. activated, the left signal will be sent to
both left and right signal paths.
with only Mono R. activated, the right signal will be sent
both left and right signal paths.
In the 'Stereo' mode, neither Mono L. or Mono R. switches
need to be activated.
The MONO L/R switch has no affect on the mic-input.
HIGH.
Adjusts high frequencies with +/- 12 dB at 10 kHz shelve.
MID
Adjusts mid frequencies with +/- 12 dB at 3 kHz bell.
LOW.
Adjusts the low frequencies with +/- 12 dB at 60 Hz shelve.
AUX.
Transmit a stereo signal to the aux. master post fader.
The channel 'on' switch also affects the aux send.
SUB
The sub switch assigns the signal in stereo to the sub output.
Airmix manual page 7
MIC/LINE INPUT SECTION
PAN.
Allows adjustment between the left and right channel outputs.
PEAK.
The peak indicator will indicate when the signal reaches
-4dB below the clipping point of the module.
CUE.
Stereo pre-fade listening. Allows pre-fade listening post
pan-pot of the channel with the fader closed.
The cue function will be automatically reset when the
channel is activated.
The CUE switch also generates a start/stop pulse in the line-mode.
ON.
Channel on/off switch. While in closed fader stand-by mode, i.e.
when red led is half illuminated. When the switch is not
activated, the channel fader can be opened without activating
the fader start, and without opening the program signal,
the red led is softly illuminated. The channel can be activated (including the
start/stop command) by pressing the "ON" switch, red fully lit.
FADER .
Channel VCA volume control adjusts overall channel level
and activates (together with the `on' switch) all on and off
switching of remote connectors.
Airmix manual page 8
MIC / LINE INPUT SECTION
SHORT OVERVIEW OF MIC / LINE CHANNEL FUNCTIONS.
Microphone input:
Impedance
Level:
Connectors:
48 Volt phantom
Mic High pass filter:
Electronically balanced.
2 kOhm.
from-70 dBu microphone input to +16 dBu.
XLR female, Pin 1 = sleeve. Pin 2 = hot. Pin 3 = cold.
internally set by a jumper, (see jumper settings)
at 80 Hz internally set by a jumper, (see jumper settings)
INSERT.
Mic insertion point, unbalanced on a stereo jack plug.
Tip=return. Ring=send. Sleeve=ground.
0dBu. Send impedance is 47 Ohm, return impedance is 10 kOhm.
Inserting a jack will interrupt the signal path before the equaliser.
REMOTE.
Remote control of the channels on/off and cue switch's, and
'Channel-on' light signalling. Connection by way of a stereo jack.
Tip=Positive supply voltage, current limited at 15 mA when the
channel is 'on' A direct connection to a led is possible between tip and
sleeve.
Ring=When connected to ground, the channel will be muted and
the cue activated.
Sleeve=ground.
A-Input and B-Input: The input impedance for both `A' and `B' are >10 kOhm, and the
maximum sensitivity ranges from -20 dBu to +20 dBu. The signal to
noise ratio is -90 dBr (R.I.A.A.: -70 dBr).
Connector is Jack:
LINE A=balanced connected by two stereo jack sockets
Tip=in phase, ring=out of phase, sleeve=ground
LINE B=unbalanced
Tip = signal left, Ring = signal right, Sleeve = ground
NOTE: By adding an optional plug in stereo R.I.A.A. pre-amp, the A input is able to
accept M.D. phono pick-ups. See jumper settings!
Start and Stop connector:
NOTE:
Stereo jack plug
Tip = Center contact
Ring = Normally open
Sleeve = Normally closed
Polarity is not important with reed relays!
Pulse or Continuous Signal: Using the internal jumper, it is possible to choose between a
pulse or continuous signal to the remote device.
NOTE:
Airmix manual page 9
The stop connector can be changed into a start connector of the
B input by changing jumper settings when needed.
SHORT OVERVIEW OF MIC / LINE CHANNEL FUNCTIONS.
GAIN LINE
Line pre-amp gain adjustment with a range of 40 dB.
GAIN MIC .
MIC pre-amp gain adjustment from -70 dBu to +16 dB.
HIGH.
Lift and cut of 12 dB at 10 kHz shelve curve.
MID.
Lift and cut of 12 dB at 3 kHz bell curve.
LOW.
Lift and cut of 12 dB at 60 Hz shelve curve.
AUXILIARY.
A separate post pan, post fader stereo send to the master aux.
Pre fader but post pan is also possible by internal jumper settings.
SUB
The Sub switch switches the stereo modules output from the main
output to seperate SUB mix amps located in the master section of the
console.
PAN.
The 'pan' enables the signal to be precisely placed anywhere
between fully left or fully right.
PEAK
The peak indicator acts as a warning that the audio signal is 4 dB below
clipping.
CUE
Cue enables pre-fade listening (post panpot) in order to adjust the gain
control whilst the fader is closed, or the `on' switch is off.
The cue will be automatically disabled when the channel fader
is opened, if the "ON" switch is active or when the "ON" switch is
activated if the fader was already open.
ON.
Channel on/off switch. Switches the channel to stand-by mode
when the fader is closed; the red led will softly illuminate.
When the on' switch is not activated the channel fader can be opened
(red led on) without bringing the audio up and without generating a
mic-on signal. The channel can now be activated, including mic-on
signalling, by pressing the 'on' switch (red led from low to high
intensity). The cue will be automatically reset.
FADER
Channel switch and volume control. This fader controls the audio
signal level by means of a high quality VCA.
Airmix manual page 10
TRIPLE INPUT SECTION
Mono Microphone input.
The front end of this module is designed to amplify balanced microphone signals. A +48 Volt
phantom power supply is available for condenser microphones. The Airmix has the ultimate in
mic amplification with a wide dynamic range and extremely low noise.
The microphone input is electronically balanced and protected against R.F. interference.
The input has RF cancelling input coils to avoid hearing "radio Moskou" when you are not in
the mood.
Input impedance is 2 kOhm - high enough to accept all modern microphones.
A seperate Gain control can vary the input levels between -70dB and +16 dB in one turn.
The signal to noise ratio is -129.0 dBr, and is therefore well suited to low noise performances.
Phantom Powering.
This +48 Volt power is required for condenser microphones, and can be applied to the
microphone inputs via jumper settings, (see jumper settings).
When the phantom power is applied and the channel is active, a 'click' can be heard when a
microphone is plugged in. This is due to a D.C. component on the input which is suddenly
interrupted and amplified by +/- 70 dB; it is therefore important not to do this with channel
faders up and channel ON.
DO NOT use unbalanced or electret microphones when the phantom power is applied, as it
could damage the microphones.
High-Pass Filter on MIC.
The high-pass filter attenuates the low frequencies - below 80 Hz, and can be switched on or
off by jumper settings (see jumper settings). It is only active on MIC inputs.
NOTE:Some microphones have built in high-pass filters and therefore do not require use of
the Airmix high-pass filter.
Microphones used for speech are usually set for high-pass filtering in order to avoid 'popping'
and other unwanted low frequency rumble, and therefore improves the quality and
intelligability of the spoken word.
MIC Insert.
When a jack is plugged into the Mic insert jack, the signal path is interrupted. The ring of the
jack sends the signal pre equaliser and on the tip of the jack the signal returns just before the
equalizer. In this way it is therefore possible to insert a D&R compressor or other signal
processor or microphone only signals.
It is also possible to use this insert jack as a direct send without interrupting the signal path.
In that case you connect tip and ring with each other this can be usefull for driving external
producers desks, or for selective recording etc.
By de-activating the MIC switch it is possile to use the stereo line inputs at the same time or
other stereo sources to be mixed into the main outputs.
Airmix manual page 11
TRIPLE INPUT SECTION
REMOTE/COUGH/SIGNALLING IN MIC MODE
This useful feature has two important functions:
1. Cough/communication,
2. 'Mic-on'
1. Cough/Communication,
(A pushbutton needs to be connected to the ring and sleeve of the jackplug.)
Using the pushbutton during broadcast, the announcer can temporarily mute the
microphone in order to cough (where the name comes from). At the same time his
microphone will be routed to the cue system, in order to give him the opportunity to
communicate with the engineer/producer.
2. 'Mic-on',
When the channel is active a voltage is applied between Tip (+) and Sleeve (0V),
which can be used to activate a led (red) or an opto coupler.
In addition to the localised 'mic-on' signalling, there is also a master signal in the
master section. The ON-AIR signalling outputs 1 and 2 offer the option of driving
external red light indicators in the studio. Two jumpers per channel select which
channel will activate the master ON-AIR signalling (see jumper settings)
REMOTE/SIGNALLING IN LINE MODE
In this mode Cue can be switched on/off and the channel can be switched on/off.
MIC GAIN.
The MIC-Gain' control adjusts the gain of the mic input only, the range is -70 dBu to +16dBu.
Alignment of the MIC input.
With the fader in the 'down' position, and the Cue activated, the input signal is adjusted with
the gain control until the ZERO dB posititon of the master meter is illuminated.
When the fader is in its 0 dB position, the signal has a nominal level in the Airmix
This way of alignment will give enough margin to compensate for signal losses of up to 10 dB,
whilst the noise floor remains well below the nominal level.
Airmix Line input module.
This part of the triple input module is specially designed to accept balanced and unbalanced
stereo input signals. There are two stereo inputs, line A and line B, Line A has seperate fader
start and stop connectors. By changing jumpers the stop connector of line A will be converted
to a start connector for line B.
R.I.A.A.
As an option, a stereo phono pre-amp with R.I.A.A. filter curves can be plugged onto the
mother board, in order to accept Magnetic Dynamic phono cartridges.
Jumpers.
A number of module functions can be activated by jumper settings, (see jumper settings).
Airmix manual page 12
TRIPLE INPUT SECTION
START/STOP FUNCTIONS
The fader `Start' and `Stop' is normally active when input A is selected, however jumpers
change Line A STOP into a Start connector of line B input.
These remote connectors are activated by the fader and/or `on' switch in the channel module.
The start and stop jack connectors are electronically separated by use of encapsulated reed
relays. The stop connector can be used for recue of appliances.
Reed relays are ideal devices for eliminating ground loops and limited lifespan effects of other
switches, and can easily be interfaced with all modern equipment.
The start and stop connectors are connected to separate reed relays.
The maximum current is 50 mA. Current limiting resistors of 10 Ohm are placed in series with
the reed relay contacts to protect them from abuse. (Polarity is not important with reed
relays!)
NOTE 1:
NOTE 2:
NOTE 3:
Nearly all modern devices require pulse information. Continuous signals
however, can have the advantage that during broadcast a CD player cannot be
accidentally stopped. One disadvantage however is that some CD players are
blocked from other functions when started with a continuous pulse.
It is advisable to only use the pulse start mode with jingle machines, and not
connect the stop jack. The cart has to finish its tape to the end, and then
automatically rewinds.
Some of the older products such as the A-77, require additional relays or
switching transistors to operate satisfactorily, contact your dealer for more
information.
LINE GAIN.
The seperate Line Gain control adjusts the gain of the stereo channel pre-amps, within a range
of -20 dB to +20 dB. The range of the fader (VCA) gives an additional 10 dB of gain when
needed.
Alignment of the channel.
With the fade closed (or muted channel) and the cue switch is activated; the Autocue in the
master section must be activated. The gain control is used to adjust the level of the incoming
signal until a zero dB reading is achieved. If the `ON' switch is now activated, the signal level
will be nominal. When the fader is opened, the cue signal will be automatically reset, and its
associated led will switch off.
Stereo/Mono Switches.
With two pushbutton switches, Mono-L and Mono-R, the incoming left and right signals can
be switched to mono or stereo. When both switches are in their 'up' positions, the module will
accept stereo signals. When both switches are in their 'down' positions, Mono summing of the
stereo input signals occurs.
When Mono-L is in its 'down' position, the mono signal coming in from the left input will be
sent to both signal paths of the stereo line module.
When Mono-R is activated, only the 'right' signal will be sent to both stereo signal paths.
Airmix manual page 13
TRIPLE INPUT SECTION
Equaliser.
The equaliser is optimised for broadcast. Centre detents on all equaliser controls indicate their
flat position. (Note: There are also modules availale without EQ controls)
The maximum lift and cut is 12 dB at the following frequencies:
10 kHz :
Shelve
3 kHz :
Bell
60 Hz :
Shelve
Auxilliary.
The stereo auxiliary send is postfader, bringing the signal to the master stereo auxiliary send.
When the input module is used for microphone signals only both left and right signal paths are
fed by the same mono mic input signal. The channels `ON' switch will also switch the
Auxiliary send on or off when it is jumpered post fader.
SUB
The Sub switch switches the stereo modules output from the main output to seperate SUB
mix amps located in the master section of the console.
This setup makes production work possible during ON-AIR broadcast due to extremely good
crosstalk figures achieved in the Airmix console by carefull usage of high-end CAD design
systems in the initial design stage of the console.
The Sub mix can be mixed into the main output mixbuss in the master section.
This is a convenient way to use the SUB assigment switch as a subgroup system, creating new
possibilities in the Airmix console.
PAN
The PAN enables adjustment between the left and right signals. The range is not restricted in
order to enable to position any incoming signal anywhere in the stereo image.
Peak Indicator.
The peak indicator comes on when the left or right input signals reach -4 dB from the
maximum level of +22 dBu.
CUE.
This is an automatic prefade-listen system post pan-pot which enables you to listen to a
channel without actually opening that channel. When the cue button is activated, the channel
signal will be connected to the cue output and meter circuitry (when the fader is closed or
open dependent on jumper settings); the yellow cue led indicator will illuminate.
When the channel is active, the cue system will be reset, including its associated led, however
it is possible re-activate the CUE switch.
Channel Cueing on D.J. channels will only be heard in the headphone outputs. The CRM
output will be muted.
The Cue switch can also generate a start/stop pulse for remotely connected machines by
changing jumper settings
The cue signal can be heard in two ways:1.
Through the stereo Control Room Monitors by activating the autocue switche in the
master section. If the cue is activated in one of the channels, the CRM and meters
will be activated without interruption of the main output.
2.
By way of an externally connected cue amplifier with loudspeaker.
Airmix manual page 14
TRIPLE INPUT SECTION
ON The channel on/off switch operates in tandem with the fader start. There are two visible
intensities of the illuminated led indicators:
1. Low glowing red led : channel is on 'stand-by' mode.
2. Bright emitting red led : channel is `active'
There are two methods of activating the channel:
A. Depress the `ON' switch, (red led is softly glowing), then by moving up the fader, the
signal is sent to the master and at the same time a mic-on indication is sent to the
cough connector. The red led illuminates brightly.
B. When the `on' switch is "off", no led is illuminated. As the fader is
moved upwards, the channel is put into 'stand-by' and the On switch illuminates softly.
At this point there is no 'mic-on' signalling or audio to the master. Pressing the ON'
switch activates the channel and the red led is illuminated brightly, mic-on' signalling
is now present.
In order to switch the channel and mic-on signalling off, the "ON" switch should be
deactivated, or the fader closed.
Fader.
The fader is an ultra smooth 100mm model controlling the internal high quality VCA's and
sending on/off information to the logic circuitry. There is no audio going through the faders
which guarantees noise free fading for ever! When the fader is closed, the signal is
automatically muted, providing a cut-off in excess of 100 dB. This high dB cut-off value
ensures that the main output is protected from crosstalk from announcers or fast spooling tape
decks.
Airmix manual page 15
5.0 TELCO MODULE
TELCO SEND
This gain control adjusts outgoing levels coming from the main
output or the SUB output .
LINE A/B.
A/B input selector. When line B is selected, the red led is
illuminated. In this mode Phone line B is activated.
GAIN.
This control adjusts incoming call levels.
DUCK.
Dims all incoming signals when outgoing signals are pesent.
HIGHPASS.
Fixed low frequency roll off
LOWPASS.
Fixed high frequency roll off.
HIGH/MID/LOW.
only availale as an option.
AUX.
Transmit a signal to the aux. master post fader.
The channel on' switch also affects the aux send.
SUB
Assigns input signal to seperate SUBmaster
PAN.
Allows adjustment between the left and right channel outputs.
PEAK.
The peak indicator will indicate when the signal reaches
-4dB below the clipping point of the module.
CUE.
pre-fade listening. Allows pre-fade listening of the channel and
taking an incoming call with the fader closed. The cue function
is automatically disabled when the channel is activated.
ON.
Channel on/off switch. While in closed fader stand-by mode, i.e.
when red led is half illuminated incoming calls can be connected by pressing the
"ON" switch, red fully lights.
FADER .
Channel VCA volume-control adjusts overall channel level.
Airmix manual page 16
TELCO MODULE
Airmix TELCO input module.
This input module is specially designed to accept a maximum of two telephone lines. An
internal telephone hybrid circuit simplifies connection of telephone lines and phone appliances.
There are two inputs, line A and line B, Line A is internally connected to PHONE A, and Line
B is internally connected to PHONE B (the start and stop connectors of the triple input
modules). When the internal relays are not active both phone lines can be used as normal.
The "MIC" labelled insert jack is an insert for the incoming phone signal. An inserted Limiter
keeps spikes from entering the Airmix Telco module.
Jumpers.
A number of module functions can be activated by jumper settings, (see jumper settings).
TELCO SEND.
The Telco send controls the outgoing signal to the caller. This can be either the MIX or Sub
output
dependent upon the SUB switch setting in the Telco module. Yes this switch not only controls
the assignment of the incoming signal to the masters but also which signal is sent to the caller.
A/B select
This switch select either phone line A or B to enter the Telco module.
Note:
Switching during an established connection will cancel the connection!
GAIN.
The Gain control adjusts the gain of the incoming phone call within a range of -20 dBu to
+20 dBu. The range of the fader (VCA) gives an additional 10 dB of gain when needed.
DUCK
The duck switch automatically dims incoming signals when outgoing signals are present,
giving the presenter priority over the caller as well as better intelligibility.
HIGHPASS
The highpass filter smoothly filters out all frequencies below the passband of the telephone
line.
LOWPASS
The low pass filter effectively filters out all above telephone line frequencies.
NOTE:
In the standard Airmix Telco module there is no EQ available, however if needed we can offer
a three band eq on this module.
The maximum range is then 12 dB at frequencies:5 kHz :
1 kHz :
200 Hz :
Airmix manual page 17
Shelve
Bell
Shelve
TELCO MODULE
Auxiliary.
The stereo auxiliary sends a post fader signal, dependent upon the 'ON' switch of the input
channel, signal to the master auxiliary busses. The PAN control creates a stereo image in the
Aux masters.
SUB
The Sub switch switches the Telco modules output from the main output to seperate SUB mix
amps located in the master section of the console.
This setup makes production work possible during ON-AIR broadcast due to extremely good
crosstalk figures achieved in the Airmix console by carefull usage of high-end CAD design
systems in the initial design stage of the console.
The Sub mix can be mixed into the main output mixbuss in the master section. This is a
convenient way to use the SUB assigment switch as a subgroup system, creating new
possibilities in the Airmix console.
At the same time the incoming signal from a caller is reassigned to the sub buss.
PAN
The PAN enables positioning of the incoming caller signal. The range is not restricted in order
to enable to position any incoming signal anywhere in the stereo image.
PEAK INDICATOR.
The peak indicator comes on when the left or right input signals reach -4 dB from the
maximum level of +22 dB.
CUE/RING.
Automatic pre-fade listening/post pan, or cue, allows a caller to be heard without being in the
broadcast. When activating the cue switch, the caller is connected to the CUE bus and listens
to the talkback mic of the engineer (fader closed).
The Cue switch shows an incoming call by flashing, hitting the CUE switch makes a
connection as described above. A remote switch can pick up a call by wiring the remote
conector of the Telco module.
The 'ON' switch works in conjunction with the fader switch.
1. Red Led low intensity
The channel mode is 'stand-by'
2. Red Led high intensity
The channel is 'active'
There are two methods of activating an incoming call.
A.
If the 'ON' switch is pressed, the red ON led will illuminate with low intensity. and the
caller is connected to the Telco module but not yet heard in the broadcast because the
fader is still down.
By opening the fader, the Telco module will be activated and the signal will enter the
program, the red led will now fully light.
When the fader is closed again the program signal will be muted, when the fader is at
its lowest position (the red ON led lowers its intensity).
Airmix manual page 18
TELCO MODULE
B
When the `on' switch is not depressed, no Led is illuminated even if the fader is now
opened. In this situation, none of the signals are active but as soon as the ON switch is
activated (with a flashing Cue switch) the caller will be direct "On-AIR".
All switching is carried out electronically with carefullly designed timing, and is
therefore smooth and click-free.
If the cue function is active, it will be disabled when the channel is activated.
NOTE: In the Telco module it is not possible to "Cue" when the channel is active.
FADER.
The Airmix is fitted with a modern ultra-smooth lineair fader controlling a high quality VCA
and the Airmix internal logic circuitry, not the audio signal. This system eliminates any noise
from disturbing the audio signal path. When the fader is closed, the signal will be
automatically muted, which provides excellent fader attenuation in excess of 100 dB. This
system also eliminates any possible crosstalk from fast- winding tape recorders during
broadcast.
Alignment of the channel.
With the fader closed (or muted channel) the Cue switch will be activated; the Autocue in the
master section must be activated. The gain control is used to adjust the level of the incoming
signal until a zero dB reading is achieved. If the `on' switch is now activated, the signal level
will be nominal. When the fader is opened, the cue signal will be automatically reset, and its
associated led will switch off. The cue signal can be heard in two ways:1. Through the stereo Control Room Monitors by activating the autocue switch in the master
section. If the Cue is activated in one of the channels, the CRM and meters will be activated
without interruption of the main output.
2. By way of an externally connected cue amplifier with loudspeaker.
CONNECTORS
LINE INSERT
Connector type is Jack:
Line A - Input.
Connector type is Jack:
Line B - Input.
Connector type is jack:
Airmix manual page 19
Tip = signal return
Ring = signal send
Sleeve = ground
Tip = phone line A-wire
Ring = phone line B-wire
Sleeve = not connected
Tip = phone line A-wire
Ring = phone line B-wire
Sleeve = not connected
TELCO MODULE
The input impedance for both `Phone A' and `Phone B' are optimized for correct loading of
modern telephone stations.
PHONE A - Input.
Connector type is Jack:
PHONE B - Input.
Connector type is jack:
Tip = phone line A-wire
Ring = phone line B-wire
Sleeve = not connected
Tip = phone line A-wire
Ring = phone line B-wire
Sleeve = not connected
REMOTE.
The remote connector lets you activate the CUE of the Telco module when the module is in
its "off" or "standby" mode. A convenient way of communicating for the announcer/director
with callers. An ON led can be connected to the remote to indicate the "ON" status of the
Telco module. The same Led indicates incoming calls by flashing.
REMOTE - Input.
Connector type is jack:
Tip = Channel "ON" led
Ring = Cue control
Sleeve = Ground
COMMUNICATION WITH TELCO MODULE
ENGINEER TO/FROM TELCO
Communication with the engineer is easily accomplished by activating the Cue switch in the
Telco module. An open communication is achieved now between caller and engineer.
DIRECTOR TO/FROM/ TELCO
The Cue switch on the Telco module has to be activated. Now dependent upon internal
selection of the director communication jumpers (switched/off/on) the director has
communication with the caller. In the case of the "switched" jumper selection, the remote unit
can be used to activate the communication with the Telco module.
ANNOUNCER TO/FROM TELCO
The Cue switch on the Telco module and the "autocomm" switch in the master section has to
be activated. The moment the Annoucer hits his cough switch communication takes place
between announcer and caller (Telco module).
Airmix manual page 20
6.0 MASTER SECTION / STUDIO
STUDIO.
In the Studio area are three monitor systems which can be used as needed in your studio
situation.
MONITOR
The monitor will give a mono signal fed from the "From sub" switches
Talk back level into the Monitor output is independent of monitor level settings.
Output of the monitor is mono and both tip and ring are fed with signal, to easily interface
with stereo amps in the studio area.
The monitor output is mainly intended to be used as an overall output to monitor what is
going on during broadcast, maye in other area's than the studio room itself.
A useful option during broadcast, is to jumper all outputs of the individual channels, except
the studio microphones, and to amplify the summed signal through a small loudspeaker in the
studio. This enables everyone present in the studio to follow the program material. If the
loudspeaker is set to a low level, it will not `colour' the sound of an 'open' microphone.
The monitor output is wired to a stereo jack socket with the following configuration.
Tip = signal (mono)
Ring = signal (mono)
Sleeve = ground
GUEST
The GUEST output is stereo and follows the input selection of "From air" or "From sub".
A separate stereo headphone output is provided for a guest, and the talkback is always
adressed to both earphones independent of level settings. The pogram material will be dimmed
when the talkback is activated. The output is identical to that of the announcer, and could
therefore be used as a second announcers output.
FOLLOW CRM (Guest).
When this switch is activated it will follow the input selection of the Control Room Monitor.
The Guest output is on a stereo jack and wired with:
Tip = left
Ring = right
Sleeve = ground
The signal is powerful enough to drive several 600 Ohm headphones in tandem.
The talkback volume to the Guest output is independant from the guests level control;
normally the guest would listen to the main stereo program material.
ANNOUNCER
The ANNOUNCER output is stereo and follows the input selection of "From air" or "From
sub". A separate stereo headphone output is provided for the announcer, and the talkback is
always adressed to both earphones independent of level settings.
FOLLOW CRM (Announcer).
When this switch is activated it will follow the input selection of the Control Room Monitor.
Airmix manual page 21
MASTER SECTION / STUDIO
AUTO COMM.
When the "Autocomm" is active, the announcer is able to listen to the talkack mic and the
CUE buss at the same time, when he hits his "cough" switch.
This set-up creates a direct communication with the Director and engineer without having to
ask them to use their cough/talkback switches.
At the same it is now possibble to talk with the Telco module if its cue is activated.
The Announcer output is on a stereo jack and the signal is powerful enough to drive several
600 Ohm headphones in tandem.
The talkback volume to the Announcer output is independant from the announcers level
control; normally the announcer listens to the main stereo program material.
BACK PANEL CONNECTORS
Apart from the already described monitor/guest and announcer outputs there are three more
outputs. The Timer control output, the Cue output and the "from-air" input
The TIMER output can trigger an optional timer every time a channel is activated or
deactivated
The CUE output gives the cue signal in stereo. This is an unswitched CUE output in stereo.
If the D.J. Cue is activated the Cue will be muted
FROM AIR is the stereo input for controlling the off air signal coming from a receiver. This is
a stereo input on jack. Input sensitivity is either 0dBu or -10dBV.
MASTER SECTION / TAPE
This section of the master houses the switches, controlling what is going to the tape outputs.
FROM OSC.
An internal 1kHz oscillator can be assigned to the tape 1 and 2 outputs as well as the Aux
output.
Level can be internally adjusted to read 0dBu or -10dBv, dependent on jumper settings for the
tape outputs. Both tape outputs are set with one set of jumper settings.
FROM SUB
Normally the Tape outputs are fed by the main output. Depressing the from sub switch sends
the sub stereo mix to the tape outputs for recording. With this circuitry it is possible to record
stereo sources from the channels assigned to the sub buss during broadcast.
Airmix manual page 22
MASTER SECTION / TALKBACK.
This section houses all controls needed to communicate with every connected source to the
Airmix. Communication is one of the most important parts of a broadcast, inside and outside
the console We have done a great deal of thought concerning this part of the console.
The talkback microphone is a built in Electret microphone with its associated level control and
pulse 'on' switch. The mic-amp is protected against clipping and a peak detector watches over
overloads. The same peak detector is used to watch the directors mic input.
The talkback routing is latching, and can be assigned to several outputs at the same time. The
Monitor, Guest and Announcer outputs are driven post their volume controls, so
communication is always possible. The Aux output level also controls the talk-back level!
DIRECTOR MIC INPUT
The Airmix has a seperate low noise mic input, with +48volt phantom power possibility,
assignable to the cue system and Telco sends/returns. The remote connector of the Directors
mic activates the directors mic to the same assignment switches as used for the engineers
talk-back mic.
Apart from these assignments it is possible to jumper the Directors mic to the settings
described below.
1. Director to Telco return (and Announcer in "autocomm" mode) by remote connector
(directors TB switch)
2. Director always to Telco return (and Announcer in "autocomm" mode)
3. Director never to Telco return (and Announcer in "autocomm" mode)
NOTE:
If the "autocomm" switch is activated, talk back can be activated by the Announcer.
On the back of the master section you can find the following connectors fitted on this board
located in this section.
Tape1 out stereo, Tape 2 out stereo, Master out stereo, On-air signalling 1, On-air signalling
2, Remote director.
Tape 1 and 2 are stereo outputs with levels either 0dBu or -10dBv
Master out stereo is an extra stereo output of the main mix either available in 0dBu or -10dBv
dependent upon jumper settings.
The ON-Air signalling jacks are connected to reed relays driven by the logic of the input
channels as described in the channel sections of this manual.
Using the D.J.mode it is possible to operate and be an announcer at the same time. If the
mic-on lamp illuminates, the loudspeakers and cue loudspeaker are automatically muted.
Internally microphone channels can be connected via jumpers to the centralised ON-AIR
signalling connector, so when one or more of these channels are opened, the mic-on signal will
be given.
Airmix manual page 23
MASTER SECTION / TALKBACK.
We advise you to use an externally connected solid state relay. A suitable model is the
S 201-8 04 from Sharp, which switches 220 Volts/l.S Amp click-free. A solid state relay is
much safer to use and is more reliable. The ON-AIR 1/2 output can be connected directly to
the S 201-8 04 relay in seies with a 12 volt dc power supply..
Connector:
Tip = Center contact
Ring =Normally open
Sleeve=Normally closed
These signalling outputs are only to be used for low voltage applications!
The Remote Director is a stereo jack to connect a switch and a signalling led for remotely
controlling the talk back of the directors mic input. The led will indicate On-Air 1 active.
MASTER SECTION CUE/CRM
AUTOCUE.
When this switch is activated both CRM outputs are automatically connected to a selected cue
switch in stereo. When this witch is not active the CRM will monitor the main outputs.
The Cue signal will always be present at the Cue output jack
AUTO CUE RESET
When this switch is depressed, the Cue reset circuitry will be active meaning that any activated
CUE in the console will be reset by activating any input channel in the console.
DIM LEVEL
This control adjusts the amount of dimming the main output level when talkback is active or
the communication/cue system is active. The range is adjustable from fully cancelling the main
output up to -6dB below Cue level.
FROM AIR
This is a stereo switch sourcing the off-air signal from a stereo receiver and assigning it to the
CRM output. It is used to control the off-air signal while broadcasting.
FROM SUB
This is a stereo switch bringing the Sub output into the CRM output. It will override the from
air signal when selected.
Airmix manual page 24
MASTER SECTION CUE/CRM
EXTERN 1/2
These are stereo inputs to be used for any stereo source that needs to be monitored in the
CRM outputs. The input level can be set by jumpers to 0dBu or -10dBv
CRM
The control room monitor controls the outgoing level to the control room monitors. Level is
0dBu on a stereo jack.
DIM
The dim switch is a momentary switch activating the dimming of the CRM and giving
indication of dimming by the TB circuitry and Cue system.
BACK PANEL CONNECTORS ON THIS SECTION OF THE MASTER.
CRM out L/R
This is a stereo jack giving the CRM stereo signal, nominal level is 0dBu
Extern1/2 L/R
These are the stereo inputs for the external stereo sources. level is jumperable between 0dBu
and -10dBV.
Insert L & R.
The main outputs Left and Right, each have their own insertion points.
These inserts are intended to accept D&R limiters or compressors.
Tip = return
Ring = send
Sleeve = ground
Insert Mono.
Insertion point for the mono output.
NOTE:The mono output can have its own compressor/limiter, which would be particularly
worthwhile when this output is used for transmitting through FM. It is usual to have higher
compression ratios to increase the energy for small portables and car radios.
The signal for the mono output amp is the summed left/right main output signal. By means of
the jumper settings, it is possible to determine whether the signal comes from before or after
the stereo insertion points, (see jumper settings).
Airmix manual page 25
MASTER SECTION AUX / SUB
The stereo auxiliary send can be used for several purposes, such as driving effects, such as the
D&R Qverb etc.
A cue switch lets you listen in stereo post master fader what has been assigned to the Aux
busses.
SUB TO MIX
When the sub switch in the channel is used to assign specific channels to this stereo buss it is
possible to bring this whole subgroup into the main output by depressing this SUB TO MIX
switch.
SUB
This stereo control adjusts the overall level of the whole subgroup. Output level is either 0dBu
or -10dbV set by jumpers if desirable.
A stereo cue switch assigns this signal to the CRM and the metering (if the auto cue is active)
METER FOLLOW CRM
Normal situation is; left meter follows the left main output and the right meter follows the
CRM.
When the "METER FOLLOW CRM" switch is activated, the left meter follows the CRM as
well.
FROM AIR
This is the input select for the phones output. Either the main mix is heard in the phones or the
from air signal (the self-op switch needs to be down and the DJ channel active)
SELF OP
When this mode is activated Phones automatically switches to the main output or the
eventually selected "from air" outputs, when the D.J channel is opened.
When self op is not activated, headphones will follow the CRM.
PHONES LEVEL
This controls the overall level of the stereo headphones output. To avoid misunderstandings in
stressfull situations it is not possible to fully kill the headphone signal.
DJ LED
The DJ led lights whenever a DJ channel is active.
CUE RESET
Depressing this large switch resets all activated Cues in all channels and masters
The switch also indicates any activated cue switch in the console when Autocue is active.
Airmix manual page 26
BACK PANEL CONNECTORS ON THE AUX/SUB BOARD
On top you will see a 9 pin subD connector with the following signals/voltages
1=CRM-right (feeds meter right)
2=ground
3=External CUE led drive
4=ground
5=Mix right signal (extra meter output)
6=meter left feed (Mix left or CRM left)
7= +18 volt
8= -18 volt
9=Mix left signal (extra meter output)
AIRMIX METERING
In its basic version the Airmix is shipped with 37 segment high resolutionpeak reading
ledbargraph meters. However on request we can supply you with VU meters
The Airmix has logarithmic peak reading meters, with 10 m sec. attack time, and 1.5 sec.
release for every 20 dB. Normally these meters follow the CRM selectors, but internal jumpers
can set the left meter to read the left program material at all times.
It is also possible to mount a second set of stereo meters to always follow the main outputs.
NOTE:The following levels should be used for a suitable sound pressure, for music,
talkshows, and interviews etc.
Music
Speech
Telephone
: up to -4 dB
: up to O dB
: up to +4 dB
A mild compression such as 2:1 with slow attack and a threshold of -6 dB to limiting around
+8 dB will improve the relationship between different broadcast material.
NOTE:These are average settings only, presentation of modern pop music will certainly
require alternative settings.
MASTER SECTION AUX / SUB
AUX OUT STEREO
This is a stereo output of the aux masters. level is 0dBu
SUB OUT STEREO
Stereo output jack of the subgroup output, level is 0dBu or -10dBv
PHONES OUTPUT
The engineers stereo headphone output can also be used as D.J. output.
NOTE: DO NOT use headphones with an impedance lower than 200 Ohm. 600 Ohm is
preferable.
Airmix manual page 27
MASTER SECTION AUX / SUB
PHONES OUTPUT
Connector type is stereo jack plug.
Tip = left.
Ring = right.
Sleeve = ground.
NOTE: Under the arm rest, there is another parallel connector for connecting headphones.
SWITCHED CUE OUTPUT
This is a stereo output of the CUE system which is switched in parallel with the CRM if it
needs to be muted to prevent feedback from happening.
The level can be set by jumpers to be 0dBu o -10dBv.
If only a low output is required, a small 100 Ohm loudspeaker can be connected directly to the
cue output.
MAIN OUTPUTS.
The Airmix contains three transformer balanced main outputs: master left, master right and
mono. All three outputs have their own line output amps with high quality output
transformers.
The output level is 0/+6 dB at 600 Ohm when the meter reads O dB.
Connectors are XLR male:
Pin 1 = ground
Pin 2 = hot
Pin 3 = cold
If the Airmix is required to drive unbalanced equipment, Pins 1 and 3 must be shorted.
NOTE:The mono output can have its own compressor/limiter, which would be particularly
worthwhile when this output is used for transmitting through FM. It is usual to have higher
compression ratios to increase the energy for small protables and car radios.
==================================================
The mains input is set for 230 volt 50/60 Hz.
The Aimix can be set to 115 volt only by qualified technicians
==================================================
Airmix manual page 28
AIRMIX MASTER BACKPANEL CONNECTORS
MONITOR OUT STEREO/MONO
Type:
Jack
Level 0dBu/680 Ohm
Tip=signal
Ring=signal
Sleeve=Ground
GUEST OUT STEREO
Type:
Jack
ANNOUNCER OUT STEREO
Type:
Jack
TIMER CONTROL OUT
Type:
Jack
CUE OUT STEREO
Type:
Jack
FROM AIR
Type:
Jack
TAPE 1 OUT STEREO
Type:
Jack
TAPE 2 OUT STEREO
Type:
Jack
Airmix manual page 29
Level +15dBu/330 Ohm
Tip=Left
Ring=Right
Sleeve=Ground
Level +15dBu/330 Ohm
Tip=Left
Ring=Right
Sleeve=Ground
Level ground//6V8 volt
Tip=Normally low/active high (timer start)
Ring=Normally low/active pulse (timer reset)
Sleeve=Ground
Level 0dBu/47 Ohm
Tip=Left
Ring=Right
Sleeve=Ground
Level 0dBu/-10dBv/10kOhm
Tip=Left
Ring=Right
Sleeve=Ground
Level 0dBu/-10dBV/100 Ohm
Tip=Left
Ring=Right
Sleeve=Ground
Level 0dBu/-10dBV/100 Ohm
Tip=Left
Ring=Right
Sleeve=Ground
AIRMIX BACK PANEL CONNECTORS
MASTER OUT STEREO
Type:
Jack
ON AIR SIGNALLING 1
Type:
Jack
ON AIR SIGNALLING 2
Type:
Jack
REMOTE DIRECTOR
Type:
Jack
Level 0dBu/-10dBV 47 Ohm
Tip=Left
Ring=Right
Sleeve=Ground
REED RELAY MAX VOLTAGE 24VOLT
Tip=Center contact
Ring=Normally open
Sleeve=Normally closed
REED RELAY MAX VOLTAGE 24VOLT
Tip=Center contact
Ring=Normally open
Sleeve=Normally closed
Solid state input
Tip=led output Anode (activated by ON-AIR-1)
Ring=normally high (active to ground)
Sleeve=ground
CRM OUT L/R
Type:
Jack
Level 0dBu/47 Ohm
Tip=Left
Ring=Right
Sleeve=Ground
EXTERN 1 IN L/R
Type:
Jack
Level 0dBu/-10dBV100Kohm
Tip=Left
Ring=Right
Sleeve=Ground
EXTERN 2 IN L/R
Type:
Jack
Level 0dBu/-10dBV100Kohm
Tip=Left
Ring=Right
Sleeve=Ground
LEFT INSERT
Type:
Jack
Level 0dBu/100E/10ohm
Tip=Return
Ring=Send
Sleeve=Ground
Airmix manual page 30
MASTER BACKPANEL CONNECTORS
MONO INSERT
Type:
Jack
Level 0dBu/100E/100Kohm
Tip=Return
Ring=Send
Sleeve=Ground
RIGHT INSERT
Type:
Jack
Level 0dBu/100E/10Kohm
Tip=Return
Ring=Send
Sleeve=Ground
METER
Type
Sub-D
female
1=CRM-right (feeds meter right)
2=ground
3=External CUE led drive
4=ground
5=Mix right signal (extra meter output)
6=meter left feed (Mix left or CRM left)
7= +18 volt
8= -18 volt
9=Mix left signal (extra meter output)
AUX OUT STEREO
Type:
Jack
SUB OUT STEREO
Type:
Jack
PHONES OUT STEREO
Type:
Jack
SWITCHED CUE OUT STEREO
Type:
Jack
Airmix manual page 31
Level 0dBu/47 Ohm
Tip=Left
Ring=Right
Sleeve=Ground
Level 0dBu/-10dBV/47 Ohm
Tip=Left
Ring=Right
Sleeve=Ground
Level +15dBu/330 Ohm
Tip=Left
Ring=Right
Sleeve=Ground
Level 0dBu/-10dBv/47 Ohm
Tip=Left
Ring=Right
Sleeve=Ground
7. AIRMIX JUMPER SETTINGS
TRIPLE INPUT MIC/LINE/LINE MODULE.
Default
A=ANNOUNCER COM
B=TIMER
C=LINE ON-AIR2
D=MIC ON-AIR2
E=MIC ON-AIR1
F=LINE ON-AIR
G=DJ MIC
H=MIC TO MONITOR
I=LINE TO MONITOR
K=LOW CUT
L=CUE LINE A START/STOP
M=STOP A OR START B
N=START A
O=START B
P=+48Volt (J23)
Q=AUX PRE/POST
R=AUX PRE/POST
OFF
ON
ON
OFF
ON
OFF
OFF
OFF
ON
OFF
OFF
PULSE
PULSE
STOP A
OFF
POST
POST
1 + 2 = ON
3 + 4 = OFF
1+2=LINE A 2+3 = OFF 3 + 4 = ON
1 + 2 = ON
3 + 4 = OFF
1 + 2 = ON
3 + 4 = OFF
1 + 2 = ON
3 + 4 = OFF
1 + 2 = ON
3 + 4 = OFF
1 + 2 = ON
3 + 4 = OFF
1 + 2 = ON
3 + 4 = OFF
1 + 2 = ON
3 + 4 = OFF
1 + 2 = OFF
3 + 4 = ON
1 + 2 = OFF
3 + 4 = ON
1 + 2 = CONT.
3 + 4 = PULSE
1 + 2 = CONT.
3 + 4 = PULSE
1 + 2 = STOPA
3 + 4 = START B
1 + 2 = OFF
3 + 4 = ON
1 + 2 = POST
3 + 4 = PRE
1 + 2 = POST
3 + 4 = PRE
NOTE
An optional R.I.A.A. phono pre amp can be plugged in here. The 'A' input of the channel can
thus be connected directly to a phono cartridge. Jumpers should be removed from the channel
completely. DO NOT plug the jumpers on the lower connecting pins, as this will short out the
positive and negative channel power supply lines to earth!
TELCO MODULE.
J19=AUX PRE/POST
J10=AUX PRE/POST
J17=TELCO TO TIMER
J20=TELCO TO MONITOR
J11=TELCO ON-AIR 1
J14=TELCO ON-AIR 2
1 + 2 = POST
1 + 2 = POST
1 + 2 = ON
1 + 2 = ON
1 + 2 = ON
1 + 2 = ON
3 + 4 = PRE
3 + 4 = PRE
3 + 4 = OFF
3 + 4 = OFF
3 + 4 = OFF
3 + 4 = OFF
1 + 2 = -10dBV
1 + 2 = -10dBV
1 + 2 = -10dBV
1 + 2 = -10dBV
3 + 4 = 0dBu
3 + 4 = 0dBu
3 + 4 = 0dBu
3 + 4 = 0dBu
STUDIO PCB
J13=AIR IN LEFT
J 9=AIR IN RIGHT
J15=CUE-OUT LEFT
J16=CUE-OUT RIGHT
Airmix manual page 32
AIRMIX JUMPER SETTINGS
TAPE/TALKBACK PCB
J 7=+48VOLT DIRECTOR MIC
J12=TAPE 1/2 OUT LEFT
J13=TAPE 1/2 OUT RIGHT
J14=STEREO OUT LEFT
J15=STEREO OUT RIGHT
J11=DIRECTOR TO TELCO
1 + 2 = OFF
1 + 2 = -10dBV
1 + 2 = -10dBV
1 + 2 = -10dBV
1 + 2 = -10dBV
1+2=switched
3 + 4 = ON
3 + 4 = 0dBu
3 + 4 = 0dBu
3 + 4 = 0dBu
3 + 4 = 0dBu
2+3=OFF
3+4=ON
1 + 2 = -10dBV
1 + 2 = -10dBV
1 + 2 = -10dBV
1 + 2 = -10dBV
1 + 2 = POST
1 + 2 = POST
3 + 4 = 0dBu
3 + 4 = 0dBu
3 + 4 = 0dBu
3 + 4 = 0dBu
3 + 4 = PRE
3 + 4 = PRE
1 + 2 = -10dBV
1 + 2 = -10dBV
1 + 2 = -10dBV
1 + 2 = -10dBV
1 + 2 = ON
3 + 4 = 0dBu
3 + 4 = 0dBu
3 + 4 = 0dBu
3 + 4 = 0dBu
3 + 4 = EXT
CUE/CRM PCB JUMPER SETTINGS
J13=EXTERNAL-1 IN LEFT
J14=EXTERNAL-1 IN RIGHT
J15=EXTERNAL-2 IN LEFT
J16=EXTERNAL-2 IN RIGHT
J12=MONO PRE/POST LEFT INSERT
J11=MONO PRE/POST RIGHT INSERT
AUX/SUB PCB JUMPER SETTINGS
J7=SWITCHED CUE OUT LEFT
J9=SWITCHED CUE OUT RIGHT
J10=SUB OUT LEFT
J11=SUB OUT RIGHT
J19=CUE LED EXTERNAL
Airmix manual page 33
8. INSTALLING THE AIRMIX
Mains.
Please check that the local mains supply corresponds with the voltage selected on the Airmix
mains inlet. The Airmix can be factory set for voltages between 100 - 120 Volt or 220 - 240
Volt.
The Airmix is fused with a 2 Amp slow blow fuse for 110 Volt or 1.2 Amp slow blow fuse for
220 Volt.
DO NOT use any other value, as this would be hazardeous, and the Airmix guarantee will be
void.
Clean Power Connection.
Be sure to use a 'clean' power outlet, i.e. one that is fed directly from the mains, including
earth.
Only connect the Airmix to this outlet and its associated equipment. This will act as the
centralized mains and earth for the studio.
It is advisable to install several multiple mains connectors close to the Airmix, with a master
power switch to shut down all power to the studio. Grounding MUST BE a starground
system.
Keep all wires as short as possible, but never install audio next to power cables.
"Polluted" mains are caused by changing currents on the outlets, such as air-conditioners,
coffee machines, fridges, computers, dimmer packs etc. DO NOT connect any of these types
of items to
the Airmix main power outlet.
Wiring.
In cases where all the equipment is transformer balanced, it is usual to connect the shielding of
the wiring to the source side only.
In the Airmix, many of the sources will be unbalanced, so a different strategy needs to be
adopted.
Equipment such as CD players do not have a mains ground connection. In this case the
shielding can be connected on both sides of the connection - a ground loop will not occur.
Try to choose a CD player with metal housing. If you experience problems with the
transmitter interfering with the CD sound, connect the CD housing to a ceramic capacitor of
0.01 uF/250 V to the mains earth.
Audio Connections to the Airmix.
Prior to commencing wiring of the studio, it is advisable to obtain some labels, which will
simplify trouble-shooting. Label such as "CD-1, chl 2A"
The first step is to connect the Airmix to the mains, with all faders closed, no CRM active and
the CRM volume controls fully clock-wise.
A.
B.
Connect the CRM amp to the CRM output, and check whether there is any 'hum' or
'noise'
Now connect the phono players, and check again for `hum' and 'noise'
NOTE:In most cases it is a matter of finding the best grounding for the phono ground by trial
and error. This might be directly to the audio ground or to the chassis of the Airmix.
C.
Now connect Tapedeck, Cartmachines, CD players etc.
Airmix manual page 34
INSTALLING THE AIRMIX
NOTE:Wiring a tuner needs special attention.
If the tuner is "cable", the coax antennae cable will probably cause a ground loop. The
antennae input of the tuner must be separated by an H.F. transformer - ask your
dealer or any radio shop for details.
*IMPORTANT*
SAFETY PRECAUTION - All 'outside' connections to the Airmix, even from the
same building, must be connected via a transformer. This avoids the possibility of
ground loops and `hum'
The shielding must be connected to the source side.
In areas with a strong H.F. interferance, it is wise to connect the other side of the
shielding through a 0.1 uF/250 Volt ceramic capacitor. The capacitor will not affect
the audio, but will reduce H.F. signals.
Servicing the Airmix.
A.
B.
C.
D.
E.
F.
G.
Disconnect the mains supply.
Remove the power cable from the back of the console.
Remove the backpanel of the meterhood.
Remove cabling as necessary.
Unscrew the channel module bolts.
Now lift the channel up at the fader section, and then the other side. Carefully lift
the module until you see a connector mounted to a ribbon (flat) cable.
On the PCB part of the connector you will see two ejectors, with which to eject the
cable header.
Installing the Channel Module.
A.
B.
C.
Plug the ribbon cable connector into the PCB connector, ensuring that the ejectors are
securely replaced.
Slowly put the module down into the chassis, rear first.
Tighten all screws, and reconnect the channel.
Servicing the Master Section.
A.
B.
C.
D.
E.
F.
G.
Disconnect the Airmix from the mains supply.
Remove all cables.
Remove all holding screws.
Lift the master section, from the fader side first.
Remove the connector to the power PCB.
Lift the section upwards until you are able to remove the ribbon cable from the PCBs.
Reverse this procedure to re-mount the master section.
Airmix manual page 35
INSTALLING THE AIRMIX
INSTALLING/ALIGNMENT OF THE TELCO MODULE.
A.
Connect the telephone line with line A and a phone appliance to phone A
(see connector pages).
1.
Connect audio to the insert (in/return) and adjust VR4 (N-1 control) to a minimal
signal strength on test point J16 (N-1 testpin).
NOTE: This setting has already performed at the factory but can be repeated if needed.
2.
Connect a headphone to insert send and activate the telco module (ON switch).
3.
Listen to the headphones(inserted in insert send) and adjust VR3 to minimum signal.
4.
Select with a jumper the correct Condenser for miminum signal feed through (Side
tone selection)
NOTE: Repeat steps 3 and 4 several times, until the maximum attenuation is achieved.
The hybrid is now aligned, leave the R and C balance selection as selected.
As long as the hybrid remains connected to the same "phone company", no changes need to be
made to this set up.
NOTE: Try to by-pass the in house telephone system if possible, otherwise it will be extremely
difficult to achieve a good alignment. A direct connection with the incoming 'phone company
gives the best results.
NOTE VERY IMPORTANT!!!
INSTALLATION OF NEW (EXTRA) MODULES
When installing new (extra) modules in your Airmix it is necessary to re-adjust the internal
power supply voltages to guarantuee a stable performance at all times.
More current is taken from the internal power supply because you have put in more modules
now.
It is necessary to adjust the power supply voltage to a precise level of 16.7 volts for both the
positive and negative rails with all modules connected.
Adjustment is performed on the power supply PCB mounted on the bottom of the console
located beneath the master section.
Power supply voltage is measured across the output terminals of the power supply PCB inside
the console.
NOTE: If the power supply voltage is not adjusted to 16.7 volts again, it may be possible that
certain logic functions may not work properly all times.
Airmix manual page 36
9. SPECIFICATION
INPUTS
Mic inputs: balanced 2 kOhm, R.F. protected.
C.M.R.R. at 50 Hz: -76 dB.
Sensitivity: -70 dBu to +16 dBu for +6 dBu out.
Signal to noise ratio: - 129.00 dBr.
LINE INPUTS
Line (stereo) inputs: Balanced/Unbalanced 10 kOhm minimum.
Signal to noise ratio: - 90 dB.
Sensitivity: -20 dBv to +20 dBv active controlled for +6 dBv output.
Insert: input unbalanced at 10 kOhm.
Sensitivity: OdBv.
Tape returns in master: -10 dBv or 0 dBu at 10 kOhm .
OUTPUTS
Left/right/mono 0/+6 dBu transformer balanced.
Aux. 1/2, Telco send, Cue, CRM, 0dBu at 47/330 Ohm unbalanced.
Phones / Announcer / Guest, +15 dBv at 47 Ohm.
EQUALISATION
+/- 12 dB at 10 kHz shelf.
+/- 12 dB at 3 kHz bell curve.
+/- 12 dB at 60 Hz shelf.
OVERALL
Frequency response: 20-20.000 Hz +/- 0.5 dB.
Harmonic distortion: less than 0.02% at all levels (VCA's in).
Max gain through desk: 86 dB.
Cross talk: channel to channel: - 90dB at 1 kHz.
Noise: -86 dBu (one channel @ OdB).
A/B line cross talk: -80 dB.
Max output: +22 dBu into 2 kOhm.
Headroom: +22 dB above internal nominal level.
REMOTES
WEIGHT
OPTIONS
All control inputs are on jack sockets.
Channel/master mike-on signalling is via buffered transistors
and or reed relays.
Machine remote control is via separate reed relays for start
and stop pulse or continuous signals.
`
Airmix 16: 50 kg (110 Ib).
Conductive plastic faders.
VU meters, extra main output meters.
Timer
DIMENSIONS
Drop though mounting
Airmix manual page 37
815mm width
610mm depth
10. SICO REMOTE UNIT.
The Airmix Sico Remote unit is designed to be the communication interface between the
control room and the announcer or guest. It has a built in headphone amp, a remote connector
to be wired via a shielded stereo cable to the related Airmix channel, and a very convenient
CHOUGH/COMMUNICATION button.
We shall describe all functions in detail now.
COUGH/SIGNALLING IN MIC MODE
This useful feature has two important functions:
1. Cough/communication,
2. 'Mic-on'
1. Cough/Communication,
A shielded stereo cable has to be connected between the Sico remote unit and the Airmix input
channel that needs to be communicated to.
Using the push-button during broadcast, the announcer can temporarily mute the microphone
in order to cough (where the name comes from). At the same time his microphone will be
routed to the cue system, in order to give him the opportunity to communicate with the
engineer/producer.
2. 'Mic-on',
When the channel is active a voltage is applied between Tip (+) and Sleeve (0V),
which can be used to activate a led (red) (in this case the internal led of the SiCo remote unit.
It can also be used to activate an externally connected lamp (-18 Volt/20mA), but resistor
R123 needs to be replaced. Contact your dealer for additional information.
In addition to the localized 'mic-on' signaling, there is also a master signal in the master
section. The ON-AIR signaling outputs 1 and 2 offer the option of driving external red light
indicators in the studio. Two jumpers per channel select which channel will activate the master
ON-AIR signaling (see jumper settings, page 32).
The input jack of the Sico Remote unit needs to be wired to the master of the Airmix, Guest
or Announcer outputs or whatever suits your purpose mostly.
The output jack is a parallel jack to the input jack to simplify wiring to more than one SiCo
remote unit in the presentation room.
Airmix manual page 38
11. AIRMIX USER QUESTIONNAIRE
Dear Airmix user,
We care very much about your opinion of our product, and would very much appreciate if you
could complete the following questionnaire, and return it to the address below. Please use the
reverse, or additional paper if required.
USER NAME .......................................................................................................................
ORGANISATION ................................................................................................................
ADDRESS ...........................................................................................................................
TOWN .................................................................................................................................
POST CODE ........................................................................................................................
COUNTRY ..........................................................................................................................
AIRMIX SERIAL NO:
.............................................................................................................................................
CONFIGURATION .............................................................................................................
DEALER .............................................................................................................................
HOW DID YOU HEAR ABOUT THE "AIRMIX"? (please circle)
(Dealer / Advertisement / Exhibition / Other user / Other)
WHAT JOURNALS DO YOU TAKE ON A REGULAR BASIS?
..............................................................................................................................................
WHAT IS YOUR OPINION OF THE PRICE/QUALITY OF THE 'AIRMIX'?
..............................................................................................................................................
WHAT PRICE WOULD YOU CONSIDER SUITABLE FOR THE 'AIRMIX'?
..............................................................................................................................................
ANY OTHER SUGGESTIONS?
..............................................................................................................................................
"I REQUIRE INFORMATION ABOUT
..............................................................................................................................................
WHAT OTHER EQUIPMENT DO YOU USE?
..............................................................................................................................................
PLEASE SEND TO:
D&R Electronica Weesp bv, Rijnkade 15B, 1382 GS WEESP
Airmix manual page 39
12. PRODUCT SAFETY
This product is manufactured with the highest standards and is double checked in our quality
control department for reliability in the "HIGH VOLTAGE" section.
CAUTION
Never remove any panels, or open this equipment. No user servicable parts inside.
Equipment power supply must be grounded at all times.
Only use this product as described, in user manual or brochure.
Do not operate this equipment in high humidity or expose it to water or other liquids.
Check the AC power supply cable to assure secure contact.
Have your equipment checked yearly by a qualified dealer service center.
Hazardous electrical shock can be avoided by carefully following the above rules.
EXTRA CAUTION FOR LIVE SOUND
Ground all equipment using the ground pin in the AC power supply cable.
Never remove this pin.
Ground loops should be eliminated only by use of isolation transformers for all inputs and
outputs. Replace any blown fuse with the same type and rating only after equipment has been
disconnected from AC power. If problem persists, return equipment to qualified service
technician
PLEASE READ THE FOLLOWING INFORMATION VERY CAREFULLY
Especially in sound equipment on stage the following information is essential to know.
An electrical shock is caused by voltage and current, actually it is the current that causes the
shock.
In practise the higher the voltage the higher the current will be and the higher the shock.
But there is another thing to consider and it is resistance.
When the resistance in Ohms is high between two poles, the current will be low and vica
versa. All three of these; voltage, current. and resistance are important in determining the
effect of an electrical shock.
However, the severity of a shock primarily determined by the amount of current flowing
through a person.
A person can feel a shock because the muscles in a body respond to electric
Current can also be fatal when it causes the chest muscles to contract and stop breathing.
At what potential is current dangereous.
Well the first feeling of current is a tingle at 0.001 Amp of current. The current between 0.1
Amp and 0.2 Amp is fatal. Imagine that your home fuses of 20 Amp can handle 200 times
more current than is necessary to kill. How does resistance affect the shock a person feels.
A typical resistance between one hand to the other in "dry" condition could be well over
100,000 Ohm.
If you are playing on stage your body is perspiring extensively andyour body resistance is
lowered by more than 50%. This is a situation in which current can easilyflow.
Airmix manual page 40
12.0 PRODUCT SAFETY
Current will flow when there is a difference in ground potential between equipment on stage
and in the P,A. system. Please do check if there is any potential between the housing of the
mics and the guitarsynth amps, which will be linked by your body on stage.
Imagine, a guitar in your hand and your lips close to the mike! A ground potential difference
of above 10 volts is not unusual, in improperly wired buildings it can possibly be as high as
240 volts.
Allthough removing the ground wire sometimes cures a system hum, it will create a very
hazardeous situation for the performing musician.
Always earth all your equipment by, the grounding pin in your mains plug Hum loops
should be only cured by proper wiring and isolation input/output transformers.
Replace fuses always with the same type and rating after the equipment has been turned off
and unplugged. If the fuse blows again you have an equipment failure, do not use it again and
return it to your dealer for repair.
And last but not least be carefull not to touch a person being shocked as you, yourself could
also be shocked. Once removed from the shock, have someone send for medical help
inmediately
Always keep the above mentioned information in mind when using electrically powered
equipment.
D&R ELECTRONICA B.V. WEESP
HEAD OFFICE
D&R Electronica Weesp b.v.
Rijnkade 15B
1382 GS WEESP
THE NETHERLANDS
Phone: +31 (294) 418 014*
Fax: +31 (294) 416 987
Website: http//www.d-r.nl
E-mail: [email protected]
Airmix manual page 41
Conformity statement according to
ISO/IEC Nr. 22 and EN 45014
Name Manufacturer
Addres manufacturer
D&R Electronica Weesp b.v.
Rijnkade 15B,
1382 GS Weesp,
The Netherlands
declares that this product
Name product
Modelnumber
Produktoptions
AIRMIX series
n.a.
All
passed the following product specifications:
Security
EN 60950: 1988 +Al, A2
EMC:
CISPR-22: 1985 / EN 55022: 1988 class B (*)
EN 50082-1: 1992
IEC 801-2:1991 / prEN 55024-2:1992 - 3kV CD, 8kV AD
IEC 801-3:1984 / prEN 55024-3:1991 - 3 V/m
IEC 801-4:1988 / prEN 55024-4:1992 - 0.5kV signal cables,
1 kV powercables.
Extra information:
The product passed the specifications of the following regulations;
Low voltage 73 / 23 / EEG
EMC-regulations 89 /336 / EEG.
(*) The product is tested in a normal users environment.
Airmix manual page 42
AIRMIX
SERVICE MANUAL
Airmix manual page 43
Cicuit diagram list
Description
PCB name
Number of Sheets
Topview cutout dimension Airmix 16
1
Block diagram
2
Triple EQ/standard channel
AIRMIX1D
1
Telco channel
AIRMIX3B
2
Master-1
AIRMIX5B
1
Master-2
AIRMIX6A
1
Master-3
AIRMIX7B
1
Master-4
AIRMIX8A
1
Power Supply
AIRCOM9C
1
RIAA pre-amp
AIRCOM10A
1
Phone-amp
SICOREMOTE/A
1
Vu- driver
VUD-B
1
Airlb7p.sch-1 - Fri Aug 20 15:09:31 1999
D&R Electronica Weesp BV (AIRMIX PARTLIST) DATE: 20-04-1998
60881601 Airmix triple EQ channel
------------------------------------------------------------------------------------------------Articlecode | Description
|
Quantity | Unit
------------------------------------------------------------------------------------------------10400208
| Condensator ker
3p9 R2.5
|
2.0000 | st
10400209
| Condensator ker
4p7 R2.5
|
2.0000 | st
10400211
| Condensator ker
6p8 R2.5
|
2.0000 | st
10400213
| Condensator ker 10p R2.5
|
5.0000 | st
10400221
| Condensator ker 47p R2.5
|
4.0000 | st
10400225
| Condensator ker 100p R2.5
|
1.0000 | st
10400232
| Condensator ker 470p R2.5
|
1.0000 | st
10401241
| Condensator ker 100nF/50V R5 T
|
26.0000 | st
10401246
| Condensator poly 1n0 R5.0
|
2.0000 | st
10401249
| Condensator poly 3n3 R5.0
|
2.0000 | st
10400278
| Condensator poly 8n2 R5.0
|
2.0000 | st
10400277
| Condensator poly 22n R5.0
|
2.0000 | st
10401257
| Condensator poly 33n R5.0
|
2.0000 | st
10401261
| Condensator poly 100n R5.0
|
1.0000 | st
10401265
| Condensator poly 330n R5.0
|
1.0000 | st
10250342
| Diode 1N4148
(signaal)
|
17.0000 | st
10650517
| Draadbrug (0.6 mm)
|
2.0000 | st
10400279
| Elco 1uF / 63V radiaal R5.0
|
4.0000 | st
10400284
| Elco 10uF / 40V radiaal R5.0
|
3.0000 | st
10400292
| Elco 100uF / 25V radiaal R5.0
|
29.0000 | st
10400302
| Elco 100uF / 63V radiaal R5.0
|
3.0000 | st
10400280
| Elco 2.2uF / 50V radiaal R5.0
|
1.0000 | st
10400303
| Elco 1000uF / 10V radiaal R5.0
|
1.0000 | st
10250017
| Fet J175 (P-channel switch)
|
1.0000 | st
10600511
| Header 3p Lock straightR 2.54)
|
2.0000 | st
10600512
| Header 4P lock straight(R2.54)
|
2.0000 | st
10600141
| Header haaks 64p (raster 2.54)
|
1.0000 | st
10600478
| Header recht 4p (raster 2.54)
|
18.0000 | st
10600170
| Header recht 4p female pcb
|
1.0000 | st
10250355
| Ic 4013B (GEEN MOTOROLA!!!!)
|
1.0000 | st
10250004
| Ic 4053B (HCF4053 BEY)switch
|
2.0000 | st
10250005
| Ic 4093B
(snand)
|
1.0000 | st
10250184
| Ic SSM-2017 P (audio pre-amp)
|
1.0000 | st
10250032
| Ic THAT 2180-LB VCA
|
2.0000 | st
10250304
| Ic TL-072 CP TI (dual-opamp)
|
2.0000 | st
10250305
| Ic TL-074 CN TI (quad-opamp)
|
3.0000 | st
10600394
| Ic-voet 8 pins (vork-contact)
|
3.0000 | st
10600402
| Ic-voet 8 pins SIL 2.54mm
|
2.0000 | st
10600395
| Ic-voet 14 pins (vork-contact)
|
5.0000 | st
10600396
| Ic-voet 16 pins (vork-contact)
|
2.0000 | st
10600530
| Jack chassis break (slimline)
|
7.0000 | st
10300374
| Potm.16 1x 20kB/1x 10kRD gain
|
1.0000 | st
10300370
| Potm.16 2x 10kA
log
|
1.0000 | st
10300371
| Potm.16 2x 10kB
cn lin
|
1.0000 | st
10300375
| Potm.16 2x100kB
cn lin
|
4.0000 | st
10201131
| Print Airmix 1D (ch)
|
1.0000 | st
10550001
| Relais D1C121000 1xchnge minid
|
2.0000 | st
10550400
| Schakelaar Alps 2p-ns (2 x om)
|
2.0000 | st
10550401
| Schakelaar Alps 4p-ns (4 x om)
|
2.0000 | st
10550402
| Schakelaar Alps 6p-ns (6 x om)
|
1.0000 | st
10600414
| Shunt 2p (mini-jumper)
|
19.0000 | st
10250333
| Transistor BC-327/25 (pnp)
|
1.0000 | st
10250332
| Transistor BC-337/25 tape(npn)
|
9.0000 | st
10351745
| Weerstand 22k 1/8W 5%
|
10.0000 | st
10250351
| Zenerdiode 5V6 / 400mW
|
4.0000 | st
10250350
| Zenerdiode 18V0 / 400mW
|
4.0000 | st
10600173
| Conn: 3p wrd:402-03*20cm 2.5T
|
1.0000 | st
10600169
| Conn: 4p wired:1=blk/grn/rd/bl
|
2.0000 | st
10450151
| Deksel SiFam 11mm Hopsack/117
|
1.0000
| st
10450153
| Deksel SiFam 11mm black/5bulk
|
1.0000 | st
10450182
| Deksel SiFam 11mm blue bulk
|
1.0000 | st
10450195
| Deksel SiFam 11mm gray bulk
|
1.0000 | st
10450194
| Deksel SiFam 11mm green bulk
|
1.0000 | st
10450152
| Deksel SiFam 11mm red/7 bulk
|
2.0000 | st
10300102
| Fader JP 100mm lin 10KB
|
1.0000 | st
10101131
| Front Airmix 1A EQ zincor
|
1.0000 | st
10450198
| Knop Druktoets 3.3 black-recta
|
2.0000 | st
10450197
| Knop Druktoets 3.3 grey-rectan
|
2.0000 | st
10450196
| Knop Druktoets 3.3 red-rectang
|
1.0000 | st
10450082
| Knop Fader SiFam white (1.2x8)
|
1.0000 | st
10450103
| Knop SiFam grey splined(11mm)
|
7.0000 | st
10250386
| Led 3mm green round
|
1.0000 | st
10250387
| Led 3mm red round
|
3.0000 | st
20851131
| Print bestukt Airmix 1 stchlux
|
1.0000 | st
10550450
| Schak Miyama RED OFF(ON)LEDred |
1.0000 | st
10550445
| Schak Miyama YEL OFF(ON)LEDred |
1.0000 | st
10700787
| Taptite M3x6 bolkoppozidr/zwrt
|
2.0000 | st
60881602 Airmix triple standard channel
------------------------------------------------------------------------------------------------Articlecode | Description
|
Quantity | Unit
------------------------------------------------------------------------------------------------10400208
| Condensator ker
3p9 R2.5
|
2.0000 | st
10400209
| Condensator ker
4p7 R2.5
|
2.0000 | st
10400211
| Condensator ker
6p8 R2.5
|
2.0000 | st
10400213
| Condensator ker 10p R2.5
|
5.0000 | st
10400221
| Condensator ker 47p R2.5
|
4.0000 | st
10400225
| Condensator ker 100p R2.5
|
1.0000 | st
10400232
| Condensator ker 470p R2.5
|
1.0000 | st
10401241
| Condensator ker 100nF/50V R5 T
|
26.0000 | st
10401246
| Condensator poly 1n0 R5.0
|
2.0000 | st
10401249
| Condensator poly 3n3 R5.0
|
2.0000 | st
10400278
| Condensator poly 8n2 R5.0
|
2.0000 | st
10400277
| Condensator poly 22n R5.0
|
2.0000 | st
10401257
| Condensator poly 33n R5.0
|
2.0000 | st
10401261
| Condensator poly 100n R5.0
|
1.0000 | st
10401265
| Condensator poly 330n R5.0
|
1.0000 | st
10250342
| Diode 1N4148
(signaal)
|
17.0000 | st
10400279
| Elco 1uF / 63V radiaal R5.0
|
4.0000 | st
10400284
| Elco 10uF / 40V radiaal R5.0
|
3.0000 | st
10400292
| Elco 100uF / 25V radiaal R5.0
|
29.0000 | st
10400302
| Elco 100uF / 63V radiaal R5.0
|
3.0000 | st
10400280
| Elco 2.2uF / 50V radiaal R5.0
|
1.0000 | st
10400303
| Elco 1000uF / 10V radiaal R5.0
|
1.0000 | st
10250017
| Fet J175 (P-channel switch)
|
1.0000 | st
10600511
| Header 3p Lock straightR 2.54)
|
2.0000 | st
10600512
| Header 4P lock straight(R2.54)
|
2.0000 | st
10600141
| Header haaks 64p (raster 2.54)
|
1.0000 | st
10600478
| Header recht 4p (raster 2.54)
|
18.0000 | st
10600170
| Header recht 4p female pcb
|
1.0000 | st
10250355
| Ic 4013B (GEEN MOTOROLA!!!!)
|
1.0000 | st
10250004
| Ic 4053B (HCF4053 BEY)switch
|
2.0000 | st
10250005
| Ic 4093B
(snand)
|
1.0000 | st
10250184
| Ic SSM-2017 P (audio pre-amp)
|
1.0000 | st
10250032
| Ic THAT 2180-LB VCA
|
2.0000 | st
10250304
| Ic TL-072 CP TI (dual-opamp)
|
2.0000 | st
10250305
| Ic TL-074 CN TI (quad-opamp)
|
3.0000 | st
10600394
| Ic-voet 8 pins (vork-contact)
|
3.0000 | st
10600402
| Ic-voet 8 pins SIL 2.54mm
|
2.0000 | st
10600395
| Ic-voet 14 pins (vork-contact)
|
5.0000 | st
10600396
| Ic-voet 16 pins (vork-contact)
|
1.0000 | st
10600530
| Jack chassis break (slimline)
|
7.0000 | st
10300374
| Potm.16 1x 20kB/1x 10kRD gain
|
1.0000 | st
10300370
| Potm.16 2x 10kA
log
|
1.0000 | st
10300371
| Potm.16 2x 10kB
cn lin
|
1.0000 | st
10300375
| Potm.16 2x100kB
cn lin
|
1.0000 | st
10201131
| Print Airmix 1D (ch)
|
1.0000 | st
10550001
| Relais D1C121000 1xchnge minid
|
2.0000 | st
10550400
| Schakelaar Alps 2p-ns (2 x om)
|
2.0000 | st
10550401
| Schakelaar Alps 4p-ns (4 x om)
|
2.0000 | st
10550402
| Schakelaar Alps 6p-ns (6 x om)
|
1.0000 | st
10250333
| Transistor BC-327/25 (pnp)
|
1.0000 | st
10250332
| Transistor BC-337/25 tape(npn)
|
9.0000 | st
10350517
| Weerstand 0E 5% 1/4W
|
6.0000 | st
10250351
| Zenerdiode 5V6 / 400mW
|
4.0000 | st
10250350
| Zenerdiode 18V0 / 400mW
|
4.0000 | st
10600173
| Conn: 3p wrd:402-03*20cm 2.5T
|
1.0000 | st
10600169
| Conn: 4p wired:1=blk/grn/rd/bl
|
2.0000 | st
10450182
| Deksel SiFam 11mm blue bulk
|
1.0000 | st
10450195
| Deksel SiFam 11mm gray bulk
|
1.0000 | st
10450152
| Deksel SiFam 11mm red/7 bulk
|
2.0000 | st
10300102
| Fader JP 100mm lin 10KB
|
1.0000 | st
10101132
| Front Airmix 2A stand. zincor
|
1.0000 | st
10450198
| Knop Druktoets 3.3 black-recta
|
2.0000 | st
10450197
| Knop Druktoets 3.3 grey-rectan
|
2.0000 | st
10450196
| Knop Druktoets 3.3 red-rectang
|
1.0000 | st
10450082
| Knop Fader SiFam white (1.2x8)
|
1.0000 | st
10450103
| Knop SiFam grey splined(11mm)
|
4.0000 | st
10250386
| Led 3mm green round
|
1.0000 | st
10250387
| Led 3mm red round
|
3.0000 | st
20851132
| Print bestukt Airmix 1 stchstd
|
1.0000 | st
10550450
| Schak Miyama RED OFF(ON)LEDred |
1.0000 | st
10550445
| Schak Miyama YEL OFF(ON)LEDred |
1.0000 | st
10700787
| Taptite M3x6 bolkoppozidr/zwrt
|
2.0000 | st
Page 1
D&R Electronica Weesp BV (AIRMIX PARTLIST) DATE: 20-04-1998
60881603 Airmix Telco channel
------------------------------------------------------------------------------------------------Articlecode | Description
|
Quantity | Unit
------------------------------------------------------------------------------------------------10400209
| Condensator ker
4p7 R2.5
|
1.0000 | st
10400213
| Condensator ker 10p R2.5
|
6.0000 | st
10400217
| Condensator ker 22p R2.5
|
1.0000 | st
10400221
| Condensator ker 47p R2.5
|
2.0000 | st
10400234
| Condensator ker 680p R2.5
|
1.0000 | st
10400235
| Condensator ker 820p R2.5
|
1.0000 | st
10401241
| Condensator ker 100nF/50V R5 T
|
29.0000 | st
10401246
| Condensator poly 1n0 R5.0
|
2.0000 | st
10401268
| Condensator poly 1uF R5.0
|
1.0000 | st
10401248
| Condensator poly 2n2 R5.0
|
3.0000 | st
10401249
| Condensator poly 3n3 R5.0
|
1.0000 | st
10401250
| Condensator poly 4n7 R5.0
|
4.0000 | st
10401251
| Condensator poly 6n8 R5.0
|
1.0000 | st
10400278
| Condensator poly 8n2 R5.0
|
2.0000 | st
10400273
| Condensator poly 12n R5.0
|
1.0000 | st
10400277
| Condensator poly 22n R5.0
|
1.0000 | st
10401257
| Condensator poly 33n R5.0
|
4.0000 | st
10401261
| Condensator poly 100n R5.0
|
1.0000 | st
10400269
| Condensator poly 220n R5.0
|
1.0000 | st
10250342
| Diode 1N4148
(signaal)
|
16.0000 | st
10400279
| Elco 1uF / 63V radiaal R5.0
|
8.0000 | st
10400284
| Elco 10uF / 40V radiaal R5.0
|
2.0000 | st
10400292
| Elco 100uF / 25V radiaal R5.0
|
26.0000 | st
10400280
| Elco 2.2uF / 50V radiaal R5.0
|
4.0000 | st
10400290
| Elco 220uF / 25V radiaal R5.0
|
2.0000 | st
10600511
| Header 3p Lock straightR 2.54)
|
1.0000 | st
10600512
| Header 4P lock straight(R2.54)
|
2.0000 | st
10600141
| Header haaks 64p (raster 2.54)
|
1.0000 | st
10600478
| Header recht 4p (raster 2.54)
|
10.0000 | st
10250355
| Ic 4013B (GEEN MOTOROLA!!!!)
|
1.0000 | st
10250004
| Ic 4053B (HCF4053 BEY)switch
|
3.0000 | st
10250005
| Ic 4093B
(snand)
|
1.0000 | st
10250014
| Ic 4N27
(opto-coupler)
|
1.0000 | st
10250055
| Ic LS 1240 (ringer)
|
1.0000 | st
10250307
| Ic NE-5532 AP TI (dual-opamp)
|
1.0000 | st
10250032
| Ic THAT 2180-LB VCA
|
2.0000 | st
10250304
| Ic TL-072 CP TI (dual-opamp)
|
1.0000 | st
10250305
| Ic TL-074 CN TI (quad-opamp)
|
3.0000 | st
10600394
| Ic-voet 8 pins (vork-contact)
|
4.0000 | st
10600402
| Ic-voet 8 pins SIL 2.54mm
|
2.0000 | st
10600395
| Ic-voet 14 pins (vork-contact)
|
4.0000 | st
10600396
| Ic-voet 16 pins (vork-contact)
|
3.0000 | st
10300202
| Instelpot 22-turn 2k H T93YB
|
2.0000 | st
10600530
| Jack chassis break (slimline)
|
6.0000 | st
10300385
| Potm.16 1x 100KB
cn lin
|
3.0000 | st
10300374
| Potm.16 1x 20kB/1x 10kRD gain
|
1.0000 | st
10300370
| Potm.16 2x 10kA
log
|
1.0000 | st
10300371
| Potm.16 2x 10kB
cn lin
|
1.0000 | st
10300375
| Potm.16 2x100kB
cn lin
|
1.0000 | st
10201133
| Print Airmix 3B (telco)
|
1.0000 | st
10550001
| Relais D1C121000 1xchnge minid
|
4.0000 | st
10550400
| Schakelaar Alps 2p-ns (2 x om)
|
3.0000 | st
10550401
| Schakelaar Alps 4p-ns (4 x om)
|
2.0000 | st
10600414
| Shunt 2p (mini-jumper)
|
6.0000 | st
10950018
| Trafo LM-NP-1003-B (PTT line)
|
2.0000 | st
10250333
| Transistor BC-327/25 (pnp)
|
2.0000 | st
10250332
| Transistor BC-337/25 tape(npn)
|
8.0000 | st
10350517
| Weerstand 0E 5% 1/4W
|
2.0000 | st
10350765
| Weerstand 1M0 5% 1/4W
|
1.0000 | st
10350729
| Weerstand 1k0 5% 1/4W
|
5.0000 | st
10350732
| Weerstand 1k8 5% 1/4W
|
4.0000 | st
10350733
| Weerstand 2k2 5% 1/4W
|
4.0000 | st
10350734
| Weerstand 2k7 5% 1/4W
|
4.0000 | st
10350735
| Weerstand 3k3 5% 1/4W
|
1.0000 | st
10350736
| Weerstand 3k9 5% 1/4W
|
4.0000 | st
10350704
| Weerstand 4E7 5% 1/4W
|
5.0000 | st
10350737
| Weerstand 4k7 5% 1/4W
|
9.0000 | st
10351737
| Weerstand 4k7 1/8W 5%
|
7.0000 | st
10350738
| Weerstand 5k6 5% 1/4W
|
1.0000 | st
10350845
| Weerstand 5k62 1% 1/4W
|
1.0000 | st
10350739
| Weerstand 6k8 5% 1/4W
|
3.0000 | st
10350741
| Weerstand 10k 5% 1/4W
|
7.0000 | st
10351741
| Weerstand 10k 1/8W 5%
|
12.0000 | st
10350848
| Weerstand 10k0 1% 1/4W
|
1.0000 | st
10350850
| Weerstand 11k0 1% 1/4W
|
1.0000 | st
10350742
| Weerstand 12k 5% 1/4W
|
1.0000 | st
10350743
| Weerstand 15k 5% 1/4W
|
3.0000 | st
10350856
| Weerstand 20k0 1% 1/4W
|
7.0000 | st
10350745
| Weerstand 22k 5% 1/4W
|
7.0000 | st
10350747
| Weerstand 33k 5% 1/4W
|
2.0000 | st
10350748
| Weerstand 39k 5% 1/4W
|
1.0000 | st
10350749
| Weerstand 47k 5% 1/4W
|
2.0000 | st
10351749
| Weerstand 47k 1/8W 5%
|
1.0000 | st
10350751
| Weerstand 68k 5% 1/4W
|
3.0000 | st
10350752
| Weerstand 82k 5% 1/4W
|
1.0000 | st
10350717
| Weerstand 100E 5% 1/4W
|
10.0000 | st
10350753
| Weerstand 100K 5% 1/4W
|
4.0000 | st
10351753
| Weerstand 100k 1/8W 5%
|
25.0000 | st
10350756
| Weerstand 180K 5% 1/4W
|
1.0000 | st
10350757
10350758
10350725
10350761
10351761
10350726
10350792
10350727
10350763
10351763
10350825
10350002
10250351
10250350
10600173
10600169
10450153
10450182
10450195
10450152
10300102
10101133
10450198
10450197
10450196
10450082
10450103
10250386
10250387
20851133
10550450
10550445
10700787
| Weerstand 220K 5% 1/4W
| Weerstand 270k 5% 1/4W
| Weerstand 470E 5% 1/4W
| Weerstand 470k 5% 1/4W
| Weerstand 470k 1/8W 5%
| Weerstand 560E 5% 1/4W
| Weerstand 604E 1% 1/4W
| Weerstand 680E 5% 1/4W
| Weerstand 680k 5% 1/4W
| Weerstand 680k 1/8W 5%
| Weerstand 768E 1% 1/4W
| Weerstand vdr SIOV-S05K250
| Zenerdiode 5V6 / 400mW
| Zenerdiode 18V0 / 400mW
| Conn: 3p wrd:402-03*20cm 2.5T
| Conn: 4p wired:1=blk/grn/rd/bl
| Deksel SiFam 11mm black/5bulk
| Deksel SiFam 11mm blue bulk
| Deksel SiFam 11mm gray bulk
| Deksel SiFam 11mm red/7 bulk
| Fader JP 100mm lin 10KB
| Front Airmix 3A Telco zincor
| Knop Druktoets 3.3 black-recta
| Knop Druktoets 3.3 grey-rectan
| Knop Druktoets 3.3 red-rectang
| Knop Fader SiFam white (1.2x8)
| Knop SiFam grey splined(11mm)
| Led 3mm green round
| Led 3mm red round
| Print bestukt Airmix 3 (telco)
| Schak Miyama RED OFF(ON)LEDred
| Schak Miyama YEL OFF(ON)LEDred
| Taptite M3x6 bolkoppozidr/zwrt
|
|
|
|
|
|
|
|
|
|
|
|
|
|
|
|
|
|
|
|
|
|
|
|
|
|
|
|
|
|
|
|
|
1.0000
1.0000
2.0000
4.0000
1.0000
1.0000
1.0000
1.0000
1.0000
1.0000
1.0000
1.0000
3.0000
5.0000
1.0000
2.0000
1.0000
1.0000
1.0000
2.0000
1.0000
1.0000
2.0000
2.0000
1.0000
1.0000
4.0000
1.0000
3.0000
1.0000
1.0000
1.0000
2.0000
| st
| st
| st
| st
| st
| st
| st
| st
| st
| st
| st
| st
| st
| st
| st
| st
| st
| st
| st
| st
| st
| st
| st
| st
| st
| st
| st
| st
| st
| st
| st
| st
| st
60881605 Airmix master
------------------------------------------------------------------------------------------------Articlecode | Description
|
Quantity | Unit
------------------------------------------------------------------------------------------------10400213
| Condensator ker 10p R2.5
|
2.0000 | st
10400217
| Condensator ker 22p R2.5
|
34.0000 | st
10400221
| Condensator ker 47p R2.5
|
12.0000 | st
10400223
| Condensator ker 68p R2.5
|
1.0000 | st
10400225
| Condensator ker 100p R2.5
|
1.0000 | st
10400236
| Condensator ker 1000p R2.5
|
2.0000 | st
10401241
| Condensator ker 100nF/50V R5 T
|
75.0000 | st
10401246
| Condensator poly 1n0 R5.0
|
1.0000 | st
10401268
| Condensator poly 1uF R5.0
|
2.0000 | st
10401253
| Condensator poly 10n R5.0
|
4.0000 | st
10600040
| Connector sub-D9 female pcb
|
1.0000 | st
10250342
| Diode 1N4148
(signaal)
|
12.0000 | st
10400279
| Elco 1uF / 63V radiaal R5.0
|
2.0000 | st
10400284
| Elco 10uF / 40V radiaal R5.0
|
2.0000 | st
10400286
| Elco 22uF / 50V radiaal R5.0
|
1.0000 | st
10400287
| Elco 47uF / 25V radiaal R5.0
|
2.0000 | st
10400289
| Elco 47uF / 63V radiaal R5.0
|
3.0000 | st
10400292
| Elco 100uF / 25V radiaal R5.0
| 156.0000 | st
10400280
| Elco 2.2uF / 50V radiaal R5.0
|
6.0000 | st
10400281
| Elco 4.7uF / 50V radiaal R5.0
|
1.0000 | st
10250338
| Fet J112 (N-channel switch)
|
7.0000 | st
10250017
| Fet J175 (P-channel switch)
|
14.0000 | st
10600511
| Header 3p Lock straightR 2.54)
|
6.0000 | st
10600512
| Header 4P lock straight(R2.54)
|
4.0000 | st
10600449
| Header haaks 6p (raster 3.96)
|
1.0000 | st
10600140
| Header haaks 34p (raster 2.54)
|
4.0000 | st
10600141
| Header haaks 64p (raster 2.54)
|
4.0000 | st
10600474
| Header recht 3p (raster 3.96)
|
1.0000 | st
10600478
| Header recht 4p (raster 2.54)
|
21.0000 | st
10250355
| Ic 4013B (GEEN MOTOROLA!!!!)
|
1.0000 | st
10250004
| Ic 4053B (HCF4053 BEY)switch
|
3.0000 | st
10250028
| Ic LM-317 (var.pos.volt.reg)
|
1.0000 | st
10250307
| Ic NE-5532 AP TI (dual-opamp)
|
12.0000 | st
10250306
| Ic NE-5534 AP TI(single-opamp)
|
1.0000 | st
10250184
| Ic SSM-2017 P (audio pre-amp)
|
1.0000 | st
10250304
| Ic TL-072 CP TI (dual-opamp)
|
11.0000 | st
10250305
| Ic TL-074 CN TI (quad-opamp)
|
7.0000 | st
10600394
| Ic-voet 8 pins (vork-contact)
|
24.0000 | st
10600395
| Ic-voet 14 pins (vork-contact)
|
8.0000 | st
10600396
| Ic-voet 16 pins (vork-contact)
|
3.0000 | st
10300163
| Instelpot 10-turn 1k (T18)
|
1.0000 | st
10300166
| Instelpot 10-turn 22k (T18)
|
1.0000 | st
10600530
| Jack chassis break (slimline)
|
22.0000 | st
10300378
| Potm.16 1x 10kA
log
|
1.0000 | st
10300374
| Potm.16 1x 20kB/1x 10kRD gain
|
2.0000 | st
10300370
| Potm.16 2x 10kA
log
|
7.0000 | st
10201135
| Print Airmix 5B (master)
|
1.0000 | st
10201136
| Print Airmix 6A (master)
|
1.0000 | st
10201137
| Print Airmix 7B (master)
|
1.0000 | st
10201138
| Print Airmix 8A (master)
|
1.0000 | st
10550001
| Relais D1C121000 1xchnge minid
|
2.0000 | st
Page 2
D&R Electronica Weesp BV (AIRMIX PARTLIST) DATE: 20-04-1998
60881605 Airmix master
------------------------------------------------------------------------------------------------Articlecode | Description
|
Quantity | Unit
------------------------------------------------------------------------------------------------10550400
| Schakelaar Alps 2p-ns (2 x om)
|
9.0000 | st
10550401
| Schakelaar Alps 4p-ns (4 x om)
|
15.0000 | st
10600414
| Shunt 2p (mini-jumper)
|
21.0000 | st
10950003
| Trafo LL-5402 (output)
|
3.0000 | st
10250333
| Transistor BC-327/25 (pnp)
|
11.0000 | st
10250332
| Transistor BC-337/25 tape(npn)
|
5.0000 | st
10350517
| Weerstand 0E 5% 1/4W
|
3.0000 | st
10350701
| Weerstand 1E0 5% 1/4W
|
1.0000 | st
10350765
| Weerstand 1M0 5% 1/4W
|
1.0000 | st
10350729
| Weerstand 1k0 5% 1/4W
|
7.0000 | st
10350732
| Weerstand 1k8 5% 1/4W
|
17.0000 | st
10350733
| Weerstand 2k2 5% 1/4W
|
2.0000 | st
10350734
| Weerstand 2k7 5% 1/4W
|
3.0000 | st
10350736
| Weerstand 3k9 5% 1/4W
|
2.0000 | st
10350704
| Weerstand 4E7 5% 1/4W
|
29.0000 | st
10350737
| Weerstand 4k7 5% 1/4W
|
37.0000 | st
10351737
| Weerstand 4k7 1/8W 5%
|
18.0000 | st
10350846
| Weerstand 6K81 1% 1/4W
|
2.0000 | st
10350739
| Weerstand 6k8 5% 1/4W
|
4.0000 | st
10350740
| Weerstand 8k2 5% 1/4W
|
2.0000 | st
10350705
| Weerstand 10E 5% 1/4W
|
3.0000 | st
10350776
| Weerstand 10M0 5% 1/4W
|
22.0000 | st
10350741
| Weerstand 10k 5% 1/4W
|
42.0000 | st
10351741
| Weerstand 10k 1/8W 5%
|
14.0000 | st
10350742
| Weerstand 12k 5% 1/4W
|
1.0000 | st
10350743
| Weerstand 15k 5% 1/4W
|
11.0000 | st
10351743
| Weerstand 15k 1/8W 5%
|
4.0000 | st
10350856
| Weerstand 20k0 1% 1/4W
|
6.0000 | st
10350709
| Weerstand 22E 5% 1/4W
|
1.0000 | st
10350745
| Weerstand 22k 5% 1/4W
|
12.0000 | st
10350747
| Weerstand 33k 5% 1/4W
|
2.0000 | st
10350713
| Weerstand 47E 5% 1/4W
|
14.0000 | st
10350749
| Weerstand 47k 5% 1/4W
|
11.0000 | st
10350750
| Weerstand 56k 5% 1/4W
|
8.0000 | st
10350752
| Weerstand 82k 5% 1/4W
|
2.0000 | st
10350717
| Weerstand 100E 5% 1/4W
|
16.0000 | st
10350753
| Weerstand 100K 5% 1/4W
|
97.0000 | st
10351753
| Weerstand 100k 1/8W 5%
|
40.0000 | st
10350721
| Weerstand 220E 5% 1/4W
|
1.0000 | st
10350757
| Weerstand 220K 5% 1/4W
|
1.0000 | st
10350723
| Weerstand 330E 5% 1/4W
|
6.0000 | st
10350759
| Weerstand 330k 5% 1/4W
|
2.0000 | st
10350761
| Weerstand 470k 5% 1/4W
|
5.0000 | st
10350726
| Weerstand 560E 5% 1/4W
|
6.0000 | st
10350727
| Weerstand 680E 5% 1/4W
|
2.0000 | st
10350763
| Weerstand 680k 5% 1/4W
|
2.0000 | st
10250340
| Zenerdiode 2V4 / 400mW
|
2.0000 | st
10250351
| Zenerdiode 5V6 / 400mW
|
4.0000 | st
10250359
| Zenerdiode 15V0 / 400mW
|
10.0000 | st
10250350
| Zenerdiode 18V0 / 400mW
|
11.0000 | st
10650159
| Bandkabel 34p (R 1.27)
|
40.0000 | cm
10600173
| Conn: 3p wrd:402-03*20cm 2.5T
|
1.0000 | st
10600169
| Conn: 4p wired:1=blk/grn/rd/bl
|
3.0000 | st
10600132
| Connector bandkabel female 34p
|
4.0000 | st
10450195
| Deksel SiFam 11mm gray bulk
|
5.0000 | st
10450152
| Deksel SiFam 11mm red/7 bulk
|
5.0000 | st
10101135
| Front Airmix 5A Master zincor
|
1.0000 | st
10450198
| Knop Druktoets 3.3 black-recta
|
2.0000 | st
10450197
| Knop Druktoets 3.3 grey-rectan
|
15.0000 | st
10450196
| Knop Druktoets 3.3 red-rectang
|
7.0000 | st
10450103
| Knop SiFam grey splined(11mm)
|
10.0000 | st
10250386
| Led 3mm green round
|
20.0000 | st
10250387
| Led 3mm red round
|
6.0000 | st
10970912
| Microfoon (condens) (talkback)
|
1.0000 | st
10700690
| Platstaf 25 x 10 x 10mm
|
4.0000 | st
10700611
| Popnagel 3.0 x 6.5 blank
|
8.0000 | st
20851135
| Print bestukt Airmix 5 (mstr)
|
1.0000 | st
20851136
| Print bestukt Airmix 6 (mstr)
|
1.0000 | st
20851137
| Print bestukt Airmix 7 (mstr)
|
1.0000 | st
20851238
| Print bestukt Airmix 8 (mstr)
|
1.0000 | st
10550450
| Schak Miyama RED OFF(ON)LEDred |
2.0000 | st
10550445
| Schak Miyama YEL OFF(ON)LEDred |
1.0000 | st
10700787
| Taptite M3x6 bolkoppozidr/zwrt
|
4.0000 | st
60881631 Airmix Vu meter sectie
------------------------------------------------------------------------------------------------Articlecode | Description
|
Quantity | Unit
------------------------------------------------------------------------------------------------10400213
| Condensator ker 10p R2.5
|
2.0000 | st
10401241
| Condensator ker 100nF/50V R5 T
|
4.0000 | st
10400287
| Elco 47uF / 25V radiaal R5.0
|
4.0000 | st
10600512
| Header 4P lock straight(R2.54)
|
4.0000 | st
10250303
| Ic TL-071 CN TI (single-opamp)
|
2.0000 | st
10600394
| Ic-voet 8 pins (vork-contact)
|
2.0000 | st
10300200
| Instelpot 25-turn 20k H T93YB
|
2.0000 | st
10200030
| Print VUD/a (VU-driver)
|
2.0000 | st
10350736
| Weerstand 3k9 5% 1/4W
|
2.0000 | st
10350705
| Weerstand 10E 5% 1/4W
|
4.0000 | st
10350741
| Weerstand 10k 5% 1/4W
|
2.0000 | st
10650446
| Bandkabel 10p (R 1.27)
|
50.0000 | cm
10700671
| Bout M 4 x 10 inbus verz zwart
|
4.0000 | st
10600174
| Conn: 4p wired: 402-04/2*20cm
|
1.0000 | st
10600465
| Connector krimpcontact 2.54
|
8.0000 | st
10600095
| Connector sub-D bandkb.mal 9p
|
1.0000 | st
10100026
| Front 9.5" VU-meter anal.2HE/b
|
1.0000 | st
10600007
| Kabelschoen + boutgat M3 rood
|
4.0000 | st
10700625
| Kartelring M 3 (buitenvertan)
|
4.0000 | st
10500683
| Krimpkous 3.2mm RNF-100 1/8"zw
|
6.0000 | cm
10700610
| Moer M 3
|
4.0000 | st
20850130
| Print bestukt VUD (VU-driver)
|
2.0000 | st
10700790
| Taptite M3x6 verzkop/pozidr/zw
|
4.0000 | st
10951001
| VU meter AL29-WF / 24v lamp
|
2.0000 | st
60881675 Airmix frame
------------------------------------------------------------------------------------------------Articlecode | Description
|
Quantity | Unit
------------------------------------------------------------------------------------------------10350517
| Weerstand 0E 5% 1/4W
|
3.0000 | st
10700928
| Bout M 3 x 16
rvs
|
4.0000 | st
10250347
| Brugcel B250-C3700/2200 rechth
|
2.0000 | st
10250345
| Brugcel B80C1000
(rond)
|
1.0000 | st
10401241
| Condensator ker 100nF/50V R5 T
|
3.0000 | st
10250343
| Diode 1N4004
(rectifier)
|
8.0000 | st
10400284
| Elco 10uF / 40V radiaal R5.0
|
1.0000 | st
10400292
| Elco 100uF / 25V radiaal R5.0
|
4.0000 | st
10400302
| Elco 100uF / 63V radiaal R5.0
|
1.0000 | st
10400272
| Elco 2200uF / 63V axiaal
|
2.0000 | st
10400300
| Elco 4700uF / 50V axiaal
|
2.0000 | st
10600450
| Header recht 8p (raster 3.96)
|
1.0000 | st
10250019
| Ic LM-350 TO3
(volt.reg)
|
2.0000 | st
10250020
| Ic TL-783 TO220 (high voltreg)
|
1.0000 | st
10300201
| Instelpot 25-turn 1k H T93YB
|
2.0000 | st
10700625
| Kartelring M 3 (buitenvertan)
|
8.0000 | st
10720664
| Koelblok KL-135 75mm TO-3 zwrt
|
2.0000 | st
10720659
| Koelprof KL-176/SW hoed
|
2.0000 | st
10700610
| Moer M 3
|
4.0000 | st
10700611
| Popnagel 3.0 x 6.5 blank
|
8.0000 | st
10200610
| Print Aircom- 9c (powersupply)
|
1.0000 | st
10350835
| Weerstand 2k00 1% 1/4W
|
2.0000 | st
10350842
| Weerstand 3k01 1% 1/4W
|
1.0000 | st
10350742
| Weerstand 12k 5% 1/4W
|
2.0000 | st
10350716
| Weerstand 82E 5% 1/4W
|
1.0000 | st
10350720
| Weerstand 180E 5% 1/4W
|
2.0000 | st
10101140
| Achterplaat Airmix 10D Zincor
|
1.0000 | st
10700650
| Afstandstift PCB 11mm wit
|
6.0000 | st
10650451
| Bandkabel 64p (R 1.27)
| 300.0000 | cm
10700778
| Bout M 3 x 16
zwart
|
4.0000 | st
10700671
| Bout M 4 x 10 inbus verz zwart
|
32.0000 | st
10700908
| Bout M 5x40 tapbout blank
|
1.0000 | st
10600173
| Conn: 3p wrd:402-03*20cm 2.5T
|
20.0000 | st
10600169
| Conn: 4p wired:1=blk/grn/rd/bl
|
1.0000 | st
10600460
| Connector 406-6p 3.96
|
1.0000 | st
10600133
| Connector bandkabel female 64p
|
20.0000 | st
10600471
| Crimp contact 406 series tin
|
12.0000 | st
10800005
| Doos Airmix-16
|
1.0000 | st
10700975
| Dubbelzijdig plakband 12mm dun
| 1610.0000 | cm
10500004
| Isolatiekous 4.0mm rond (grys)
| 330.0000 | cm
10500006
| Isolatiekous 6.0mm rond (grys)
|
65.0000 | cm
10600432
| Jack chassis break
|
1.0000 | st
10600437
| Jack fiberring (zwart)
|
1.0000 | st
10600436
| Jack moer
|
1.0000 | st
10600007
| Kabelschoen + boutgat M3 rood
|
1.0000 | st
10700625
| Kartelring M 3 (buitenvertan)
|
2.0000 | st
10700910
| Kartelring M5 (buitenvertand)
|
1.0000 | st
10150425
| Kast Airmix-16 D (kompleet)
|
1.0000 | st
10450088
| Knop Fader SiFam black (1.2x8)
|
2.0000 | st
10450011
| Knop Fader SiFam red (1.2x8)
|
2.0000 | st
10500683
| Krimpkous 3.2mm RNF-100 1/8"zw
|
10.0000 | cm
10700007
| Magneetstrip 8.5mm x 3mm
| 162.0000 | cm
10600701
| Mains inlet SKT MS3 + FR MS3
|
1.0000 | st
10700610
| Moer M 3
|
6.0000 | st
10700909
| Moer M5
|
1.0000 | st
10650374
| Montagedraad 0.4 mm2 (geel)
|
40.0000 | cm
10650375
| Montagedraad 0.4 mm2 (groen)
|
10.0000 | cm
10650371
| Montagedraad 0.4 mm2 (rood)
|
40.0000 | cm
Page 3
D&R Electronica Weesp BV (AIRMIX PARTLIST) DATE: 20-04-1998
60881675 Airmix frame
------------------------------------------------------------------------------------------------Articlecode | Description
|
Quantity | Unit
------------------------------------------------------------------------------------------------10550020
| Netschak. small black no lamp
|
1.0000 | st
10600498
| Netsnoer 3 aders euroconnector
|
1.0000 | st
10700603
| Parker 2.9 x 9 zwart
|
8.0000 | st
10700606
| Popnagel 3x7 zwart ano alu/sta
|
40.0000 | st
20850029
| Print bestukt Aircom- 9 (ps)
|
1.0000 | st
10950879
| Ringk 80VA/2x19/1x30+Mu+kern
|
1.0000 | st
10100682
| Schrijfstrook 2800x28x3mm 62st
| 162.0000 | cm
10700702
| Schroef spaanplaat 4.5 x 20
|
2.0000 | st
10700700
| Schroef spaanplaat 4.5 x 30
|
14.0000 | st
10800958
| Schuimblok 40x140x280mm
|
11.0000 | st
10800966
| Schuimblok 80x140x280mm
|
2.0000 | st
10700787
| Taptite M3x6 bolkoppozidr/zwrt
|
28.0000 | st
10700681
| Tywrap kort 94 mm blank
|
2.0000 | st
10700679
| Tywrap plakzadel 21 x 21 mm
|
2.0000 | st
10750402
| Voorbalk Airmix-16 (grijs)
|
1.0000 | st
10600424
| XLR chass fem 3p pl.zw s
|
17.0000 | st
10800950
| Zakje klein (met snelsluiting)
|
1.0000 | st
10990650
| Zekering 1.0 A slow 5 x 20mm
|
1.0000 | st
10750757
| Zijkant Airmix B Ral 7042(L+R)
|
1.0000 | s01
60881680 Sico Remote Airmix
------------------------------------------------------------------------------------------------Articlecode | Description
|
Quantity | Unit
------------------------------------------------------------------------------------------------10250345
| Brugcel B80C1000
(rond)
|
1.0000 | st
10400216
| Condensator ker 18p R2.5
|
2.0000 | st
10401241
| Condensator ker 100nF/50V R5 T
|
4.0000 | st
10600180
| Connector netaanslklem 2p 5mm
|
1.0000 | st
10400292
| Elco 100uF / 25V radiaal R5.0
|
4.0000 | st
10400280
| Elco 2.2uF / 50V radiaal R5.0
|
2.0000 | st
10400297
| Elco 1000uF / 40V axiaal
|
2.0000 | st
10600512
| Header 4P lock straight(R2.54)
|
1.0000 | st
10600478
| Header recht 4p (raster 2.54)
|
1.0000 | st
10250322
| Ic 7818 TO220 SGS (volt.reg)
|
1.0000 | st
10250323
| Ic 7918 TO220 SGS (volt.reg)
|
1.0000 | st
10250307
| Ic NE-5532 AP TI (dual-opamp)
|
1.0000 | st
10600394
| Ic-voet 8 pins (vork-contact)
|
1.0000 | st
10600530
| Jack chassis break (slimline)
|
4.0000 | st
10300370
| Potm.16 2x 10kA
log
|
1.0000 | st
10200155
| Print SiCo remote/a (Airmix)
|
1.0000 | st
10950582
| Printtrafo 3VA 2x18v 2x115v
|
1.0000 | st
10550083
| Schakelaar span.keuze 115/230V
|
1.0000 | st
10600414
| Shunt 2p (mini-jumper)
|
1.0000 | st
10350517
| Weerstand 0E 5% 1/4W
|
3.0000 | st
10350737
| Weerstand 4k7 5% 1/4W
|
2.0000 | st
10350749
| Weerstand 47k 5% 1/4W
|
2.0000 | st
10350753
| Weerstand 100K 5% 1/4W
|
2.0000 | st
10350723
| Weerstand 330E 5% 1/4W
|
2.0000 | st
10990693
| Zekering 160mA slow 5 x 20mm
|
1.0000 | st
10990675
| Zekeringhouder print + kap
|
1.0000 | st
10600169
| Conn: 4p wired:1=blk/grn/rd/bl
|
1.0000 | st
10800927
| Doos Teleporter2 220x210x110mm
|
1.0000 | st
10500084
| Isolatieplaat 9.5" randapp.PVC
|
1.0000 | st
10150160
| Kast Sico remote/B
|
1.0000 | st
10450103
| Knop SiFam grey splined(11mm)
|
1.0000 | st
10600498
| Netsnoer 3 aders euroconnector
|
1.0000 | st
20850155
| Print bestukt Sico remote
|
1.0000 | st
10550450
| Schak Miyama RED OFF(ON)LEDred |
1.0000 | st
10700786
| Taptite M3x5 verzkop/pozidr/zw
|
6.0000 | st
10700691
| Trekontlasting voeding rond
|
1.0000 | st
60881598 RIAA correctie optie
------------------------------------------------------------------------------------------------Articlecode | Description
|
Quantity | Unit
------------------------------------------------------------------------------------------------10350517
| Weerstand 0E 5% 1/4W
|
2.0000 | st
10400230
| Condensator ker 270p R2.5
|
2.0000 | st
10401241
| Condensator ker 100nF/50V R5 T
|
2.0000 | st
10400251
| Condensator poly 6n8 R7.5
|
2.0000 | st
10401257
| Condensator poly 33n R5.0
|
2.0000 | st
10400288
| Elco 47uF / 16V radial 2mm
|
4.0000 | st
10600478
| Header recht 4p (raster 2.54)
|
1.0000 | st
10600170
| Header recht 4p female pcb
|
1.0000 | st
10250307
| Ic NE-5532 AP TI (dual-opamp)
|
1.0000 | st
10600394
| Ic-voet 8 pins (vork-contact)
|
1.0000 | st
10200611
| Print Aircom-10b (RIAA-preamp)
|
1.0000 | st
10350741
| Weerstand 10k 5% 1/4W
|
2.0000 | st
10350749
| Weerstand 47k 5% 1/4W
|
2.0000 | st
10350753
| Weerstand 100K 5% 1/4W
|
2.0000 | st
10350724
| Weerstand 390E 5% 1/4W
|
2.0000 | st
10700650
| Afstandstift PCB 11mm wit
|
2.0000 | st
20850031
| Print bestukt Aircom-10 (RIAA)
|
1.0000 | st
60881535 Airmix Hi-Res ledbar 9.5" 37sg
------------------------------------------------------------------------------------------------Articlecode | Description
|
Quantity | Unit
------------------------------------------------------------------------------------------------10400216
| Condensator ker 18p R2.5
|
2.0000 | st
10401241
| Condensator ker 100nF/50V R5 T
|
6.0000 | st
10250342
| Diode 1N4148
(signaal)
|
10.0000 | st
10400284
| Elco 10uF / 40V radiaal R5.0
|
2.0000 | st
10400287
| Elco 47uF / 25V radiaal R5.0
|
8.0000 | st
10250338
| Fet J112 (N-channel switch)
|
4.0000 | st
10250017
| Fet J175 (P-channel switch)
|
2.0000 | st
10600452
| Header 10p haaks (raster 2.54)
|
2.0000 | st
10600512
| Header 4P lock straight(R2.54)
|
2.0000 | st
10600478
| Header recht 4p (raster 2.54)
|
2.0000 | st
10250325
| Ic 78L12 TO92 SGS (volt.reg)
|
2.0000 | st
10250316
| Ic LM-339
(comparator)
|
18.0000 | st
10250306
| Ic NE-5534 AP TI(single-opamp)
|
2.0000 | st
10250305
| Ic TL-074 CN TI (quad-opamp)
|
2.0000 | st
10600394
| Ic-voet 8 pins (vork-contact)
|
2.0000 | st
10600395
| Ic-voet 14 pins (vork-contact)
|
20.0000 | st
10300166
| Instelpot 10-turn 22k (T18)
|
2.0000 | st
10200011
| Print Hi-Res ledbar-37F segm
|
2.0000 | st
10600414
| Shunt 2p (mini-jumper)
|
2.0000 | st
10250333
| Transistor BC-327/25 (pnp)
|
6.0000 | st
10350765
| Weerstand 1M0 5% 1/4W
|
2.0000 | st
10350729
| Weerstand 1k0 5% 1/4W
|
2.0000 | st
10350832
| Weerstand 1k37 1% 1/4W
|
2.0000 | st
10350732
| Weerstand 1k8 5% 1/4W
|
2.0000 | st
10350733
| Weerstand 2k2 5% 1/4W
|
2.0000 | st
10350734
| Weerstand 2k7 5% 1/4W
|
2.0000 | st
10350704
| Weerstand 4E7 5% 1/4W
|
4.0000 | st
10350737
| Weerstand 4k7 5% 1/4W
|
10.0000 | st
10350740
| Weerstand 8k2 5% 1/4W
|
2.0000 | st
10350776
| Weerstand 10M0 5% 1/4W
|
4.0000 | st
10350742
| Weerstand 12k 5% 1/4W
|
2.0000 | st
10350749
| Weerstand 47k 5% 1/4W
|
2.0000 | st
10350809
| Weerstand 88E7 1% 1/4W
|
2.0000 | st
10350717
| Weerstand 100E 5% 1/4W
|
6.0000 | st
10350753
| Weerstand 100K 5% 1/4W
|
4.0000 | st
10350806
| Weerstand 113E 1% 1/4W
|
2.0000 | st
10350854
| Weerstand 115E 1% 1/4W
|
2.0000 | st
10350754
| Weerstand 120K 5% 1/4W
|
4.0000 | st
10350805
| Weerstand 133E 1% 1/4W
|
2.0000 | st
10350719
| Weerstand 150E 5% 1/4W
|
2.0000 | st
10350811
| Weerstand 162E 1% 1/4W
|
2.0000 | st
10350847
| Weerstand 182E 1% 1/4W
|
2.0000 | st
10350812
| Weerstand 205E 1% 1/4W
|
4.0000 | st
10350884
| Weerstand 226E 1% 1/4W
|
2.0000 | st
10350885
| Weerstand 237E 1% 1/4W
|
2.0000 | st
10350886
| Weerstand 243E 1% 1/4W
|
2.0000 | st
10350887
| Weerstand 249E 1% 1/4W
|
2.0000 | st
10350813
| Weerstand 261E 1% 1/4W
|
4.0000 | st
10350888
| Weerstand 274E 1% 1/4W
|
2.0000 | st
10350889
| Weerstand 287E 1% 1/4W
|
2.0000 | st
10350890
| Weerstand 294E 1% 1/4W
|
2.0000 | st
10350702
| Weerstand 309E 1% 1/4W
|
2.0000 | st
10350815
| Weerstand 316E 1% 1/4W
|
2.0000 | st
10350891
| Weerstand 324E 1% 1/4W
|
2.0000 | st
10350816
| Weerstand 332E 1% 1/4W
|
2.0000 | st
10350892
| Weerstand 340E 1% 1/4W
|
2.0000 | st
10350893
| Weerstand 357E 1% 1/4W
|
2.0000 | st
10350894
| Weerstand 374E 1% 1/4W
|
2.0000 | st
10350818
| Weerstand 392E 1% 1/4W
|
4.0000 | st
10350820
| Weerstand 412E 1% 1/4W
|
2.0000 | st
10350895
| Weerstand 422E 1% 1/4W
|
2.0000 | st
10350896
| Weerstand 442E 1% 1/4W
|
2.0000 | st
10350897
| Weerstand 475E 1% 1/4W
|
2.0000 | st
10350898
| Weerstand 499E 1% 1/4W
|
2.0000 | st
10350899
| Weerstand 523E 1% 1/4W
|
2.0000 | st
10350900
| Weerstand 562E 1% 1/4W
|
2.0000 | st
10350901
| Weerstand 590E 1% 1/4W
|
2.0000 | st
10350902
| Weerstand 634E 1% 1/4W
|
2.0000 | st
10350763
| Weerstand 680k 5% 1/4W
|
2.0000 | st
10350728
| Weerstand 820E 5% 1/4W
|
4.0000 | st
10250340
| Zenerdiode 2V4 / 400mW
|
2.0000 | st
10600169
| Conn: 4p wired:1=blk/grn/rd/bl
|
2.0000 | st
10600095
| Connector sub-D bandkb.mal 9p
|
1.0000 | st
10100042
| Front 9.5" Hi-Res 37seg ledb/A
|
1.0000 | st
10500005
| Isolatiekous 5.0mm rond (grys)
|
60.0000 | cm
10250391
| Led 5x2mm green (BRIGHT)
|
52.0000 | st
10250392
| Led 5x2mm red (BRIGHT)
|
22.0000 | st
10700690
| Platstaf 25 x 10 x 10mm
|
4.0000 | st
10700611
| Popnagel 3.0 x 6.5 blank
|
8.0000 | st
20850011
| Print bestukt 37 segm ledbar
|
2.0000 | st
10700788
| Taptite M3x8 verzkop/pozidr/zw
|
4.0000 | st
10100056
| Vulplaat 9.5" (zincor 1.5mm)
|
2.0000 | st
Page 4
Airsico.sch-1 - Mon Nov 08 12:05:46 1999