1
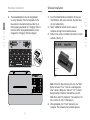
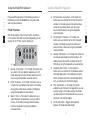
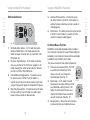
MediaPilot™
MediaPilot™
Enjoy the freedom of a wireless,
rechargeable keyboard with built-in
mouse AND audio video remote control
Belkin Tech Support
US: 800-223-5546, ext. 2263
310-898-1100, ext. 2263
Europe: 00 800 223 55 460
Australia: 1800 235 546
New Zealand: 0800 235 546
Belkin Corporation
501 West Walnut Street
Compton, CA 90220, USA
310-898-1100
310-898-1111 fax
Belkin Ltd.
Express Business Park, Shipton Way
Rushden, NN10 6GL, United Kingdom
+44 (0) 1933 35 2000
+44 (0) 1933 31 2000 fax
Belkin B.V.
Boeing Avenue 333
1119 PH Schiphol-Rijk,The Netherlands
+31 (0) 20 654 7300
+31 (0) 20 654 7349 fax
Belkin Ltd.
7 Bowen Crescent, West Gosford
NSW 2250, Australia
+61 (0) 2 4372 8600
+61 (0) 2 4372 8603 fax
© 2004 Belkin Corporation. All rights reserved. All trade names
are registered trademarks of respective manufacturers listed.
P74669
User Manual
F8E838
Table of Contents
Introduction
1 Introduction ............................................................... 1
Congratulations and thank you for purchasing the
MediaPilot by Belkin. We appreciate your business and
we are sure you will enjoy years of reliable use with this
innovative, 3-in-1 input device. MediaPilot provides true
wireless freedom and outperforms traditional wireless
keyboards. It offers a 75% wider operating range and
robust performance so you can work effectively without
interference from other devices—a common problem with
other wireless keyboards. Freed from the restrictions of
cables, you will find it easy to compute, surf the Web,
and control your media system from virtually anywhere in
your home, even if the base is in another room.
System Requirements ............................................ 2
Packaging Includes ................................................ 2
2 Hardware Installation ............................................... 3
3 Software Installation ................................................ 7
4 Using the MediaPilot Keyboard................................. 8
PC/AV Functions .................................................... 8
Multimedia Section .............................................. 10
On-Board Mouse Function .................................. 11
Programmable Function Keys.............................. 12
Universal IR Remote Function ............................. 12
Default Key Functions .......................................... 13
Your satisfaction is our goal. Please review this User
Manual thoroughly, to ensure that you get the most from
this product’s many advanced features.
Device Selection Keys ......................................... 15
Variable Device Selection Keys............................ 16
Learning Features ................................................ 17
Removing a Program from a Key ........................ 18
Dock Station ........................................................ 19
Text Cursor Control Section................................. 20
Dock Station LEDs ............................................... 21
5 Information ............................................................. 22
1
1
___
2
___
3
___
4
___
5
1
___
2
___
3
___
4
___
5
Introduction
Hardware Installation
System Requirements
1.
• Pentium® processor-based computer or
Macintosh® system
• Windows® 2000, XP or Mac OS® X v10.x
• Available USB port
• CD-ROM drive
• Internet account for World Wide Web and
Internet functionality
• Netscape® Navigator®, Microsoft® Internet Explorer,
or AOL®
Remove the battery compartment cover, then
install the three provided Nickel Metal Hydride
(NiMH) rechargeable batteries. Pay close attention
to the polarity of the batteries during installation.
(See Fig. 1)
Packaging Includes
• MediaPilot: Wireless keyboard with built-in,
dual-thumb-control mouse
• 26-Key Docking Station
• Removable Palm Rest
• 3 NiMH Batteries
• Software CD
2
Fig. 1
Important note: Do not install regular carbon or
alkaline batteries into your keyboard. Recharging
these types of batteries could cause damage to
your keyboard.
3
1
___
2
___
3
___
4
___
5
Hardware Installation
1
___
2
___
3
___
4
___
5
2.
Hardware Installation
Plug the USB cable into an available USB port on
your computer. (See Fig. 2)
1
___
2
___
3
___
4
___
5
Fig. 4
Fig. 2
3.
To properly synchronize the keyboard and base
station, follow the procedure below.
a) Press the “Connect” button on the bottom of the
base station. (See Fig. 3) You will notice that the
“Connect” LED on the base station is flashing.
(See Fig. 4)
���
������
b) Press the “Connect” button on the bottom of the
keyboard. When the keyboard and base station
are synchronized, the “Connect” LED will stop
flashing. (See Fig. 5)
Fig. 3
Fig. 5
4
���
5
1
___
2
___
3
___
4
___
5
Hardware Installation
Software Installation
4.
1.
The keyboard batteries must be charged prior
to using it remotely. Place the keyboard into the
base station to charge the batteries. (See Fig. 6)
When properly positioned, the “Charging” LED will
illuminate. When the keyboard batteries are fully
charged, the “Charging” LED will extinguish.
���
������
2.
3.
Insert the MediaPilot driver installation CD into your
CD-ROM drive. After a few moments, the main menu
will start automatically.
Select “MediaPilot Control Center” and your
computer will begin the installation process.
Follow the on-screen installation instructions to install
software. (See Fig. 7)
Fig. 6
Fig. 7
Note: If main CD does not auto-start, click the “Start”
button and select “Run”. From the run dialogue box,
enter “<driver>:\Setup.exe” and click “OK” (“<driver>”
being the letter of the drive that identifies your CDROM driver under “My Computer”. For example, if the
CD is in driver D, enter “D:\Setup.exe”.)
4. When prompted, click “Finish” and restart your
computer. This completes the installation process.
6
7
1
___
2
___
3
___
4
___
5
Using the MediaPilot Keyboard
1
___
2
___
3
___
4
___
5
Please read through each of the following sections to
familiarize yourself with MediaPilot’s many advanced
and innovative features.
Using the MediaPilot Keyboard
4.
PC/AV Functions
With the exception of the “Power” button, all buttons
in this section offer dual functionality depending on the
position of the “PC/AV” switch. (See Fig. 9)
5.
6.
Fig. 9
1.
2.
3.
Internet, Tuner button – In PC mode, this button acts
as a shortcut for your default web browser. In AV
mode, pressing this button allows control of an AV
tuner using the keyboard’s universal remote.
Email, CD button – In PC mode, this button acts as
a shortcut for your default email client. In AV mode,
pressing this button allows control of a CD player
using the keyboard’s universal remote.
Search, VCR – In PC mode, this button acts as a
search feature in the application you are currently
���
running. In AV mode,
pressing this button allows
������
control of a tape deck using the keyboard’s
universal remote.
8
7.
8.
9.
My Documents, Aux button – In PC mode, this
button acts as a shortcut for the “My Documents”
window. In AV mode, pressing this button allows
control of an auxiliary device such as a laser
disc or satellite receiver using the keyboard’s
universal remote.
My Computer, TV button – In PC mode, this
button acts as a shortcut for the “My Computer”
window. In AV mode, pressing this button will
allow control of a television using the keyboard’s
universal remote.
Desktop, DVD button – In PC mode, this button will
minimize all open windows to the taskbar. In AV
mode, pressing this button will allow control of a
DVD player using the keyboard’s universal remote.
Calculator, Vid 1 button – In PC mode, this
button acts as a shortcut for the Windows default
calculator application. In AV mode, pressing this
button will allow control of a second video device
such as a plasma or LCD monitor display.
Print, Vid 2 button – In PC mode, this button
enables the print feature in the application you are
currently using. In AV mode, pushing this button
will allow control of a third video device such as a
plasma or LCD monitor display.
PC/AV slide switch – Toggles the keyboard
between PC mode and Video mode.
9
1
___
2
___
3
___
4
___
5
1
___
2
___
3
___
4
___
5
Using the MediaPilot Keyboard
Using the MediaPilot Keyboard
Multimedia Section
5.
6.
Fig. 10
1.
2.
3.
4.
My Media, Menu button – In PC mode, this button
launches Media Player. In AV mode, pressing this
button will open the setup menu in a television, VCR,
DVD player, etc.
My Music, Record button – In PC mode, this button
acts as a shortcut for the “My Music” window. In AV
mode, pressing this button will activate the “Record”
function in a VCR or DVD-RW player.
Forward/Reverse toggle button – This button serves
the same function in either PC or AV mode. It is
used to move to the next track or previous track when
using a PC-based CD player or stand-alone CD player.
Stop, Play/Pause button – This button serves the same
function in either PC or AV mode. It is used to play/
pause or stop an audio or video selection.
Volume UP/Down button – This button serves
the same function in either PC or AV mode. It is
used to increase or decrease volume in audio or
video programs.
Mute button – This button serves the same function
in either PC or AV mode. It is used to mute the
volume in a video or audio program.
On-Board Mouse Function
MediaPilot’s removable keyboard section includes a
fully functional, three-button mouse. While holding the
keyboard in your hands, all mouse functions are readily
available for use with both your thumbs.
The mouse consists of three major components:
1. Force sensitive resistor (FSR) – The FSR
is used to control movement of the
mouse cursor on your computer’s
monitor display. (See Fig. 11)
Fig. 11
2. Scroll wheel – In PC mode, the scroll
wheel serves the same scrolling function
as a traditional scrolling mouse. In AV
mode, the scroll wheel functions as a
Channel UP/Channel Down control for
use with a television. (See Fig. 12)
Fig. 12
3. Mouse buttons – Serves the same functions
as mouse buttons on a traditional mouse.
���
������
10
11
1
___
2
___
3
___
4
___
5
1
___
2
___
3
___
4
___
5
Using the MediaPilot Keyboard
Using the MediaPilot Keyboard
Programmable Function Keys
Default Key Functions
Function keys 1 through 12 can be reprogrammed to
perform any standard keyboard function by using the
MediaPilot software (included). Please see the online
help file for additional details. (See Fig. 13)
In AV mode, the following keys perform the stated
default functions.
Operation Keys
Fig. 13
Key Name
Menu
Default Function
DVD = disk menu
Other = device menu
Rec
Record
Rewind (<<)
Rewind to previous track
Fast Forward (>>)
Fast-forward to next track
Stop ()
Stop
Universal IR Remote Function
Play/Pause
Toggle play/pause
The MediaPilot includes a fully functional universal IR
remote. The following section describes the IR remote
functionality of the keyboard while in AV mode.
Volume Up
Volume +
Volume Down
Volume -
Mute
Mute
In AV mode, certain keys on the keyboard have default
functions as described on the next page.
P1
Programmable key
P2
Programmable key
In addition to basic IR remote functionality, the
keyboard also has the ability to learn IR codes from
another IR remote. This procedure is also described
on the next page.
P3
Programmable key
P4
Programmable key
P5
Programmable key
P6
Programmable key
P7
Programmable key
P8
Programmable key
P9
Programmable key
P10
Programmable key
���
������
12
13
1
___
2
___
3
___
4
___
5
1
___
2
___
3
___
4
___
5
Using the MediaPilot Keyboard
Using the MediaPilot Keyboard
Operation Keys (cont.)
Device Selection Keys
Key Name
P11
Default Function
Programmable key
P12
Programmable key
1
Numeric 1
2
Numeric 2
There are two types of device selection keys—fixed and
variable. The function of a fixed device selection key
is associated with a particular device type. A variable
device selection key can be programmed to use a variety
of different devices.
3
Numeric 3
Fixed Device Selection Keys
4
Numeric 4
5
Numeric 5
6
Numeric 6
Tuner - Selects an AV receiver
CD - Selects a CD player
DVD - Selects DVD player
7
Numeric 7
8
Numeric 8
9
Numeric 9
0
Numeric 0
Enter
Select current menu option
Up Arrow
Navigate up in menu
Down Arrow
Navigate down in menu
Left Arrow
Navigate left in menu
Right Arrow
Navigate right in menu
Channel Up
DVD/CD = Next track
Other = Channel up
Channel Down
DVD/CD = Previous track
Other = Channel down
Power
Turns power to a device on or off
14
TV - Selects the TV
Tape - Selects a VCR
The brand of the device to be controlled by the IR remote
must be identified by using the MediaPilot software. Use
the following procedure.
1.
2.
3.
4.
Launch the MediaPilot Control Center and select the
“AV Key Programmer” tab.
Press the “P” (Program) key in combination with
one of the fixed device-type keys (Tuner, DVD, TV,
CD, Tape).
Type in the four-digit device code that corresponds
to the device to be controlled. The device codes may
be found on the “Device Chart” included in Appendix
1 of this User Manual.
Press the “P” (Program) key again.
Note: If the sequence above is not completed within
60 seconds, no changes will be saved.
15
1
___
2
___
3
___
4
___
5
Using the MediaPilot Keyboard
1
___
2
___
3
___
4
___
5
Using the MediaPilot Keyboard
Variable Device Selection Keys
b)
There are three keys that the user can program to
operate certain device types.
1.
2.
3.
Vid1 - The Vid1 button is used to select a device to
control such as a cable set-top box, satellite receiver,
or laser disc.
Vid2 - The Vid2 button is used to select a device to
control such as a cable set-top box, satellite receiver,
or laser disc.
Aux – The Aux button is used to select devices
such as an AV amplifier, cable set-top box, home
automation device, laser disc, or satellite receiver.
These keys are programmed using one of two
available methods:
1.
2.
Via the MediaPilot software which is installed on
the PC.
Direct entry from the keyboard itself. To program
the keys directly from the keyboard, follow the
procedure below.
a) Press the “P” (Program) key in combination
with one of the variable device-type keys
(Vid1, Vid2, Aux).
c)
d)
Note: If the above sequence is not completed within 40
seconds, no changes will be saved.
Learning Features
The keyboard is also capable of learning the IR codes
from other remote controls. To teach, or program, a new
code, use the following the procedure:
1.
2.
3.
4.
16
Type in a single digit that matches the
following table:
1 = Amp
2 = Cable
3 = Home Automation
4 = Laser Disk
5 = Satellite
Type in the four-digit device code for the
matching brand of the device (these will be
listed in the Component Codes user guide).
Press the “P” (Program) key again.
Press the MediaPilot’s “P” (Program) key in
combination with the key you wish to program.
Press the mode (DVD, TV, etc.) to which this
program applies.
Aim your original remote at the IR window on the
MediaPilot.
Press the button to be programmed on your
original remote.
17
1
___
2
___
3
___
4
___
5
1
___
2
___
3
___
4
___
5
Using the MediaPilot Keyboard
Using the MediaPilot Keyboard
Learning Features (cont.)
Dock Station
5.
The base serves as a recharging station and charges
through the simplicity of Plug-and-Play USB technology,
removing the need for a bulky power supply. The
MediaPilot’s base includes a 10-button keypad and
directional arrow keys to provide the convenience of a
full-size keyboard.
Press the “P” (Program) key again to end
learning mode.
Notes:
1. If a key is programmed with a learned code, the
learned code shall override any programming done
by the PC. For example, if the user programs the
“Enter” key with a learned IR code in the DVD mode,
any programming received from the PC shall be
ignored for the “Enter” key for DVD mode.
2. If the above sequence is not completed within 40
seconds, the keyboard will exit learning mode and
no changes will be made to the key’s programming.
Removing a Program from a Key
To remove a learned code from a key, use the following
procedure:
1.
2.
Press the MediaPilot’s “P” (Program) key in
combination with the key that was programmed.
Press the MediaPilot “P” (Program) key again.
Note: If the above sequence is not completed within 10
seconds, the keyboard will exit learning mode and no
changes will be made to the key’s programming.
18
Insert Key – Allows text to be inserted. When insert
is enabled, the text inserted in a document will not
overwrite any other text. However, when disabled, text
will be overwritten.
Sleep Key – Puts the system into power management
mode (such as standby, suspend, or hibernation) if the
system supports power management and has it enabled.
You can put your computer to sleep with the press of
this button directly on your desktop, protecting your data
and saving energy. If power management is not enabled,
this hot key will not work; and it cannot be reassigned
because it is a system key.
Scroll Lock Key – Temporarily stops the scrolling of text
or halts the operation of a program. The functionality of
the “Scroll Lock” key depends on the system you are
using. For more information about how to use this key,
see your system documentation.
19
1
___
2
___
3
___
4
___
5
1
___
2
___
3
___
4
___
5
Using the MediaPilot Keyboard
Using the MediaPilot Keyboard
Dock Station (cont.)
Dock Station LEDs
Delete – Deletes/removes data or files.
The five status LEDs alert you if the keyboard is charging
or connected, and if Caps Lock, Num Lock, or P Mode
features are enabled. (See Fig. 14)
Print Screen Key – Enables you to copy an image of
the active window or the entire screen. Once copied,
you can then use a program to manipulate, save, or
print the image.
Pause Break Key – Enables you to halt information that
automatically scrolls on your screen.
1.
2.
3.
4.
5.
Charging – Indicates that your keyboard is charging.
Connect – Flashes when keyboard is in
synchronization mode.
Caps Lock – Indicates your Caps Lock is on.
P Mode – Indicates P Mode is activated.
Num Lock – Indicates Num Lock is on.
Num Lock Key – Lets you use the numeric keypad as a
way to input numbers and functions (Num Lock) or as a
navigation pad to move your pointer or insertion point
(Num Lock off). When you turn on the computer, system
settings determine whether Num Lock is on or off.
Text Cursor Control Section
Arrow Keys – These four keys are the left arrow (back
arrow), up arrow, down arrow, and the right arrow
(forward arrow).
Fig. 14
Some examples of how these keys can work:
1.
2.
3.
Move text cursor within an application;
Move characters within a computer game; and
Select text.
���
������
20
21
1
___
2
___
3
___
4
___
5
1
___
2
___
3
___
4
5
Information
Information
FCC Statement
Modifications
DECLARATION OF CONFORMITY WITH FCC RULES FOR
ELECTROMAGNETIC COMPATIBILITY
We, Belkin Corporation, of 501 West Walnut Street, Compton, CA 90220, declare
under our sole responsibility that the product,
F8E838
to which this declaration relates,
Complies with Part 15 of the FCC Rules. Operation is subject to the following two
conditions: (1) this device may not cause harmful interference, and (2) this device must
accept any interference received, including interference that may cause undesired
operation.
Caution: Exposure to Radio Frequency Radiation.
The radiated output power of this device is far below the FCC radio frequency exposure
limits. Nevertheless, the device shall be used in such a manner that the potential for
human contact during normal operation is minimized. When connecting an external
antenna to the device, the antenna shall be placed in such a manner to minimize the
potential for human contact during normal operation. In order to avoid the possibility
of exceeding the FCC radio frequency exposure limits, human proximity to the antenna
shall not be less than 20cm (8 inches) during normal operation.
Federal Communications Commission Notice
This equipment has been tested and found to comply with the limits for a Class B digital
device, pursuant to Part 15 of the FCC Rules. These limits are designed to provide
reasonable protection against harmful interference in a residential installation.
This equipment generates, uses, and can radiate radio frequency energy. If this
equipment does cause harmful interference to radio or television reception, which can
be determined by turning the equipment off and on, the user is encouraged to try and
correct the interference by one or more of the following measures:
• Reorient or relocate the receiving antenna.
• Increase the distance between the equipment and the receiver.
• Connect the equipment to an outlet on a circuit different from that to
which the receiver is connected.
• Consult the dealer or an experienced radio/TV technician for help.
The FCC requires the user to be notified that any changes or modifications to this
device that are not expressly approved by Belkin Corporation may void the user’s
authority to operate the equipment.
Canada-Industry Canada (IC)
The wireless radio of this device complies with RSS 139 & RSS 210 Industry Canada.
This Class B digital apparatus complies with Canadian ICES-003.
Cet appareil numérique de la classe B conforme á la norme NMB-003 du Canada.
Belkin Corporation Limited Lifetime Product Warranty*
Belkin Corporation warrants this product against defects in materials and
workmanship for its lifetime. If a defect is discovered, Belkin will, at its option, repair
or replace the product at no charge provided it is returned during the warranty period,
with transportation charges prepaid, to the authorized Belkin dealer from whom you
purchased the product. Proof of purchase may be required.
This warranty does not apply if the product has been damaged by accident, abuse,
misuse, or misapplication; if the product has been modified without the written
permission of Belkin; or if any Belkin serial number has been removed or defaced.
THE WARRANTY AND REMEDIES SET FORTH ABOVE ARE EXCLUSIVE IN LIEU OF
ALL OTHERS, WHETHER ORAL OR WRITTEN, EXPRESSED OR IMPLIED. BELKIN
SPECIFICALLY DISCLAIMS ANY AND ALL IMPLIED WARRANTIES, INCLUDING,
WITHOUT LIMITATION, WARRANTIES OF MERCHANTABILITY AND FITNESS FOR A
PARTICULAR PURPOSE.
No Belkin dealer, agent, or employee is authorized to make any modification,
extension, or addition to this warranty.
BELKIN IS NOT RESPONSIBLE FOR SPECIAL, INCIDENTAL, OR CONSEQUENTIAL
DAMAGES RESULTING FROM ANY BREACH OF WARRANTY, OR UNDER ANY
OTHER LEGAL THEORY, INCLUDING BUT NOT LIMITED TO, LOST PROFITS,
DOWNTIME, GOODWILL, DAMAGE TO OR REPROGRAMMING, OR REPRODUCING
ANY PROGRAM OR DATA STORED IN, OR USED WITH, BELKIN PRODUCTS.
Some states do not allow the exclusion or limitation of incidental or consequential
damages or exclusions of implied warranties, so the above limitations or exclusions may
not apply to you. This warranty gives you specific legal rights, and you may also have
other rights that vary from state to state.
*Batteries not included under warranty.
22
23
1
___
2
___
3
___
4
5
Notes
Notes