1
First impressions using ACS. Installing and using ACS from scratch
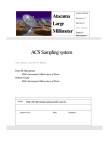
P. de Vicente, R. Bolaño
Informe Técnico IT-OAN 2004-1
1
CONTENTS
Contents
1
Introduction
2
2
Installation on a Debian 3.0 distribution
2
3
Installation on a Debian 3.1 distribution
4
4
Using the ACS for the first time
4.1 Trying the ACS in the line command in a single host . . . . . . . . . . . . . .
4.2 Trying the ACS in different hosts from the command line . . . . . . . . . . . .
4.3 Trying the ACS from the ACS Command Center . . . . . . . . . . . . . . . .
6
6
7
8
5
Setting up a local account for development
9
6
Adding new libraries which use GNU tools by ACS
7
Developing a simple example
7.1 Customizing the manager. The CDB location . . . .
7.2 The directory structure . . . . . . . . . . . . . . . .
7.2.1 Customizing the manager. The CDB location
7.3 Code directories . . . . . . . . . . . . . . . . . . . .
7.4 The Makefile . . . . . . . . . . . . . . . . . . . . .
7.5 The server . . . . . . . . . . . . . . . . . . . . . . .
7.6 The client . . . . . . . . . . . . . . . . . . . . . . .
7.7 Compiling and testing the code . . . . . . . . . . . .
10
.
.
.
.
.
.
.
.
.
.
.
.
.
.
.
.
.
.
.
.
.
.
.
.
.
.
.
.
.
.
.
.
.
.
.
.
.
.
.
.
.
.
.
.
.
.
.
.
.
.
.
.
.
.
.
.
.
.
.
.
.
.
.
.
.
.
.
.
.
.
.
.
.
.
.
.
.
.
.
.
.
.
.
.
.
.
.
.
.
.
.
.
.
.
.
.
.
.
.
.
.
.
.
.
.
.
.
.
.
.
.
.
10
11
11
12
16
16
17
23
24
1
INTRODUCTION
2
1 Introduction
ACS is the acronym for Alma Common Software. The ALMA Common Software (ACS) “provides a software infrastructure common to all partners and consists of a documented collection
of common patterns in control systems and of components, which implement those patterns.
The heart of ACS is an object model of controlled devices, called Distributed Objects (DOs),
implemented as CORBA network objects.” The ACS will be used in the ALMA project, a 64
antenna millimeter and submillimeter interferometer placed in the Atacama desert in Chile.
Although ACS is oriented towards ALMA, it may be used in other projects where there
are real time control systems and distributed network components. We, at the Observatorio
Astronmico Nacional, have tested the ACS to verify if it may be used in the control system of
the 40m radiotelescope of the OAN.
This report describes our experience installing ACS on a Debian distribution and using it
for the first time. Although there is plenty of information and documentation in the ACS pages
( http://www.eso.org/ gchiozzi/AlmaAcs/) we try to offer here the point of view of a
new comer with no previous knowledge on the technologies used by ACS.
2 Installation on a Debian 3.0 distribution
Debian is the default Linux distribution used in the Observatorio Astronmico Nacional. We
want to keep only one distribution in the observatory to minimize software management complexity. At the time of writing this report the current stable Debian version is 3.0.
ACS is provided for RedHat 7.2 and the installation of ACS on a Debian distribution has
never been performed before. This section describes how to successfully complete such an
installation on a Debian 3.0 host.
ACS installation can be performed on two ways, either using the binary executables and
already compiled libraries or compiling the code. Both approaches are faulty with ACS 2.1
and Debian 3.0. ACS needs the compiler provided by Red Hat 7.2, g++2.96, while Debian
3.0 uses g++2.95. Both g++ versions are binary incompatible and therefore compilation is
unsuccessfull. Debian 3.0 uses g++2.95 because according to GNU the g++2.96 version is a
development version which preceded the stable gcc 3.x versions. Hence it is not advisable to
use it.
Since the release of ACS 3.0 it is also possible to download the tools to generate the ACS
binaries. Below we describe a step by step procedure to generate ACS 3.0 on a Debian 3.0
distribution:
1. Create an account “almamgr”.
2. Create directory downloads in almamgr
cd $HOME
mkdir downloads
3. Download the following files and place them in $HOME/downloads:
2
INSTALLATION ON A DEBIAN 3.0 DISTRIBUTION
3
almatools-src.tar.gz
acssw.tar.gz
The tools file may be pulled out from
http://www.eso.org/g̃chiozzi/AlmaAcs/Releases/ACS 3 0/index.html and
the ACS software from: http://www.eso.org/g̃chiozzi/AlmaAcs/Releases/ACS 3 0/ACS 3 0
4. Create target directory:
mkdir /alma/ACS-3.0
This directory should belong to “almamgr:almamgr”.
5. Before building the libraries and executables it is very important to set the environment
variables. These variables are available in $HOME/.acs/.bash profile.acs. This
file was obtained from ACS 2 1 Linux-CD-LGPL.tar.gz, and was patched according
to our needs. The environment file is attached in appendix 1. It is also advisable to include
the following instruction in the .bashrc almamgr file so that it gets executed every time
we log in the almamgr account:
source $HOME/.acs/.bash_profile.acs
6. Untar the sources in the “almamgr” account:
tar xzf downloads/almatools-src.tar.gz
A directory named ACS will be created un der $HOME. In order to get a successful compilation the following files should be modified according to the instructions shown in
appendix 2:
ACS/ExtProd/INSTALL/buildAnt
ACS/ExtProd/INSTALL/buildjava
ACS/ExtProd/INSTALL/buildTcltk
ACS/ExtProd/INSTALL/buildOmniORB
7. The build scripts are not executable so we need to modify the mode of the build scripts:
cd ACS/ExtProd/INSTALL
chmod 755 build*
8. Now we will build the tools:
./buildTools
9. The procedure will log all information in files called buildXXXX.log. All software will
be installed under /alma/ACS-3.0/ in different directories. Once this step is completed
the environment will be active since the PATH will point to an existing directory and the
GNU tools to be used are those provided by ACS
10. Untar and build the ACS software:
cd $HOME
tar xzf downloads/acssw.tar.gz
cd ACS
make build
3
INSTALLATION ON A DEBIAN 3.1 DISTRIBUTION
4
3 Installation on a Debian 3.1 distribution
In order to use client applications which use libraries from the system it is necessary to link
the applications to the libraries. This is a problem if using Debian 3.0 since libraries like Qt or
MySQL are linked against g++2.95, while ACS 3.0 uses compiler g++3.2. The code compiled
and linked against g++2.95 and g++3.2 is binary incompatible. There are three ways to solve
this problem,
• use java only applications,
• install the ACS using the native g++ compiler provided by the OS
• recompile and install all applications and libraries needed by the system using the compiler g++3.2 provided by ACS.
Since we do not want to renounce to Qt and MySQL and we do not want to reinstall all
software, we installed Debian 3.1 (testing version) which, at the time of this report, provides
g++3.3.2. The installation of ACS 3.0.1 on Debian 3.1 is performed basically the same way
as for Debian 3.0. However it requires some minor changes because we use the g++3.3.2-4
compiler and Tcl/Tk tools provided by Debian.
1. Install the following packages: tcl8.3, tcl8.4, tcl8.4-dev, tk8.3, tcl8.4, tk8.4-dev, tkman,
iwidgets4, itk3, itcl3, itcl3-dev, blt, blt-common, tcl8.3x, tkx8.3, expect, groff, pgplot5.
It may be possible that not all packages are needed, but in order to have exactly the same
packages ACS supplies, all of them should be installed.
2. Make a link for gtar in the system since ACS uses gtar:
ln -s /usr/bin/gtar /bin/tar
3. Create an account “almamgr”.
4. Create directory downloads in almamgr:
cd $HOME
mkdir downloads
5. Download the following files and place them in $HOME/downloads:
almatools-src.tar.gz
acssw.tar.gz
The tools file may be pulled out from
http://www.eso.org/ gchiozzi/AlmaAcs/Releases/ACS 3 0/index.html and
the ACS software from:
http://www.eso.org/ gchiozzi/AlmaAcs/Releases/ACS 3 0/ACS 3 0-LGPL/ACS 3 0 Linu
6. Create target directory:
3
INSTALLATION ON A DEBIAN 3.1 DISTRIBUTION
5
mkdir /alma/ACS-3.0
This directory should belong to “almamgr:almamgr”.
7. Before building the libraries and executables it is very important to set the environment
variables. These variables are available in $HOME/.acs/.bash profile.acs. This
file was obtained from ACS 2 1 Linux-CD-LGPL.tar.gz, and was patched to accomodate to our needs. The environment file is attached in appendix 1. It is also advisable
to include the following instruction in the .bashrc almamgr file so that it gets executed
every time we log in the almamgr account:
source $HOME/.acs/.bash_profile.acs
8. Untar the sources in the “almamgr” account:
tar xzf downloads/almatools-src.tar.gz
A directory named ACS will be created. In order to compile properly the following files
should be modified according to the instructions shown in appendix 2.
ACS/ExtProd/INSTALL/buildAnt
ACS/ExtProd/INSTALL/buildjava
ACS/ExtProd/INSTALL/buildOmniORB
9. The build scripts are not executable so we need to modify the mode of the build scripts:
cd ACS/ExtProd/INSTALL
chmod 755 build*
10. Instead of running:
./buildTools
run:
./buildJava
./buildTAO
./buildAnt
./buildJacORB
./buildPython
./buildOmniORB
11. The procedure will log all information in files called buildXXXX.log. All software will
be installed under /alma/ACS-3.0/ in different directories. Once this step is completed
the environment will be active since the PATH will point to an existing directory and the
GNU tools to be used are those provided by ACS
12. Untar and build the ACS software:
cd $HOME
tar xzf downloads/acssw.tar.gz
cd ACS
make build
In principle it should be possible to use Python and OmniORB from the OS and load the
Python packages produced by ACS. However we have encountered several problems concerning
Python PATHs which we have not solved by the time this report was written.
4
USING THE ACS FOR THE FIRST TIME
6
4 Using the ACS for the first time
Once ACS 3.0.1 is installed in our host we are ready to play around with it and acquire some
experience on how it works. The first step should be to try the ACS locally on one computer.
These operations are described in section 6 of the document “Alma Common Software. Installation Manual”, It is advisable to open an xterm, or better, several terminals on a Konsole
application (KDE environment) per command listed below, so that we can easily read the log
messages from all applications.
4.1 Trying the ACS in the line command in a single host
• First, to start up the services and the manager, one should enter:
acsStart
This instruction will produce many messages that inform how the services, the interface
repository, the database and the manager are started up. These messages are important
for debugging purposes. The shell from which this command is launched will be freed
upon completion.
• Next we start up one container. ACS 3.0 provides three containers as examples; one per
programming language.
acsStartContainer -cpp bilboContainer
The option which comes after acsStartContainer indicates the kind of language used to
code the container.
We could also start other containers with the following instructions:
acsStartContainer -java frodoContainer
acsStartContainer -py aragornContainer
but this is not necessary for test purposes on a first trial.
• We may also launch a client for a power supply.
acsStartJava alma.acsabeans.examples.PSPanel.PSPanel
• Once the power supply client has started up, we can choose an instance of the Power supply client, by selecting one item from its dropdown list whose first element says ‘none’.
For example one can choose ”TEST PS 1”.
• Next we start up the “Object explorer”, a Java generic client, which will allow us to
interact with the different components that live in the container we have started up.
4
USING THE ACS FOR THE FIRST TIME
7
objexp
• The object explorer shows a tree view with all available components and properties for
each component on the left side of the window. On the right side all available methods for
the Power Supply will be shown together with the attributes. By invoking the methods it
is possible to get and set property values and view its characteristics. It is also possible to
monitor the instance of the created power supply and plot, for example, the trend of the
current.
[Kadunc, Tkačic & Šekoranja, 2003] describe thorougly the Object Explorer.
• To close all ACS processes enter the following command:
killACS
4.2 Trying the ACS in different hosts from the command line
A second convenient test is to start a client that talks to the activated component on a different
host. In this way we can check that the communication is working through the network, one of
the fundamental aims of the ACS. It should be stressed that the ACS works on an Ethernet LAN
and is not restricted to a CAN Bus, as planned in ALMA for real time operations.
The central access point to the ACS is the manager which keeps information on the status
of the different parts of the system, that is, containers and their components. In order that the
containers and the clients know where the manager is running and communicate with it, it is
necessary to pass them the location and port of the manager. One way to achieve this is by
modifying the environment variable MANAGER REFERENCE.
For example let us imagine the following situation:
1. ACS manager runs on host A
2. There is a container running on host B
3. There is a client running on host C, that shows the state of a component in host B that is
activated by the container in host B
4. There is a second client in host D which changes the status of the component.
It is not necessary to run the services and the manager in hosts B, C, and D but it is necessary
to have all the ACS software installed on the four hosts. A way to check that the ACS works
among different hosts using the command line is described below:
1. We start the services and the manager in host A. The manager needs access to the CDB.
It is possible to have the CDB in a different computer but we will assume for simplicity
that it is in the same host.
acsStart
4
USING THE ACS FOR THE FIRST TIME
8
2. We start the container in host B. It is necessary to indicate the address and port where the
manager is running. This may be done either by changing an environment variable, or
passing an option when starting the container:
export MANAGER_REFERENCE=corbaloc::polifemo.cay.oan.es:3000/Manager
acsStartContainer -cpp bilboContainer
3. We start a client in host C. As in the previous case we need to tell it where the manager
lives. If the client is written appropiately it should find the location of the manager either
by using the environment variable MANAGER REFERENCE or by passing an option
when launching the client. This depends critically on the way the client is designed and
written.
export MANAGER_REFERENCE=corbaloc::polifemo.cay.oan.es:3000/Manager
acsStartJava alma.acsabeans.examples.PSPanel.PSPanel
The power supply client lets you play with an instance of the power supply component
when we choose one of this in the dropdown list. This component is activated by “bilboContainer”, and if the latter were not started, it would not possible to create it.
4. If we want to check visually that the power supply client in host C changes, we may
start an object explorer in host D and change the value of the current by using method
“set sync” and introducing a new value.
export MANAGER_REFERENCE=corbaloc::polifemo.cay.oan.es:3000/Manager
objexp
When the value is changed via the object explorer in host D by calling “set sync” the
current changes in the component and this is reflected in the client running in host C,
demonstrating that ACS works on a distributed environment.
4.3
Trying the ACS from the ACS Command Center
It is also possible to start the services, manager and containers from the ACS command center,
at the same host or in different hosts. Section 2.1 of the “Alma Common Software Overview”
document describes how to use this application.
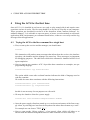
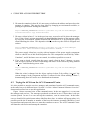
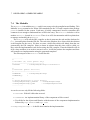
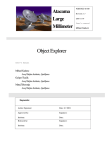
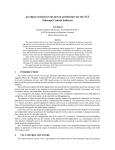
Figure 1 shows a normal view of the command center. In the area tagged as 1 we can start
the manager and services. The messages produced are shown in area 3 where there is tab per
session opened. In area 2 we can start up the containers, even in remote hosts. In the latter
case we should click on the button whose label has three dots. A window will popup where it is
possible provide the IP number or number of the host, the instance (normally should be 0) and
account name and password where we want the container to run at. The ACS Command Center
will launch a ssh session and startup the container.
5
SETTING UP A LOCAL ACCOUNT FOR DEVELOPMENT
9
Figure 1: Snapshot of the ACS command center. The log shows a failure trying to start up the services and
manager on a host without any Internet connection.
5 Setting up a local account for development
It is advisable to create a separate account to work on the development of local code which uses
ACS. This is described in document “Alma Common Software. Installation Manual”, sections
7 and 8. The “almamgr” should be kept apart from the development area to avoid cluttering the
installation area.
We should create an account, for example by issuing:
adduser acs
The user has to be added to group “almamgr”, so that the development user may use all the
software residing in directory /alma. It may be possible that some files from /alma do not
have read or execution permission for the almamgr group. That depends on the used umask
in the host. If the umask is not properly set it may happen that it is necessary to change the
permision of some files, like for example:
chmod oug+r /alma/ACS-3.0/TAO/ACE_wrappers/build/linux/ace/config.h
One should then configure the environment by placing in file $HOME/.bashrc an instruction like this one:
source /alma/ACS-3.0/ACSSW/config/.acs/.bash_profile
which provides the ACS environment. In the previous example ACSROOT=/alma/ACS-3.0/ACSSW
Finally we need a directory to place all the code that will be written locally. This directory is
known as INTROOT. This is explained in section 7 of the “Alma Common Software. Installation
Manual” document and should be acomplished by running “getTemplate”. This script allows to
create a template for a directory structure or for code.
Let us go to the parent directory where the INTROOT directory will be, and issue:
getTemplate
6
ADDING NEW LIBRARIES WHICH USE GNU TOOLS BY ACS
10
Since we need a directory we will choose the first option. We should then choose option
“createINTROOTarea”, to create an INTROOT directory where we will place our code. The
procedure will prompt us for the name of the directory and after supplying it, it will create a
template structure.
In order to have a visible INTROOT we have to modify the environment variable in
/alma/ACS-3.0/ACSSW/config/.acs/.bash profile
6 Adding new libraries which use GNU tools by ACS
It may be possible that the user wants to use libraries not provided by ACS and link the clients
with these libraries. That would be the case if we want to use the Qt graphical toolkit, with C++
or Python. This is also the case when trying to use MySQL.
To overcome the problem we used Python from ACS and manually installed “python-qt3”,
generating the libraries and binaries compiling from the source. One should be careful since the
final installation can be done on the ACS directory and this may clutter the ACS ROOT directory.
The best option is to define a OANROOT directory using the ACS environment. For example like
this:
OANROOT=/oan/1.0/
OANLOCAL=$OANROOT/local
QTDIR=/usr/share/qt3
PYTHONPATH=$OANLOCAL/Python/lib/python2.3/site-packages
PATH=$QTDIR/bin:OANLOCAL/bin:$PATH
LD_LIBRARY_PATH=$QTDIR/lib:$LD_LIBRARY_PATH
The target directory should be OANLOCAL.
7 Developing a simple example
This issue is fully covered for C++, Java and Python in three documents found in the ACS
documentation pages:
• Document “C++ Component/Container Framework Tutorial” describes how to create a
container and a component using C++.
• Document “Java Component/Container Framework Tutorial” describes how to create a
container and a component using Java.
• Document “Python Component/Container Framework Tutorial” describes how to create
a container and a component using Python.
However, in this section, we will provide our point of view and for that we will repeat part
of what is explained in the mentioned reports.
A simple example for a new user, could be to develop a component in C++, which simulates a cryogenic thermometer and a client written in Python to retrieve its values. The device
7
DEVELOPING A SIMPLE EXAMPLE
11
producing temperature values will be emulated by a file with four columns: a time stamp, a
temperature value for stage 1, a second timestamp and a temperature value for stage 2. The
client, which may be run in a different host, will show the temperature values stored in the file
as time passes by.
ACS uses the component - container paradigm to model the devices in a distributed environment. A component is associated to a physical device, for example, a cryogenic thermometer
which we may want to read and/or command through the serial port using a client. Components are started and managed by containers, hiding the services the latter provide to users. One
container may hold more than one component.
Components are fully described by their properties, because they define their state. The
properties of a cryogenic thermometer could be, for example the temperature and its status
(whether it is on or off).
Components also have characteristics which represent static data that provide additional
information. Characteristics may be associated to components or they may be associated to the
properties of the components. For example, some characteristics of the temperature property
of the cryogenic thermometer would be the maximum and minimum allowed values, the units,
and a descriptive text.
The Component properties are specified in the IDL files, and the characteristics in XML
schema files. The IDL allows to define the interface to the object. During compilation the IDL
compiler will produce templates in C++, Java and Python, both for the server and the client,
that the user may use to create the code needed to control and monitor the object.
Containers are not developed by the user, they are provided by the ACS infrastructure and
therefore we do not need to implement them. In these way the services they provide are hidden
to the user and to the developer. The developer just needs to specify which container holds
which components and it may also configure some options for the container.
7.1
Customizing the manager. The CDB location
In the previous section, where we described the first usage of the ACS, the manager used the
ACS database with its three containers, one per supported language, and all components provided by the ACS framework. However, in a practical case, we need that the manager reads
our own database (CDB) so that our containers and our components are available to interact
with them. This is usually achieved by modifying one of the environment variables, $ACS CDB.
Chapter 5 of the “ACS Overview” document summarizes the most important environment variables and their meaning.
7.2
The directory structure
Our code will be located in the $INTROOT directory, which we have created according to the
instructions of section 5. The main directories we should pay attention to are idl, config,
src, include and test.
7
DEVELOPING A SIMPLE EXAMPLE
7.2.1
12
Customizing the manager. The CDB location
. Chapter 5 of the “ACS Overview” document summarizes the most important environment
variables and their meaning.
The directories involved on the configuration of the components and containers are:
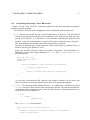
• idl. This directory holds the IDL of each component to be deployed. The IDL should
contain all properties and methods of the component. There may be more than one component in one IDL file. It is advisable to write comments explaining the properties and
methods, since the documentation is extracted from these comments using “doxygen”.
The documentation should follow the format suggested by “doxygen”.
We may use different types for the properties. Some of the types are standard, some of
them are derived types defined by ACS.
In our case the IDL will only contain one property, temperature. The temperature is a
RODouble, an ACS derived type defined in baci.idl. The acsexmplTempFile.idl
file looks like this:
#include <baci.idl>
#pragma prefix "alma"
module TF
{
interface TempFile : ACS::CharacteristicComponent
{
/* Property: Temperature
*/
readonly attribute ACS::ROdouble temperature;
};
};
As previously mentioned the IDL compiler will produce templates for the server and
client, also known as skeleton and stub, in the three ACS supported languages.
• config. This directory holds another directory, CDB, which hosts a subdirectory named
schemas where the XML schema of the component is defined. The schema describes the
composition of the component and it is used for XML instances validation purpouses. In
our case the directory structure is:
‘-- CDB
‘-- schemas
‘-- TempFile.xsd
The TempFile.xsd looks like this:
<?xml version="1.0" encoding="UTF-8"?>
<!-- Example Configuration Database Schema for a thermometer
- Author: Ruben Bolano
7
DEVELOPING A SIMPLE EXAMPLE
13
- History:
2003-12-11 Ruben Bolano Created
-->
<xs:schema
targetNamespace="urn:schemas-cosylab-com:TempFile:1.0"
xmlns:xs="http://www.w3.org/2001/XMLSchema"
xmlns="urn:schemas-cosylab-com:TempFile:1.0"
xmlns:cdb="urn:schemas-cosylab-com:CDB:1.0"
xmlns:baci="urn:schemas-cosylab-com:BACI:1.0"
elementFormDefault="qualified" attributeFormDefault="unqualified">
<xs:import namespace="urn:schemas-cosylab-com:CDB:1.0"
schemaLocation="CDB.xsd"/>
<xs:import namespace="urn:schemas-cosylab-com:BACI:1.0"
schemaLocation="BACI.xsd"/>
<xs:complexType name="TempFile">
<xs:sequence>
<xs:element name="temperature" type="baci:ROdouble"/>
</xs:sequence>
</xs:complexType>
<xs:element name="TempFile" type="TempFile"/>
</xs:schema>
A simple glance shows the reader that there are no special characteristics defined here,
however this file has “import” statements which include characteristics which are common to some ACS defined types like ROdoubles. Therefore, by using the “import”
statetments this file expands as explained in document “Configuration Database User’s
Manual”.
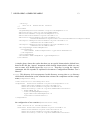
• test. This directory is for test purposes. In this directory we may place a CDB directory
which holds information on the container that activates the component and the components (Components.xml),
<?xml version="1.0" encoding="utf-8"?>
<Components xmlns="urn:schemas-cosylab-com:Components:1.0"
xmlns:cdb="urn:schemas-cosylab-com:CDB:1.0"
xmlns:baci="urn:schemas-cosylab-com:BACI:1.0"
xmlns:xsi="http://www.w3.org/2001/XMLSchema-instance">
<_ Name="TEST_TF_1"
Code="acsexmplTempFileImpl"
Type="IDL:alma/TF/TempFile:1.0"
Container="oanContainer"/>
</Components>
the configuration of our container (oanContainer.xml),
<?xml version="1.0" encoding="UTF-8"?>
<Container xmlns:cdb="urn:schemas-cosylab-com:CDB:1.0"
xmlns="urn:schemas-cosylab-com:Container:1.0"
xmlns:baci="urn:schemas-cosylab-com:BACI:1.0"
xmlns:xsi="http://www.w3.org/2001/XMLSchema-instance"
7
DEVELOPING A SIMPLE EXAMPLE
14
CommandLine=""
Timeout="20000"
UseIFR="1"
ManagerRetry="10"
ManagerReference=""
CacheSize="10"
MinCachePriority="0"
MaxCachePriority="31"
CentralizedLogger="Log">
<Autoload>
<cdb:_ string="baci"/>
</Autoload>
</Container>
and of our manager (oanContainer.xml),
<?xml version="1.0" encoding="utf-8"?>
<Manager xmlns:cdb="urn:schemas-cosylab-com:CDB:1.0"
xmlns="urn:schemas-cosylab-com:Manager:1.0"
xmlns:baci="urn:schemas-cosylab-com:BACI:1.0"
xmlns:xsi="http://www.w3.org/2001/XMLSchema-instance"
CommandLine=""
Timeout="50000"
HeartbeatTimeout="2000"
CacheSize="10"
MinCachePriority="0"
MaxCachePriority="31"
CentralizedLogger="Log">
<Startup>
<cdb:_ string=""/>
</Startup>
<Execute>
<cdb:_ string=""/>
</Execute>
<ServiceComponents>
<cdb:_ string="Log"/>
<cdb:_ string="LogFactory"/>
<cdb:_ string="NotifyEventChannelFactory"/>
<cdb:_ string="ArchivingChannel"/>
<cdb:_ string="LoggingChannel"/>
<cdb:_ string="InterfaceRepository"/>
<cdb:_ string="CDB"/>
<cdb:_ string="ACSLogSvc"/>
<cdb:_ string="PDB"/>
</ServiceComponents>
</Manager>
and one XML file per instance of the component that sets the values of the desired characteristics like, a description, limits, alarm values, graphic limits, formats, units. If the
values are not set explicitly the defaults are taken into account. (TEST LS 1.xml).
7
DEVELOPING A SIMPLE EXAMPLE
15
<?xml version="1.0" encoding="UTF-8"?>
<!-- Example Configuration Database Entry for a Thermometer
- Author: Ruben Bolano
- History:
2003-12-11 RB Created
-->
<TempFile xmlns="urn:schemas-cosylab-com:TempFile:1.0"
xmlns:baci="urn:schemas-cosylab-com:BACI:1.0"
xmlns:cdb="urn:schemas-cosylab-com:CDB:1.0"
xmlns:xsi="http://www.w3.org/2001/XMLSchema-instance">
<temperature description="temperature" units="K" graph_min="0" graph_max="400"
alarm_low_on="10.0"
alarm_low_off="15.0"
alarm_high_on="30.0"
alarm_high_off="25.0"/>
</TempFile>
The XML instance files are trusted against the corresponding schema file. Here we show
a typical directory structure:
‘-- CDB
|-|
|
|
|
|
|
|
|
‘--
MACI
|-- Components
|
‘-- Components.xml
|-- Containers
|
‘-- oanContainer
|
‘-- oanContainer.xml
‘-- Managers
‘-- Manager
‘-- Manager.xml
alma
‘-- TEST_LS_1
‘-- TEST_LS_1.xml
This directory may be associated to the environment variable $ACS CDB so that the manager extracts the database information from that location. This association is temporal
because we placed it in the test directory. If we want a definitive location we should use
a devoted directory to place our components and containers so that all of them are found
by the manager.
7.3
Code directories
Directories src and include will contain the Makefile and the code the developer has to
implement. The client can be placed in directory test
7
DEVELOPING A SIMPLE EXAMPLE
16
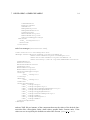
7.4 The Makefile
The Makefile is in subdirectory src and it is necessary to do the compilation and linking. This
Makefile is very customized to follow ESO standards for the VLT and it requires that package
pdksh is installed in the system. Each entry is briefly commented, however sometimes this
comment is not enough to understand how to fill in the entry. The Makefile includes a call to
another Makefile located in $ACSROOT. There is no ACS documentation which explains how
to manage and modify the Makefile
The Makefile will call the IDL compiler so that it generates the stub and the skeleton for
C++, java and Python from the IDL file. The stub is the template for a client, while the skeleton
is the template for the server. We have to create a child class which will inherit from the one
generated by the IDL compiler. Since we know in advance how this class will be called, we
may write the implementation code before using the IDL compiler. Then the Makefile will do
all at a time and there is no need to execute it twice. It will first produce the templates and later
will compile our implementation using the generated templates.
The relevant part of the Makefile looks like this:
............
#
# Includes (.h) files (public only)
# --------------------------------INCLUDES
= acsexmplTempFileImpl.h DevIOFile.h
#
# Libraries (public and local)
# ---------------------------LIBRARIES
= acsexmplTempFileImpl
LIBRARIES_L
=
#
# <brief description of lllll library>
acsexmplTempFileImpl_OBJECTS
= acsexmplTempFileImpl
acsexmplTempFileImpl_LIBS
= acsexmplTempFileStubs
............
As can be seen we only fill the following fields:
• INCLUDES. With all .h files that we need.
• LIBRARIES. An implementation library of the component will be created.
• Two fields for the objects and libraries with the name of the component implementation
followed by Impl OBJECTS and Impl LIBS.
acsexmplTempFileImpl.h is the file that contains the implementation.
7
DEVELOPING A SIMPLE EXAMPLE
17
7.5 The server
The component has to be declared in a header file and has to be implemented in a cpp file. The
former should be in directory include and the latter in directory src From the point of view of
a newcomer, both the ‘.h’ and ‘.cpp’ files have pieces of code which are difficult to understand
at a first glance and which are repeated for different projects. This fact has been exploited by
the HPT and Apex groups to create a code generator which produces these common parts and
leaves the customization to the developer. We are not going to comment these parts and will
leave the explanation to the three ACS documents mentioned at the beginning of this section.
The header file contains the declaration for the component class which inherits from classes
CharacteristicComponentImpl and POA TF::TempFile, being the latter the one created
by the IDL compiler. The header file contains the declaration for the constructor, the destructor,
a method to obtain the the property which returns a pointer to a RODouble, and finally a private
member which holds the pointer to the temperature property and to the DevIOFile:
#ifndef acsexmplTempFileImpl_h
#define acsexmplTempFileImpl_h
/*******************************************************************************
*
ARIES21 - Antena RadioInterferomtrica Espaola para el siglo XXI
*
(c) Observatorio Astronmico Nacional, 2003
*
Copyright by OAN, All rights reserved
*
*
This library is free software; you can redistribute it and/or
*
modify it under the terms of the GNU Lesser General Public
*
License as published by the Free Software Foundation; either
*
version 2.1 of the License, or (at your option) any later version.
*
*
This library is distributed in the hope that it will be useful,
*
but WITHOUT ANY WARRANTY; without even the implied warranty of
*
MERCHANTABILITY or FITNESS FOR A PARTICULAR PURPOSE. See the GNU
*
Lesser General Public License for more details.
*
*
You should have received a copy of the GNU Lesser General Public
*
License along with this library; if not, write to the Free Software
*
Foundation, Inc., 59 Temple Place, Suite 330, Boston, MA 02111-1307 USA
*
*
* who
when
what
* -----------------------------------------------------------* r.bolano
11-12-2003 Created
* p.devicente 23-03-2004 Cleanup
*/
/************************************************************************
*
*---------------------------------------------------------------------*/
#ifndef __cplusplus
#error This is a C++ include file and cannot be used from plain C
#endif
7
DEVELOPING A SIMPLE EXAMPLE
#include
#include
#include
#include
#include
18
<baciCharacteristicComponentImpl.h>
<acsexmplExport.h>
<acsexmplTempFileS.h>
<baciROdouble.h>
<DevIOFile.h>
NAMESPACE_USE(baci);
class acsexmpl_EXPORT TempFile: public CharacteristicComponentImpl,
public virtual POA_TF::TempFile
{
public:
/**
* Constructor
* @param poa poa which will activate this and also all other COBs
* @param name DO name
*/
TempFile(PortableServer::POA_ptr poa, const ACE_CString &name);
/**
* Destructor
*/
virtual ˜TempFile();
/**
* Method which returns a reference to the temperature property.
* Implementation of IDL interface for the property.
* @htmlonly
* <br><hr>
* @endhtmlonly
*/
virtual ACS::ROdouble_ptr
temperature ()
throw (CORBA::SystemException);
private:
// reference to the DevIOFile
DevIOFile<double> *m;
/**
* m_temperature_p is a pointer the current temperature for stage 1.
* m_ stands for member and _p for pointer.
*/
ROdouble
*m_temperature_p;
7
DEVELOPING A SIMPLE EXAMPLE
19
};
#endif
In the include directory we also need to define a DevIO which allows to read values from
a file. The DevIOFile is a class specially designed to read and write from different devices. In
our case the device is a file:
/*******************************************************************************
* ARIES21 - Antena RadioInterferomtrica Espaola para el siglo XXI
* (c) Observatorio Astronmico Nacional, 2003
*
* This code is under GNU General Public Licence (GPL).
* Correspondence concerning ALMA Software should be addressed to:
* [email protected]
*
* who
when
what
* -----------------------------------------------------------* r.bolano
11-12-2003
Created
* p.devicente 23-3 -2004
Cleanup
*/
#ifndef __cplusplus
#error This is a C++ include file and cannot be used from plain C
#endif
#include
#include
#include
#include
#include
<baciDevIO.h>
<unistd.h>
<stdio.h>
<stdlib.h>
<string.h>
NAMESPACE_USE(baci)
template <class T> class DevIOFile : public DevIO<T>
{
public:
// Constructor:
// It opens the file
DevIOFile(const char * fr)
{
fp = fopen(fr,"r");
ACS_SHORT_LOG ((LM_DEBUG, "File opened: %d", fp));
}
// Destructor:
// It closes the file
virtual ˜DevIOFile()
{
fclose(fp);
ACS_SHORT_LOG ((LM_DEBUG, "File closed: %d", fp));
}
7
DEVELOPING A SIMPLE EXAMPLE
20
virtual bool initalizeValue(){ return true; }
// Reimplementation of method read:
virtual T read(int& errcode, unsigned long long& timestamp)
{
// The file contains 4 columns with:
// modified julian day, temperature from stage 1, modified julian day, temp stage 2.
fscanf(fp, "%lf %lf %lf %lf", &mjdnow1, &lectura1, &mjdnow2, &lectura2);
ACS_SHORT_LOG ((LM_DEBUG, "Retrieved record: %f %f %f %f",
mjdnow1, lectura1, mjdnow2, lectura2));
errcode = 0;
timestamp = getTimeStamp();
m_value = lectura1;
return m_value;
}
// Reimplementation of method write:
virtual void write(const T& value, int& errcode, unsigned long long& timestamp)
{
ACS_SHORT_LOG ((LM_DEBUG, "Cannot write!"));
errcode = 0;
timestamp = getTimeStamp();
m_value = value;
}
private:
T m_value;
FILE *fp;
double mjdnow1,lectura1,mjdnow2,lectura2;
};
#endif
The DEVIO contains a constructor that opens the file, a destructor that closes the file, and
two methods which reimplement the read and write methods from the DevIO template. The
read procedure returns the temperature value as read from the file, stores the value in a private
member variable and obtains a timestamp for that value, while the write value would change the
private member and obtain a timestamp, but since the temperature is a RODouble it will never
be called.
The src directory contains the implementation of the component:
/*******************************************************************************
*
ARIES21 - Antena RadioInterferomtrica Espaola para el siglo XXI
*
(c) Observatorio Astronmico Nacional, 2003
*
Copyright by OAN 2003, All rights reserved
*
*
This library is free software; you can redistribute it and/or
*
modify it under the terms of the GNU Lesser General Public
*
License as published by the Free Software Foundation; either
*
version 2.1 of the License, or (at your option) any later version.
*
7
DEVELOPING A SIMPLE EXAMPLE
21
*
This library is distributed in the hope that it will be useful,
*
but WITHOUT ANY WARRANTY; without even the implied warranty of
*
MERCHANTABILITY or FITNESS FOR A PARTICULAR PURPOSE. See the GNU
*
Lesser General Public License for more details.
*
*
You should have received a copy of the GNU Lesser General Public
*
License along with this library; if not, write to the Free Software
*
Foundation, Inc., 59 Temple Place, Suite 330, Boston, MA 02111-1307 USA
*
*
*
*
"@(#) $Id: acsexmplTempFileImpl.cpp,v 1.1 2004/03/23 11:01:28 vicente Exp $"
*
* who
when
what
* -----------------------------------------------------------* r.bolano
11-12-2003 Created
* p.devicente 23-3-2004
Cleanup
*/
#include <vltPort.h>
#include <baciDB.h>
#include <acsexmplTempFileImpl.h>
ACE_RCSID(acsexmpl, acsexmplTempFileImpl, "$Id: acsexmplTempFileImpl.cpp,v 1.1 2004/0
NAMESPACE_USE(baci);
// Constructor. It inherits from CharacteristicComponentImpl and sets m_temperature_p
TempFile::TempFile(PortableServer::POA_ptr poa, const ACE_CString &name) :
CharacteristicComponentImpl(poa,name),
m_temperature_p(0)
{
ACS_TRACE("::TempFile::TempFile");
// Create the Properties
//
the property’s name must be composed of the server’s name and the
//
property name.
m = new DevIOFile<double>("../data/temp.log");
m_temperature_p = new ROdouble(name+":temperature", getComponent(), m);
// if this property wasn’t created properly, we destroy it and all
//
of this COB’s previous properties
CHARACTERISTIC_COMPONENT_PROPERTY(temperature, m_temperature_p);
}
// Destructor:
TempFile::˜TempFile()
{
ACS_TRACE("::TempFile::˜TempFile");
if (getComponent())
7
DEVELOPING A SIMPLE EXAMPLE
22
{
ACS_DEBUG_PARAM("::TempFile::˜TempFile", "Destroying %s...", getComponent()->getName());
// stop threads
getComponent()->stopAllThreads();
}
// properties
if (m_temperature_p)
{
m_temperature_p->destroy();
m_temperature_p = 0;
}
ACS_DEBUG("::TempFile::˜TempFile", "Properties destroyed");
delete m;
ACS_DEBUG("::TempFile::˜TempFile", "DevIOFile destroyed");
}
// Method with retrieves the temperature value:
ACS::ROdouble_ptr
TempFile::temperature ()
throw (CORBA::SystemException)
{
if (!m_temperature_p)
{
return ACS::ROdouble::_nil();
}
ACS::ROdouble_var prop = ACS::ROdouble::_narrow(m_temperature_p->getCORBAReferenc
return prop._retn();
}
/* --------------- [ MACI DLL support functions ] -----------------*/
#include <maciACSComponentDefines.h>
MACI_DLL_SUPPORT_FUNCTIONS(TempFile)
/* ----------------------------------------------------------------*/
The constructor inherits from CharacteristicComponentImpl and sets the temperature to 0. It creates the DevIOFile, which in turn opens the file, and creates the property by
passing three arguments to ROdouble constructor: the name of the server plus the name of the
property, the ”parent” of the property (the component itself) and the DevIO to be used to retrieve
the value for the property.
The destructor stops all threads, destroys the temperature property, sets its value to 0 and
destroys the DevIOFile.
Finally the method which returns a pointer to the temperature property. It obtains the
CORBA reference of the property and casts the value to be a ROdouble by using narrow.
7
DEVELOPING A SIMPLE EXAMPLE
23
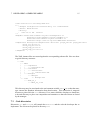
7.6 The client
We may write a very simple client using Python, that we may place in a file called client.py
in directory test:
#!/usr/bin/env python
from acspy.clients.simpleClient import PySimpleClient
import acsexmplTempFile_idl
from time import sleep
sc = PySimpleClient(sys.argv)
tf = sc.getComponent("TEST_TF_1")
temp = tf._get_temperature()
i=1
while(i<100):
print temp.get_sync()
i+=1
sleep(1)
The client imports the module PySimpleClient and acsexmplTempFile idl. The last
one will be created by the IDL compiler. Then we create, sc, a simple Python client.
The simplest way to create a client is to call it without arguments:
sc = PySimpleClient([])
but it is also possible to pass some arguments which tell the client the location of the component, for example on another host. If we want to pass this information it should have the
following format so that the PySimpleClient successfully recognizes it:
client.py -managerCORBALoc corbaloc::host:xxxx/Manager
where host is the name of the host where the component is located(for example “host.oan.es”,
and xxxx is the number of the port at which the Manager listens, which if the ACS instance is
0 corresponds to port 3000.
Next we get a reference to tf, the TempFile component by calling getComponent() on sc
the simple client and the same for the temperature property temp by calling get temperature()
on tf the component. To obtain the current value of the property we may issue a get sync on
temp the property.
The loop with the sleep(1) is just for aesthetic purposes and to show how the value
changes after 1 second.
7
DEVELOPING A SIMPLE EXAMPLE
24
7.7 Compiling and testing the code
Let us assume that all our code is under directory /home/acs/acsexamplTempFile. To
compile and run the code one should proceed as follows:
export INTROOT=\$HOME/acsexamplTempFile
source /alma/ACS-3.0/ACSSW/config/.acs/.bash\_profile.acs
Then we compile:
cd acsexamplTempFile/src
make
We will get some messages which indicate that the stubs and skeletons are being created for
C++, Java and Python and finally that the objects are created from the implementation files that
we have written:
almamgr@polifemo:˜/acsexmplTempFile/src$ make
== Dependencies: ../object/acsexmplTempFile.didl
== IDL Compiling for TAO (C++): acsexmplTempFile.idl
== (preprocessing) acsexmplTempFile.idl
== IDL Compiling for JacORB (Java): acsexmplTempFile.idl
== IDL Compiling for OmniOrb (Python): acsexmplTempFile.idl
/alma/ACS-3.0/ACSSW/idl/acserr.idl:137: Warning: Anonymous sequences for recursive
omniidl: 1 warning.
== IDL Compiling Stubs into libraries/executable (C++): acsexmplTempFile.idl
/alma/ACS-3.0/ACSSW/include/acsMakefile.all:374: ../object/acsexmplTempFileImpl.d:
/alma/ACS-3.0/ACSSW/include/acsMakefile.all:391: ../object/acsexmplTempFileImpl.da
== Dependencies: ../object/acsexmplTempFileImpl.da
== Dependencies: ../object/acsexmplTempFileImpl.d
== C++ Compiling: acsexmplTempFileImpl.cpp
== Making library: ../lib/libacsexmplTempFileImpl.a
== Making library: ../lib/libacsexmplTempFileImpl.so
. . . ’all’ done
The compilation procedure will produce several libraries placed in directory lib which
are necessary for implementing the server and the client and it will produce objects from the
compilation of the implementation files in directory obj.
To test it we need to set up the ACS CDB environment variable so that ACS finds our container and its component:
cd acsexamplTempFile/test
export ACS\_CDB=\$PWD
acsStart
acsStartContainer -cpp oanContainer
From the same host in a different terminal window we will run the client:
REFERENCES
25
cd acsexamplTempFile/test
./client.py
The client should run for approximately 100 seconds and should print on the screen the
different temperature values.
If we run the client, on a different host, we will need the imported modules. The easiest
way to achieve this is to copy the whole compiled acsexamplTempFile directory content
on that host and to install it. Then we can run it typing:
cd acsexamplTempFile/test
export MANAGER_REFERENCE=corbaloc::host:3000/Manager
./client.py
We may also use the Object explorer to retrieve the temperature values and to display a
graphics with the trend along time, as described by [Kadunc, Tkačic & Šekoranja, 2003].
References
[Chiozzi & Sivera, 2003] Chiozzi G., Sivera P. & Filippi G., 2003, “Alma Common Software.
Installation Manual”.
[Chiozzi & Šekoranja 2003] Chiozzi G. & Šekoranja M., 2003, “ACS Overview”.
[Fugate 2003] Fugate D., 2003, “Python Component/Container Framework Tutorial”.
[Kadunc, Tkačic & Šekoranja, 2003] Kadunc, Tkačic & Šekoranja, 2003, “Object Explorer
User’s Manual”.
[Milcinski et al., 2003] Milcinski G., Šekoranja M., Lopez B. & Fugate D., 2003, “C++ Component/Container Framework Tutorial”.
[Vitas & Zagar, 2003] Vitas D., Zagar K., 2003, “Configuration Database User’s Manual”.