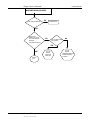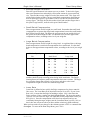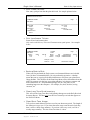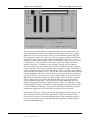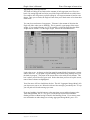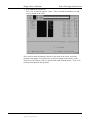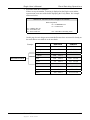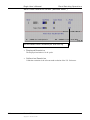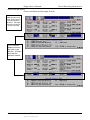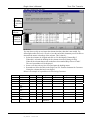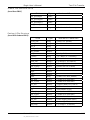
1
Eagle User's Manual Version 8.70 3/15/02 © 1997-2001 Command Alkon Incorporated. Information disclosed herein was originated by and is the property of Command Alkon Incorporated, and except for rights expressly granted by written consent, such information shall not be disclosed, disseminated or duplicated in whole or in part. Command Alkon Incorporated reserves all patent, proprietary, design, manufacturing, use and reproduction rights thereto. Command Alkon Incorporated 1800 International Park Suite 400 Birmingham, AL 35243 Eagle User’s Manual Safety Procedures Emergency Procedures If there is an emergency at your plant immediately press the EMERGENCY STOP switch. This will remove control power from the Eagle. Be sure that it is safe to reapply power before releasing the Emergency Stop button. Eagle Maintenance Procedures When preparing to do any work on the Eagle System or Plant turn the key on the manual panel to the off position and remove the key. Then lock and tag all 3 Phase power and/or control power necessary to guarantee everyone’s safety. Eagle Testing Procedures You may be asked by a Command Alkon Service Technician to open the Eagle box and use the test probe to check for voltage. The Eagle system will be running at this time. Use caution when testing, test only the areas that you are directed to test by the technician. Note: Misuse of the Test Probe may cause electrical shock and/or damage to the system. Note: If your local government authorities prohibit you from opening any electrical components do not proceed with any testing procedures. This is to be done by authorized personnel only. Other Maintenance Procedures As a courtesy to you we have included a copy of “Lockout for Safety on the Job” booklet. This booklet can be found on the inside front cover of this manual. The booklet describes lockout/tagout procedures in easy-to-follow steps. All employees working around machinery or equipment need lockout/tagout training to prevent the sudden release of energy. Version 8.70 5thSafety.doc 15 March 02 4:03 PM 1 Eagle User’s Manual Certificates To request a National Type Evaluation Program Certificate of Conformance for Weighing and Measuring Devices for a particular state please contact: Chris Fornwalt [email protected] 1-972-262-2692 x 2101 Version 8.70 20 May 02 4:03 PM 1 Eagle User’s Manual Table of Contents Installation System Specifications .............................................................................................................i-1 Troubleshooting Guide............................................................................................................i-2 Hot Keys................................................................................................................................i-12 Introduction .....................................................................................................................ii-2 Chapter 1: Getting Started Master Menu .......................................................................................................................... 1-2 Master Menu Screens Chart .................................................................................................... 1-4 Help Screen ............................................................................................................................ 1-6 Batching/Storage Menu.......................................................................................................... 1-8 Chapter 2: Plant Setup Menu General Plant Options ............................................................................................................ 2-3 Extended Plant options........................................................................................................... 2-7 Scale Calibration ................................................................................................................. 2-11 Scale Configuration Menu ................................................................................................... 2-14 Batch Screen Options........................................................................................................... 2-16 Batch Setup Screen Options................................................................................................. 2-19 Order Entry Titles ................................................................................................................ 2-22 Printer & Comm Config....................................................................................................... 2-23 Primary Printer Setup........................................................................................................... 2-25 Secondary Printer Setup....................................................................................................... 2-31 Aggregate Batching.............................................................................................................. 2-32 Aggregate Freefall................................................................................................................ 2-34 Aggregate Jogging................................................................................................................ 2-37 Cement Batching .................................................................................................................. 2-39 Cement Freefall .................................................................................................................... 2-41 Cement Jogging.................................................................................................................... 2-44 Water Freefall ...................................................................................................................... 2-46 Water Jogging Data.............................................................................................................. 2-49 Water Pulse Calibration ....................................................................................................... 2-51 Admix Pulse Calibration ...................................................................................................... 2-53 Agg/Cem Discharge Gates ................................................................................................... 2-57 General Discharge................................................................................................................ 2-61 Admix Batch/Discharge ....................................................................................................... 2-71 Probe Cal/Config.................................................................................................................. 2-74 Passwords ............................................................................................................................. 2-76 Time/Date Menu .................................................................................................................. 2-81 Print Screens......................................................................................................................... 2-82 Remote Configuration .......................................................................................................... 2-83 Soft I/O Config..................................................................................................................... 2-84 Disk Maintenance................................................................................................................. 2-88 Version 8.70 3rdToc.doc 15 March 02 4:03 PM 1 Eagle User’s Manual Table of Contents Chapter 3: End of Day Operation End of Day Menu ................................................................................................................... 3-1 End of Day Duties .................................................................................................................. 3-2 Aggregate Inventory............................................................................................................. 3-15 Cement Inventory ................................................................................................................. 3-24 Admix Inventory .................................................................................................................. 3-33 Cement Tracking .................................................................................................................. 3-41 Tickets Summary.................................................................................................................. 3-45 Summary .............................................................................................................................. 3-49 Chapter 4: Plant Storage Information Storage Menu ......................................................................................................................... 4-1 Mix Storage Menu.................................................................................................................. 4-4 Calculations for Moisture Compensation .............................................................................. 4-9 Truck Storage Menu............................................................................................................. 4-15 Materials Storage Menu ....................................................................................................... 4-19 Moisture Storage Menu........................................................................................................ 4-20 Aggregate Storage Menu...................................................................................................... 4-22 Cement Storage Menu.......................................................................................................... 4-26 Admix Storage Menu ........................................................................................................... 4-29 Water Storage Menu ............................................................................................................ 4-32 Extra Products Menu............................................................................................................ 4-35 Deliveries Menu ................................................................................................................... 4-38 Chapter 5: Plant Batching Operations Batching Menu ....................................................................................................................... 5-1 Customers Menu .................................................................................................................... 5-5 Orders Menu......................................................................................................................... 5-13 Batch Setup .......................................................................................................................... 5-24 Verify Menu ......................................................................................................................... 5-41 Ticket Stack.......................................................................................................................... 5-45 Truck Washout Utility.......................................................................................................... 5-48 Dual Units Metrication......................................................................................................... 5-50 Appendixes Appendix A: Notices, Warnings, & Error Messages ............................................................ A-1 Appendix B: Field Number Selections ................................................................................. B-1 Appendix C: Scale Readout Manual ..................................................................................... C-1 Appendix D: Inventory Security ........................................................................................... D-1 Appendix E: Expanded Water Handling (2 of 4 Waters) ......................................................E-1 Appendix F: Eagle Text File Transfers..................................................................................F-1 Index....................................................................................................................................... 1 Version 8.70 3rdToc.doc 15 March 02 4:03 PM 2 Eagle User’s Manual Installation (i) Version 8.70 6thE_inst.doc 03/15/02 2:10 PM Eagle User’s Manual Installation System Specifications • Power Requirements − System 110 VAC +/- 20%, 50/60 Hz or 220 VAC +/- 20%, 50/60 Hz • Plant Power 110 VAC +/- 20%, 50/60 Hz or 220 VAC +/- 20%, 50/60 Hz • Physical Specifications − − Operator Monitor Weight: 29 lbs. Dimensions: Operator Keyboard Weight: 10 lbs. Dimensions: 15” 15” 7” 15” 18” • System Printer Weight: 12 lbs. (Microline 180) Microline 180 Printer Front View 20lbs. (Microline 320) Microline 320 Printer Front View 4.5” 4” 13.5” 11” 12” Microline 80 Printer Top View Version 8.70 6thE_inst.doc 103/15/02 2:10 PM 15” Microline 320 Printer Top View 1 Eagle User’s Manual • Installation Manual Control Panel − Weight: 56 lbs. Manual Panel Front View Right Side View 9” 21.5” 18.5” Top View • Computer Junction Box − Weight: 260 lbs. 24” 37 1/4” Center to Center 42” Mounting holes. Eagle Series 30” Computer J-Box Front View 2 Version 8.70 6thE_inst.doc 03/15/02 2:10 PM 8” Left Side View Eagle User’s Manual Installation System Interconnect Diagram Speaker Side View Front View Eagle J-Box System Monitor Eagle Eagle Series Series Line Rcvr. System Keyboard A Bottom View B I/o cables (3) to plant Remotely located Dispatch computer AC Power In Modem B Moisture probes A Analog input devices, (Up to 9), Scale Pots, Load Cells Manual Panel Rear View Serial Printer Parallel Printer Version 8.70 6thE_inst.doc 103/15/02 2:10 PM Manual Batch Panel Front View 3 Eagle User’s Manual Installation Troubleshooting Guide TURN KEY ON MANUAL SWITCH PANEL NOTHING HAPPENS NO CHECK THE EMERGENCY SWITCH ON THE MANUAL SWITCH PANEL. PRESS THE EMERGENCY SWITCH ON THE MANUAL SWITCH PANEL IS THE SWITCH IN THE OFF POSITION? YES CHECK CIRCUIT BREAKERS ON FRONT OF THE PSI EAGLE JUNCTION BOX NO PUSH CIRCUIT BREAKERS IN ARE BOTH OF THEM PUSHED IN? YES OPEN JUNCTION BOX PUT TEST PROBE ON TERMINAL LABELED L1. DOES TEST PROBE LIGHT? YES CALL FOR SUPPORT 4 Version 8.70 6thE_inst.doc 03/15/02 2:10 PM NO CHECK MAIN POWER TRANSFORMER ON THE PLANT AND CHECK THAT POWER CORD FROM BOTTOM OF JUNCTION BOX IS PLUGGED INTO THE WALL Eagle User’s Manual Installation MONITOR IS BLANK (NO VIDEO) IS THE MONITOR TURNED ON? NO TURN MONITOR ON YES PRESS THE KEY MARKED CTRL, LOWER LEFT HAND CORNER OF KEYBOARD NO WAS AN AUDIBLE SOUND (OUCH) HEARD? NO DOES MONITOR COME ON? YES YES CALL FOR SUPPORT MONITOR OR VIDEO CARD CALL FOR SUPPORT EXTENDER TRANSMITTER, EXTENDER RECEIVER, OR CABLES SYSTEM IS OK Version 8.70 6thE_inst.doc 103/15/02 2:10 PM 5 Eagle User’s Manual Installation PRINTER ERROR MESSAGE AND VOICE PROMPT KEEPS REPEATING IS THE PRINTER TURNED ON? NO TURN THE PRINTER ON AND RETRY YES YES NO IS THE SELECT LIGHT ON? PRESS THE SELECT BUTTON YES IS PAPER IN THE PRINTER? NO ARE THE CABLES PLUGGED IN? YES CALL FOR SUPPORT Version 8.70 6thE_inst.doc DOES THE PRINTER WORK NOW? YES PUT PAPER IN THE PRINTER YES 6 DOES THE PRINTER WORK NOW? 03/15/02 2:10 PM DOES THE PRINTER WORK NOW? YES NO PLUG THE CABLES IN DOES THE PRINTER WORK NOW? YES NO SYSTEM IS OK NO SYSTEM IS OK NO SYSTEM IS OK NO SYSTEM IS OK Eagle User’s Manual Installation P R IN T E R D O E S N O T P R IN T (N O E R R O R M E S S A G E ) G O T O P L A N T S E T -U P M E N U , P R IN T E R & C O M M C O N F IG M E N U D O E S T H E P R IM A R Y A N D /O R S E C O N D A R Y P R IN T E R H A V E A P O R T A N D /O R B A U D R A T E A S S IG N E D ? YES NO I F U S IN G 1 P R I N T E R S O F T W A R E THEN USE PAG E UP TO ENTER LPT1 IN T H E P R IM A R Y P O R T L IN E PRESS F5 TO ENTER THE C O N F IG U R A T IO N I F U S IN G 2 P R I N T E R S O F T W A R E THEN USE PAG E UP TO ENTER LPT1 IN T H E P R IM A R Y P O R T L IN E THEN USE PAG E UP TO ENTER C O M M 1 IN T H E S E C O N D A R Y P O R T L IN E A N D U S E P A G E U P T O E N T E R 9 6 0 0 IN T H E S E C O N D A R Y B A U D R A T E L IN E P R E S S F 5 T O E N T E R C O N F IG U R A T IO N D O E S T H E P R IN T E R W O R K N O W ? YES NO C O N T IN U E B A T C H IN G CALL FO R SUPPO RT Version 8.70 6thE_inst.doc 103/15/02 2:10 PM 7 Eagle User’s Manual Installation THE AUTOMATIC INPUT AND OUTPUT The Output (OAC) and Input (IAC) modules are located on the PB Boards (Fig. #2) which are located on the right side of the PSI EAGLE Box (Fig. #1). The OAC (Fig. #3) is black in color and is responsible for communications between the PSI EAGLE and the concrete plant. These operate various fill , discharge, open and close signals that control the plant. during automatic batching and discharging. The IAC (Fig. #4) is yellow in color and receives incoming signals from the plant and Manual Switch Panel during batching and discharging. These signals include; limit switches, manual batching of materials, float switches, and liquid measuring meters for water and admixes. The OAC and IAC are dedicated to certain functions and these are shown on the inside door of the PSI EAGLE (DWG #1). FIGURE #1 PSI EAGLE BOX FIGURE #2 PB BOARD PB-1 DWG #1 FIGURE #3 OAC (BLACK) TO 110/220 VAC FIGURE #4 IAC (YELLOW) TO PSI TERMINAL STRIP (OUTPUT) NEUTRAL (L2) TEST POINT A PICO FUSE (REMOVABLE) BLACK OUTPUT MODULE TEST POINT B RESISTOR (DO NOT REMOVE) TO PSI TERMINAL STRIP (INPUT) TEST POINT A YELLOW INPUT MODULE PICO FUSE (REMOVABLE) TEST POINT B RESISTOR (DO NOT REMOVE) RED LED TO REPLACE THE OAC OR IAC, TURN POWER OFF, UNSCREW THE MODULE FROM THE PB BOARD AND GENTLY PULL THE MODULE OUT OF THE SOCKET. THEN INSERT A NEW MODULE IN THE SOCKET AND TIGHTEN. TO REPLACE THE PICO FUSE, TURN POWER OFF, REMOVE THE MODULE IF NECESSARY, THEN USING A PAIR OF NEEDLE-NOSE PLIERS, GRASP THE PICO FUSE AT ONE END AND GENTLY PULL. REPEAT ON OTHER END. TO INSERT, BEND THE LEGS TO FIT INTO THE HOLES, CUT OFF EXCESS LEAD WIRE, AND INSERT INTO THE HOLES. 8 Version 8.70 6thE_inst.doc 03/15/02 2:10 PM Eagle User’s Manual Installation TROUBLESHOOTING THE AUTOMATIC OUTPUT (OAC) In a normal automatic operation, when the computer turns on an output, the red LED under the module lights up and closes the contact in the OAC. This applies power at the PSI EAGLE terminal (see Fig. #3). In an abnormal automatic operation, the computer tries to turn on output, the red LED under the module lights up , but the gate or fill solenoid does not operate. IDENTIFY THE PROBLEM. THE MATERIAL BEING CALLED FOR WILL BE HIGHLIGHTED ON THE SCREEN. GATE IS NOT OPEN, NOTHING BEING WEIGHED UP. REFER TO DWG #1 ON THE DOOR OF THE PSI EAGLE. FIND LOCATION OF BLACK OPTO THAT OPERATES THAT PARTICULAR MATERIAL. NO IS THE RED LED UNDER THE OAC LIT? CALL FOR SUPPORT YES PUT TEST PROBE ON SCREW ABOVE AND TO THE RIGHT OF THE OAC. DOES TEST PROBE LIGHT? PUT TEST PROBE AT TEST POINT “B”, TO THE RIGHT OF THE OAC. DOES TEST PROBE LIGHT? NO YES NO REPLACE THE OAC YES REPLACE THE PICO FUSE REFER TO PLANT DRAWINGS TO FIND WHAT TERMINAL NUMBER WIRE GOES TO. PUT TEST PROBE ON THAT TERMINAL. DOES TEST PROBE LIGHT? YES Version 8.70 6thE_inst.doc 103/15/02 2:10 PM NO CALL FOR SUPPORT PROBLEM IS OUT IN THE PLANT 9 Eagle User’s Manual Installation TROUBLESHOOTING THE INPUT (IAC) The devices that are connected to the input modules can be limit switches, float switches, conveyor input, flop gate input and manual inputs for manual batching. In a normal operation when a switch is closed, the red LED lights showing that the signal is being detected. In an abnormal operation, the red LED will not be lit and an error message will be displayed (i.e. Batcher Open, Conveyor Not Running, or no manual recordation). IDENTIFY THE PROBLEM. IF AN ERROR MESSAGE IS RECEIVED OR NO MANUAL RECORDATION REFER TO DWG #1 ON THE DOOR OF THE PSI EAGLE. FIND LOCATION OF YELLOW OPTO THAT IS RECEIVING THE INPUT FOR THAT PARTICULAR PROBLEM IS THE RED LED UNDER THE IAC LIT? YES NO PUT TEST PROBE ON SCREW ABOVE AND TO THE RIGHT OF IAC. DOES TEST PROBE LIGHT? NO PROBLEM IS OUT ON THE PLANT YES CALL FOR SUPPORT PUT TEST PROBE AT TEST POINT “B”, TO THE RIGHT OF THE IAC. DOES TEST PROBE LIGHT? YES REPLACE THE IAC 10 Version 8.70 6thE_inst.doc 03/15/02 2:10 PM NO REPLACE THE PICO FUSE Eagle User’s Manual Installation TROUBLESHOOTING THE INPUT (IAC) The devices that are connected to the input modules can be liquid measuring meters for water and admixes. In a normal operation when a pulse from the meter is received at the PSI EAGLE the red LED pulses on and off as the water and/or admix is being metered. In an abnormal operation, the red LED will not pulse on and off and an error message will be displayed (i.e. Low Flow Detected). IDENTIFY THE PROBLEM. IF AN ERROR MESSAGE IS RECEIVED OR NO COUNTS ARE DETECTED REFER TO DWG #1 ON THE DOOR OF THE PSI EAGLE. FIND LOCATION OF YELLOW OPTO THAT IS RECEIVING THE INPUT FOR THAT PARTICULAR PROBLEM GO INTO MANUAL FOR THE MATERIAL THAT IS NOT COUNTING PRESS THE MANUAL BUTTON WHILE WATCHING THE RED LED UNDER THE IAC. IS THE RED LED UNDER THE IAC PULSE ON AND OFF? YES NO PUT TEST PROBE ON SCREW ABOVE AND TO THE LEFT OF IAC. DOES TEST PROBE LIGHT? NO PROBLEM IS OUT ON THE PLANT YES CALL FOR SUPPORT PUT TEST PROBE AT TEST POINT “B”, TO THE RIGHT OF THE IAC. DOES TEST PROBE LIGHT? NO REPLACE THE PICO FUSE YES REPLACE THE IAC Version 8.70 6thE_inst.doc 103/15/02 2:10 PM 11 Eagle User’s Manual Installation Hot Keys The following keystroke combinations activate functions as listed below. They can be used to invoke utility software functions or allow real time operator input during automatic mode batching. Keystrokes Mode/Precondition Action <Alt> + <F7> Holding Hopper Closes Holding Hopper Disch./Opens Batcher Discharge <Alt> + <W> Batching Screen Truck Washout Utility Pop-Up Screen <Alt> + <T>* Batching Mode* Change Truck Number* <Alt> + <V> Batching Mode Concrete Volume Calculator <Alt> + <C> Batching Mode Concrete Volume Calculator <Alt> + <B> Fast Batch Option Switch From Primary To Alternate Batch <Alt> + <I> Batching Screen Bring Up Inventory Pop-Up Screen <Alt> + <J> Weigh-Up Force A Manual Jog On A Non-Jogging Material <Gray Plus> Code 1 Discharge Increase Discharge Rate <Gray Minus> Code 1 Discharge Decrease Discharge Rate <Page Up> Code 1 Discharge Increase Discharge Rate <Page Down> Code 1 Discharge Decrease Discharge Rate <Esc> When Errors Displayed Acknowledge Error, Remove Message * Requires enabling in the “Extended Plant Options”, in the “Plant Setup” section of the software. 12 Version 8.70 6thE_inst.doc 03/15/02 2:10 PM Eagle User’s Manual Installation Consumable Parts List The following list of parts are ones that require routine replacement at normal or predictable intervals. These parts may be obtained from the Command Alkon - Dallas Customer Service department. Customer Service Number: 1-800-852-4565 Consumable Parts List Part Number Description 01-024 PB16A Fuses 02-003 5 Amp Circuit Breaker 02-022 10 Amp Circuit Breaker 02-061 Fan Filter 03-001 Single Scale Pot 01-008 Octal Relay 01-040 Octal Relay Base 04-051 Indicator Actuator 04-052 Momentary Actuator 04-055 Single Pole Switch Block 04-056 Double Pole Switch Block 04-064 12 Volt Light Bulb Version 8.70 6thE_inst.doc 103/15/02 2:10 PM 13 Eagle User’s Manual Installation Field Replaceable Parts The following list of parts may be ordered from the Command Alkon - Dallas Customer Service department to repair an Eagle Batching controller. Some of the parts below are returnable for an exchange credit. Customer Service Number: 1-800-852-4565 Field Replaceable Parts List Part Number 14 Description 01-009 PB16 PCB 01-055 G4 PB16 Rack 18-025* Parallel/RTC PCB 18-027* Speech/Analog PCB 18-031* CPU PCB 18-032* Video I/O PCB (Diamondpak) 18-036* Extender/Receiver Assembly 18-037* Extender/Transmitter Assembly 18-038* Manual Panel Main Scale PCB 18-040* Display PCB 18-041* Counter PCB 18-044* Preamp PCB , 7200 Moisture Probe 18-045* Power Supply, 7200 Moisture Probe 18-026* Backplane PCB Assembly 18-035 Disk Emulator EPROM version 6.xx (Part of 18-035 above) Disk Emulator RAM version 6.xx 18-047* Disk Emulator RAM version 7.xx 18-049* CDI Moisture Probe Control PCB 18-051* External Receiver Assembly (New Style) 18-052* External Transmitter Assy. (New Style) 18-053* Disk Emulator EPROM version 7.xx 18-056 Multi I/O PCB (New Style) 02-009* Power Supply IM603-122 02-060 Isatrol for 240 Volt Systems 02-078* Power Supply For Manual Switch Panel 07-193 VGA Video Cable (New Style) 07-194 Internal Video Cable (New Style) 07-195 Internal CPU Cable (New Style) 07-196 Internal Speaker Cable (New Style) 07-210 Com 1 Cable (New Style) 09-176 Floppy Disk Drive 09-259 Varistor For 240 Volt Systems Version 8.70 6thE_inst.doc 03/15/02 2:10 PM Eagle User’s Manual Installation Field Returnable Parts The following list of parts may be returned to the Command Alkon - Dallas Customer Service department for an exchange credit. Customer Service Number: 1-800-852-4565 Field Returnable Parts List Part Number Description 18-025* Parallel/RTC PCB 18-027* Speech/Analog PCB 18-031* CPU PCB #b880-640 (Level 7) 18-029* CPU PCB (Level 8) 18-048* Flash Memory Disk (Level 8) 18-030* Flash Memory PCB (Level 8) 18-032* Video I/O PCB (Diamondpak) 18-036* Extender/Receiver Assembly 18-037* Extender/Transmitter Assembly 18-038* Manual Panel Main Scale PCB 18-040* Display PCB 18-041* Counter PCB 18-044* Preamp PCB , 7200 Moisture Probe 18-045* Power Supply, 7200 Moisture Probe 18-026* Backplane PCB Assembly 18-035* Disk Emulator EPROM version 6.xx (Part of 18-035 above) Disk Emulator RAM version 6.xx 18-047 Disk Emulator RAM version 7.xx 18-049 CDI View Moisture Control PCB 18-051 External Receiver Assembly (New Style) 18-052 External Transmitter Assy. (New Style) 18-053 Disk Emulator EPROM version 7.xx 02-009 Power Supply IM603-122 02-078 Power Supply For Manual Switch Panel Version 8.70 6thE_inst.doc 103/15/02 2:10 PM 15 Eagle User’s Manual Introduction Introduction Welcome to the Eagle 8.70, the latest automatic batching computer designed by Command Alkon Incorporated. The Eagle is designed to replace the manual control method of concrete batching, or replace the present automatic system you have in use on your plant. The parts of the system include a terminal, the keyboard, a control panel, a computer junction box, and an optional printer. The terminal looks like a small television set. When you use the Eagle, you will be watching the screen most of the time. The keyboard is what you will use to talk to the Eagle by typing instructions and commands. The control panel houses all the manual switches, and the key that turns the power on and off. The junction box is the big white box hanging on the wall. This contains the computer, control relays, power supply, and plant wiring terminal strip. Learning to use the Eagle is simple. There is a computer controlled voice to guide you through each batching and loading step. The voice can also alert you if a malfunction occurs. The Eagle uses a system of menus to allow the operator a step-by-step process to follow. The Eagle also has a feature called the Demonstration Mode, which allows you to practice or train on the system without turning the plant on. The Eagle controls plant operations and ensures fast, accurate, in-tolerance batching. It can also monitor your inventory and keep detailed summaries of the material used and total yards batched. Inventory can be displayed or printed out at any time. Other features control the sequence and rate at which materials are loaded onto the trucks. A security option records not only the automatic batching operations, but manual batching as well. The manual control panel serves as a backup to the automatic system. If you have purchased the Eagle Junior, you will use your existing manual panel. Any time during the batching or loading operation, the operator can take over plant operation simply by choosing the manual override option. The panel's color coded lights go on and off as the Eagle moves from one phase to the next, giving you another indication of what stage each batch is in. Version 8.70 7thEag_intr.doc 03/15/02 2:11:43 PM ii-1 Eagle User’s Manual Chapter 1 Getting Started Version 8.70 chp1_Eag.doc 03/15/02 1:03:05 PM Eagle User’s Manual Getting Started Getting Started Once the system has been installed, you will turn it on with the key to the manual switch panel. This turns on the entire system. First, make sure that the switch on your terminal screen is on. Next, insert the key into the lock on your manual switch panel and turn the key clockwise. You will see a flashing cursor at the top of the computer screen. This means that the computer is loading. The Eagle program tests the data files for errors in the structure of the files and checks the CRC of the memory files. It will be ready to begin operations in about 30 seconds. As soon as the Eagle has loaded, the screen will change to the Master Menu, which looks like the illustration below: Now, before we begin to go to any specific functions within the Eagle system, let's talk a little bit about how the Eagle works. Although it is a highly sophisticated system, the Eagle is easy to operate. Each screen provides only a limited number of possible functions. The operator must choose operations from what is called a menu. The menu is a list. Like a menu in a restaurant, only the available choices are listed. If you strike a key that is not on the menu, the Eagle will ignore it. Look again at the illustration above. The Master Menu is the first menu that you will see each time that you turn on the computer. The User's Manual also begins with this menu. The organization of this book is intended to follow the organization of the program itself. Under the Master Menu section in this chapter is a chart called "Master Menu Screens Chart" that tells you where each screen is located on the computer. Take a moment to look at this chart until you have become more familiar with the way the Eagle’s screens are organized. If you want to look up a particular section that will explain what to do on a certain screen, use the Index for easy reference. Version 8.70 chp1_Eag.doc 03/15/02 1:03:05 PM 1-1 Eagle User’s Manual Getting Started Master Menu The Master Menu is the first screen you will see each time you turn on your Eagle batching computer. The screen shows the Command Alkon logo, the revision level of the software, the current time and date. At the bottom of the screen are the Master Menu prompts. These prompts tell you which keys to press to begin operating the Eagle. Locate the "F" keys along the top of the keyboard above the letter pad. The "F" keys are already set up to tell the Eagle to perform certain functions. At the bottom of each screen, you will see a list of the "F" keys that will work for that screen. This list of "F" keys is called a menu. Like a menu at a restaurant, the menus on each screen tell you what options you have available. Look at the bottom of the Master Menu. Locate the words, "Master Menu." Below this title are three options you can choose: • F3 = End of Day Menu • F4 = Plant Setup Menu • F5 = Batching/Storage Try pressing some of the other "F" keys. Note that nothing happens. The Eagle will say "Ouch!" whenever you hit a wrong key. This way you will know to try again. Now you are ready to find out how to use the Eagle to operate your plant. You probably have plenty of questions. What can you do in the Plant Setup Menu? What can you do in the Batching/Storage Menu? What button do you push to set up a mix design? How do you setup the Eagle so that you can use it to operate the plant? Read along through the next few pages, and you will get some answers. 1-2 Version 8.70 chp1_Eag.doc 03/15/02 1:03:05 PM Eagle User’s Manual Getting Started First, you will need to learn the arrangement of the screens and menus. The screens are set up in a logical order − similar jobs are grouped together. The "Master Menu Screens Chart" on the next page shows how the screens break down into particular jobs. The Master Menu breaks down into three primary menus: End of Day Menu, Plant Setup Menu, and Batching/Storage Menu. In the column, beneath the box that says End of Day, are all the features of the End of Day Menu. The features of the Plant Setup Menu are listed below the box that says Plant Setup. In the last column are the features listed for the Batching/Storage Menu. Use the "Master Menu Screens Chart" as a map to find your way through the various screens. As you become more familiar with the way the Eagle is organized you will need to use this screens chart less. But while you are learning, use it to find the particular area you want to look at more closely. Version 8.70 chp1_Eag.doc 03/15/02 1:03:05 PM 1-3 Eagle User’s Manual Getting Started Master Menu Screens Chart Master Menu <F3> End of Day Menu <F4> Plant Setup Menu <F5> Batching/Storage Menu • End of Day Duties • General Plant Options • Storage Menu • Aggregate Inventory • Extended1 Plant Options • Customers • Cement Inventory • Extended2 Plant Options • Orders • Admix Inventory • Scale Calibration • Ticket Stack • Cement Tracking • Scale Configuration • Batch Setup • Tickets Summary • Batch Screen Options • Summary • Batch Setup Options • Order Entry Titles • Printer & Comm Config • Primary Printer Setup • Secondary Printer Setup • Aggregate Batching • Aggregate Freefall • Aggregate Jogging • Cement Batching • Cement Freefall • Cement Jogging • Water Freefall • Water Jogging • Water Pulse Calibration • Admix Pulse Calibration • Agg/Cem Discharge • General Discharge • Admix Batch/Discharge • Probe Cal/Config • Passwords • Time/Date • Print Screens • Remote Configuration • Soft I/O Config • Disk Maintenance 1-4 Version 8.70 chp1_Eag.doc 03/15/02 1:03:05 PM Eagle User’s Manual Getting Started Help Screen The Eagle 8.70 features help screens that you can call up when you have a question. At the top of the keyboard near the number keys is a green button called <HELP>. The illustration below shows the Help Screen for the Master Menu. Each menu has its own Help Screen. You can press <HELP> for an explanation of the features of the current screen. Call up the screen you want to know more about. Once it is displayed, press the <HELP> key. The <HELP> key provides general information since space on the help screens is limited. If you are trying to perform a function for the first time, the Help Screens may not go into enough detail to answer all of your questions. In this case, refer to the User's Manual for a more complete explanation. The <HELP> key is intended to remind the operator of the next step. It will not replace the manual as a training tool for the operator not yet familiar with the Eagle. The Help Screens have a couple of features you should know about. For most of the menus, the Help Screens are only single page displays. For example, on the Master Menu, the Help Screen that pops up is all the help you get for that menu. There are certain menus whose Help Screens have multiple pages. To check this out, press <F4> to go to the Plant Setup Menu; then press the down arrow four times to select the Batch Screen Options Menu. Finally, press the <Enter> key. Once the Batch Screen Options Menu is displayed on your screen, press the <HELP> key. At the top of the pop-up Help Screen a message says, "Help: Field # Selections − 1." Since the list of Field numbers available for this and other setup screens is too long to fit on only one Help Screen, this part of Help has been divided into a number of "pages." To move from page 1 to page 2, press the <Page Down> key. Each time you press the <Page Down> key, you will advance one page in the Help Screens. To back up, use the <Page Up> key. Version 8.70 chp1_Eag.doc 03/15/02 1:03:05 PM 1-5 Eagle User’s Manual Getting Started All together there are 26 pages of Field number codes. These include not only fields you can use on your Batch Setup Menu but also for Order Entry Title fields, Print only fields for recordation, and Communications fields as well. Two other menus that offer more than one page of Help are Batching Menu, and Communications Diagnostics. You may also notice that you can use the <Page Up> or <Page Down> key to page through all the available help screens. But the simplest way to find the Help Screen for the menu you want is to go first to that menu. Whenever you press the <HELP> key, the Eagle automatically calls up the Help Screen for that menu. For your convenience, there is a list of all available field number codes located at the back of this manual titled, "Appendix B − Help: Field Number Selections". This gives you a second place to refer to these codes. To exit Help, press any key on the keyboard. Press the <F10> key twice to return to the Master Menu. 1-6 Version 8.70 chp1_Eag.doc 03/15/02 1:03:05 PM Eagle User’s Manual Getting Started Batching/Storage Menu The ColorStat status displays allow the batchman to quickly verify batch progress while juggling other tasks. If you want to enable ColorStat, go to the Extended Plant Options from the Plant Setup Menu and set the “Use Bar Graph Displays Y/N” to Y. Pressing <F11> will quickly toggle the ColorStat display on and off. Your video monitor will display a screen that looks like the illustration below just prior to discharge enable: Full scale is 100% of target weight. Individual material status bar. Colored area shows current scale trend. Version 8.70 chp1_Eag.doc 03/15/02 1:03:05 PM Full scale is 100% of scale capacity The third stripe is only present if you have weighed water. 1-7 Eagle User’s Manual Getting Started Press <F11> key on the Batching Menu to toggle between ColorStat and the normal scale displays below: 1-8 Version 8.70 chp1_Eag.doc 03/15/02 1:03:05 PM Eagle User’s Manual Getting Started Material Status Blocks Take a good look at your screen by using the illustration above to make sure you are on the right menu. The name of the current menu appears just below the middle of the screen. It should say, "Batching Menu." For every menu you will come to, the name will always appear in this same place on the screen. At the top of the screen are four blocks − the material status blocks. Note that there is one for Aggregate, Cement, Admix, and Water. These boxes tell you the status of each material with cues like: "Ready," "Manual," "Batch," "Start," "Done," "Load," "Hold," "Dump." Notice that in the illustration above, the message in each box is "Ready." This is where the status message will appear. Further on we will discuss what each word means but for now, just remember that the purpose of this status message is to keep the batchman aware of each phase of the batch. The boxes for cement and aggregate also include scale readouts which show the current total weight on each scale. The readout for water is displayed in gallons if it is metered, and pounds if weighed. From the Batching/Storage Menu, every screen you can go to will display these material status blocks. This means that no matter what menu you are on, as long as it is a part of either the Batching operations or the Storage Operations, you will be able to keep track of a load as it is batching while you perform other functions. You can watch the scale readouts to see the weight increasing on the scales. While the load is batching, the status message next to the scale readouts should change with each phase of the batch. Below is a list of possible prompts that will appear in the material status blocks during weigh up and discharge. • Ready Means that the weigh bin is empty, discharge gates are shut, and the bin is ready to begin weighing up the next batch. • Batch Indicates that material is being batched into the weigh hopper. • Done Tells you when weigh up of material is complete. • Load Means material is ready to be discharged into truck or mixer. • Hold Appears during discharge; material is waiting for its turn. Discharge sequence is set on Plant Setup Menu. The Eagle will hold during discharge according to the rules you set for it on those setup screens. • Dump Means that material is discharging. Watch the aggregate and cement scale weights decrease as material falls out of the bin. Water, if weighed, will also decrease, and if metered, the number of gallons will increase during discharge. • Done Discharge is complete for this material. When each material completes discharge this message will appear. Version 8.70 chp1_Eag.doc 03/15/02 1:03:05 PM 1-9 Eagle User’s Manual • Getting Started Ready This is the message we began with above. All weigh bins are empty (within scale tolerances), and discharge gates are closed. The Eagle is ready to begin weighing up the next batch. Material Display for Batching and Discharge Below these status blocks is the main part of the screen − a large box. This box in turn is divided into smaller sections. In this box you will be able to watch the individual weight of each material as it weighs up and then discharges. Some of the information will be similar to what you see at the material status blocks, but most of what you look at here in the main box is more detailed and will be of more use to you. There are column titles along the top of each side of the main box: Material, Target, Actual, and Status. Note that these titles are the same on both sides of the box. Locate these titles on your screen now. If you are looking at this screen for the first time, these spaces will be blank. Later, when you have begun batching, these spaces will show each material you are using in the current batch. Look at the illustration below to see where all of the material classes are located. (AGGREGATE) (ADMIX) (CEMENT) (WATER) From the Batching Menu, you can press <F1> for Storage Menu or <F5> for the Batch Setup Menu. Note that by pressing <F7> you can begin discharge without having to return to the Batching Menu. This will come in handy when you are batching concrete because you will be able to perform other tasks while a load is batching. Also from the Batching Menu are three paid option screens: Customers, Order, and Ticket Stack. These screens will ONLY appear on the Batching Menu if you have one or more paid options turned on. If you want to go back to the Master Menu, press <F10>. 1-10 Version 8.70 chp1_Eag.doc 03/15/02 1:03:05 PM Eagle User’s Manual Chapter 2 Plant Setup Version 8.70 chp2_Eag.doc 03/15/02 1:05:41 PM Eagle User’s Manual Plant Setup Menu Plant Setup Menu This menu provides you with access to most of the setup screens for your plant. This is where you will go to calibrate your scales, configure your scales, set general plant options, and set up your Batch Screen. Also, you can set batching, freefall, and jogging information for all your materials. Consider the Plant Setup Menu as the place you go first to set up all the preliminary plant options. You cannot start batching until you have set up the plant. As you can see from the illustration above, the screen shows a three column box. Below the box is a title, "Plant Setup Menu." No matter what screen you are on, this is where the screen title will be located. Below the "Plant Setup Menu" title are the menu prompts. In the case of the Plant Setup Menu, there is only one menu prompt. As explained in the Master Menu section, these menu prompts are a list of the available "F" keys you can press to perform specific functions. Look under the title "Plant Setup Menu." The Eagle lists only one "F" key: F10 = RETURN to Master Menu. This is the only "F" key that will work while you are on this screen. Take a second to locate the arrow keys, near the bottom of the keyboard, to the right of the letter pad and the <Enter> key. Now, look back at the box in the middle of the screen. Note that a blue bar highlights the top line of the left-hand column. You can move this bar up or down, or to either side by pressing the arrow keys. This is how you select the option you want to look at more closely. When you have highlighted the item you want, press the <Enter> key. The screen changes to show a new menu. Now that you have learned how to select options from the Plant Setup Menu, you are ready to learn the specifics about each of the setup options. On the pages, which follow, each of the Plant Setup Options is discussed in detail. You can flip through to a specific section, or read about each option in order. Version 8.70 chp2_Eag.doc 03/15/02 1:05:41 PM 2-1 Eagle User’s Manual Plant Setup Menu General Plant Options Go to the General Plant Options Menu to select some of the features for the Eagle and the plant. After you have selected the General Plant Options from the Plant Setup Menu, your screen should look like this: Main Menu <F4> Plant Setup Select General Plant Options <Enter> The screen has a box with a number of questions that you must answer. Most of these questions have to do with the physical features of your plant. Remember that the Eagle does not know what is on your plant until you tell it. By answering each of the questions in the box, you have begun to teach the Eagle about your plant. For most of the questions select <Y> for yes, and <N> for no. Some of the questions require numbers as answers, for example, Water Flow Rate. At the bottom of the screen, there are two "F" key options under the screen title. You will use these after you have made changes to the information in the box. The cursor rests in the answer space to the first question. Once you answer the question, the cursor moves down to the next line. If you do not wish to change the answer in a given space, you can skip the question. Simply move the cursor down to the next line by pressing either the <Enter> key or the down arrow key. Let's look at each line in the box. The recommended entry is underlined. • 2-2 Demonstration mode?. . .Y/N Enter <Y> to turn demonstration mode on. Enter <N> to turn it off. Demonstration mode, when turned on, allows you to train other operators and practice batching. The results appear on your screen without sending signals to the plant. Also, there will be no changes made to the inventory for demo batches. Version 8.70 03/15/02 1:05:41 PM Eagle User’s Manual Plant Setup Menu • AUTO DISCHARGE w/Belt Run? This feature will cause the Eagle to automatically start and stop the discharge process as the conveyor belt starts and stops. Set the field to <Y> and press <F5> to save it. After a batch has been started, the <F7> Auto Discharge key is pressed and ENABLED, and the discharge process has begun. The Auto Discharge Enable, and the discharge process will start and stop with the conveyor belt start and stop. • Motion detect?. . .Y/N Tells the computer to wait until the scales motion has settled. If <Y>, there is a ±2 grad swing to accept. If <N>, the Eagle uses Settle Time specified in Scale Configuration Screen. • Delay for moisture probe?. . .Y/N Delays water batching until moisture probe has sampled 75% of the probed aggregate. If <Y>, nothing happens until 75% of probe aggregate is weighed. If <N>, the water will reach 50% and stop until the probed aggregate reaches 75% of target weight. • Print Received Materials?. . .Y/N Print the deliveries of incoming materials as they are entered. • Weight check mode?. . .Y/N While in weight check, the Eagle will halt after each material in the weigh up sequence to check scales and printout accuracy. Weight check will also help you to check for a problem during batching or loading, or when testing the scales for accuracy. • Cumulative weighing?. . .Y/N - Enter <Y> if you want cumulative weights for aggregate, cement, admix, and water. The Aggregate and Cement materials are editable, the targets are not editable. The water is editable if it is metered water, but if it is weighed water it is not editable. All weights for aggregates are added together, all cements are added together, and all waters are added together so that weights printed out on the recordation ticket list cumulative weights. - Enter <N> if you want individual weights for each of your materials. The target amount in the Batch Result message to dispatch will always be printed as net weight. • Metric Plant Base Units ?. . .Y/N You can shift all measurements from pounds to kilograms, gallons to liters, and ounces to milliliters. Enter <Y> for measurements to be made in metric. Enter <N> if you want imperial units. Note: When you change from one system to the other, you will need to reenter your mix designs and recalibrate your scales. Version 8.70 chp2_Eag.doc 03/15/02 1:05:41 PM 2-3 Eagle User’s Manual • Plant Setup Menu Wet/Dry Plant? . . . Y/N When set to “Y” if Code 3 discharge is set either in the Wet side or the Dry side or in both sides, a F2 key can be used to toggle from the wet side configuration menu to the dry side configuration menu or from the dry side to the wet side. Note: When the “Wet/Dry Plant? Y/N” is set to “Y” on the General Plant Options menu, the Wet/Dry field will display on the General Discharge menu. • Central mixer?. . .Y/N If <Y>, three questions will appear. The first question is Recordation before Tilt?...Y/N. If <N>, it will print the complete batch weight recordation when the mixer is tilted. The second question is Multi-Drop Mixer Full Warn?...Y/N. If <Y>, the computer will warn you between multi-drop regardless of mixer capacity. If <N>, the computer will not warn you between multi-drop loads. The third question is Disable “Load Truck”?…Y/N. If set to yes this will disable the Load Truck speech. With a Central Mixer plant you may add “Mixer W/C Ratio” field (#441) to the Batch Screen Option menus. This field will allow the Eagle to dynamically display the Water/Cement ratio of a load while it is in the central mixer and temper water is being added. This will allow you to monitor water/cement ratio dynamically as you add water so you can avoid exceeding specified maximum ratios. The “Recordation before Tilt?” must be set to “N” for this to print out. Specifics: − Because the field will be dynamic, it will be for display only, and not for recordation. − The field will be active for the load currently in the mixer. − The field will begin displaying dynamically when the mixer timing starts. − The field will stop displaying dynamically when the mixer reaches full tilt. − When the field is not displaying dynamically, it will show a value of “*.***”. − The field will have the format “Mixer W/C: n.nnn”. − The field will display the Water/Cement ratio WITHOUT differentiation between cementious and pozzolanic cements. − The value in the field will be calculated as the amount of Water batched plus the Agg compensation moisture, plus the Admix moisture, plus the Temper Water added, plus the water in truck, plus the amount of ice, divided by the amount of Cement batched. − The field will be updated every quarter second. 2-4 • Block plant?. . .Y/N Enter <Y> to repeat the same batch automatically (used with external switch). Enter <N> if you will be varying mix designs and batch sizes. • Adjust Multi-Drop Targets?. . .Y/N Recalculate target for each drop to compensate for the weighing error discrepancy in the previous drop. Version 8.70 03/15/02 1:05:41 PM Eagle User’s Manual • Plant Setup Menu SSD Moisture Compensation?. . .Y/N Determine which formula is used for determining moisture compensation. If <Y>, then the formula below is used: Target weight = SSD weight × [1 + (% Free moisture ÷ 100)] If <N>, then the formula below is used. It is more accurate to use this formula: Target weight = SSD weight ÷ [1 - (% Free moisture ÷ 100)] • Water Allowed with cement?…Y/N If <Y> water and cement are allowed to discharge together. If <N> the water will stop and go into “Cem Cut” hold status when the cement starts discharging. This will only happen if the water has not finished or reached its hold back point. • Washdown water w/Agg vib?...Y/N If <Y>, the tail water will start with agg vibrator and after cement. If <N>, the tail water will start after the aggregate is completely discharged. • Weighed water?. . .Y/N Enter <Y> if your plant weighs water. When set to <Y> the Water Freefall and Water Jogging options will display on the menu. Enter <N> if your plant measures water through a meter. • Water holding tank?. . .Y/N Enter <Y> if your plant uses a holding tank for its water. Enter <N> if your plant does not. • Compensate Admix moisture?. . .Y/N If <Y>, the computer will adjust total water for the water content of the admix. If <N>, the computer doesn't adjust or recognize admix content as water. • Allow Manual H20 Initiate?. . .Y/N If <Y>, the computer will print recordation ticket and initiate a batch when manually batching. If <N>, the computer does not consider water as a batch. • Allow Early H20?…..Y/N If <Y> and F7 Auto Discharge is Enabled the water will start as soon as all bottle admixes have reached their targets. This is preferred for most dry batch plants where you want most of the headwater in the Mixer Truck prior to the solids. If <N> and F7 Auto Discharge is Enabled the water will not start early but will wait until all materials have reached their targets and then it will start. This is preferred for some Central Mix Plants where you do not want a lot of headwater in the Mixer before the other materials start. Version 8.70 chp2_Eag.doc 03/15/02 1:05:41 PM 2-5 Eagle User’s Manual Plant Setup Menu • Water flow rate: ____Gal/s Enter the number of gallons per second that your plant discharges water. It is used to calculate the start of aggregate discharged. • Max washdown water: ____gal Enter a maximum number of gallons to be held back as tail water. The number should be between 25 to 75 gallons. • Percent washdown water: ____% Enter what percent of the total water you want the Eagle to hold back until all materials are discharged. It should be between 15% to 35%. This will be overridden by Max washdown water on large loads. Note: The Eagle looks at Max washdown water and Percent washdown water and uses whichever is less. Washdown each Multi-Drop?. . .Y/N Washdown water allows the operator to determine whether the hold water is applied to each split batch or saved for the final batch. If <Y> is entered, the Eagle will wash down each drop of a multi-drop batch. If <N> is entered, the Eagle will apply the entire wash water to the final drop of a multi-drop load. Once you have gone through the features on the General Plant Options Menu and have checked to make sure that you have set each of the controls, you are ready to begin another setup task. Look down at the bottom of the screen. Below the menu there are two commands listed: Note: If you make any changes to the screen, you must press <F5> to enter them into the computer. Although the Eagle shows the changes you have just made on the screen, it will not put them into effect until you press <F5> to record them in the permanent memory. After you have pressed <F5>, you are ready to move on to the next task. Press <F10> to return to the Plant Setup Menu. • 2-6 Disable Mixer Wash H2O?. . . Y/N Set to “N” to disable the wash water when switched to the wet side. Version 8.70 03/15/02 1:05:41 PM Eagle User’s Manual Plant Setup Menu Extended1 Plant Options This screen is an extension of the General Plant Options Screen. Main Menu <F4> Plant Setup Select Extended Plant Options <Enter> • Start Batch Delay Seconds Enter the number of second that you want to delay in starting the batch. It will alert the plant operator that a batch is going to start. • Wash Water Delay (Sec) Enter the number of seconds that you want to delay starting the wash water. This allows for the aggregate belt transfer time. • Enter admix per 100 weight (CWT) Enter <Y> if you want to enter your mix design admixes in ounces per hundred pounds of cement. If set to <N> , admix per volume is selected. • Screen Blank Minutes (Screen saver) Enter the minutes of keyboard inactivity before the screen goes blank. • User Bar Graphs on batch screens? . . .Y/N If <Y>, the screen will default to bar graphs. If <N>, the screen will default to digital display. Pressing <F11> allows the operator to toggle between bar graphs and digital weight indicator. Version 8.70 chp2_Eag.doc 03/15/02 1:05:41 PM 2-7 Eagle User’s Manual • Plant Setup Menu Use H20 Reducer Reduction Factor? . . .Y/N If the field is set to “Y” this feature will be enabled. If the field is set to “N” this feature will be disabled. A column of Type fields has been added on the Admix Storage Menu. The PG_UP and PG_DOWN key will toggle the fields with “A”, “R” and “ “ indicating the Accelerator type, Water Reducer type or No type respectively for each admix. The Eagle assumes that only one Accelerator admix type and only one Water Reducer admix type in each Mix Design. If there is more than one Accelerator type admix and/or more than one Water Reducer type admix in a Mix Design this will be applied to the first Accelerator admix and first Water Reducer admix. In the Admix trim field (field #41-52 or #61-72) on the Batch Setup Menu, a prefix “*” in front of the material name will indicate an Accelerator type admix while the Water Reducer type admix becomes a non-editable field. The percentage of Water Reducer admix trim will be modified automatically according to the percentage of Accelerator type admix trim. When the Accelerator Admix trim is less than 1.00% the Water Reducer Admix trim will be 100% (full dosage of Water Reducer Admix). When the Accelerator Admix trim is 1.00% the Water Reducer Admix trim will be 50%. When the Accelerator Admix trim is greater or equal to 2.00% the Water Reducer Admix trim will be 0% (no Water Reducer Admix). When the Accelerator Admix trim is between 1.00% and 2.00% the Water Reducer trim will be a linear factor. 2-8 • Print COD Invoices? . . .Y/N Print invoice for COD tickets. • Change Truck After Batch Start? . . .Y/N Allows you to change truck number after starting the batch but before starting discharge. • Low Flow Detection: . . .Y/N If set to <Y>, then the Eagle will warn you if the material has no flow after the low flow timeout delay time. • Agg . . .Y/N Cem . . .Y/N Admix . . .Y/N Water . . .Y/N Selecting which materials have low flow detection enabled. • Low Flow Timeout Seconds: . . . Enter the number of seconds between 0 - 99. The default is set at four seconds. If weighed material, the Eagle gives a warning message, hits timeout, stops learning for freefall and jogs, and holds gate open until material starts again. If metered material, that material is halted to prevent overfill. Version 8.70 03/15/02 1:05:41 PM Eagle User’s Manual • Plant Setup Menu Shop test mode?. . .Y/N (see warnings below) Enter <N> for this question. It is available ONLY when the demonstration mode is on. In shop test mode, the Eagle sends out signals to the plant, but it ignores the readouts on the scales. Be careful with this one because you could end up shoveling aggregate off the belt if you accidentally turn this mode on. It is used for testing in the shop before the Eagle goes out, and sometimes at the plant during installation. Warnings: DO NOT TURN SHOP TEST MODE ON. ONLY TO BE USED BY COMMAND ALKON FIELD SERVICE PERSONNEL. • Allow Dual Units? ...Y/N If set to <Y> it enables “Dual Unit” capability. Use <F12> to toggle between Metric and U.S. units. If set to <N> the Eagle will display, batch, and record in whatever “Plant Base Units” that the “Plant Base Units Metric” flag is set to on the “General Plant Options” screen. • Save Ticket Information?…Y/N When set to <Y> End of Day reports are available for Yards per Truck, Yards per Mix, and Yard per Hour. Anyone who wishes to use this feature, and does not have the Delivery Ticket option enabled, must enable the saving of ticket information via the “Save Ticket Information” field on the Extended Plant option menu. • Enable Performance Logging?... Y/N This is a performance logging feature. When set to <Y> logs timing information, jogging information, target and actual weights, to begin and end tare weights, and status information for each material in a batch. The information is stored in the PERFORMANCE.8 file. Up to 800 material records may be stored in the file. If a plant averages eight materials per batch, then information for up to 100 batches may be stored. A performance spy report is available by holding down the <Ctrl> key and pressing the <F2> key. This report prints the timing information for all materials of the most recent batch in which performance logging was enabled. The report can be printed from any menu. (See example of the Performance Spy Report on the following page.) Version 8.70 chp2_Eag.doc 03/15/02 1:05:41 PM 2-9 Eagle User’s Manual Plant Setup Menu Performance Spy Report Performance Spy Report Ticket #: Qty Batched: 52 Mix ID: 5.00 4000 Metric: N Batch #: 27 Batch Time: Start Gate Start Low Gate Material Time Open Flow Flow Close WTR RED 13:36:06 135 162 27 567 AIR 13:36:06 135 162 27 3/4 13:36:06 27 54 SAND 13:36:23 27 54 TYPE I 13:36:06 27 FLY ASH 13:36:21 WATER 13:36:06 2-10 Seq: 1 1:36PM 27Feb98 Jogs End Start End End Drop Disc Disc Time 0 756 3510 3564 13:36:41 324 0 540 3240 4293 13:36:49 27 1215 0 1755 3753 5481 13:37:00 27 1026 1 1377 1971 3705 13:37:01 54 27 1323 0 1485 4374 5724 13:37:03 27 54 27 216 0 378 2862 4218 13:37:03 0 216 216 5778 0 27 0 5994 13:37:06 • Material Materials used in the batch, sorted by End Time. • Start Time Time of day to the 100th of a second the material started batching. • Gate Open The time the gate opened from the start time. (100th of seconds) • Start Flow The time of material flow from the start time. (100th of seconds) • Gate Close The time the gate closed from the start time. (100th of seconds) • Jogs Number of jogs. • End Drop The time from the start time the batching process completed. (100th of seconds) • Start Discharge Time of discharge from the start time. (100th of seconds) • End Discharge Time the material finished discharging from the start time. (100th of seconds) • End Time Timed of day to the 100th of a second the material finished. Version 8.70 03/15/02 1:05:41 PM Eagle User’s Manual Plant Setup Menu • Disable ‘Start Water’ Speech? If set to <Y>, the Eagle speech will say when the Early Water starts. • Warn if Repeated Batch Setup? If set to <Y> allows the operator to configure the Eagle to issue a warning if you start a batch with the same Truck Number, Load Size, and Mix ID as the previous batch. The operator may override this warning by pressing the <F6> key and entering the batching error password. If set to <N>, a warning will not be issued. This feature will not work if the Block Plant flag is set to <Y>. • Max Smart Drop Seconds: The number of seconds is the maximum Smart Drop allowed for any material. When set to zero smart drop is disabled for every material. Version 8.70 chp2_Eag.doc 03/15/02 1:05:41 PM 2-11 Eagle User’s Manual Plant Setup Menu Extended2 Plant Options This screen is an extension of the Extended1 Plant Options screen. Multi Admix Limits?: Y/N • If this field is set to “y”, a function key F3 = EDIT Admix Limits will display on the Admix Storage menu. • 2-12 On the Admix Storage menu when F3 key is pressed the Eagle will display the bin name and six editable columns that are high over, high under, medium over, medium under, low over, low under. Version 8.70 03/15/02 1:05:41 PM Eagle User’s Manual Plant Setup Menu When F3 = Edit Admix Limits is pressed the Eagle will display the bin name and six editable columns that are high over, high under, medium over, medium under, low over, and low under. This is password protected by the “OUT Of TOLERANCE” password. Version 8.70 chp2_Eag.doc 03/15/02 1:05:41 PM 2-13 Eagle User’s Manual Plant Setup Menu Extended Print Tolerance Config Menu Extended Print Tolerance?: Y/N If this field is set to “Y,” a new string “Print Tolerance Option” will be shown on the Plant setup menu. If this string is highlighted and a “enter” key is pressed the new menu “Print Tolerance Option Config” can be accessed. • The Small/Large Load Cross_over field … 30% is not an editable field. • To edit a line press <F5>. The prompt at the bottom of your screen will be replaced with a message: Type in the correct password (the recordation password). For more information on passwords, look under the “Password” section later in this chapter. • During a batch, a status calculation for each material is based on the ASTM specification. After each material has weighed and a status has been calculated, the Eagle will display the status “Under” and “Over” in RED color on the Batch menu if it will print out of tolerance. Is H2O Extended Print Tolerance? Y/N • 2-14 If this field is set to “Y” the water will print out with an ASTM field. If set to “N” there will not be an ASTM field for water. Version 8.70 03/15/02 1:05:41 PM Eagle User’s Manual Plant Setup Menu When a “used admix” is toggled on the Mix Design Menu, a letter “h”, or “m”, or “l” in yellow color will be displayed in front of the admix name to indicate that the admix will be in high limitation, or medium limitation, or low limitation. • • When starting a batch or saving a mix design the admix target limitation checking will base on the limitation setting. Is POSS Cement in CWT?:Y/N If this field is set to “y”, the admix per 100 weight (CWT) will be based on both C type cement and P type cement instead of C type cement only. NOTE: This field is only visible if the “Enter admix per 100 weight (CWT)?” is set to yes. Version 8.70 chp2_Eag.doc 03/15/02 1:05:41 PM 2-15 Eagle User’s Manual Plant Setup Menu Scale Calibration The Scale Calibration Menu is used to calibrate your scales. See screen below: Note: If you are in demonstration mode, you will not be able to access the screen. At the top of the screen is a row of four small blocks, which tell the operator the status of the materials: aggregate, cement, admix, and water. The status blocks for aggregate and cement show the weight on the scales as well. The water status block will show "Lb" if you are weighing water, and "Gal" if the water is metered. Keep an eye on these scale readouts when you are calibrating scales. The major part of the screen is the box in the center. It holds seven columns: 2-16 • Scale Input Numbers optionally up to twelve scales. Note the pointer beside the number. The pointer lets you chose a particular scale and can be moved as needed by pressing the up or down arrow keys. • Type of Material Labels the material (Agg, Cem, Amx, or Wat) that each scale will weigh. The material names can be edited in the Scale Configuration Menu ONLY. Use <Page Up> or <Page Down> key to scroll through the list. • Lb/grad Lists the number of pounds per scale graduation. • Full Scale Shows the maximum capacity of each scale. Version 8.70 03/15/02 1:05:41 PM Eagle User’s Manual Plant Setup Menu • Weight Tells you the present number of pounds on each scale. This number may not always match exactly with the number in the status block at the top of the screen because the status block shows the weight in grads, according to the number entered in the Lb/grad column. The Weight column in the box shows the exact number of pounds. • Count Displays a number. These raw counts are numbers directly from the Eagle's Analog to digital converter. This is the number that the Eagle uses to calculate scale weight. Counts are used to troubleshoot problems with the scale calibration. • Last Changed The Eagle records the date and time of the last change. This helps you keep track of how often you are recalibrating your scales. At the bottom of the screen are the menu prompts. Use the menu choices to make changes to the columns in the box. Note: If you have 7 or more scales the <F1> selection will be on the menu. • Press <F1> to view scales 7 thorough 12 This will toggle between the scales 1 to 6 and scales 7 to 12. The menu works the same as with the first 6 scales. • Press <F2> to Zero Selected Scale To recalibrate a particular scale, locate the arrow keys to the right of the letter pad and the <Enter> key. The arrow keys move the pointer up and down. Choose the particular scale you want to recalibrate with the pointer; then press <F2> to zero that scale. The menu prompts are replaced by instructions for the next step. Note that the menu title now says, "Scale Zero Calibration Menu." Below the title, you have two instructions: Press F1 after scale settles to zero Esc to exit If you do not wish to zero this scale, press <Esc> to return to the Scale Calibration Menu without making any changes. If you do wish to zero this scale, wait until the scale settles to zero, then press <F1>. Version 8.70 chp2_Eag.doc 03/15/02 1:05:41 PM 2-17 Eagle User’s Manual • Plant Setup Menu Press <F3> to Calibrate Selected Scale Once you have set the zero range of the scale, the next step is to calibrate the scale span. Press <F3>. The menu prompts are replaced by another message: Please enter password Esc to exit You must type in the correct password to make this scale change. Passwords should be given only to those operators authorized to adjust the scales on your plant. This protects the plant from any unwanted tampering with scales. If you do not know the password, press <Esc> to return to the Scale Calibration Menu. If you know the password, type it in and press the <Enter> key. Notice that stars appear in the blank, not the numbers or letters you have entered. This is another security measure to keep the password secret. If you enter an incorrect password, the blank fills with stars and a message appears − "Bad Password." You can try again, or press <Esc> to return to the Scale Calibration Menu. If you enter the correct password, the menu will change to the "Full Scale Calibration Menu", shown below: Full Scale Calibration Menu Esc to exit • Press F1 after scale settles Load the scale to approximately 3/4 of its capacity, either by dropping weight onto it, or by hanging test weights. Make sure you wait for the scale to settle; then press <F1>. The display now changes to allow you to type in the actual weight. Check to make sure it is accurate, and press enter. The Eagle automatically returns you to the Scale Calibration Menu unless there is a problem. If the computer does not return to the Scale Calibration Menu, please call Command Alkon Customer Service Department for assistance. You may calibrate another scale if there are no problems by moving the pointer and beginning the process for the next scale. Refer to the “Scale Calibration Manual” for use of simulated output mode to track the DRO’s. Refer to the “Probe Readout Manual” that came with the Moisture Probe, for use of simulated output mode for Eagle tracking. Press <F4> to Toggle the Date/Event ID If an entry has been added to each scale’s calibration record that represents a nonresettable, non-repeatable Id number. This number will be a random number to be used (along with the Time & Date) to uniquely identify the changes for each scale. This Event Id number will be displayed on the Scale Calibration Menu in the last column. A function key prompt (F4 Key) has been provided to toggle this last column between “Time & Date” and “Event Id”. This Event Id number will be zero (0) initially. Then each time a Zero Calibration or a Full Calibration or a change in any fields is done, it will be assigned a random number. The range of numbers will be 1 to 65535. Anytime the plant file is restored, the Event Id number will be reset to zero if the Event Id number in this plant file is different with the Event Id number assigned in the last changes. 2-18 Version 8.70 03/15/02 1:05:41 PM Eagle User’s Manual • Plant Setup Menu Press <F5> to Edit Scale Configuration If you want to make changes to the Lb/grad or Full scale columns, press F5 = Edit Scale Configuration. You must type in the correct password. The box shows Lb/grad and Full Scale columns highlighted and the menu prompts at the bottom of the screen change. The prompts should look like this: Locate the cursor, a blinking bar located in the top space under the Lb/grad column. Move the cursor with the arrow keys, or by pressing <Enter>. Make changes by typing in new figures. If there are numbers in the blanks that you want to change, you do not have to erase first but simply type over the old numbers. After you have entered all changes, press <F5> to enter the new configuration. When you finish calibrating the plant scales or making changes to Lb/grad and Full Scale columns, you are ready to take care of the next order of business. Press <F10> to return to the Plant Setup Menu. Version 8.70 chp2_Eag.doc 03/15/02 1:05:41 PM 2-19 Eagle User’s Manual Plant Setup Menu Scale Configuration Menu Use the Scale Configuration Menu to assign specific characteristics to your scales. This screen looks similar to the Scale Calibration Menu − the four materials status blocks at the top, the box in the middle, and the menu prompts at the bottom of the screen. The material status blocks tell the operator the status of the materials: aggregate, cement, admix, and water. The status blocks for aggregate and cement show the weight on the scales as well. The water status block will show "Lb" if you are weighing water, and "Gal" if the water is metered. Let's identify each of the columns first; then discuss how to make changes to the configuration. The first two columns are identical to those on the Scale Calibration Menu. • 2-20 Scale Input Numbers optionally up to twelve scales. Note the pointer beside the number. The pointer lets you pick out a particular scale and can be moved as needed by pressing the up or down arrow keys. Version 8.70 03/15/02 1:05:41 PM Eagle User’s Manual Plant Setup Menu • Type of Material Identifies the contents of each weigh up bin. This is where you will assign material types to the scales. Move the cursor to the Scale Input that you wish to modify. Using the <Page Up> or <Page Down> key, you can select the type of material to be used on the selected Scale Input. When you are finished assigning the Scale Input, the material types will be duplicated automatically in the Scale Calibration Menu. • Zero Tolerance Lists the amount of weight that the Eagle will allow on the scales and still consider the scales to be empty. This allows for compensation of small amounts of aggregate or cement left in the weigh up bins. A typical amount for zero tolerance might be a weight equivalent to three scale grads. • Settle Time Controls the number of seconds you will allow the scale to settle before reading a final weight. A typical settle time might be one second. • Attached Bins Covers 12 numbered columns. Enter a <Y> for each bin you have in use. This is where you assign material bins to scales. Each bin can only be assigned to one scale in its class. If you have multiple agg scales, then bin 1 can only be assigned to 1 scale. Note: • These bins match the material names we will assign in the Material Storage section of the Storage Menu. Scale zero interlock?: Y/N If <Y>, the actual tare weights will be printed regardless of whether the scale is within zero tolerance range. If <N>, the words “Tare ZERO” will be printed if the beginning weights is within zero tolerance range. To make changes to the present configuration, move the cursor with either the arrow keys or the <Enter> key. Do not try to type in your own material names. These have been pre-programmed into the Eagle. To choose from the existing list of names, move the cursor into the Type of Material column and line it up with the correct Scale Input number. Then select the material name by pressing the <Page Up> or <Page Down> key. When you come to the desired name (Agg, Cem, Amx, or Wat), press the <Enter> key and move to the next blank. You can also move the cursor by pressing the arrow keys. Changing information in the other highlighted spaces is done by typing in over the existing figures. For quicker entry of numbers, use the numeric keypad to the right of the arrow keys, at the far right of the keyboard. To skip a space, press the arrow keys or the <Enter> key. While making changes in the Attached Bins columns, note that as soon as you press either the <Y> or <N> key, the cursor will move to the next space. Skip spaces with either the arrow key or <Enter> key. To change the letter in the bin, do not erase first but simply type in the desired letter. Press <F5> to record the changes. Press <F10> to return to the Plant Setup Menu. Version 8.70 chp2_Eag.doc 03/15/02 1:05:41 PM 2-21 Eagle User’s Manual Plant Setup Menu Batch Screen Options Use this screen to determine what information will appear at the bottom of your Batch Screen. By changing the numbers in the highlighted blocks located across the middle of the screen, you decide what additional batch data the box will include. Compare the illustration below to your screen. The top half is a partial re-creation of what you will see on the real Batching Screen. You have the material status blocks along the top of the screen. Below this is a large box. As you can see from the headings at the top, this box displays the material used in your batches, target weights, actual weights, and the status of each material as it is weighed out. When a load is being batched, it is this box in the middle of the Batch Screen that shows the status. At the bottom of this box there are five additional lines, which can be set up to include information that your plant might want on the Batching Screen − things like the batch number, mixer time, mixer status, mix ID, batch size, truck number, and truck loading rate. Notice that each line is broken into four sections. Each of these sections is called a field. By changing the numbers in these spaces, or fields, you determine what information will appear in the same space on the Batch Screen. You can enter up to twenty single column fields. This means that the corresponding space on the Batch Screen can hold up to twenty pieces of information. 2-22 Version 8.70 03/15/02 1:05:41 PM Eagle User’s Manual Plant Setup Menu How to Custom Design the Batch Screen Tailoring the Batch Screen to suit the needs of your plant requires two steps. First, identify the information you want in the available spaces. Second, type in the appropriate code numbers. You will need to consult the list of available code numbers. For each number entered in a field, the Eagle will fill that space with a particular bit of information. The list of Field Codes, which is stored in the Help Screen, tells you what title goes with each number. For example, if you type in a 0 in any of these fields, your Batch Screen will show a blank space. If you type in a 5, the Batch Screen will show the title Mix ID along with the mix ID number. If you type in a 3, the Eagle will display the word Driver followed by the driver's name. Now you want to take a look at the result of your work. Press the <F1> key to see how the various fields on the screen will look when the Batching menu or the Batch Setup menu is displayed. Compare the illustration below to your screen. Check over the titles to make sure they are in the order you want. You can always go back to the field screen to make changes, press <F10>. You should remember that the number of the code determines which title appears on the Batch Screen. The field sequence decides the location of the title you are entering. You may want to experiment a little to see which arrangement of the codes you like best. After you have entered the codes into the selected fields or spaces, press <F5> to record them in the Eagle's permanent memory. Version 8.70 chp2_Eag.doc 03/15/02 1:05:41 PM 2-23 Eagle User’s Manual Plant Setup Menu A few of the codes call up information that stretches over two fields instead of one. If you want the delivery address, special instructions, or mix description, you will have to leave the next field to the right blank. Enter in a 0 (zero) so that the extra long field can run over into the next blank field. Look at the following examples. The first shows the fields with a possible combination of code numbers. The second shows how these numbers affect the titles on the actual Batch Screen. As mentioned above, some of the titles stretch over two fields. Note how in the example above, we left the next field to the right blank so that the Mix Description would not get cut off. When you are ready to return to the Master Menu, press <F10>. 2-24 Version 8.70 03/15/02 1:05:41 PM Eagle User’s Manual Plant Setup Menu Batch Setup Screen Options On this screen you will design the Batch Setup Screen. Note that the large box in the center of the screen has four columns with highlighted spaces. You will type in code numbers to determine what information will appear in each of these fields. A field is simply the space where a certain piece of information will appear inside the box on the Batch Setup Screen. There are twelve lines for normal length fields beginning at the top of the box. Some of the codes are for titles that are twice the normal field length. If you are using any of the double-length codes, you will need to place a 0 (zero) in the field just to the right of your double length entry. Note: Please do not use a double length field in the far right column. Refer to the list of codes by pressing the <HELP> key in the upper left hand corner and scrolling through all of the selections to find the information you want on your Batch Setup Screen. You may want to experiment a little as you type in the numbers, arranging the codes so that you have titles in the order you want. Below is an example of an arrangement of batch codes and the resulting look of the Batch Setup Screen. Use this as an example of how columns of numbers translate into an organized Batch Setup Screen on the next page. Version 8.70 chp2_Eag.doc 03/15/02 1:05:41 PM 2-25 Eagle User’s Manual Plant Setup Menu If there are spaces that you will not be using, you can leave them blank by typing a 0 (zero) in the corresponding field. If you want to use a double length code in one of the top twelve lines, you will have to leave the next field to the right blank so that the double-length code will fit. In the examples above, we located the Mix Description (a double-length code) in the top line so that it would be close to the Mix ID. To accommodate this longer field, we left the next field (the fourth field in the top line) blank since mix descriptions are a double length field. To view how the entered fields will display press f1= Preview fields. To return to Plant Setup menu press the ESC key. Admix trims Setting up the correct codes does not have to be confusing. Admix trims are written either in terms of 100% or 1.00%, depending on the admix type. Accelerators such as calcium are trimmed in terms of 1.00 %. All other admixes should be trimmed in terms of 100%. This means that for accelerators, use one of the codes 41 - 52 depending on which bin holds your accelerator. For the rest of the admixes, use the appropriate codes from 61 - 72. In our example, admix #4 was calcium. We wanted to record calcium trims in terms of 1.0 percent, according to the industry standard. So we chose the number 44, the code for the admix in bin #4 with a 1.00% trim. Note that you do not have to tell the Eagle the contents of bin #4. It can read the admix name from the Admix Storage Menu. You simply assign the bin number and the terms of the trim. Continuing our example, admix #1 was Air Entrainer. For air entrainer, we wanted a 100% trim. So we chose the number 61, the code for the admix in bin #1 with a 100% trim. As before, the Eagle will display the name of the admix in bin #1 on the Batch Setup Screen, reading it from the bin assignments on the Admix Storage Menu. 2-26 Version 8.70 03/15/02 1:05:41 PM Eagle User’s Manual Plant Setup Menu These are the only three admixes displayed on the Batch Setup Screen in our example. The reason that none of the other admixes are displayed is that they are not called for in this particular mix design. Looking back at the Batch Setup Screen Options for the Batch Setup Menu, you see that you have included the following codes: 61, 62, 43, 44, 65, and 66. These are the codes for admixes in the remaining six bins. When you call for a different mix design, admixes called for in the new mix design will appear on the screen. For example, you call for a mix design that uses a water reducer and a super plasticizer. If the water reducer was in bin #2, and the super plasticizer was in bin #5, you would see these names appear on the Batch Setup Screen in the same fields where you had entered codes 62 and 65. If these were the only two admixes called for, then calcium in bin #4 and air entrainer in bin #1 would not appear. Assign a code for all admixes that you might want to trim. Admix trim lines appear on the Batch Screen only when called for in a particular mix design. If the admix is not used in a particular mix design, it will not appear. You may want to use the example Batch Setup Screen as a model for your plant. If so, enter in the numbers on your own Batch Setup Options Screen exactly as they appear in the previous example. From there you can make any adjustments that you may want. Once you have entered all the codes in the fields you want, press <F5> to record the configuration. Now go to the actual Batching Menu to see how things turned out. To move from Batch Setup Options Screen to Batch Setup Menu: • Press <F10> twice to get to the Master Menu • Press <F5> to go to Batching/Storage Menu • Press <F5> to go to Batch Setup Menu The Batch Setup Screen with now show the new codes you have just entered. You may want to make further adjustments, now that you have the results in front of you. To move from Batch Setup Menu to Batch Setup Options Screen: • Press <F10> twice to get to the Master Menu • Press <F4> to go to Plant Setup Menu • Highlight Batch Setup Options and press <Enter> The Batch Setup Options Screen displays the Fields and codes again. If you wish, you can make changes now. Remember that if you do make any changes, you must press <F5> before returning to the Plant Setup Menu. Otherwise, the Eagle will not implement your changes. Version 8.70 chp2_Eag.doc 03/15/02 1:05:41 PM 2-27 Eagle User’s Manual Plant Setup Menu Order Entry Titles Note: This screen will ONLY appear if you have Eagle Order Entry/Ticket Printing Paid Option. On this screen you will set up the titles you want at the bottom of your Order Entry Screen. Look at illustration below: The lower part of the box on your screen has 10 highlighted squares. These squares allow you to customize the Eagle Order Entry Screen. You can type in the titles you want here. Once entered, these titles will appear on the Order Entry Menu, followed by blanks. You get to set up the information you want at the bottom of your orders. Just what kind of information would you find useful on this part of the ticket? Although that is up to you to decide, we can offer a suggestion. The Eagle has a set of titles that you can use if you want. These are called Default titles because they are already set up. You can modify them if you want or leave them as they are. Default Titles To install the default titles, press <F2> key. Notice that on your screen these titles are still highlighted. This means that you can change them to suit the needs of your plant. Delete the titles you won't use, or use the space for another title. Press <F5> to record the changes. When you are ready to return to the Plant Setup Menu, press <F10>. 2-28 Version 8.70 03/15/02 1:05:41 PM Eagle User’s Manual Plant Setup Menu Printer & Comm Config If you have Multi-Lane Discharge paid option the printer setup will be located under Multi-Lanes Config on the Plant Setup Menu. There is a printer setup for each lane. The setups work the same as below. If more information is needed refer to Eagle User’s manual Volume 2 of this manual under option 14. This screen is used to connect the Eagle to up to two printers. The printer port choices are shown by pressing <Page Up> or <Page Down> key with the cursor under the port label. The choices are COM1 and COM2 for serial printers, and LPT 1 and LPT 2 for parallel printers. Generally the recordation printer is the primary printer, and it is set to COM1. The delivery ticket printer is set to LPT1 on the secondary printer. When a port is set for LPT1 or LPT2, there is no need to select a BAUD Rate (BAUD Rate is how fast information is sent to the printer). If you are using COM1 or COM2, then place the cursor under BAUD Rate and press <Page Up> or <Page Down> to scroll through the BAUD Rate until you select the one that matches your serial printer. Enter the information and press <F5> to enter the configuration. Press <F10> to return to Plant Setup Menu. These fields will only appear if you enter <Y> in the “Allow Secondary setup with Primary Port?” field. Note: If you have Comm Paid Option, refer to the “Communications” option section for information. Version 8.70 chp2_Eag.doc 03/15/02 1:05:41 PM 2-29 Eagle User’s Manual • 2-30 Plant Setup Menu Allow Secondary setup with Primary Port? With this feature, the Eagle may be configured to use the Secondary setup on the Primary printer. If <Y>, the Secondary Printer port setup fields will disappear, and the Selection Method field will appear. Use the <Page Up> or <Page Down> key to select the method that you want. You have four available methods to choose from: − Setup Field #426 Allows the operator to put Field #426 in the Batch Setup screen and select which ticket setup to use when setting up the batch. The format for field #426 is Ticket Setup: Primary or Ticket Setup: Secondary. Use the <Page Up> or <Page Down> key to toggle between Primary or Secondary. − Local Ticket/Comm Ticket Automatically select s the Primary Ticket Setup for local tickets and the Secondary Ticket Setup for Comm tickets. − Pri Batch/Alt Batch Automatically selects the Primary Ticket Setup for loads batched on the Primary Batch screen and the Secondary Ticket Setup for loads batched on the Alternate Batch screen. − Wet Side/Dry Side Automatically selects the Primary ticket Setup for loads batched on the Wet side of a Wet/Dry plant, and the Secondary Ticket Setup for loads batched on the Alternate Batch screen. Version 8.70 03/15/02 1:05:41 PM Eagle User’s Manual • Plant Setup Menu F1 = Toggle Interface Type The Communications paid option (Option #6) must be enabled to get access to this feature. Pressing the F1 key will toggle the interface type between the traditional CDI serial interface, the Generic TCPIP interface, and the Hanson Premix interface. When the generic TCPIP interface is selected, the screen will look like the example below. For more information about this feature look in Volume II of the Eagle User’s manual under the Communications paid option (Option #6). Version 8.70 chp2_Eag.doc 03/15/02 1:05:41 PM 2-31 Eagle User’s Manual Plant Setup Menu Primary Printer Setup On this screen you design the recordation or delivery ticket depending on which option you have purchased, and upon which printer you have declared as your primary printer. The Recordation ticket is primarily a record of batch weights. The default length for a recordation ticket is 33 lines, or half the length of a normal 8 1/2" by 11" (size A) sheet of paper. There is space on the recordation ticket for such information as mix ID, mix description, customer ID, order number, and ticket number, etc. The default recordation format has been set up to comply with the requirements of NRMCA, NIST Handbook 44, and the U.S. Army Corps of Engineers standards. The Delivery ticket can print out even more information because it is normally set to 66 lines long, which is the full length of a standard sheet of paper. You can include much more, including specific billing information, a list of extra products, and more detailed order information. Below is an illustration of the screen that has been set up to the default Recordation formats. Compare it to your own screen. Note: To activate the install default values hold down the <Alt> key and press the <F2> key. The Primary Printer Setup Screen shows the printouts one line at a time. To move down to the next line, or up to the previous line, press the <Page Up> or <Page Down> key. Let's discuss each of these lines: • 2-32 Line #: 01 of 33 The number 01 is the current line being displayed, and number 33 is the printout length that you set. Line #: 01 of 33 will increase by one to Line #: 02 of 33 if you move down. If there is anything written on these lines, you will see numbers displayed in Column, another number in Field #, another in Length, and a brief description of the item in Description. When Line #: 01 of 33 changes to Line #: 02 of 33, it will also display Line #: 02 above the sample line. Version 8.70 03/15/02 1:05:41 PM Eagle User’s Manual Plant Setup Menu • Printer will STOP at Line #: 5 until Load Complete The printer will print the information on Line #: 1 and stop at Line #: 5. It will not print Line #: 5 because the line contains some batch dependent field number. In order to get the Line # to increase, do not put batch parameters in the upper lines for example: batch duration, actual weight, etc. • Company Info Press F5 = EDIT Functions to set up this information. Move the cursor to the area that you want to modify. • Summarize multiple drops?. . .Y/N If <Y>, it will print ONLY one batch result for all multiple drops. If <N>, it will print the batch result for each multiple drop. • Column There are 80 columns or spaces in a line, moving from left to right. There are 66 lines in the standard 8 1/2" by 11" (size A) sheet of paper. The number in the column tells you where the item begins on the line. For example, the first number underneath the title is a 1. This means that the first item begins in column 1 (all the way over on the left side of the paper). The second item begins on column 45, which is 45 spaces over to the right. The third item begins on column 60, or 60 spaces over to the right side of the paper. Look below at what we just talked about. Column 1 2 → 45 → 60 → 80 Line 1 ↓ ↓ ↓ Line 33 ↓ ↓ ↓ Line 66 8 1/2" by 11" (size A) sheet of paper • Field # The number that you type under this title determines what item appears on the printout. For example, the first item on line one of the default recordation printout is field # 320. Item # 320 is the words Batch Record:. The next Field # is 152, which tells the Eagle to print out the current time. Field # 189, the third item on line #01, will print out the words Demo Mode Notice whenever the Eagle batches in demo mode. Each number that you type under the Field # title has a specific meaning, a specific item that the Eagle will put on the recordation ticket printout. For a complete and up-to-date list of all available Field #s and what each number means, press your <HELP> key. Version 8.70 chp2_Eag.doc 03/15/02 1:05:41 PM 2-33 Eagle User’s Manual Plant Setup Menu • Length The numbers in this column tell you how many spaces each Field # takes up. If you change the field length, you can put more information on the line. If you begin a new field before the end of another field, the computer will cut it off or blank the overlap area. On the line, the numbers are right justify, and the letters are left justify. All you do is type in the Field # you want, and the Eagle will tell you how long it is. For example Field # 320 is 13 characters long. Field # 152 is eight spaces long. Field # 189 is 20 characters. You will not have to type in the length of your fields. • Description This column tells you what the field # translates to. Each field # tells the Eagle to print out a particular item. The description helps you make sure that you put in the right field #. • Line#: 1 It is the current line being displayed. It represents the sample line. • Batch Record: SSSSSSSS SSSSSSSSSSSSSSSSS> In this area it is called the sample line. The sample line shows a sample of how the fields in the upper portion of the screen are placed on the line. Notice that in line one of our example, the word, Batch Record:, appears all the way to the left of the line, beginning on column 1. Further over you see a group of letters, SSSSSSSS. These letters tell you what part of the line your second field will occupy. Since the item is the current time, it will vary for each ticket printed. Since the time will vary, the Eagle uses the letters to show you where the time will be. When you print out a recordation ticket, you will get an actual time not a group of letters. For all field #s that represent messages that can change, the space they occupy on the line will be represented by groups of letters or symbols - see next page under the "Explanation of Letters and Symbols" section. This is not a mistake by the computer. When you print out an actual ticket, the information will appear, as it should. Press <F4> to print out a test ticket. The test ticket will substitute groups of capital letters for the actual time, or mix ID, etc. The printout will help you to see the exact location of each field. Look at the examples on the next page. It is what is showing on the computer screen. 2-34 Version 8.70 03/15/02 1:05:41 PM Eagle User’s Manual Plant Setup Menu On the actual ticket it will print the following information: Batch Record: 12:40 PM Demo Mode Notice Explanation of Letters and Symbols • S = String characters This character doesn't require field justification. • A = Alpha characters The numbers are right justify, and the letters are left justify. • N = Tare Type It can be numeric or the text string ZERO. If ending tare weight is within zero tolerance, the word “ZERO” will be printed. Otherwise, the actual weights will be printed. • @ = Control character If in column, it sends column number to printer as a character. This is true only if field # is set to 308. • + = Comm field A field produced by another computer system. In the Eagle's case it is via modem. • * = Trim field Number in formatted field. Version 8.70 chp2_Eag.doc 03/15/02 1:05:41 PM 2-35 Eagle User’s Manual • Plant Setup Menu Installing Default Printouts The Eagle offers you a default setting for both types of printouts. To select one of the Eagle's default printouts, while holding down the <Alt> key, press <F2> in the Primary or Secondary Printer Setup Menu. A default setting is one that is already set up for you at our factory. You may want to look at it first before designing your own printout since it might be close to what you want for your plant. You can also create your own printout by making changes to the default printout. A long narrow box with three options replaces the menu prompts at the bottom of the screen: You can select any of the three choices above, but note that you cannot use the Delivery Ticket setup option or the Comm Ticket setup option effectively without purchasing the paid options. Use the arrow keys to highlight the option you want to select, then press the <Enter> key. The original menu prompts will return to the bottom of the screen. • Editing a Line To edit a line, press <F5>. The prompts at the bottom of the screen will be replaced by a message: Type in the correct password - For more information on password, look under the "Password" section later in this chapter. When you enter the correct password, the prompt at the bottom of the screen will change again. Using the arrow keys to highlight the option you want. Press the <Enter> key to select it. If you do not want to edit the printout setup, press the <Esc> key to return to the Primary Printout Setup Menu. − Add a blank line This will insert a single blank line at the present line number and shift all lines down one line. Insert a line if you want to make an addition without having to retype every line below it. After you add a blank line, go back and choose to edit the line. Now you can write in the information you want. Note: 2-36 Version 8.70 03/15/02 1:05:41 PM Line 33 is deleted if you only have 33 lines. Eagle User’s Manual Plant Setup Menu − Change this line Edit the line currently displayed in the box by selecting this option. Make changes by typing over the existing information. Column information does not need to be in sequence. To blank out an item, use the space bar. You can move the cursor by pressing the arrow keys. Once you change a number in the Field column, the information in Length and Description spaces automatically change. After you have made all changes to the line, press <F5> to enter that line into the Eagle's memory. − Delete this line Deleting the line currently displayed in the main box, moving all the lines that come after it up one line, and inserting a blank line at the bottom. When you are ready to return to the Plant Setup Menu, press <F10>. Version 8.70 chp2_Eag.doc 03/15/02 1:05:41 PM 2-37 Eagle User’s Manual Plant Setup Menu Secondary Printer Setup The ONLY difference is that the Secondary Printer Setup Screen does not have Company Information. It does the same function as the Primary Printout Setup Screen does. Below is an illustration of the screen that has been set for default Recordation printout. Note: To activate the install default values hold down the <Alt> key and press the <F2> key. 2-38 Version 8.70 03/15/02 1:05:41 PM Eagle User’s Manual Plant Setup Menu Aggregate Batching Use this menu to determine the proper bin for each aggregate material by selecting the gate you want to draw from a selected bin. Your screen should look like this: In the upper half of the screen is a large box with several columns. Below the box is a title, "Aggregate Batching Gate Selections." If you ever wonder where you are, look for a title in this same part of the screen. Below this title are two menu prompts. Now look at the columns inside the box. See that the spaces under the first two columns are not highlighted. You cannot make changes to these columns on this screen. In order to change these columns you will have to go to the Batching Menu. • Bin Lists 12 aggregate bins. This is the maximum number. You do not need to use them all. These are bins for storage inside computer. • Call for The contents of each bin are listed in this column. These names describe each aggregate so that you will not forget what is in each bin. Refer to the "Aggregate Storage Menu" section in Chapter Four on how to change the names in this column. • Fast Batch Open Gates In Fast Batch you can open up to four gates per aggregate. When you call up this screen, the cursor will be located in the first space under this column. If the cursor is not in the Fast Batch column, move it in place using the arrow keys. Enter the new gate numbers by typing in the spaces provided. If there are already numbers in the columns, do not worry about erasing them first. Just type over them. Use the space bar to clear out a column that you will not be using. Press the <Enter> key or arrow keys to skip spaces that you do not want to change. Version 8.70 chp2_Eag.doc 03/15/02 1:05:41 PM 2-39 Eagle User’s Manual Plant Setup Menu • Fast Cutoff Weight This is the scale weight prior to the target weight that the fast gates will shut. For example, if you enter a fast cutoff of 500 pounds, the fast batch gates will stay open until the weight on the scales is within 500 pounds of the target weight. Then the fast gates will close, leaving only the final batch gates open to batch the last 500 pounds. This way, you can batch quickly and still have an accurate final weigh up. • Final Batch Contains only two spaces for open gates. Most final batching is accomplished with only one gate, unless gates are exceptionally small or the target weights are very high. Enter the numbers of the gates you will use to weigh up the last part of the batch. When you have made all your changes to the columns inside the box, look down to the menu prompts at the bottom of the screen. Press <F5> to record the changes. Press <F10> to return to the Plant Setup menu. 2-40 Version 8.70 03/15/02 1:05:41 PM Eagle User’s Manual Plant Setup Menu Aggregate Freefall Use this screen to adjust your freefall compensation values for each aggregate. The Eagle drops material into the weigh bin, monitoring the scale. When the weight hits the target, the Eagle closes the gates. Because the gates are above the scale, there is still a certain amount of material in the air when the gates close. It is falling but has not reached the scales. This is called freefall weight. If the Eagle weighs right up to the target weight before closing the gates, the freefall weight will consistently push the actual weight over the limit. By entering compensation values for freefall, you set the Eagle to close its gates early so that the freefall will bring the weight up to the target without going over. Let's take a look at an example of what happens when you do not make freefall compensations. Assume we have a 10 yard aggregate weigh hopper with an overhead aggregate storage bin. For a one yard batch, the Eagle needs to weigh up 2000 pounds of material. The Eagle opens the overhead gate, and material begins to fall. The Eagle closes the gate when it sees the scale hit 2000 pounds. However, the scale reading continues to climb. The Eagle has overshot its target weight. On most 10 yard plants, this overshoot will be about 1500 pounds. This 1500 pounds of overshoot represents the freefall − material past the gate but not yet on the top of the pile in the weigh hopper when the scale read 2000 pounds, and the gates shut. This material did not register until it hits the top of the pile in the weigh hopper. In order to have batched the original 2000 pounds, the Eagle should have allowed for 1500 pounds of the freefall compensation. This means the Eagle should have closed the gate 1500 pounds early. With the Eagle, we can allow for this freefall compensation. Another example, let's batch 10 yards of this material, which will be 20,000 pounds, on the same plant. The Eagle opens the overhead gate, and material begins to fall. The Eagle closes the gate when the scale hits 20,000 pounds. However, the scale reading continues to climb. This time the Eagle will probably end up with about 500 pounds of overshoot. Again, this represents the material that had fallen from the overhead bin when the scale read 20,000 pounds, yet had not reached the top of the pile in the weigh hopper. In this case, the Eagle needs 500 pounds of freefall compensation for an accurate batch. Note in the above examples, the variation of the freefall compensation weight with batch size. What accounts for this difference? Basically, the difference is accounted for in the movement of the top of the pile in the weigh hopper. In the small batch, the distance between the overhead gate and the top of the material heap is quite large (10 - 15 feet). In the larger batch, this distance is substantially less (two - four feet). The difference in distances accounts for a difference in amounts of material in freefall. Smaller batches have more material in freefall than do larger batches. So, the result is that the amount of freefall compensation will vary with batch size: Large batch → Short freefall distance → Small compensation value Small batch → Large freefall distance → Large compensation value Version 8.70 chp2_Eag.doc 03/15/02 1:05:41 PM 2-41 Eagle User’s Manual Plant Setup Menu When you select the Aggregate Freefall Compensation Menu, your screen should look like the illustration below. Look at the screen. The main box has five columns with the SmartDrop option. The first two are identical to the Aggregate Batching Gate Selections Menu. • Bin Lists 12 aggregate bins. This is the maximum number. You do not need to use them all. The bins will not necessarily match your physical plant. These are bins for storage inside the computer. • Call for The contents of each bin are listed in this column. Refer to the "Aggregate Storage Menu" section in Chapter Four on how to change the names in this column. To enter new figures in the highlighted columns, move the cursor with the arrow keys or by pressing the <Enter> key until the cursor is in a blank that you want to change. Then type in the new numbers. To move to the next space, press the <Enter> key, or the appropriate arrow key. Note: If Smart Drop is set to <0> in the Extended Plant Option menu the Smart Drop column will show on the Aggregate Freefall Compensation screen. • 2-42 Smart Drop A timed drop when the load size is less than the small Freefall value to prevent multiple jogs to the target. By entering a learn rate at the bottom of the smart drop rate column a drop rate will be calculated and updated with each batch of that material. To disable a bin set the Smart Drop rate to zero. Learning will not effect it. Version 8.70 03/15/02 1:05:41 PM Eagle User’s Manual Plant Setup Menu • Average Weight Per Batch Enter the typical amount of each aggregate you use per batch. To derive this figure, take some common mixes and multiply each aggregate amount by your normal load size. Then find the average weight for each of the aggregates used. This figure will tell the Eagle whether to make a large or small batch compensation, depending on how far the target weight in a given batch is above or below the mid point of this average figure. The Eagle divides this number in half and considers targets above this point "Large batches", and below this point "Small batches". • Small Batch Compensation Enter an approximate freefall weight in a small batch. Remember that small batch compensations are greater than large batch compensations because the small batches do not fill the bin up as high. The bigger the gap between the gate and the bin level, the greater the freefall weight will be. Use the chart below to enter approximate compensation values, according to the size of your weigh bin. • Large Batch Compensation Enter an approximate freefall weight for a large load. As explained above, the large batch compensation is smaller than compensation for a small batch. Use the chart below to enter approximate compensation values, according to the size of your weigh bin. Batcher Capacity Yds Compensation (Lbs) Small Load Large Load 2 500 - 700 150 - 450 4 600 - 800 150 - 450 5 700 - 1000 150 - 450 8 800 - 1200 150 - 450 10 1000 - 1500 200 - 500 12 1150 - 1700 300 - 600 This table lists approximate compensation values based on batcher size. These numbers should be used as starting points during initial installation. The Eagle's learning feature will adjust to make compensation values more accurate. The Eagle has a learning feature that will help it to get closer and closer to the actual compensation weight of freefall in a small and large batch. • Learn Rate Learn Rate is defined as how quickly the Eagle compensates for plant or material flow errors. The Learn Rate can be anywhere between 0% to 99%. If your Learn Rate is 0%, it means that the Eagle has nothing to adjust. 99% is the fastest the Eagle can learn. Enter a number into the highlighted blank. The larger the number (typically 50%) the faster the Eagle will adjust the freefall compensation values you have given it. Once the compensation values have been adjusted, and you are consistently hitting the target weights, turn the Learn Rate down (typically 10%) so that it does not overcorrect when you have sudden variations in plant conditions. When you have made all your changes to the columns, press <F5> to record the changes. To return to the Plant Setup menu, press <F10>. Version 8.70 chp2_Eag.doc 03/15/02 1:05:41 PM 2-43 Eagle User’s Manual Plant Setup Menu Aggregate Jogging Use this menu to set up the time and target weights of small and large jogs for your aggregate weigh up. The Aggregate Jogging Data Menu on your screen should resemble the example below: As explained earlier, a jog is a slight, timed opening of the bin gates to close the gap between the actual and the target weight. The Eagle can make as many jogs as necessary to come within the acceptable range of the target weight. The first two columns in the box are similar to Aggregate Batching and Aggregate Freefall menus, showing bin numbers and descriptions of each aggregate. 2-44 • Jog Controls the jogging feature of the Eagle. A jog is a rapid open and close of the gate to allow only a small amount of material through. With jogging you can get closer to your target weight if the Eagle batches too low. Jogging status determines whether or not a gate may be jogged by the Eagle. Any mechanical gate can be jogged, but screw fed gates should not be jogged because electric motors will overheat and trip the thermal overload. For now, turn on the Jogging feature with <Y>; turn it off with <N>. • Small Jog Enter a target weight in pounds and a time in this column. The Eagle learns to jog in seconds. Please note the pounds will not change, but the seconds will. Since aggregate scales are usually in 40 pound graduations, the typical small jog is one scale grad, or 40 lbs. For the time, enter a pulse time that will allow the target weight to drop. A typical small jog time might be .15 seconds. Version 8.70 03/15/02 1:05:41 PM Eagle User’s Manual Plant Setup Menu • Large Jog Enter a larger target weight and another approximate open time for the gate. A typical weight for a large jog is three grads, or in this case 120 lbs. A typical pulse time might be .30 seconds. These times are approximations; the Eagle will adjust them to drop the desired jog weight. • Learn Rate Learn Rate is defined as how quickly the Eagle compensates for plant or material flow errors. The Learn Rate can be anywhere between 0% to 99%. If your Learn Rate is 0%, it means that the Eagle has nothing to adjust. 99% is the fastest the Eagle can learn. Enter a number into the highlighted blank. The larger the number (typically 50%) the faster the Eagle will adjust the open time to jog out the target weight you have selected. Once the Eagle has adjusted the jog times and you are consistently getting the jog weights you want, turn the Learn Rate down (typically 10%) so that it does not overcorrect when you have sudden variations in plant conditions. Press <F5> to record into the Eagle's memory. To return to the Plant Setup Menu, press <F10>. Version 8.70 chp2_Eag.doc 03/15/02 1:05:41 PM 2-45 Eagle User’s Manual Plant Setup Menu Cement Batching Use this menu to set the gates you will use for batching cements. When you select this menu, your screen should look like the illustration below: In the upper half of the screen is a large box with several columns. Below the box is a title, "Cement Batching Gate Selections." If you ever wonder where you are, look for a title in this same part of the screen. Below this title are two menu prompts. Now look at the columns inside the box. See that the spaces under the first two columns are not highlighted. You cannot make changes to these columns on this screen. In order to change these columns you will have to go to the Batching Menu. 2-46 • Bin Lists 12 cement bins. This is the maximum number. You do not need to use them all. The bins should match your physical plant. • Call for The contents of each bin are listed in this column. These names describe each cement so that you will not forget what is in each bin. Refer to the "Cement Storage Menu" section in Chapter Four on how to change the names in this column. • Fast Batch Open Gates In Fast Batch you can open up to four gates per cement. When you call up this screen, the cursor will be located in the first space under this column. If the cursor is not in the Fast Batch column, move it in place using the arrow keys. Enter the new gate numbers by typing in the spaces provided. If there are already numbers in the columns, do not worry about erasing them first. Just type over them. Use the space bar to clear out a column that you will not be using. Press the <Enter> key or arrow keys to skip spaces that you do not want to change. Version 8.70 03/15/02 1:05:41 PM Eagle User’s Manual Plant Setup Menu • Fast Cutoff Weight This is the scale weight prior to the target weight that the fast gates will shut. For example, if you enter a fast cutoff of 500 pounds, the fast batch gates will stay open until the weight on the scales is within 500 pounds of the target weight. Then the fast gates will close, leaving only the final batch gates open to batch the last 500 pounds. This way, you can batch quickly and still have an accurate final weigh up. If the Fast Cutoff for a material is set to zero, the Fast Fill gates will jog with the Final Fill gates any time a large or small jog is executed. • Final Batch Contains only two spaces for open gates. Most final batching is accomplished with only one gate, unless gates are exceptionally small or the target weights are very high. Enter the numbers of the gates you will use to weigh up the last part of the batch. When you have made all your changes to the columns inside the box, look down to the menu prompts at the bottom of the screen. Press <F5> to record the changes. Press <F10> to return to the Plant Setup Menu. Version 8.70 chp2_Eag.doc 03/15/02 1:05:41 PM 2-47 Eagle User’s Manual Plant Setup Menu Cement Freefall Use this screen to adjust your freefall compensation values for each cement. The Eagle drops material into the weigh bin, monitoring the scale. When the weight hits the target, the Eagle closes the gates. Because the gates are above the scale, there is still a certain amount of material in the air when the gates close. It is falling but has not reached the scales. This is called freefall weight. If the Eagle weighs right up to the target weight before closing the gates, the freefall weight will consistently push the actual weight over the limit. By entering compensation values for freefall, you set the Eagle to close its gates early so that the freefall will bring the weight up to the target without going over. Let's take a look at an example of what happens when you do not make freefall compensations. Assume we have a 10 yard cement weigh hopper with an overhead cement storage bin. For a one yard batch, the Eagle needs to weigh up 600 pounds of material. The Eagle opens the overhead gate and material begins to fall. The Eagle closes the gate when it sees the scale hit 600 pounds. However, the scale reading continues to climb. The Eagle had overshot our target weight. On most 10 yard plants, this overshoot will be about 200 pounds. This 200 pounds of overshoot represents the freefall − material past the gate but not yet on the top of the pile in the weigh hopper when the scale read 600 pounds, and the gates shut. This material did not register until it hit the top of the pile in the weigh hopper. In order to have batched the original 600 pounds, the Eagle should have allowed for 200 pounds of the freefall compensation. This means the Eagle should have closed the gate 200 pounds early. With the Eagle, we can allow for this freefall compensation. Another example, let's batch 10 yards of this material, which will be 6000 pounds, on the same plant. The Eagle opens the overhead gate, and material begins to fall. The Eagle closes the gate when the scale hits 6000 pounds. However, the scale reading continues to climb. This time the Eagle will probably end up with about 100 pounds of overshoot. Again, this represents the material that had fallen from the overhead bin when the scale read 6000 pounds, yet had not reached the top of the pile in the weigh hopper. In this case, the Eagle needs 100 pounds of freefall compensation for an accurate batch. Note in the above examples, the variation of the freefall compensation weight with batch size. What accounts for this difference? Basically, the difference is accounted for in the movement of the top of the pile in the weigh hopper. In the small batch, the distance between the overhead gate and the top of the material heap is quite large (10 - 15 feet). In the larger batch, this distance is substantially less (two - four feet). The difference in distances accounts for a difference in amounts of material in freefall. Smaller batches have more material in freefall than do larger batches. So, the result is that the amount of freefall compensation will vary with batch size: 2-48 Large batch → Short freefall distance → Small compensation value Small batch → Large freefall distance → Large compensation value Version 8.70 03/15/02 1:05:41 PM Eagle User’s Manual Plant Setup Menu When you select the Cement Freefall Compensation Menu, your screen should look like the illustration below. Look at the screen. The main box has five columns. The first two are identical to the Cement Batching Gate Selections Menu. • Bin Lists 12 cement bins. This is the maximum number. You do not need to use them all. The bins should match your physical plant. • Call for The contents of each bin are listed in this column. Refer to the "Cement Storage Menu" section in Chapter Four on how to change the names in this column. To enter new figures in the highlighted columns, move the cursor with the arrow keys or by pressing the <Enter> key until the cursor is in a blank that you want to change. Then type in the new numbers. To move to the next space, press the <Enter> key, or the appropriate arrow key. Note: If Smart Drop is set to <Y> in the Extended Plant Option menu the Smart Drop column will show on the Cement Freefall Compensation screen. • Smart Drop rate By entering a learn rate on the bottom of the Smart Drop column a drop rate will be entered and updated with each batch of that material. If more than one gate is used to batch the material all gates will open in the Smart Drop mode even if the target is less than the fast cut off for the gates. To disable a bin set the Smart Drop rate to zero. Learning will not effect it. Version 8.70 chp2_Eag.doc 03/15/02 1:05:41 PM 2-49 Eagle User’s Manual Plant Setup Menu • Average Weight Per Batch Enter the typical amount of each cement you use per batch. To derive this figure, take some common mixes and multiply each cement amount by your normal load size. Then find the average weight for each of the cements used. This figure will tell the Eagle whether to make a large or small batch compensation, depending on how far the target weight in a given batch is above or below the mid point of this average figure. The Eagle divides this number in half and considers targets above this point "Large batches", and below this point "Small batches". • Small Batch Compensation Enter an approximate freefall weight in a small batch. Remember that small batch compensations are greater than large batch compensations because the small batches don't fill the bin up as high. The bigger the gap between the gate and the bin level, the greater the freefall weight will be. Use the chart below to enter approximate compensation values, according to the size of your weigh bin. • Large Batch Compensation Enter an approximate freefall weight for a large load. As explained above, the large batch compensation is smaller than compensation for a small batch. Use the chart below to enter approximate compensation values, according to the size of your weigh bin. Batcher Capacity Yds Compensation (Lbs) Small Load Large Load 2 100 - 300 50 - 150 4 100 - 300 50 - 150 5 150 - 350 50 - 150 8 150 - 350 50 - 150 10 200 - 400 100 - 200 12 250 - 500 100 - 300 This table lists approximate compensation values based on batcher size. These numbers should be used as starting points during initial installation. The Eagle's learning feature will adjust to make compensation values more accurate. The Eagle has a learning feature that will help it to get closer and closer to the actual compensation weight of freefall in a small and large batch. • Learn Rate Learn Rate is defined as how quickly the Eagle compensates for plant or material flow errors. The Learn Rate can be anywhere between 0% to 99%. If your Learn Rate is 0%, it means that the Eagle has nothing to adjust. 99% is the fastest the Eagle can learn. Enter a number into the highlighted blank. The larger the number (typically 50%) the faster the Eagle will adjust the freefall compensation values you have given it. Once the compensation values have been adjusted, and you are consistently hitting the target weights, turn the Learn Rate down (typically 10%) so that it does not overcorrect when you have sudden variations in plant conditions. When you have made all your changes to the columns, press <F5> to record the changes. To return to the Plant Setup Menu, press <F10>. 2-50 Version 8.70 03/15/02 1:05:41 PM Eagle User’s Manual Plant Setup Menu Cement Jogging Use this menu to set up the time and target weights of small and large jogs for your cement weigh up. The Cement Jogging Data Menu on your screen should resemble the example below: As explained earlier, a jog is a slight, timed opening of the bin gates to close the gap between the actual and the target weight. The Eagle can make as many jogs as necessary to come within the acceptable range of the target weight. The first two columns in the box are similar to Cement Batching and Cement Freefall menus, showing bin numbers and descriptions of each cement. • Jog Controls the jogging feature of the Eagle. A jog is a rapid open and close of the gate to allow only a small amount of material through. With jogging you can get closer to your target weight if the Eagle batches too low. Jogging status determines whether or not a gate may be jogged by the Eagle. Any mechanical gate can be jogged, but screw fed gates should not be jogged because electric motors will overheat and trip the thermal overload. For now, turn on the Jogging feature with <Y>; turn it off with <N>. Note: If the Fast Cutoff for a material is set to zero, the Fast Fill gates will jog with the Final Fill gates any time a large or small jog is executed. See Fast Cutoff Weight under the Cement Batching section for further explanation. Version 8.70 2-51 chp2_Eag.doc 03/15/02 1:05:41 PM Eagle User’s Manual Plant Setup Menu • Small Jog Enter a target weight in pounds and a time in this column. The Eagle learns to jog in seconds. Please note the pounds will not change, but the seconds will. Since cement scales are usually in 6 pound graduations, the typical small jog is one scale grad, or 6 lbs. For the time, enter a pulse time that will allow the target weight to drop. A typical small jog time might be .15 seconds. • Large Jog Enter a larger target weight and another approximate open time for the gate. A typical weight for a large jog is three grads, or in this case 18 lbs. A typical pulse time might be .30 seconds. These times are approximations; the Eagle will adjust them to drop the desired jog weight. • Learn Rate Learn Rate is defined as how quickly the Eagle compensates for plant or material flow errors. The Learn Rate can be anywhere between 0% to 99%. If your Learn Rate is 0%, it means that the Eagle has nothing to adjust. 99% is the fastest the Eagle can learn. Enter a number into the highlighted blank. The larger the number (typically 50%) the faster the Eagle will adjust the open time to jog out the target weight you have selected. Once the Eagle has adjusted the jog times and you are consistently getting the jog weights you want, turn the Learn Rate down (typically 10%) so that it does not overcorrect when you have sudden variations in plant conditions. Press <F5> to record into the Eagle's memory. To return to the Plant Setup Menu, press <F10>. 2-52 Version 8.70 03/15/02 1:05:41 PM Eagle User’s Manual Plant Setup Menu Water Freefall From the Plant Setup Menu, move the highlight bar to Water Freefall and press <Enter>. Use this screen to adjust your freefall compensation values for each water. The Eagle drops material into the weigh bin, monitoring the scale. When the weight hits the target, the Eagle closes the gates. Because the gates are above the scale, there is still a certain amount of material in the air when the gates close. It is falling but has not reached the scales. This is called freefall weight. If the Eagle weighs right up to the target weight before closing the gates, the freefall weight will consistently push the actual weight over the limit. By entering compensation values for freefall, you set the Eagle to close its gates early so that the freefall will bring the weight up to the target without going over. Let's take a look at an example of what happens when you do not make freefall compensations. Assume we have a 10 yard water weigh hopper with an overhead water storage bin. For a one yard batch, the Eagle needs to weigh up 200 pounds of water. The Eagle opens the overhead gate and material begins to fall. The Eagle closes the gate when it sees the scale hit 200 pounds. However, the scale reading continues to climb. The Eagle had overshot our target weight. On most 10 yard plants, this overshoot will be about 50 pounds. This 50 pounds of overshoot represents the freefall − material past the gate but not yet on the top of the pile in the weigh hopper when the scale read 200 pounds, and the gates shut. This material did not register until it hit the top of the pile in the weigh hopper. In order to have batched the original 200 pounds, the Eagle should have allowed for 50 pounds of the freefall compensation. This means the Eagle should have closed the gate 50 pounds early. With the Eagle, we can allow for this freefall compensation. Another example, let's batch 10 yards of this material, which will be 2000 pounds, on the same plant. The Eagle opens the overhead gate, and material begins to fall. The Eagle closes the gate when the scale hits 2000 pounds. However, the scale reading continues to climb. This time the Eagle will probably end up with about 10 pounds of overshoot. Again, this represents the material that had fallen from the overhead bin when the scale read 2000 pounds, yet had not reached the top of the pile in the weigh hopper. In this case, the Eagle needs 10 pounds of freefall compensation for an accurate batch. Note in the above examples, the variation of the freefall compensation weight with batch size. What accounts for this difference? Basically, the difference is accounted for in the movement of the top of the pile in the weigh hopper. In the small batch, the distance between the overhead gate and the top of the material heap is quite large (10 - 15 feet). In the larger batch, this distance is substantially less (two - four feet). The difference in distances accounts for a difference in amounts of material in freefall. Smaller batches have more material in freefall than do larger batches. So, the result is that the amount of freefall compensation will vary with batch size. Large batch → Short freefall distance → Small compensation value Small batch → Large freefall distance → Large compensation value Version 8.70 chp2_Eag.doc 03/15/02 1:05:41 PM 2-53 Eagle User’s Manual Plant Setup Menu When you select the Water Freefall Compensation Menu, your screen should look like the illustration below. The main box has five columns. Note: If you say <Y> to "Weighed water?" in the General Plant Options, you will see this menu in the Plant Setup Menu. • Bin Lists 12 water bins. This is the maximum number. You do not need to use them all. The bins should match your physical plant. • Call for The contents of each bin are listed in this column. Refer to the "Water Storage Menu" section in Chapter Four on how to change the names in this column. To enter new figures in the highlighted columns, move the cursor with the arrow keys or by pressing the <Enter> key until the cursor is in a blank that you want to change. Then type in the new numbers. To move to the next space, press the <Enter> key, or the appropriate arrow key. • 2-54 Average Weight Per Batch Enter the typical amount of each cement you use per batch. To derive this figure, take some common mixes and multiply each water amount by your normal load size. This figure will tell the Eagle whether to make a large or small batch compensation, depending on how far the target weight in a given batch is above or below the mid point of this average figure. The Eagle divides this number in half and considers targets above this point "Large batches", and below this point "Small batches". Version 8.70 03/15/02 1:05:41 PM Eagle User’s Manual Plant Setup Menu • Small Batch Compensation Enter an approximate freefall weight in a small batch. Remember that small batch compensations are greater than large batch compensations because the small batches don't fill the bin up as high. The bigger the gap between the gate and the bin level, the greater the freefall weight will be. Use the chart on the next page to enter approximate compensation values, according to the size of your weigh bin. • Large Batch Compensation Enter an approximate freefall weight for a large load. As explained above, the large batch compensation is smaller than compensation for a small batch. Use the chart below to enter approximate compensation values, according to the size of your weigh bin. Batcher Capacity Yds Compensation (Lbs) Small Load Large Load 2 10 - 30 5 - 15 4 10 - 30 5 - 15 5 15 - 35 5 - 15 8 15 - 35 5 - 15 10 25 - 50 10 - 20 12 30 - 60 10 - 30 This table lists approximate compensation values based on batcher size. These numbers should be used as starting points during initial installation. The Eagle's learning feature will adjust to make compensation values more accurate. The Eagle has a learning feature that will help it to get closer and closer to the actual compensation weight of freefall in a small and large batch. • Learn Rate Learn Rate is defined as how quickly the Eagle compensates for plant or material flow errors. The Learn Rate can be anywhere between 0% to 99%. If your Learn Rate is 0%, it means that the Eagle has nothing to adjust. 99% is the fastest the Eagle can learn. Enter a number into the highlighted blank. The larger the number (typically 50%) the faster the Eagle will adjust the freefall compensation values you have given it. Once the compensation values have been adjusted, and you are consistently hitting the target weights, turn the Learn Rate down (typically 10%) so that it does not overcorrect when you have sudden variations in plant conditions. When you have made all your changes to the columns, press <F5> to record the changes. o return to the Plant Setup menu, press <F10>. Version 8.70 chp2_Eag.doc 03/15/02 1:05:41 PM 2-55 Eagle User’s Manual Plant Setup Menu Water Jogging Data Note: If you say <Y> to "Weighed water?" in the General Plant Options, you will see this menu in the Plant Setup Menu. Use this menu to set up the time and target weights of small and large jogs for your cement weigh up. The Water Jogging Data Menu on your screen should resemble the example below: As explained earlier, a jog is a slight, timed opening of the bin gates to close the gap between the actual and the target weight. The Eagle can make as many jogs as necessary to come within the acceptable range of the target weight. The first two columns in the box are similar to Water Freefall menu, showing bin numbers and descriptions of each water. 2-56 • Jog Controls the jogging feature of the Eagle. A jog is a rapid open and close of the gate to allow only a small amount of material through. With jogging you can get closer to your target weight if the Eagle batches too low. Jogging status determines whether or not a gate may be jogged by the Eagle. Any mechanical gate can be jogged, but screw fed gates should not be jogged because electric motors will overheat and trip the thermal overload. For now, turn on the Jogging feature with <Y>; turn it off with <N>. • Small Jog Enter a target weight in pounds and a time in this column. The Eagle learns to jog in seconds. Please note the pounds will not change, but the seconds will. Since water scales are usually in 6 pound graduations, the typical small jog is one scale grad, or 6 lbs. For the time, enter a pulse time that will allow the target weight to drop. A typical small jog time might be .15 seconds. Version 8.70 03/15/02 1:05:41 PM Eagle User’s Manual Plant Setup Menu • Large Jog Enter a larger target weight and another approximate open time for the gate. A typical weight for a large jog is three grads, or in this case 18 lbs. A typical pulse time might be .30 seconds. These times are approximations; the Eagle will adjust them to drop the desired jog weight. • Learn Rate Learn Rate is defined as how quickly the Eagle compensates for plant or material flow errors. The Learn Rate can be anywhere between 0% to 99%. If your Learn Rate is 0%, it means that the Eagle has nothing to adjust. 99% is the fastest the Eagle can learn. Enter a number into the highlighted blank. The larger the number (typically 50%) the faster the Eagle will adjust the open time to jog out the target weight you have selected. Once the Eagle has adjusted the jog times and you are consistently getting the jog weights you want, turn the Learn Rate down (typically 10%) so that it does not overcorrect when you have sudden variations in plant conditions. Press <F5> to record into the Eagle's memory. To return to the Plant Setup Menu, press <F10>. Version 8.70 chp2_Eag.doc 03/15/02 1:05:41 PM 2-57 Eagle User’s Manual Plant Setup Menu Water Pulse Calibration Use this menu to calibrate each pulse meter to the flow rate of your water. If your plant discharges water through a meter, the meter sends back pulses to the Eagle. The Eagle counts these pulses to measure the total flow of water. But first, you must tell the Eagle how many gallons of water pass through the meter for each pulse. This figure will depend on the meter since the calibration depends on the manufacturer and the meter capacity. Look at the illustration above. This is how the Water Pulse Calibration Menu should appear on your screen. In the center of the box are three headings. 2-58 • Water Lists up to two types of water. You cannot make changes to this column on this screen. Refer to the "Water Storage Menu" section in Chapter Four on how to change the names in this column. Stay on this screen if you want to make changes to the information in either of the two remaining columns, which are highlighted on your screen. Read below for an explanation of how to use this screen to adjust the calibration and coast pulses for the water meters on your plant. • Gal/Pulse The numbers listed in this column should match the calibration of each water meter, showing the number of gallons per pulse. To adjust this figure, move the cursor to the blank you want with the arrow keys or the <Enter> key. When the cursor is in place, enter the number you want. Many water meters are calibrated at 1 gal/pulse. Yours may be 2 gal/pulse, or 4 gal/pulse. In the event that your meter is slightly off, you can make very fine adjustments by using decimal figures. Write in the correct number of gallons that pass through with each pulse (ex. 1.02 gal/pulse). Version 8.70 03/15/02 1:05:41 PM Eagle User’s Manual • Plant Setup Menu Coast Pulses This column allows you to close the valve on your water before you reach your target. Remember the importance of taking freefall weight into account when batching weighed up material? Coast Pulses allow for water that slips past the valve as it is closing. For example, if you have an older valve that shuts slowly, you may have a few extra gallons pass through before it closes completely. With the Eagle you can begin closing the valve early to allow for this overflow. If you enter a coast pulse of 1, you tell the Eagle to close the valve one pulse early, one pulse before the target volume is reached. Use coast pulses to make allowances for the variables on your plant that may keep you from getting precise water measurements. Press <F5> to record into the Eagle's memory. To return to the Plant Setup Menu, press <F10>. Version 8.70 chp2_Eag.doc 03/15/02 1:05:41 PM 2-59 Eagle User’s Manual Plant Setup Menu Admix Pulse Calibration Use this menu to calibrate each pulse meter to the flow rate of the admix it measures. If your plant pumps admix through a meter, the meter sends back pulses to the Eagle. The Eagle counts these pulses to measure the total flow of ounces. But first, you must tell the Eagle how many ounces of admix pass through these meters with each pulse. This figure will depend on the admix since high volume admixes may require larger meters that send several ounces per pulse, while low volume admixes may use small meters which send fewer ounces per pulse. Your screen should look like the illustration below: • Admix Lists up to 12 types of admix. You cannot make changes to this column on this screen. Refer to the "Admix Storage Menu" section in Chapter Four on how to change the names in this column. Stay on this screen if you want to make changes to the information in either of the two remaining columns, which are highlighted on your screen. Read below for an explanation of how to use this screen to adjust the calibration and coast pulses for the admix meters on your plant. • Large Units A “Y” in this column will cause gallons, liters, pounds, or kilograms to be selected. An “N” in this column will cause ounces, milliliters, weighed ounces or grams to in effect. Note: Pulses from a meter must match what is selected (one pulse equals a gallon or one pulse equals an ounce.) If the “Large Unit?” column is set to <Y>: Customary Units Gallons Metric Liters Weighed Pounds Weighed and Metric Kgs 2-60 Version 8.70 03/15/02 1:05:41 PM Eagle User’s Manual Plant Setup Menu On the “Verify Menu” the Admix Mix fields will display gallons, liters, pounds, or kilograms for the admixes that have a <Y> under the “Large Units?” column on the “Admix Pulse Calibration” menu. It will also display ounces, milliliters, weighed ounces or grams if you have a <N> in the “Large Units?” column on the “Admix Pulse Calibration” menu. The columns “Large Units” in the Admix Pulse Calibration Menu and “Weighed Admix” in the Admix Discharge Menu will both affect what is displayed. A weighed admix batched in ounces will be displayed as “ozw” with the “w” indicating weighed type of ounces whereas “oz” will indicate metered ounces. Note: If you have the “Weighed Admix” option the “w” will be displayed. All others will only show “oz.” Version 8.70 chp2_Eag.doc 03/15/02 1:05:41 PM 2-61 Eagle User’s Manual Plant Setup Menu • The units of the Admix in the scale box will be in the small units. The number of digits used to indicate the current quantity in the scale box has been increased from six digits to seven digits. Scale Box showing the small units. • Oz/Pulse The numbers listed in this column should match the calibration of each admix meter, showing the number of ounces per pulse. To adjust this figure, move the cursor to the blank you want with the arrow keys or the <Enter> key. When the cursor is in place, enter the number you want. Every admix pulse meter should have a preset ratio of ounces it discharges for each pulse. Use the manufacturer's specs to determine the number of ounces per pulse. If you do not know the manufacturer's specifications, or if the meter is old, you may want to test it by discharging admix, counting the pulses, and then counting the ounces. When you have determined the number of ounces each meter discharges per pulse, type in the number into the appropriate space in this column. Note: You can use decimals to get the exact flow rate (ex. 1.02 oz/pulse) and to do the final calculation. • Coast Pulses This column allows you to compensate your admix flow. Remember the importance of taking freefall weight into account when batching weighed up material? Coast Pulses allow for admix that slips past the valve as it is closing. For example, if you have an older meter that shuts slowly, you may have a few extra ounces pass through before it closes completely. With the Eagle you can begin closing the valve early to allow for this overflow. If you enter a coast pulse of 1, you tell the Eagle to close the valve one pulse early, one pulse before the target volume is reached. Use coast pulses to make allowances for the variables on your plant that may keep you from getting precise admix measurements. Remember that one pulse may equal several ounces of material. Press <F5> to record the changes. To return to the Plant Setup Menu, press <F10>. 2-62 Version 8.70 03/15/02 1:05:41 PM Eagle User’s Manual Plant Setup Menu Agg/Cem Discharge Gates On this screen, you set up the controls for aggregate and cement discharge gates. You will adjust the discharge rates, blow open times, adjust pause, and the Eagle's learn rate. Compare the illustration above to the screen on your Eagle. Some of the numbers in the columns may be different, but that's okay. You will be changing the numbers on your screen anyway. Let's look at the screen. The top half is enclosed in a box. On the far left is a list of the different features you will set. The next three columns are highlighted. Above the first two columns is the title, Aggregate. The columns themselves are labeled Slow Flow and Fast Flow. The column on the far right is called Cement − Fast Flow. Cement has only one possible discharge flow rate. Note that the cursor rests in the top space of the Aggregate Slow Flow Column. This is where you will enter the Slow Flow Blow Open time. • Blow Open Time The length of the pulse sent to the gate to open it at the beginning of the discharge. Sometimes the weight on the gate makes opening difficult. By sending a longer electrical pulse, you make sure that the gate does not stick or open too slowly. You can set the pulse up to several seconds, but this is not necessary in most cases. A typical Blow Open Time is .50 seconds. • Vibrate Time If you want to turn on the vibrator in the sand weigh hopper at the beginning of discharge, enter the number of seconds you want the weigh hopper to vibrate here. The vibrator might be necessary to shake out material. If you do not want any vibration at the beginning of discharge, leave the number in this space at zero. Version 8.70 chp2_Eag.doc 03/15/02 1:05:41 PM 2-63 Eagle User’s Manual Plant Setup Menu • Open Gates Slow Flow is for plant with single discharge gate. Fast Flow is for plant with two discharge gates, and it allows the gates to work independently from each other. Note that aggregate Slow Flow and Fast Flow columns have two blanks on this line. This means that you can designate up to two discharge gates in either of the aggregate columns. Cement fast flow has only one gate. For each column, type in the number(s) of the gate(s). The cursor will automatically move to the next space. If you only want to set one gate for Aggregate Slow Flow or Fast Flow, place a zero in the second space − either by typing zero or by pressing the space bar. If you want to set two gates for Slow Flow or Fast Flow, type in the second gate number here. • Close Gates On this line, enter in the same numbers that you entered above in the Open Gates line. It is important that the numbers on the Close Gates line are identical to the Open Gates line above, that each column has the same open gates as close gates. This way the Eagle will be able to close the gates it opens. • Adjust Pause This is the amount of time the Eagle pauses between adjustments to the discharge rate. Whenever it alters the flow, the Eagle waits before checking to see if another adjustment needs to be made. The adjust pause makes it easier for the Eagle to keep a steady flow and allows the weigh hopper to settle down. A typical adjust time for Aggregate Slow Flow and Fast Flow and Cement Slow Flow might be 2 seconds. • Learn Rate In this space you determine how quickly the Eagle will learn to discharge at the proper rate. (You will set the discharge rate on another screen, the General Discharge Menu.) What the Eagle is learning in this case is the time for small and large opens and closes. It will adjust the length of the pulses in order to hit the target weights you have put in for Open/Close Times. The Small Open/Close Time is to regulate flow for small errors. The Large Open/Close Time is to regulate flow for large errors. While the Eagle is still learning to make the adjustment, set the Learn rate fairly high so that it will learn faster (20 - 30 percent). Once the Eagle has gotten to where it is maintaining an even flow rate, turn the learning rate down (10% or less) so that you can protect your accuracy from random changes in the material flow. 2-64 Version 8.70 03/15/02 1:05:41 PM Eagle User’s Manual Plant Setup Menu • Small Error Now that you have set the learn rate, you are ready to set the adjustments you want the Eagle to learn. Look at the screen below. A typical Small Error adjustment might be 80 pounds for Aggregate Slow Flow and Fast Flow. For Cement Fast Flow, the Small Error might be 20 pounds. As long as the flow rate error is not above this figure, no adjustment is made. If the flow rate error exceeds this margin but is below the Large Error value, the Eagle adjusts with a small open or close. • Small Open/Small Close Type in a value in each of these spaces. You set it up; then the Eagle will learn based on your error setting. A typical value for 80 pounds/sec of aggregate will be approximately .02 seconds. A typical pulse time for 20 pounds of cement will also be approximately .02 seconds. This is the time the Eagle will send a pulse to the gate, either opening or closing it slightly. Enter the numbers in the appropriate columns; then let the Eagle adjust the times of the pulse until it can maintain the material flow properly. For an example, the desired discharge rate (aggregate) is 200 pounds/sec. After Blow Open Time and a one second Adjust Pause, the flow rate is 260 pounds/sec. According to the screen above, the Eagle will not make any adjustment. Any flow rate between 120 and 280 is acceptable because the small error is set at 80 pounds/sec. • Large Error A typical Large Error adjustment for Aggregate Slow Flow and Aggregate Fast Flow might be 120 pounds. A typical Large Error for Cement Fast Flow might be 40 pounds. If the flow rate is off by more than this figure, the Eagle will adjust with a large open or large close. With a relatively small figure in the Large Error column, adjustments to the flow will take a little longer, but there will be less chance of the Eagle opening the gate too wide and overloading the belt, or closing it too far and leaving a gap on the belt. Version 8.70 chp2_Eag.doc 03/15/02 1:05:41 PM 2-65 Eagle User’s Manual • Plant Setup Menu Large Open/Large Close Type in a value in each of these spaces. You set it up; then the Eagle will learn based on your error setting. Look at the screen below. A typical value for 120 pounds/sec of aggregate will be approximately .04 seconds. A typical pulse time for 40 pounds of cement will also be approximately .04 seconds. This is the time the Eagle will send a pulse to the gate, either opening or closing it. Enter the numbers in the appropriate columns; then let the Eagle adjust the times of the pulse until it can maintain the material flow properly. For an example, the truck rate (aggregate) is 200 pounds/sec. After Blow Open Time and a one second Adjust Pause, the flow rate is 350 pounds/sec. According to the screen below, the Eagle will make a large close adjustment since the large error is set at 120 pounds. The cursor moves down when you press the <Enter> key so that you can fill in the information one column at a time. Fill out the Aggregate Slow Flow column first, then move on to the Aggregate Fast Flow column, and finally, the Cement Fast Flow. Once you have finished with all three columns, look them over to make sure you have not made any typing errors. At the bottom of the screen are two Menu prompts: Press <F5> to record the changes. To return to the Plant Setup Menu, press <F10>. 2-66 Version 8.70 03/15/02 1:05:41 PM Eagle User’s Manual Plant Setup Menu General Discharge Use this screen to set the discharge rates. You have a choice of four sequences: Compare the illustration above to the display on the video monitor of your Eagle to see that they are similar. The box that fills the top half of your screen has several lines and several highlighted blanks where you can type in information, just like the illustration. Some of the numbers in the blanks may be different, but do not worry. You will want to change the numbers on your screen anyway. At the top of the box is the title General Discharge. Locate this title on your screen. Below this title are several features of general discharge − things like Discharge Code, Vibration Set Point for aggregate and cement, Times of open and close pulses for the end of discharge. These general discharge features are standard no matter what discharge code you will use. Below the General Discharge features is another block, occupying the center of the box. The title over this section is Code 1 Sequencing. Locate this title on your screen. A Code 1 discharge is a controlled discharge that is usually used on a dry batch plant. The Code 1 Sequencing allows optimum control over the discharge process to achieve ribbon blending of the materials going into the mixer truck. At the bottom of the box is the title Code 2 Sequencing. Below this is one line. Since Code 2 sequencing is a timed delay, unrestricted flow of aggregate, cement, and water, all the Eagle requires is the amount of delay time (seconds) prior to discharging the class of material. Once discharge starts, it goes at full speed. Code 3 Discharge (DynaBlend) is an improvement over Code 3 flow control. DynaBlend is especially useful for blending multiple materials in the same class when the plant configuration allows individual material discharge control. See page 2-65 for details. Version 8.70 chp2_Eag.doc 03/15/02 1:05:41 PM 2-67 Eagle User’s Manual Plant Setup Menu General Discharge • 2-68 Discharge Code (1-3) Enter the code you want. As stated above, discharge sequences indicate which materials you will control and which materials you will not control during discharge. − Code 1 Controlled independent aggregate discharge; controlled dependent cement discharge. An independent variable is when the operator determines the flow by setting up the rate of discharge. A dependent variable is when the computer determines the flow based on what the aggregate flow rate is. By selecting this discharge code, the Eagle will maintain a ribbon feed discharge sequence during the entire discharge cycle. To achieve the flow rate control, the Eagle uses the Truck Storage Menu to enter the Load Rate (lbs/sec) on each individual truck. This is a controlled discharge that prevents material from overflowing the truck. A controlled discharge is primarily used on Dry Batch Plants where the flow rate varies on each truck. − Code 2 Timed aggregate discharge; timed cement discharge; timed water discharge. By selecting this discharge code, the Eagle will hold the discharge gates wide open in a time delayed sequence. The flow rate does not apply to this discharge code. The timed delay discharge is used primarily on central mix plants where speed is required, but spillage is no problem. • Aggregate Vibrate Type in the vibration set point. When the weight on the scales drops to this level, the Eagle applies signal to vibrator and shakes out any aggregate that does not want to come out. A typical set point for aggregate vibrate might be 1000 pounds. • Cement Vibrate Type in the vibration set point. When the weight on the scales drops to this level, the Eagle applies signal to vibrator and shakes out any cement that doesn't want to come out. A typical set point for cement vibrate might be 500 pounds. • End of Discharge Full Open At the end of discharge, when the remaining weight on the scales reaches the vibrate set points, you will want to open your gates all the way to empty the cement and aggregate bins as quickly as possible. Enter the pulse time that the Eagle will send to the gate to open it as wide as it will go. A typical full open pulse might be 2.0 sec. • End of Discharge Full Close Once the scales drop down to zero and the bins are empty, the Eagle will want to shut the gates. The figure you enter into this space is the number of seconds the close pulse will be. Make sure that it is as long as the full open so that the gate will be closed completely. Version 8.70 03/15/02 1:05:41 PM Eagle User’s Manual Plant Setup Menu Code 1 Sequencing By selecting Code 1, the Eagle will maintain a ribbon feed discharge sequence during the entire discharge cycle. To achieve the flow rate control, the Eagle uses the Truck Storage Menu to enter the Load Rate (lbs/sec) on each individual truck. This is a controlled discharge that prevents material from overflowing the truck. A controlled discharge is primarily used on Dry Batch Plants where the flow rate varies on each truck. • Default Aggregate Fast Flow Rate Set the number of pounds/sec that the Eagle will discharge aggregate. This flow rate is the standard rate. It is called default because the Eagle will automatically discharge at this rate unless told to do otherwise. The Truck Storage Menu allows customized load rates (lb/sec) to be inserted on each individual truck. The Eagle will use this number whenever possible. If the truck has not been assigned a load rate, then the default will be used. • Slow flow is what percentage of fast flow Enter the percent of the fast flow loading rate. This feature is useful when the plant has two individually operated aggregate discharge gates. The Eagle can control the amount of material discharge from both gates. One discharge gate will be assigned as the slow flow gate (usually coarse aggregate), and both discharge gates are assigned as fast flow. With a dual discharge gate system, the coarse aggregate is usually discharged first to prevent head packing the agitator. The percentage that is entered here tell the Eagle how much of the total load rate is to be achieved out of the slow flow gate. The reason that you set a percentage here instead of an actual weight is that if you change the fast flow rate to accommodate a slower loading truck, the slow flow rate will change also. The slow flow rate will still remain in proportion to the fast flow rate. • Percent of aggregate discharged during slow flow Enter how much of you aggregate you want to be discharged during slow flow at the beginning. Whatever is left will be discharged during fast flow. A typical slow flow discharge might be 1% of total aggregate. This way you can start slowly so you don't overload the belt with a sudden drop of material. • Percent of aggregate discharged before cement discharge begins This is one of the ways you can control the flow of cement. What you are actually doing is telling the Eagle how much aggregate you want in the truck or mixer before it should begin adding cement. Typically 8%. Version 8.70 chp2_Eag.doc 03/15/02 1:05:41 PM 2-69 Eagle User’s Manual 2-70 Plant Setup Menu • Percent of aggregate discharged after cement discharge ends Enter the percent of total aggregate that you want discharged after the cement discharge ends. Let's say you want to hold 12% of the aggregate for discharge after cement discharge is complete. This amount of aggregate will load into the truck or mixer after cement has finished. • Delay Cement after Restart? If <Y>, it would resume the normal discharge sequence, which would be to delay the cement and allow a portion of the aggregate to go in first. If <N>, both the cement and aggregate resume discharge simultaneously. • Aggregate Belt Time Enter the amount of time the material takes to run along the belt from the weigh hopper to the discharge point. This time is one-half of one revolution of the belt. This delays the discharge sequencing to allow the percentage of aggregate to be discharged into the truck instead of on the belt. • Aggregate Discharge Delay How long you want to delay aggregate from the time the computer determines when the aggregate discharge should begin. • Water Discharge Delay How long you want to delay water from the time the computer determines when the water discharge should begin. • Minimum Cement Flow Rate Enter the number of pounds/sec for cement discharge. This is the minimum allowable cement flow rate that the Eagle will discharge. • Maximum Cement Flow Rate Enter the number of pounds/sec for cement discharge. This is the maximum allowable cement flow rate that the Eagle will discharge. This feature is needed to prevent the Eagle from dropping the cement too fast, which may cause dusting. Version 8.70 03/15/02 1:05:41 PM Eagle User’s Manual Plant Setup Menu Code 2 Sequencing By selecting Code 2, the Eagle will hold the discharge gates wide open in a time delayed sequence. The flow rate does not apply to this discharge code. The timed delay discharge is used primarily on central mix plants where speed is required, but spillage is no problem. • Aggregate Delay Enter the number of seconds you want to delay aggregate discharge. Typically the delay for aggregate might be zero seconds so that aggregate begins flowing right away. • Cement Delay Enter the number of seconds you want to delay cement discharge. Most batch plant operators like to delay the cement discharge until they have some aggregate and water already in the mixer or truck. A typical delay for cement discharge might be nine seconds. • Water Delay Enter the number of seconds you want to delay water discharge. A typical delay time for water might be six seconds. In Code 2 you can still hold back a certain number of gallons for tail water to wash down any aggregate or cement into the truck. The amount of water and the water flow rate is not set on this screen. You will have to go back to the Plant Setup Menu and select the General Plant Options Menu to change the water discharge information. Press <F5> to record the changes. To return to the Plant Setup Menu, press <F10>. Version 8.70 chp2_Eag.doc 03/15/02 1:05:41 PM 2-71 Eagle User’s Manual Plant Setup Menu Dynablend (Code 3 Sequencing) Introduction This document describes the Dynablend Code 3 Discharge feature which is a discharge process in the Eagle system. The Dynablend Code 3 Discharge feature derives a discharge rate for each scale from the total charge rate of the truck. Each scale’s percentage discharge rate is based on the weight of the individual scale, divided by the total of all the selected scales weight. The Dynablend Code 3 Discharge process deals with the discharge corresponding to each individual scale, instead of the summing the scales by class (by which code 1 and code 2 deal with the discharge). The Eagle will control the flow rate of discharge in each scale defined in the Scale Configuration Screen. The Eagle will allow selected scales to discharge in code 2 along with the Dynablend Code 3 Discharge process. The Eagle will automatically turn the vibrate on or stop the discharge if the flow rate is too low. The initial release that supports this feature is Eagle 8.23. System Setup A new field “Dynablend Code 3 Discharge?” has been added to the General Discharge menu. If this field is set to “Y”, the Eagle is in Code 3 discharge mode. After pressing <F5> to save this setup, the fields only for Code 3 discharge will be shown on this screen. Dynablend Code 3 Discharge? = “N” 2-72 Version 8.70 03/15/02 1:05:41 PM Eagle User’s Manual Plant Setup Menu Dynablend Code 3 Discharge? “Y” Discharge Code (1-2): Wet Dry: This field only displays when the “Wet/Dry Plant?” is set to <Y> in the General Pant options menu. The Wet and Dry side can be set up separately for Code 3 discharge sequencing. If the Code 3 discharge is set either in the Wet side or the Dry side or in both sides, a F2 key can be used to toggle from the wet side configuration menu to the dry side configuration menu or from the dry side to the wet side. End of Discharge Full Open: The meaning is the same as the original field. The open time applies to all scales. End of Discharge Full Close: The meaning is the same as the original field. The close time applies to all scales. Default Truck Flow Rate: Enter the default loading rate for all materials combined. Time between Flow Rate Calculations: Enter the amount of time between flow rate calculations. The Eagle will calculate each scale’s flow rate in each interval. Low Flow Rate by Scale: Enter the minimum flow rate. If the current flow rate becomes lower than minimum flow rate, the Eagle will turn the vibrator on. After the vibration, if the flow rate is still lower than minimum flow rate, then all gates for discharge will be shut off. You can either abort the batch or try pressing <F7> again. Code 3 Scale Spy: Enter the number of the scale to assist in fine-tuning the discharge process. Field #439 can be added to the Batching menu and will be updated during the discharge process. Version 8.70 chp2_Eag.doc 03/15/02 1:05:41 PM 2-73 Eagle User’s Manual Plant Setup Menu This will appear as “Scl 0 T:000 A:000” on the Batch Setup menu. Scl is the scale number assigned in the Discharge Configuration. T is the Target and A is the actual. Percent of water before agg and cem discharge This displays only when using metered water. Set the percent of head water to be allowed before the Agg/Cem discharge begins. Note: If you are changing from Code 1 or Code 2 to Code 3 you must go into the Scale Configuration menu. Press <F5> to Edit and Press <F10> to return. This is to make the Eagle read the correct Scale Configuration. You do not have to make any changes on the Scale Configuration menu. Water Delay This displays only when using metered water. Used with Dynablend (Code 3) and Metered Water so the delay time for water can be modified. 2-74 Version 8.70 03/15/02 1:05:41 PM Eagle User’s Manual Plant Setup Menu If the field “Dynablend Code 3 Discharge” has been set to “Y”, the Agg/Cem Discharge menu will be changed to display information and allow you to enter information about Code 3 discharge for each scale. Scale 1 to 6 would display on this screen and the scale 7 to 12 would display on Second Page of Agg/Cem Discharge menu if the scale has been defined on Scale Configuration menu. Dynablend Code 3 Discharge? = “Y” Materials: Tells what kind of Class is on this scale. The number for this class depends on the order of appearance on Scale Configuration Screen. Code 2 Disc?: If <Y>, the material in this scale will discharge in code 2. The code 3 discharge sequence will not apply to this scale. Start Delay: How long the material on this scale will delay from the time the computer began discharging the other scales. Start % of scale: What percentage of material in another scale should be discharged before this scale discharge begins. End % of Scale: The percentage of material in another scale can be entered in this field to indicate that the discharge material on the scale will finish before another scale finishes discharging. Open/Vib: Same as field “Blow Open Time” and “Vibrate Time” on the original screen. Version 8.70 chp2_Eag.doc 03/15/02 1:05:41 PM 2-75 Eagle User’s Manual Plant Setup Menu End Vib: Enter the vibration set point.(Same as the fields “Aggregate vibrate” or “Cement Vibrate” in the original General Discharge Screen). This field doesn’t apply to Water Scales. Min Flow: If any scale’s actual flow rate drops below the entered percent of a calculated flow for that scale, there will be three consecutive open adjust pulses, then the scale vibrator will turn on (if available) for set amount of time. If the flow does not rise above the threshold rate after the vibrator turns on, the discharge process will be halted and a warning will be issued. If the calculated proportional flow rate for a scale is less than the entered minimum flow rate, the entered value will be used. Open Gate: Display existing signal for Agg1, Agg2 , Cem 1, H2O 1, and enter the Soft I/O for other scales. Close Gate: Display existing signal for Agg1, Agg2 , Cem 1, and enter the Soft I/O for other scales. Vib Gate: Display existing signal for Agg1, Cem 1, and enter the Soft I/O for other scales. This field doesn’t apply to Water Scales. Adj Pause: Same as original screen. S/L Error: Enter the small error before the slash and the large error after the slash. S/L Open: Enter the small open time before the slash and the large open time after the slash. S/L Close: Enter the small close time before the slash and the large close time after slash. Learn Rate: Same as original screen. Limitations This feature requires Soft I/O for gate control and there are single open/close signals for each scale instead of Fast/Final gates for each class. This feature is incompatible with the following Paid Options: FB-MultiDrop/SmallBatcher, and Decumulative Batching. 2-76 Version 8.70 03/15/02 1:05:41 PM Eagle User’s Manual Plant Setup Menu Admix Batch/Discharge On this screen you will tell the Eagle how it will discharge admixes; whether admix is measured into a bottle or directly through a meter or weighed admixes, and the sequence of discharge. Compare the illustration below to your screen. The box that fills the top half of the screen has several columns. Some of the blanks may have different letters or numbers, but do not worry. You want the screen on your Eagle to match the specifications of your plant. For now, let's take a closer look at the box. The two columns on the left list the number of the bins and the contents. You will need to enter information in each column for each admix. The cursor moves from left to right so that you can set the features for each admix one at a time. • Bin Lists up to 12 admix bin numbers. This is the maximum number. You do not need to use them all. The bins should match your physical plant. • Call for The contents of each bin are listed in this column. Refer to the "Admix Storage Menu" section in Chapter Four on how to assign bins or change the names in this column. • Bottle? Here you determine if each admix will be measured up in a graduated bottle before discharging, or if it will be metered directly into the truck or mixer. Type <Y> if the admix is measured into a graduated bottle. When it is in bottle, it can start immediately upon starting the batch. Type <N> if the admix runs through a pulse meter directly into the truck or mixer. When it is direct, the admix batching has to wait until the discharge begins. Version 8.70 chp2_Eag.doc 03/15/02 1:05:41 PM 2-77 Eagle User’s Manual Plant Setup Menu • Into Water Into Water is only displayed when Water Holding tank is set to yes in the General Plant options screen. This will also display if you have the Weighed Water paid option. • Onto Agg If an admix is set to discharge onto agg it will discharge after all the aggregates have weighed up, regardless of the status of <F7> “Auto Discharge”. • With head? In this column you determine how the admix will be discharged. If you want the admix to dump with head water (water at the beginning of discharge) type <Y> in this space. If you do not want the admix discharged with head water, type <N> in the blank. • With tail? In this column, you give the Eagle further discharge instructions. If you want the admix discharge with tail water or wash down water, type <Y> in this column. If you do not want the admix released with tail water (for example, if you have already selected discharge with head water), type <N> in this space. Note: If you type <Y> in both columns, the Eagle will release the admix with head water, and then complete the discharge with tail water. • Last Drop If <Y>, it will put all of the admix in the last drop. If <N>, it will split the admix in equal portions per drop. • Delay This feature enables you to stagger your admixes so that you do not mix them going into the truck. The time entered here will delay the discharge of an admixture. If no delay is entered, then all head water admixes will discharge at the same time. Likewise for all tail water admixes. • Blow After With admix bottles, you may choose to blow air through the lines for a number of seconds once discharge is complete to clear the lines. Enter the blow after time in number of seconds. You can type in any whole number between 0 and 99. If you do not want a blow after time, type in zero. • Admix Zero Probe Series Wiring Type <Y> if your admix probes are electrically wired in series. If wired in series, the input signal will be active when all admix bottles are empty. Type <N> if your admix probes are wired in parallel. If wired in parallel, the input signal will be inactive when all admixes bottles are empty. Press <F5> to record the changes. To return to the Plant Setup Menu, press <F10>. 2-78 Version 8.70 03/15/02 1:05:41 PM Eagle User’s Manual Plant Setup Menu Probe Cal/Config Note: This screen will ONLY appears if you have enables the Probe Option. On this screen you will calibrate the moisture probes in use on your plant. Before calibrating the computer to the probes you must first fill out the information on the Probe Configuration Menu. Once you have set up the gates and materials on the Moisture Probe Configuration menu, you are ready to calibrate the computer to the probe. Take a moment to look over the screen. In the box located in the top half of the screen there are four columns. Below the title, "Moisture Probe Calibration" are a few "F" key prompts. You will use "F" keys as you are calibrating. Your screen should resemble the illustration below: To Calibrate Moisture Probe Using the arrow to the left of the Scale Input column, locate the probe you want to calibrate. Move this arrow up or down with the arrow keys to select the probe to be calibrated. For information on the simulated output mode, refer to the "Probe Readout Manual" that came with the Moisture Probe. When you have pointed out the probe you want to work on, you are ready to calibrate. Press <F1> to set the Low Calibration. The menu prompts are replaced by a new set of instructions, similar to the following illustration: Version 8.70 chp2_Eag.doc 03/15/02 1:05:41 PM 2-79 Eagle User’s Manual Low Probe Cal/Menu Plant Setup Menu These instructions are called the Low Probe Calibration Menu and will guide you through the next step. Adjust the moisture probe box until it displays the lowest reading you will want to use. Remember that negative numbers can be entered in to help you compensate for aggregate that is excessively dry and is absorbing water. The instructions on the screen say, "Press <F1> to hold probe reading." When the probe reading is steady, press <F1>. Once you press <F1>, the menu prompts will change again, and you will have another instruction for the next step. The prompt on your screen should match the illustration below: The next step is to tell the Eagle what the probe reading says. The message in the box says, "Enter probe reading." In the highlighted space type in the number displayed on the probe box. Then press the <Enter> key. High Probe Cal/Menu You have completed the first part of the probe calibration − the low end. The screen once again shows the Moisture Probe Calibration Menu. Next you must calibrate the high end of the probe. To calibrate the high end of the moisture probe range, move the pointer back to the probe you were just working on. Then press <F2> to calibrate the high end of the scale. The menu at the bottom of the screen will be replaced by the instructions for the first step. The display on the screen should look like the illustration below: This set of instructions is called the High Probe Calibration Menu. Press <F1> to hold the probe reading after you have adjusted the probe to a high reading (say, 8%). After you press <F1>, the message inside the little box will change. The message says, "Enter probe reading," and the cursor rests in the space after it. Type in the number displayed on the probe box. Then press the <Enter> key. Once again, you will return to the Moisture Probe Calibration Menu. You have successfully calibrated the probe. If you want to check for accuracy, vary the probe output to simulate different moisture readings. The reading on the screen should be the same as the reading on the probe box. In this way you can check to see that the Eagle is accurately tracking changes in moisture. To calibrate more than one moisture probe, simply repeat the process. Select the next probe to be calibrated and start all over again. Make sure that you are using a scale input that does not already have a scale wired to it. And remember to set both the low and the high end of the probe's range. 2-80 Version 8.70 03/15/02 1:05:41 PM Eagle User’s Manual Plant Setup Menu • Scale Input The same six Scale Inputs you have in your Probe Calibration Screen are the same six inputs you find in your Scale Configuration Screen. The Scale Input used in the Scale Configuration Screen are not available for use in moisture probe. The first thing that you will do is to determine which of the scale inputs are connected to which scales, and which inputs are available to use. If you cannot remember, go back to the Plant Setup Menu. From there highlight either the Scale Calibration Menu or Scale Configuration Menu. When you begin to configure the moisture probes, make sure that the information you entered corresponds with the available input. • Gate In this column, you will enter the number of the gate under which your probe is located. Move the cursor down to available scale input. The probe is located underneath a specific gate. Type in this gate number here. • Material The cursor moves into this column as soon as you type in the gate number. Note that you cannot type the name yourself. To select the aggregate, press the <Page Up> or <Page Down> key. The Eagle will display each agg, one at a time. When you come to the type of aggregate that you want, press the <Enter> key. Now the cursor drops down to the next bin back in the Gate column. If you are using more than one moisture probe, set up the second gate and material just like you did for the first probe. • Moisture The moisture of the material in percentage. • Count Displays a number. These raw counts are numbers directly from the Eagle's Analog to digital converter. This is the number that the Eagle uses to calculate scale weight. Counts help to troubleshoot problems with the scale calibration. • Minimum Probe Samples This is a selectable field. The minimum number of sample required for a valid probe reading. It is use to determine moisture content in aggregate. • Spy Spy Diagnostics is a report that shows all samples taken during the previous batch. To print the report, hold down the <Ctrl> key and press <F1>. Assign spy to corresponding Scale Input. When you have gate assignments and material names for each probe using free scale inputs, press <F5> to record it into the Eagle’s memory. Numbers will appear in the Moisture and Counts column. These numbers will be modified when you calibrate your probes. The Entered time at the bottom right corner of the box will change to the current time and date. To return to the Plant Setup Menu, press <F10>. Version 8.70 chp2_Eag.doc 03/15/02 1:05:41 PM 2-81 Eagle User’s Manual Plant Setup Menu Passwords Use the Password Menu to change the passwords used in the Eagle program. You may have already noticed that the Eagle uses passwords in several places to protect your plant from tampering or unauthorized use. You can keep all passwords the same, or change them to keep certain batching operations in the control of only a few people. Passwords are used to override batching errors and material overweighs. You will also need passwords to calibrate scales, to edit inventory screens, and to adjust mix designs, orders, customers, and tickets and the ticket stack. There is a master password that "unlocks" access to all of the function passwords. This master password should be closely safeguarded and changed at regular intervals. It might make sense to change passwords every month or every quarter to correspond with the close out of a standard accounting period in your business. The system is shipped with the same password in all locations. This original password is "1". Up to five numeric digits may be specified for the passwords. After you select the Passwords Menu from the Plant Setup Menu, your video monitor should display a screen that looks like the illustration below: Look at your Eagle screen. Note that there is a box in the middle of the screen, which lists all the menus that require use of a correct password. In the spaces where the numbers appear are rows of smiling faces. These faces hide the actual password numbers. 2-82 Version 8.70 03/15/02 1:05:41 PM Eagle User’s Manual • Plant Setup Menu Edit the Passwords Press <F5> when you are ready to edit the passwords. The Eagle asks you for the Master Password in a message, "Please enter the Master Password." See the illustration below: The cursor rests in a blank space. Type in the Master Password (up to five digits) and press the <Enter> key. Note that the numbers or letters that you type in do not appear. Instead, the Eagle shows stars, one for each key you press. This is another safety feature designed to prevent someone from reading the Master Password over your shoulder. If you enter the wrong Master Password, the message "Bad Password" will appear: Try again, or press the <Esc> key to return to the Password Menu if you do not know the Master Password. When you enter the correct Master Password, the screen changes to the Password Edit Menu. Now all the passwords in the box are visible. They are also highlighted so that you can make changes to them if you want. The Password Edit Menu on your screen should look like the illustration below. Version 8.70 chp2_Eag.doc 03/15/02 1:05:41 PM 2-83 Eagle User’s Manual Plant Setup Menu One thing to remember before you start editing your passwords is that they are all visible. If you are having problems on your plant with unauthorized use of your Eagle system, or the unauthorized sale of plant materials, you will want to be careful whom you have in the batch room when you are editing the passwords. For example, below is a list of key people who should know the passwords to get into the particular screen: − Master password: plant owner − Out of Tolerance: batchman − Scale Calibration: scale personnel, plant manager − Mix design: Q.C. person, plant manager Remember that the passwords, especially the Master Password, are like the keys to the cash register. You want to limit the number of people who have them so that you do not come in one day and find the money gone. The cursor rests in the top space on the left. Move the cursor with the <Enter> key or arrow keys. Type new numbers over the old numbers you wish to change. Note: Zero turns off passwords. Make sure the passwords that you typed in are correct. When you have made all the changes you want to make at this time, press <F5> to enter this new configuration. After you have entered the new configuration, press <F10> twice to return to the Plant Setup Menu. When you enter the new changes, check the time and date in the Entered space at the bottom of the box. It should show the current time and date since you have just entered new changes into the Password Menu. In this way you can make sure that you did in fact record the changes that you just made. 2-84 Version 8.70 03/15/02 1:05:41 PM Eagle User’s Manual • Plant Setup Menu Disabling the password feature It is possible to entirely eliminate any or all of the password security prompts by inserting a lone "0 (zero)" into the appropriate password control. The following conditions require a password unless disabled with a 0 (zero): 1. Override batching errors 2. Override out of tolerance 3. Turning recordation off or on 4. Modification of Scale Calibration • Editing of − − − − − − − − − − − Inventory on hand Short term material usage Long term material usage Deliveries Mix Designs Orders Customers Tickets Ticket Stack Supervisor Printer set up Version 8.70 chp2_Eag.doc 03/15/02 1:05:41 PM 2-85 Eagle User’s Manual Plant Setup Menu Password Security Form To assist you in managing your security we have included this password form. Remove it and copy freely and store the filled in table in a secure location. Month Year __ __ __ __ __ __ Master password __ __ __ __ __ __ __ __ __ __ __ Override batching errors __ __ __ __ __ __ __ __ __ __ __ Override out of tolerance __ __ __ __ __ __ __ __ __ __ __ Modify scale calibration __ __ __ __ __ __ __ __ __ __ __ Edit inventory on hand __ __ __ __ __ __ __ __ __ __ __ Edit short term material usage __ __ __ __ __ __ __ __ __ __ __ Edit long term material usage __ __ __ __ __ __ __ __ __ __ __ Edit deliveries __ __ __ __ __ __ __ __ __ __ __ Edit mix designs __ __ __ __ __ __ __ __ __ __ __ Edit orders __ __ __ __ __ __ __ __ __ __ __ Edit customers __ __ __ __ __ __ __ __ __ __ __ Edit tickets __ __ __ __ __ __ __ __ __ __ __ Edit ticket stack __ __ __ __ __ __ __ __ __ __ __ Edit supervisor __ __ __ __ __ __ __ __ __ __ __ Edit printer set up __ __ __ __ __ 2-86 Password category Version 8.70 03/15/02 1:05:41 PM Person(s) issued to: 5 digits num. password Day Eagle User’s Manual Power Failure Warning Plant Setup Menu The Power Failure Warning feature has been added to the Eagle. It will now process the Power Failure Monitor function if the previous batch is interrupted by loss of power or by pressing the Ctrl-E keys before the discharge is completed. • A “Power Failure Monitor” password has been added in the Password Menu. If a nonzero value is entered for this password, that value will be required in order to allow the Eagle to return to normal operations. • When the system is started, the Power Failure Warning Menu will be displayed instead of the Master Menu if the previous batch is interrupted by power loss or if the Ctrl-E key has been pressed before the discharge is completed. This menu will display a warning message and the Mix ID, Order ID, Truck Number, Load Size, Ticket Number, Start Time of an interrupted batch, and current weights on each of the configured scales. If both, foreground batch and background batch, are interrupted, information will be displayed for the earliest one started. Total 1 WARNING: A Power Failure was detected during last batch, and on-hand amounts may be incorrect. Interrupted Batch Information: Mix ID: Order Truck #: F234 196 Load Size 10.00 yd. Ticket #: 35 Interrupted Scale Reading: Scale 1 Scale 2 Scale 3 1499 602 Scale 4 Scale 5 Scale 6 Scale 7 Scale 10 Scale 11 Scale 12 Scale 8 F3 = DELETE Records F4 = PRINT Functions Scale 9 Start Time 49AM 19Jul99 F10 = RETURN to Master Menu • On the Power Failure Warning Menu, pressing F10 will prompt for the Power Failure password if it is nonzero. If the correct password is entered, or if the password is zero, the Master Menu will be displayed. Pressing F4 will prompt for the Supervisor password if it is nonzero. If the correct password is entered, or if the password is zero, a list of power failure information records in the Power_fl.log file will be printed out. Pressing F3 will prompt for the Supervisor password if it is nonzero. If the correct password is entered, or if the password is zero, the power failure records will be deleted. • A command-line option /P (or /p) has been added to force the Eagle to the Power Failure Warning Menu at startup so that a Power Failure log can be displayed and printed without actually having to cause a failure. Starting up in this mode will not cause a new record to be added to the log file unless a failure occurred. Version 8.70 chp2_Eag.doc 03/15/02 1:05:41 PM 2-87 Eagle User’s Manual Plant Setup Menu Time/Date Menu Use this menu to reset the time and date. Your Eagle has an internal clock that will keep time even when the computer is off. Occasionally, you may need to reset either the time or the date. See the illustration below: • Time Enter the valid number for hours; then for minutes. • AM/PM Type only the first letter either upper or lower case. Once you enter the time and date, all letters will automatically change to capital letters. The cursor will jump over to the date as soon as you type either A or P. • Date Type in the day. If number is only one digit, you will need to press the <Enter> key to move to the next space. • Month name Use the following abbreviations for month. No other abbreviations will work. If you enter an abbreviation that the Eagle does not recognize, it will default to display Dec in this space. January March May July September November February April June August October December • Year Type in the last two digits of the current year. Press <F5> to record the new time and date. The clock will begin. The time and date displayed at the bottom of the box will change to the new time and date. This means that you have successfully reset the clock. To return to the Plant Setup Menu, press <F10>. 2-88 Version 8.70 03/15/02 1:05:41 PM Eagle User’s Manual Plant Setup Menu Print Screens Main Menu <F4> Command Alkon includes this feature because it gives you a hard copy backup of all of your plant data. The Eagle will ask you a question before it prints all of the screens. Type <Y> if you want the Eagle to print ALL of the screen. You can press <F10> at any time to stop the Eagle from printing. If you do not want to print all of the screens, type <N>. This will return you to the Plant Setup Menu. Press <Shift><Print Screen> to print ONLY the screen that is visible on your monitor. Plant Setup Select Print Screens <Enter> Below is the list of reports that will be printed if you answer <Y> to the question above: • • • • • • • • • • • • • • • • • • • • • • • • • • • Scale Calibration Menu Scale Configuration General Plant Options Extended Plant Options Batch Screen Options Batch Setup Screen Options Order Entry Titles Menu Aggregate Batching Gate Selections Aggregate Freefall Compensation Aggregate Jogging Data Cement Batching Gate Selections Cement Freefall Compensation Cement Jogging Data Water Pulse Calibration Menu Admix Pulse Calibration Menu Agg/Cem Discharge Gates Discharge Configuration Admix Batch/Discharge Moisture Probe Cal/Config Soft I/O Configuration Moisture Storage Menu Aggregate Storage Menu Cement Storage Menu Admix Storage Menu Water Storage Printer Configuration Menu End Of Day Duties Menu Version 8.70 chp2_Eag.doc 03/15/02 1:05:41 PM 2-89 Eagle User’s Manual Plant Setup Menu Remote Configuration 1. The reason this is called the Remote Configuration Menu is because it is also used for Paid Options, Batch View and Eagle Remote. All of these functions require the use of one of the four communications ports, (COM1 - COM4), even without the Dispatch Communications Interface. The Remote Diagnostics column displays only when Batch View or Eagle Remote has been enabled. 2. It is always accessible. 3. The Kermit File Transfer function merely gives the customer a convenient way to send ASCII.TXT data files to a non-Command Alkon dispatch computer. 4. How it works: 2-90 • The Eagle operator puts a formatted floppy in the floppy drive and presses <F2> key. The software unloads the Eagle and automatically converts the .8 files to ASCII.TXT files, copies them to the floppy, and starts up the Kermit file transfer program in the Server Mode. This is called “Standby Mode”. • The Dispatch Computer Operator Loads Kermit on his computer and dials up the Eagle. He specifies *.8, (level 8), and initiates the Kermit file transfer. He then “logs off” the Eagle, (disconnects electronically). • The Eagle senses the “log-off” and unloads Kermit; then reloads the Eagle Batching software. The Eagle operator may abort the “Standby” Mode by pressing <Ctrl> <C>. Version 8.70 03/15/02 1:05:41 PM Eagle User’s Manual Plant Setup Menu Soft I/O Config In this menu, you can reassign a selected function to be reused as a user specified function. The available functions are displayed on the configuration screen. Use the <Page Up> or <Page Down> key to toggle through the modules in each entry field. Note: Use to customize system operation and enhance plant production. It is highly recommend that this be done by Command Alkon service personnel. Only appears if you have Eagle Communications Paid Option. • Available on any Eagle or Junior: Note: Active means 110 VAC is present. − Weigh Duration - Agg - output This output is active during the entire length of the aggregate weigh up cycle. − Weigh Duration - Cem - output This output is active during the entire length of the cement weigh up cycle. − End Of Batch - Agg - output This is a one second active pulse which occurs after all Aggregates are finished weighing. − End Of Batch - Cem - output This is a one second active pulse which occurs after all cements are finished weighing. Version 8.70 chp2_Eag.doc 03/15/02 1:05:41 PM 2-91 Eagle User’s Manual Plant Setup Menu − Discharge Duration - Agg - output This output is active from the start of the aggregate discharge through scale zero. − Discharge Duration - Cem - output This output is active from the start of the cement discharge through scale zero. − Ready To Load - output This output is active when: 1. The discharge is enabled and the dry material discharge begins, or 2. The discharge is not enabled and "Load Truck" or "Load Mixer" is reached, and remains active till discharge complete. 2-92 − Batch Complete - output This is a one second active pulse which occurs at discharge complete. − Batch Duration - output This output is active from "Start Batch" through "Discharge Complete". − Discharge Duration - output This output is active from the start of the dry material discharge through "Discharge Complete". − Repeat Disc Enable - input This input, when active, will keep the auto discharge enabled. − Truck Washout Done - output This is a one second active output which occurs when the Truck washout is complete. − Tol. Error/Override - output This output will become active on a tolerance error, and remain active until the override put is made active, then inactive. Tol. Error/Override (input) must be reactivated for each individual error. − Pulse Tol. Output - output If <Y>, the Tolerance Error output will pulse on for 1 second. If <N>, the Tolerance Error output will remain active until the error is overridden. − Tol. Class - output If a class is entered (agg, cem, amx, or wat), then only tolerance errors occurring in that class will activate the Tolerance Error output module. If this field is left blank (no class), then any class can trigger the output on a tolerance error. − Air Pressure LSW - input An input that prevents batching when air pressure falls below a certain pressure. Warns the operator of a low air pressure condition during a batch. Version 8.70 03/15/02 1:05:41 PM Eagle User’s Manual • Plant Setup Menu − Shared AGG Batcher? - input Enable two Eagle systems to share an aggregate batcher. The soft I/O inputs and outputs are used for handshaking between the Eagle systems to insure that the batcher is not operated simultaneously by both systems. - Stop 2 Disc Enable – input Works with a two stop plant configuration. If not used the Eagle will go to dump mode after 100% of the 1st Stops material has discharged if Cement is at the 2nd Stop or immediately if 2nd Stop is Aggregate. A ‘Interlock Relay’ can be used if Soft I/O is not available or not wanted. If the Soft Input is used, it is not looked at until the Agg is finished weighing and discharge is enabled. This input should be wired to a momentary switch on the MSP. If discharge is stopped the input will need to be re-energize to re-enable discharge again for the 2nd Stop. Available when Multi Setup Option is turned on: − Setup 1, 2, 3, & 4 1. The output is active from the start of the discharge of a batch begun on the associated setup until the start of the next discharge. 2. The input when made active in conjunction with the repeat batch input will start the batch that is setup on the associated setup. • − Multi-Setup Auto Cycle? Y/N Used to cause the Eagle to automatically batch setup 1,2,3,4 in sequence. − Auto End Of Cycle This output is a one second pulse which occurs at Discharge Complete of the last setup in an automatic cycle. Available when Fast Batch Option is turned on: − Select Primary Batch This input, when active, forces all batches to be batched on the primary scale. − Select Alternate Batch This input, when active, forces all batches to be batched on the alternate scale. − Alt Discharge Limit Sw This is the input to tell the Eagle that the alternate batcher is closed. − Alt Discharge Vibrate This output operates the alternate batcher vibrator. − Pri Batch Active This output is active during the weigh up of the primary batcher. Version 8.70 chp2_Eag.doc 03/15/02 1:05:41 PM 2-93 Eagle User’s Manual 2-94 Plant Setup Menu − Alt Batch Active This output is active during the weigh up of the alternate batcher. − Alt Disc 1 & 2 Open These outputs are used for alternate batcher gates open signals. − Alt Disc 1 & 2 Close These outputs are used for alternate batcher gates close signals. Version 8.70 03/15/02 1:05:41 PM Eagle User’s Manual • Plant Setup Menu Available when Comm Option is turned on: − Comm Ticket Arrival This output will pulse one second on the receipt of a comm ticket. When using remote batch, the output remains on as long as the ticket remains on the stack. − Attention Plant This output will pulse on for two seconds when the attention plant signal is received from dispatch. Version 8.70 chp2_Eag.doc 03/15/02 1:05:41 PM 2-95 Eagle User’s Manual Plant Setup Menu Disk Maintenance Use this screen to copy all your data from the Eagle's memory to a floppy diskette. This is an optional feature that helps protect your system from a memory loss. Keeping relatively up-to-date files on floppy diskettes will ensure that if you lose memory through some sort of natural disaster, like a lightning strike, or through the failure of a worn out memory card, you will not have to retype all your data − mix designs, material inventory, etc. See below: On the left side of the box are the names of the files, the dates and times of the last changes made to them, and the size of the files. All this information falls under the title Data File Directory. To the right there is more space, located under the title Floppy Disk Directory. On the left side, the names of the files will not be repeated since what you are storing on the floppy diskette has the same file name. Note that there are spaces for the rest of the information − date, time, and file size. The reason that the floppy disk directory is empty is that there is no disk in the disk drive (located inside the Eagle box). When you are ready to copy the data files, insert a blank diskette into the disk drive. From this screen, you will be able to backup data files to a diskette, restore files from a merge file diskette to the Eagle's memory, read a disk file directory, or format a diskette. Format a Diskette Let's assume that you are not familiar with computers. This is the first computer you have worked on. If this is the case, you no doubt have some questions right now. Since it is unlikely that you have any other computers around the batch room, the first step in backing up plant information will probably be to format your diskettes. When you buy a new package of diskettes, they have nothing on them. But you can't just stick one of the new diskettes in and start copying the information onto it. All diskettes have to be formatted before they can be used. Formatting a disk means letting the computer mark it. Imagine that a brand new disk is like a blank sheet of paper. You want the computer to write on it, but the computer is like a little kid. It cannot write on a totally blank sheet of paper. It needs some lines to write on. By formatting a disk, you are doing something similar to putting lines onto a blank sheet of paper. 2-96 Version 8.70 03/15/02 1:05:41 PM Eagle User’s Manual Plant Setup Menu Formatting a diskette is very simple, though. Make sure disk is empty. All you do is insert the diskette into the disk drive. After you insert the diskette, press <F7>. This begins the formatting procedure. The Eagle will format the diskette and then return you to the Disk Maintenance Menu. It takes a minute or two for the Eagle to format your disk. Now that your disk is formatted, you are ready to perform another operation. It is a good idea to format all your diskettes as soon as you open a box. That way you will not have worry about which diskettes are formatted and which diskettes aren't. If you try to perform a backup with a diskette that is unformatted, you will get an error message that says the disk is bad. Before you throw the disk away, try formatting it. The Eagle will call any unformatted disk a bad disk. What it means is that it cannot read or write on it. • Backup Data Files To Floppy On the question Copy ALL Files?, type <Y> if you want all of the files to be backup to a disk. Type <N> if you only want to select a certain file to be backup to a disk. If you typed <N>, then go down and select the file that you want to backup. For example, type <N> to Copy ALL File?. From there go down to the Copy? column and type <Y> to MIX.S file. Type <N> for the rest of the files. Now press <F2>. After you press <F2>, only the MIX.S file will be backup to a disk. Once you have a formatted diskette, you can perform this operation. A backup means that you are copying all the information from your plant onto a floppy diskette. What is information? It means everything that you typed in. This includes all the Plant Setup Information, all the information about the plant, bin contents, jog weights and times, mix designs, customer and order information, to name a few. Think about this for a moment, and you will see how valuable a backup can be. Your plant stores up to 2000 mix designs, 1000 customers, 200 trucks with special loading rates, 100 orders, inventories, and material bin assignments. If you lost all this information in a memory failure, you could spend hours just typing the information back into the Eagle. To backup your data files onto a floppy diskette, open the Eagle box and insert a formatted diskette into the disk drive. Now look at your screen, which should still display the Disk Maintenance Menu. Press <F2> to select the backup option. The Disk Maintenance Menu will disappear for now. On the screen you will see a message similar to the one below: Version 8.70 chp2_Eag.doc 03/15/02 1:05:41 PM 2-97 Eagle User’s Manual Plant Setup Menu When you see this message on the screen, you will know that the Eagle is getting ready to copy the data files onto a diskette. Updating the files means that it is going through one last time and saving any changes that might have been made to the data files. Once the Eagle has updated all the files, it will return you to the Disk Maintenance menu. Compare your screen to the following illustration: Notice that the Menu prompts have been replaced by a question in the long narrow box. If you have the disk inserted and are ready to begin copying, press <Y>. If you do not want to copy, press <N> and return to the Disk Maintenance Menu. When you press <Y>, the Eagle begins copying the files from the Eagle's permanent memory to the floppy diskette. Your screen will resemble the illustration below: The Eagle copies each data file. As the file is copying, stars appear to tell you that the information is being transferred without any problems. Just relax and let the Eagle finish copying. When it has copied each file onto the floppy diskette, the Eagle will return you to Disk Maintenance Menu again. Notice that the information under the Disk File Directory has changed. See below. 2-98 Version 8.70 03/15/02 1:05:41 PM Eagle User’s Manual • Plant Setup Menu Restore Data Files From Floppy Restoring data files means copying the information from one of your diskettes and replacing the data files. Let's say you had a lightning strike, and you have lost all memory. To replace the memory, begin by selecting the most recent disk. You want current information. Insert the disk into the disk drive. Press <F3> to restore the data files. Wait until the Eagle has updated the files and has returned to the Disk Maintenance Menu. Notice that the arrow indicates that you are copying from Disk File Directory to Data File Directory. The bottom of the screen will show a question for you: If you have the disk inserted and are ready to begin copying, press <Y>. If you do not want to copy, press <N> and return to the Disk Maintenance Menu. When you press <Y>, the Eagle begins copying the files from the diskette into the Eagle's permanent memory. Your screen will resemble the following illustration: The Eagle copies the files from disk first. Then it re-initializes the system, using the newly copied data files. After it re-initializes the system, it acts as if it was just turned on again. This means that when the Eagle has finished restoring the files from diskette to the permanent memory, it brings you to the Master Menu. Version 8.70 chp2_Eag.doc 03/15/02 1:05:41 PM 2-99 Eagle User’s Manual • • Plant Setup Menu Merge Data Files From Floppy When you select this function, the Eagle will look for something that has been changed. It leaves everything else unchanged. To merge a file, insert a disk that has all of the changes and press <F4>. Read Floppy Disk Directory What if you have several floppy diskettes and you are not sure which diskette has the most recent data. You can insert a diskette into the disk drive and just read the file information. To do this, press <F5>. The information on the disk files will appear in the main box, showing the date and time and size of the files. If you put a disk in that does not have these files, the spaces under Disk File Directory will fill with stars. See below: Below is a successful reading of the disk file. To see if the files are the most updated version, look at date on the Data File Directory column. To return to the Plant Setup Menu, press <F10>. 2-100 Version 8.70 03/15/02 1:05:41 PM Eagle User’s Manual Chapter 3 End Of Day Operations Version 8.70 chp3_Eag.doc 03/15/02 1:16:17 PM Eagle User’s Manual End of Day Operations End Of Day Operations End of Day Menu Go to the End of Day Menu when you want to adjust material inventories, or to perform other end of day duties. On Hand inventory is password protected. Raw material deliveries are normally entered through the Delivery Screen in the Batching/Storage section. The On Hand column is the only column in the inventory section that you can modify. In the Short Term and Long Term columns, you can only clear them. You cannot modify them. Clearing Long Term usage will also clear Short Term usage. When you press <F3>, the screen will change to show the End of Day Screen. See the illustration below: Note: Tickets Summary is not shown on the End Of Day Screen Selection without the Order Entry/Ticket Printing Paid Option. In the top half of the screen is a box separated into three sections. Inside this box you can see the available selections you can make. The first item in the first column on the left is highlighted. You can highlight any of the other items on this menu by moving the bar up or down or to the side with the appropriate arrow key. Locate your arrow keys. Once you find them, practice moving the blue bar until you have highlighted each of the End of Day options. When you have highlighted the item you want, press the <Enter> key to select it. When you press the <Enter> key, the screen displayed on the Eagle will change to show the screen you have just selected. Let's say you moved the highlighting bar down until it highlights the item, "Cement Inventory." To get to the Cement Inventory screen, you must press the <Enter> key. After you press <Enter>, the Eagle will display the Cement Inventory Screen. Select any of the items from the End of Day Menu in exactly the same way − use the arrow keys to highlight the item you want; then press <Enter> to select the new screen. Version 8.70 chp3_Eag.doc 03/15/02 1:16:17 PM 3-1 Eagle User’s Manual End of Day Operations Now that you have learned how to select options from the End of Day menu, you are ready to learn the specifics about each of the End of Day options. 3-2 Version 8.70 chp3_Eag.doc 03/15/02 1:16:17 PM Eagle User’s Manual End of Day Operations End of Day Duties This menu is designed for the supervisor to set the reports to be printed. This menu is password protected. (Example shown on the following page). Select Data Operations This menu is designed for the supervisor to set the duties to be performed. Backup, Clear, Reset, Delete, and Review. Supervisor notes allow you to add messages to the batchman. This menu is password protected. (Example of menu shown on the following pages). Execute EOD Duties When selected press <Enter> to execute the duties to be performed. Version 8.70 chp3_Eag.doc 03/15/02 1:16:17 PM 3-3 Eagle User’s Manual End of Day Operations Select End of Day Reports Your screen should look like the screen below. Note: If you do not have all paid options, then some lines will be missing. Press <F5> to select the duties that you would like to perform. Each item that you place a <Y> next to will be performed when you press <F4> to execute the duties. Let's discuss each of the reports that will be printed on the following pages. Remember only the reports that you place a <Y> next to will be printed. Note: The End-of-Day Reports will print in the order in which they appear on the End-of-Day Menu. 3-4 Version 8.70 chp3_Eag.doc 03/15/02 1:16:17 PM Eagle User’s Manual End of Day Operations Select Data Operations Your screen should look like the one below. Press <F5> to select the duties that you would like to perform. Each item that you place a <Y> next to will be performed when you select the Execute EOD duties. Let’s discuss each of the reports that will be performed on the following pages. Version 8.70 chp3_Eag.doc 03/15/02 1:16:17 PM 3-5 Eagle User’s Manual End of Day Operations Print Inventory Report This will give you a permanent record of short term and long term usage, the day's percent deviation, and the material received that day. In short, the Eagle will print out what currently shows on your Aggregate, Cement, and Admix Inventory screens plus moisture, pounds, and tons. Before you clear out all your daily usage summaries, you might want to keep a record of the daily business. By printing out an inventory report first, you can keep a permanent record of the day's inventory. See sample printout of the Aggregate Inventory report below: Inventory Report : COMMAND ALKON Main Plant 3:50 PM 2Jul01 Page 1 Aggregate Inventory Material 1" Rock Special Sand Pea Gvl 1-1/2 Rk Mfg Sand #57 Rock #67 Rock On Hand (Tons) 1815.0 1981.0 1695.8 1919.7 2027.1 1332.0 2277.3 1807.1 0.0 0.0 0.0 0.0 Yards Batched Short Term (Tons) 0.0 0.0 109.0 0.0 0.0 0.0 108.5 48.3 0.0 0.0 0.0 0.0 198.5 Long Term (Tons) 17.6 4.6 120.0 0.0 0.0 0.0 108.5 48.3 0.0 0.0 0.0 0.0 229.5 Deviation (%) Daily Rec'd (Tons) 0.0 0.0 - 0.1 0.0 0.0 0.0 0.0 0.0 0.0 0.0 0.0 0.0 0.0 0.0 27.0 0.0 27.2 0.0 25.5 0.0 0.0 0.0 0.0 0.0 Long Term Usage Since: 8:25 PM 2Jul01 Material 1" Rock Special Sand Pea Gvl 1-1/2 Rk Mfg Sand #57 Rock #67 Rock 3-6 Version 8.70 chp3_Eag.doc 03/15/02 1:16:17 PM On Hand (Lbs) Short Term (Lbs) 3629840 3961810 3391529 3839260 4054300 2664000 4554410 3614200 0 0 0 0 0 0 218120 0 0 0 217000 96600 0 0 0 0 Moisture (Lbs) 0 0 0 0 0 0 0 0 0 0 0 0 SSD (Lbs) 0 0 218120 0 0 0 217000 96600 0 0 0 0 Daily Avg Moisture (%) 0.0 0.0 0.0 0.0 0.0 0.0 0.0 0.0 0.0 0.0 0.0 0.0 Eagle User’s Manual • End of Day Operations Print Summary This report will show the number of yards batched, number of yards adjusted, batch number, load number, and ticket number. See sample printout below: Summary Report : COMMAND ALKON Main Plant Batched: Adjust: Page 1 198.50 Yards 0.00 Yards Batch # Load # Ticket # • 3:50 PM 2Jul01 43 25 51 Print Orders (Short) − ONLY with Order Entry/Ticking Printing Will print the Order number, Cust ID, Quantity ordered, Quantity delivered, number of loads, total $, time, and date the order was entered. See sample printout below: List of Orders − Short Form : COMMAND ALKON Main Plant Order Cust ID 1 2 3:50 PM 2Jul01 Qty Ord Qty Del 100.00 yds 116.00 yds Page Loads Total $ 13 $ 1254.02 1 Time 10:53 AM 11Mar01 List of Orders − Short Form : COMMAND ALKON Main Plant Total Qty Ordered: Total Qty Delivered: Total Loads Delivered: Total Amount COD: Total Amount on Account: Grand Total: Version 8.70 chp3_Eag.doc 03/15/02 1:16:17 PM 3:50 PM 2Jul01 Page 2 100.00 116.00 13 $ 0.00 $ 1254.02 $ 1254.02 3-7 Eagle User’s Manual • End of Day Operations Print Orders (Long) − ONLY with Order Entry/Ticket Printing Print all the information available about each order. See sample printout below: List of Orders − Long Form : COMMAND ALKON Main Plant Order: Cust ID: 3:51 PM 2Jul01 1 2 Mix ID: Size: Keep Amx Trims? N COD? N 16 10.00 yds Start: Price: $ 7:00 AM 0.00 Page Qty Ord: 100.00 yds Qty Del: 116.00 yds Loads: 13 Spacing: 20 min Tax: 0.000 % Subtot $ Tax $ Total $ 1156.00 98.02 1254.02 Extra Product? Del Adr: 4335 ROYAL LANE DALLAS, TX 75226 Instr: For: ...................... OrderBy: JOHN H. Use: ............ SLAB Zone: 1 Job #: ......... 4837 Slump: ... 3 " Due at: ASAP Phone: ..214-555-9032 (M) Qty: Per yds? 1.00 0.00 0.00 0.00 0.00 0.00 PO#:......... 338412 Plant #: 1 ID: Y N N N N N Description 2 CALCIUM 1% 1 Y I-35E TO ROYAL LANE EXIT LEFT 3 LIGHTS ON RIGHT Unit Price $ 1.00 $ 0.00 $ 0.00 $ 0.00 $ 0.00 $ 0.00 Tax: 8.250 % 0.000 % 0.000 % 0.000 % 0.000 % 0.000 % List of Orders − Long Form : COMMAND ALKON Main Plant Total Qty Ordered: Total Qty Delivered: Total Loads Delivered: Total Amount COD: Total Amount on Account: Grand Total: 3-8 Version 8.70 chp3_Eag.doc 03/15/02 1:16:17 PM 3:51 PM 2Jul01 100.00 116.00 13 $ 0.00 $ 1254.02 $ 1254.02 Page 2 Eagle User’s Manual • End of Day Operations Print All Tickets − ONLY with Order Entry/Ticket Printing Prints out a list of all the day's tickets by ticket number. If you have voided, edited, or local tickets, there will be a notation beside the ticket number, either a "v" for voided, an "m" for modified, or a "L" for local. Does not print out Comm tickets. Look at the sample printout below: List of ALL Tickets : COMMAND ALKON Main Plant Ticket # L L L L L L L • 44 45 46 47 48 49 50 5:39 PM 2Jul01 Page Order Cust ID Mix ID Qty 2 1 1 2 1 1 2 4 2 2 4 2 2 4 11 16 16 11 16 16 11 10.00 10.00 10.00 10.00 10.00 10.00 10.00 m m v Time Batched 3:04 PM 3:11 PM 3:13 PM 3:36 PM 3:38 PM 3:42 PM 3:44 PM 1 Truck # 2Jul01 2Jul01 2Jul01 2Jul01 2Jul01 2Jul01 2Jul01 232 287 306 234 235 240 243 Print Tickets By Order − ONLY with Order Entry/Ticket Printing Prints out a list of the day's tickets, but arranges them according to the order. In other words, all tickets that were batched to fill an order are grouped together. See sample printout below: List of Tickets by Order Name : COMMAND ALKON Main Plant Order: 5:39 PM 2Jul01 Page 1 1 Cust ID: HALL CONSTRUCTION 4088 LOOP 12 DALLAS, TX 75990 Ticket # Time Date Del Adr: 4335 ROYAL LANE DALLAS, TX 75226 Truck L 45 m 3:11 PM 2Jul01 287 L 46 v 3:13 PM 2Jul01 306 1 Tickets Total Qty 10.00 10.00 10.00 10.00 10.00 Yards Product ID Unit Price 16 2 16 2 52.00 1.00 52.00 1.00 $ 530.00 Tax 8.750% 8.250% 8.750% 8.250% Total 576.33 (573.73) $ 46.33 $ 576.33 1 Tickets Voided Version 8.70 chp3_Eag.doc 03/15/02 1:16:17 PM 3-9 Eagle User’s Manual • End of Day Operations Print Invoices By Order − ONLY with Order Entry/Ticket Printing Prints out all outstanding invoices by the order. The title "CUSTOMER INVOICE" appears in the top right corner. Each order includes all tickets that have not yet been paid. The arrangement is just like the Tickets By Order described in the previous page except that only those tickets which have not been paid are listed. At the end of the invoice, the number of tickets, total yards, price, and tax are all totaled up. See sample printout below: CUSTOMER INVOICE Order: 1 5:53 PM Cust ID: 2 HALL CONSTRUCTION 4088 LOOP 12 DALLAS, TX 75990 For: ...................... OrderBy: JOHN H. Use: ............ SLAB Ticket # L 45 m Please remit payment to: Version 8.70 chp3_Eag.doc Date 3:11 PM 2May00 1 Tickets Total 3-10 03/15/02 1:16:17 PM Del Adr: 4335 ROYAL LANE DALLAS, TX 75226 PO#:......... 338412 Plant #: 1 Time 2Mar01 Zone: 1 Job #: ......... 4837 Slump: ... 3 " Due at: ASAP Phone: ..214-555-9032 (M) Truck 287 Qty Product ID Unit Price 10.00 10.00 10 Yards Command Alkon Inc. 605 East Safari Pkwy #C4 Grand Prairie, TX 75050 16 2 52.00 1.00 $ 530.00 Tax 8.750% 8.250% Total 576.33 $ 46.33 $ 576.33 Eagle User’s Manual • End of Day Operations Print Daily Activities Report − ONLY with Order Entry/Ticket Printing General overview per order including all tickets information and summarizes all order information for that day. See sample printout below: Daily Activity Report : COMMAND ALKON Main Plant Order: 5:58 PM 2Jul01 Page 1 1 Cust ID: HALL CONSTRUCTION 4088 LOOP 12 DALLAS, TX 75990 Ticket # Time Date L 45 m 3:11 PM 2Jul01 L 46 v 3:13 PM 2Jul01 L 48 3:38 PM 2Jul01 L 49 3:42 PM 2Jul01 3 Tickets Total Del Adr: 4335 ROYAL LANE DALLAS, TX 75226 Truck Qty Product ID Unit Price 287 10.00 10.00 306 10.00 10.00 235 10.00 10.00 240 10.00 10.00 30.00 Yards 16 2 16 2 16 2 16 2 52.00 1.00 52.00 1.00 0.00 1.00 0.00 1.00 $ 550.00 Tax Total 8.750% 8.250% 8.250% 8.250% 0.000% 8.250% 0.000% 8.250% 576.33 (573.73) 10.83 10.73 $ 47.89 $ 597.89 1 Tickets Voided Daily Activity Report : COMMAND ALKON Main Plant Today's Total Qty Delivered: Today's Total Loads Delivered: Today's Total Amount COD: Today's Total Amount on Account: Today's Grand Total: 5:58 PM 2Jul01 Page 2 30.00 Yards 3 $ 0.00 $ 597.89 $ 597.89 Today's Active Orders (Estimated) Today's Total Qty Remaining: Today's Total Loads Remaining: 0.00 Yards 0 Today's New Inactive Orders (Estimated) Total Qty Remaining: Total Loads Remaining: 0.00 Yards 0 Old Inactive orders (Estimated) Total Qty Remaining: Total Loads Remaining: Version 8.70 chp3_Eag.doc 03/15/02 1:16:17 PM 98.00 Yards 49 3-11 Eagle User’s Manual • End of Day Operations Print Daily Received Inventory Tracks deliveries of new material. Material quantities received through the Deliveries Screen are transferred to the Material Storage Menu. On the Deliveries Screen, you list the number of pounds you have received. The Eagle automatically converts this to weight in tons and adds it to the Daily Rec'd column and the On Hand column. See sample printout below. Delivery Report : COMMAND ALKON Main Plant 3:54 PM 2Jul01 Page 1 Material: 1" Rock Total Daily Received: 0 Lb Long Term Received: 0.0 Tons Material: Sand Qty Received Ticket # 54039 Lb 6 Total Daily Received: 54039 Lb Supplier Time Entered aggregates 3:33 PM 2Jul01 Long Term Received: 27.0 Tons Material: Type I Qty Received Ticket # 52000 Lb 1 Total Daily Received: 52000 Lb Supplier Time Entered portland 3:14 PM 2Jul01 Long Term Received: 26.0 Tons Material: Air Ent Qty Received Ticket # 300 Gal 4 Total Daily Received: • 300 Gal Supplier Time Entered Admix 3:32 PM 2Jul01 Long Term Received: 300.0 Gal Print Daily Washout Times Print a report showing the washout time of each truck. This could be used to track when the drivers ended their workday. See sample printout below. Today's Washout Times : COMMAND ALKON Main Plant Truck # 9 7 6 4 3 2 3-12 Driver JONES WALLS JOHNSON SMITH KLINE BAKER Version 8.70 chp3_Eag.doc 03/15/02 1:16:17 PM 3:54 PM 2Jul01 Water Gal 300 300 250 250 250 250 Admix Oz 112 112 96 96 96 96 Page Today's Washout Time 4:11 PM 4:10 PM 4:09 PM 4:08 PM 4:08 PM 4:07 PM 2Jul01 2Jul01 2Jul01 2Jul01 2Jul01 2Jul01 1 Eagle User’s Manual • End of Day Operations Print Yards Per Truck General truck performance report. It shows the yardage and total number of loads on a per truck basis. It then computes an average load size with the average loading time for each truck. See sample printout below. Truck Report : COMMAND ALKON Main Plant Truck # 218 219 232 234 235 240 243 256 261 262 • 3:54 PM 2Jul01 Page Driver Truck Size Total yards Total Loads: Avg. Load J. Smith D. Kelly T. Hugh R. Boyd H. Pope S. Tate A. Poll W. Levy K. Lane B. Mays 10.00 9.00 10.00 10.00 9.00 9.00 10.00 8.00 8.00 10.00 10.00 9.00 44.50 10.00 9.00 9.00 10.00 8.00 8.00 10.00 1 1 5 1 1 1 1 1 1 1 10.00 9.00 8.90 10.00 9.00 9.00 10.00 8.00 8.00 10.00 1 Avg. Time 0:04:33 0:31:30 0:09:26 0:05:18 0:05:18 0:04:15 0:04:39 0:04:33 0:04:35 0:04:52 Print Yards Per Mix Lists the volume of materials used on a per mix design basis. See sample printout below. Mix Designs, Usage Report : COMMAND ALKON Main Plant 3:57 PM 2Jul01 Page 1 **************************************************************************************************************** Mix ID Total Yards Total Loads: Avg. Load Avg. Load Time 11 30.00 3 10.00 0:09:33 Agg Lb Cem #57 Rock Sand 54000 40440 Type I Lb 11250 Admix Air Ent Wat Red Accel Oz 31 214 0 Water WATER Gal 1049 **************************************************************************************************************** Mix ID Total Yards Total Loads: Avg. Load Avg. Load Time 16 40.00 4 10.00 0:08:05 Agg Lb Cem Lb Admix #67 Rock Sand 76000 49920 Type I 19600 Air Ent Wat Red Non Chl Version 8.70 chp3_Eag.doc 03/15/02 1:16:17 PM Oz 136 664 0 Water WATER Gal 1272 3-13 Eagle User’s Manual • End of Day Operations Print Yards Per Hour How many yard per hour that the plant delivered. See sample printout below. Yards Per Hour From Plant : COMMAND ALKON Main Plant Total Yards 132.50 Total Hours 1.05 Yards Per Hour 126.19 • 3:58 PM 2Jul01 Total Loads 14 Start Time 2:45 PM 2Jul01 Page 1 Avg. Load 9.46 End Time 3:49 PM 2Jul01 Print local/comm Tickets Prints all local and comm tickets. Only works with Delivery Ticket and Communications paid options. See example below. List of All Tickets: : COMMAND ALKON Main Plant Ticket # Order 10125 2 L 121 2 Tickets Total 3-14 Cust ID 1 1 3:58 PM 2Jul01 Mix ID Qty 30455 9.00 yd3 3000-S 1.00 yd3 Total yd3 = 10.00 Total m3 = 0.00 Page Time Batched 8:22AM 22Oct00 8:28AM 22Oct00 1 Truck # 0 0 Grand Total: 10.00 yd3 • Backup Data to Disk When you first purchased the Eagle system, two formatted diskettes are included. Once you have a formatted diskette, you can perform this operation. A backup means that you are copying all the data information or files from your plant onto a floppy diskette. This includes all the Plant Setup Menu, all the information about the plant, bin contents, mix designs, jog weights and times, mix designs, customer and order information, etc. Keep the backup floppy disk in a safe place in case something happens to the computer − for example, fire, theft, mischief, roving raccoons, etc. • Clear Long Term Rcvd Inventory This will zero the Long Term Received Quantity that appears on the Daily Received Inventory Report. This does not clear the list of inventory received that appears on the Deliveries Menu. • Clear Short Term Usage Tells you how much Material you have used in your short term period. The length of the short term is up to you. If you clear short term usage out at the end of each day, then it will be a daily usage summary. If you clear it out every week, it will be a weekly usage summary. This also clears Deviation % values. Version 8.70 chp3_Eag.doc 03/15/02 1:16:17 PM Eagle User’s Manual End of Day Operations • Clear Long Term Usage Tells you how much Material you have used in a long term period. Again, you determine the length of the period. The starting date is displayed on the lower section of the Material Inventory screens: "Long Term Usage Since:" followed by the date. Whenever you clear long term usage summaries, the Eagle begins a new running tally. The long term usage date changes to the present date whenever you clear long term usage. This also clears Deviation % values. • Clear Daily Received Inventory This will zero the Total Daily Received Quantity that appears on the Daily Received Inventory Report. This also clears the list of inventory received that appears on the Deliveries Menu. It also clears the Daily Rec'd Quantities that appear on the Inventory Screens. Version 8.70 chp3_Eag.doc 03/15/02 1:16:17 PM 3-15 Eagle User’s Manual End of Day Operations • Reset Yardage Summaries This will reset the Batched and Adjusted Yardage Quantities that appear on the Summary Screen. • Reset Batch Number This will reset the batch number in the Summary screen to zero. • Reset Ticket Number This will reset the ticket number in the Summary screen to zero. • Reset Load Number This will reset the load number in the Summary screen to zero. • Delete All Tickets Deletes all tickets from the Ticket Summary screen. • Delete All Active Orders Deletes all orders that have at least one load delivered. • Review All Orders This is interactive and allows you to set up orders for the next day. • Supervisor Notes Allows you to leave messages to the batchman. Up to three lines. Press <F5> and go to the Supervisor Notes area. Type in the messages − for example, Turn off main plant breakers but leave north security light on. Press <F5> to enter all the information into the Eagle's memory. Press <F10> to return to the End of Day Screen Selection. 3-16 Version 8.70 chp3_Eag.doc 03/15/02 1:16:17 PM Eagle User’s Manual End of Day Operations Aggregate Inventory Use this menu to keep track of your Aggregate Inventory. Look at the screen. You should see a display that looks like the illustration below: There is a box, which covers the top half of the screen. In the box are several columns. Below the box is the title "Aggregate Inventory" and several "F" key prompts. Let's examine the columns in the box before working with the "F" keys. Although the numbers in the columns of the illustration will not be identical to those on your screen, these columns display all the Aggregate Inventory information for your plant. • Material Displays the names of all bin contents. You can hold up to 12 names. You pick the names for the materials in each aggregate bin. The names above are only examples. To fill in the material descriptions for the contents of the aggregate bins on your plant, refer to the "Aggregate Storage Menu" section in Chapter Four on how to change the names in this column. Version 8.70 chp3_Eag.doc 03/15/02 1:16:17 PM 3-17 Eagle User’s Manual 3-18 End of Day Operations • On Hand Inventory Tracks the depletion and usage of stored or On Hand aggregate for your plant. The On Hand Inventory is expanded by either entering aggregate through the Deliveries Screen or by adjusting the On Hand inventory. The aggregates are depleted automatically as the plant uses the material. • Short Term Tells you how much aggregate you have used in your short term period. The length of the short term is up to you. If you clear Short Term Usage out at the end of each day, then it will be a daily usage summary. If you clear it out every week, it will be a weekly usage summary. The amount of aggregate is listed in tons. Version 8.70 chp3_Eag.doc 03/15/02 1:16:17 PM Eagle User’s Manual End of Day Operations • Long Term Tells you how much aggregate you have used in a long term period. Again, you determine the length of the period. The starting date is displayed at the bottom of the box: "Long Term Usage Since:" followed by the date. Whenever you clear Long Term Usage summaries, the Eagle begins a new running tally. The Long Term Usage date changes to the present date whenever you clear Long Term Usage. Clearing Long Term Usage also clears Short Term Usage. • Deviation (%) This column refers to accumulated differences between the target weight and the actual weight in your batches. If a minus deviation (negative number) appears in this column, it means that the actual material used is less than the target weights. In this case we say that material is shorting. If the number in this column is a positive deviation (a positive number), this means that too much material is going into your mixes. Your mixes are ending up with more material than called for in the target weights. This feature tracks deviations and check it every day. Any major deviation indicates a mechanical problem with your plant. These values are cleared whenever either Short Term Usage or Long Term Usage is cleared. Version 8.70 chp3_Eag.doc 03/15/02 1:16:17 PM 3-19 Eagle User’s Manual End of Day Operations • Daily Rec'd Tracks deliveries of incoming material. On the Deliveries Screen, you enter the number of pounds you have received. The Eagle automatically converts this weight into tons and will print inventory in tons. When the incoming material is entered in the Deliveries Screen in the Materials Storage Menu, it is automatically entered in the Daily Rec'd column and On Hand column. • Yards Batched (in Auto) Located at the bottom line of the box. This line counts total number of yards batched while the Eagle is in automatic. It counts total yards batched for Short Term and Long Term Usage. Aggregate Inventory "F" Key Prompts Now that you have identified all of the columns in the box, look below the Aggregate Inventory title at the "F" key prompts. • Press <F1> = Clear Usage Summaries • Press <F4> = Print Inventory Report • Press <F5> = Edit Material On Hand • Press <F6> = Enter or edit User-defined Inventory Units • Press <F10> = Return to the End of Day Menu To make any changes to the data displayed in the inventory box, you have to start by pressing one of these "F" keys. We will explain each of these "F" keys on the next page. 3-20 Version 8.70 chp3_Eag.doc 03/15/02 1:16:17 PM Eagle User’s Manual • End of Day Operations Clear Summaries − Clear Short Term Usage To select this option from the Aggregate Inventory Menu, press <F1>. A rectangular box with three options to choose from will replace the menu prompts at the bottom of the screen: You want to select the first item on the list, which should already be highlighted. If it is not, use the arrow keys to move the highlighting bar. When you have highlighted the line that says "CLEAR Short Term Usage," press the <Enter> key. The messages inside the small box will change. They should look like the following illustration: You must know the password to clear Short Term Usage. If you do not know the password, press the <Esc> key to exit. This will bring back the Aggregate Inventory Menu. Note that the blinking cursor rests in the answer space right below the "Please enter password" message. Type in the password and press the <Enter> key. If you type in a password that is incorrect, a line of stars will fill up the answer blank, and a message will appear, "Bad password." But the cursor is still in the answer space. Try again by typing in the correct password. If you can't get the password, press <Esc> to exit. When you do type in the correct password, all the numbers including yards batched in the Short Term column will change to zero. Also the Deviation is zeroed. Version 8.70 chp3_Eag.doc 03/15/02 1:16:17 PM 3-21 Eagle User’s Manual − End of Day Operations Clear Long Term Usage To select this option from the Aggregate Inventory Menu, press <F1>. The menu prompts at the bottom of the screen will be replaced by the three options you saw when you wanted to clear Short Term Usage. You want to select the second item on the list. Use the arrow keys to move the highlighting bar down one. When you have highlighted the line that says "CLEAR Long Term Usage," press the <Enter> key. The messages inside the small box will change. They should look like the following illustration: You must know the password to clear Long Term Usage. If you do not know the password, press the <Esc> key to exit. This will bring back the Aggregate Inventory Menu. Note that the blinking cursor rests in the answer space right below the "Please enter password" message. Type in the password and press the <Enter> key. If you type in a password that is incorrect, a line of stars will fill up the answer blank, and a message will appear, "Bad password." But the cursor is still in the answer space. Try again by typing in the correct password. If you can't get the password, press <Esc> to exit. When you do type in the correct password, all the numbers including yards batched in the Long Term column will change to zero. Also, the message at the bottom of the box, "Long Term Usage Since:" will change to show the current time and date. The Eagle will begin to tally up the Long Term Usage from this time on. Finally, the Deviation will be zeroed. 3-22 Version 8.70 chp3_Eag.doc 03/15/02 1:16:17 PM Eagle User’s Manual − End of Day Operations Clear Daily Received Inventory To select this option from the Aggregate Inventory Menu, press <F1>. The menu prompts at the bottom of the screen will be replaced by the three options you saw when you wanted to clear Short Term Usage or Long Term Usage. You want to select the third item on the list. Use the arrow keys to move the highlighting bar down two. When you have highlighted the line that says "CLEAR Daily Received Inventory," press the <Enter> key. The messages inside the small box will change. They should look like the illustration below: You must know the password to clear the Daily Received Inventory. If you do not know the password, press the <Esc> key to exit. This will bring back the Aggregate Inventory Menu. Note that the blinking cursor rests in the answer space right below the "Please enter password" message. Type in the password and press the <Enter> key. If you type in a password that is incorrect, a line of stars will fill up the answer blank, and a message will appear, "Bad password." But the cursor is still in the answer space. Try again by typing in the correct password. If you can't get the password, press <Esc> to exit. When you do type in the correct password, all the values for Daily Rec'd are zeroed. In all these Clear Summaries functions, after you clear out one of the usage columns, the screen will return back to the Aggregate Inventory Menu, complete with "F" key prompts at the bottom. If you want to perform another Clear Summaries function, you will have to begin all over again. Press <F1>, enter the password, move the highlighting bar with the arrow keys to select the option you want, and press the <Enter> key. Version 8.70 chp3_Eag.doc 03/15/02 1:16:17 PM 3-23 Eagle User’s Manual End of Day Operations • Print Inventory Report Press <F4> to print out the information displayed on the screen. This will give you a permanent record of Short Term and Long Term Usage, the day's percent deviation, and the material received that day. In short, the Eagle will print out what currently shows on your Aggregate Inventory screen, Cement Inventory screen, and Admix Inventory screen plus moisture summaries on all aggregates. Before you clear out all your daily usage summaries, you might want to keep a record of the daily business. By printing out an inventory report first, you can keep a permanent record of the day's inventory. Save the report as End of Day. • Edit Material On Hand This feature is helpful when you want to change incorrect value on your inventory. Some of the inventory could be sold, contaminated, or transferred to another plant; therefore you need an option to edit the inventory. It is possible to have negative value on the Material On Hand column because you choose not to inventory a particular class of material such as aggregate. To show how much material that has been used, set the On Hand to zero, and the Eagle will maintain a negative balance of Material On Hand. A scale inaccuracy will affect your On Hand Inventory. Manual batching without security option will also affect inventory when batched outside of the Batching/Storage section of the program. Press <F5> to make changes to the On Hand column. When you press <F5>, the Aggregate Inventory "F" key prompts are replaced by another long box. You must enter the password. The cursor already rests in the answer blank. You just have to type in the number and press the <Enter> key. If you get the password wrong, stars will appear in the answer blank, and the Eagle will tell you "Bad password." But the cursor remains in the answer blank so that you can try again. If you do not know the password, press the <Esc> key to return to the Aggregate Inventory Menu. Once you have entered the correct password, the screen will show the On Hand column highlighted. The cursor rests at the top line. Now you can change the values in any of the materials. By pressing the <Enter> key, you can skip down the column and change the numbers you want to change. You can also move the cursor up and down with the arrow keys. Notice that the cursor will not move beyond the highlighted area. • User-defined Inventory Units This feature is used when you want to receive inventory in different unit than what you sell the inventory at. Pressing the <F6> key will display the setup information for that material class. Editing of the setups is protected by the Supervisor Editing password. The setup information consists of twelve numeric fields for entering a conversion factor for each material, a 4-character text field for entering the units label, and a Yes/No field to tell the Eagle if it should use the user-defined units. The units label will appear on the Deliveries Menu, on the inventory screen, and on the Inventory and Delivery reports. The conversion factors are used when adjusting the on-hand inventory and long-term and short-term usage for each load batched. 3-24 Version 8.70 chp3_Eag.doc 03/15/02 1:16:17 PM Eagle User’s Manual Note: End of Day Operations The on-hand inventory quantities are not changed when values are edited in the user-defined conversion factor fields. Any time the conversion factors are edited, the Eagle will notify the operator to check the on-hand quantities. If the on-hand quantities were in tons before enabling user-defined units, they must be manually converted to the user-defined units for the inventory tracking to remain accurate. If the Eagle is using the Communications option, and the Dispatch computer requests the inventory for a material with user-defined units, the returned inventory message will have quantities in user-defined units, and the user-defined units label will appear in the units field of the message. All batching is still done in weight units (lb. or kg.), and the actual weights from the batch results are converted to user-defined units for updating the inventory records. When you have made all changes to the On Hand column, press <F5> to enter the new numbers. Then press <F10> to return to the Aggregate Inventory Menu. When you have made all the adjustments to the Aggregate Inventory Menu and are ready to move on to another task, press <F10>. This will bring you back to the End of Day Menu where you can perform the next end of day task. Version 8.70 chp3_Eag.doc 03/15/02 1:16:17 PM 3-25 Eagle User’s Manual End of Day Operations Cement Inventory Use this menu to keep track of your Cement Inventory. Look at the screen. You should see a display that looks like the illustration below: There is a box, which covers the top half of the screen. In the box are several columns. Below the box is the title "Cement Inventory" and several "F" key prompts. Let's examine the columns in the box before working with the "F" keys. Although the numbers in the columns of the illustration will not be identical to those on your screen, these columns display all the Cement Inventory information for your plant. • Material Displays the names of all bin contents. You can hold up to 12 names. You pick the names for the materials in each cement bin. The names above are only examples. To fill in the material descriptions for the contents of the cement bins on your plant, refer to the "Cement Storage Menu" section in Chapter Four on how to change the names in this column. 3-26 Version 8.70 chp3_Eag.doc 03/15/02 1:16:17 PM Eagle User’s Manual End of Day Operations • On Hand Inventory Tracks the depletion and usage of stored or On Hand cement for your plant. The On Hand Inventory is expanded by either entering cement through the Deliveries Screen or by adjusting the On Hand inventory. The cements are depleted automatically as the plant uses the material. • Short Term Tells you how much cement you have used in your short term period. The length of the short term is up to you. If you clear Short Term Usage out at the end of each day, then it will be a daily usage summary. If you clear it out every week, it will be a weekly usage summary. The amount of cement is listed in tons. Version 8.70 chp3_Eag.doc 03/15/02 1:16:17 PM 3-27 Eagle User’s Manual 3-28 End of Day Operations • Long Term Tells you how much admix you have used in a long term period. Again, you determine the length of the period. The starting date is displayed at the bottom of the box: "Long Term Usage Since:" followed by the date. Whenever you clear Long Term Usage summaries, the Eagle begins a new running tally. The Long Term Usage date changes to the present date whenever you clear Long Term Usage. • Deviation (%) This column refers to accumulated differences between the target weight and the actual weight in your batches. If a minus deviation (negative number) appears in this column, it means that the actual material used is less than the target weights. In this case we say that material is shorting. If the number in this column is a positive deviation (a positive number), this means that too much material is going into your mixes. Your mixes are ending up with more material than called for in the target weights. This feature tracks deviations and checks it every day. Any major deviation indicates a mechanical problem with your plant. These values are cleared whenever either Short Term Usage or Long Term Usage is cleared. Version 8.70 chp3_Eag.doc 03/15/02 1:16:17 PM Eagle User’s Manual End of Day Operations • Daily Rec'd Tracks deliveries of incoming material. On the Deliveries Screen, you enter the number of pounds you have received. The Eagle automatically converts this weight into tons and will print inventory in tons. When the incoming material is entered in the Deliveries Screen in the Materials Storage Menu, it is automatically entered in the Daily Rec'd column and On Hand column. • Yards Batched (in Auto) Located at the bottom line of the box. This line counts total number of yards batched while the Eagle is in automatic. It counts total yards batched for Short Term and Long Term Usage. Cement Inventory "F" Key Prompts Now that you have identified all of the columns in the box, look below the Cement Inventory title at the "F' key prompts. • Press <F1> = Clear Usage Summaries • Press <F4> = Print Inventory Report • Press <F5> = Edit Material On Hand • Press <F6> = Enter or edit User-defined Inventory Units • Press <F10> = Return to the End of Day Menu To make any changes to the data displayed in the inventory box, you have to start by pressing one of these "F" keys. We will explain each of these "F" keys on the next page. Version 8.70 chp3_Eag.doc 03/15/02 1:16:17 PM 3-29 Eagle User’s Manual • End of Day Operations Clear Summaries − Clear Short Term Usage To select this option from the Cement Inventory Menu, press <F1>. A rectangular box with three options to choose from will replace the menu prompts at the bottom of the screen: You want to select the first item on the list, which should already be highlighted. If it is not, use the arrow keys to move the highlighting bar. When you have highlighted the line that says "CLEAR Short Term Usage," press the <Enter> key. The messages inside the small box will change. They should look like the following illustration: You must know the password to clear Short Term Usage. If you do not know the password, press the <Esc> key to exit. This will bring back the Cement Inventory Menu. Note that the blinking cursor rests in the answer space right below the "Please enter password" message. Type in the password and press the <Enter> key. If you type in a password that is incorrect, a line of stars will fill up the answer blank, and a message will appear, "Bad password." But the cursor is still in the answer space. Try again by typing in the correct password. If you can't get the password, press <Esc> to exit. When you do type in the correct password, all the numbers including yards batched in the Short Term column will change to zero. Also the Deviation is zeroed. 3-30 Version 8.70 chp3_Eag.doc 03/15/02 1:16:17 PM Eagle User’s Manual − End of Day Operations Clear Long Term Usage To select this option from the Cement Inventory Menu, press <F1>. The menu prompts at the bottom of the screen will be replaced by the three options you saw when you wanted to clear Short Term Usage. You want to select the second item on the list. Use the arrow keys to move the highlighting bar down one. When you have highlighted the line that says "CLEAR Long Term Usage," press the <Enter> key. The messages inside the small box will change. They should look like the following illustration: You must know the password to clear long term usage. If you do not know the password, press the <Esc> key to exit. This will bring back the Cement Inventory Menu. Note that the blinking cursor rests in the answer space right below the "Please enter password" message. Type in the password and press the <Enter> key. If you type in a password that is incorrect, a line of stars will fill up the answer blank, and a message will appear, "Bad password." But the cursor is still in the answer space. Try again by typing in the correct password. If you can't get the password, press <Esc> to exit. When you do type in the correct password, all the numbers including yards batched in the Long Term column will change to zero. Also, the message at the bottom of the box, "Long Term Usage Since:" will change to show the current time and date. The Eagle will begin to tally up the long term usage from this time on. Finally, the Deviation will be zeroed. Version 8.70 chp3_Eag.doc 03/15/02 1:16:17 PM 3-31 Eagle User’s Manual − End of Day Operations Clear Daily Received Inventory To select this option from the Cement Inventory Menu, press <F1>. The menu prompts at the bottom of the screen will be replaced by the three options you saw when you wanted to clear Short Term Usage or Long Term Usage. You want to select the third item on the list. Use the arrow keys to move the highlighting bar down two. When you have highlighted the line that says "CLEAR Daily Received Inventory," press the <Enter> key. The messages inside the small box will change. They should look like the illustration below: You must know the password to clear the Daily Received Inventory. If you do not know the password, press the <Esc> key to exit. This will bring back the Cement Inventory Menu. Note that the blinking cursor rests in the answer space right below the "Please enter password" message. Type in the password and press the <Enter> key. If you type in a password that is incorrect, a line of stars will fill up the answer blank, and a message will appear, "Bad password." But the cursor is still in the answer space. Try again by typing in the correct password. If you can't get the password, press <Esc> to exit. When you do type in the correct password, all the values for Daily Rec'd are zeroed. In all these Clear Summaries functions, after you clear out one of the usage columns, the screen will return back to the Cement Inventory Menu, complete with "F" key prompts at the bottom. If you want to perform another Clear Summaries function, you will have to begin all over again. Press <F1>, enter the password, move the highlighting bar with the arrow keys to select the option you want, and press the <Enter> key. 3-32 Version 8.70 chp3_Eag.doc 03/15/02 1:16:17 PM Eagle User’s Manual End of Day Operations • Print Inventory Press <F4> to print out the information displayed on the screen. This will give you a permanent record of Short Term and Long Term Usage, the day's percent deviation, and the material received that day. In short, the Eagle will print out what currently shows on your Aggregate Inventory screen, Cement Inventory screen, and Admix Inventory screen plus summaries on all aggregates. Before you clear out all your daily usage summaries, you might want to keep a record of the daily business. By printing out an inventory report first, you can keep a permanent record of the day's inventory. Save the report as End of Day. • Edit Material On Hand This feature is helpful when you want to change incorrect value on your inventory. Some of the inventory could be sold, contaminated, or transferred to another plant; therefore you need an option to edit the inventory. It is possible to have negative value on the Material On Hand column because you choose not to inventory a particular class of material such as cement. To show how much material that has been used, set the On Hand to zero, and the Eagle will maintain a negative balance of Material On Hand. A scale inaccuracy will affect your On Hand Inventory. Manual batching without security option will also affect inventory when batched outside of the Batching/Storage section of the program. Press <F5> to make changes to the On Hand column. When you press <F5>, the Cement Inventory "F" another long box replaces key prompts. You must enter the password. The cursor already rests in the answer blank. You just have to type in the number and press the <Enter> key. If you get the password wrong, stars will appear in the answer blank, and the Eagle will tell you "Bad password." But the cursor remains in the answer blank so that you can try again. If you do not know the password, press the <Esc> key to return to the Cement Inventory Menu. Once you have entered the correct password, the screen will show the On Hand column highlighted. The cursor rests at the top line. Now you can change the values in any of the materials. By pressing the <Enter> key, you can skip down the column and change the numbers you want to change. You can also move the cursor up and down with the arrow keys. Notice that the cursor will not move beyond the highlighted area. • User-defined Inventory Units This feature is used when you want to receive inventory in different unit than what you sell the inventory at. Pressing the <F6> key will display the setup information for that material class. Editing of the setups is protected by the Supervisor Editing password. The setup information consists of twelve numeric fields for entering a conversion factor for each material, a 4-character text field for entering the units label, and a Yes/No field to tell the Eagle if it should use the user-defined units. The units label will appear on the Deliveries Menu, on the inventory screen, and on the Inventory and Delivery reports. If user-defined units are used for the cement class materials, the units label will appear on the Cement Tracking Menu as well. The conversion factors are used when adjusting the on-hand inventory and long-term and short-term usage for each load batched. Version 8.70 chp3_Eag.doc 03/15/02 1:16:17 PM 3-33 Eagle User’s Manual Note: End of Day Operations The on-hand inventory quantities are not changed when values are edited in the user-defined conversion factor fields. Any time the conversion factors are edited, the Eagle will notify the operator to check the on-hand quantities. If the on-hand quantities were in tons before enabling user-defined units, they must be manually converted to the user-defined units for the inventory tracking to remain accurate. If the Eagle is using the Communications option, and the Dispatch computer requests the inventory for a material with user-defined units, the returned inventory message will have quantities in user-defined units, and the user-defined units label will appear in the units field of the message. All batching is still done in weight units (lb. or kg.), and the actual weights from the batch results are converted to user-defined units for updating the inventory records. For example, to inventory cement in 94 lb. sacks, enter ‘94.00’ as the value in each of the conversion factor fields, enter ‘Sack’ in the units label field, and enter ‘Y’ to indicate that you wish to use user-defined inventory units. The Cement Inventory screen will show ‘Sack’ as the units in the column headings. Deliveries will be entered in ‘Sacks’, and all inventory and delivery reports will indicate quantities in ‘Sacks’. The Cement Tracking screen and pop-up Inventory Status screen will also show quantities in ‘Sacks’. When you have made all changes to the On Hand column, press <F5> to enter the new numbers. Then press <F10> to return to the Cement Inventory Menu. When you have made all the adjustments to the Cement Inventory Menu and are ready to move on to another task, press <F10>. This will bring you back to the End of Day Menu where you can perform the next end of day task. 3-34 Version 8.70 chp3_Eag.doc 03/15/02 1:16:17 PM Eagle User’s Manual End of Day Operations Admix Inventory Use this menu to keep track of your Admix Inventory. Look at the screen. You should see a display that looks like the illustration below: There is a box, which covers the top half of the screen. In the box are several columns. Below the box is the title "Admix Inventory" and several "F" key prompts. Let's examine the columns in the box before working with the "F" keys. Although the numbers in the columns of the illustration will not be identical to those on your screen, these columns display all the Admix Inventory information for your plant. • Material Displays the names of all bin contents. You can hold up to 12 names. You pick the names for the materials in each admix bin. The names above are only examples. To fill in the material descriptions for the contents of the admix bins on your plant, refer to the "Admix Storage Menu" section in Chapter Four on how to change the names in this column. Version 8.70 chp3_Eag.doc 03/15/02 1:16:17 PM 3-35 Eagle User’s Manual 3-36 End of Day Operations • On Hand Inventory Tracks the depletion and usage of stored or On Hand admix for your plant. The On Hand Inventory is expanded by either entering admix through the Deliveries Screen or by adjusting the On Hand inventory. The admixes are depleted automatically as the plant uses the material. • Short Term Tells you how much admix you have used in your short term period. The length of the short term is up to you. If you clear Short Term Usage out at the end of each day, then it will be a daily usage summary. If you clear it out every week, it will be a weekly usage summary. The amount of admix is listed in gallons. Version 8.70 chp3_Eag.doc 03/15/02 1:16:17 PM Eagle User’s Manual End of Day Operations • Long Term Tells you how much admix you have used in a long term period. Again, you determine the length of the period. The starting date is displayed at the bottom of the box: "Long Term Usage Since:" followed by the date. Whenever you clear Long Term Usage summaries, the Eagle begins a new running tally. The Long Term Usage date changes to the present date whenever you clear Long Term Usage. Clearing Long Term Usage also clears Short Term Usage. • Deviation (%) This column refers to accumulated differences between the target weight and the actual weight in your batches. If a minus deviation (negative number) appears in this column, it means that the actual material used is less than the target weights. In this case we say that material is shorting. If the number in this column is a positive deviation (a positive number), this means that too much material is going into your mixes. Your mixes are ending up with more material than called for in the target weights. This feature tracks deviations and check it every day. Any major deviation indicates a mechanical problem with your plant. These values are cleared whenever either Short Term Usage or Long Term Usage is cleared. Version 8.70 chp3_Eag.doc 03/15/02 1:16:17 PM 3-37 Eagle User’s Manual End of Day Operations • Daily Rec'd Tracks deliveries of incoming material. On the Deliveries Screen, you enter the number of gallons you have received. When the incoming material is entered in the Deliveries Screen in the Materials Storage Menu, it is automatically entered in the Daily Rec'd column and On Hand column. • Yards Batched (in Auto) Located at the bottom line of the box. This line counts total number of yards batched while the Eagle is in automatic. It counts total yards batched for Short Term and Long Term usage. Admix Inventory "F" Key Prompts Now that you have identified all of the columns in the box, look below the Admix Inventory title at the "F" key prompts. • Press <F1> to Clear Usage Summaries • Press <F4> to Print Inventory Report • Press <F5> to Edit Material On Hand • Press <F10> to return to the End of Day Menu To make any changes to the data displayed in the inventory box, you have to start by pressing one of these "F" keys. We will explain each of these "F" keys on the next page. 3-38 Version 8.70 chp3_Eag.doc 03/15/02 1:16:17 PM Eagle User’s Manual • End of Day Operations Clear Summaries − Clear Short Term Usage To select this option from the Admix Inventory Menu, press <F1>. A rectangular box with three options to choose from will replace the menu prompts at the bottom of the screen: You want to select the first item on the list, which should already be highlighted. If it is not, use the arrow keys to move the highlighting bar. When you have highlighted the line that says "CLEAR Short Term Usage," press the <Enter> key. The messages inside the small box will change. They should look like the following illustration: You must know the password to clear Short Term Usage. If you do not know the password, press the <Esc> key to exit. This will bring back the Admix Inventory Menu. Note that the blinking cursor rests in the answer space right below the "Please enter password" message. Type in the password and press the <Enter> key. If you type in a password that is incorrect, a line of stars will fill up the answer blank, and a message will appear, "Bad password." But the cursor is still in the answer space. Try again by typing in the correct password. If you can't get the password, press <Esc> to exit. When you do type in the correct password, all the numbers including yards batched in the Short Term column will change to zero. Also the Deviation is zeroed. Version 8.70 chp3_Eag.doc 03/15/02 1:16:17 PM 3-39 Eagle User’s Manual − End of Day Operations Clear Long Term Usage To select this option from the Admix Inventory Menu, press <F1>. The menu prompts at the bottom of the screen will be replaced by the three options you saw when you wanted to clear Short Term Usage. You want to select the second item on the list. Use the arrow keys to move the highlighting bar down one. When you have highlighted the line that says "CLEAR Long Term Usage," press the <Enter> key. The messages inside the small box will change. They should look like the following illustration: You must know the password to clear long term usage. If you do not know the password, press the <Esc> key to exit. This will bring back the Admix Inventory Menu. Note that the blinking cursor rests in the answer space right below the "Please enter password" message. Type in the password and press the <Enter> key. If you type in a password that is incorrect, a line of stars will fill up the answer blank, and a message will appear, "Bad password." But the cursor is still in the answer space. Try again by typing in the correct password. If you can't get the password, press <Esc> to exit. When you do type in the correct password, all the numbers including yards batched in the Long Term column will change to zero. Also, the message at the bottom of the box, "Long Term Usage Since:" will change to show the current time and date. The Eagle will begin to tally up the Long Term Usage from this time on. Finally, the Deviation will be zeroed. 3-40 Version 8.70 chp3_Eag.doc 03/15/02 1:16:17 PM Eagle User’s Manual − End of Day Operations Clear Daily Received Inventory To select this option from the Admix Inventory Menu, press <F1>. The menu prompts at the bottom of the screen will be replaced by the three options you saw when you wanted to clear Short Term Usage or Long Term Usage. You want to select the third item on the list. Use the arrow keys to move the highlighting bar down two. When you have highlighted the line that says "CLEAR Daily Received Inventory," press the <Enter> key. The messages inside the small box will change. They should look like the illustration below: You must know the password to clear the Daily Received Inventory. If you do not know the password, press the <Esc> key to exit. This will bring back the Admix Inventory Menu. Note that the blinking cursor rests in the answer space right below the "Please enter password" message. Type in the password and press the <Enter> key. If you type in a password that is incorrect, a line of stars will fill up the answer blank, and a message will appear, "Bad password." But the cursor is still in the answer space. Try again by typing in the correct password. If you can't get the password, press <Esc> to exit. When you do type in the correct password, all the values for Daily Rec'd are zeroed. In all these Clear Summaries functions, after you clear out one of the usage columns, the screen will return back to the Admix Inventory Menu, complete with "F" key prompts at the bottom. If you want to perform another Clear Summaries function, you will have to begin all over again. Press <F1>, enter the password, move the highlighting bar with the arrow keys to select the option you want, and press the <Enter> key. Version 8.70 chp3_Eag.doc 03/15/02 1:16:17 PM 3-41 Eagle User’s Manual End of Day Operations • Print Inventory Press <F4> to print out the information displayed on the screen. This will give you a permanent record of Short Term and Long Term Usage, the day's percent deviation, and the material received that day. In short, the Eagle will print out what currently shows on your Aggregate Inventory screen, Cement Inventory screen, Admix Inventory screen plus summaries on all aggregates. Before you clear out all your daily usage summaries, you might want to keep a record of the daily business. By printing out an inventory report first, you can keep a permanent record of the day's inventory. Save the report as End of Day. • Edit Material On Hand This feature is helpful when you want to change incorrect value on your inventory. Some of the inventory could be sold, contaminated, or transferred to another plant; therefore you need an option to edit the inventory. It is possible to have negative value on the Material On Hand column because you choose not to inventory a particular class of material such as admix. To show how much material that has been used, set the On Hand to zero, and the Eagle will maintain a negative balance of Material On Hand. A meter inaccuracy will affect your On Hand Inventory. Manual batching without security option will also affect inventory when batched outside of the Batching/Storage section of the program. Press <F5> to make changes to the On Hand column. When you press <F5>, the Admix Inventory "F" another long box replaces key prompts. You must enter the password. The cursor already rests in the answer blank. You just have to type in the number and press the <Enter> key. If you get the password wrong, stars will appear in the answer blank, and the Eagle will tell you "Bad password." But the cursor remains in the answer blank so that you can try again. If you do not know the password, press the <Esc> key to return to the Admix Inventory Menu. Once you have entered the correct password, the screen will show the On Hand column highlighted. The cursor rests at the top line. Now you can change the values in any of the materials. By pressing the <Enter> key, you can skip down the column and change the numbers you want to change. You can also move the cursor up and down with the arrow keys. Notice that the cursor will not move beyond the highlighted area. When you have made all changes to the On Hand column, press <F5> to enter the new numbers. Then press <F10> to return to the Admix Inventory Menu. When you have made all the adjustments to the Admix Inventory Menu and are ready to move on to another task, press <F10>. This will bring you back to the End of Day Menu where you can perform the next end of day task. 3-42 Version 8.70 chp3_Eag.doc 03/15/02 1:16:17 PM Eagle User’s Manual End of Day Operations Cement Tracking By using the Cement Tracking feature, the computer will alert the operator when his Cement Inventory drops below a selected amount. Compare your screen to the one below: Every time you press "F5 = Batch this one" in the Batch Setup Menu, the computer checks the cement inventory to determine if the inventory is below the value you have placed in the Low Bin Alarm column. When the computer finds the Cement Inventory below this setpoint, it will flash a message on the Batch Screen telling you "Cement Bin Low - by X trucks", where X is the number of trucks to refill the cement bin. If the cement bin inventory is above the setpoint, no message will be displayed. • Silo Capacity The volumetric size of the cement silo minus the fluff factor of the cement or flyash. • Low Bin Alarm The least amount of Material On Hand before the operator is notified through the Batch Screen. When the material has reached the low limit, it is time to reorder. The warning includes the number of trucks needed to refill the silo. • Truck Capacity The average net weight of all the trucks delivering cement or flyash to your plant. • Trucks Low The number of trucks needed to refill the silo. Version 8.70 chp3_Eag.doc 03/15/02 1:16:17 PM 3-43 Eagle User’s Manual End of Day Operations Tickets Summary Note: This screen will ONLY appear if you have Eagle Order Entry/Ticket Printing Paid Option. The Tickets Summary Menu holds up to 200/400 optional tickets after they have been batched, which helps you keep a detailed record of your plant's daily activity. Each ticket is a record of an amount of concrete batched. The ticket can account for one load of concrete, or a multiple load batch. Compare your screen to the illustration below: Inside the menu the Eagle displays one ticket at a time. The tickets displayed here are records of what has been batched so that the information gets typed in while setting up a batch and recorded when that ticket is batched. Refer to the "Order Entry Titles" section in Chapter Two for more information. Let's discuss each of the information in a ticket. • • 3-44 Ticket The ticket number that was assigned to the batch. Order The alphanumeric identification of an order. • Cust ID The alphanumeric identification of a customer. • Truck# The truck that carried the concrete. • Mix ID The alphanumeric identification of the mix design. • Size The cubic yard or meter delivered in that batch. Version 8.70 chp3_Eag.doc 03/15/02 1:16:17 PM Eagle User’s Manual End of Day Operations • Adjust The resold concrete included in the batch size. • Time Batched The time that the concrete was batched. • COD?. . .Y/N If <Y>, the customer will pay for the concrete by COD (Cash On Delivery). Prices will be printed on a COD ticket. • Price The total cost of the concrete per yard. • Tax Total tax applies to the price. Near the bottom of the box is a list of six extra products. Information on extra products is also carried over from the ticket. Any extra products you include in a batch will automatically appear on the ticket summary for that batch. Refer to the "Extra Products Storage" section in Chapter Four for more information. • Qty How many of the product that was sent with the load. • Per /?. . .Load, yd3, or m3 The Eagle calculates the prices of extra products based on Per Yard3, Per Meter, or Per Load. - The Yard3 field is based on the batch size in customary units. - The Meter3 field is based on batch size in metric units. - The Load field is based on quantity per load. For example: Extra product: color, Unit price: $12 on the Extra Storage Menu; Qty: 5 on the Extra Products menu; Load size: 10 yards. If the “Per /?” is set to yd3, the price of color for this order will be 5 * 10 * $12 = $600. If the “Per /?” is set to M3, the price of color for this order will be 5 * 7.65 * $12 = $459. If the “Per /?” is set to Load, the price of color for this order will be 5 * $12 = $60. If the allow Dual Units is set to “N”, the “Per /?” will only have two choices depending on the Base Plant Units. - For Base Plant Units set to metric you would have Load and M3. - For Base Plant Units set to customary you would have Load and yd3. • ID The alphanumeric identification of a product. • Description Description of the product in reference to the ID column. Version 8.70 chp3_Eag.doc 03/15/02 1:16:17 PM 3-45 Eagle User’s Manual 3-46 • Unit Price Refers to the individual cost of the product. • Tax Refers to the individual tax of the product. Version 8.70 chp3_Eag.doc 03/15/02 1:16:17 PM End of Day Operations Eagle User’s Manual • End of Day Operations Find A Ticket You can find a ticket in two ways: one way is to scroll up or downs through the list, displaying each ticket one at a time in the main box. To go up through the list, press the <Page Up> key. To go down through the list, press the <Page Down> key. These <Page Up> and <Page Down> keys are located on the right side of your keyboard. When you come to the end of the list, the message, "No Such" appears on the screen, telling you that you can go no further. But you can reverse direction, simply by pressing the other key. The second way to find a ticket is to use the <F1> key. Look down below the title "Ticket Summary Menu" and locate the notation for <F1>. It says "FIND a Ticket." Press <F1> on your keyboard. A long narrow box replaces the menu at the bottom of the screen with two messages in it. See illustration below: If you want to return to the Ticket Summary Menu, press the <Esc> key. If you want to find a ticket, type in the ticket number. Notice that the cursor is already resting in the answer space. After you type in the number, press the <Enter> key. If you enter a number that does not match a ticket number in the Tickets Summary Menu, the screen will flash a message, "Not Found." Don't worry, you can type in another number without any big problems. The cursor is at the beginning of the space again, and you just have to type the correct number over the stars. Once you enter a correct ticket number, that ticket will appear in the main box in the middle of the screen, and the original Tickets Summary Menu prompts return. • Delete All Tickets At the End of Day, if you are finished with the order, you can delete all tickets. But if you are to going use it tomorrow, do not delete all tickets. To delete all tickets from the file, press <F3>. The prompts at the bottom of the screen are replaced by a message: If you do not want to delete all tickets, type <N>. This will return you to the Tickets Summary Menu without making any changes. If you do want to delete all tickets, type the letter <Y>. The message at the bottom of the screen changes again. See below. Version 8.70 chp3_Eag.doc 03/15/02 1:16:17 PM 3-47 Eagle User’s Manual • End of Day Operations This is a security feature that will prevent unauthorized clearing of the ticket memory. Notice that the cursor is blinking in the first space of the highlighted blank. Type in the password. When you enter the correct password the Eagle will pause. You may think that it is not doing anything. Actually, the Eagle is deleting the tickets, but since it takes a while, you will have to wait. This should only last for several seconds. When the Eagle has cleared the ticket memory, the Tickets Summary Menu prompts will appear again at the bottom of the screen. And the number at the top right border of the box will say "0 of 200/400 used." Print Ticket Summary To select print options from this menu, press <F4>. The bottom of the screen will show the following message: Notice that the first of these three options is highlighted. Use the up or down arrow keys to highlight the option you want to select. Next, press the <Enter> key to begin printing. − Print All Tickets Prints out a list of all the day's tickets by ticket number. If you have voided, edited, or local tickets, there will be a notation beside the ticket number, either a "v" for voided, an "m" for modified, or a "L" for local. Look at the sample printout below. List of ALL Tickets : CDI/COMMAND ALKON Main Plant Ticket # L L L L L L L − 44 45 46 47 48 49 50 m m v 5:39 PM 2Jul99 Page Order Cust ID Mix ID Qty 2 1 1 2 1 1 2 4 2 2 4 2 2 4 11 16 16 11 16 16 11 10.00 10.00 10.00 10.00 10.00 10.00 10.00 Time Batched 3:04 PM 3:11 PM 3:13 PM 3:36 PM 3:38 PM 3:42 PM 3:44 PM 1 Truck # 2Jul99 2Jul99 2Jul99 2Jul99 2Jul99 2Jul99 2Jul99 232 287 306 234 235 240 243 Print local/comm Tickets Prints all tickets both local and comm. Works only with Delivery and Commutations paid Options. List of All Tickets: : COMMAND ALKON Main Plant Ticket # Order 10125 2 L 121 2 Tickets Total 3-48 Version 8.70 chp3_Eag.doc 03/15/02 1:16:17 PM Cust ID 1 1 3:58 PM 22Oct98 Mix ID Qty 30455 9.00 yd3 3000-S 1.00 yd3 Total yd3 = 10.00 Total m3 = 0.00 Page Time Batched 8:22AM 22Oct98 8:28AM 22Oct98 1 Truck # 0 0 Grand Total: 10.00 yd3 Eagle User’s Manual − End of Day Operations Print Tickets By Order Prints out a list of the day's tickets but arranges them according to the order. In other words, all tickets that were batched to fill an order are grouped together. See sample printout below. List of Tickets by Order Name : COMMAND ALKON Main Plant Order: 5:39 PM 2Jul99 Page 1 1 Cust ID: HALL CONSTRUCTION 4088 LOOP 12 DALLAS, TX 75990 Ticket # Time Date Del Adr: 4335 ROYAL LANE DALLAS, TX 75226 Truck L 45 m 3:11 PM 2Mar98 287 L 46 v 3:13 PM 2Mar98 306 1 Tickets Total Qty Product ID Unit Price 10.00 10.00 10.00 10.00 16 2 16 2 10.00 Yards 52.00 1.00 52.00 1.00 $ 530.00 Tax 8.750% 8.250% 8.750% 8.250% Total 576.33 (573.73) $ 46.33 $ 576.33 1 Tickets Voided − Print Invoices By Order Prints out all outstanding invoices by the order. The title "CUSTOMER INVOICE" appears in the top right corner. Each order includes all tickets that have not yet been paid. The arrangement is just like the Tickets By Order described above, except that only those tickets which have not been paid are listed. At the end of the invoice, the number of tickets, total yards, price, and tax are all totaled up. See sample printout below. CUSTOMER INVOICE Order: 1 5:53 PM Cust ID: 2 HALL CONSTRUCTION 4088 LOOP 12 DALLAS, TX 75990 For: ...................... OrderBy: JOHN H. Use: ............ SLAB Ticket # L 45 m Please remit payment to: chp3_Eag.doc 03/15/02 1:16:17 PM Date 3:11 PM 2Jul99 1 Tickets Total Version 8.70 Del Adr: 4335 ROYAL LANE DALLAS, TX 75226 PO#:......... 338412 Plant #: 1 Time 2Jul99 Zone: 1 Job #: ......... 4837 Slump: ... 3 " Due at: ASAP Phone: ..214-555-9032 (M) Truck 287 Qty Product ID Unit Price 10.00 10.00 10 Yards 16 2 52.00 1.00 $ 530.00 Tax 8.750% 8.250% Total 576.33 $ 46.33 $ 576.33 Command Alkon Inc. 605 East Safari Pkwy #C4 Grand Prairie, TX 75050 3-49 Eagle User’s Manual • End of Day Operations Edit This Ticket To edit a ticket, the first thing to do is display it on the screen. Look back to the section within this chapter called, "To Find a Ticket," if you do not know how to display the ticket you want on the screen. You must have the ticket that you want to edit in the box in the middle of the screen before you can begin editing. Once you have the ticket you want to edit on the screen, press <F5>. The menu prompts at the bottom of the screen will be replaced by a message: Type in the correct password. If you do not know the password, press the <Esc> key to return to the Tickets Summary Menu. When you type in the correct password, the ticket currently displayed on the screen will become highlighted. You can make changes to any of these highlighted spaces. − Modify A Ticket You can make changes to any of the highlighted spaces on the screen, simply by typing new information over the old. When you have made the changes that you want, press <F5> to enter the changes. As soon as you enter the changes, a message − "Modified Ticket" − appears in the bottom of the box. Compare your screen to the following illustration: 14 of 200 used Ticket: Mix ID: COD ? 0 1001 N Extra Products: Qty: Per /? 0.00 0.00 0.00 0.00 0.00 0.00 Modified Ticket Order: Size: Price: $ ID: 7 9.00 yds 12.00 Description Cust ID: Fishel Truck#: Adjust: Tax: Time Batched: 2:55 PM 24Jun01 0.00 yds 8.250 % Unit Price $ 0.00 $ 0.00 $ 0.00 $ 0.00 $ 0.00 $ 0.00 7 Tax: 0.000 % 0.000 % 0.000 % 0.000 % 0.000 % 0.000 % Entered: 1:32 PM 28Aug01 When you print out any of the ticket summaries, a letter m will appear next to the ticket number to indicate that the ticket has been modified. 3-50 Version 8.70 chp3_Eag.doc 03/15/02 1:16:17 PM Eagle User’s Manual − End of Day Operations Void A Ticket Press <F3> to void the ticket on the screen. As soon as you press this key, a message − "Voided Ticket" − will appear at the bottom of the box. Compare your screen to the illustration below: 14 of 200 used Ticket: 13 Order: Mix ID: COD ? 4 Y Size: Price: $ Extra Products: Qty: Per /? 0.00 0.00 0.00 0.00 0.00 0.00 ID: 6 9.00 yds 50.00 Description Cust ID: Joe Bob Truck#: Adjust: Tax: Time Batched: 2:55 PM 24Jun99 0.00 yds 7.000 % Unit Price $ 0.00 $ 0.00 $ 0.00 $ 0.00 $ 0.00 $ 0.00 1 Tax: 0.000 % 0.000 % 0.000 % 0.000 % 0.000 % 0.000 % Voided Ticket Entered: 1:32 PM 28Aug99 When you print out any of the ticket summaries, a letter v will appear next to the ticket number to indicate that the ticket has been voided. When you are ready to return to the End of Day Menu, press <F10>. Version 8.70 chp3_Eag.doc 03/15/02 1:16:17 PM 3-51 Eagle User’s Manual End of Day Operations Summary The Summary Menu tells you the total number of yards of concrete batched for the short term period. It tells you how many yards adjusted for the same period. Also displayed on this menu is the number of the upcoming ticket and batch. Compare your screen to the illustration below: If the Supervisor Edit Password is set to a value other than zero, the Supervisor Edit Password must be entered prior to editing the summary values. • Edit Summaries Press <F5> to change the batch number, load number, and ticket number. If you want to clear out the numbers in the highlighted spaces, just type in the new numbers you want to start with. For example, we want to begin tomorrow's work day with our ticket and batch set at five. Press <F5> to edit the summaries. The cursor already resets in the first highlighted space. We would type in a 5 and press the <Enter> key. This moves the cursor down to the next space. We would type in a 5 here also, then press <Enter>. If we just erased the numbers in these two spaces, then our first ticket number would be zero (0). Since that might get a little confusing, it might be better to type in the actual number that you want to begin with. After you made the changes, press <F5> to save them. If you pressed <F10> to exit the screen without saving the changes, the batch number, load number, and ticket number will be restored to their previous values. After you pressed <F5> to edit the summaries, the prompt below will appear. • Clear These Summaries Press <F1> to clear the summaries of yards batched and yards adjusted. This brings both totals back down to zero, getting ready for the next day. The next day's work can be made to begin at any number sequence you wish. Press <F10> twice to return to the Master Menu. 3-52 Version 8.70 chp3_Eag.doc 03/15/02 1:16:17 PM Eagle User’s Manual Chapter 4 Plant Storage Information Version 8.70 chp4_Eag.doc 03/15/02 1:18:08 PM Eagle User’s Manual Plant Storage Information Plant Storage Information Storage Menu Your screen should display a menu very similar to the one pictured below. The F4 = EXTRA Products Storage key will only appear if you have Order Entry/Ticket Printing Paid Option. Material Status Blocks At the top of the screen are four blocks − the scale readout/material status blocks. Note that there is one for Aggregate, Cement, Admix, and Water. The active scale readouts are available throughout the Batching/Storage Menus. This allows the operator to start and monitor the batch while inserting new mix design, adding a new material, entering deliveries, etc. These boxes tell you the status of each material, with cues like: "Ready," "Manual," "Batch," "Start," "Done," "Load," "Hold," "Dump." Notice that in the illustration above, the message in each box is "Ready." The status message will always appear in this same place. The purpose of this status message is to keep the batchman aware of each phase of the batch. The boxes for cement and aggregate also include scale readouts which show the current weight on each scale. The readout for water is displayed in gallons if it is metered, and pounds if weighed. You can watch the scale readouts to see the weight increasing on the scales. While the load is batching, the status message next to the scale readouts should change with each phase of the batch. Here is a list of possible prompts that will appear in the material status blocks during weigh up and discharge. • Ready Means that the weigh bin is empty, discharge gates are shut, and the bin is ready to begin weighing up the next batch. • Batch Indicates that material is being batched into the weigh hopper. Version 8.70 chp4_Eag.doc 03/15/02 1:18:08 PM 4-1 Eagle User’s Manual Plant Storage Information • Done Tells you when weigh up of material is complete. • Load Means material is ready to be discharged into truck or mixer. • Hold Appears during discharge, material is waiting for its turn. Discharge sequence is set on Plant Setup Menu. The Eagle will hold during discharge according to the rules you set for it on those setup screens. • Dump Means that material is discharging. Watch the aggregate and cement scale weights decrease as material falls out of the bin. Water, if weighed, will also decrease; if metered, the number of gallons will increase during discharge. • Done Discharge is complete for this material. When each material completes discharge this message will appear. • Ready This is the message we began with above. All weigh bins are empty (within scale tolerances), and discharge gates are closed. The Eagle is ready to begin weighing up the next batch. The benefit of having the status blocks on every menu is obvious. You can keep the Eagle batching while you do other things − find the next mix design, make changes to your list of trucks, look at the ticket stack, set up the next batch. Storage Menu "F" Keys Toward the bottom of the screen, the message above the menu prompts identifies the screen you are in. It says, "Storage Menu." Below the menu names are the available "F" keys you can use to select specific storage screens. 4-2 • Press <F1> = Mix Storage Menu On this menu you can look up, change, add, delete, or print mix designs. • Press <F2> = Truck Storage Menu This menu lists up to 200 trucks by number and notes individual loading rates and drivers. • Press <F3> = Materials Storage Menu This menu directs you to a number of submenus: one for moisture compensation values for aggregates, and a menu for each material − aggregate, cement, admix and water − which holds under and over limits, minimum and maximum batching tolerances, and a minimum tolerance cutoff weight. Version 8.70 chp4_Eag.doc 03/15/02 1:18:08 PM Eagle User’s Manual Plant Storage Information • Press <F4> = Extra Products Storage Menu This menu allows you to store and track any extra products you might use. • Press <F5> = Received Materials Menu Use this menu to track materials you are receiving. Blank spaces in this menu can be filled to show name of material, quantity received supplier's name, the ticket number, and the time entered. • Press <F7> = LOAD Truck/Mixer If you are batching a load of concrete at the same time you are making changes in the various Storage Menus, this key gives you the ability to turn on the automatic discharge feature without having to return to the batching screen. To return to the Batching/Storage Menu, press <F10>. Version 8.70 chp4_Eag.doc 03/15/02 1:18:08 PM 4-3 Eagle User’s Manual Plant Storage Information Mix Storage Menu The screen will change. Let's look at this new screen for a moment. At the top of the screen are the material status blocks. This should be a familiar sight by now. If they aren't and you want to know more about them, look back to the previous section. The status blocks let you keep an eye on the load currently being batched while you get ready for the next batch. Below the status blocks is a large box. This box displays a mix design. If you have no mix designs in the Eagle's memory, the screen will show zeroes for material quantities. • Find A Mix Design There are two ways to find a mix design. You can use either one depending on what you feel most comfortable with. In the upper right corner of the large middle box is a message. In the example on the previous page, it says 16 of 2000 used. This means that you have 16 different mix designs in the Eagle's memory out of a possible 2000. If your message says 0 out of 400 used, this means that you should begin by learning how to add mix designs. See the "Add a Mix Design" section which follows later in this chapter. One way to find the mix design you want is to scroll through the list. This is like flipping through pages in a book to find the page you want. To flip through the mix designs that are stored in the Eagle's memory, locate the <Page Up> and <Page Down> keys near the number pad on the far right side of your keyboard. These keys will move you through the list one at a time. The Eagle stores the mix designs according to the numbers or letters in the Mix ID. To go forward from the beginning, press the <Page Down> key. To go backward through the list, press the <Page Up> key. Try this now if you have not used the <Page Up> and <Page Down> keys yet. You will use these keys in the same way on other screens. 4-4 Version 8.70 chp4_Eag.doc 03/15/02 1:18:08 PM Eagle User’s Manual Plant Storage Information This method is easy since you don't have to do anything but press a key. Each time you press one of the keys, a different mix will appear with the target weights of each material that the mix calls for. The benefit here is that you do not have to remember the Mix ID. However, if you are scrolling through 2000 mix designs, it might take you a while to find the one you are after. The second way to find the mix design is to press <F1>. This is the quickest way to access to a particular mix design. The menu at the bottom of the screen will change to look like the example below: Type in the number of the Mix ID as it is stored in the Eagle's memory. You can enter a combination of up to eight letters and numbers. If you make a mistake and do not type in the Mix ID as it appears in the mix file, the message "Not Found" appears at the bottom of the screen. Use the <Page Up> or <Page Down> key to find the closest mix design on the list that you want. Mixes are listed in sequence. • Print Mix Designs A small box which holds three print options replaces the Mix Storage Menu prompts: If you find yourself in the Print Functions Menu, and you want to get out, press <Esc>. This will return you to the Mix Storage Menu without performing any print tasks. − Print this mix design Move the highlighting bar down with the arrow key. When you have highlighted this option, press the <Enter> key. The Eagle printer will print out the mix design currently displayed on the screen. − Print mix design summary Move the highlighting bar down with the arrow key. When you have highlighted this option, press the <Enter> key. The Eagle printer will print out a short form list of all mix designs with Mix ID and Name. − Print all mix designs Select this option by moving the blue bar until this message is highlighted. If this is what you want to do, just press the <Enter> key. Your printer will print out each mix design just as it would appear on the screen. If your printer is not connected properly turned off, or not functioning, a message will appear on the screen, "Printer not available." Version 8.70 chp4_Eag.doc 03/15/02 1:18:08 PM 4-5 Eagle User’s Manual • Plant Storage Information Edit Functions What if you are looking at this screen for the first time, and you have not yet entered in any mix designs. We will begin by discussing how to enter a mix design into the Eagle's memory. There are four different things you can do in the edit functions. You can add a mix design, make changes to a mix design already in memory, copy a mix design, and delete a mix design from the memory. Begin by pressing <F5>. A long box replaces the prompts at the bottom of the screen. This box has two messages and should look like the illustration below: If you do not want to edit your mix designs, or if you do not know the correct password, press the <Esc> key located above the number pad on your keyboard to return to the Mix Storage Menu without going further. The password is a security feature, which allows you to restrict access to this operation. The cursor rests in the highlighted blank below the "Please enter password" message. Type in the password and press the <Enter> key. If you type in an incorrect password, the message "Bad Password" will appear above the box. See the illustration below: If this happens to you, try again. Note that the cursor is still in the blank. You can type directly over the stars. If you do not know the password, press the <Esc> key to return to the Mix Storage Menu. When you enter the correct password, the messages in the box change again. You now have three options listed below: Note that the top message is highlighted. You can move this highlighting bar by pressing the arrow keys. When you have highlighted the option that you want, press the <Enter> key. An alternative way to select the option that you want is to press the letter "A" for Adding a mix design, "C" for Changing this mix design, or "D" for Deleting this mix design. 4-6 Version 8.70 chp4_Eag.doc 03/15/02 1:18:08 PM Eagle User’s Manual Plant Storage Information Let's discuss each of these options. − Add a Mix Design This is the first of the three options in the Edit Functions of the Mix Storage Menu. When selected, the mix design that was on the screen disappears. Don't worry, you have not lost the mix design that was on the screen. It is still in the memory. In its place all the blanks are highlighted. The cursor rests at the top of the box beginning with the Mix ID. 1. Mix ID The number or name you will use to identify this mix design. Up to eight characters (alphanumeric). If you add a new mix design, the Eagle will look at the Mix ID that you assign to it and place it in numerical order listing first; then alphanumeric order listing. For example, let's say you already have two mix designs with the ID 10 and ID 60 in your Mix Storage Menu. You want to add a mix design with the Mix ID 75. According to the Eagle's program, this mix design will be located after ID 60. Using the same example, you want to add another mix design with the ID A12. This particular mix design will be located after Mix ID 75. 2. Mix Name A longer description of the mix. Up to 24 characters (alphanumeric). ex.) 3500 AIR & WAT RED 3. W/(C+P) Ratio Calculation of water and cement. ex.) [(33 gal X 8.33)/420 lbs of cement plus 50 lbs of pozzolanic] = 0.57 Version 8.70 chp4_Eag.doc 03/15/02 1:18:08 PM 4-7 Eagle User’s Manual Plant Storage Information 4. Max Maximum amount that the batch plant can batch in one load. ex.) 10 Yds 5. Aggregate Choose up to five different aggregates for each mix design. Position the cursor in the first line; then select the kind of aggregate you will use. Do not try to type in your own names. The letters on the keyboard will not work when the cursor is in this space. Instead, use the <Page Up> or <Page Down> key to scroll through the existing list of aggregates. The Eagle reads these names from the Aggregate Storage Menu - refer to the "Aggregate Storage Menu" section in Chapter Four. The <Page Up> or <Page Down> key allows you to write a mix more quickly because you do not have to type in material names. Also, using standardized names ensures accuracy in tracking inventory because it eliminates problems of referring to contents of the same bin with more than one name. When you have scrolled through to the name of the aggregate you want, press the <Enter> key to select it. The cursor will move to the next space on the right. Type in the weight per yard by using the number pad on the right side of the keyboard; then press the <Enter> key. The cursor will move down to the next line in the aggregate column. Enter the name and amount in the same way for any additional aggregates you will use in this mix design. SSD (Saturated Surface Dry) is the state of aggregate when it can no longer absorb moisture, and the outer surface is dry. SSD is important in determining concrete volume and concrete strength. Aggregates below SSD will absorb water out of the mix requiring the addition of more water to obtain the desired slump. Aggregate above SSD will lower the volume of concrete due to aggregate weight being displaced by excess water in the aggregate. The Eagle allows compensation for these conditions by calculating the increase or decrease of the materials (aggregate and water) to maintain the desired slump, strength, and volume. 4-8 Version 8.70 chp4_Eag.doc 03/15/02 1:18:08 PM Eagle User’s Manual Plant Storage Information 6. Cement Choose up to three different cements for each mix design. Position the cursor in the first line; then select the kind of cement you will use. Do not try to type in your own names. The letters on the keyboard won't work when the cursor is in this space. Instead, use the <Page Up> or <Page Down> key to scroll through the existing list of cements. The Eagle reads these names from the Cement Storage Menu - refer to the "Cement Storage Menu" section in Chapter Four. When you have scrolled through to the name of the cement you want, press the <Enter> key to select it. The cursor will move to the next space on the right. Type in the weight per yard by using the number pad on the right side of the keyboard; then press the <Enter> key. The cursor will move down to the next line in the cement column. Enter the name and amount in the same way for any additional cement you will use in this mix design. 7. Admix Choose up to six different admixes for each mix design. Position the cursor in the first line; then select the kind of admix you will use. Do not try to type in your own names. The letters on the keyboard won't work when the cursor is in this space. Instead, use the <Page Up> or <Page Down> key to scroll through the existing list of admixes. The Eagle reads these names from the Admix Storage Menu - refer to the "Admix Storage Menu" section in Chapter Four. When you have scrolled through to the name of the admix you want, press the <Enter> key to select it. The cursor will move to the next space on the right. Type in the weight per yard by using the number pad on the right side of the keyboard; then press the <Enter> key. The cursor will move down to the next line in the admix column. Enter the name and amount in the same way for any additional admixes you will use in this mix design. Instead of using Oz/Yd, you can select Oz/CWT. Oz/CWT is a selectable feature in the Extended Plant Option. It allows you to enter how many ounces of admix per hundred weight of cement. The Eagle calculates the total ounces by total cement weight. Optionally admixes can be weighed. This is a paid option. When enabled, admixes are weighed instead of metered. Version 8.70 chp4_Eag.doc 03/15/02 1:18:08 PM 4-9 Eagle User’s Manual Plant Storage Information 8. Water Choose up to two different waters for each mix design. Position the cursor in the first line; then select the kind of water you will use. Do not try to type in your own names. The letters on the keyboard won't work when the cursor is in this space. Instead, use the <Page Up> or <Page Down> key to scroll through the existing list of waters. The Eagle reads these names from the Water Storage Menu - refer to the "Water Storage Menu" section in Chapter Four. When you have scrolled through to the name of the water you want, press the <Enter> key to select it. The cursor will move to the next space on the right. Type in the weight ("Lb" if weighed or "Gal" if metered) per yard by using the number pad on the right side of the keyboard; then press the <Enter> key. The cursor will move down to the next line in the water column. Enter the name and amount in the same way for any additional waters you will use in this mix design. When you press <F5>, the mix will be entered, or the message "Out of Limits" appears. If it's "Out of Limits", you have to press <F10> to get out of that mix design. No changes to the mix will be stored. You must then go to the Material Storage Menu to the material that is out of limit and change the under or over limit. You will decrease the under limit or increase the over limit to allow for the amount you are trying to put in the mix design. You may then return to the Mix Storage Menu and change the mix design. − Change a Mix Design This is the second of the three options in the Edit Functions of the Mix Storage Menu. Note that you have to start from the Mix Storage Menu again. The first step to changing a mix design already in the Eagle's memory is to display it on the screen. Look back again at the first illustration in this section, which shows a mix design in the middle box. On your screen, there will also be a mix design displayed. But what if it is not the mix design that you want to change? What then? Remember the techniques discussed earlier in this section "Find a Mix Design." Press <F1> and enter the Mix ID number of the mix design that you want to change. If you do not know the Mix ID, then use the <Page Up> or <Page Down> key to find it. Either way, you must display the mix design that you want to change in the middle box on the screen. The next step is to press <F5>. The menu prompts at the bottom of the screen will be replaced by the messages that appear below: If you do not know the correct password, press the <Esc> key to return to the Mix Storage Menu without going further. 4-10 Version 8.70 chp4_Eag.doc 03/15/02 1:18:08 PM Eagle User’s Manual Plant Storage Information The password is a security feature, which allows you to restrict access to this operation. The cursor rests in the highlighted blank below the "Please enter password" message. Type in the password and press the <Enter> key. If you type in an incorrect password, the message "Bad Password" will appear above the box, like in the illustration below: If this happens to you, try again. Note that the cursor is still in the blank. You can type directly over the stars. If you do not know the password, press the <Esc> key to return to the Mix Storage Menu. When you enter the correct password, the messages in the box change again. You now have three options, listed below: Note that the top message is highlighted. You can move this highlighting bar by pressing the arrow keys. When you have highlighted the option Change this mix design, press the <Enter> key. An alternative way to select the option that you want is to press the letter "A" for Adding a mix design, "C" for Changing this mix design, or "D" for Deleting this mix design. Move the highlighting bar down with the arrow keys to select this option. Press the <Enter> key. Note that the mix design displayed on the screen is still there. But all the information is now highlighted. You can make changes to any of these highlighted areas. Move the cursor around the middle box by pressing the arrow keys, <tab>, or <Enter> key. When you have finished changing the mix design, press <F5> to insert it into the memory. You can press <F5> anytime on screen. If you made changes, either the message below or the message "Out of Limits" appears. If it's "Out of Limits", you have to press <F10> to get out of that mix design. No changes to the mix will be stored. You must then go to the Material Storage Menu to the material that is out of limit and change the under or over limit. You will decrease the under limit or increase the over limit to allow for the amount you are trying to put in the mix design. You may then return to the Mix Storage Menu and change the mix design. Version 8.70 chp4_Eag.doc 03/15/02 1:18:08 PM 4-11 Eagle User’s Manual Plant Storage Information If you have not changed the mix ID, then a message will appear at the bottom of the screen: The Eagle is asking you if you want to replace the old mix design that had that Mix ID. If you want to replace the old mix design with the new modified one, press <Y>, and the Eagle will delete the old mix design and replace it with the modified one. If you don't want to replace the old mix design, then press <N>. The Eagle will return the cursor up to the Mix ID blank. You can save both mix designs, but you cannot have two mix designs with the same ID. So you will have to give the new mix design a new Mix ID. Once you have done this, press <F5> again. As long as the ID is not being used for another mix design, the Eagle will store your changed mix design, and the Mix Storage Menu prompts will return to the bottom of the screen. − Copy this Mix Design Enter a mix ID for the copy and press enter. The mix will be validated through a filter to check if it already exists. If the mix ID already exists an error message will display telling you to try another. − Delete this Mix Design This is the fourth of the four options in the Edit Functions of the Mix Storage Menu. Note that you have to start from the Mix Storage Menu again. You can delete a mix design from the memory. You must first display the mix design you want to delete on the screen. Select the mix design by pressing <F1> and typing in the Mix ID, or by scrolling through the list of mix designs with the <Page Up> or <Page Down> key. Once you have the mix design you want displayed in the large box in the middle of the screen, you are ready for the next step. The next step is to press <F5>. The menu prompts at the bottom of the screen will be replaced by the messages that appear below: If you do not know the correct password, press the <Esc> key to return to the Mix Storage Menu without going further. The password is a security feature, which allows you to restrict access to this operation. The cursor rests in the highlighted blank below the "Please enter password" message. Type in the password and press the <Enter> key. If you type in an incorrect password, the message "Bad Password" will appear above the box, like in the following illustration: 4-12 Version 8.70 chp4_Eag.doc 03/15/02 1:18:08 PM Eagle User’s Manual Plant Storage Information If this happens to you, try again. Note that the cursor is still in the blank. You can type directly over the stars. If you do not know the password, press the <Esc> key to return to the Mix Storage Menu. Version 8.70 chp4_Eag.doc 03/15/02 1:18:08 PM 4-13 Eagle User’s Manual Plant Storage Information When you enter the correct password, the messages in the box change again. You now have four options, listed below: Note that the top message is highlighted. You can move this highlighting bar by pressing the arrow keys. When you have highlighted the option Delete this mix design, press the <Enter> key. Press Y to delete mix design. Pressing N will return you to the Mix Storage menu. If the mix design is deleted the number on the upper right border of the mix box decreases by one. The mix design is now gone. The Mix Storage Menu prompts return to the bottom of the screen, and you can now take care of the next order of business. To return to the Storage Menu, press <F10>. 4-14 Version 8.70 chp4_Eag.doc 03/15/02 1:18:08 PM Eagle User’s Manual Plant Storage Information Truck Storage Menu Your screen will change to look like the illustration below: Like all of the Storage Menus, at the top of the screen above the Truck Menu, you will see the material status blocks. You can keep an eye on the load that is batching while you change truck data. For a more detailed explanation of the status blocks at the top of the screen, go back to the section on the "Batching/Storage Menu" in Chapter One. The Truck Menu occupies the center of the screen. Below it is the title, Truck Menu, and the "F" key prompts that you can use on this menu. At the top of the box, set into the top right corner, is a line that tells you how many trucks you have stored on this menu − "n of 250 used." You can store up to 250 trucks. Each time you add a truck, the number "n" will increase by one. Each time you delete a truck, the number "n" will decrease by one. Inside the menu are three lines, which display specific information for each truck. The Eagle automatically displays the first truck on the list when you call up this menu. Before going on to learn how to perform the various operations available through the "F" keys, look at each of the information fields. • Truck # This field accepts numbers ONLY. The Eagle will store 1,2,3, or 4 digit truck numbers and insert them into the list of trucks you already have. Truck numbers are stored sequentially. • Driver Type in the name of the driver for this particular truck. It can be letters or numbers up to eight characters. You can leave this space blank if you want by pressing the space bar to clear anything that might already be in that field. Move on to the next field by pressing either <Enter> or one of the arrow keys. Version 8.70 chp4_Eag.doc 03/15/02 1:18:08 PM 4-15 Eagle User’s Manual Plant Storage Information • Loading Rate Type in the loading rate for each truck, displayed either in lb/s or kg/s, according to the measurements your plant uses. During discharge the Eagle will automatically adjust its discharge rate to match the truck it is loading. This number is what tells the Eagle the maximum aggregate load rate. For a better description see "General Discharge" section in Chapter Two, and look at the "Default Aggregate Fast Flow Rate" section under "Code 1 Sequencing". • Water Whatever amount you use to wash out the truck, it will appear in this field on this menu after the truck has been washed out and will be subtracted from total water if the Apply to Batch field is set to <Y>. • Apply to Batch:. . .Y/N Enter <N> if you want the water used in washout to just get dumped. Enter <Y> if you want to compensate for the water in the next load of concrete you batch into this truck. If you enter <Y>, the Eagle will apply the amount shown in the Water: field to the next batch that goes into the truck. • Washed out?:. . .Y/N This field is not editable. It is there to tell you whether or not the truck has been washed out. A <Y> means that the truck has been washed out since its last load. The <Y> will remain after washout until a new load goes into that truck. Once you use the truck again, the message in this field will change to <N>. • Admix This field is not editable on this screen. It is there to tell you whether or not an admix was included with the water during washout. The amount is listed in the units specified for your plant, either oz or ml. If you want to select an admix for the washout of a particular truck, you can only do that through the Truck Washout Utility (refer to section in Chapter Five) and only then if you know the Supervisor password. • Load Size and Max Weight work together. Load Size is the Maximum capacity of the truck’s mixer. Max Weight is the capacity of the truck’s mixer by weight. If a number greater than zero is set in the Load Size field in the Truck Storage Menu, the Eagle will compare the Load Size and the Batch Size. If the Batch Size is larger than the Load Size, the batch will not start and the error message will be displayed as in the past. If the load size field is set to zero, the Eagle will compare the Max Truck Weight and the total target weight. If the total target weight is larger than the Max Truck Load Weight, the batch will not start and the error message will be displayed. Begin by typing in the truck number. With the arrow keys or the <Enter> key, move the cursor to the next blank. Type in the driver's name. If you do not wish to assign a driver’s name to any truck, leave this space blank. Press the space bar, and then press <Enter> without typing in a name. This space will stay blank. In the last space, type in this truck's special loading rate. The Eagle has a standard discharge rate, but for some trucks this may be too fast, for others it may be too slow. By listing a special loading rate for each truck, you tell the Eagle how fast to discharge into each truck. For more information on Loading Rate, refer to "General Discharge" section in Chapter Two, and look at the "Default Aggregate Fast Flow Rate" section under "Code 1 Sequencing". Press <F5> to enter when you have finished typing the new truck data. Note that the number of trucks (n of 250 used) increases by one. 4-16 Version 8.70 chp4_Eag.doc 03/15/02 1:18:08 PM Eagle User’s Manual Plant Storage Information Truck Menu and the Truck Washout Utility The Truck Menu is designed to work with the Truck Washout Utility to keep track of not simply the number of trucks your plant is using, but what is in them. You can use the Truck Washout Utility in two ways: 1. To hold concrete for later use by the addition of "recovery" - type admixes. 2. Just to clean out the trucks. In the first example, you will apply the washout water and admix to the next batch. In the second example, you may or may not. For more information, refer to the "Truck Washout Utility" section in Chapter Five. The extra washout information is included on the Truck Menu so that you can know which trucks might still have water or admix in them, and which trucks may need to be washed out. Once you have washed out a truck, the Truck Menu will show how much water and/or admix was used. It automatically zeros on the next batch. Note: The Batch Setup Screen can include a field number, #140 for metered and #141 for weighed, which will display the field "Water in Truck: _____ gal (or lbs.)." The amount displayed will match the Truck Washout amount. So you can adjust the amount in the truck on the Batch Setup Screen if you include this field. Since this is a trim field, the line will only be displayed if you specified "Apply to Batch? Y" on the Truck Menu for this truck. The Eagle will warn the batchman about possible water in the truck when he goes to batch into the truck for the first time after it has been washed out, regardless of the "Apply to Batch?" line on the Truck Menu. This serve as a warning to the batchman of the possibility that there is still water in this truck. "Warning! Truck Washed Out, Water and/or Admix in Truck!" The message appears as soon as the truck is selected on the Batch Setup Screen, giving the batchman plenty of time to either use another truck, make sure that the water has been dumped, or that the trim will be made. Version 8.70 chp4_Eag.doc 03/15/02 1:18:08 PM 4-17 Eagle User’s Manual • Plant Storage Information Find a Truck If you want to find a truck, press <F1>. The menu prompts at the bottom of the screen disappear and are replaced by a box, like the illustration below: If you want to return to the Truck Menu, press the <Esc> key. If you want to find a truck, type in the truck number. Notice that the cursor is already resting in the answer space. After you type in the number, press the <Enter> key. If you enter a number that does not match a truck number in the Truck Menu, the screen will flash a message, "No Such." If you cannot remember a truck number, press <Esc>, and you can scroll through the list by pressing the <Page Up> or <Page Down> key. Trucks are displayed one at a time. When you come to the end of the list, the message, "No Such" appears again on the screen. • Clear Washout Clears washout quantity and resets “Washed Out?” to <N>. • Delete this Truck Press <F3> to delete the truck currently displayed on the screen. The highlighted spaces showing numbers and name of driver all go to zero. The count at the top of the box decreases by one. • Print ALL Trucks Press <F4> to print all trucks. This is a printout of every field on the Truck Menu Screen for all trucks. • Load truck Press <F7> to load truck. If you are batching a load of concrete at the same time you are making changes to the Truck Storage Menu, this key gives you the ability to turn on the automatic discharge feature without having to return to the Batching Screen. When you have finished making changes to the Truck Storage Menu, press <F10> to return to the Storage Menu. 4-18 Version 8.70 chp4_Eag.doc 03/15/02 1:18:08 PM Eagle User’s Manual Plant Storage Information Materials Storage Menu This menu will allow you to select any of the material menus, to make changes to bin names, tolerances, or under and over limits. The display on your video monitor should resemble the illustration below: This screen shows the material status blocks at the top of the screen. These blocks enable you to perform other tasks while a load is batching and still follow the progress of the batch. Near the bottom of the screen is the title, Material Storage Menu, which tells you what menu you are looking at. Below this title are the available "F" keys. To call up a new menu, press the corresponding "F" key. Let’s discuss each of these “F” keys on the following pages. Version 8.70 chp4_Eag.doc 03/15/02 1:18:08 PM 4-19 Eagle User’s Manual Plant Storage Information Moisture Storage Menu This menu lets you set moisture levels in your aggregate bins. You can also set high and low limits on moisture limits. The screen changes to show the Moisture Storage Screen. At the top of the screen are four material status blocks: aggregate, cement, admix, and water. Use these blocks to keep an eye on the load that is batching while you set or adjust moisture values. See screen below: The heart of this screen is the box in the center, where you can set the moisture percentages in all of your aggregate bins. Notice that the first column lists the names of each aggregate. They appear in the same order as on the Aggregate Storage Menu. To change the name of an item on the Material column, you'll have to go to the Aggregate Storage Menu. On this screen you will change only moisture percentages, and limits of acceptable moisture levels. When you first call up this screen, you will see that the second column is already highlighted. This column is called Moisture. These are the actual moisture levels for each of the aggregate bins. The cursor rests at the first space. You can move it down the column by pressing either the <Enter> key or the arrow keys. To change the moisture values, just type in over the existing numbers. You can skip over numbers you do not want to change by pressing either the <Enter> key or the arrow keys. Once you have entered all of your new moisture percentages, press <F5> to enter. If you have entered either too small or too large a number, the Eagle will not accept the new moisture figure. A message will appear when you press <F5> − "Material Out of Limits" − ,and the values that are not good will be replaced by stars. See screen on the next page. 4-20 Version 8.70 chp4_Eag.doc 03/15/02 1:18:08 PM Eagle User’s Manual Plant Storage Information The value you enter in the Moisture column must fall between the values in the Low Limit and High Limit columns. For example, the Low Limit for sand is 1%, and the High Limit is 6%, if you try to enter a value of 7% in the Moisture column, the Eagle will not accept it. In this case, a moisture of 0% or any negative number would also be out of limits. Your value must fall between the high and low limits listed. You can change your moisture limits, though. In the case we looked at above, let's say your sand is completely dry. It has not rained in four weeks, and it is the middle of the hottest summer in 100 years. Your sand is as dry as a dune. Not only will it not add any moisture to the mix, but it will absorb some moisture. In other words, you are going to need to compensate for moisture absorption when your sand is very dry. To do this, you can put a negative number in the Low Limit column. Then if you want to put a negative value in the Moisture column, you can. The box in the center screen now shows the limit columns highlighted. Move the cursor the same way you did in the Moisture column by pressing the <Enter> key or arrow keys. Type in the new figures over the existing ones. When you have made all the changes you want, press <F5> to enter the new limits. Then press F10 to return to the Moisture Menu. Now you are back to the original Moisture Storage Menu. You may want to re-check and perhaps make new changes to the Moisture column now that your limits are where you want them. If you do make additional changes to the Moisture column, make sure you press <F5> to enter these moistures. If you return to the Material Storage Menu without entering your changes, they will be lost and you will have to redo your work. In the column Daily Avg, it displays the average daily aggregate moisture percent. The Daily Tons tells you how much water you purchased. If you are batching a load of concrete at the same time you are making changes to the Truck Storage Menu, the <F7> key gives you the ability to turn on the automatic discharge feature without having to return to the Batching Screen. Version 8.70 chp4_Eag.doc 03/15/02 1:18:08 PM 4-21 Eagle User’s Manual Plant Storage Information Aggregate Storage Menu This menu will help you set limits on the amounts of each aggregate you will use in a batch. By setting high and low limits you tell the Eagle what amounts are within limits. For example, this will protect you from calling for too large an amount of sand in a mix design. Once you set limits, the Eagle will not allow you to batch more or less than these limits allow. You can also set tolerances for aggregate. Tolerance is the amount of deviation the Eagle will allow when you are batching. This is generally a percentage of the target weight. If you set the tolerance at ±1% for example, you tell the Eagle that the actual weight must be within 1% of the target weight. Look at the illustration below: Look at the screen. At the top are the four materials status blocks for aggregate, cement, admix, and water. If your plant is up and running, these blocks help you keep an eye on the batch in progress. The center of the screen shows a box with several columns. This box is where you will do all of your work. Notice that when you first call up this screen, none of these columns are highlighted. Your first move will be to look below the box. The title "Aggregate Storage Menu" tells you what screen you are on. Below this title are four messages, preceded by the "F" keys you will push to select the message you want. If you are batching a load of concrete at the same time you are making changes to the Truck Storage Menu, the <F7> key gives you the ability to turn on the automatic discharge feature without having to return to the Batching Screen. If you want to enter new information or make changes to existing Aggregate Storage Menu, press <F5>. 4-22 Version 8.70 chp4_Eag.doc 03/15/02 1:18:08 PM Eagle User’s Manual Plant Storage Information The menu prompts at the bottom of the screen are replaced by a new pair of instructions. This is your next step, you must know the password to make changes to this screen. If you do not want to change the Aggregate Storage Menu, or if you do not know the correct password, press the <Esc> key to return to the Aggregate Storage Menu without going further. The password is a security feature, which allows you to restrict access to this operation. The cursor rests in the highlighted blank below the "Please enter password" message. Type in the password and press the <Enter> key. If you type in an incorrect password, the message "Bad Password" will appear above the box, like in the illustration below: Notice that the cursor still rests in the answer space, which is now filled with stars. You can try again, just type another password in right over the stars and press the <Enter> key once more. When the correct password is chosen, the box in the center of the screen will change. All columns are highlighted, and you can make changes in any of them. The message below the box now says, "Aggregate Edit Menu." Below it are two menu prompts. For now though, you will want to focus your attention on the box in the center of the screen. If you fill the space up, the cursor will automatically move one column to the right. Notice that the cursor moves from left to right when you press the <Enter> key. This allows you to set up all information for one bin at a time. Let's discuss each of the items in the box. • Material Type in the name of the aggregate you keep in the bin. You can use any combination of upper and lower case letters, up to eight characters. • Used Type in a <Y> if you will be using this bin. If the bin is not operative for some reason, make sure you have <N> in this space. Version 8.70 chp4_Eag.doc 03/15/02 1:18:08 PM 4-23 Eagle User’s Manual Plant Storage Information • Under In this space you should type in the smallest amount of sand you will use in a batch. Type in the number. You can enter up to four digits in this space. If you use all four digits (1000, for example) the cursor will automatically move to the next column. If your under limit is only a three digit number (500, for example) you will need to press the <Enter> key to move the cursor to the next column. • Over This is the maximum amount of material (sand in our example) you will allowed per yard batched. Here you have up to five digits to work with (10000 for example). These limits will catch you if you make a mistake writing in your mix designs. Let's say you or another batchman makes a typing error. If this error puts the amount of aggregate either too low or too high, the Eagle will not accept the mix. One thing to remember is that you should set your aggregate limits to allow for moisture compensation. Let's say the maximum limit for sand will be 1000 pounds per yard. If you have any moisture compensation values in and try to batch 1000 pounds of sand, the Batch Screen will tell you that you are over the limit. What has happened is that when the Eagle compensated for the moisture, it added sand. If you have a moisture value of 5%, for example, the Eagle will add approximately 55 more pounds of sand, putting you over the weight limit. To get around this, figure the maximum amount of sand you will use. Let's say it is 1,000 pounds, just to keep things simple. Now calculate the maximum moisture level you will allow and still batch. Usually this figure is around 9%. Now multiply the two figures: (Maximum allowable weight per yard) X (maximum moisture level) In our example this would be 1,000 lbs. X .09 or 9% = 90 lbs. So, 90 lbs is the most weight you could ever have from moisture compensation. Add this to the over limit weight and enter the new number (in our example, 1090 lbs.) into the Over column. Your new over limit now allows for fluctuations weight due to moisture compensation. 4-24 • Tolerances This column has two numbers. The first blank has a "-" sign in front of it. This is what is called the Under Tolerance, a certain percentage below the target weight that will be acceptable or within tolerance. The second blank has a "+" sign in front of it. It is called the Over Tolerance. This is a certain percentage above the target weight that will be acceptable or within tolerance. By entering numbers in these spaces (±1%, for example), you tell the Eagle that as long as it is within 1% of the target weight it is close enough. Let's say you are batching 10,000 pounds of aggregate. As long as the actual weight is within 100 pounds, either over or under the target, the batch will be within tolerance. • MinTol Enter a minimum tolerance. This will help you stay in tolerance on small batches. Imagine trying to batch within one percent on a small batch, like 200 pounds. You would have to be within 2 pounds in order to stay within tolerance. This kind of accuracy is hard to get. If you have even a slight bounce on the scales, the reading may be off. By putting a slightly higher weight in the MinTol column, you can batch small loads without going out of tolerance. It is suggested that this value be at least three scale graduations. Version 8.70 chp4_Eag.doc 03/15/02 1:18:08 PM Eagle User’s Manual • Plant Storage Information Edit Material Sources Press <F4> to enter the supplier’s name. These are stored in a hidden screen and may be printed on the ticket. Once you have made all changes to the box in the center of the screen, look at the prompts at the bottom. You will need to record your changes in the memory of the Eagle, first of all. Press <F5> to enter the new information. Press <F10> to return to the Material Storage Menu. Version 8.70 chp4_Eag.doc 03/15/02 1:18:08 PM 4-25 Eagle User’s Manual Plant Storage Information Cement Storage Menu This menu will help you set limits on the amounts of each cement you will use in a batch. By setting high and low limits you tell the Eagle what amounts are within limits. For example, this will protect you from calling for too large an amount of type one in a mix design. Once you set limits, the Eagle will not allow you to batch more or less than these limits allow. You can also set tolerances for cement. Tolerance is the amount of deviation the Eagle will allow when you are batching. This is generally a percentage of the target weight. If you set the tolerance at ±1% for example, you tell the Eagle that the actual weight must be within 1% of the target weight. Look at the screen. At the top are the four materials status blocks for aggregate, cement, admix, and water. If your plant is up and running, these blocks help you keep an eye on the batch in progress. The center of the screen shows a box with several columns. This box is where you will do all of your work. Notice that when you first call up this screen, none of these columns are highlighted. Your first move will be to look below the box. The title "Cement Storage Menu" tells you what screen you are on. Below this title are four more messages, preceded by the "F" keys you will push to select them. If you are batching a load of concrete at the same time you are making changes to the Truck Storage Menu, the <F7> key gives you the ability to turn on the automatic discharge feature without having to return to the Batching Screen. If you want to enter new information or make changes to existing Cement Storage Menu, press <F5>. 4-26 Version 8.70 chp4_Eag.doc 03/15/02 1:18:08 PM Eagle User’s Manual Plant Storage Information The menu prompts at the bottom of the screen are replaced by new instructions. This is your next step, you must know the password to make changes to this screen. If you do not want to change the Cement Storage Menu, or if you do not know the correct password, press the <Esc> key to return to the Cement Storage Menu without going further. The password is a security feature which allows you to restrict access to this operation. The cursor rests in the highlighted blank below the "Please enter password" message. Type in the password and press the <Enter> key. If you type in an incorrect password, the message "Bad Password" will appear above the box, like in the illustration below: Notice that the cursor still rests in the answer space, which is now filled with stars. You can try again, just type another password in right over the stars and press the <Enter> key once more. When the correct password is chosen, the box in the center of the screen will change. All columns are highlighted, and you can make changes in any of them. The message below the box now says, "Cement Edit Menu." Below it are two menu prompts. For now though, you will want to focus your attention on the box in the center of the screen. If you fill the space up, the cursor will automatically move one column to the right. Notice that the cursor moves from left to right when you press the <Enter> key. This allows you to set up all information for one bin at a time. • Material Type in the name of the cement you keep in the bin. You can use any combination of upper and lower case letters, up to eight characters. • Used Type in a <Y> if you will be using this bin. If the bin is not operative for some reason, make sure you have <N> in this space. Version 8.70 chp4_Eag.doc 03/15/02 1:18:08 PM 4-27 Eagle User’s Manual Plant Storage Information • Type In the Cement Storage screen the “Type” column indicates whether the cement is effectively: Cementious, Pozzolanic, or Inert. Flyash is an example of a pozzolanic cement. This information can be obtained from your cement vendor or Quality Assurance person. • Under In this space you should type in the smallest amount of cement you will use in a yard. Type in the number. You can enter up to four digits in this space. If you use all four digits (1000, for example) the cursor will automatically move to the next column. If your under limit is only a three digit number (100, for example) you will need to press the <Enter> key to move the cursor to the next column. • Over This is the maximum amount of material (type 1 in our example) you will allow per yard batched. Here you have up to five digits to work with (10000 for example). These limits will catch you if you make a mistake writing in your mix designs. Let's say you or another batchman makes a typing error. If this error puts the amount of cement either too low or too high, the Eagle will not accept the mix. • Tolerances This column has two numbers. The first blank has a "-" sign in front of it. This is what is called the Under Tolerance, a certain percentage below the target weight that will be acceptable or within tolerance. The second blank has a "+" sign in front of it. It is called the Over Tolerance. This is a certain percentage above the target weight that will be acceptable or within tolerance. By entering numbers in these spaces (±1%, for example) you tell the Eagle that as long as it is within 1% of the target weight it is close enough. Let's say you are batching 1000 pounds of type one cement. As long as the actual weight is within 10 pounds, either over or under the target, the batch will be within tolerance. • MinTol Enter a minimum tolerance. This will help you stay in tolerance on small batches. Imagine trying to batch within one percent on a small batch, like 200 pounds. You would have to be within 2 pounds in order to stay within tolerance. This kind of accuracy is hard to get. If you have even a slight bounce on the scales, the reading may be off. By putting a slightly higher weight in the MinTol column, you can batch small loads without going out of tolerance. It is suggested that this value be at least three scale graduations. • Edit Material Sources Press <F4> to enter the supplier’s name. These are stored in a hidden screen and may be printed on the ticket. Once you have made all changes to the box in the center of the screen, look at the prompts at the bottom. You will need to record your changes in the memory of the Eagle, first of all. Press <F5> to enter the new information. Press <F10> to return to the Material Storage Menu. 4-28 Version 8.70 chp4_Eag.doc 03/15/02 1:18:08 PM Eagle User’s Manual Plant Storage Information Admix Storage Menu This menu will help you set limits on the amounts of each admix you will use in a batch. By setting high and low limits you tell the Eagle what amounts are within limits. For example, this will protect you from calling for too large an amount of calcium in a mix design. Once you set limits, the Eagle will not allow you to batch more or less than these limits allow. You can also set tolerances for admix. Tolerance is the amount of deviation the Eagle will allow when you are batching. This is generally a percentage of the target amount. If you set the tolerance at ±1% for example, you tell the Eagle that the actual amount must be within 1% of the target amount. Look at the screen. At the top are the four materials status blocks for aggregate, cement, admix, and water. If your plant is up and running, these blocks help you keep an eye on the batch in progress. The center of the screen shows a box with several columns. This box is where you will do all of your work. Notice that when you first call up this screen, none of these columns are highlighted. Your first move will be to look below the box. The title "Admix Storage Menu" tells you what screen you are on. Below this title are three messages, preceded by the "F" keys you will push to select them. If you are batching a load of concrete at the same time you are making changes to the Truck Storage Menu, the <F7> key gives you the ability to turn on the automatic discharge feature without having to return to the Batching Screen. If you want to enter new information or make changes to existing Admix Storage Menu, press <F5>. Version 8.70 chp4_Eag.doc 03/15/02 1:18:08 PM 4-29 Eagle User’s Manual Plant Storage Information The menu prompts at the bottom of the screen are replaced by new instructions. This is your next step, you must know the password to make changes to this screen. If you do not want to change the Admix Storage Menu, or if you do not know the correct password, press the <Esc> key to return to the Admix Storage Menu without going further. The password is a security feature, which allows you to restrict access to this operation. The cursor rests in the highlighted blank below the "Please enter password" message. Type in the password and press the <Enter> key. If you type in an incorrect password, the message "Bad Password" will appear above the box, like in the illustration below: Notice that the cursor still rests in the answer space, which is now filled with stars. You can try again, just type another password in right over the stars and press the <Enter> key once more. When the correct password is chosen, the box in the center of the screen will change. All columns are highlighted, and you can make changes in any of them. The message below the box now says, "Admix Edit Menu." Below it are two menu prompts. For now though, you will want to focus your attention on the box in the center of the screen. If you fill the space up, the cursor will automatically move one column to the right. Notice that the cursor moves from left to right when you press the <Enter> key. This allows you to set up all information for one bin at a time. 4-30 • Material Type in the name of the admix you keep in the bin. You can use any combination of upper and lower case letters, up to eight characters. • Used? Type in a <Y> if you will be using this bin. If the bin is not operative for some reason, make sure you have <N> in this space. Version 8.70 chp4_Eag.doc 03/15/02 1:18:08 PM Eagle User’s Manual • Plant Storage Information Type Page up and Page Down will toggle the fields “A”, “R” and “” indicating the Accelerator type, Water Reducer type or No type for each admix. The Eagle assumes that only one Accelerator admix type and only one Water Reducer admix type will be used in each Mix Design. If there is more than one Accelerator type admix and/or more than one Water Reducer type admix in a Mix Design this feature will be applied to the first Accelerator admix and first Water Reducer admix. In the Admix trim field (field #41-52 or #61-72) on the Batch Setup Menu, a prefix “*” in front of the material name will indicate an Accelerator type admix while the Water Reducer type admix becomes a non-editable field. The percentage of Water Reducer admix trim will be modified automatically according to the percentage of Accelerator type admix trim. When the Accelerator Admix trim is less than 1.00% the Water Reducer Admix trim will be 100% (full dosage of Water Reducer Admix). When the Accelerator Admix trim is 1.00% the Water Reducer Admix trim will be 50%. When the Accelerator Admix trim is greater or equal to 2.00% the Water Reducer Admix trim will be 0% (no Water Reducer Admix). When the Accelerator Admix trim is between 1.00% and 2.00% the Water Reducer trim will be a linear factor. • CWT If the “Admix per 100 weight (CWT)?” is set to <Y> in the Extended Plant Option menu, this column will show on the Admix Storage menu. When set to <Y> on the Admix Storage menu, admix per 100 weight is selected. The values in the Low Limit and the High Limit fields are the admix per 100 weight. When performing limits checking the limits depend on the cement amount. If set to <N> the admix per volume is selected. • Under In this space you should type in the smallest amount of admix you will use in a batch. Type in the number. You can enter up to three digits before the decimal and another after in this space. All admix measurements are in ounces. If you use all four digits (100.5, for example) the cursor will automatically move to the next column. If your under limit is only a three digit number or less, you will need to press the <Enter> key to move the cursor to the next column. • Over This is the maximum amount of admix (air in our example) you will allowed per yard batched. Here you can use up to four digits before the decimal and one after. These limits will catch you if you make a mistake writing in your mix designs. Let's say you or another batchman makes a typing error. If this error puts the amount of admix either too low or too high, the Eagle will not accept the mix. • Water % This enables you to edit the moisture percentages to compensate the water targets when setting up loads to batch. Version 8.70 chp4_Eag.doc 03/15/02 1:18:08 PM 4-31 Eagle User’s Manual Plant Storage Information • Tolerances This column has two numbers. The first blank has a "-" sign in front of it. This is what is called the Under Tolerance, a certain percentage below the target amount that will be acceptable or within tolerance. The second blank has a "+" sign in front of it. It is called the Over Tolerance. This is a certain percentage above the target amount that will be acceptable or within tolerance. By entering numbers in these spaces (±1%, for example) you tell the Eagle that as long as it is within 1% of the target amount it is close enough. With admixes you may want to allow a slightly larger tolerance. Since many admixes use only a few ounces per yard, a larger tolerance will give the Eagle more room to work with. • MinTol Enter a minimum tolerance. This will help you stay in tolerance on small batches. Let's say you are batching 10 ounces of air admix. The actual amount, if your tolerance was set at 1% would have to be within .1 ounces of the target amount. This kind of accuracy is impossible with the pulse meters or graduated bottles used to measure admix. By putting a measurable number of ounces in the MinTol column, you can batch small loads without going out of tolerance. • Edit Material Sources Press <F4> to enter the supplier’s name. These are stored in a hidden screen and may be printed on the ticket. Once you have made all changes to the box in the center of the screen, look at the prompts at the bottom. You will need to record your changes in the memory of the Eagle, first of all. Press <F5> to enter the new information. To return to the Materials Storage Menu, press <F10>. 4-32 Version 8.70 chp4_Eag.doc 03/15/02 1:18:08 PM Eagle User’s Manual Plant Storage Information Water Storage Menu This menu will help you set limits on the amounts of each water you will use in a batch. By setting high and low limits you tell the Eagle what amounts are within limits. For example, this will protect you from calling for too many gallons in a mix design. Once you set limits, the Eagle will not allow you to batch more or less than these limits allow. You can also set tolerances for water. Tolerance is the amount of deviation the Eagle will allow when you are batching. This is generally a percentage of the target amount. If you set the tolerance at ±1% for example, you tell the Eagle that the actual amount must be within 1% of the target amount. Look at the screen. At the top are the four materials status blocks for aggregate, cement, admix, and water. If your plant is up and running, these blocks help you keep an eye on the batch in progress. The center of the screen shows a box with several columns. This box is where you will do all of your work. Notice that when you first call up this screen, none of these columns are highlighted. Your first move will be to look below the box. The title "Water Storage Menu" tells you what screen you are on. Below this title are three messages, preceded by the "F" keys you will push to select them. Version 8.70 chp4_Eag.doc 03/15/02 1:18:08 PM 4-33 Eagle User’s Manual Plant Storage Information If you are batching a load of concrete at the same time you are making changes to the Truck Storage Menu, the <F7> key gives you the ability to turn on the automatic discharge feature without having to return to the Batching Screen. If you want to enter new information or make changes to existing water storage information, press <F5>. The menu prompts at the bottom of the screen are replaced by new instructions. This is your next step, you must know the password to make changes to this screen. If you do not want to change the Water Storage Menu, or if you do not know the correct password, press the <Esc> key to return to the Water Storage Menu without going further. The password is a security feature, which allows you to restrict access to this operation. The cursor rests in the highlighted blank below the "Please enter password" message. Type in the password and press the <Enter> key. If you type in an incorrect password, the message "Bad Password" will appear above the box, like in the illustration below: Notice that the cursor still rests in the answer space, which is now filled with stars. You can try again, just type another password in right over the stars and press the <Enter> key once more. When the correct password is chosen, the box in the center of the screen will change. All columns are highlighted, and you can make changes in any of them. The message below the box now says, "Water Edit Menu." Below it are two menu prompts. For now though, you will want to focus your attention on the box in the center of the screen. If you fill the space up, the cursor will automatically move one column to the right. Notice that the cursor moves from left to right when you press the <Enter> key. This allows you to set up all information for one bin at a time. • 4-34 Material Type in the name of the water you keep in the bin. You can use any combination of upper and lower case letters, up to eight characters. Version 8.70 chp4_Eag.doc 03/15/02 1:18:08 PM Eagle User’s Manual Plant Storage Information • Used? Type in a <Y> if you will be using this bin. If the bin is not operative for some reason, make sure you have <N> in this space. • Under In this space you should type in the smallest amount of water you will use in a batch. Type in the number, entering up to four digits. Water measurements are in gallons if measured pounds if weighed. If you use all four digits the cursor will automatically move to the next column. If your under limit is only a three digit number or less, you will need to press the <Enter> key to move the cursor to the next column. If you want the under limit to be zero, type in a 0, or press the space bar to clear out any other number. • Over This is the maximum amount of water you will allow per yard batched. Here you can use up to five digits. These limits will catch you if you make a mistake writing in your mix designs. Let's say you or another batchman makes a typing error. If this error puts the amount of water either too low or too high, the Eagle will not accept the mix. • Tolerances This column has two numbers. The first blank has a "-" sign in front of it. This is what is called the Under Tolerance, a certain percentage below the target amount that will be acceptable or within tolerance. The second blank has a "+" sign in front of it. It is called the Over Tolerance. This is a certain percentage above the target amount that will be acceptable or within tolerance. By entering numbers in these spaces (±1%, for example) you tell the Eagle that as long as it is within 1% of the target amount it is close enough. • MinTol Enter a minimum tolerance. This will help you stay in tolerance on small batches. Let's say you are batching 10 gallons of water. The actual amount if your tolerance was set at 1% would have to be within .1 gallons of the target amount. You can try all you want, but you will not be able to measure out .1 gallons with a pulse meter. This means that if you are only off by a gallon you will exceed the limit called for in the mix design. By putting a measurable number of gallons in the MinTol column, you can batch small loads without going out of tolerance. Once you have made all changes to the box in the center of the screen, look at the prompts at the bottom. First of all, you will need to record your changes in the memory of the Eagle. Press <F5> to enter the new information. Press <F10> to return to the Material Storage Menu. To return to the Storage Menu, press <F10>. Version 8.70 chp4_Eag.doc 03/15/02 1:18:08 PM 4-35 Eagle User’s Manual Extra Products Menu Note: Plant Storage Information This screen will ONLY appear if you have Eagle Order Entry/Ticket Printing Paid Option. Use this screen to list any extra products you use or sell on your plant. Extra products usually means concrete-related material like rebar which many plants sell to their customers, along with the concrete. This list of Extra Products can be called up when setting up orders on the Order Menu. The line at the top of the menu lists the number of extra products currently stored in the menu. You can store up to 50 Extra Products on this menu, and the Eagle will store them in numerical order from the smallest to the largest ID number. The left side of the menu displays information about a specific product. When you first come into this menu, the Eagle will display the first product on the list. Specific information displayed on this part of the menu includes the ID number, a description of the product, a unit price, a space for the amount of tax, and a per yards field, which allows the Extra Product quantity to be multiplied by the number of yards or meters batched when the ticket is set up. The price and tax information will also be automatically figured into the Batch Setup when you select this Extra Product. And later, all this information will be recorded on the Ticket Summary Menu, which holds a record of all tickets batched during the day. The right side of the Extra Product Menu has five columns for ID numbers. Each column displays up to 10 ID numbers. This means that the ID numbers for all of your 50 Extra Products are always displayed for easy access. 4-36 Version 8.70 chp4_Eag.doc 03/15/02 1:18:08 PM Eagle User’s Manual Plant Storage Information • Enter an Extra Product You may want to enter a new product into the Extra Product storage. To do this, you must have the Extra Product Menu displayed with the cursor blinking in the first line on the left side of the main box. The screen should look like the illustration at the beginning of this section. The cursor is already in the first space of the line for ID. Type in the new ID name or number. There is space for up to eight letters or numbers. Then press the <Enter> key to move the cursor down to the next blank. Type in a description of the product. You have space for up to 24 characters. Type in the price, placing a decimal in the space if you need to. Press the <Enter> key again. Type in the tax rate that is appropriate for the location where you are doing business. The amount of tax will automatically be added to the final price. Press the <Enter> key again. Finally, enter a <Y> or <N> response for the Per yds? field. This will determine if the pricing needs to be multiplied by the total yards to calculate pricing. When you have entered correct information in each blank, press <F5> to enter this Extra Product. Notice that the new ID appears in the ID list on the right of the box, and the number of extra products, the "n of 50 used," increases by one. • Add an Extra Product You can add extra products at any time, simply by typing in new information over what is currently displayed in the fields on the left side of the menu. As long as you type in a new ID number, the Eagle will save both the new extra product and the one that you just typed over. If you do not change the ID number when adding a new extra product to the menu, the Eagle will substitute the new information for the old and will end up changing an existing product rather than adding a new one. • Find an Extra Product To call up a particular product, you can scroll up or down through the list of extra products by pressing the <Page Up> or <Page Down> key. You can go down through the list by pressing the <Page Down> key, and back up to the first item on the list by pressing the <Page Up> key. If you get to the last item on the extra products list and press the <Page Down> key, a message, "No Such", will appear to tell you that you are at the end of the list. This message will also appear if you are at the beginning of the list and press the <Page Up> key. At the top of the list you can only scroll down, and at the bottom of the list you can only scroll up. If you do not want to find a product this way, you can use another method. First, press <F1> to find an extra product. The menu prompts at the bottom of the screen are replaced by a long narrow box, which should look like the illustration below: Notice that the cursor blinks in the first space of the highlighted space. You will type the ID name or number as it appears in the ID columns of the main box above. If you type in an incorrect ID name or number, the highlighted space fills with stars and the message "No Such" appears. Look at the illustration below: Version 8.70 chp4_Eag.doc 03/15/02 1:18:08 PM 4-37 Eagle User’s Manual Plant Storage Information Since the ID names or numbers for each product are always displayed, just check again to make sure you have typed in the correct ID. You can press the <Esc> key to return back to the Extra Products Menu if you do not want to select an item from the list. When you enter the correct ID, the selected product will appear in the highlighted lines in the left of the box. Now you can make changes to any of the features. For example, you may want to adjust the price or the tax rate, change the description, or even the ID. If you make any changes, press <F5> to enter the new product. As long as you do not change the ID, the Eagle will simply replace the new product for the old so that you can never have two products with the same ID. But if you do change the ID, then you have also created a new product. You will see both products on the list, each with its own ID. Also, the number along the top right corner of the box will increase if you change the ID. If you only make changes to an existing product, then the number will not change. 4-38 • Toggle Units Toggle by pressing the “F2 = Toggle Units” the Per /?, will be set to Yd3, M3, or Load. - If the Per /?… field is set to “yd3” the quantity of extra product will be based on the batch size in customary units. - If the Per / ?… field is set to “m3” the quantity of extra product will be based on the batch size in metric units. - If the Per /?… field is set to “Load” the quantity of extra product will be based on per load. For example: Extra Product: color, Unit price $12 on the Extra Product Storage Menu; Qty:5 Load size: 10 yards. If the “Per /?” is set to yd3, the price of color for this order will be 5 * 10 * $12 = $600. If the “Per /?” is set to m3, the price of color for this order will be 5 * 7.65 * $12 = $459. If the “Per /?” is set to Load, the price of color for this order will be 5 * $12 = $60. If the Allow Dual Units is set to “N” the “Per /?” will only have two choices depending on the Base Plant Units. - For Base Plant Units set to metric you would only have Load and m3. - For Base Plant Units set to customary you would only have Load and yd3. • Delete an Extra Product You may want to delete one of the extra products stored on this screen. To do this, follow a simple two step procedure. First, display the item you want to delete in the highlighted blocks on the left of the main box. You can select it either by pressing the <Page Up> or <Page Down> key, or by pressing <F1> and typing in the ID. Make sure that you have the item you want to delete displayed on the left section of the main box − ID, price, tax, description − before you go on to step two. Second, to delete the Extra Product displayed in the highlighted spaces of the box, press <F3>. Make sure that the product displayed is the one you want to delete. Once you press <F3>, the Eagle will wipe this product off the screen and off the list on the right of the box. Notice that the number in the top right corner of the main box, "n of 25 used," has decreased by one each time you delete a product. The next item on the list appears in the highlighted spaces. • Print Extra Products At some time, you may want to print a list of your extra products onto paper for your records. To do this, just press <F4>. The Eagle will print each item on the Extra Products List as they appear in the highlighted spaces on the screen − with ID, price, tax, and product description. Version 8.70 chp4_Eag.doc 03/15/02 1:18:08 PM Eagle User’s Manual • Plant Storage Information Load Truck If you are batching a load of concrete at the same time you are making changes to the Extra Products Menu, this key gives you the ability to turn on the automatic discharge feature without having to return to the Batching Screen. You will not need to use this "F" key if you are not batching while you are on this screen. To return to the Storage Menu, press <F10>. Version 8.70 chp4_Eag.doc 03/15/02 1:18:08 PM 4-39 Eagle User’s Manual Plant Storage Information Received Materials Menu Use this menu to record any deliveries of material that your plant receives. By entering all your received materials here, you can track them more easily. Everything you record on this screen is automatically counted in the inventory records. Compare your screen to the illustration below: In the menu are the titles for several items: Material, , Ticket #, Qty Del, Truck #, Supplier, Time Entered, and Hauler. At the bottom of the menu is a highlighted area where you will record the information for each delivery. • Material To choose the material name press the <Page Up> or <Page Down> keys until the material name appears. Note: • 4-40 You cannot type in a new material name on this screen. If you are receiving a new material, you have to designate a bin for it in the appropriate Material Storage Menu before you can record the delivery. Ticket # Allows you to record the number of the invoice or delivery ticket for more accurate record keeping. You can skip this column by pressing the space bar. Press <Enter> to move the cursor to the last highlighted column. Version 8.70 chp4_Eag.doc 03/15/02 1:18:08 PM Eagle User’s Manual Plant Storage Information • Qty Del Type in the amount of the delivery, and press <Enter> to move the cursor to the next column. Aggregate and Cement are recorded in pounds. Admix is recorded in gallons. On the Inventory Menus, weights for aggregates and cements are automatically converted to tons. • Truck # Enter the truck number. • Supplier Type in the supplier's name. • Hauler Type in the haulers name. • Time Entered Notice that the Menu displays up to ten orders after they have been entered. Notice also that the time and date appears automatically under this column when you press <F5>. The Eagle stores up to 100 deliveries in the Delivery.8 file, though it only displays 3 on the screen. If you have a printer, and are not printing each delivery out at the same time you enter it onto the screen, the Eagle will flash a message once you have entered 100 deliveries. The message tells you to print out a list of deliveries before you can enter in any more. No further entries will be allowed until the list is printed. • Change Material Type The first step in recording a delivery is choosing the material. Press <F1> to select between aggregate, cement, and admix. (Any extra materials are recorded and stored in the Extra Products Menu.) In the highlighted space at the bottom of the Material column, you will see the name of the aggregate, cement, or admix stored in bin one. Use the <Page Up> or <Page Down> key to select the specific type of material. The Eagle will display the names of each material currently assigned to a bin. These are the names listed in the storage menus for aggregates, cements, and admixes. Each time you press the <Page Up> key, the Eagle will toggle up through the list. Toggle down through the list by pressing the <Page Down> key. Version 8.70 chp4_Eag.doc 03/15/02 1:18:08 PM 4-41 Eagle User’s Manual Plant Storage Information • Clear All Received Materials You can clear all received materials by pressing <F2> or you can go to the End of Day menu to clear deliveries. • Print Received Materials List To print a list of all received materials for the day, press <F4> or you can print deliveries from the End of Day menu. Warning: The General Plant Options Menu has a <Y> or <N> feature that automatically prints out a record of each received material at the time you enter it on the Received Materials Menu. If your Eagle uses only one printer, you will probably want to make sure that this feature is turned OFF. For more information, refer to the section on the General Plant Options Menu in Chapter 2, "Setting up the Plant." • Enter this Received Material Once you have typed in the information for the order, you need to enter it into the Eagle's memory by pressing <F5>. If you have made a typing error, you can move the cursor from one column to the next with the arrow keys. • Load Truck Note the Material Status Blocks at the top of the screen above the Menu. These features enable you to keep track of a load of concrete that is batching at the same time you are recording Received Materials. Once the load is ready to be discharged into the truck, you can do so without having to return to the Batching Menu. To return to the Storage Menu, press <F10>. 4-42 Version 8.70 chp4_Eag.doc 03/15/02 1:18:08 PM Eagle User’s Manual Chapter 5 Plant Batching Operations Version 8.70 chp5_Eag.doc 03/15/02 1:21:36 PM Eagle User’s Manual Plant Batching Operations Plant Batching Operations Batching Menu Use this screen to batch concrete. You could call this the primary work screen since this screen displays each step of the weigh up and discharge process. When you tell the Eagle to batch a load, it automatically switches to this screen. It is true that you can go to any other screen within the Batching Menu section while the Eagle is batching concrete. For example, you might want to set up the next batch, or many times you may want to use the Batching Menu to watch each phase of the batching and loading sequence. Look at the illustration below. The F2 = Customers, F3 = Orders, and F4 = Ticket Stack keys will only appear if you have Order Entry/Ticket Printing Paid Option. Only the F4 = Ticket Stack key will appear if you have Communications Paid Option. Scan through the following sections for explanations of each part of this Batching Screen. Material Status Blocks Take a good look at your screen, using the illustration to make sure you are on the right menu. The name of the current menu appears just below the middle of the screen. It should say, "Batching Menu." For every menu you will come to, the name will always appear in this same place on the screen. At the top of the screen are four blocks − the material status blocks. Note that there is one for Aggregate, Cement, Admix, and Water. These boxes tell you the status of each material, with cues like: "Ready," "Manual," "Batch," "Start," "Done," "Load," "Hold," "Dump." Notice that in the illustration, the message in each box is "Ready." This is always where the status message will appear. Further on we will discuss what each word means, for now, just remember that the purpose of this status message is to keep the batchman aware of each phase of the batch. The boxes for cement and aggregate also include scale readouts which show the current weight on each scale. The readout for water is displayed in gallons if it is metered, and pounds if weighed. Version 8.70 chp5_Eag.doc 03/15/02 1:21:36 PM 5-1 Eagle User’s Manual Plant Batching Operations From the Batching/Storage Menu, every screen you can go to will display these material status blocks. This means that no matter what menu you are on, as long as it is a part of either the Batching operations or the Storage Operations, you will be able to keep track of a load as it is batching while you perform other functions. You can watch the scale readouts to see the weight increasing on the scales. While the load is batching, the status message next to the scale readouts should change with each phase of the batch. Here is a list of possible prompts that will appear in the material status blocks during weigh up and discharge. 5-2 • Ready Means that the weigh bin is empty, discharge gates are shut, and the bin is ready to begin weighing up the next batch. • Batch Indicates that material is being batched into the weigh hopper. • Done Tells you when weigh up of material is complete. • Load Means material is ready to be discharged into truck or mixer. • Hold Appears during discharge; material is waiting for its turn. Discharge sequence is set on Plant Setup Menu. The Eagle will hold during discharge according to the rules you set for it on those setup screens. • Dump Means that material is discharging. Watch the aggregate and cement scale weights decrease as material falls out of the bin. Water, if weighed, will also decrease, and if metered, the number of gallons will increase during discharge. • Done Discharge is complete for this material. When each material completes discharge this message will appear. • Ready This is the message we began with above. All weigh bins are empty (within scale tolerances), and discharge gates are closed. The Eagle is ready to begin weighing up the next batch. Version 8.70 chp5_Eag.doc 03/15/02 1:21:36 PM Eagle User’s Manual Plant Batching Operations Material Display for Batching and Discharge Below these status blocks is the main part of the screen, a large box. This box in turn is divided into smaller sections. In this box you will be able to watch each material as it weighs up and then discharges. Some of the information will be similar to what you see at the material status blocks, but most of what you look at here in the main box is more detailed and will be of more use to you. Let's look at the screen below: There are column titles along the top of each side of the main box: Material, Target, Actual, and Status. Note that these titles are the same on both sides of the box. Locate these titles on your screen now. Locate two spaces below the heading on the left, numbered 1 and 2, and two spaces below the heading on the right, numbered 3 and 4. If you are looking at this screen for the first time, these spaces will be blank. Later, when you have begun batching, these spaces will show each material you are using in the current batch. In the number 1 space, the upper left hand space of the box, you will see all the aggregates, listed by material name, target weight, actual weight, and status (status is a word that tells you what part of the batching or loading stage the material is at, ex. Fast, Slow, Jog, Done, Over, or Under). Below aggregates you will see a similar breakdown of cements, in space number 2. Up to three cements will be listed by material name, target weight, actual weight after they have been batched, and status. In the upper right hand space, number 3 on the illustration above, you will find a list of admixes. You can include up to six admixes per batch on this screen. Each admix called for in a batch will show target amount, the actual amount once batching is completed, and a status word. Version 8.70 chp5_Eag.doc 03/15/02 1:21:36 PM 5-3 Eagle User’s Manual Plant Batching Operations Below admixes you will see the display for waters, which is in space number 4. You can batch up to two waters, and each is listed by name, target amount and actual amount batched once discharge is complete. If you are weighing water, the target will be shown in pounds, and it will begin weighing up with the other materials. If you are metering water directly into the truck, as with most dry batch plants, the water will count up as it discharges. As for the other materials, the status word indicates each phase of the batching and discharge sequence. At the bottom of the box there are two more lines, which are separated by a line. You can select the information that you want displayed on your Batch Screen. Possible information that you might want to include in this section: Mix ID, Mix Description, Customer Name, Truck Number and Load Rate, Batch Number, and Batch Size. These are just suggestions. If you want to select options for this part of the screen, refer to the Plant Setup in Chapter Two for Batch Screen Options section for a list of all options and an explanation of how to choose options. While you are on the Batching Screen, you will not be able to alter the information that appears here. These lines are only intended to inform you of particular features of the current batch. If you want to change the Mix Design, the Truck, or the Batch Size, you will have to move to the Batch Setup Screen. 5-4 Version 8.70 chp5_Eag.doc 03/15/02 1:21:36 PM Eagle User’s Manual Plant Batching Operations Menu Prompts At the bottom of the Batching Menu screen are the menu prompts. These are the selections you can make from this screen. Each of the five "F" keys listed on the left will bring you to a new screen. You will want to create a list of customers that your plant sells concrete to, and also list orders that come in during the day. Stacking tickets that are ready to batch will help keep your plant running at top speed. You will probably want to look at these menus if you are not familiar with what they do. The next few sections explore in more detail each of these screens. First, let’s discuss the workings of the first three “F” keys. These are concerned with setting up materials, mix designs, orders, customers, etc. After detailing the workings of these screen, the rest of the chapter will be devoted to the process of batching concrete. Storage Menu Refer to this section in Chapter Four. Customers Menu Appears only with Order Entry/Ticket Printing Paid Option. This optional screen allows you to keep a record of up to 200 customers that your plant does business with. If you have expanded memory, you will be able to keep a record of up to 1000 customers. On the Customers Menu, you can record a billing address and particular billing information. When you select this menu from the Batching Menu, your screen should resemble the illustration below: Version 8.70 chp5_Eag.doc 03/15/02 1:21:36 PM 5-5 Eagle User’s Manual Plant Batching Operations At the top of your screen is a line of four small blocks. These are the material status blocks, which help you keep an eye on the progress of a load of concrete as it is being batched and discharged. For more details, refer back to the beginning of this chapter in the section on Batching Menu. Below the material status blocks is the main box of the Customer Menu screen. Along the top border of the box is a message that tells you how many customers you have listed. You can store up to 200 customers in the Eagle's memory. If you have expanded memory, you will be able to keep a record of up to 1000 customers. The first time you select this screen, the message will say "0 out of 200 used (1000 if expanded memory is present)." But as you enter in customer information that first number will increase with every customer you add. It will decrease by one for each customer that you delete. Most of the important information on this screen is located inside this main box. There are four different items: Customer ID, COD (Y/N)?, a three line billing address, and a three line space for telephone numbers and a name of a contact, if you want to include that. Near the bottom of the screen are the "F" keys, located below Customer Menu. Let’s discuss each of the "F" keys you see listed on the Customer Screen. • Find a Customer You can find a customer in two ways: one is to scroll up or down through the list, displaying each customer one at a time in the main box. To go up through the list, press the <Page Up> key. To go down through the list, press the <Page Down> key. When you come to the end of the list, the message, "No Such" appears on the screen, telling you that you can go no further. But you can reverse direction simply by pressing the other key. The second way to find a customer is to use the <F1> key. Look down below the title "Customer Menu" and locate the notation for <F1>. It says "FIND a Customer." Press <F1> on your keyboard. The menu at the bottom of the screen is replaced by a long narrow box with two messages in it. The bottom of your Customer Menu screen should now look like the illustration below: If you want to return to the Customer Menu, press the <Esc> key. If you want to find a customer, type in the Customer ID . Notice that the cursor is already resting in the answer space. After you type in the name, press the <Enter> key. If you enter a name that does not match a customer name in the Customer Menu, the screen will flash a message, "Not Found." The cursor is at the beginning of the space again, and you just have to type the correct name over the stars. Once you enter a correct customer name, that customer entry will appear in the main box in the middle of the screen, and the original Customer Menu prompts return. 5-6 Version 8.70 chp5_Eag.doc 03/15/02 1:21:36 PM Eagle User’s Manual • Plant Batching Operations Print a List of Customers You may want to print a list of customers from time to time, to have a list of customers on paper. From the Customer Menu, press <F4> to print a list of customers. The Customer Menu prompts will be replaced by a long narrow box at the bottom of the screen. See illustration below: Notice that the top line, "Print all customers - Short Form," is highlighted. You can use the arrow keys to move this highlighting bar from one line to the other. In this way you select either the Short or the Long Form customer list. Once you select the printing option that you want, press the <Enter> key to begin printing. If the printer is not connected, a message, "Printer not Available," will appear. Check to make sure that the printer is connected to the Eagle, that it is turned on, on line, and that the Eagle knows you are using a printer. You may need to go back to the General Plant Options screen, located with the other setup features on the Plant Setup Menu in Chapter Two. • − Short Form Prints out a list that includes the Customer ID, COD (Y/N)?, a telephone number and the full name of the customer, from the Billing Address. Each customer takes up only one line. − Long form Prints out the Customer ID, COD (Y/N)?, a full three-line address, and all three lines from the telephone space on the Customer Screen. Instead of each customer occupying one line, each customer takes up three lines. Edit Items on the Customer Menu You can do three things on the Customer Menu that are considered editing functions: First, you can add a new customer; second, you can change a customer already on the list, or third, you can delete a customer already on the list. From the Customer Menu, press <F5> to edit customer list. The Customer Menu prompts are replaced by a long narrow box at the bottom of the screen. Compare the illustration below to your screen display. If you do not want to edit the customer list, or if you do not know the correct password, press the <Esc> key to return to the Customer Menu without going further. Version 8.70 chp5_Eag.doc 03/15/02 1:21:36 PM 5-7 Eagle User’s Manual Plant Batching Operations The password is a security feature which allows you to restrict access to this operation. The cursor rests in the highlighted blank below the "Please enter password" message. Type in the password and press the <Enter> key. If you type in an incorrect password, the message "Bad Password" will appear above the box, like in the illustration below: You must know the password to add, change, or delete customers from the list. If you do not know the password, press the <Esc> key to return to the Customer Menu. If you do know the password, type it and press the <Enter> key. The screen will change slightly. The long narrow box at the bottom of the screen now has a different set of instructions. Compare the box on your screen to the illustration below: Note that the first option on the list, "ADD a customer," is highlighted. Use the down arrow key to highlight either of the other two options. When you have highlighted the option that you want, select it by pressing the <Enter> key. If you do not want to select any of these editing options, press the <Esc> key to return to the Customer Menu. 5-8 Version 8.70 chp5_Eag.doc 03/15/02 1:21:36 PM Eagle User’s Manual − Plant Batching Operations Add a Customer Let's say that you want to add a customer to the existing customer list. From the Customer Menu, press <F5>. The Eagle will ask for a password. Type in the password, then select "ADD a customer" by pressing the <Enter> key when this option is highlighted. Once you select the "ADD a customer" option, the features of the main box in the middle of the screen will change. Notice that whatever information was on the screen is now gone, replaced by large highlighted blocks. It is in these highlighted blocks that you will type the new customer information. See illustration below: You can see that there are four items of information that you will have to fill out for your new customer. This information will later be used by the Eagle when you are writing up an order for this customer. You will save time because you will not have to retype billing information, billing address, and the telephone number. 1. Customer ID In this space you will type the customer name. Since you only have eight spaces, you may need to use an abbreviation, or a shortened form of the name. This is all right since the full name can be included with the billing address, further down. This customer name is like an ID. You will need to refer to the customer by that same name each time you write a new order, or when you are trying to locate the customer on the list, using <F1>. Type in the name. You can also use numbers if you want. When you have typed the name and checked to make sure there are no misspellings, move on to the next blank either by pressing the down arrow key or the <Enter> key. Version 8.70 chp5_Eag.doc 03/15/02 1:21:36 PM 5-9 Eagle User’s Manual Plant Batching Operations 2. COD (Y/N)? Notice that this space already has the letter <N>, for no. If you do not want to bill this customer COD, then skip over the space by pressing the <Enter> key or the down arrow key. If you do want to bill this customer, change the letter simply by typing a <Y> over the <N>. By selecting <Y>, the pricing information will appear on Delivery Tickets. By selecting <N>, pricing information will not be printed on Delivery Tickets. Press either <Enter> or the down arrow key to move to the next item. 3. Billing Address You have three lines for the billing address. In most cases, this will be enough space for the name of the company, the street and number, and the city, state, and zip code. Once you fill up the first line the cursor will automatically wrap to the beginning of the next line. But more than likely, you will want to move the cursor down yourself by pressing either the down arrow or the <Enter> key. Once you have typed in the address and checked it over to make sure that there are no mistakes, move the cursor down to the last block, again, using the down arrow or the <Enter> key. 4. Telephone # You also have three lines for the customer's telephone number. This might come in handy since there may be two customer telephone numbers that you want to keep on record. Also, there is space for the name of a contact person, if you want to include something like that. After you have typed in all the information on your new customer, press <F5> to enter. Notice that each time you add a customer, the number on the top right corner of the main box increases by one. − Change this Customer Let's say that you want to change some information about an existing customer. From the Customer Menu, you will need to do two things: First, find the customer you want to change, and second, select the "CHANGE this customer" option from the edit features. Use the <Page Up> or <Page Down> key to scroll through the list of customers until you find the customer entry that you want to change. Or use the <F1> key and type in the customer name if you do not want to go paging through your customer list. You must have the customer entry that you want to change displayed inside the main box first, before you press <F5> to select the edit features. If you do not remember how to find a customer, go back to the section in this chapter called "Find a Customer." Once you have the customer entry that you want to change displayed inside the main box, press <F5> to select the edit functions. Enter the password, and then use the arrow key to highlight the edit option, "CHANGE this customer." Then select the option by pressing the <Enter> key. Once you select "CHANGE this customer" from the options, the information displayed in the main box will become highlighted. All the customer information is still there, but now that it is highlighted you can make changes to any of it. Use either the down arrow key or the <Enter> key to skip over the lines that you do not want to change. Change the information on any line, just by typing over. 5-10 Version 8.70 chp5_Eag.doc 03/15/02 1:21:36 PM Eagle User’s Manual Plant Batching Operations When you are ready to enter the changes made to the customer entry, press <F5>. If you have not changed the customer ID, the Eagle will ask you a question, which appears at the bottom of the screen, and should look like this: What this means is that the Eagle now sees that it has two customer entries with the same Customer ID. Either you must replace the old customer entry with the one you have just changed (this is what you will want to do in most cases), or you will have to change the Customer ID on the entry you have just edited. If you want to replace the old with the new, just press a <Y>. The Eagle will return to the Customer Menu, and the new version of the customer entry is now in the Eagle's memory. If you do not want to lose the old version of the customer entry, press <N>. This returns you to the Edit Menu, and you will have to assign a new Customer ID to the new entry. Once you do that, press <F5>. This records the new customer entry into the Eagle's memory and also returns you to the Customer Menu. Note: − If you change the Customer ID at all, the Eagle will create a new customer entry. The reason for this is that once you change the Customer ID, the Eagle creates a new customer. Delete this Customer Let's say that you want to delete an existing customer from the customer list. From the Customer Menu, you will need to do two things: First, find the customer you want to delete, and second, select the "DELETE this customer" option from the edit features. Use the <Page Up> or <Page Down> key to scroll through the list of customers until you find the customer entry that you want to delete. Or use the <F1> key and type in the Customer ID if you do not want to go paging through your customer list. You must have the customer entry that you want to delete displayed inside the main box first, before you press <F5> to select the edit features. If you do not remember how to find a customer, go back to the section in this chapter called "Find a Customer." Once you have the customer entry that you want to delete displayed inside the main box, press <F5> to select the edit functions. Enter the password, and then use the arrow key to highlight the edit option, "DELETE this customer." Then select the option by pressing the <Enter> key. Once you select "DELETE this customer" from the options and press the <Enter> key, you will wipe out that entry. The customer that was displayed in the main box in the middle of the screen has been wiped out, and now all that is left of that customer is a lot of blank space. Notice too that the total number of customers on the list has decreased by one. Version 8.70 chp5_Eag.doc 03/15/02 1:21:36 PM 5-11 Eagle User’s Manual • Plant Batching Operations Load Truck No doubt you have noticed the one "F" key option on the Customer Menu that we have not yet discussed − "F7 = LOAD Truck." If you are batching a load of concrete at the same time you are making changes to the Customer Menu, this key gives you the ability to turn on the automatic discharge feature without having to return to the batching screen. If you are not batching, then you will not have to use this option. When you are ready to return to the Batching Menu, press <F10>. 5-12 Version 8.70 chp5_Eag.doc 03/15/02 1:21:36 PM Eagle User’s Manual Plant Batching Operations Orders Menu Appears only with Order Entry/Ticket Printing Paid Option. Track up to 300 orders using this optional screen. After assigning an order number and telling the Eagle the name of the customer, the Eagle will automatically use the customer information so that you can set up an order quickly without repetition. You tell the Eagle the price of concrete per yard and how many yards the customer wants with this order. The Eagle will automatically total the amount of yards actually delivered and keep track of the number of loads you have batched toward completing the order. Also, the Eagle will incorporate the Extra Products Storage Menu by remembering which Extra Products the plant offers. By telling the Eagle when you will include Extra Products, you automatically call up the Extra Products Menu without having to leave the Order menu. If you have purchased this option, your operators will have to write up an order first before you can batch a load of concrete. This way you will have a record for every load of concrete that your plant operators batch. See illustration below: Note the material status blocks at the top of the screen. As stated before in preceding chapters, these blocks with their scale readouts and status words help the operator keep an eye on the load currently batching while performing other tasks. For a more detailed explanation of the material status blocks, refer back to the beginning of this chapter entitled Batching Menu. In the middle of the screen is the main box, which displays a number of different bits of information. You will fill in some of these blocks when you set up an order, and other items the Eagle will take care of automatically. The illustration shows blanks after each item, but if you have any orders on your list, one of them will be displayed on the screen. Whenever you call up the Order Entry Screen, the first order will be displayed in the main box. Version 8.70 chp5_Eag.doc 03/15/02 1:21:36 PM 5-13 Eagle User’s Manual Plant Batching Operations The Titles in the top half of the box are preset, but you can define the titles for the items down near the bottom of the box. Look at the illustration below. Those items with user definable titles are marked with an asterisks. Along the top line of the main box, near the right corner is the number of orders in the order list. Before you have typed any orders, the message will say "0 of 100 used." For each order that you enter, this number will increase by one. For each order you delete the number will decrease by one. Along the bottom line of the main box is another message. This message changes for each order displayed. It says, "Entered:" and then the time and date that the current order was entered into the Eagle's memory. Below the main box, at the bottom of your screen, you will see the "Order Menu," complete with the "F" keys you can use to perform certain tasks. • Find an Order You can find an order in two ways: one way is to scroll up or down through the list, displaying each order one at a time in the main box. To go up through the list, press the <Page Up> key. To go down through the list, press the <Page Down> key. When you come to the end of the list, the message, "No Such" appears on the screen, telling you that you can go no further. But you can reverse direction simply by pressing the other key. The second way to find an order is to use the <F1> key. Look down below the title "Order Menu" and locate the notation for <F1>. It says "FIND an Order." Press <F1> on your keyboard. The menu at the bottom of the screen is replaced by a long narrow box, with two messages in it. The bottom of your Order Entry screen should now look like the illustration below: 5-14 Version 8.70 chp5_Eag.doc 03/15/02 1:21:36 PM Eagle User’s Manual Plant Batching Operations If you want to return to the Order Menu, press the <Esc>key. If you want to find an order, type in the order number. Notice that the cursor is already resting in the answer space. After you type in the number, press the <Enter> key. If you enter a number that does not match an order number in the Order Menu, the screen will flash a message, "Not Found." Do not worry, you can type in another number without any big problems. The cursor is at the beginning of the space again, and you just have to type the correct number over the stars. Once you enter a correct order number, that order entry will appear in the main box in the middle of the screen, and the original Order Menu prompts return. • Extra Products By pressing <F2>, you can look at the extra products being sold with the current order (the current order is the one displayed in the main box). The Extra Products screen pops up in the middle of the main box and can display up to six extra products for each order. You can just look at it to see the Quantity, Per /?, ID, Product Description, Tax, and Unit Price for each product, or you can make changes to this information. Notice that along with the pop up Extra Products table, there is also a new menu and new prompts below it. When you press <F2>, your screen should change and resemble the illustration below: Version 8.70 chp5_Eag.doc 03/15/02 1:21:36 PM 5-15 Eagle User’s Manual Plant Batching Operations You can edit the Extra Products by pressing <F5>. Now all the columns are highlighted, which means you can move the cursor to any of them. You can change any of the information currently on the screen, or you can add new items by typing in new ID names or numbers. Use the arrow keys or the <Enter> key to move the cursor from one space to the next. You can type new information right over the lines you want to change. You can blank out a space by pressing the space bar. When you have made all the changes you want, press <F5> to enter the products. This will record the changes into the Eagle's permanent memory. It will also return you back to the Order Menu. • Concrete Volume Calculator Used to determine the yardage of concrete required. It lists different usage of concrete. By entering the dimension of the concrete, you will be able to calculate yardage required for slabs, footings, walls, steps, and cylinders or piers. You can enter the dimension for each specific category, and you will get a total for all at the bottom of the screen. The hot key for this screen is <Alt><V> or <Alt><C>. Look at the screen below. − Clear Calculator Zeros out all fields to begin new calculation. Once you enter in the length, width, height, depth, landing, etc., the Eagle will automatically calculate the amount of concrete needed. When the <F5> key is pressed, the original Order Screen appears with the newly calculated yardage inserted into the Qty Ord: field. Otherwise, press <F10> to return to the Order Menu. 5-16 Version 8.70 chp5_Eag.doc 03/15/02 1:21:36 PM Eagle User’s Manual • Plant Batching Operations Print a List of Orders You may want to print a list of orders from time to time, to have a list of orders on paper. From the Order Menu, press <F4> to print a list of orders. The Order Menu prompts will be replaced by a long narrow box at the bottom of the screen. Compare your screen to the illustration below: Notice that the top line, "Print all orders - Short Form," is highlighted. You can use the arrow keys to move this highlighting bar from one line to the other. In this way you select either the Short or the Long Form order list. Once you select the printing option that you want, press the <Enter> key to begin printing. If the printer is not connected, a message, "Printer not Available," will appear. Check to make sure that the printer is connected to the Eagle, that it is turned on, on line, and that the Eagle knows you are using a printer. You may need to go back to the General Plant Options screen, located with the other setup features on the Plant Setup Menu in Chapter Two. − Short Form The Short Form lists each individual order by Order ID, Customer ID, Quantity Ordered, Quantity Delivered, Total Number of Loads, and the Total Charge. It will not tell you whether the amount was paid by COD or billed. Each entry fits on one line. At the end of the Short Form the Eagle tells you total quantity ordered, and total delivered. It tells you how many loads your plant delivered. It also prints billing information, including a COD subtotal and a subtotal of the amount on account, as well as a grand total. − Long form The Long Form prints out the information that you see on your order screen. It prints out each order on its own page, showing all the information that would appear on the screen, including an additional space for extra products. At the end of the Long Form the Eagle tells you total quantity ordered, and total delivered. It tells you how many loads your plant delivered. It also prints billing information, including a COD subtotal and a subtotal of the amount on account, as well as a grand total. Version 8.70 chp5_Eag.doc 03/15/02 1:21:36 PM 5-17 Eagle User’s Manual • Plant Batching Operations Edit Orders You can do three things on the Order Menu that are considered editing functions: First, you can add a new order; second, you can change an order already on the list, or third, you can delete an order already on the list. From the Order Menu, press <F5> to edit order list. The Order Menu prompts are replaced by a long narrow box at the bottom of the screen. Compare the illustration below to your screen display. If you do not want to edit the order list, or if you do not know the correct password, press the <Esc> key to return to the Order Menu without going further. The password is a security feature which allows you to restrict access to this operation. The cursor rests in the highlighted blank below the "Please enter password" message. Type in the password and press the <Enter> key. If you type in an incorrect password, the message "Bad Password" will appear above the box, like in the following illustration: You must know the password to add, change, or delete orders from the list. If you do not know the password, press the <Esc> key to return to the Order Menu. If you do know the password, type it and press the <Enter> key. The screen will change slightly. The long narrow box at the bottom of the screen now has a different set of instructions. Compare the box on your screen to the illustration below: ADD an order Esc to exit CHANGE this order DELETE this order Note that the first option on the list, "ADD an order," is highlighted. Use the down arrow key to highlight either of the other two options. When you have highlighted the option that you want, select it by pressing the <Enter> key. If you do not want to select any of these editing options, press the <Esc> key to return to the Order Menu. − Add an Order Let's say that you want to add an order to the existing order list. From the Order Menu, press <F5>. The Eagle will ask for a password. Type in the password, then select "ADD an order," by pressing the <Enter> key when this option is highlighted. If you want more explicit instruction on getting from the Order Menu to this point, refer to the beginning of this section, which will take you through each step. 5-18 Version 8.70 chp5_Eag.doc 03/15/02 1:21:36 PM Eagle User’s Manual Plant Batching Operations Once you select the "ADD an order" option, the features of the main box in the middle of the screen will change. Notice that whatever information was on the screen is now gone, replaced by large highlighted blocks. It is in these highlighted blocks that you will type the new order information. Compare the main box on your screen to the illustration below: You can see that there are many items of information that you will have to fill out for your new order. This information will help you track the loads that you have batched on the plant. 1. Order You assign an order number, which will act as an ID number for this particular order. Type in the name or number and press the <Enter> key or an arrow key to move the cursor to the next blank. 2. Cust ID In this space, type in the ID of the customer who this order is for. Make sure that you type the ID name or number exactly as it appears on the customer list. The Eagle will automatically incorporate the customer information into this order, i.e., billing terms, billing address. 3. Qty Ord Type in the total number of yards that the customer has ordered. 4. Subtot$ Do not worry about this blank. The Eagle will keep track of the subtotal as the order gets filled. Leave this space blank, and the Eagle will fill it in once the order is filled. Version 8.70 chp5_Eag.doc 03/15/02 1:21:36 PM 5-19 Eagle User’s Manual Plant Batching Operations 5. Mix ID Type in the ID name or number of the mix design you want to use. Remember that you are calling up one of the 400 mix designs in the Eagle's memory, so you will have to type the Mix ID exactly the way it appears on the mix design. If you have expanded memory, you are allowed to have up to 2000 mix designs. 6. Size This is the batch size for each load. If you want to change the batch size for this order, simply type in the new figure in this space. 7. Qty Del The Eagle adds up this item, too. With each load that is batched, the Eagle will automatically add so that you always know how close you are to filling the order. Leave this space at zero when you write up the order because the Eagle will add to whatever number is in the space. 8. Tax$ Leave this space blank. The Eagle will add in the tax to the subtotal. A little further down, you will tell the Eagle what tax rate to use when it figures the tax. 9. Loads The Eagle will count out the number of loads that you batch as you fill the order. When writing in a new order, leave this space blank. 10. Total$ Leave this space blank. The Eagle will add up the subtotal and the tax and tell you what the total bill for the order will be. 11. Start In this space, you type in the time that the customer wants you to begin filling the order. This will help you organize your batches according to time of day to fill them. 12. Spacing Type in a number here that tells you how far apart to space each truck. In orders that require multiple trucks, your customer probably will not want all five trucks there at once. By spacing the trucks you can give your customer the concrete he ordered when he wants it. 13. COD? This information is picked up from the customer file. You can change the billing method for the order just by changing the letter in this space. 14. Price You fill in this blank. Type in the amount per yard that you will be billing this customer. The Eagle will look at this amount when figuring up the subtotal and total. 5-20 Version 8.70 chp5_Eag.doc 03/15/02 1:21:36 PM Eagle User’s Manual Plant Batching Operations 15. Tax You fill in this blank, too. Type in the tax rate that is required by law in the area you are selling concrete. The Eagle will look here when figuring up the total tax. 16. Extra Product Type <N> if you will not be selling the customer any extra products. Type <Y> if you will. If you type <Y>, then the Eagle will flash the Extra Products Screen as soon as you try to enter the order. So for now, tell the Eagle <Y> or <N>. At the end of the order, when you try to enter it, the Eagle will ask you for the specific Extra Products. 17. Del Adr Type in the delivery address. You have space for 30 characters on two lines, which should be enough for street address and city name. 18. Instr Type in any additional instructions for your drivers. This information can be made to appear on the Delivery Ticket. Default Optional Order Entry Options Depending on the needs of your plant, the information down on this part of the main box may be a little different. Below is an explanation of usage with the Default Order Titles. 1. For Additional customer identification. 2. PO# Type in a purchase order number for this order. 3. Zone Type in the particular area that this order is to be delivered. 4. Job# Type in a job number associated with this order. 5. OrderBy Record the name of the person who actually made the order. 6. Plant# This is a blank for your own plant identification since many concrete companies operate more than one plant. 7. Slump Record the slump that the customer requested for the order. Version 8.70 chp5_Eag.doc 03/15/02 1:21:36 PM 5-21 Eagle User’s Manual Plant Batching Operations 8. Due at When is the concrete supposed to be delivered. 9. Use This is an additional space for more information about the order. 10. Phone Type in a telephone number where you can reach that customer with any problems or questions concerning the order. After you have typed in all the information on your new order, press <F5> to enter it into the Eagle's permanent memory. Notice that each time you add an order, the number on the top right corner of the main box increases by one. If you typed a <Y> for special products, the Special Products Menu will pop up as soon as you press <F5>. − Change an Order Let's say that you want to change some information about an existing order. From the Order Menu, you will need to do two things: First, find the order you want to change, and second, select the "CHANGE this order" option from the edit functions. Use the <Page Up> or <Page Down> key to scroll through the list of orders until you find the order entry that you want to change. Or use the <F1> key and type in the order number if you do not want to go paging through your order list. You must have the order entry that you want to change displayed inside the main box first, before you press <F5> to select the edit features. If you do not remember how to find an order, go back to the section in this chapter called "Find an Order." Once you have the order entry that you want to change displayed inside the main box, press <F5> to select the edit functions. Enter the password, and then use the arrow key to highlight the edit option, "CHANGE this order." Then select the option by pressing the <Enter> key. Once you select "CHANGE this order" from the options, the information displayed in the main box will become highlighted. All the order information is still there, but now that it is highlighted you can make changes to any of it. Use either the down arrow key or the <Enter> key to skip over the lines that you do not want to change. Change the information on any line, just by typing over. When you are ready to enter the changes made to the order entry, press <F5>. If you have not changed the order ID, the Eagle will ask you a question, which appears at the bottom of the screen, and should look like this: Order already exists. Replace previous contents of order? (Y/N) 5-22 Version 8.70 chp5_Eag.doc 03/15/02 1:21:36 PM Eagle User’s Manual Plant Batching Operations What this means is that the Eagle now sees that it has two order entries with the same ID or order number. Either you must replace the old order entry with the one you have just changed (this is what you will want to do in most cases), or you will have to change the order number on the entry you have just edited. If you want to replace the old with the new, just press a <Y>. The Eagle will return to the Order Menu, and the new version of the order entry is now in the Eagle's memory. If you do not want to lose the old version of the order entry, press <N>. This returns you to the Edit Menu, and you will have to assign a new order ID to the new entry. Once you do that, press <F5>. This records the new order entry into the Eagle's memory and also returns you to the Order Menu. Note: − If you change the order number at all, the Eagle will create a new order entry. Delete an Order Let's say that you want to delete an existing order from the order list. From the Order Menu, you will need to do two things: First, find the order you want to delete, and second, select the "DELETE this order" option from the edit features. Use the <Page Up> or <Page Down> key to scroll through the list of orders until you find the order entry that you want to delete. Or use the <F1> key and type in the order number if you do not want to go paging through your order list. You must have the order entry that you want to delete displayed inside the main box first, before you press <F5> to select the edit features. If you do not remember how to find an order, go back to the section in this chapter called "Find an Order." Once you have the order entry that you want to delete displayed inside the main box, press <F5> to select the edit functions. Enter the password, and then use the arrow key to highlight the edit option, "DELETE this order." Then select the option by pressing the <Enter> key. Once you select "DELETE this order" from the options and press the <Enter> key, you will wipe out that entry. The order that was displayed in the main box in the middle of the screen has been wiped out, and now all that is left of that order is a lot of blank space. Notice too that the total number of orders on the list has decreased by one. • Load Truck No doubt you have noticed the one "F" key option on the Order Menu that we have not yet discussed − "F7 = LOAD Truck." If you are batching a load of concrete at the same time you are making changes to the Order Menu, this key gives you the ability to turn on the automatic discharge feature without having to return to the batching screen. If you are not batching, then you will not have to use this option. When you are ready to return to the Batching Menu, press <F10>. Version 8.70 chp5_Eag.doc 03/15/02 1:21:36 PM 5-23 Eagle User’s Manual Plant Batching Operations How to Batch Concrete Let’s discuss the three ways (see flowchart below) that could be used to begin batching concrete, which is what the Eagle Batching Computer is all about. 1. Batch Setup 2. Verify Menu 3. Ticket Stack (Appears only with Order Entry/Ticket Printing Paid Option or Communications Paid Option) Batching Batch Setup Menu Verify Menu Ticket Stack Menu Let’s start by discussing the first way, Batch Setup. Batch Setup Before you begin setting up a batch, you will need to have already taken care of a few things: 1. You should have already designed your Batch Setup Menu Screen in the Plant Setup Options. 2. Make sure that you have set up all the other necessary screens: everything on the Plant Setup Menu, and everything from the Storage Menu, including materials, mix designs, moisture information, and extra products. The Eagle will not batch concrete properly if you have not set up the computer fully. 3. You should have read the sections on the Customer and Order Menus. If you have purchased the optional Order Entry system, the information on these screens will be useful in setting batches. Not only should you have read these sections, you should have also entered in the Customer and Order information that your plant will use. 5-24 Version 8.70 chp5_Eag.doc 03/15/02 1:21:36 PM Eagle User’s Manual Plant Batching Operations Now, the moment that you have been waiting - that is to begin batching concrete. The first thing that you must do is to go to the Batching Menu. The Batching Screen is the main work screen. We looked at it at the beginning of this section. Unless you are taking care of some other business, you will probably want to use this screen to watch while the Eagle batches a load. See illustration below: Version 8.70 chp5_Eag.doc 03/15/02 1:21:36 PM 5-25 Eagle User’s Manual Plant Batching Operations Now that you are on the Batching Screen, press <F5> to go to the Batch Setup Screen. This is where you will set up every single load of concrete that your plant will batch. Look at our sample Batch Setup Screen below: Note: Refer back to the Plant Setup Screen in Chapter Two for the section titled "Batch Setup Screen Options" to specify the fields you want displayed on the Batch Setup Menu Screen. By now, you should be familiar enough with the screen design of the Eagle to recognize the major features of this screen. At the top, the material status blocks. In the middle, the main box where you will actually set up the batch. At the bottom, the title "Batch Setup Menu" and the available "F" keys for this screen. You will probably notice that the information in the main box does not exactly match what is displayed on your screen. This is unavoidable since you set up the Batch Screen to suit the needs of your own plant. But look over the following explanation of how to set up a batch using the example screen, and you will be able to apply the lesson to working with your own screen. The cursor will rest in the upper left hand blank. It will appear in the same part of your screen even if you do not have the same item in this space. With each entry that you make, the cursor will move across to the right and then down to the next line. You will simply type in the information that you want in the appropriate blank. Let's look at each of the entries on the sample screen on the next page. 5-26 Version 8.70 chp5_Eag.doc 03/15/02 1:21:36 PM Eagle User’s Manual Plant Batching Operations • Order Type in the order number that you want to fill. Remember that you should have already written up an order for this batch of concrete. If you have purchased the Customer and Order entry options, you cannot batch a load of concrete without first writing up an order for it. If you have not yet learned about the Order Menu, go back to that section of this chapter now. If you enter an order number that the Eagle does not recognize, the order blank will fill with stars, and you will have to try again. Once you have entered the correct order number, press the <Enter> key and move to the next space. • Mix ID After you have entered the order number, the Eagle will read the order entry and fill in the Mix ID automatically. Remember that one of the blanks on the order entry was for a Mix ID. This is intended to save time and eliminate the chance of selling a customer the wrong mix. • Mix Description This is the longer name of the mix, which the Eagle will automatically fill in, as soon as you enter the Order number. If for some reason you wish to change the Mix ID, the Mix Name will also change. • Yards This is filled in also. The Eagle pulls from the information you entered on the original order. If you wish to change the size of a particular batch, just type over the existing numbers. You can also type in a rather large number if you want, and the Eagle will automatically split the load into smaller batches. For example, let's say your plant has a four yard batcher. You have an order for eight yards from Jones Construction. They want it all delivered at the same time. Instead of writing up two separate batching tickets, you can type in eight yards, and the Eagle will split this large batch into two four yard batches. • Adjust You can adjust the size of the next load in this blank. Let's say one of your trucks returns to the plant with two yards of left over concrete. You have an order for nine yards, so you only need to add seven more yards. In the Yards blank type in a 9 because this is the amount of concrete the customer ordered. But in the Adjust blank, type a 2. This tells the Eagle to adjust the nine yard batch by two. When it weighs up, it will weigh up a seven yard batch, and you will not have to waste the left over concrete, or worry about an overfill. On the delivery ticket, the amount will say nine yards, but the weights will only be for a seven yard batch. Note: If you have Adjust Yards Lockout option this field will be uneditable. This option is intended for use in California and has been implemented to satisfy their State Agencies. • Cust ID This blank is automatically filled in by the Eagle. When you enter the order number, the customer information is picked up and sent here. If you left the space blank on the customer entry, it will come up blank here too. Version 8.70 chp5_Eag.doc 03/15/02 1:21:36 PM 5-27 Eagle User’s Manual Plant Batching Operations • Truck# Assign a truck number. If you enter an incorrect truck number, the screen will fill with stars and you will have to try again. When you enter a correct truck number, the next two blanks on our setup screen are also automatically filled in. • Driver The Eagle takes whatever information you had typed in on the Truck Storage Menu. If you want to change the driver name, go ahead, just type over the existing name. • Mix in Truck Last mix ID number used for last batch in the assigned truck. Note: If you have Adjust Yards Lockout option this field will be uneditable. This option is intended for use in California and has been implemented to satisfy their State Agencies. • Rate: Lb/s The Eagle reads this information from the Truck Storage Menu also. If you have assigned a special loading rate for this truck, the Eagle will remember when it comes time to load this batch into the truck. Instead of discharging at the default discharge rate, the Eagle will discharge at a rate custom made for the particular truck. • Quick Charge Adjusts the flow rate of the discharge in to the truck during the actual batch discharge. To speed up the flow rate while discharging the aggregate. Press the page up or plus key to speed up the flow rate. To slow down the flow rate while the aggregate is still discharging press the page down or minus key. • Truck Admix ID The Truck Admix ID of the returned concrete. Note: If you have Adjust Yards Lockout option this field will be uneditable. This option is intended for use in California and has been implemented to satisfy their State Agencies. 5-28 Version 8.70 chp5_Eag.doc 03/15/02 1:21:36 PM Eagle User’s Manual • Plant Batching Operations Admix Trims You can keep trim information on up to 12 admixes. Only the admixes that are being used in the mix design that you are currently setting up will appear on the screen. Notice that on our example screen, there are three admixes showing. These happen to be the admixes in bins one, two, and three. But below the admix trim line, there is an empty line. We have saved this space for admixes four through seven. The reason that no other admixes appear on the screen is that they are not called for in the current mix design. You should have a space saved for all the admixes that you will want to trim. Those admixes that you never adjust do not need to be listed. An admix can be trimmed two ways: either up or down. Trimming an admix up increases the amount of admix in the mix design. Trimming an admix down decreases the amount of admix in the mix design. When admix trims first appear on the Batch Setup Screen, they will be set at 0%. If you leave the trim at 0, you will trim the admix completely out of the mix. You will need to type in either 1.00 in the case of an accelerator like calcium, or 100 for your other admixes. A 1.00% trim for accelerators means that you are putting in exactly what is called for in the mix design. A 100% trim for other admixes means that you are putting in exactly what is called for in the mix design. To trim admixes, change the percentage. For example, to double the admix, change from 1.0% to 2.0%, or 100% to 200%. To decrease the admix by half, change 1.0% to .5%, or 100% to 50%. You can also make more delicate adjustments, increasing an admix by 10%. For an accelerator, the trim would change from 1.00% to 1.10%; for other admixes, the trim would change from 100% to 110%. In both cases the principle is the same. • Water Trims Down in the next spaces are the water trims. You can trim water three different ways. You may not need to use all three options. You may only want to trim water one or two ways. − For /Batch: ___ Gal Determine total number of gallons to be added or subtracted from amount called for in the mix design. If you do not want to change the amount called for, type in zero. This will leave the total water unaffected. Otherwise, entered the desired quantity of water for the entire batch. Version 8.70 chp5_Eag.doc 03/15/02 1:21:36 PM 5-29 Eagle User’s Manual − Plant Batching Operations For/Yard: ___ Gal Trim number of gallons per yard. If you do not want to change the amount of water, type in a zero in this space. 1. To Increase Gallons/Yard Type in the number of gallons. For each yard batched, the Eagle will increase the number of gallons that you have entered. For example, if you enter the number 1, you will add one gallon of water for each yard called for in this batch. A one yard batch will show an increase of one gallon. A nine yard batch will show an increase in total water of 9 gallons. 2. To decrease Gallons/Yard Type in a "-" sign in front of the number of gallons. For each yard batched, the Eagle will decrease the number of gallons that you have entered. For example, if you enter a - 4, the Eagle will take out four gallons of water for each yard you batch. A one yard batch will have total water decreased by four gallons. A five yard batch will have total water decreased by 20 gallons. A nine yard batch will have total water decreased by 36 gallons. − 5-30 Special ___% This feature can be handy if your plant uses more than one water. Let's say you have hot and cold water on your plant. The mix design you are using calls for cold, but you want to add in some hot water as well. Instead of rewriting the mix design, you can change the percentage in this blank. By entering a 50, you tell the Eagle to make 50% of the total water special − in this case, hot water. The Eagle can split the water up any way you want, designating up to 99% special water. This feature does not affect the total number of gallons being used. Total gallons will not be affected. You can use this trim with either of the other trims, and not affect the changes they make in total water. This means that you can trim in three more gallons of water per yard and also designate 40% of it as special water. The Eagle is capable of performing both trim operations. • Probe If your plant is using a moisture probe to adjust the moisture in your aggregate, you may want to have a probe reading displayed on your batch setup screen. • Instr1 It is a user-defined field. The Eagle allows you to key in specific instructions. • Del Addr Type in the number and street here, if you want. Although the address is already on the customer order, you can retype the first line of that delivery address, or write in a new one. • Abort Batch <F10> If a batch is started but has not started batching any materials the batch can be cancelled by pressing <F10>. If a material is already started thenthe batch can be “Suspended” by pressing <F10> . After it is suspended it is put into “Load” status. <F7> can be pressed to clear out the scales or press <F10> again to Abort to Master Menu. Version 8.70 chp5_Eag.doc 03/15/02 1:21:36 PM Eagle User’s Manual ! Plant Batching Operations "F" key prompts After you have typed in all the information for this batch, look down to the "F" key prompts under the menu title. You can do one of three things with this batch ticket that you have just set up. 1. Press <F3> to Verify the ticket. 2. Press <F4> to Stack the ticket without verifying it. 3. Press <F5> to Batch the ticket without either verifying it or stacking it. If you are on the Batch Setup Screen, press <F5> to batch the ticket you have just written. The screen will change to the Batch Screen. If you are on the Verify Screen when you press <F5> to batch, the screen will not change much. The title changes from Verify Menu to Batch Menu, and the "F" key prompts change too. If you are on the Ticket Stack Menu when you press <F5> to batch the ticket you have selected, the screen change will be more noticeable. On the Batch Screen, notice that the box in the middle displays the makeup of this batch. At the top of the box, on the left side, the aggregates are listed by material name and target weight, and below the aggregates, the cements are displayed. The admixes for this batch appear at the top of the right side of the box. Below admixes, you should see the waters you are using. As soon as you press <F5> to batch a ticket, the Eagle begins weighing up material. Notice that in this main box, the Eagle highlights the material as it is weighing up. It does this to tell you which material is being weighed up. It will weigh up the first item first, then the second item, and so on until it has weighed up each material. Most plants have only one weigh hopper for all their aggregates and one weigh hopper for all their cements. As a result, they can only weigh one aggregate and one cement at a time. For example if the batch calls for both sand and rock, then the sand will batch up first. When the sand is completely batched, then the rock will begin to batch. With only one aggregate weigh hopper, the materials must batch in sequential order. However, if a plant has two aggregate weigh hoppers, it could weigh two aggregates at the same time. It could be batching aggregates in parallel order. The important point here is that the manner in which the Eagle sequences the weighing of materials is greatly affected by the number and configuration of weigh hoppers. These differences in sequence are apparent when observing a batch in progress on the Batch Screen. As the materials weigh up, the blocks at the top of the screen show the weight on the scales increasing. In the box, under the column Actual, you can watch the actual weight increasing for the material weighing into the scale. On the left of the actual weight is the target weight. On the right of the actual weight is the Status column, which has a word that tells you the batching status. You will see several different words here as the material is weighed up. Let's discuss each of these words on the next page. 5-32 • Start Material is beginning to load into weigh hopper. • Fast High speed batching. The Eagle is using the Fast Batch gates. Version 8.70 chp5_Eag.doc 03/15/02 1:21:36 PM Eagle User’s Manual Plant Batching Operations • Slow Once past the fast cutoff weight, the Eagle shuts the Fast Batch gates and finishes batching with the Final Batch gates. • Learn Batching gates have shut, and the Eagle is learning to adjust freefall weights. • Jog If you are allowing jogging, the Eagle will jog out material to close the gap between the target weight and the actual weight. If you are not allowing jogging, use the <Alt><J> hot key to force a jog for the material that is under tolerance. • Done Weigh up is complete. Actual weight is within the tolerances set up on the material storage screens. • Over Weigh up is complete, but actual weight exceeds target weight plus the over tolerance weight. • Under Weigh up is complete, but actual weight is below target weight minus the under tolerance weight. If weight goes over or under, a flashing message will appear on the screen and batching will stop. Depending on the type of material, the message will appear, "Aggregate out of tolerance," "Cement out of tolerance," or "Admix out of tolerance." Along with this message another flashing prompt appears, "F6 = Override Error." To resume batching, you must press <F6> to override the out of tolerance condition. Note that other materials continue to batch. For example, if you overweigh an aggregate, the message, "Aggregate out of tolerance, F6 = Override error." Admix and cement will continue to weigh up, but the rest of the aggregates will not begin weigh up while this message is flashing. Until you acknowledge the overweigh error, the Eagle will not complete the batch and begin discharge. To override the error, press <F6>. The Eagle will ask for a password. Type the password and press the <Enter> key. If you do not know the password, you cannot override the signal. You will have to press the <Esc> key to return to the Batching Menu. If your plant is set up so that you are not supposed to override weigh up errors, then you will have to get someone on the plant to help you. This may be either your boss or the plant manager. Once you enter the password, you have successfully overridden the error. The flashing messages disappear from the screen and the Eagle will resume batching. You can press <F7> to Load Truck while the material is still weighing up if you want to start your water early. The Eagle will automatically begin discharging material as soon as the weigh up is complete. If you do not want automatic discharge, then wait until the Eagle has finished weighing up. When the material status blocks all say "Load," and the truck is in place, press <F7> to discharge material. To regulate discharge rate per truck while loading, press <Page Up> or <Page Down>. To increase use <Page Up>. To decrease use <Page Down>. Each keystroke changes the discharge rate by 1/2 of a scale graduation for a maximum of ±3 graduation. Refer to the Scale Calibration Screen for graduation size. Version 8.70 chp5_Eag.doc 03/15/02 1:21:36 PM 5-33 Eagle User’s Manual Plant Batching Operations ReNew The batch weights are adjusted on an individual material basis whenever possible. The returned concrete must contain the ingredients that are in the mix design for the load to be batched, and the total weight of any type of material of the returned concrete may not exceed the non-compensated target weight of that material in the load to be batched. To use this feature, first ensure the “Mix in Truck” field (#428), and the “Yards Adjust” field (#12) are on the Batch Setup Menu. These fields provide the Eagle with the information it needs to perform the Full Mix Adjustment. Note: If you have Adjust Yards Lockout option the fields are non editable therefore, you are unable to use the ReNew feature. This option is intended for use in California and has been implemented to satisfy their State Agencies. • Matched Mix Designs If the Mix Design of the material in the truck is matched with the Mix Design to be batched, the on-board quantities are displayed next to the batch targets for the materials to be batched in the Verify Menu. In the below example, a total of 10 yards is being batched. The truck has three yards and seven more will be batched. The “Mix in Truck” is matched if: 1. The mix in truck does not have different ingredients than the mix being batched. 2. The total amount of an ingredient in the truck is less than or equal to the target of the total yardage for that ingredient. 5-34 Version 8.70 chp5_Eag.doc 03/15/02 1:21:36 PM Eagle User’s Manual • Plant Batching Operations Mismatched Mix Designs If there are any mismatches, a warning is displayed on the Eagle screen, and the operator must issue an override before displaying the Verify Menu. See example and screen below: Material in Truck not in Mix Design to be batched! Batch Setup Menu F6 = OVERRIDE Error F7 = LOAD Truck F3 = VERIFY this one F4 = STACK this one F5 = BATCH this one F10 = RETURN to Batching Menu On this page, the mix designs are not matched because there are materials already on the truck that are not called for in the new batch. New batch Example: Mix ID 25 Quantity 10 25AW Yds 3/4 Rock Mismatched material 3 Yds 1825 Lb/Yd 1/2 Rock 1800 Lb/Yd Sand 1350 Lb/Yd 1350 Lb/Yd 375 Lb/Yd 325 Lb/Yd 50 Lb/Yd Type I Flyash Air Reducer Water Version 8.70 chp5_Eag.doc OnBoard 03/15/02 1:21:36 PM 4.5 Oz/Yd 5.3 Oz/Yd 16.4 Oz/Yd 15.5 Oz/Yd 291.5 Lb/Yd 291.5 Lb/Yd 5-35 Eagle User’s Manual Plant Batching Operations After displaying the warning message, the <F6> prompt is displayed giving the operator the opportunity to override the warning. He has three options at this point: Option 1: Override and Start Batch If he overrides the warning (with the batching error password), the batch targets will be adjusted based on the assumption that the material in the truck was batched with the same mix design as the load to be batched, causing all materials to be adjusted. The screen below shows the actual weights after the operator pressed <F5> to batch the material. Notice that the targets and Actuals are for the additional seven yards that were batched. 5-36 Version 8.70 chp5_Eag.doc 03/15/02 1:21:36 PM Eagle User’s Manual Plant Batching Operations Option 2: Verify and View Combined Mix If he chooses to verify the batch instead, he can press <F3>. The screen below shows that if an ingredient on board is not in the Mix Design to batch, that ingredient’s name will appear in the Verify Menu with the amount on board, and the Target value will be displayed as dashes (“-----”). Here he can choose to batch it by pressing <F5>, or if wants to edit the material or weights, press <F3> to go into the Change Materials/Targets Screen. Option 3: Change Assumptions and Try Again If he enters a new Mix in Truck or a new value for Yards Adjust, a new check is performed, and if the mixes are matched, the warning is cleared. Version 8.70 chp5_Eag.doc 03/15/02 1:21:36 PM 5-37 Eagle User’s Manual Plant Batching Operations If the error occurred because a quantity on board exceeds the amount called for by the Mix Design to batch, the operator has three options to override the error: Option 1: Override and Start Batch If he overrides the warning (with the batching error password), the material will be adjusted based on the total yards in the truck not on per material basis. This is done by pressing <F5> to batch the material. See screen below: 5-38 Version 8.70 chp5_Eag.doc 03/15/02 1:21:36 PM Eagle User’s Manual Plant Batching Operations Option 2: Verify and View Combined Mix If he pressed <F3> to verify the batch, the screen below shows the quantity on board exceeding the target weights. Here he can choose to batch it by pressing <F5>, or if wants to edit the material or weights, press <F3> to go into the Change Materials/Targets Screen. New batch Example: Excessive material OnBoard Mix ID 25 Quantity 10 1/2 Rock 1800 Lb/Yd 1875 Lb/Yd Sand 1350 Lb/Yd 1275 Lb/Yd 375 Lb/Yd 445 Lb/Yd Type I Air Reducer Water 30 Yds 9 Yds 4.5 Oz/Yd 4.5 Oz/Yd 16.4 Oz/Yd 16.4 Oz/Yd 291.5 Lb/Yd 275.0 Lb/Yd Option 3: Change Assumptions and Try Again If he enters a new Mix in Truck or a new value for Yards Adjust, a new check is performed, and if the mixes are compatible, the warning is cleared. Version 8.70 chp5_Eag.doc 03/15/02 1:21:36 PM 5-39 Eagle User’s Manual Plant Batching Operations If the mix designs are mismatched and you wish to modify them to be matched, press <F3> to jump into the Change Materials/Targets Screen (QwikEdit) for rapid modifications. On the Change Materials/Targets Screen, any Materials with corresponding OnBoard amounts will have non-editable material names. (Editable fields are shaded.) See example and screen below: New batch Example: Mix ID 25 Quantity 10 25AW Yds 3/4 Rock Mismatched material Yds 1825 Lb/Yd 1800 Lb/Yd Sand 1350 Lb/Yd 1350 Lb/Yd 375 Lb/Yd 325 Lb/Yd Flyash Air Reducer Water Version 8.70 chp5_Eag.doc 3 1/2 Rock Type I 5-40 OnBoard 03/15/02 1:21:36 PM 50 Lb/ 4.5 Oz/Yd 5.3 Oz/Yd 16.4 Oz/Yd 15.5 Oz/Yd 291.5 Lb/Yd 291.5 Lb/Yd Eagle User’s Manual Plant Batching Operations If the total number of ingredients on board and in the Mix Design to be batched exceeds the total number of materials allowed for any class, none of the on board quantities will be displayed on the Verify Menu or the Change Materials/Targets Menu. The target weights will be calculated from the mix design for the new batch. An informative message will be displayed on the Eagle screen. See example and screen below: Too many differences to display materials in truck! Verify Menu F1 = Change total WATER/BATCH F2 = Change CEMENT Bin F3 = Change Material/Targets F4 = STACK this one F5 = START this one Mix ID 25 Quantity 10 OnBoard 25M Yds 3 Yds River Rk 450 Lb/Yd 3” Rock 1350 Lb/Yd 3/4 Rock 450 Lb/Yd 1” Rock 450 Lb/Yd Pea-rock 450 Lb/Yd 375 Lb/Yd 1/2 Rock 1800 Lb/Yd Sand 1350 Lb/Yd 375 Lb/Yd Type I Air Reducer Water Version 8.70 chp5_Eag.doc F10 = RETURN to Batching Menu New batch Example: Excessive number of aggregates F7 = LOAD truck 03/15/02 1:21:36 PM 4.5 Oz/Yd 4.5 Oz/Yd 16.4 Oz/Yd 16.4 Oz/Yd 291.5 Lb/Yd 291.5 Lb/Yd 5-41 Eagle User’s Manual Plant Batching Operations The second way that could be used to begin batching concrete is to verify the batch ticket that you have just setup. Verify Menu To verify a batch ticket that you have just set up, press <F3> from the Batch Setup Menu. Your screen will change to look like the illustration below: In the illustration, you should notice that the Verify Screen is very similar to the Batching Screen. Notice that there is a ticket broken down into individual materials. You can see by looking at the screen how much 3/8 rock is called for, and how much sand is called for. You can also see the target weights for the cement, the admix, and the water. If you go to the Verify Menu from the Batch Setup Screen, you will look at a break out of the batch that you just set up. You can also verify any one of the tickets on the ticket stack, which you will see later. The purpose of the Verify Screen is to give you a chance to look at the target weights of all materials before you begin batching. But you can do more than look. You can also change some of the items on the batch ticket by using the "F" keys at the bottom of the screen. • Change Total WATER/BATCH Press <F1> to change the total water on the batch in the Verify Menu. Look back above at our example. This batch calls for 330 gallons of water. To reduce this amount, you can use the Change Total Water feature. Press <F1> to change the total water. The Verify Menu prompts will be replaced by a long narrow box at the bottom of the screen. Look at the illustration below: Total Water/Batch Esc to exit 5-42 Version 8.70 chp5_Eag.doc 03/15/02 1:21:36 PM Eagle User’s Manual Plant Batching Operations The cursor is located in the highlighted space. Type in the number of gallons or pounds you want in the batch. Remember that this is total gallons or pounds, not per yard. When you have changed the number, press the <Enter> key to return to the Verify Menu prompts. If you do not want to change the total water, press the <Esc> key to return to the Verify Menu without making any changes. After you have changed the water, you will see the new total water in the lower right section of the main box. • Change CEMENT Bin You can also switch one cement bin for another. To do this, press <F2>. The Verify Menu prompts will be replaced by a long narrow box at the bottom of the screen. Compare your screen to the illustration below: Enter desired cement bin Esc to exit The cursor rests in the highlighted blank, which displays the current cement bin number. To change it, type in a bin number in this space. If you type in the number of a bin that is not in use, or not assigned, the Eagle will tell you, and you will have to enter another number. If you do not want to change the assigned cement bin, press the <Esc> to exit. Once you have changed the cement bin, you will see the contents of the new bin listed with the other cements, replacing the old. The target weight does not change. • Change Materials/Targets (QwikEdit) This primary purpose of this feature is to allow the batchman to alter the ingredients and quantities of a given load just before it is batched without having to enter a new mix design in the storage section. See screen below: Version 8.70 chp5_Eag.doc 03/15/02 1:21:36 PM 5-43 Eagle User’s Manual Plant Batching Operations A batch may be modified if the batch was not sent from Dispatch with the “No Changes Allowed” flag set. When the <F3> = Change Materials/Targets key is pressed, a password entry screen is displayed which requires the supervisor password. When the proper password is entered, the screen will change making the fields for Material name and Target weights editable. The cursor will be on the first aggregate. These fields can then be changed in the same way as on the Mix Design screen by pressing the <Page Up> or <Page Down> key and typing numbers for the target weights. Any material can be changed, and additional materials can be added that were not originally in the mix design. Note: Any changes or additional mix entries will be flagged with a “c” for Changed material. For example, if an admix was trimmed from the Batch Setup Screen, the Verify Screen will display a “*1” next to the material name. If it is changed on the Change Materials/Targets Screen, it will display and print a “c1” when batched. Press <F5> to start batching. The batch will begin as soon as the normal checks are done to insure that the materials were not entered out of the proper limits. Note: If <F10> is pressed, any changes made will be discarded, and the previous mix will be displayed. In the case of a mix requiring multiple drops, the Verify Screen shows the first drop. Likewise, the Change Materials/Targets Screen will also show the first drop. Consequently, any material and target weight entered on this screen will also be on a per drop basis. The only exception to this is if an admix is set up to batch only with the last drop and is used in the batch. In this case, the target weight is a total for the batch, and the text “Last Drop” will appear in the Actual and Status columns. For example, when you changed material target on the multi-drop batch, it reflects the change value on every drop of a multi-drop load. Let’s say that the target is 1880 lb. for a two drop load (i.e. 940 lb. per drop). If you go into the Change Materials/Targets Screen and change the cement target value from 940 lb. to 900 lb., the second batch target weight will also be 900 lb. for a total of 1800 lb. for the combined batch. The following functions are restricted when using the QwikEdit feature: 1. If anything is changed, then Absolute Volume Adjust and Slurry Adjust features are not used. 2. If any moisture probed aggregate, water, or admix (if set to compensate water for admix), then dynamic moisture compensation is turned off for that batch. 3. This feature cannot be used with the Matrix Master feature because of interdependencies of the Cements and Waters that insure that the vortex will not collapse. 5-44 Version 8.70 chp5_Eag.doc 03/15/02 1:21:36 PM Eagle User’s Manual Plant Batching Operations 4. When using Cumulative weighing, the Aggregate and Cement targets are not editable. Only the material is editable. The water is editable if it is Metered Water, but if it is weighed water it is not editable. 5. Once you are in the Change Materials/Targets Screen, you can only press <F5> to start the batch or <F10> to cancel the batch. • STACK this one After you setup a load, you can press <F4> to stack this batch on the Ticket Stack. • START this batch When you select this option, it will start the batch. Version 8.70 chp5_Eag.doc 03/15/02 1:21:36 PM 5-45 Eagle User’s Manual Plant Batching Operations The final way that could be used to begin batching concrete is to batch a ticket off the Ticket Stack. Ticket Stack Each ticket in the stack shows the following information: Ticket Number, Truck Number, Time Due, Customer Name, and Delivery Address. The Ticket Stack Screen can hold up to 10 tickets. Look at the main box in the middle of the screen. If you are on the Batch Setup Screen or the Verify Screen and you stack a ticket, this ticket will appear at the bottom of the stack. Tickets can be placed on the Ticket Stack in the following three possible ways: 1. From the Batch Setup Screen, by pressing <F4> = STACK this one, the details of the batch just setup are placed on the stack. 2. From the Verify Screen, by pressing <F4> = STACK this one, the details of the batch just verified are placed on the stack. 3. With the Communications option, tickets can be sent from a remote dispatch computer and placed on the Ticket Stack. To change the sequence of the stack: • Move the arrow to the ticket you want by using the arrow keys. • Press the space bar to highlight the line to be moved. • Use your arrow keys to move the ticket up or down to the location on the stack you want the ticket. • Press the space bar again to save the new location. If the Esc key is pressed while in the movable mode, the screen will return to the normal mode and the tickets will return to their original positions. Regardless of the source of the tickets, the Ticket Stack Screen will closely resemble the below illustration: 5-46 Version 8.70 chp5_Eag.doc 03/15/02 1:21:36 PM Eagle User’s Manual Plant Batching Operations The appearance of the ticket item on the Stack Screen has the ability of distinguishing the different types of tickets. The color for each type of ticket is: • Black on Gray = local ticket with the ticket units same as the plant base units. • Magenta on Gray = local ticket with the ticket units different from the plant base units. • Yellow on Blue = comm. ticket with the ticket units same as the plant base units. • Yellow on Magenta = comm. ticket with the ticket units different from the plant base units. Note: If you have Communications option turned ON in the Options Menu, the column titled Order will be changed to Ticket #. All of this information comes from the Batch Setup Screen. • Toggle displayed fields The information display on the Stack Menu Screen can be modified from the standard information. To modify the information display on the screen, press <F1>. <F1> will toggle the standard information from the Delivery Address to mix ID, load size, and slump target. Pressing <F1> again will restore the original delivery information. • Delete a Ticket The first step to deleting a ticket from the ticket stack is to choose which ticket from the stack you want to get rid of. Locate the arrow key on the left side of the order column. You can move this pointer up or down by pressing the arrow keys. Move the pointer until it is next to the ticket you want to delete. The second step is to press <F3> to delete the ticket. As soon as you delete, the ticket will disappear from the stack, and all the tickets below it will move up one. Only local tickets can be deleted. • Verify a Ticket Select the ticket you want to verify by moving the pointer up or down with the arrow keys. When the pointer is next to the ticket you want to verify, press <F5>. Your screen will change, and the Verify Menu will appear. In the box will be all the target weights for the materials in that mix. Refer to the section on the "Verify Menu" later in this chapter if you want to know what to do on that screen. Version 8.70 chp5_Eag.doc 03/15/02 1:21:36 PM 5-47 Eagle User’s Manual Plant Batching Operations • Set Up a Ticket Takes you to the Batch Setup Menu Screen so that you can change or verify the information on that screen. • Batch a Ticket Select the ticket you want to batch by moving the pointer up or down with the arrow keys. When the pointer is next to the ticket you want to verify, press <F5>. Your screen will change, and the Batching Screen will appear. In the main grid you will see material begin to weigh up. Outside on your plant, the weigh up bins will begin filling with material. Once you have started to batch a load, the batch ticket will disappear automatically from the ticket stack. Congratulations! You now have successfully completed the batching process. 5-48 Version 8.70 chp5_Eag.doc 03/15/02 1:21:36 PM Eagle User’s Manual Plant Batching Operations Finally, let’s discuss the final section of this manual on how you can keep track of the truck washout time versus the employee clock out time at the end of the day. Truck Washout Utility Washing out the truck or mixer can be made easier by using the Truck Washout Utility. This utility is a pop-up screen that the batchman can use to tell the Eagle how much water and/or admix to put in the truck, and when to start the washout. The Eagle puts the called-for amount of water and/or admix into the truck automatically and also keeps track of which trucks have been washed out, to warn the batchman of possible water in the truck before it gets loaded again. To use the Truck Washout Utility, you must be in the Batching Menu. From the Batching Menu, you can pop-up the Truck Washout Utility screen by pressing the <Alt> <W> keys at the same time. Your screen will then display a smaller screen in the middle of the Batching Menu. Compare your screen to the illustration below: Notice that when the Truck Washout Utility pops up, the bottom of the Batching Menu disappears. The only "F" keys you can use are the ones displayed on the utility menu itself. These "F" keys allow you to edit the washout materials, start washout, and return to the Batching Menu. • LOCK in Truck Washout Does not allow any access to any other screens. The computer must be reset to clear. • EDIT Washout Materials Allows selection of water/admix to be used for washout. You can edit three of the fields right away without pressing any of the "F" keys. These are the truck number field and the amount of water. If you want to select an admix to add to the washout, or change to another water, you must press <F4>. Below the pop-up screen a message will appear. See below: Please Enter Password Esc to exit Version 8.70 chp5_Eag.doc 03/15/02 1:21:36 PM ***** 5-49 Eagle User’s Manual Plant Batching Operations You must know the Mix Edit Password to select either a new admix or a new water. This security feature is designed to protect the plant from unauthorized changes to normal operations. If you do not know the Mix edit Password, press <Esc> to return to the pop-up menu. In the Mix Edit mode, you can change any of the fields in the pop-up screen. Use the <Page Up> or <Page Down> key to select the name of the admix or water you want. Type in the amount of each you want for this washout. • START Washout This will start the washout. When you have completed the washout, press <F10> to leave the Truck Washout Utility and return to the Batching Menu. Note: If you press <F10> during the washout of a truck, the Eagle will turn off the water, and not complete the washout. Make sure that you do not press <F10> until the washout is complete. Truck Menu The Truck Menu is designed to work with the Truck Washout Utility to keep track of not simply the number of trucks your plant is using, but what is in them. You can use the Truck Washout Utility in two ways: 1.) To hold concrete for later use, as with "recovery" type admixes or 2.) Just to clean out the trucks In the first example you will apply the washout water and admix to the next batch. In the second example, you may or may not. The extra washout information is included on the Truck Menu so that you can know which trucks might still have water or admix in them, and which trucks may need to be washed out. Once you have washed out a truck, the Truck Menu will show how much water and admix was used. If it has been dumped, you may want to change the amount of water by zeroing out the number. The Batch Setup Screen can include a field number, #140 for metered, #141 for weighed, which will display the field "Water in Truck: ____ gal (or lbs)." The amount displayed will match the Truck Washout amount. So you can adjust the amount in the truck on the Batch setup Screen if you include this field. Since this is a trim field, the line will only be displayed if you specified "Apply to Batch? Y" on the Truck Menu for this truck. The Eagle will warn the batchman about possible water in the truck when he goes to batch in to the truck for the first time after it has been washed out, regardless of the "Apply to Batch?" line on the Truck Menu. This serves as a warning to the batchman of the possibility that there is still water in this truck: "Warning! Truck Washed Out, Water and/or Admix in Truck!" The message appears as soon as the truck is selected on the Batch Setup Screen, giving the batchman plenty of time to either use another truck, make sure that the water has been dumped, or that the trim will be made. This is the last section of this manual. We at Command Alkon Dallas hope that the Eagle’s User Manual is helpful to you in answering all of your questions about the Eagle batching system. If you have any question, please call the Command Alkon Dallas Service Department. 5-50 Version 8.70 chp5_Eag.doc 03/15/02 1:21:36 PM Eagle User’s Manual Plant Batching Operations Dual Units Metrication Introduction The Eagle batching controls have been capable of all metric operation since 1988. The United States changeover to metric job specifications at the federal and state government levels has created a demand for the ability to batch in both U.S. units and metric units on a batch-by-batch basis. The following subsection describes the “Dual Units” software included with Eagle software release 8.10 and above. Plant Base Units Plant Base Units are the units that the scales and volumetric pulse heads are calibrated in. If your plant has U.S. “Lb” weight calibrations on the scales and gallon/ounce calibration on the pulse heads, the Eagle should be setup in U.S. units. (See General Plant Options screen later in this subsection for how to set the Plant Base Units.) The Eagle Manual Switch Panel scale readouts will display in the Plant Base Units by U.S. regulatory agency requirement. These readouts are considered to be “Primary Scale Indicators” under the regulations. The scale readouts on the Eagle monitor screen are slaved to the readouts on the Manual Switch Panel, and display in the same units as the Manual Panel. The scale readouts in the upper 20% of the monitor will read in the Plant Base Units, regardless of the ColorStat <F11> key setting. The lower 80% of the monitor screen will display units and values according to the <F12>key, which is the key that toggles the display back-and-forth between U.S. and metric units. (See Extended Plant Options screen later in this subsection for how to setup “Dual Unit” operation.) Version 8.70 chp5_Eag.doc 03/15/02 1:21:36 PM 5-51 Eagle User’s Manual Plant Batching Operations Plant Base Units “Plant Base Units” are determined by the Scale calibration units. The same units are displayed on the “Primary Indicator” ( Manual Switch Panel readouts). Eagle Manual Panel with Scale Readouts (Primary Indicator) 99999 99999 99999 Tickets Batch Commands Tickets Batch weights & data. Output to light or horn Batch Weights Batching Data Remote operators panel Eagle Series Dispatch computer Remote P.C. running Remote Batch Software Direct connect up to 300 ft. Eagle Batching System -OR- Short haul Eagle System CRT modem up (Secondary Indicator) to 6000ft. Follows and display the same units as the “Primary Indicator” on-ORthe top portion of your screen. Long haul modems for unlimited The Lower portion will show the Dual separation. Units. 5-52 Version 8.70 chp5_Eag.doc 03/15/02 1:21:36 PM Batch Recordation Printer Eagle User’s Manual Plant Batching Operations Dual Units Software Operation • Material Storage In the Materials Storage Menu, under Aggregate, Cement, and Admix storage, Edit Sources/Aliases <F4>, is available when Dual Units is turned on. This gives you a place to rename the material to a metric material name. This shows a metric material name in the Batching Menu and Recordation printouts when using the metric units. • Mix Designs U.S. unit mix designs may be soft-converted to metric units, adjusted to maintain the same material proportions per unit of volume, renamed to a metric mix name and stored for later retrieval. One-Key, <F12>, is all it takes to do the conversion. • Local Orders Local orders may be setup, batched, and recorded in any combination of U.S. or Metric units. • Comm Orders Metric orders may be sent from the dispatch computer with the “changes allowed” flag set to Yes, meaning the ticket may be edited at the Eagle. (If the flag is set to No, the ticket cannot be changed and must be recorded in metric units.) If the flag is set to Yes, the ticket may be batched in U.S. units and recorded in metric or batched in U.S. units and recorded in U.S. units. • Batch Setup Returned concrete may be entered in yards and One-Key converted to be used on a metric load. When you are in metric the background color on the metric unit will be magenta. (See page 5- 65 for example screen.) • Batching You can observe the batching process in either unit system, no matter what units the mix design, batch setup or recordation print units. • Recordation Recordation units can be selected on the Batch Setup screen if the order is local or if the Comm Ticket has “Changes Allowed” set to “Yes”. Version 8.70 chp5_Eag.doc 03/15/02 1:21:36 PM 5-53 Eagle User’s Manual Plant Batching Operations • Deliveries Deliveries may be unit converted to either unit system at the time of entry or left in the units delivered in. • Inventory The Eagle inventory software will automatically resolve deliveries in both unit systems into the Plant Base Units, so that a total quantity on-hand amount is known. • List of All Tickets The “List of Tickets” report will print load sizes from Metric loads in cubic meters, and load sizes from Customary loads in cubic yards. It will also print separate summarized totals in the base plant units. • Tickets by Order/Invoices by Order/Daily Activities The Tickets by Order, Invoices by Order, and Daily Activities reports will print all the tickets associated with an order in the units system used by that order. For Metric orders, the tickets’ load sizes will be printed in cubic yards. • Order Reports (Short and Long) On the Order Reports, the Quantity Ordered, Quantity Delivered, and Load Size values will be printed in the units system used by each order. The summary at the end of each of these reports will have a separate section for the Customary orders and the Metric orders. The dollar amounts are totaled for all orders. • Summary Report The Summary Report will print the total quantity batched and the total quantity adjusted in base plant units, as in previous Eagle Revisions. In addition, it will print in parentheses to the right of each of these values the equivalent quantities in the alternate units system. • Slump Water Report The Slump Water report will use the same format as before, but will print quantities and units in the same units system as was used for the load’s recordation. This report is only available with Manual Slump Water Entry paid option. • Print Screen feature To print out a copy of any screen in the Eagle system press the Print Screen key while holding down the Shift key. <Shift/Print Screen> This can be used to show a comparison between custom units and metric units. Print a screen showing one units type then press <F12> and print out the same screen showing the other units type. 5-54 Version 8.70 chp5_Eag.doc 03/15/02 1:21:36 PM Eagle User’s Manual Plant Batching Operations Plant Set Up General Plant Options Screen This flag tells the Eagle if the “Primary Indicator” scale units are Metric or Customary. Plant Base Units Flag Set to “N” If the flag is set to “N” the screen units displayed at the top of the screen will be U.S. units. • Plant Base Units Flag Set to “Y” If the flag is set to “Y” the screen units displayed at the top of the screen will be Metric units. Note: The ability to do “Dual Units” is controlled by a flag on the “Extended Plant Options” screen. Note: The “Plant Base Units Metric” flag was formerly called the “Metric ?” flag, as the Eagle has been capable of all metric operation for a number of years due to the requirements of the international market. Version 8.70 chp5_Eag.doc 03/15/02 1:21:36 PM 5-55 Eagle User’s Manual Plant Batching Operations Extended1 Plant Options Screen This flag controls the “Dual Units” feature. 5-56 • Dual Units set to “Y” If set to “Y” it enables “Dual Unit” capability. Use <F12> to toggle between Metric and U.S. units. • Dual Units set to “N” If set to “N” the Eagle will display, batch and record in whatever “Plant Base Units” that the “Plant Base Units Metric?” flag is set to on the “General Plant Options” screen. Version 8.70 chp5_Eag.doc 03/15/02 1:21:36 PM Eagle User’s Manual Plant Batching Operations Scale Calibration Screen This cumulative scale indicator will display unit in agreement with the “Primary Scale Indicator”. Agg Cem Water These two fields are the user editable fields. They allow user defined scale grad increments. → 1240 Lb 240 Lb 0 Gal Ready ♦. . . • . . . • . . . • . . . • . . . ♦. . . • . . . • . . . • . . . • . . .♦ Ready ♦. . . • . . . • . . . • . . . • . . . ♦. . . • . . . • . . . • . . . • . . .♦ Admix Ready Scale Input Type of Material Unit/grad Lb kg Full Scale Weight Lb kg 1 2 3 4 5 6 Agg Cem 40 10 0 0 0 0 40000 10000 0 0 0 0 1224 244 0 0 0 0 20 5 0 0 0 0 555 111 0 Count 256 255 0 0 0 0 Last Changed 8:18AM 8:18AM 12:36AM 11:23AM 11:23AM 11:23AM 11Mar98 11Mar98 1Jan98 4Dec97 4Dec97 4Dec97 Entered: 8:19 PM 12Mar97 Scale Calibration Menu F2 = ZERO Selected Scale F3 = CALIBRATE Selected Scale F5 = EDIT Scale Configuration F10 = RETURN to Plant Setup Menu 9:40 AM These columns are activated by the “Dual Units” flag on the Extended Plant Options screen. Note: There is no linkage between U.S. unit and Metric unit grad values. This allows the operator to choose convenient graduations for each measurement system. Version 8.70 chp5_Eag.doc 03/15/02 1:21:36 PM 5-57 Eagle User’s Manual Plant Batching Operations Water Pulse Calibration Screen ( Metered Water ) This non-editable column is activated by the “Dual Units” flag. 5-58 • Displayed Resolution The displayed resolution is 10 ml / pulse. • Calibration Resolution Calibration resolution is the soft converted resolution of the U.S. Unit meter. Version 8.70 chp5_Eag.doc 03/15/02 1:21:36 PM Eagle User’s Manual Plant Batching Operations Admix Pulse Calibration Screen This non-editable column is activated by the “Dual Units” flag. • Volume per Pulse The “ml / Pulse” column is the soft converted result of the U.S. Units column. Note: If the Plant Base Units were set to metric, the “mL/pulse” column would be on the left and the Oz/Pulse would be on the right. Version 8.70 chp5_Eag.doc 03/15/02 1:21:36 PM 5-59 Eagle User’s Manual Plant Batching Operations Material Storage Aggregate Storage Screen, <F4> Edit Sources/Aliases This column is activated by the Dual Units flag on the Extended Plant Option screen. Enter the metric name in the alias column. The Eagle will enter the original material name by default. When using “Dual Units” the metric material name will appear in the batching menu and the recordation printouts. The <F4> Edit Sources/Aliases option is available in the Aggregate, Cement, and Admix Storage screens. 5-60 Version 8.70 chp5_Eag.doc 03/15/02 1:21:36 PM Eagle User’s Manual Mix Storage Plant Batching Operations Mix Storage Screen ( Demo Mix1- U.S. Units ) Demo Mix 1 was entered in Customary units and toggled to display Metric units. <f12> switches displayed units (any time during viewing) Mix Storage Screen (Demo 1 – Metric Units) Version 8.70 chp5_Eag.doc 03/15/02 1:21:36 PM 5-61 Eagle User’s Manual Mix Storage Plant Batching Operations Mix Storage Screen ( Demo Mix2 - Metric Units) Demo Mix 2 was entered in Metric and toggled to display Customary units. <f12> switches displayed units (any time during viewing) 5-62 Mix Storage Screen ( Demo Mix2 - U.S. Units ) Version 8.70 chp5_Eag.doc 03/15/02 1:21:36 PM Eagle User’s Manual Mix Edit Menu Plant Batching Operations Adding a Mix Design Press <F5> Edit Functions, after the password is entered, a message box will appear on the bottom half of the screen. As shown below. Esc to exit ADD a mix design CHANGE this mix design DELETE this mix design Select ADD a mix design and press “Enter.” The bottom half of your screen will change as shown below. Mix Edit Menu F1 = CONVERT Mix to Metric Units F7 = LOAD Truck F5 = INSERT this Mix Design F10 = RETURN to Mix Storage Menu To toggle between Metric and Customary press <F1>. The mix storage will be stored in unit chosen. Mix Edit Menu F1 = CONVERT Mix to Customary Units F7 = LOAD Truck F5 = INSERT this Mix Design Version 8.70 chp5_Eag.doc 03/15/02 1:21:36 PM F10 = RETURN to Mix Storage Menu 5-63 Eagle User’s Manual Plant Batching Operations Mix Storage • Conversion Any U.S. units Mix design may be called up from storage, soft converted, renamed and saved as a “Metric” units mix design. • Conversion Process A three step conversion process is used to convert the units; while maintaining the proper material weight per unit of volume. 1. First, the mass component is converted. 2. Then, the volume component. 3. Finally, the result is rounded off to the displayed precision EXAMPLE 1 - Metric to U.S. Units: 1. 326 kg / m3 x 2.2046224 = 718.7069 Lb / m3 mass conversion 2. 718.7069 x .7645549 = 549.49088 Lb / yd3 volume conversion 3. 549.49088 rounds to 549 with integer precision. EXAMPLE 2 - U.S. to Metric Units: 1. 550 Lb / yd3 2.2046224 = 249.47582 kg / yd3 2. 249.47582 x 1.3079435 = 326.30027 kg / m3 3. 326.30027 rounds to 326 with integer precision. 5-64 Version 8.70 chp5_Eag.doc 03/15/02 1:21:36 PM Eagle User’s Manual Plant Batching Operations ASTM E380 The A.S.T.M. E-380 conversion factors listed below are used to soft-convert from one unit system to the other. To convert From Inch Foot (US Survey) Yard Mile (US Statute) Sq. foot Sq. yard Sq. mile Acres Cubic yard Fluid ounce Gallon Ounce Pound Ton Miles per hour 0 Temperature ( F ) From Multiply By mm m m km 2 m 2 m 2 km ha 3 m ml L g kg Mg km/h 0 C 25.4 .3048006 0.9144 1.6093472 0.09290304 0.83612736 2.589998 0.404687 0.7645549 29.57353 3.785412 28.34952 0.4535924 0.90718474 1.609344 0 (F -32)/1.8 To Millimeter Meter Meter Kilometer Sq. Meter Sq. Meter Hectare Cubic Meter Milliliter Liter Gram Kilogram Megagram Kilometers per hour 0 Temperature ( C) Version 8.70 chp5_Eag.doc To 03/15/02 1:21:36 PM in. ft. yd mi. 2 ft 2 yd acre 3 yd Oz gal. ounce Lb ton mph 0 F Multiply By 0.03937 3.2808334 1.0936132 0.6213699 10.763915 1.1959901 2.4710455 1.3079505 0.033814 0.264172 0.0352739 2.2046224 1.1023113 0.6213711 °F=( °C * 1.8)+32 5-65 Eagle User’s Manual Orders Plant Batching Operations Order Entry Screen - Adding a Customary Order Changes to unit chosen. After the password is entered, a box will appear on the bottom half of your screen. You may choose customary or metric. The order will be stored in the units chosen. Note: If the order is added in metric or customary it will be stored in the unit chosen. To change, you have to renter the order. The order menu can not toggle between metric and customary using <F12>. 5-66 Version 8.70 chp5_Eag.doc 03/15/02 1:21:36 PM Eagle User’s Manual Plant Batching Operations Order Entry Screen - Adding a Metric Order After the password is entered, a box will appear on the bottom half of your screen. You may choose customary or metric. The order will be stored in the units chosen. Note: If the order is added in metric or customary it will be stored in the unit chosen. To change, you have to renter the order. The order menu can not toggle between metric and customary using <F12>. Version 8.70 chp5_Eag.doc 03/15/02 1:21:36 PM 5-67 Eagle User’s Manual Batch Setup Plant Batching Operations Concrete Volume Calculator - Metric Units Entry can be made on either screen. In other words, a slab could be entered as; 10 meters long x 20 meters wide x 6 inches deep by entering the length and width on the metric screen, flipping to the customary screen and entering the depth, flipping back to the metric screen to see the results. <f12> switches displayed units (any time during viewing) 5-68 Concrete Volume Calculator - U.S. Units Version 8.70 chp5_Eag.doc 03/15/02 1:21:36 PM Eagle User’s Manual Plant Batching Operations Batch Setup Menu - U.S. Units Field #430 “Print Metric?” has been added to allow the operator to specify the units system in which to print batch recordation. A “Y” in this field will cause the batch to print metric units, and a “N” will cause the batch recordation to print customary. <f12> switches displayed units (any time during viewing) Batch Setup Menu - Metric Units When using the Alternate units the background color for the unit changes to magenta. Note: Recordation occurs in the units displayed in the flex field on the Batch Setup Screen. Version 8.70 chp5_Eag.doc 03/15/02 1:21:36 PM 5-69 Eagle User’s Manual Batch Setup <f12> switches displayed units (any time during viewing) 5-70 Verify Menu - U.S. Units Verify Menu - Metric Units Version 8.70 chp5_Eag.doc 03/15/02 1:21:36 PM Plant Batching Operations Eagle User’s Manual Batching Plant Batching Operations Batching Menu - U.S. Units Note: This weight indication will always be displayed in the units of the Primary Indicator. <f12> switches displayed units (any time during viewing) Batching Menu - Metric Units Version 8.70 chp5_Eag.doc 03/15/02 1:21:36 PM 5-71 Eagle User’s Manual Plant Batching Operations Recordation • Recordation units are controlled by: 1. Comm Tickets. 2. Order Screen “Batch in Metric” flag. 3. Batch Setup Screen “Record in Metric” flag. ( Editable, as long as Comm “No Changes” flag not set ). U.S. Unit Recordation Aggregate 1/2” ROCK SAND Cement Type I-1 Target Tare 18260 Lb 13411 Lb Actual Zero 18240 13400 Tare Target Tare 4800 Lb Zero Actual Zero 4800 Tare Status Moist Admix In Tol In Tol 0.0 % 5.0 % AIR WAT RED CALCIUM Status Water In Tol WATER Zero Target Tare 13 Oz 89 Oz 980 Oz Actual Zero 12 88 960 Status Target Tare 249 Gal Actual Zero 248 Status Tare In Tol In Tol Out Tol In Tol Zero Metric Unit Recordation Aggregate 12.7 mm SAND Cement Type I-1 Target Tare 8283 kg 6083 kg Actual Zero 8274 6078 Tare Target Tare 2177 kg Zero Actual Zero 2177 Tare 5-72 Status In Tol In Tol Status In Tol Zero Version 8.70 chp5_Eag.doc 03/15/02 1:21:36 PM Moist 0.0 % 5.0 % Admix AIR WAT RED CALCIUM Water WATER Target Tare 384 mL 2632 mL 28982 mL Actual Zero 355 2602 28391 Status Target Tare 943 L Actual Zero 939 Status Tare Zero In Tol In Tol Out Tol In Tol Eagle User’s Manual Inventory Plant Batching Operations Metric Aggregate Inventory Note: Mg = Megagrams <F12> switches displayed units (any time during viewing) Customary Aggregate Inventory Pressing the <F4> key on an inventory screen will generate an inventory report using the units displayed at that time. The End-of-Day Duties inventory report will always print in the base plant units. Version 8.70 chp5_Eag.doc 03/15/02 1:21:36 PM 5-73 Eagle User’s Manual Metric Cement Inventory Note: “Mg” = Megagrams <F12> switches displayed units (any time during viewing) U.S. Unit Cement Inventory 5-74 Version 8.70 chp5_Eag.doc 03/15/02 1:21:36 PM Plant Batching Operations Eagle User’s Manual Plant Batching Operations Metric Admix Inventory <F12> switches display units (any time during viewing) U.S. Unit Admix Inventory Version 8.70 chp5_Eag.doc 03/15/02 1:21:36 PM 5-75 Eagle User’s Manual Received Materials Received Materials/Storage Screen Note: Material names and units can be entered the way they were received. The Eagle resolves the units for inventory tracking. <f12> switches display units only the units on the edit line. All other lines stay the same as entered. 5-76 Version 8.70 chp5_Eag.doc 03/15/02 1:21:36 PM Plant Batching Operations Eagle User’s Manual Plant Batching Operations List of all Tickets List of ALL Tickets : COMMAND ALKON Main Plant Ticket # 64 65 Order Cust ID Mix ID 3511 3512 9573 9573 3 4 Total yd3 = Total m3 = 10.0 6.00 2 Tickets Total Version 8.70 chp5_Eag.doc 4:43 AM 23Jun96 03/15/02 1:21:36 PM Qty 10.00yds3 6.00m3 Page Time Batched 4:13AM 4:28AM Grand Total: 1 Truck # 23Jun97 23Jun97 5 5 17.85 yd3 5-77 Eagle User’s Manual Plant Batching Operations List of Tickets by Order Name - Customary List of Tickets by Order Name : COMMAND ALKON Main Plant 4:34 AM 23Jun97 Page 1 Order:3511 Cust ID: HALL CONSTRUCTION 4088 LOOP 12 DALLAS, TX 75990 Ticket # 64 Time Date 4:13AM 23Jun96 1 Tickets Total Del Adr: 4335 ROYAL LANE DALLAS, TX 75226 Truck Qty 5 10.00 Product ID Unit Price 3 10.00 Yards 0.00 $ 0.00 Tax Total 0.000% $ 0.00 0.00 $ 0.00 0 Tickets Voided Metric List of Tickets by Order Name : COMMAND ALKON Main Plant 4:43 AM 23Jun97 Page 1 Order:3512 Cust ID: HALL CONSTRUCTION 4088 LOOP 12 DALLAS, TX 75990 Ticket # 65 Time 4:28AM: 23Jun96 1 Tickets Total 0 Tickets Voided 5-78 Version 8.70 chp5_Eag.doc Date 03/15/02 1:21:36 PM Del Adr: 4335 ROYAL LANE DALLAS, TX 75226 Truck Qty 5 6.00 6.00 Meters Product ID Unit Price 4 0.00 $ 0.00 Tax 0.000% $ 0.00 Total 0.00 $ 0.00 Eagle User’s Manual Plant Batching Operations Daily Activity Report Daily Activity Report : COMMAND ALKON Main Plant 4:44AM 23Jun97 Page 1 Order:3512 Cust ID: HALL CONSTRUCTION 4088 LOOP 12 DALLAS, TX 75990 Ticket # 65 Time Date 4:28 AM 23Jun96 1 Tickets Total Del Adr: 4335 ROYAL LANE DALLAS, TX 75226 Truck 5 Qty Product ID Unit Price 6.00 6.00 Meters 4 0.00 $ $ 0.00 Tax Total 0.000% $ 0.00 0.00 $ 0.00 0 Tickets Voided Daily Activity Report : COMMAND ALKON Main Plant 4:44 AM 23Jun97 Today's Total Qty Delivered: Today's Total Loads Delivered: 17.85 Yards 2 Today's Total Amount COD: Today's Total Amount on Account: Today's Grand Total: $ 0.00 $ 0.00 $ 0.00 Page 2 Today's Active Orders (Estimated) Today's Total Qty Remaining: Today's Total Loads Remaining: 164.00 Yards 22 Today's New Inactive Orders (Estimated) Version 8.70 chp5_Eag.doc 03/15/02 1:21:36 PM 5-79 Eagle User’s Manual Plant Batching Operations Orders Report - Short Form List of Orders − Short Form : COMMAND ALKON Main Plant Order Cust ID 3511 3512 9573 9753 4:42AM 23Jun97 Qty Ord 100.00 yd3 80.00 m3 Qty Del Page Loads 10.00 yd3 6.00 m3 1 1 Total $ $ 0.00 $ 0.00 Time 2:54AM 9:24AM 23Jun95 23Jun95 List of Orders − Short Form : COMMAND ALKON Main Plant CUSTOMARY Total Qty Ordered: Total Qty Delivered: 4:42 AM 23Jun97 1000.00 yd3 10.00 yd3 Total Loads Delivered: 5-80 1 METRIC Total Qty Ordered: Total Qty Delivered 80.00 m3 6.0 m3 Total Amount COD: Total Amount on Account: Grand Total: $ 0.00 $ 0.00 $ 0.00 Version 8.70 chp5_Eag.doc 03/15/02 1:21:36 PM 1 Page 1 Eagle User’s Manual List of Orders - Plant Batching Operations Long Form List of Orders − Long Form : COMMAND ALKON Main Plant Order: Cust ID: 4:42 AM 23Jun97 3512 9573 Mix ID: Size: Keep Amx Trims? N COD? N 4 6.00 m3 Start: 10:00 AM Price: $ 0.00 Page Qty Ord: 80.00 m3 Qty Del: 6.00 m3 Loads: 1 Spacing: 0 min Tax: 0.000 % Subtot $ Tax $ Total $ 1 0.00 0.00 0.00 Extra Product? Del Adr: 4335 ROYAL LANE DALLAS, TX 75226 Instr: For: ...................... OrderBy: JOHN H. Use: ............ SLAB Zone: 1 Job #: ......... 4837 Slump: ... 3 " Due at: ASAP Phone: ..214-555-9032 (M) Qty: Per yds? 0.00 0.00 0.00 0.00 0.00 0.00 PO#:......... 338412 Plant #: 1 ID: Description N N N N N N N I-35E TO ROYAL LANE EXIT LEFT 3 LIGHTS ON RIGHT Unit Price $ 0.00 $ 0.00 $ 0.00 $ 0.00 $ 0.00 $ 0.00 Tax: 0.000 % 0.000 % 0.000 % 0.000 % 0.000 % 0.000 % List of Orders − Long Form : COMMAND ALKON Main Plant CUSTOMARY Total Qty Ordered: Total Qty Delivered: 4:42 AM 23Jun97 1 80.00 m3 6.00 m3 Total Loads Delivered: Total Amount COD: Total Amount on Account: Grand Total: Version 8.70 chp5_Eag.doc 03/15/02 1:21:36 PM 2 100.00 yd3 10.00 yd3 Total Loads Delivered: METRIC Total Qty Ordered: Total Qty Delivered: Page 1 $ 0.00 $ 0.00 $ 0.00 5-81 Eagle User’s Manual Plant Batching Operations Summary Report Summary Report : COMMAND ALKON Main Plant Batched: Adjust: Batch # Load # Ticket # 5-82 45.70 Yards 0.00 Yards 6 6 66 Version 8.70 chp5_Eag.doc 03/15/02 1:21:36 PM 4:42 AM 23Jun97 (34.94 Meters) ( 0.00 Meters) Page 1 Eagle User’s Manual Appendix A Notices, Warnings, & Error Messages Version 8.70 EAG_APPA.DOC 03/15/02 1:23 PM Eagle User’s Manual Notices, Warnings, & Error Messages Appendixes Appendix A: Notices, Warnings, & Error Messages The following is a list of possible notices, warnings, and error messages you may encounter while operating your Eagle batching computer. Although the most frequently encountered messages have been discussed already throughout the pages of the manual, many of the more uncommon messages have not. This reference will help you look up a message quickly, find out what it means, and how to solve the problem. The Eagle can give you three different kinds of messages: Notice Message A notice is an informative message that will disappear after a few seconds. Warning Message A warning indicates a situation that can be overridden by the operator. Not a fatal problem but significant. Error Message An error message notifies the operator of a situation that cannot be overridden. Typically it will be a failure in the data or a violation of a safety feature. • "Absolute Volume and Slurry Adjust must be different positions!" Warning--the absolute volume aggregate position must be different from the slurry adjust aggregate position for the calculations to work. • "Admix Batcher Not Empty" Notice--appears on the Batching Screen when you tell the Eagle to begin batching if any of the admix bottles are not empty. You may need to manually dump that admix, or check to make sure that you do not have a faulty limit switch. • "Admix Bin Not In Use" Error--this message can appear on the Batching Screen if your mix design has called for a material that is not in use. To change this error, you will have to go to the Admix Storage Menu and change the letter <N> in the Used column to <Y>. • "Admix Bottle Not Empty" Warning--this message can appear when you try to start a batch, but one of your admix bottles is not empty. You will have to either manually empty the bottle if there is admix still inside, or press <F6> to override the error. If the Eagle consistently tells you that admix bottles are not empty when they actually are, you may have to replace a faulty limit switch. • "Admix is in Manual" Warning--this message can appear if you begin an automatic batch with the admix in manual. Either press the switch on the manual panel to put the admix back into automatic, or override the warning by pressing <F6>; then batch the load with admix still in manual. Version 8.70 EAG_APPA.DOC 03/15/02 1:23 PM A-1 Eagle User’s Manual A-2 Notices, Warnings, & Error Messages • "Admix Low Flow Detected!!" Notice--an admix fill valve was opened, but no pulses or scale movement were detected. • "Admix Out of limits" Notice--appears when you are trying to enter a new or modified mix design. The Eagle is telling you that the amount of admix called for in this mix design is either too low or too high. Rewrite the amount of admix, or go back to the Admix Storage Menu and change the under and over limits. • "Admix Out Of Tolerance" Warning--this message can appear while batching if the Eagle goes over the tolerance levels set on the Admix Storage Menu. Press <F6> to override the warning and continue batching. • "Admix Type Not Allowed" Notice--the operator attempted to enter the admix class as the parallel class. • "Admix, Water is in Manual" Warning--this message can appear if you begin an automatic batch with the admix and the water in manual. Either press the switch on the manual panel to put the admix and water back into automatic, or override the warning by pressing <F6>; then batch the load with admix and water still in manual. • "Agg percent moisture changed too much!" Error--a matrix mixer plant with no delay for the moisture probe detected an aggregate moisture that was different from that of the previous batch by more than the maximum aggregate moisture deviation. • "Aggregate, Admix is in Manual" Warning--this message can appear if you begin an automatic batch with the admix and aggregate in manual. Either press the switch on the manual panel to put the admix and aggregate back into automatic, or override the warning by pressing <F6>; then batch the load with admix and aggregate still in manual. • "Aggregate, Admix, Water is in Manual" Warning--this message can appear if you begin an automatic batch with the admix, aggregate and water in manual. Either press the switch on the manual panel to put the admix, aggregate, and water back into automatic, or override the warning by pressing <F6>; then batch the load with admix, aggregate, and water still in manual. • "Aggregate batcher Not Empty" Notice--appears on the Batching Screen when you tell the Eagle to begin batching if the aggregate weigh up bin is not yet empty. You may need to manually open the gates to dump out the material, or check to make sure that you do not have a faulty limit switch. If the amount is small and is stuck up in the bin, you might also want to zero the scale so that the Eagle will overlook the problem. Version 8.70 EAG_APPA.DOC 03/15/02 1:23 PM Eagle User’s Manual Notices, Warnings, & Error Messages • "Aggregate Batcher Open" Warning--this message can appear during batching, if the aggregate batcher gate is still open. You will want to make sure that the gates are in fact closed before you try to override this warning. Use the switch on the manual panel to manually close the batcher gate. If the message repeats when you try to batch again, it may mean you have a failed limit switch. • "Aggregate Bin Not In Use" Error--this message can appear on the Batching Screen if your mix design has called for a material that is not in use. To change this error, you will have to go to the Aggregate Storage Menu and change the letter <N> in the Used column to <Y>. • "Aggregate, Cement, Admix is in Manual" Warning--this message can appear if you begin an automatic batch with the admix, aggregate, and cement in manual. Either press the switch on the manual panel to put the admix, aggregate, and cement back into automatic, or override the warning by pressing <F6>; then batch the load with admix, aggregate, and cement still in manual. • "Aggregate, Cement, Admix, Water is in Manual" Warning--this message can appear if you begin an automatic batch with the admix, aggregate, cement, and water in manual. Either press the switch on the manual panel to put the admix, aggregate, cement, and water back into automatic, or override the warning by pressing <F6>; then batch the load with admix, aggregate, cement, and water still in manual. • "Aggregate, Cement, Water is in Manual" Warning--this message can appear if you begin an automatic batch with the water, aggregate, and cement in manual. Either press the switch on the manual panel to put the water, aggregate, and cement back into automatic, or override the warning by pressing <F6>; then batch the load with water, aggregate, and cement still in manual. • "Aggregate is in Manual" Warning--this message can appear if you begin an automatic batch with the aggregate in manual. Either press the switch on the manual panel to put the aggregate back into automatic, or override the warning by pressing <F6>; then batch the load with aggregate still in manual. • "Aggregate Low Flow Detected" Notice--an aggregate fill gate was opened, but no scale movement was detected. • "Aggregate Out of Limits" Notice--appears when you are trying to enter a new or modified mix design. The Eagle is telling you that the amount of aggregate called for in this mix design is either too low or too high. Rewrite the amount of aggregate, or go back to the Aggregate Storage Menu and change the under and over limits. Version 8.70 EAG_APPA.DOC 03/15/02 1:23 PM A-3 Eagle User’s Manual A-4 Notices, Warnings, & Error Messages • "Aggregate Out Of Tolerance" Warning--this message can appear while batching if the Eagle goes over the tolerance levels set on the Aggregate Storage Menu. Press <F6> to override the warning and continue batching. • "Aggregate Scale Not Configured" Error--this message can appear on the Batching Screen if you try to batch a load without having configured your aggregate scale. To fix this error, configure your aggregate scale on the Scale Configuration Screen. • "Aggregate, Water is in manual" Warning--this message can appear if you begin an automatic batch with the aggregate and water in manual. Either press the switch on the manual panel to put the aggregate and water back into automatic, or override the warning by pressing <F6>; then batch the load with aggregate and water still in manual. • "Air Pressure is Below Threshold Level!" Warning--the air pressure switch became open, indicating that there is insufficient air pressure available to safely run the plant. • "Alternate Scale Not Configured" Warning--a plant using Fast Batch/Alternating Batchers did not have the alternate scale configured prior to entering the Batching Menu. • "Background Batching Error, Press Alt B to See the Error" Notice--an error occurred with the batch that is not currently displayed. Press <Alt><B> will display the other batch’s screen and show the error. • "Bad CRC" Error--this message can appear when you are booting up the system. It indicates that you have file corruption. Typically the Eagle will still be able to initialize the system, but you should always check the screens on the Plant Setup Menu for garbage. If you get this message, you will probably have to spend some time cleaning up your screens, or copy old system files from a backup disk to replace the Plant.S file. You can only copy files from disk if you have purchased the Backup Disk Option. • "Bad Customer ID - Try another one!" Error--this message can appear on a screen that calls for the Customer ID, either the Customers Menu, or the Batch Setup Screen. The Eagle cannot recognize the ID that you entered, and you should try again. • "Bad Mix ID - Try another one!" Error--this message can appear on a screen that calls for the Mix ID, either the Mix Storage Menu, or the Batch Setup Screen. The Eagle cannot recognize the ID that you entered, and you should try again. Version 8.70 EAG_APPA.DOC 03/15/02 1:23 PM Eagle User’s Manual Notices, Warnings, & Error Messages • "Bad Order ID - Try another one!" Error--this message can appear on a screen that calls for the Order ID, either the Orders Menu, or the Batch Setup Screen. The Eagle can not recognize the ID that you entered, and you should try again. • "Bad Password" Notice--appears when you type in a password that the Eagle does not recognize. Try the password again if you think you know it, or press <Esc> key to return to the previous set of menu prompts. You may want to refer to the Passwords Menu on the Plant Setup Screen to check for the correct password. • "Bad Ticket ID - Try another one!" Error--this message can appear on a screen that calls for the Ticket ID, either the Tickets Summary Menu, or the Batch Setup Screen. The Eagle cannot recognize the ID that you entered, and you should try again. • "Batching Not allowed in current Remote Diagnostic mode!” Error--the operator or the person running the remote session attempted to start a batch in the interactive Remote Diagnostic mode. The non-interactive Remote Diagnostic mode must be used if batching is needed. The interactive mode enables the keyboard on the remote terminal, and the non-interactive mode disables the keyboard on the remote terminal. • "Bin Has No Assigned Scale" Error--this message can appear when you try to batch, but the material bins the mix design calls for do not yet have a scale assigned. To fix this you will need to go back to the Scale Configuration Screen. • "Can't go any further" Notice--the cursor is as far up, down, or to the side as it can go. Try another arrow key to move the cursor in a different direction. • "Can not substitute Pozzolan for Cement!" Warning--a cement bin substitution was attempted using a Pozzolanic material as a substitute for a cementious material. • "Can not substitute with dedicated Matrix Cement!" Warning--a cement bin substitution was attempted using a dedicated matrix mixer cement. • "Cement, Admix is in Manual" Warning--this message can appear if you begin an automatic batch with the cement and admix in manual. Either press the switch on the manual panel to put the cement and admix back into automatic, or override the warning by pressing <F6>; then batch the load with cement and admix still in manual. Version 8.70 EAG_APPA.DOC 03/15/02 1:23 PM A-5 Eagle User’s Manual A-6 Notices, Warnings, & Error Messages • "Cement, Admix, Water is in Manual" Warning--this message can appear if you begin an automatic batch with the cement, admix, and water in manual. Either press the switch on the manual panel to put the cement, admix, and water back into automatic, or override the warning by pressing <F6>; then batch the load with cement, admix, and water still in manual. • "Cement Batcher Not Empty" Notice--appears on the Batching Screen when you tell the Eagle to begin batching if the cement weigh up bin is not yet empty. You may need to manually open the gates to dump out the material, or check to make sure that you do not have a faulty limit switch. If the amount is small and is stuck up in the bin, you might also want to zero the scale so that the Eagle will overlook the problem. • "Cement batcher Open" Warning--this message can appear during batching, if the cement batcher gate is still open. You will want to make sure that the gates are in fact closed before you try to override this warning. Use the switch on the manual panel to manually close the batcher gate. If the message repeats when you try to batch again, it may mean you have a failed limit switch. • "Cement bin low. CEMENT01 nn.n Trucks Low" Warning--the amount of material in the specified cement bin has dropped below the warning threshold by the number of trucks (n.nn). • "Cement bin low. CEMENT02 nn.n Trucks Low" Warning--the amount of material in the specified cement bin has dropped below the warning threshold by the number of trucks (n.nn). • "Cement bin low. CEMENT03 nn.n Trucks Low" Warning--the amount of material in the specified cement bin has dropped below the warning threshold by the number of trucks (n.nn). • "Cement bin low. CEMENT04 nn.n Trucks Low" Warning--the amount of material in the specified cement bin has dropped below the warning threshold by the number of trucks (n.nn). • "Cement bin low. CEMENT05 nn.n Trucks Low" Warning--the amount of material in the specified cement bin has dropped below the warning threshold by the number of trucks (n.nn). • "Cement bin low. CEMENT06 nn.n Trucks Low" Warning--the amount of material in the specified cement bin has dropped below the warning threshold by the number of trucks (n.nn). • "Cement bin low. CEMENT07 nn.n Trucks Low" Warning--the amount of material in the specified cement bin has dropped below the warning threshold by the number of trucks (n.nn). Version 8.70 EAG_APPA.DOC 03/15/02 1:23 PM Eagle User’s Manual Notices, Warnings, & Error Messages • "Cement bin low. CEMENT08 nn.n Trucks Low" Warning--the amount of material in the specified cement bin has dropped below the warning threshold by the number of trucks (n.nn). • "Cement bin low. CEMENT09 nn.n Trucks Low" Warning--the amount of material in the specified cement bin has dropped below the warning threshold by the number of trucks (n.nn). • "Cement bin low. CEMENT10 nn.n Trucks Low" Warning--the amount of material in the specified cement bin has dropped below the warning threshold by the number of trucks (n.nn). • "Cement bin low. CEMENT11 nn.n Trucks Low" Warning--the amount of material in the specified cement bin has dropped below the warning threshold by the number of trucks (n.nn). • "Cement bin low. CEMENT12 nn.n Trucks Low" Warning--the amount of material in the specified cement bin has dropped below the warning threshold by the number of trucks (n.nn). • "Cement Bin Not In Use" Error--this message can appear on the batching screen if your mix design has called for a material that is not in use. To change this error, you will have to go to the Cement Storage Menu and change the letter <N> in the Used column to <Y>. • "Cement is in Manual" Warning--this message can appear if you begin an automatic batch with the cement in manual. Either press the switch on the manual panel to put the cement back into automatic, or override the warning by pressing <F6>; then batch the load with cement still in manual. • "Cement Low Flow Detected!!" Notice--a cement fill gate was opened, but no scale movement was detected. • "Cement out of Limits" Notice--appears when you are trying to enter a new or modified mix design. The Eagle is telling you that the amount of cement called for in this mix design is either too low or too high. Rewrite the amount of cement, or go back to the Cement Storage Menu and change the under and over limits. • "Cement Out Of Tolerance" Warning--this message can appear while batching if the Eagle goes over the tolerance levels set on the Cement Storage Menu. Press <F6> to override the warning and continue batching. • "Cement Scale not Configured" Error--this message can appear on the batching screen if you try to batch a load without having configured your cement scale. To fix this error, configure your cement scale on the Scale Configuration Screen. Version 8.70 EAG_APPA.DOC 03/15/02 1:23 PM A-7 Eagle User’s Manual • "Cement, Water is in Manual" Warning--this message can appear if you begin an automatic batch with the cement and water in manual. Either press the switch on the manual panel to put the cement and water back into automatic, or override the warning by pressing <F6>; then batch the load with cement and water still in manual. • "Check on-hand inventory quantities!" Notice--a change has been made to the inventory units. Check the on-hand quantities to make sure they are correct. • "COD Price of ZERO Not Allowed" Notice--the operator entered a COD order with a unit price of $0.00. • "Delivery List Full!! Print Deliveries before entering more" Notice--the maximum number of deliveries has been reached. Printing the deliveries will clear the list. • "Descriptor Data Each Error" "Descriptor Data Offset Error" "Descriptor Length Error" "Descriptor Record Code Error" "Descriptor Units Error" Error--these messages can appear when the system is booting up. If you see one of these messages, it means that you have a file corruption problem. It is less likely, but these messages can also come up during run time. File corruption means that you have garbage in some of the files, which the Eagle cannot read. Go through the mixes, orders, customers, and ticket files and try to correct. If you have disk backup, you may want to restore your most recent backup files to clean out the garbage. • • • • A-8 Notices, Warnings, & Error Messages • "Do Not Use Alt Scale for Holding Hoppers" Notice--a holding hopper scale has been designed as the alternate batcher scale. • "Duplicate Found" Error--this message can appear on the Printer Configuration Menu, if you have tried to configure two printers identically. You will have to make sure that you do not tell the Eagle that both printers are using the same outputs. • "Duplicates Not Allowed" Notice--the same I/O module was assigned to two different soft I/O functions. • "Duties Canceled" Notice--execution of End of Day Duties was terminated by the operator or the printer timed out prior to normal completion. • "Duties Completed" Notice--execution of End of Day Duties has finished. Version 8.70 EAG_APPA.DOC 03/15/02 1:23 PM Eagle User’s Manual Notices, Warnings, & Error Messages • "Error, Gate Used by Soft I/O" Notice--an aggregate or cement gate used for a soft I/O function was entered as a batching gate on the Batch/Gating Menu. • "Error, Scale in use" Warning--the moisture probe was assigned to a scale input already in use by a batcher. • "File Access Error" "File Already Exists" "File Close Error" "File Flush Error" "File Not Found" "File Read Error" "File Seek Error" "File Write Error" "Material Record Code Error" "Record Code Error" "Unknown File Error" Error--these messages can appear on the screen when the system is booting up, right after you have turned on the power. Since the Eagle looks for certain files when it tries to initialize the system, these messages mean that it cannot find or cannot read these files. In most cases, the system will still boot up, but you should always check through your mix, order, customer, ticket, and plant set up screens to be sure that the information is all still there. Sometimes, these file error messages mean that the Eagle cannot find a file, so it creates a new one, which will be blank. If this happens to you, you may have to retype the file information you have lost. • • • • • • • • • • • "Holding Hopper Scale Must be either Agg or Cem type" Notice--the class of a holding hopper scale is something other than aggregate or cement. • "Incompatible Mix in Truck" Warning--an ingredient in the mix design for the concrete in the truck is not called for by the mix design to be batched. This message will only appear if the Adjust (#xxx) and Mix in Truck (#428) fields are in the Batch Setup Menu, the Adjust quantity is non-zero, and the above condition exists. • "Incorrect Flop Gate Position" Error--the physical position of the flop gate (wet or dry) does not agree with the position called for by a communications ticket. Version 8.70 EAG_APPA.DOC 03/15/02 1:23 PM A-9 Eagle User’s Manual • • • A-10 Notices, Warnings, & Error Messages "Invalid File Handle Error" "No Handle" "No More File Handle Errors" Error--this message can appear during boot up, when the system is initializing. If you get this message, the Eagle probably will not even initialize at all. This may be the only message you get. The Eagle is having trouble accessing the files, and probably has some corruption in one of its system files. Call your Command Alkon Dallas service department in this situation. • "Less Than 15 Counts Not Allowed" Notice--appears on the Scale Calibration and Probe Calibration Screen. The lowest count reading can be no lower than 15 counts. Adjust the counts and try to zero the scale again. • "Load may be nn.nn xxx short" Notice--the truck number was changed after the batch was started on an adjusted batch, and the new truck may not have the adjusted quantity on board. The adjusted quantity is nn.nn, and xxx is the units (yards or meter). • "Load Mixer" Notice--all materials are ready to start going into the mixer. • "Load Size Too Large for Truck" Warning--the load size exceeds the truck capacity. • "Load Truck" Notice--all materials are ready to start going into the truck. • "Loading in Progress" Error--this message can appear while you are batching. If you have a load that has not quite finished weigh up or discharge and you try to begin another batch, the Eagle will give you this message. You will have to wait until the discharge of the current load is complete to begin the next batch. • "Local Change Not Allowed" Notice--operator attempted to delete a communications ticket from the ticket stack. Communications tickets may only be deleted by dispatch. • "Loss of High Range - 105% of Full Scale Not Detectable" Notice--appears on the Scale Calibration and Probe Calibration Screen. This message means that when calibrating scales that you have limited the range of your counts, so that they will not cover the range of the scale. If you cannot bring your low end counts down to 15-75 when the scale is at zero, you may have to manually adjust the potentiometer before you can recalibrate. Version 8.70 EAG_APPA.DOC 03/15/02 1:23 PM Eagle User’s Manual Notices, Warnings, & Error Messages • "Loss of Low Range - Scale Less Than Zero Not Detectable" Notice--appears on the Scale and Probe Calibration Screen when you are trying to calibrate a scale or probe. This is the same kind of problem as above. The input signal that the Eagle is receiving is too low or too high and it will not be able to track the low end of the scale. Remember that when calibrating zero for a scale, you want about 40 counts. This way the Eagle can still accurately track low end scale weights. • "Loss of Precision - Less than 1.5 counts/grad" Notice--appears during scale calibration and probe calibration. This message means that you do not have enough counts per scale grad. As the result, the range of counts in been stretched so that the readings will not be accurate. Check your calibration, which should be between 1.5 and 4.0 counts per scale grad to ensure maximum accuracy. • "Low Limit Bigger Than High Limit" Notice--appears during scale and probe calibration. This message appears if you type in a high limit for a scale or probe that is less than the low limit. If this occurs, you must recalibrate both low and high end. • "Material Name Required" Notice--the operator attempted to enter a delivery without a material selected. • "Matrix Scale Must be Wat type" Notice--the class of the matrix scale is something other than water. • "Missing Gate Assignment" Error--this message can appear when you go to batch a load. If any of the materials called for do not have either fast or slow flow gate assignments, you will get this message. To correct this problem, check the gate assignments on the Aggregate Batching and Cement Batching Menus. • "Mixer is Full" Warning--this message can appear while batching. The Eagle is telling you that the mixer is full and that you need to dump it. If the mixer is not full, and the Eagle keeps telling you this message, then you may want to check for a faulty full tilt limit switch. • "Mixer Not Returned" Error--this message can appear during batching operations when you try to discharge a load into the mixer. To correct this, manually return the mixer to upright position. If you still get this message, it could mean you have a faulty full return limit switch. • "Moisture Compensation Out of Limits" Warning--this message can appear on the Moisture Storage screen, if you try and write in a moisture value that is either too high or too low for the limits. You will have to adjust the moisture compensation value, or change the limits to accept this number. Version 8.70 EAG_APPA.DOC 03/15/02 1:23 PM A-11 Eagle User’s Manual A-12 Notices, Warnings, & Error Messages • "More Than 4000 Counts Not Allowed" Notice--appears during probe and scale calibration if you have too many counts. The Eagle will not allow a high end reading of more than 4000 counts. You must recalibrate. • "No Associated Aggregate Scale" Error--this message can appear on the Probe Configuration Menu, if you try to configure a probe with a material that does not have a gate assigned to the aggregate scale. You will need to go back to the Scale Configuration Screen and check to make sure you have <Y> in the bin number that corresponds to the aggregate you are tying your probe to. • "No Calibration For a Metered Water" Notice--the message appears on the Batching Screen. It means that one of the waters in the mix design you are trying to batch has not been calibrated. You will need to return to the Plant Setup Menu and select the Water Pulse Calibration Screen to correct this problem. • "No Calibration For an Admix" Notice--the message appears on the Batching Screen. It means that one of the admixes in the mix design you are trying to batch has not been calibrated. You will need to return to the Plant Setup Menu and select the Admix Pulse Calibration Screen to correct this problem. • "No Cement in Batch" Warning--this message can appear on the Batching Screen if you tell the Eagle to batch a mix design that has no cement in it. You can override this warning by pressing <F6>, if you want to batch a load without cement. • "No Room For" Error--this message can appear when you try to put more extra products into the Extra Product list than the 50 allowed; or when you try to exceed the number of trucks, mix designs, orders, or customers. The Eagle can only store a certain number of each, displayed along the top right hand border of the main box on each of those screens. • "No Room for Matrix Cement!" Warning--on a matrix mixer plant, the dry-side cements used all three of the available slots, leaving none for the wet-side matrix cement. • "No Scale Number Assigned" Warning--a scale number outside the valid range was entered. • "NO Setup Inputs Active!" Warning--a block plant with multi-setup did not have an active setup input when the operator attempted to start a batch. Version 8.70 EAG_APPA.DOC 03/15/02 1:23 PM Eagle User’s Manual Notices, Warnings, & Error Messages • "No Such" Error--this message can appear when you come to the end of the list and press the <Page Down> key, or at the beginning of a list when you press the <Page Up> key. You will have to reverse the direction. • "No Such Gate" Error--this message can appear on a couple of the screens in Plant Setup. This message says that you have entered a batching gate that the Eagle does not understand. Check to make sure that the numbers you have entered match the available gates on your plant. • "Not Allowed in Demo" Error--this message can appear on the Plant Setup Menu when you try to select either the scale calibration or the probe calibration. You cannot calibrate scales or probes while in demonstration mode. • "Not Configured" Notice--can appear during scale and probe calibration. You cannot calibrate a probe or scale that has not been configured. • "Not Found" Error--this message can appear on screens for tickets, orders, mixes, trucks, or anything that the Eagle keeps on a list. If you enter an incorrect ID, the Eagle will not be able to find what you called for. • "Please Contact the Dispatch Office!" Warning--an “Attention Plant” message was received from the dispatch system. • "OK" Notice--appears on the Tickets Summary Screen when the Eagle has finished deleting all tickets. It means the Eagle is ready for the next job. • "Only One (1) Alternate Scale Allowed" Notice--more than one scale was selected as an alternate batch scale. • "Only Agg or Cem Types Allowed" Notice--a class other than aggregate or cement was entered as the asynchronous class. • "Option not installed!!" Error--this message can appear when you try to calibrate a moisture probe, but do not have the moisture probe option installed. You cannot use this screen unless you have the appropriate hardware. • "Out of Room for batch results" Warning--the batch results queue is full. The oldest data in the queue will be lost. This is due to the dispatch system not requesting batch results. Version 8.70 EAG_APPA.DOC 03/15/02 1:23 PM A-13 Eagle User’s Manual A-14 Notices, Warnings, & Error Messages • "Out of Room in Manual Batch" Notice--can appear while batching in manual, if you try to batch more than 5 aggregates, more than 3 cements, more than 6 admixes, or more than 2 different waters. You will have to decrease the number of materials to complete the batch. • "Over Aggregate Scale Capacity" Error--this message can appear on the Batch Screen when target weights exceed aggregate scale capacity. The Eagle will not batch a load if the weight is too high. You will have to either change the size of the batch or call for a new mix design. • "Over Cement Scale Capacity" Error--this message can appear on the Batch Screen when target weights exceed cement scale capacity. The Eagle will not batch a load if the weight is too high. You will have to either change the size of the batch or call for a new mix design. • Over Water Scale Capacity" Error--this message can appear on the Batch Screen when target weights exceed water scale capacity. The Eagle will not batch a load if the weight is too high. You will have to either change the size of the batch or call for a new mix design. • "Primary Printer Configuration Problem" Error--this message can appear on the Printer Configuration Screen if you try to configure a printer that is not available, or if you designate a serial or parallel port that the Eagle does not have. • "Printer Not Available" Notice--this message can appear from a number of screen. You have selected a print command, but the Eagle is not finding a printer. Check to make sure your printer is properly connected to the Eagle, has power, and is turned on. You may need to check the General Plant Options Menu to see if a printer has been selected, or check the Printer Configuration Screen. • "Printer Not Ready" Notice--this message can appear from a number of screen. You have selected a print command, but the Eagle is not finding a printer. Check to make sure your printer is properly connected to the Eagle, has power, and is turned on. You may need to check the General Plant Options Menu to see if a printer has been selected, or check the Printer Configuration Screen. • "Printer OFFLINE. Correct to continue!" Error--this message can appear when you go to print a ticket or report, but do not have the printer on line. To correct this problem, press the select button to turn the printer on line. Version 8.70 EAG_APPA.DOC 03/15/02 1:23 PM Eagle User’s Manual Notices, Warnings, & Error Messages • "Quantity of XXX ingredient in truck exceeds quantity for load!" Warning--the calculated quantity of an individual ingredient in the truck exceeds the calculated target called for by the mix design to be batched. This message will only appear if the Yards Adjust (#12) and Mix in truck (#428) fields are in the Batch Setup Menu, the Yards Adjust quantity is non-zero, and the above condition exists. The ‘XXX’ in the message is replaced by the class (AGG, CEM, AMX, H2O) of the offending ingredient. • "Release Tolerance Error Override Button!" Warning--the tolerance error override soft input is active. This signal must be inactive to start a batch. • "Repeat Admixes Not Allowed" Error--this message can appear on the Mix Storage Menu when you are writing up a mix design. You cannot call for the same admix twice on the same mix design. • "Report In Progress" Notice--this message can appear while you are batching, if you try to initiate another batch while the printer is still printing out a delivery or recordation ticket. You will have to wait until the printing is complete. • "Scale Problem!" Error--this message can appear on the Master Menu, when you try to select the Batching/Storage Menu. This message means that the scale card in your computer is not responding. Until you fix this problem you will not be able to batch at all. Since correcting this problem may mean having a look at the scale card, call your Command Alkon Dallas service department, to help you get running again. • "Scales Are LOCKED" Error--this message will appear for all settings affecting scale measurements when scale lockout is turned on. You can physically lock the scale to prevent a high end calibration. This includes Zero Calibration, Motion Detection, scale settle times, and zero tolerances. In addition, the Scale Configuration and Scale Calibration menus require the scale lockout to be turned off before editing may occur. Reminding you that some states laws prohibits unauthorized scale recalibration. • “Scales are not all calibrated!” Error--this message can appear in a raw initialized system. The Eagle can detect if scales have ever been calibrated. You may see this at the start of the batch. You will have to calibrate your scales before you can batch. • “Scales Not Zero” Error--this message will appear on the Batch Screen when a scale or scales are assigned in the scale configuration screen but, are not used. • "Secondary Printer Configuration Problem" Error--this message can appear on the Printer Configuration Screen if you try to configure a printer that is not available, or if you designate a serial or parallel port that the Eagle does not have. Version 8.70 EAG_APPA.DOC 03/15/02 1:23 PM A-15 Eagle User’s Manual A-16 Notices, Warnings, & Error Messages • "Setup 1 Input Not Active!" Notice--the operator tried to start a batch from setup #1 without activating the setup #1 input. • "Setup 2 Input Not Active!" Notice--the operator tried to start a batch from setup #2 without activating the setup #2 input. • "Setup 3 Input Not Active!" Notice--the operator tried to start a batch from setup #3 without activating the setup #3 input. • "Setup 4 Input Not Active!" Notice--the operator tried to start a batch from setup #4 without activating the setup #4 input. • "Stack is FULL" Error--this message can appear when you are setting up batches and stacking the tickets on the Ticket Menu. It means that once the stack is full, you cannot stack any more, until you either delete or batch some of the tickets on the stack. • "Start Conveyor" Error--this message can appear when you try to begin discharge but have not yet turned on the belt. You must turn the conveyor on before the Eagle will discharge. • "Steps Landing is Too Large For Steps Length" Warning--the steps landing size is larger than the steps length. • "Stop Conveyor Before Starting Remote Batch" Notice--the operator attempted to start a remote batch with the conveyor run input active. • "That Number Was Too Big" Notice--this message can appear on a number of screens. It means that you have entered a number that exceeds the acceptable range. Enter a smaller number. • "There Is Nothing To Batch" Notice--this message will appear on the Ticket Stack Screen when you press the “F” key to batch a ticket and there is nothing on the stack. If you want to batch a ticket, you will have to set up a new batch first. • "There Is Nothing To Delete" Notice--this message will appear on the Ticket Stack Screen when you try to delete a ticket and there is nothing on the stack to delete. You may also see this message on other screens if you try to delete something that is not there. Version 8.70 EAG_APPA.DOC 03/15/02 1:23 PM Eagle User’s Manual Notices, Warnings, & Error Messages • "There Is Nothing To Enter" Notice--this message will appear on any screen where you press the <Enter> key before you have typed any information. If this message appears, look again to make sure that you have typed in the information you want. • "There is Nothing to Find" Notice--this message can appear on any screen that maintains a list, for example, Tickets Summary, Ticket Stack, Customers, Orders, Mix Storage. If you ask the Eagle to find something, but there is no information stored on the screen, then it will give you this message. • "There Is Nothing To Print" Notice--this message can appear on any screen that maintains a list, for example, Tickets Summary, Ticket Stack, Customers, Orders, Mix Storage. If you ask the Eagle to print something, but there is no information stored on the screen, then it will give you this message. • "There Is Nothing To Setup" Notice--operator attempted to enter the Setup Screen from the Stack Screen with the arrow pointing to an empty stack position. • "There Is Nothing To Verify" Notice--this message can appear on the Ticket Stack Screen, if you press the "F" key to Verify a ticket and there are no tickets currently stored on the stack. • "Ticket Already Entered" Notice--this message can appear on the Delivery Screen, if you try to enter the same ticket twice. If all the information repeats a previous ticket, the Eagle will notify you that you have already recorded this delivery. This is intended to help prevent inventory errors. • "Ticket File Full!! - Losing tickets!!" Error--this message can appear while batching, it means that the memory on the Tickets Summary Screen is full and will not hold the batches you are doing now. To solve this problem, you must go to the Tickets Summary and process the records you have accumulated so far; then delete the tickets and start batching again. • "Ticket File nearly full!!” Notice--this message will appear on the screen during batching if your Tickets Summary List, which stores 200 (optionally 400) batched tickets, is getting close to full. When the Tickets Summary reaches 90% of its capacity, this message will alert you. If you do not clear the tickets summary, all batches that you make after 200 (optionally 400) will not be recorded. So when you get this message, you may want to go to the End of Day Menu and print and then clear your tickets and invoices. Version 8.70 EAG_APPA.DOC 03/15/02 1:23 PM A-17 Eagle User’s Manual A-18 Notices, Warnings, & Error Messages • "Too few probe samples" Warning--this message can appear during a batch, if you have a moisture probe connected to your system. What this means is that the moisture probe has not taken enough readings to be sure that it has the correct moisture. This is a warning for you to make sure that the mix does not end up too wet or too dry. You may encounter this in small mixes or mix designs that call for small amounts of aggregates. • "Too Many Cubic Meters" Warning--the quantity calculated for an order is greater than 9999.99 cubic meters. • "Too Many Cubic Yards" Warning--the quantity calculated for an order is greater than 9999.99 cubic yards. • "Too Much Meters Adjust" Error--this message can appear if you are batching in metric, and the meters adjust exceeds the batch size. Check to make sure that the numbers you have entered are correct. The Eagle will not batch a negative amount. • "Too Much % Special Water" Error--this message can appear on the Batch Setup Screen if you try to enter a number in the special water greater than 100%. Remember that special water is based on the total amount of water called for. The most special water you can designate is 100%. If you want to increase the total water in the batch, use one of the other water trim features. • "Too Much Yards Adjust" Error--this message can appear if you are batching a load, and the yards adjust exceeds the batch size. Check to make sure that the numbers you have entered are correct. The Eagle will not batch a negative amount. • "Too Many Drops" Error--this message can appear on the Batch Setup Screen if you call for too many drops. The maximum number of drops the Eagle can make on a multiple batch is 99. • "Truck already washed! Press Y to wash anyway" Warning--wash was attempted on a truck that has been washed out and no batches have been loaded onto that truck since that time. • "Unassigned Admix Gate in Manual Batch" Notice--manual batching was attempted with a gate signal that does not have a material assigned to it. • "Unassigned Agg Gate in Manual Batch" Notice--manual batching was attempted with a gate signal that does not have a material assigned to it. • "Unassigned Cement Gate in Manual Batch" Notice--manual batching was attempted with a gate signal that does not have a material assigned to it. Version 8.70 EAG_APPA.DOC 03/15/02 1:23 PM Eagle User’s Manual Notices, Warnings, & Error Messages • "Unassigned Gate in Manual Batch" Notice--this message can appear during batching. The Eagle has found a gate opening that has not yet been assigned to a scale. To correct this oversight, you will need to go to the Plant Setup Menu and check your gate assignments in the material batching menus. • "Unassigned Water Gate in Manual Batch" Notice--manual batching was attempted with a gate signal that does not have a material assigned to it. • "Unentered changes. Enter Y to exit anyway” Warning--the operator made changes on a screen, then pressed <F10> to exit the screen without pressing <F5> to save the edits. • "Use Unused Bin for Matrix Mixer Setup" Notice--the operator tried to use an alternate bin for matrix mixer freefall and jogging, and specified a bin that was already in use. • "w/Footing Width is Too Large For Slab Length” Warning--the footing width specified will not fit on a slab of the specified length. • "w/Footing Width is Too Large For Slab Width” Warning--the footing width specified will not fit on a slab of the specified width. • "Warning! Truck Washed Out, Water and/or Admix in Truck!!" Notice--the truck entered in the setup has water and/or admix from a washout cycle. • "Water Batcher Not Empty" Notice--this message can appear on the batching screen when you tell the Eagle to begin batching if the water weigh up bin is not yet empty. You may need to manually open the gates to dump out the material, or check to make sure that you don't have a faulty limit switch. If the amount is small and is stuck up in the bin, you might also want to zero the scale so that the Eagle will overlook the problem. • "Water Batcher Open" Warning--this message can appear during batching, if the weighed water batcher gate is still open. You will want to make sure that the gates are in fact closed before you try to override this warning. Use the switch on the manual panel to manually close the batcher gate. If the message repeats when you try to batch again, it may mean you have a faulty limit switch. • "Water Bin Not In Use" Error--this message can appear on the batching screen if your mix design has called for a material that is not in use. To change this error, you will have to go to the Water Storage Menu and change the letter <N> in the Used? column to <Y>. Version 8.70 EAG_APPA.DOC 03/15/02 1:23 PM A-19 Eagle User’s Manual A-20 Notices, Warnings, & Error Messages • "Water Gate Open" Warning--this message can appear when you try to begin a batch and the Eagle has not received a gate closed signal from the limit switch. Close the weighed water discharge gate from the switch on the manual panel and try again. If you get the same message, you may have a faulty limit switch. Another possible explanation is that the full close pulse at the end of discharge is not long enough to close the gate all the way. Make sure this is not the problem before you begin to pull off limit switches, by checking the full close pulse time on the General Discharge Options Screen, in the Plant Setup. • "Water is in Manual" Warning--this message can appear if you begin an automatic batch with the water in manual. Either press the switch on the manual panel to put the water back into automatic, or override the warning by pressing <F6>; then batch the load with water still in manual. • "Water Low Flow Detected!!" Notice--a water fill valve was opened, but no pulses or scale movement were detected. • "Water Out of Limits" Notice--this message can appear when you are trying to enter a new or modified mix design. The Eagle is telling you that the amount of water called for in this mix design is either too low or too high. Rewrite the amount of water, or go back to the Water Storage Menu and change the under and over limits. • "Water Out Of Tolerance" Warning--this message can appear while batching if the Eagle goes over the tolerance levels set on the Water Storage Menu. Press <F6> to override the warning and continue batching. • "Water Scale Not Configured" Error--this message can appear on the batching screen if you try to batch a load without having configured your weighed water scale. To fix this error, configure your weighed water scale on the Scale Configuration Screen. • "Zero delivery not allowed" Notice--a value of zero was entered for a delivery amount. • "Zero Grads Not Allowed" Notice--the operator entered a value of zero for the scale graduation on the Scale Calibration Menu. Version 8.70 EAG_APPA.DOC 03/15/02 1:23 PM Eagle User’s Manual Appendix B Field Number Selections Version 8.70 EAG_APPB.DOC 03/15/02 1:25 PM Eagle User’s Manual Field Number Selections Appendix B: Field Number Selections The following are the fields which can be placed on the Batching Screen, the Batch Setup Screen, and the Batch Recordation Report. The fields are placed on the screens and printout by entering their numbers in the Batch Screen Options, Batch Setup Options, and Printer Configuration Menus. An abbreviated list of these fields can be displayed on the screen by pressing the green <HELP> key while in one of the mentioned menus. Note: Print Data Only Fields begin with No. 150. * : Not printable field @ : Double width (more than 16 characters wide) No. Description No. Description 0 Blank 26 Raw Moisture #6 1 'Admix Trims:' 27 Moist Spy Average 2 'Water Trims:' 28 Order ID 3@ Driver Name 29 Batch Number 4 Customer ID 30 Pounds of Ice 5 Mix ID 31 Moist #1 samples 6 Block Plant ? 32 Moist #2 samples 7 Weight Check ? 33 Moist #3 samples 8* Mixer Status 34 Moist #4 samples 9 Batch XX of XX 35 Moist #5 samples 10 Mix time (per mix) 36 Moist #6 samples 11 Discharge rate 37 Moist Spy Samples 12 Yards Adjusted 38 Flop Gate Status 13 Truck Number 39 Load Number 14 Size of load 40 Mix Adjusted 15 Water trim/batch 41 Amx1 trim 1.00% 16 Water trim/yard 42 Amx2 trim 1.00% 17 % Special/water2 43 Amx3 trim 1.00% 18 Washdown water 44 Amx4 trim 1.00% 19* Mixer time left 45 Amx5 trim 1.00% 20 Cem bin select 46 Amx6 trim 1.00% 21 Raw Moisture #1 47 Amx7 trim 1.00% 22 Raw Moisture #2 48 Amx8 trim 1.00% 23 Raw Moisture #3 49 Amx9 trim 1.00% 24 Raw Moisture #4 50 Amx10 trim 1.00% 25 Raw Moisture #5 51 Amx11 trim 1.00% Version 8.70 EAG_APPB.DOC 03/15/02 1:25 PM B-1 Eagle User’s Manual B-2 Field Number Selections No. Description No. Description 52 Amx12 trim 1.00% 86 Extra #1 ID 53 Specific Gravity 87 Extra #2 ID 54 % Substitution 88 Extra #3 ID 55 % Activity 89 Extra #4 ID 56 Temper water 90 Extra #5 ID 57 Slump Adj Target 91 Extra #6 ID 58* Slump Status 92 Extra #1 Qty 59 Slump Target 93 Extra #2 Qty 60 Slump Meter 94 Extra #3 Qty 61 Amx1 trim 100% 95 Extra #4 Qty 62 Amx2 trim 100% 96 Extra #5 Qty 63 Amx3 trim 100% 97 Extra #6 Qty 64 Amx4 trim 100% 98 Extra #1 Price 65 Amx5 trim 100% 99 Extra #2 Price 66 Amx6 trim 100% 100 Extra #3 Price 67 Amx7 trim 100% 101 Extra #4 Price 68 Amx8 trim 100% 102 Extra #5 Price 69 Amx9 trim 100% 103 Extra #6 Price 70 Amx10 trim 100% 104 Extra #1 Tax 71 Amx11 trim 100% 105 Extra #2 Tax 72 Amx12 trim 100% 106 Extra #3 Tax 73 Qty Ordered 107 Extra #4 Tax 74 Qty Delivered 108 Extra #5 Tax 75 Loads Delivered 109 Extra #6 Tax 76 Price 110@ Order Delivery-1 77 Tax 111@ Order Delivery-2 78 User1 TitledData 112@ Order Instr-1 79 User2 TitledData 113@ Order Instr-2 80 User3 TitledData 114@ User9 TitledData 81 User4 TitledData 115@ User10 TitledData 82 User5 TitledData 116@ Del. Addr. Local 83 User6 TitledData 117@ Cust. Name Local 84 User7 TitledData 118@ Mix Description 85 User8 TitledData 119@ Amx to 0.00/0% Version 8.70 EAG_APPB.DOC 03/15/02 1:25 PM Eagle User’s Manual Field Number Selections No. Description No. Description 120@ Amx to 0.00/100% 154 Driver Name 121 % Air Volume 155 Del. Addr. #1 122 H2O Temperature 156 Cust. Name #1 123 Batchcode ID 157 Yards Adjusted 124 DrumCoat AGG 158 Yards Batched 125 DrumCoat CEM 159 Truck Number 126 DrumCoat H2O 160 Agg #1 Line 127 DrumCoat Y/N ? 161 Agg #2 Line 128 Setup Output# 162 Agg #3 Line 129 Time Due 163 Agg #4 Line 130 Batchbook Amx ID 164 Agg #5 Line 131 Vol Adjust Y/N ? 165 Cem #1 Line 132 'Agg Trims::' 166 Cem #2 Line 133 Agg #1 Trim/Yard 167 Cem #3 Line 134 Agg #2 Trim/Yard 168 Amx #1 Line 135 Agg #3 Trim/Yard 169 Amx #2 Line 136 Agg #4 Trim/Yard 170 Amx #3 Line 137 Agg #5 Trim/Yard 171 Amx #4 Line 138@ User Editfield #1 172 Amx #5 Line 139@ User Editfield #2 173 Amx #6 Line 140 Wat in Truck GAL 174 Wat #1 Line 141 Wat in Truck LBS 175 Wat #2 Line 142 Admix in Truck 176 Agg #1 Moisture 143 'Cem Trims::' 177 Agg #2 Moisture 144 Cem #1 Trim/Yard 178 Agg #3 Moisture 145 Cem #2 Trim/Yard 179 Agg #4 Moisture 146 Cem #3 Trim/Yard 180 Agg #5 Moisture 147 Last Ticket..Y/N 181 Agg Begin Tare 148 Keep Cem Bin Y/N 182 Cem Begin Tare 149 Reference ID 183 Amx Begin Tare 150 Mix ID 184 Wat Begin Tare 151 Mix Description 185 Agg End Tare 152 Time 186 Cem End Tare 153 Date 187 Amx End Tare Version 8.70 EAG_APPB.DOC 03/15/02 1:25 PM B-3 Eagle User’s Manual B-4 Field Number Selections No. Description No. Description 188 Wat End Tare 222 Batch END Time 189 Demo Mode Notice 223 ELASPED Time 190 Batch Units 224 Agg#1 Source 191 Batch Number 225 Agg#2 Source 192 Jobsite Water 226 Agg#3 Source 193 Moisture Comp 227 Agg#4 Source 194 Total Mix Water 228 Cem#1 Source 195 Total Aggregate 229 Cem#2 Source 196 Total Cement 230 Total YARDAGE 197 Total Admix 231 Wat in Slurry 198 Total Water 232 Cem in Slurry 199 W/C Ratio 233 Tot Wat w/Slurry 200 Load Number 234 Weighed Units 201 Specific Gravity 235 Water Units 202 % Substitution 236 Admix Units 203 % Activity 237 'Total Water' 204 Temper water 238 Total Agg Moist 205 Agg RAW Begin Tare 239 Ord Grand Subttl 206 Cem RAW Begin Tare 240 Ord Grand Tax 207 Amx RAW Begin Tare 241 Ord Grand Total 208 Wat RAW Begin Tare 242 Total H2O (lbs) 209 Agg RAW End Tare 243 Parallel Status 210 Cem RAW End Tare 244 Actual Mix Time 211 Amx RAW End Tare 245 Absolute Volume 212 Wat RAW End Tare 246* Resume Printing 213 Company Title 247 W/(C+P) Ratio 214 Company Plant ID 248 Actual Slurry W/C 215 Company Addr #1 249 COD Y/N 216 Company Addr #2 250 Ticket ID 217 Company Addr #3 251 Order ID 218 Company Phone 252 Customer ID 219 Mix Slump Target 253 Qty Ordered 220 Slump reading 254 Qty Delivered 221 Batch START Time 255 Loads Delivered Version 8.70 EAG_APPB.DOC 03/15/02 1:25 PM Eagle User’s Manual Field Number Selections No. Description No. Description 256 Order Price 290 Extra #1 Tax 257 Order Tax % 291 Extra #2 Tax 258 Delivery Addr #1 292 Extra #3 Tax 259 Deliver Addr #2 293 Extra #4 Tax 260 Order Instr #1 294 Extra #5 Tax 261 Order Instr #2 295 Extra #6 Tax 262 User #1 Data 296 Extra #1 Descrip 263 User #2 Data 297 Extra #2 Descrip 264 User #3 Data 298 Extra #3 Descrip 265 User #4 Data 299 Extra #4 Descrip 266 User #5 Data 300 Extra #5 Descrip 267 User #6 Data 301 Extra #6 Descrip 268 User #7 Data 302 Cust Bill Addr 1 269 User #8 Data 303 Cust Bill Addr 2 270 User #9 Data 304 Cust Bill Addr 3 271 User #10 Data 305 Cust Phone # 272 Extra #1 ID 306 Cust Notes #1 273 Extra #2 ID 307 Cust Notes #2 274 Extra #3 ID 308 Control Codes !!! 275 Extra #4 ID 309 Report Stallout! 276 Extra #5 ID 310 Batch $ 277 Extra #6 ID 311 Extra Prod #1 $ 278 Extra #1 Qty 312 Extra Prod #2 $ 279 Extra #2 Qty 313 Extra Prod #3 $ 280 Extra #3 Qty 314 Extra Prod #4 $ 281 Extra #4 Qty 315 Extra Prod #5 $ 282 Extra #5 Qty 316 Extra Prod #6 $ 283 Extra #6 Qty 317 COD Subtotal $ 284 Extra #1 Price 318 COD Tax $ 285 Extra #2 Price 319 COD Total $ 286 Extra #3 Price 320 'Batch Record:' 287 Extra #4 Price 321 'Aggregate' 288 Extra #5 Price 322 'Cement' 289 Extra #6 Price 323 'Admix' Version 8.70 EAG_APPB.DOC 03/15/02 1:25 PM B-5 Eagle User’s Manual B-6 Field Number Selections No. Description No. Description 324 'Water' 358 '-' 80 times 325 'Target' 359 'Total' 326 'Actual' 360 'Design' 327 'Status' 361 'Free H2O' 328 'Moist' 362 'Material' 329 'Tare' 363 'Per' 330 'Mix ID:' 364 'Source' 331 'Mix Name:' 365 'Holding Hopper' 332 'Mix Time:' 366 ...unused 333 'Mix Design:' 367 ...unused 334 'Time' 368 ...unused 335 'Date' 369 ...unused 336 'Ticket #' 370 Ext Agg #1 Line 337 'Order:' 371 Ext Agg #2 Line 338 'Qty Ord:' 372 Ext Agg #3 Line 339 'Qty Del:' 373 Ext Agg #4 Line 340 'Loads:' 374 Ext Agg #5 Line 341 'Start:' 375 Ext Cem #1 Line 342 'Spacing:' 376 Ext Cem #2 Line 343 'Price:' 377 Ext Cem #3 Line 344 'Tax:' 378 Ext Amx #1 Line 345 'Extra Product' 379 Ext Amx #2 Line 346 'Del Adr:' 380 Ext Amx #3 Line 347 'Instr:' 381 Ext Amx #4 Line 348 'Size:' 382 Ext Amx #5 Line 349 '$ Today' 383 Ext Amx #6 Line 350 'Qty:' 384 Ext Wat #1 Line 351 'of' 385 Ext Wat #2 Line 352 'Begin' 386 Probe Cal Ref 353 'End' 387 Design Agg Ref 354 '%' 388 Absorbd Agg H2O 355 '$' 389 Free Agg H2O 356 '-' 36 times 390 Total Agg H2O 357 '-' 42 times 391 Total Amx H2O Version 8.70 EAG_APPB.DOC 03/15/02 1:25 PM Eagle User’s Manual Field Number Selections No. Description No. Description 392 Agg#5 Source 426@ Ticket Setup Sel 393 Cem#3 Source 427@ Motor On (% H2O) 394 Amx#1 Source 428@ Mix in Truck 395 Amx#2 Source 429 Slurry Rinse Delay 396 Amx#3 Source 430 Print Metric? 397 Amx#4 Source 431 Truck Admix ID 398 Amx#5 Source 432 Batch Book? 399 Amx#6 Source 433 ‘Agg Moist::’ 400 Async XX of XX 434 Agg #1 Moist 401 Prints Weights ? 435 Agg #2 Moist 402@ User Editfield #3 436 Agg #3 Moist 403@ User Editfield #4 437 Agg #4 Moist 404@ User Editfield #5 438 Agg #5 Moist 405@ User Editfield #6 439 Code 3 Scale Spy 406@ User Editfield #7 440 6 Char. BBK ID 407@ User Editfield #8 441 Mixer W/C Ratio 408 Type Code 442 SP Gravity 409 Pct. Purge Water 443* Decum Xfer Status 410@ Slurry W/C Ratio 444 Pri. H20 Bin 411@ Min. Dry Cement 445 Sec. H20 Bin 412@ Vortex Build Delay 446 Keep PriH20 Bin 413@ Purge Tank Cap. 447 Keep PriH20 Bin 414@ Max Agg Moist Dev 448 HC Auto Moist % 415 Cum. Quantity 449 HC Water Trim 416 Pri Trans. Weight 700 Total Weight 417 Min Slurry Load Sz 701 Cem/Agg1 Ratio 418 Adj. Slurry W/C 702 Cem/Agg2 Ratio 419 Pri Hopper Scale 703 Cem/Agg3 Ratio 420 Pri Hopper Status 704 Cem/Agg4 Ratio 421 ALT Hopper Scale 705 Cem/Agg5 Ratio 422 ALT Hopper Status 706 Probe Status 423 ALT Trans. Weight 707 Calc Cum Qty 424@ Purge Tank Frfall 708 Aborted Batch Msg 425 Jobsite Water 709 Jobsite H2O Gals Version 8.70 EAG_APPB.DOC 03/15/02 1:25 PM B-7 Eagle User’s Manual B-8 Field Number Selections No. Description No. Description 710 Scale 1 Beg Tare 744 Cem3 Async1 Line 711 Scale 2 Beg Tare 745 Cem3 Async2 Line 712 Scale 3 Beg Tare 746 Agg1 ASTM Line 713 Scale 4 Beg Tare 747 Agg2 ASTM Line 714 Scale 5 Beg Tare 748 Agg3 ASTM Line 715 Scale 6 Beg Tare 749 Agg4 ASTM Line 716 Scale 7 Beg Tare 750 Agg5 ASTM Line 717 Scale 8 Beg Tare 751 Cem1 ASTM Line 718 Scale 9 Beg Tare 752 Cem2 ASTM Line 719 Scale 1 End Tare 753 Cem3 ASTM Line 720 Scale 2 End Tare 754 Amx1 ASTM Line 721 Scale 3 End Tare 755 Amx2 ASTM Line 722 Scale 4 End Tare 756 Amx3 ASTM Line 723 Scale 5 End Tare 757 Amx4 ASTM Line 724 Scale 6 End Tare 758 Amx5 ASTM Line 725 Scale 7 End Tare 759 Amx6 ASTM Line 726 Scale 8 End Tare 760 H2o1 ASTM Line 727 Scale 9 End Tare 761 H2o2 ASTM Line 728 Sensor Temp 762 Tt l Cem ASTM Ln 729 ...unused 763 Design W/C 730 Agg1 Async1 Line 764 Design W/ (P+C) 731 Agg1 Async2 Line 765 HC Auto H2o Target 732 Agg2 Async1 Line 766 HC Tt1 H2o Added 733 Agg2 Async2 Line 767 HC ManualH2oAdded 734 Agg3 Async1 Line 768 HC Operator Trim 735 Agg3 Async2 Line 769 HC Mix Status 736 Agg4 Async1 Line 770 HC Dry Weigth 737 Agg4 Async2 Line 771 HC Actual Moist 738 Agg5 Async1 Line 1001 Plant ID 739 Agg5 Async2 Line 1002 Ticket # 740 Cem1 Async1 Line 1003 Truck # 741 Cem1 Async2 Line 1004 Load Size 742 Cem2 Async1 Line 1005 Mix Code 743 Cem2 Async2 Line 1006 Mix Description Version 8.70 EAG_APPB.DOC 03/15/02 1:25 PM Eagle User’s Manual Field Number Selections No. Description No. Description 1007 Slump 1042 X Prod 2 Desc 1008 Use 1043 X Prod 2 Units 1009 Date 1044 X Prod 2 Price 1010 Customer ID 1045 X Prod 2 Ext $ 1011 Customer Name 1 1046 X Prod 3 Ld. Qty 1012 Customer Name 2 1047 X Prod 3 Name 1013 Customer Name 3 1048 X Prod 3 Desc 1014 Driver # 1049 X Prod 3 Units 1015 Driver Name 1050 X Prod 3 Price 1016 Delivery Addr 1 1051 X Prod 3 Ext $ 1017 Delivery Addr 2 1052 X Prod 4 Ld. Qty 1018 Purchase Order # 1053 X Prod 4 Name 1019 Order # 1054 X Prod 4 Desc 1020 Qty on Board 1055 X Prod 4 Units 1021 Delivery Inst 1 1056 X Prod 4 Price 1022 Delivery Inst 2 1057 X Prod 4 Ext $ 1023 Delivery Inst 3 1058 X Prod 5 Ld. Qty 1024 Tax Code 1059 X Prod 5 Name 1025 Time Due on Job 1060 X Prod 5 Desc 1026 ...unused 1061 X Prod 5 Units 1027 Cumulative Qty 1062 X Prod 5 Price 1028 Ordered Qty 1063 X Prod 5 Ext $ 1029 Mix Prod. Code 1064 X Prod 6 Ld. Qty 1030 Mix Prod. Desc. 1065 X Prod 6 Name 1031 Unit of Measure 1066 X Prod 6 Desc 1032 Mix Price 1067 X Prod 6 Units 1033 Mix Extended $ 1068 X Prod 6 Price 1034 X Prod 1 Ld. Qty 1069 X Prod 6 Ext $ 1035 X Prod 1 Name 1070 MinLoad Desc 1036 X Prod 1 Desc 1071 MinLoad Amt$$ 1037 X Prod 1 Units 1072 Ticket SubTot $ 1038 X Prod 1 Price 1073 Ticket TaxTot $ 1039 X Prod 1 Ext $ 1074 Order Cum Tot $ 1040 X Prod 2 Ld. Qty 1075 Time Ticket Sent 1041 X Prod 2 Name 1076 Zone Version 8.70 EAG_APPB.DOC 03/15/02 1:25 PM B-9 Eagle User’s Manual B-10 Field Number Selections No. Description No. Description 1077 Project Num. 1111 AM - Cem 1 Name 1078 Ordered By 1112 AM - Cem 1 Wt. 1079 Special Inst 1 1113 AM - Cem 2 Name 1080 Special Inst 2 1114 AM - Cem 2 Wt. 1081 Operator Msg 1115 AM - H2O 1 Name 1082 Local Change OK 1116 AM - H2O 1 Wt/Gal 1083 Lot/Block # 1117 AM - Amx 1 Name 1084 Project Phone # 1118 AM - Amx 1 Oz 1085 % Calcium (INFO) 1119 AM - Amx 2 Name 1086 % Air Ent (INFO) 1120 AM - Amx 2 Oz 1087 % SuprPlas (INFO) 1121 AM - Amx 3 Name 1088 ...unused 1122 AM - Amx 3 Oz 1089 ...unused 1123 AM - Amx 4 Name 1090 ...unused 1124 AM - Amx 4 Oz 1091 ...unused 1125 AM - Amx 5 Name 1092 % Calcium TRIM 1126 AM - Amx 5 Oz 1093 % Air Ent TRIM 1127 AM - Amx 6 Name 1094 % SuprPlas TRIM 1128 AM - Amx 6 Oz 1095 % Special Water 1129 AM - Cem 3 Name 1096 Pounds of Ice 1130 AM - Cem 3 Wt. 1097 Loads Delivered 1131 AM - H2O 2 Name 1098 Admix Code 1132 AM - H2O 2 Wt/Gal 1099 Cust. Job # 1133 AM - Mixer Time 1100 Print Weights 1134 AM - Max Load Size 1101 AM - Mix Code 1135 AM - Agg 5 Name 1102 AM - Mix Desc 1136 AM - Agg 5 Wt. 1103 AM - Agg 1 Name 1137 AM - Percent Air 1104 AM - Agg 1 Wt. 1138 AM - Slump Target 1105 AM - Agg 2 Name 1139 AM - Max Dry Size 1106 AM - Agg 2 Wt. 1140 AM - Max Async Sz 1107 AM - Agg 3 Name 1141 AM - Agg Moist Ref 1108 AM - Agg 3 Wt. 1142 ...unused 1109 AM - Agg 4 Name 1143 ...unused 1110 AM - Agg 4 Wt. 1144 ...unused Version 8.70 EAG_APPB.DOC 03/15/02 1:25 PM Eagle User’s Manual Field Number Selections No. Description No. Description 1145 ...unused 1180 User Right 6 1146 ...unused 1181 User Right 7 1147 ...unused 1182 User Right 8 1148 ...unused 1183 User Right 9 1149 Zone Trvl Mileage 1184 User Right 10 1150 User Left 1 1185 User Right 11 1151 User Left 2 1186 User Right 12 1152 User Left 3 1187 User Right 13 1153 User Left 4 1188 User Right 14 1154 User Left 5 1189 User Right 15 1155 User Left 6 1190 User Right 16 1156 User Left 7 1191 User Right 17 1157 User Left 8 1192 User Right 18 1158 User Left 9 1193 User Right 19 1159 User Left 10 1194 User Right 20 1160 User Left 11 1195 User Right 21 1161 User Left 12 1196 User Right 22 1162 User Left 13 1197 User Right 23 1163 User Left 14 1198 User Right 24 1164 User Left 15 1199 User Right 25 1165 User Left 16 1200 ExtProd 1 OrdQty 1166 User Left 17 1201 ExtProd 1 CumQty 1167 User Left 18 1202 ExtProd 1 LngDsc 1168 User Left 19 1203 ExtProd 1 $ U/M 1169 User Left 20 1204 ExtProd 2 OrdQty 1170 User Left 21 1205 ExtProd 2 CumQty 1171 User Left 22 1206 ExtProd 2 LngDsc 1172 User Left 23 1207 ExtProd 2 $ U/M 1173 User Left 24 1208 ExtProd 3 OrdQty 1174 User Left 25 1209 ExtProd 3 CumQty 1175 User Right 1 1210 ExtProd 3 LngDsc 1176 User Right 2 1211 ExtProd 3 $ U/M 1177 User Right 3 1212 ExtProd 4 OrdQty 1178 User Right 4 1213 ExtProd 4 CumQty 1179 User Right 5 1214 ExtProd 4 LngDsc Version 8.70 EAG_APPB.DOC 03/15/02 1:25 PM B-11 Eagle User’s Manual B-12 Field Number Selections No. Description No. Description 1215 ExtProd 4 $ U/M 1246 Mix Agg. Size 1216 ExtProd 5 OrdQty 1247 Sales Type Code 1217 ExtProd 5 CumQty 1248 Sls Type ShrtDsc 1218 ExtProd 5 LngDsc 1249 Sls Type LngDsc 1219 ExtProd 5 $ U/M 1250 Skip Tkt Print 1220 ExtProd 6 OrdQty 1251 Wet/Dry Flop Pos 1221 ExtProd 6 CumQty 1252 Prev Cum Qty 1222 ExtProd 6 LngDsc 1223 ExtProd 6 $ U/M 1224 Delivery Inst 4 1225 Delivery Inst 5 1226 Delivery Inst 6 1227 Heat Charge Prt 1228 Heat Charge Amt 1229 Tkt Grand Total 1230 PrevOrd CumTotal 1231 Mix Max Wat/Yd 1232 Mix Max Wat/Load 1233 Sand Wat/Yd 1234 Sand Wat/Load 1235 Plant Wat/Yd 1236 Plant Wat/Load 1237 Allowed Wat/Yd 1238 Allowed Wat/Load 1239 Ticket Misc. 1 1240 Ticket Misc. 2 1241 Order Misc. 1 1242 Order Misc. 2 1243 Order Misc. 3 1244 Mix Class 1245 Mix Strength Version 8.70 EAG_APPB.DOC 03/15/02 1:25 PM Scale Readout Manual Appendix C Scale Readout Manual Version 8.70 EAG_APPC.DOC 07/03/01 1:40 PM C-2 Scale Readout Manual Introduction Appendix C: Scale Readout Manual The Scale Readout Unit is a digital weight indicator that may be used for 1 to 3 scales. The interface to each scale may be load cells or scale pots (dial potentiometers). A 5 digit LED display is provided for each scale. Along with each display is a set of 3 pushbuttons that provide all of the control functions for the display. The unit also provides an analog output voltage for each scale. These signals may be used by a batching computer to control the scale weighing operation. Some of the features include password protection of all calibration data, motion detection, overload indication (weight exceeding 105% of capacity), digital filtering for stable readings, and output simulation for ease of calibrating external controllers. This manual includes information describing the normal operation as well as all steps required to setup and calibrate the unit. Included is a Menu Map diagram that may be used as a guide to access the available functions. Version 8.70 EAG_APPC.DOC 03/15/02 1:26 PM C-1 Scale Readout Manual Operation Readout Menu Map Normal Weight Display Note: “CAL” “SEtUP” “PASS” “PASS” “XXXXX” “XXXXX” “ZErO” “FULL” “GrAd” “CAP” “Count” “Out” “rEAL” “rAtE” “SPAn” “CALC” “PASS” ConFG “-SET-” XXXXX XXXXX XXXXX coounts XXXXX weight weight counts XXXXX XXXXX config counts XXXXX 1. This is the Weight Added to the scale for calibration. 2. Enter the Old password here. 3. Enter the New password here. C-2 “r1 _ 12” “dIAG” Version 8.70 EAG_APPC.DOC 03/15/02 1:26 PM Scale Readout Manual Menu Prompts (see Readout Menu Map) • • • 'CAL' Calibration Modes − 'PASS' Password protection from unauthorized calibrations − ‘ZErO' Zero Calibration Mode − 'SEt' Used for setting the zero calibration point − 'FULL' Full Scale Calibration Mode ‘SEtUP' Setup Scale Parameters − 'PASS' Password protection from unauthorized modifications − 'GrAd' Scale Graduations − 'CAP' Scale Capacity Calibration 'dIAG' Diagnostic Modes − 'Count' View the raw converter counts − 'Out' Simulated Output Mode (for calibrating external equipment) − 'rEAL' View the real weight (instead of normal tared weight) − 'rAtE' View the rate of change of weight (motion) − 'SPAn' View the number of counts available over the span of the scale. − 'CALC' Calculates the number of counts when adding weight for setting the gain. − 'PASS' To change the password − 'ConFG' View the Configuration DIP switch settings • 'r1.12' Revision number (r1.12 = Revision 1.12) • xxxxx Numeric Entry Required ! Version 8.70 EAG_APPC.DOC 03/15/02 1:26 PM C-3 Scale Readout Manual Operation Pushbuttons • • Normal Weight Display Mode − ZERO used to re-zero the scale weight (limited to a range of -2% to +5% from the zero calibration set point). − SELECT used to enter the calibration modes. − ASTERISK used to view the actual weight (weight calculated from zero calibration set point) for approximately 1 to 2 seconds. Numeric Entry Mode − ZERO used as an escape key to exit without changing any data. − SELECT used to select digit to edit. − ASTERISK used to enter changed data. − To CHANGE Number: − − Press the SELECT button to select which digit to change. As a digit becomes editable, it begins blinking. − To increment the digit, press the ASTERISK button. This will increment the digit from 0 to 9, then back to 0 if pressed repeatedly. − When final number is displayed, press the SELECT button until no digits are blinking. To ENTER Number: − − To EXIT (without saving changes): − C-4 To enter the new number, press the ASTERISK button (with no digits blinking). Press the ZERO button to Escape back to the normal weight display mode. Version 8.70 EAG_APPC.DOC 03/15/02 1:26 PM Scale Readout Manual • Calibration Other Modes − ZERO used as an escape key to exit any function without changing any data. − SELECT used to select between various functions. − ASTERISK used as an enter key to enter a lower level in the menu structure. Version 8.70 EAG_APPC.DOC 03/15/02 1:26 PM C-5 Scale Readout Manual Operation Normal Weight Display Mode The normal weight display mode has the basic function of displaying the weight on the scale. This weight is displayed in graduations (grads) of typically 0.1% of scale capacity (i.e. - 10 lbs for a 10,000 lb scale). The displayed weight is also adjusted for any tared weight. Additional information available in this mode: 1. The decimal point at the right side of the displayed number serves as an annunciator of motion detection. If motion detection is enabled (see Configuration Switch Settings), the LED will be on when motion is sensed. 2. If the ASTERISK button is pressed, the 'real' weight is displayed (that is, the weight calculated from the calibrated zero set point). The real weight is displayed for 1 to 2 seconds. During this time, all 5 of the decimal points will be illuminated. 3. If the range of the scale has been exceeded (105% of scale capacity), the prompt will indicate the overload condition 'oLOAd' (flashing display). If above the upper limit of the display, the indication will be 'EEEEE'. If below the lower limit of the display, the indication will be '-EEEE'. In either case, the display will be flashing. C-6 Version 8.70 EAG_APPC.DOC 03/15/02 1:26 PM Scale Readout Manual Calibration Initial Hardware Setup 1. Make sure the wiring of each scale cable is correct. Refer to the enclosed cable drawings for the proper wiring (for load cell or scale pot connections). 2. Open the rear door of the enclosure for access to the printed circuit board as shown in Figure 2. 3. Each of the 3 scale channels uses a slide switch to select the use of either load cells (LC) or scale pots (SP). Move this switch to the proper setting (up for load cells or down for scale pots). Refer to Figure 2. 4. For each channel there is a rotary switch with a knob on top labelled 0 - 9. This is provided to adjust the gain of the circuit. Knob Setting Gain Use 0 1 For Scale Pots 1-7 100 - 700 For Load Cells 8, 9 N/U Not used For load cells, the knob should be initially set to position 1. On the side of the rotary switch housing there is a mark that points to the number setting on the knob. Refer to Figure 2 below. Additional gain adjustment is provided by jumpers W1, W2, W3, one for each of the respective scales. When the jumper is installed, the gain is reduced by 1/3 (one-third). This allows for more precise gain adjustment when using load cells. 5. Connect the scale cables to the respective channel inputs and turn on power. W1 W2 Gain W3 Gain Gain 1 2 3 4 5 6 7 8 1 0 9 2 3 1 8 7 4 5 0 2 3 6 1 9 8 7 4 5 9 2 3 8 7 4 6 0 5 ON 6 OFF Config LC LC LC SP SP SP Scale Input (Water) Scale Input (Cement) Scale Input (Aggregate) Analog Scale Ouputs (To Eagle) Figure 2- Calibration Controls (as viewed from rear of display unit). Shown set up for scale pots with Gain pointing to zero (0). Version 8.70 EAG_APPC.DOC 03/15/02 1:26 PM C-7 Scale Readout Manual Calibration Initial Calibration Setup 1. Refer to the Readout Menu Map diagram when stepping through the menu. 2. Press the SELECT button to enter the menu structure. The first prompt is 'CAL' which allows entering the calibration area. 3. To get a feel for the menus at this time, press the SELECT button a few times and see the prompts rotate between the possible settings. 4. Press the SELECT button until the prompt 'SEtUP' is displayed. This allows changing the setup parameters. Enter this menu by pressing the ASTERISK button. The prompt should now read 'GrAd'. Note: If the display prompt reads 'PASS', then a password needs to be entered at this point. See “Password” section. 5. When 'GrAd' is displayed, press the ASTERISK button to enter the mode to change the graduation size. The present value is now displayed. 6. To change this value, press the SELECT button to select one digit at a time to be changed. The editable digit is blinking. As the digit is blinking, press the ASTERISK button to increment the digit from 0 to 9, then back to 0. When all digits are correct, press the ASTERISK button to enter the value (when no digits are blinking). Note: The display will then return to the normal weight display mode. Note: Whenever stepping through the menus or changing values, if the ZERO button is pressed, the display will return to the normal weight display mode, and no changes will be made! 7. Repeat the process of pressing the SELECT button and stepping into the 'SEtUP' menu. Next, press the ASTERISK button. The display should now read 'GrAd'. Then press the SELECT button and the display should read 'CAP'. Next, press the ASTERISK button to enter the mode to change the value of scale CAPacity. As with the graduations, the present value is now displayed. Change the value by pressing the SELECT button and save it as described in step 6 (which set the graduation size). Now that the initial setup is complete, we need to adjust the gain if using load cells. C-8 Version 8.70 EAG_APPC.DOC 07/03/01 1:40 PM Scale Readout Manual Calibration Gain Adjustment (performed at installation time) 1. The initial knob setting for load cell gain should be 1 to prevent overdriving the amplifier. The jumpers W1, W2, and W3 should not be installed initially. If using scale pots, set the gain knob to 0, install the jumpers (W1,W2,W3) and skip these gain adjustment steps. Note: Before proceeding to set the gain, a zero calibration must be done. See “Zero Calibration” section. 2. Referring to the Scale Readout Menu Map diagram, step to the 'dIAG' menu by pressing the SELECT button. Enter this menu by pressing the ASTERISK button. This menu allows you to view raw converter counts ('Count'), to simulate a scale weight output to the batching computer ('Out'), to view real weight ('rEAL') as compared to the normal weight which has been adjusted for Tare weight, the rate of change of the weight ('rAtE'), the counts over the scale span ('SPAn'), a function to calculate counts for setting the gain ('CALC'), or a password modification function ('PASS'). 3. Enter the 'Count' display by pressing the ASTERISK button to view the raw counts. These counts have a range of 0 to 65535. The initial counts displayed with the load cell connected and at zero weight should be between 200 and 30000. If not, the load cell cable is incorrectly wired. 4. Now it is time to set the gain. This is done by adding a precise weight to the scale and reading the number of counts. The amount of precision weight depends on what is available (typically 500 to 2000 lbs). Use as much weight as possible (without exceeding the scale capacity). This weight will also be used for full scale calibration. The maximum number of counts for optimum performance may be calculated using the 'CALC' function. After entering the 'dIAG' menu, press the SELECT button until the prompt 'CALC' is displayed. Then press the ASTERISK button to enter the function. Now a number is displayed which should be changed to show the amount of precision weight to be added to the scale. This is done by pressing the SELECT button to select one digit at a time to be changed. The editable digit is blinking. As the digit is blinking, press the ASTERISK button to increment the digit to the correct value. When the value is correct (and no digits are blinking), press the ASTERISK button to enter this value. The display then shows the number of counts. Write this number down for use in the next step. Press any button to return to normal weight display mode. 5. Now add the precision weight and view the raw counts again (follow steps 2 and 3 above). If the counts exceed the calculated value, then the gain is set too high. You should set the gain so that the counts are as close as possible but less than this number. If the gain knob is set to '1', and the gain is still too high, install a jumper block on the respective jumper W1, W2, or W3. Note: Every time the gain is changed, a zero calibration must be performed and the calculation must be repeated to arrive at a new count number. This is because the number of counts at zero weight will have changed. (Of course this means unloading and reloading the weight, but there is no other way!) Version 8.70 EAG_APPC.DOC 03/15/02 1:26 PM C-9 Scale Readout Manual Calibration Zero Calibration 1. Remove all weight from the scale before performing this calibration. 2. Referring to the Scale Readout Menu Map diagram, step to the 'CAL' menu by pressing the SELECT button. Enter this menu by pressing the ASTERISK button. Note: If the display prompt reads 'PASS', then a password needs to be entered at this point. See “Password” section. 3. Now the prompt should read 'ZErO'. Press the ASTERISK button to enter the zero calibration mode. Now the prompt reads '-SEt-'. Be sure the scale is empty then press the ASTERISK button. Now the zero calibration is automatically performed, the data is saved, and the display returns to the normal weight display mode. C-10 Version 8.70 EAG_APPC.DOC 07/03/01 1:40 PM Scale Readout Manual Calibration Full Scale Calibration 1. This function is called full scale calibration, but since we can only hang a small percentage of the full scale weight (precision weights typically range from 500 to 2000 lbs), this is the most accurate point for calibration. Use as much weight as possible (without exceeding the scale capacity). Load the scale now with the precision weight. 2. Referring to the Scale Readout Menu Map diagram, step to the 'CAL' menu by pressing the SELECT button. Enter this menu by pressing the ASTERISK button. Note: If the display prompt reads 'PASS', then a password needs to be entered. See “Password” section. 3. Press the SELECT button again until the prompt reads 'FULL'. Press the ASTERISK button to enter the full scale calibration mode. Now the last entered value of full scale calibration weight is displayed. Change this value to the amount added to the scale. This is done by pressing the SELECT button to select one digit at a time to be changed. The editable digit is blinking. As the digit is blinking, press the ASTERISK button to increment the digit to the correct value. When the value is correct (and no digits are blinking), press the ASTERISK button to enter this value. Now the calculations are automatically performed, the data is saved, and the display returns to the normal weight display mode. 4. Check the calibration (and linearity of the scale system) by sequentially removing the precision weight, adding approximately that amount of material to the scale, then add the precision weight again. The graduation size can be changed at any time without affecting the calibration, so you may wish to reduce this number when checking the accuracy of the scale. Version 8.70 EAG_APPC.DOC 03/15/02 1:26 PM C-11 Scale Readout Manual Calibration Simulated Outputs 1. The readout supplies an analog output signal to a batching control system for each of the 3 scales. The simulated mode is used to calibrate the batching control to the output signals by simulating any value of weight from zero to full scale capacity. This allows the batching control to be calibrated any time after the readout has been calibrated to the scale. 2. Referring to the Scale Readout Menu Map diagram, step to the 'dIAG' menu by pressing the SELECT button. Enter this menu by pressing the ASTERISK button. 3. Press the SELECT button until the prompt reads 'Out'. Press the ASTERISK button to enter the output simulation mode. Now the last entered value of simulated weight is displayed. Change this value to the desired simulated weight. This is done by pressing the SELECT button to select one digit at a time to be changed. The editable digit is blinking. As the digit is blinking, press the ASTERISK button to increment the digit to the correct value. When the value is set as desired (and no digits are blinking), press the ASTERISK button to send this value out the analog output port. This simulates the value that will be sent out when the scale is reading this same weight. If an amount greater than the scale capacity is entered, the display reads 'HiErr' for one second and then returns to the normal weight display mode. To return to the normal weight display mode, press any button. Note: C-12 Be sure to exit the Simulate Output mode before using the scale. Version 8.70 EAG_APPC.DOC 07/03/01 1:40 PM Scale Readout Manual Miscellaneous Error Messages The following error messages may be encountered during calibration of the readout board. The messages are only displayed when data is entered from the front panel pushbuttons. • 'LoErr' A Low Error indicates that with the present gain and calibration adjustment the scale cannot register 5 graduations below zero. (Either gain is too low, or the cable is wired incorrectly) • 'HiErr' A High Error indicates that with the present gain and calibration adjustment the scale cannot register 105% of full scale capacity. (Gain is too high) • 'GAin' A Gain Error indicates that with the present gain setting, the number of counts over the scale range is less than 32000. This will not give optimum performance. (Gain is too low). The actual number of counts over the span can be read by using the Span function in the Diagnostic menu. • 'rAtE' A Rate Error indicates that there is too much motion on the scale (rate of change of the weight) to perform an accurate calibration. Motion detection is enabled by selecting the proper DIP switch settings. The actual motion may be viewed by entering the Rate function in the Diagnostic menu. • ‘Error’ An ‘Error’ error can be caused by the following: • If the counts when Zero Calibrating are less than 600. • If the counts when Zero Calibrating are greater than the counts when the scale is at 75% of max capacity (according to previous calibration). • If the counts when Full Scale calibrating are less than 200 counts above the Zero calibrate point. Version 8.70 EAG_APPC.DOC 07/03/01 1:40 PM C-13 Scale Readout Manual Miscellaneous Passwords When entering the 'CAL' menu or the 'SEtUP' menu, a password entry is required (unless passwords have been bypassed or locked out). • Entry If a password entry is required, the display reads 'PASS'. At this point press the ASTERISK key to enter this mode. Now the display should read '0'. To enter a password, change this value to correct password number. This is done by pressing the SELECT button to select one digit at a time to be changed. The editable digit is blinking. As the digit blinks, press the ASTERISK button to increment the digit to the correct value. When the value is correct (and no digits are blinking), press the ASTERISK button to enter this value. If the number entered is not correct, the display will return to the normal weight display mode. If correct, the prompt will then display either 'ZErO' or 'GrAd'. At this point any of the calibration functions or setup functions may be performed, respectively. • Bypass This password entry steps are bypassed if the password is set to zero. Also, after the correct password has been entered once, subsequent calibrations do not require the password to be entered again (until power is turned off). • Lock-Out The entire calibration menu is not available if an optional lock-out switch is turned on (or if CONFIG switch position 8 is ON. See Scale Lock Out). If locked out, password modifications are disabled also. • Modify To modify the password, step to the 'dIAG' menu by pressing the SELECT button (refer to the Scale Readout Menu Map). Enter this menu by pressing the ASTERISK button. Press the SELECT button until the prompt shows 'PASS', then press the ASTERISK button to enter the modify function. First, a random number is displayed. Change this number to the old password (if unknown, call the factory for a temporary password). This is done by pressing the SELECT button to select one digit at a time to be changed. The editable digit is blinking. As the digit blinks, press the ASTERISK button to increment the digit to the correct value. When the value is correct (and no digits are blinking), press the ASTERISK button to enter this value. After entering this password, the old password is displayed again and should be changed to the new password. Note: C-14 Cycle power when done to establish the password protection. Version 8.70 EAG_APPC.DOC 07/03/01 1:40 PM Scale Readout Manual Miscellaneous Configuration Switch Settings The CONFIG DIP switch as shown in Figure 2 controls various functions. There is an entry in the diagnostic area that allows the user to view the switch settings from the front panel display. This is needed when the back cover plate is sealed or otherwise inaccessible. To view the settings from the display, enter the 'dIAG' menu (refer to the Scale Readout Menu Map diagram). Press the SELECT button until the prompt reads 'ConFG'. Then press the ASTERISK key to display the configuration. There is a series of 8 lights and each represent a corresponding DIP switch position (1 to 8, left to right). Each light can be up or down, just as the DIP switch appears when viewed from the rear of the unit (UP = ON, DOWN = OFF). If a switch setting is changed, the new function is activated when power is cycled. The functions presently available are listed as follows : • Motion Detection Disabled 1 2 3 4 5 6 7 Motion = +/-1 Grad 8 1 2 3 4 5 6 7 ON ON OFF OFF Config Config +/-3 Grads 1 2 3 4 5 6 7 +/-5 Grads 1 2 3 4 5 6 7 8 ON ON OFF OFF Config 8 8 Config When motion is detected, the decimal point on the far right side of the display will be ON. This gives a constant indication of when motion is present. The amount of motion may be viewed as a rate of change in units (i.e. - pounds). This is found in the diagnostic menu as 'rAtE' (see Scale Readout Menu Map). When this mode is entered, the rate of change (+/-) is displayed until one of the 3 keys is pressed. Scale calibrations are affected by motion detection. If motion is detected when attempting a zero calibration, or upon entering the full scale calibration mode, or when pressing the tare button, the action will not be performed. The error message 'rAtE' will be displayed. Version 8.70 EAG_APPC.DOC 07/03/01 1:40 PM C-15 Scale Readout Manual • Miscellaneous Digital Filtering Filtering Disabled 1 2 3 4 5 6 7 Low 8 1 2 3 4 5 6 7 ON ON OFF OFF Config Config Medium High 1 2 3 4 5 6 7 1 2 3 4 5 6 7 8 ON ON OFF OFF Config 8 8 Config Digital filtering is active in the readout if the appropriate DIP switches are set. The figure above illustrates the switch settings necessary to get varying amounts of filtering. Use care when setting for medium to high filtering because it greatly increases the response time of the scale . • Scale Lock Out Disabled 1 2 3 4 5 6 7 Enabled 1 2 3 4 5 6 7 8 ON ON OFF OFF 8 This feature is used to lock out the user from making unauthorized calibration changes. It also prevents the user from changing the scale capacity (which in turn changes calibrations). Scale Calibration Sealing Method Disabling the DIP switch shown above allows the unit to be calibrated. There is a metal plate that must be removed to access the DIP switches. The plate is attached with 2 screws that have holes through them. A lead wire seal can be used to restrict access to these switches (refer to the diagram on the following page). C-16 Version 8.70 EAG_APPC.DOC 07/03/01 1:40 PM Scale Readout Manual Miscellaneous To assist you in managing your security we have included this password form. Remove it and copy freely and store the filled in table in a secure location. Day Month Year __ __ __ __ __ __ Password category Setup and Calibration Version 8.70 EAG_APPC.DOC 07/03/01 1:40 PM Person(s) issued to: 5 digits num. password __ __ __ __ __ C-17 Eagle User’s Manual Appendix D Inventory Security Version 8.70 EAG_APPD.DOC 03/15/02 1:27 PM Eagle User’s Manual Inventory Security Software Options Inventory Security & Passwords The Eagle maintains the integrity of the inventory by recording all batching done in both the automatic and manual modes. (Unless overridden by the security override keyswitch). The Eagle will not batch in manual mode unless two conditions are met: 1. The computer must be displaying the Batching Menu. (This is to activate the recordation software.) 2. The printer must be turned on and in the "online" condition. (This forces a written record of the batch.) The Security override key should be removed from the system and in the custody of the person responsible for the inventory. If the person responsible for inventory is not always on the batching site, an alternate approach is to seal the key in an envelope with tape on all edges and signed, or some other container that is sealed. The seal should be checked at regular intervals by the person responsible for inventory and this person should be notified if it is necessary to override the security for any reason. Security Override Switch The Security override switch is located in a box on the inside of the J-box door in the lower right hand corner of the door. The keyswitch is in the upper left corner of the box. When the keyswitch is in the "on" position the inventory security feature is overridden, (disabled). Security is standard on Eagle and Eagle Plus and is optional on the Eagle Junior. In the vertical position, the override is "OFF", (Security Enabled). ON In the horizontal position, the override is "ON", (Security Disabled). Version 8.70 EAG_APPD.DOC 103/15/02 1:27 PM D-1 Eagle User’s Manual Appendix E Expanded Water Handling (2 of 4 Waters) Version 8.70 EAG_APPE.DOC 03/15/02 1:28 PM Eagle User’s Manual Expanded Water Handling (2 of 4 Waters) This Feature is only available with an Eagle Plus system. Introduction Beginning with Revision 8.30, The Eagle Pluses’ Water handling capabilities have been expanded so that it can control as many as 2 of 4 waters. The third and fourth waters use the IO points from the 12th and 11th admixes, respectively. The following combinations are now possible: Admix Water 6 of 12 2 of 2 6 of 11 2 of 3 6 of 10 2 of 4 Limitations: If 3 waters are needed, they MUST use water bins 1, 2, and 3. The 4th water bin can NOT be used unless the 3rd bin is also in use. If the 3rd water is used, the 12th admix is disabled. If the 4th water is used, the 11th admix is disabled. Use of 3rd and 4th waters requires the presence of the PB6 IO board for Admix 11 and 12 Fill and Admix 11 and 12 Pulse signals. Eagle Software Setup Steps: 1. On the Admix Storage menu, set the “Used?” fields to <N> for the Admix bins that correspond to the water bins that are to be used. If enabling water bin 3, set the “Used?” field for Admix bin 12 to <N>. If enabling water bin 4, set the “Used?” field for Admix bin 11 to <N>. Change to <N> if enabling water bins. Version 8.70 EAG_APPE.DOC 103/15/02 1:28 PM E-1 Eagle User’s Manual Expanded Water Handling (2 of 4 Waters) 2. On the Water Storage menu, set up the water bin(s) to be used. Enter information in all fields, including a <Y> in the “Used?” field. Press <F5> and put in material names and change the “Used?” fields to <Y>. E-2 Version 8.70 EAG_APPE.DOC 03/15/02 1:28 PM Eagle User’s Manual Expanded Water Handling (2 of 4 Waters) 3. If using weighed water, go to the Scale Configuration menu and add <Y> entries to attach the new bin(s) to the water scale. Change to <Y> to attach the new bin(s) to the water scale. Go to the Water Freefall and Water Jogging menus and enter settings for the new bin(s). Enter new settings for the new bins. Version 8.70 EAG_APPE.DOC 103/15/02 1:28 PM E-3 Eagle User’s Manual Expanded Water Handling (2 of 4 Waters) Enter new settings for the new bins. 4. If using metered water, go to the Water Pulse Calibration menu and enter the pulse calibrations for the new bin(s). Enter new water pulse calibrations. E-4 Version 8.70 EAG_APPE.DOC 03/15/02 1:28 PM Eagle User’s Manual Expanded Water Handling (2 of 4 Waters) 5. Go to the Mix Storage menu and change any Mix Designs that will use the new Water bin(s) that will use the new water bins 3 or 4. Press <F5> to edit, and add or change the mix design. Version 8.70 EAG_APPE.DOC 103/15/02 1:28 PM E-5 Eagle User’s Manual Expanded Water Handling (2 of 4 Waters) Eagle Software Change: When using the “Special” field, the bin used for Special Water may be specified to be something other than the second water bin, such as Water 3 or Water 4. This is accomplished by putting the desired bin into the second water of the Mix Design and setting the target amount to zero. Note: You can only have two waters in the Mix Design. When a nonzero Percent Special value is entered, the Eagle will use the bin from the Mix Design second water as the Special Water. If the second water of the Mix Design is left blank, the Eagle will default to using the second water bin for Special Water. To blend two waters together use a nonzero percent or to use only the second water enter 100 percent. E-6 Version 8.70 EAG_APPE.DOC 03/15/02 1:28 PM Eagle User’s Manual Expanded Water Handling (2 of 4 Waters) If “Special” is set to 50 percent in the “Batch Setup Menu” the Eagle will show the 2 water targets. If “Special” is set to 100 percent in the “Batch Setup Menu” the Eagle will show only the special water. Version 8.70 EAG_APPE.DOC 103/15/02 1:28 PM E-7 Eagle User’s Manual Expanded Water Handling (2 of 4 Waters) If “Special” is set to 0 percent you may use the second bin for something other than the second water. The second water will show a zero value on the “Verify Menu”. E-8 Version 8.70 EAG_APPE.DOC 03/15/02 1:28 PM Eagle User’s Manual Expanded Water Handling (2 of 4 Waters) Eagle Wiring Changes: 1. The Admix Fill modules need to be rewired to be powered through the Water Auto/Manual power bus. If Water 3 is used, Admix 12 Fill (PB6 #13) should be rewired. If Water 4 is used, Admix 11 Fill (PB6 #12) should be rewired. 2. If weighed water is used, the input modules should be jumpered to the fill modules. If Water 3 is used, Admix 12 Pulse (PB6 #5) should be jumpered to Admix 12 Fill(PB6 #13). If Water 4 is used, Admix 11 Pulse (PB6 #4) should be jumpered to Admix 11 Fill (PB6 #12). 3. The Manual Panel should have Admix 12 and Admix 11 (if water 4 is used) buttons removed or disabled, and appropriate Water fill buttons added for controlling the new bin(s). New Function Water 3 Fill Water 3 Input Water 4 Fill Water 4 Input Version 8.70 EAG_APPE.DOC 103/15/02 1:28 PM Eagle Wiring Old Function Admix 12 Fill Admix 12 Pulse Admix 11 Fill Admix 11 Pulse Table 1 E.R. MSP & TB Wire P3-12, BLK/WHT, TB-213 P3-32, ORG/BLK/GRN, TB-207 P3-11, BLU/BLK, TB-212 P3-31,GRN/BLK/ORG, TB-206 E-9 Eagle User’s Manual Appendix F Eagle Text File Transfer 2.00 Version 8.70 EAG_APPF.DOC 03/15/02 1:29 PM Eagle User’s Manual Introduction ........................................................................................................................ 1 Expanding .8 files to text Method I Eagle Operator ........................................................................................................... 2 Database Operator ................................................................................................... 3 Method II .............................................................................................................................. 4 Telephone Communication Procedure Level 6 & 7....................................... 5 Kermit File Transfer Eagle Side ..................................................................................................................... 6 Receiving Computer ................................................................................................ 7 How to Exit Kermit .................................................................................................. 8 Kermit Prompt Commands................................................................................... 9 Modem Commands ................................................................................................. 10 Modem Defaults ....................................................................................................... 11 How to Import Text Files into Excel ................................................................... 12 File Structure Level 6 & 7......................................................................................... 15 File Structure Level 8.................................................................................................. 23 Switches............................................................................................................................. 35 Changes by Revision.................................................................................................... 36 Version 8.70 EAG_APPF.DOC 03/15/02 1:29 PM Eagle Text File Transfer Introduction Expanding and transferring Eagle.S and Eagle.8 files is available on Eagle Level 6.xx or higher. This is for the Eagle Junior, Eagle, and Eagle Plus. Files can be transferred by floppy disk or by telephone communications. (Modem supplied by customer.) EXPS.EXE, (Level 6.xx & 7.xx), is a program we supply that expands the compressed files into an ASCII format. (ASCII is an acronym for American Standard Code for Information Interchange.) EXPS8.EXE is a similar program for Level 8 Eagles only. ALL Level 6 & 7 files have the .S extension. ALL Level 8 files will have the .8 extension. Files available for transfer: Level 6.xx and Level 7.xx Order.S (Eagle Order File) Customer.S (Eagle Customer File) Mix.S (Eagle Mix File) Ticket.S (Eagle Ticket File) Level 8 only Order.8 Customer.8 Mix.8 Ticket.8 Truck.8 (Eagle Order File) (Eagle Customer File) (Eagle Mix Design File) (Eagle Ticket File) (Eagle Truck File) Level 8.20 and above will have all of the above plus Deliveries.8 (Eagle Deliveries File) Performance.8 (Eagle Performance File) On level 6.xx systems we will send the customer EXPS.EXE from Command Alkon. On level 7.xx systems EXPS.EXE resides on the Eagle system "C" disk drive and can be copied to the removable floppy "A" drive and given to the customer. On level 8.xx systems EXPS8.EXE resides on the Eagle system "C" disk drive and can be copied to the removable floppy "A" drive and given to the customer. Version 8.70 EAG_APPF.DOC15 March 02 4:03 PM F-1 Eagle User’s Manual Text File Transfer Floppy Disk Transfer Procedure Method I The Eagle operator will copy files to a floppy disk. The Level 6 & 7 files will have a .S extension and Level 8 files will have a .8 extension. The files will be expanded on the database computer. Eagle Operator How to copy .8 files to floppy disk • • • • From the main menu on the Eagle press <F4> to open the “Plant Setup menu.” Select Disk Maintenance and press “Enter.” Insert a blank formatted disk into the floppy drive. Chose which files to be copied by putting a “Y” in the Copy column. If you do not want to copy a file, put a “N” in the Copy column for that file. To copy all files put a “Y” for the “Copy ALL Files?” question. • Press <F2> Backup data files to floppy. A dialog box will display on the bottom of your screen, telling you how many disks required to complete this operation. • Press “Y” to continue or “N” to cancel. When you press “Y” the Eagle will start copying the files selected. On the screen it will show the process as in the example below. Copying the files Customer.8 Data ➙ Floppy When the process is completed the Eagle will go back to the Disk Maintenance menu. The .8 files are now on the disk. Remove the disk from the drive and give to the operator of the Database PC. Version 8.70 EAG_APPF.DOC 03/15/02 1:29 PM F-2 Eagle User’s Manual Text File Transfer Telephone Communication Procedure (Level 6.xx & 7.xx ONLY) • Communications modems and cables supplied by customer. • At the end of the day the Batchman exits the Eagle Batching Program by typing: "CTL-E". • Upon display of the screen prompt "Command Alkon>", the Batchman inserts a formatted floppy disk into the Eagle drive and types "Standby.bat", then presses Enter. The program automatically expands the .S files to the ASCII format and transfers the files to the floppy disk. • The "Standby.bat" program will execute the Kermit program in the Eagle system which is an industry standard communications protocol program. • The Kermit program puts the Eagle in a "Listening Mode". • The telephone modem connected to the Eagle will be set to the "Auto-Answer" mode. • The Kermit program also must be on the host central office accounting computer, (MS-DOS OR VAX VMS). Command Alkon Dallas can supply this program to the customer, (on floppy disk), if he does not have it already. • Once the Kermit program is running on the central office computer, type "serverbaud rate" at the prompt. This will instruct the central office computer to capture any incoming .S files from remote Eagle systems. The Kermit program looks at the "Com 1" serial port. • The objective of automatic data transfer is to eliminate the time consuming and often error prone process of manually editing tickets, and key punching ticket transaction data into the accounting system. Version 8.70 EAG_APPF.DOC15 March 02 4:03 PM F-3 Eagle User’s Manual Text File Transfer Kermit File Transfer Level 8 software allows the operator to run a Kermit file transfer without exiting to DOS. It will first execute EXPS8 and expand the files onto the A drive, then execute Kermit and put the system in the server mode ready to download the TXT files on command. Eagle Side • From the Main menu press <F4> to go to the Plant Setup menu. • From the Plant Setup menu select Remote Configuration. • Press <F5> to edit the screen. Port: Com 1 Baud: 2400 WARNING: You must use 2400 for the Baud rate to run Kermit. DO NOT CHANGE SETTINGS ONCE THEY ARE ENTERED! • Once the settings are entered press <F2> for Kermit. The Eagle screen should resemble the example below. Please insert a BLANK FORMATTED Floppy Disk in the Disk Drive. Press any key to continue….. NOTE: Do not use your back up disk, use a different disk and label it Kermit. • Once the disk is in the disk drive press any key to continue. The Eagle will automatically expand the .8 files to the ASCII format and transfer the files to the floppy disk. The Eagle screen will show the process of the files expanding. When the process has completed the Eagle screen will change to the Server Mode. Server Mode Now the Eagle System is ready for the Receiving computer to make the call. Version 8.70 EAG_APPF.DOC 03/15/02 1:29 PM F-4 Eagle User’s Manual Text File Transfer Receiving Computer NOTE: Kermit must be installed on the Receiving Computer. If you do not have Kermit already Command Alkon will furnish you a copy. Go into the directory where Kermit is located. For this example we will put Kermit in the directory called Transfer. • C:\> cd (press space bar one time) Transfer • Press “Enter” C:\Transfer> • Type “Kermit” C:\Transfer> Kermit • Press “Enter” The screen will change to: Kermit - MS> • Type C for connect or you may type Connect. Kermit - MS >C The screen will change to NOTE: On the bottom of your screen you will see the following: ESC - chr: ^] help: ^}? Port:1 speed:2400 parity: none echo: rem VT102…. NOTE: ^ = Ctrl key. • Type ATDT 2627160 • Press “Enter” The dialing process will begin Then the screen will change to: “# N3 2627160” or “Connected at 2400” • Press “Ctrl]” • Type “C” Screen will change to: Kermit -MS> • Type “Get (press space bar once) A:*.* Kermit - MS>Get A:*.* • Press “Enter” The screen will change to resemble the example below. Changes as it goes through the process. Version 8.70 EAG_APPF.DOC15 March 02 4:03 PM File name: Customer.TXT Kbytes transferred: 1 Receiving: In process Number of packets: 42 Number of retries: 0 Last error: None Last Warning Renaming file to Customer.TXT F-5 Eagle User’s Manual Text File Transfer How to Exit Kermit Receiving Computer When the process is complete the screen will resemble the example below: MS Kermit • To Exit type “Hangup” • Press “Enter” • Type “Exit” • Press “Enter” This will take you to the C prompt. Eagle Computer When the process is complete the Eagle Screen will resemble the example below: File Name: Plant.TXT Kbytes Transferred: Percent Transferred: 100 % Sending: Completed. • Press “Ctrl/Emergency Stop.” To restart the Eagle. Version 8.70 EAG_APPF.DOC 03/15/02 1:29 PM F-6 Eagle User’s Manual Text File Transfer MS-Kermit> Prompt Commands ? Connect Get Hang-up Quit Status Set Baud 2400 Set Port 1 Gives a list of Kermit Commands. Puts the Kermit program into the modem command screen. Starts the file retrieval process. Disconnects the modem. (Places the modem back on-hook) Exits the Kermit program and returns the user to DOS. List the Communications parameters for the modem. Sets the baud rate to 2400. Sets the Comm Port to 1. Modem Commands ATDT 262-7120 CTRL & ] C Version 8.70 EAG_APPF.DOC15 March 02 4:03 PM Places the modem in a call mode and dials the number. Places the cursor off the modem command line (must be used prior to exiting). Closes the modem command screen and returns to the MS-Kermit> Prompt. F-7 Eagle User’s Manual Text File Transfer Modem Commands Modem commands can be sent from any computer to set certain parameters in a modem; for example, Auto Answer. There are programs that make it much easier to access and monitor the modem but the modem can be accessed from DOS by using echo commands. The following are a few examples that may be helpful in the field to verify that the modems are responding to the computer, etc. Echo ATS0=1>com1 Sets the modem to auto answer after the first ring. Echo ATS0=0>com1 Disables auto answer. Echo ATH1>com1 Takes the modem off hook and you should hear a dial tone. Echo ATH0>com1 Hangs up the modem Echo ATDT 262-7160>com1 This will go off hook and dial the phone number. Echo ATL3> com 1 Changes volume (Loudness) Version 8.70 EAG_APPF.DOC 03/15/02 1:29 PM F-8 Eagle User’s Manual Text File Transfer Modem Defaults DEFAULTS Before modem is initialized TX CD OH HS TR MR TX CD OH HS TR MR TR MR RX RI PRACTICAL PERIPHERALS Eagle Modem Once Initialized to Auto Answer RX RI PRACTICAL PERIPHERALS Eagle modem running a session TX & RX will blink as data is being transferred HS OH CD TX RX RI PRACTICAL PERIPHERALS RI = Ring Indicator & Auto Answer RX = Receive Data TX = Transmit Data CD = Carrier Detect OH = Off Hook HS = High Speed TR = Terminal Ready MR= Modem Ready Version 8.70 EAG_APPF.DOC15 March 02 4:03 PM F-9 Eagle User’s Manual Text File Transfer How to Import Text files into Excel After the file transfer is completed and the information is on a floppy disk. Note: What is done with the data from this point is the customer’s responsibility working with an in-house MIS employee or outside programming consultant. The following is an example of how to import files into Excel. You may use the database of your choice. • Insert the floppy disk with the transferred files into the “A” drive of the computer to be used to open the data. • Open the Excel program • File/Open • Select “A” drive For this example the customer files will be opened. Select the drive for the floppy disk. Highlight or click on the file/s to be d Chose Text files for the file type. • • • Click on the down arrow by “Files of type:” and select “ext Files (*.prn.,*.txt.,*.csv)” Click on “Customer.txt” Click on “Open” Version 8.70 EAG_APPF.DOC 03/15/02 1:29 PM F-10 Eagle User’s Manual Text File Transfer The Import Wizard dialog box will open as in the example below: Click on Delimited for Data Type Choose Windows (ANSI) for file origin • • • Click on “Delimited” for the file type that best describes the data. Make sure the “File Origin” is set for “Window (ANSI)” Click on “Next” Select Comma for the Delimiters. Quotations for the Text Q lifi The Step 2 dialog box will open. In this box • For the Delimiters select “Comma” • Be sure that there are quotation marks in the Text Qualifier box. • Click on “Next” Version 8.70 EAG_APPF.DOC15 March 02 4:03 PM F-11 Eagle User’s Manual Text File Transfer The Step 3 dialog box will open click on this after the column to skip has been Skip indicator. Highlight or click on column to be skipped. In this box: You may chose to skip or not import the columns that have data that is not needed. By following the tables for Level 6.xx to 8.xx in at the end of this document you will be able to determine the names or headings of the columns. This is done by: • Select the column to be skipped and click on “Do Not Import Column (Skip)” When this is selected the heading for the column selected will change to Skip When all the columns that are not needed have been marked Skip click on “Finish” The excel spreadsheet will be displayed. • Insert a row above the top line of text and enter the heading names. • Remember to follow the table in the Eagle Text File Transfer document for Customers. Noting the columns that have been skipped. Below is an example of a spread sheet in Excel using Customers. Customer ID Stamp Is_cod Billing 1 Billing 2 O&D Thu Mar 01 1990 0.77083333 N COD Thu Mar 12 1998 0.54875 Y 123413 Thu Apr 09 1998 0.58696759 N 1 0.56667824 Y COD ORDERS 0.56731481 N JOHNSON 0.56795138 N CUSTOMER # 4 3304 Brisco 5 Wed Apr 15 1998 Wed Apr 15 1998 Wed Apr 15 1998 Thu Apr 09 1998 0.64163194 N 6 Thu Apr 09 1998 0.64178240 N 3 Wed Apr 15 0.56762731 N 1998 Mon Jun 15 1998 0.37601851 N 2 4 162 Version 8.70 EAG_APPF.DOC 03/15/02 1:29 PM Billing 3 Telephone Command Alkon COD Customer 555-1212 1414 WILL AVE BURLINGTON SHIPYARD JOE'S CONCRETE 6543 EAST GATE Dallas, TX 75403 972-262-2693 Greenville, SC 66094 Ft. Worth, TX 77700 800-777-8888 F-12 Eagle User’s Manual Text File Transfer The EXPS.EXE program is an MS-DOS utility used to expand the Eagle Level 6.xx & 7.xx series CUSTOMER.S, MIX.S, ORDER.S, and TICKET.S files to the ASCII data format. The EXPS8.EXE is an MS-DOS utility used to expand the Eagle Level 8.xx series CUSTOMER.8, MIX.8, ORDER.8, TICKET.8, AND TRUCK.8 files to the ASCII data format. The file format used is the PARADOX database file format in all of the cases above. The EXPS.EXE program uses two command line parameters. The first is the input path of the .S, (or .8) files, and the second is the output path of the .TXT files. If the output path is omitted, it will use the current directory for the output path. If both parameters are omitted, it will use the current directory for both input and output paths. Be sure that the PLANT.S file resides in the same directory as the Eagle's .S, (or .8) files, as the EXPS.EXE, (or EXPS8.EXE), will read this file for necessary information. Upon execution, EXPS.EXE , (or EXPS8.EXE), will attempt to expand all of the Eagle's .S , (or .8) files. The Paradox file format recognizes two types of fields: (1) Alphanumeric text fields, and (2) Numeric character fields. Each record in the file is delimited by a carriage return and line feed combination. For the purposes of this discussion alphanumeric fields will be referred to as string fields. String fields in the Paradox file format are delimited by a comma character and a quotation mark character at both the beginning and ending of the field. Example: ,"1/2" Rock", If however, a string field is the first field in a record it will begin with only a quotation mark. If it is the last field in a record, it will end with a quotation mark and a carriage return - the carriage return being the record separator. Numeric fields are delimited by only comma characters at both ends of the field. Example: ,12000, If however, a numeric field is the first field in a record it will begin with the first asciinumeric character of the field. If it is the last field in a record, it will end with a carriage return instead of a comma. The following pages are a brief description of the .S and the .8 file structures. Please note that the time stamp portion of the structures are divided into two strings as: ,"MON MAY 22 1989", "13:22:33", Version 8.70 EAG_APPF.DOC15 March 02 4:03 PM F-13 Eagle User’s Manual Text File Transfer Level 6.xx Files available for transfer: Order.S (Eagle Order File) Customer.S (Eagle Customer File) Mix.S (Eagle Mix Design File) Ticket.X (Eagle Ticket File) Level 7.xx Files available for transfer: Order.S (Eagle Order File) Customer.S (Eagle Customer File) Mix.S (Eagle Mix Design File) Ticket.X (Eagle Ticket File) Customer.S File Structure (Level 6.xx & 7.xx ONLY) Field Number of Characters record_code string 2, (always "Cr") customer_id string 8 stamp string (s) 23, (2 strings, 15 + 8) is_cod string 1, (“Y” or “N”) billing1 string 30 billing2 string 30 billing3 string 30 telephone string 12 notes1 string 16 notes2 string 16 Version 8.70 EAG_APPF.DOC Type 03/15/02 1:29 PM F-14 Eagle User’s Manual Text File Transfer Mix.S File Structure (Level 6.xx & 7.xx ONLY) Field Type Number of Characters record_code string 2, (always "MR") mix_id string 8 stamp string 23, (2 strings, 15 + 8) description string 24 load_size numeric 5, (4 + dp 12.34) mix_time numeric 5, (# of seconds) agg1_name string 8 agg1_amount numeric 9 agg1_units string 3 agg2_name string 8 agg2_amount numeric 9 agg2_units string 3 agg3_name string 8 agg3_amount numeric 9 agg3_units string 3 agg4_name string 8 agg4_amount numeric 9 agg4_units string 3 agg5_name string 8 agg5_amount numeric 9 agg5_units string 3 cem1_name string 8 cem1_amount numeric 9 cem1_units string 3 cem2_name string 8 cem2_amount numeric 9 cem2_units string 3 cem3_name string 8 cem3_amount numeric 9 cem3_units string 3 admix1_name string 8 admix1_amount numeric 9 Version 8.70 EAG_APPF.DOC15 March 02 4:03 PM F-15 Eagle User’s Manual Text File Transfer Mix.S File Structure cont’d (Level 6.xx & 7.xx ONLY) Field Number of Characters admix1_units string 3 admix2_name string 8 admix2_amount numeric 9 admix2_units string 3 admix3_name string 8 admix3_amount numeric 9 admix3_units string 3 admix4_name string 8 admix4_amount numeric 9 admix4_units string 3 admix5_name string 8 admix5_amount numeric 9 admix5_units string 3 admix6_name string 8 admix6_amount numeric 9 admix6_units string 3 water1_name string 8 water1_amount numeric 9 water1_units string 3 water2_name string 8 water2_amount numeric 9 water2_units string 3 Version 8.70 EAG_APPF.DOC Type 03/15/02 1:29 PM F-16 Eagle User’s Manual Text File Transfer Order.S File Structure (Level 6.xx & 7.xx ONLY) Field Type Number of Characters record_code string 2, (always "Or") order_id string 8 stamp string 23, (2 strings, 15 + 8) customer_id string 8 mix_id string 8 are_extras string 1, ("Y" or "N") deliver1 string 24 deliver2 string 24 instruct1 string 24 instruct2 string 24 qty_ordered numeric 9, (6 + dp + 2) qty_delivered numeric 9, (6 + dp + 2) num_of_loads numeric 5 start_time string 23, (2 strings, 15 + 8) spacing_time numeric 5, (# of minutes) price numeric 9, (6 + dp + 2) tax numeric 9, (5 + dp + 3) user1 string 8 user2 string 8 user3 string 8 user4 string 8 user5 string 8 user6 string 8 user7 string 8 user8 string 8 user9 string 16 user10 string 16 extra_id1 string 8 extra_qty1 numeric 9, (6 + dp + 2) extra_price1 numeric 9, (6 + dp + 2) extra_tax1 numeric 9, (5 + dp + 3) extra_id2 string 8 Version 8.70 EAG_APPF.DOC15 March 02 4:03 PM F-17 Eagle User’s Manual Text File Transfer Order.S File Structure cont’d (Level 6.xx & 7.xx ONLY) Field Number of Characters extra_qty2 numeric 9, (6 + dp + 2) extra_price2 numeric 9, (6 + dp + 2) extra_tax2 numeric 9, (5 + dp + 3) extra_id3 string 8 extra_qty3 numeric 9, (6 + dp + 2) extra_price3 numeric 9, (6 + dp + 2) extra_tax3 numeric 9, (5 + dp + 3) extra_id4 string 8 extra_qty4 numeric 9, (6 + dp + 2) extra_price4 numeric 9, (6 + dp + 2) extra_tax4 numeric 9, (6 + dp + 2) extra_id5 string 8 extra_qty5 numeric 9, (6 + dp + 2) extra_price5 numeric 9, (6 + dp + 2) extra_tax5 numeric 9, (6 + dp + 2) extra_id6 string 8 extra_qty6 numeric 9, (6 + dp + 2) extra_price6 numeric 9, (6 + dp + 2) extra_tax6 numeric 9, (6 + dp + 2) load_size numeric 5, (2 + dp + 2) is_cod string 1 sobtotal_dollars numeric 9, (6 + dp + 2) subtotal_tax numeric 9, (6 + dp + 2) total_dollars numeric 9, (6 + dp + 2) Version 8.70 EAG_APPF.DOC Type 03/15/02 1:29 PM F-18 Eagle User’s Manual Text File Transfer Ticket.S File Structure (Level 6.xx & 7.xx ONLY) Field Type No. of Characters record_code string 2, (always "TR") ticket_id string 8 stamp string(s) 23 order_id string 8 customer_id string 8 mix_id string 8 load_size numeric 5, (2 + dp + 2) resold numeric 5, (2 + dp + 2) is_cod string 1, ("Y" or "N") time_batched string(s) 23, (2 strings 15 + 8) time_due string(s) 23, (2 strings 15 + 8) truck_number numeric 5 unit_price numeric 9, (6 + dp + 2) tax numeric 9, (6 + dp + 2) agg1_name string 8 agg1_amount numeric 9 agg1_units string 3 agg2_name string 8 agg2_amount numeric 9 agg2_units string 3 agg3_name string 8 agg3_amount numeric 9 agg3_units string 3 agg4_name string 8 agg4_amount numeric 9 agg4_units string 3 agg5_name string 8 agg5_amount numeric 9 agg5_units string 3 cem1_name string 8 cem1_amount numeric 9 cem1_units string 3 Version 8.70 EAG_APPF.DOC15 March 02 4:03 PM F-19 Eagle User’s Manual Text File Transfer Ticket.S File Structure cont’d (Level 6.xx & 7.xx ONLY) Field No. of Characters cem2_name string 8 cem2_amount numeric 9 cem2_units string 3 cem3_name string 8 cem3_amount numeric 9 cem3_units string 3 admix1_name string 8 admix1_amount numeric 9 admix1_units string 3 admix2_name string 8 admix2_amount numeric 9 admix2_units string 3 admix3_name string 8 admix3_amount numeric 9 admix3_units string 3 admix4_name string 8 admix4_amount numeric 9 admix4_units string 3 admix5_name string 8 admix5_amount numeric 9 admix5_units string 3 admix6_name string 8 admix6_amount numeric 9 admix6_units string 3 water1_name string 8 water1_amount numeric 9 water1_units string 3 water2_name string 8 water2_amount numeric 9 water2_units string 3 extra_id1 string 8 extra_qty1 numeric 9 Version 8.70 EAG_APPF.DOC Type 03/15/02 1:29 PM F-20 Eagle User’s Manual Text File Transfer Ticket.S File Structure cont’d (Level 6.xx & 7.xx ONLY) Field Type No. of Characters extra_price1 numeric 9 extra_tax1 numeric 9 extra_id2 string 8 extra_qty2 numeric 9 extra_price2 numeric 9 extra_tax2 numeric 9 extra_id3 string 8 extra_qty3 numeric 9 extra_price3 numeric 9 extra_tax3 numeric 9 extra_id4 string 8 extra_qty4 numeric 9 extra_price numeric 9 extra_tax4 numeric 9 extra_id5 string 8 extra_qty5 numeric 9 extra_price5 numeric 9 extra_tax5 numeric 9 extra_id6 string 8 extra_qty6 numeric 9 extra_price6 numeric 9 extra_tax6 numeric 9 is_modified string 1 is_voided string 1 percent_moist1 numeric 5 percent_moist2 numeric 5 percent_moist3 numeric 5 percent_moist4 numeric 5 percent_moist5 numeric 5 Version 8.70 EAG_APPF.DOC15 March 02 4:03 PM F-21 Eagle User’s Manual Text File Transfer Level 8.xx Customer.8 File Structure (Level 8.xx ONLY) Field Type Number of Characters record_code string 2, (always “Cr” optional) customer_id string 8 stamp string(s) 23, (2 strings, 15, 8) is_cod string 1, (“Y” or “N”) billing1 string 30 billing2 string 30 billing3 string 30 telephone string 12 notes1 string 16 notes2 string 16 Field record_code Type string Number of Characters 2, (always “Dr” optional) material string 8 qty_rvcd Numeric 9 units string 4 supplier string 20 ticket_number string 8 stamp string 23, (2 strings 15,8) truck string 20 hauler string 20 is_printed string 1, (“Y” or “N”) is_com_sent string 1, (“Y” or “N”) Delivery.8 File Structure (Level 8.20 & above ONLY) Version 8.70 EAG_APPF.DOC 03/15/02 1:29 PM F-22 Eagle User’s Manual Text File Transfer Mix.8 File Structure (Level 8.xx ONLY) Field Type Number of Characters recoed_code string 2, (always “Mr” optional) mix_id string 8 stamp string (s) 23, (2 strings, 15, 8) description string 24 load_size numeric 5, (4 + dp 12.34) mix_time numeric 5, (# of seconds) agg1_name string 8 agg1_amount numeric 9 agg1_units string 3 agg2_name string 8 agg2_amount numeric 9 agg2_units string 3 agg3_name string 8 agg3_amount numeric 9 agg3_units string 3 agg4_name string 8 agg4_amount numeric 9 agg4_units string 3 agg5_name string 8 agg5_amount numeric 9 agg5_units string 3 cem1_name string 8 cem1_amount numeric 9 cem1_units string 3 cem2_name string 8 cem2_amount numeric 9 cem2_units string 3 cem3_name string 8 cem3_amount numeric 9 cem3_units string 3 admix1_name string 8 admix1_amount numeric 9 admix1_units string 3 Version 8.70 EAG_APPF.DOC15 March 02 4:03 PM F-23 Eagle User’s Manual Text File Transfer Mix.8 File Structure cont’d (Level 8.xx ONLY) Field Number of Characters admix2_name string 8 admix2_amount numeric 9 admix2_units string 3 admix3_name string 8 admix3_amount numeric 9 admix3_units string 3 admix4_name string 8 admix4_amount numeric 9 admix4_units string 3 admix5_name string 8 admix5_amount numeric 9 admix5_units string 3 admix6_name string 8 admix6_amount numeric 9 admix6_units string 3 water1_name string 8 water1_amount numeric 9 water1_units string 3 water2_name string 8 water2_amount numeric 9 water2_units string 3 percent_air numeric 5, (4 + dp 12.34) slump_target numeric 5 dry_max_size numeric 5, (4 + dp 12.34) async_max_size numeric 5, (4 + dp 12.34) agg_moist_ref numeric 1, (0=SSD, 1=WET, 2=OVEN_DRY spare numeric 9, Reserved is_metric string 1, (Y = Metric, N = Customary) Version 8.70 EAG_APPF.DOC Type 03/15/02 1:29 PM F-24 Eagle User’s Manual Text File Transfer Order.8 File Structure (Level 8.xx ONLY) Field Type Number of Characters record_code string 1, (always “Or” optional) order_id string 8 stamp string (s) 23, (2 strings, 15, 8) customer_id string 8 mix_id string 8 are_extras string 1, "Y" or "N" deliver1 string 24 deliver2 string 24 instruct1 string 24 instruct2 string 24 qty_ordered numeric 9, (8 + dp, 123456.78) qty_delivered numeric 9, (8 + dp, 123456.78) num_of_loads numeric 5 start_time string (s) 23, (2 strings, 15, 8) spacing_time numeric 5, (# of minutes) price numeric 9, (8 + dp, 123456.78) tax numeric 9, (8 + dp, 12345.678) user1 string 8 user2 string 8 user3 string 8 user4 string 8 user5 string 8 user6 string 8 user7 string 8 user8 string 8 user9 string 16 user10 string 16 extra_id1 string 8 extra_qty1 numeric 9, (8 + dp, 123456.78) extra_price1 numeric 9, (8 + dp, 123456.78) extra_tax1 numeric 9, (8 + dp, 12345.678) extra_id2 string 8 extra_qty2 numeric 9, (8 + dp, 123456.78) Version 8.70 EAG_APPF.DOC15 March 02 4:03 PM F-25 Eagle User’s Manual Text File Transfer Order.8 File Structure cont’d (Level 8.xx ONLY) Field Number of Characters extra_price2 numeric 9, (8 + dp, 123456.78) extra_tax2 numeric 9, (8 + dp, 12345.678) extra_id3 string 8 extra_qty3 numeric 9, (8 + dp, 123456.78) extra_price3 numeric 9, (8 + dp, 123456.78) extra_tax3 numeric 9, (8 + dp, 12345.678) extra_id4 string 8 extra_qty4 numeric 9, (8 + dp, 123456.78) extra_price4 numeric 9, (8 + dp, 123456.78) extra_tax4 numeric 9, (8 + dp, 12345.678) extra_id5 string 8 extra_qty5 numeric 9, (8 + dp, 123456.78) extra_price5 numeric 9, (8 + dp, 123456.78) extra_tax5 numeric 9, (8 + dp, 12345.678) extra_id6 string 8 extra_qty6 numeric 9, (8 + dp, 123456.78) extra_price6 numeric 9, (8 + dp, 123456.78) extra_tax6 numeric 9, (8 + dp, 12345.678) load_size numeric 5, (4 + dp, 12.34) is_cod string 1, (“Y” or “N”) sobtotal_dollars numeric 9, (8 + dp, 123456.78) subtotal_tax numeric 9, (8 + dp, 123456.78) total_dollars numeric 9, (8 + dp, 123456.78) is_remem_amx_trims string 1, (“Y” or “N”) amx_percentage1 numeric 5 amx_percentage2 numeric 5 amx_percentage3 numeric 5 amx_percentage4 numeric 5 amx_percentage5 numeric 5 amx_percentage6 numeric 5 amx_percentage7 numeric 5 amx_percentage8 numeric 5 Version 8.70 EAG_APPF.DOC Type 03/15/02 1:29 PM F-26 Eagle User’s Manual Text File Transfer Order.8 File Structure cont’d (Level 8.xx ONLY) Field Type Number of Characters amx_percentage9 numeric 5 amx_percentage10 numeric 5 amx_percentage11 numeric 5 amx_percentage12 numeric 5 is_metric string 1, (Y = Metric, N = Customary) Field record_code Type string Number of Characters 2, (always “Pr” optional) ticket_id string 8 mix_id string 8 batch_number numeric 9 drop_number numeric 5 load_size numeric 5, (4 + dp, 12.34) is_metric string 1, (Y = Metric, N = Customary) reserved string 1, (always N) batch_start string(s) 23, (2 strings 15, 8, Load Size) start_stamp string(s) 23, (2 strings 15, 8, Matl start) start_of_drop numeric 9, (master start tick in 100ths) material string 8 target numeric 9 actual numeric 9 status string 6, (Under, Over, Done, Manual) gate_open numeric 9, (100ths of sec. from Start) start_of_flow numeric 9, (100ths of sec. from Start) low_flow numeric 5, (elapsed 100ths of sec. from 0) gate_close numeric 9, (100ths of sec. from Start) jogs numeric 5, (total number of jogs) end_of_drop numeric 9, (100ths of sec. from Start) start_of_disc numeric 9, (100ths of sec. from Start) end_of_disc numeric 9, (100ths of sec. from Start) start_tare numeric 9, (scale weight @ start of disc) end_tare numeric 9, (scale weight 15, 8, end time) end_stamp numeric 23, (2 strings 15, 8, end time) Perform.8 File Structure (Level 8.20 & above ONLY) Version 8.70 EAG_APPF.DOC15 March 02 4:03 PM F-27 Eagle User’s Manual Text File Transfer Ticket.8 File Structure (Level 8.xx ONLY) Field No. of Characters record_code string 1, (always “Tr” optional) ticket_id string 8 stamp string (s) 23, (2 strings 15, 8, End Time), order_id string 8 customer_id string 8 mix_id string 8 load_size numeric 5, (4 + dp, 12.34) resold numeric 5, (4 + dp, 12.34) is_cod string 1, "Y" or "N" time_batched string (s) 23, (2 strings 15, 8, Start Time) time_due string (s) 23, (2 strings 15, 8) truck_number numeric 5 unit_price numeric 9, (8 + dp, 123456.78) tax numeric 9, (8 + dp, 12345.678) agg1_name string 8 agg1_amount numeric 9 agg1_units string 3 agg2_name string 8 agg2_amount numeric 9 agg2_units string 3 agg3_name string 8 agg3_amount numeric 9 agg3_units string 3 agg4_name string 8 agg4_amount numeric 9 agg4_units string 3 agg5_name string 8 agg5_amount numeric 9 agg5_units string 3 cem1_name string 8 cem1_amount numeric 9 cem1_units string 3 cem2_name string 8 Version 8.70 EAG_APPF.DOC Type 03/15/02 1:29 PM F-28 Eagle User’s Manual Text File Transfer Ticket.8 File Structure cont’d (Level 8.xx ONLY) Field Type No. of Characters cem2_amount numeric 9 cem2_units string 3 cem3_name string 8 cem3_amount numeric 9 cem3_units string 3 admix1_name string 8 admix1_amount numeric 9 admix1_units string 3 admix2_name string 8 admix2_amount numeric 9 admix2_units string 3 admix3_name string 8 admix3_amount numeric 9 admix3_units string 3 admix4_name string 8 admix4_amount numeric 9 admix4_units string 3 admix5_name string 8 admix5_amount numeric 9 admix5_units string 3 admix6_name string 8 admix6_amount numeric 9 admix6_units string 3 water1_name string 8 water1_amount numeric 9 water1_units string 3 water2_name string 8 water2_amount numeric 9 water2_units string 3 extra_id1 string 8 extra_qty1 numeric 9, (8 + dp, 123456.78) extra_price1 numeric 9, (8 + dp, 123456.78) Version 8.70 EAG_APPF.DOC15 March 02 4:03 PM F-29 Eagle User’s Manual Text File Transfer Ticket.8 File Structure cont’d (Level 8.xx ONLY) Field No. of Characters extra_tax1 numeric 9, (8 + dp, 12345.678) extra_id2 string 8 extra_qty2 numeric 9, (8 + dp, 123456.78) extra_price2 numeric 9, (8 + dp, 123456.78) extra_tax2 numeric 9, (8 + dp, 12345.678) extra_id3 string 8 extra_qty3 numeric 9, (8 + dp, 123456.78) extra_price3 numeric 9, (8 + dp, 123456.78) extra_tax3 numeric 9, (8 + dp, 12345.678) extra_id4 string 8 extra_qty4 numeric 9, (8 + dp, 123456.78) extra_price numeric 9, (8 + dp, 123456.78) extra_tax4 numeric 9, (8 + dp, 12345.678) extra_id5 string 8 extra_qty5 numeric 9, (8 + dp, 123456.78) extra_price5 numeric 9, (8 + dp, 123456.78) extra_tax5 numeric 9, (8 + dp, 12345.678) extra_id6 string 8 extra_qty6 numeric 9, (8 + dp, 123456.78) extra_price6 numeric 9, (8 + dp, 123456.78) extra_tax6 numeric 9, (8 + dp, 12345.678) is_modified string 1 is_voided string 1 percent_moist1 numeric 5, (4 + dp, 123.4, signed) percent_moist2 numeric 5, (4 + dp, 123.4, signed) percent_moist3 numeric 5, (4 + dp, 123.4, signed) percent_moist4 numeric 5, (4 + dp, 123.4, signed) percent_moist5 numeric 5, (4 + dp, 123.4, signed) driver_id string 8 agg1_target numeric 9 agg2_target numeric 9 agg3_target numeric 9 Version 8.70 EAG_APPF.DOC Type 03/15/02 1:29 PM F-30 Eagle User’s Manual Text File Transfer Ticket.8 File Structure cont’d (Level 8.xx ONLY) Field Type No. of Characters agg4_target numeric 9 agg5_target numeric 9 cem1_target numeric 9 cem2_target numeric 9 cem3_target numeric 9 admix1_target numeric 9 admix2_target numeric 9 admix3_target numeric 9 admix4_target numeric 9 admix5_target numeric 9 admix6_target numeric 9 water1_target numeric 9 water2_target numeric 9 is_local string 1, (“Y” or “N”) total_water numeric 9, (follows plant’s water units) reference_id string 8, (contents of Eagle field # 149) type_code string 2, (contents of Eagle field # 408) is_metric string 1, (Y = Metric, N = Customary) Version 8.70 EAG_APPF.DOC15 March 02 4:03 PM F-31 Eagle User’s Manual Text File Transfer Truck.8 File Structure (Level 8.xx ONLY) Field Type Number of Characters record_code string 2, (always “Kr” optional) truck_id string 8 number numeric 5 driver string 32 max_load numeric 5, (12.34) loading_rate numeric 5, (Dry Rate) paste_loading_rate numeric 5, (Matrix Master Rate) is_to_batch string 1, (“Y” or “N”) is_washed string 1, (“Y” or “N”) washed_stamp string (s) 23, (2 strings 15, 8, Last Wash Time) h2o_in_truck numeric 5, (in metered or weighed units) amx_in_truck numeric 5, (in metered or weighed units) mix_in_truck string 8, (mix_id of last load) resold_mixes numeric 5, (total # of resold loads) resold_yards numeric 9, (123456.78, total resold yards) resold_stamp string (s) 23, (2 strings 15, 8, Last Res. Time) bbk_amx_id_in_trk string 3, (admix ID if Batchbook enabled) Field record_code title plant material_name is_used sp_grav material_source on_hand short_term_used long_term_used deviation long_term_received percent_moisture material_alias eagle_revision Type string string string string string numeric string numeric numeric numeric numeric numeric numeric string string Number of Characters 2, (always “Pr” optional) 24 24 8 1 5 15 9 9 9 5 9 5 8 5 (xx.xx) Plant8. File Structure (Level 8.xx OLNY) Version 8.70 EAG_APPF.DOC 03/15/02 1:29 PM F-32 Eagle User’s Manual Text File Transfer Switches The /r switch: This will cause EXPS8 to suppress record codes. By default, EXPS8 will put record codes in each record of each file. The /f switch: This will cause EXPS8 to change time stamp format to “05/22/89”, “13:22:33.” By default , the time stamp string is: “MON MAY 22 1998”, “13:22:33”. The /d switch This will cause EXPS8 to remove all Comma, Quotation Mark, Carriage Return, and Line Feed delimiter characters. The /t switch: This will cause EXPS8 to replace the Alpha-Numeric String field delimiter, normally a Quotation Mark character (“), with the character immediately following the “/t”, such as: /t˜ would yield a delimited String field as: ,˜1/2” ROCK. Version 8.70 EAG_APPF.DOC15 March 02 4:03 PM F-33 Eagle User’s Manual Text File Transfer Changes by Revision Version 8.00 January 31. 1995 1. Derived from original EXPS Version 2.07 2. Removed RAVEN support. 3. Add /t command line switch. Version 8.01 March 3, 1995 1. Added /r command line switch. Version 8.02 April 24, 1995 1. Added /f command line switch. Version 8.03 May 5, 1995 1. Added support for Metric/Customary dual units. Version 8.20 February 14, 1996 1. Added support for expanding DELIVERY.8 2. Added support for expanding PERFORM.8 Version 8.21 February 28, 1996 1. Implemented Alias and Revision fields for PLANT.TXT file. 2. Added Batchbook Admix Id in Truck field to TRUCK.TXT file. Version 8.22 April 19, 1996 1. Added detection for “seconds since Jan 01 1970” stamps of -1 (they now show as Jan 01 1980) Version 8.24 June 27, 1996 1. Fixed the problem with the Material Source Field in the PLANT.TXT file. Version 8.28 August 15, 1996 1. The format of admix (1-6) _amount and water(1-2)_amount fields in the MIX.TXT has been changed. The values in these fields will be same as the values in the Mix Design Menu. Version 8.70 EAG_APPF.DOC 03/15/02 1:29 PM F-34