1
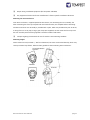
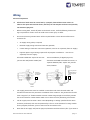
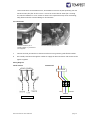
User Manual User Manual and Installation Guide Storm Tornado Moving Light Enclosures Lighting Enclosures Tempest Lighting, Inc. 13110 Saticoy Street, Unit C N. Hollywood, CA 91605, USA Tel +1 888 649 6743 Fax +1 818 982 5510 [email protected] For all Tempest Storm models manufactured after July 2008 www.tempest.org In the interest of continuous product improvement, the information in this document is subject to change without notice. Neither Tempest Lighting, Inc. nor its representatives or agents may be held liable for expense or injury arising from it. © Tempest Lighting Inc. All Rights Reserved Storm Enclosure User Manual July, 2008 page 1 Table of Contents Introduction ................................................................................................................. 3 Identifying Major Parts............................................................................................. 4 Installation ................................................................................................................... 5 Safety and Warnings ................................................................................................ 5 Handling the Enclosure ............................................................................................ 5 Mounting the Enclosure ........................................................................................... 6 Wiring........................................................................................................................... 7 Electrical Preparation ............................................................................................... 7 AC Connections........................................................................................................ 8 Mounting the Luminaire.............................................................................................. 9 Operation ...................................................................................................................10 Routine Maintenance.................................................................................................11 Troubleshooting ........................................................................................................13 Sample Specification .................................................................................................14 Warranty .................................................................................................................... 15 Tempest Product Support .........................................................................................16 Storm Enclosure User Manual page 2 Introduction The Storm TM Lighting Enclosure This manual covers Storm Models 5000 and 5050. The difference is the length – the 5050 has a short nose and is suited to smaller effects projectors and fixed-beam ellipsoidal spotlights from 12º to 50º. In all other respects they are identical, and this manual covers them both. Using This Manual Please read this manual in its entirety before starting work. All the information contained is important, and should be read carefully before proceeding. Heed all warnings and advisories. Terminology: Enclosure - Storm Lighting Enclosure Luminaire - lighting fixture or digital projector that will be placed into the enclosure Icon Key: Valuable information Electrical Warning Safety Information Storm Enclosure User Manual page 3 Identifying Major Parts Center Ring Front Cap Window Front Cap Intake Vent Exhaust Vent Internal Yoke Electrical Box Fan & Filter Storm Enclosure User Manual page 4 Installation Safety and Warnings These warnings are for your protection. Failure to comply may result in serious injury or death. Manufacturer assumes no responsibility for damages or injury incurred by misuse or mishandling of product. Do not attempt to install or operate the enclosure before fully reading and understanding this manual Never allow anyone who has not read this manual to open the enclosure or perform maintenance on the luminaire within. Never leave the enclosure unattended when open. Always make sure all bolts are tight and safety cables are in place after performing any form of maintenance on the unit. Observe all posted warnings in the enclosure itself. Do not open any electrical boxes until power has been shut off to all supply lines to the enclosure (including the one powering the luminaire). Do not open the enclosure in wet weather. Handling the Enclosure In order to preserve the integrity of the unit, care must be taken to prevent damage. The following simple warnings will go a long way in achieving this. Never grab unit by end caps or vent covers when assembled. Never handle assembled unit unless all latches are securely fastened. Always handle assembled unit by center ring or yoke. Always fully loosen the yoke bolts when adjusting its position. Otherwise, make sure they are firmly tightened. Tools and Equipment To install the enclosure, you will need the following items: Crescent wrench Phillips screwdriver Storm Enclosure User Manual page 5 Proper wiring installation equipment (for line power and DMX) Any equipment listed in the fixture manufacturer’s fixture-specific installation directions Mounting the Storm Enclosure Your Storm enclosure is supplied packed in two cartons, one containing the rear assembly, the other containing the front cap. Unpack both and check that they are complete before continuing. The Storm enclosure rear assembly is provided with a yoke, which may be bolted to your structure, or hung from a truss or pipe, using a pipe clamp (not supplied). Do not mount the front cap until the rear assembly and luminaire/projector have been installed and tested. Tempest Lighting recommends the use of stainless steel mounting hardware. Mounting Angles Storm enclosures may be tilted +/- 80º from horizontal, but must not be tilted laterally, which may cause premature lamp failure. Observe these guidelines when mounting Storm enclosures. No Roll Angle Rotation Permitted 80° WRONG Horizontal -80° RIGHT Storm Enclosure User Manual page 6 Wiring Electrical Preparation All electrical work must be carried out by a properly licensed electrician. Failure to observe this point will void the factory warranty for the Tempest Enclosure and possibly the luminaire/projector. 1 Before starting work, switch off power to the branch circuit, carefully following lockout and tag-out procedures. Failure to do so could cause serious injury or death. 2 One or two electrical junction boxes will be required within a short distance of the Storm enclosure for: AC Supply wiring (always required) Dimmed supply wiring to dimmed luminaire (optional) Control wiring to luminaire accessories (optional, must be run separately from AC supply) Projector picture signal wiring (required for all projector installations – must be run separately from AC supply) [619] [293] [619] [293] 24 3/8” Installations 11 9/16”” require at least one All Storm 3/8” 11 9/16”” Storm24installations for digital projectors, junction box and flexible conduit feed. luminaires with DMX-controlled accessories, or separate dimmed feeds, require two junction boxes/conduits TOP Electrical Junction Box, AC Supply [483] 19” TOP [483] 19” [343] Electrical 13 1/2” [343] 13 1/2” [218] 8 5/8” Junction Box, AC Supply Electrical Junction Box, Dimmed Supply or Control/Projector Signal [495] 19 1/2” [495] 19 1/2” SIDE REAR Flexible conduit 2 [218] 8 5/8” SIDE REAR Flexible conduits The supply junction box must be installed in accordance with local electrical codes and should be located near the permanent installation of the enclosure. The junction box should have a length of 1/2" flexible weather-resistant conduit long enough to reach from junction box to the enclosure conduit bodies. Make sure to leave slack for positioning of enclosure. 5 The AC supply must be either 120V or 230V (depending on voltage specified for the Storm enclosure purchased), and must be protected by a fuse or circuit breaker of a rating suitable for the projector/luminaire, plus 25 watts max for the enclosure fan. 6 Note that the AC supply will feed the projector/luminaire and the enclosure fan. If you want to Storm Enclosure User Manual page 7 control a luminaire via a dimmed circuit, the dimmed circuit must be fed separately from the Storm enclosure fan feed. In this event it is critical to ensure that the Storm fan is running any time the luminaire is in use. Failure to observe this requirement may cause overheating, lamp failure and other internal damage to the luminaire. AC Connections External connector for ½” flexible conduit t o junction box (not supplied) Internal electrical junction box 1 Connect the local junction box to the Storm enclosure using exterior grade flexible conduit. 2 Pull suitably rated wires through the conduit to supply the Storm enclosure and connect to the pigtails supplied: Wiring Diagram North America International ENCLOSURE Line Ground Neutral 120VAC Storm Enclosure User Manual 230VAC page 8 Mounting a Luminaire/Projector in the Storm Enclosure Having mounted and wired the enclosure, the next step is to mount the luminaire or digital projector into the enclosure. Luminaire For safety, this should be done by two people. 1 While one person lifts the luminaire into the enclosure, the other should bolt it into place using the carriage bolts, nuts, and washers provided. 2 Adjust the luminaire on its internal yoke so that it is as close as possible to being centered in the enclosure. Tighten the nuts fully. 3 Check that the external yoke bolts are tight and secure. 4 Attach all luminaire accessories. 5 NOTE: 10º Source Four Luminaires will fit in Storm 5000 and 5100 enclosures, only if the Source Four gel clips are removed from the front of the lens tube. For 10º Source Fours requiring gel frames or accessories, and for all 5º Source Fours, use a Tempest Lighting Typhoon enclosure. 6 Connect the luminaire to the internal enclosure power connection. Tie down any cables so neither they nor any connectors will come into contact with the lamp housing. 7 Switch on the luminaire, adjust focus and lock down. 8 Attach Storm enclosure front cap, carefully securing the front cap latches. Projector 1 Lift the projector into the enclosure and strap down onto the projector tray, using the universal strap provided. 2 Connect the projector to the internal enclosure power connection. Tie down any cables so neither they nor any connectors will come into contact with the lamp housing. 3 Connect the projector signal cable, in accordance with the manufacturer’s instructions. 4 Set up the projector so that it will switch on automatically when power is applied, according to the manufacturer’s instructions. 5 Switch on the projector, and adjust focus. 6 Attach Storm enclosure front cap, carefully securing the front cap latches. Storm Enclosure User Manual page 9 Operation While there are no specific operational actions required for normal use, the following points should be kept in mind. The cooling fan will only turn when power is applied to the enclosure. Unless the enclosure or projector/luminaire is undergoing routine maintenance, the enclosure should be closed and securely latched at all times. Only authorized personnel should open the enclosure (see maintenance warnings in the next chapter). Storm Enclosure User Manual page 10 Routine Maintenance It is very important to perform routine maintenance on both the enclosure and the luminaire or projector inside it. Failure to do so may reduce lifetime for both the enclosure and the luminaire. Note Maintenance schedules depend on location and environment. The intervals given here are general minimum guidelines. It is up to the user to judge whether maintenance should be carried out more frequently. We recommend doing these tasks no less often than mentioned here. Safety As the enclosure is a powered unit with moving parts, it is necessary to keep safety in mind while performing routine maintenance. Although maintenance can be performed while the enclosure is powered, it is safer to carry it out with the power disconnected with proper lockout and tag out procedures followed. Be aware that once the enclosure has had power applied to it, the fan will start to turn. Make sure that your hands are clear of the fan before applying power to the enclosure. Only authorized personnel should perform maintenance on the enclosure or luminaire Do not service the unit in the rain or other adverse weather conditions (snow, sleet, high winds, etc.). Inspection Checklist: - Every Three (3) Months Glass should be clean and free of cracks Enclosure should be free of debris both inside and out Bolts should be tight All safety cable should be in good condition Lid seal should be in good condition, Check seal inside and out for gaps. Fan should be functioning and not making excessive noise Fan filter should be clean Drainage holes free of obstruction Storm Enclosure User Manual page 11 Air Filters - Every Three (3) Months The air filter on the fan (inside the enclosure) should be removed and cleaned on a regular basis. To remove the filter, remove the plastic frame holding the filter in place (held in place by a tab on each of its 4 sides). The filter can be cleaned by running water from a hose and do not require any special solution. Allow the filter to dry before placing it back into the enclosure. Replacement/extra filters can be purchased through your Tempest dealer/representative (part number 12-0070F). Case - As Needed The outside of the case should be cleaned as needed. The case should be cleaned with a wet cloth and mild detergent (if necessary). Do not use a direct spray from a hose to clean the case. Window – As Needed Clean using a proprietary glass cleaning solution or a mild detergent, and wipe dry. Use only soft, lint-free cloths for glass cleaning. Never use an abrasive cleaner. Luminaire/Projector Review the manufacturer's instructions for proper maintenance of your luminaire/projector. Remember, the enclosure simply protects the equipment inside it and is not a substitute for regular maintenance. Storm Enclosure User Manual page 12 Troubleshooting This is a guide to the general symptoms, problems, and solutions that may occur during the usage of your enclosure. However, it is important to remember that problems may occur within the luminaire itself and these must also be considered. Luminaire does not have power. Check power supply wiring and voltage. Fan is not spinning Fan is obstructed. Shut off power to enclosure and check for obstructions. If no obstruction is present and luminaire is operating, look for damage to the fan’s wires and contact technical support. Excessive water in enclosure. Weep (drain) holes may be clogged. Clear them. Glass seal leak. Repair with silicon Latches do not latch properly. Make sure the front cap is attached to the front of the center ring and the rear cap is attached to the rear of the center ring. Check hardware. If rivet is loose, it can be drilled out and replaced by an 8-32 (M4) screw with locknut. Storm Enclosure User Manual page 13 Sample Specification Unit shall be a Tempest Lighting catalog number 5___. Unit housing shall be non-corrosive fiberglass composite. Further, unit shall possess filtered forced-air ventilation, which will draw less than 25W of power from the luminaire circuit. Unit shall be ETL listed to U.L., standard 50 for wet locations and be a NEMA type 3R enclosure. Unit shall also have above ground connection ports. Unit shall have minimum 9” diameter projection window. Unit shall be identified as The Storm Enclosure, manufactured by Tempest Lighting, Inc., of North Hollywood, California, USA. Storm Enclosure User Manual page 14 Limited Warranty INSPECTION/WARRANTY/RETURNS. A. Customer, at its sole expense, shall inspect all Goods promptly upon receipt and accept all Goods that conform to the specifications or catalog. All claims for any alleged defect in or failure of the Goods or Seller's performance to conform to the Contract, capable of discovery upon reasonable inspection, must be set forth in a written rejection notice detailing the alleged non-conformity, and be received by Seller within thirty (30) calendar days of Customer's receipt of the Goods. Failure by Customer to notify Seller of the alleged non-conformity within thirty (30) days will be conclusive proof that the Goods have been received by Customer without defects or damage, and in the quantities specified on the bill of lading and shall constitute an irrevocable acceptance of the Goods and a waiver of any such claim in connection with the Goods. B. Seller warrants to Customer only that the Goods will be free from defects in material and workmanship at the time of delivery and, subject to the exceptions and conditions set forth below, for the following period (the "Warranty Period"): twelve (12) months from the date of shipment by Seller. Seller may provide additional years of warranty coverage beyond 12 month, at the rate of 2.5% of the net sale price per year, up to a total of four additional years’ coverage beyond the standard 12 month warranty period. Seller will remedy a defect as set forth in paragraph 7 D, below, (the "Warranty"). The Warranty is subject to each of the following exceptions and conditions: 1. Customer must promptly (and in all events within the Warranty Period) notify Seller of any alleged defect in a written notice (the "Notice") which shall set forth the quantity, catalog number, finish, original purchase order number, Seller's invoice number on which Goods were originally billed and a statement of the alleged defect, along with digital photographs showing such defects where feasible. 2. The Warranty shall not apply: (i) to any claimed defect that was capable of discovery upon reasonable inspection and deemed to be waived under paragraph A, above; (ii) to any Goods that have been subject to misuse, abnormal service or handling, or altered or modified in design or construction; (iii) to any Goods repaired or serviced by any person other than Seller's authorized service personnel or to Goods installed other than according to installation instructions, or (iv) with respect to normal wear and tear. 3. Seller makes no Warranty with respect to parts or components that are not the product of Seller, and specifically makes no warranty whatsoever for equipment housed inside enclosure products manufactured by Seller. 4. The Warranty is Seller's exclusive warranty with respect to the Goods. Seller makes no warranties, guarantees or representations, express or implied, to Customer except as set forth in this section. ALL OTHER WARRANTIES, EXPRESS OR IMPLIED, INCLUDING, WITHOUT LIMITATION ANY IMPLIED WARRANTY OF MERCHANTABILITY OR OF FITNESS FOR USE OR FOR A PARTICULAR PURPOSE, ARE HEREBY EXCLUDED AND DISCLAIMED. C. Seller will accept the return of Goods properly rejected under paragraph A, above, or as to which Notice of an alleged breach of Warranty has been timely given and such Goods may be returned to Seller, freight prepaid, but only upon Customer's receipt of Seller's written return material authorization ("RMA") and shipping instructions. The RMA shall be void if the Goods are not received within 45 days after issuance of the RMA. No deduction or credit in respect of any rejected or returned Goods shall be taken until Customer has received Seller's further written deduction or credit/authorization following Seller's inspection to confirm nonconformity or defect. Seller will charge to Customer any and all costs incurred by Seller in connection with the handling, shipping, inspection and disposition of any returned Goods that are determined by Seller not to have been nonconforming upon Delivery or as to which the warranty hereunder is not applicable. D. UPON ANY PROPER RETURN PURSUANT TO PARAGRAPH C, ABOVE, WHETHER IN CONNECTION WITH A REJECTION OF GOODS OR AN ALLEGED BREACH OF WARRANTY AND BASED UPON THE CONDITIONS SET FORTH IN THIS PARAGRAPH 7, SELLER AGREES THAT IT WILL, AS THE SOLE AND EXCLUSIVE REMEDY UNDER THE CONTRACT OR OTHERWISE, FOR ANY NONCONFORMITY OR BREACH OF WARRANTY, AND AT SELLER'S SOLE ELECTION: (i) REPAIR SUCH GOODS; OR (ii) REPLACE SUCH GOODS. Storm Enclosure User Manual page 15 Tempest Product Support. Step 1: First contact your local Dealer for support. Your dealer is best placed to respond quickly to your needs. Step 2: If your dealer is unable to answer your questions please contact our Sales Office: Tempest Lighting, Inc. 13110 Saticoy Street, Unit C North Hollywood, CA 91605, USA Tel +1 818 787 8984 Fax +1 818 982 5582 [email protected] Visit our web site for current information and specifications: www.tempest.org Storm Enclosure User Manual page 16