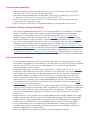
1
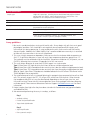
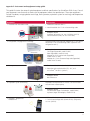
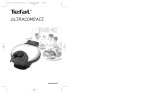
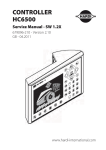
PrimeFlow™ RNA Assay User Manual and Protocol PrimeFlow™ RNA Assay User Manual and Protocol For Research Use Only Introduction PrimeFlow™ RNA assay is an in situ hybridization assay that combines the power of branched-DNA technology with the single-cell resolution of flow cytometry. This assay enables the simultaneous detection of up to three RNA targets in combination with immunophenotyping for cell surface and intracellular proteins using fluorochrome-conjugated antibodies to allow further discrimination of specific cell subpopulations. In the PrimeFlow RNA assay, branched-DNA technology is used to amplify the detection of a RNA transcript, rather than the target RNA itself. In the first hybridization step of the assay, a gene-specific oligonucleotide Target Probe set that contains 20–40 probe pairs binds to the target RNA sequence. An individual probe pair is designed to bind adjacent to each other in order for signal amplification to take place. Signal amplification is then achieved through a series of sequential hybridization steps. The PreAmplifier molecules confer an additional level of specificity because they will hybridize to the Target Probes only when both halves of a respective probe pair have bound to their target sequence. Multiple Amplifier molecules subsequently hybridize to their respective PreAmplifier. Finally, Label Probe oligonucleotides conjugated to a fluorescent dye hybridize to their corresponding Amplifier molecules. A fully assembled signal amplification "tree" has 400 Label Probe binding sites. When all target-specific oligonucleotide probes in the Target Probe set bind to the target RNA transcript, 8,000–16,000-fold amplification is achieved. We currently offer three different amplification structures that allow simultaneous measurement of up to three different RNA targets for multicolor flow cytometric analysis. Once the cells have been processed by the PrimeFlow RNA assay, the data can be collected and analyzed on any standard flow cytometer. The schematic below illustrates the detection of two unique targets. Sample Preparation Target Hybridization Gene-specific Target Probes Signal Amplification Detection Fluorescent Label Probe PreAmplifier Add Label Probes to cells Amplifier Label proteins with antibody (optional) Fix and permeabilize cells in suspension Incubate cells with gene-specific Target Probes (Type 1, 4 or 6) Hybridized with Pre-Amplifier and Amplifier DNA (Type 1, 4, and 6) Gene 1 Gene 2 Suspension cells with RNA fixed IFN gamma protein eFluor ® 450 Process cells using a standard flow cytometer IFN gamma mRNA Alexa Fluor ® 750 1 General notes Assay specifications Sample type Single-cell suspensions, including human whole blood and peripheral blood mononuclear cells (PBMC), mouse dissociated tissues, and cell lines. See Appendix A5 for a complete list of validated cell types. Species Mammalian Plex level Up to three RNA targets simultaneously Assay format 1.5-mL microcentrifuge tube or 96-well v-bottom plate. See Appendix A7 for the protocol to use 96-well plates. Instrumentation for RNA detection Flow cytometer equipped with: § blue (488 nm) and red (633-640 nm) lasers § filter sets for FITC (bandpass 530/30), APC (bandpass 660/20), and APC-eFluor® 780 (APC-Cyanine7) (bandpass 780/60) Assay guidelines 1. B est results are obtained when starting with healthy cells. Always begin with cells that are in good physiological condition. Cells should be in active growth phase to preserve RNA integrity and minimize cell lysis during processing. If using sorted primary cells, make sure the cells are healthy after purification. Addition of a Fixable Viability Dye is recommended to ensure analysis is restricted to those cells that were alive at the start of the protocol. 2. T his assay is highly temperature-dependent. Please ensure that the incubator holds temperature at 40±1°C. A significant reduction in signal will result from temperature deviations greater than 1°C. The incubator must be validated using the ViewRNA® Temperature Validation Kit (Affymetrix, cat. no. QV0523), following the instructions in Appendix A6 of this user manual. 3. T his assay allows detection of up to three (3) RNA targets in a single sample: Type 1: Alexa Fluor® 647; high sensitivity that is best for low or unknown expression levels Type 4: Alexa Fluor® 488; intermediate-to-low sensitivity that is best for medium to high expression levels Type 6: Alexa Fluor® 750; intermediate-to-low sensitivity that is best for medium to high expression levels (data for Type 6, Alexa Fluor® 750 probe sets should be collected in the APC-eFluor® 780 channel with a 780/60 bandpass filter, or equivalent). 4. T he autofluorescence of cells is increased following this protocol when compared to live cells or fixed cells. This primarily impacts the FITC, PE, eFluor® 450, and eFluor® 506 channels. Other channels (up to approximately 650 nm) may also be affected, depending on the cell type, laser line, and instrument settings. Please take this into consideration when setting voltages and when designing multicolor panels. Please contact eBioscience Technical Support ([email protected]) for more information. 5. P rotect samples from light after they have been stained with fluorochrome-conjugated antibodies and labeled for RNA. 6. We recommend performing the assay in two days, as follows: Day 1 Antibody staining Fixation and permeabilization Target Probe hybridization Day 2 Signal amplification Flow cytometric analysis 2 Fluorochrome compatibility 1. O rganic fluorochromes are compatible with this assay, such as FITC, eFluor® 450, eFluor® 660, and Alexa Fluor® 700. BV dyes are also reported to work. 2. M ost protein-based fluorochromes are compatible with this assay, including PE, PE-eFluor® 610, PE-Cyanine5, PE-Cyanine5.5, PE-Cyanine7, APC, and APC-eFluor® 780. 3. P erCP, PerCP-Cyanine5.5, and PerCP-eFluor® 710 should not be used. We recommend using PE-Cyanine5 or PE-Cyanine5.5 instead. 4. Qdot® nanocrystal- and eVolveTM-conjugated antibodies are not compatible with this assay. Intracellular antibody staining compatibility 1. The fixation and permeabilization buffers in this kit are compatible with most eBioscience® antibodies used for intracellular staining. Some changes in performance are expected when compared to performance in the Intracellular Fixation and Permeabilization Buffer Set (cat. no. 88-8824) or Foxp3/Transcription Factor Staining Buffer Set (cat. no. 00-5523). Antibody performance should be determined empirically using the PrimeFlow™ Fixation/Permeabilization Buffer Set (cat. no. 88-17000). 2. The fixation and permeabilization buffers in this kit are compatible with most eBioscience phospho-specific antibodies; however, phospho-specific antibodies that will work only in the IC Fixation/Methanol protocol are not compatible. Please see the Phospho Flow Cytometry Antibody Clone Buffer Selection Guide or the datasheet for the individual antibody for more information. 3. S taining for some surface markers may be done after fixation and permeabilization. Please see the Antibody Clone Performance Following Fixation/Permeabilization table and refer to the column for “After IC Fixation and Perm Wash” to determine if the antibody clone will recognize a fixed epitope. Experimental design guidelines 1. T o ensure proper assay performance, use Positive Control Probe Sets in every experiment. For your convenience, these probe sets are included with PrimeFlow RNA Assay (RPL13A for human leukocytes and beta-actin [ACTB] for mouse tissues). See Appendix A5 for specific cell types and other recommended positive control genes. 2. F or proper compensation, we recommend using PrimeFlow™ Compensation Kit (cat. no. 88-17001). Please refer to the product data sheet for instructions on use. Alternatively, cells stained with positive control probe sets may be used for single-color compensation samples. Do not use fluorochromeconjugated antibodies to set compensation for RNA signal. If using a combination of cells and beads as compensation controls, be sure to use the appropriate negative population for setting compensation (i.e., for beads, use the negative bead population; for cells, use unlabeled cells that have undergone the PrimeFlow RNA assay). Please contact eBioscience Technical Support (tech@ ebioscience.com) for more information. 3. F luorescence-Minus-One (FMO) controls are highly recommended. The FMO control is a sample that contains all but one of the fluorochromes used in the experiment. As with single-color controls, there should be an FMO control for every fluorochrome used in the experiment. FMO controls facilitate assessment of background on gated events and allow fine-tuning of compensation for optimal performance. 4. N egative controls, such as samples with the target probe omitted or samples labeled with a target probe not expressed in the cells of interest (e.g., DapB, a bacterial gene), are highly recommended. Negative control samples comprised of or containing cells known to be negative for the gene of interest (e.g., unstimulated) are also recommended to confirm specificity of the target probes. 5. If using whole blood, there is no need to pre-lyse red blood cells; however, due to changes in forward-scatter and side-scatter properties of granulocytes, the use of antibodies to distinguish leukocyte subpopulations is recommended. 6. Please see Appendix A4 for examples of sample set-up and experimental design. 3 This protocol is for use with 1.5 mL microcentrifuge tubes. (See Appendix 7 for the 96-well plate protocol.) Materials included Store at room temperature PrimeFlow™ RNA tubes (1.5-mL microcentrifuge tubes) Store at 2–8°C PrimeFlow™ RNA Fixation Buffer 1A PrimeFlow™ RNA Fixation Buffer 1B PrimeFlow™ RNA Permeabilization Buffer (10X) PrimeFlow™ RNA Fixation Buffer 2 (8X) PrimeFlow™ RNA Wash Buffer PrimeFlow™ RNA Target Probe Diluent PrimeFlow™ RNA PreAmp Mix PrimeFlow™ RNA Amp Mix PrimeFlow™ RNA Label Probe Diluent PrimeFlow™ RNA Storage Buffer RNase Inhibitor 2 (100X) Store at –20°C RNase Inhibitor 1 (1,000X) Positive Control Target Probe Sets (20X) (one for each RNA detection channel) PrimeFlow™ RNA Label Probes (100X) Materials required, but not included Flow Cytometry Staining Buffer (cat. no. 00-4222) Fluorochrome-conjugated antibodies, as needed Fixable Viability Dye, as needed 12 x 75 mm polystyrene tubes (e.g., Corning, cat. no. 352008) PrimeFlow™ Compensation Kit (cat. no. 88-17001) [OPTIONAL] IC Fixation Buffer (cat. no. 00-8222) [OPTIONAL] 96-well, v-bottom polystyrene plate (cat. no. 44-17005; see Appendix A7 for modified protocol) Instruments and equipment Refer to Appendix A2 of this user manual Experiment duration 4 Day 1 (~6–8 hours) Day 2 (~6 hours) Antibody staining Fixation and permeabilization Target probe hybridization Signal amplification Flow cytometric analysis Experimental procedure Note: This procedure is written based on the use of the 1.5-mL tubes provided in the kit throughout the assay. The use of these tubes is important during the hybridization and signal amplification steps to control residual volumes. However, staining with antibodies and/or fixable viability dyes as well as fixation and permeabilization (Steps 1–16) may be done in bulk and in any tube desired. If these procedures are done in bulk, use volumes such that cells do not exceed 1 x 10⁷ cells/mL. To perform the assay in 96-well plates, refer to Appendix A7 of this user manual. Day 1: Antibody staining, fixation, and permeabilization 1. Pre-warm PrimeFlow RNA Wash Buffer to room temperature. This buffer will first be used in Step 13. 2. Aliquot 1–5 x 10⁶ cells in Flow Cytometry Staining Buffer or 100 µL of whole blood into the 1.5-mL tubes provided in the kit. Note: When using whole blood, it is not necessary to lyse the red blood cells before beginning the assay. However, if pre-lysis is desired, the use of 10X RBC Lysis Buffer (cat. no. 00-4300) is recommended. Please see the product datasheet or Best Protocols: Red Blood Cell Lysis Protocol, Protocol A for detailed instructions for use. 3. Surface stain cells with fluorochrome-conjugated antibodies at their optimal concentration for 30 minutes at 2–8°C. Note: If needed, please see Best Protocols: Staining Cell Surface Antigens for Flow Cytometry: Protocol A: Cell Suspensions for detailed instructions for staining. Note: Use antibodies that are conjugated to approved fluorochromes only (see general notes, fluorochrome compatibility section above). Note: Cells may be stained with a Fixable Viability Dye before or after surface staining (see Best Protocols: Viability Staining Protocol, Protocol C for detailed instructions). Note: Staining for some surface markers may be done after fixation and permeabilization. Please see the Antibody Clone Performance Following Fixation/Permeabilization table on our website and refer to the column for “After IC Fixation and Perm Wash” to determine if the antibody clone will recognize a fixed epitope. If you prefer to stain after fixation, skip this step and proceed to Step 5. 4. Add 1 mL of Flow Cytometry Staining Buffer to each sample, invert to mix, and spin down at 500 x g for 5 minutes. Discard supernatant and resuspend cells in the residual volume. Note: When using whole blood, skip this step and proceed to Step 5. 5. Prepare Fixation Buffer 1 by mixing equal parts of PrimeFlow RNA Fixation Buffer 1A and PrimeFlow RNA Fixation Buffer 1B. Mix gently by inverting. Note: You will need 1 mL of this buffer per sample. Prepare this buffer in bulk to accommodate all samples. Avoid vortexing or vigorously shaking this buffer. This buffer should be prepared fresh. Dispose of any unused buffer. 6. Add 1 mL of prepared Fixation Buffer 1 to each sample and invert to mix. Incubate for 30 minutes at 2–8°C. 7. Spin down at 800 x g for 5 minutes. Discard supernatant and resuspend cells in the residual volume. 8. Prepare 1X PrimeFlow RNA Permeabilization Buffer with RNase Inhibitors by diluting PrimeFlow RNA Permeabilization Buffer (10X) to 1X with RNase-free water. Then add RNase Inhibitor 1 (1,000X) at a 1/1,000 dilution and RNase Inhibitor 2 (100X) at a 1/100 dilution. Mix gently by inverting. Keep at 2–8°C. Note: You will need 3 mL of this buffer per sample. Prepare this buffer in bulk to accommodate all samples. Avoid vortexing or vigorously shaking this buffer. This buffer should be prepared fresh. Dispose of any unused buffer. 9. Add 1 mL of 1X PrimeFlow RNA Permeabilization Buffer with RNase Inhibitors to each sample, invert to mix, and spin down at 800 x g for 5 minutes, then discard supernatant and resuspend cells in the residual volume. 10. Repeat Step 9. 5 11. Intracellularly stain cells with fluorochrome-conjugated antibodies at their optimal concentration in the 1X PrimeFlow RNA Permeabilization Buffer with RNase Inhibitors for 30 minutes at 2–8°C. Note: If intracellular staining is not desired, skip this step and proceed to Step 13. Note: Staining for some surface markers may be done after fixation and permeabilization. Please see the Antibody Clone Performance Following Fixation/Permeabilization table on our website and refer to the column for “After IC Fixation and Perm Wash” to determine if the antibody clone will recognize a fixed epitope. Note: Use antibodies that are conjugated to approved fluorochromes only (see General notes, Fluorochrome compatibility section above). 12. Add 1 mL of 1X PrimeFlow RNA Permeabilization Buffer with RNase Inhibitors to each sample, invert to mix, and spin down at 800 x g for 5 minutes, then discard supernatant and resuspend cells in the residual volume by vortexing gently. 13. Prepare 1X PrimeFlow RNA Fixation Buffer 2 by combining 125 µL of PrimeFlow RNA Fixation Buffer 2 (8X) with 875 µL of PrimeFlow RNA Wash Buffer per sample. Mix gently by inverting. Note: You will need 1 mL of this buffer per sample. Prepare this buffer in bulk to accommodate all samples. For example, for 10 samples, combine 1.25 mL of PrimeFlow RNA Fixation Buffer 2 (8X) with 8.75 mL of PrimeFlow Wash Buffer. Avoid vortexing or vigorously shaking this buffer. This buffer should be prepared fresh. Dispose of any unused buffer. 14. Add 1 mL of 1X PrimeFlow RNA Fixation Buffer 2 to each sample and invert to mix, and then incubate for 60 minutes in the dark at room temperature. Note: It is important to fix the samples at room temperature. Do not perform this step on ice. 15. [OPTIONAL] Cells may be stored in 1X PrimeFlow RNA Fixation Buffer 2 overnight in the dark at 2–8°C, instead of incubating for 60 minutes at room temperature (i.e., skip Step 14). 16. Spin down at 800 x g for 5 minutes, then aspirate all but 100 µL of supernatant and resuspend cells in the residual volume by vortexing gently. Note: If staining, fixation, and permeabilization were performed in bulk, the cells should be transferred into the 1.5-mL tubes provided in the kit during the following wash steps and before storage overnight. 17. Add 1 mL of PrimeFlow RNA Wash Buffer to each sample, invert to mix, and spin down at 800 x g for 5 minutes, then aspirate all but 100 µL of supernatant and resuspend cells in the residual volume by vortexing gently. 18. Repeat Step 17. Note: It is critical that the residual volume is as close to 100 µL as possible. Use the markings on the 1.5-mL tubes provided in the kit to assist. 19. [OPTIONAL] Cells may be stored in PrimeFlow Wash Buffer with RNase Inhibitor 1 overnight in the dark at 2–8°C. To do so, add RNase Inhibitor 1 (1,000X) to PrimeFlow RNA Wash Buffer at a 1/1,000 dilution and use in Step 18. Note: You will need 1 mL of this buffer per sample. Prepare this buffer in bulk to accommodate all samples. This buffer should be prepared fresh. Dispose of any unused buffer. Day 1: Target probe hybridization Note: It is critical that the residual volume after all washes be as close to 100 µL as possible. Use the markings on the 1.5-mL tubes provided in the kit to assist. Note: Diluted Target Probes should be pipetted directly into the 100 µL of residual volume and samples should be mixed well before incubating. Do not pipette solutions onto the walls of the tubes. 6 20.Thaw Target Probes, including Positive Control Target Probe Sets (20X), at room temperature. 21.Pre-warm PrimeFlow RNA Target Probe Diluent to 40°C. 22.Dilute Positive Control Target Probe Sets (20X) 1/20 in PrimeFlow RNA Target Probe Diluent. Mix thoroughly by pipetting up and down. Note: You will need 100 µL of diluted Target Probes for each sample. If you are adding more than one Target Probe per sample, adjust the volume of the PrimeFlow RNA Target Probe Diluent accordingly so that the final volume remains 100 µL per sample. 23.Add 100 µL of diluted Target Probe(s) directly into the cell suspension for the appropriate samples and briefly vortex to mix, and then incubate for 2 hours at 40°C. Invert samples to mix after 1 hour. 24.Add 1 mL of PrimeFlow RNA Wash Buffer to each sample, invert to mix, and spin down at 800 x g for 5 minutes. Aspirate all but 100 µL of supernatant and resuspend cells in the residual volume by vortexing gently. 25.Prepare PrimeFlow RNA Wash Buffer with RNase Inhibitor 1 by adding RNase Inhibitor 1 (1,000X) at a 1/1,000 dilution to the PrimeFlow RNA Wash Buffer. Mix gently by inverting. Note: You will need 1 mL of this buffer per sample. Prepare this buffer in bulk to accommodate all samples. This buffer should be prepared fresh. Dispose of any unused buffer. 26.Add 1 mL of PrimeFlow RNA Wash Buffer with RNase Inhibitor 1 to each sample, invert to mix, and spin down at 800 x g for 5 minutes. Aspirate all but 100 µL of supernatant and resuspend cells in the residual volume by vortexing gently. 27.Store samples overnight in the dark at 2–8°C. Note: We recommend this stopping point for ease-of-use and a more manageable workflow. However, if desired, Step 27 may be skipped. If skipping this step, proceed to Step 28 and continue through to the end of the protocol. Day 2: Signal amplification Note: It is critical that the residual volume after all washes be as close to 100 µL as possible. Use the markings on the 1.5-mL tubes provided in the kit to assist. Note: PrimeFlow RNA PreAmp Mix, PrimeFlow RNA Amp Mix, and diluted Label Probes should be pipetted directly into the 100 µL of residual volume and samples should be mixed well before incubating. Do not pipette these solutions onto the walls of the tubes. 28.Pre-warm samples and PrimeFlow RNA Wash Buffer to room temperature. 29.Pre-warm PrimeFlow RNA PreAmp Mix, PrimeFlow RNA Amp Mix, and PrimeFlow RNA Label Probe Diluent to 40°C. 30.Thaw PrimeFlow RNA Label Probes (100X) on ice in the dark. Note: This can be done during the Amp Mix incubation (Step 34). 31.Add 100 µL of PrimeFlow RNA PreAmp Mix directly into the cell suspension for each sample and briefly vortex to mix. Incubate for 1.5 hours at 40°C. 32.Add 1 mL of PrimeFlow RNA Wash Buffer to each sample, invert to mix, and spin down at 800 x g for 5 minutes. Aspirate all but 100 µL of supernatant and resuspend cells in the residual volume by vortexing gently. 33.Repeat Step 32 two times, for a total of three washes. 34.Add 100 µL of PrimeFlow RNA Amp Mix directly into the cell suspension for each sample and briefly vortex to mix. Incubate for 1.5 hours at 40°C. 35.Add 1 mL of PrimeFlow RNA Wash Buffer to each sample, invert to mix, and spin down at 800 x g for 5 minutes. Aspirate all but 100 µL of supernatant and resuspend cells in the residual volume by vortexing gently. 36.Repeat Step 35. 37.Dilute PrimeFlow RNA Label Probes (100X) 1/100 in PrimeFlow RNA Label Probe Diluent. Note: You will need 100 µL of diluted Label Probes for each sample. Prepare diluted Label Probes in bulk to accommodate all samples. 38.Add 100 µL of diluted Label Probes directly into the cell suspension for each sample and briefly vortex to mix, and then incubate for 1 hour at 40°C. 39.Add 1 mL of PrimeFlow RNA Wash Buffer to each sample, invert to mix, and spin down at 800 x g for 5 minutes. Aspirate all but 100 µL of supernatant and resuspend cells in the residual volume by vortexing gently. 40.Repeat Step 39. 7 41.Add 1 mL of PrimeFlow RNA Storage Buffer or Flow Cytometry Staining Buffer to each sample, invert to mix, and spin down at 800 x g for 5 minutes. Aspirate all but 100 µL of supernatant and resuspend cells in the residual volume by vortexing gently. 42.Transfer samples to 12 x 75 mm polystyrene tubes, resuspend in an appropriate volume of PrimeFlow RNA Storage Buffer or Flow Cytometry Staining Buffer, and analyze samples on a flow cytometer. Note: Samples may be stored before analysis. If samples have been stained with antibodies conjugated to tandem dyes, we recommend storing the samples in IC Fixation Buffer by mixing 100 µL of cells with 100 µL of IC Fixation Buffer. Store samples in the dark at 2–8°C for up to three days. Quick guide: PrimeFlow™ RNA Assay in 1.5-mL tubes Day 1: 1. Surface stain cells with antibody and/or fixable viability dye. 2. Wash once with Flow Cytometry Staining Buffer. Spin cells at 500 x g for 5 minutes. 3. Fix cells in PrimeFlow RNA Fixation Buffer1 for 30 minutes at 2–8°C. 4. Wash twice with 1X PrimeFlow RNA Permeabilization Buffer with RNase Inhibitors. Spin cells at 800 x g for 5 minutes. 5. Intracellularly stain cells with antibody for 30 minutes at 2–8°C. 6. Wash once with 1X PrimeFlow RNA Permeabilization Buffer with RNase Inhibitors. Spin cells at 800 x g for 5 minutes. 7. Fix cells in 1X PrimeFlow RNA Fixation Buffer 2 for 60 minutes at room temperature. 8. Wash twice with PrimeFlow RNA Wash Buffer. Spin cells at 800 x g for 5 minutes. 9. Perform Target Probe hybridization for 2 hours at 40°C. Invert to mix after 1 hour. 10. Wash once with PrimeFlow RNA Wash Buffer. Spin cells at 800 x g for 5 minutes. 11. Wash once with PrimeFlow RNA Wash Buffer with RNase Inhibitor 1. Spin cells at 800 x g for 5 minutes. 12. Store samples overnight. Day 2: 13. Perform PreAmp hybridization for 1.5 hours at 40°C. 14. Wash three times with PrimeFlow RNA Wash Buffer. Spin cells at 800 x g for 5 minutes. 15. Perform Amp hybridization for 1.5 hours at 40°C. 16. Wash twice with PrimeFlow RNA Wash Buffer. Spin cells at 800 x g for 5 minutes. 17. Perform Label Probe hybridization for 1 hour at 40°C. 18. Wash twice with PrimeFlow RNA Wash Buffer. Spin cells at 800 x g for 5 minutes. 19. Wash once with PrimeFlow RNA Storage Buffer. Spin cells at 800 x g for 5 minutes. 20. Analyze samples on a flow cytometer. 8 Appendix 1: Troubleshooting Problem Possible Reasons Solution A. Poor Cell Recovery / Low Cell Count on Cytometer 1. Cell lysis due to cells in poor physiological condition during processing 1.If using frozen cells, thaw cells carefully following proper cell culture procedures, and rest cells for 30 minutes at 37°C before starting the assay. Make sure cells are cryopreserved while still in log-phase growth. 2. Check cell viability using trypan blue or other viability dye before beginning the assay. 2. Improper centrifuge settings 1. Confirm settings are for RCF (x g), not RPM. 2. Set centrifuge to the speed specified in the protocol. B. Weak / No Signal 3. Improper tubes used Only use the 1.5-mL tubes provided with the kit. Tubes from other vendors may result in significant cell loss. 4. High aspiration rate by pipetting or vacuum aspirator when removing supernatant Ensure vacuum setting for aspirator is low. Aspirate no faster than 0.5 mL/sec. Place a 10-µL pipette tip on the tip of the aspirator to help reduce aspiration rate. While aspirating, follow the meniscus down to the 100-µL mark on the side of the tube. 5. Rough handling Avoid excessive vortexing to prevent cell damage. Vortex in short pulses. 6. Incorrect cell count by flow cytometer Verify the flow rate of cytometer using beads of known concentration such as the Flow Cytometry Absolute Count Standard (Bangs Laboratories, cat. no. 580). 1. Cytometer not set up properly Check that your instrument is properly set up according to the manufacturer's recommendations. 2. Incorrect samples used for setting compensation Use samples labeled with one each of the included Positive Control Probe Sets to set compensation. Do not use fluorochrome-conjugated antibodies to set compensation for RNA detection. 3. Incorrect preparation of signal amplification reagents Make sure PreAmp Mix, Amp Mix, and Label Probes are used in the specified order. 4. Incorrect incubator temperature 1. Incubator must be able to hold temperature at 40±1°C. 2. Use a metal heat block for hybridization. 3. Minimize traffic to incubator. Temperature tolerance is 1–2°C. 4. Ensure incubator has been stable at 40°C for at least 12 hours before starting the assay as temperature may drift during initial incubator setup. 5. Measure temperature using the ViewRNA® Temperature Validation Kit (Affymetrix, cat. no. QV0523). 5. Incorrect Wash Buffer Do not substitute PrimeFlow™ RNA Wash Buffer with Storage Buffer or any other buffer. 6. Incorrect diluents used Ensure PrimeFlow™ RNA Target Probe Diluent is used with Positive Control Target Probe Sets (20X), and PrimeFlow™ RNA Label Probe Diluent is used with PrimeFlow™ RNA Label Probes (100X). 9 Appendix 1: Troubleshooting Problem Possible Reasons Solution B. Weak / No Signal 7. Incorrect dilution of Target Probes or Label Probes 1. Ensure Target Probes are diluted 1/20 with PrimeFlow RNA Target Probe Diluent. 2. Ensure PrimeFlow RNA Label Probes (100X) are diluted 1/100 with PrimeFlow RNA Label Probe Diluent. 8. Gene expressed at very low level 1. Check biological model and confirm gene is expressed in sample by an alternative method such as QuantiGene® 2.0 Assay for lysate. 2. Keep in mind that protein expression might not correlate with RNA expression in some cases. C. High Background 9. Incorrect or insufficient RNase Inhibitor used 3. Ensure that 1X PrimeFlow RNA Permeabilization Buffer contains both RNase Inhibitor 1 (1,000X) at a final dilution of 1/1,000 and RNase Inhibitor 2 (100X) at a final dilution of 1/100. Ensure that the PrimeFlow RNA Wash Buffer for overnight sample storage in Step 19 or Step 25, or both, contains RNase Inhibitor 1 at a final dilution of 1/1,000. 1. Compensation not set up correctly 1. See Appendix A3 for how to set compensation. 2. Use the PrimeFlow™ Compensation Kit (sold separately) or samples labeled with one each of the included Positive Control Target Probe Sets (20X) to set compensation. 3. Do not use fluorochrome-conjugated antibodies to set compensation for RNA detection. 2. Incorrect incubator temperature 1. See Appendix A6 for how to validate an incubator. 2. Incubator must be able to hold temperature at 40±1°C. 3. Use a metal heat block for hybridization. 4. Minimize traffic to incubator. Temperature tolerance is 1–2°C. 5. Ensure incubator has been stable at 40°C for at least 12 hours before starting assay as temperature may drift during initial incubator setup. 6. Measure temperature using the ViewRNA® Temperature Validation Kit (Affymetrix, cat. no. QV0523). 3. Insufficient washing 1. Ensure the PrimeFlow RNA Wash Buffer is used at room temperature. 2. Follow instructions for washing steps in the protocol. 3. Ensure uniform cell resuspension by gentle vortexing. 10 4. Cytometer not set up properly Reduce voltage settings on your cytometer. Note that this assay may require lower settings than typical antibody staining. 5. Over-fixation Follow the protocol for proper fixation time. 6. Excessive Target Probe used Dilute Target Probes at a 1/20 dilution. Appendix 2: Instrument and equipment setup guide This guide illustrates the setup of typical equipment and their specifications for PrimeFlow™ RNA Assay. Consult your equipment manufacturers to make sure the equipment meets the specifications. The major equipment include: incubator, swinging bucket centrifuge, flow cytometer, aspiration system for washing, and temperature validation kit. Equipment Specifications 1. Incubator with heat block inside 1. Validated to maintain 40±1°C 2. Metal heat block for 1.5-mL microcentrifuge tube Example shown: Incubator (Affymetrix, cat. nos. QS0704 or QS0712) Metal heat block (VWR, cat. no. 13259-002) 2. Refrigerated swinging bucket centrifuge Swinging bucket centrifuge with adaptors for 15-mL conical tubes and 1.5-mL microcentrifuge tubes. (Optional: with refrigeration to 4°C) Examples shown: Centrifuge (Eppendorf, model 5810R) Rotor (Eppendorf, model A-4-44) Adaptor for 15-mL conical tube (Eppendorf, model 5804 755.006) Adaptor for 1.5-mL microcentrifuge tube (Eppendorf, model 5804 750.004) 3. Flow cytometer 1. Two lasers: blue (488 nm) and red (633 nm or similar) 2. Detection optics optimized for FITC, APC, and APC-eFluor® 780 (APC-Cyanine7) Example shown: BD LSRFortessa 4. Aspiration system for washing Aspiration rate adjusted to 0.5 mL/sec. Can use in-house vacuum line or vacuum pump Example shown: Vacuum bottle (Argos Technologies, model EV432) Aspirator (Argos Technologies, model EV514) 5. ViewRNA® Temperature Validation Kit NIST traceable thermometer, with temperature probe in 1.5-mL microcentrifuge tube (shown on left). (Affymetrix, cat. no. QV0523) 11 Appendix 3: Cytometer setup The PrimeFlow RNA assay utilizes up to three fluorescent channels for detection of RNA on a flow cytometer. To ensure optimal detection of RNA, it is important that the cytometer is set up properly. In a multicolor assay, signal from a given fluorochrome often spills over into the other detection channels due to overlapping emission spectra. The process of subtracting the spillover signal is called compensation. The procedures below describe how to set proper PMT voltage and compensation for multicolor PrimeFlow™ RNA analysis. Materials required § Calibration beads § Unstained cells that have undergone the PrimeFlow™ assay § Samples prepared using the PrimeFlow Compensation Kit (cat. no. 88-17001): Unstained UltraComp eBeads UltraComp eBeads labeled with PrimeFlow™ RNA Alexa Fluor® 647 Compensation Control UltraComp eBeads labeled with PrimeFlow™ RNA Alexa Fluor® 488 Compensation Control UltraComp eBeads labeled with PrimeFlow™ RNA Alexa Fluor® 750 Compensation Control Single-color, antibody-stained UltraComp eBeads (needed only if protein staining is performed) Experimental procedure Step I: Ensure proper instrument alignment. 1. Follow the instrument manufacturer's recommendations for checking instrument alignment. Alternatively, calibration beads, such as Rainbow Calibration Particles (8-peak beads) (Spherotech, cat. no. RCP-30-5A) or Rainbow Fluorescent Particles (1-peak beads) (Spherotech, cat. no. RFP-30-5A), may be used to check the linearity of the PMT, PMT voltage range, and alignment of the instrument. 12 Step II: Set PMT voltages. 1. Create an acquisition template/workspace that includes a forward-scatter versus sidescatter plot, a single-parameter histogram plot for every fluorescent channel used, and a two-parameter plot for every pairwise combination of fluorescent channels used in the experiment. 2. Place the unstained cell sample on the cytometer and begin to collect events. a. Adjust voltages for forward scatter and side scatter so that cells/events of interest are on scale. Set a threshold on forward scatter to eliminate debris from acquisition. Make a note of these settings. b.Looking at the histogram plots, ensure that the signals are on scale and adjust PMT voltages, if necessary. c. Stop collecting events and remove sample from the cytometer. 3. Place a single-color sample on the cytometer and begin to collect events. Note: UltraComp eBeads may require different forward and side scatter voltage settings to be visualized. Adjust these settings as needed and make a note of these settings. a.Looking at the histogram plot for the fluorochrome collected, ensure that events are on scale for the fluorescent channel collected and adjust PMT voltages, if necessary. b.Ensure that the signal is at least 0.5 log brighter in the channel of interest than in all other channels. Adjust other PMT voltages as necessary. c. Stop collecting events and remove sample from the cytometer. d.Repeat for each of the single-color samples. 4. Confirm that the voltage settings are appropriate for the experimental samples. a.Place an experimental sample on the cytometer and begin collecting events. Note: If forward- and side-scatter voltages were changed between Steps II2a and II3, adjust voltages back to those noted in Step II2a. b.Looking at each of the histogram plots, confirm that all fluorescent signals are on scale and adjust PMT voltages, if necessary. c. Stop collecting events and remove sample from the cytometer. Step III: Set compensation. Note: Use PrimeFlow Compensation Kit for single-color compensation controls. Please see the product data sheet for preparation of samples and instructions for use. Alternatively, cell samples labeled with individual Positive Control Probe sets may be used for single-color compensation controls. Do not use fluorochrome-conjugated antibodies to compensate for RNA signal. APC-eFluor ® 780 APC-eFluor ® 780 CD8 APC-eFluor ® 780 CD8 APC-eFluor ® 780 APC-eFluor ® 780 1. If using PrimeFlow Compensation Kit for single-color controls, return forward- and sidescatter voltages to those noted in Step II3 in order to visualize the compensation beads. Do not change voltages for any of the fluorescent PMT channels. 2. If an autocompensation feature is available for the cytometer used, follow the manufacturer's instructions for use 3. If an autocompensation feature is not available or to set compensation manually: a. Place the unstained sample on the cytometer and begin to collect events. b.Looking at the two-parameter plots, create quadrant regions on each plot such that the cells fall within the lower left quadrant (Figure A3.1). c. For each two-parameter plot, create statistics windows according to your instrument's acquisition software and include the x- and y-median for all parameters. d.Stop collecting events and remove sample from the cytometer. 4. Place a single-color sample on the cytometer and begin to collect events. Note: If using a single-color cell sample that does not contain any negative events, a small amount of unstained cells may be added APC to the single-color samples just before loading the sample onto Figure A3.1. Unstained sample. the cytometer. Alternatively, an unstained cell sample that has been processed through the PrimeFlow assay must be used and the median fluorescence intensity of that sample should be noted for all parameters. a. Looking at the two-parameter plots for the fluorochrome collected, adjust the quadrants so that the positive events are fully contained within either the lower right or the upper left quadrant (Figure A3.2, left). b.Looking at the statistics, note the y- or x-median of the two populations. Adjust the compensation for the fluorochrome being collected (subtract its fluorescence out of the other channels being used in the experiment) until the medians of the two populations are the same (Figure A3.2, right). c. Stop collecting events and remove sample from the cytometer. d.Repeat for each of the single-color samples. 5. Confirm that the compensation settings are appropriate for the experimental samples. CD4 APC CD4 APC a.Adjust forward- and side-scatter Q3 APC-eFluor 780 Median: 951 Q3 APC-eFluor 780 Median: 2.02 voltages back to those noted in Q4 APC-eFluor 780 Median: -0.411 Q4 APC-eFluor 780 Median: -0.143 Step II2a. Do not change voltages for any of the fluorescent PMT channels. b.Place an experimental sample on the cytometer and begin collecting events. c. Looking at each of the two-parameter plots, confirm that the compensation is set correctly by looking at the medians. d.Stop collecting events and remove sample from the cytometer. APC APC 6. After setting compensation, you are ready Q1 APC Median: 258 Q1 APC Median: -0.519 to acquire your samples. Q4 APC Median: -0.894 Q4 APC Median: -0.474 7. Use FMO controls after acquisition and during analysis to optimize compensation Figure A3.2. Single-color samples for APC (top row) or APC-eFluor 780 (bottom row). Uncompensated (left) or compensated (right) data settings. ® are shown. 13 14 unstained/autofluorescence Alexa Fluor 488 single-color PE-eFluor 610 single-color PE-Cyanine7 single-color Alexa Fluor 750 single-color eFluor 450 single-color eFluor 506 single-color Alexa Fluor 488 FMO PE-eFluor 610 FMO PE-Cyanine7 FMO Alexa Fluor 750 FMO eFluor 450 FMO eFluor 506 FMO Isotype/no probe control 6-color sample Alexa Fluor 488 FMO PE-eFluor 610 FMO PE-Cyanine7 FMO Alexa Fluor 750 FMO eFluor 450 FMO eFluor 506 FMO Isotype/no probe control 6-color sample 2 3 4 5 6 7 8 9 10 11 12 13 14 15 16 17 18 19 20 21 22 23 Tube description 1 Tube # unstim unstim unstim unstim unstim unstim TNFa mRNA no probe TNFa mRNA TNFa mRNA TNFa mRNA TNFa mRNA TNFa mRNA – unstim unstim TNFa mRNA no probe TNFa mRNA TNFa mRNA TNFa mRNA TNFa mRNA TNFa mRNA – – – – – – TNFa mRNA – Alexa Fluor® 488 530/30 stim stim stim stim stim stim stim stim stim stim stim stim stim stim stim Cell sample CD8a CD8a CD8a CD8a CD8a CD8a – CD8a CD8a CD8a CD8a CD8a CD8a CD8a – CD8a – – – – CD8a – – PE-eFluor® 610 610/20 488 Laser TNF alpha mIgG1 isotype TNF alpha TNF alpha TNF alpha – TNF alpha TNF alpha TNF alpha mIgG1 isotype TNF alpha TNF alpha TNF alpha – TNF alpha TNF alpha – – – TNF alpha – – – PE-Cyanine7 780/60 IFNg mRNA no probe IFNg mRNA IFNg mRNA – IFNg mRNA IFNg mRNA IFNg mRNA IFNg mRNA no probe IFNg mRNA IFNg mRNA – IFNg mRNA IFNg mRNA IFNg mRNA – – IFNg mRNA – – – – Alexa Fluor® 750 780/60 633 Laser IFN gamma mIgG1 isotype IFN gamma – IFN gamma IFN gamma IFN gamma IFN gamma IFN gamma mIgG1 isotype IFN gamma – IFN gamma IFN gamma IFN gamma IFN gamma – IFN gamma – – – – – eFluor® 450 450/50 FVD eF506 FVD eF506 – FVD eF506 FVD eF506 FVD eF506 FVD eF506 FVD eF506 FVD eF506 FVD eF506 – FVD eF506 FVD eF506 FVD eF506 FVD eF506 FVD eF506 FVD eF506 – – – – – – eFluor® 506 (510/20) 405 Laser Table A4.1. Experimental set up for a 6-color panel to detect induction of IFN gamma and TNF alpha in stimulated normal human peripheral blood mononuclear cells (PBMC). Appendix 4: Examples of expected results 15 IFN gamma eFluor ® 450 IFN gamma mRNA Alexa Fluor ® 750 TNF alpha mRNA Alexa Fluor ® 488 IFN gamma mRNA Alexa Fluor ® 750 TNF alpha mRNA Alexa Fluor ® 488 Stimulated IFN gamma mRNA Alexa Fluor ® 750 TNF alpha mRNA Alexa Fluor ® 488 Figure A4.1. Normal human peripheral blood mononuclear cells were unstimulated (left) or stimulated with the Cell Stimulation Cocktail (plus protein transport inhibitors) (cat. no. 00-4975) for 3 hours (right) and then analyzed using PrimeFlow™ RNA Assay. Cells were intracellularly stained with Anti-Human CD8a PE-eFluor ® 610 (cat. no. 61-0088), Anti-Human TNF alpha PE-Cyanine7 (cat. no. 25-7349), and Anti-Human IFN gamma eFluor ® 450 (cat. no. 48-7319). Cells were then labeled with Type 4 Human TNF alpha Alexa Fluor ® 488 or Type 6 Human IFN gamma Alexa Fluor ® 750 Target Probes (top or bottom row, respectively) for the measurement of mRNA. Cells in the lymphocyte gate were used for analysis. Detection of RNA are shown on the x-axes, while the y-axes show antibody staining of either CD8 or the corresponding cytokine as indicated. IFN gamma mRNA Alexa Fluor ® 750 TNF alpha mRNA Alexa Fluor ® 488 TNF alpha PE-Cyanine7 Unstimulated CD8 PE-eFluor ® 610 CD8 PE-eFluor ® 610 CD8 PE-eFluor ® 610 CD8 PE-eFluor ® 610 TNF alpha PE-Cyanine7 IFN gamma eFluor ® 450 16 unstained/autofluorescence Alexa Fluor 488 single-color PE-eFluor 610 single-color PE-Cyanine7 single-color Alexa Fluor 750 single-color eFluor 450 single-color Alexa Fluor 488 FMO PE-eFluor 610 FMO PE-Cyanine7 FMO Alexa Fluor 750 FMO eFluor 450 FMO Isotype/no probe control 5-color sample Alexa Fluor 488 FMO PE-eFluor 610 FMO PE-Cyanine7 FMO Alexa Fluor 750 FMO eFluor 450 FMO Isotype/no probe control 5-color sample 2 3 4 5 6 7 8 9 10 11 12 13 14 15 16 17 18 19 20 Tube description 1 Tube # unstim unstim unstim unstim unstim unstim unstim stim stim stim stim stim stim stim stim stim stim stim stim stim Cell sample Ki-67 mRNA no probe Ki-67 mRNA Ki-67 mRNA Ki-67 mRNA Ki-67 mRNA CD8a CD8a CD8a CD8a CD8a – CD8a CD8a Ki-67 mRNA – CD8a CD8a CD8a CD8a – CD8a – – – CD8a – – PE-eFluor® 610 610/20 no probe Ki-67 mRNA Ki-67 mRNA Ki-67 mRNA Ki-67 mRNA – – – – – Ki-67 mRNA – Alexa Fluor® 488 530/30 488 Laser Granzyme B rIgG2a isotype Granzyme B Granzyme B – Granzyme B Granzyme B Granzyme B rIgG2a isotype Granzyme B Granzyme B – Granzyme B Granzyme B – – Granzyme B – – – PE-Cyanine7 780/60 633 Laser Gzmb mRNA no probe Gzmb mRNA – Gzmb mRNA Gzmb mRNA Gzmb mRNA Gzmb mRNA no probe Gzmb mRNA – Gzmb mRNA Gzmb mRNA Gzmb mRNA – Gzmb mRNA – – – – Alexa Fluor® 750 780/60 Table A4.2. Experimental set up for a 5-color panel to detect induction of Granzyme B and Ki-67 in stimulated mouse splenocytes. Ki-67 rIgG2a isotype – Ki-67 Ki-67 Ki-67 Ki-67 Ki-67 rIgG2a isotype – Ki-67 Ki-67 Ki-67 Ki-67 Ki-67 – – – – – eFluor® 450 450/50 405 Laser 17 Granzyme B PE-Cyanine7 Granzyme B mRNA AF750 Ki-67 mRNA Alexa Fluor ® 488 Granzyme B mRNA AF750 Ki-67 mRNA Alexa Fluor ® 488 Granzyme B mRNA AF750 Ki-67 mRNA Alexa Fluor ® 488 Stimulated Figure A4.2. Mouse splenocytes were unstimulated (left) or stimulated with Anti-Mouse CD3 and CD28 Functional Grade Purifieds (cat. no. 16-0031 and 16-0281) for 2 days (right) then analyzed using PrimeFlowTM RNA Assay. Cells were intracellularly stained with Anti-Mouse CD8a PE-eFluor ® 610 (cat. no. 61-0081), Anti-Mouse Granzyme B PE-Cyanine 7 (cat. no. 25-8898), and Anti-Mouse Ki-67 eFluor® 450 (cat. no. 48-5698). Cells were then labeled with Type 4 Mouse Ki-67 Alexa Fluor® 488 or Type 6 Mouse Granzyme B Alexa Fluor® 750 Target Probes (top or bottom row, respectively) for the measurement of mRNA. Detection of RNA are shown on the x-axes, while the y-axes show antibody staining of either CD8 or the corresponding protein, as indicated. Granzyme B mRNA AF750 Ki-67 mRNA Alexa Fluor ® 488 Ki-67 protein eFluor ® 450 Unstimulated CD8 PE-eFluor ® 610 CD8 PE-eFluor ® 610 CD8 PE-eFluor ® 610 CD8 PE-eFluor ® 610 Ki-67 protein eFluor ® 450 Granzyme B PE-Cyanine7 Appendix 5: Validated cells and recommended positive control genes Cell Recommended Positive Control Gene Human peripheral blood (whole blood or PBMC) – fresh and cryopreserved RPL13A, B2M Mouse splenocytes (tissue) – fresh and cryopreserved ACTB, RPL13A Mouse thymocytes (tissue) ACTB, RPL13A Mouse bone marrow ACTB Human monocytic lymphoma, U937 RPL13A, B2M Human T cell lymphoma, Jurkat RPL13A, B2M Human cervical carcinoma, HeLa* RPL13A, GAPDH Human lung carcinoma, PC9* RPL13A, GAPDH *adherent cells, limited testing Appendix 6: Temperature validation procedure for incubator Temperature control is critical for the success of the PrimeFlow™ RNA assay. Improper hybridization temperature will result in high background or weak signal, or both. The incubator should be validated before use following these instructions. This temperature validation procedure is appropriate for both tube- and plate-based protocols in this user manual. Materials required § Incubator capable of maintaining temperature at 40±1°C (Affymetrix, cat. nos. QS0704 or QS0712) § ViewRNA® Temperature Validation Kit (Affymetrix, cat. no. QV0523) § 1.5-mL microcentrifuge tube (included in the PrimeFlow RNA Assay kit) § Metal heat block for 1.5-mL microcentrifuge tube (VWR, cat. no. 13259-002) § Parafilm® wrap Calibration procedure Step I: Prepare the incubator. 1.Turn on the incubator. 2.Set the temperature to 40°C. 3.Place the metal heat block into the incubator near the center of the middle shelf of the incubator. 4.Allow the incubator and heat block to equilibrate overnight. Step II: Assemble the temperature validation unit. 1.Insert the battery to activate the digital thermometer. 2.Use a pointed object (e.g., a ballpoint pen) to drill a hole into the center of the lid of a 1.5-mL microcentrifuge tube. 3.Add 0.2 mL of deionized water to the tube and then close the lid. 4.Insert the Type-K beaded probe into the digital thermometer, and place the other end of the probe through the pre-drilled hole of the 1.5-mL tube and into the water. 5.Wrap Parafilm around the top of the 1.5-mL tube and probe to form a seal. Avoid an excessive amount of Parafilm around the sides of the tube; otherwise it may not fit properly into the heat block. 6.Turn on the digital thermometer. 18 Step III: Measure and adjust the temperature of the incubator. 1.Place the 1.5-mL tube containing the probe from Step II into the prewarmed heat block from Step I. 2.Close the door, making sure there is sufficient slack in the wiring. 3.Wait 15 minutes for temperature to equilibrate. 4.Record the temperature. If necessary, adjust the temperature settings so that the digital thermometer reads 40°C. After adjustment, allow the incubator and heat block to equilibrate. Then recheck the temperature. 5.Repeat the step above to adjust temperature until the incubator is 40±1°C. Note: We recommend calibrating the incubator at least once a month to ensure accuracy. Step IV: Assess incubator temperature uniformity. 1.Repeat Step III to measure the temperature at multiple positions in the incubator to determine temperature uniformity. Note: The temperature for all positions should be 40±1°C. Step V: Assess temperature ramp-up time. 1.Remove the 1.5-mL tube containing the probe from the prewarmed heat block from Step III, and allow it to return to room temperature. 2.Open the incubator door for 1 minute, then place the 1.5-mL tube containing the probe from Step V1 into the heat block and close the door. Measure the time needed for the temperature to return to 40°C and monitor the temperature profile during recovery. 3.Repeat Steps V1–2 two more times. Note: Do not use the incubator for the assay if it takes more than 10 minutes to return to 40°C or if it overshoots by more than 2°C during recovery. 19 Appendix 7: Protocol using 96-well plates This protocol is validated based on the use of a polystyrene 96-well v-bottom plate (cat. no. 44-17005); polystyrene u-bottom plates may also be used. To discard supernatant from the wells, the plate may be inverted, using a single motion with adequate force, and then gently blotted on a paper towel. Alternatively, aspiration may be used, being careful to not disrupt the pellet. The residual volume inside each well should not exceed 10 µL. Note: Flat-bottom plates are not recommended for use with this protocol. Experimental procedure Day 1: Antibody staining, fixation, and permeabilization 20 1. Pre-warm PrimeFlow™ RNA Wash Buffer to room temperature. This buffer will first be used in Step 14. 2. Aliquot 1–5 x 10⁶ cells in 100 µL of Flow Cytometry Staining Buffer per well. Note: To use whole blood, it is necessary to pre-lyse the red blood cells before beginning the assay using the 10X RBC Lysis Buffer (cat. no. 00-4300). Please see the product datasheet or Best Protocols: Red Blood Cell Lysis Protocol, Protocol A for instructions for use. Alternatively, perform Steps 2–11 in bulk (refer to the 1.5-mL tube protocol above, Steps 2–10, to maintain the optimal sample to reagent ratio). 3. Surface stain cells with fluorochrome-conjugated antibodies at their optimal concentration for 30 minutes at 2–8°C. Note: If needed, please see Best Protocols: Staining Cell Surface Antigens for Flow Cytometry: Protocol A: Cell Suspensions for detailed instructions for staining. Note: Use antibodies that are conjugated to approved fluorochromes only (see General notes, Fluorochrome compatibility section above). Note: Cells may be stained with a Fixable Viability Dye before or after surface staining (see Best Protocols: Viability Staining Protocol, Protocol C for detailed instructions). Note: Staining for some surface markers may be done after fixation and permeabilization. Please see the Antibody Clone Performance Following Fixation/Permeabilization table on our website and refer to the column for “After IC Fixation and Perm Wash” to determine if the antibody clone will recognize a fixed epitope. If you prefer to stain after fixation, skip this step and proceed to Step 5. 4. Spin down at 500 x g for 4 minutes, then discard supernatant. 5. Add 200 µL of Flow Cytometry Staining Buffer to each sample, pipet to mix, and spin down at 500 x g for 4 minutes, then discard supernatant and resuspend cells in the residual volume by vortexing. 6. Prepare Fixation Buffer 1 by mixing equal parts of PrimeFlow™ RNA Fixation Buffer 1A and PrimeFlow™ RNA Fixation Buffer 1B. Mix gently by inverting. Note: You will need 200 µL of this buffer per well. Prepare this buffer in bulk to accommodate all samples. Avoid vortexing or vigorously shaking this buffer. This buffer should be prepared fresh. Dispose of any unused buffer. 7. Add 200 µL of prepared PrimeFlow RNA Fixation Buffer 1 to each sample and pipet to mix. Incubate for 30 minutes at 2–8°C. 8. Spin down at 1,000 x g for 4 minutes, then discard supernatant and resuspend cells in the residual volume by vortexing. 9. Prepare 1X PrimeFlow RNA Permeabilization Buffer with RNase Inhibitors by diluting PrimeFlow™ RNA Permeabilization Buffer (10X) to 1X with RNase-free water. Then add RNase Inhibitor 1 (1,000X) at a 1/1,000 dilution and RNase Inhibitor 2 (100X) at a 1/100 dilution. Mix gently by inverting. Keep at 2–8°C. Note: You will need 700 µL of this buffer per sample. Prepare this buffer in bulk to accommodate all samples. Avoid vortexing or vigorously shaking this buffer. This buffer should be prepared fresh. 10. Add 200 µL of 1X PrimeFlow RNA Permeabilization Buffer with RNase Inhibitors to each sample, pipet to mix, and spin down at 1,000 x g for 4 minutes, then discard supernatant and resuspend cells in the residual volume by vortexing. 11. Repeat Step 10. Note: Whole blood samples being prepared in bulk should be transferred into a 96-well plate before proceeding to Step 12. 12. Intracellularly stain cells with fluorochrome-conjugated antibodies at their optimal concentration in the 1X PrimeFlow RNA Permeabilization Buffer with RNase Inhibitors for 30 minutes at 2–8°C. Note: If intracellular staining is not desired, skip this step and proceed to Step 14. Note: Staining for some surface markers may be done after fixation and permeabilization. Please see the Antibody Clone Performance Following Fixation/Permeabilization table on our website and refer to the column for “After IC Fixation and Perm Wash” to determine if the antibody clone will recognize a fixed epitope. Note: Use antibodies that are conjugated to approved fluorochromes only (see general notes, fluorochrome compatibility section above). 13. Add 200 µL of 1X PrimeFlow RNA Permeabilization Buffer with RNase Inhibitors to each sample, pipet to mix, and spin down at 1,000 x g for 4 minutes, then discard supernatant and resuspend cells in the residual volume by vortexing. 14. Prepare 1X PrimeFlow RNA Fixation Buffer 2 by combining 25 µL of PrimeFlow™ RNA Fixation Buffer 2 (8X) with 175 µL of PrimeFlow RNA Wash Buffer per well. Mix gently by inverting. Note: You will need 200 µL of this buffer per well. Prepare this buffer in bulk to accommodate all samples. For example, for 10 samples, combine 250 µL of PrimeFlow RNA Fixation Buffer 2 (8X) with 1,750 µL of PrimeFlow RNA Wash Buffer. Avoid vortexing or vigorously shaking this buffer. This buffer should be prepared fresh. Dispose of any unused buffer. 15. Add 200 µL of 1X PrimeFlow RNA Fixation Buffer 2 to each well and pipet to mix. Incubate for 60 minutes in the dark at room temperature. Note: It is important to fix the samples at room temperature. Do not perform this step on ice. 16. [OPTIONAL] Cells may be stored in 1X PrimeFlow RNA Fixation Buffer 2 overnight in the dark at 2–8°C, instead of incubating for 60 minutes at room temperature (i.e., skip Step 15). 17. Spin down at 1,000 x g for 4 minutes, then discard supernatant and resuspend cells in the residual volume by vortexing. 18. Add 200 µL of PrimeFlow RNA Wash Buffer to each well, pipet to mix, and spin down at 1,000 x g for 4 minutes, then discard supernatant and resuspend cells in the residual volume by vortexing. 19. Repeat Step 18. 20. [OPTIONAL] Cells may be stored in PrimeFlow RNA Wash Buffer with RNase Inhibitor 1 overnight in the dark at 2–8°C with lid on. To do so, add RNase Inhibitor 1 (1,000X) to PrimeFlow RNA Wash Buffer at a 1/1,000 dilution and use in Step 19. Note: You will need 100 µL of this buffer per well. Prepare this buffer in bulk to accommodate all samples. This buffer should be prepared fresh. Dispose of any unused buffer. Day 1: Target probe hybridization Note: It is critical that the residual volume after all washes does not exceed 10 µL. Note: Diluted Target Probes should be pipetted directly into the cell suspension, and samples should be mixed well before incubating. The total volume for Target Probe hybridization should be 200 µL per well. 21. Thaw Target Probes, including Positive Control Probe Sets (20X), at room temperature. 22. Pre-warm PrimeFlow™ RNA Target Probe Diluent to 40°C. 23. Dilute Target Probes 1/20 in PrimeFlow RNA Target Probe Diluent. Mix thoroughly by pipetting up and down. Note: You will need 100 µL of diluted Target Probes for each sample. If you are adding more than one Target Probe per sample, adjust the volume of the PrimeFlow RNA Target Probe Diluent accordingly so that the final volume remains 100 µL per sample. 24. Add 100 µL of PrimeFlow RNA Wash Buffer to each well. Then add 100 µL of diluted Target Probe(s) directly into the cell suspension for the appropriate samples and pipet to mix. Incubate plate with the lid on for 2 hours at 40°C. Note: Plate sealing is not necessary for hybridization. Plates should be placed directly onto the incubator shelf. Do not stack plates. 21 25. Spin down at 1,000 x g for 4 minutes. Discard supernatant and resuspend cells in the residual volume by vortexing. 26. Add 200 µL of PrimeFlow RNA Wash Buffer, and spin down at 1,000 x g for 4 minutes. Discard supernatant and resuspend cells in the residual volume by vortexing. 27. Repeat Step 26. 28. Prepare PrimeFlow RNA Wash Buffer with RNase Inhibitor 1 by adding RNase Inhibitor 1 (1,000X) to PrimeFlow RNA Wash Buffer at a 1/1,000 dilution. Mix gently by inverting. Note: You will need 100 µL of this buffer per well. Prepare this buffer in bulk to accommodate all samples. This buffer should be prepared fresh. Dispose of any unused buffer. 29. Add 100 µL of PrimeFlow RNA Wash Buffer with RNase Inhibitor 1, and pipet to mix. 30. Store samples overnight in the dark at 2–8°C with lid on. Note: We recommend this stopping point for ease-of-use and a more manageable workflow. However, if desired, Step 30 may be skipped. If skipping this step, proceed to Step 31 and continue through to the end of the protocol. Day 2: Signal amplification Note: It is critical that the residual volume after all washes does not exceed 10 µL. Note: PrimeFlow™ RNA PreAmp Mix, PrimeFlow™ RNA Amp Mix, and diluted Label Probes should be pipetted directly into the samples and mixed well before incubating. The total volume for each hybridization is 200 µL per well. During hybridization, keep lid on the plate. Place plates directly on the incubator shelf. Do not stack plates. 31. Pre-warm samples and PrimeFlow RNA Wash Buffer to room temperature. 32. Pre-warm PrimeFlow RNA PreAmp Mix, PrimeFlow RNA Amp Mix, and PrimeFlow RNA Label Probe Diluent to 40°C. 33. Thaw PrimeFlow™ RNA Label Probes (100X) on ice in the dark. Note: This can be done during the Amp Mix incubation (Step 38). 34. Add 100 µL of PrimeFlow RNA PreAmp Mix directly into the cell suspension for each sample, and pipet to mix, and then incubate plate with the lid on for 1.5 hours at 40°C. 35. Spin down at 1,000 x g for 4 minutes, then discard supernatant and resuspend cells in the residual volume by vortexing. 36. Add 200 µL of PrimeFlow RNA Wash Buffer, and spin down at 1,000 x g for 4 minutes, then discard supernatant and resuspend cells in the residual volume by vortexing. 37. Repeat Step 36. 38. Add 100 µL of PrimeFlow RNA Wash Buffer to each well. Then add 100 µL of PrimeFlow RNA Amp Mix directly into the cell suspension, and pipet to mix. Incubate plate with the lid on for 1.5 hours at 40°C. 39. Spin down at 1,000 x g for 4 minutes, then discard supernatant and resuspend cells in the residual volume by vortexing. 40. Add 200 µL of PrimeFlow RNA Wash Buffer, and spin down at 1,000 x g for 4 minutes, then discard supernatant and resuspend cells in the residual volume by vortexing. 41. Repeat Step 40. 42. Dilute PrimeFlow RNA Label Probes (100X) 1/100 in PrimeFlow RNA Label Probe Diluent. Note: You will need 100 µL of diluted Label Probes for each sample. Prepare diluted Label Probes in bulk to accommodate all samples. 43. Add 100 µL of PrimeFlow RNA Wash Buffer to each well. Then add 100 µL of diluted PrimeFlow RNA Label Probes directly into the cell suspension, and pipet to mix. Incubate plate with the lid on for 1 hour at 40°C. 44. Spin down at 1,000 x g for 4 minutes. Discard supernatant and resuspend cells in the residual volume by vortexing. 45. Add 200 µL of PrimeFlow RNA Wash Buffer, and spin down at 1,000 x g for 4 minutes, then discard supernatant and resuspend cells in the residual volume by vortexing. 46. Repeat Step 45. 47. Add 200 µL of PrimeFlow RNA Storage Buffer or Flow Cytometry Staining Buffer, and spin down at 1,000 x g for 4 minutes, then discard supernatant and resuspend cells in the residual volume by vortexing. 22 48. If a plate adapter is used for sample acquisition, resuspend cells in an appropriate volume of PrimeFlow RNA Fixation Buffer or Flow Cytometry Staining Buffer, and analyze on a flow cytometer. Otherwise, transfer samples to 12 x 75 mm polystyrene tubes, resuspend cells in an appropriate volume of Storage Buffer or Flow Cytometry Staining Buffer, and analyze on a flow cytometer. Note: Samples may be stored before analysis. If samples have been stained with antibodies conjugated to tandem dyes, we recommend storing the samples in IC Fixation Buffer by mixing 100 µL of cells with 100 µL of IC Fixation Buffer. Store samples in the dark at 2–8°C for up to three days. Quick guide: PrimeFlow RNA Assay in 96-well plates Day 1: 1. Surface stain cells with antibody and/or fixable viability dye. 2. Wash once with Flow Cytometry Staining Buffer. Spin cells at 500 x g for 4 minutes. 3. Fix cells in PrimeFlow RNA Fixation Buffer 1 for 30 minutes at 2–8°C. 4. Wash twice with 1X PrimeFlow RNA Permeabilization Buffer with RNase Inhibitors. Spin cells at 1,000 x g for 4 minutes. 5. Intracellularly stain cells with antibody for 30 minutes at 2–8°C. 6. Wash once with 1X PrimeFlow RNA Permeabilization Buffer with RNase Inhibitors. Spin cells at 1,000 x g for 4 minutes. 7. Fix cells in 1X PrimeFlow RNA Fixation Buffer 2 for 60 minutes at room temperature. 8. Wash twice with PrimeFlow RNA Wash Buffer. Spin cells at 1,000 x g for 4 minutes. 9. Perform Target Probe hybridization for 2 hours at 40°C. 10. Wash twice with PrimeFlow RNA Wash Buffer. Spin cells at 1,000 x g for 4 minutes. 11. Wash once with PrimeFlow RNA Wash Buffer with RNase Inhibitor 1. Spin cells at 1,000 x g for 4 minutes. 12. Store samples overnight. Day 2: 13. Perform PreAmp hybridization for 1.5 hours at 40°C. 14. Wash twice with PrimeFlow RNA Wash Buffer. Spin cells at 1,000 x g for 4 minutes. 15. Perform Amp hybridization for 1.5 hours at 40°C. 16. Wash twice with PrimeFlow RNA Wash Buffer. Spin cells at 1,000 x g for 4 minutes. 17. Perform Label Probe hybridization for 1 hour at 40°C. 18. Wash twice with PrimeFlow RNA Wash Buffer. Spin cells at 1,000 x g for 4 minutes. 19. Wash once with PrimeFlow RNA Storage Buffer. Spin cells at 1,000 x g for 4 minutes. 20. Analyze samples on a flow cytometer. 23 Notes 24 Customers in countries where direct sales are not available may contact their local eBioscience distributor listed at www.ebioscience.com/distributors or email us at [email protected] Technical support: USA: +1.888.810.6168 (toll free) ¡ +1.858.642.2058 Europe: +43.1.796.4040.120 Affymetrix, Inc. 3420 Central Expressway Santa Clara, CA 95051 www.ebioscience.com FC05776-2 PrimeFlow User Manual 0915 © 2015 Affymetrix, Inc. All rights reserved.