1
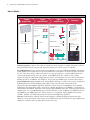
User Manual QuantiGene® ViewRNA miRNA ISH Cell Assay Format: Glass coverslips in 24-well plate P/N 18841 Rev.A 121010 For research use only. Not for use in diagnostic procedures. Trademarks Affymetrix® , and QuantiGene® are trademarks of Affymetrix, Inc. All other trademarks are the property of their respective owners. Limited License Subject to the Affymetrix terms and conditions that govern your use of Affymetrix products, Affymetrix grants you a non-exclusive, nontransferable, non-sublicensable license to use this Affymetrix product only in accordance with the manual and written instructions provided by Affymetrix. You understand and agree that, except as expressly set forth in the Affymetrix terms and conditions, no right or license to any patent or other intellectual property owned or licensable by Affymetrix is conveyed or implied by this Affymetrix product. In particular, no right or license is conveyed or implied to use this Affymetrix product in combination with a product not provided, licensed, or specifically recommended by Affymetrix for such use. Citing QuantiGene ViewRNA in Publications When describing a procedure for publication using this product, please refer to it as the QuantiGene ViewRNA miRNA ISH Cell assay. Disclaimer Affymetrix, Inc. reserves the right to change its products and services at any time to incorporate technological developments. This manual is subject to change without notice. Although this manual has been prepared with every precaution to ensure accuracy, Affymetrix, Inc. assumes no liability for any errors or omissions, nor for any damages resulting from the application or use of this information. Copyright © 2012 Affymetrix Inc. All rights reserved. Contents Chapter 1 Introduction . . . . . . . . . . . . . . . . . . . . . . . . . . . . . . . . . . . . . . . . . . . . . . . . . . . 1 About This Manual . . . . . . . . . . . . . . . . . . . . . . . . . . . . . . . . . . . . . . . . . . . . . . . . . . . . . . . . 1 Related User Documents . . . . . . . . . . . . . . . . . . . . . . . . . . . . . . . . . . . . . . . . . . . . . . . . . . . . 1 Assay Overview . . . . . . . . . . . . . . . . . . . . . . . . . . . . . . . . . . . . . . . . . . . . . . . . . . . . . . . . . . . 1 How it Works . . . . . . . . . . . . . . . . . . . . . . . . . . . . . . . . . . . . . . . . . . . . . . . . . . . . . . . . . . 2 Performance Highlights . . . . . . . . . . . . . . . . . . . . . . . . . . . . . . . . . . . . . . . . . . . . . . . . . . . 3 Safety Warnings and Precautions . . . . . . . . . . . . . . . . . . . . . . . . . . . . . . . . . . . . . . . . . . . . . 3 Required Materials . . . . . . . . . . . . . . . . . . . . . . . . . . . . . . . . . . . . . . . . . . . . . . . . . . . . . . . . 4 QuantiGene ViewRNA miRNA ISH Cell Assay Kit . . . . . . . . . . . . . . . . . . . . . . . . . . . . . . . . 4 QuantiGene ViewRNA miRNA Probe Sets . . . . . . . . . . . . . . . . . . . . . . . . . . . . . . . . . . . . . 5 QuantiGene ViewRNA TYPE 4 and TYPE 10 Probe Sets . . . . . . . . . . . . . . . . . . . . . . . . . . . 5 QuantiGene ViewRNA ISH Cell 740 Module (Optional) . . . . . . . . . . . . . . . . . . . . . . . . . . . 5 Required Materials and Equipment Not Provided . . . . . . . . . . . . . . . . . . . . . . . . . . . . . . . . 5 Microscopy and Imaging Equipment Guidelines . . . . . . . . . . . . . . . . . . . . . . . . . . . . . . . . . . 7 Chapter 2 Assay Guidelines . . . . . . . . . . . . . . . . . . . . . . . . . . . . . . . . . . . . . . . . . . . . . . . 9 About This Section . . . . . . . . . . . . . . . . . . . . . . . . . . . . . . . . . . . . . . . . . . . . . . . . . . . . . . 9 Assignment of mRNA Targets to Channels When Multiplexing . . . . . . . . . . . . . . . . . . . . . 9 Assessing Non-Assay Related Background . . . . . . . . . . . . . . . . . . . . . . . . . . . . . . . . . . . . . 9 Experimental Design Guidelines . . . . . . . . . . . . . . . . . . . . . . . . . . . . . . . . . . . . . . . . . . . . 10 Recommended Pretreatment Optimization . . . . . . . . . . . . . . . . . . . . . . . . . . . . . . . . . . . 11 Chapter 3 QuantiGene ViewRNA miRNA ISH Cell Assay Procedure. . . . . . . . . . . . . . . 13 About the QuantiGene ViewRNA miRNA ISH Cell Assay Workflow . . . . . . . . . . . . . . . . . 13 Important Procedural Notes and Guidelines . . . . . . . . . . . . . . . . . . . . . . . . . . . . . . . . . . .13 Part 1: Sample Preparation for Adherent Cells . . . . . . . . . . . . . . . . . . . . . . . . . . . . . . . . . . .14 A. Preparing of Poly-L-Lysine Coated Coverslips in 24-Well Plate . . . . . . . . . . . . . . . . . . . 14 B. Culturing Fresh Adherent Cells on Poly-L-Coated Coverslips in 24-Well Plate. . . . . . . . 14 Part 2: Sample Pretreatment and Target Probe(s) Hybridization . . . . . . . . . . . . . . . . . . . . . . 16 Part 2 Procedure . . . . . . . . . . . . . . . . . . . . . . . . . . . . . . . . . . . . . . . . . . . . . . . . . . . . . . 16 Part 3: Signal Amplification and Detection . . . . . . . . . . . . . . . . . . . . . . . . . . . . . . . . . . . . . 19 Part 3 Procedure . . . . . . . . . . . . . . . . . . . . . . . . . . . . . . . . . . . . . . . . . . . . . . . . . . . . . . 19 Chapter 4 Troubleshooting . . . . . . . . . . . . . . . . . . . . . . . . . . . . . . . . . . . . . . . . . . . . . . 23 Contacting Technical Support . . . . . . . . . . . . . . . . . . . . . . . . . . . . . . . . . . . . . . . . . . . . . 23 Poor Cell Morphology and Retention . . . . . . . . . . . . . . . . . . . . . . . . . . . . . . . . . . . . . . . . 23 High Non-Specific Binding Outside the Cells . . . . . . . . . . . . . . . . . . . . . . . . . . . . . . . . . . 23 Weak or No Signal . . . . . . . . . . . . . . . . . . . . . . . . . . . . . . . . . . . . . . . . . . . . . . . . . . . . . 24 Patchy and Diffused Fast Red Signals . . . . . . . . . . . . . . . . . . . . . . . . . . . . . . . . . . . . . . . . 25 iv QuantiGene® ViewRNA miRNA ISH Cell Assay User Manual High Background Inside Cells . . . . . . . . . . . . . . . . . . . . . . . . . . . . . . . . . . . . . . . . . . . . . 25 Variable Staining Within a Sample . . . . . . . . . . . . . . . . . . . . . . . . . . . . . . . . . . . . . . . . . .25 Appendix A Sample Preparation Procedure for Suspension Cells . . . . . . . . . . . . . . . . . 27 About the Preparation for Suspension Cells . . . . . . . . . . . . . . . . . . . . . . . . . . . . . . . . . . .27 Appendix B Detecting siRNA with QuantiGene miRNA ISH Cell Assay . . . . . . . . . . . . . 29 About Detecting siRNA with QuantiGene miRNA ISH Cell Assay . . . . . . . . . . . . . . . . . . . 29 1 Introduction About This Manual This manual provides complete instructions for performing the QuantiGene ViewRNA miRNA ISH Cell Assay for visualization of 1 target miRNA and up to 2 target mRNAs in adherent and suspension cultured cells. The procedures in this manual use samples processed on glass coverslips in a 24-well tissue culture plate using a temperature-validated dry incubator. Related User Documents Refer to the QuantiGene ViewRNA miRNA ISH Cell Assay User Manual, format: 96-well OpticalBotttom Plate for assay instructions using cultured cell samples processed in a 96-well optical-bottom plate. Refer to the QuantiGene ViewRNA miRNA ISH Cell Assay Supplemental Reference Guide for the following information: Guidelines for data interpretation Sample images to aid in optimization and troubleshooting Assay Overview In situ hybridization (ISH) techniques are used to visualize DNA or localize RNAs within cells. However, the in situ analysis of RNA, in particular, has always been limited by low sensitivity and complicated probe synthesis. In the case of miRNAs, these issues are further compounded by the short (~17-27 nt) target sequences, which have a tendency to diffuse out of the cells, limit the affinity and specificity of any probe designs in which standard nucleic acid chemistry is utilized, and in general, negatively affect the overall sensitivity of the assay. The QuantiGene ViewRNA miRNA ISH Cell Assay overcomes these challenges by (1) improving target retention, (2) incorporating a novel probe design with proprietary nucleic acid chemistry, and (3) employing a second generation branched DNA signal amplification system to allow visual detection and validation of miRNA expression down to a 4-nt difference at a single cell resolution. The sensitivity and robustness of the QuantiGene ViewRNA miRNA ISH Cell Assay permit simultaneous in situ detection of any miRNA and up to 2 mRNAs within cultured cells in an easyto-handle 24-well plate format. The assay design is illustrated and explained in Figure 1.1. 2 QuantiGene® ViewRNA miRNA ISH Cell Assay User Manual How it Works Figure 1.1 QuantiGene ViewRNA miRNA ISH Cell Assay Workflow Sample preparation Target hybridization Target-specific Probe Sets TYPE1 microRNA Probe Set TYPE 4 mRNA-1 Probe Set Fix, cross-link and permeabilize cells Signal amplification PreAmplifier Mix QM Detection TYPE4 TYPE1 Amplifier Mix QM TYPE1 Label Probes LP1-AP TYPE4 Incubate LP4-488 Fast Red Substrate Mount processed coverslip onto slide for imaging Visualize using fluorescence microscope Sequential hybridizations microRNA mRNA-1 microRNA mRNA-1 Sample Preparation. Cells are fixed and cross-linked to ensure retention of sample and targets. Cells are then permeabilized with detergent and digested with protease to allow target accessibility. Target Hybridization. Target-specific Probe Sets hybridize to each target miRNA and mRNA. Subsequent signal amplification is predicated on specific hybridization of the pair(s) of oligonucleotides (indicated by “II” in the above image) within each probe set to the target sequence. A typical mRNA Probe Set contains 20 oligonucleotide pairs. By contrast, each miRNA Probe Set consists of only a single oligonucleotide pair synthesized using proprietary nucleic acid chemistry to increase the Tm and enhance binding specificity to miRNAs. For simplicity, only 2 pairs per mRNA target are shown in the figure. Signal Amplification. Signal amplification, using bDNA technology, is achieved via a series of sequential hybridization steps. The PreAmplifiers hybridize to their respective pair of bound Probe Set oligonucleotides then multiple Amplifiers hybridize to their respective PreAmplifier. Next, multiple Label Probe oligonucleotides, either conjugated to alkaline phosphatase (for miRNA) or to fluorescent ALEXA fluor (for mRNA), hybridize to the corresponding Amplifier molecules. A fully assembled signal amplification “tree” has 400 binding sites for the Label Probe (a total of 400 for each miRNA molecule and 8,000 for each mRNA molecule). These separate, yet compatible, signal amplification systems (TYPE 1, TYPE 4, and TYPE 10) provide the assay with multiplexing capability. Detection. Following the addition of the Fast Red substrate, alkaline phosphatase breaks down the substrate to form a precipitate wherever the target miRNA molecule is localized. The target miRNA and mRNA are visualized with a standard fluorescent microscope. Chapter 1 | Introduction 3 Performance Highlights Table 1.1 Performance Highlights Specification Description Sample types Adherent or suspension cultured cells Format Cultured cells on or adhered to glass cover-slips in a 24-well plate Sensitivity miRNAs/mRNA Single molecule that appears as a single spot/dot in cells Multiplexing 1 miRNA + up to 2 mRNAs (simultaneous detection) Detection miRNA: fluorescence or chromogenic mRNAs: fluorescence Nuclear stain DAPI Instrumentation Fluorescence and brightfield microscope Safety Warnings and Precautions Formaldehyde is a poison and an irritant. Avoid contact with skin and mucous membranes. Use in a fume hood. EDC is a cross-linker and can cause respiratory tract, eye and skin irritation as well as target organ damage. Do not breathe dust and use with adequate ventilation. Avoid contact with eyes, skin and clothing. Cross-Linking Buffer QM contains 1-methylimidazole, which is corrosive and harmful by ingestion and inhalation. Avoid contact with eyes, skin and mucous membrane. Probe Set Diluent QF, PreAmplifier Mix QM, and Amplifier Mix QM contain formamide, a teratogen, irritant and possible carcinogen. Avoid contact with mucous membranes. DAPI is a possible mutagen. Avoid contact with skin and mucous membranes. Perform all procedural steps in a well-ventilated area at room temperature unless otherwise noted. Discard all reagents in accordance with local, state, and federal laws. 4 QuantiGene® ViewRNA miRNA ISH Cell Assay User Manual Required Materials The QuantiGene ViewRNA miRNA ISH Cell Assay, for detection of 1 miRNA and 1 mRNA, is composed of 3 modules each sold separately: QuantiGene ViewRNA miRNA ISH Cell Assay Kit (for detection of 1 miRNA + 1 mRNA) QuantiGene ViewRNA miRNA TYPE 1 Probe Set QuantiGene ViewRNA TYPE 4 Probe Set(s) For detection of 1 miRNA and 2 mRNAs the following additional components are required: QuantiGene ViewRNA 740 Module QuantiGene ViewRNA TYPE 10 Probe Set QuantiGene ViewRNA miRNA ISH Cell Assay Kit QuantiGene ViewRNA miRNA ISH Cell Assay Kit contains sufficient materials to perform 24 assays in a 24-well plate format. This kit is compatible with TYPE 1 Probe Sets designated for miRNA, TYPE 4 and TYPE 10 for mRNAs. Each kit is configured for processing a minimum of 6 wells per experiment. The components of the QuantiGene ViewRNA miRNA ISH Cell Assay Kit and their recommended storage conditions are listed below. Refer to the product insert for quantities of individual components supplied. Kits are shipped in 3 parts, based on storage conditions and have a shelf life of 6 months from date of delivery when stored as recommended. Table 1.2 Assay Kit Components and Their Storage Conditions: Component Description Label Probe 4-488 ALEXA 488-labeled oligonucleotides in aqueous buffered solution –20 °C 100X DAPI Aqueous solution containing DAPI stain –20 °C Protease QSa Enzyme in aqueous buffered solution 2-8 °C Probe Set Diluent QF Aqueous solution containing formamide and detergent 2-8 °C PreAmplifier Mix QM PreAmp 1 and PreAmp 4 in aqueous solution containing formamide and detergent 2-8 °C Amplifier Mix QM Amp 1 and Amp 4 in aqueous solution containing formamide and detergent 2-8 °C Label Probe Diluent QF Aqueous solution containing detergent 2-8 °C AP Enhancer Solution Aqueous buffered solution 2-8 °C Fast Red tablets Red precipitating substrate for the detection of alkaline phosphatase activity 2-8 °C Naphthol Buffer Buffer required for preparation of Fast Red Substrate 2-8 °C Label Probe 1-APa Alkaline phosphatase-conjugated oligonucleotide in aqueous buffered saline 2-8 °C 10X PBS Aqueous buffered solution 15-30 °C Detergent Solution QC Aqueous solution containing detergent 15-30 °C Cross-Linking Buffer QM Aqueous buffered solution containing 1-methylimidazole 15-30 °C Wash Buffer Component 1 (Wash Comp 1) Aqueous solution containing detergent 15-30 °C Wash Buffer Component 2 (Wash Comp 2) Aqueous buffered solution 15-30 °C a IMPORTANT! Do not freeze. Storage Chapter 1 | Introduction 5 QuantiGene ViewRNA miRNA Probe Sets QuantiGene ViewRNA miRNA TYPE 1 Probe Sets are available in multiple sizes and should be stored at –20 °C. Refer to the product insert for quantities provided and design specificities. Our current probe set catalog can be found at Panomics.com. Table 1.3 ViewRNA miRNA TYPE 1 Probe Set and Storage Conditions: Component Description QuantiGene ViewRNA miRNA TYPE 1 Probe Set RNA-specific oligonucleotides designed against an miRNA target of interest and are compatible with TYPE 1 Signal Amplification System. Storage –20 °C QuantiGene ViewRNA TYPE 4 and TYPE 10 Probe Sets The QuantiGene ViewRNA Probe Sets are available in multiple sizes. Only those designated as TYPE 4 and TYPE 10 are compatible with the QuantiGene ViewRNA miRNA Cell Assay Kit. Refer to the product insert for quantities provided and design specificities. Our current probe set catalog can be found at Panomics.com. Table 1.4 ViewRNA TYPE 4 and TYPE 10 Probe Set and Storage Conditions: Component Description Storage QuantiGene ViewRNA TYPE 4 Probe Set RNA-specific oligonucleotides designed against a transcript target of interest and are compatible with the TYPE 4 Signal Amplification System with detection using ALEXA 488. –20 °C QuantiGene ViewRNA TYPE 10 Probe Set (Optional) RNA-specific oligonucleotides designed against a transcript target of interest and are compatible with the TYPE 10 Signal Amplification System with detection using ALEXA 750. –20 °C QuantiGene ViewRNA ISH Cell 740 Module (Optional) The QuantiGene ViewRNA ISH Cell 740 Module is available separately and offers the flexibility of expanding the assay to a 3-plex assay (1 miRNA + 2 mRNAs). Table 1.5 ViewRNA ISH Cell 740 Module Contents and Storage Conditions: Component Description QuantiGene ViewRNA ISH Cell 740 Module Set of 3 reagents necessary for signal amplification and visualization of target mRNA with a 740 nm filter. Each set is composed of PreAmp10-740, Amp10-740 and LP10-740. Compatible with TYPE 10 Probe Sets. Storage –20 °C Required Materials and Equipment Not Provided Other materials required to perform the QuantiGene ViewRNA miRNA ISH Cell Assay that are not included in the QuantiGene ViewRNA miRNA ISH Cell Assay Kit are listed here. IMPORTANT: When specified, do not use alternate materials or suppliers. 6 QuantiGene® ViewRNA miRNA ISH Cell Assay User Manual Table 1.6 QuantiGene ViewRNA miRNA ISH Cell Assay Materials and Equipment Required but not Provided: Material Source Part Number Double-Distilled Water (ddH2O) MLSa 100% Ethanol (200 proof) VWR 89125-188 37% Formaldehyde Fisher Scientific F79-1 Prolong® Gold Antifade Reagent Life Technologies P36930 Poly L-Lysine Sigma P8920 Sterile Nuclease-Free Water MLS Complete Cell Culture Medium MLS Sterile Culture Grade 1X PBS MLS EDC (1-ethyl-3-[3-dimethylaminopropyl] carbodiimide hydrochloride) Pierce Biotechnology 22980 Microscope Slidesb Affymetrix QVC0505 Coverslipsb Affymetrix QVC0507 Forcepsb (straight, fine-tipped) Affymetrix QVC0501 24-Well Tissue Culture Plateb Affymetrix QVC0504 QuantiGene View Temperature Validation Kit or QuantiGene Incubator Temperature Validation Kit Affymetrix QV0523 QS0517 Water Bath (capable of maintaining 40 ± 1 °C) MLS Pipettes (P20, P200, P1000) MLS Table-Top Microtube Centrifuge MLS Platform Rocker MLS Dry Incubator (capable of maintaining 40 ± 1 °C) Affymetrix Microscope and Imaging Equipment See QuantiGene ViewRNA miRNA ISH Cell Assay Imaging Options on page 7 Fume Hood MLS Laminar Flow Hood MLS Optional Vacuum System (set to aspirate at a rate of ~2 mL/5 sec) MLS Equipment Optional Aspirator 8-Channel Aspirator Adapter a Major Laboratory Supplier b These items are included in the QuantiGene ViewRNA ISH Cell Assay Accessory Kit (Affymetrix P/N QVC0700) VWR VWR QS0704 (1.6 ft3; 120V) QS0700 (3 ft3; 120V) QS0701 (5 ft3; 120V) QS0712 (1.6 ft3; 220V) QS0710 (3 ft3; 220V) QS0711 (5 ft3; 220V) 8909-050 29443-002 Chapter 1 | Introduction Microscopy and Imaging Equipment Guidelines Table 1.7 QuantiGene ViewRNA miRNA ISH Cell Assay Imaging Options Viewing and Digital Capturing Options Brightfield viewing Microscope Type Standard brightfield microscope Recommended Microscope/ System Leica DM series Nikon E series Olympus BX series Zeiss Axio Lab/Scope /Imager Or equivalent Inverted microscope OK if optics and condenser meet requirements Required Optics Fluorescence viewing and image capture Microscope with camera and fluorescence options Fluorescence detection requires high-resolution, high-sensitivity cooledCCD camera: 6.45 μm pixel size or smaller >65% peak Quantum Efficiency 6-10 electrons read noise Common models include: CoolSnap HQ2 (Photometrics) Orca R2 (Hamamatsu) Retiga Exi (QImaging) Leica DM series Nikon E series Olympus BX series Zeiss Axio Lab/Scope/Imager Or equivalent Inverted microscope OK if optics and condenser meet requirement Light source must have sufficient output at 700775 nm with removable IR blocking filter if using ALEXA 750 Recommended Filter Requires 20 and 40x objectives 20X objective is for visualization of high expression gene and 40X is for visualization of low expression genes Condenser (N.A. >0.5) Requires neutral density filters and/or color filters for white balancing 20X (N.A. 0.75) air and 40X (N.A. 1.3) oil immersion objectives 20X objective is for visualization of high expression gene and 40X is for visualization of low expression genes For Fast Red Substrate: Excitation: 530/40 nm Emission: 590/40 nm (e.g., Semrock Cy34040c) For ALEXA 488: Excitation: 485/20 nm Emission: 524/24 nm (e.g., Semrock FITC2024B) For ALEXA 750: Excitation: 708/75 nm Emission: 809/81 nm (e.g., Semrock Cy7-B) For DAPI filter set Excitation: 387/11 nm Emission: 447/60 nm (e.g., Semrock DAPI11060B) 7 8 QuantiGene® ViewRNA miRNA ISH Cell Assay User Manual 2 Assay Guidelines About This Section The success of any in situ hybridization assay is measured by the maximal specific signal-to-background ratio. In this section, we provide recommendations on (a) assignment of mRNA targets to the available channels when multiplexing, (b) assessing for non-assay related background (c) experimental design and (d) pretreatment assay optimization that will ensure your chance of success with the QuantiGene ViewRNA miRNA ISH Cell Assay. Assignment of mRNA Targets to Channels When Multiplexing The QuantiGene ViewRNA miRNA ISH Cell Assay has multiplexing capability and allows for in situ detection of any miRNA and up to 2 mRNAs. However, when multiplexing 2 mRNAs, it is helpful to have some knowledge of the expression level of the two targets, as this will assist in the proper assignment of the mRNA targets to the available channels (FITC or Cy7) in order to achieve the best signal detection. While the FITC channel can be utilized for any mRNA target with low, medium, or high expression, the Cy7 channel should be reserved for mRNA targets with high expression due to its inherent lower sensitivity. It should be noted that the dimmer property of the signals typically associated with Cy7 channel is not assay-related, but rather a product of the innate characteristic of many fluorophores that emit light in the far red region (for example, ALEXA 750) and the limitations of conventional instruments (that is, camera and light source) used for this channel. Nonetheless, the following guidelines will ensure proper signal detection of your targets when performing multiplex assay. Table 2.1 Guidelines for Proper Signal Detection: Target Probe Set PreAmp Amp Label Probe Substrate Detection Signal Recommended Target miRNA TYPE 1 PreAmp 1 Amp 1 LP1-alkaline phosphatase Fast Red Fast Red Any miRNA with low, medium or high expression mRNA #1 TYPE 4 PreAmp 4 Amp 4 LP4-ALEXA 488 None ALEXA 488 Any mRNA with low, medium or high expression mRNA #2 TYPE 10 PreAmp 10 Amp 10 LP10-ALEXA 750 None ALEXA 750 Any high expressing transcript Assessing Non-Assay Related Background Background signal can come from a variety of sources, including: (1) auto-fluorescence from the cell type being tested, (2) the materials used to coat the coverslips, and (3) the glass slides. As such, it is important to assess and identify whether any of these reagents or materials are contributing to your background 10 QuantiGene® ViewRNA miRNA ISH Cell Assay User Manual signal. We recommend performing the following experiment to assess the sample background prior to performing any assays. You can avoid doing this step if you use the recommended materials listed in Table 1.6 on page 6. Table 2.2 Procedure for Assessing Non-Assay Related Background: Step Action 1 Grow cells overnight on a coverslip coated with appropriate matrix protein. 2 After overnight recovery, wash cells once with 1X PBS. 3 Fix with 4% formaldehyde (diluted in 1X PBS) for 10 min at room temperature. 4 Stain with 1X DAPI solution (diluted in 1X PBS from the 100X stock solution supplied in the kit) for 5 min. 5 Mount the coverslip onto a glass microscope slide using Prolong® Gold Antifade Reagent (see Step 20. Mounting on Glass Slide on page 21). 6 Observe the samples using a fluorescent microscope with the filter sets intended for future experiment. Expected Results The background fluorescence on the glass surface should be minimal with strong, nuclear DAPI staining. Some smear, bright spots or debris should be observed in the 488 nm, Fast Red, or 750 nm detection channel. If any of the materials used results in a high level of auto-fluorescence such that it would hinder the detection of your specific signals, we recommend checking the reagents used and verifying that they have been validated for use with the QuantiGene ViewRNA miRNA ISH Cell Assay (see Table 1.6 on page 6 for recommended suppliers). Some cell lines will exhibit high auto-fluorescence, particularly in the 488 nm channel. This is a normal biological property of the cells. If this occurs, the 488 nm dye can still be used for detecting your mRNA of interest since the specific signals are generally much brighter than the autofluorescence. Alternatively, if the type of cell line being used is not critical, perform the assay using a different cell line. Experimental Design Guidelines Control Cell Lines We recommend running positive and negative control cell lines, based on your sample type, in every QuantiGene ViewRNA miRNA ISH Cell Assay. This will allow you to appropriately qualify and interpret your results. Examples include: Isogenic cell lines (+/-) miRNA target expression Cell line (+/-) known treatment that induces up- or down-regulation of miRNA expression Negative Assay Control This sample undergoes the entire assay procedure with the exception of adding the target Probe Set(s). Alternatively, a Probe Set designed against a target not present in your cell line, for example, bacterial target DapB. This control permits the assessment of assay background. Positive Assay Control This sample undergoes the entire assay procedure using Probe Set(s) against targets with high to medium high expression and are either expressed ubiquitously (for example, Let-7a for miRNA and ActB for mRNA) or specifically in your cell type. This control ensures that the assay procedure has been performed successfully. Replicates We recommend running all assays in duplicate. Chapter 2 | Assay Guidelines 11 Recommended Pretreatment Optimization Critical to any in situ assay is the balance between the cross-linking of cells to the glass surface and target molecules to the cellular structures by chemical fixatives and the subsequent unmasking of the miRNA and mRNA targets by protease digestion for the probes to hybridize. Because the optimal pretreatment conditions are largely sample dependent, we recommend running a duplex assay, that is, 1 miRNA + 1 mRNA and titrating the fixation time and protease concentration as described in Table 2.3 to empirically determine the optimal condition for any new cell type to ensure an optimal balance between cell retention and target accessibility. When optimizing the pretreatment conditions for your cell type, choose a pair of targets with medium to medium-high levels of expression. This will avoid possible signal saturation that may be associated with extremely high expressing targets and allow for detectable changes in the signals to be assessed as a function of the different pretreatment conditions. In general, a housekeeping gene with medium expression, such as PPIB, can be used as the mRNA target for this purpose and Let-7a can be employed as the miRNA counterpart. Once the optimal pretreatment conditions have been identified for a cell type, the same conditions can be used with different probes with no impact on assay performance. Table 2.3 Recommended Pretreatment Optimization Conditions: Protease Dilution Formaldehyde Fixation Time 30 min 60 min 1:500 +/- probe +/- probe 1:1000 +/- probe +/- probe 1:2000 +/- probe +/- probe 1:4000 +/- probe +/- probe Selecting the Optimal Conditions While these initial conditions should work for most samples, keep in mind that some cell types may require pretreatment conditions that fall outside this initial range. When visualizing the in situ hybridized samples under the microscope, use the following criteria to select the optimal assay conditions: Least Cell Loss. The majority of cell loss typically occurs after the protease digestion. If the cell loss is less than 50%, proceed with the assay. Least Impact on Cell Morphology and Structure. Cell morphology and structure is most affected by the protease digestion. A protease condition that sufficiently exposes the targets without loss of nuclei or morphology is desired. Highest Signal-to-Background Ratio. Highest signal-to-background ratio of specific fluorescent dots inside the cell. The average signal-to-background ratio should generally be greater than 3 for mRNA and 8 for miRNA signals. If you choose to bypass the recommended pretreatment assay optimization, note that the assay protocol provided in this user manual serves only as a starting point. Understanding the following trends will aid in any future pretreatment assay optimization study. Refer to the QuantiGene ViewRNA miRNA ISH Cell Assay Reference Guide for more information. Under fixation causes a loss of cells and target molecules and results in no or low signals. Over fixation prevents proper unmasking of the targets and results in no or low signals. For optimal target retention, miRNA targets (shorter length) typically requires longer fixation time than the mRNA targets (longer length). Given the same fixation condition, mRNA targets require stronger protease treatment than miRNA targets for optimal signal detection. The current assay conditions favor miRNA detection; to improve mRNA detection, a trade-off in miRNA signal may be necessary. 12 QuantiGene® ViewRNA miRNA ISH Cell Assay User Manual 3 QuantiGene ViewRNA miRNA ISH Cell Assay Procedure About the QuantiGene ViewRNA miRNA ISH Cell Assay Workflow The QuantiGene ViewRNA miRNA ISH Cell Assay workflow is sectioned into 3 parts that are performed over the course of 4 days: Part 1: Sample Preparation (performed at least 2 days prior to the QuantiGene ViewRNA miRNA ISH Cell Assay) Part 2: Sample Pretreatment and Target Probe(s) Hybridization Part 3: Signal Amplification and Detection Important Procedural Notes and Guidelines Use sterile cell culture reagents and techniques when preparing poly-L-lysine coated glass coverslips and culturing cells. Avoid reagent shortage by running at least 6 wells or more at a time and using a single-channel pipette for dispensing any reagents other than 1X PBS, Wash Buffer and Fast Red Substrate. Use a vacuum system, if possible, for all steps that require aspiration. Aspirate from the bottom edge of the wells and dispense against the upper edge of the well to minimize cell loss or displacement. Before You Start Validate the temperature of the dry incubator using either the QG ViewRNA Temperature Validation Kit (Affymetrix P/N QV0523) or the QuantiGene Incubator Temperature Validation Kit (Affymetrix P/N QS0517). Make sure that the EDC is fresh and properly stored in desiccant. Identify the optimum formaldehyde fixation time and protease concentration for your sample type. Practice removing coverslips from tissue culture 24-well plate with fine tipped forceps and mounting them onto microscope slides as described in Step 20. Mounting on Glass Slide on page 21. 14 QuantiGene® ViewRNA miRNA ISH Cell Assay User Manual Part 1: Sample Preparation for Adherent Cells Adherent cells that are used in the QuantiGene ViewRNA miRNA ISH Cell Assay must be cultured and fixed on poly-L-lysine coated 12-mm circular coverslips. Begin the coating procedure the day prior to seeding the cells. The optimal cell density for this assay is 70-90% confluent at the start of the assay. NOTE: If working with suspension cells, refer to Sample Preparation Procedure for Suspension Cells on page 27. A. Preparing of Poly-L-Lysine Coated Coverslips in 24-Well Plate Step Step 1. Prepare Reagents Action A. Prepare 25 mL of a 0.01% poly-L-lysine solution: Mix 2.5 mL of the poly-L-lysine stock solution + 22.5 mL of nuclease-free water. Set aside until use. B. 5 min Ensure availability of: 100% ethanol Step 2. Sterilize Coverslips 1X PBS (sterile) 24-well tissue culture plate 12-mm glass coverslips Fine-tipped forceps In a culture hood, place one coverslip into each well of a sterile tissue culture 24-well plate. To sterilize the coverslips, dispense 1 mL/well of 100% ethanol and soak at RT for 15 min. 20 min Step 3. Dry Coverslips Aspirate off the 100% ethanol and allow the coverslips to air dry completely for 15 min. 20 min Step 4. Coat Coverslips Dispense 1 mL/well of diluted poly-L-lysine, ensuring that the coverslips are completely submerged in the solution. Incubate for 15 min at RT. 20 min Step 5. Wash Coverslips Aspirate off the poly-L-lysine and rinse the coverslips three times, each time with 2 mL/well of 1X PBS. 10 min Step 6. Incubate Overnight Aspirate off the final 1X PBS. Allow to air dry, with lid off, in a laminar flow tissue culture hood overnight. Keep air flow on and turn UV light off to prevent the tissue culture plastic from becoming brittle and cracking during the assay. NOTE: Coverslips may be used directly for cell seeding or stored at 4 °C in the 24-well tissue culture plate with lid on and sealed with parafilm for up to 1 month. Step 7. Proceed to culturing cells on poly-L-lysine coated coverslips. B. Culturing Fresh Adherent Cells on Poly-L-Coated Coverslips in 24-Well Plate. Step Step 1. Dissociate Cells from Culture Flask with Trypsin 5 min Action Wash the adherent cells with 1X PBS and treat with trypsin. Resuspend the cells in complete culture medium. Chapter 3 | QuantiGene ViewRNA miRNA ISH Cell Assay Procedure 15 Step Step 2. Remove Trypsin Action Pellet the cells (200 x g, 5 min) at RT, remove the supernatant, and resuspend the cell pellet in fresh complete culture medium 10 min Step 3. Count and Adjust Cell Density Count and adjust the cell density such that when seeded, 1 mL/well, the culture will reach 70-90% confluence at the start of the assay. 10 min Step 4. Seed Cells on Coverslips Dispense 1 mL/well of the adjusted cell suspension gently over the poly-L-lysine coated coverslips. Make sure all coverslips are submerged in the cell culture medium. 5 min Step 5. Incubate Overnight Incubate the plate overnight under the recommended growth conditions for the cells. Step 6. Proceed to Part 2: Sample Pretreatment and Target Probe(s) Hybridization on page 16. 16 QuantiGene® ViewRNA miRNA ISH Cell Assay User Manual Part 2: Sample Pretreatment and Target Probe(s) Hybridization Part 2 Procedure Step Step 1. Sample Fixation Action A. Prepare 1L of 1X PBS: Mix 100 mL of 10X PBS + 900 mL of ddH20 water. This will be used throughout the assay. 1 hr 15 min B. In a fume hood, prepare 11 mL of fresh 4% formaldehyde solution: Dilute 1.2 mL of a 37% formaldehyde stock + 9.8 mL of 1X PBS. Vortex briefly to mix. C. Carefully aspirate off culture medium, avoiding contact with coverslips and cells. Gently rinse coverslips twice, each time with 2 mL/well of 1X PBS. D. Aspirate off the final 1X PBS wash and add 400 μL/well of freshly prepared 4% formaldehyde, making sure that the coverslips are submerged. Cover plate with lid and incubate at RT for 60 min under a fume hood. E. Step 2. Preparing Buffers and Reagents during Sample Fixation 0 min Aspirate off the formaldehyde solution and gently rinse the coverslips three times, each with 2 mL/well of 1X PBS. A. Set a dry incubator to 40 ± 1 °C. Calibrate and monitor temperature using either the QG ViewRNA Temperature Validation Kit (Affymetrix P/N QV0523) or the QuantiGene Incubator Temperature Validation Kit (Affymetrix P/N QS0517) according to the manufacturer's instructions. B. Equilibrate EDC to RT C. Pre-warm Probe Set Diluent QF to 40 °C. D. Thaw Probe Set(s). Vortex briefly to mix, centrifuge to collect contents to the bottom of the tubes, and place tubes on ice until use. E. F. Place Protease QS on ice. Prepare 800 mL of Wash Buffer by adding components to a 1 L capacity container in the following order, to prevent formation of precipitates, and then mixing well: 1) 2) 3) 793.6 mL ddH20 2.4 mL Wash Comp 1 4 mL Wash Comp 2 G. Prepare 30 mL of Storage Buffer: Mix 9 mL of Wash Comp 2 + 21 mL of nuclease-free water. H. Ensure availability of the following: 1X PBS Cross-Linking Buffer QM Detergent Solution QC 50%, 70% and 100% ethanol Platform rocker (at moderate speed setting) Chapter 3 | QuantiGene ViewRNA miRNA ISH Cell Assay Procedure 17 Step Step 3. EDC Cross-Linking 1 hr 30 min Action IMPORTANT: Prepare the EDC Cross-Linking Solution no more than 10 min before use. The calculations provided here are for 24 wells. If assaying fewer samples, please scale down accordingly. A. Remove all trace of 1X PBS and add 400 μL/well of Cross-Linking Buffer QM. Cover the plate with lid and rock gently at RT for 10 min. B. Aspirate off the Cross-Linking Buffer QM completely and replace with 400 μL/well of fresh Cross-Linking Buffer QM. Cover the plate with lid and rock moderately at RT for 10 min. C. Carefully weigh out 337.7 mg of EDC into a clean 50 mL conical tube. D. Prepare 0.16 M EDC Solution by adding 11 mL of fresh Cross-Linking Buffer QM to the EDC. Cover the tube and vortex to dissolve. Set the solution aside at RT until use. E. Aspirate off the Cross-Linking Buffer QM from each well and add 400 μL/well of 0.16 M EDC solution. F. Cover the plate with lid and rock at moderate speed setting at RT for 1 hr. G. Aspirate off the EDC solution and rinse cells three times, each with 2 mL/well of 1X PBS. H. Choose one of the following options: Step 4. Dehydrating for Storage (optional) 15 min To proceed with the next step in the assay, go to Step 6. Permeabilizing Cells To store the samples for later use, go to Step 4. Dehydrating for Storage (optional) NOTE: Samples can be dehydrated and stored in 100% ethanol at –20 °C for up to 1 month. A. Aspirate off the 1X PBS and replace with 400 μL/well of 50% ethanol. Incubate for 2 min at RT. B. Aspirate off the 50% ethanol and replace with 400 μL/well of 70% ethanol. Incubate for 2 min at RT. C. Aspirate off the 70% ethanol and replace with 400 μL/well of 100% ethanol. Incubate for 2 min at RT. D. Aspirate off the 100% ethanol and replace with 400 μL of fresh 100% ethanol. E. Seal the plate with parafilm and store the dehydrated cells in 100% ethanol at –20 °C until needed. Dehydrated cells can be stored under these conditions for 1 month. F. Go to Step 5. Rehydrating Samples after Storage (optional) when you want to continue the assay. NOTE: Dehydrated cells must be rehydrated prior to being permeabilized with detergent. Step 5. Rehydrating Samples after Storage (optional) NOTE: Rehydration is ONLY necessary when using dehydrated cell samples. Skip this step and proceed directly to Step 6 when using freshly fixed and cross-linked adherent samples. A. Aspirate off the 100% ethanol and replace with 400 μl/well of 70% ethanol. Incubate for 2 min at RT. 15 min B. Aspirate off the 70% ethanol and replace with 400 μL/well of 50% ethanol. Incubate for 2 min at RT. C. Aspirate off the 50% ethanol and replace with 400 μL/well of 1X PBS. Incubate for 10 min at RT. D. Proceed to Step 6. Permeabilizing Cells. Step 6. Permeabilizing Cells A. Aspirate off the 1X PBS and replace with 400 μl/well of Detergent Solution QC. Cover plate with lid and incubate at RT for 10 min. B. 15 min Aspirate off the Detergent Solution QC and rinse cells twice, each with 2 mL/well of 1X PBS. Allow samples to sit in the final 1X PBS wash while preparing the Working Protease Solution for the next step. 18 QuantiGene® ViewRNA miRNA ISH Cell Assay User Manual Step Step 7. Digesting with Protease 25 min Action IMPORTANT: The optimal protease concentration can vary with cell type. If you do not wish to perform the optimization in Recommended Pretreatment Optimization on page 11, we suggest starting with a 1:1000 protease dilution in 1X PBS and optimize as needed. A. Prepare the Working Protease Solution by diluting the Protease QS 1:1000 in 1X PBS. Scale reagents accordingly to the number of assays to be run and include overage for an extra well. Working Protease Solution for 1 Wella Reagent Protease QS 0.4 μL 1X PBS 399.6 μL Total volume a Scale B. C. Volume 400 μL accordingly for other dilution ratios. Vortex briefly to mix. Aspirate off the 1X PBS and replace with 400 μl/well of Working Protease Solution. Cover plate with lid and incubate at RT for 10 min. D. Aspirate off the Working Protease Solution and rinse cells three times, each with 2 mL/well of 1X PBS. Allow samples to sit in the final 1X PBS wash while preparing the Working Probe Set Solution for the next step. Step 8. Hybridizing with Probe Set(s) A. Prepare the Working Probe Set Solution by diluting each Probe Set 1:100 in pre-warmed Probe Set Diluent QF. Scale reagents accordingly to the number of assays to be run and include overage for an extra well. 3 hr 10 min Working Probe Set Solution for 1 Well Reagent Volume Probe Set (each) Probe Set Diluent QF (pre-warmed at 40 °C) 4 μL 400 μL - (4x) μL where x = # of probe sets used in each assay Total volume B. C. 400 μL Vortex briefly to mix. Aspirate off the 1X PBS and replace with 400 μL/well of the appropriate Working Probe Set Solution. For the no probe negative control, use 400 μL/well of pre-warmed Probe Set Diluent QF or a Probe Set designed against a target not present in the test cell line. D. Cover plate with lid and incubate at 40 °C for 3 hours. Step 9. Wash Cells 10 min Step 10. Stopping Point A. Remove plate from the incubator. B. Aspirate off the Working Probe Set Solution and wash cells three times, each with 2 mL/ well of Wash Buffer. Soak cells for 3 min between aspirations. A. Aspirate off the Wash Buffer and replace with 1 mL/well of Storage Buffer. B. Cover plate with lid, seal with parafilm. C. Store plate at 4 °C overnight for up to 24 hours. Chapter 3 | QuantiGene ViewRNA miRNA ISH Cell Assay Procedure 19 Part 3: Signal Amplification and Detection Part 3 Procedure Step Action Step 11. Prepare Additional Buffers and Reagents A. Prewarm PreAmplifier Mix QM, Amplifier Mix QM, and Label Probe Diluent QF to 40 °C. B. Place Label Probe 1-AP on ice. C. Thaw Label Probe 4-488 at RT. Vortex briefly to mix and place tubes on ice until use. Protect 10 min D. Thaw 100X DAPI briefly at RT. Vortex to mix. Prepare 11 mL of 1X DAPI: Mix 110 μL of DAPI Label Probe from light. + 10.89 mL of 1X PBS and place on ice until use. Protect from light. E. Equilibrate the following reagents to RT: AP Enhancer F. Fast Red Tablets (protect from light) Naphthol Buffer Ensure availability of the following reagents: Wash Buffer 1X PBS G. Ensure the availability of Prolong® Gold Antifade Reagent; remove from –20 °C and allow to sit at RT for 30 min before use. Step 12. Hybridizing with PreAmplifier(s) A. Swirl the prewarmed PreAmplifier Mix QM briefly to mix the content. Prepare the Working PreAmplifier Mix Solution as instructed in the table below. Scale reagents according to the number of assays to be run and include overage for an extra well. 60 min Reagent Working PreAmplifier Mix Solution for 1 Well 2-Plex 3-Plex (1 miRNA + 1 mRNA) (1 miRNA + 2 mRNAs) PreAmplifier Mix QM (pre-warmed at 40 °C) 400 μL 384 μL PreAmplifier 10-740 — 16 μL Total volume 400 μL 400 μL B. Aspirate off the Storage Buffer and wash cells two times, each with 2 mL/well of Wash Buffer. C. Remove the Wash Buffer and replace with 400 μL/well of Working PreAmplifier Mix Solution. D. Cover plate with lid and incubate at 40 °C for 60 min. Step 13. Wash Cells 10 min A. Remove plate from the incubator. B. Aspirate off the Working PreAmplifier Mix Solution and wash cells three times, each with 2 mL/well of Wash Buffer. Soak cells for 3 min between aspirations. Allow samples to sit in the final wash while preparing the Working Amplifier Mix Solution. 20 QuantiGene® ViewRNA miRNA ISH Cell Assay User Manual Step Step 14. Hybridizing with Amplifier(s) Action A. Swirl the prewarmed Amplifier Mix QM briefly to mix the content. Prepare the Working Amplifier Mix Solution as instructed in the table below. Scale reagents according to the number of assay to be run and include overage for an extra well. 60 min Reagent Working Amplifier Mix Solution for 1 Well 2-Plex 3-Plex (1 miRNA + 1 mRNA) (1 miRNA + 2 mRNAs) Step 15. Wash Cells Amplifier Mix QM (pre-warmed at 40 °C) 400 μL 384 μL Amplifier 10-740 — 16 μL Total volume 400 μL 400 μL B. Aspirate off the Wash Buffer and replace with 400 μL/well of Working Amplifier Mix Solution. C. Cover plate with lid and incubate at 40 °C for 60 min. A. Remove plate from the incubator. B. Aspirate off the Working Amplifier Mix Solution and wash cells three times, each with 2 10 min Step 16. Hybridizing with Label Probe(s) 60 min mL/well of Wash Buffer. Soak cells for 3 min between aspirations. Allow samples to sit in the final wash while preparing the Working Label Probe Mix Solution. IMPORTANT: Protect samples from light, by covering reagents and plate with aluminum foil, during this and all subsequent steps. A. Prepare the Working Label Probe Mix Solution by diluting the LP4-488 1:100 and the LP1AP 1:1500 (and LP10-740 1:25) in pre-warmed Label Probe Diluent QF. Scale reagents according to the number of assay to be run and include overage for an extra well. Reagent Working Label Probe Mix Solution for 1 Well 2-Plex 3-Plex (1 miRNA + 1 mRNA) (1 miRNA + 2 mRNAs) Label Probe Diluent QF (pre-warmed at 40 °C) 395.73 μL 379.73 μL LP1-AP 0.27 μL 0.27 μL LP4-488 4 μL 4 μL LP10-740 — 16 μL Total volume 400 μL 400 μL B. C. Vortex briefly to mix. Aspirate off the Wash Buffer and replace with 400 μL/well of Working Label Probe Mix Solution. D. Cover plate with lid and incubate at 40 °C for 60 min. Step 17. Wash Cells 20 min A. Remove plate from incubator. B. Aspirate off the Working Label Probe Mix Solution and wash cells three times, each with 2 mL/well of Wash Buffer. Soak cells for 3 min for the first two washes and 10 min for the final wash. Protect from light. Chapter 3 | QuantiGene ViewRNA miRNA ISH Cell Assay Procedure 21 Step Step 18. Developing with Fast Red Substrate 1 hr 20 min Action NOTE: Volumes indicated for this step are for 24 wells. Please scale down accordingly if using 6, 12 or 18 wells. A. Aspirate off the final Wash Buffer. B. Immediately add 400 μL/well of AP Enhancer Solution and incubate at RT for 5 min while preparing the Fast Red Substrate. C. Prepare the Fast Red Substrate: Add 15 mL of Naphthol Buffer + 3 Fast Red tablets into a 15 mL conical tube. Vortex on high speed to completely dissolve the tablets. Protect from light. D. Aspirate off the AP Enhancer completely and add 400 μL/well of the Fast Red Substrate. Cover plate with lid and incubate at 40 °C for 45 min. E. Meanwhile, in a hood, prepare 11 mL of 4% formaldehyde solution: Mix 1.2 mL of 37% formaldehyde stock + 9.8 mL of 1X PBS. Set aside until use. F. Remove plate from incubator. G. Aspirate off the Fast Red Substrate and wash cells twice, each with 2 mL/well 1X PBS. H. Aspirate off the final 1X PBS wash and fix cells in 400 μL/well of 4% formaldehyde at RT, in the hood for 10 min. Protect from light. I. Aspirate off the 4% formaldehyde and wash cells three times, each with 2 mL/well of 1X PBS. Step 19. DAPI Staining A. Aspirate off the 1X PBS and replace with 400 μL/well of Working DAPI Solution. Incubate 5 min B. C. at RT for 5 min. Protect from light. Aspirate off Working DAPI Solution and wash cells once with 2 mL/well of 1X PBS. Add 1mL/well of fresh 1X PBS. Step 20. Mounting on Glass Slide A. For easy identification of samples, label the frosted area of the glass slides with a pencil. B. Place a small drop (10 μL/sample) of Prolong® Gold Antifade Reagent onto a microscope 15 min C. slide (one microscope slide can hold 2 samples). Avoid air bubbles. Remove a coverslip from the 24-well plate with fine-tipped forceps. Dab the edge of the coverslip gently on a dry laboratory wipe to remove excess 1X PBS. Mount the coverslip, cell side facing DOWN, onto the spot of mounting medium. Avoid air bubbles. D. Repeat A-C until all coverslips are mounted onto the slides. Step 21. Image Samples A. Samples may be viewed under a microscope immediately after mounting. However, fluorescent signals will be enhanced after the mounting medium is completely cured. B. Cure the slides at RT, protected from light, for several hours to overnight. Samples can then be stored at 2-8 °C protected from light. Fluorescent signals will be stable for up to one week when properly stored. C. Prior to viewing the samples under the microscope, gently wipe the cured coverslips with a laboratory wipe soaked with 70% ethanol to remove any crystallized salt that may have formed on the coverslips from the 1X PBS. D. For viewing samples, use appropriate filter sets. Probe Set Filter Set TYPE 1 Fast Red: EX 530/40 nm; EM 590/40 nm TYPE 4 ALEXA 488: EX 485/20 nm; EM 524/24 nm TYPE 10 ALEXA 750: EX 708/75 nm; EM 809/81 nm NOTE: Signals of LP1-Fast Red and LP4-488 are visible to unaided eyes under the microscope and appear as red and green dots, respectively. Signal of LP10-740 is invisible and require CCD-cooled camera to capture the image. 22 QuantiGene® ViewRNA miRNA ISH Cell Assay User Manual 4 Troubleshooting Contacting Technical Support For technical support, contact the appropriate resource provided below based on your geographical location. For an updated list of FAQs and product support literature, visit our website at www.affymetrix.com/panomics. Table 4.1 Technical Support Contacts Location Contact Information North America 1.877.726.6642 option 1, then option 3; [email protected] Europe +44 1628-552550; [email protected] Asia +81 3 6430 430; [email protected] Poor Cell Morphology and Retention Table 4.2 Troubleshooting Poor Cell Morphology and Retention Probable Cause Recommended Action Excess protease treatment or inadequate fixation Titrate fixation time and protease concentration. Poor cell adhesion to the glass surface Check to make sure that the poly-L-lysine is fresh and has not expired. Try coating the coverslips with different extracellular matrices such as MatriGel, collagen or poly-D-lysine. Use protocol for suspension cells if cell adhesion is extremely poor. Cells were not seeded/spotted at optimal density Increase the number of cells seeded/spotted so that the density is between 70-90% at the beginning of the assay. Cells were dislodged by vigorous dispensing or aspiration during washes Aspirate from the bottom edge of the wells and dispense against the upper edge of the well to minimize cells loss or displacement. High Non-Specific Binding Outside the Cells Table 4.3 Troubleshooting Non-Specific Binding Outside Cells Probable Cause Recommended Action Non-specific binding of Probe Set(s), PreAmps, Amps or Label Probes to glass surface Verify coating materials by running the assay without cells in the presence and absence of coating materials. Insufficient washing Increase soaking time by 5 min for each washing step. Samples were allowed to dry Make sure sufficient solution is covering the entire sample at all times during the assay. 24 QuantiGene® ViewRNA miRNA ISH Cell Assay User Manual Weak or No Signal Table 4.4 Troubleshooting Weak Signal: Probable Cause Recommended Action Protease digestion not optimal Titrate protease concentrations; generally higher protease concentration is required for mRNA target and lower protease concentration for miRNA target. Fixation time not optimal, over- or under-fixation Titrate formaldehyde fixation time; generally longer fixation time is required for miRNA target and shorter fixation time for mRNA target. Cross-linking not optimal Check to make sure that EDC is fresh and properly stored in desiccant at 20 °C. Equilibrate EDC to RT before opening the bottle to avoid moisture absorption. Prepare EDC cross-linking solution just before use. Ensure that EDC is prepared at the proper concentration. Inaccurate hybridization temperature Hybridization reactions must be carried out at 40 ± 1 °C. Target is either expressed at a very low level or not expressed at all in the cells being assayed Use positive control cell line known to express your miRNA target to validate the procedure. Probe Set concentration too low (miRNA target only) Increase the recommended concentration by diluting 1:75 instead of 1:100. Samples left too long in Wash Buffer Follow protocol for appropriate washing times. Samples left too long in Storage Buffer Follow protocol for appropriate storage time and temperature. Incorrect use of Probe Set(s) Ensure that the Working Solutions are prepared properly. Use a QG ViewRNA Temperature Validation Kit (Affymetrix P/N QV0523) to verify and monitor the temperature. Use positive control probe set against a target with medium to high ubiquitous expression (housekeeping gene) or against a target that is your cell-type specific with medium to high expression. Do not leave samples in Wash Buffer longer than 30 min. Incorrect use of PreAmp, Amp and/ Make sure that the Probe Set, PreAmp Mix, Amp Mix and Label Probes are or LP added in the correct order and to the appropriate samples. Accidental Omission of APEnhancer (miRNA target only) Check to make sure AP-Enhancer is warmed up to RT and added to samples. Insufficient Fast Red Incubation Time (miRNA target only) Make sure that Naphthol Buffer and Fast Red Tablets are at RT and not cold when substrate solution is being prepared. Increase Fast Red Substrate incubation time to 60 min for low expressing miRNA targets. Reagents did not reach the cells Make sure cell seeded coverslips are faced up during the assay. If you lose track of which side of the coverslip contains the cells, check it under the microscope by scraping a small surface area with a fine-tipped forceps. Inappropriate microscope setup or operation Ensure that your microscope is in good working order and that your light source, objectives, filters and exposure times for image acquisition are selected properly (refer to Microscopy and Imaging Equipment Guidelines on page 7.) Chapter 4 | Troubleshooting 25 Patchy and Diffused Fast Red Signals Table 4.5 Troubleshooting Patchy and Diffused Fast Red Signals Probable Cause Recommended Action Accidental Omission of APEnhancer Check to make sure that the AP-Enhancer step has not been left out. Incomplete Removal of APEnhancer Ensure that the AP-Enhancer is completely aspirated off before adding the Fast Red Substrate Fast Red Substrate not freshly prepared Prepare Fast Red substrate immediately before use. Insufficient Fast Red incubation time Increase the incubation time by 15 min. Insufficient post-label fixation Ensure that the formaldehyde is fresh and post-label fixation is for the entire 10 min. Endogenous alkaline phosphatase activity in cell line Treat cell line with a solution of 0.2 M HCl and 3 M NaCl for 10 min at RT, then wash twice each time with 2 mL 1X PBS for 1 min before proceeding to the detergent treatment step. High Background Inside Cells Table 4.6 Troubleshooting High Background Inside Cells Probable Cause Recommended Action Insufficient washing after formaldehyde fixation Increase washing volume or soaking time by 5 min for each washing step. Insufficient washing after hybridization Increase washing volume or soaking time by 5 min for each washing step. Auto-fluorescence Some cell lines may exhibit high auto-fluorescence, particularly in the 488 nm wavelength. This is a normal biological property of the cell. If this occurs, the 488 nm channel can still be used especially for detecting a highly expressed transcript. If the cell type is not critical, switch to another cell line with lower autofluorescence. Switch to using 740 module for detection of the mRNA target. Samples were allowed to dry Make sure sufficient solution is covering the entire sample at all times during the assay. Variable Staining Within a Sample Table 4.7 Troubleshooting Variable Staining Within a Sample Probable Cause Recommended Action Sample were allowed to dry Make sure sufficient solution is covering the entire sample at all times during the assay. Insufficient mixing of reagents Prewarm all hybridization buffers to dissolve any precipitates before use. Briefly vortex all working hybridization solutions before use. 26 QuantiGene® ViewRNA miRNA ISH Cell Assay User Manual A Sample Preparation Procedure for Suspension Cells About the Preparation for Suspension Cells Suspension cells that are used in the QG ViewRNA miRNA ISH Cell Assay must be fixed in suspension and then spotted directly on poly-L-line coated glass coverslips (for instructions on how to prepare polyL-lysine coated glass coverslips, refer to Part 1: Sample Preparation for Adherent Cells on page 14.) Cells can be prepared on the same day for use for the in situ hybridization assay in 24-well plate format. Step Step 1. Setting Incubator to 50 °C and Preparing Reagents Action A. Set incubator to 50 ± 1 °C. B. Prepare 1L of 1X PBS: Mix 100 mL of 10X PBS + 900 mL of ddH2O. This will be used throughout the assay. C. 1 min In a fume hood, prepare 4.5 mL of fresh 4% formaldehyde solution: Mix 500 μL of a 37% formaldehyde stock + 4 mL of 1X PBS. Set aside until use. D. Ensure availability of 100% ethanol, if planning on storing the fixed and dehydrated cells at –20 °C. Step 2. Fixing Cells in 4% Formaldehyde Solution A. Disperse suspension cells to single cells by pipetting up and down with a 10 mL pipette. B. Aliquot 1.5-5 million suspended cells into a 15 mL centrifuge tube. Spin down cells (200 x g, 5 min), aspirate off culture medium and resuspend cell pellet with 5 mL of 1X PBS. 90 min C. Spin down cells (200 x g, 5 min), aspirate off 1X PBS solution and resuspend cell pellet with 1 mL of 4% formaldehyde. D. Incubate for 60 min at RT (briefly vortex the tube every 20 min during the incubation to resuspend cells). Step 3. Spotting Fixed Cells on Poly-L-Lysine Coated Glass Surface 35 min E. Transfer cell solution to a 1.5 mL microcentrifuge tube. Spin down cells (15,000 x g, 1 min), gently decant the formaldehyde solution and wash cell pellet 3 times, each with 1 mL of 1X PBS (15,000 x g, 1 min). F. Spin down cells (15,000 x g, 1 min), gently decant the final 1X PBS wash and resuspend cell pellet thoroughly with 150 μL of 1X PBS using 200 μL pipette to obtain a single-cell suspension. Adjust cell concentration to 1000 cells/μL. A. Pipette 20 μL of fixed suspension cells onto each poly-L-lysine coated glass coverslip (approximately 20,000 total cells/spot) fitted in a 24-well plate. Gently spread out the spot with a pipette tip to ensure even distribution of the cells. B. C. Place the 24-well plate (without lid) in the oven and bake at 50 °C for 30 min or until cells are completely dried. (Open vent on incubator if using Affymetrix incubator.) Do one of the following: To continue with the assay, proceed to Step 5. Rehydration. Step 4. Dehydration (optional) To preserve samples for later use, proceed to Step 4. Dehydration (optional). A. Add 400 μL/well of 100% ethanol. B. Seal the plate with parafilm and store the dehydrated cells in 100% ethanol at –20 °C until needed. Dehydrated cells can be stored under these conditions for 1 month. NOTE: Dehydrated cells must be rehydrated prior to being used in the next step of the assay. C. When ready to proceed with the assay, start at Step 5. Rehydration on page 28 to rehydrate the samples. 28 QuantiGene® ViewRNA miRNA ISH Cell Assay User Manual Step Step 5. Rehydration Action A. If the samples were from Step 4. Dehydration (optional), aspirate off the 100% ethanol and replace with 400 μl/well of 70% ethanol. Incubate for 2 min at RT. B. If the samples were baked but not stored in 100% ethanol, add 400 μl/well of 70% ethanol. Incubate for 2 min at RT. C. Aspirate off the 70% ethanol and replace with 400 μL/well of 50% ethanol. Incubate for 2 min at RT. D. Aspirate off the 50% ethanol and replace with 400 μL/well of 1X PBS. Incubate for 10 min at RT. E. To continue with the assay, go to Step 3. EDC Cross-Linking on page 17 to proceed with cross-linking and permeabilization. B Detecting siRNA with QuantiGene miRNA ISH Cell Assay About Detecting siRNA with QuantiGene miRNA ISH Cell Assay The QuantiGene ViewRNA miRNA ISH Cell Assay kit can also be used to detect siRNA in cultured cells providing researchers in the field of RNAi with a useful and sensitive tool for simultaneous in situ analysis of siRNA and its mRNA target sequences. Because siRNA sequences used to transfect cells for knockdown study are mostly double-stranded, a slight modification to the protocol is necessary to denature the double-stranded siRNA molecule to allow accessibility between the probe and siRNA target sequence. We recommend using DeliverX and DeliverX Plus siRNA transfection reagents (Affymetrix) for high transfection efficiency and low cellular toxicity. Please apply the following modifications when using the QuantiGene ViewRNA miRNA ISH Cell Assay for detecting siRNA. Step Step 1. Prepare Buffer and Reagents Action A. B. C. D. E. Set a dry incubator to 75 °C. Prepare 12 mL of Denaturing Solution (2X SSC/50% Formamide). Place the Denaturing Solution in a capped bottle. Place 150 mL of 1X PBS in a capped bottle. Preheat the 1X PBS and Denaturing Solution to 75 °C. Step 2. Pretreatment of Cells 24-hr post-transfection, fix, permeabilize and digest cells with protease according to Part 2: Sample Pretreatment and Target Probe(s) Hybridization on page 16. Follow the protocol exactly up to Step D in Step 7. Digesting with Protease on page 18 (that is, protease treatment followed by 3 washes in 1X PBS). Step 3. Denaturation A. Remove the 1X PBS from cells and add 400 μL/well of preheated Denaturing Solution. B. Cover plate with lid and incubate at 75 °C for 15 min. Step 4. Wash Cells A. Aspirate off the Denaturing Solution. B. Wash cells 3 times, each with 2 mL/well of preheated 1X PBS. Step 5. Target Probe(s) Hybridization Proceed with the assay starting from Step 8. Hybridizing with Probe Set(s) on page 18. 30 QuantiGene® ViewRNA miRNA ISH Cell Assay User Manual