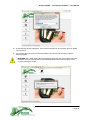
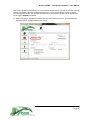
1
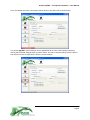
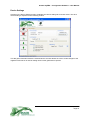
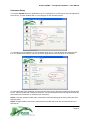
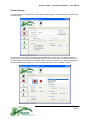
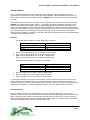
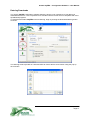
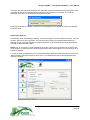
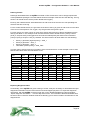
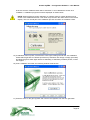
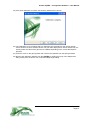
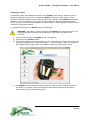
Analox aspida
Configuration Software User Manual
Analox Sensor Technology Ltd.
15 Ellerbeck Court, Stokesley Business Park
North Yorkshire, TS9 5PT, UK
T: +44 (0)1642 711400
W: www.analox.net
F: +44 (0)1642 713900
E: [email protected]
Analox aspida – Configuration Software – User Manual
Contents
Contents .................................................................................................................................................. 1
About the Program .................................................................................................................................. 2
System Requirements ..................................................................................................................... 2
Installation of the Program....................................................................................................................... 3
Running the Program .............................................................................................................................. 6
Connecting a Device ............................................................................................................................... 6
Reading and Saving Settings .................................................................................................................. 8
Device Settings...................................................................................................................................... 10
Setting the Date and Time..................................................................................................................... 11
Username Setup.................................................................................................................................... 12
Global Alarm Settings............................................................................................................................ 13
Alarms Latching ............................................................................................................................. 13
Alarm Muting.................................................................................................................................. 13
Man-down Alarm............................................................................................................................ 13
Alarms Quiet (available on the Sub Aspida only) ..................................................................... 13
Sensor Settings ..................................................................................................................................... 14
Sensor Alarms ....................................................................................................................................... 15
Alarm Set-points ............................................................................................................................ 15
Alarm Hysteresis............................................................................................................................ 16
Data-log Downloads .............................................................................................................................. 17
Clearing the Data-log..................................................................................................................... 18
Selecting different logging periods (available on the Sub Aspida only)................................... 19
Data-log Format ............................................................................................................................. 20
Exporting Diagnostic Data ............................................................................................................. 20
Maintenance .......................................................................................................................................... 21
Carbon Dioxide Calibration............................................................................................................ 21
Oxygen Sensor Replacement........................................................................................................ 28
Upgrading Firmware ...................................................................................................................... 29
Document Ref: PGA-802-10 – April 2012
Page 1
Analox aspida – Configuration Software – User Manual
About the Program
The Analox aspida configuration software provides a simple interface to configure the various
features of the aspida unit. The program is common between all members of the aspida family
herein referred to simply as aspida. The program provides facility to set the alarm features such as
the personal protection, man-down alarm as well as tailoring the aspida’s gas alarms to suit specific
gas monitoring needs. Detailed data-logs can be downloaded through the program and up to two
usernames can be registered to a single aspida to support shared device usage. . Different
members of the aspida family may have different capabilities and these variations are noted where
relevant.
System Requirements
The Analox aspida configuration software has the following system requirements to run:
Operating system:
•
•
•
•
®
Microsoft Windows 2000
®
Microsoft Windows XP
®
Microsoft Windows Vista
®
Microsoft Windows 7
Supporting software:
•
®
Microsoft .NET Framework (2.0 or higher) – Included on the CD or available from
http://www.microsoft.com
Hardware:
•
A USB port
Document Ref: PGA-802-10 – April 2012
Page 2
Analox aspida – Configuration Software – User Manual
Installation of the Program
The following step-by-step guide explains how to install the Analox aspida configuration software
®
onto a Microsoft Windows based PC.
Ensure that any Analox aspida units are disconnected from the computer.
Insert the Analox aspida software CD into the CD drive.
Browse the Analox aspida software disk and run the file named ‘setup.exe’.
The setup program will begin by checking that you have the Microsoft .NET Framework®
installed on you computer. If it is not installed on the system, the setup program will prompt
you to install the Microsoft .NET Framework® from the CD. Follow the instructions given by
the setup program to complete the installation of the Microsoft .NET Framework®.
5) Next, the setup program will begin to install the Analox aspida configuration software. The
following screen will be displayed.
1)
2)
3)
4)
6) Click the ‘Next’ button to continue.
Document Ref: PGA-802-10 – April 2012
Page 3
Analox aspida – Configuration Software – User Manual
7) The installer will now prompt you to provide an install location for the software as shown
below. If the default location is not desired, use the browse button to provide a different install
location. The option is also given to make this installation available for the user logged in only
or for all users of the computer.
8) Once you are happy with your choices, click ‘Next’ to continue. A prompt will now be given to
start the installation as shown below. The installation will take a few moments.
Document Ref: PGA-802-10 – April 2012
Page 4
Analox aspida – Configuration Software – User Manual
9) Once the application has installed, the device drivers will be installed automatically. Before
this installation begins, the following prompt will be shown.
NOTE: The driver software will now install in the background. This will briefly show a
window with a black background. It is important that this window is not closed before it
completes. Upon completion the window will close automatically.
10) When the installation is complete, the confirm window will be displayed as shown below. Click
‘Close’ to finish the installation.
Document Ref: PGA-802-10 – April 2012
Page 5
Analox aspida – Configuration Software – User Manual
Running the Program
To run the program, double click the aspida Configuration Tool icon on the desktop or select the
application from the start menu under Analox>PGA. When the application starts, main application
window will be shown. All controls will be greyed out until an aspida unit is connected to the
computer.
Connecting a Device
To make changes to an aspida’s settings, it must first be connected to the computer. To connect the
USB cable to the device, remove the battery cover by undoing the screw on the rear of the device.
One end of the USB cable should then be inserted into the USB port situated between the batteries
(shown below). At this point, with the application running, connect the other end of the USB cable to a
USB port on the PC.
Document Ref: PGA-802-10 – April 2012
Page 6
Analox aspida – Configuration Software – User Manual
On connection to the PC, the aspida will power up if it is not already switched on. The USB symbol
will be displayed on the aspida screen in place of the battery icon as shown below.
The program will recognise the device and an icon representing the device will appear in the found
device box at the top of the window. The serial number of the device will be displayed below the
device icon. The current settings will be downloaded from the device and the device settings tab will
be displayed.
1
1
1
Options available on the Sub Aspida only
Document Ref: PGA-802-10 – April 2012
Page 7
Analox aspida – Configuration Software – User Manual
Reading and Saving Settings
IMPORTANT: Any changes made to settings on the Device Settings, and the Sensor
Settings pages will not modify the settings on the Analox aspida until they are saved to
the device. To save any changes to settings, click the Save Settings button as shown.
Clicking the Save Settings button will now give a prompt to confirm the save.
WARNING: Confirming the save will overwrite the device’s previous settings.
Document Ref: PGA-802-10 – April 2012
Page 8
Analox aspida – Configuration Software – User Manual
Once the settings are saved, confirmation will be shown in the status bar as shown below.
The Analox aspida’s current settings can be downloaded at any time whilst making changes by
clicking the Download Settings button as shown below. This will re-read the settings from the device
and reset all controls to represent the device’s current settings.
Document Ref: PGA-802-10 – April 2012
Page 9
Analox aspida – Configuration Software – User Manual
Device Settings
Clicking on the Device Settings button will display the device setting tab as shown below. The each
device setting is explained in the following section.
This tab gives information about the selected device and also allows the user to make changes to the
registered usernames as well as setting various other global device options.
Document Ref: PGA-802-10 – April 2012
Page 10
Analox aspida – Configuration Software – User Manual
Setting the Date and Time
When a device is connected, date and time that was read from the unit is displayed in the ‘Date And
Time’ box. To change the date and time on the device, click the ‘Set Date And TimeI’ button.
The following window will be shown and give the options to set a new date and time to the unit.
Set the time using the controls in the Time box. The clock is set in 24 hour format. Set the date using
the calendar shown in the Date box. When the date and time are correct, press the ‘OK’ button to
update the device. Pressing cancel will make no changes to the date and time on the unit.
NOTE: Setting the date and time does not require a settings save. The clock is updated
automatically.
Document Ref: PGA-802-10 – April 2012
Page 11
Analox aspida – Configuration Software – User Manual
Username Setup
The Analox aspida allows for registration of up to 2 usernames. If no usernames are to be registered
to the device, uncheck Enable User #1. This will grey out the username boxes.
If 1 username is to be registered, check the Enable User #1 box. This will enable the username text
box. The desired username for user one should be typed into this box (maximum 15 characters).
If 2 usernames are to be registered, check the Enable User #2 box after first checking the Enable User
#1 box. This will enable both username text boxes. The two desired usernames should be entered into
these text boxes (maximum 15 characters per username).
NOTE: For these changes to take effect, remember to save the settings to the device using the Save
Settings button.
NOTE: Changes made to the device usernames will not take effect until the next time the device is
switched on.
Document Ref: PGA-802-10 – April 2012
Page 12
Analox aspida – Configuration Software – User Manual
Global Alarm Settings
Alarms Latching
To enable the latching feature on all device alarms, check the ‘Enable latching alarms’ box.
(See the aspida device user manual for details of latching alarms).
NOTE: For these changes to take effect, remember to save the settings to the device using the Save
Settings button.
Alarm Muting
To enable the muting feature on all device alarms, check the ‘Enable mutable alarms’ box.
(See the aspida user manual for details of alarm muting).
NOTE: For these changes to take effect, remember to save the settings to the device using the Save
Settings button.
Man-down Alarm
WARNING: Ensure that you read the section relating to the man-down alarm feature in the
aspida user manual before enabling this feature.
To enable the man down detection feature, check the ‘Enable man-down alarm’ box. This option will
instruct the device to begin detecting movement and enable the ultra-loud sounder in the case where
no movement is detected over a period of time. This will also enable the panic alarm feature.
NOTE: For these changes to take effect, remember to save the settings to the device using the Save
Settings button.
Alarms Quiet (available on the Sub Aspida only)
To disable the audible annunciation on all device alarms, uncheck the ‘Audible alarms’ box.
(See the aspida user manual for details of audible alarms).
NOTE: For these changes to take effect, remember to save the settings to the device using the Save
Settings button.
Document Ref: PGA-802-10 – April 2012
Page 13
Analox aspida – Configuration Software – User Manual
Sensor Settings
To access the sensor settings tab, click the Sensor Settings button. This will bring up the sensors tab
as shown below.
The Sensors box on the Sensor Settings tab will display the sensors which are fitted to the device.
(Two sensors in the case of a dual instrument and one sensor in the case of a single instrument). To
view the details and settings of the particular sensor, click on the sensor’s icon. This will populate the
Sensor Details and the Alarms boxes with information about the sensor selected as shown.
Document Ref: PGA-802-10 – April 2012
Page 14
Analox aspida – Configuration Software – User Manual
Sensor Alarms
Once a sensor is selected, the alarms settings controls will show the available alarms for that
th
particular sensor. Each sensor has 3 alarm set-points attributed. Carbon dioxide sensors have a 4
alarm which is reserved for TWA alarms (see the aspida device user manual for further information
on TWA).
The sensor alarms have a priority ordering. This corresponds to the urgency of the gas alarm on the
aspida unit. Gas levels that trigger Alarm 1, for example, will cause the LEDs to flash and horn to
sound at a rate higher than Alarm 2, giving a clear warning that the level of danger has increased.
Alarm 1 has the highest priority and will always be activated even if Alarm 2 or Alarm 3 have already
activated. For this reason, a sensor’s Alarm 1 should always be reserved for the most dangerous level
for the gas that sensor’s monitored gas. The TWA alarm for carbon dioxide sensors is always the
lowest priority and will be over-ridden by any other gas alarm representing the more immediate danger
posed by rising or falling gas levels.
Example
The default alarm settings for carbon dioxide are as follows:
Alarm
Alarm 1
Alarm 2
Alarm 3
•
•
•
•
Set-point (%carbon dioxide)
4.0
1.5
0.5
With a carbon dioxide level of 0.3% no alarms will be active.
With a carbon dioxide level of 0.7% Alarm 3 will be active.
With a carbon dioxide level of 1.6% Alarm 2 will be active.
With a carbon dioxide level of 4.1% Alarm 1 will be active.
The default alarm settings for oxygen are as follows:
Alarm
Alarm 1
Alarm 2
Alarm 3
•
•
•
Set-point (%oxygen)
18.0
19.5
23.0
With an oxygen level of 19.6% no alarms will be active.
With an oxygen level of 19.4% Alarm 2 will be active.
With an oxygen level of 17.9% Alarm 1 will be active.
To change the settings for a particular sensor alarm, select a sensor then click on the alarm in the
alarms list box. This will then display the current setting for the selected alarm. If the alarm is not
currently enabled on the device, the ‘Enable Alarm’ check-box will be un-checked and all other alarm
controls will be disabled. To enable or disable the alarm, check the ‘Enable Alarm’ check-box.
Alarm Set-points
When an alarm is enabled, the set-point can be changed using the ‘Alarm set-point’ box. The
behaviour of the device for gas levels around the set-point will differ depending on the direction of the
alarm. High going alarms will be activated when the gas level rises above the set-point. Low going
alarms will be activated when the gas level falls below the set-point. To set the direction of the alarm,
select the appropriate option from the ‘Alarm Direction’ box.
Document Ref: PGA-802-10 – April 2012
Page 15
Analox aspida – Configuration Software – User Manual
Alarm Hysteresis
In addition to the alarm set-point, a hysteresis can be applied to the set-point. Adding a hysteresis
value to a set-point means that when the gas value passes a set-point and triggers an alarm, the
alarm condition does not clear immediately when the gas value returns through the set-point.
Example
Example alarm
Example 1
Example 2
Set-point (%
carbon dioxide)
2.0
2.0
Direction
Hysteresis
High-going
High-going
0.0
0.2
In Example 1, no hysteresis is applied and the alarm is high-going. A gas reading of 1.99 will
not activate the alarm. The gas level rises to 2.00 and the alarm is activated. The gas level
drops back to 1.99 and the alarm is de-activated.
In Example 2, a hysteresis is applied and the alarm is high-going. A gas reading of 1.99 will
not activate the alarm. The gas level rises to 2.00 and the alarm is activated. The gas level
drops back to 1.86 and the alarm persists. Only when the alarm drops to 1.79 will the alarm
will de-activate (as shown below).
Example 2
NOTE: For sensor alarm changes to take effect, remember to save the settings to the device using
the Save Settings button.
Document Ref: PGA-802-10 – April 2012
Page 16
Analox aspida – Configuration Software – User Manual
Data-log Downloads
The Analox aspida configuration software allows the device’s own internal log of gas data to be
downloaded to the PC. This is exported into a standard CSV file format which is compatible with most
spreadsheet programs.
To download the Analox aspida’s internal data-log, begin by clicking the Download Data-log button
as shown.
The data-log will be exported as a standard CSV file. Select the file save location using the pop-up
save window.
Document Ref: PGA-802-10 – April 2012
Page 17
Analox aspida – Configuration Software – User Manual
Click Save and the download will begin. The download progress window will show the progress of the
download as well as the estimated time remaining for the download to complete. To cancel the
download at any time, close the download progress window.
When the download is complete, confirmation will be displayed in the status bar of the main window,
as shown below.
Clearing the Data-log
Occasionally, after downloading a data-log, it may be desirable to clear the data-log memory. This will
reset the data-log to zero log entries. This may be useful if data-logs are downloaded frequently.
Clearing the log each time will lead to smaller and quicker log downloads as previously-downloaded
data will not be downloaded again.
NOTE: It is not necessary to clear the data-log at all. If the log memory becomes full, the device will
simply begin to overwrite the very earliest log ensuring that the data logged on the unit remains as up
to date as possible.
To clear the data log, right click on the ‘Download Datalog’ button in the left button bar and select the
‘Reset Data-log’ option from the drop down menu. A confirmation box will be presented before the
data-log is cleared.
Document Ref: PGA-802-10 – April 2012
Page 18
Analox aspida – Configuration Software – User Manual
Selecting different logging periods (available on the Sub Aspida only)
The Analox aspida configuration software allows the device to be configured to log the sensor data
at different intervals, to allow data to be captured over a longer period.
To select a different data log resolution, click on the ‘Logging Period’ dropdown box in the Logging
Options pane, and select the desired period between data captures. A longer period will capture data
over a greater time, but with less time resolution on the capture.
NOTE: Only conditions applying at the time of data capture are recorded, so if a short term event
(e.g., alarm level of gas detected) occurs wholly between data captures on the log, there will be no
record of the event.
Table relating Logging Period to datalog capacity
Logging period
30 seconds
1 minute
5 minutes
15 minutes
30 minutes
Data capacity
20 days
41 days
29 weeks
20 months
41 months
NOTE: Only time whilst the instrument is turned on counts towards the data capacity, so if an
instrument is turned on only 8 hrs per day, 5 days per week, then with a 30 second logging period the
memory will hold data for 12 weeks.
Document Ref: PGA-802-10 – April 2012
Page 19
Analox aspida – Configuration Software – User Manual
Data-log Format
Data-logs downloaded from an aspida are saved in CSV format which can be simply imported into
most spreadsheet packages. The table below shows an example of the format of the data-log. The log
shown is for a dual sensor device (carbon dioxide and oxygen).
Each log has a date and time associated with it as well as the ID of the user who was operating the
device at the time of the log.
For the carbon dioxide sensor, the gas value at the time of the log is given as well as the current value
of the user’s TWA exposure. For oxygen, only the gas value at log time is given.
For each sensor, an alarm column is given which shows and instances of alarms activated since the
last log was taken. In this example it can be seen that the carbon dioxide sensor’s priority 3 alarm
(ALM_3, set-point 0.5%) was triggered at 10:55:58 and subsequently the alarm level increased to
priority 2 (ALM_2 set-point 1.5%) by 10:56:28. The alarm column will show alarms for the following:
•
•
•
•
Priority 1 gas alarm (highest priority) – ALM_1
Priority 2 gas alarm – ALM_2
Priority 3 gas alarm – ALM_3
TWA alarm (lowest priority) – ALM_TWA
The last column shows instances of activation of the man-down alarm. In this example it can be seen
that the man-down alarm was activated at 10:57.
Date
16/07/2009
16/07/2009
16/07/2009
16/07/2009
16/07/2009
16/07/2009
16/07/2009
16/07/2009
16/07/2009
16/07/2009
16/07/2009
16/07/2009
Time
10:53:57
10:54:27
10:54:58
10:55:28
10:55:58
10:56:28
10:56:58
10:57:28
10:57:59
10:58:29
10:58:59
10:59:29
User ID
User 1
User 1
User 1
User 1
User 1
User 1
User 1
User 1
User 1
User 1
User 1
User 1
%CO2
0.039
0.037
0.035
0.042
1.201
0.55
0.071
0.041
0.044
0.043
0.039
0.051
%CO2
TWA
0.025
0.025
0.025
0.025
0.025
0.025
0.025
0.025
0.025
0.025
0.025
0.025
CO2
Alarm
ALM_3
ALM_2
ALM_3
-
%O2
20.908
21.012
20.95
20.888
19.286
21.011
20.961
21.021
20.903
20.933
20.926
20.879
O2
Alarm
ALM_2
ALM_2
-
Man-down
ALM
-
Exporting Diagnostic Data
Occasionally, if the aspida has given warning of a fault, it may be necessary to download and export
diagnostic information from the instrument for technical support purposes. To export the diagnostic
information, with the aspida connected, right click on the’ Download Data-log’ button and select
‘Export diagnostic informationI’ from the drop down menu. The information will be downloaded from
the device and a ‘Save file’ window will be show allowing you to select a location and filename for the
diagnostic file.
Document Ref: PGA-802-10 – April 2012
Page 20
Analox aspida – Configuration Software – User Manual
Maintenance
Carbon Dioxide Calibration
This section deals only with the calibration of the carbon dioxide sensor (if fitted). Oxygen calibration is
performed using the on-device fresh air calibration as described in the aspida user manual.
The carbon dioxide sensor should be recalibrated every twelve months. When a calibration is due, a
reminder will be shown on the aspida display (see aspida user manual for details).
WARNING: A full carbon dioxide calibration requires first a calibration on a zero carbon
dioxide gas (i.e. 100% Nitrogen) and then a span calibration on a span gas (4-5% carbon
dioxide). Calibration due reminders will only reset once a zero and span calibration have
been performed in the same calibration session.
NOTE: During the calibration process, gas alarms and range fault alarms may be triggered
due to the use of calibration gasses. This is normal and any spurious alarms can be
acknowledged/muted.
For calibration, the following equipment is required:
•
•
•
•
•
•
•
aspida unit
USB cable
aspida configuration software
aspida calibration adapter (dual or single)
Analox supplied zero calibration gas (100% nitrogen)
Analox supplied span calibration gas (4-5% carbon dioxide, nitrogen balance)
Analox supplied gas regulator
User supplied gasses may be used, in which case a pressure regulator (set to approx 1Bar) and flow
meter (or other flow regulation method) must be used to provide a sample flow of 0.5 to 1 litre per
min. to the calibration adapter. The calibration adapter should be connected to the
regulator/flowmeter by flexible pipe (I/D 4mm) on one spigot of the flow adapter, with fittings/adaptors
to suit the user supplied regulator/flowmeter at the other end. Analox cannot normally supply gas
overseas.
NOTE: The tolerance of the calibration gasses directly affects the accuracy of the
instrument measurement, and use of wide tolerance gasses for calibration may result in the
instrument not achieving the stated accuracy on gas measurement.
To calibrate the sensor:
1) Run the aspida configuration software and connect to the aspida unit.
2) Click ‘Sensor Settings’ and select the carbon dioxide sensor.
3) Click the button ‘CalibrateI’ in the box ‘Sensor Tools’.
Document Ref: PGA-802-10 – April 2012
Page 21
Analox aspida – Configuration Software – User Manual
4) The calibration wizard start page will be displayed as shown below.
5) Click ‘Next’ to display the page shown below.
6) The calibration can be performed in either order. This guide will perform zero calibration first.
Document Ref: PGA-802-10 – April 2012
Page 22
Analox aspida – Configuration Software – User Manual
7) Check ‘Zero calibrate the sensor’ and click next. The following window will be shown.
8) Follow the instructions on screen to fit the gas regulator to the zero gas bottle (100%
nitrogen).
WARNING: Ensure that the regulator’s valve is fully closed before fitting to the bottle. A
small amount of gas may be expelled during the process. Do not over tighten the regulator
fitting.
9) Click ‘Next’ to continue. The following window will be shown.
10) Follow the instructions on screen to set-up the calibration adapter and piping. Ensure that
there are no foreign objects or material in either of the aspida’s gas ports. The calibration
adapter should be aligned with the gas ports and pressed firmly into place to form a seal.
Ensure that the calibration adapter’s bridging tube is fitted firmly between the two inner tubes
of the adapter.
Document Ref: PGA-802-10 – April 2012
Page 23
Analox aspida – Configuration Software – User Manual
11) Click ‘Next’ to continue. The following window will be shown.
12) Follow the instructions on screen to begin the gas flow across the sensors. Slowly open the
regular valve until the gas begins to flow. Adjust the rate of flow until the indicator ball sits
between the two lines on the regulator.
NOTE: It is important to observe that the gas flow continues at this rate throughout the calibration
process. Adjust the flow as necessary.
NOTE: If a user supplied flow regulation is used, any pressure regulator should be set to approx 1 Bar,
and the flow meter adjusted to give a gas flow between 0.5 and 1 litre/min. This flow rate is much
lower than generally used for welding work, and care should be taken not to exceed 1 litre/min as this
can pressurise the sensors and cause incorrect reading or calibration.
13) Click ‘Next’ to continue. The following window will be shown.
14) The current carbon dioxide reading will be displayed. This reading will be monitored until it has
been settled for a minimum of 30 seconds. ‘NOT STABLE’ will be displayed and the ‘Calibrate’
button disabled until the gas level has stabilised. Once the gas level is stable, ‘STABLE’ will
Document Ref: PGA-802-10 – April 2012
Page 24
Analox aspida – Configuration Software – User Manual
be shown and the ‘Calibrate’ button will be activated. To zero calibrate the sensor click
‘Calibrate’. A calibration progress bar will be displayed as shown below.
NOTE: When performing a zero calibration, a negative value for carbon dioxide may be
shown in this calibration window. This value may not match the value shown on the device
display. This is a normal part of the calibration process and does not constitute a fault.
15) If calibration does not pass, check that the correct gas is being used for the zero calibration.
Check that the gas flow is sufficient (low flow may indicate a near empty or empty gas bottle)
and allow the gas to settle again before re-calibrating. If calibration problems persist, contact
the supplier.
16) If zero calibration succeeds, the following window will be shown.
17) Close the valve on the gas regulator and unscrew the regulator from the zero gas bottle.
Document Ref: PGA-802-10 – April 2012
Page 25
Analox aspida – Configuration Software – User Manual
18) With zero calibration complete, a subsequent span calibration should be performed (or zero
calibration if span calibration was performed first. Click ‘Span Calibrate’ (or ‘Zero Calibrate’) to
continue to the next calibration. The following window will be shown.
19) Check ‘Span calibrate the sensor’ and the span calibration options will be shown.
20) The bottle carbon dioxide concentration of the span gas (4-5% carbon dioxide, nitrogen
balance) should be entered into the ‘Calibration gas concentration’ box.
NOTE: If calibrating at altitude or in a location with a know atmospheric pressure which may be
significantly different from standard atmospheric pressure, check the ‘Advanced Settings’ box and
enter the current local atmospheric pressure.
An assumed standard atmospheric pressure is used otherwise and will be adequate for the majority of
usage situations. If a pressure is entered this must be the actual pressure at the location, note that
most weather reports quote pressures corrected to sea level so such a figure must be adjusted to
compensate for the altitude of the location.
21) Click ‘Next’ to continue. From this point follow steps 8 – 15 to span calibrate the sensor.
Document Ref: PGA-802-10 – April 2012
Page 26
Analox aspida – Configuration Software – User Manual
22) If the span calibration succeeds, the following window will be shown.
23) The calibration is now complete and any calibration due reminders for the carbon dioxide
sensor should now have cleared. NOTE: The gas value displayed for carbon dioxide may not
exactly reflect the value of the gas used to calibrate depending on the current atmospheric
pressure.
24) Close the valve on the gas regulator and unscrew the regulator from the span gas bottle.
25) Remove the calibration adapter from the aspida by gripping the body of the adapter and
lifting it away from the device. Do not lift the adapter by its tubing.
Document Ref: PGA-802-10 – April 2012
Page 27
Analox aspida – Configuration Software – User Manual
Oxygen Sensor Replacement
After 15 months of service the oxygen cell on an aspida will need to be replaced (if fitted). The
procedure for changing the sensor is described in the aspida user manual. After the sensor has been
replaced, the sensor replacement due reminder will continue to flash on the aspida display. This
reminder must be reset using the aspida configuration software. The sensor will also need
recalibration after changing.
WARNING: Do not reset the replacement due date unless a new sensor has been fitted.
Doing so may mean that reminders will not be given for a sensor which is overdue
replacement which may result in inaccurate operation of oxygen monitoring.
To reset the sensor replacement reminder, first run the aspida configuration software and connect to
the device. Click ‘Sensor Settings’ and select the oxygen sensor. The oxygen sensor information will
be displayed as shown below. Click the
button and then click OK on the subsequent window to
reset the replacement due date.
Document Ref: PGA-802-10 – April 2012
Page 28
Analox aspida – Configuration Software – User Manual
Upgrading Firmware
Occasionally, Analox may update the firmware for the aspida to add changes, features or fixes. A
facility is provided to allow the user to upgrade an aspida’s firmware to a later version. Usually,
appropriate firmware upgrades will be included as part of the installation of the aspida Configuration
Software. It may be necessary to uninstall the current Configuration Software and install the latest
version in order to access the latest upgrades. The latest version of the Configuration Software can be
obtained from the Analox website.
To upgrade the firmware on an aspida, perform the following:
WARNING: This feature is used to reprogram the aspida device with new firmware. The
following instructions should be strictly adhered to or the device may become nonfunctional.
1) Connect to the computer the aspida device to be upgraded.
2) Open the Analox aspida software.
3) On the main window, right click the device you wish to upgrade in the Found devices bar. If an
upgrade is available then an “Upgrade Firmware” option will appear. (Note: If no upgrades
are available then this option will not be available.) Select this option with a left click:
4) The aspida Firmware Upgrade window will appear. Take note of the warning text before
proceeding. To proceed, click the drop down box and select the appropriate upgrade to
perform. Click Program to begin the process:
Document Ref: PGA-802-10 – April 2012
Page 29
Analox aspida – Configuration Software – User Manual
5) A final warning window will appear. This is the last opportunity to cancel the process. Select
OK to proceed.
6) The process will now erase the current firmware of the device and proceed to load the
firmware update:
WARNING: If the USB cable is disconnected during this time the device will become nonfunctional. Ensure communications are retained between device and computer until a
success message is shown.
Document Ref: PGA-802-10 – April 2012
Page 30
Analox aspida – Configuration Software – User Manual
Note: If the upgrade is not possible, an error message will be shown. This can occur if the upgrade
version of firmware is already loaded onto the device, or if the current device version is higher
than the upgrade version. The upgrade may also fail to proceed if the upgrade is not appropriate
for the type of aspida connected.
7) After a successful upgrade left click the device in the Found devices bar. This will show the
firmware version currently loaded in the device:
Document Ref: PGA-802-10 – April 2012
Page 31