1
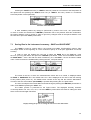
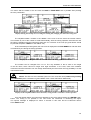
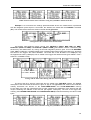
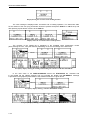
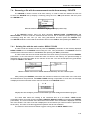
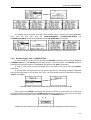
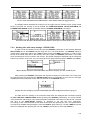
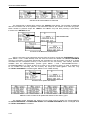
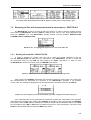
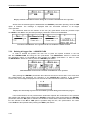
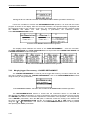
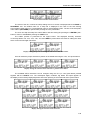
SVAN 953 USER MANUAL
7
SAVING THE MEASUREMENT RESULTS - FILE
The registration of the measurement results is an essential task for the efficient use
of the instrument. All available measurement results can be stored in the FLASH type memory
of the instrument or on the USB memory stick.
There are two main ways for storing the measurement data in the instrument:
1. Saving files with the main results and setup settings using the FILE list.
2. Saving data in the logger’s file.
Notice: The instrument’s logger memory is independent from the results and setup
memory. The capacity of the available memory is equal to 16 MB and is divided between logger
(8257280 bytes), results and setup settings (7208736 bytes).
Notice: All of the options (except DEFRAGMENTATION) from the FILE list can be used
for the USB memory stick if the instrument has the USB host controller option.
Saving files
In the case of the SVAN 953 instrument there are files containing data:
• from Sound LEVEL METER mode (available in the FILE list);
• from DOSE METER mode (available in the FILE list);
• from 1/1 OCTAVE mode (available in the FILE list)
• stored in the instrument’s logger (accessible in the DISPLAY / LOGGER VIEW window).
Notice: The logger files are created automatically (the usage of the SAVE is not
required).
Each file consists of some elements, which are the same for all kind of files:
• a file header;
• the unit and software specification;
• the user’s text stored together with the measurement data;
• the parameters and global settings;
• the special settings for profiles;
• the marker of the end of the file.
The other elements of the file structure depend on the type of the file (SLM, DOSE METER,
1/1 OCTAVE, logger) and on the setting of SAVE STATISTICS (path: MENU / FILE / SAVE OPTIONS /
SAVE STATISTICS).
These elements are as follows:
• the main results from LEVEL METER mode;
• the results coming from DOSE METER mode;
• the results coming from 1/1 OCTAVE analysis mode;
• the statistical levels;
• the header of the statistical analysis;
• the results of the statistical analysis;
7-1
SVAN 953 USER MANUAL
_
• the settings of the instrument saved in the setup file;
• the header of the file from the logger;
• the data stored during the measurements in the logger’s file.
Notice: The detailed description of all types of file structures is given in the Appendix B.
Storing the sound measurement results as files in the instrument’s FLASH DISC can be done
by means of the FILE list. In order to open, the FILE list the user has to:
• press the <MENU> push-button,
• select from the main list, using the <>, <> (or <>, <>) push-buttons, the FILE text (highlight
it inversely),
• press the <ENTER> push-button.
Main list; the FILE text highlighted (displayed inversely)
The FILE list contains the following items:
SAVE
enables one to save the measurement results as a file in the instrument’s
memory;
SAVE OPTIONS
enables one to set the options of the measurement result savings;
LOAD
enables one to load to the working space of the instrument’s memory
the measurement results saved in a file;
DELETE
enables one to delete a selected file from the instrument’s memory;
DELETE ALL
enables one to delete all files from the instrument’s memory;
DEFRAGMENTATION
enables one to consolidate the flash memory after deleting some files from it;
CATALOGUE
enables one to overview the catalogue of the files saved in the instrument’s
memory;
FREE SPACE
informs the user about the capacity of the instrument’s memory still available
for storing the measurement results;
SAVE SETUP
enables one to save the setup as a file in the instrument memory;
LOAD SETUP
enables one to load to the working space of the instrument’s memory the selected
setup saved in a file;
DIRECTORY
this position appears on the display when the USB Memory Stick is connected to
the instrument, it informs the user about connected device (free space, directory
number, directory name)
COPY FILES TO USB this position appears on the display when the USB Memory Stick is connected to
the instrument, it enables the user to copy files from internal memory of the
instrument to the external USB Memory Stick
MOVE FILES TO USB this position appears on the display when the USB Memory Stick is connected to
the instrument, it enables the user to move files from internal memory of the
instrument to the external USB Memory Stick
7-2
SVAN 953 USER MANUAL
Pressing the <SHIFT> and <> (or <SHIFT> and <>) results in a movement to the first position of
the opened list and pressing the <SHIFT> and <> (or <SHIFT> and <>) results in a movement
to the last position of the opened list.
FILE list of the instrument
In each available position any change is performed by means of the <>, <> push-buttons.
In order to confirm the selection the <ENTER> push-button has to be pressed. After this confirmation,
the opened window or list is closed. In order to ignore any changes made in the opened window or list
the user has to press the <ESC> push-button.
7.1
Saving files in the instrument’s memory - SAVE and SAVE NEXT
The SAVE is used for storing data in the internal non-volatile (FLASH DISC) memory (files
are always written at the beginning of a free continuous space) as a file (see Appendix B for the file
formats).
In order to enter the window the user has to select the SAVE text in the FILE list, using
the <> (or <>) push-button and press the <ENTER> push-button. There are two available functions:
the SAVE NEXT – save a file with the name increased by one, and SAVE – save a file with the edited
name. These functions are available after pressing the <>, <> push-buttons.
SAVE window in the FILE list
The name of the file, in which the measurements results are to be saved, is displayed above
the SAVE or SAVE NEXT text. The default name for a file is displayed in the case of the first entering
to this position (after power on). The default name consists of the day and the month’s abbreviation.
The line of the file’s name edition (FILE NAME) is opened after pressing the <> push-button.
The user can skip the file’s name edition and start saving file pressing the <ENTER> push-button or
return to the FILE list pressing the <ESC> one.
The edition process is presented on the Figure below. The displayed inversely character
is currently edited. The <>, <>, <>, <> and <SHIFT> push-buttons are used for editing the name
which cannot exceed eight characters.
Display during the process of setting the character in the edited name
7-3
SVAN 953 USER MANUAL
_
One can select the proper position of the character in the edited text using the <>, <> pushbuttons.
Display during the selection of the character’s position to be edited
The available ASCII characters can be changed using the <> (or <>) push-button pressed
together with the <SHIFT> one. The subsequent digits, underline, big letters and space appear on
the display in the inversely displayed position after each pressing of the mentioned above push-buttons.
...
...
Display during the selection of the character
Displays in the FILE NAME edition after pressing the <SHIFT> and <
> push-buttons
Displays in the FILE NAME edition after pressing the <SHIFT> and <
> push-buttons
The edited name is accepted and the file is saved after pressing the <ENTER> push-button.
The special warning is displayed in the case the file with the edited name already exists in the memory.
The instrument waits then for a reaction of the user (any push-button should be pressed except
the <SHIFT> or the <ALT> one).
All changes introduced to the file name during the edition are ignored after pressing the <ESC>
push-button. This pressing causes the return to the list from which the SAVE option was entered.
7-4
SVAN 953 USER MANUAL
The return after the edition to the line with the SAVE or SAVE NEXT text is possible after pressing
the <> push-button.
Displays during the attempt of overwriting the existing file, changing the name and saving data
The simplified edition consists in the addition at the end of the file name the natural number.
The increase by one of the number is made automatically. After the saving operation execution the new
file name is displayed and the instrument waits then for a reaction of the user (any push-button should
be pressed except the <SHIFT> or the <ALT> one).
In the next attempt of saving data, the new name is displayed in the FILE NAME line and that name
is increased by one during the saving operation.
Displays in the simplified edition of the file name and saving operation execution
The number can be changed from 0 to N. The only limitation of the N value is the length
of the file name, which cannot be longer than eight characters. In the case, when such limitation
is achieved and the instrument can not change automatically the file’s name the only possibility is to edit
new base file name.
Notice: The files can be overwritten (the use of the same file name) without any warning
if the REPLACE option is switched on (path: MENU / FILE / SAVE OPTIONS / REPLACE).
Displays in the simplified edition of the file name, saving and the “saturation” of that operation
As it was already written, the instrument attempts to save a file after pressing the <ENTER> pushbutton. The saving is not possible in the case when the instrument is measuring the signal.
The special message is displayed for about 3 seconds in this case and the instrument returns
to the SAVE window.
7-5
SVAN 953 USER MANUAL
_
Displays after the attempt to perform unavailable saving operation and the return to the SAVE NEXT
The presented below message is displayed after trying to execute the save operation in the case
when no measurements were performed and there are no results to be saved. The instrument then waits
for the reaction of the user (any push-button should be pressed except the <SHIFT> or the <ALT> one)
and after pressing a push-button it returns to the SAVE window.
Display after the SAVE operation when there were no results for storing
Notice: During the execution of the SAVE or SAVE NEXT function an additional window
is displayed informing about the operation performed. In the case of short files, this window can
be unnoticed by the user.
Displays during and after the execution of the SAVE operation
As it was already written it is not possible to store the data in the file, which already exists, when
the REPLACE is not active ([ ]) (path: MENU / FILE / SAVE OPTIONS / REPLACE). The presented
below sequence of displays illustrates the situation when during the name edition process the user
selected the name, which was used before. The instrument displays a special message and waits for
the reaction of the user (any push-button should be pressed except the <SHIFT> or the <ALT> one) and
after pressing a push-button it returns to the FILE list.
Displays after the attempt to overwrite a file if the REPLACE is not active
Notice: The direct access to the SAVE / SAVE NEXT function is possible after pressing
simultaneously the <ENTER> and <ALT> push-buttons if the DIRECT SAVE option is switched off
(path: MENU / FILE / SAVE OPTIONS / DIRECT SAVE). In another case (DIRECT SAVE option is
switched on) the results are saved, after pressing these push-buttons, in the file with the automatically
incremented name.
7-6
SVAN 953 USER MANUAL
Notice: After the usage of the <ENTER> and <ALT> push-buttons (if the DIRECT SAVE
option is switched on) the measurement results are saved only once. The following pressing
will not cause any instrument’s reaction unless next measurement is performed. The same result
can be saved in the multiply number of files only using the SAVE / SAVE NEXT function.
Finally, let us present some examples showing the occupation of the result files memory and
the logger files memory after the execution of the saving operation.
Example 1. Let us assume the settings presented below where one measurement is performed
with the integration period equal to 10 seconds, nothing is saved in the logger and the statistics are not
stored. The measurement results are saved in the file named @EXAMP1.
=>
Settings and the FILE INFO after the performed measurements
The size of the file is equal to 452 bytes and it is visible in the FILE INFO window. The detailed
description of the level-meter file structure is given in App. B. The @EXAMP1 file saved in the result files
memory decreases the amount of the FREE SPACE and TOTAL AVAILABLE memory
by the value of the file size (452 bytes) plus 4 bytes containing the addresses of the previous file and
4 bytes containing the address of the next file (all together 460 bytes). The size of the logger files memory
(the LOGGER FREE SPACE and LOGGER AVAILABLE) is not changed as the LOGGER (path: MENU /
INPUT / MEASUREMENT SETUP) was not activated.
=>
FREE SPACE window before and after saving the @EXAMP1 file
Example 2. Let us assume the settings presented below where one measurement is performed
with the integration period equal to 10 seconds, nothing is saved in the logger but this time the statistics
are also stored. The measurement results are saved in the file named @EXAMP2.
=>
Settings and the FILE INFO after the performed measurements
The size of the file is now equal to 1932 bytes and it is visible in the FILE INFO window.
The detailed description of the level-meter file structure is given in App. B. The @EXAMP2 file saved
in the result files memory decreases the amount of the FREE SPACE and TOTAL AVAILABLE memory
by the value of the file size (1932 bytes) plus 4 bytes containing the addresses of the previous file and
4 bytes containing the address of the next file (all together 1940 bytes). The size of the logger files
7-7
SVAN 953 USER MANUAL
_
memory (the LOGGER FREE SPACE and LOGGER AVAILABLE) is not changed as the LOGGER (path:
MENU / INPUT / MEASUREMENT SETUP) was not activated.
=>
FREE SPACE window before and after saving the @EXAMP2 file
Example 3. Let us assume the settings presented below where one measurement is performed
with the integration period equal to 10 seconds, the statistics are not saved but this time the LOGGER
is activated (On). The measurement results are saved in the file named @EXAMP3.
Settings before the execution of the measurements
All together eight different results coming from PROFILE 1 (PEAK, MAX, MIN and RMS),
PROFILE 2 (PEAK and RMS) and PROFILE 3 (MAX and MIN) (path: MENU / INPUT / PROFILE x) are
saved every 100 milliseconds. Therefore, during 10 seconds integration period it gives 10*10=100
RECORDS (path: MENU / DISPLAY / LOGGER VIEW), each containing eight values (each two-bytes
long). All results are saved in the logger’s file named &LOG96. The exact size of the &LOG96 is not
displayed, only the approximate value (2 kilobytes) can be visible in the logger files delete window (path:
MENU / FILE / DELETE / LOGGER FILES).
=>
Settings for the current measurements
=>
FILE INFO during and after the measurements
The size of the file is equal to 452 bytes and it is visible in the FILE INFO window. The detailed
description of the level-meter file structure is given in App. B. The @EXAMP3 file saved in the result files
memory decreases the amount of the FREE SPACE and TOTAL AVAILABLE memory
by the value of the file size (452 bytes) plus 4 bytes containing the addresses of the previous file and
4 bytes containing the address of the next file (all together 460 bytes). The size of the logger files memory
(the LOGGER FREE SPACE and LOGGER AVAILABLE) is also decreased by the value
of 2050 bytes.
7-8
SVAN 953 USER MANUAL
=>
FREE SPACE window before and after saving the @EXAMP3 and &LOG96 files
Example 4. Let us assume the settings presented below where one measurement is performed
with the integration period equal to 10 seconds, the statistics are saved and the LOGGER is activated
(On). The measurement results are saved in the file named @EXAMP4.
Settings before the execution of the measurements
All together eight different results coming from PROFILE 1 (PEAK, MAX, MIN and RMS),
PROFILE 2 (PEAK and RMS) and PROFILE 3 (MAX and MIN) (path: MENU / INPUT / PROFILE x) are
saved every 100 milliseconds. So, during 10 seconds integration period it gives 10*10=100 RECORDS
(path: MENU / DISPLAY / LOGGER VIEW), each containing eight values (each two-bytes long). All results
are saved in the logger’s file named &LOG97. The exact size of the &LOG97 is not displayed, only
the approximate value (2 kilobytes) can be visible in the logger files delete window (path: MENU / FILE /
DELETE / LOGGER FILES).
=>
=>
Settings and the FILE INFO during and after the measurements
The size of the file is equal to 1932 bytes and it is visible in the FILE INFO window. The detailed
description of the level-meter file structure is given in App. B. The @EXAMP1 file saved in the result files
memory decreases the amount of the FILES FREE SPACE and TOTAL AVAILABLE memory
by the value of the file size (1932 bytes) plus 4 bytes containing the addresses of the previous file and
4 bytes containing the address of the next file (all together 1940 bytes). The size of the logger files
memory (the LOGGER FREE SPACE and LOGGER AVAILABLE) is also decreased by the value of 2050
bytes.
=>
FREE SPACE window before and after saving the @EXAMP4 and &LOG97 files
7-9
SVAN 953 USER MANUAL
_
All four result files: @EXAMP1, @EXAMP2, @EXAMP3 and @EXAMP4 and two logger files:
&LOG96 and &LOG97 described in the examples, are visible in the CATALOGUE window (path: MENU /
FILE / CATALOGUE).
CATALOGUE window with the files described in the examples
7.2
Controlling the data storing in the instrument’s memory - SAVE OPTIONS
The SAVE OPTIONS sub-list is used for the selection of the options of data storing
in the FLASH DISC memory of the instrument. The sub-list is opened after pressing the <ENTER> pushbutton when the SAVE OPTIONS text in the FILE list is displayed inversely (selected using the <>, <>
(or <>, <>) push-buttons). The return to the FILE list is possible after pressing the <ESC> push-button.
FILE list with the SAVE OPTIONS text highlighted (displayed inversely)
It is possible to write data into the same part of the memory starting all the time with the same
address (RAM FILE), to replace the existing in the memory file by the new with the same name
(REPLACE), to add to the results the statistics of the measurements (SAVE STATISTICS), to save
automatically the results of the measurements (AUTO SAVE). The position of the sub-list is changed after
pressing the <>, <> push-buttons. In order to confirm the selection the <ENTER> push-button has to
be pressed. Such pressing closes also the opened sub-list.
7.2.1
Saving data starting from the same address - RAM FILE
The measurement data usually are saved in the different files in the flash memory
of the instrument. There is also possibility to save data in RAM file starting from the same address.
It means that each time the data are saved the previous file is overwritten.
This option is useful for the permanent monitoring and remote reading data from the instrument
by means of any available interface with the proper period. In order to read data saved in a RAM file one
has to use #4,3 function described in details in App. A.
The RAM FILE is switched on after placing the special character ([√
√]) in the inversely displayed
position in the line with the RAM FILE text. The activation or deactivation of the RAM FILE is done
by pressing the <>, <> push-buttons.
SAVE OPTIONS sub-list; the selection of the RAM FILE in LEVEL METER
7-10
SVAN 953 USER MANUAL
After pressing the <ENTER> push-button the selections made in any position of the sub-list
(in particular also in the RAM FILE) are confirmed and the sub-list is closed.
In the case when the AUTO SAVE was active ([√
√]), after pressing the <ENTER> push-button
the FILE NAME window is opened for editing the names for the AUTO SAVE files.
The SAVE OPTION is closed ignoring all settings made in it after pressing the <ESC> push-button.
The RAM FILE functionality is available only in the LEVEL METER and 1/1 OCTAVE analysis
mode. In the DOSE METER mode the line with the RAM FILE text does not appear on the display
after entering the SAVE OPTIONS sub-list.
7.2.2
Replacement of the existing files by the new ones - REPLACE
The result of the attempt to save the file with the name, which already exists in the memory,
depends on the setting of the REPLACE.
It is possible to erase the old file and to save the new one with the same name if the position
is active ([√
√]). The activation or deactivation of the REPLACE is done by pressing the <>, <> pushbuttons.
SAVE OPTIONS sub-list; the selection of the REPLACE in LEVEL METER and 1/1 OCTAVE analyser
SAVE OPTIONS sub-list; the selection of the REPLACE in DOSE METER
The message is displayed that such operation is not available in the case when this position is not
active ([ ]) – cf. the description of the SAVE. In the other case, the existing file is overwritten.
Displays during the file saving when the REPLACE is switched off and on
After pressing the <ENTER> push-button the selections made in any position of the sub-list
(in particular also in the REPLACE) are confirmed and the sub-list is closed.
In the case when the AUTO SAVE was active ([√
√]), after pressing the <ENTER> push-button
the FILE NAME window is opened for editing the names for the AUTO SAVE files.
The SAVE OPTION sub-list is closed ignoring all settings made in it after pressing the <ESC>
push-button.
7-11
SVAN 953 USER MANUAL
7.2.3
_
Controlling the measurement statistics savings - SAVE STATISTICS
The SAVE STATISTICS is used to set self saving, together with the measurement results,
the statistics of the measurements ([√
√]) or to switch off ([ ]) this possibility. Together
with the measurements 100-class statistics are calculated (the values named from L01 to L99).
The activation or deactivation of the SAVE STATISTICS is done by pressing the <>, <> push-buttons.
Notice: This position was created to save the memory of the instrument in the case when the
knowledge of the statistics is not necessary. Each registration of the statistics requires 600 bytes of
the memory! Ten selected statistic levels are always saved with the main results.
SAVE OPTIONS sub-list; the selection of the SAVE STATISTICS in LEVEL METER and in 1/1 OCTAVE
analysis mode
SAVE OPTIONS sub-list; the selection of the SAVE STATISTICS in DOSE METER
After pressing the <ENTER> push-button the selections made in any position of the sub-list
(in particular also in the SAVE STATISTICS) are confirmed and the sub-list is closed.
In the case when the AUTO SAVE was active ([√
√]), after pressing the <ENTER> push-button
the FILE NAME window is opened for editing the names for the AUTO SAVE files.
The SAVE OPTION sub-list is closed ignoring all settings made in it after pressing the <ESC>
push-button.
7.2.4
Controlling the measurement results savings - AUTO SAVE
Using the AUTO SAVE one can set the self-saving of the measurement results ([√
√]) or to switch off
([ ]) this possibility. The activation or deactivation of the AUTO SAVE is done by pressing the <>, <>
push-buttons. This position was also established in order not to waste too much memory
of the instruments when the self-saving is not necessary.
SAVE OPTIONS sub-list; the selection of the AUTO SAVE in LEVEL METER and in 1/1 OCTAVE modes
7-12
SVAN 953 USER MANUAL
Notice: The AUTO SAVE function can be performed only in the case when
the INTEGR. PERIOD (path: MENU / INPUT / MEASUREMENT SETUP) is not less than 10 seconds.
If it is less than 10 seconds, the measurement results are not saved without any indication of that fact!
There is only one exception - when the REP. CYCLE (path: MENU / INPUT / MEASUREMENT SETUP) is
equal to one, the AUTO SAVE function is executed disregarding the value of the integration period.
SAVE OPTIONS sub-list; the selection of the AUTO SAVE in DOSE METER
The FILE NAME window is opened after switching on the AUTO SAVE function and pressing
the <ENTER> push-button. This window is closed and the SAVE OPTION sub-list is displayed once more,
but with the AUTO SAVE function switched off, after pressing the <ESC> push-button.
Displays during the execution of the AUTO SAVE switching on; the FILE NAME skipping and return to the
SAVE OPTION sub-list
When the integration period is too short for setting the AUTO SAVE option the following message
appears on the display:
Display after attempt of setting AUTO SAVE option with too short INT. PERIOD
The FILE NAME window is closed after pressing the <ENTER> push-button with the confirmation
of the AUTO SAVE function switched on and the user interface returns to the FILE list.
Displays during the execution of the AUTO SAVE switching on; the FILE NAME confirmation and return to
the FILE list
The edition of the file name in the FILE NAME window is performed almost in the same way
as it was described in the case of the SAVE / SAVE NEXT function. The displayed inversely character
is currently edited. The <>, <>, <>, <> and <SHIFT> push-buttons are used for editing the name
which cannot exceed eight characters including the starting special character @ which cannot be edited.
One can select the proper position of the character in the edited text using the <>, <> push-buttons.
7-13
SVAN 953 USER MANUAL
_
The available ASCII characters can be changed using the <> (or <>) push-button pressed
together with the <SHIFT> one. Additionally, the character can be also changed using the <> (or <>)
push-button (this functionality is not available in the SAVE / SAVE NEXT function). The subsequent digits,
underline, big letters and space appear on the display in the inversely displayed position after each
pressing of the mentioned above push-buttons.
The edition is finished after pressing the <ENTER> push-button. The edited name is compared
with the file names existing in the catalogue.
In the case when the file with the same name already exists, the special message is displayed and
after pressing any character except the <SHIFT> or <ALT> one, the instrument returns once more
to the FILE NAME window.
Displays after the incorrect file name edition
When the AUTO SAVE option is active ([√
√]), after starting the measurements by pressing
the <START/STOP> push-button the results are saved in the file with the selected name. Depending on
the instrument’s mode and selected options the sequence of the displays available after each pressing
of the <> or <> could be as presented below.
Measurement results presented after pressing the <> or <> push-buttons
In the case when from a profile more than one result was saved in the logger’s file, the other results
are presented after pressing the <>, <> push-buttons together with the <ALT> one.
Results saved from a profile presented after pressing the <
> or <
> and <ALT> push-buttons
After pressing the <> or <> and <ALT> push-buttons the VIEW is changed (path: MENU /
DISPLAY / DISPLAY SETUP / LOGGER VIEW / VIEW). So, after pressing these push-buttons and then
repeating the previous sequence (the <>, <> push-buttons together with the <ALT> one) the user can
observe the displays presented below.
7-14
SVAN 953 USER MANUAL
Results saved from a profile presented after pressing the <
> or <
> and <ALT> push-buttons
Another measurement is started after next pressing of the <START/STOP> push-button.
The measurement is stopped after the selected INTEGR. PERIOD (path: MENU / INPUT /
MEASUREMENT SETUP / INTEGR. PERIOD) names of the next saved files are automatically
incremented by one. The same remarks are valid in this case as it was already stated in the description
of the SAVE NEXT function.
7.2.5
Direct access to the SAVE / SAVE NEXT function - DIRECT SAVE
The DIRECT SAVE enables one to select the instrument’s reaction on the simultaneous pressing
of the <ENTER> and <ALT> push-buttons. If this option is not active ([ ]), after pressing these pushbuttons the SAVE window is accessed (if the measurements are not performed). If the option is active
([√
√]), after pressing the <ENTER> and <ALT> push-buttons the results are saved in the file with
the automatically incremented name and the proper message is displayed for a few seconds. The proper
setting of the DIRECT SAVE is done by pressing the <>, <> push-buttons.
SAVE OPTIONS sub-list; the selection of the DIRECT SAVE in LEVEL METER
SAVE OPTIONS sub-list; the selection of the DIRECT SAVE in DOSE METER
After pressing the <ENTER> push-button the selections made in any position of the sub-list
(in particular also in the DIRECT SAVE) are confirmed and the sub-list is closed.
In the case when the AUTO SAVE was active ([√
√]), after pressing the <ENTER> push-button
the FILE NAME window is opened for editing the names for the AUTO SAVE files. The SAVE OPTION
sub-list is closed ignoring all settings made in it after pressing the <ESC> push-button.
During the execution of the measurements pressing the <ENTER> and <ALT> push-buttons
causes, disregarding the option set in the DIRECT SAVE, that the message presented below
is displayed.
Display after the attempt to perform an unavailable operation during measurement in progress
7-15
SVAN 953 USER MANUAL
_
The presented below displays illustrates the difference in the user interface execution
after pressing the <ENTER> and <ALT> push-buttons in the case when the measurements are not
performed and the DIRECT SAVE is not active ([ ]) and active ([√
√]).
<ENTER>
Exemplary executions of the software with the DIRECT SAVE not active
Exemplary executions of the software with the DIRECT SAVE active
7.3
Loading the files with the measurement results - LOAD
The LOAD is used for loading data file from the FLASH DISC (e.g. for the verification or
comparison). The position is opened after pressing the <ENTER> push-button when the LOAD text in
the FILE list is displayed inversely (selected using the <>, <> (or <>, <>) push-buttons).
The return to the FILE list is possible after pressing the <ESC> push-button.
FILE list with the LOAD text highlighted (displayed inversely)
Notice: It is not possible to load the file during the execution of the measurements.
On such attempt the message: MEASUREMENT IN PROGRESS is displayed for about 3 seconds.
After pressing the <ENTER> push-button the instrument checks its current state. In the case when
the measurements are performed, the file loading is impossible and the message is displayed.
Display after the attempt to perform an unavailable operation during measurement in progress
In the case when the instrument memory is empty (no file is stored), after entering the LOAD
window the NO FILES text is displayed and the instrument waits for the reaction of the user. The user
should press then the <ESC>, <ENTER> (the instrument returns to the FILE list) or <START / STOP>
push-button (the instrument starts the measurement).
7-16
SVAN 953 USER MANUAL
Display during the execution of the LOAD operation
The current number of the file and the total number of the saved files is displayed in the first line
of the LOAD window. The name of the file is displayed in the second line (its current number is presented
in the first line). The name of the file suggests the operation the file was created-in.
The names in which the first character is @ are coming from the AUTO SAVE function.
The file with the default name @Timer@ is coming from the AUTO SAVE function executed
in the TIMER operation. The other names suggest the SAVE / SAVE NEXT function. The type
of the current file (LEVEL METER, 1/1 OCTAVE or DOSE METER) is given in the third line.
If during the measurements which results are saved in the file, the logger file was also created its
name is displayed in the fourth line.
Notice: The logger file can be deleted from the instrument’s memory in the FILE / DELETE /
LOGGER FILES window and this deleting operation does not modify the contents of the fourth line
of the LOAD window.
The date and time of the SAVE operation are displayed in the fifth and sixth line respectively.
The change of the current file with the unit step can be done after pressing the <>, <> push-buttons.
The first file is available after pressing the <> with <SHIFT> push-button (or <> with <SHIFT>) and
the last one is displayed after pressing the <> with <SHIFT> push-button (or <> with <SHIFT>).
Exemplary contents of the LOAD window
Notice: Many result files can be associated with one logger file, i.e. during the execution
of the AUTO SAVE function.
Exemplary result files associated with the same logger file (&LOG33)
The name of the file is accepted and the file is loaded after pressing the <ENTER> push-button.
The message with the name of the selected file is displayed during the execution of the loading operation.
7-17
SVAN 953 USER MANUAL
_
Display during the execution of the loading function
The next message is displayed after successful end of loading operation. The instrument waits
for the reaction of the user (any push-button should be pressed except the <SHIFT> or <ALT> one) and
after pressing a push-button it returns to the FILE list.
<A KEY>
Displays after the execution of the LOAD operation
The contents of the loaded file is displayed in the available result presentation modes
(after pressing the <>, <> push-buttons) depending on the current settings of the instrument.
=> <ENTER> =>
...
<A KEY>
Exemplary displays during the loading and checking the contents of a DOSE METER file
In the case when in the DISPLAY MODES sub-list the STATISTICS are activated and
in the loaded file the statistic analysis was not included the display with NO RESULT message
is presented in the graphical presentation of the statistical levels as it is given above.
<ENTER>
...
Exemplary displays during a LEVEL METER file loading
Exemplary displays during contents checking of a LEVEL METER file
7-18
<A KEY>
SVAN 953 USER MANUAL
7.4
Removing a file with the measurement results from memory - DELETE
The DELETE is used to remove a file from memory. In order to enter the window the user has
to select the DELETE text (to display it inversely) using the <>, <
> push-buttons and then press
the <ENTER> one.
FILE list with the DELETE text highlighted (displayed inversely)
In the DELETE window, there are three elements: RESULT FILES, LOGGER FILES and
SETUP FILES. In order to enter the selected sub-list the user has to select the proper text (to display
it inversely) using the <>, <> (or <>, <>) push-buttons and then press the <ENTER> one.
The DELETE window is closed and the instrument returns to the FILE list after pressing the <ESC> one.
7.4.1
Deleting files with the main results - RESULT FILES
In order to enter the window one has to press the <ENTER> push-button on the inversely displayed
RESULT FILES text of the DELETE sub-list using the <>, <> push-buttons. The DELETE sub-list is
closed and the instrument returns to the FILE list after pressing the <ESC> push-button.
In order to enter the list of the saved result files in the flash memory one has to press the <ENTER>
push-button. In the case when the result files were not saved in the memory, the special message is
displayed and the instrument waits for the reaction of the user. The user should press any push-button
except the <SHIFT> and <ALT>.
=> <ENTER> =>
RESULT FILES selected to be deleted and the flash memory does not contain any file
After pressing the <ENTER> push-button the instrument checks its current state. In the case when
the measurements are performed, the RESULT FILES entering is impossible. In such case, the message
is displayed and the instrument returns after few seconds to the DELETE sub-list.
Display after the attempt to perform an unavailable operation during measurement in progress
The same data about the existing in the instrument files as in the FILE / LOAD window
are displayed after successful opening the FILE / DELETE / RESULT FILES one (pressing the <ENTER>
push-button). The current number of the file and the total number of the saved files is displayed in the first
line of the window. The name of the file is displayed in the second line (its current number is presented in
the first line). The name of the file suggests the operation the file was created-in.
The names in which the first character is @ are coming from the AUTO SAVE function.
7-19
SVAN 953 USER MANUAL
_
The file with the default name @Timer@ is coming from the AUTO SAVE function executed
in the TIMER operation. The other names suggest the SAVE / SAVE NEXT function. The type
of the current file (LEVEL METER, 1/1 OCTAVE or DOSE METER) is given in the third line. If during
the measurements which results are saved in the file, the logger file was also created its name is
displayed in the fourth line.
Notice: The logger file can be deleted from the instrument’s memory in the FILE / DELETE /
LOGGER FILES window and this deleting operation does not modify the contents of the fourth line of the
DELETE window.
The date and time of the SAVE operation are displayed in the fifth and sixth line, respectively.
The change of the current file with the unit step can be done after pressing the <>, <> push-buttons.
The first file is available after pressing the <> with <SHIFT> push-button (or <> with <SHIFT>) and
the last one is displayed after pressing the <> with <SHIFT> push-button (or <> with <SHIFT>).
Selection of the RESULT FILES to be deleted
The selected file is deleted after pressing the <ENTER> push-button. The message is displayed
after the successful end of the operation. The instrument waits for the reaction of the user (any pushbutton should be pressed except the <SHIFT> and <ALT> one) and after pressing a push-button
it returns to the DELETE sub-list.
=> <ENTER> =>
=> <ANY PUSH-BUTTON> =>
=> <ENTER> =>
Execution of the RESULT FILES deletion
After the execution of the result files removing from the memory usually the FREE SPACE memory
(path: MENU / FILE / FREE SPACE) rests the same as before the deletion but TOTAL AVAILABLE
memory is increased. It is because erased file was somewhere in the file’s space.
The file is no longer accessible but the recuperated memory is still unused for the next saving.
This memory becomes available after the defragmentation process (path: MENU / FILE /
DEFRAGMENTATION) in which all files are moved to the continuous space. In order to illustrate it let us
consider the result file named @EXAMP2, which is 1878 bytes long.
After removing LMET file from the memory, only the TOTAL AVAILABLE is increased (path: MENU
/ FILE / FREE SPACE).
7-20
SVAN 953 USER MANUAL
=> <ENTER> =>
=>
Execution of the file deletion and the influence of this process on the memory space
The displays below illustrates the erasing from the flash memory another file named @EXAMP3
which was also 460 bytes long; the FILES FREE SPACE, LOGGER FREE SPACE and
LOGGER AVAILABLE remain unchanged while the TOTAL AVAILABLE is increased.
=>
=>
Execution of the @EXAMP3 file deletion and the influence of this process on the memory space
7.4.2
Deleting logger files - LOGGER FILES
In order to enter the window one has to press the <ENTER> push-button on the inversely displayed
LOGGER FILES text of the DELETE sub-list using the <>, <> push-buttons. The DELETE sub-list is
closed and the instrument returns to the FILE list after pressing the <ESC> push-button.
In order to enter the list of the saved logger files in the memory one has to press the <ENTER>
push-button.
In the case when the logger files were not saved in the memory, the special message is displayed
and the instrument waits for the reaction of the user. The user should press any push-button except the
<SHIFT> and <ALT>.
=> <ENTER> =>
LOGGER FILES selected to be deleted and the memory does not contain any file
After pressing the <ENTER> push-button the instrument checks its current state. In the case when
the measurements are performed, the LOGGER FILES entering is impossible. In such case, the message
is displayed and the instrument returns after few seconds to the DELETE sub-list.
Display after the attempt to perform an unavailable operation during measurement in progress
7-21
SVAN 953 USER MANUAL
_
The similar data about the existing in the instrument logger files as in the DISPLAY /
LOGGER VIEW window are displayed after successful opening the FILE / DELETE / LOGGER FILES
one (pressing the <ENTER> push-button). In the first line, the available still logger’s memory is displayed
followed by:
• The selected number of the logger’s file and the number of all saved files (FILE NO.:).
• The name of the logger’s file (LOG.FILE:).
• The size of the logger file which name is displayed in the previous line (LOG.SIZE:).
• The results saved (if any are present) in the logger from the first profile (P(1):).
• The results saved (if any are present) in the logger from the second profile (P(2):).
• The results saved (if any are present) in the logger from the third profile (P(3):).
The change of the current file with the unit step can be done after pressing the <>, <> pushbuttons. The first file is available after pressing the <> with <SHIFT> push-button (or <> with <SHIFT>)
and the last one is displayed after pressing the <> with <SHIFT> push-button (or <> with <SHIFT>).
Selection of the LOGGER FILES to be deleted
The selected file is deleted after pressing the <ENTER> push-button. The message is displayed
after the successful end of the operation. The instrument waits for the reaction of the user (any pushbutton should be pressed except the <SHIFT> and <ALT> one) and after pressing a push-button
it returns to the DELETE sub-list.
<ENTER>
<ANY PUSH-BUTTON>
<ENTER>
Execution of the LOGGER FILES deletion
After the execution of the logger files deletion from the memory, usually the logger free space rests
the same as before the deletion but the total logger available memory is increased. It is because erased
file was somewhere in the file’s space. The file is no longer accessible but the recuperated memory is still
unused for the next saving. This memory becomes available after the defragmentation process (path:
MENU / FILE / DEFRAGMENTATION / LOGGER DEFRAGMENT.) in which all files are moved to the
continuous space. It can be illustrated on the figures below by erasing from the memory logger file named
&LOG8 (626 B). The presented there FREE SPACE window comes from the FILE list.
<ENTER>
Execution of the &LOG8 file erasing from the logger memory
7-22
SVAN 953 USER MANUAL
=>
Increase of the LOGGER AVAILABLE memory after deletion a file from logger memory
The displays below illustrates the erasing from the logger memory another big file (9 kB) named
&LOG17 just after the erasing of the file &LOG8 the FILES FREE SPACE, TOTAL AVAILABLE and
LOGGER FREE SPACE remain unchanged while the LOGGER AVAILABLE is increased.
=>
=>
Execution of the &LOG17 file deletion and the influence of this process on the memory space
7.4.3
Deleting files with setup settings - SETUP FILES
In order to enter the window one has to press the <ENTER> push-button on the inversely displayed
SETUP FILES text of the DELETE sub-list using the <>, <> push-buttons. The DELETE sub-list is
closed and the instrument returns to the FILE list after pressing the <ESC> push-button. In order to enter
the list of the saved setup files in the memory one has to press the <ENTER> push-button. In the case
when the setup files were not saved in the memory, the special message is displayed and the instrument
waits for the reaction of the user. The user should press any push-button except the <SHIFT> and <ALT>.
<ENTER>
SETUP FILES selected to be deleted and the instrument’s memory does not contain any file
After pressing the <ENTER> push-button the instrument checks its current state. In the case when
the measurements are performed, the SETUP FILES entering is impossible. In such case, the message
is displayed and the instrument returns after few seconds to the DELETE sub-list.
Display after the attempt to perform an unavailable operation during measurement in progress
The data about the existing in the instrument setup files are displayed after successful opening
the FILE / DELETE / LOGGER FILES window (pressing the <ENTER> push-button). The current number
of the file and the total number of the saved setup files is displayed in the first line of the window. The date
and time of the SAVE SETUP operation is displayed in the last two lines respectively.
The change of the current file with the unit step can be done after pressing the <>, <> push-buttons.
The first file is available after pressing the <> with <SHIFT> push-button (or <> with <SHIFT>) and the
last one is displayed after pressing the <> with <SHIFT> push-button (or <> with <SHIFT>).
7-23
SVAN 953 USER MANUAL
_
..
Selection of the SETUP FILES to be deleted
The selected file is deleted after pressing the <ENTER> push-button. The message is displayed
after the successful end of the operation. The instrument waits for the reaction of the user (any pushbutton should be pressed except the <SHIFT> and <ALT> one) and after pressing a push-button
it returns to the DELETE sub-list.
<ENTER>
<ANY PUSH-BUTTON>
<ENTER>
Execution of the RESULT FILES deletion
After the execution of the setup files removing from the memory usually the FREE SPACE memory
(path: MENU / FILE / FREE SPACE) rests the same as before the deletion but TOTAL AVAILABLE
memory is increased. It is because erased file was somewhere in the file’s space. The file is no longer
accessible but the recuperated memory is still unused for the next saving. This memory becomes
available after the defragmentation process (path: MENU / FILE / DEFRAGMENTATION /
FILES DEFRAGMENT.) in which all files are moved to the continuous space. In order to illustrate it
let us consider the removing from the memory the setup file named @SET7. After this, only
the TOTAL AVAILABLE is increased (path: MENU / FILE / FREE SPACE).
<ENTER>
Execution of the @SET7 file deletion
=>
Influence of the execution of the @SET3 file deletion on the memory space
The displays below illustrates the erasing from the flash memory another file named @SET8;
the FILES FREE SPACE, LOGGER FREE SPACE and LOGGER AVAILABLE remain unchanged while
the TOTAL AVAILABLE is increased.
7-24
SVAN 953 USER MANUAL
=>
=>
Execution of the @SET4 file deletion and the influence of this process on the memory space
7.5
Removing all files with measurement results from memory - DELETE ALL
The DELETE ALL is used to remove all files from memory. In order to enter the position the user
has to select the DELETE ALL text in the FILE list, using the <>, <> (or <>, <>) push-buttons and
press the <ENTER> one. The DELETE ALL sub-list consists of three positions: RESULT FILES,
LOGGER FILES and SETUP FILES.
DELETE ALL text highlighted (displayed inversely) in the FILE list
7.5.1
Deleting all result files - RESULT FILES
In order to activate the position the user has to place the special character in the line
with the RESULT FILES text using the <> push-button. The DELETE ALL sub-list is closed and
the instrument returns to the FILE list after pressing the <ESC> push-button. In order to enter
the DELETE ALL window one has to press the <ENTER> push-button.
RESULT FILES selected to the execution of the DELETE ALL operation
After pressing the <ENTER> push-button the instrument checks its current state. In the case when
the measurements are performed, the execution of the DELETE ALL operation is not possible.
In such case, the message is displayed for few seconds and the instruments returns to the FILE list.
Display after the attempt to perform an unavailable operation during measurement in progress
If the measurements are not performed the instrument requests the confirmation of the operation
after entering this window (after pressing the <ENTER> push-button). After next pressing the <ENTER>
push-button, when the NO option is selected, the window is closed and the instrument returns to the FILE
list. The selection of the NO or YES option is possible using the <>, <> push-buttons. The return to the
FILE list is also possible after pressing the <ESC> push-button.
7-25
SVAN 953 USER MANUAL
_
Displays with the confirmation window during the execution of the DELETE ALL operation
All files from the selected type are deleted after the <ENTER> push-button pressing, when the YES
option is selected. The message is displayed after the successful execution of all stages
of the operation.
The instrument waits for the reaction of the user (any push-button should be pressed except
the <SHIFT> and <ALT> one) and after pressing a push-button it returns to the FILE list.
Execution of the DELETE ALL operation in the case of RESULT FILES selection
7.5.2
Deleting all logger files - LOGGER FILES
In order to activate the position the user has to place the special character in the line
with the LOGGER FILES text using the <> push-button. The DELETE ALL sub-list is closed and
the instrument returns to the FILE list after pressing the <ESC> push-button. In order to enter
the DELETE ALL window one has to press the <ENTER> push-button.
LOGGER FILES selected to the execution of the DELETE ALL operation
After pressing the <ENTER> push-button the instrument checks its current state. In the case when
the measurements are performed, the execution of the DELETE ALL operation is not possible.
In such case, the message is displayed for few seconds and the instruments returns to the FILE list.
Display after the attempt to perform an unavailable operation during measurement in progress
If the measurements are not performed the instrument requests the confirmation of the operation
after entering this window (after pressing the <ENTER> push-button). After next pressing the <ENTER>
push-button, when the NO option is selected, the window is closed and the instrument returns to the FILE
list. The selection of the NO or YES option is possible using the <>, <> push-buttons. The return
to the FILE list is also possible after pressing the <ESC> push-button.
7-26
SVAN 953 USER MANUAL
Displays with the confirmation window during the execution of the DELETE ALL operation
All files from the selected type are deleted after the <ENTER> push-button pressing, when the YES
option is selected. The message is displayed after the successful execution of all stages
of the operation. The instrument waits for the reaction of the user (any push-button should be pressed
except the <SHIFT> and <ALT> one) and after pressing a push-button it returns to the FILE list.
Execution of the DELETE ALL operation in the case of LOGGER FILES selected
7.5.3
Deleting all setup files - SETUP FILES
In order to activate the position the user has to place the special character in the line
with the SETUP FILES text using the <> push-button. The DELETE ALL sub-list is closed and
the instrument returns to the FILE list after pressing the <ESC> push-button. In order to enter
the DELETE ALL window one has to press the <ENTER> push-button.
SETUP FILES selected to the execution of the DELETE ALL operation
After pressing the <ENTER> push-button the instrument checks its current state. In the case when
the measurements are performed, the execution of the DELETE ALL operation is not possible.
In such case, the message is displayed for few seconds and the instruments returns to the FILE list.
Display after the attempt to perform an unavailable operation during measurement in progress
If the measurements are not performed the instrument requests the confirmation of the operation
after entering this window (after pressing the <ENTER> push-button). After next pressing the <ENTER>
push-button, when the NO option is selected, the window is closed and the instrument returns to the FILE
list. The selection of the NO or YES option is possible using the <>, <> push-buttons. The return
to the FILE list is also possible after pressing the <ESC> push-button.
7-27
SVAN 953 USER MANUAL
_
Displays with the confirmation window during the execution of the DELETE ALL operation
All files from the selected type are deleted after the <ENTER> push-button pressing, when the YES
option is selected. The message is displayed after the successful execution of all stages
of the operation. The instrument waits for the reaction of the user (any push-button should be pressed
except the <SHIFT> and <ALT> one) and after pressing a push-button it returns to the FILE list.
Execution of the DELETE ALL operation in the case of SETUP FILES selection
Notice: The execution of the DELETE ALL function described above takes place in the case
when only one type of the files is selected in the DELETE ALL sub-list. If all types are selected
simultaneously and the logger, result and setup are saved, only Clearing operation is performed but two
times – one time in logger files memory and one time in result and setup files memory. After clearing
all memory, the defragmentation is not done. The memory merging is done only in the case of setup and
results memory, as these two different types of files are saved together in the same space.
Execution of the DELETE ALL operation for all type files simultaneously
7.6
Merging file space - DEFRAGMENTATION
The DEFRAGMENTATION is used to make the file memory continuous. All new files are saved
starting from the beginning of the free memory space. The memory occupied by the deleted file, assuming
that the file was not the last one, remains unused for the next files saving. After the removing
a file the files memory becomes discontinuous, with unused parts, which cannot be utilized in the future.
The situation is changed after the process called defragmentation. During this process, the files saved
in the files memory are moved in order to obtain the continuous occupied space. The files’ merging
is performed separately for two parts of the instrument’s memory: the FILES DEFRAGMENT. is used
to join the result and setup files and LOGGER DEFRAGMENT. is used in the case of the logger. Before
the defragmentation the FILES FREE SPACE and TOTAL AVAILABLE, characterizing the result memory
(path: MENU / FILE / FREE SPACE), usually differ between each other. After this operation, these
two parts are equal. The same situation is in the case of the LOGGER FREE SPACE and
TOTAL AVAILABLE characterizing the logger file. In order to enter the DEFRAGMENTATION sub-list the
user has to select the DEFRAGMENTATION text in the FILE list, using the <>, <> (or <>, <>)
push-buttons and press the <ENTER>.
7-28
SVAN 953 USER MANUAL
DEFRAGMENTATION text highlighted (displayed inversely) in the FILE list
7.6.1
Merging result and setup files memory - FILES DEFRAGMENT.
The FILES DEFRAGMENT. is used to join the result and setup files memory. In order to select this,
the user has to display inversely the FILES DEFRAGMENT. text in the DEFRAGMENTATION sub-list
using the <> (or <>) push-button.
FILES DEFRAGMENT. selected to the execution of the DEFRAGMENTATION operation
The DEFRAGMENTATION sub-list is closed and the instrument returns to the FILE list
after pressing the <ESC> push-button. In order to continue the execution of the function one has to press
the <ENTER> push-button. The instrument requests the confirmation of the operation. The next pressing
of the <ENTER> push-button, when the NO option is selected, causes the closing of the window and
the return to the DEFRAGMENTATION sub-list. The selection of the NO or YES option is possible using
the <>, <> push-buttons. The return to the DEFRAGMENTATION sub-list is also possible
after pressing the <ESC> push-button.
Confirmation windows during the execution of the FILES DEFRAGMENTATION operation
After pressing the <ENTER> push-button the instrument checks its current state. In the case when
the measurements are performed, the execution of the DEFRAGMENTATION operation is not possible.
In such case, the message is displayed and after few seconds instrument returns
to the DEFRAGMENTATION sub-list.
Display after the attempt to perform an unavailable operation during measurement in progress
If the measurements are not performed, after pressing the <ENTER> push-button on the active
YES option, the instrument checks whether the used result and setup files memory is continuous or not.
If this memory is continuous, the DEFRAGMENTATION operation is not executed and the special
message is displayed. The instrument waits for the reaction of the user (any push-button should be
pressed except the <SHIFT> and <ALT> one) and after pressing a push-button it returns
to the DEFRAGMENTATION sub-list.
7-29
SVAN 953 USER MANUAL
_
Message in the case when the execution of the DEFRAGMENTATION operation is unnecessary
If there are conditions to execute the DEFRAGMENTATION operation, it is done and the current
progress is shown on the display. After the successful execution, the special message is displayed and
the instrument waits for the reaction of the user. Any push-button should be then pressed except
the <SHIFT> and <ALT> one. After pressing a push-button, the instrument returns
to the DEFRAGMENTATION sub-list.
Execution of the DEFRAGMENTATION operation
The displays below illustrate the results of the FILES DEFRAGMENT. – after the execution,
the FILES FREE SPACE and TOTAL AVAILABLE become equal while the LOGGER FREE SPACE and
LOGGER AVAILABLE remain unchanged.
=>
Result of the FILES DEFRAGMENTATION operation
7.6.2
Merging logger files memory - LOGGER DEFRAGMENT.
The LOGGER DEFRAGMENT. is used to join the logger files memory. In order to select this, the
user has to display inversely the LOGGER DEFRAGMENT. text in the DEFRAGMENTATION sub-list
using the <> (or <>) push-button.
LOGGER DEFRAGMENT. selected to the execution of the DEFRAGMENTATION operation
The DEFRAGMENTATION sub-list is closed and the instrument returns to the FILE list
after pressing the <ESC> push-button. In order to continue the execution of the function one has to press
the <ENTER> push-button. The instrument requests the confirmation of the operation. The next pressing
of the <ENTER> push-button, when the NO option is selected, causes the closing of the window and
the return to the DEFRAGMENTATION sub-list. The selection of the NO or YES option is possible
using the <
>, <
> push-buttons. The return to the DEFRAGMENTATION sub-list is also possible
after pressing the <ESC> push-button.
7-30
SVAN 953 USER MANUAL
Confirmation windows during the execution of the LOGGER DEFRAGMENTATION operation
After pressing the <ENTER> push-button the instrument checks its current state. In the case when
the measurements are performed, the execution of the DEFRAGMENTATION operation is not possible.
In such case, the message is displayed and after few seconds instrument returns
to the DEFRAGMENTATION sub-list.
Display after the attempt to perform an unavailable operation during measurement in progress
If the measurements are not performed, after pressing the <ENTER> push-button on the active
YES option, the instrument checks whether the used logger files memory is continuous or not.
If this memory is continuous, the DEFRAGMENTATION operation is not executed and the special
message is displayed. The instrument waits for the reaction of the user (any push-button should
be pressed except the <SHIFT> and <ALT> one) and after pressing a push-button it returns
to the DEFRAGMENTATION sub-list.
Message in the case when the execution of the DEFRAGMENTATION operation is unnecessary
If there are conditions to execute the DEFRAGMENTATION operation, it is done and the current
progress is shown on the display. After the successful execution, the special message is displayed and
the instrument waits for the reaction of the user. Any push-button should be then pressed except
the <SHIFT> and <ALT> one. After pressing a push-button the instrument returns
to the DEFRAGMENTATION sub-list.
Execution of the DEFRAGMENTATION operation
The displays below illustrate the results of the LOGGER DEFRAGMENT. – after the execution
the LOGGER FREE SPACE and LOGGER AVAILABLE become equal while the FILES FREE SPACE
and TOTAL AVAILABLE remain unchanged.
7-31
SVAN 953 USER MANUAL
_
=>
=>
Result of the LOGGER DEFRAGMENTATION operation
7.7
Checking the contents of the memory - CATALOGUE
The CATALOGUE is used for checking the contents of the memory (the list of the result and setup
files). In order to enter the window the user has to select the CATALOGUE text in the FILE list, using
the <>, <> (or <>, <>) push-buttons and press the <ENTER> one.
CATALOGUE text highlighted (displayed inversely) in the FILE list
In the case when the instrument memory is empty (no file is stored), after entering
the CATALOGUE the NO FILES text is displayed and the instrument waits for the reaction of the user.
The user should press then the <ESC>, <ENTER> (the instrument returns to the FILE list) or
<START / STOP> push-button (the instrument starts the measurement).
CATALOGUE window when the memory is empty
In the case when the result and setup files memory in the instrument is not empty (some files
are stored) another window is displayed in which the same data about the existing in the instrument files
as in the FILE / LOAD window are presented. The current number of the file and the total number
of the saved result and setup files is displayed in the first line of the window. The name of the file
is displayed in the second line (its current number is presented in the first line). The name of the file
suggests the operation the file was created-in.
The names in which the first character is @ are coming from the AUTO SAVE function.
The file with the default name @Timer@ is coming from the AUTO SAVE function executed
in the TIMER operation. The other names suggest the SAVE / SAVE NEXT function. The type
of the current file (LEVEL METER, 1/1 OCTAVE or DOSE METER) is given in the third line. If during
the measurements which results are saved in the file, the logger file was also created its name
is displayed in the fourth line.
7-32
SVAN 953 USER MANUAL
Notice: The logger file can be deleted from the instrument’s memory in the FILE / DELETE /
LOGGER FILES window and this deleting operation does not modify the contents of the fourth line
of the CATALOGUE window.
The date and time of the SAVE operation are displayed in the fifth and sixth line, respectively.
The change of the current file with the unit step can be done after pressing the <>, <> push-buttons.
The first file is available after pressing the <> with <SHIFT> push-button (or <> with <SHIFT>) and
the last one is displayed after pressing the <> with <SHIFT> push-button (or <> with <SHIFT>).
The setup file is indicated by the SETUP text displayed in the third line instead of the LEVEL METER /
1/1 OCTAVE / DOSE METER text.
Contents of the CATALOGUE window
Notice: Many result files can be associated with one logger file, i.e. during the execution
of the AUTO SAVE function.
Exemplary result files associated with the same logger file (&LOG52) in the CATALOGUE window
7.8
Checking the free space in the memory - FREE SPACE
The FREE SPACE is used to read out the free space in the FLASH DISC memory
of the instrument. In order to enter the window the user has to select the FREE SPACE text in the FILE
list, using the <>, <> (or <>, <>) push-buttons and press the <ENTER> one.
FREE SPACE text highlighted (displayed inversely) in the FILE list
The files memory in the instrument is divided into two separate parts. One part is dedicated
for saving the result and setup files and its size is equal to 7208736 bytes. The second part is used for
saving the logger files and its size is equal to 8257280 bytes.
The FREE SPACE window in the instrument after the execution of the DELETE ALL operation is
presented below.
7-33
SVAN 953 USER MANUAL
_
FREE SPACE window after the execution of the DELETE ALL operation
The FREE SPACE window contains four numbers. First two, named FILES FREE SPACE and
TOTAL AVAILABLE, characterise the result and setup files memory. The files are always saved starting
from the beginning of the continuous memory space. The size in bytes of this space is given
in the FILES FREE SPACE position.
If the result and setup files were not deleted from the memory the number of bytes displayed
in the TOTAL AVAILABLE position is the same as in the FILES FREE SPACE. However, if some of them
were deleted, assuming that they were not the last saved, the memory used by them is empty but it does
not increase the continuous space. In such case, the number given in the TOTAL AVAILABLE position
is greater than that in the FILES FREE SPACE.
The DEFRAGMENTATION operation, which merges files, should be used to increase
the FREE SPACE. The next two numbers given in the FREE SPACE window, named
LOGGER FREE SPACE and LOGGER AVAILABLE characterize the logger files memory where
the saving mechanism is the same. Therefore, the numbers presented in the FREE SPACE window
depend on the history of the measurements and the operations performed by the user.
FREE SPACE window with the number depending on the measurements and operations performed
The window is closed and the instrument returns to the FILE list after pressing the <ENTER> or
<ESC> push-buttons or it starts the measurements (after pressing the <START / STOP> one).
7.9
Saving setup files in the instrument’s memory - SAVE SETUP
The SAVE SETUP is used for storing setup settings in the internal non-volatile (FLASH DISC)
memory (files are always written at the beginning of a free continuous space) as a file (see Appendix B for
the file formats). In order to enter the window the user has to select the SAVE SETUP text in the FILE list,
using the <>, <> (or <>, <>) push-button and press the <ENTER> one.
SAVE SETUP text highlighted (displayed inversely) in the FILE list
There are two available functions: the SAVE NEXT – save a setup file with the name increased
by one, and SAVE – save a setup file with the edited name. These functions are available after pressing
the <>, <> push-buttons.
7-34
SVAN 953 USER MANUAL
SAVE SETUP window in the FILE list
The name of the file, in which the setup settings are to be saved, is displayed above the SAVE or
SAVE NEXT text. The default name for a setup file is displayed in the case of the first entering
to this position (after power on). The default file name for setup settings is SET. The line of the setup file’s
name edition (FILE NAME) is opened after pressing the <> push-button.
The user can skip the setup file’s name edition and start saving file pressing the <ENTER> pushbutton or return to the FILE list pressing the <ESC> one.
The edition process is presented on the Figure below. The displayed inversely character
is currently edited. The <>, <>, <>, <> and <SHIFT> push-buttons are used for editing the name
which cannot exceed eight characters.
Display during the process of setting the character in the edited name
One can select the proper character’s position in the edited text using the <>, <> push-buttons.
Display during the selection of the character’s position to be edited
The available ASCII characters can be changed using the <> (or <>) push-button pressed
together with the <SHIFT> one. The subsequent digits, underline, big letters and space appear on
the display in the inversely displayed position after each pressing of the mentioned above push-buttons.
...
Display during the selection of the character
7-35
SVAN 953 USER MANUAL
_
Displays in the FILE NAME edition after pressing the <SHIFT> and <
> push-buttons
Displays in the FILE NAME edition after pressing the <SHIFT> and <
> push-buttons
The edited name is accepted and the setup file is saved after pressing the <ENTER> push-button.
The special warning is displayed in the case the file with the edited name already exists in the memory,
if the REPLACE position is not activated (path: MENU / FILE / SAVE OPTIONS). The instrument waits
then for a reaction of the user (any push-button should be pressed except the <SHIFT> or the <ALT>
one).
=>
...
...
Displays during the attempt of overwriting the existing file, changing the name and saving data
All changes introduced to the setup file name during the edition are ignored after pressing
the <ESC> push-button. This pressing causes the return to the list from which the SAVE option
was entered. The return after the edition to the line with the SAVE or SAVE NEXT text is possible
after pressing the <> push-button.
The simplified edition consists in the addition at the end of the file name the natural number.
The increase by one of the number is made automatically. After the saving operation execution the new
setup file name is displayed and the instrument waits then for a reaction of the user (any push-button
should be pressed except the <SHIFT> or the <ALT> one).
In the next attempt of saving data, the new name is displayed in the FILE NAME line and that name
is increased by one during the saving operation.
...
...
Displays in the simplified edition of the setup file name and saving operation execution
7-36
SVAN 953 USER MANUAL
The number can be changed from 1 to N. The only limitation of the N value is the length of the file
name, which cannot be longer than eight characters. In the case when such limitation is achieved and
the instrument can not change automatically the file’s name the only possibility is to edit new base file
name.
Notice: The files can be overwritten (the use of the same file name) without any warning
if the REPLACE option is switched on (path: MENU / FILE / SAVE OPTIONS / REPLACE).
...
Displays in the simplified edition of the file name, saving and the “saturation” of that operation
As it was already written, the instrument attempts to save a file after pressing the <ENTER> pushbutton. The saving is not possible in the case when the instrument is measuring the signal.
The special message is displayed for about 3 seconds in this case and the instrument returns to the
SAVE SETUP window.
Displays after the attempt to perform unavailable saving operation; the return to the SAVE SETUP
Notice: During the execution of the SAVE or SAVE NEXT function an additional window
is displayed informing about the operation performed. This window can be unnoticed by the user
as it appears for the short time.
Displays during and after the execution of the SAVE operation
As it was already written it is not possible to store the data in the file, which already exists, when
the REPLACE is not active ([ ]) (path: MENU / FILE / SAVE OPTIONS / REPLACE).
The presented below sequence of displays illustrates the situation when during the name-edition
process, the user selected the name that was used before but this time the REPLACE is active. The setup
file is overwritten, the instrument displays a special message and waits for the reaction of the user (any
push-button should be pressed except the <SHIFT> or the <ALT> one) and after pressing a push-button it
returns to the FILE list.
7-37
SVAN 953 USER MANUAL
_
... =>
...
=> ...
...
Displays after the attempt to overwrite a file if the REPLACE is active
7.10 Loading the files with the setup settings - LOAD SETUP
The LOAD SETUP is used for loading setup setting file from the FLASH DISC (e.g. for performing
different type of measurements with different instrument’s settings). The position is opened after pressing
the <ENTER> push-button when the LOAD SETUP text in the FILE list is displayed inversely (selected
using the <> (or <>) push-buttons or <> (or <>) with the <SHIFT> one). The return to the FILE list
is possible after pressing the <ESC> push-button.
FILE list with the LOAD SETUP text highlighted (displayed inversely)
Notice: It is not possible to load the file during the execution of the measurements.
On such attempt the message: MEASUREMENT IN PROGRESS is displayed for about 3 seconds.
After pressing the <ENTER> push-button the instrument checks its current state. In the case when
the measurements are performed, the file loading is impossible and the message is displayed.
Display after the attempt to perform an unavailable operation during measurement in progress
In the case when the setup files were not saved, after entering the LOAD SETUP window,
the NO FILES text is displayed and the instrument waits for the reaction of the user. The user should
press then the <ESC>, <ENTER> (the instrument returns to the FILE list) or <START / STOP> pushbutton (the instrument starts the measurement).
Display during the execution of the LOAD SETUP operation
7-38
SVAN 953 USER MANUAL
The current number of the setup file and the total number of the saved setup files is displayed
in the first line of the LOAD SETUP window. The name of the file is displayed in the second line
(its current number is presented in the first line).
The date and time of the SAVE SETUP operation is displayed in the fourth and fifth line
respectively. The change of the current file with the unit step can be done after pressing the <>, <>
push-buttons. The first file is available after pressing the <> with <SHIFT> push-button (or <> with
<SHIFT>) and the last one is displayed after pressing the <> with <SHIFT> push-button (or <> with
<SHIFT>).
Exemplary contents of the LOAD SETUP window
The name of the file is accepted and the file is loaded after pressing the <ENTER> push-button.
The message with the name of the selected file is displayed during the execution of the loading operation.
The next message is displayed after successful end of loading operation. The instrument waits
for the reaction of the user (any push-button should be pressed except the <SHIFT> or <ALT> one) and
after pressing a push-button it returns to the FILE list.
<A KEY>
Displays after the execution of the LOAD SETUP operation
7.11 Connecting the external USB memory stick- DIRECTORY
The DIRECTORY text appears in the FILE list when the USB memory stick is connected
to the device (the USB DISK option has to be selected in USB-HOST PORT window in SETUP list).
In order to enter the window the user has to select the DIRECTORY text in the FILE list, using
the <>, <> (or <>, <>) push-buttons and press the <ENTER> one. The return to the FILE list is
possible after pressing the <ESC> push-button.
a)
b)
FILE list with the DIRECTORY text selected (a) and the DIRECTORY window opened (b)
The FREE SPACE denotes the available free memory on the connected disk. The DIR NO. shows
st
the number of the selected directory (the 1 number) and the number of the existing directories
nd
(the 2 number). In the case the directories do not exist, these numbers are equal to zero.
st
The DIR NAME enables one to edit the directory name (the 1 number) or displays its name. The help
lines are placed at the display’s bottom.
There are two ways of the current directory selection:
• the name edition in the DIR NAME line. The default name consists of the day number and the month
abbreviation. The not existing directory will be created.
7-39
SVAN 953 USER MANUAL
_
• the selection of the existing directory by means of the <>, <> push-buttons pressed in the line
with the DIR NO. text. The name of the selected directory is displayed in the DIR NAME line.
The selection is confirmed after pressing the <ENTER> push-button which closes the window and
returns to the FILE list. The return to this list is also possible after pressing the <ESC> push-button but
the selection is not confirmed. The selection of the directory is obligatory during the initialisation process.
In this case also the <ESC> push-button confirms the settings.
FILE list, the DIRECTORY window
Notice: After connecting a USB memory stick to the device the paper sheet icon appears in
the top of the display.
7.12 Copying files to the external USB memory stick - COPY FILES TO USB
The COPY FILES TO USB is used for copying files to the external USB memory stick. The position
is opened after pressing the <ENTER> push-button when the COPY FILES TO USB text in the FILE list is
displayed inversely. The return to the FILE list is possible after pressing the <ESC> push-button.
b)
a)
FILE list with the COPY FILES TO USB text selected (a) and the COPY FILES window opened (b)
The COPY FILES TO USB sub-list consists of three positions to be selected: RESULT FILES,
LOGGER FILES and SETUP FILES and DIRECTORY position with the name of the directory in which the
files from the internal memory of the instrument will be stored.
In order to copy required type of the files the user has to place the special character in the line
with the RESULT FILES, LOGGER FILES or SETUP FILES text using the <> or <> push-button. After
next pressing the <ENTER> push-button, when no option is selected, the window is closed and
the instrument returns to the FILE list. The return to the FILE list is also possible after pressing the <ESC>
push-button.
a)
b)
RESULT FILES selection to the execution of the COPY FILES TO USB operation (a); the RESULT,
LOGGER and SETUP files selected to the execution of the COPY FILES TO USB operation (b)
7-40
SVAN 953 USER MANUAL
After pressing the <ENTER> push-button the instrument checks its current state. When
the measurements are performed, the execution of the COPY FILES TO USB operation is not allowed.
In such case, the message is displayed for few seconds and the instrument returns to the FILE list.
Display after the attempt to perform an unavailable operation during measurement in progress
If the measurements are not performed, the instrument starts the operation. After the operation
Files Copied O.K. message is presented on the display. If a file has been already copied to the USB
stick, a message ALREADY EXIST is presented on the display as well as the name of the file.
b)
a)
Display after the execution of COPY FILES TO USB operation (a) and when the file exists already (b)
7.13 Moving files to the USB memory stick- MOVE FILES TO USB
The MOVE FILES TO USB is used for moving files from internal instrument’s memory to the USB
memory stick. The position is opened after pressing the <ENTER> push-button when the
MOVE FILES TO USB text in the FILE list is displayed inversely. The return to the FILE list is possible
after pressing the <ESC> push-button.
a)
b)
FILE list with the MOVE FILES TO USB text selected (a) and the MOVE FILES window opened (b)
The MOVE FILES TO USB sub-list consist of three positions to choose: RESULT FILES,
LOGGER FILES and SETUP FILES and DIRECTORY position with the name of the file in which
the files from the internal memory of the instrument will be stored.
In order to activate required position the user has to place the special character in the line
with the RESULT FILES, LOGGER FILES or SETUP FILES text using the <> or <> push-button. After
next pressing the <ENTER> push-button, when no option is selected, the window is closed and
the instrument returns to the FILE list. The return to the FILE list is also possible after pressing
the <ESC> push-button.
b)
a)
RESULT FILES selection to the execution of the MOVE FILES TO USB operation (a) the RESULT,
LOGGER and SETUP files selected to the execution of the MOVE FILES TO USB operation (b)
7-41
SVAN 953 USER MANUAL
_
After pressing the <ENTER> push-button the instrument checks its current state. In the case when
the measurements are performed, the execution of the MOVE FILES TO USB operation is not possible.
In such case, the message is displayed for few seconds and the instruments returns to the FILE list.
Display after the attempt to perform an unavailable operation during measurement in progress
If the measurements are not performed, the instrument starts the operation. After the operation
Files Moved O.K. message is presented on the display. If the file already exist in the USB memory stick
the message with the name of the file and ALREADY EXIST text is presented on the display.
b)
a)
Display after the execution of MOVE FILES TO USB operation (a) and when the file already exists
in the USB memory (b)
Notice: After the execution of the MOVE FILES TO USB operation, files, which have been
moved, do not exist in the internal instrument’s memory any more.
7-42