1
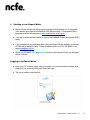
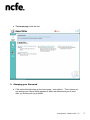
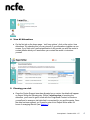
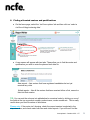
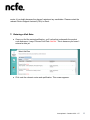
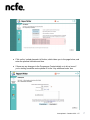
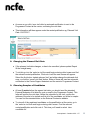
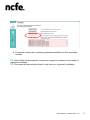
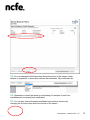
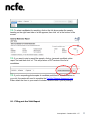
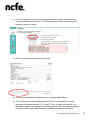
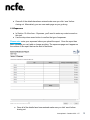
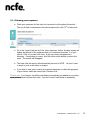
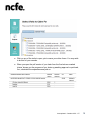
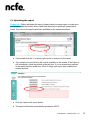
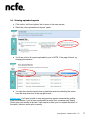
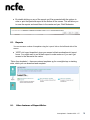
Report Writer Manual Content: 1. 2. 3. 4. 5. 6. 7. 8. 9. 10. 11. 12. 13. 14. 15. 16. 17. Starting to use Report Writer Logging in to Report Writer Changing your password View all allocations Planning your visit Finding allocated centres’ qualifications Entering a visit date Changing planned visit date Choosing samples of candidates Filling out the visit report Expenses Claiming your expenses Uploading reports Viewing uploaded reports Reports Other features of Report Writer Troubleshooting/Frequently Asked Questions Last updated – October 2013 – LZ 1 1. Starting to use Report Writer Report Writer is a secure online reporting system which allows you to complete your reports from external moderation visits electronically. It’s accessed like a webpage and the web address is http://reportwriter.ncfe.org.uk. Your log in details will be emailed to you by the External Quality Assurance (EQA) team. If you experience any problems when using the Report Writer website, a member of EQA will be happy to help. Please telephone them on 0191 239 8092 or via email [email protected]. Watch out for useful TIPs and Notes throughout the manual to help you navigate within software. Logging in to Report Writer Enter your CP number (which can be found on your contractual documents) and password (as issued by EQA) and then click login. The log in screen looks like this: Last updated – October 2013 – LZ 2 The home page looks like this: 3. Changing your Password Click on the third tab down on the home page - ‘user options’. This is where you can change your Report Writer password, which we recommend you do soon after you receive your log in details. Last updated – October 2013 – LZ 3 4. View All Allocations On the first tab on the home page - ‘visit form options’, click on the option ‘view allocations’. By selecting this you can view all of your allocations together on one screen. If you click onto a centre/qualification it will provide you with the centre’s contact details which you’ll need when you contact the centre to introduce yourself. 5. Planning your visit Once the Centre Support team has allocated you a centre, the details will appear on Report Writer the following day. Within 3 working days of receiving the allocation, you’ll need to get in touch with the Programme Contact to introduce yourself and to arrange a visit date that’s convenient for you and the centre. Once the date has been agreed, you’ll need to enter it into Report Writer within 24 hours of arranging the visit (see Section 7). Last updated – October 2013 – LZ 4 6. Finding allocated centres and qualifications On the home page, select the ‘visit form options’ tab and then click on ‘select a visit form & begin entering data’. A new screen will appear with two tabs. These allow you to find the centre and qualification you wish to enter the planned visit date for. New reports – lists centres that have registered candidates but not yet received any visits Visited reports – lists all the centres that have received either a first, second or third visit that session. TIP: You can sort the columns into alphabetical or numerical order by clicking on one of the fields at the top eg product number, product name, centre number etc. This is really useful when you have a number of allocations. Please note: If the centre isn’t showing, check the correct session is selected in the drop down box, and check under both new and visited reports. If you still can’t find the Last updated – October 2013 – LZ 5 centre, it’s probably because they haven’t registered any candidates. Please contact the relevant Centre Support Assistant (CSA) to check. 7. Entering a Visit Date Once you find the centre/qualification, you’ll notice that underneath the product code and name, it says ‘Planned Visit Date: Not Set’. This is because you haven’t entered a date yet. Click onto the relevant centre and qualification. This screen appears: Last updated – October 2013 – LZ 6 Click on the ‘update planned visit’ button, which takes you to the page below, and enter the planned visit date and time. If there are any changes to the Programme Contact details or to let us know if you’re visiting a satellite centre please fill in the ‘Any additional notes’ box. Last updated – October 2013 – LZ 7 As soon as you click ‘save visit date’ an automatic notification is sent to the Programme Contact at the centre, confirming the visit date. This information will then appear under the centre/qualification eg ‘Planned Visit Date: 03/07/2013’ 8. Changing the Planned Visit Date If the planned visit date changes, or has to be cancelled, please update Report Writer straight away. To do this go into the ‘select a visit form and begin entering data’ screen and find the relevant centre/qualification. Click onto it and the next screen will appear. Select the first button ‘update planned visit’ and either change the date and click save, or click the ‘cancel visit date’ button. Either of these will send an automatic notification to the Centre Support Assistant and the centre’s Programme Contact. 9. Choosing Samples of Candidates At least 3 weeks before the agreed visit date, you should send the standard External Moderator Visit letter by post or email to the Programme Contact. This letter will confirm the visit date, outline the schedule for the visit, confirm the address of the site to be visited and list all of the candidates you’d like to sample. You can find the standard letter on the External Contractor website. To view all of the registered candidates on the qualification at the centre, go to the ‘select a visit form and begin entering data’ screen. Find the relevant centre/qualification and click onto it. This time you’ll need to select ‘view candidate list’. Last updated – October 2013 – LZ 8 A separate screen pops up showing registered candidates and their associated batches. TIP: Report Writer will automatically recommend a sample size based on the number of registered candidates. TIP: The screen will automatically default to only show you ‘registered’ candidates. Last updated – October 2013 – LZ 9 TIP: You can change the third drop down box at the bottom of the screen, which defaults to registered, to show other statuses like withdrawn, fully certificated etc. TIP: Remember to check the status to avoid asking for samples of work from candidates who’ve already been certificated. TIP: You can also view and sample candidates from previous sessions by changing the first drop down box at the bottom of the screen. Last updated – October 2013 – LZ 10 TIP: To select candidates for sampling, click on the tick boxes under the sample heading on the right hand side so a tick appears, then click ‘ok’ at the bottom of the screen. TIP: If you want to print or email the sample, click on ‘generate candidate status report’ first and then click ‘ok’. This will produce a PDF version of the list of candidates. TIP: If you’re requesting photocopies of candidate portfolios for standardisation on your visit, the centre will need to complete the Portfolio Release Agreement form. Either attach the form to your email or include it with the letter if you’re posting it. 10. Filling out the Visit Report Last updated – October 2013 – LZ 11 Go to the ‘select a visit form and begin entering data’ screen, find the relevant centre/qualification and click on it. You’ll then be able to enter the visit report by selecting ‘begin visit report’. Here is how the first page of the report looks. Continue through the form making sure you complete all sections. You’ll notice that the final grading column ‘N/A’, is only available for certain questions throughout sections 3, 4, 5 and 6. This is to make sure that the ‘not applicable’ grade is only selected for questions which can’t be graded eg physical resources, liaising with satellite centres, candidate attendance records etc. Last updated – October 2013 – LZ 12 Once all of the details have been entered make sure you click ‘save’ before closing out. Alternatively you can save each page as you go along. 11. Expenses In Section 12 of the form - Expenses, you’ll need to enter any costs incurred on this visit. Use the drop down menu button to confirm the type of expenses. Please note: enter your expenses before you upload the report. Once the report has been uploaded you can’t add or change anything. The expenses page won’t appear on the version of the report that can be sent to the centre. Once all of the details have been entered make sure you click ‘save’ before closing out. Last updated – October 2013 – LZ 13 12. Claiming your expenses Claim your expenses for the visits you’ve carried out throughout the month. The cut-off date for expenses to be paid in that month is the 13 th of the month. Go to the ‘reports’ tab and click the ‘claim expenses’ button. Another screen will appear showing all of the expenses that you’ve entered in section 12 of your reports. Click on ‘process this claim’. A pop up screen will appear as a summary. If everything is correct, click the button at the bottom ‘process this claim’. The screen will disappear. The claim (like the report) will automatically be sent to NCFE. You don’t need to email or post us the claim or receipts. If you wish to view, print or save your claimed expenses or check the progress of your claims, select the second tab ‘Claimed visits’. Please note: Your fee per visit will be calculated automatically and added to your claim, once you’ve clicked ‘process this claim’. You don’t need to add these on seperately. Last updated – October 2013 – LZ 14 Click on any of the visits to open, print or save your claim forms. You may wish to do this for your records. When you open the pdf version of your claim form the final column marked ‘status’ shows you the progress of your claim eg awaiting approval or paid and, if so, what date the expenses were paid on. Last updated – October 2013 – LZ 15 13. Uploading the report Please note: Before uploading the report, please check your report again to make sure you’re happy with the content and to check that there are no spelling or grammatical errors. You can use the spell check that’s available for the narrative sections. Once saved click the ‘x’ in the top right corner to close out of the report. The ‘upload visit report’ button will now be available on the screen. If the button is still unavailable, check the actions in the pink box. If you’ve missed any sections in the report they’ll be listed here. Click on ‘begin visit report’ and complete the missed sections. Click the ‘upload visit report’ button. The report will then be automatically uploaded to NCFE. Last updated – October 2013 – LZ 16 14. Viewing uploaded reports Click on the ‘visit form options’ tab to return to the main screen. Select the ‘view uploaded visit reports’ option. You’ll see a list of all reports uploaded by you to NCFE. If the page is blank, try changing the session. You can also view the reports from a particular centre by selecting the centre from the drop down box in the top right corner. Please note: You’ll also be able to view any previous reports completed by another External Moderator if you’ve been re-allocated a centre from someone else. Report Writer gives you access to the last 2 visit reports to allow you to complete Section 2 of the report ‘previous action plan’ correctly. Last updated – October 2013 – LZ 17 By double clicking on any of the reports you’ll be presented with the options to save or print that particular report at the bottom of the screen. This will allow you to save the reports and email them to the centre and your Chief Moderator. 15. Reports You can access a number of templates using the ‘reports’ tab on the left hand side of the screen. ‘NCFE visit report templates’ gives you access to blank moderation visit report forms. You might want to use a blank report to make notes on if you can’t get access to the internet at the centre. ‘Claim form templates’ – there are various templates eg for overnight stays or training visits, which you can download and complete. 16. Other features of Report Writer Last updated – October 2013 – LZ 18 In section 7 of the report you can apply the Internal Moderator (IM) initials, Assessors initials and level to all candidates by clicking the arrow next to the box. If they’re all the same you don’t need to enter them separately. In the blue box at the top of the Report Writer page, there are reminders to let you know the number of days you have left to claim your expenses and to show how many new allocations you have. Last updated – October 2013 – LZ 19 17. Troubleshooting / FAQs This section provides you with the answers to the most common problems. If you can’t find what you’re looking for, please contact the External Quality Assurance team on 0191 239 8092 or email [email protected]. Postal Moderation Postal moderation can be requested by the centre by completing and submitting the request form available on the NCFE website. The request will be reviewed and authorised by EQA. You should indicate that the report is for postal moderation by ticking the box on the first page of the report before you click Begin Report. You must have received authorisation from EQA for this and once clicked as ‘postal’ this cannot be reversed. Multiple sessions Report Last updated – October 2013 – LZ 20 If you’re completing a moderation visit which covers multiple sessions for the same qualification, you only need to fill in the current session report, and use the sampling candidate section to indicate the different sessions. I can’t see a certain centre Make sure you’ve chosen the correct session under both new and visited products using the drop down box. I can’t view any candidates Make sure you’ve checked all of the different sessions, batches and candidate statuses by changing the drop down boxes at the bottom of the screen. How do I de-select candidates? Tick again on the ticks in the boxes to remove them. I’m trying to upload my report, but it says in the pink box that there is information missing from section 7 and I don’t know what’s missing! Check you’ve entered the ‘level’, ‘status’ and ‘sources of evidence’ for each candidate. Every time I enter the duration the system doesn’t save it Just enter a number and not the word ‘hours’. The information keeps disappearing Make sure you’re clicking the save button before closing the screen. I’ve uploaded the report but didn’t enter the mileage Unfortunately you can’t enter or change data retrospectively. Please make sure for the future you’re checking these details before you upload your report. I’ve uploaded the report and then found an error in the text Unfortunately you can’t enter or change data retrospectively. Please make sure for the future you’re checking these details before you upload your report. I’ve completed a visit, but the centre isn’t showing and I’ve checked the correct session under new and visited products This is probably because no candidates have been registered, or you haven’t been allocated to that centre and qualification. Please contact the relevant Centre Support Assistant for the centre to check before making any visit arrangements. I can’t log into Report Writer Last updated – October 2013 – LZ 21 Please check you are using the correct link, CP number and password. If you are, and are still unable to log into Report Writer please contact the External Quality Assurance team on 0191 239 8092. I have some batch numbers missing? Try changing the session. How do I change my password? Go to the ‘user options’ tab on the left hand side and select ‘Change my NCFE Report Writer password’. I can’t find my second visit report to complete? Check the visited products screen. The information I typed into section 12 isn’t saving Make sure you haven’t typed any additional information into that section, as incorrect data in certain fields might cause it to disappear. Last updated – October 2013 – LZ 22