1
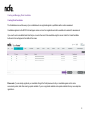
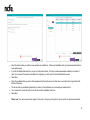
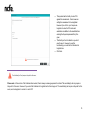
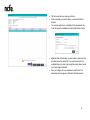
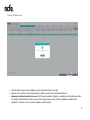
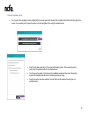
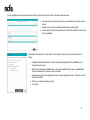
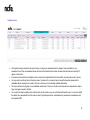
online assessment user guide Table of Contents Logging in and navigating the system .................................................................................................................................................................. 4 1 Logging In ........................................................................................................................................................................................................ 4 Searching............................................................................................................................................................................................................. 6 Creating and Managing Users.............................................................................................................................................................................. 6 Creating New Users ......................................................................................................................................................................................... 6 Editing Users.................................................................................................................................................................................................... 7 Resetting Passwords ....................................................................................................................................................................................... 7 Creating and Managing Pirate Candidates ........................................................................................................................................................... 8 Creating Pirate Candidates .............................................................................................................................................................................. 8 Editing Candidates ......................................................................................................................................................................................... 10 Creating and Managing Cohorts ........................................................................................................................................................................ 10 Scheduling and Managing Exams ...................................................................................................................................................................... 12 Scheduling Exams ......................................................................................................................................................................................... 13 Editing scheduled exams ............................................................................................................................................................................... 18 Deleting individual exams............................................................................................................................................................................... 19 Printing invigilation packs ............................................................................................................................................................................... 20 Invigilate screen ............................................................................................................................................................................................. 22 Keycode screen ............................................................................................................................................................................................. 23 Results ............................................................................................................................................................................................................... 24 Managing your own profile ................................................................................................................................................................................. 27 Advanced Caching Assessments ....................................................................................................................................................................... 27 Remote Assessments ........................................................................................................................................................................................ 28 Scheduling remote assessments.................................................................................................................................................................... 28 Downloading the assessment onto a laptop ................................................................................................................................................... 29 2 Uploading the results from a laptop .................................................................................................................................................................... 31 Downloading the assessment onto a USB data key ....................................................................................................................................... 33 3 Logging in and navigating the system After you apply for access to the NCFE Online Assessment system we’ll contact you and guide you through the process of approval and setup. Once this is complete you’ll have user names and passwords for up to 2 of your staff and you’ll be ready to start using the system to manage your candidate assessments. This manual will guide you through the major features and functions of the system. Logging In You can access the NCFE Online Assessment administration site through our website www.ncfe.org.uk; your user names and passwords will have been supplied during the approval process. Once these details are supplied, you can fill in the following login screen with your new details You’ll then see the Home screen. The options you see on this screen will vary depending on the level of access you have. This is the Home screen for a Centre Admin User. The grey menu bar at the top of the screen has buttons for each screen that you can access. You’ll have 2 users set up by NCFE; a Centre Admin User and a Technical Contact. The Centre Admin User will be in control of all other user accounts at your centre and can also set up new users with varying access. These are called Centre Roles. 4 Primary Contact/Centre Admin Technical Contact/Centre IT Admin Exams Admin Tutor Invigilator Standard User As you can see, only the Centre Admin role has a user’s screen and is able to set up other user accounts. However if your Centre Admin wishes to amend their account, please contact NCFE and your Centre Support Assistant will be able to help. 5 Searching Most of the screens take the form of data tables and there can be quite a lot of information to look through so each screen has a search bar at the top of each column. The search option is available by selecting the drop down arrow next to each column title and filling in the search field. When you’re happy with the search criteria, press the magnifying glass icon to search. If you need to clear the search history you can select Reset Filters from the search bar. Creating and Managing Users Creating New Users Your Centre Admin user will be able to add new users for your centre and select what access they have. This is done through the Users screen. 6 Select Create User and a form will appear in the centre of the screen. The mandatory fields are shown with a small star icon. Don’t complete the Online ID box as it auto populates. The Associated Qualifications tab will display a list of qualifications which you’ve approval to offer and are available for online assessment. Tick the box next to any qualification that you want the new user to be able to set up candidates and assessments for. The Associated Centre Roles tab lets you set the new user’s access. Tick the box next to your centre and then click the arrow to open up a drop down list. Now tick the box next to the roles you want that user to have. Select OK and you’ll set the user up and send them an email with their username and password. The new user can log in straight away and start using the system Editing Users Once you’ve set up a user account you can edit it by selecting it from the Users screen and selecting Edit User. Editing uses a screen similar to the one above; you’ll be able to amend any of the information on the screen other than the user name. The edit screen will also have a tick box which lets you retire a user who’s no longer active. Resetting Passwords You can reset a user’s password using the third button at the bottom right of the Users screen. Select the user you want to reset the password for and select Reset User’s Password. The user will receive an email with their new password. 7 Creating and Managing Pirate Candidates Creating Pirate Candidates The Candidates screen will show any of your candidates who are registered against a qualification with an online assessment. Candidates registered on the NCFE Portal will appear online one hour from registration and will be available to be entered for assessments. If you need to enter a candidate faster than that you can enter them as a Pirate candidate using this screen. Select the Create Candidate button and a form will appear in the middle of the screen Please note: If you’ve already registered your candidates through the Portal please wait until your candidate appears on the online assessment system, rather than creating a pirate candidate. If you’ve a registered candidate and a pirate candidate this may cause duplicate registrations. 8 This shows a pirate candidate ready to be created. You should tick both boxes labelled Auto Generate but don’t type in the field next to them. Fields with an asterisk are mandatory. Associated Qualifications lets you select which qualifications the candidate will be able to sit assessments for. Please only tick one qualification for each record created. You can grant the candidate 25% extra time at this point by ticking the Special Requirements box. This will grant the candidate 25% extra time on any assessment they sit. If you want to limit the candidate to extra time on just a single assessment you can set that at a later stage. In these cases leave the Special Requirements box empty. When you select OK, the pirate candidate will be created and you’ll be able to see them on the Candidates screen. They can be entered for assessment straight away. 9 Editing Candidates Select a candidate from the list on the Candidates screen and select Edit Candidate. This will open the same screen as the create candidate screen above. The edit screen lets you add or remove the tick in the Special Requirements box. You can also retire the candidate by ticking the relevant box at the bottom of the screen. This removes the candidate from NCFE Online Assessment but doesn’t delete them from our database. You won’t be able to edit any other candidate details on this screen. If you want to change a candidate’s name or date of birth, please contact your Centre Support Assistant. Creating and Managing Cohorts Creating Cohorts Cohorts are a feature of the NCFE Online Assessment administration system. They allow you to create groups of candidates in the system so that it’s easier to manage large numbers of candidates and enter them for assessments together. Cohorts are very flexible so you can create groups in any way you wish, eg all of your NCFE Level 1 Adult Literacy candidates could be grouped together or all of your Year 9 candidates. This is the cohorts screen before any cohorts have been set up, cohorts you create will appear on the left. Candidates at your centre will appear on the right to be selected and added to a cohort. You can create cohorts within cohorts, and the same candidate can belong to a number of cohorts at the same time. Select Create Cohort to get started. A form will appear, name your cohort and give it a description then select OK. 10 You’ll see the new cohort appear on the left hand side of the screen. Click on the new cohort and the right side of the screen will display a list of candidates at your centre. The right side of the screen is where you can add and remove candidates. The arrow buttons in the centre move selected candidates into or out of the cohort. The double arrow will move everyone in the list. The left list shows candidates available to be added, the right list shows candidates added to the cohort. You can select multiple candidates using shift and control keys. Once you’ve added candidates to your cohort, clicking the Apply button at the bottom of the screen will bring up a prompt screen asking you to either save your added candidates to the cohort or cancel. Please note: deleting a cohort you’ve created, doesn’t delete your candidates, only the cohort. 11 Scheduling and Managing Exams The Exam Schedules screen allows you to set an exam up and enter candidates as well as setting additional time requirements and printing paperwork. The screen will guide you through the whole process. The Exam Schedules screen will show you a list of any assessments you set up with the usual search bar at the top and a number of buttons at the bottom right. In the status column, a status of ‘Editable’ means you can still amend the details of the assessment. ‘Locked’ means the exam has reached its start time so can’t now be changed. Note the key at the bottom of screen where it shows a green tick and red cross denoting if an exam is valid or invalid - these will appear next to any scheduled exam in the far left hand column. If a red cross appears next to an exam when it’s due to start it means there’s an issue with the assessment and you’ll need to contact your Centre Support Assistant immediately. To begin scheduling an assessment, select the Create Exam button at the bottom of screen. A ‘wizard’ will appear which will guide you through the process. 12 Scheduling Exams At each step of the Schedule Exam Wizard you select the option you want and then select Next to move on. You can always select Back to return to previous steps or Cancel to close the window. Select your centre and choose Next. Select the qualification you want to schedule an assessment for from the top window. Once you’ve selected the qualification, you can then select from the window below whether you want to schedule a live exam or a practice exam. 13 Select the date and time you want the exam window to be available for. Please note candidates can’t log into assessments before the exam window opens. If you tick the Multiple Day Exam box, you can set a start and end date. This lets you make assessments available for a number of days. If you only want the exam to be available for a single day you don’t need to tick the Multiple Day Exam box. Select Next. Select the candidates that you want to sit the assessment by ticking the box next to their name or use Select all in page button at the bottom of the screen. This list will show any candidate registered at your centre on the qualification you’re scheduling an assessment for. You can also select a cohort from the list on the left and enter candidates from there. Select Next. Please note: Your centre users will also appear in this screen - this gives you the option to book yourself onto practice assessments. 14 This system has the facility to set a PIN against the assessment - this is known as setting the assessment to be invigilated. However if you do this, you’ll require an Invigilator to enter the PIN onto each workstation in addition to the candidate then entering the Keycode password they’ll be given. This facility isn’t set to default so you don’t need to use it. However to use this functionality you must tick the Schedule for Invigilate box. Click Next. Please note: In this section of the Schedule Exam wizard, there’s always a message present to indicate ‘The candidate(s) will only require a Keycode for this exam’. However if you select the Schedule for Invigilate button this changes to ‘The candidate(s) will require a Keycode for this exam, and an Invigilator to unlock it or set a PIN’ 15 The final screen lets you review your choices. If there’s anything you need to change, you can select Back to change it. You can grant extra time to a candidate for this assessment only. To do this select the candidate and click the Edit Duration button. Adjust the slider to the duration you want, select a reason from the drop down menu then select OK. If you require more time for a candidate than you’re able to give using this screen, please contact your Centre Support Assistant. Once you’re happy with your assessment, select Finish. The assessment will now appear on the Exams Schedules screen. 16 You’ll notice at the top of the screen, there’s an Only show exams created by me option so you don’t have to view exams scheduled by other users at your centre. You’ll also notice there’s an Invigilated exams button - this allows you to only view exams that have been set to invigilation if you’ve selected the Schedule for invigilate button when scheduling the exam At the bottom left of the screen, there are 2 buttons. Selecting the Group by session button allows you to view assessments and the Show each candidate button allows you to view candidates. 17 Editing scheduled exams A scheduled assessment will have a status of ‘editable’ until the start time for the assessment window has been reached. At this point the assessment status will change to ‘locked’. Assessments that are locked will appear on the Invigilation screen, whereas if an assessment is editable, it appears in the Exams Schedules screen as shown in the screen shot to the left. To edit an assessment when editable, select your candidate and click the Edit button - this brings up the wizard and you follow this to make the required adjustments to the assessment. If you’ve scheduled an exam which is no longer needed you can delete it from this screen. You may find this helpful to keep your records up to date and accurate. You’ll only be able to delete an exam while it’s in an editable state before the start of the exam window. There are 2 methods to delete exams, either delete the actual exam itself or delete individual candidates from exams. 18 Deleting individual exams Select the button Group by session, highlight your exam and click the Delete exam button. Be aware if you do delete an exam using this method, it deletes the exam for each candidate booked onto it. Removing an individual candidate from exam- Click ‘Show each candidate’, highlight your candidate and click the Edit exam button. This brings up the Schedule Exam wizard, which you follow through until you come to the list of candidates scheduled onto the assessment. At this point you can un-tick the candidate you wish to remove. 19 Printing invigilation packs You can print off an invigilation pack by highlighting the relevant exam and choosing Print Invigilation Pack from the bottom right of the screen. Once selected you’ll be given the option to Create Invigilation Pack using the selected exams. Once this has been selected you’ll be shown the following screen. This screen will give the option to print invigilation packs for an individual exam. You’ll be given the option of choosing to print candidate assessment Keycodes, Supervision reports and candidate slips with one or multiple Keycodes per page. Once these option have been selected, choose Finish and the relevant files will open in a printable screen. 20 To print invigilation packs using the wizard, select Print Invigilation pack from the bottom of the exam schedules screen. Once selected you’ll be given another pop up screen where you’ll be given various options. Select the correct centre, qualification and the exam and choose Next Another series of pop up boxes will allow you to select the time/date of exam as well as the candidate(s). The final part of this process is ‘output options’. You’ll be given 4 options of how you want the reports to behave. Candidate Assessment Keycodes - this lists the Keycodes (passwords) for the candidates you’ve selected using the wizard. NCFE Online Assessment Candidate Slips – these are the individual slips to give to candidates with their Keycodes which they’ll need to login to their exam. Supervision report - this is an optional report for your internal invigilation records. This doesn’t need to be returned to NCFE. Either one or multiple Keycodes per page. Click Finish. 21 Invigilate screen The Invigilate screen is intended to be used to help you manage your assessments as they happen, from a workstation in your assessment room. When an assessment shows as locked in the Schedule Exam screen (the exam start time has been reached) it’ll appear on this screen. It has some functions which are available on other screens but are duplicated here for the benefit of users with lower levels of access. You may want to use this just as an information screen, for instance it’s a convenient way of seeing the Keycodes (passwords) for candidates without needing to print a report. Each line on this screen is an individual candidate assessment. The screen will show the progress of your candidates’ assessments. The icons in the left column show when an assessment is ready to begin, in progress, paused or finished. You can print the same Invigilation Pack from the button on this screen as you can on the Exams Schedule screen. You can also modify the duration of an assessment from this screen to cater for special requirements, void assessments, pause/resume assessments and set invigilation PIN’s. 22 Keycode screen The Keycode screen is another information screen designed for certain user roles that don’t have access to the Invigilator screen. It’ll allow you to see all of the relevant information for assessments, with a line for each candidate, but doesn’t give you any control over the assessments themselves. Each candidate’s Keycode is available on this screen. You can use Print Keycodes to produce a report listing Keycodes for an assessment or multiple assessments. 23 Results The Results screen allows you print reports for completed assessments. Each line on the screen is an individual candidate assessment. You can print reports for an individual candidate or for several candidates at once. Only completed assessments will appear on the results screen. There are 3 reports available that you’ll use: Summary - a list of all the selected candidates and their results Candidate Breakdown - a feedback report to let you see details of the candidate’s performance against each learning outcome Results Slip - individual candidate results on slips which can be given to the candidate. To obtain the Summary, Candidate Breakdown and Results slips, you need to the use buttons on the bottom right of the results screen as shown above. For each of the 3 reports, you can use 2 methods to obtain them, either printing them using the wizard to print reports for a selection of candidates who sat an assessment within a certain assessment date and time range, or actually highlighting a candidate or multiple candidates on screen. To print reports via the wizard, click on the required report button you want the report ie Results Slip, Candidate Breakdown or Summary to bring up the wizard. 24 Above is the Results wizard, the first step is to select your centre and choose Next. Select the qualification you want to produce the report for and select the live or practice test below in the second window. Depending on the type of exam the candidate is taking, you may be given a pass or fail result at the end of exam. This mark will then be available on the exams screen. Please be aware this mark is unconfirmed until a confirmation email is received from NCFE with the candidate’s final mark. 25 Select the date and time range that you want the report for and choose Next. Select the candidate(s) you want to produce reports for. You can use the Select All and Deselect All buttons with large groups of candidates. Select Print to view the document which includes all the candidate information 26 Managing your own profile The My Profile screen allows you to amend details of your own user account. You can also change your password to something memorable on this screen. This is the My Profile screen. You can edit any of the fields except User Name. Make the change you need then select the Change My Details button. Select the Change My Password button to open up a new form. Enter your current password in the first box, type your new password in the Advanced Assessments secondCaching box and confirm it in the third box. 27 Remote Assessments The Remote Assessment system is a way to manage assessments that you want to deliver remotely, away from your main site. You can use Remote Assessment in 2 ways - either downloading assessments to laptops to take out to candidates or downloading assessments to USB data keys. Scheduling remote assessments There’s no special process for scheduling remote assessments to sit remotely, as this is the same as scheduling any assessment. However there are a few things to be aware of. The assessment is downloaded from the Invigilate screen, and this is done by launching the Secure Candidate software by clicking on the icon on the laptop or data key being used to sit the assessment. Once the software is launched there’s an option called Show Admin, where you can login using your normal username and password. This then takes you to the Invigilate screen. Assessments don’t appear on the Invigilate screen until the start time of the assessment window is reached. This means that if you are scheduling an assessment for remote assessment you need to set the start time early enough to give yourself time to download the assessment. Anyone who’s going to download remote assessments will need to have the Invigilator user role as part of their user account. You also need to upload the candidate results before the end of the scheduled assessment window - if you don’t do this the candidate results will not be retrievable. Please see the section Uploading the results from a Laptop for more information. 28 Scenario: You’re going to deliver a remote assessment on 8 May 2014 at 9am and you want to download the assessment the day before so that you have time to travel to the remote site. You should schedule the assessment to start on 7 May 2014 at 9am and finish on 9 May 2014 at 5pm. The assessment will then be available to download from 9am on 7 May. Your candidates will be able to sit the exam on 8 May and you will be able to upload the results when you get back to the office, before the exam expires on 9 May 2014 at 5pm. Please note: A reliable internet connection will be required when using the Remote Assessment feature. If you'd like to check this before attempting to use this feature, please contact your Centre Support Assistant on 0191 239 8000. Downloading the assessment onto a laptop Once you’ve scheduled your online assessment you can download the assessment to the laptop (or laptops) you’ll be taking the assessment on. It’s important that you download the assessment to the specific laptop which will be used by the candidate. Load the Secure Candidate Software. Select Show Admin, this will open the same login screen that you’d see on the website. Enter your user name and password and login. You’ll see a list of assessments downloaded to this laptop. Select Download Exam at the bottom of the screen. 29 You’ll now see the Invigilate screen and any assessments available will be listed, each line is an individual candidate assessment. Select the assessments which will be sat on that laptop. Assessments which can be downloaded will show with an R symbol to indicate they are ready. Select Download. A confirmation box will appear. Select Close Download Screen to proceed. Select Logout. Close the secure client software. You can now take the laptop to your remote site and the candidate can log in using their Keycode and sit the assessment as normal. They’ll see the provisional result on screen at the end of the assessment as normal. 30 Uploading the results from a laptop Once the assessments have been completed and you’re back at the office you can connect the laptop to the internet again and upload the results to NCFE. Open the Secure Candidate Software on the laptop the assessment was sat on. Once the software is launched, leave it for 10 seconds as there is an auto-submit feature built into the candidate software which uploads the candidate’s result. Close the Secure Candidate Software. Log into the Online Assessment system as normal. Select the Results screen - your candidate’s result will show. If you’ve had problems using the automatic upload, these results can be uploaded manually. Log into the admin feature of the Secure Client. Highlight the exam in question. Select Upload results. If you're still having issues when attempting to upload the results, please don’t hesitate to get in touch with your Centre Support Assistant on 0191 239 8000. 31 Using remote assessments with USB data keys In addition to downloading assessments onto laptops for advanced caching assessments, you can download assessments onto USB data keys. They can then be used to sit remote tests without the need for an internet connection or the Secure Candidate Software being installed on the PC the candidates sit the assessment on, as the software will be launched directly from the USB data key. Preparing the USB data key Before you download a candidate’s scheduled assessment to a data key, you need to prepare the data key so that the Secure Candidate Software is copied onto it. Insert data key into USB port of a PC with Secure Candidate Software installed on it. Launch the Secure Candidate Software and select Show admin - this allows you to log into the Invigilate screen using your normal Online Assessment username and password. Click on the Prepare Memory Stick button - this then copies the Secure Candidate Software onto your data key. Close the Secure Candidate Software. 32 Downloading the assessment onto a USB data key The next step is to schedule your assessment which is done as normal through the Exams Schedules screen in the Online Assessment system. Once your assessment is scheduled, you need to download the candidate’s assessment onto the data key. To do this, follow these steps: Plug your data key into a PC with internet connection, access My computer then access the data key. Double click the file named Secure Client Initial Run – this runs a quick diagnostic check of the data key then launches the Secure Candidate Software. Log into the Show admin section using your normal online assessment login. Click the Download exams button. Find your candidate’s assessment, select it and click the download button. Close the client - your assessment is now downloaded to the USB data key. Now that you’ve prepared your data key and downloaded the scheduled assessment you’re ready to take the USB data key to the candidate for them to sit their test. Please note as you now have the software copied onto the USB data key, the candidate won’t need this installed on their PC to sit their assessment and they now won’t require an internet connection. When the candidate is ready to sit their assessment, insert the USB data key into their PC, go to My computer and access the data key. Once you’ve accessed the data key, double click the file named ‘Secure Client Initial Run’ - this runs a quick diagnostic check of the data key then launches the Secure Candidate Software. The candidate then logs in with their Keycode and sits their assessment. 33 Uploading the results from a USB stick Once the assessment has been completed, you need to upload the candidate’s results from the data key when you get back to your centre. Insert the data key into a USB port of a PC with internet connection. Go to My computer and access the data key. Double click on the file named Secure Client Initial Run – this runs a quick diagnostic check of the data key then launches the Secure Candidate Software. Once the Secure Candidate Software has been launched, leave this open for at least 10 seconds - it has an auto upload feature and uploads your candidate’s result. Close the Secure Candidate Software and unplug the data key. Log into the Online Assessment system and go to the Results screen - your candidate’s result will show. If you have problems using the automatic upload, these results can be uploaded manually. To upload the results manually, please follow the steps below: insert the data key into a USB port of a PC with internet connection go to My computer and access the data key double click on the file named Secure Client Initial Run – this runs a quick diagnostic check of the data key then launches the Secure Candidate Software log into the admin feature highlight the exam in question select Upload results. 34 Resilience caching assessments NCFE Online Assessment has a function which means that if a PC crashes while candidates are sitting an assessment, they can log back in and continue from where they left off. Also if there’s an interruption to your internet connection during an assessment the candidate will be able to continue as if nothing had happened. As long as the internet connection is restored before the end of the assessment the results will be uploaded automatically to NCFE as normal. If the internet connection is still offline when the candidate completes their assessment, the candidate will see their provisional result on screen, but the results won’t have been uploaded to the NCFE Online Assessment system. The results will be stored on the PC used to sit the assessment. As the candidate software has an auto upload function built into it, once internet connection is restored, simply re-launch the candidate software on the PC the candidate was using and the software auto uploads any results that haven’t been uploaded yet. 35