1
Online Learning System
Lecturers user manual
Lecturers
User Guide
Author
Bashir Ansari
Cesar Muradas
Cesar Muradas
Cesar Muradas
Cesar Muradas
Approver
Cesar Muradas
Cesar Muradas
Cesar Muradas
Cesar Muradas
Cesar Muradas
version
1.0
1.1
1.2
1.3
1.4
date
16/07/2015
21/07/2015
27/07/2015
19/08/2015
07/09/2015
Description
First version
Quiz section added
New Features Added
Quiz section updated
Import/Export Grades
Online Learning System
Lecturers user manual
Contents
About this document .............................................................................................................................. 3
Purpose ................................................................................................................................................... 3
What is the main responsibility of an OLS Lecturers? ............................................................................ 3
Logging in to the OLS .............................................................................................................................. 3
Welcome page ........................................................................................................................................ 4
Viewing course content .......................................................................................................................... 5
View weekly activities ......................................................................................................................... 7
Introduction ........................................................................................................................................ 7
Assignments ........................................................................................................................................ 9
Self-Reflection ..................................................................................................................................... 9
Announcement ................................................................................................................................... 9
Discussion Forum .............................................................................................................................. 11
Mid Term Survey ............................................................................................................................... 11
Exam List (Quiz) ................................................................................................................................. 11
Adding questions .............................................................................................................................. 12
Creating a new question ............................................................................................................... 13
Choosing a pre-made question ..................................................................................................... 14
Adding a random question............................................................................................................ 14
Question categories ...................................................................................................................... 15
End Term Survey ............................................................................................................................... 15
Online Chat ....................................................................................................................................... 15
Entering the chat........................................................................................................................... 16
Joining in a chat session ................................................................................................................ 17
Your Grades....................................................................................................................................... 18
Filtering and sorting students list ................................................................................................. 19
Entering grades ............................................................................................................................. 19
Grades Export................................................................................................................................ 22
Importing Grades .......................................................................................................................... 23
Creating a group................................................................................................................................ 24
General .......................................................................................................................................... 27
Grade Me .......................................................................................................................................... 28
Analytics Graphs ............................................................................................................................... 29
Quickmail .......................................................................................................................................... 31
Features ........................................................................................................................................ 31
Appendix 1 ........................................................................................................................................ 33
Online Learning System
Lecturers user manual
About this document
This document is a general user manual for OLS administrators in the OLS portal. The OLS is based on
Moodle system but many customizations have been applied to it, therefore this user manual is only
valid to the current version of the OLS, all legacy versions of the OLS are not covered in this manual.
Please note. This is not a technical document for development or applying major changes in the OLS.
Purpose
The purpose of this document is to define OLS lecturers’ responsibilities and providing a user guide
for them to manage and maintain the OLS.
What is the main responsibility of an OLS Lecturers?
OLS lecturers are responsible for managing and maintaining all semester course content in the OLS.
They should liaise with course coordinators to update course content/supporting documentation
prior to the commencement of each semester.
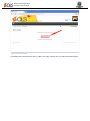
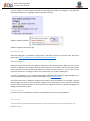
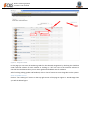
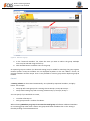
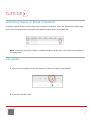
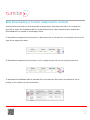
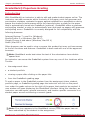
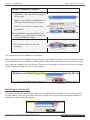
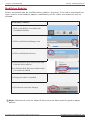
Logging in to the OLS
For logging in to APIC OLS, first open a browser (Firefox, Chrome, IE, Safari …) and enter the OLS
portal address (http://ols.apicollege.edu.au/) in the address bar.
Then you will see the login page as per below.
Figure 1 Login Page
Then enter your username and password and click the Log in button.
Online Learning System
Lecturers user manual
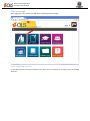
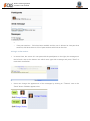
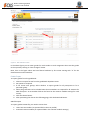
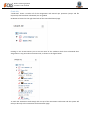
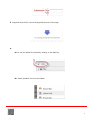
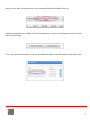
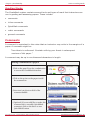
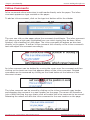
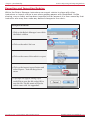
Welcome page
After logging in to the system you will see the following welcome page.
Figure 2 - Welcome Page - My Courses
In this page you can see major sections of the OLS. You can continue on to each section by clicking
each tile.
Online Learning System
Lecturers user manual
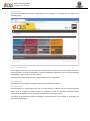
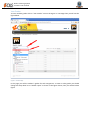
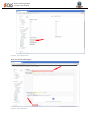
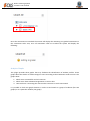
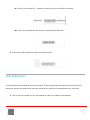
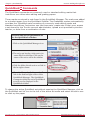
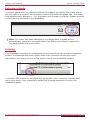
Viewing course content
The main tasks of an OLS Lecturer are managing course content and update student’s marks.
For the purpose of viewing course content click on “My Courses” tile in the welcome page and the
list of all courses will appear as shown in the figure below.
Figure 3 - Course Page - Units
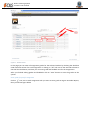
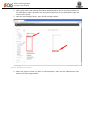
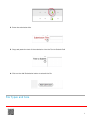
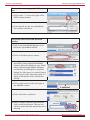
By clicking on each unit title you will see all the unit contents as per below.
Online Learning System
Lecturers user manual
Figure 4 - Unit Page
Unit content is categorised on a weekly basis, therefore we have 15 weeks for each unit in each
semester and activities and materials should be uploaded separately for each week.
Online Learning System
Lecturers user manual
View weekly activities
In the unit page you can view each week’s activities and materials by clicking on the week icon.
Figure 5 - Unit Page - View Week – Acitvities
Introduction
To view the unit of study introduction page, click on “Introduction” icon (Figure 4 - Unit Page) then
you will see the introduction page as shown below.
Online Learning System
Lecturers user manual
You will be able to view or download “Unit of Study Guide” document as you can see in the figure
above.
Online Learning System
Lecturers user manual
Assignments
To see student assignments click on “Assignments” icon on Figure 4 - Unit Page then you will see the
following page:
Figure 6 – Assignments Page
In this page you will see a list of assignments allocated for the UoS, click on the “Submit” button of
each assignment. You will be redirected to Turnitin assignment page where you can see the students
uploaded files and Turnitin’s similarity report.
For more information about Turnitin’s reports please refer to Appendix 1.
Self-Reflection
Self-reflection is a module for students to do their self-reflection activities.
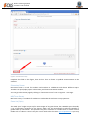
Announcement
Announcement is a useful feature and many use this forum in a Moodle course to announce exam
dates, times or changes to exams, lectures or seminars, as well as important information about
course work throughout a term or special announcements relating to events.
You can go to announcement page by clicking on “Announcement” icon on Figure 4 - Unit Page, you
will see the below figure.
Online Learning System
Lecturers user manual
Figure 7 Announcement Page
For adding new announcement click on “Add a new topic” button then you will see the below figure.
Online Learning System
Lecturers user manual
Figure 8 - Announcement Info
Complete the fields in this figure, then click on “Post to forum: to publish announcement to the
students.
Discussion Forum
Discussion forum is a tool for students and teachers to collaborate and discuss different topics.
Teachers can post/replay topics in discussion just like announcement module.
You can go to discussion page by clicking on “Discussion Forum” icon on Figure 4 - Unit Page .
Mid Term Survey
Mid Term survey is a module for students to undertake the mid-term survey questions.
Exam List (Quiz)
The word “quiz” might conjure up for some images of TV game shows, but a Moodle quiz is basically
a set of questions presented to the learner which may be automatically marked by Moodle or
graded later by the teacher. The questions may be in sentence or number form or contain various
media such as video or sound. They do not all need to be the same type of questions: a quiz may
Online Learning System
Lecturers user manual
contain multiple choice, matching, essays (teacher-graded) and calculated. Feedback may be given
at any or all stages of the process.
Once a quiz is made, that’s not the end of it. A Moodle quiz is environmentally friendly: its questions
are saved in a Question bank and may be recycled for use elsewhere. Thus, Mr Brown could create a
Physics Quiz with 20 questions for his class, Class Brown, and his colleague Mr Smith sharing the
course could save himself valuable time by reusing 5 of Mr Brown’s questions in his own General
Science quiz for Class Smith. (See also Question Sharer role for sharing questions across the site)
If a quiz is a book, the Quiz settings are equivalent to the front cover; the quiz itself is contained
within when the questions are created. (Be careful: once you have chosen the Quiz Settings, it will
be “live” on your course page, unless you hide it, so your learners could potentially see a quiz with
no questions, like a front cover with no content.)
Once a quiz has been added to the course and the Quiz settings established, the teacher can start to
build the quiz. The teacher can access the quiz to edit the questions by clicking directly on the Quiz
name on the course home page and then "Edit quiz" or by clicking the "info" link in the Navigation
block. The "Edit quiz link can also be accessed from Settings>Quiz administration.
Accessing the quiz to add or edit questions
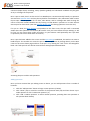
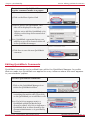
Adding questions
Once you have accessed the quiz editing screen as above, you can add questions from a number of
locations:
1. Click the "Add question" button to begin a new question (1 below)
2. Click "Show" (2a) to reveal the contents of the question bank (2b) and then choose a premade question or click "Create new question" (3)
3. Click "Add a random question" to add a random question, providing there are questions in
the question bank already.
Online Learning System
Lecturers user manual
Adding a question
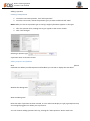
Creating a new question
1. To make a brand new question, click "Add a question".
2. From the next screen, choose the question type you want to add and click "Next"
NOTE: When you click on a question type on the left, helpful information appears on the right.
1. Fill in the question form, making sure to give a grade to the correct answer.
2. Click "Save changes"
Selecting a question type
A question when it has been created
Adding responses and feedback
New
feature
in Moodle 2.5! When you add responses and feedback you can hide or display the text editor:
Without the editing tools
With the editing tools
Note that when a question has been created, an icon and words display its type (eg multiple choice)
and a magnifiying glass icon allows you to preview it.
You can continue adding questions this way, clicking the "Add a question" button each time.
Online Learning System
Lecturers user manual
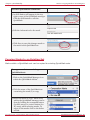
Choosing a pre-made question
If other teachers in the course have made questions, or if a teacher made questions in an earlier
quiz, these can be added to the current quiz by clicking the arrows next to them in the question bank
(1 below) or by checking/ticking the box of several and then clicking the button "add to quiz" (2). To
ensure all previously made questions are available, make sure to tick the boxes "also show questions
from sub-categories/old questions".
Using a previously made question
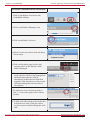
Adding a random question
As long as you have questions in the question bank, you can add random questions to your quiz. This
might be useful if you have students in a class taking a quiz at the same time, because they are
unlikely to get the same questions at the same time. The same question will never appear twice in a
quiz. If you include several random questions then different questions will always be chosen for each
of them. If you mix random questions with non-random questions then the random questions will be
chosen so that they do not duplicate one of the non-random questions. This does imply that you
need to provide enough questions in the category from which the random questions are chosen,
otherwise the student will be shown a friendly error message. The more questions you provide the
more likely it will be that students get different questions on each attempt.
The grade for the randomly chosen question will be rescaled so that the maximum grade is what you
have chosen as the grade for the random question.
Online Learning System
Lecturers user manual
You can add one or more random questions by choosing the number and category in the question
bank. Note the die icon to highlight random question selection.
Adding a random question
Random question selected for quiz
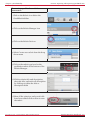
Quiz question tags
Note that although it is possible to tag questions, the feature does not currently work. See forum
discussion: https://moodle.org/mod/forum/discuss.php?d=194119
Question categories
Questions can be stored and retrieved from categories in the Question bank. When you make a new
question it defaults to the category with the course name. So if you make a quiz in the Senior Physics
course, questions will automatically be added to "Default for Senior Physics". You can opt to have
your quiz questions in a category of their own ("Quizname") or to add a subcategory.
To add a subcategory, go to Administration>Quiz administration>Question bank>Categories For
more information on question contexts and categories, see Question bank
Users will have access to different categories according to their permissions. For example, a regular
teacher might only have access to question categories in his own Physics course whereas his Faculty
Head of Science with permissions in all science courses might have access to question categories in
Biology and Chemistry as well
End Term Survey
End Term survey is a module for students to undertake the end term survey questions.
Online Chat
The chat activity module allows participants to have a real-time synchronous discussion in a
Moodle course.
Online Learning System
Lecturers user manual
This is a useful way to get a different understanding of each other and the topic being discussed
– the mode of using a chat room is quite different from the asynchronous forums. The Chat
module contains a number of features for managing and reviewing chat discussions.
Entering the chat
•
As you click the chat link on the course page you see two or three options:
o
Click here to enter the chat now - this takes you to the chat using the chosen site default
chat method - for example Ajax.
o
Use more accessible interface - this gives a simpler chat room without frames and
javascript:
Online Learning System
Lecturers user manual
•
o
View past sessions - if this has been enabled and the user is allowed to view past chat
sessions, this takes them to a list of past sessions with links to the chat.
Joining in a chat session
•
In normal view, the screen is in two parts with the participants on the right, the messages on
the left and a box at the bottom into which users type their message and press "Send" to
make their contribution:
•
Users can change the appearance of the messages by clicking on "Themes" next to the
"Send" button. Bubbles appears thus:
Online Learning System
Lecturers user manual
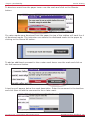
Your Grades
To enter student grades click on “Your Grades” icon on the Figure 4 - Unit Page then you will see the
figure below
Figure 9 - Grades Page
In this page you will the student’s grades for each assignment. To enter or edit grades you should
change the drop down list to “Grader report” as shown in the figure above, then you will the below
figure.
Online Learning System
Lecturers user manual
Figure 10 Grader Report
In this figure you have complete control over students and assignment selection for entering grades.
Filtering and sorting students list
You can filter students by using “Filter Students” box shown in the above figure. Clicking on each
alphabet letter will filter student list by first name/surname starting with that alphabet letter.
By using “Surname” and “First name” link on the left side of student table header you can sort
students list by surname or first name.
Entering grades
There are 3 ways to entering grades.
Enter grades for a specific student
Click on
icon next to each student you want to enter grade, then you will see figure below
Online Learning System
Lecturers user manual
Figure 11 - Student Grades
In this page you can enter all assignment grades for the selected student by checking the checkbox
under Override column for each assignment or clicking on “All” link next to the Override column to
check all the checkboxes, and then you can enter grade and feedback text for the assignments.
After you finished editing grades and feedbacks click on “Save” button to store the grades on the
system.
Enter grade for specific assignment
Click on
icon next to each assignment title you want to enter grade on Figure 10 Grader Report,
then you will see figure below
Online Learning System
Lecturers user manual
Figure 12 - Assignment Grade
In this page you can enter all students grades for the selected assignment by checking the checkbox
under Override column for each student or clicking on “All” link next to the Override column to
check all the checkboxes then you can enter grade and feedback text for students.
After finishing editing grades and feedback, click on “Save” button to store the grades on the system.
Enter all grades at once
Click on “Turn editing on” button on the top right corner of the page on Figure 9 - Grades Page then
you will the below figure.
Online Learning System
Lecturers user manual
Figure 13 - Edit all Grades at Once
In the above figure you can enter grades for each student in each assignment then save the grades
to the system by clicking on “Save changes” button.
Note, that in the figure above we have filtered students by first name starting with “S” for the
demonstration and screenshots.
Grades Export
To export grades from the gradebook:
1. Choose an export format from the gradebook dropdown menu.
2. Set options as required.
3. If the course uses groups, select whether to export grades for all participants or for a
particular group.
4. Select the grade items to be included. Note that ID numbers are required for all activities for
XML file export. An ID number field can be found in the common module settings for each
activity.
5. Click the submit button.
6. After previewing the data on the following page, click the download button.
XML file export
To export grades to XML file, you need to ensure that:
•
•
Users have ID numbers (an optional field in the user profile)
Activities have ID numbers (an optional field in the common module settings)
Online Learning System
Lecturers user manual
Figure 149 – Grades Export
Importing Grades
To import grades into the gradebook:
1. Decide on an import format - CSV or XML file (see below) - then export some grades using
the corresponding export format.
2. Edit the export file as appropriate and save it.
3. Tip: If you opened your exported file in Excel, don't add columns there because Moodle will
reject the import if there are new columns that didn't exist in the exported file. If you need
to add columns, do that in Moodle BEFORE you export your gradebook.
4. Select your chosen import format from the gradebook dropdown menu.
5. Browse and upload your previously saved file.
6. Set options as required.
7. Click the "Upload grades" button.
8. CSV import only: Preview the grade import and choose the column mapping then click the
"Upload grades" button to complete the grade import.
Tip: By default "Map from" is set to First Name, and "Map to" to userid. Change both dropdowns to:
"Email Address" to "useremail", or to "Id Number" to "useridnumber" (assuming that your users
have ID number fields filled in in their profiles)
Online Learning System
Lecturers user manual
Creating a group
1. Click on Administration > Course administration > Users > Groups as shown in figure below
Figure 15 Groups link
Then Click the 'Create group' button as shown in figure below
Online Learning System
Lecturers user manual
Figure 16 - Create Group Button
Then you will see below figure
Figure 17 - Group Information
Online Learning System
Lecturers user manual
2. Add a group name and optional description (displayed above the list of group members on
the participants page), enrolment key and picture (displayed on the participants page and
next to forum posts)
3. Click the 'Save changes' button, then you will see figure below
Figure 18 - Add/remove user’s button
4. Select the group to which you want to add participants, then click the 'Add/remove users
button, you will see figure below
Online Learning System
Lecturers user manual
Figure 19 - Add users to group
5. In the "Potential members" list, select the users you want to add to the group. Multiple
users may be selected using the Ctrl key.
6. Click the Add button to add the users to the group
An optional group ID number (an advanced setting) may be added for matching the group against
external systems. Group ID numbers are not displayed anywhere on the site. Within a course, all
group ID numbers must be unique. Thus it's not possible to create a group with a duplicate group ID
number
General
A naming scheme can be created automatically. # is replaced by sequential numbers, and @ by
letters. For example:
•
•
Group @ will create group with a naming scheme Group A, Group B, Group C . . .
Group # will create group with a naming scheme Group 1, Group 2, Group 3 . . .
You can specify if you would like to create,
•
•
x number of Groups or
each group contain x number of students
When selecting Members per group the Prevent last small group will allocate additional members
to an existing group rather than create a new group with fewer members than x. This setting is
found by clicking on the Show More link.
Online Learning System
Lecturers user manual
Grade Me
“Grade Me” shows a teacher all of the assignments and manual quiz questions (essays and file
responses) that have been submitted, but not graded.
Grade Me is located on the right hand side of the course dashboard page.
Clicking on the arrows allows you to see the name of the students which have submitted their
assignment to any particular assessment task, as shown in the figure below:
To mark the assessment tasks simply click on top of the assessment task name and the system will
take you directly to the assessment task submission page:
Online Learning System
Lecturers user manual
Once the assessments are marked the counter will display the remaining non graded assessments in
the assessment tasks area, once all assessment tasks are marked the system will display the
following:
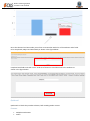
Analytics Graphs
This plugin provides three graphs that may facilitate the identification of student profiles. Those
graphs allow the teacher to send messages to users according to their behaviour inside a course. The
graphs show:
1. Which users accessed file and url resources.
2. Which users have submitted assignments on time or late.
3. How each user is accessing the course and its resources in each course week.
It is possible to click over graph elements in order to send email to a group of students (first two
graphs) or to a particular student (last graph).
Online Learning System
Lecturers user manual
You can access all the submissions selecting the individual links, as shown in the figure below.
Analytics Graphs will open a new window with the information selected. Please note that APIC only
uses “turnitin type of assignments” not the normal moodle assignment.
To send an email to a group of students, simply hover your mouse on top of the bar chart and click
on the selected group as shown in the figure below:
Online Learning System
Lecturers user manual
Once the selection has been made you will see a new window with a list of the students and 2 fields
to be completed, Subject and Email body as shown in the figure below:
Complete both fields and click on the “send email” button to send the email to the students as
shown in the figure below.
Quickmail
Quickmail is a block that provides selective, bulk emailing within courses.
Features
•
•
Multiple attachments
Drafts
Online Learning System
Lecturers user manual
•
•
•
•
Signatures
Filter by Role
Filter by Groups
Optionally allow Students to email people within their group.
The figure below shows the Quickmail Block in the OLS. To write an email to your class please click
on the “Compose New Email” link.
Quickmail will open a new screen where you can select the users from your class. You can use the
filter to select different groups of students.
To send the email, please use the send button located at the button of the page.
Online Learning System
Lecturers user manual
Appendix 1
Turnitin Instructor User Manual
Chapter 4: GradeMark
®
Updated October 3, 2012
Copyright © 1998 – 2012 iParadigms, LLC. All rights reserved.
Turnitin Instructor Handbook: 87
Assignment Submission Dates
After completing the assignment settings and clicking on the Save and Display button you will be
redirected to the Turnitin assignment page. Clicking on the Turnitin assignment from the course
homepage also redirects you to the Turnitin assignment page.
All the assignment dates are contained within the Submission Inbox tab for the Turnitin assignment. The
due date will default to a week after the date the assignment was created.
To change any of the assignment dates click on the pencil icon to the right of the date.
Use the drop down menus to change the date and times for the Start Date, Due Date, or the Post Date.
You may also change the assignment part name and the assignment point value. Once you have finished
editing the dates click elsewhere on the screen to save your changes.
1
Start Date -The start date defines the earliest time a student can make a submission to the assignment
part.
Due Date -This is the final date by which the student should have submitted their assignment. If you
are allowing late submissions, the submissions will be marked as late after this date.
Post Date - This is the date when marks/grades will be released to students. If anonymous marking is
turned on (UK only) this is also the date when marks will be released to students.
2
Submitting Papers on Behalf of Students
To submit a paper to the Turnitin assignment on behalf of a student, within the Submissions Inbox page
click on the file upload icon to the right of the student’s name within the student list.
Note: Instructors are able to submit on behalf of students at any time, even after the post-date of
the assignment
File upload
1. Click on the file upload icon for the student to submit on behalf of that student
2. Enter the submission title
3
3. Drag and drop the file into the drag and drop area of the page
4.
4a. Or use the add a file method by clicking on the Add link.
4b. Select Upload a file from the sidebar
4
4c. Click on the Choose File... button to select the file you would like to submit
4d. Click on the Upload this file button to upload the selected file
5. Click on the Add Submission button to submit the file
Text Submission
If Text submission was selected within the general Turnitin assignment settings instructors will submit
papers by copying and pasting the text they would like to submit to the assignment into a text box.
1. Click on the file upload icon for the student to submit on behalf of that student
5
2. Enter the submission title
3. Copy and paste the text of the submission into the Text to Submit field
4. Click on the Add Submission button to submit the file
File Types and Size
6
Turnitin currently accepts the following file types for upload into an assignment:
Microsoft Word® (DOC and DOCX)
Corel WordPerfect®
HTML
Adobe PostScript®
Plain text (TXT)
Rich Text Format (RTF)
Portable Document Format (PDF)
OpenOffice (ODT)
Hangul (HWP)
The maximum file size is defined in the course settings and selected in the assignment set up screen.
Files of larger size may be reduced in size by removal of non-text content. Files that are password
protected, encrypted, hidden, system files, or read only files cannot be uploaded or submitted to Turnitin
Note: Text only files may not exceed 2 MB.
PDF File Note: PDF documents must contain text to be submitted. PDF files containing only
images of text will be rejected during the upload attempt. To determine if a document contains
actual text, copy and paste a section or all of the text into a plain-text editor such as Microsoft
Notepad or Apple TextEdit. If no text is copied over, the selection is not actual text.
PDF Tip: Users submitting scanned images of a document or an image saved as a PDF will need to
use Optical Character Recognition (OCR) software to convert the image to a text document. Manual
correction of the resulting document is highly recommended to fix any errors caused by the
conversion software.
Embedded Links Note: Some document formats can contain multiple data types. This includes
text, images, embedded information from another file, and formatting. Non-text information that is
not saved directly within the document will not be included in a file upload. This includes
references to a Microsoft Excel® spreadsheet included within a Microsoft Office Word document.
File Type Note: Users whose files are saved in a file type that is not accepted by Turnitin will
7
need to use a word processing program to save the file as one of the accepted types. Rich Text
Format and Plain Text file types are nearly universally available in word processing software.
Neither file type will support images or non-text data within the file. Plain text format does
not support any formatting, and rich text format supports only limited formatting options.
Warning: Users who are converting to a new file format will need to save their file with a name
different than the original. Any file should be saved with a new file name when converting to plain
text or rich text formats to prevent permanent loss of the original formatting or image content of a
file.
8
Viewing the Turnitin Submission Inbox
The Submission Inbox
Instructors can view the Originality Reports completed for submitted papers by accessing the Turnitin
assignment inbox. Either click on the Assignments link in the Activities section on the homepage and
click on the assignment title or click on the assignment title on the homepage.
To access the submissions click on the Submissions Inbox tab.
The submission inbox displays a list of the students enrolled in the course and a summary of the
originality scores associated with their submissions.
The columns headings in the assignment inbox are:
Student - a column containing the names for Moodle students in the assignment. Clicking on the name
takes you to the Moodle user page for that student. If a student is enrolled in the Turnitin system but not
enrolled in the Moodle system the student is listed as “Non Moodle Student”. If the student is
9
subsequently enrolled in Moodle the submission will be linked to the student account automatically. The
number of submissions made by a student is included in brackets.
If anonymous marking is enabled for the account the student's name will appear as 'Anonymous Marking
Enabled'. Once the student has submitted to the assignment clicking on this will allow you to remove the
student's anonymity. You will be prompted to input a reason to release the student's information.
Anonymous marking is revealed on an Assignment Part level.
Submission Title - a column containing the submission’s title
Paper ID – this column of the report contains the paper id of the submission.
Submitted – this column of the report contains the date and time of the submission. Late submissions
are color coded red.
Similarity - this column contains a percentage indicating the overall similarity of the paper to
information in the Turnitin repositories, 100% being ‘fully similar’, 0% indicating ‘no similarity’. Clicking
on the Similarity % icon opens the Originality Report.
Grade – this column either contains a grade and a pencil icon for editing the grade or if GradeMark has
been enabled the column indicates if GradeMark is available. A pencil icon shows what papers can be
accessed in GradeMark. No icon will appear if a student has not submitted a paper to the assignment or
if GradeMark has not been purchased for the account. If the icon is available, click on the pencil icon to
open a GradeMark window.
Download icon - a arrow icon located to the right of the submission. Click on the icon to download a
copy of the submission.
Delete icon - a trash bin icon located to the right of the submission. Click on the icon to delete the
submission from the inbox.
Refresh Submissions - this option checks with Turnitin to see if more submissions have been entered
or if new Originality Reports are available.
10
Downloading Student Papers
You are able to download student papers in two forms, as the original files or as the GradeMark report
that you have created.
1. Click on the checkbox beside each of the assignments you would like to download
2. Options to download the assignments will appear beneath the assignment information
3. Click Download Original Files to download the submission as the student first uploaded it. It will
download as a .zip file.
3a. To download the GradeMark files for an assignment click Download Selected GradeMark
Files. A modal will appear to indicate that his process is currently working in the background. The
process of compiling GradeMark files can take time depending on the amount of files that will be
processed.
11
3b. Once files are ready to download you will receive a message in your Messages Inbox for the
assignment
3c. There will be a new message in your Turnitin Messages Inbox once the file has finished
processing. Open this message to download your files
3d. There will be two files within this message. A manifest, containing all a log of files that have
been processed for download and any errors that may have occurred, and a download link to a zip
file containing the files you have requested
12
Opening the Originality Report
The Turnitin Originality Report can be accessed from the submission inbox. Under the Similarity column
are the icons indicating the percentage of the similarity score and the corresponding color on a blue(0%)
to red scale(100%).
Click on the icon to open the Originality Report. For more in depth information on Originality Reports
please click here to view the Originality Report chapter of the Turnitin Instructor manual.
13
Accessing GradeMark®
To access GradeMark to grade the student’s paper, click on the pencil icon in the Grade column. For
more in depth information on using GradeMark please click here to view the GradeMark chapter of the
Turnitin Instructor manual.
14
Bulk Downloading a Turnitin assignment’s contents
Instructors have the ability to bulk download an assignment’s submissions as pdfs or the original file
type and to export the GradeMark pdfs for selected submissions. After the download is initiated the
downloadable file is located in the Messages Inbox.
To download the assignment’s submissions in pdf format click on the pdf icon in the Export column to the
right of the assignment dates.
To download the assignment’s submission in their original format click on the original format icon.
To download the GradeMark pdfs for selected files, first select the files within the submission list by
clicking in the checkbox for each submission.
15
Once all of the files are selected click on the Download Selected GradeMark Files link.
All bulk download files are located within the Message Inbox. Click on the Messages Inbox link to open
the list of downloads.
Click on the bulk download link to view the download information and download the generated zip file.
16
Glossary
Definitions
account
A Turnitin account allows instructors to use
products purchased from Turnitin
account ID
The numeric identification number for a
specific account or sub-account
administrator
The controller of a specific Turnitin account. This
user type is able to install and configure, activate
or deactivate products on an account, change
account settings, and add or remove instructors
from account access
assignment
Submissions to a class on Turnitin are made to
an assignment. Each assignment can allow only a
single submission per student user who is
enrolled in the class
class
To allow students to submit files, an instructor
must create a class for their students. A
class requires a name, a class ID, and a class
enrollment password
class portfolio
The class portfolio page is the main view page of
a student for a specific class
default submission type
A user preference set by instructor or student
users to define which file submission method
should be displayed by default for submissions to
an assignment in a Turnitin class
digital receipt
The digital receipt is a confirmation of a
successful
paper submission to a Turnitin assignment. The
digital receipt contains the unique paper
ID number, user name, submission date and
time, class name, assignment title, and a copy
17
of the submitted work. The digital receipt is
shown on-screen after submission and a copy is
sent by e-mail to the user at the e-mail address
provided as the user login name. This e-mail is
sent by [email protected] and spam filters
should be checked to ensure they do not block
users from receiving this e-mail
download
Transmission of a file from Turnitin to the
computer of the user selecting to download files).
Some users may need to enable file download
due to security considerations on the web
browser or computer being used
due date
The due date on a Turnitin assignment indicates
the
date and time of day at which an assignment is
due. Submissions after the due date and time
may no longer be allowed and will be
automatically blocked by the Turnitin system.
Only the instructor can enable late submissions
on an assignment on Turnitin. The due date must
come after the start date and before the post
date during assignment creation. The due
date and time may be changed by the instructor
at their discretion to meet the needs of a class
GradeMark
A digital grading product offered by Turnitin
which allows instructors to place comments and
QuickMark editing marks on a submission
for students to review. This product also includes
standardized rubric scorecards and the ability to
SM
share QuickMark standard editing marks and
rubric scorecards between instructors on an
account via export or via administrators using the
libraries sharing feature of the GradeMark digital
grading product
homepage
The default login page, which is different based
on the selected default user type of the user
profile being accessed
instructor
The term used for teachers, tutors, or other
student assisting users added or authorized to
join as instructors on a specific Turnitin account.
A single person may be joined to multiple
Turnitin accounts or sub-accounts using one user
profile or separate user profiles. Users may fill
more than one user type role on Turnitin
internet archive
Turnitin’s web repository includes inactive or
no longer available web pages and copies of
18
pages that have changed over time. This allows
Turnitin to search against information that is no
longer available or which has changed over time.
libraries
the libraries menu displays the rubrics created by
Turnitin
or the instructor. For more information about
rubrics please view the GradeMark training video
or the rubric section of the GradeMark manual
available at www.turnitin.com/training.html
log in
the act of an authorized user entering the e-mail
address and personal password created for a user
profile to enter Turnitin as the user associated
with the e-mail address entered
Optical Character Recognition (OCR)
Optical character recognition software converts
a image of text information into an actual text
document that can be read and altered by
word processing software. Papers or documents
transferred into a computer via a scanner
require optical character recognition software
conversion to be submitted to Turnitin. Turnitin
only accepts documents containing actual text
data rather than an imaged document or
submission. Some scanners offer OCR
conversion automatically, but most
OCR conversion requires hand correction to
resolve any inaccuracies which can cause major
changes to the actual content of a document
Originality Report
The Originality Report is a flexible document
that allows students and instructors to review
matches between a submitted work and the
repositories scanned by Turnitin.
Citations, quotations, and bibliographic material
are all scanned against Turnitin’s repositories to
determine an overall similarity percentage as well
as specific matches to similar text
Overall Similarity Index
The overall similarity index is a percentage
indicating the similarity of the text submitted to
information contained in the Turnitin repositories
used for comparison on the assignment the
submission was made in. This percentage
indicates a percentage based on the length of the
paper compared to the length of the areas
flagged as similar during the comparison
paper
A paper refers to the document or file submitted
by a user to an assignment in a class on the
Turnitin website
19
paper ID
The paper ID number is a unique identifier that
can be used to refer to a specific paper.
The paper ID number can be viewed
by accessing the paper in the assignment inbox
for instructors. The paper ID number is
also available on the paper view page, Originality
Report, and GradeMark digital assessment view
of the submission
PeerMark
This product allows students to anonymously or
with attribution review submissions made by
other students within the course. Students reply
to free response and scale questions selected or
created by the instructor. Instructors may
also comment on the paper using three different
commenting tools: inline text tool, highlighter
tool, and composition marks. A
PeerMark assignment must be based on a normal
Turnitin assignment where the student papers are
initially submitted
Plagiarism Prevention
This product creates Originality Reports for
submissions in assignments on Turnitin. The
Originality Reports allow instructors and students
to easily determine any problems in citation or
referencing and assists instructors in determining
the originality of a submitted work
post date
The post date of an assignment is set by the
instructor
during the assignment creation. When the post
date and time has passed, students will be able
to view GradeMark and GradeBook information on
their submissions in this assignment. If the
assignment is a Peer Review, students will be
able to read the assessments written by their
peers after the post date passes. The post date
does not control Originality Reports. The
post date must come after the start date and due
date during assignment creation
product
a specific service, feature, or group of
features offered by Turnitin as part of
the purchase of a Turnitin license by
an educational customer
repository
A set of information of a specific type or types. In
the specific context of the Originality Report
provided by Turnitin, repository is used to refer to
the type of information the submission was
evaluated against for direct matching or high
levels of similarity. Available repositories include
20
internet, archived internet, periodical/journal/
publication information, and previous submissions
resubmit
The act of submitting a new paper in place of an
existing submitted paper. Resubmission can only
be done if the instructor has set an assignment to
allow students to overwrite until the due date and
time of the paper, or if the instructor has
manually deleted the student’s existing
submission in the assignment inbox. This
option can only be enabled by the class instructor
shared key
A shared key is the eight digit, alphanumeric code
that an institution’s Turnitin account
administrator has created with the account’s
Turnitin Sales Representative. The shared
secret key is used to verify the integrity
of requests sent from the Institution’s Moodle
account to the institution’s Turnitin account
start date
a date and time selected by the instructor
when creating an assignment. The start date and
time must pass before students are able to
begin submitting to an assignment. Instructors
are not prevented from submitting before the
start date. The start date for an assignment must
be before the selected due date and post date
during assignment creation. This may be updated
only by the instructor to meet the needs of a
class
student
A user type able to enroll in courses created by
an instructor
user. Student user profiles can only submit to
assignments created by an instructor in a class
they are joined to or have been authorized to join
submission
A file or files uploaded by a student or
instructor user into an assignment within
a Turnitin class. Only a single file per student
user can be submitted to an assignment by a
student user
submission type
Turnitin offers multiple submission types
for students and instructors. Students are able to
submit a single file at a time by either single file
upload or cut-and-paste submission. Instructors
are able to submit files by file upload or text
submission
21
upload (file)
The act of submitting or sending a file into a
specific assignment within a Turnitin for use with
the Turnitin products selected for the class
user profile
The user profile is a set of user preferences
and information associated with a specific ID
within Turnitin. Each user profile requires a
unique e-mail address. A specific e-mail
address can only be used once within the Turnitin
repository. New attempts to create a profile
associated with an e-mail address currently
existing in Turnitin will not succeed
22
Chapter 4: GradeMark®
Section: Introduction
GradeMark® Paperless Grading
Introduction
With GradeMark® an instructor is able to edit and grade student papers online. The
instructor can add comments within the body of the paper, point out grammar and
punctuation mistakes, evaluate the paper against qualitative or quantitative rubrics,
assess the student’s performance within the class and enter a grade for the paper
that is automatically saved into GradeBook (optional). GradeMark offers a grammar
and spelling checker, e-rater, to automatically scan and mark up papers with grammar
and spelling errors. GradeMark is currently designed for full compatibility with the
following browsers:
Internet Explorer 7.x and 8.x (Windows)
Mozilla Firefox 3.x (Windows, Mac OS X)
Google Chrome 4 and above (Windows, Mac OS X)
Safari (Mac OS X)
Other browsers can be used to view or access this product but may not have access
to the full functions and features. GradeMark is best used with one of the approved
browsers.
Note: GradeMark works best when the text of the submissions have double
spaced text.
An instructor can access the GradeMark system from any one of four locations within
Turnitin:
• the assignment inbox
• a student portfolio
• viewing a paper after clicking on the paper title
• from the GradeBook grading page
To mark a paper in the GradeMark system from the assignment inbox, student
portfolio page, or GradeBook grading page the instructor will click on the pencil
icon under the grade column to the right of the paper that needs to be marked. A
new window will open displaying the GradeMark interface. Using this interface, an
instructor can add marks, general comments, and location specific comments to a
student paper as well as entering a numeric grade.
Note: If no icon appears in the GradeMark column, then the paper has not
been submitted by the student to the assignment.
Copyright © 1998 – 2012 iParadigms, LLC. All rights reserved.
Turnitin Instructor Handbook: 88
Chapter 4: GradeMark®
Section: Grading Marks
Grading Marks
The GradeMark system contains several tools and types of mark that instructors can
use in grading and assessing papers. These include:
• comments
• inline comments
• QuickMark comments
• rubric scorecards
• general comments
Comments
A comment is equivalent to the notes that an instructor may write in the margins of a
paper. A comment might be:
“Your thesis is unfocused. Consider refining your thesis in subsequent
versions of this paper.”
A comment may be up to one thousand characters in length.
Adding a comment to a paper:
1. Click on the pencil icon for a submission
to access the GradeMark interface
2. Click on the point on the paper to add
the comment to
3. Enter text into the text field of the
comment bubble
4. (Optional) If you would like to make this
comment into a reusable QuickMark
comment, click on the Save as new
QuickMark button
Copyright © 1998 – 2012 iParadigms, LLC. All rights reserved.
Turnitin Instructor Handbook: 89
Chapter 4: GradeMark®
Section: Deleting a Comment
Adding a comment to a paper:
4B. (Optional) Enter a title for the
QuickMark. This title will be displayed
on the paper.
Select a set to add this QuickMark to by
clicking on the Set drop down menu.
Click Save to save the comment as a
QuickMark
Note: QuickMark comments that are not
added to a set will be located within All
in the QuickMark manager
6. Click the Save button to save the
comment
The comment will be added to the paper.
The comment can be edited at any time by hovering the cursor over the mark for the
comment and then clicking the Edit button. Edit the comment and click Save to save
any changes made to the comment. To move a comment, click and hold on the mark
symbol and drag the icon to a new location.
Deleting a Comment
A comment and the associated mark can be deleted by clicking on the mark symbol
on the paper. Click on the trash can icon at the top right of the comment bubble to
delete the mark from the paper.
Copyright © 1998 – 2012 iParadigms, LLC. All rights reserved.
Turnitin Instructor Handbook: 90
Chapter 4: GradeMark®
Section: Highlighting Text for a Comment
Highlighting Text for a Comment
An instructor can associate a highlighted section of text with a comment to reference
a specific area of text.
To associate a highlight with a
comment:
1. Within the GradeMark interface select
the text of the paper
2. Click anywhere within the highlighted
text to open up a comment bubble
3. The selected text will be highlighted
and the comment is placed where
the highlighted section of text was
clicked. Enter the comment into the
text field of the comment bubble. Select
the highlight color from the 5 color
options. Yellow is the default color for
highlights
4. Click the Save button to save the
comment
5. The comment icon will appear where the
highlight was clicked. The comment
icon can be moved away from the
highlight and still be associated with
the highlight by a connecting line
6. To move the comment icon click on the
icon and drag it to the new location,
release the held click
Striking Through Text
An instructor can strike through text within GradeMark by first selecting the text and
then hitting either delete or backspace on the keyboard. To delete the strikethrough
hover over the strikethroughed text and then click on the trash can icon that appears.
Copyright © 1998 – 2012 iParadigms, LLC. All rights reserved.
Turnitin Instructor Handbook: 91
Chapter 4: GradeMark®
Section: Striking Through Text
Inline Comments
Inline comments allow instructors to add marks directly onto the paper. The inline
comment appears as type overlaid on the paper.
To add an inline comment, click on the type tool button within the sidebar.
The user can click on the paper where the comment should begin. The inline comment
will show up as a light gray highlighted box over which typing may be done. When
finished, click elsewhere on the paper. The inline comment will appear as blue text
directly on the paper. To edit an inline comment click directly on the inline comment’s
text and adjust the comment accordingly.
An inline comment can be deleted by moving the cursor over the comment and then
clicking on the trash can icon that appears above of the inline comment. Deleted
comments can be recovered by clicking on the Undo button at the bottom of the
document viewer.
The inline comment can be moved by clicking on the inline comment’s gray border
and dragging the comment to a new location on the page. The cursor will transform
into a hand notifying the user that a click will enable the inline comment to be moved.
Releasing the mouse will affix the inline comment to the new location on the page.
Copyright © 1998 – 2012 iParadigms, LLC. All rights reserved.
Turnitin Instructor Handbook: 92
Chapter 4: GradeMark®
Section: Striking Through Text
QuickMarkSM Comments
The QuickMark comments are commonly used or standard editing marks that
instructors can utilize when editing and grading papers.
These marks are stored in sets found in the QuickMark Manager. The marks are added
to a student paper from the QuickMark Sidebar. The GradeMark system automatically
provides four QuickMark sets consisting of commonly used editing marks and
standard corrections. Instructors can use these sets, create sets of their own, access
a set shared by the Turnitin account administrator, upload a set provided by another
teacher, or draw from a combination of sets.
To select the active QuickMark set
for the QuickMark sidebar:
1. Click on the QuickMark Manager icon
2. The active set has the circle next to its
name filled in with blue. Click on the
name of the set to add to the sidebar
3. Click the Make this the active set link in
the far right column
4. Close the library by clicking on the Close
link in the bottom right corner of the
QuickMark Manager. The QuickMark
comments within the active QuickMark
set will now be displayed in the
QuickMark sidebar
To change the active QuickMark set without opening the QuickMark Manager, click on
the QuickMark set list icon to the left of the active set name and select the set to use
to mark up the paper.
Copyright © 1998 – 2012 iParadigms, LLC. All rights reserved.
Turnitin Instructor Handbook: 93
Chapter 4: GradeMark®
Section: Creating QuickMark Sets
To add a QuickMark editing mark to
a paper:
1. If the QuickMark sidebar is not open,
Click on the QuickMark button below
the sidebar
2. Click the QuickMark comment to add
it to the center of the paper or click
and drag the comment to the desired
location on the paper. Hovering over a
QuickMark will display the description
of the mark in the blue tinted area
below the QuickMark sidebar
3. To associate a highlight with a
QuickMark comment, select the text
on the paper and then click on the
QuickMark comment on the sidebar
4. The QuickMark comment will
automatically be placed at the end of
the highlight
5a. (Optional) Instructors can add
additional comments to a QuickMark
or change the color of the highlight
by clicking on the Edit button while
hovering over a QuickMark comment
5b. (Optional) Enter the additional
comment in the text box or select
a different color for the highlight.
Then click Save to add the additional
comment to the QuickMark or apply
the new highlight color
Creating QuickMark Sets
To create a new empty QuickMark
set:
1. Click on the QuickMark Manager icon
within the QuickMark sidebar
Copyright © 1998 – 2012 iParadigms, LLC. All rights reserved.
Turnitin Instructor Handbook: 94
Chapter 4: GradeMark®
Section: Creating QuickMark Sets
To create a new empty QuickMark
set:
2. Click on the “+” icon to the right of the
SETS column header
3. Enter the title for the new QuickMark
set and then click Save
To create a new set from selected
marks:
1. Click on the QuickMark Manager icon
within the QuickMark sidebar
2. Click on All above the set names
3. Every QuickMark throughout all
sets will be listed within the MARKS
column. Select the Marks to copy. Multi
select within the QuickMark manager
can be done by holding the command
button (for Mac users) or control button
(for PC users) while selecting marks. To
select all the marks click on the Select
all link
4. Click on the Actions link to the right of
the MARKS column
5. Click on the New set button
6. Enter a name for the new set and then
click on the Save button. The new set
will be created with the marks that were
selected
Copyright © 1998 – 2012 iParadigms, LLC. All rights reserved.
Turnitin Instructor Handbook: 95
Chapter 4: GradeMark®
Section: Creating QuickMark Comments
Creating QuickMark Comments
Instructors can create their own QuickMark comments in the QuickMark Manager or
transform a regular comment on a paper into a QuickMark. This allows instructors to
create class or curriculum specific marks that may not be part of the sets provided by
Turnitin or the account administrator.
To create a new QuickMark:
1. Click on the QuickMark Manager icon
from the QuickMark sidebar
2. Click the name of the set to add a new
QuickMark to
3. Click the “+” icon next to the MARKS
column header
4. Enter the following information for the
new mark:
• a title
• a description
5. Click Save to save the new QuickMark
symbol into the selected set
To create a new QuickMark from a
regular comment made to a paper:
1. Click on the Comment button on the
side bar or click anywhere on the paper
to add a comment to the paper
2. Enter the comment description within
the text field
Copyright © 1998 – 2012 iParadigms, LLC. All rights reserved.
Turnitin Instructor Handbook: 96
Chapter 4: GradeMark®
Section: Editing QuickMark Comments
To create a new QuickMark from a
regular comment made to a paper:
3. Click on the More Options link
4. Enter a title for the QuickMark. This
title will be displayed on the paper.
Select a set to add this QuickMark to by
clicking on the drop down menu below
Add to set:
Note: QuickMark comments that are not
added to a set will be located within All
in the QuickMark manager
5. Click Save to save the new QuickMark
comment
Editing QuickMark Comments
QuickMark comments can be edited from within the QuickMark Manager. Any edits
that are made to a QuickMark are applied to every instance where this mark appears
in your students’ papers.
To edit a QuickMark comment:
1. Click on the QuickMark Manager icon
within the QuickMark sidebar
2. Click on the name of the QuickMark set
containing the mark to edit. Then click
on the QuickMark you would like to edit
Note: If a lock icon appears next to a
QuickMark within the Marks list it
cannot be edited. A lock icon indicates a
QuickMark that is either shared by the
account administrator or is provided by
Turnitin.
Copyright © 1998 – 2012 iParadigms, LLC. All rights reserved.
Turnitin Instructor Handbook: 97
Chapter 4: GradeMark®
Section: Copying Marks to an Existing Set
To edit a QuickMark comment:
3. An Edit button will appear in the top
right corner of the QuickMark manager.
Click the Edit button to edit the
QuickMark
4. Edit the information for the mark
5. Click Save to save the changes made to
the mark in this QuickMark set
Copying Marks to an Existing Set
Marks within a QuickMark set can be copied to existing QuickMark sets.
To copy a mark to an existing
QuickMark set:
1. Click on the QuickMark Manager icon
within the QuickMark sidebar
2. Click the name of the QuickMark set
containing the mark (s) to copy
3. Select the marks to copy. Multi select
within the QuickMark manager can be
done by holding the command button
(for Mac users) or control button (for
PC users) while selecting marks. To
select all the marks click on the Select
all link
Copyright © 1998 – 2012 iParadigms, LLC. All rights reserved.
Turnitin Instructor Handbook: 98
Chapter 4: GradeMark®
Section: Archiving or Removing a QuickMark from a Set
To copy a mark to an existing
QuickMark set:
4. Click on the Actions link under the
search field
5. Click on the Add to set button
6. Select the set from the list that you
would like to add the marks to
Archiving or Removing a QuickMark from a Set
A QuickMark can not be completely deleted from the system but may be removed
from all active sets and archived.
To remove marks from a QuickMark
set:
1. Click on the QuickMark Manager icon
within the QuickMark sidebar
2. Click on the name of a QuickMark set
3. Select the marks to remove
Copyright © 1998 – 2012 iParadigms, LLC. All rights reserved.
Turnitin Instructor Handbook: 99
Chapter 4: GradeMark®
Section: Archiving or Removing a QuickMark from a Set
To remove marks from a QuickMark
set:
4. Click on the Actions link to the right of
the Marks column header and click on
the Other button
5. Click on the Remove from this set
option
To remove a QuickMark from all sets
and archive it:
1. Click on the QuickMark Manager icon
within the QuickMark sidebar
2. Click on the name of a QuickMark set
3. Select the marks to remove
4. Click on the Actions link to the right of
the Marks column header and click on
the Other button
5. Click on the Archive option
Copyright © 1998 – 2012 iParadigms, LLC. All rights reserved.
Turnitin Instructor Handbook: 100
Chapter 4: GradeMark®
Section: Exporting and Importing QuickMark Sets
Note: A QuickMark with a lock symbol to the right of its name in the MARKS
list cannot be removed from the Turnitin provided sets: Composition, Format
Punctuation, and Usage.
Warning: Archiving a QuickMark will remove it from all QuickMark sets in the
QuickMark Manager.
Warning: Instructors may only add, delete, copy, or edit QuickMark sets
and marks that they own. QuickMark sets with a lock icon to the right of the
set name cannot be modified and are provided by Turnitin or the account
administrator.
Exporting and Importing QuickMark Sets
Within the QuickMark Manager instructors can export QuickMark sets to share
with other instructors or import QuickMark sets to use when grading papers with
GradeMark. Unlike sharing, once a QuickMark set has been imported into an account
it is then owned by that instructor who may then make any desired changes to the
QuickMark comments.
To export QuickMark sets:
1. Click on the QuickMark Manager icon
within the QuickMark sidebar
2. Click on the name of a QuickMark set to
export
3. Click on the import/export button and
select Export Set... from the drop down
menu
4. A prompt will appear asking if you
would like to save the file, click OK
to save the file. The file name will be
the QuickMark set name with .qms
appended.
Copyright © 1998 – 2012 iParadigms, LLC. All rights reserved.
Turnitin Instructor Handbook: 101
Chapter 4: GradeMark®
Section: Exporting and Importing QuickMark Sets
To import QuickMark sets:
1. Click on the QuickMark Manager icon
within the QuickMark sidebar
2. Click on the import/export button and
select Import Set... from the drop down
menu
3. Click on the Browse button and
locate the QuickMark set file on your
computer. Only .qms file types may be
imported into the QuickMark manager
4. Click on the Import button
5. To import additional QuickMark sets
repeat steps 3-4.
6. Click the Close button to return to the
QuickMark Manager
Copyright © 1998 – 2012 iParadigms, LLC. All rights reserved.
Turnitin Instructor Handbook: 102
Chapter 4: GradeMark®
Section: Exporting and Importing QuickMark Sets
Rubric Scorecards
Rubric scorecards can be used to evaluate student work based on defined criteria
and scales. The rubric scorecards can be created by the account administrator and
shared to all instructors on an account. Instructors can also create and share rubric
scorecards, allowing other instructors to upload the rubric scorecard to their classes.
There are three rubric types:
Standard rubric - allows you to enter scale values and criteria percentages. The
maximum value for the Standard rubric will be the same as the highest scale value
entered
Custom rubric - allows you to enter any value directly into the rubric cells. The
maximum value for the Custom rubric will be the sum of the highest value entered in
each of the criteria rows
Qualitative rubric - allows you to create a rubric that has no numeric scoring
To create a standard rubric
scorecard:
1. Click on the Rubric icon below the
GradeMark sidebar
2. Click on the Rubric Manager icon
3. Click on the Rubric list icon
4. Select Create new rubric from the drop
down menu
5. Enter the Rubric name in the top left of
the rubric manager
Copyright © 1998 – 2012 iParadigms, LLC. All rights reserved.
Turnitin Instructor Handbook: 103
Chapter 4: GradeMark®
Section: Exporting and Importing QuickMark Sets
To create a standard rubric
scorecard:
6. To edit the name, description, or
percentage value for a criterion, click
directly on the title, description or
percentage value to open the text box
field. Enter the new title, description or
value and press enter to finish editing
the field or click elsewhere on the screen
7. To add extra rows of criteria click on
the “+” icon to the right of the Criteria
header
8. To enter the description for each cell,
click on the cell, enter the description
and then click outside of the cell’s text
field to finish editing the description
9. To enter the scale title or value, click on
the scale title or scale value and enter
the title or value. Click elsewhere on the
screen to finish editing
10. To add extra scale columns click on the
“+” icon to the right of the Scale header
11. Once the rubric is completed, click on
Save at the bottom right of the Rubric
Manager
Copyright © 1998 – 2012 iParadigms, LLC. All rights reserved.
Turnitin Instructor Handbook: 104
Chapter 4: GradeMark®
Section: Exporting and Importing QuickMark Sets
To create a custom rubric scorecard:
1. Click on the Rubric icon below the
GradeMark sidebar
2. Click on the Rubric Manager icon
3. Click on the Rubric list icon
4. Select Create new rubric from the drop
down menu
5. Click on the rubric type icon for the
custom rubric at the bottom of the
Rubric Manager
6. To enter the title and description for
each criterion, click on the appropriate
field and enter the new title or
description within the text field that
appears. Click elsewhere on the screen
to finish editing the criterion title or
description
7. To add extra rows of criteria click on
the “+” icon to the right of the Criteria
header
8. To edit scale titles click on the Scale title
and enter new title. Click else where
on the screen to finish editing the scale
title
Copyright © 1998 – 2012 iParadigms, LLC. All rights reserved.
Turnitin Instructor Handbook: 105
Chapter 4: GradeMark®
Section: Exporting and Importing QuickMark Sets
To create a custom rubric scorecard:
9. To add extra scale columns click on the
“+” icon to the right of the Scale header
10. To edit the cell descriptions click
on the description field. Enter the
description and then click elsewhere
on the paper to finish editing the
description
11. Enter the cell value for each cell by
clicking on the 0.00 portion of each
cell. In a custom rubric cell values are
chosen by the instructor
12. Once the rubric is complete click on
Save to save the rubric scorecard
Copyright © 1998 – 2012 iParadigms, LLC. All rights reserved.
Turnitin Instructor Handbook: 106
Chapter 4: GradeMark®
Section: Exporting and Importing QuickMark Sets
To create a qualitative rubric
scorecard:
1. Click on the Rubric icon below the
GradeMark sidebar
2. Click on the Rubric Manager icon
3. Click on the Rubric list icon
4. Select Create new rubric from the drop
down menu
5. Click on the rubric type icon for the
qualitative rubric at the bottom of the
Rubric Manager
6. Edit the criteria title and description,
the scale title, and each cell description
by clicking on either the title or
description fields
7. When all the criterion, scales, and cells
have been edited click on Save to save
the rubric
Copyright © 1998 – 2012 iParadigms, LLC. All rights reserved.
Turnitin Instructor Handbook: 107
Chapter 4: GradeMark®
Section: Modifying Rubrics
Modifying Rubrics
Rubric scorecards can be modified after creation. However, if the rubric scorecard has
been used to score student papers, modification of the rubric scorecard will not be
allowed.
To modify a rubric:
1. Click on the Rubric icon below the
GradeMark sidebar
2. Click on the Rubric Manager icon
3. Click on the Rubric list icon
4. Select the rubric you would like to edit
from the list of rubrics
Note: Rubrics that have been shared with
you cannot be edited
5. Change the rubric as needed
6. Click Save to save any changes
Note: Rubrics can only be edited if they have not been used to grade a paper
before.
Copyright © 1998 – 2012 iParadigms, LLC. All rights reserved.
Turnitin Instructor Handbook: 108
Chapter 4: GradeMark®
Section: Duplicating a Rubric
Duplicating a Rubric
Rubrics that have been attached to an assignment cannot be edited. Duplicating a
rubric helps instructors reuse a rubric that they would like to modify.
To duplicate a rubric:
1. Click on the Rubric icon below the
GradeMark sidebar
2. Click on the Rubric Manager icon
3. Click on the rubric list icon
4. Select the rubric you would like to
duplicate from the list of rubrics
5. Click on the rubric list icon and select
Duplicate this rubric from the drop
down menu
6. (Optional) Enter a new name for the
rubric and make any changes to the
rubric
7. Click Save to save the changes
Copyright © 1998 – 2012 iParadigms, LLC. All rights reserved.
Turnitin Instructor Handbook: 109
Chapter 4: GradeMark®
Section: Attaching a Rubric to an Assignment
Attaching a Rubric to an Assignment
To use a rubric scorecard, the instructor must first access the GradeMark view of a
student paper in an assignment and attach the rubric to the assignment. This enables
the rubric scorecard for the assignment.
Adding a rubric to an assignment:
1. Click on the Rubric icon below the
GradeMark sidebar
2. Click on the Rubric Manager icon
3. Click on the rubric list icon
4. Select the rubric you would like to
attach from the list of rubrics
5. Click on the attach icon to attach the
rubric to the assignment
6. If a rubric is already attached to the
assignment a warning notification will
be given. To attach the new rubric click
Ok, detach the rubric
Copyright © 1998 – 2012 iParadigms, LLC. All rights reserved.
Turnitin Instructor Handbook: 110
Chapter 4: GradeMark®
Section: Exporting and Importing Rubrics
Exporting and Importing Rubrics
Within the Rubric Manager instructors can export rubrics to share with other
instructors or import rubrics to use when grading papers with GradeMark. Unlike
sharing, once a rubric set has been imported into an account it is then owned by that
instructor who may then make any desired changes to the rubric.
To export a rubric:
1. Click on the Rubric Manager icon within
the Rubric sidebar
2. Click on the rubric list icon
3. Click on the name of the rubric to export
4. Click on the import/export button and
select Export... from the drop down
menu
5. A prompt will appear asking if you
would like to save the file, select OK to
save the file. The file name will be the
rubric name with .rbc appended.
Copyright © 1998 – 2012 iParadigms, LLC. All rights reserved.
Turnitin Instructor Handbook: 111
Chapter 4: GradeMark®
Section: Exporting and Importing Rubrics
To import a rubric:
1. Click on the Rubric Manager icon within
the rubric sidebar
2. Click on the import/export button and
select Import... from the drop down
menu
3. Click on the Browse button and locate
the rubric file on your computer. Only
.rbc file types may be imported into the
Rubric Manager
4. Click on the Import button
5. To import additional rubrics repeat
steps 3-4.
6. Click the Close button to return to the
Rubric Manager
Copyright © 1998 – 2012 iParadigms, LLC. All rights reserved.
Turnitin Instructor Handbook: 112
Chapter 4: GradeMark®
Section: Using a Rubric Scorecard to Grade
Using a Rubric Scorecard to Grade
The rubric scorecard allows the instructor to easily score the performance of a paper
against a set of criterion on a scale. The rubric scorecard is accessed within the rubric
sidebar in the GradeMark paper view.
To open the rubric scorecard while viewing a student paper, the instructor user must
click on the rubric icon at the bottom right corner of the GradeMark window. A rubric
scorecard will only appear if there is a rubric attached to the assignment.
To grade with the rubric scorecard, click on the scale the paper has met for the
criteria. The Rubric score below the scorecard displays the total of all the selected cell
values. The Rubric Percentage displays the percentage of the total points out of points
possible for the rubric scorecard. Click on the Apply rubric percentage to grade button
at the bottom of the rubric sidebar to apply this percentage to the assignments total
point value. Once a grade is applied from the rubric scorecard it will appear in the
Grade field at the top right corner of the document viewer.
Copyright © 1998 – 2012 iParadigms, LLC. All rights reserved.
Turnitin Instructor Handbook: 113
Chapter 4: GradeMark®
Section: Using the Expanded Rubric Scorecard to Grade
Using the Expanded Rubric Scorecard to Grade
Instructors can use the expanded rubric scorecard to grade papers in GradeMark.
The expanded rubric opens a new window displaying the rubric cell descriptions. The
expanded rubric can remain open and used to grade each student’s paper as the
instructor navigates through the submitted papers using the paper list drop down
located at the top right of the document viewer.
To view the expanded rubric within another window, from the rubric sidebar click on
the expand rubric icon.
The expanded rubric displays each cell description to allow instructors to easily select the
criteria scales for the paper.
Click on the Apply rubric percentage to grade button at the bottom of the expanded
rubric window to apply the rubric percentage to the assignments total point value.
Once a grade is applied from the rubric scorecard it will appear in the Grade field at
the top right corner of the document viewer.
To continue grading other student papers with the expanded rubric open in another
browser window, click on the next arrow at the top right of the document viewer or
use the paper list drop down to select a specific paper.
Copyright © 1998 – 2012 iParadigms, LLC. All rights reserved.
Turnitin Instructor Handbook: 114
Chapter 4: GradeMark®
Section: Using the Expanded Rubric Scorecard to Grade
General Comments
An instructor is able to write a general comment or leave a voice comment regarding
a paper. The general comment tool allows for a longer, less area-specific feedback to
be provided to the paper’s author.
To add a general comment:
1. Click on the general comments icon at
the bottom of the GradeMark sidebar.
2. Click on the pencil icon or within the
text field to add your comment
3. Type in the comment within the text
field
4. Click Save to save your comment
The general text comment will be part of the printable version of the GradeMark page
for student users.
Note: The General Comments sidebar is the default sidebar that students see
when they open up their paper in GradeMark.
Copyright © 1998 – 2012 iParadigms, LLC. All rights reserved.
Turnitin Instructor Handbook: 115
Chapter 4: GradeMark®
Section: Using the Expanded Rubric Scorecard to Grade
Voice Comment
Instructors are able to leave a voice comment on the student’s paper from within the
General Comments sidebar. Just like the written general comment the voice comment
allows the instructor to leave an extended comment about the paper as a whole. To
leave a voice comment the instructor must first navigate to the General Comment
sidebar and have a computer microphone available.
To add a voice comment:
1. Click on the general comments icon at
the bottom of the GradeMark sidebar.
2. Click on the record button to begin
recording the voice comment
Note: An Adobe Flash player settings popup will appear asking for permission
to allow Turnitin to use the computer’s
microphone. Select allow to be able to
record a voice comment
3. Once you have finished recording your
voice comment click on the stop button
to stop recording
Note: A voice comment can be up to
three minutes long. The length of the
recording is noted in the top right
corner of the Recording section
4. To play back the recording before saving
it click on the play button
5. To save the voice comment click on the
save icon
6. If you would like to rerecord a voice
comment after a voice comment was
already saved, you must first delete the
current voice comment by clicking on
the trash can icon and then repeat steps
2-5
Copyright © 1998 – 2012 iParadigms, LLC. All rights reserved.
Turnitin Instructor Handbook: 116
Chapter 4: GradeMark®
Section: The Comment List
Additional Functions
The Comment List
The list of all marks that have been added to a paper can be viewed by clicking the
comment list icon at the bottom of the GradeMark sidebar.
The list of comments can be used to navigate to the location of a comment on the
paper by hovering the cursor over a mark in the comment list and then clicking on the
show on paper link that appears.
Navigation Between Papers
An instructor grading several papers may need to move to the next or previous paper
without returning to the inbox and re-launching the GradeMark interface.
The previous paper and next paper arrows at the top of each paper in the document
viewer allow the instructor to continue grading without returning to the assignment
inbox. Each time the instructor moves between papers, any changes that have been
made to the papers are saved automatically. An instructor may select a specific
student from the Paper # of # drop down menu.
Copyright © 1998 – 2012 iParadigms, LLC. All rights reserved.
Turnitin Instructor Handbook: 117
Chapter 4: GradeMark®
Section: Entering a Grade
Entering a Grade
A numeric grade may be manually entered for a paper by clicking the Grade box at
the top right of the paper, which opens a text box to enter the grade into. The Grade
field automatically displays a -- for the grade until a grade is entered. Grades entered
in this field will be saved to the GradeBook.
Note: If a rubric has been attached to the assignment, a grade will be
automatically entered in the grade field if the Rubric percentage is applied to
the assignments total point value.
Printing
The GradeMark interface is not designed to be printed from the primary GradeMark
screen. To download and print a paper with a full comment list and any rubric
information, use the print icon at the bottom left of the GradeMark window.
A printable PDF version of the paper will be saved to your computer. Use the print
menu from within your computer’s default pdf viewing application to print the
GradeMark paper.
Copyright © 1998 – 2012 iParadigms, LLC. All rights reserved.
Turnitin Instructor Handbook: 118
Chapter 4: GradeMark®
Section: Printing
e-rater® Grammar Check Technology
The e-rater grammar feedback technology, developed by ETS®, automatically checks
submissions to an assignment for grammar, usage, mechanics, style and spelling
errors; providing in depth feedback with on paper marks. To use e-rater technology
for an assignment it must be enabled during assignment creation.
When viewing a paper in GradeMark for an assignment with e-rater settings enabled,
e-rater technology will load the grammar and spelling marks once GradeMark opens
in the document viewer.
Note: It may take up to a minute for the e-rater feedback to load onto the
paper.
The e-rater feedback appears on the paper as purple comments. Hover the cursor
over the mark to view the description of the e-rater feedback.
The e-rater sidebar in GradeMark displays the five e-rater trait categories and the
number of each type of mark found for the paper. To view the ETS sidebar click on the
ETS icon at the bottom of the sidebar.
The e-rater sidebar displays each feedback category, a list of the traits for the
category and the number of marks for each trait. The marks for a category can be
hidden from the paper by unchecking the check box next to the category name.
During assignment creation instructors can select which categories are hidden by
default for all papers submitted to the assignment.
Copyright © 1998 – 2012 iParadigms, LLC. All rights reserved.
Turnitin Instructor Handbook: 119
Chapter 4: GradeMark®
Section: Printing
To dismiss a mark from the paper hover over the mark and click on the Dismiss
button.
If e-rater marks were dismissed from the paper the top of the sidebar will track the #
of dismissed marks. The instructor can restore the dismissed marks to the paper by
clicking on the Reveal All button.
To add an additional comment to the e-rater mark hover over the mark and click on
the Add comment button.
A text box will appear below the mark description. Enter the comment in the text box
and click Save to add the comment to the e-rater mark.
Copyright © 1998 – 2012 iParadigms, LLC. All rights reserved.
Turnitin Instructor Handbook: 120
Chapter 4: GradeMark®
Section: Printing
Comments added to e-rater marks can be edited by hovering over the mark and
clicking on the edit comment button.
When an additional comment is added to an e-rater mark an icon appears next to the
mark’s title informing the student or the instructor that there is a comment added to
this mark.
Student Engagement
Once the papers submitted to an assignment are graded, instructors can view student
engagement with the graded papers. An icon of a person with a check mark appears
within the response column in the assignment inbox for each student who reviewed
their graded paper in GradeMark for longer than 30 seconds.
Copyright © 1998 – 2012 iParadigms, LLC. All rights reserved.
Turnitin Instructor Handbook: 121