1
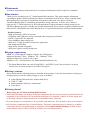
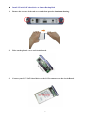
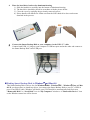
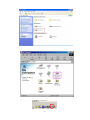
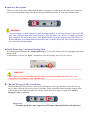
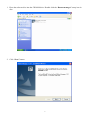
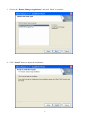
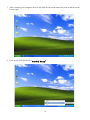
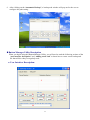
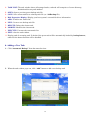
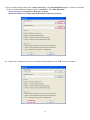
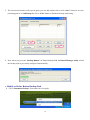
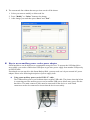
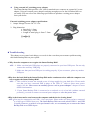
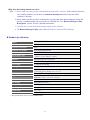
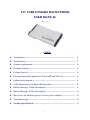
2.5” USB2.0 SMART BACKUP DISK USER MANUAL ( Rev.: 1.0 ) INDEX z Trademarks ----------------------------------------------------------------------- 2 z Introduction ----------------------------------------------------------------------- 2 z System requirements ------------------------------------------------------------ 2 z Package contents ----------------------------------------------------------------- 2 z Getting Started ------------------------------------------------------------------- 2 z Finding Smart Backup Disk in Windows® and Mac OS ----------------- 4 z Indicator description ------------------------------------------------------------ 6 z Safely Removing your Smart Backup Disk --------------------------------- 6 z Button Manager Utility Installation ----------------------------------------- 6 z Button Manager Utility Description --------------------------------------- 11 z How to use an auxiliary power cord or power adapter ------------------ 15 z Troubleshooting ------------------------------------------------------------------ 16 z Product Specification ----------------------------------------------------------- 17 1 Trademarks All names and products mentioned below are registered trademarks of their respective companies. Introduction Thank you for purchasing our 2.5” Smart Backup Disk enclosure. This guide contains information regarding the product features and the procedures of installation for this device. Please read this guide thoroughly before you begin its installation and operation and retain it for future references. The Smart Backup Disk is a standalone and portable storage enclosure. It allows you to install a high-speed 2.5” SATA hard drive by DIY and implements a high performance backup storage device. The Smart Backup provides a friendly one touch backup button. Users can then regularly synchronize the data from PC’s hard disk to the Smart Backup drive as a specified location by pressing a backup button. Product features: • High performance, USB 2.0 interface • Compliant with USB mass storage class bulk-only transport specification. • SATA 1.0 and SATA II compliant. • Up to 60MB/sec data transfer rate. • Ideal for 2.5” high speed SATA hard drive application • One button data backup • Plug & Play and hot swappable • Perfect for regular or daily backup user. System requirements PC or Macintosh®computer with one free USB2.0 port. ® ® ® zSupports Windows 2000、Windows XP、Windows Vista. ™ zSupports Mac OS 9.x and 10.0.X or later. zRequires a 2.5” SATA hard drive for Smart Backup Disk before use. zIBM ® * The Smart Backup Disk can work at both USB 1.1 and USB 2.0 port, but to achieve a hi-speed transfer rate, you must connect to an USB 2.0 host port. Package contents Please check that the following items are included in the package. If any the listed items are missing or damaged, please return the whole package to your local dealer. z z z z Smart Backup Disk enclosure (without hard drive) USB “Y” cable Button manager utility disc with manual Screwdriver Getting Started Before using the 2.5”Smart Backup Disk Enclosure ) Electrostatic discharge can damage electronic components. Be sure you are properly grounded before the beginning of any procedure.You can touch the metal parts of a computer’s chassis or power supply unit to discharge any static charge that may have accumulated inside your body. ) To avoid damage to your hard drive, please handle with much care. Do not shake or drop your hard drive. ) All electronic components have a limited lifetime. Electronic components may be damage by a sudden electrostatic shock or personal misuse or negligence. Please always double backup your data in other media formats such as CD-R or DVD-R to ensure your own data protection. 2 z Install 2.5 inch SATA hard drive to Smart Backup Disk 1. Remove the screws of the end cover and then open the aluminum housing. 2. Take out the plastic cover and circuit board. 3. Connect your 2.5” SATA hard drive to the SATA connector on the circuit Board. 3 4. Place the hard drive back to the aluminum housing 1) Slide the hard drive carefully into the bottom of aluminum housing. 2) The hard drive should be placed in accordance with the picture below. 3) Close the cover by applying the previously removed screws. 4) Please handle with much care. Make sure that the SATA hard drive does not become detached in the process. 5. Connect the Smart Backup Disk to your computer via the USB “Y” cable Connect both USB “A” plugs to your computer’s USB host ports and at the other end connect to the Smart Backup Disk’s mini USB port. Finding Smart Backup Disk in Windows® and Mac OS. This Smart Backup Disk is driver-free for Windows®2000、Windows®XP、Windows® Vista and Mac OS.X, you do not have to install any driver, just connect the Smart Backup Disk to your PC’s USB2.0 port via an USB Y-cable. Windows will detect your STAT hard drive automatically and find a new “Removable Disk” or “Local Disk” icon in “My Computer” windows. A "Removable Device" icon on the Windows status bar will be shown. 4 5 Indicator Description There is a status LED on the Smart Backup Disk for diagnosis, it lights green when this device detected by the system and flash orange if the data is being transmitted between PC and Smart Backup Disk. WARNING: ) If your computer system supports remote wakeup function, it will keep the power alive on USB port when you have shut down your computer. This will allow your device to standby and wake your computer up, but it may cause your Mobile Disk to keep the indicator and hard drive on. In this situation, you should pull out the USB cable to cut the power off. This action can protect your hard drive from damage. Safely Removing your Smart Backup Disk It’s recommended to disable the "Removable Device" icon on the status bar before unplugging the Smart Backup Disk. In Macintosh®, you can use “Eject” command to eject this storage device for safe remove. ---------------------------------------------------------------------------------------------------------------------------WARNING: ) Please do not remove Smart Backup Disk while data is transmitting, this may cause your computer to crash and lost your valuable data. ---------------------------------------------------------------------------------------------------------------------------- Button Manager Utility Installation The Smart Backup Disk provides a special backup button for file copy function. It provides an easy way to make a backup task just by touch of a button. Firstly, install the button-manager backup utility software that comes with the bundle disc. Please follow the below steps to complete the Button Manager Utility installation: Please note: * The utility program is only supported on Windows 2000 and Windows XP platforms. 6 1. Place the software disc into the CD ROM drive. Double click the “Button manager” setup icon in disc. 2. Click “Next” button. 7 3. Choose the “Button Manager Application” and click “Next” to continue 4. Click “Install” button to begin the installation. 8 5. Click “Finish” button to exit the software installation. 6. Choose “Yes, I want to restart my computer now” and click “OK” button to restart your computer. 9 7. After restarting your computer, the user will find an icon on the status bar of the windows on the bottom right. 8. Click on the icon and choose “Automatic Backup". 10 9. After clicking on the “Automatic Backup”, a backup task window will pop out for the user to configure the path setting. Button Manager Utility Description When you begin using this Button Manager Utility, you will need to read the following sections of the “user interface description” and “Adding a new task” to know how to create a new backup task file that will do what you regularly need. a. User Interface Description: 1 2 3 4 5 7 11 11 6 9 8 10 1. TASK LIST: The task window shows all arranged tasks, each task will comprises of source directory, destination directory and attribute. 2. OPEN: Open a previous preset backup task file. 3. SAVE: Save current task list to a backup task file (as *.iniBackup file). 4. Disk Properties: Display: Display your host system’s current disk drives information. 5. ADD: To add a new task in list. 6. NEW: Create a new backup task file. 7. DELETE: Deletes the chosen task. 8. MODIFY: Modifies the chosen task. 9. EXECUTE: Executes the current task list. 10. EXIT: close the task window. 11. Display path of executing task. If checked, the preset task will be automatically loaded by backup button; otherwise the button function will be disabled. b. Adding a New Task 1. Click “Automatic Backup” from the status bar icon. 2. When the task window pops out, click “Add” button to add a new backup task. 12 3. Set your daily backup tasks in the “Source Directory” and “Destination Directory” columns by clicking the browse button and check the necessary “Attributes” and “Task Direction”. Source Directory: assign Source Directory location. Destination Directory: assign backup Destination Directory location. 4. Complete the configuration of your presetting backup path then click “OK” button to continue. 13 5. The current task window will pop out again, you can add another task or click “Save” button to save the presetting path as a *.iniBackup file. Press “Exit” button to finish the backup task setting. 1 2 6. Now, when you press the “Backup Button” on Smart Backup Disk, the Button Manager utility will do the backup task as previously configured automatically. c. Modify or Delete Button Backup Task 1. Click “Automatic Backup” from status bar icon again. 14 2. The current task list window that was previous saved will be shown. 1- Select your want to modify or delete task list. 2- Press “Modify” or “Delete” button to do change. 3- After change your task then press “Save” and “Exit”. How to use an auxiliary power cord or power adapter SATA hard drives can be high power consumption storage devices. To operate the SATA hard drive successfully, you need to connect dual USB ports to get more power supply from another USB port by an USB Y-cable. If notebook user can not drive this Smart Backup Disk, you may need use it by an external AC power adapter. Please refer following description of power supply issue. z Using extra auxiliary power cord of USB “Y” cable. The USB auxiliary power cord is thinner than a regular USB cable. The picture showing below is connecting an extra auxiliary power cord to another USB port to direct more power into the hard drive. The main connector (left) must be connected for the device to work. Both connectors need to be connected to ensure that the device runs stably. 15 z Using external AC switching power adapter The Smart Backup Disk provides a DC jack for notebook user connects an external AC power adapter. Using an external power adapter can bring enough power for the SATA hard drive to run stably. You can refer to the following specification to purchase a suiting power adapter from your dealer. External switching power adapter specification: 1. Output Voltage/Current: DC 5V/1.5A 2. Plug dimension: a. Inner hole: 1.3mm b. Outer plug: 3.5mm c. Length of metal plug: 6.5mm~7.5mm Troubleshooting This chapter covers some basic things you can do in the event that you encounter problems using this Smart Backup Disk on your system. z Why does the computer not recognize the Smart Backup Disk? ANS:1. Make sure that both USB plugs are properly connected to your host USB ports. Do not only connect the auxiliary USB plug. 2. Make sure that your host USB port is working properly. If you are unsure, please try another USB port. zWhy does the hard disk in the Smart Backup Disk make continuous noises while the computer can not recognize the Smart Backup Disk? ANS:1. This could be because not enough power is being supplied to your hard drive. Please make sure that you have connected both A-plugs of the USB “Y” cable to direct more power supply. See the “How to use an auxiliary power cord or power adapter” chapter for more detailed information. 2. If your Smart Backup Disk is connected to a notebook or via a bus hub (without external powered), you need to connect an external power adapter to solve the power issue. zWhy is the data transfer rate between the computer and the device slowing down? ANS:You may be connected to an USB 1.1 low speed port. Please make sure that you have connected to a high speed USB2.0 host port. The Smart Backup Disk can work at both USB 1.1 and USB 2.0 ports. However, to achieve a hi-speed transfer rate, we recommend you to connect the Smart Backup Disk to an USB2.0 port. 16 zWhy does the backup button not work? ANS:1. Please make sure that you have installed the backup utility software. If the software has been successfully installed, it will show an automatic backup icon in the status bar when windows is booting. 2. Please make sure that you have configured a copying path in the button manager utility and specify a suitable backup task and saved it to a backup file. See “Button Manager Utility Description” section for more detailed information. 3. You may have closed the button manager utility under windows. 4. The Button Manager Utility only works on Windows 2000 and XP platforms. Product Specification: Chipset INITIO_INIC 1605 Host Interface USB 2.0 (USB1.1 compatible) Hard Drive Interface SATA Hard Drive Capacity Up to 60/80/120/160GB. Hard Drive From Factor Data transfer rate 2.5” SATA HDD Indicator USB link and active indicator Yes (software only support Windows 2000 and XP) One button backup Heat cooling Housing Material Power Source Cable type Support OS Unit Dimensions 1.USB 2.0 up to 480Mbps (60MB/s) 2. USB 1.1 up to 12Mbps (1.5MB/s) By aluminum housing. Aluminum 1. USB Bus power 2. External power adapter (DC 5V/1.5A) “Y” type USB cable Windows®: Windows®2000/ XP/Vista. Macintosh®: Mac® 9.X, 10.X or higher 80*15*138 mm (W*H*D) Unit Weight Storage Temperature 105g (Without hard drive) Operating Temperature Certificated: 5°C to 40°C FCC、CE. All Materials: RoHS compliant -20°C~60°C ∗ This specification may be revised without notice. 17