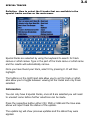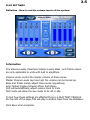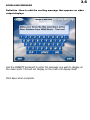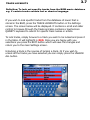
1
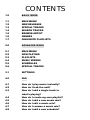
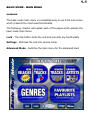
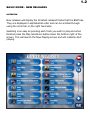
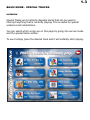
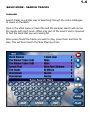
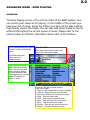
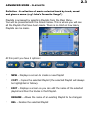
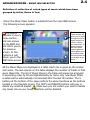
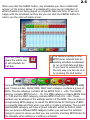
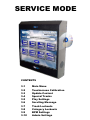
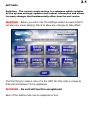
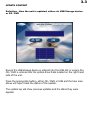
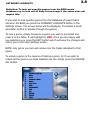
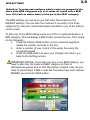
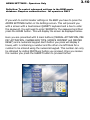
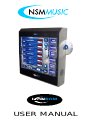
I ONBGM
USER MANUAL
CONTENTS
1.0
BASIC MODE
1.1
1.2
1.3
1.4
1.5
1.6
1.7
MAIN MENU
NEW RELEASES
SPECIAL TRACKS
SEARCH TRACKS
BROWSE ARTIST
GENRES
FAVOURITE PLAYLISTS
2.0
ADVANCED MODE
2.1
2.2
2.3
2.4
2.5
2.6
MAIN MENU
NOW PLAYING
PLAYLISTS
MUSIC MIXERS
SCHEDULES
SPECIAL TRACKS
3.1
SETTINGS
4.0
FAQ
4.1
4.2
4.3
How do I play music instantly?
How do I lock the unit?
How do I add a single track to
what’s playing?
How do I create my own playlist?
How do I add a new music mix?
How do I edit a music mix?
How do I rename a music mix?
How do I add a new schedule?
4.4
4.5
4.6
4.7
4.8
1.1
BASIC MODE - MAIN MENU
OVERVIEW
The basic mode main menu is a simplified easy to use front end screen
which presents the most used functionality.
The following chapter will explain each of the pages which subsets the
basic mode main menu.
Lock - The lock button locks the unit and prevents any functionality
Settings - Will take the unit into service mode.
Advanced Mode - Switches the main menu for the advanced main
1.2
BASIC MODE - NEW RELEASES
OVERVIEW
New releases will display the 40 latest released tracks that the BGM has.
They are displayed in alphabetical order and can be scrolled through
using the scroll bar on the right hand side.
Selecting is as easy as pressing each track you wish to play and when
finished press the Play Selections button down the bottom right of the
screen. This will launch the Now Playing screen and will instantly start
playing.
1.3
BASIC MODE - SPECIAL TRACKS
OVERVIEW
Special Tracks are 8 instantly playable tracks that can be used to
interrupt anything that is currently playing. This is useful for special
occasions and celebrations.
You can select which songs are on this page by going into service mode
and the special tracks section.
To use it simply press the desired track and it will instantly start playing.
1.4
BASIC MODE - SEARCH TRACKS
OVERVIEW
Search tracks is a simple way of searching through the entire catalogue
of music on the BGM.
Type in the artist name or track title and the dynamic search will narrow
the results with each press. Often only part of the search text is required
to find the track that you are looking for.
Once youve found the tracks you wish to play, press them and then hit
play. This will then launch the Now Playing screen.
1.5
BASIC MODE - BROWSE ARTIST
OVERVIEW
Browse Artist allows you to see all the artists that exist on the BGM, by
pressing on the image of the artist will display all the tracks by that artist
in the right window.
Select the tracks you wish to play, then either select another artist to
make more selections or hit play.
Should you wish to Select All or Un Select all then hit the relevant
button.
1.6
BASIC MODE - GENRES
OVERVIEW
The Genre screen displays all the musical categories that are on the
BGM.
Selections can be made by pressing on the relevant genre buttons.
You can also define the speed of the music by using the music speed
scroller at the bottom of the screen. Note each time you adjust the
speed of the music the amount of tracks in each genre button and any
selections made will change.
The total amount of tracks in your selection will be displayed in the
bottom left hand corner.
You can also reset all the selections by pressing the reset selections
button.
1.7
BASIC MODE - FAVOURITE PLAYLISTS
OVERVIEW
The Favourite Playlist screen allows you to see all the playlists that have
been setup on the BGM.
To select them simply press one or more of the desired playlists and hit
play
You can also define the speed of the music by using the music speed
scroller at the bottom of the screen. Note each time you adjust the
speed of the music the amount of tracks in each playlist button and any
selections made will change.
The total amount of tracks in your selection will be displayed in the
bottom left hand corner.
You can also reset all the selections by pressing the reset selections
2.1
ADVANCED MODE - MAIN MENU
The Main Menu, is the central screen where all features and functions can
be accessed from. This module will focus on explaining how it works.
By default “out the box” the unit will automatically play music randomly
from its database. This is not configured and will play any track from any
genre.
This is the Main Menu and
will be the first screen that
you will see after the unit
has powered on. The screen
is divided into 2 sections.
On the left you have the
Instant Play Mode and on
the right the Settings and
Configuration represented
by 6 navigation buttons.
INSTANT PLAY MODE
Instant Play Mode is a very easy way of selecting music quickly and
instantly. The large buttons down the middle of the screen are the
collections of music on the unit. ‘Out the box’ there will be a list of all the
Genres by default, and as you make your own Playlists and Music Mixes
they will appear here too. As you make multiple selections it will estimate
the total number of tracks selected, shown bottom centre of the screen.
This is a Music Collection button
By pressing this button you
would be selecting the entire
Dance genre.
The number represents how
many tracks are contained
within that collection.
2.2
ADVANCED MODE - NOW PLAYING
OVERVIEW
The Now Playing screen is the control centre of the BGM system; here
you control your music as it’s playing. In the middle of the screen you
have your list of music, along the bottom you have all the play controls
that directly control the tracks. You can also add music tracks on the fly
without interrupting the current queue of music. Please refer to the
picture below for function information about each of the buttons.
The # Tracks shows the number NOW PLAYING
of tracks in the current music
This shows the current track, and
queue.
artist info, plus artist image.
The BGM button will
return the unit to
scheduled play.
This is the area which
shows the track listing.
From here you can see
what’s playing, what’s
next and what was last.
The songs play in number
order. A/V stands for
Audio or Video
These are the play control buttons.
From left to right.
1. Repeat - will repeat the list once complete
2. Volume - Only functions with an amp
3. Previous - Will select the previous track
4. Stop - This will stop music
5. Play - This will play selected track
6. Next - This will skip to the next track
7. Mute - This will mute the output
8. Shuffle - This will mix up the entire list
9. Delete - This will remove the track
2.3
ADVANCED MODE - PLAYLISTS
Definition - A collection of music selected track by track, saved
and given a name. (e.g “John’s Favourite Songs”)
Playlists is accessed by selecting Playlists from the Main Menu.
You will be presented with the screen below. This is where you will see
all the Playlists that have been made. There is no limit on how many
Playlists can be made.
At this point you have 5 options:
·
NEW – Displays a screen to create a new Playlist
·
COPY – Copies the selected Playlist (the selected Playlist will always
be highlighted in Yellow).
·
EDIT – Displays a screen so you can edit the name of the selected
playlist and then the tracks in that Playlist.
RENAME – Allows the name of an existing Playlist to be changed.
·
DEL – Deletes the selected Playlist
2.4
ADVANCED MODE - MUSIC MIX SELECTOR
Definition: A collection of varied types of music which have been
grouped by Artist, Genre & Year
When the Mucic Mixer button is selected from the main BGM screen the following screen appears:
This button
appears on every
menu section
and sub-menus
on the BGM and
will return you to
the previous
screen. In this
instance it will
return you to the
BGM main screen
The Up and
Down arrows will
allow you to scroll
through the list of
music mixes 1 at
a time. If there
are more than 10
music mixes in
the list a slider
control appears
which allows you
to scroll through
the list quicker as
you drag it up or
down.
All the Music Mixes are displayed in a table. Each mix is given an ID number
and name. The last column on the table displays the number of tracks in that
given Music Mix. The list of Music Mixes in the table will always be arranged
in ascending order by ID and Alphabetically by name. Any new Music Mixes
created will be automatically incremented after the last ID number. The 5
buttons at the bottom of the page perform the same functions as the buttons
located on the Playlists screen. The COPY and DELETE buttons will copy or
delete any selected playlist.
Make sure you are certain you want to delete
any music mix as your music selections will be deleted!
2.5
ADVANCED MODE - SCHEDULE SELECTOR
Definition: A collection of set schedules which include Playlists
and/or Music Mixes to be played at a given date and time
When the Scheduler button is selected from the main BGM screen - the
screen below will be displayed. The Up and Down arrows can be used to
scroll the list and when there are more than 10 Schedules in the list a
Slider control appears.
The ID is
generated
automatically
when a new
schedule is
created
The table is sorted
alphabetically by
Name. the names
can always be
edited without fear
of losing the music
As with most of the main screens, the standard NEW,
EDIT, RENAME and DELETE buttons are displayed to
allow you to add or amend a current schedule.
However there is a SHOW button which will display the
date and time each schedule in the list will commence.
It does not have any functionality - you will have to
edit a specific schedule to arrive at the screen to alter
the date and time of each schedule
2.5
When you click the SHOW button, any schedules you have created will
appear on the screen below. It is designed to give you an indication of
what schedules are being played on a specific date and time. If you are
happy with the schedules as they are you can click the FINISH button to
return you the main schedule screen
The CLR (clear) button
clears the entire row
of set schedule for
that day
The Padlock symbol on the
BPM blocks indicate that an
existing schedule is allocated
to run on that date and time.
If you have to overwrite this,
the only way you can do so is
by pressing the CLR button
There are 4 main types of BPM (Beats Per Minute) categories that the BGM
uses. These are ALL, SLOW, MED, FAST. Each category contains a group of
BPM’s. The ALL category contains all the BPM’s from 1 - 200. The SLOW
category contains BPM’s from 1 - 70. The MED category contains BPM’s from
71 - 130 and the FAST category contains BPM’s from 131 - 200. These
numbers can be altered in the settings section of the BGM. You can press a
corresponding BPM category to insert the BPM blocks for that type of BPM
on a specific date and time when you edit or create a schedule. The current
selected BPM category will have a green indicator within its button. Each
time you press a different BPM category button you will see the indicator
change to green to show you that you are currently inserting BPM blocks for
this schedule when editing or creating a schedule.
2.6
ADVANCED MODE - SPECIAL TRACKS
Definition - A small number of tracks pre selected in service mode
which can be quickly selected for a special event.
e.g “Happy Birthday, A Wedding Song, Football Song”
Special Tracks are accessed by pressing the Special Track Button on the
main menu.
Once loaded you will be presented with 8 Tracks. By pressing the desired
track it will immediately interrupt both scheduled music and instant play
music and start playing. Once complete, the music will continue as it
previously was.
SERVICE MODE
CONTENTS
3.1
3.2
3.3
3.4
3.5
3.6
3.7
3.8
3.9
3.10
Main Menu
Touchscreen Calibration
Update Content
Special Tracks
Play Settings
Scrolling Message
Track Lockouts
Category Lockouts
BPM Settings
Admin Settings
3.1
SETTINGS
Definition - The service mode section is a submenu which includes
all the system settings, updates and lockout information and allows
for many changes that fundamentally effect how the unit works.
WARNING - Before you enter into the Settings section be aware that it
will stop any music playing: this is to allow any changes to take effect.
The first thing to make a note of is the UNIT ID: this code is unique to
that unit and allows it to be registered.
WARNING - No unit will function unregistered
Each of the buttons will now be explained in turn.
3.2
CONFIGURE TOUCHSCREEN
Definition - To configure the screen to make it more accurate.
1.
Press Settings, and press Yes to “this will stop the music.
Continue?”
2.
Press The TOUCHSCREEN CALIBRATION button in the top left.
3.
It will then prompt you to touch the screen in 9 places, one after
the other, indicated by
4.
Press CONFIRM
The Screen is now calibrated.
3.3
UPDATE CONTENT
Definition - How the unit is updated, either via USB Storage device
or CD / DVD
Ensure the USB storage device is entered into the USB slot or ensure the
CD / DVD is entered into the optical drive thats located on the right hand
side of the unit.
Press the appropriate button, either CD / DVD or USB and the blue area
above will report back the status of the update.
The update log will show previous updates and the dates they were
applied.
3.4
SPECIAL TRACKS
Definition - How to select the 8 tracks that are available in the
special tracks section on the main menu.
Special tracks are selected by using the keyboard to search for track
names or artist names. Type in the part of the track name or artist name
and the results will automatically narrow.
Once you have found your track, select it by pressing it. It will then
highlight.
The buttons on the right hand side allow you to sort by track or artist,
also allow you to toggle between viewing all the tracks and only those
selected.
Information
You can only have 8 special tracks, once all 8 are selected you will need
to unselect some before further selections can be made.
Press the respective button either CD / DVD or USB and the blue area
above will report back the status of the update.
The update log will show previous updates and the dates they were
applied.
3.5
PLAY SETTINGS
Definition - How to set the volume levels of the system.
Information
The Volume Levels, Maximum Volume Levels, Bass , and Treble values
are only applicable to units with built in amplifiers.
Volume Levels control the master volume of those zones.
Master Volume Levels cap how high the volume can be turned up.
Bass and Treble merely adjust those levels respectively
Amp Output toggles between Mono And Stereo
AVC will automatically adjust volume track to track
AUX mode will allow the aux mode to be off or idle.
To test how these settings are effected there is a PLAY TEST TRACK at
the top left of the page, this will play a random track from the database.
Click Save when complete.
3.6
SCROLLING MESSAGE
Definition - How to edit the scolling message that appears on video
output displays
Use the QWERTY keyboard to enter the message you wish to display on
the video units. This will not display on the main unit display itself.
Click Save when complete.
TRACK LOCKOUTS
3.7
Definition: To lock out specific tracks from the BGM music database
e.g. if certain tracks contain foul or abusive language.
If you wish to lock specific tracks from the database of music that is
stored in the BGM, press the TRACK LOCKOUTS button in the Settings
screen. The screen below will be displayed. It contains a scroll and slider
control to browse through the tracks and also contains a touchscreen
QWERTY keyboard to search for specific track names or artists.
To lock tracks, simply browse to a track you wish to be locked and press it
in the table. It will highlight in RED. Once you are happy with you
selections you press the EXIT button which will save the changes and
return you to the main Settings screen.
Unlocking a track is the reverse of locking a track. Or if you wish to
unlock all the tracks you have selected you can simply press the UNLOCK
ALL button.
CATEGORY LOCKOUTS
3.8
Definition: To lock out specific genres from the BGM music
database e.g. to lock out all Easy Listen songs if the venue does not
require this.
If you wish to lock specific genres from the database of music that is
stored in the BGM you press the CATEGORY LOCKOUTS button in the
Settings screen. The screen below will be displayed. It contains a scroll
and slider control to browse through the genres.
To lock a genre, simply browse to a genre you wish to be locked and
press it in the table. It will highlight in RED. Once you are happy with
you selections you press the EXIT button which will save the changes and
return you to the main Settings screen.
NOTE: Any genre you lock will remove ALL the tracks allocated to that
genre.
To unlock a genre is the reverse of locking a genre. Or if you wish to
unlock all the genres you have selected you can simply press the UNLOCK
ALL button.
BPM SETTINGS
3.9
Definition: To setup and configure which tracks are grouped in the
three main BPM categories e.g. to to make all tracks with a BPM
over 130 (such as dance music) to be put in the FAST category.
The BPM settings you see when you first enter this screen are the
DEFAULT settings. You can alter the numbers if you wish in the three
categories by using the numerical keypad provided for you at the bottom
of the screen.
To alter any of the BPM settings press one of the 2 numbered boxes in a
BPM category. This will display a RED border around the box. Then simply
do the following:
1. Press the Yellow CLEAR button on the numerical keypad to
delete the number currently in the box.
2. Enter a number of your choice in the empty box using the
numerical keypad
3. Press the SAVE button to save your changes and return you
back to the Settings screen.
IMPORTANT NOTICE: If you alter one box in one BPM category, you
have to alter ALL the boxes is EVERY category so that no
discrepancies appear and so that they follow a logical order. So you
have to repeat steps 1 AND 2 until ALL the boxes have been altered
BEFORE you press the SAVE button.
ADMIN SETTINGS - Operators Only
3.10
Definition: To control advanced settings in the BGM music
database. Requires authentication - for operators ONLY
If you wish to control master settings in the BGM you have to press the
ADMIN SETTINGS button in the Settings screen. This will present you
with a screen with a touchscreen QWERTY keyboard and a box to enter
the password. You will need to enter ‘ADMIN’ for the password and then
press the LOGIN button. This will display the screen as displayed below.
Here you are presented with 5 main buttons (MANUAL ACTIVATION, PRE
PAY ACTIVATION, CHANGE BOX TYPE, UPDATE CONTENT and MASTER
RESET) and a numerical keypad. Each button you press will display 2
boxes, with 1 containing a number and the other one left blank for a
number to be entered using the numerical keypad. This number can only
be obtained by calling NSM Music before you proceed. Once you receive
this number you press the SUBMIT button to proceed further.
4.1
HOW DO I PLAY MUSIC
INSTANTLY?
1.
Press the music collection buttons of your choice, the unselected
light will change to SELECTED. Press one or more as required.
2.
Select music speed using the arrows at the bottom left of the screen.
3.
Press Play Selections.
The NOW PLAYING screen will now load with your selections, the music
will start playing immediately from a shuffled list of tracks selected. This
will override any scheduled music.
HOW DO I LOCK THE
UNIT?
1.
Press on the lock button in the bottom left of this screen, the unit will
then lock.
2.
To unlock the unit type in the unlock code and the unit will return to
working order
WARNING
The override code is 1234
this code must not be
disclosed to unauthorised
personnel as it cannot be
changed or modified.
4.2
HOW DO I ADD A
SINGLE TRACK TO
WHAT’S PLAYING?
1.
Press on ADD TRACKS button in the top right hand corner.
2.
Type in the name of the track or artist, touch on all the tracks you
wish to enter into the list
3.
Click Save when done.
4.
The music in the Now Playing screen will continue, but the added
tracks will appear at the bottom of the list.
5.
Select the track and click play, the previous track will fade out and
new track will play.
* Information *
The search screen uses intelligent filtering technology. As you type the
search will automatically change to only include what you have typed in.
Often only part (any part) of the track name or artist name is sufficient to
find the result you need.
4.3
HOW DO I CREATE
MY OWN PLAYLIST?
1.
Press the Playlists Button on the Main Menu
2.
Press the New Button
3.
Enter the Playlists name e.g “My Party Tunes”
4.
Press Save
5.
Use the search to find your tracks, press the track and it will
highlight green. (Press CLR to reset and continue searching)
6.
Click Save when complete.
7.
Return to the Main Menu to instantly play it or can be used
later in the schedule section.
MAKE
SELECT
PLAY
4.4
HOW DO I ADD A NEW
MUSIC MIX?
1.
2.
3.
4.
Press the NEW button in the Music Mix Selector screen
Type in a name of your choice using the touchscreen QWERTY keyboard
Press the SAVE button
Select the music you want to add to the music mix by pressing on the
artists in the table provided (each artist selected will be highlighted in
green. Or you can click the Genres/Years buttons to add music by that
category or by clicking the SELECT ALL button which will add all the
tracks in whatever category you have currently selected (i.e.
Artists/Genres/Years)
5. Type in a search field of your choice if you wish to search for particular
Artists/Genres/Years using the touchscreen QWERTY keyboard
6. Press the SAVE button
HOW DO I EDIT A MUSIC
MIX?
4.5
1. Select the music mix you wish to edit by pressing it to highlight it in
green or by using the Up and Down arrows
2. Press the EDIT button in the Music Mix Selector screen
3. You can add or delete any music from this mix either by
Artist/Genre/Year by simply going to your choice of category and
select/deselecting the items you wish by pressing on the item in the list
is to either highlight it in green to mark it as selected, or pressing a
current highlighted item to mark it as deselected. There is also a
REMOVE ALL button which will deselect all items in the list. If you do not
want to Add/Delete music from the music mix go to 4.
4. Press the SAVE button
HOW DO I RENAME A
MUSIC MIX?
1. Select the Music Mix you wish to rename by pressing it to highlight it
in yellow or by using the Up and Down arrows
2. Press the RENAME button in the Music Mix Selector screen
3. You can now alter the name of the music mix to whatever you wish
using the touchscreen QWERTY keyboard
4. Press the SAVE button
4.6
HOW DO I ADD A NEW
SCHEDULE?
1. Press the NEW button in the Schedule Selector screen
2. Type in a name of your choice using the touchscreen QWERTY keyboard
3. Press the SAVE button
4. Select the Playlists and/or Music mixers you want to add to the music
mix by clicking on the individual Playlists and Mixers in the 2 tables
provided (each playlist or mixer selected will be highlighted in yellow.
5. Press the NEXT button
6. Using the BPM category buttons at the bottom insert the BPM blocks of
your choice by pressing in the blank fields to allow the playing of certain
tracks within that BPM range to commence playing at a given time on a
specific day
7. Press FINISH. Your new schedule is now set to commence playing as
you have set
CREATE
SELECT
SCHEDULE