1
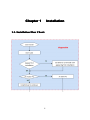
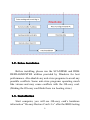
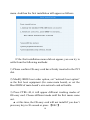
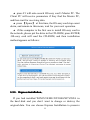
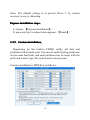
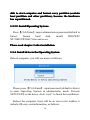
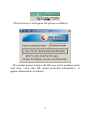
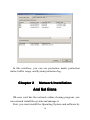
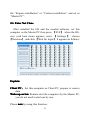
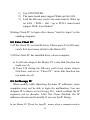
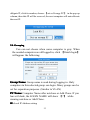
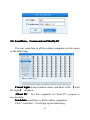
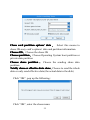
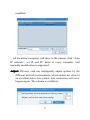
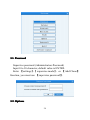
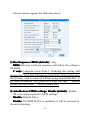
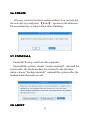
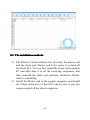
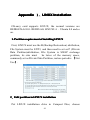
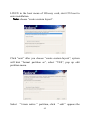
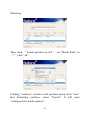
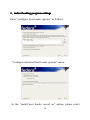
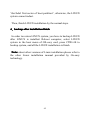
OS-easy Card
User’s Manual
(Add and Smart Version)
OS-easy Technology Co., Ltd.
Http://www.os-easy.com
E-mail: [email protected]
Warning
Welcome to use OS-easy card. Before you using this
product, please read this manual first. This manual is suit for
OS-easy Card’s Add version, Smart version.
Copyright © 2006 reserves to OS-easy technology Co.,
Ltd. OS-easy card, OS-easy logo, and other OS-easy marks are
owned by OS-easy technology Co., Ltd. and registered. All
other trademarks are the property of their respective owners.
OS-easy assumes no responsibility for any errors that may
appear in this manual. Information contained here in is subject
to change without notice.
2
Content
Manual Navigation
Product Advantages…………………………………………5
Hardware Requirement……………………………………7
Operating System Support…………………………………7
Chapter 1: Installation.................................................... 8
1.1. Installation flow chart................................................. 8
1.2. Before Installation...................................................... 9
1.3. Installation.................................................................. 9
1.3.1. Express Installation............................................... 11
1.3.2. Custom Installation............................................... 12
1.3.3. Operating System installation……………………17
1.3.4. Install Driver in OS…………………………………18
Chapter 2: Network Installation and Net Clone......... 20
2.1. Enter Net Clone....................................................... 21
2.2. Enter Client PC........................................................ 22
2.3. Set Occupy PC………………………………………23
2.4. Grouping………………………………………………23
2.5. Send Data、Command and Modify IP……………….24
Chapter 3: Settings....................................................... 29
3.1. Password................................................................. 29
3.2. Options.................................................................... 30
3.3. Disk INFO................................................................ 33
3.4. Net Clone................................................................. 34
3.5. FDISK...................................................................... 34
3.6. Upgrade................................................................... 34
3
3.7. Uninstall................................................................... 34
3.8. About........................................................................ 35
Chapter 4: Add Clone
Clone(not suit for smart card).............. 36
4.1. First Operation in One PC....................................... 36
4.2. Enter Master PC...................................................... 37
4.3. Part Renewal and Total Renewal……………………37
4.4. Add Clone................................................................ 38
4.5. Clone continuous…………………………………......38
Chapter 5: Master Control function
function…………………39
5.1. The installation methods……………………………39
APPENDIX 1 LINUX installation...................................40
4
Product Advantages
1. Part Add Clone function
You can add Clone the software to one group of the
computers in the computer lab based on your need, and you can
do a Totally Add Clone to all the computers in the next time.
2. Clone continuous:
Some times your cloning is stopped for PC or network
malfunctions, but you can continue clone from the break off
point by the Clone Continuous Function when the PCs and
network is normal in the next time.
3. Faster Clone Speed
OS-easy card breaks through the cloning from 1 to 512
computers, and the speed has reached from 420MB/Min to
546MB/Min.
4. Multi OS
You can install win2000/2003/XP/Linux/Vista in one PC,
the Multi Operating System number reaches to 15, which
makes one computer lab having multiple environments.
5. IP Inserting and IP Fixing
When modify multi Operating Systems’ IP addresses,
some computers may not be able to login for malfunction. You
5
can insert IP to them, which confirm the IP sequence not in
disorder. After Net Clone finished, the IP address don’t need to
modify if you use the IP Fixing function.
6. Enter Supervise Mode (Open Mode) at random
It doesn’t affect the Add Clone function when the Master
PC and the Client PC are all enter the Supervise Mode (Open
Mode) or manually permanent write in data.
7. Dynamic show the malfunction PC
During net clone, you can view all the computers’ status,
and show the lowest one in the control screen. And you can take
actions to them by exactly find the malfunction PC.
8. Buffer Auto Enlarge Technology
You can use the surplus disk space as the dynamic buffer
when the static buffer is used up, this totally avoids Blue Screen
problem for data overflowing.
9. Network clone auto delay
OS-easy card can intelligently adjust options by the
different network environments, which makes net clone in a
excellent status, lose packet, lose connection will never happen.
10. Master control function
You can stop the client PCs surfing, lock the screen and so
on by the Master Control Function.
6
Hardware Requirements
★
★
★
★
★
★
80486 and above compatible PC.
Minimum 500 MB of free hard disk space with LBA
Support.
BIOS must be able to support Hard Disk size over 8.4GB
32MB of Memory
One free PCI slot.
Color monitor
Operating System Support
★
★
★
Instant Restore Mode
Support DOS/ 95/98/ /2000/XP/VISTA
Backup Restore Mode
Support DOS/ 95/98/ 2000/XP,/VISTA LINUX
No Restore Mode
Support DOS/ 95/98/ 2000/XP/VISTA, LINUX
7
Chapter 1
Installation
1.1. Installation Flow Chart:
8
1.2. Before Installation
Before installing, please run the SCANDISK and DISK
DEFRAGMENTER utilities provided by Windows for best
performance. Also disable any anti-virus programs to avoid any
possible conflicts. Some anti-virus programs operating much
like viruses and may cause conflicts with the OS-easy card.
(Making the OS-easy card think there is a booting virus.)
1.3. Installation
Start computer, you will see OS-easy card’s hardware
information“Os-easy Restore Card v1.x”after the BIOS testing
9
menu. And then the first installation will appear as follows.
If the first installation menu did not appear, you can try to
settle from the following methods:
1) Please confirm OS-easy card have firmly inserted in the PCI
slot.
2) Modify BIOS boot order option, set “network boot option”
as the first boot equipment (for some main board), or set the
Boot ROM of main board’s own network card as Enable.
3) Press CTRL+H, it will appear different working modes of
OS-easy card. Choose different mode until the first menu come
out.
★ at this time, the OS-easy card will not install if you don’t
press any key in 30 second or press 【ESC】.
10
press F1 will auto search OS-easy card’s Master PC. The
Client PC will receive parameters if they find the Master PC,
and then wait for receiving data.
★ press 【Space】 at this time, the OS-easy card stop count
down, and remain in this menu, wait for your next operation.
★ if this computer is the first one to install OS-easy card in
the network, please put the drive in the CD-ROM, press ENTER,
OS-easy card will read the CD-ROM, and then installation
method appears as follows:
★
1.3.1. Express installation
installation:
If you had installed WIN95/98/ME/NT/2000/XP/VISTA in
the hard disk and you don’t want to change or destroy the
original data. You can choose Express Installation to preserve
11
them. The default setting is to protect Drive C by instant
recovery in every rebooting.
Express installation steps
steps:
1) choose 【Express Installation】;
2) press any key to reboot when appears 【finish】;
1.3.2. Custom installation
installation:
Repartition by the built-in FDISK utility, all data and
partitions will be destroyed. You can set multi booting partitions
on the same hard disk, and each partition may be setup with the
preferred restore type, file system and restore period.
Custom installation’s FDISK is as follows:
12
OS-easy card supports up to 30 partitions, please repartition
by the hardware capacity by your actual need.
Set method:
Click the option to choose by mouse, or move the cursor to
the option, press ENTER to change. Please press ENTER key to
save and exit.
1.3.2.1. Attribution (Partition Type):
Attribution : Means the partitions’ restore type. Once it has
been set, you cannot change, except to do a total disk repartition.
It contains the following method:
A: Instant Restoration:
Within this partition type, all changes will be instantly
restored to its original state with a simple reboot. Various restore
period are provided, including Not Use, Every, Manually Daily,
Weekly, Monthly. Supports
Dos/Win95/98/ME/NT/2000/XP/VISTA.
B: Backup Restoration:
Setup this partition type, you can backup data manually, or
restore the original data with preset schedules. Support all
Operating Systems in the market.
C: No Restoration:
13
This partition type is totally open, no protection or backup
function is provided. Any changes done in this partition will
permanently remain.
P: Private Data Partition:
This partition type will only be visible for the boot partition
with the same name in the setup menu. It will be invisible when
booting from any other partitions. This is excellent for
constantly changing data that is exclusive to one OS. (Logs, etc.)
For example, if the name of boot partition is【WinVISTA】, then
the name of its private data partition must be 【WinVISTA】 as
well.
S: Shared Data Partition:
This partition type will be visible for every partition you
choosed to boot from, Excellent for sharing data between
different OS. (Documents, etc.)
Hide Partition
H)::
F、Hide
Partition(H
This partition type will be invisible for every OS.
1.3.2.2
1.3.2.2.. Name: Identify the partition in OS-easy card boot menu.
The length is 1 to 10 characters.
3. Size: Partition size can set as xxxxxMB
1.3.2.
1.3.2.3.
4. File System: Choose appropriate file system for each
1.3.2.
1.3.2.4.
OS
FAT32: Support WinNT/2000 versions (Recommended)
14
FAT16: Supports hardware under 8.4GB. Total partition size
cannot be more than 2000MB.
NTFS: You’d better choose this method for more than 30G
partitions, supports WIN NT/2000/XP/2003/Vista
EXT: Be suit for LINUX main sector document system.
1.3.2.5. Restore Period: System data recovery
1.3.2.5.1. Instant restore boot partition:
Not use: not restore and not use auto clear
Every: The system will be instantly restored to its original state
with every reboot.
Manually: Every access writes to the hard disk will be kept
temporarily. The system will be restored to its original
status by pressing 【trl+r】 by password.
Daily: The system will be instantly restored to its original state
at the first boot of every day.
Weekly: The system will be auto restored to its original status
at the first boot of every week.
Monthly: The system will be auto restored to its original state
at the first boot of date 1st every month.
1.3.2.5.2. Private:
Unprotect
Unprotect:: Not Use restore function
With System: Private data partition will follow the restore
period of its boot partition.
1.3.2.5.3. Share partition:
Not use: not restore and not use auto clear
Manually clear: Every access writes to the hard disk will be
15
kept temporarily. The system will be restored to its
original status by pressing 【trl+r】 by the password.
Every: The system will be instantly restored to its original state
with every reboot.
Daily: The system will be instantly restored to its original
state at the first boot of every day.
Weekly: The system will be auto restored to its original status
at the first boot of every week.
Monthly: The system will be auto restored to its original state
at the first boot of date 1st every month.
Note:
1) The “unprotect” mode partition cannot be modified to
“protect” , and the “protect” mode can be set as “unprotect”,
so “protect” is recommended.
2) The restore period can be modified at any time in the
“protect” partition.
3) The “protect” mode partition cannot be modified to
“unprotect” when Add Clone talk is established. Except you
“cancel Add Clone talk” by press F10.
1.3.2.6. Buffer:
Type A (Instant Restoration
Restoration)): Maximum size is 9993MB and
Minimum is 101MB. Default value is the Minimum size.
Recommend to set a larger size if the hardware space is big
enough.
Type B (Backup Restoration
Restoration)): Requires a buffer zone that is
equal in size to the protected partition as the backup buffer.
The buffer zone will be automatically reserved within the
remaining not partitioned hard disk space.
16
1.3.3. Operating System installation:
It will appear the menu as follows when rebooting computer:
Appear hotkey explaining by pressing F2
1.3.3.1. Hotkey explains
explains:
1) F10: Enter OS-easy card 【options】
2) F8: Enter add clone
3) Ctrl+Enter: Enter windows in Administrator Mode,
system is unprotected, you can install software、change
the settings
4) Ctrl+B Execute Backup function to this partition
5) Ctrl+R Execute Restore function to this partition
6) Ctrl+K Enter OS and save the past modification
Please press up/down key to choose the boot partition, OSeasy card will be accord to the following steps to install
operating system.
Note: you must prepare a boot Compact Disc or floppy
17
disk to start computer and format every partition (contain
), because the hardware
boot partition and other partition
partition),
has repartitioned.
1.3.3.2. Install Operating System:
Press【Ctrl+Enter】, input administrators password(default is
Enter),
format
hard
disk,
install
DOS/WIN
NT/2000/XP/2003/Vista and so on.
Please read chapter 3 after installation.
1.3.4. Install drive in the Operating System
Reboot computer, you will see menu as follows:
Please press 【Ctrl+Enter】, input password (default is Enter)
to enter Operating System in administrator mode. Execute
SETUP.EXE in the driver, click “next” to finish the installation.
Reboot the computer, there will be an icon in the taskbar, it
include OS-easy card information, as follows:
18
Click the icon, it will appear the picture as follows:
The instant protect mode is the OS-easy card’s working mode,
and click “view this OS’ detail protected information”, it
appears information as follows:
19
In this interface, you can see protection mode, protection
status, buffer usage, and System protection log.
Chapter 2
Network Installation
And Net Clone
OS-easy card has the network online cloning program, you
can network install the system and manage it.
First, you must install the Operating System and software by
20
the “Express installation” or “Custom installation”, and set as
“Master PC”.
2.1. Enter Net Clone
After installed the OS and the needed software, set this
computer as the Master PC then press 【F10】 when the OSeasy card boot menu appears, enter 【 Settings 】 , choose
【Netclone】, and click 【Wait for login】. It appears as follows:
Explain:
Client PC
PC:Set this computer as Client PC, prepare to receive
data.
Wake up on lan: Remote start the computers by the Master PC,
you do not need to start one by one.
Please note by using this function:
21
1) Use ATX POWER.
2) The main board must support Wake up On LAN.
3) Link the OS-easy card to the main board’s Wake up
on LAN(WOL)slot(up to PCI2.1 main board
support WOL if not linked).
Waiting Client PC to login after choose “wait for login” in the
sending computer.
2.2. Enter Client PC
1) If the Client PC not install driver. Please press F1 in OS-easy
card’s first boot menu to link to the Master PC.
2) If the Client PC has installed drive, reboot computer,
a) It will auto inspect the Master PC (auto link function has
made use of)
b) Press F10 during the OS-easy card’s boot menu, choose
NetClone, and set as “Client PC” (auto link function has
not made use of)
2.3. Set Occupy PC
When modify multi Operating Systems’ IP addresses, some
computers may not be able to login for malfunction. You can
obligate IP to them (set as Occupy PC), which confirm the IP
sequence not in disorder. After Net Clone finished, the IP
addresses do not need to modify if you use the IP Fixing.
In the Master PC 【 wait for login 】 menu, when a computer need to
22
obligate IP, click its number, choose 【set as Occupy PC】 in the pop up
column, then this IP will be reserved, the next computer will auto allocate
the next IP.
2.4. Grouping
You can not choose when some computer is gray. When
the needed computers are all logged in, click 【finish login】
will appear the following:
Group Name: Group name is used during logging in. Only
computers in this selected group can login. Many groups can be
set for separation purposes. (Similar to VLAN)
PC Name: Computer Name after netclone or Add Clone. If you
leave it blank, the LOGIN NAME will show 【?】 while
running netclone or Add Clone.
IP: Local IP Address setting
23
Command and Modify IP
2.5. Send Data
Data、Command
You can send data to all the online computers as the menu
in the following:
Cancel login: Cancel online status, and back to the 【wait
for login】 situation
Client PC : Set this computer as Client PC, prepare to
receive data.
Send data: send data to all the online computers
Click “send data”, it will pop up the following:
24
Clone card partition options
options’’ data : Select this means to
clone OS-easy card’s options’ data and partition information.
Choose OS
OS:Choose the clone OS
Choose partition
partition:Choose Operating System boot partition or
private data partition
Choose share partition : Choose the sending share data
partition
Totally clone or effective data clone
clone:Choose to send the whole
data or only send effective data (the actual data in the disk)
Click “OK”, pop up the following:
Click “OK”, enter the clone menu.
25
Note:
1) If not choose all the protected partition of this OS, OS-easy
card will prompt “cannot establish Add Clone Talk”.
2) OS-easy card chooses clone every OS one by one in order
to establish Add Clone Talk.
Wake up on lan
lan:Remote start the computers by the Master PC,
you do not need to start client PCs one by one.
Remote shutoff
shutoff:Shut down all the online computers.
Remote reboot
reboot:Reboot all the online computers.
Remote lock : Lock all the online computers’ keyboards and
mouse (except Master PC). This function stops misoperations to the Client PCs during the net clone process.
IP Allocate
Allocate:Based on the Master PC, OS-easy card can auto
add the IP and PC name one by one according the logging
in order. So the PC names and IP addresses will be auto
26
modified.
All the online computers will show in the column, click “Auto
IP Allocate”, set IP and PC name to every computer. And
manually modification is supported.
Adjust: OS-easy card can intelligently adjust options by the
different network environments, which makes net clone in
an excellent status, lose packet, lose connection will never
happen again. The column is as follows:
27
Select “Send packet in the appointed delay time”, the
reference value is “20”, please choose the perfect one.
Chapter 3
Settings
Press 【 F10 】 in the boot menu of OS-easy card, input
supervise password (administrators password), then enter the
OS-easy card’s system settings menu:
28
3.1. Password
Supervise password (Administrators Password)
Input 0 to 10 character, default value is ENTER.
Enter 【settings】、【 supervise mode】、 or 【Add Clone】
function, you must use 【supervise password】.
3.2. Options
29
Choose options, appear the following menu:
1) Boot Sequence: BIOS (default)
(default)/C only
BIOS: OS-easy card boot sequence will follow the setting in
the BIOS.
C only: Computer boots from C. Enabling this setting will
protect your hard disk information from being destroyed in case
the OS-easy card is removed without being uninstalled first. If
the card is removed, the system will warn you that “ lancard
restore card not found”, system cannot start.
2) Auto Restore CMOS settings: Disable (default) / Enable
OS-easy card can protect CMOS settings.
Disable: Default Value
Enable: If CMOS DATA is modified, it will be restored by
the next rebooting.
30
3) Boot link check: Disable (default) / Enable
Disable
Disable:: Not check if there is Master PC when rebooting.
Enable: Check if there is the same group Master PC existed
when rebooting, if have, establish connection at once.
4) Choose the display OS: Disable (default) / choose
Disable
Disable:: Display all Operating System
Choose: Choose the Operating System in the starting menu
5) Boot menu: Show (Default) / hide
Show: Show OS-easy card menu on every start
Hide: Do not show OS-easy card menu.
Note: when this option is selected, please combine with the
default booting partition or the appointed partition, and auto
select the time setting, otherwise, it will stop in the black
screen on every start. Users don’t know how to operate.
6) Boot menu hotkey hint: Show (Default) / Hidden
Show: Show hotkeys on boot menu
Hide: Do not show hotkey.
7) Show brand name: Show (Default) / Hidden
Show: Show brand name 【OS-easy card】 on boot menu
Hide: Do not show brand name. But can wake up by
CTRL+L
8) Default boot partition settings: Disable (Default)
Default)/ Boot
31
partition name
Disable: Users’ selected boot partition to start
Boot partition name
name:: you can choose the select boot
partition on every start.
9) Appoint boot partition settings: Disable (Default)/ Boot
partition name
Disable: Do not force select boot partition.
Boot partition name: This function enables the administrator
to preset the OS-easy card to boot only from a predetermined
partition.
10) Auto select delay time settings: 0(Default)
0(Default)/1~99second
0: Users press 【Enter】 in the start menu to set a boot
partition
1~99s: Auto enters the cursor to exist boot partition when the
set several second have count down
Note: 1. this function is working with the Default Boot
Partition Settings function
2. press 【Space】 during the count down to stop it
11) Auto Power off time settings: 0(Default)
0(Default)/1~60second
0: this function cannot be used
0~60s: system will auto power off if no operation have done
during the start menu
12) Analyze CMOS
32
CMOS is under protection, analyze the CMOS parameter
when there is different between the Master PC and the Client PC
CMOS. Confirm the CMOS is protected, not affect the
computer use.
13) Cancel Add Clone
You cannot change the options in the FDISK if the Add Clone
Talk is established. If you want to modify it, you can choose
Cancel Add Clone Talk. Please be cautious to use.
3.3. DISK INFO
The size setting can not be changed after Save and Exit. To
change the partition size requires you to use FDISK again in
Setup menu. All data in hard disk will be destroyed if FDISK is
used. Changing File Systems is also not recommended unless
you are installing a new OS in that partition. All other fields can
be changed as your will.
3.4. Net Clone
Please refer to chapter 2.
3.5. FDISK
FDISK is for repartitioning hard disk space without
uninstalling OS-easy card.
Note: All the data in the hard drive will be destroyed
permanently. Please think twice before using this function.
(operation please refer to 1.2.2.)
33
3.6. UPDATE
OS-easy card use the drive update method. You can just put
the new drive in, and press 【Enter】, operate as the direction.
Press random key to reboot when show finishing.
3.7. UNINSTALL
Uninstall OS-easy card from this computer.
Uninstall this system, choose “restore uninstall”, uninstall the
system after the hardware data has restored to the last time
status, choose “backup uninstall”, uninstall the system after the
hardware data has been saved!
3.8. ABOUT
34
Information is about OS-easy card’s hardware and software
versions and the card NO., you can check at http://www.oseasy.com
Chapter 4
Add Clone
Add Clone function is a stirring function in the OS-easy card.
If you want to do any modification to all PCs in LAN after
finishing the net clone, Add Clone function can help you to
fulfill it, Add Clone can help you to deploy any changed part of
the Master PC to all the computers in LAN.
35
a) Add new software (like auto CAD, Photoshop…)
b) New software upgrade
c) Uninstall software
d) Install windows patch
e) Upgrade anti-virus software
f) Build every exam environment
g) Modify option settings of software and windows
h) Install client end of the network software
Precondition
recondition:
1) The Add Clone partition must be under protection
2) The OS must be built Add Clone Talk by net clone
function.
4.1. First Operation in One Computer
OS-easy card allows you to install the Add Clone Content in
WINDOWS as the Administrators Mode (Open Mode). And
then you can do other operations.
Enter Master PC with all the Add Clone Content has
installed, reboot the computer, and choose the Add Clone OS
during appearing the OS selecting menu. Press F8, input the
password, and then enter the Add Clone main menu.
36
Enter Master PC, you can start the Client PCs by the Wake
Up On LAN function.
4.3. Part Renewal and Total Renewal
Click Finish Login after all the computers finished
connection. Then you will see the picture as follows:
1) Part Renewal Mode
Please choose Part Renewal Mode if you just do Add Clone to
one group of computers, and you want to do Add Clone to
37
another group in the next time.
2) Total Renewal Mode
Please choose Total Renewal Mode if you do Add Clone to all
the computers in LAN, or confirm another group of the
computers you don’t want to do Add Clone in the next time.
4.4. Clone continuous function
1) During your net clone or add clone data from the Master
PC to the Client PCs, power off the Master PC or any one
of the Client PC, or any malfunctions cause to stop
executing net clone or add clone;
2) Restart PCs when all of them is normal, and execute net
clone or add clone again, it will appear the dialog box of
“do you want to clone from the last break off point?”;
3) Select “yes”, and you can clone from the last break off
point, the last cloned data not need to clone once again,
totally improve the net clone or add clone efficiency.
38
Chapter 5
Master control function
Master control function is realized in windows, which have the
following functions:
Allow/Forbid to use applications
Allow/Forbid client PCs surfing
Wake up on LAN
File Deployment
Monitoring
Remote Recovery Mode Switching
Remote Rebooting /Shutdown
Remote setting parameter
Time synchronizing
The shortcut of this software is as follows:
39
5.1. The installation methods
1) The Master Control software has two ends, the master end
and the client end. Master end is the center to control all
the client PCs. You can first install the client end in sample
PC and add clone it to all the receiving computers, and
then uninstall the client end software, install the Master
end for controlling.
2) Install the Master end in the sample computer, and install
the Client end in every Client PCs one by one, so you can
remote control all the client computers.
40
LINUX Installation
Appendix Ⅰ、LINUX
OS-easy card supports LINUX, the normal versions are
REDHAT6.0-10.0、REDFLAG LINUX2.4. 、Ubuntu 8.0 and so
on.
1. Partition requirement of installing LINUX
First, LINUX must use the B (Backup Restoration) attribution,
File System must be EXT3, and then need to set as P (Private
Data Partition)attribution, File System is SWAP exchange
partition, its size must
be twice of the memory space,
commonly set as Private Data Partition, restore period is 【Not
Use】.
Edit partition in LINUX installation
2、Edit
Put LINUX installation drive in Compact Disc, choose
41
LINUX in the boot menu of OS-easy card, start CD boot to
enter installation.
Note: choose “create custom layout”.
Click “next” after you choose “create custom layout”, system
will hint “format partition as”, select “YES”, pop up edit
partition menu.
Select “ Linux native ” partition, click “ edit ” appears the
42
following:
Then, click “format partition as ext3”, set “Mount Point” as
“/”, click “ok”.
Clicking “continue” is back to edit partition menu, click “next”
hint formatting partition, select “format”. It will enter
“configure boot loader options”.
43
induct loading program settings
3、induct
Enter “configure boot loader options” as follows:
“Configure advanced boot loader options” menu:
In the “install boot loader record on” option, please select
44
“dev/hda1 first sector of boot partition”, otherwise, the LINUX
system cannot induct.
Then, finish LINUX installation by the normal steps.
backup after installation finish
4、backup
In order to restore LINUX system, you have to backup LINUX
after LINUX is installed. Reboot computer, select LINUX
system in the boot menu of OS-easy card, press CTRL+B to
backup system, and all the LINUX installation is finish.
Note: about other versions of Linux installation please refer to
the other Linux installation manual provided by Os-easy
technology.
45


![Fio 2.0 UM ECU [ENG]](http://vs1.manualzilla.com/store/data/005638068_1-6dee15c8bb797972f1fa6aeeeee54189-150x150.png)