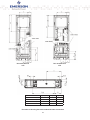
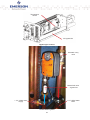
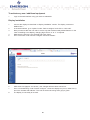
1
Knürr® DCL User Manual Part number 01998440 Revision c Author M. Blass Date 19.01.2015 Reviewed H. Ebermann Date 19.01.2015 Unit configuration number Model number – Part 1/2 1 2 3 4 5 6 D C L 3 0 L D C L 3 4 H D C L 3 0 R 7 8 Model details 9 Part 2/2 10 11 12 13 14 15 16 17 18 19 20 21 22 23 24 25 1.-3. DCL (Data center rack cooling solution) 14. Chilled water monitoring/condensate pump DCL – Data Center Loop 4.-5. Nominal cooling capacity 30 – 30 kW (2,000 mm/42U) 34 – 34 kW (2,200 mm/47U) 6. Type of application 0 – none T – temperature sensor inlet/outlet 4 – calorific meter 5 – condensate pump 6 – temperature sensor inlet/outlet + condensate pump 7 – calorific meter + condensate pump L – closed loop architecture (without external panels) H – hybrid architecture (without external panels) R – in-row cooling (with external panels) 15. Ambience monitoring 7. Depth 1 – 1,000 mm (DCL-R version only) R – 1,100 mm (not for DCL-L version) 2 – 1,200 mm H – 1,300 mm 0 – none S – smoke detection H – humidity monitoring B – smoke detection and humidity monitoring 16. Color 8. Mechanical options 1 – RAL 7021 (gray-black) G – RAL 7035 (light gray) 2 – non standard color (SFA) 0 – none (two units per pallet possible) D – caster bracket (only one unit per pallet with ramp) 9. Electrical connection 2 – 230V AC 1-phase 50/60Hz CE 4 – 230V AC 1-phase 50/60Hz CE with A/B transfer switch A – 230V AC 1-phase 50/60Hz 2-pole CE B – 230V AC 1-phase 50/60Hz 2-pole CE with A/B transfer switch P – 208/230V AC 2-pole 50/60Hz CSA S – 208/230V AC 2-pole 50/60Hz CSA with A/B transfer switch 10. Water connection/hex Z – bottom Y – top 9 – top and bottom V – redundant bottom (valves external) 11. Filter (only for DCL-R) N – no filter A – MERV 1 (NA for 1,000 mm depth) C – MERV 1, clog switch (NA for 1,000 mm depth) 12. Display 0 – none Y – 5.7” display (14.5 cm) touchscreen 13. Preparation for automatic door release system 17. – 18. Free 19. Communication 0 – standard/always present (HTTPS, SSH, MODBUS TCP, SNMP V3) D – input/output customer (8/4) M – Modbus RTU B – Bacnet V – input/output customer + Modbus RTU W – input/output customer + Bacnet 20. Server rack monitoring 0 – none 1 – door contacts for 1 rack 2 – door contacts for 2 racks A – door contacts for 3 racks B – door contacts for 4 racks 3 – 2 temperature sensors for 1 rack 4 – 2 x 2 temperature sensors for 2 racks C – 3 x 2 temperature sensors for 3 racks D – 4 x 2 temperature sensors for 4 racks 7 – door contacts + temperature sensors for 1 rack 8 – door contacts + temperature sensors for 2 racks E – door contacts + temperature sensors for 3 racks F – door contacts + temperature sensors for 4 racks 21. Packaging P – land freight – short distance (pallet, shrink wrap, cardboard protection) S – seaworthy (air freight) – long distance (wooden crate) 0 – none 1 – prepared for one DCM server rack 2 – prepared for two DCM server racks 3 – prepared for three DCM server racks 4 – prepared for four DCM server racks 22. Special features A = no SFAs, standard unit X = SFA included 23. – 25. Factory configuration number 2 Table of contents Unit configuration number 2 Block diagram 4 1 Safety 5 1.1 Safety symbols 5 1.2 Safety notice 6 2 Application conditions 8 3 Description 9 3.1 General function 9 3.2 Modes of operation 9 3.3 Overview and dimensions 11 3.5 Technical specifications 19 4 Unpacking and installation 21 4.1 Unpacking 21 4.2 Securing brackets 26 4.3 Chilled water connection 26 4.4 Control 32 4.5 Condensate drain connection 34 4.6 Electrical connection 35 4.7 Sealing the housing 40 5 Options 41 5.1 Caster bracket 41 5.2 A/B transfer switch 42 5.3 Filter 43 5.4 Chilled water monitoring 44 5.5 Ambience monitoring 45 5.6 Communication 46 5.7 Server rack monitoring 46 6 User interface 47 6.1 Display screens 47 6.2 Web interface 52 6.3 Unit grouping 63 7 Maintenance and repair 67 8 Disassembly and disposal 70 9 Customer service contact and address 70 10 Annexes 71 10.1 Quality requirements for water 71 10.2 Check list for setting up the device 72 10.3 Commissioning protocol 73 10.4 Additional modules - installation procedure 77 10.5 Electrical box connectors description 87 10.6 Performance charts 89 10.7 MIB file structure description 101 3 Block diagram 4 1Safety 1.1 Safety symbols Attention! Danger spot! Safety notice! Hazard by electrical current or high voltage! Caution! Hot surface! Caution! Rotating parts/automatic start! Disconnect from power prior to works! Attention! Refers to possible damage to the device. Hazard by high voltage! Note! Marks possible hazards for the environment. Important note, information! 5 1.2 Safety notice Our engineers can give you comprehensive advice in assembling the Knürr DCL. Extensive material, functional and quality testing grants high benefit and a long life cycle. Nonetheless, such devices may cause hazards if improperly handled by untrained personnel and if used for purposes they are not intended for. Carefully read this assembly and operational manual prior to assembling and commissioning the Knürr DCL. The electrical equipment corresponds with applicable VDE and accident prevention regulations. There are hazardous voltages (higher than 50V AC or higher than 100V DC): - behind cabinet doors - at the fans and their hook-ups Use genuine fuses for the specified current. Immediately switch OFF the device if there is any disturbance in the electrical supply or in the cold water supply. Hazard by high voltage. Maintenance and cleaning works are only permitted to be performed by trained personnel, whereby such personnel must make sure that the device is free from voltage at the time of maintenance and cleaning. Therefore, prior to any works, the device must be taken out of operation in accordance with instructions. Internal sockets shall be used by authorized personnel only. Hazard by works on the device carried out by non-experts. Maintenance and cleaning works are permitted to be performed by trained personnel only. In order to keep the device in operationally safe condition and its long life cycle, maintenance and cleaning intervals must be observed by all means. Operate the Knürr DCL in accordance with its specified purpose, within its limits of capacity and approved operating means only. When performing any works on and with the device, please observe: • any respectively applicable regulations (e.g. VDE regulations or other nationally applicable guidelines) • any applicable accident prevention regulations • any respective provisions • any applicable environmental protection acts Operate the device in its proper condition only. In the event of functional disturbances or deficiencies, the device must immediately be taken out of operation and the operator’s responsible person must be informed of its state. The device must be taken into operation again only after the flawless function of the device has been restored. 6 Caution! Hot surface! Defect fans, power supply units or control boards may have run hot. Allow them to cool down prior to any works. 7 2 Application conditions Appropriate use The device is an add-on/in-row cabinet for circulation cooling and is used only for the removal of heat from server cabinets to protect temperature-sensitive components. The cooling system (cabinet – Knürr DCL) works thermally independently of the room air or as an open system in conjunction with open server racks. The total heat load issued from the installed equipment is taken out to be absorbed by a chilled water circuit in the building. For reliable function of the Knürr DCL, chilled water must be available in an appropriate amount, at the appropriate temperature and pressure. The water quality must be in accordance with the table on page 65 (see Annex). One of the fans must be running at all times (at least at minimum speed)! If this requirement cannot be met, the chilled water supply must be stopped! This requirement is crucial for the proper function of the device! Ambient temperature at the site of installation (air supply side) 10°C to 35°C (40°F to 95°F) (other temperatures upon request) Absolute humidity at the site of installation Recommended 8 g H2O/ kg air Water temperature, feed 4 - 20°C Nominal capacity at 10°C (50 °F) feed 16°C (61 °F) return Use of anti-freeze in chilled water Not recommended (upon request) Water connection Top or/and bottom (see Unit code) Condensed water connection Top or/and bottom (see Unit code) Max. operating pressure 10 bar (145 psi) 8 3 3.1 Description General function The Knürr DCL is a chilled water cooling unit to be installed side by side with racks. Its modular design permits to be added on to the right, to the left or to both sides, and also centrally between two server racks to be cooled. There is the possibility to adjust the air flow pattern using a modular panel system. The Knürr DCL complies with the conditions of EN 60950. Heat emitted by installed equipment (e.g., servers) is reliably removed using the cold water system integrated in the Knürr DCL. The cooling system is entirely safe in itself, so that water is prevented from ever entering the server area. Air that has been heated by the server (to, e.g., 35°C) is led through the laterally arranged wall openings or through the rear door to a special air/water heat exchanger. The heat is absorbed there and the air is cooled down to, e.g., 20 - 25°C. The cooled air is now provided again by speed-controlled fan boxes at the front of the server. Thereby, non-return flaps prevent any re-circulation within the fan boxes. The chilled water is provided by a water chiller installed in the building. Below the heat exchanger, there is a tray for collecting condensed water, with a 5/8” outlet. The Knürr DCL can optionally come with a condensed water pump to pump the possibly accumulating condensed water into the existing drainage system. Attention! The Knürr DCL works only if the cold fresh air supplied to the server and the heated return air from the server have fully been separated. Height units not in use have to be sealed by blanking panels. 3.2 Modes of operation Closed loop mode of operation DCL-L The closed-loop mode of operation completely contains cooling air. This solution is suitable for higher densities. 9 Hybrid mode of operation DCL-H The hybrid mode contains the hot air released from the servers while the cold air is released into the installation area. This mode supports the “cold room” concept - no heat is released into the room. In-row mode of operation DCL-R The in-row mode of operation draws the air out of and releases it into the installation area. This setup is suitable for lower heat densities. In all the above scenarios, multiple units can be used to cool one rack (to gain desired levels of redundancy) or a single unit may be used for multiple racks if desired. 10 In the event of any failure of the cooling plant, the server cabinet doors are to be opened (H and L versions) in order to avoid any heat from piling up inside the rack housing. In such a case, the heat is discharged as thermal load to the ambient room of installation. (Automatic opening is optional.) In the event of any failure of the Knürr DCL fans, the doors are to be opened in order to avoid any heat from piling up inside the housing. In such a case, the heat is discharged as thermal load to the ambient room of installation. Note: The server rack can optionally be provided with automatic door opening, which would facilitate the use of ambient air for cooling the server temporarily. For maintenance purposes, both the front and the rear doors can be opened jointly or separately. However, cooling of the equipment must be guaranteed. 3.3 Overview and dimensions DCL 30 Nominal cooling capacity* Air flow (without filter) Water flow Max. water pressure Number of fans Fans power consumption Dimensions (WxDxH) Heat exchanger internal fluid volume DCL 34 30 kW 34 kW 5,000 m /h (2,943 cfm) 6,000 m /h (3,532 cfm) 4.5 m3/h (20 gpm) 5.0 m3/h (22 gpm) 10 bar (145 psi) 10 bar (145 psi) 5 6 5x170 W 6x170 W 300xD**x2,000 [mm] 300xD**x2,222 [mm] 10.72 l (2.83 gal.) 11.93 l (3.15 gal.) 3 3 * Sensible cooling, at 10°C/16°C (50°F/61°F) water temperature, and 37°C (100°F) air inlet temperature ** Depends on unit configuration – see unit configuration number (dimensions 1,000mm, 1,100mm, 1,200mm, 1,300mm) 11 4 5 1 2 10 7 3 12 8 2 6 3 9 2 3 11 13 15 16 14 17 Knürr DCL cross-section 12 12 Nr. Description 1 Electronics MCB 2 Fan groups (5 or 6 fans total – depending on version) 3 Fan group MCB 4 ID tag 5 Electronics box 6 A/B transfer switch 7 Display 8 Fan inlet rings (one for each fan) 9 Heat exchanger 10 Chilled water connection top (see unit code) 11 Chilled water connection bottom (see unit code) 12 Condensate pump (option) 13 Air filter (option) 14 Casters (option) 15 Levelling feet 16 Stabilizer bar (option) 17 Condensate pump flow switch Table contains optional features. Please see unit configuration number. Component location Frame depth Dry net weight +/- 5% DCL 30 DCL 34 1,000 mm 162 kg / 356 lb 180 kg / 396 lb 1,100 mm 166 kg / 356 lb 184 kg / 405 lb 1,200 mm 170 kg / 374 lb 188 kg / 414 lb 1,300 mm 174 kg / 392 lb 192 kg / 423 lb Land freight packaging +40 kg / 88 lb +40 kg / 88 lb Seaworthy packaging +125 kg / 276 lb +125 kg / 276 lb Unit weight 13 14 1,000 1,200 1,100 1,300 H2,000 W300 D1,000 H2,000 W300 D1,200 H2,000 W300 D1,100 H2,000 W300 D1,300 30 kW unit drawing T1 [mm] Dimensions 222 222 222 122 T2 [mm] 15 1,000 1,200 1,100 1,300 H2,200 W300 D1,200 H2,200 W300 D1,100 H2,200 W300 D1,300 34 kW unit drawing T1 [mm] Dimensions H2,200 W300 D1,000 222 222 222 122 T2 [mm] DCL 34 2,222 mm unit Dimensions DCL 30 2,000 mm unit Depth [mm] T2 [mm] K [mm] H2,000 W300 D1,000 1,000 122 382 H2,000 W300 D1,200 1,200 222 482 H2,000 W300 D1,100 1,100 222 382 H2,000 W300 D1,300 1,300 222 482 Possition of leveling feet and condensed water connection 16 Depth [mm] X [mm] 1,000 97 1,100 197 1,200 197 1,300 297 Floor cutout dimensions REAR Chilled water connection location - single feed heat exchanger 17 +X +X REAR SIDE Chilled water connection location - redundant heat exchanger (top view) Depth [mm] X [mm] 1,000 -100 1,100 0 1,200 0 1,300 100 Pipe position - redundant heat exchanger 18 The air inlet/outlet opening must be kept unobstructed to guarantee free air circulation all the time. Do not cover them by separate installation, such as socket strips. 3.5 Technical specifications Housing material Frame of aluminum profile/steel sheet, galvanized and powder-coated Ambient temperature range 10°C to 35°C (40°F to 95°F) Absolute humidity Recommended 8 g H2O/kg air Cold air outlet after heat exchanger 20 - 25°C acc. to ASHRAE Temperature difference via server Approx. 15K, depending on server equipment Chilled water Cooling capacity depending on number of fans: 30 kW (5 fans) and 34 kW (6 fans) Chilled water temperature, feed 4 - 20°C Nominal capacity at 10°C/16°C (50°F/61°F) water temperature, and 37°C (100°F) air inlet temperature Max. operating pressure, chilled water 10 bar (145 psi) Connection feed/return 1 ¼”, male thread (ISO 228) – union connection (flat sealed) 19 20 Number of fans - 5 6 Effective cooling capacity kW 30 34 2,222 2,000 mm Height 300 300 mm Width m3/h 4.5 5.0 mm 1,000 1,100 1,200 1,300 1,000 1,100 1,200 1,300 Depth Chilled water flow 62.0 51.0 kPa Pressure loss DCL 8.3 6.8 kPa Pressure loss connecting set 16 / 3 x 2.5 (C type tripping characteristic) 16 / 3 x 2.5 (C type tripping characteristic) 230V AC 50/60Hz 208 / 230V AC 50/60Hz 230V AC 50/60Hz 208 / 230V AC 50/60Hz m3/h 6,000 5,000 A/mm2 V/Hz Air flow External power supply / fusing Electrical connections 4 Unpacking and installation 4.1Unpacking Warning! Risk of top-heavy unit falling over. May cause equipment damage, personal injury or death. Read all of the following instructions before attempting to move, lift or remove packaging from the Knürr DCL. Caution! Risk of sharp edges, splinters and exposed fasteners. May cause personal injury. Only properly trained and qualified personnel wearing appropriate safety gear (follow local health and safety regulations) should attempt to move, lift or remove packaging from the Knürr DCL or prepare the unit for installation. Notice! Risk of overhead interference. May cause unit and/or building damage. The unit may be too tall to fit through a doorway while on the pallet. Measure the unit and doorway heights and refer to the installation plans to verify clearances prior to moving the unit. Notice! Risk of improper unit storage. May cause unit damage. Keep the unit upright, indoors and protected from dampness, freezing temperatures and contact damage. All the packaging material is recyclable. Please save this material for future use or dispose of it in accordance with local waste policy and laws. Before unpacking the Knürr DCL, verify that the delivered equipment matches the bill of lading. Examine the packaging for any signs of mishandling or damage. Inspect all items for damage, visible or concealed. Immediately report any damage to the carrier and file a damage claim. Send a copy of the claim to Knürr or your Knürr representative. Transport the packaged Knürr DCL using a forklift, pallet jack or a crane with slings and spreader bars rated for the weight of the unit. See table in chapter 3.3 for unit weights. • If using a fork lift or pallet jack, make sure the forks (if adjustable) are spread to the widest possible distance that fits under the pallet. Make sure the fork length is suitable for the pallet length. • When moving the packaged unit with a forklift or pallet jack, lift the unit from either end of the pallet. • WARNING. Risk of improper handling or moving. Can cause equipment damage, injury or death. When handling the packaged Knürr DCL with a forklift or pallet jack, do not lift it any higher than 4” (102mm) off the floor. Any personnel not directly involved in lifting the unit must be at least 12 ft (3.7m) from the unit. List of required tools Phillips screwdriver PH1, PH2 Hexagonal key 6mm (Allen) Utility knife Flat-bladed screwdriver Hexagonal socket screwdriver 8mm (Allen) Torx screwdriver T20 Open-jawed/ring wrench 8mm Magnet or a tool a with magnetic tip Open-jawed/ring wrench 7mm (for activating hall sensors) Open-jawed/ring wrench 13mm Hose with Schrader valve for bleeding 21 Wooden crate disassembly 1 2 Locate and remove all the bolts holding the side walls of the crate together. The number of bolts may vary. Take all the side panels off. Two people are required to do this. 2 Rolling the unit off the ramp 1 Use the utility knife to cut the shrink wrap. Remove cardboard protectors. 2a 1 22 2 Locate the ramp, detach it and place it in the designated position. 2b 2c 23 1 2 3 4 Use the open-jawed/ring spanner to undo the bolts securing the unit to the pallet. (Please note that from this moment on the unit is not secured to the pallet and is prone to tilting.) Align the holes in the ramp with the holes in the pallet. Use three of the four bolts to secure the ramp to the pallet. Remove the wedges. Roll the unit off the pallet. Two people are required to do this. 1 2 3 4 24 Unit positioning 1 2 3 4 Roll the unit into the desired position. Use the 8mm open-jawed/ring spanner to detach the stabilizer bar from brackets. Use the 8mm open-jawed/ring spanner to detach the brackets from the unit frame. Adjust the leveling feet using a hexagonal key. 2a 2b 3a 3b 4 The built-in casters allow rolling the Knürr DCL into position for installation. The stabilizers reduce the likelihood of the unit tipping over. These stabilizers must be removed before the unit is positioned in the row (use the hexagonal socket screwdriver – 8 mm). The adjustable leveling feet prevent moving after positioning. Once positioned, the Knürr DCL must be secured either to the floor with the included shipping brackets or to an adjacent cabinet. 25 4.2 Securing brackets The Knürr DCL and the added-on server cabinet or cabinets are bolted with each other by means of the connecting set in order to reach the required stability. Available securing brackets are shown in chapter “Accessories”. Securing bracket between DCM and DCL 4.3 Chilled water connection Notice! Risk of water leakage. Can cause severe property damage and loss of critical data center equipment. This unit requires a water drain connection. Improper installation, application and service practices can result in water leakage from the unit. Do not locate the Knürr DCL directly above any equipment that could suffer from water damage. Emerson recommends installing leak detection equipment for the unit and supply lines. Notice! Risk of corrosion. Can cause equipment damage. Read and follow the individual unit installation instructions for precautions regarding the fluid system design, material selection and use of field-provided devices. Knürr systems contain iron and copper alloys that require appropriate corrosion protection. Contact a local water consultant regarding water quality, corrosion and freeze protection requirements and follow their recommendations for the monitoring and treatment of the water/coolant fluid. The water chemistry varies widely by location, as do the required additives or inhibitors that reduce the corrosive effect of the fluids on the piping systems and components. The chemistry of the water used must be considered, because water from some sources may contain corrosive elements that reduce the effectiveness of the inhibited formulation. Chilled water that is classified as soft and that is low in chloride and sulfate ion content should preferably be applied. Proper inhibitor maintenance must be performed in order to prevent corrosion of the system. Consult the glycol manufacturer for the testing and maintenance of inhibitors. Commercial ethylene glycol (e.g., Union Carbide Ucartherm, Dow Chemical Dowtherm SR-1 and Texaco E.G. Heat Transfer Fluid 100), when pure, is generally less corrosive to common metals of construction than water itself. It will, however, assume the corrosivity of the water from which it is prepared and may become increasingly corrosive with use if not properly inhibited. 26 All the control and measuring armatures are installed within the Knürr DCL. Their connection is made about 10 - 20 cm above the bottom (or at the top) of the Knürr DCL. By closing the internal ball valve the configuration can be changed from a 3-way valve to a 2-way valve. Field-installed piping must be installed in accordance with local codes and must be properly assembled, supported, isolated and insulated. All piping below the elevated floor must be arranged so that it offers the least resistance to airflow. Careful planning of the piping layout under the raised floor is required to prevent the airflow from being blocked. When installing piping in the raised floor, Knürr recommends installing the pipes in a horizontal plane rather than stacked one above the other. Whenever possible, the pipes should run parallel to the airflow. Condensate piping — field-installed • Do not expose the drain line to freezing temperatures. • The drain line must comply with local building codes. • Emerson recommends installing under-floor leak detection equipment. Requirements of systems using water or glycol These guidelines apply to the field leak checking and fluid requirements for field piping systems, including Knürr chilled water circuits. General Guidelines • Equipment damage and personal injury can result from improper piping installation, leak checking, fluid chemistry and fluid maintenance. • Follow local piping codes and safety codes. • Qualified personnel must install and inspect system piping. • Contact a local water consultant regarding water quality, corrosion protection and freeze protection requirements. • Install manual shut-off valves at the supply and return line to each indoor unit to permit routine service and emergency isolation of the unit. NOTICE Risk of no-flow condition. May cause equipment damage. Idle fluid allows sedimentation that prevents the formation of a protective oxide layer on the inside of tubes. Keep the unit switched ON and the system pump operating. NOTICE Flexible pipe connection When using top CW connection, please consider using flexible pipes. We recommend using flexible pipes to reduce strain to the roof panels. Notes for closed-circuit applications The installation in the picture below is for the purpose of illustration only; for individual installations follow the project diagram. • Install a pump system calculated on the basis of the flow and total head of the system (see site plan data). • Insulate both pipes. • Very important: Add anti-freeze to the circuit when the ambient temperature falls below 0°C (32°F); refer to the Knürr DCL technical data manual, SL-11978, page 65. Do not exceed the nominal operating pressure of the circuit components. • Bleed the circuit. It is recommended to use a hose for bleeding the system because there is the risk of water being sprayed over the optional A/B transfer switch or other electronic appliances located in the vicinity. 27 • Gravity drain — units without factory-installed condensate pump. • 3/4” FPT drain connection is provided to units without an optional factory-installed condensate pump. • Pitch the drain line toward the drain at a minimum of 3mm (1/8”) per 300mm (1 foot) of length (1%). • The drain is trapped internally. Do not trap the drain outside the equipment. • The drain line must be sized for a flow of 15 l/h (0.07 gpm). Knürr DCL Bleeding point location NOTICE In case your unit comes with a redundant chilled water supply heat exchanger. The internal piping is 1” and the chilled water valves have to be installed outside of the unit. 28 To prevent condensate from building up on the water connection pipes, cover them with appropriate insulation. Insulation thickness: “F” (9-12mm) at λ = 0.037 W.m-1.K-1 (10°C) National pipe thread conversion kit (for use in US only) In case on site piping provides national pipe thread (NPT), it is possible to connect the unit using the optional conversion kit. The conversion kit consists of a pipe adaptor and sealing material. The NPT site is to be sealed with Teflon tape and the ISO 228 site with a flat sealing. NPT adaptor 29 Heat exchanger Temp sensor Bypass ball valve 3-way valve Hydraulic schematic 30 Dual feed heat exchanger (optional) In case an extended redundancy is required the unit can be equipped with dual-feed heat exchanger which allows two chilled water circuits to feed the coil at the same time. All connection points as well as the service ports are then doubled (i.e. two sets of bleeding/drainage ports, two sets of ports for additional equipment and two sets of temperature reading pockets). Piping diameter is reduced from 5/4” to 1” diameter (connection remains at 5/4”). In case one chilled water feed fails the unit can still provide sufficient cooling capacity (the percentage depends on chilled water flow rate of the remaining circuit and permitted air supply temperature increase. Chilled water control valves and bypass lines have to be installed outside (e.g. raised floor). Bleeding - A feed Return - B feed Pressure reading point 2 - A feed Temperature reading slot 2 - B feed Bleeding - B feed Pressure reading point 2 - B feed Temperature reading slot 2 - A feed Return - A feed Temperature reading slot 1 - B feed Pressure reading point 1 - B feed Draining - B feed Temperature reading slot 1 - A feed Supply - B feed Pressure reading point 1 - A feed Supply - A feed Draining - A feed 31 4.4Control The main task of the control is to provide constant temperature conditions to the installations in the server cabinet at varying loads as well as to run the supporting system in an energy-saving mode. Another task is the comprehensive visualization and transfer of the monitored parameters, with process decisions derived to guarantee availability; everything in view of data exchange and access via the network. A series of control and monitoring options complements the basic concept for all applications that occur and that are to be safeguarded. The temperature is controlled depending on the temperature inside the server cabinet. Fan control The fan speed is controlled by air temperature sensors (three supply sensors or three return sensors). The air temperature is constantly monitored and the fan speed is adjusted accordingly to provide a sufficient amount of cooling air. Any sensor can be selected as a control sensor (see the web interface chapter 6.2). The fan speed may be set either manually or automatically. The minimum fan speed is 25%. For closed loop units (DCL-L and DCL-H), there is a bypass pipe with a temperature sensor running from back to front. This solution allows indirect monitoring of the pressure difference and accurate fan speed adjustment to provide a sufficient amount of cooling air. Return Supply Return and supply temperature sensor location Chilled water valve control A 3-way or 2-way valve (manually adjustable) adjusts the chilled water flow to modify the cooling capacity. This is to avoid low temperatures during operation at partial load. In the event of failure, the valve will close and the entire volume flow will be run via the bypass. To keep the desired temperature on the air supply side, the valve controls the water flow between 0% and 100% of the designed flow rate (distribution and quantity control). 32 Temperature sensor Air bypass line Bypass pipe location Actuated 3-way valve Manual ball valve – bypass line 1 1/4” chilled water supply 1 1/4” chilled water return Chilled water system 33 4.5 Condensate drain connection Condensation may occur during the operation of the Knürr DCL unit. For draining such condensed water, a 5/8” condensed water connection is provided with both the condensed water tub and the condensate pump (optional). When connecting the condensed water tube, take care that the condensed water line is connected to a siphon trap with a self-filling non-return valve and that the condensed water line is inclined. The level of installation of the respective siphon trap must be designed for negative or excess pressure of 300 Pa, respectively, so that sucking in air or releasing it from the sewage system is prevented. The condensed water is drained de-pressurized or optionally by means of the condensate water pump. Heat exchanger Condensate tray LWD sensor Condensate management system Condensate pump location 34 Pump performance Head (ft) Flow (gph) Head (m) Flow (l/h) 1 2.5 0.3 9.5 5 1.5 1.5 5.7 10 1 3.0 3.8 15 0.7 4.6 2.6 20 0.6 6.1 2.3 * To ensure proper condensate drainage, please keep the unit level or slightly inclined to the front. 4.6 Electrical connection WARNING. Risk of arc flash or electric shock. May cause injury or death. Disconnect all local and remote electric power supplies and wear appropriate personal protective equipment per NFPA 70E (or any other local safety regulations which may apply) before working within. Therefore, take the cabinet out of operation prior to assembly and secure it against unauthorized re-connection. The device must be connected electrically by authorized personnel (electrically skilled staff) only. Make sure that during such connecting works the cabinet remains free from voltage and is secured against being switched ON by unauthorized parties. Internal sockets must be used by authorized personnel only. As soon as all precautions for assembly have been taken, you may start installing the electrical connection. Check if the voltage and frequency as indicated by the manufacturer as well as pre-fusing meet the requirements as specified on the nameplate. 35 Electronics MCB Fan group 1 MCB Fan group 2 MCB Fan group 3 MCB Electrical connections For connection of the device to power • Switch the main switch OFF (superior circuit breaker). • Derive the connection scheme from the power flow diagram. • Check for safe grounding. 36 Put the DCL into operation again in accordance with instructions. Switch all automatic safety cutouts ON. The device fans start turning clockwise. Warning! Risk of electric shock. May cause injury or death. This unit has high leakage current potential. Proper grounding as per national and local codes is required before connection to electric power supply. The lithium battery must be exchanged by the manufacturer only. The battery is soldered to the control PCB. Caution! Explosion hazard. Automatic door opening power supply circuit breaker QF9 Electronics power supply circuit breaker QF8 Mains connection terminals* X3 Fans power terminals XHM 1 Electrical connection terminals For cable routing, there are two pipes running alongside the electronics box from front to back of the unit. * In case your unit is equipped with the optional A/B transfer switch, these terminals come pre-connected. In such a case, your connection point is the A/B transfer switch at the back of the unit. (Terminals X1 and X2 - see chapter 5.2) 37 Single pole version 230 V / 50 Hz (60 Hz) Dual pole version 208/230 V / 50 Hz (60 Hz) Electronics circuit breaker 1 x ABB S201-C6 Number of poles: 1 Tripping characteristic: C Rated current (In): 6.00 A Rated operational voltage (Ue): 230 V AC Rated short-circuit capacity (Icn): 6.0 kA Degree of protection: IP20 1 x ABB S202-C6 Number of poles: 2 Tripping characteristic: C Rated current (In): 6.00 A Rated operational voltage (Ue): 208/230 V AC Rated short-circuit capacity (Icn): 6.0 kA Degree of protection: IP20 Fan circuit breakers 3 x ABB S202-C6 Number of poles: 2 Tripping characteristic: C Rated current (In): 6.00 A Rated operational voltage (Ue): 208/230 V AC Rated short-circuit capacity (Icn): 6.0 kA Degree of protection: IP20 3 x ABB S201-C6 Number of poles: 1 Tripping characteristic: C Rated current (In): 6.00 A Rated operational voltage (Ue): 230 V AC Rated short-circuit capacity (Icn): 6.0 kA Degree of protection: IP20 Circuit breakers 38 Modbus line 2 Modbus line 3 Modbus line 4 Electronics connection terminals * Description of the connectors is shown in the Annex Put the Knürr DCL into operation again in accordance with instructions. Switch the main switch ON. Switch all automatic safety cutouts ON. The device fans start turning clockwise. This device has no main switch, a switch must be installed in the building’s electrical network. Please use a 16A pre-fuse (MCB) according to the wiring scheme. (EN 60950-1, 3.4.3) Typical EU voltage levels 230 V AC (1ph – 50 Hz/60 Hz) Typical other voltage levels 208/230 V AC (1ph/2ph – 50 Hz/60 Hz) Nominal current (30kW/34kW) 9.1 A / 10 A Short circuit current rating 6 kA 39 4.7 Sealing the housing In order to guarantee optimum cooling performance, the housing must be sealed as follows: • Use the provided connecting kit to seal the seams between cabinets (kit contains - connecting brackets, horizontal and vertical foam sealing strips, plastic sealing strips for the frame gap). • Seal cable outlets by applying foam or similar material. • Keep air between the cold and warm sides of the Knürr DCL and the server cabinet thoroughly separated. Horizontal strip Connecting bracket Frame-gap strip Vertical strip Horizontal strip 40 5 5.1 Options Caster bracket The unit can be ordered with optional caster brackets which allow for easy movement around the installation area. The unit equipped with casters also comes with stabilizers to prevent the top-heavy unit from toppling over. However, a unit ordered with casters can be shipped one per pallet only. Levelling foot Caster Stabilizer bar Servicing and maintenance shall be performed by properly trained personnel in accordance with applicable regulations as well as manufacturers’ specifications only. 41 5.2 A/B transfer switch The A/B change-over circuit offers the possibility to supply the Knürr DCL control equipment and fans from two independent mains supplies. The switch works automatically. It is located at the back of the unit. There are two cables to connect the Knürr DCL to the external mains. These cables are connected to the internal circuit of the cabinet by terminal X ( X1:1 = phase, X1:2 = neutral , X1:3 = PE for mains A and X2:1 = phase, X2:2 = neutral , X2:3 = PE for mains B ). Please observe the recommendations regarding external fusing. The changeover circuit itself consists of contactors Q11 to Q14. Q11 is an auxiliary contactor that presets the circuit to supply power from mains A (if both mains supplies are powered up). Only in the case that power from mains A is OFF, the circuit automatically switches to mains B. When powering up mains A again, the circuit automatically switches back to mains A. Change-over time is about ten milliseconds. The interruption causes no “power failure” alarm signal. It only shows which supply is powering the unit. Main contactors Q12 and Q13 are mechanically coupled by part Q14 (the new version comes without Q14), which ensures that only one of the main contactors is closed. The phase and the neutral wires are switched. All internal equipment is connected to the output of the A/B change-over circuit. That means that there is redundant supply to the fans and the fan control unit. B feed connection point A/B transfer switch – internal components 42 A feed connection point 5.3Filter A G1-class air filter is available to provide air purification. The unit can additionally be equipped with a filter clog switch to detect dirty filters to be replaced. The filter is mounted in the back of the unit on metal brackets (see pictures). Air filter bracket Air filter clog switch 43 5.4 Chilled water monitoring For managing the chilled water system, including potential condensation, the unit may come equipped with several devices: • temperature sensors, • a flow meter (pressure difference), • a condensate pump. The pipework of the Knürr DCL is equipped with flanges that allow connecting additional equipment. There are two flanges on the pipe before the heat exchanger and two on the pipe after the exchanger. These are intended for bleeding and pressure measurements. There are also two ports (one before and one after the heat exchanger) for measuring the temperature. Temperature reading point Pressure reading point Drain point/ air bleeding point The pressure difference provides the value for the flow rate of the chilled water. And, jointly with the temperature difference of the chilled water, the cooling capacity can be calculated based on the calorific formula. All sensors come prewired. The information obtained is shown on the display (or in the web interface). The pressure difference sensor is attached to the aluminium frame in the back of the unit (see picture below). 44 Pressure difference sensor The condensed water pump is described in chapter 4.5. 5.5 Ambience monitoring For monitoring the ambient conditions, the unit can be ordered with a smoke detection sensor (optical) and a humidity monitoring sensor. The sensors are located at the back of the electronics box at the rear of the unit (on the return air side). The values obtained are shown on the display and/or in the web interface. Smoke detection Humidity monitoring Ambience monitoring sensors 45 5.6Communication Various communication protocols are available. • TCP/IP – standard, always available (SNMP up to V3, HTTP and HTTPS) • 8/4 Digital I/O for customer specific application • Modbus RTU ... and their combinations (see unit configuration number). Ports are accessible from the rear side of the unit. Top LAN port has IP address 192.168.0.88, the bottom one has IP address 192.168.254.88. Communication connection 5.7 Server rack monitoring As the unit is based on the same platform as the Knürr DCM racks and is intended to be used alongside such racks, there are options available for adjacent racks. See unit configuration number – digit 20. - - Door contacts Temperature sensors The connection status of sensors is then shown on the display and/or in the web monitoring interface (see chapter 6). 46 6 6.1 User interface Display screens The display of the unit is a color touch screen. Three languages are currently available. For accessing the user interface on the display, enter “user” as the user name and “1111” as the password. Please note that temperature-sensor value of -30°C indicates a faulty sensor. After having selected your language, you can proceed to various menus. User menus provide a basic overview of the operational mode of the unit. In order to proceed to higher levels (Admin, Service, Default settings), you need to select the desired level from the touch-screen menu and enter the relevant user name and password. Using an incorrect user name and/or password will cause an error message. 47 There are some basic screens available for the user. See pictures below. Hours run Indicates how many hours each fan has run – for ease of maintenance. Diagrams Graphical representation of temperatures, etc. Information Displays information on controllers and the firmware version. Alarm history Shows information about past alarms and their duration. Active alarms Displays currently active alarms. Status global Provides information on all cooling units in the group. Status Displays multiple pages about the current unit and its remote sensors (if active); use left or right arrow keys for navigating through the pages. 48 49 50 51 6.2 Web interface The CoolCon control serves the control of air conditioning and the monitoring of the Knürr DCL and the server cabinets attached to it. It is a modularly expandable monitoring and control system. The basic variant enables the monitoring of up to four fan racks, a leakage sensor, temperature sensors for supply and return air as well as air conditioning of the cabinet. Thereby, the chilled water flow is adjusted to the required cooling by means of a control valve; the fan speed is likewise variable. A 10/100MBit Ethernet connection is available for communication to support TCP/IP, HTTP(S), FTP, SNMP (up to V3) and NTP protocols. It is configured and monitored via an integrated Web server, an FTP server as well as an SNMP agent. To access the web interface, please enter “user” as the user name and “1111” as the password or enter “admin” as the user name und “knuerr” for administrator level access. Please note that temperature-sensor value of -30°C indicates faulty sensor. User section DCL3x Global status All devices in the group are displayed in “DCL grouping”. Change to the status page of the respective DCL by clicking on the device name. 52 DCL3x Unit status Shows the current status of the Knürr DCL. This screen shows equipment actually installed on the unit. Alarm boxes: green = normal, red = alarm Input 1 - 8: Digital inputs (option digital I/O) Output 1 - 4: Digital outputs (option digital I/O) Fan speed in %: the actual value of the fan controller Valve opening in %: the actual value of the valve controller Hand icon appears when the respective controller is operating in manual mode DCL3x Rack status Displays devices connected to the DCM server racks. Content depends on the actual situation. 53 DCL3x Alarms List of active alarms with the option of displaying the alarms history (with a time stamp) and an export option (under ‘History’) DCL3x Firmware/software information Displays various system information and documents (Manual, MIB file, spare parts list, circuit diagram, etc.). This page is displayed for three sec after the first login; it will then switch on to the “Status” page. The “Snapshot” button saves the current status of the unit in a file for service purposes. 54 Admin section DCL3x Alarm settings This matrix determines where the alarm groups will be sent – to traphost, e-mail, sms, etc. General Alarm button (summary alarm): General alarm settings. General alarm settings Here you can select which alarm groups will trigger the general alarm/general alarm relay. Summary alarm settings Under summary alarm settings all the events are grouped into logical groups. By selecting particular group you gain access to detailed settings for this group of events. 55 Summary alarm settings Within the group you can select whether the particular event is going to be treated as info, warning, alarm or critical. And if this event will trigger the alarm relay (please refer to chapter 10.5 - XPFC contact). DCL3x User alarms This screen allows you to create your own logic using the outputs of the various sensors on the unit (temperature measurements, door contacts, etc.) in order to create your own events. There are two levels of logic creation. The “result” of the first level is handed on to the second level. 56 DCL3x User alarms 1 DCL3x User alarms 2 57 DCL3x Network setup Here you can change the IP addresses of LAN ports 1 and 2 (static IP) or, if a DHCP server is present, you can use dynamic addressing. The IP address of port 2 is changed based on the grouping mode automatically and should not be changed manually. DCL3x SNMP setup Settings for SNMPv3 can be changed here. SNMPv3 users can be created and deleted. Trap recipients can be defined – it can use various security settings, such as MD5/SHA or DES/AES. 58 DCL3x E-mail setup Here you can set email recipients and send a test e-mail by pressing the “Test” button. DCL3x SQL setup Configuration of the internal SQL client. This can be used to write values into an external database, featuring MySQL, MS-SQL or Oracle support. 59 DCL3x User accounts Up to eight users can be created. Three user levels (user, admin, service) are available with different rights.To delete a user account, related password needs to be used. DCL3x Time settings Time can be set manually or using a time server. 60 Service section DCL3x Controller settings Settings of the fan and valve controllers. Manual or automatic mode can be selected. Manual input values will be used in manual mode. Kp, Tn, Tv: Values for PID controller, should not be changed Rule sensor: Choice of the sensor used for the control Speed max/min: Limit fan speed Valve limits: Limit the valve control range Scaling, control direction, interval: Do not change – these are constant values for components in use. 61 DCL3x Operation hours Shows hours of fan operation. Will be reset after fan replacement. DCL3x Bus power internal This allows you to reset the electronic fuses after an unexpected error/event (interrupted cable, replacing the module, etc.) 62 6.3 Unit grouping Running the units in “group” mode is highly recommended for rack cooling or when using a containment solution (e.g., Smart Aisle). In the group regime, the fan speed regulation (only) is handled by the group’s master unit. Chilled water valve regulation is autonomous for each unit. The master unit collects sensor data from all selected “slave” units (step 5) and sets the regulation parameters accordingly. In case the master unit fails, all of the units revert to autonomous operation (“single” mode) using their respective settings. Up to 32 units (1 master + 31 slaves) can be in one group. The size of the group should reflect the actual physical arrangement of the units (usually up to 12 units). We suggest to divide the units into the groups based on which rack or row or containment they belong to. If you have any doubts please contact your respective service organization. Group connection and communication is always handled via LAN port 2. LAN port 1 is used for connecting the units to the customer network (monitoring etc.) or to a computer (service purposes). It is possible to use only one switch for these connections. However, it is possible to use two separate network switches – one for the grouping (LANs 2) and one for the monitoring (LANs 1). To create a group Steps 1 and 2 describe LAN 1 network creation. When you are configuring a group mode for units with an existing LAN 1 network, you can skip steps 1 and 2. 1 Prepare a layout (drawing) of your data center/computer room and plan out the groups. 2 Before you connect the units to the network physically, it is necessary to change the IP addresses to avoid conflicts. You only need to set the LAN port 1 address manually. The LAN port 2 address will be changed automatically based on the group settings. Log in to the web interface with your administrator user name (see chapter 6.2) and go to “De- vice control” – “Network setup”. Set up your LAN port 1 settings according to your requirements and in order to avoid conflicts. We recommend giving the units fixed IP addresses. Leave the LAN port 2 settings untouched. Now you can connect all the units to the switch using LAN port 1. LAN port 2 remains unconnected at this point. Save the settings you made. DCL3x 63 3 Now access the web interface of each individual unit (through LAN 1 switch or directly) 4 To establish the group communication, you need to log in to the web interface of each of the units you want to have in the respective group and make the following settings: Under “Device control” – “Grouping”, please select the number of the group the unit belongs to. You also need to select whether the unit is a “master” or a “slave” (only one unit can be the master within the group). The “Group subnet” address determines the range of IP addresses used within the group. You are free to select the first two positions (X.X.0.0). The last two positions remain at “0” and their value is determined based on the group number and the unit’s position within the group hierarchy. For example: The first slave unit (Slave 1) in group 5 would have the IP address of 192.168.5.2. The master unit of this group would then have the IP address of 192.168.5.1. Please note that these changes cannot be made to the working group. If you want to change anything, you need to start over with the group creation (set all units to single mode and start all over again). Save the settings you made. IP address: 192.168.5.2 Group number DCL3x 64 Unit number (within the group) 5 On the master unit (only), in the same section “Device control” – “Grouping”, it is also necessary to select which units will be taken into account when calculating the control value for the fan regulator as well as the method of calculation. Multiple units can be selected by holding “Ctrl” on your keyboard and clicking on the name of the unit. After this step you can connect all the LAN ports 2 to the switch. Save the settings you made. DCL3x 6 As there are multiple sensors on the units available for fan control, the sensor referred to in the “Grouping” setup (above) also needs to be selected. You can select this sensor in “Device configure” - “Controller settings”. Make this change ONLY on the master unit. Any changes made to any of the slave units will not be considered in the grouping mode. Slave units will use these settings only once the master unit has failed. Save the changes you made. DCL3x 65 7 The master unit will now “collect” the information from the respective sensors (step 6) of all the units considered within the group (step 4 and 5), calculate the control value based on the calculation method desired (step 5) and set the group fan speed accordingly. 8 Optionally you can assign an individual name to each of the units to make them easily distinguishable. Under “Device control” – “SNMP setup” click on “Host name” and write the name for that particular unit into the box and save the changes. Names must not contain any spaces or underscores. DCL3x 66 7 Maintenance and repair WARNING. Hazards due to arc flashing, electric shock, high and low temperatures and fan blades rotating at high speed. May cause equipment damage, injury or death. Disconnect local and remote electric power supplies and wear appropriate personal protective equipment per NFPA 70E. Allow component temperatures to become safe for human contact before removing protective covers and working within. If the doors are opened immediately after the Knürr DCL has been switched OFF, the following hazards may prevail: • electrical heaters, outlet areas may remain at high temperature of about 212°F (100°C); • piping may remain at low temperature; • fan blades may continue to rotate. These residual risks are highlighted by warning labels on the Knürr DCL. WARNING. Risk of electrical shock. Can cause injury or death. Disconnect all local and remote electric power supplies before working within. Before proceeding with installation, read all instructions, verify that all the parts are included and check the nameplate to be sure the unit voltage matches available utility power. The microprocessor controller does not isolate power from the unit, not even in the Unit OFF mode. Some internal components require and receive power even during the Unit OFF mode of the embedded controller. An optional factory-supplied disconnect switch may be installed inside the unit. The line side of this switch contains live high voltage when switched OFF. You must open all local and remote electric power disconnect switches to ensure that there is NO life-threatening voltage potential inside the unit. Refer to the unit electrical schematic. Follow all local codes. Risk of improper maintenance. May cause equipment damage. All maintenance must be performed by authorized and properly trained and qualified personnel only. All maintenance operations must strictly observe national, state and local accident prevention regulations, especially regulations concerning electrical systems, refrigerators and manufacturing resources. Maintenance on air conditioning equipment must be performed by authorized and properly trained and qualified personnel only. In order to keep all warranties valid, any maintenance must adhere to the manufacturer’s regulations. Ignoring safety instructions can be dangerous to humans as well as to the environment. Soiled parts always cause loss of performance and, for switch or control devices, may lead to the breakdown of the facility. Spare parts originally made by Emerson Network Power must be used only. Using third-party material may void warranty. When seeking technical assistance, always refer to the component list supplied with the equipment, and specify the model number, serial number and, if available, the part number. Conduct checks monthly, quarterly, biannually and annually according to the following guidelines. NOTICE. When replacing a component, follow the relevant manufacturer’s instructions. When replacement parts must be brazed, be careful not to damage the internal parts (gaskets, seals, O-rings, etc.). 67 All tasks and time periods listed here are the manufacturer’s regulations and must be documented in an inspection report. Follow the maintenance schedule below (skip the parts of no relevance to your unit). Component Maintenance period Monthly by user General Filters Check unit display for clogged filter warning X Check for irregular noise from the unit fans X Every 3 months Check state of the filters X Replace filter if necessary X Check filter switch functionality Electrical/electronics Chilled water circuit Air circuit Water pump Annually X Verify that impellers move freely Fans Every 6 months X Check bearings X Check motor mounts for tightness X Check condition of contacts X Check electrical connections X Check operation of controller X Check unit operation sequence X Check for leakages / general condition X Check water inlet and outlet temperatures X Check water valve operation X Check coil condition X Check pipeline conditions X Check functionality X Maintenance schedule 68 Problem Rack temperature is too high Unit fan fails to start Water drops carried by airflow Water on the floor around the unit Noise level is higher than expected Unsteady air supply temperature Possible cause Corrective action Dirty filters Replace filter Faulty filter clogs Call service Incorrect positioning of temperature sensors Verify remote temperature sensors correct positioning Remote temperature sensor issue Call service Inlet water temperature is too high Check cooling water temperature Cold/hot air short circuit Verify unit positioning/check containment sealing Insufficient room cooling capacity Reduce rack heat load or add cooling units Water regulating valve issue Call service Unit safety devices intervention Call service Faulty fan Call service Room humidity is off limit Check room conditioning Condensate tray is clogged Call service Unit is not properly levelled Adjust the levelling feet Condensate pipe is clogged Remove pipe obstruction Water circuit leak Locate the leak and fix it Broken piping insulation Repair the insulation Leak in drain circuit Call service Condensate pump is faulty Call service Incorrect positioning of remote temperature sensors Verify correct positioning of remote temperature sensors Unbalanced heat load Enhance rack heat load distribution Remote temperature sensor issue Call service Faulty temperature sensors Call service Unit controller issue Call service Display cable disconnected Connect the cable Local display not operational but unit Display cable damaged operates Local display configuration lost Unit electrical supply is off Local display not operational and the Main switch is off unit does not operate Control boar issue Basic troubleshooting 69 Replace the cable Call service Restore power supply Switch the unit on Call service Heavily soiled heat exchangers are largely limited in their operation and must immediately be cleaned. For cleaning their lamellas, use a vacuum cleaner, compressed air or a soft brush. When cleaning the lamellas, do not bend them. This will increase pressure loss. Regularly check the condensed water drain and, if necessary, clean it. 8 Disassembly and disposal Properly switch OFF all fans and other electrical components and disconnect them from their power supply! Protect them against being re-connected! Any disassembly of the Knürr DCL unit must be performed by qualified personnel only. Shut down the chilled water system before disassembly and prevent it from restarting. Dispose of all components and parts in accordance with local waste management and regulations. We recommend a recycling company. All components consist of: • aluminium, steel, brass, copper • marked plastic components 9 Customer service contact and address EMERSON NETWORK POWER - EMEA Racks and Solutions Knürr GmbH Mariakirchener Str. 38 94424 Arnstorf Germany T +498723270 F +49872327154 [email protected] [email protected] 70 10 Annexes 10.1 Quality requirements for water Water impurity Method for removal Mechanical impurity (dp < 0.3 mm) Filter the water Excess hardness Soften the water by ion exchange Moderate level of mechanical impurities and hardeners Add dispersion or stabilizing agents Moderate level of chemical impurities Add deadening agents and inhibitors Biological impurities (bacteria and algae) Add biocides Hydrological data pH values Values (7 ÷ 10,5) Carbonate hardness (0.54 ÷ 1.43) mmol/l Free carbon dioxide (8 ÷ 15) mg/dm3 Combined carbon dioxide (8 ÷ 15) mg/dm3 Aggressive carbon dioxide 0 mg/dm3 Sulphides < 10 mg/dm3 Oxygen < 50 mg/dm3 Chloride ions < 250 mg/dm3 Sulphate ions < 10 mg/dm3 Nitrates and nitrites <7 mg/dm3 COB <5 mg/dm3 Ammonia <5 mg/dm3 Iron < 0.2 mg/dm3 Manganese < 0.2 mg/dm3 Conductivity < 30 μS/cm Solid residue from evaporation < 500 mg/dm3 Potassium manganese consumption < 25 mg/dm3 Suspended matter <3 mg/dm3 (3 ÷ 15) mg/dm3 > 15 mg/dm3 (partial flow cleaning is recommended) (permanent cleaning) 71 10.2 Check list for setting up the device Performed checks Done (to be signed upon completion) Notes Check device for damage upon receipt. Check the ground for being horizontal. Check bearing capacity of ground. Add-on and align, connect to server cabinet, position feet of Knürr DCL and adjust them horizontally Cables connected with server cabinet: - Temperature sensors (optional) - Server shut-down (optional) - Automatic door opening - Door contact (optional) - Fire alarm systems (optional) Cable connected with set of external valves (optional): - Valve drive - Flowmeter with temperature sensors (optional) Optional automatic door opening adjusted at server cabinet No remains of packaging inside Knürr DCL All assembly tools removed Cable bushings into the device proper and air-tight Cable connections checked (power supply) Chilled water connection leak-proof/ pressure-tested Chilled water system deaerated Volume flow of chilled water adjusted Condensed water line unobstructed Smell trap of chilled water system functional Cooler tub connected to condensed water line Fans checked for function All front panels closed (air ducts technically separated) ......................................................................................................... Place:Date: Signature of Tester 72 10.3 Commissioning protocol Knürr DCL Commissioning Protocol 1. 1.1 General Details Customer/Site of installation Customer’s name:……………………….. Customer’s address:……………………….. ……………………….. ……………………….. Contact partner:……………………….. Phone number:……………………….. Site of installation/room number: .................................. Humidity at site of installation: ................................... % rel. humidity Ambient temperature ................................... ° C 1.2 Configuration Cabinet type: Knürr DCL 30 kW □ DCL-R □ Knürr DCL 34 kW □ DCL-L □ DCL-H □ Commission number:................................... Serial number:................................... Special remarks: ......................................................................................................................................... ......................................................................................................................................... ......................................................................................................................................... 2. 2.1 State Check General State Customer’s proof of bearing capacity of ground / transport ways □ Check of alignment □ Transport damage to housing: yes □ no Remarks ......................................................................................................................................... ......................................................................................................................................... ......................................................................................................................................... Residual packaging removed: yes 73 □ no □ □ Assembly tools removed: no □ Air ducts checked: yes □ no (server cabinet front plates closed, passages/opening Knürr DCL/server cabinet) □ 2.2 yes □ Chilled water system within the facility Chilled water: with anti-freeze □ Knürr DCL Connected to: CTU □ circuit in building, direct □ without anti-freeze cold water system, direct □ Chilled water temperature (primary): Feed:.........°C Return: .........°C Chilled water pressure Feed: ......... bar Return:......... bar Connection: set of internal valves with Knürr connection set set of external valves Customer’s hydraulic plant OK (visual check): yes □ □ □ □ □ no □ Remarks:…………………………………………………….. 2.3 Electrical data/documents Power circuit diagram enclosed: yes □ no □ Remarks: ......................................................................................................................................... Cabling checked: yes □ no □ Acceptance protocol for electrical installation available: yes □ no □ Remarks: ......................................................................................................................................... 3. 3.1 Functional check Mechanical functions Damage to heat exchanger/ Connections/ lamellas / surface: none □ existing □ Remarks: ......................................................................................................................................... Add-on screwed to fit, stiffening wall: yes □ no remarks: ......................................................................................................................................... Front door, closing: yes □ no Remarks: ......................................................................................................................................... Rear door, closing: yes □ no Remarks: ......................................................................................................................................... 74 □ □ □ Pipe duct inlets / cable bushings closed: yes □ no Remarks: ......................................................................................................................................... Condensed water drain open / connected: yes □ no remarks: ......................................................................................................................................... Fans run perfectly (bearings OK) Visual check yes □ no Remarks: ......................................................................................................................................... 3.2 Electrical functions Functional check of valve / fan control yes □ no Remarks: ......................................................................................................................................... Functional check of smoke alarm (optional) yes □ no Remarks: ......................................................................................................................................... Functional check of temperature control: yes □ no Remarks: ......................................................................................................................................... □ □ □ □ □ □ Functional check of automatic door opening (optional) yes □ no □ Adjustment of electric magnets – see Operation Manual “Automatic Door Opening/Initial Commissioning” Remarks: ......................................................................................................................................... Functional check of water alarm (optional) yes □ no □ Remarks: ......................................................................................................................................... Check for error / disturbance alarms yes □ no □ Remarks: ......................................................................................................................................... 3.3 Thermodynamic Checks Condensed water forming at heat exchanger yes □ no Remarks: ......................................................................................................................................... Chilled water entering heat exchanger: ...............° C Chilled water leaving heat exchanger: ...............° C Cabinet temperature in front of heat exchanger: ...............° C Cabinet temperature behind the heat exchanger: ...............° C Chilled water network bleeded: □ yes □ no □ Pressure of chilled water network tested: yes (customer’s protocol available) □ no □ 75 Chilled water flow adjusted: yes Chilled water flow: …………. l / min □ no □ external external □ Remarks: ......................................................................................................................................... Correctness of above values is hereby confirmed. Commissioning was performed during on-going operation. ......................................... Commissioning firm ............................................................................. Date Signature ......................................... .............................................................................. CustomerDateSignature 76 □ 10.4 Additional modules - installation procedure Modbus lines/sensor modules numbering To determine the number of the rack/module and the number of the sensor module, you need to consult the following diagram. There are 4 Modbus lines in total. Line number 1 is used internally for modules within the unit itself. Line number 4 is used for connecting external optional equipment. Line number 2 is used for connecting modules which are located in the racks to the left (viewed from the front) of the unit. Line number 3 is used for connecting modules which are located in the racks to the right (viewed from the front) of the unit. Each Modbus line must be terminated with an end-of-the-line resistor. Modbus line 3 Modbus line 2 Rack 3 Rack 1 Rack 2 Rack 4 Modbus lines 1 and 4 Front view Example: If you want to activate the door contact module in rack 1, you need to look under Port (Line) 2 for the module “Door contacts +AR1 A202”. See the first picture in the chapter “New sensor module activation” – below. Door contacts +AR1 A202 Modbus lines 2 and 3 (racks) Rack 1 Display A112 Modbus line 1 (internal) 77 Sensor modules types There are four different types of sensor boards (modules) available for the Knürr DCL. Fan module - This board collects temperature readings of supply and return air and the fan data of respective group of the fans. It is located on the board with fan circuit breaker. Valve module - This board controls the chilled water circuit valve and measures the chilled water temperature. It is located next to the middle fan circuit breaker. 78 Digital I/O module - This module is used for customer inputs and outputs (and rack door control and monitoring). It is optional and, if present, it is located in the back of the unit at the top, bolted to a metal bracket. Analog module - This module is used for remote rack temperature measurement and also the bypass pipe temperature measurement. The bypass temperature measurement module is located at the top of the DCL next to the Gateway. When present as an option, it is located in the respective rack bolted to a metal bracket. 79 To activate any new / additional equipment 1 Login to the web interface using your service credentials. Display installation 1 2 3 4 5 Connect the display as described in “Display installation” section. The display connects to Modbus line 1. In the web interface, go to “Options” under “Device configure” and click on “Unit code”. Now you need to alter the unit code in such a way that it reflects newly added features. In the case of installing a new display, changing digit 16 from “0” to “Y” is required. Make sure the tick-box is not checked and press “Save”. Go to “Firmware” under “Device Configure” and click “Restart”. 6 7 8 After some time (approx. 30-120 sec.), the changes will have been carried out. Go to “Commissioning” under “Device configure”. Locate the display box (A112, under Port 1) and click “Activate with address”. The color of the box should go from grey to green. The display is now ready to be used. 80 Digital module installation (e.g. customer I/Os, rack door control and monitoring, fire detection inside the rack) 1 Connect the module to respective Modbus line and mount it using the material provided with the module. 2 Next to the “H” terminal of the board, there is a Hall effect sensor. Use a magnet to activate the sensor. Sensor activation is signaled by rapid blinking of the LED. After 30s activation (LED flashing frequency increases) the board is set to address “247” and is now ready to be assigned. 3 In the web interface, go to “Options” under “Device configure” and click on “Unit code”. 4 Now you need to alter the unit code in such a way that it reflects newly added features. In case of installing user I/Os, changing digit 19 from “0” to “D” is required. 5 Make sure the tick-box is not checked and press “Save”. 6 Go to “Firmware” under “Device Configure” and click “Restart”. 81 7 8 9 10 After some time (approx. 30-120 sec.) the changes will have been carried out. Go to “Commissioning” under “Device configure”. Locate the I/Os box (A401, under Port 4). It should show in purple. Use a magnet to activate the Hall effect sensor once more (for approx. 1 sec.) and click on “Activate new”. The color of the box should turn from purple via orange to green. The module is now ready to be used. Also the status of the I/Os should be displayed on the “Status DCL” page in the web interface. 82 Analog module installation (e.g. Calorific flow meter) 1 2 3 4 5 6 Connect the module to respective Modbus line and mount it using the material provided with the module. Refer to the installation manual of the device. Next to the “H” terminal of the module board, there is a Hall effect sensor. Use a magnet to activate the sensor. Sensor activation is signaled by rapid blink- ing of the LED. After 30s activation (LED flashing frequency increases) the board is set to address “247” and is now ready to be assigned. In the web interface, go to “Options” under “Device configure” and click “Unit code”. Now you have to alter the unit code in such a way that it reflects newly added features. Make sure the tick-box is not checked and press “Save” Go to “Firmware” under “Device Configure” and click “Restart”. 7 8 9 10 After some time (approx. 30-120 sec.) the changes will have been carried out. Go to “Commissioning” under “Device configure”. Locate the calorific flow meter (A403, under Port 4). It should show in purple. Use a magnet to activate the Hall effect sensor once more (for approx. 1 sec.) and click on “Activate new”. The color of the box should turn from purple via orange to green. The module is now ready to be used. Also the status of the flow meter should be displayed on the “Status DCL” page in the web interface. 83 Other equipment (not requiring module e.g. A/B transfer switch, condensate pump) 1 2 3 4 5 Connect the device switch according to the instructions provided and using the materials pro- vided with the device shipment. The device needs to be connected to the respective terminals of the DCL unit (see table in the annex). In the web interface, go to “Options” under “Device configure” and click “Unit code”. Now you need to alter the unit code in such a way that it reflects newly added features (e.g., in case of installing a user transfer switch, changing digit 12 to the respective option is required). Make sure the tick-box is not checked and press “Save”. Go to “Firmware” under “Device Configure” and click “Restart”. 6 7 After some time (approx. 30-120 sec.) the changes will have been carried out. The device is now ready to be used. Also the status of the device should be displayed on the “Status DCL” page in the web interface. 84 Additional racks, installation procedure for modules Preparation 1 2 3 4 5 Log in to the web interface using your service credentials. In the web interface, go to “Options” under “Device configure” and click on “Unit code”. Now you need to alter the unit code in such a way that it reflects newly added features. In case of installing a user transfer switch, changing digits 13 and 20 to their respective options (reflecting the number of racks, etc.) is required. Make sure the tick-box is not checked and press “Save”. Go to “Firmware” under “Device Configure” and click “Restart”. 85 New sensor module activation The first step is to “reset” the sensor to default address “247”. After that, the sensor can be assigned for different tasks. There are two types of modules available for the racks: digital and analogue. Analogue modules are used (mainly) for temperature measurement and are equipped with two ports for connecting temperature sensors. Digital modules are mainly used for door monitoring and door opening. Digital sensors do not have ports for connecting temperature sensors. To activate the sensor module... 1 Mount the sensor to the desired position and plug the Modbus line in. 2 Use a magnet to activate the Hall sensor for 30s. The Hall sensor is located close to the “H” terminal, next to the blinking LED. (There are different types of sensor boards. However, the position of the Hall sensor is approximately the same.) This resets the module to address “247”. 3 Log in to the web interface with your log-in credentials – user name “admin”, password “knuerr”. 4 Use a magnet to activate the Hall sensor for 1s. 5 In section “Device configure”, click on “Commissioning”. Select the desired sensor and click on “Activate new”. 6 In the web interface, the color of the field should turn from grey to green (briefly showing orange). 7 The sensor is now ready to be used. (If you need to reset the board to its default settings, hold the magnet close to the sensor for ~30 s. A successful reset is signaled by rapid flashing of the LED.) 86 10.5 Electrical box connectors description Terminal XTS Pin 1 2 3 4 5 6 Function COM (+24V ) NC COM (+24V ) NC free free Description door contacts door contact front door closed Pin 1 2 3 4 5 6 Function COM (+24V ) NC COM (+24V ) NC free free Description A/B transfer switch mains A powered ON Pin 1 2 3 4 5 6 Function free free free free COM (+24V ) NO Description Terminal XSP1 Pin 1 2 3 4 5 6 Function +24V (supply) GND (supply) free free free free Description power supply switch Terminal XPFC Pin 1 2 Function NC NO 3 4 5 6 COM free COM (+24V ) NC Description Summary alarm default: relay deactivated for failure (software invertable) Pin 1 2 3 4 5 6 Function free free free free free free Terminal XAB Terminal XAI Terminal XSP2 door contact rear door closed mains B powered ON water alarm Remote standby default: wire bridge Description 87 Terminal XSP3 Pin 1 2 3 4 5 6 Function free free free free free free Description Terminal XBLK Pin 1 2 Function Out ( 1= ON ) GND Description beacon Terminal XCPA Pin 1 2 Function COM (+24V ) NC Description condensate pump failure Terminal XSA Pin 1 2 3 4 Function +24V (supply) GND (supply) COM (+24V ) NO Description smoke alarm Terminal XHU Pin 1 2 3 4 Function +24V (supply) GND (supply) 0-10V(+) 0-10V(+) Description air monitoring humidity Pin 1 2 PE Function 230V L 230V N PE Description condensate pump power Terminal XCP temperature 0-100°C humidity 0-100% X15, X16 (not on the rear of the e-box, cable ending near valve) Terminal X15 Terminal X16 Pin 1 2 3 4 5 6 Function +24V (supply) GND (supply) 0 – 10VDC free 2 – 10VDC free Description valve Pin 1 2 3 4 5 6 Function +24V (supply) GND (supply) 0 – 10VDC free 2 – 10VDC free Description valve - redundant heat exchanger 88 control valve position feedback valve position control valve position feedback valve position 10.6 Performance charts DCL 30kW Single Feed EWT 7°C, 5°C Water temp. increase EWT 10°C, 5°C Water temp. increase EWT 13°C, 5°C Water temp. increase 40°C - 20% RH Total Cooling Capacity - kW 37,7 34,1, 30,4 Sensible Cooling Capacity - kW 37,7 34,1 30,4 Unit Power Input - kW 0,83 0,83 0,83 Water Flow Rate - l/s 1,80 1,63 1,46 Water Side Pressure Drop - kPa 105 86 69 Supply Air Temperature - °C 16,8 19,1 21,4 Total Cooling Capacity - kW 34,1 30,5 26,8 Sensible Cooling Capacity - kW 34,1 30,5 26,8 37°C - 24% RH Unit Power Input - kW 0,83 0,83 0,83 Water Flow Rate - l/s 1,63 1,46 1,28 Water Side Pressure Drop - kPa 88 70 55 Supply Air Temperature - °C 16,3 18,6 20,9 Total Cooling Capacity - kW 31,7 28 24,3 35°C - 26% RH Sensible Cooling Capacity - kW 31,7 28 24,3 Unit Power Input - kW 0,83 0,83 0,83 Water Flow Rate - l/s 1,51 1,34 1,16 Water Side Pressure Drop - kPa 77 61 46 Supply Air Temperature - °C 15,9 18,2 20,5 24,3 20,6 32°C - 29% RH Total Cooling Capacity - kW 28 Sensible Cooling Capacity - kW 28 24,3 20,6 Unit Power Input - kW 0,83 0,83 0,83 Water Flow Rate - l/s 1,34 1,16 0,98 Water Side Pressure Drop - kPa 61 47 34 Supply Air Temperature - °C 15,4 17,6 19,9 30°C - 34% RH Total Cooling Capacity - kW 25,5 21,8 18 Sensible Cooling Capacity - kW 25,5 21,8 18 Unit Power Input - kW 0,83 0,83 0,83 Water Flow Rate - l/s 1,22 1,04 0,86 Water Side Pressure Drop - kPa 52 39 27 Supply Air Temperature - °C 15,0 17,3 19,6 28°C - 38% RH Total Cooling Capacity - kW 23 19,2 15,4 Sensible Cooling Capacity - kW 23 19,2 15,4 Unit Power Input - kW 0,83 0,83 0,83 Water Flow Rate - l/s 1,1 0,92 0,74 Water Side Pressure Drop - kPa 43 31 20 Supply Air Temperature - °C 14,6 16,9 19,2 89 25°C - 40% RH Total Cooling Capacity - kW 19,2 15,3 11,4 Sensible Cooling Capacity - kW 19,2 15,3 11,4 Unit Power Input - kW 0,83 0,83 0,83 Water Flow Rate - l/s 0,91 0,73 0,54 Water Side Pressure Drop - kPa 31 20 12 Supply Air Temperature - °C 14,0 16,4 18,7 22°C - 50% RH Total Cooling Capacity - kW 15,2 11,2 6,9 Sensible Cooling Capacity - kW 15,2 11,2 6,9 Unit Power Input - kW 0,83 0,83 0,83 Water Flow Rate - l/s 0,73 0,54 0,33 Water Side Pressure Drop - kPa 21 12 5 Supply Air Temperature - °C 13,5 15,9 18,5 Cooling capacities are net values. All capacities are nominal values; actual performance will be ±5%. NOTE: Some options or combinations of options may result in reduced airflow. Consult factory for recommendations. 90 DCL 34 kW Single Feed EWT 7°C, 5°C Water temp. increase EWT 10°C, 5°C Water temp. increase EWT 13°C, 5°C Water temp. increase 40°C - 20% RH Total Cooling Capacity - kW 42,1 38,0 33,9 Sensible Cooling Capacity - kW 42,1 38,0 33,9 Unit Power Input - kW 1,1 1,1 1,1 Water Flow Rate - l/s 2,01 1,82 1,62 Water Side Pressure Drop - kPa 126 103 83 Supply Air Temperature - °C 18,5 20,7 22,8 37°C - 24% RH Total Cooling Capacity - kW 38,0 33,9 29,8 Sensible Cooling Capacity - kW 38,0 33,9 29,8 Unit Power Input - kW 1,1 1,1 1,1 Water Flow Rate - l/s 1,82 1,62 1,43 Water Side Pressure Drop - kPa 105 84 66 Supply Air Temperature - °C 17,9 20,0 22,1 Total Cooling Capacity - kW 35,3 31,2 27,1 Sensible Cooling Capacity - kW 35,3 31,2 27,1 Unit Power Input - kW 1,1 1,1 1,1 Water Flow Rate - l/s 1,68 1,49 1,29 35°C - 26% RH Water Side Pressure Drop - kPa 92 72 55 Supply Air Temperature - °C 17,4 19,5 21,6 Total Cooling Capacity - kW 31,2 27,0 22,9 Sensible Cooling Capacity - kW 31,2 27,0 22,9 Unit Power Input - kW 1,1 1,1 1,1 32°C - 29% RH Water Flow Rate - l/s 1,49 1,29 1,09 Water Side Pressure Drop - kPa 73 56 41 Supply Air Temperature - °C 16,7 18,8 20,9 30°C - 34% RH Total Cooling Capacity - kW 28,4 24,2 20,0 Sensible Cooling Capacity - kW 28,4 24,2 20,0 Unit Power Input - kW 1,1 1,1 1,1 Water Flow Rate - l/s 1,36 1,16 0,96 Water Side Pressure Drop - kPa 62 46 32 Supply Air Temperature - °C 16,2 18,3 20,5 28°C - 38% RH Total Cooling Capacity - kW 25,6 21,4 17,1 Sensible Cooling Capacity - kW 25,6 21,4 17,1 Unit Power Input - kW 1,1 1,1 1,1 Water Flow Rate - l/s 1,22 1,02 0,82 Water Side Pressure Drop - kPa 51 37 24 Supply Air Temperature - °C 15,7 17,8 20,0 91 25°C - 40% RH Total Cooling Capacity - kW 21,3 17,0 12,6 Sensible Cooling Capacity - kW 21,3 17,0 12,6 Unit Power Input - kW 1,1 1,1 1,1 Water Flow Rate - l/s 1,01 0,81 0,6 Water Side Pressure Drop - kPa 37 24 14 Supply Air Temperature - °C 15,0 17,1 19,3 22°C - 50% RH Total Cooling Capacity - kW 16,9 12,4 7,6 Sensible Cooling Capacity - kW 16,9 12,4 7,6 Unit Power Input - kW 1,1 1,1 1,1 Water Flow Rate - l/s 0,81 0,59 0,36 Water Side Pressure Drop - kPa 24 14 6 Supply Air Temperature - °C 14,3 16,5 18,9 Cooling capacities are net values. All capacities are nominal values; actual performance will be ±5%. NOTE: Some options or combinations of options may result in reduced airflow. Consult factory for recommendations. 92 DCL 30 kW Dual Feed (both feeds active) EWT 7°C, 5°C Water temp. increase EWT 10°C, 5°C Water temp. increase EWT 13°C, 5°C Water temp. increase 40°C - 20% RH Total Cooling Capacity - kW 37,7 34,1 30,4 Sensible Cooling Capacity - kW 37,7 34,1 30,4 Unit Power Input - kW 0,83 0,83 0,83 Water Flow Rate (total) - l/s 1,80 1,63 1,46 Water Side Pressure Drop - kPa 154 127 103 Supply Air Temperature - °C 16,8 19,1 21,4 37°C - 24% RH Total Cooling Capacity - kW 34,1 30,5 26,8 Sensible Cooling Capacity - kW 34,1 30,5 26,8 Unit Power Input - kW 0,83 0,83 0,83 Water Flow Rate (total) - l/s 1,63 1,46 1,28 Water Side Pressure Drop - kPa 127 103 80 Supply Air Temperature - °C 16,3 18,6 20,9 Total Cooling Capacity - kW 31,7 28 24,3 Sensible Cooling Capacity - kW 31,7 28 24,3 Unit Power Input - kW 0,83 0,83 0,83 Water Flow Rate (total) - l/s 1,51 1,34 1,16 35°C - 26% RH Water Side Pressure Drop - kPa 110 88 67 Supply Air Temperature - °C 15,9 18,2 20,5 Total Cooling Capacity - kW 28 24,3 20,6 Sensible Cooling Capacity - kW 28 24,3 20,6 Unit Power Input - kW 0,83 0,83 0,83 32°C - 29% RH Water Flow Rate (total) - l/s 1,34 1,16 0,98 Water Side Pressure Drop - kPa 88 67 49 Supply Air Temperature - °C 15,4 17,6 19,9 18 30°C - 34% RH Total Cooling Capacity - kW 25,5 21,8 Sensible Cooling Capacity - kW 25,5 21,8 18 Unit Power Input - kW 0,83 0,83 0,83 Water Flow Rate (total) - l/s 1,22 1,04 0,86 Water Side Pressure Drop - kPa 73 54 38 Supply Air Temperature - °C 15,0 17,3 19,6 28°C - 38% RH Total Cooling Capacity - kW 23 19,2 15,4 Sensible Cooling Capacity - kW 23 19,2 15,4 Unit Power Input - kW 0,83 0,83 0,83 Water Flow Rate (total) - l/s 1,10 0,92 0,74 Water Side Pressure Drop - kPa 60 43 29 Supply Air Temperature - °C 14,6 16,9 19,2 93 25°C - 40% RH Total Cooling Capacity - kW 19,2 15,3 11,4 Sensible Cooling Capacity - kW 19,2 15,3 11,4 Unit Power Input - kW 0,83 0,83 0,83 Water Flow Rate (total) - l/s 0,91 0,73 0,54 Water Side Pressure Drop - kPa 42 28 17 Supply Air Temperature - °C 14,0 16,4 18,7 22°C - 50% RH Total Cooling Capacity - kW 15,2 11,2 6,9 Sensible Cooling Capacity - kW 15,2 11,2 6,9 Unit Power Input - kW 0,83 0,83 0,83 Water Flow Rate (total) - l/s 0,73 0,54 0,33 Water Side Pressure Drop - kPa 28 17 7 Supply Air Temperature - °C 13,5 15,9 18,5 Cooling capacities are net values. All capacities are nominal values; actual performance will be ±5%. NOTE: Some options or combinations of options may result in reduced airflow. Consult factory for recommendations. 94 DCL 30 kW Dual Feed (only one feed active) EWT 7°C, 5°C Water temp. increase EWT 10°C, 5°C Water temp. increase EWT 13°C, 5°C Water temp. increase 40°C - 20% RH Total Cooling Capacity - kW 24,7 22,4 19,9 Sensible Cooling Capacity - kW 24,7 22,4 19,9 Unit Power Input - kW 0,83 0,83 0,83 Water Flow Rate - l/s 1,15 1,04 0,93 Water Side Pressure Drop - kPa 246 203 163 Supply Air Temperature - °C 25,4 26,9 28,3 37°C - 24% RH Total Cooling Capacity - kW 22,4 20,0 17,6 Sensible Cooling Capacity - kW 22,4 20,0 17,6 Unit Power Input - kW 0,83 0,83 0,83 Water Flow Rate - l/s 1,04 0,93 0,82 Water Side Pressure Drop - kPa 203 163 129 Supply Air Temperature - °C 24,0 25,4 26,9 Total Cooling Capacity - kW 20,8 18,4 15,9 Sensible Cooling Capacity - kW 20,8 18,4 15,9 35°C - 26% RH Unit Power Input - kW 0,83 0,83 0,83 Water Flow Rate - l/s 0,96 0,85 0,74 Water Side Pressure Drop - kPa 174 138 106 Supply Air Temperature - °C 23,0 24,4 25,9 Total Cooling Capacity - kW 18,4 15,9 13,5 32°C - 29% RH Sensible Cooling Capacity - kW 18,4 15,9 13,5 Unit Power Input - kW 0,83 0,83 0,83 0,62 Water Flow Rate - l/s 0,85 0,74 Water Side Pressure Drop - kPa 138 106 76 Supply Air Temperature - °C 21,6 23,0 24,4 Total Cooling Capacity - kW 16,7 14,3 11,8 30°C - 34% RH Sensible Cooling Capacity - kW 16,7 14,3 11,8 Unit Power Input - kW 0,83 0,83 0,83 Water Flow Rate - l/s 0,78 0,66 0,55 Water Side Pressure Drop - kPa 117 85 60 Supply Air Temperature - °C 20,6 22,0 23,5 28°C - 38% RH Total Cooling Capacity - kW 15,1 12,6 10,1 Sensible Cooling Capacity - kW 15,1 12,6 10,1 Unit Power Input - kW 0,83 0,83 0,83 Water Flow Rate - l/s 0,70 0,59 0,47 Water Side Pressure Drop - kPa 95 69 45 Supply Air Temperature - °C 19,6 21,0 22,5 95 25°C - 40% RH Total Cooling Capacity - kW 12,6 10,0 7,5 Sensible Cooling Capacity - kW 12,6 10,0 7,5 Unit Power Input - kW 0,83 0,83 0,83 Water Flow Rate - l/s 0,58 0,47 0,34 Water Side Pressure Drop - kPa 67 45 25 Supply Air Temperature - °C 18,1 19,6 21,0 22°C - 50% RH Total Cooling Capacity - kW 10,0 7,3 4,5 Sensible Cooling Capacity - kW 10,0 7,3 4,5 Unit Power Input - kW 0,83 0,83 0,83 Water Flow Rate - l/s 0,47 0,34 0,21 Water Side Pressure Drop - kPa 45 25 11 Supply Air Temperature - °C 16,7 18,2 19,8 Cooling capacities are net values. All capacities are nominal values; actual performance will be ±5%. NOTE: Some options or combinations of options may result in reduced airflow. Consult factory for recommendations. 96 DCL 34 kW Dual Feed (both feeds active) EWT 7°C, 5°C Water temp. increase EWT 10°C, 5°C Water temp. increase EWT 13°C, 5°C Water temp. increase 40°C - 20% RH Total Cooling Capacity - kW 42,1 38,0 33,9 Sensible Cooling Capacity - kW 42,1 38,0 33,9 Unit Power Input - kW 1,1 1,1 1,1 Water Flow Rate (total) - l/s 2,0 1,8 1,6 Water Side Pressure Drop - kPa 184,8 152,1 123,9 Supply Air Temperature - °C 18,5 20,7 22,8 37°C - 24% RH Total Cooling Capacity - kW 38,0 33,9 29,8 Sensible Cooling Capacity - kW 38,0 33,9 29,8 Unit Power Input - kW 1,1 1,1 1,1 Water Flow Rate (total) - l/s 1,8 1,6 1,4 Water Side Pressure Drop - kPa 151,5 123,6 96,0 Supply Air Temperature - °C 17,9 20,0 22,1 35°C - 26% RH Total Cooling Capacity - kW 35,3 31,2 27,1 Sensible Cooling Capacity - kW 35,3 31,2 27,1 Unit Power Input - kW 1,1 1,1 1,1 Water Flow Rate (total) - l/s 1,7 1,5 1,3 Water Side Pressure Drop - kPa 131,4 103,9 80,1 Supply Air Temperature - °C 17,4 19,5 21,6 32°C - 29% RH Total Cooling Capacity - kW 31,2 27,0 22,9 Sensible Cooling Capacity - kW 31,2 27,0 22,9 Unit Power Input - kW 1,1 1,1 1,1 Water Flow Rate (total) - l/s 1,5 1,3 1,1 Water Side Pressure Drop - kPa 105,3 79,8 59,1 Supply Air Temperature - °C 16,7 18,8 20,9 Total Cooling Capacity - kW 28,4 24,2 20,0 Sensible Cooling Capacity - kW 28,4 24,2 20,0 Unit Power Input - kW 1,1 1,1 1,1 30°C - 34% RH Water Flow Rate (total) - l/s 1,4 1,2 1,0 Water Side Pressure Drop - kPa 87,0 63,7 45,0 Supply Air Temperature - °C 16,2 18,3 20,5 Total Cooling Capacity - kW 25,6 21,4 17,1 Sensible Cooling Capacity - kW 25,6 21,4 17,1 Unit Power Input - kW 1,1 1,1 1,1 28°C - 38% RH Water Flow Rate (total) - l/s 1,2 1,0 0,8 Water Side Pressure Drop - kPa 71,2 51,3 34,8 Supply Air Temperature - °C 15,7 17,8 20,0 97 25°C - 40% RH Total Cooling Capacity - kW 21,3 17,0 12,6 Sensible Cooling Capacity - kW 21,3 17,0 12,6 Unit Power Input - kW 1,1 1,1 1,1 Water Flow Rate (total) - l/s 1,0 0,8 0,6 Water Side Pressure Drop - kPa 50,1 33,6 19,8 Supply Air Temperature - °C 15,0 17,1 19,3 22°C - 50% RH Total Cooling Capacity - kW 16,9 12,4 7,6 Sensible Cooling Capacity - kW 16,9 12,4 7,6 Unit Power Input - kW 1,1 1,1 1,1 Water Flow Rate (total) - l/s 0,8 0,6 0,4 Water Side Pressure Drop - kPa 32,0 19,8 8,4 Supply Air Temperature - °C 14,3 16,5 18,9 Cooling capacities are net values. All capacities are nominal values; actual performance will be ±5%. NOTE: Some options or combinations of options may result in reduced airflow. Consult factory for recommendations. 98 DCL 34 kW Dual Feed (one feed active) EWT 7°C, 5°C Water temp. increase EWT 10°C, 5°C Water temp. increase EWT 13°C, 5°C Water temp. increase 40°C - 20% RH Total Cooling Capacity - kW 27,6 25,0 22,2 Sensible Cooling Capacity - kW 27,6 25,0 22,2 Unit Power Input - kW 1,1 1,1 1,1 Water Flow Rate (total) - l/s 1,3 1,2 1,0 Water Side Pressure Drop - kPa 295,2 243,1 196,1 Supply Air Temperature - °C 28,0 29,2 30,2 37°C - 24% RH Total Cooling Capacity - kW 25,0 22,2 19,6 Sensible Cooling Capacity - kW 25,0 22,2 19,6 Unit Power Input - kW 1,1 1,1 1,1 Water Flow Rate (total) - l/s 1,2 1,0 0,9 Water Side Pressure Drop - kPa 242,2 195,6 154,8 Supply Air Temperature - °C 26,4 27,3 28,4 Total Cooling Capacity - kW 23,2 20,5 17,7 Sensible Cooling Capacity - kW 23,2 20,5 17,7 35°C - 26% RH Unit Power Input - kW 1,1 1,1 1,1 Water Flow Rate (total) - l/s 1,1 0,9 0,8 Water Side Pressure Drop - kPa 207,9 162,9 126,7 Supply Air Temperature - °C 25,2 26,1 27,3 Total Cooling Capacity - kW 20,5 17,7 15,0 Sensible Cooling Capacity - kW 20,5 17,7 15,0 Unit Power Input - kW 1,1 1,1 1,1 32°C - 29% RH Water Flow Rate (total) - l/s 0,9 0,8 0,7 Water Side Pressure Drop - kPa 165,1 126,3 91,6 Supply Air Temperature - °C 23,4 24,6 25,6 Total Cooling Capacity - kW 18,6 15,9 13,1 Sensible Cooling Capacity - kW 18,6 15,9 13,1 Unit Power Input - kW 1,1 1,1 1,1 30°C - 34% RH Water Flow Rate (total) - l/s 0,9 0,7 0,6 Water Side Pressure Drop - kPa 139,5 100,3 71,1 Supply Air Temperature - °C 22,2 23,3 24,6 28°C - 38% RH Total Cooling Capacity - kW 16,8 14,0 11,2 Sensible Cooling Capacity - kW 16,8 14,0 11,2 Unit Power Input - kW 1,1 1,1 1,1 Water Flow Rate (total) - l/s 0,8 0,7 0,5 Water Side Pressure Drop - kPa 112,7 82,4 54,0 Supply Air Temperature - °C 21,1 22,1 23,4 99 25°C - 40% RH Total Cooling Capacity - kW 14,0 11,1 8,3 Sensible Cooling Capacity - kW 14,0 11,1 8,3 Unit Power Input - kW 1,1 1,1 1,1 Water Flow Rate (total) - l/s 0,6 0,5 0,4 Water Side Pressure Drop - kPa 80,0 54,0 29,2 Supply Air Temperature - °C 19,4 20,4 21,7 Total Cooling Capacity - kW 11,1 8,1 5,0 Sensible Cooling Capacity - kW 11,1 8,1 5,0 Unit Power Input - kW 1,1 1,1 1,1 22°C - 50% RH Water Flow Rate (total) - l/s 0,5 0,4 0,2 Water Side Pressure Drop - kPa 51,4 29,2 13,2 Supply Air Temperature - °C 17,7 18,9 20,2 Cooling capacities are net values. All capacities are nominal values; actual performance will be ±5%. NOTE: Some options or combinations of options may result in reduced airflow. Consult factory for recommendations. 100 Performance - 30kW version 101 102 161 public private Port for getting and setting values Read community Write community ModuleState (INTEGER) {inactive(0), toActivate(1), offline(2), online(3)} FanState (BITS) {noFan(0), fan1(1), fan2(2), fan3(3), fan4(4), fan5(5), fan6(6), fan7(7), fan8(8), fan9(9), fan10(10), fan11(11), fan12(12), fanOk(13)} ValveState (BITS) {noValve(0), valve1Fault(1), valve2Fault(2), valveOk(4)} ValveState (BITS) {noValve(0), valve1Fault(1), valve2Fault(2), valveOk(4)} ValveState (BITS) {noValve(0), valve1Fault(1), valve2Fault(2), valveOk(4)} DigitalInput (BITS) {input1(0), input2(1), input3(2), input4(3), input5(4), input6(5), input7(6), input8(7)} DigitalOutput (BITS) {output1(0), output2(1), output3(2), output4(3)} Syntax of modules health Syntax of fan module states Syntax of valve modules states Syntax of analogue modules states Syntax of temperature module states Syntax of State Inputs Syntax of State Outputs ModuleState (INTEGER) FanState (BITS) Syntax of modules health Syntax of fan module states Syntax of Ims (Power monitoring) module INTEGER {error(0), normal(1)} states {coolcon1(1), coolcon2(2), coolcon3(3), coolcon4(4), coolcon5(5), coolcon6(6), coolcon7(7), coolcon8(8), coolcon9(9), coolcon10(10), coolcon11(11), coolcon12(12), coolcon13(13), coolcon14(14), oolcon15(15), coolcon16(16), coolcon17(17), coolcon18(18), coolcon19(19), coolcon20(20), coolcon21(21), coolcon22(22), coolcon23(23), coolcon24(24), coolcon25(25), coolcon26(26), coolcon27(27), coolcon28(28), coolcon29(29), coolcon30(30), coolcon31(31), coolcon32(32)} CoolCons (INTEGER) Syntax of modules indexes (unless stated CoolCons (INTEGER) otherwise) Syntax of modules indexes (unless stated CoolCons (INTEGER) {coolcon1(1), coolcon2(2), coolcon3(3), coolcon4(4), coolcon5(5), coolcon6(6), coolcon7(7), coolcon8(8), otherwise) coolcon9(9), coolcon10(10), coolcon11(11), coolcon12(12), coolcon13(13), coolcon14(14), oolcon15(15), coolcon16(16), coolcon17(17), coolcon18(18), coolcon19(19), coolcon20(20), coolcon21(21), coolcon22(22), coolcon23(23), coolcon24(24), coolcon25(25), coolcon26(26), coolcon27(27), coolcon28(28), coolcon29(29), coolcon30(30), coolcon31(31), coolcon32(32)} 162 Trap port Variables description 10.7 MIB file structure description 103 ValveState (BITS) ValveState (BITS) DigitalInput (BITS) DigitalOutput (BITS) {inactive(0), toActivate(1), offline(2), online(3)} {noFan(0), fan1(1), fan2(2), fan3(3), fan4(4), fan5(5), fan6(6), fan7(7), fan8(8), fan9(9), fan10(10), fan11(11), fan12(12), fanOk(13)} {noValve(0), valve1Fault(1), valve2Fault(2), valveOk(4)} {input1(0), input2(1), input3(2), input4(3), input5(4), input6(5), input7(6), input8(7)} {output1(0), output2(1), output3(2), output4(3)} Syntax of analogue modules states Syntax of temperature module states Syntax of State Inputs Syntax of State Outputs ModuleState (INTEGER) FanState (BITS) ValveState (BITS) DigitalInput (BITS) DigitalOutput (BITS) dclGlobal SettingsLimitsIndex, dclGlobalSet- DclModules (INTEGER) tingsDioNamesIndex dclGlobal SettingsLimitsIndex, dclGlobalSet- DclModules (INTEGER) {dclFanModuleA101(101), dclFanModuleA102(102), dclFanModuleA103(103), dclValveModutingsDioNamesIndex leA104(104), dclFanModuleA105(105), dclFanModuleA106(106), dclFanModuleA107(107), dclValveModuleA108(108), dclAnalogueA109(109), dclFanModuleA110(110), dclValveModuleA111(111), dclModuleA112(112), dclServerOffAR1A201(201), dclDoorsModuleAR1A202(202), dclTemperaturesAR1A203(203), dclVesdaAR1A204(204), dclServerOffAR3A201(205), dclDoorsModuleAR3A202(206), dclTemperaturesAR3A203(207), dclAnalogueModuleAR3A208(208), dclImsAR1A209(209), dclImsAR3A210(210), dclSocketStripAR1A211(211), dclSocketStripAR1A212(212), dclSocketStripAR3A211(213), dclSocketStripAR3A212(214), dclExternalDeviceAR1A215(215), dclExternalDeviceAR1A216(216), dclExternalDeviceAR3A215(217), dclExternalDeviceAR3A216(218), dclServerOffAR2A201(301), dclDoorsModuleAR2A202(302), dclTemperaturesAR2A203(303), dclVesdaAR2A204(304), dclServerOffAR4A201(305), dclDoorsModuleAR4A202(306), dclTemperaturesAR4A203(307), dclAnalogueModuleAR4A208(308), dclImsAR2A209(309), dclImsAR4A210(310), dclSocketStripAR2A211(311), dclSocketStripAR2A212(312), dclSocketStripAR4A211(313), dclSocketStripAR4A212(314), dclExternalDeviceAR2A215(215), dclExternalDeviceAR2A216(316), dclExternalDeviceAR4A215(317), dclExternalDeviceAR4A216(318), dclDigitalIOA401(401), dclDigitalIOA402(402), dclWaterMonitorAA403(403), dclWaterMonitorBA404(404), dclFanModule405(405), dclFanModule406(406), dclFanModule407(407), dclValveModule408(408), dclAnalogue409(409), dclGateway(500)} ValveState (BITS) Syntax of valve modules states 104 CoolCons (INTEGER) {coolcon1(1), coolcon2(2), coolcon3(3), coolcon4(4), coolcon5(5), coolcon6(6), coolcon7(7), coolcon8(8), coolcon9(9), coolcon10(10), coolcon11(11), coolcon12(12), coolcon13(13), coolcon14(14), coolcon15(15), coolcon16(16), coolcon17(17), coolcon18(18), coolcon19(19), coolcon20(20), coolcon21(21), coolcon22(22), coolcon23(23), coolcon24(24), coolcon25(25), coolcon26(26), coolcon27(27), coolcon28(28), coolcon29(29), coolcon30(30), coolcon31(31), coolcon32(32)} CoolCons (INTEGER) dclDioNamesSourceDevice dclDioNamesSourceDevice {dclFanModuleA101(101), dclFanModuleA102(102), dclFanModuleA103(103), dclValveModuleA104(104), dclFanModuleA105(105), dclFanModuleA106(106), dclFanModuleA107(107), dclValveModuleA108(108), dclAnalogueA109(109), dclFanModuleA110(110), dclValveModuleA111(111), dclModuleA112(112), dclServerOffAR1A201(201), dclDoorsModuleAR1A202(202), dclTemperaturesAR1A203(203), dclVesdaAR1A204(204), dclServerOffAR3A201(205), dclDoorsModuleAR3A202(206), dclTemperaturesAR3A203(207), dclAnalogueModuleAR3A208(208), dclImsAR1A209(209), dclImsAR3A210(210), dclSocketStripAR1A211(211), dclSocketStripAR1A212(212), dclSocketStripAR3A211(213), dclSocketStripAR3A212(214), dclExternalDeviceAR1A215(215), dclExternalDeviceAR1A216(216), dclExternalDeviceAR3A215(217), dclExternalDeviceAR3A216(218), dclServerOffAR2A201(301), dclDoorsModuleAR2A202(302), dclTemperaturesAR2A203(303), dclVesdaAR2A204(304), dclServerOffAR4A201(305), dclDoorsModuleAR4A202(306), dclTemperaturesAR4A203(307), dclAnalogueModuleAR4A208(308), dclImsAR2A209(309), dclImsAR4A210(310), dclSocketStripAR2A211(311), dclSocketStripAR2A212(312), dclSocketStripAR4A211(313), dclSocketStripAR4A212(314), dclExternalDeviceAR2A215(215), dclExternalDeviceAR2A216(316), dclExternalDeviceAR4A215(317), dclExternalDeviceAR4A216(318), dclDigitalIOA401(401), dclDigitalIOA402(402), dclWaterMonitorAA403(403), dclWaterMonitorBA404(404), dclFanModule405(405), dclFanModule406(406), dclFanModule407(407), dclValveModule408(408), dclAnalogue409(409), dclGateway(500)} DclModules (INTEGER) 105 AlarmTarget (INTEGER) {internal-only(0), email(1), sms(2), trap-host-1(3), trap-host-2(4), trap-host-3(5), trap-host-4(6)} aryAlarm(0), externalCoolingDevice(1), clogSwitch(2), overcurrentPort1(3), overcurrentPort2(4), overcurrentPort3(5), overcurrentPort4(6), overcurrentPower1(7), overcurrentPower2(8), overcurrentPower3(9), overcurrentDigiOutputs(10), powerSupplyADown(11), powerSupplyBDown(12), moduleFault(13), sensorFault(14), fan1Fault(100), fan2Fault(101), fan3Fault(102), fan4Fault(103), fan5Fault(104), fan6Fault(105), supplyAirTempLowAlarm(200), supplyAirTempHighAlarm1(201), supplyAirTempHighAlarm2(202), supplyAirTempHighAlarm3(203), supplyAirTempHighAlarm4(204), returnAirTempLowAlarm(205), returnAirTempHighAlarm1(206), returnAirTempHighAlarm2(207), returnAirTempHighAlarm3(208), returnAirTempHighAlarm4(209), supplyWater1LowAlarm(210), supplyWater1HighAlarm(211), returnWater1LowAlarm(212), returnWater1HighAlarm(213), supplyWater2LowAlarm(214), supplyWater2HighAlarm(215), returnWater2LowAlarm(216), returnWater2HighAlarm(217), temperatureAR11HighAlarm(218), temperatureAR12HighAlarm(219), temperatureAR13HighAlarm(220), temperatureAR14HighAlarm(221), temperatureAR15HighAlarm(222), temperatureAR16HighAlarm(223), temperatureAR21HighAlarm(224), temperatureAR22HighAlarm(225), temperatureAR23HighAlarm(226), temperatureAR24HighAlarm(227), temperatureAR25HighAlarm(228), temperatureAR26HighAlarm(229), temperatureAR31HighAlarm(230), temperatureAR32HighAlarm(231), temperatureAR33HighAlarm(232), temperatureAR34HighAlarm(233), temperatureAR35HighAlarm(234), temperatureAR36HighAlarm(235), temperatureAR41HighAlarm(236), temperatureAR42HighAlarm(237), temperatureAR43HighAlarm(238), temperatureAR44HighAlarm(239), temperatureAR45HighAlarm(240), temperatureAR46HighAlarm(241), humidityLowAlarm(300), humidityHighAlarm1(301), humidityHighAlarm2(302), humidityHighAlarm3(303), humidityHighAlarm4(304), waterSensor(400), leakageSensor(401), condensatePump(402), smokeSensor(500), fireDetectionPreAlarm1(501), fireDetectionPreAlarm2(502), fireDetectionMainAlarm1(503), fireDetectionMainAlarm2(504), fireDetectionFault(505), extinguishingReleased(506), powerMainsA(600), powerMainsB(601), doorCfront(700), doorCrear(701), doorLfront(702), doorLrear(703), doorRfront(704), doorRrear(705), flowMeter1Break(800), flowMeter2Break(801), userInput1(900), userInput2(901), userInput3(902), userInput4(903), userInput5(904), userInput6(905), userInput7(906), userInput8(907), userInput9(908), userInput10(909), userInput11(910), userInput12(911), userInput13(912), userInput14(913), userInput15(914), userInput16(915), userOutput1(916), userOutput2(917), userOutput3(918), userOutput4(919), dclOff(1000), dclStandby(1001), fanStop(1002), emergencyRun(1003), doorsOpen(1004), summaryAlarmPowerMon(1100), overCurrent-L1-mainsA(1101), overCurrent-L2-mainsA(1102), overCurrent-L3-mainsA(1103), lowVoltage-L1-mainsA(1104), lowVoltage-L2-mainsA(1105), lowVoltage-L3-mainsA(1106), activePowerExceeded-mainsA(1107), unbalance-mainsA(1108), overCurrent-L1-mainsB(1111), overCurrent-L2-mainsB(1112), overCurrent-L3-mainsB(1113), lowVoltage-L1-mainsB(1114), lowVoltage-L2-mainsB(1115), lowVoltage-L3-mainsB(1116), activePowerExceeded-mainsB(1117), unbalance-mainsB(1118), overCurrent-L1-mainsC(1121), overCurrent-L2-mainsC(1122), overCurrent-L3-mainsC(1123), lowVoltage-L1-mainsC(1124), lowVoltage-L2-mainsC(1125), lowVoltage-L3-mainsC(1126), activePowerExceeded-mainsC(1127), unbalance-mainsC(1128), overCurrent-L1-mainsD(1131), overCurrent-L2-mainsD(1132), overCurrent-L3-mainsD(1133), lowVoltage-L1-mainsD(1134), lowVoltage-L2-mainsD(1135), lowVoltage-L3-mainsD(1136), activePowerExceeded-mainsD(1137), unbalance-mainsD(1138), temperatureWarning(1141), noValueChange(1142), moduleFailure(1143), gatewayFailure(1144), measureDeviceA(1145), measureDeviceB(1146), measureDeviceC(1147), measureDeviceD(1148)} 106 dclModulesPort1 1.3.6.1.4.1.2769.2.4.1 dclFanModuleA103Table 1.3.6.1.4.1.2769.2.4.1.3.1 dclFanModuleA102Table 1.3.6.1.4.1.2769.2.4.1.2.1 dclFanModuleA101Table 1.3.6.1.4.1.2769.2.4.1.1.1 Modbus line 1 dclFanModuleA103Name dclFanModuleA103Health dclFanModuleA103State dclFanModuleA103Speed1 dclFanModuleA103Speed2 dclFanModuleA103SupplyAir dclFanModuleA103ReturnAir .1.3.6.1.4.1.2769.2.4.1.3.1.1.3 .1.3.6.1.4.1.2769.2.4.1.3.1.1.4 .1.3.6.1.4.1.2769.2.4.1.3.1.1.5 .1.3.6.1.4.1.2769.2.4.1.3.1.1.6 .1.3.6.1.4.1.2769.2.4.1.3.1.1.7 .1.3.6.1.4.1.2769.2.4.1.3.1.1.8 dclFanModuleA102ReturnAir .1.3.6.1.4.1.2769.2.4.1.2.1.1.8 .1.3.6.1.4.1.2769.2.4.1.3.1.1.2 dclFanModuleA102SupplyAir .1.3.6.1.4.1.2769.2.4.1.2.1.1.7 dclFanModuleA103Index dclFanModuleA102Speed2 .1.3.6.1.4.1.2769.2.4.1.2.1.1.6 .1.3.6.1.4.1.2769.2.4.1.3.1.1.1 dclFanModuleA102Speed1 .1.3.6.1.4.1.2769.2.4.1.2.1.1.5 dclFanModuleA102State dclFanModuleA101ReturnAir .1.3.6.1.4.1.2769.2.4.1.1.1.1.8 dclFanModuleA102Health dclFanModuleA101SupplyAir .1.3.6.1.4.1.2769.2.4.1.1.1.1.7 .1.3.6.1.4.1.2769.2.4.1.2.1.1.4 dclFanModuleA101Speed2 .1.3.6.1.4.1.2769.2.4.1.1.1.1.6 .1.3.6.1.4.1.2769.2.4.1.2.1.1.3 dclFanModuleA101Speed1 .1.3.6.1.4.1.2769.2.4.1.1.1.1.5 dclFanModuleA102Name dclFanModuleA101State .1.3.6.1.4.1.2769.2.4.1.1.1.1.4 .1.3.6.1.4.1.2769.2.4.1.2.1.1.2 dclFanModuleA101Health .1.3.6.1.4.1.2769.2.4.1.1.1.1.3 dclFanModuleA102Index dclFanModuleA101Name .1.3.6.1.4.1.2769.2.4.1.1.1.1.2 .1.3.6.1.4.1.2769.2.4.1.2.1.1.1 dclFanModuleA101Index Name .1.3.6.1.4.1.2769.2.4.1.1.1.1.1 Address ro ro ro ro ro ro ro ro ro ro ro ro ro ro ro ro ro ro ro ro ro ro ro ro Type INTEGER32 INTEGER32 INTEGER (0..1000) INTEGER (0..1000) BITS INTEGER DISPLAYSTRING INTEGER INTEGER32 INTEGER32 INTEGER (0..1000) INTEGER (0..1000) BITS INTEGER DISPLAYSTRING INTEGER INTEGER32 INTEGER32 INTEGER (0..1000) INTEGER (0..1000) BITS INTEGER DISPLAYSTRING INTEGER Access 107 dclModulesPort1 1.3.6.1.4.1.2769.2.4.1 dclFanModuleA107Table 1.3.6.1.4.1.2769.2.4.1.7.1 dclFanModuleA106Table 1.3.6.1.4.1.2769.2.4.1.6.1 dclFanModuleA105Table 1.3.6.1.4.1.2769.2.4.1.5.1 dclValveModuleA104Table 1.3.6.1.4.1.2769.2.4.1.4.1 dclValveModuleA104Temperature1 dclValveModuleA104Temperature2 dclValveModuleA104Temperature3 .1.3.6.1.4.1.2769.2.4.1.4.1.1.7 .1.3.6.1.4.1.2769.2.4.1.4.1.1.8 .1.3.6.1.4.1.2769.2.4.1.4.1.1.9 dclFanModuleA106State dclFanModuleA106Speed1 dclFanModuleA106Speed2 dclFanModuleA106SupplyAir dclFanModuleA106ReturnAir .1.3.6.1.4.1.2769.2.4.1.6.1.1.4 .1.3.6.1.4.1.2769.2.4.1.6.1.1.5 .1.3.6.1.4.1.2769.2.4.1.6.1.1.6 .1.3.6.1.4.1.2769.2.4.1.6.1.1.7 .1.3.6.1.4.1.2769.2.4.1.6.1.1.8 dclFanModuleA107Index dclFanModuleA106Health .1.3.6.1.4.1.2769.2.4.1.6.1.1.3 .1.3.6.1.4.1.2769.2.4.1.7.1.1.1 dclFanModuleA106Name dclFanModuleA105ReturnAir .1.3.6.1.4.1.2769.2.4.1.5.1.1.8 .1.3.6.1.4.1.2769.2.4.1.6.1.1.2 dclFanModuleA105SupplyAir .1.3.6.1.4.1.2769.2.4.1.5.1.1.7 dclFanModuleA106Index dclFanModuleA105Speed2 .1.3.6.1.4.1.2769.2.4.1.6.1.1.1 dclFanModuleA105Speed1 .1.3.6.1.4.1.2769.2.4.1.5.1.1.6 dclFanModuleA105State .1.3.6.1.4.1.2769.2.4.1.5.1.1.5 .1.3.6.1.4.1.2769.2.4.1.5.1.1.4 dclFanModuleA105Health dclValveModuleA104Position2 .1.3.6.1.4.1.2769.2.4.1.4.1.1.6 .1.3.6.1.4.1.2769.2.4.1.5.1.1.3 dclValveModuleA104Position1 .1.3.6.1.4.1.2769.2.4.1.4.1.1.5 dclFanModuleA105Name dclValveModuleA104State .1.3.6.1.4.1.2769.2.4.1.4.1.1.4 .1.3.6.1.4.1.2769.2.4.1.5.1.1.2 dclValveModuleA104Health .1.3.6.1.4.1.2769.2.4.1.4.1.1.3 dclFanModuleA105Index dclValveModuleA104Name .1.3.6.1.4.1.2769.2.4.1.4.1.1.2 .1.3.6.1.4.1.2769.2.4.1.5.1.1.1 dclValveModuleA104Index .1.3.6.1.4.1.2769.2.4.1.4.1.1.1 ro ro ro ro ro ro ro ro ro ro ro ro ro ro ro ro ro ro ro ro ro ro ro ro ro ro INTEGER INTEGER32 INTEGER32 INTEGER (0..1000) INTEGER (0..1000) BITS INTEGER DISPLAYSTRING INTEGER INTEGER32 INTEGER32 INTEGER (0..1000) INTEGER (0..1000) BITS INTEGER DISPLAYSTRING INTEGER INTEGER32 INTEGER32 INTEGER32 INTEGER (0..1000) INTEGER (0..1000) BITS INTEGER DISPLAYSTRING INTEGER 108 dclModulesPort1 1.3.6.1.4.1.2769.2.4.1 dclFanModuleA110Table 1.3.6.1.4.1.2769.2.4.10.1 dclAnalogueA109Table 1.3.6.1.4.1.2769.2.4.1.9.1 dclValveModuleA108Table 1.3.6.1.4.1.2769.2.4.1.8.1 dclFanModuleA107State dclFanModuleA107Speed1 dclFanModuleA107Speed2 dclFanModuleA107SupplyAir dclFanModuleA107ReturnAir .1.3.6.1.4.1.2769.2.4.1.7.1.1.4 .1.3.6.1.4.1.2769.2.4.1.7.1.1.5 .1.3.6.1.4.1.2769.2.4.1.7.1.1.6 .1.3.6.1.4.1.2769.2.4.1.7.1.1.7 .1.3.6.1.4.1.2769.2.4.1.7.1.1.8 dclValveModuleA108Temperature1 .1.3.6.1.4.1.2769.2.4.1.8.1.1.7 dclAnalogueA109Health dclAnalogueA109State dclAnalogueA109Value1 dclAnalogueA109Value2 dclAnalogueA109Value3 dclAnalogueA109Value4 dclAnalogueA109Value5 dclAnalogueA109Value6 .1.3.6.1.4.1.2769.2.4.1.9.1.1.3 .1.3.6.1.4.1.2769.2.4.1.9.1.1.4 .1.3.6.1.4.1.2769.2.4.1.9.1.1.5 .1.3.6.1.4.1.2769.2.4.1.9.1.1.6 .1.3.6.1.4.1.2769.2.4.1.9.1.1.7 .1.3.6.1.4.1.2769.2.4.1.9.1.1.8 .1.3.6.1.4.1.2769.2.4.1.9.1.1.9 .1.3.6.1.4.1.2769.2.4.1.9.1.1.10 dclFanModuleA110Index dclAnalogueA109Name .1.3.6.1.4.1.2769.2.4.1.9.1.1.2 .1.3.6.1.4.1.2769.2.4.1.10.1.1.1 dclAnalogueA109Index .1.3.6.1.4.1.2769.2.4.1.9.1.1.1 dclValveModuleA108Temperature3 dclValveModuleA108Position2 .1.3.6.1.4.1.2769.2.4.1.8.1.1.6 .1.3.6.1.4.1.2769.2.4.1.8.1.1.9 dclValveModuleA108Position1 .1.3.6.1.4.1.2769.2.4.1.8.1.1.5 dclValveModuleA108Temperature2 dclValveModuleA108State .1.3.6.1.4.1.2769.2.4.1.8.1.1.4 .1.3.6.1.4.1.2769.2.4.1.8.1.1.8 dclValveModuleA108Name dclValveModuleA108Health .1.3.6.1.4.1.2769.2.4.1.8.1.1.2 .1.3.6.1.4.1.2769.2.4.1.8.1.1.3 dclValveModuleA108Index dclFanModuleA107Health .1.3.6.1.4.1.2769.2.4.1.7.1.1.3 .1.3.6.1.4.1.2769.2.4.1.8.1.1.1 dclFanModuleA107Name .1.3.6.1.4.1.2769.2.4.1.7.1.1.2 ro ro ro ro ro ro ro ro ro ro ro ro ro ro ro ro ro ro ro ro ro ro ro ro ro ro ro INTEGER INTEGER32 INTEGER32 INTEGER32 INTEGER32 INTEGER32 INTEGER32 BITS INTEGER DISPLAYSTRING INTEGER INTEGER32 INTEGER32 INTEGER32 INTEGER (0..1000) INTEGER (0..1000) BITS INTEGER DISPLAYSTRING INTEGER INTEGER32 INTEGER32 INTEGER (0..1000) INTEGER (0..1000) BITS INTEGER DISPLAYSTRING 109 dclModulesPort2 1.3.6.1.4.1.2769.2.4.2 Modbus line 2 dclModulesPort1 1.3.6.1.4.1.2769.2.4.1 dclDoorsModuleAR1A202Table .1.3.6.1.4.1.2769.2.4.2.2.1 dclServerOffAR1A201Table 1.3.6.1.4.1.2769.2.4.2.1.1 dclModuleA112 dclValveModuleA111Table 1.3.6.1.4.1.2769.2.4.11.1 dclDoorsModuleAR1A202Health dclDoorsModuleAR1A202StateInput .1.3.6.1.4.1.2769.2.4.2.2.1.1.3 .1.3.6.1.4.1.2769.2.4.2.2.1.1.4 dclServerOffAR1A201StateOutput .1.3.6.1.4.1.2769.2.4.2.1.1.1.5 dclDoorsModuleAR1A202Name dclServerOffAR1A201StateInput .1.3.6.1.4.1.2769.2.4.2.1.1.1.4 .1.3.6.1.4.1.2769.2.4.2.2.1.1.2 dclServerOffAR1A201Health .1.3.6.1.4.1.2769.2.4.2.1.1.1.3 dclDoorsModuleAR1A202Index dclServerOffAR1A201Name .1.3.6.1.4.1.2769.2.4.2.1.1.1.2 .1.3.6.1.4.1.2769.2.4.2.2.1.1.1 dclServerOffAR1A201Index dclModuleDisplay .1.3.6.1.4.1.2769.2.4.2.1.1.1.1 1.3.6.1.4.1.2769.2.4.1.12.1.0 dclValveModuleA111Temperature3 dclValveModuleA111Temperature1 .1.3.6.1.4.1.2769.2.4.1.11.1.1.7 .1.3.6.1.4.1.2769.2.4.1.11.1.1.9 dclValveModuleA111Position2 .1.3.6.1.4.1.2769.2.4.1.11.1.1.6 dclValveModuleA111Temperature2 dclValveModuleA111Position1 .1.3.6.1.4.1.2769.2.4.1.11.1.1.5 .1.3.6.1.4.1.2769.2.4.1.11.1.1.8 dclValveModuleA111State .1.3.6.1.4.1.2769.2.4.1.11.1.1.4 .1.3.6.1.4.1.2769.2.4.1.10.1.1.8 dclValveModuleA111Health dclFanModuleA110ReturnAir .1.3.6.1.4.1.2769.2.4.1.10.1.1.7 dclValveModuleA111Name dclFanModuleA110SupplyAir .1.3.6.1.4.1.2769.2.4.1.10.1.1.6 .1.3.6.1.4.1.2769.2.4.1.11.1.1.2 dclFanModuleA110Speed2 .1.3.6.1.4.1.2769.2.4.1.10.1.1.5 .1.3.6.1.4.1.2769.2.4.1.11.1.1.3 dclFanModuleA110Speed1 .1.3.6.1.4.1.2769.2.4.1.10.1.1.4 dclValveModuleA111Index dclFanModuleA110State .1.3.6.1.4.1.2769.2.4.1.10.1.1.3 .1.3.6.1.4.1.2769.2.4.1.11.1.1.1 dclFanModuleA110Name dclFanModuleA110Health .1.3.6.1.4.1.2769.2.4.1.10.1.1.2 ro ro ro ro ro ro ro ro ro ro ro ro ro ro ro ro ro ro ro ro ro ro ro ro ro ro BITS INTEGER DISPLAYSTRING INTEGER BITS BITS INTEGER DISPLAYSTRING INTEGER OBJECT IDENTIFIER INTEGER32 INTEGER32 INTEGER32 INTEGER (0..1000) INTEGER (0..1000) BITS INTEGER DISPLAYSTRING INTEGER INTEGER32 INTEGER32 INTEGER (0..1000) INTEGER (0..1000) BITS INTEGER DISPLAYSTRING 110 dclModulesPort2 1.3.6.1.4.1.2769.2.4.2 dclTemperaturesAR1A203Value2 dclTemperaturesAR1A203Value3 dclTemperaturesAR1A203Value4 dclTemperaturesAR1A203Value5 dclTemperaturesAR1A203Value6 .1.3.6.1.4.1.2769.2.4.2.3.1.1.6 .1.3.6.1.4.1.2769.2.4.2.3.1.1.7 .1.3.6.1.4.1.2769.2.4.2.3.1.1.8 .1.3.6.1.4.1.2769.2.4.2.3.1.1.9 .1.3.6.1.4.1.2769.2.4.2.3.1.1.10 dclDoorsModuleAR3A202Table .1.3.6.1.4.1.2769.2.4.2.6.1 dclServerOffAR3A201Table 1.3.6.1.4.1.2769.2.4.2.5.1 dclServerOffAR3A202Name dclServerOffAR3A202Health dclServerOffAR3A202StateInput dclServerOffAR3A202StateOutput .1.3.6.1.4.1.2769.2.4.2.6.1.1.3 .1.3.6.1.4.1.2769.2.4.2.6.1.1.4 .1.3.6.1.4.1.2769.2.4.2.6.1.1.5 dclServerOffAR3A201StateOutput .1.3.6.1.4.1.2769.2.4.2.5.1.1.5 .1.3.6.1.4.1.2769.2.4.2.6.1.1.2 dclServerOffAR3A201StateInput .1.3.6.1.4.1.2769.2.4.2.5.1.1.4 dclServerOffAR3A202Index dclServerOffAR3A201Health .1.3.6.1.4.1.2769.2.4.2.5.1.1.3 .1.3.6.1.4.1.2769.2.4.2.6.1.1.1 dclServerOffAR3A201Name .1.3.6.1.4.1.2769.2.4.2.5.1.1.2 dclVesdaAR1A204EntryStateOutput .1.3.6.1.4.1.2769.2.4.2.4.1.1.5 dclServerOffAR3A201Index dclVesdaAR1A204EntryStateInput .1.3.6.1.4.1.2769.2.4.2.4.1.1.4 .1.3.6.1.4.1.2769.2.4.2.5.1.1.1 dclVesdaAR1A204EntryHealth .1.3.6.1.4.1.2769.2.4.2.4.1.1.3 dclVesdaAR1A204EntryName dclTemperaturesAR1A203Value1 .1.3.6.1.4.1.2769.2.4.2.3.1.1.5 .1.3.6.1.4.1.2769.2.4.2.4.1.1.2 dclTemperaturesAR1A203State .1.3.6.1.4.1.2769.2.4.2.3.1.1.4 dclVesdaAR1A204EntryIndex dclTemperaturesAR1A203Health .1.3.6.1.4.1.2769.2.4.2.3.1.1.3 .1.3.6.1.4.1.2769.2.4.2.4.1.1.1 dclTemperaturesAR1A203Name .1.3.6.1.4.1.2769.2.4.2.3.1.1.2 dclVesdaAR1A204Table .1.3.6.1.4.1.2769.2.4.2.4.1 dclTemperaturesAR1A203Index dclDoorsModuleAR1A202StateOutput dclTemperaturesAR1A203Table .1.3.6.1.4.1.2769.2.4.2.3.1.1.1 .1.3.6.1.4.1.2769.2.4.2.3.1 .1.3.6.1.4.1.2769.2.4.2.2.1.1.5 ro ro ro ro ro ro ro ro ro ro ro ro ro ro ro ro ro ro ro ro ro ro ro ro ro ro BITS BITS INTEGER DISPLAYSTRING INTEGER BITS BITS INTEGER DISPLAYSTRING INTEGER BITS BITS INTEGER DISPLAYSTRING INTEGER INTEGER32 INTEGER32 INTEGER32 INTEGER32 INTEGER32 INTEGER32 BITS INTEGER DISPLAYSTRING INTEGER BITS 111 dclModulesPort2 1.3.6.1.4.1.2769.2.4.2 dclTemperaturesAR3A203Value4 dclTemperaturesAR3A203Value5 dclTemperaturesAR3A203Value6 .1.3.6.1.4.1.2769.2.4.2.7.1.1.8 .1.3.6.1.4.1.2769.2.4.2.7.1.1.9 .1.3.6.1.4.1.2769.2.4.2.7.1.1.10 dclImsAR1A209Table .1.3.6.1.4.1.2769.2.4.2.9.1 dclImsAR1A209State dclImsAR1A209CurrentL1 dclImsAR1A209CurrentL2 dclImsAR1A209CurrentL3 dclImsAR1A209VoltageL1 .1.3.6.1.4.1.2769.2.4.2.9.1.1.5 .1.3.6.1.4.1.2769.2.4.2.9.1.1.6 .1.3.6.1.4.1.2769.2.4.2.9.1.1.7 dclTemperaturesAR3A208Value6 .1.3.6.1.4.1.2769.2.4.2.8.1.1.10 .1.3.6.1.4.1.2769.2.4.2.9.1.1.4 dclTemperaturesAR3A208Value5 .1.3.6.1.4.1.2769.2.4.2.8.1.1.9 .1.3.6.1.4.1.2769.2.4.2.9.1.1.3 dclTemperaturesAR3A208Value4 .1.3.6.1.4.1.2769.2.4.2.8.1.1.8 dclImsAR1A209Name dclTemperaturesAR3A208Value3 .1.3.6.1.4.1.2769.2.4.2.8.1.1.7 .1.3.6.1.4.1.2769.2.4.2.9.1.1.2 dclTemperaturesAR3A208Value2 .1.3.6.1.4.1.2769.2.4.2.8.1.1.6 dclImsAR1A209Index dclTemperaturesAR3A208Value1 .1.3.6.1.4.1.2769.2.4.2.8.1.1.5 .1.3.6.1.4.1.2769.2.4.2.9.1.1.1 dclTemperaturesAR3A208State .1.3.6.1.4.1.2769.2.4.2.8.1.1.4 dclTemperaturesAR3A208Health dclTemperaturesAR3A203Value3 .1.3.6.1.4.1.2769.2.4.2.7.1.1.7 dclTemperaturesAR3A208Name dclTemperaturesAR3A203Value2 .1.3.6.1.4.1.2769.2.4.2.7.1.1.6 .1.3.6.1.4.1.2769.2.4.2.8.1.1.3 dclTemperaturesAR3A203Value1 .1.3.6.1.4.1.2769.2.4.2.7.1.1.5 .1.3.6.1.4.1.2769.2.4.2.8.1.1.2 dclTemperaturesAR3A203State .1.3.6.1.4.1.2769.2.4.2.7.1.1.4 dclTemperaturesAR3A208Index dclTemperaturesAR3A203Health .1.3.6.1.4.1.2769.2.4.2.7.1.1.3 .1.3.6.1.4.1.2769.2.4.2.8.1.1.1 dclTemperaturesAR3A203Name .1.3.6.1.4.1.2769.2.4.2.7.1.1.2 dclAnalogueModuleAR3A208Table .1.3.6.1.4.1.2769.2.4.2.8.1 dclTemperaturesAR3A203Index dclTemperaturesAR3A203Table .1.3.6.1.4.1.2769.2.4.2.7.1.1.1 .1.3.6.1.4.1.2769.2.4.2.7.1 ro ro ro ro ro ro ro ro ro ro ro ro ro ro ro ro ro ro ro ro ro ro ro ro ro ro ro INTEGER32 INTEGER32 INTEGER32 INTEGER32 INTEGER DISPLAYSTRING INTEGER INTEGER32 INTEGER32 INTEGER32 INTEGER32 INTEGER32 INTEGER32 BITS INTEGER DISPLAYSTRING INTEGER INTEGER32 INTEGER32 INTEGER32 INTEGER32 INTEGER32 INTEGER32 BITS INTEGER DISPLAYSTRING INTEGER 112 dclModulesPort2 1.3.6.1.4.1.2769.2.4.2 dclSocketStripAR1A211Table .1.3.6.1.4.1.2769.2.4.2.11.1 dclImsAR3A210Table .1.3.6.1.4.1.2769.2.4.2.10.1 dclImsAR1A211State dclImsAR1A211CurrentL1 dclImsAR1A211CurrentL2 dclImsAR1A211CurrentL3 dclImsAR1A211VoltageL1 .1.3.6.1.4.1.2769.2.4.2.11.1.1.4 .1.3.6.1.4.1.2769.2.4.2.11.1.1.5 .1.3.6.1.4.1.2769.2.4.2.11.1.1.6 .1.3.6.1.4.1.2769.2.4.2.11.1.1.7 dclImsAR3A210Energy .1.3.6.1.4.1.2769.2.4.2.10.1.1.14 .1.3.6.1.4.1.2769.2.4.2.11.1.1.3 dclImsAR3A210Cos .1.3.6.1.4.1.2769.2.4.2.10.1.1.13 dclImsAR1A211Name dclImsAR3A210ReactPower .1.3.6.1.4.1.2769.2.4.2.10.1.1.12 .1.3.6.1.4.1.2769.2.4.2.11.1.1.2 dclImsAR3A210AppPower .1.3.6.1.4.1.2769.2.4.2.10.1.1.11 dclImsAR1A211Index dclImsAR3A210ActPower .1.3.6.1.4.1.2769.2.4.2.10.1.1.10 .1.3.6.1.4.1.2769.2.4.2.11.1.1.1 dclImsAR3A210VoltageL3 dclImsAR3A210VoltageL1 .1.3.6.1.4.1.2769.2.4.2.10.1.1.7 .1.3.6.1.4.1.2769.2.4.2.10.1.1.9 dclImsAR3A210CurrentL3 .1.3.6.1.4.1.2769.2.4.2.10.1.1.6 dclImsAR3A210VoltageL2 dclImsAR3A210CurrentL2 .1.3.6.1.4.1.2769.2.4.2.10.1.1.5 .1.3.6.1.4.1.2769.2.4.2.10.1.1.8 dclImsAR3A210CurrentL1 .1.3.6.1.4.1.2769.2.4.2.10.1.1.4 dclImsAR1A209Energy .1.3.6.1.4.1.2769.2.4.2.9.1.1.14 dclImsAR3A210State dclImsAR1A209Cos .1.3.6.1.4.1.2769.2.4.2.9.1.1.13 dclImsAR3A210Name dclImsAR1A209ReactPower .1.3.6.1.4.1.2769.2.4.2.9.1.1.12 .1.3.6.1.4.1.2769.2.4.2.10.1.1.3 dclImsAR1A209AppPower .1.3.6.1.4.1.2769.2.4.2.9.1.1.11 .1.3.6.1.4.1.2769.2.4.2.10.1.1.2 dclImsAR1A209ActPower .1.3.6.1.4.1.2769.2.4.2.9.1.1.10 dclImsAR3A210Index dclImsAR1A209VoltageL3 .1.3.6.1.4.1.2769.2.4.2.9.1.1.9 .1.3.6.1.4.1.2769.2.4.2.10.1.1.1 dclImsAR1A209VoltageL2 .1.3.6.1.4.1.2769.2.4.2.9.1.1.8 ro ro ro ro ro ro ro ro ro ro ro ro ro ro ro ro ro ro ro ro ro ro ro ro ro ro ro ro INTEGER32 INTEGER32 INTEGER32 INTEGER32 INTEGER DISPLAYSTRING INTEGER INTEGER32 INTEGER32 INTEGER32 INTEGER32 INTEGER32 INTEGER32 INTEGER32 INTEGER32 INTEGER32 INTEGER32 INTEGER32 INTEGER DISPLAYSTRING INTEGER INTEGER32 INTEGER32 INTEGER32 INTEGER32 INTEGER32 INTEGER32 INTEGER32 113 dclModulesPort2 1.3.6.1.4.1.2769.2.4.2 dclSocketStripAR3A211Table .1.3.6.1.4.1.2769.2.4.2.13.1 dclSocketStripAR1A212Table .1.3.6.1.4.1.2769.2.4.2.12.1 dclImsAR3A211State dclImsAR3A211CurrentL1 dclImsAR3A211CurrentL2 dclImsAR3A211CurrentL3 dclImsAR3A211VoltageL1 .1.3.6.1.4.1.2769.2.4.2.13.1.1.4 .1.3.6.1.4.1.2769.2.4.2.13.1.1.5 .1.3.6.1.4.1.2769.2.4.2.13.1.1.6 .1.3.6.1.4.1.2769.2.4.2.13.1.1.7 dclImsAR1A212Energy .1.3.6.1.4.1.2769.2.4.2.12.1.1.14 dclImsAR3A211Name dclImsAR1A212Cos .1.3.6.1.4.1.2769.2.4.2.12.1.1.13 .1.3.6.1.4.1.2769.2.4.2.13.1.1.3 dclImsAR1A212ReactPower .1.3.6.1.4.1.2769.2.4.2.12.1.1.12 .1.3.6.1.4.1.2769.2.4.2.13.1.1.2 dclImsAR1A212AppPower .1.3.6.1.4.1.2769.2.4.2.12.1.1.11 dclImsAR3A211Index dclImsAR1A212ActPower .1.3.6.1.4.1.2769.2.4.2.12.1.1.10 .1.3.6.1.4.1.2769.2.4.2.13.1.1.1 dclImsAR1A212VoltageL3 dclImsAR1A212VoltageL1 .1.3.6.1.4.1.2769.2.4.2.12.1.1.7 .1.3.6.1.4.1.2769.2.4.2.12.1.1.9 dclImsAR1A212CurrentL3 .1.3.6.1.4.1.2769.2.4.2.12.1.1.6 dclImsAR1A212VoltageL2 dclImsAR1A212CurrentL2 .1.3.6.1.4.1.2769.2.4.2.12.1.1.5 .1.3.6.1.4.1.2769.2.4.2.12.1.1.8 dclImsAR1A212CurrentL1 .1.3.6.1.4.1.2769.2.4.2.12.1.1.4 dclImsAR1A211Energy .1.3.6.1.4.1.2769.2.4.2.11.1.1.14 dclImsAR1A212State dclImsAR1A211Cos .1.3.6.1.4.1.2769.2.4.2.11.1.1.13 dclImsAR1A212Name dclImsAR1A211ReactPower .1.3.6.1.4.1.2769.2.4.2.11.1.1.12 .1.3.6.1.4.1.2769.2.4.2.12.1.1.3 dclImsAR1A211AppPower .1.3.6.1.4.1.2769.2.4.2.11.1.1.11 .1.3.6.1.4.1.2769.2.4.2.12.1.1.2 dclImsAR1A211ActPower .1.3.6.1.4.1.2769.2.4.2.11.1.1.10 dclImsAR1A212Index dclImsAR1A211VoltageL3 .1.3.6.1.4.1.2769.2.4.2.11.1.1.9 .1.3.6.1.4.1.2769.2.4.2.12.1.1.1 dclImsAR1A211VoltageL2 .1.3.6.1.4.1.2769.2.4.2.11.1.1.8 ro ro ro ro ro ro ro ro ro ro ro ro ro ro ro ro ro ro ro ro ro ro ro ro ro ro ro ro INTEGER32 INTEGER32 INTEGER32 INTEGER32 INTEGER DISPLAYSTRING INTEGER INTEGER32 INTEGER32 INTEGER32 INTEGER32 INTEGER32 INTEGER32 INTEGER32 INTEGER32 INTEGER32 INTEGER32 INTEGER32 INTEGER DISPLAYSTRING INTEGER INTEGER32 INTEGER32 INTEGER32 INTEGER32 INTEGER32 INTEGER32 INTEGER32 114 dclModulesPort2 1.3.6.1.4.1.2769.2.4.2 dclExternalDeviceAR3A215Table .1.3.6.1.4.1.2769.2.4.2.17.1 dclExternalDeviceAR1A216Table .1.3.6.1.4.1.2769.2.4.2.16.1 dclExternalDeviceAR1A215Table .1.3.6.1.4.1.2769.2.4.2.15.1 dclSocketStripAR3A212Table .1.3.6.1.4.1.2769.2.4.2.14.1 dclImsAR3A212Cos dclImsAR3A212Energy .1.3.6.1.4.1.2769.2.4.2.14.1.1.13 .1.3.6.1.4.1.2769.2.4.2.14.1.1.14 dclExternalDeviceAR3A215Index dclExternalDeviceAR1A216Name .1.3.6.1.4.1.2769.2.4.2.16.1.1.2 .1.3.6.1.4.1.2769.2.4.2.17.1.1.1 dclExternalDeviceAR1A216Index .1.3.6.1.4.1.2769.2.4.2.16.1.1.1 dclExternalDeviceAR1A215Name dclImsAR3A212ReactPower .1.3.6.1.4.1.2769.2.4.2.14.1.1.12 .1.3.6.1.4.1.2769.2.4.2.15.1.1.2 dclImsAR3A212AppPower .1.3.6.1.4.1.2769.2.4.2.14.1.1.11 dclExternalDeviceAR1A215Index dclImsAR3A212ActPower .1.3.6.1.4.1.2769.2.4.2.14.1.1.10 .1.3.6.1.4.1.2769.2.4.2.15.1.1.1 dclImsAR3A212VoltageL3 dclImsAR3A212VoltageL1 .1.3.6.1.4.1.2769.2.4.2.14.1.1.7 .1.3.6.1.4.1.2769.2.4.2.14.1.1.9 dclImsAR3A212CurrentL3 .1.3.6.1.4.1.2769.2.4.2.14.1.1.6 dclImsAR3A212VoltageL2 dclImsAR3A212CurrentL2 .1.3.6.1.4.1.2769.2.4.2.14.1.1.5 .1.3.6.1.4.1.2769.2.4.2.14.1.1.8 dclImsAR3A212CurrentL1 .1.3.6.1.4.1.2769.2.4.2.14.1.1.4 dclImsAR3A211Energy .1.3.6.1.4.1.2769.2.4.2.13.1.1.14 dclImsAR3A212State dclImsAR3A211Cos .1.3.6.1.4.1.2769.2.4.2.13.1.1.13 dclImsAR3A212Name dclImsAR3A211ReactPower .1.3.6.1.4.1.2769.2.4.2.13.1.1.12 .1.3.6.1.4.1.2769.2.4.2.14.1.1.3 dclImsAR3A211AppPower .1.3.6.1.4.1.2769.2.4.2.13.1.1.11 .1.3.6.1.4.1.2769.2.4.2.14.1.1.2 dclImsAR3A211ActPower .1.3.6.1.4.1.2769.2.4.2.13.1.1.10 dclImsAR3A212Index dclImsAR3A211VoltageL3 .1.3.6.1.4.1.2769.2.4.2.13.1.1.9 .1.3.6.1.4.1.2769.2.4.2.14.1.1.1 dclImsAR3A211VoltageL2 .1.3.6.1.4.1.2769.2.4.2.13.1.1.8 ro ro ro ro ro ro ro ro ro ro ro ro ro ro ro ro ro ro ro ro ro ro ro ro ro ro INTEGER DISPLAYSTRING INTEGER DISPLAYSTRING INTEGER INTEGER32 INTEGER32 INTEGER32 INTEGER32 INTEGER32 INTEGER32 INTEGER32 INTEGER32 INTEGER32 INTEGER32 INTEGER32 INTEGER DISPLAYSTRING INTEGER INTEGER32 INTEGER32 INTEGER32 INTEGER32 INTEGER32 INTEGER32 INTEGER32 115 dclModulesPort3 1.3.6.1.4.1.2769.2.4.3 Modbus line 3 dclServerOffAR2A201Health dclServerOffAR2A201StateInput dclServerOffAR2A201StateOutput .1.3.6.1.4.1.2769.2.4.3.1.1.1.3 .1.3.6.1.4.1.2769.2.4.3.1.1.1.4 .1.3.6.1.4.1.2769.2.4.3.1.1.1.5 dclDoorsModuleAR2A202StateOutput .1.3.6.1.4.1.2769.2.4.3.2.1.1.5 dclTemperaturesAR2A203Value1 dclTemperaturesAR2A203Value2 dclTemperaturesAR2A203Value3 .1.3.6.1.4.1.2769.2.4.3.3.1.1.5 .1.3.6.1.4.1.2769.2.4.3.3.1.1.7 dclTemperaturesAR2A203State .1.3.6.1.4.1.2769.2.4.3.3.1.1.4 .1.3.6.1.4.1.2769.2.4.3.3.1.1.6 dclTemperaturesAR2A203Name dclTemperaturesAR2A203Health .1.3.6.1.4.1.2769.2.4.3.3.1.1.2 .1.3.6.1.4.1.2769.2.4.3.3.1.1.3 dclTemperaturesAR2A203Index dclDoorsModuleAR2A202StateInput .1.3.6.1.4.1.2769.2.4.3.2.1.1.4 dclTemperaturesAR2A203Table .1.3.6.1.4.1.2769.2.4.3.3.1.1.1 .1.3.6.1.4.1.2769.2.4.3.3.1 dclDoorsModuleAR2A202Name dclDoorsModuleAR2A202Health .1.3.6.1.4.1.2769.2.4.3.2.1.1.2 .1.3.6.1.4.1.2769.2.4.3.2.1.1.3 dclDoorsModuleAR2A202Index dclServerOffAR2A201Name .1.3.6.1.4.1.2769.2.4.3.1.1.1.2 .1.3.6.1.4.1.2769.2.4.3.2.1.1.1 dclServerOffAR2A201Index dclExternalDeviceAR3A216Name .1.3.6.1.4.1.2769.2.4.2.18.1.1.2 .1.3.6.1.4.1.2769.2.4.3.1.1.1.1 dclExternalDeviceAR3A216Index dclExternalDeviceAR3A215Name .1.3.6.1.4.1.2769.2.4.2.18.1.1.1 .1.3.6.1.4.1.2769.2.4.2.17.1.1.2 dclDoorsModuleAR2A202Table .1.3.6.1.4.1.2769.2.4.3.2.1 dclServerOffAR2A201Table 1.3.6.1.4.1.2769.2.4.3.1.1 dclExternalDeviceAR3A216Table .1.3.6.1.4.1.2769.2.4.2.18.1 ro ro ro ro ro ro ro ro ro ro ro ro ro ro ro ro ro ro ro ro INTEGER32 INTEGER32 INTEGER32 BITS INTEGER DISPLAYSTRING INTEGER BITS BITS INTEGER DISPLAYSTRING INTEGER BITS BITS INTEGER DISPLAYSTRING INTEGER DISPLAYSTRING INTEGER DISPLAYSTRING 116 dclModulesPort3 1.3.6.1.4.1.2769.2.4.3 dclServerOffAR4A202Name dclServerOffAR4A202Health dclServerOffAR4A202StateInput dclServerOffAR4A202StateOutput .1.3.6.1.4.1.2769.2.4.3.6.1.1.2 .1.3.6.1.4.1.2769.2.4.3.6.1.1.3 .1.3.6.1.4.1.2769.2.4.3.6.1.1.4 .1.3.6.1.4.1.2769.2.4.3.6.1.1.5 dclTemperaturesAR4A203Value3 dclTemperaturesAR4A203Value4 dclTemperaturesAR4A203Value5 .1.3.6.1.4.1.2769.2.4.3.7.1.1.7 .1.3.6.1.4.1.2769.2.4.3.7.1.1.9 dclTemperaturesAR4A203Value2 .1.3.6.1.4.1.2769.2.4.3.7.1.1.6 .1.3.6.1.4.1.2769.2.4.3.7.1.1.8 dclTemperaturesAR4A203State dclTemperaturesAR4A203Value1 .1.3.6.1.4.1.2769.2.4.3.7.1.1.4 .1.3.6.1.4.1.2769.2.4.3.7.1.1.5 dclTemperaturesAR4A203Name dclTemperaturesAR4A203Health .1.3.6.1.4.1.2769.2.4.3.7.1.1.2 .1.3.6.1.4.1.2769.2.4.3.7.1.1.3 dclTemperaturesAR4A203Index dclServerOffAR4A202Index dclServerOffAR4A201StateOutput .1.3.6.1.4.1.2769.2.4.3.5.1.1.5 .1.3.6.1.4.1.2769.2.4.3.6.1.1.1 dclServerOffAR4A201Health dclServerOffAR4A201StateInput .1.3.6.1.4.1.2769.2.4.3.5.1.1.3 dclServerOffAR4A201Name .1.3.6.1.4.1.2769.2.4.3.5.1.1.2 .1.3.6.1.4.1.2769.2.4.3.5.1.1.4 dclServerOffAR4A201Index dclVesdaAR2A204EntryStateOutput .1.3.6.1.4.1.2769.2.4.3.4.1.1.5 .1.3.6.1.4.1.2769.2.4.3.5.1.1.1 dclVesdaAR2A204EntryHealth dclVesdaAR2A204EntryStateInput .1.3.6.1.4.1.2769.2.4.3.4.1.1.3 .1.3.6.1.4.1.2769.2.4.3.4.1.1.4 dclVesdaAR2A204EntryName .1.3.6.1.4.1.2769.2.4.3.4.1.1.2 dclTemperaturesAR2A203Value6 dclVesdaAR2A204EntryIndex .1.3.6.1.4.1.2769.2.4.3.3.1.1.10 .1.3.6.1.4.1.2769.2.4.3.4.1.1.1 dclTemperaturesAR2A203Value5 .1.3.6.1.4.1.2769.2.4.3.3.1.1.9 dclTemperaturesAR4A203Table .1.3.6.1.4.1.2769.2.4.3.7.1.1.1 .1.3.6.1.4.1.2769.2.4.3.7.1 dclDoorsModuleAR4A202Table .1.3.6.1.4.1.2769.2.4.3.6.1 dclServerOffAR4A201Table 1.3.6.1.4.1.2769.2.4.3.5.1 dclVesdaAR2A204Table .1.3.6.1.4.1.2769.2.4.3.4.1 dclTemperaturesAR2A203Value4 .1.3.6.1.4.1.2769.2.4.3.3.1.1.8 ro ro ro ro ro ro ro ro ro ro ro ro ro ro ro ro ro ro ro ro ro ro ro ro ro ro ro INTEGER32 INTEGER32 INTEGER32 INTEGER32 INTEGER32 BITS INTEGER DISPLAYSTRING INTEGER BITS BITS INTEGER DISPLAYSTRING INTEGER BITS BITS INTEGER DISPLAYSTRING INTEGER BITS BITS BITS INTEGER DISPLAYSTRING INTEGER32 INTEGER32 INTEGER32 117 dclModulesPort3 1.3.6.1.4.1.2769.2.4.3 dclImsAR4A210Table .1.3.6.1.4.1.2769.2.4.3.10.1 dclImsAR2A209Table .1.3.6.1.4.1.2769.2.4.3.9.1 dclAnalogueModuleAR4A208Table .1.3.6.1.4.1.2769.2.4.3.8.1 dclTemperaturesAR4A203Value6 dclImsAR4A210Name .1.3.6.1.4.1.2769.2.4.3.10.1.1.2 dclImsAR2A209Energy dclImsAR4A210Index .1.3.6.1.4.1.2769.2.4.3.9.1.1.14 .1.3.6.1.4.1.2769.2.4.3.10.1.1.1 dclImsAR2A209ReactPower dclImsAR2A209Cos .1.3.6.1.4.1.2769.2.4.3.9.1.1.12 .1.3.6.1.4.1.2769.2.4.3.9.1.1.13 dclImsAR2A209AppPower .1.3.6.1.4.1.2769.2.4.3.9.1.1.11 ro dclImsAR2A209VoltageL3 dclImsAR2A209ActPower .1.3.6.1.4.1.2769.2.4.3.9.1.1.9 .1.3.6.1.4.1.2769.2.4.3.9.1.1.10 ro dclImsAR2A209VoltageL2 .1.3.6.1.4.1.2769.2.4.3.9.1.1.8 ro ro ro ro ro ro ro ro ro dclImsAR2A209CurrentL3 ro dclImsAR2A209VoltageL1 dclImsAR2A209CurrentL2 .1.3.6.1.4.1.2769.2.4.3.9.1.1.5 ro .1.3.6.1.4.1.2769.2.4.3.9.1.1.6 dclImsAR2A209CurrentL1 .1.3.6.1.4.1.2769.2.4.3.9.1.1.4 ro ro ro ro ro ro ro ro ro ro ro ro ro ro .1.3.6.1.4.1.2769.2.4.3.9.1.1.7 dclImsAR2A209State dclImsAR2A209Name .1.3.6.1.4.1.2769.2.4.3.9.1.1.2 .1.3.6.1.4.1.2769.2.4.3.9.1.1.3 dclImsAR2A209Index dclTemperaturesAR4A208Value6 .1.3.6.1.4.1.2769.2.4.3.8.1.1.10 .1.3.6.1.4.1.2769.2.4.3.9.1.1.1 dclTemperaturesAR4A208Value4 dclTemperaturesAR4A208Value5 .1.3.6.1.4.1.2769.2.4.3.8.1.1.8 dclTemperaturesAR4A208Value3 .1.3.6.1.4.1.2769.2.4.3.8.1.1.7 .1.3.6.1.4.1.2769.2.4.3.8.1.1.9 dclTemperaturesAR4A208Value1 dclTemperaturesAR4A208Value2 .1.3.6.1.4.1.2769.2.4.3.8.1.1.5 dclTemperaturesAR4A208State .1.3.6.1.4.1.2769.2.4.3.8.1.1.4 .1.3.6.1.4.1.2769.2.4.3.8.1.1.6 dclTemperaturesAR4A208Name dclTemperaturesAR4A208Health .1.3.6.1.4.1.2769.2.4.3.8.1.1.2 .1.3.6.1.4.1.2769.2.4.3.8.1.1.3 dclTemperaturesAR4A208Index .1.3.6.1.4.1.2769.2.4.3.7.1.1.10 .1.3.6.1.4.1.2769.2.4.3.8.1.1.1 INTEGER32 DISPLAYSTRING INTEGER INTEGER32 INTEGER32 INTEGER32 INTEGER32 INTEGER32 INTEGER32 INTEGER32 INTEGER32 INTEGER32 INTEGER32 INTEGER32 INTEGER32 DISPLAYSTRING INTEGER INTEGER32 INTEGER32 INTEGER32 INTEGER32 INTEGER32 INTEGER32 BITS INTEGER DISPLAYSTRING INTEGER 118 dclModulesPort3 1.3.6.1.4.1.2769.2.4.3 dclSocketStripAR2A212Table .1.3.6.1.4.1.2769.2.4.3.12.1 dclSocketStripAR2A211Table .1.3.6.1.4.1.2769.2.4.3.11.1 dclImsAR2A212Name .1.3.6.1.4.1.2769.2.4.3.12.1.1.2 dclImsAR2A211Cos dclImsAR2A211Energy .1.3.6.1.4.1.2769.2.4.3.11.1.1.13 .1.3.6.1.4.1.2769.2.4.3.11.1.1.14 dclImsAR2A212Index dclImsAR2A211ReactPower .1.3.6.1.4.1.2769.2.4.3.11.1.1.12 .1.3.6.1.4.1.2769.2.4.3.12.1.1.1 dclImsAR2A211ActPower dclImsAR2A211AppPower .1.3.6.1.4.1.2769.2.4.3.11.1.1.10 .1.3.6.1.4.1.2769.2.4.3.11.1.1.11 dclImsAR2A211VoltageL2 dclImsAR2A211VoltageL3 .1.3.6.1.4.1.2769.2.4.3.11.1.1.8 dclImsAR2A211VoltageL1 .1.3.6.1.4.1.2769.2.4.3.11.1.1.7 .1.3.6.1.4.1.2769.2.4.3.11.1.1.9 dclImsAR2A211CurrentL2 dclImsAR2A211CurrentL3 .1.3.6.1.4.1.2769.2.4.3.11.1.1.5 .1.3.6.1.4.1.2769.2.4.3.11.1.1.6 dclImsAR2A211CurrentL1 .1.3.6.1.4.1.2769.2.4.3.11.1.1.4 dclImsAR2A211Name dclImsAR2A211State .1.3.6.1.4.1.2769.2.4.3.11.1.1.2 .1.3.6.1.4.1.2769.2.4.3.11.1.1.3 dclImsAR2A211Index .1.3.6.1.4.1.2769.2.4.3.11.1.1.1 dclImsAR4A210Cos dclImsAR4A210Energy .1.3.6.1.4.1.2769.2.4.3.10.1.1.13 .1.3.6.1.4.1.2769.2.4.3.10.1.1.14 ro dclImsAR4A210AppPower dclImsAR4A210ReactPower .1.3.6.1.4.1.2769.2.4.3.10.1.1.11 .1.3.6.1.4.1.2769.2.4.3.10.1.1.12 ro dclImsAR4A210ActPower .1.3.6.1.4.1.2769.2.4.3.10.1.1.10 ro ro ro ro ro ro ro ro ro ro ro ro ro ro ro ro ro ro ro ro ro dclImsAR4A210VoltageL2 dclImsAR4A210VoltageL3 ro .1.3.6.1.4.1.2769.2.4.3.10.1.1.8 dclImsAR4A210VoltageL1 .1.3.6.1.4.1.2769.2.4.3.10.1.1.7 ro ro ro ro .1.3.6.1.4.1.2769.2.4.3.10.1.1.9 dclImsAR4A210CurrentL2 dclImsAR4A210CurrentL3 .1.3.6.1.4.1.2769.2.4.3.10.1.1.5 dclImsAR4A210CurrentL1 .1.3.6.1.4.1.2769.2.4.3.10.1.1.4 .1.3.6.1.4.1.2769.2.4.3.10.1.1.6 dclImsAR4A210State .1.3.6.1.4.1.2769.2.4.3.10.1.1.3 DISPLAYSTRING INTEGER INTEGER32 INTEGER32 INTEGER32 INTEGER32 INTEGER32 INTEGER32 INTEGER32 INTEGER32 INTEGER32 INTEGER32 INTEGER32 INTEGER32 DISPLAYSTRING INTEGER INTEGER32 INTEGER32 INTEGER32 INTEGER32 INTEGER32 INTEGER32 INTEGER32 INTEGER32 INTEGER32 INTEGER32 INTEGER32 INTEGER32 119 dclModulesPort3 1.3.6.1.4.1.2769.2.4.3 dclSocketStripAR4A212Table .1.3.6.1.4.1.2769.2.4.3.14.1 dclSocketStripAR4A211Table .1.3.6.1.4.1.2769.2.4.3.13.1 ro dclImsAR4A212Index dclImsAR4A212Name .1.3.6.1.4.1.2769.2.4.3.14.1.1.1 .1.3.6.1.4.1.2769.2.4.3.14.1.1.2 dclImsAR4A211Cos dclImsAR4A211Energy .1.3.6.1.4.1.2769.2.4.3.13.1.1.13 .1.3.6.1.4.1.2769.2.4.3.13.1.1.14 ro dclImsAR4A211AppPower dclImsAR4A211ReactPower .1.3.6.1.4.1.2769.2.4.3.13.1.1.11 .1.3.6.1.4.1.2769.2.4.3.13.1.1.12 ro dclImsAR4A211ActPower .1.3.6.1.4.1.2769.2.4.3.13.1.1.10 ro ro ro ro ro ro ro dclImsAR4A211VoltageL2 dclImsAR4A211VoltageL3 ro .1.3.6.1.4.1.2769.2.4.3.13.1.1.8 dclImsAR4A211VoltageL1 .1.3.6.1.4.1.2769.2.4.3.13.1.1.7 ro ro ro ro ro ro ro ro ro .1.3.6.1.4.1.2769.2.4.3.13.1.1.9 dclImsAR4A211CurrentL2 dclImsAR4A211CurrentL3 .1.3.6.1.4.1.2769.2.4.3.13.1.1.5 .1.3.6.1.4.1.2769.2.4.3.13.1.1.6 dclImsAR4A211CurrentL1 .1.3.6.1.4.1.2769.2.4.3.13.1.1.4 dclImsAR4A211Name dclImsAR4A211State .1.3.6.1.4.1.2769.2.4.3.13.1.1.3 .1.3.6.1.4.1.2769.2.4.3.13.1.1.2 dclImsAR2A212Energy dclImsAR4A211Index .1.3.6.1.4.1.2769.2.4.3.12.1.1.14 .1.3.6.1.4.1.2769.2.4.3.13.1.1.1 dclImsAR2A212Cos .1.3.6.1.4.1.2769.2.4.3.12.1.1.13 ro dclImsAR2A212AppPower dclImsAR2A212ReactPower .1.3.6.1.4.1.2769.2.4.3.12.1.1.11 .1.3.6.1.4.1.2769.2.4.3.12.1.1.12 ro dclImsAR2A212ActPower .1.3.6.1.4.1.2769.2.4.3.12.1.1.10 ro ro dclImsAR2A212VoltageL2 dclImsAR2A212VoltageL3 ro ro .1.3.6.1.4.1.2769.2.4.3.12.1.1.8 dclImsAR2A212VoltageL1 .1.3.6.1.4.1.2769.2.4.3.12.1.1.7 ro ro .1.3.6.1.4.1.2769.2.4.3.12.1.1.9 dclImsAR2A212CurrentL2 dclImsAR2A212CurrentL3 .1.3.6.1.4.1.2769.2.4.3.12.1.1.5 .1.3.6.1.4.1.2769.2.4.3.12.1.1.6 dclImsAR2A212State dclImsAR2A212CurrentL1 .1.3.6.1.4.1.2769.2.4.3.12.1.1.3 .1.3.6.1.4.1.2769.2.4.3.12.1.1.4 INTEGER DISPLAYSTRING INTEGER INTEGER32 INTEGER32 INTEGER32 INTEGER32 INTEGER32 INTEGER32 INTEGER32 INTEGER32 INTEGER32 INTEGER32 INTEGER32 INTEGER DISPLAYSTRING INTEGER INTEGER32 INTEGER32 INTEGER32 INTEGER32 INTEGER32 INTEGER32 INTEGER32 INTEGER32 INTEGER32 INTEGER32 INTEGER32 120 dclModulesPort4 1.3.6.1.4.1.2769.2.4.4 Modbus line 4 dclModulesPort3 1.3.6.1.4.1.2769.2.4.3 dclDigitalIOA401Table .1.3.6.1.4.1.2769.2.4.4.1.1 dclExternalDeviceModule318Table .1.3.6.1.4.1.2769.2.4.3.18.1 dclExternalDeviceModule317Table .1.3.6.1.4.1.2769.2.4.3.17.1 dclExternalDeviceAR2A216Table .1.3.6.1.4.1.2769.2.4.3.16.1 dclExternalDeviceAR2A215Table .1.3.6.1.4.1.2769.2.4.3.15.1 dclExternalDeviceModule317Name dclExternalDeviceModule318Index dclExternalDeviceModule318Name .1.3.6.1.4.1.2769.2.4.3.17.1.1.2 .1.3.6.1.4.1.2769.2.4.3.18.1.1.1 .1.3.6.1.4.1.2769.2.4.3.18.1.1.2 dclDigitalIOA401Index dclExternalDeviceModule317Index .1.3.6.1.4.1.2769.2.4.3.17.1.1.1 .1.3.6.1.4.1.2769.2.4.4.1.1.1.1 dclExternalDeviceAR2A216Name .1.3.6.1.4.1.2769.2.4.3.16.1.1.2 dclExternalDeviceAR2A215Name dclExternalDeviceAR2A216Index .1.3.6.1.4.1.2769.2.4.3.15.1.1.2 .1.3.6.1.4.1.2769.2.4.3.16.1.1.1 dclExternalDeviceAR2A215Index .1.3.6.1.4.1.2769.2.4.3.15.1.1.1 dclImsAR4A212Energy dclImsAR4A212Cos .1.3.6.1.4.1.2769.2.4.3.14.1.1.14 .1.3.6.1.4.1.2769.2.4.3.14.1.1.13 ro dclImsAR4A212AppPower dclImsAR4A212ReactPower .1.3.6.1.4.1.2769.2.4.3.14.1.1.11 .1.3.6.1.4.1.2769.2.4.3.14.1.1.12 ro dclImsAR4A212ActPower .1.3.6.1.4.1.2769.2.4.3.14.1.1.10 ro ro ro ro ro ro ro ro ro ro ro ro ro ro dclImsAR4A212VoltageL2 dclImsAR4A212VoltageL3 ro .1.3.6.1.4.1.2769.2.4.3.14.1.1.8 dclImsAR4A212VoltageL1 .1.3.6.1.4.1.2769.2.4.3.14.1.1.7 ro ro ro ro .1.3.6.1.4.1.2769.2.4.3.14.1.1.9 dclImsAR4A212CurrentL2 dclImsAR4A212CurrentL3 .1.3.6.1.4.1.2769.2.4.3.14.1.1.5 dclImsAR4A212CurrentL1 .1.3.6.1.4.1.2769.2.4.3.14.1.1.4 .1.3.6.1.4.1.2769.2.4.3.14.1.1.6 dclImsAR4A212State .1.3.6.1.4.1.2769.2.4.3.14.1.1.3 INTEGER STRING INTEGER STRING INTEGER STRING INTEGER STRING INTEGER INTEGER32 INTEGER32 INTEGER32 INTEGER32 INTEGER32 INTEGER32 INTEGER32 INTEGER32 INTEGER32 INTEGER32 INTEGER32 INTEGER 121 dclModulesPort4 1.3.6.1.4.1.2769.2.4.4 dclWaterMonitorAA404Table .1.3.6.1.4.1.2769.2.4.4.4.1 dclWaterMonitorAA403Table .1.3.6.1.4.1.2769.2.4.4.3.1 dclDigitalIOA402Table .1.3.6.1.4.1.2769.2.4.4.2.1 dclWaterMonitorAA404Health dclWaterMonitorAA404State dclWaterMonitorAA404Value1 dclWaterMonitorAA404Value2 dclWaterMonitorAA404Value3 dclWaterMonitorAA404Value4 .1.3.6.1.4.1.2769.2.4.4.4.1.1.3 .1.3.6.1.4.1.2769.2.4.4.4.1.1.4 .1.3.6.1.4.1.2769.2.4.4.4.1.1.5 .1.3.6.1.4.1.2769.2.4.4.4.1.1.6 .1.3.6.1.4.1.2769.2.4.4.4.1.1.7 .1.3.6.1.4.1.2769.2.4.4.4.1.1.8 dclWaterMonitorAA403Value6 .1.3.6.1.4.1.2769.2.4.4.3.1.1.10 dclWaterMonitorAA404Name dclWaterMonitorAA403Value5 .1.3.6.1.4.1.2769.2.4.4.3.1.1.9 .1.3.6.1.4.1.2769.2.4.4.4.1.1.2 dclWaterMonitorAA403Value4 .1.3.6.1.4.1.2769.2.4.4.3.1.1.8 dclWaterMonitorAA404Index dclWaterMonitorAA403Value3 .1.3.6.1.4.1.2769.2.4.4.3.1.1.7 .1.3.6.1.4.1.2769.2.4.4.4.1.1.1 dclWaterMonitorAA403Value2 .1.3.6.1.4.1.2769.2.4.4.3.1.1.6 dclWaterMonitorAA403State .1.3.6.1.4.1.2769.2.4.4.3.1.1.4 dclWaterMonitorAA403Value1 dclWaterMonitorAA403Health .1.3.6.1.4.1.2769.2.4.4.3.1.1.3 .1.3.6.1.4.1.2769.2.4.4.3.1.1.5 dclWaterMonitorAA403Name dclDigitalIOA402StateOutput .1.3.6.1.4.1.2769.2.4.4.2.1.1.5 .1.3.6.1.4.1.2769.2.4.4.3.1.1.2 dclDigitalIOA402StateInput .1.3.6.1.4.1.2769.2.4.4.2.1.1.4 dclWaterMonitorAA403Index dclDigitalIOA402Health .1.3.6.1.4.1.2769.2.4.4.3.1.1.1 dclDigitalIOA402Name .1.3.6.1.4.1.2769.2.4.4.2.1.1.3 dclDigitalIOA401StateOutput .1.3.6.1.4.1.2769.2.4.4.1.1.1.5 .1.3.6.1.4.1.2769.2.4.4.2.1.1.2 dclDigitalIOA401StateInput .1.3.6.1.4.1.2769.2.4.4.1.1.1.4 dclDigitalIOA402Index dclDigitalIOA401Health .1.3.6.1.4.1.2769.2.4.4.1.1.1.3 .1.3.6.1.4.1.2769.2.4.4.2.1.1.1 dclDigitalIOA401Name .1.3.6.1.4.1.2769.2.4.4.1.1.1.2 ro ro ro ro ro ro ro ro ro ro ro ro ro ro ro ro ro ro ro ro ro ro ro ro ro ro ro INTEGER32 INTEGER32 INTEGER32 INTEGER32 BITS INTEGER DISPLAYSTRING INTEGER INTEGER32 INTEGER32 INTEGER32 INTEGER32 INTEGER32 INTEGER32 BITS INTEGER DISPLAYSTRING INTEGER BITS BITS INTEGER DISPLAYSTRING INTEGER BITS BITS INTEGER DISPLAYSTRING 122 dclModulesPort4 1.3.6.1.4.1.2769.2.4.4 dclValveModule407Table .1.3.6.1.4.1.2769.2.4.4.7.1 dclFanModule406Table .1.3.6.1.4.1.2769.2.4.4.6.1 dclFanModule405Table .1.3.6.1.4.1.2769.2.4.4.5.1 dclFanModule405SupplyAir dclFanModule405ReturnAir .1.3.6.1.4.1.2769.2.4.4.5.1.1.7 .1.3.6.1.4.1.2769.2.4.4.5.1.1.8 dclValveModule407Name dclValveModule407Health dclValveModule407State dclValveModule407Position1 dclValveModule407Position2 dclValveModule407Temperature1 dclValveModule407Temperature2 dclValveModule407Temperature3 .1.3.6.1.4.1.2769.2.4.4.7.1.1.4 .1.3.6.1.4.1.2769.2.4.4.7.1.1.5 .1.3.6.1.4.1.2769.2.4.4.7.1.1.6 .1.3.6.1.4.1.2769.2.4.4.7.1.1.7 .1.3.6.1.4.1.2769.2.4.4.7.1.1.8 .1.3.6.1.4.1.2769.2.4.4.7.1.1.9 dclFanModule406ReturnAir .1.3.6.1.4.1.2769.2.4.4.6.1.1.8 .1.3.6.1.4.1.2769.2.4.4.7.1.1.3 dclFanModule406SupplyAir .1.3.6.1.4.1.2769.2.4.4.6.1.1.7 .1.3.6.1.4.1.2769.2.4.4.7.1.1.2 dclFanModule406Speed2 .1.3.6.1.4.1.2769.2.4.4.6.1.1.6 dclValveModule407Index dclFanModule406Speed1 .1.3.6.1.4.1.2769.2.4.4.6.1.1.5 .1.3.6.1.4.1.2769.2.4.4.7.1.1.1 dclFanModule406State .1.3.6.1.4.1.2769.2.4.4.6.1.1.4 dclFanModule406Health dclFanModule405Speed2 .1.3.6.1.4.1.2769.2.4.4.5.1.1.6 .1.3.6.1.4.1.2769.2.4.4.6.1.1.3 dclFanModule405Speed1 .1.3.6.1.4.1.2769.2.4.4.5.1.1.5 dclFanModule406Name dclFanModule405State .1.3.6.1.4.1.2769.2.4.4.5.1.1.4 .1.3.6.1.4.1.2769.2.4.4.6.1.1.2 dclFanModule405Health .1.3.6.1.4.1.2769.2.4.4.5.1.1.3 dclFanModule406Index dclFanModule405Name .1.3.6.1.4.1.2769.2.4.4.5.1.1.2 .1.3.6.1.4.1.2769.2.4.4.6.1.1.1 dclFanModule405Index dclWaterMonitorAA404Value6 .1.3.6.1.4.1.2769.2.4.4.4.1.1.10 .1.3.6.1.4.1.2769.2.4.4.5.1.1.1 dclWaterMonitorAA404Value5 .1.3.6.1.4.1.2769.2.4.4.4.1.1.9 ro ro ro ro ro ro ro ro ro ro ro ro ro ro ro ro ro ro ro ro ro ro ro ro ro ro ro INTEGER32 INTEGER32 INTEGER32 INTEGER (0..1000) INTEGER (0..1000) BITS INTEGER DISPLAYSTRING INTEGER INTEGER32 INTEGER32 INTEGER (0..1000) INTEGER (0..1000) BITS INTEGER DISPLAYSTRING INTEGER INTEGER32 INTEGER32 INTEGER (0..1000) INTEGER (0..1000) BITS INTEGER DISPLAYSTRING INTEGER INTEGER32 INTEGER32 123 dclGateway .1.3.6.1.4.1.2769.2.4.5 Gateway dclModulesPort4 1.3.6.1.4.1.2769.2.4.4 dclGatewayDioTable .1.3.6.1.4.1.2769.2.4.5.1.1 dclAnalogueModule409Table .1.3.6.1.4.1.2769.2.4.4.9.1 dclValveModule408Table .1.3.6.1.4.1.2769.2.4.4.8.1 dclAnalogueModule409Value3 dclAnalogueModule409Value4 dclAnalogueModule409Value5 dclAnalogueModule409Value6 .1.3.6.1.4.1.2769.2.4.4.9.1.1.7 .1.3.6.1.4.1.2769.2.4.4.9.1.1.8 .1.3.6.1.4.1.2769.2.4.4.9.1.1.9 .1.3.6.1.4.1.2769.2.4.4.9.1.1.10 dclGatewayDioName dclGatewayDioHealth dclGatewayDioStateInput dclGatewayDioStateOutput .1.3.6.1.4.1.2769.2.4.5.1.1.1.2 .1.3.6.1.4.1.2769.2.4.5.1.1.1.3 .1.3.6.1.4.1.2769.2.4.5.1.1.1.4 .1.3.6.1.4.1.2769.2.4.5.1.1.1.5 dclGatewayDioIndex dclAnalogueModule409Value2 .1.3.6.1.4.1.2769.2.4.4.9.1.1.6 .1.3.6.1.4.1.2769.2.4.5.1.1.1.1 dclAnalogueModule409Value1 .1.3.6.1.4.1.2769.2.4.4.9.1.1.5 dclValveModule408Temperature3 .1.3.6.1.4.1.2769.2.4.4.8.1.1.9 dclAnalogueModule409State dclValveModule408Temperature2 .1.3.6.1.4.1.2769.2.4.4.8.1.1.8 dclAnalogueModule409Health dclValveModule408Temperature1 .1.3.6.1.4.1.2769.2.4.4.8.1.1.7 .1.3.6.1.4.1.2769.2.4.4.9.1.1.4 dclValveModule408Position2 .1.3.6.1.4.1.2769.2.4.4.8.1.1.6 .1.3.6.1.4.1.2769.2.4.4.9.1.1.3 dclValveModule408Position1 .1.3.6.1.4.1.2769.2.4.4.8.1.1.5 dclAnalogueModule409Name dclValveModule408State .1.3.6.1.4.1.2769.2.4.4.8.1.1.4 .1.3.6.1.4.1.2769.2.4.4.9.1.1.2 dclValveModule408Health .1.3.6.1.4.1.2769.2.4.4.8.1.1.3 dclAnalogueModule409Index dclValveModule408Name .1.3.6.1.4.1.2769.2.4.4.8.1.1.2 .1.3.6.1.4.1.2769.2.4.4.9.1.1.1 dclValveModule408Index .1.3.6.1.4.1.2769.2.4.4.8.1.1.1 ro ro ro ro ro ro ro ro ro ro ro ro ro ro ro ro ro ro ro ro ro ro ro ro BITS BITS INTEGER DISPLAYSTRING INTEGER INTEGER32 INTEGER32 INTEGER32 INTEGER32 INTEGER32 INTEGER32 BITS INTEGER DISPLAYSTRING INTEGER INTEGER32 INTEGER32 INTEGER32 INTEGER (0..1000) INTEGER (0..1000) BITS INTEGER DISPLAYSTRING INTEGER 124 dclGlobalSettings .1.3.6.1.4.1.2769.2.4.6.2 Global dclGateway .1.3.6.1.4.1.2769.2.4.5 dclGlobalSettingsDioNamesTable .1.3.6.1.4.1.2769.2.4.6.2.2.1 dclGlobalSettingsLimitsTable .1.3.6.1.4.1.2769.2.4.6.2.1.1 dclGlobalStateTable .1.3.6.1.4.1.2769.2.4.6.1.1 dclGatewayCtrlTable .1.3.6.1.4.1.2769.2.4.5.2.1 dclGlobalSetingsDioNamesIndex dclDioNamesSourceDevice .1.3.6.1.4.1.2769.2.4.6.2.2.1.1.2 dclHighAlarmLimit4 .1.3.6.1.4.1.2769.2.4.6.2.1.1.1.8 .1.3.6.1.4.1.2769.2.4.6.2.2.1.1.1 dclHighAlarmLimit2 dclHighAlarmLimit3 .1.3.6.1.4.1.2769.2.4.6.2.1.1.1.6 .1.3.6.1.4.1.2769.2.4.6.2.1.1.1.7 dclLowAlarmLimit dclHighAlarmLimit1 dclAnalogueSensorName .1.3.6.1.4.1.2769.2.4.6.2.1.1.1.3 .1.3.6.1.4.1.2769.2.4.6.2.1.1.1.4 dclAnalogueModuleSensorIndex .1.3.6.1.4.1.2769.2.4.6.2.1.1.1.2 .1.3.6.1.4.1.2769.2.4.6.2.1.1.1.5 dclGlobalSettingsLimitsIndex dclGlobalStateCoolingPower .1.3.6.1.4.1.2769.2.4.6.1.1.1.9 .1.3.6.1.4.1.2769.2.4.6.2.1.1.1.1 dclGlobalStateSubGroup dclGlobalStateSlaveAddress .1.3.6.1.4.1.2769.2.4.6.1.1.1.7 .1.3.6.1.4.1.2769.2.4.6.1.1.1.8 dclGlobalStateGroup dclGlobalStateHealth dclGlobalStateMode .1.3.6.1.4.1.2769.2.4.6.1.1.1.4 .1.3.6.1.4.1.2769.2.4.6.1.1.1.5 .1.3.6.1.4.1.2769.2.4.6.1.1.1.6 dclGlobalStateName dclGlobalStateActive .1.3.6.1.4.1.2769.2.4.6.1.1.1.2 .1.3.6.1.4.1.2769.2.4.6.1.1.1.3 dclGlobalStateIndex dclGatewayCtrlReturnAirSetpoint .1.3.6.1.4.1.2769.2.4.5.2.1.1.5 .1.3.6.1.4.1.2769.2.4.6.1.1.1.1 dclGatewayCtrlSupplyAirSetpoint dclGatewayCtrlReturnAirTemperature .1.3.6.1.4.1.2769.2.4.5.2.1.1.3 dclGatewayCtrlSupplyAirTemperature .1.3.6.1.4.1.2769.2.4.5.2.1.1.2 .1.3.6.1.4.1.2769.2.4.5.2.1.1.4 dclGatewayCtrlIndex .1.3.6.1.4.1.2769.2.4.5.2.1.1.1 ro ro rw rw rw rw rw rw ro ro ro rw rw rw rw ro ro rw ro rw ro rw ro ro INTEGER INTEGER INTEGER32 INTEGER32 INTEGER32 INTEGER32 INTEGER32 DISPLAYSTRING INTEGER INTEGER INTEGER32 INTEGER (2..254) INTEGER INTEGER INTEGER INTEGER INTEGER DISPLAYSTRING INTEGER INTEGER32 INTEGER32 INTEGER32 INTEGER32 INTEGER 125 dclGlobalSettings .1.3.6.1.4.1.2769.2.4.6.2 dclGlobalSettingsPowerMonTable .1.3.6.1.4.1.2769.2.4.6.2.4.1 rw dclSetOverCurrentL3C dclSetOverCurrentL1D dclSetOverCurrentL2D dclSetOverCurrentL3D dclSetActivePowerExceededA .1.3.6.1.4.1.2769.2.4.6.2.4.1.1.15 .1.3.6.1.4.1.2769.2.4.6.2.4.1.1.16 .1.3.6.1.4.1.2769.2.4.6.2.4.1.1.17 .1.3.6.1.4.1.2769.2.4.6.2.4.1.1.18 .1.3.6.1.4.1.2769.2.4.6.2.4.1.1.19 dclSetOverCurrentL1C dclSetOverCurrentL2C .1.3.6.1.4.1.2769.2.4.6.2.4.1.1.13 dclSetOverCurrentL3B .1.3.6.1.4.1.2769.2.4.6.2.4.1.1.12 .1.3.6.1.4.1.2769.2.4.6.2.4.1.1.14 dclSetOverCurrentL1B dclSetOverCurrentL2B .1.3.6.1.4.1.2769.2.4.6.2.4.1.1.10 dclSetOverCurrentL3A .1.3.6.1.4.1.2769.2.4.6.2.4.1.1.9 .1.3.6.1.4.1.2769.2.4.6.2.4.1.1.11 dclSetOverCurrentL1A dclSetOverCurrentL2A .1.3.6.1.4.1.2769.2.4.6.2.4.1.1.7 .1.3.6.1.4.1.2769.2.4.6.2.4.1.1.8 dclSetLowVoltageL3 .1.3.6.1.4.1.2769.2.4.6.2.4.1.1.6 dclSetLowVoltageL1 dclSetLowVoltageL2 .1.3.6.1.4.1.2769.2.4.6.2.4.1.1.5 .1.3.6.1.4.1.2769.2.4.6.2.4.1.1.4 dclDigitalOutput4Name dclGlobalSettingsPowerMonIndex .1.3.6.1.4.1.2769.2.4.6.2.2.1.1.14 .1.3.6.1.4.1.2769.2.4.6.2.4.1.1.1 dclDigitalOutput3Name .1.3.6.1.4.1.2769.2.4.6.2.2.1.1.13 rw dclDigitalOutput1Name dclDigitalOutput2Name .1.3.6.1.4.1.2769.2.4.6.2.2.1.1.11 .1.3.6.1.4.1.2769.2.4.6.2.2.1.1.12 rw dclDigitalInput8Name .1.3.6.1.4.1.2769.2.4.6.2.2.1.1.10 rw rw rw rw rw rw rw rw rw rw rw rw rw rw rw rw rw ro rw rw rw rw dclDigitalInput6Name dclDigitalInput7Name rw rw .1.3.6.1.4.1.2769.2.4.6.2.2.1.1.8 dclDigitalInput5Name .1.3.6.1.4.1.2769.2.4.6.2.2.1.1.7 rw rw .1.3.6.1.4.1.2769.2.4.6.2.2.1.1.9 dclDigitalInput3Name dclDigitalInput4Name .1.3.6.1.4.1.2769.2.4.6.2.2.1.1.5 .1.3.6.1.4.1.2769.2.4.6.2.2.1.1.6 dclDigitalInput1Name dclDigitalInput2Name .1.3.6.1.4.1.2769.2.4.6.2.2.1.1.3 .1.3.6.1.4.1.2769.2.4.6.2.2.1.1.4 DISPLAYSTRING INTEGER32 INTEGER32 INTEGER32 INTEGER32 INTEGER32 INTEGER32 INTEGER32 INTEGER32 INTEGER32 INTEGER32 INTEGER32 INTEGER32 INTEGER32 INTEGER32 INTEGER32 INTEGER32 INTEGER DISPLAYSTRING DISPLAYSTRING DISPLAYSTRING DISPLAYSTRING DISPLAYSTRING DISPLAYSTRING DISPLAYSTRING DISPLAYSTRING DISPLAYSTRING DISPLAYSTRING DISPLAYSTRING 126 dclGlobalSettings .1.3.6.1.4.1.2769.2.4.6.2 dclSetActivePowerExceededD dclSetUnbalance dclSetDataSaving dclSetGridNumber .1.3.6.1.4.1.2769.2.4.6.2.4.1.1.23 .1.3.6.1.4.1.2769.2.4.6.2.4.1.1.26 .1.3.6.1.4.1.2769.2.4.6.2.4.1.1.27 dclSetActivePowerExceededC .1.3.6.1.4.1.2769.2.4.6.2.4.1.1.21 .1.3.6.1.4.1.2769.2.4.6.2.4.1.1.22 dclSetActivePowerExceededB .1.3.6.1.4.1.2769.2.4.6.2.4.1.1.20 rw rw rw rw rw rw GridNumber INTEGER INTEGER32 INTEGER32 INTEGER32 INTEGER32 127 alarmControl .1.3.6.1.4.1.2769.2.4.7.3 alarmGlobal .1.3.6.1.4.1.2769.2.4.7.2 alarmGroups .1.3.6.1.4.1.2769.2.4.7.1 Alarms alarmControlTable .1.3.6.1.4.1.2769.2.4.7.3.1 moduleTableRef .1.3.6.1.4.1.2769.2.4.7.2.2.0 alarmGlobalTable .1.3.6.1.4.1.2769.2.4.7.2.1 alarmControlIndex alarmGlobalType alarmGlobalState .1.3.6.1.4.1.2769.2.4.7.2.1.1.4 .1.3.6.1.4.1.2769.2.4.7.2.1.1.5 .1.3.6.1.4.1.2769.2.4.7.3.1.1.1 alarmGlobalPriority .1.3.6.1.4.1.2769.2.4.7.2.1.1.3 alarmGlobalSource .1.3.6.1.4.1.2769.2.4.7.2.1.1.2 alarmGlobalState .1.3.6.1.4.1.2769.2.4.7.2.1.1.5 alarmGlobalIndex alarmGlobalType .1.3.6.1.4.1.2769.2.4.7.2.1.1.4 .1.3.6.1.4.1.2769.2.4.7.2.1.1.1 alarmGlobalSource alarmGlobalPriority .1.3.6.1.4.1.2769.2.4.7.2.1.1.2 alarmGlobalIndex .1.3.6.1.4.1.2769.2.4.7.2.1.1.1 .1.3.6.1.4.1.2769.2.4.7.2.1.1.3 alarmUser alarmPowerMon .1.3.6.1.4.1.2769.2.4.7.1.10.0 alarmDigitalIo .1.3.6.1.4.1.2769.2.4.7.1.9.0 .1.3.6.1.4.1.2769.2.4.7.1.11.0 alarmFlowLoss .1.3.6.1.4.1.2769.2.4.7.1.8.0 alarmSmokeSensor alarmPowerLoss .1.3.6.1.4.1.2769.2.4.7.1.5.0 .1.3.6.1.4.1.2769.2.4.7.1.6.0 alarmDoorContacts alarmWaterSensor .1.3.6.1.4.1.2769.2.4.7.1.4.0 .1.3.6.1.4.1.2769.2.4.7.1.7.0 alarmTemperature alarmHumidity .1.3.6.1.4.1.2769.2.4.7.1.2.0 alarmFan .1.3.6.1.4.1.2769.2.4.7.1.1.0 .1.3.6.1.4.1.2769.2.4.7.1.3.0 alarmNotSpecified .1.3.6.1.4.1.2769.2.4.7.1.0.0 ro na ro ro ro ro ro ro ro ro ro ro na na na na na na na na na na na na AlarmTarget OBJECT-IDENTIFIER EventState DclAlarms AlarmPriority CoolCons INTEGER EventState DclAlarms AlarmPriority CoolCons INTEGER INTEGER INTEGER INTEGER INTEGER INTEGER INTEGER INTEGER INTEGER INTEGER INTEGER INTEGER INTEGER As at: August 2013/ Version 1.0 Locations Emerson Network Power - EMEA Racks and Solutions Knürr GmbH Mariakirchener Straße 38 94424 Arnstorf • Germany T +49 8723 27 0 F +49 8723 27 154 [email protected] Emerson Network Power, a business of Emerson (NYSE:EMR), protects and optimizes critical infrastructure for data centers, communications networks, healthcare and industrial facilities. The company provides new-to-the-world solutions, as well as established expertise and smart innovation in areas including AC and DC power and renewable energy, precision cooling systems, infrastructure management, embedded computing and power, integrated racks and enclosures, power switching and controls, and connectivity. Our solutions are supported globally by local Emerson Network Power service technicians. Learn more about Emerson Network Power products and services at Emerson Network Power - USA 1050 Dearborn Drive P.O. Box 29186 Columbus, Ohio 43229 T +1 614 8880246 Emerson Network Power - Asia 7/F, Dah Sing Financial Centre 108 Gloucester Road, Wanchai Hong Kong T +852 2572220 F +852 28029250 www.EmersonNetworkPower.com While every precaution has been taken to ensure accuracy and completeness of this literature, Emerson Network Power and/or its affiliates makes no representations or warranty about the accuracy, reliability, completeness, or timeliness of the materials and disclaims any and all liability for damages resulting from use of this information or for any errors or omissions. ©2013 Emerson Network Power. All rights reserved. Specifications subject to change without notice. Emerson Network Power The global leader in Business-Critical Continuity™. AC Power Connectivity DC Power Embedded Computing Embedded Power Infrastructure Management & Monitoring Outside Plant Power Switching & Controls Precision Cooling Racks & Solutions Services Surge Protection Emerson, Business-Critical Continuity and Emerson Network Power are trademarks of Emerson Electric Co. or one of its affiliated companies. ©2013 Emerson Electric Co.