1
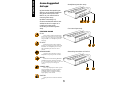
DRP-1
Direct
Recording
Pre-Amp
ENGLISH
FROM THE CHAIRMAN
I would like to thank you personally for selecting
one of our Direct Recording Pre-amps.
In our quest to make the sound of Marshall more
accessible, we constantly use the knowledge and
experience of our Research and Development team to
produce new products.
Following the success of the SE100 Speaker
Emulator and PB100 Power brake, we have now
produced the DRP-1 Direct Recording Pre-Amp.
A remarkable and compact device which is incredibly
versatile and which offers a true simulation of a
Marshall Stack for either recording or practice
purposes, plus pre-amp facilities if you wish to
extend your existing amp/ combo or drive a power
amp and cabinet set-up.
The full experience of the same design team that
produced the JCM 900, Anniversary and Valvestate
ranges has been brought to bear on the DRP-1.
This ensures that the sound quality, engineering
and construction are everything you would expect
from a product bearing the Marshall logo.
I wish you every success and above all, hope you
enjoy using your Direct Recording Pre-amp.
Sincerely,
2
ENGLISH
WARNING!
PLEASE READ THE FOLLOWING LIST CAREFULLY
A. DO NOT attempt to remove the DRP-1 chassis. There are no user serviceable parts inside.
B. ALWAYS have this equipment serviced or repaired by competent, qualified personnel.
C. PLEASE READ this instruction manual carefully before switching on.
DRP-1 Direct Recording
Pre-amp.
The Marshall Direct Recording Pre-Amp
is in essence a complete Marshall stack in
miniature, despite it’s compact size the
DRP-1 uses micro electronic techniques to
emulate the tone and feel of a typical
Marshall pre-amp, power amp and
loudspeaker cabinet. This allows the
recording and reproducing of great guitar
sounds with the minimum of fuss and
without the need to set-up and mic your
normal guitar amp rig.
The benefits of the DRP-1 can be utilised
beyond the realms of the home studio.
For instance the built-in stereo headphone
amplifier can be coupled to your favourite
effects processor to give your personal
practice routines the realism of your stage
sound. Alternatively, use the DRP-1 plugged
into the front end of your normal guitar amp
to fully ‘Marshallize’ it.
Another use of the DRP-1 is to go direct
into the PA from the emulated line-out. This
is especially handy for rehearsal, where
instead of transporting your main system
along, you can turn up with the DRP-1 and
just plug in and play.
In addition to the guitar uses, the Direct
Recording Pre-Amp can be used to add
warmth and another dimension to keyboards,
especially when mixed with the original
sound.
3
Front Panel.
1. Pre-Amp Volume.
Controls the level of input gain. Lower levels
will produce cleaner sounds, whilst higher settings
will increase the distortion produced by the preamp circuitry.
The boost switch (Item 7) provides two basic
gain levels comparable to classic and
contemporary Marshall amps.
2. Master Volume.
As in a true guitar amplifier the master
volume regulates the amount of signal passed
from the ‘pre-amp’ into the ‘power amp’ section.
The amount of drive passed through to the
power amp will influence the tone and overdrive
capabilities of the entire unit.
3,4 & 5. Bass, Middle & Treble
controls.
The Middle and Treble controls are based on
the passive system found on most Marshall amps,
but have a wider sweep allowing you to re-create
many types of guitar amp sounds.
The active Bass control is designed not only
to interact with the Treble and Middle controls,
but also to emulate the resonant low end ‘Thump’
associated with a Marshall 4x12 cabinet.
6. Line Level.
Controls the output level from the Pre-Amp
Out jack (Pre Speaker Emulation), from the
Speaker Emulated Line Out jack and from the
Headphone Amp.
7. Boost/ Battery level switch.
Multi purpose switch that selects the two gain
parameters of the pre-amp and also a ‘momentary’
position to test the battery level in conjunction
with LED (Item 8).
When activated by the switch (Item 7) the
LED will illuminate when there is sufficient
battery power to run the DRP-1.
passed onto other externally connected equipment,
any channel faders etc. should be down when
inserting the headphone jack.
Note!
Low battery levels will produce no light from
the LED, whilst borderline power will produce
only a dim output.
Due to the widely varying nature of
headphones, undesired clipping of the headphone
amplifier may occur and will produce harsh
distortion.
Rear Panel.
To control this simply reduce the line level
until a satisfactory tone is achieved.
9. Input Jack.
Accepts the input from the guitar.
10. D.C. Input.
Accepts 9V DC power from a regulated
power supply.
11. Pre-amp Out jack.
A buffered output suitable for feeding a ‘live’
guitar system such as a separate power amp and
guitar speaker cabinet set-up.
12. Line Out Jack.
Provides the output from the ‘power amp/
loud speaker emulator’.This output should be used
when wanting to directly record a full guitar amp
simulation.
The Line Out socket would also be used to
feed the input of your effects processor when
using the DRP-1 for private practice through the
headphone amplifier, or to feed the input of a
normal guitar amp/ combo as an additional preamp.
15. Battery Compartment (Located in
the base of the unit).
Finger removable cover gives easy access to
the battery compartment for the 9V PP3 or
equivalent type battery.
Note!
The power to the DRP-1 is controlled by the
guitar input jack, therefore to preserve the battery
life the guitar lead should be removed when the
unit is not in use.
13. Headphone Amp Input Jack.
Using an external power supply will switch
out the battery, but the DRP-1 is still turned on/off
by the guitar input jack.
A stereo jack accessing the input to the
headphone amplifier which allows the insertion of
effects processors between the headphone amp
and the output of the emulator.
When unplugging the input jack, it is a wise
precaution to turn down any mixer or recorder
level controls to prevent any handling noise being
passed onto external equipment.
By connecting the left and the right outputs of
the processor to this socket using a stereo jack to
two mono jack Y lead, you can gain all the
benefits of your favourite effects through the
stereo headphones connected to socket 14.
14. Headphone Amp Output Jack.
A stereo 3.5 mm jack fed from the integrated
headphone amp, which will suit stereo headphones
from 32 to 600 Ohm impedance, for private
practice.
To maximise the life of the battery, the
headphone amp is only provided with power when
the headphones are fully connected to the socket.
To prevent the switching transient being
4
ENGLISH
8. Battery Level LED.
ENGLISH
Some Suggested
Set-ups
Headphone/ practice amp.
Remember that pedal type
effects can be added between
the guitar and input of the
DRP-1 as you would with a
normal guitar amp.
●
When recording it is
recommended that effects are
added at the mix stage as is
usually the case when
recording a standard guitar
amp.
●
Live sound pre-amp.
FEATURE GUIDE
FX IN
Stereo input to take the left and right
returns from your effects processor (using
a stereo jack to 2x mono jack Y lead) when
using the DRP-1 as a headphone practice
amp only.
FX OUT
Filtered Line Out socket to feed the
input of your effects processor when using
the DRP-1 as a headphone practice amp
and controlled by the Line Out level
control.
Recording emulator or live P.A.
HEADPHONES
Output for the connection of stereo
headphones for private practice sessions.
I
M
X
MIXER
Filtered Line Out featuring Marshall
emulation for direct connection to either
P.A. or recording mixers (May also be used
to drive the input of a normal guitar
combo).
POWER AMP
Direct pre-amp output to drive a power
amp and cabinet set up. Also provides an
unfiltered alternative output for direct
recording purposes -ideal for recording
bright ‘glassy’ clean sounds.
I
M
GUITAR
Input jack for the connection from the
guitar.
5
X
GUITAR
INPUT JACK
INPUT
AMP
PREAMP
VOL.
GAIN
AMP
TONE
DRIVER
PASSIVE
TONE
MASTER
VOL.
PREAMP
OUT
BUFFER
PREAMP
OUT
JACK
@@@@@@@@e?
@@@@@@@@e?@@@@@@@@?e@@@@@@@@e?@@@@@@@@?e@@@@@@@@e?@@@@@@@@?e@@@@@@@@e?@@@@@@@@?e@@@@@@@@e?@@@@@@@@?e@@@@@@@@e?@@@@@@@@?e
@@@@@@@@e?
@@@@@@@@e?@@@@@@@@?e@@@@@@@@e?@@@@@@@@?e@@@@@@@@e?@@@@@@@@?e@@@@@@@@e?@@@@@@@@?e@@@@@@@@e?@@@@@@@@?e@@@@@@@@e?@@@@@@@@?e@@@@@@@@
@@@@@@@@
@@h?
@@
@@h?
@@
@@h?
@@
@@h?
@@
@@h?
@@
@@h?
@@
@@
@@
@@
@@
@@
@@
@@
@@
@@
@@
@@
@@
@@
@@
@@
@@
@@
@@
@@
@@
@@
@@
@@
@@
@@
@@
@@
@@
@@
@@
@@
@@
@@
@@
@@
@@
@@
@@
@@
@@
@@
@@
@@
@@
@@
@@
@@
@@
@@
@@
@@
@@
@@
@@
@@
@@
@@
@@
@@
@@
@@
@@
@@
@@
@@
@@
@@
@@
@@
@@
@@
@@
@@
@@
@@
@@
@@
@@
@@
@@
@@g
@@g
@@g
@@g
@@g
@@g
@@@@@@@@
@@@@@@@@ ?@@@@@@@@?e@@@@@@@@e?@@@@@@@@?e@@@@@@@@e?@@@@@@@@?e@@@@@@@@e?@@@@@@@@?e@@@@@@@@e?@@@@@@@@?e@@@@@@@@e?@@@@@@@@?e@@@@@@@@
?@@@@@@@@?e@@@@@@@@e?@@@@@@@@?e@@@@@@@@e?@@@@@@@@?e@@@@@@@@e?@@@@@@@@?e@@@@@@@@e?@@@@@@@@?e@@@@@@@@e?@@@@@@@@?e@@@@@@@@
?@@
?@@
?@@
?@@
?@@
?@@
?@@@@@@@@
?@@@@@@@@
BASS MID. TREBLE.
ON
POWER
SWITCH
Master
Volume
.
.
.
Bass
Middle
Treble
Line
Level
Battery Test
Gain
.
HEADPHONE AMP
INPUT JACK
HEADPHONE
AMP
1.
2.
HEADPHONE AMP
INPUT JACK
@@@@@@@@e?
@@@@@@@@e?@@@@@@@@?e@@@@@@@@e?@@@@@@@@?e
@@@@@@@@e?
@@@@@@@@e?@@@@@@@@?e@@@@@@@@e?@@@@@@@@?e@@@@@@@@
@@@@@@@@
@@h?
@@
@@h?
@@
@@h?
@@
@@h?
@@
@@h?
@@
@@h?
@@
.
.
.
.
.
.
.
.
▲
▲
Rear Panel.
LINE
LEVEL
8.
Boost
Normal
Preamp
Volume
POWER
LOUDSPEAKER
AMP
CABINET
SIMULATOR SIMULATOR
BATTERY
TEST
L.E.D.
BOOST
SWITCH
7.
Front Panel.
OFF
3.
4.
5.
6.
Headphone
Out
Headphone
In
Line Out
Pre-amp
Out
DC Input
Input
14.
13.
12.
11.
10.
9.
6
@@
@@
@@
@@
@@
@@
@@
@@
@@
@@
@@
@@
@@
@@
@@
@@
@@
@@
@@
@@
@@
@@
@@
@@
@@
@@
@@
@@
@@
@@
@@
@@
@@
@@
@@
@@
@@
@@
@@
@@
@@
@@
@@
@@
@@
@@
@@
@@
@@
@@
@@
@@
@@
@@
@@
@@
@@
@@
@@
@@
@@
@@
@@
@@
@@
@@
@@
@@
@@
@@
@@
@@
@@
@@
@@
@@
@@
@@
@@
@@
@@
@@
@@
@@
@@
@@
@@
@@
@@
@@
@@
@@
@@
@@
@@
@@
@@
@@
@@
@@
@@
@@
@@
@@
@@
@@
@@
@@
@@
@@
@@
@@
@@g
?@@
@@g
?@@
@@g
?@@
@@g
?@@
@@g
?@@
@@g
?@@
@@@@@@@@
?@@@@@@@@
@@@@@@@@ ?@@@@@@@@?e@@@@@@@@e?@@@@@@@@?e@@@@@@@@
?@@@@@@@@?e@@@@@@@@e?@@@@@@@@?e@@@@@@@@ ?@@@@@@@@
+9v
7
LINE
OUT
JACK