1
MJR-8000
SERIES
COMPUTERIZED TIME RECORDER
PROGRAM / USER'S MANUAL
TABLE OF CONTENTS
1.
GENERAL
1
2
3
Introduction
Hardware Diagram
Specifications
2.
INSTALLATION
Removing Clock From Box
Activating Batteries :
a Ni-Cd B4ttery Backup
b Full Power Reserve Kit (Optional)
Signal Kit (Optional)
Interface Kit RS-232 (Optional)
Mounting
3.
5
6
7
8
11
13
GETTING STARTED
15
16
Keypad
Display Screen
Sample Cards :
a Employee Time Card
b Authorization Cards
c Report Card
d Program Check Card~
4.
PROGRAMMING GUIDE
Overview - Entering in Data
Program Setup Procedure
Initialization
Password Setup
Clock and Calendar Programming Area
Communication Configuration Programming Area
Time Card Number Assignment Configuration Programming Area
General Programming Area
Si gnal Programming Area
Calculation Rules Programming Area
Program Print Out
5.
17
18
19
20
P
P
P
P
P
P
P
P
P
P
P
1
3
4
5
6
7
12
13
15
18
28
U
U
U
U
U
U
U
U
1
2
5
9
10
12
15
18
USER GUIDE
User Setup Procedures For :
a Traditional Assi nment Method
b Employee Master Me Using The Same Card Number
c Employee Master File Using New Card Number
Overview - Instructions for Employee Use
Department Number File Maintenance
Employee Master File Maintenance
Time Card Number Assignment
Time Card Name Printing
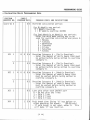
TABLE OF CONTENTS
5.
USER GUIDE (CONTINUED)
Data Correction
Individual Time Card Summary
Reports :
Accumulated Period Hours
Accumulated Period Dollars
Yesterday's Hours
Yesterday's Dollars
Today's Hours
Today's Dollars
Approaching Overtime
Punched IN
Punched OUT
Password Maintenance
6.
U
U
U
U
U
U
U
U
U
U
25
26
28
28
29
29
30
31
32
33
U
U
U
U
34
36
37
38
MAINTENANCE
Diagnostics :
a Memory Test
b Printer Test
c Sensor Test
Replacing Ribbon Cartridge
7.
U 21
U 24
ERROR CODES
MJR-8000 Error Code List / Solution
U 40
8 . APPENDIX
ASCII Table Character Translation
U 44
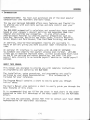
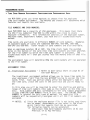
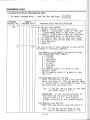
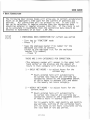
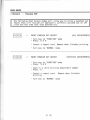
GENERAL
* INTRODUCTION
CONGRATULATIONS!
You have just purchased one of the most popular
computerized time recorders available today .
The new and improved MJR-8000 offers more features and flexibility
to provide you with even more savings and more control over your
labor costs .
The MJR-8000 automatically calculates and accumulates hours worked
based on your company's payroll policies and separates them into
regular and overtime pay categories . It also offers many
sophisticated features to simplify payroll preparation such as :
Lock Out, Revision, Red Print and Grace Zones ; Flexible Rounding
Rules ; Unpaid and Paid Breaks ; Time Card Name Printing ; and more!
In addition easy-to-read management reports are available in
hours or dollars giving you more accurate labor information in less
time .
An optional PC interface is available with JR-LINK PC SOFTWARE
to automate and simplify the payroll process even further . JR-LINK
allows you to download employee names, collect accumulated hours back
to the PC for editing and report generation, and even link your
payroll data directly to an outside payroll service or inside payroll
package .
ABOUT THIS MANUAL
This manual was designed to provide you with complete instructions
on programming and operating the MJR-8000
The installation, setup procedures, and programming are usually
performed by your Amano Representative .
This information is
included for your reference .
The Program Manual contains a chart to easily guide you through
initial setup .
The User's Manual also contains a chart to easily guide you through the
many features of this clock .
It is recommended that you follow the steps in each chart in the order
presented to take full advantage of the many capabilities the MJR - 8000
offers .
If you have any questions, please feel free to contact your local AMANO
representative for additional assistance .
Ill
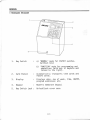
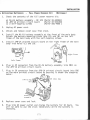
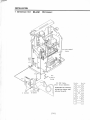
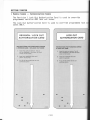
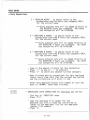
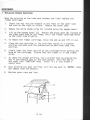
GENERAL
* HARDWARE DIAGRAM
1
2
3
4
5
1.
Key Switch
.
a)
"NORMAL" mode for IN/OUT punches .
(without key)
b)
"FUNCTION" mode for programming and
operations (with ke in keyhole and
turned to the right .
2.
Card Pocket
.
Automatically transports time cards and
report cards .
3.
Display
.
Displays date, day of week, time, AM/PM,
program addresses, etc .
4.
Keypad
. Numeric membrane keypad .
5 . Key Switch Lock : Unlock/Lock cover case .
[2]
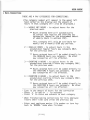
GENERAL
* SPECIFICATIONS
Power Supply
AC 120V + 10%
Ambient Temperature :
+14° F -
Humidity
20% - 90% (No condensation)
Power Consumption
Normal 25VA, Maximum 75VA
Dimensions
13 1/2"H x
Weight
17 .25 pounds
Employee Capacity
250 employees
Ribbon
Two color cartridge
Ni-CD Battery
Backup
Retains data for up to 72 hours
Mounting
Wall or table mount
Communications
(Optional) RS-232 Serial Port
Full Power Reserve
(Optional) 4 hours or 200 punches
Signals
(Optional) Rings up to 30 signals
+10 e F
[3]
9 1/2"W
x
8"D
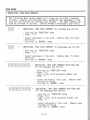
INSTALLATION
REMOVING CLOCK FROM Box
1.
CONTENTS :
1
1
1
2
MJR-8000
Program / User's Manual
uick Reference Guide
#700 keys
2 . REMOVE PACKING MATERIALS :
a) Insert key into keyhole on the front of the cover case
and turn to the right to unlock . Remove cover case .
b) Remove packing materials on ribbon cartridge .
c) Replace cover case and lock .
[5]
INSTALLATION
* ACTIVATING BATTERIES
1.
-
NI-CD BATTERY BACKUP
Ni-Cd BATTERY BACKUP :
When connected will enable the clock to store all data for
up to 72 hours .
a) Unlock cover case and remove .
b) Plug in battery connector (3P, blue and red wires) to
CN-2, located inside the frame (lower right) on
main
printed circuit board (AMJM-1) .
c) Replace cover case and lock .
[6]
INSTALLATION
* ACTIVATING BATTERIES - FULL POWER RESERVE KIT (OPTIONAL)
1.
Check the contents of the full power reserve kit :
a
b
c
Ni-Cd battery assembly - DC 12V
JPR-1A printed circuit board
2 Self-tapping screws
Part# IR-502051
Part# IR-632190
Part# SUG-4006
2.
Unplug AC power cord .
3.
Unlock and remove cover case from clock .
4.
Install the Ni-Cd battery assembly at the front of the main body .
Attach the battery mounting plate into (A) and (B) on the left
frame of the main body with the self-tapping screws .
5.
Install JPR-1A printed circuit board on the right frame of the main
body into holes (C) and (D) .
Right Frame
Left Frame
6.
Plug in 4P connector from the Ni-Cd battery assembly into CN11 on
the JPR-1A printed circuit board .
7.
Plug in 3P connector from the JPR-1A printed circuit board into CN5
on the main printed circuit board by passing it under the stepping
motor .
,_ ~
o' `j) -Zit
°,
(JPR-1A PCB)
11
CN5 (Main PCB)
~~~;'
~
l
J
8.
Replace cover case and lock .
9.
Plug into AC power outlet and charge the battery for 10 hours .
will be able to use the clock immediately while the battery is
charging .
[7]
You
INSTALLATION
* SIGNAL KIT
1 .
(OPTIONAL)
Check the contents of the signal kit :
a
b
c
d
Signal printed circuit board
Locking washer
Self-tapping screw
Cable holder
Part#
Part#
Part#
Part#
IR-632092
WIB-4006
UTJ-4006
EHL-20061 )
2.
Unplug AC power cord .
3.
Unlock and remove cover case from clock .
4.
Install signal printed circuit board assembly on the left frame of
the main body .
Insert printed circuit board support into the holes
(A) and (B) of the left frame .
(see diagram)
5.
Attach the green grounding wire from the terminal block of the
signal printed circuit board to hole (C) of the left frame with the
locking washer and self-tapping screw . (see diagram)
6.
Thread the brown and red twisted wire behind the transformer, over
the Ni-Cd battery, through the large hole (on the right side of the
frame under the back ribbon cable) and plug in 5P connector into
CN6 on main printed circuit board .
N' ..
v'
left frame
,y
1
I
.
a
s
CN6 (Main PCB)
[81
INSTALLATION
* SIGNAL KIT
7A .
(OPTIONAL)
For AC 120V Power Supply :
1) Connect external signal (bell) wire to the terminal block on
the signal PCB and to the AC 120V power supply .
2) Connect a jumper wire from the AC 120V power supply to the
terminal block on the signal PCB .
3) Connect a sure absorber (ESA-100010 - not included) to the
terminal bloc on the signal PCB .
Surge
Absorber
1 2
n
Signal PCB
(c)
O
8
8
Signal
(Bell)
(a)
L TT
(b)
Ground Wire (Green)
t
AC 120V
7B . When finished, replace cover case and lock .
7C . Test signal by following the program instructions on page [P 15]
of the program manual .
[9)
INSTALLATION
* SIGNAL KIT
8A .
(OPTIONAL)
For DC 24V Power Supply :
1) Connect external signal (bell) wire to the terminal block on
the signal PCB and to the DC side of the transformer .
2) Connect a Jumper wire from the DC side of the transformer to
the terminal block on the signal PCB .
3) Connect two wires from the AC side of the transformer to the
120V power supply .
4) Connect a sure absorber (ESA-100010
terminal bloc on the signal PCB .
not included) to the
Surge
Absorber
A
0
Signal PCB
0
Signal
(Bell)
F-
4 3
(b)
Ground Wire (Green)
0
DC
(transformer)
AC e
0
(c)
AC
20V
8B . When finished, replace cover case and lock .
8C . Test signal by following the program instructions on page [P 15,
of the program manual .
( 10 ]
t
INSTALLATION
INTERFACE KIT
1.
RS-232
(OPTIONAL)
Check the contents of the interface kit :
a
Interface p rinted circuit board (Part# AMJ2-1)
Interface B racket (Part# AX1-0019)
c 2 Screws (Part# UTJ-400699)
d Plastic Guide
b
2 . Unplug AC power cord .
3 . Unlock and remove cover case from clock .
4.
Remove screw (A) from the reinforcement plate .
5 . Install the interface bracket (B) to the left side of the frame and
reinstall screw (A) .
6 . Install interface printed circuit board by connecting CN1 (C) to
CN11 (C) on the main printed circuit board .
7 . Mount the interface printed circuit board to the interface bracket
with 2 screws (D) .
8 . Insert the plastic guide (E) on the bottom of the frame .
9 . Connect the RS-232 cable (F) to CN2 (F) on the interface printed
circuit board . Hook the cable around the protruding part of the
interface bracket making sure that it rests on the plastic guides .
10 . Connect the ground wire to the left side of the frame .
11 . When finished, replace the cover case and lock .
INSTALLATION
* INTERFACE KIT
RS-232
(OPTIONAL)
RS-232 Cable
(Part # ACC-600030)
Standard 06-25 pin connectors,
shielded nine conductor cable
with pins 1-8 and 20 .
Pin No .
Pin No .
©. .©
4
4
5
4
8
20
20
7
7
1
[12]
INSTALLATION
MOUNTING
<
Avoid direct sunlight and dusty areas when mounting
>>
1 . WALL MOUNT :
a) Unlock and remove cover case .
b) Remove the two screws that affix the back plate to the body and
push the back plate down .
c) Knock out the three holes on the back plate . (There are two on
the bottom on either side and one in the middle towards the
top) .
d) Drive one wood screw partially into the wall and hang the back
plate by the center hole .
e) After making sure that the back plate is level, firmly secure it
to the wall with the remaining screws .
f) Install the body on the back plate . Fit the hanger lips of the
body frame into the grooves of the back plate . Then install the
two screws to firmly secure the body onto the back plate .
2 . TABLE MOUNT :
a) No installation necessary .
[13]
GETTING STARTED
* KEYPAD
There are 10 numeric keys and 10 additional keys on the membrane
keypad .
I
7
8
9
F
II
4
5
6
E
III
1
2
3
#
IV
0
+
-
CL
Numeric keys - Used to access program addresses,
input of data and user access codes .
Number (Pound) key - Used to advance to next step
within an address and for paid
break when activated .
E
_
Enter key - Registers data entered from keypad
(temporarily) and advances to next
program address .
I
=
Save key - Saves program data, employee master file
data and department data .
CL
=
Clear key - Clears data incorrectly entered from
keypad .
F
=
Function or 'Find' key - Locate a specific address
number by pressing 'F' entering in
the address number, followed by 'E' .
Plus, Minus keys - Used for adding or subtracting
hours when making data corrections .
IV = Roman numeral four key - Used for generating the
sensor test after the memory test
is completed in maintenance .
II1,1III1 =
Not Used
[15]
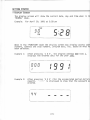
GETTING STARTED
* DISPLAY SCREEN
The display screen will show the current date, day and time when in the
"NORMAL' mode .
Example : For April 30, 1991 at 5 :28 pm
~
_ TUE
L U
PM
When in the "FUNCTION" mode the display screen may display access code
numbers address and step numbers, program data, etc . based on what has
been selected .
Example 1 : After pressing '1 0 E', the program address 000 step 1,
displays the entered data for the year 1991 .
Example 2 : After ressing '4 4 E' (for the accumulated period dollars
report,
'----' is displayed to show that the password was
entered .
[ 16 )
GETTING STARTED
* SAMPLE CARDS -- EMPLOYEE TIME CARD
Each employee will have his or her own time card each pay period . The
employee's name can be printed on the time card . The date day, punched
IN time punched OUT time along with any special codes will be printed
on the left side of the card . The right side of the card will print the
accumulated hours worked for the day, pay period and overtime .
Twenty-five pairs of punches can be printed on each side of the card .
When one side is filled, simply drop the card in the card pocket on the
next side .
1
PURCELL . JIM
000550
ID#
g
1
1
1
1
1
i
i
1
1
2
2
oz
MO
TU
WE
WE
TH
TH
TH
TH
R
R
DEPT#
IN
$
0
OUT g
U,
8 :08
5 :00
4 :28
7 :52
10 :00
2 :00
25
:00*
. . ... . ....
5 :15
6 :3.
8 :00 10 :00*
10 :12 12 :00
:1
2,:0C
: 4
4... . ...: 29
. . . ..
8 :00 12 :02
5:29
..12
. . ....:30
. .. . . .
..... .......
189
HOURS
WORKED
8 :15
8 :15
4 :00
6 :30
8 :00
2 :00
4 :00
5 :30
8 :00
4 :00
9 :00
21 3
008
FILE#
18'37566
ID#
CARD#
ACCUMULATED
HOURS
8 :00
16 :00
20 :00
22 :30
24 :00
26 :00
28 :00
29 :30
32 :00
36 :00
40 :00
o
OVERTIME
i
IN
0 :15
0 :30
1 :30
Al 181
[17]
91
PAY ENDING DATE
NAME
PAY ENDING DATE
23991,33756
09'2
PiIPCELL, JIM
09/22/91
NAME
0I_10550
18 9
DEPT#
FILE#
$ OUT
U
W°oU
HOURS
WORKED
00
CARD#
ACCUMULATED
HOURS
(OVERTIME
GETTING STARTED
* SAMPLE CARDS -- AUTHORIZATION CARDS
The Revision / Lock Out Authorization Card is used to override
programmed revision AND lock out zones .
The Lock Out Authorization Card is used to override programmed lock out
zones ONLY .
LOCK OUT
AUTHORIZATION CARD
INSTRUCTIONS FOR PUNCHING DURING
A LOCK OUT ZONE :
.1
1)
Insert this card and remove . The [II]
will be displayed in the lower left hand
corner on the screen .
2)
Insert your employee time card
(within 10 seconds)
3)
An [L] will be printed next to your
authorized punch .
1
A1183
[18]
GETTING STARTED
* SAMPLE CARDS -- REPORT CARD
The report card is used for all reports and lists that are generated by
using the available User Access Codes .
MJR SERIES
REPORT CARD
/~ AMANO
MJR SERIES
REPORT CARD
Al 184
J
[19]
A
AMANO
Al 184
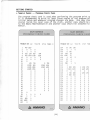
GETTING STARTED
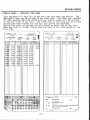
* SAMPLE CARDS -- PROGRAM CHECK CARD
The program check card is used when performing the program print out
It is recommended to print at least three copies of the program aftE
initial setup and whenever program changes are made .
One copy shoul
stored inside the cover case of the clock, another copy should be gi
to the Amano Representative and another copy should be attached to t
manual .
MJR SERIES
PROGRAM CHECK CARD
MJR SERIES
PROGRAM CHECK CARD
PF.nGRAt-1 VER 1 .0
104
105
106
107
108
109
110
111
112
113
1 14
116
AMANO
15
15
[20]
200
0
c:
300
1
1
1 _3Ci ;; t: 9
3 14 :1 14 9
800
0
:10
i0
0
0
0
0
i_i
i_i
0
2 113 i 115
21 1645 1659
0
ii
0
0
0
ii
0
0
0
0
i_i
0
,0
ii
0
0
f_i
4
Ci0
0
0
0
i_i
13r,
it
n
i_i
138
0
0
0
0
Q
f_i
140
0
0
0
i_i
Ci
Ci
0
0
it
i_i
i_i
0
ii
ti
0
0
Q
0
0
0
0
0
0
%0
ii
0
0
A
A1185
FHGE_
1 24
1X 4126
1t :
130
13
134
142
144
146,
14 ;
A
15 150
r7
0 1C+0
r,00
30
10000
0
1
17 :1x:
. . 1 . 91
0
i_i
0
AMANO
PROGRAMMING GUIDE
* OVERVIEW - ENTERING IN DATA
1.
There are six different programming areas in this section . Each
area uses address numbers and step numbers . The step number is the
area within an address number where specific data is entered to
tell the clock HOW to operate . The address number tells the
MJR-8000 WHERE this specific data is to be stored in memory .
2 . There are different types of specific data that can be entered
in a step number . These types appear in the Program Codes and
Descriptions column of each program chart .
a) Code Numbers - Enter a code number that corresponds to the
given value . (Example :
0 = 1200 where 0 is
the code number which is entered into the
step number)
b) Dates
-
c) Hours -
A year, or a month and date is entered into the
step number . (Example : 1991 for the year, 1225
for the month and date)
ALL hours must be entered in military hours
(0000 - 2359)
d) Minutes - ALL minutes must be entered in regular minutes
(00 - 60) regardless of how the clock is set up
to DISPLAY and PRINT the hours .
EXCEPTION : If the clock is set up to print in
hundredth hours then you must enter
hundredth hours when making data
corrections .
3 . Each program area has an address number that will appear in the
upper left hand corner of the display with the step number directly
beneath it .
a) If an address has only 1 step, enter the data followed by the
'E' key to advance to the next address number .
Example : In address 051 you enter in clock number 0 . This
address contains only 1 step .
Address No . Step No .
1
051
Data
0
Advance/Save
E
b) If an address has more than 1 step, enter the data for the
first step and press the '#' key to move to the second step
within that same address .
Enter the data for the second step
and then press the '#' key to move to the third step within that
same address . Enter the data for the third step and then press
the 'E' key to advance to the next address while temporarily
saving the data .
[P 1]
PROGRAMMING GUIDE
* OVERVIEW - ENTERING IN DATA
Example :
In address 000 you enter in the year (1991),
month and date (0430 for April 30th), and
the time in military hours (1728 is equivalent
This address contains 3 steps .
to 5 :28PM) .
Address No .
000
000
000
Step No .
1
2
3
[P 2]
Data
1991
0430
1728
Advance/Save
#
#
E
PROGRAMMING GUIDE
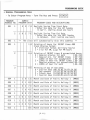
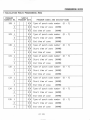
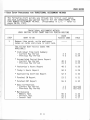
* PROGRAM SETUP PROCEDURE
PROGRAM SETUP CHART
WHAT TO DO
USER
ACCESS CODE
1
Initialize the ENTIRE clock
32 E 64 E
2
Password Setup
11 E
3
Clock and Calendar Programming
10 E
P 6
4
Communication Configuration
Programming
12 E
P 7
5
Time Card Number Assignment
Configuration Programming
13 E
P 8
6
General Programming
20 E
P 13
7
Signal Programming (OPTIONAL Signal kit must be installed
to send signal)
21 E
P 15
8
Calculation Rules Programming
22 E
P 18
9
Program Print Out
23 E
P 28
STEP
[P 3]
PAGE
P 4
P 5, U 33
PROGRAMMING GUIDE
* INITIALIZATION
Before you begin using the MJR-8000 you need to clear the memory
by initializing the clock . This procedure should be performed by
your Amano Representative .
1 . Plug into AC power outlet . The printer section will move
back and forth several times and the display may show an
error code 8-80 . To reset this error code 8-80 press the
'CL' key on the keypad .
2 . Put the key in the key switch located on the top of the clock
next to the card pocket .
3 . Turn the key to the right to access the "FUNCTION" mode .
4 . There are three initialization codes available for clearing
the memory in the clock . You can clear ALL the memory (program
and employee data), Program Data ONLY, and Employee Data ONLY .
a)
CLEAR ALL MEMORY :
This operation should be performed by your
Amano representative before you begin using the clock for the
first time .
- Press '32 E 64 E' followed by the special
'XXXX' and then press 'E' .
password number
- The display screen will go blank .
- Turn the key to the left to return to "NORMAL" mode .
b)
CLEAR PROGRAM DATA ONLY :
This operation will CLEAR ALL progra
data . It should be performed only when it is necessary to
reprogram the clock without having to clear the employee maste
files .
- Press '31 E 99 E' followed by the
and then press 'E' .
user password number 'XXXX
- The display screen will go blank .
- Turn the key to the left to return to "NORMAL" mode .
c) CLEAR EMPLOYEE DATA ONLY :
This operation will CLEAR ALL
employee master file data . It should be performed only when
employee master files need to be reentered without having to
clear out the program data .
- Press '30 E 88 E' followed by the user password number 'XXX
and then press 'E' .
- The display screen will go blank .
- Turn the key to the left to return to "NORMAL" mode .
[P 4]
PROGRAMMING GUIDE
* PASSWORD
SETUP
The MJR-8000 provides you with password protection for certain Program
and User Access Codes to offer you added security .
After the initialization procedure '32 E 64 E XXXX E' the password is
automatically set to '0000' . It is not required for you to change your
password unless you require that extra security .
The areas that require a password are :
• Initialization :
ALL memory (program and emplo ee data)
ALL employee data (30 E 88 E
ALL program data
(31 E 99 E
(32 E 64 E)
• Time Card Number Assignment Programming Area (13 E)
• Time Card Number Assignment (82 E and 83 E)
• Lists with Pay Rates :
Employee Lists
( 64 E and 65 E)
• Reports With Pay Rates or Dollar Amounts :
Individual Time Card Summary with Pay Rates
Accumulated Dollar Reports
44 E 45 E, 46
Yesterday's Dollar Report
49 Ej
Today's Dollar$ Report
51 EE
[P
5]
5 E and 6 E)
and 47 E)
PROGRAMMING GUIDE
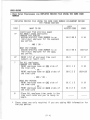
* CLOCK AND CALENDAR PROGRAMMING AREA
- To Enter Program Area - Turn The Key and Press
PROGRAM
ADDRESS NO .
000
1
SAMPLE
PROGRAM DATA
1
2
3
1
I-I
PROGRAM CODES AND DESCRIPTIONS
9
9
1 #
Calendar Year
(YYYY)
4
3
0 #
Month and Date
(MMDD)
7
2
8 E
Hour and Minute (24 hour format - HHMM)
THE DISPLAY WILL GO BLANK AND THE DATA WILL BE AUTOMATICALLY SAVED
IN MEMORY.
- Turn key back to "NORMAL" mode
[P 6]
PROGRAMMING GUIDE
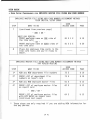
* COMMUNICATION CONFIGURATION PROGRAMMING AREA
- To Enter Program Area - Turn The Key and Press
PROGRAM
ADDRESS NO .
SAMPLE
PROGRAM DATA
I-1
n
E
PROGRAM CODES AND DESCRIPTIONS
051
1
0 E
Clock Number : 0 - 99
(O=Default)
052
1
0 E
Baud Rate :
0
1
2
3
=
=
=
=
1200
2400
4800
4800
(Default)
053
1
0 E
Parity :
0
1
2
3
=
=
=
=
Even
(Default)
Odd
None
Not used
054
1
0 E
Data Length : 0= 7 bit (Default)
1=8bit
055
1
0 E
Stop Bit :
0= 1 Stop (Default)
1 = 2 Stop Bits
** NOTE : Default values are set up for communications with
Amano JR-LINK PC Software package .
IMPORTANT : UPON COMPLETION OF THE COMMUNICATION CONFIGURATION
PROGRAMMING AREA, BE SURE TO PRESS THE
SAVE THE DATA INTO MEMORY .
- Turn key back to "NORMAL" mode
[P 7]
©
KEY TO
PROGRAMMING GUIDE
* TIME CARD NUMBER ASSIGNMENT CONFIGURATION PROGRAMMING AREA
The MJR-8000 gives you three methods to choose from for employee
time card number assignment . The method you choose will determine which
features and reports are available .
FILE NUMBERS AND CARD NUMBERS :
Each MJR-8000 has a capacity of 250 employees . This means that there
are 250 files numbered from 000 to 249 within the clock to store
employee information . This information consists of the employee number,
employee name, department number, pay rate and all accumulated hours
worked .
Time cards are available in different RANGES of card numbers . Examples
of standard boxes of cards are numbered 000-049, 000-099, 000-199,
Other ranges of card numbers are also available .
000-249 and 000-999 .
When an emptoyee punches IN or OUT, the time clock reads the punched
holes on the bottom of the card (the time card number) and then searches
for the file number to which the time card number is assigned . The
accumulated hours will then get stored into the memory area of that file
number .
The assignment type will determine HOW the card numbers will be assigned
to the file number .
ASSIGNMENT TYPES :
1)
Traditional
Assignment - ( Refer to User Setup Chart on page U1 of
the User Manual)
The traditional assignment method allows you to issue time cards to
your employees right from the box WITHOUT having to assign the time
cards first . Each pay period simply write the employee's name on
the time card, place the card in the card rack and you're ready to
go .
In this area you will be required to enter the starting and ending
ran ?e of time card numbers (the same as the numbers on the time card
box) . File number 000 will correspond to the card number programmed
in the STARTING CARD NUMBER field in this area . The ENDING CARD
NUMBER is i gnored for this type of method . The remaining file
numbers will be sequentially assigned until all 250 file numbers are
assigned .
** NOTES : a) Since the employee master file is not being used there
are no names, departments or pay rates in the clock
which limits the reports that can be generated .
The following reports can be generated :
* Individual Time Card Summary [Current (3 E) and
Previous (4 E) Pay Periods]
[P 8 1
PROGRAMMING GUIDE
* TIME CARD NUMBER ASSIGNMENT CONFIGURATION PROGRAMMING AREA
*
*
*
*
*
Accumulated Period Hours
Previous (41 E) Pay Perio
Yesterda 's Hours
48
Today's ours
50
Approaching Overtime
52
53
Punched IN
Punched OUT
55
Current (40 E) and
s
E
E
E
E
E
When an attempt is made to generate any other report
an error code (2-14) will be displayed .
b) If a semimonthly or monthly pay period is set up,
employees should be issued the same time card number
each pay period . The weekly overtime hours will
carry-over onto the new time card and ensure correct
calculation .
c) It is NOT recommended to use this method if
communicating with the PC JR-LINK Software .
d) If the clock is initialized after setting up the
assignment area 13E, you will have to reprogram 13E to
reassign time card numbers to the file numbers .
2)
EmDlov a Master File Usinq The Same Card Numbers S etup C harts on pages U2 - U4 of the User Manual)
(Refer to User
This method gives you the flexibility to utilize ALL of the features
of the MJR-8000 without having to worry about assigning time cards
(Initial set up is required)
every pay period .
In this area you will be required to enter the starting and ending
ran a of time card numbers (the same as the numbers on the time card
box) . The initial set up requires you to automatically assi gn time
card numbers for ALL employees (User Access Code = 83 E) . The
STARTING CARD NUMBER entered during 83 E must be within the starting
and ending range card numbers programmed in this area .
FOR EXAMPLE :
• There are 45 employees
• The box of time cards is numbered 000 - 049 so the
starting and ending card number range programmed in
this area is 000 - 049 .
• When accessing 83 E to automatically assign time card
numbers, the starting card range number entered is
000 .
• The clock will assign the cards as follows :
File Number
= Card Number
000
=
000
001
=
001
045
=
045
(Card numbers 046 - 049 will not be used)
Card numbers 000 - 045 will be used each pay period
and correspond to the file numbers above .
[P 9]
PROGRAMMING GUIDE
* TIME CARD NUMBER ASSIGNMENT CONFIGURATION PROGRAMMING AREA
** NOTES :
a) Since the employee master file IS USED you will be
required to set up departments and employees before
a ssi qning the time cards . (User Access C odes = 72 E
and 61 E) .
b) When new employees are added during the pay period
they will have to be individually assigned . (User
Access Codes = 61 E and 84 E)
c) During the time card number assignment (83 E), if the
ending card number is reached during sequential
incrementing, the next assignment will scroll back to
the starting card number .
d) ALL of the features and reports are available by using
this method .
3)
EmDlovee Master File Usinq New Card Numbers - (Refer to User Setup
Charts on page U5 - U8 in the User Manual)
This method gives you the flexibility to utilize ALL of the features
of the MJR-8000 . This method allows you to maximize your time card
usage . By assigning time card numbers each pay period, you will
be able to use each and every time card number without waste .
In this area you will be required to enter the starting and ending
range of time card numbers (the same as the numbers on the timecard
box)) . In addition to the initial set up, it is required to
automatically assign time card numbers EACH pay period for ALL
employees (User Access Code = 82 E or 83 E) . The STARTING CARD
NUMBER entered during 82 E or 83 E must be within the starting and
ending range card numbers programmed in this area . If the ending
card number is reached during sequential incrementing, the next
assignment will scroll back to the starting card number .
FOR EXAMPLE :
• Card assignment for four consecutive weeks with 75 employees .
• The box of time cards is 000 - 999 so the starting and ending card
range numbers programmed in this area are 000 and 999 .
• When accessing 83 E 88 E (for the current pay period) to
•
automatically assi gn time card numbers, the starting card range
number entered is 000 .
The clock will assign the cards as follows :
File Number
= Card Number
000
=
000
001
=
001
075
=
075
• When accessing 83 E 99 E (for the next pay period) to automatically assign time card numbers, the starting card number is 076 .
[P lob
PROGRAMMING GUIDE
* TIME CARD NUMBER ASSIGNMENT CONFIGURATION PROGRAMMING AREA
• The clock will assign the cards as follows :
File Number
000
001
075
= Card Number
=
076
=
077
=
151
• When this week becomes the current pay period, access 83 E 99 E
(for the next pay period) to automatically assign time card
numbers . The starting card number is 152 .
• The clock will assign the cards as follows :
File Number
= Card Number
000
=
152
001
=
153
075
=
226
• When this week becomes the current pay period, access 83 E 99 E
(for the next pay period) to automatically assign time card
numbers . The starting card number is 227 .
• The clock will assign the cards as follows :
File Number
= Card Number
000
=
227
001
=
228
075
** NOTES :
=
301
a) Since the employee master file IS USED you will be
required to set up departments and employees before
assi gnin the time cards . (User Access Codes = 72 E
and 61 E)E
b) When new employees are added during the pay period
they will have to be individually assigned . (User
Access Codes = 61 E and 84 E)
c) During the time card number assignment (83 E), if the
ending card number is reached during sequential
incrementing, the next assignment will scroll back to
the starting card number .
d) Duplicate time card numbers should not be used for 3
consecutive pay periods . If time card number 000 is
assigned to FILE number 000 for the current pay
period, then the time card number 000 should NOT be
assigned at all for the next or previous pay period .
e) ALL of the features and reports are available .
PROGRAMMING GUIDE
* TIME CARD NUMBER ASSIGNMENT CONFIGURATION PROGRAMMING AREA
- To Enter Program Area - Turn The Key and Press
-
Ia a
Type in your valid password number and press 'E' .
PROGRAM
ADDRESS NO .
13
SAMPLE
PROGRAM DATA
1
#
PROGRAM CODES AND DESCRIPTIONS
Assignment Type :
0 = Traditional Assignment
1 = Employee Master Files with The Same
Time Card Numbers
2 = Employee Master Files with New Time
Card Numbers
2
0
0
0 #
Starting Time Card Number Range
(Enter a valid 3 digit number, 000 - 999)
3
2
~
4
9 E
Ending Time Card Number Range
(Enter a valid 3 digit number, 000 - 999)
a ck
THE DISPLAY WILL GO BLANK AND THE DATA WILL BE AUTOMATICALLY SAVED
IN MEMORY .
- Turn key back to "NORMAL" mode
[P 12]
PROGRAMMING GUIDE
* GENERAL PROGRAMMING AREA
- To Enter Program Area - Turn The Key and Press ©
PROGRAM
ADDRESS NO .
001
SAMPLE
PROGRAM DATA
1
E]
I - I[
PROGRAM CODES AND DESCRIPTIONS
4
0
7 #
Daylight Saving Time Start Date
- Enter the date for the 1ST Sunda
in April . (Spring ahead one hour
0
2
7 E
Daylight Saving Time End Date
- Enter the date for the LAST Sunday
(Fall behind one hour)
in October .
2
1
002
1
<< The clock will automatically skip this address >>
003
1
#
2
0 #
Printing of IN/OUT times & accumulated hours :
0 = Regular minutes for both
:00- :59
1 = Regular min . for IN/OUT times
:00- :59
10th of hour for accumulated
.00- .98
2 = 100th of hour for IN/OUT times
.00- .98
Regular minutes for accumulated :00- :59
3 =. 10th of hour for both
.00- .98
3
0 E
Printing of day of
0 = English days
1 = Day numbers
2 = French days
3 = Spanish days
Printing of hours for IN/OUT times AND
Clock Display Format :
0 = 0-23 hour format (militar hours)
1 = 1-12 for AM, 1-12 for PM ours
the week :
MO,TU,WE,TH,FR,SA,SU
D1,D2,D3,D4,D5,D6,D7
LU,MA,ME,JE,VE,SA,DI
LU,MA,MI,JU,VI,SA,DO
004
1
1
0
1 E
Month and Date of Public Holiday 1 (MMDD)
005
1
2
1
8 E
Month and Date of Public Holiday 2 (MMDD)
006
1
5
2
7 E
Month and Date of Public Holiday 3 (MMDD)
007
1
7
0
4 E
Month and Date of Public Holiday 4 (MMDD)
008
1
9
0
2 E
Month and Date of Public Holiday 5 (MMDD)
009
1
1
0
1
4 E
Month and Date of Public Holiday 6 (MMDD)
010
1
1
1
2
8 E
Month and Date of Public Holiday 7 (MMDD)
011
1
1
2
2
5 E
Month and Date of Public Holiday 8 (MMDD)
012
1
0 E
Month and Date of Public Holiday 9 (MMDD)
[P 13]
PROGRAMMING GUIDE
* GENERAL PROGRAMMING AREA
PROGRAM
ADDRESS NO .
SAMPLE
PROGRAM DATA
PROGRAM CODES AND DESCRIPTIONS
013
1
E
Month and Date of Public Holiday 10 (MMDD)
014
1
0 E
Month and Date of Public Holiday 11 (MMDD)
015
1
0 E
Month and Date of Public Holiday 12 (MMDD)
016
1
0 E
Month and Date of Public Holiday 13 (MMDD)
017
1
0 E
Month and Date of Public Holiday 14 (MMDD)
018
1
0 E
Month and Date of Public Holiday 15 (MMDD)
019
1
0 E
Month and Date of Public Holiday 16 (MMDD)
Holidays worked can be sorted into regular hours or overtime hours
by selecting the appropriate pay category code located in the Calculation
Programming Area (22E) address 105 .
IMPORTANT :
UPON COMPLETION OF THE GENERAL PROGRAMMING AREA, BE SURE
TO PRESS THE © KEY TO SAVE THE DATA INTO MEMORY .
- Turn key back to "NORMAL" mode
[P 14]
PROGRAMMING GUIDE
* SIGNAL PROGRAMING AREA (OPTIONAL)
- To Enter Program Area - Turn The Key and Press
PROGRAM
ADDRESS NO .
020
1
021
1
SAMPLE
PROGRAM DATA
1
3
-II-1
E
PROGRAM CODES AND DESCRIPTIONS
5 E
Signal duration in seconds ( 0 - 15)
5 #
Day code number :
1 = Monday
2 = Tuesday
3 = Wednesday
4 = Thursday
5 = Friday
6 = Saturday
7 = Sunday
8 = Monday thru Friday
9 = Monday thru Sunday
- Enter the number for the day(s) the
signal applies .
(Example :
If Mon, Wed, Fri press 1,3,5)
** When code number is selected the day(s)
will appear on the display .
2
022
7
1
2
023
7
1
2
0
1
3
0
1
2
027
0
1
2
026
8
1
2
025
5
1
2
024
3
1
6
5
1
2
1
7
0
0 E
Signal time
5 #
Day code number (1 - 9)
5 E
Signal
8 #
Day code number (1 - 9)
0 E
Signal time
8 #
Day code number (1 - 9)
0 E
Signal time
8 #
Day code number (1 - 9)
0 E
Signal time
8 #
Day code number (1 - 9)
5 E
Signal time
8 #
Day code number (1 - 9)
0 E
Signal time
time
[P 15]
(HHMM)
(HHMM)
(HHMM)
(HHMM)
(HHMM)
(HHMM)
(HHMM)
PROGRAMMING GUIDE
* SIGNAL PROGRAMMING AREA (OPTIONAL)
PROGRAM
ADDRESS NO .
028
029
030
031
032
033
034
035
036
037
038
039
SAMPLE
PROGRAM DATA
PROGRAM CODES AND DESCRIPTIONS
1
0 #
Day code number (1 - 9)
2
0 E
Signal time
1
0 #
Day code number (1 - 9)
2
0 E
Signal time
1
0 #
Day code number (1 - 9)
2
0 E
Signal time
1
0 #
Day code number (1 - 9)
2
0 E
Signal time
1
0 #
Day code number (1 - 9)
2
0 E
Signal time
1
0 #
Day code number (1 - 9)
2
0 E
Signal time
1
0 #
Day code number (1 - 9)
2
0 E
Signal time
1
0 #
Day code number (1 - 9)
2
0 E
Signal time
1
0 #
Day code number (1 - 9)
2
0 E
Signal time
1
0 #
Day code number (1 - 9)
2
0 E
Signal time
1
0 #
Day code number (1 - 9)
2
0 E
Signal time
1
0 #
Day code number (1 - 9)
2
0 E
Signal time
[P 16]
(HHMM)
(HHMM)
(HHMM)
(HHMM)
(HHMM)
(HHMM)
(HHMM)
(HHMM)
(HHMM)
(HHMM)
(HHMM)
(HHMM)
PROGRAMMING GUIDE
* SIGNAL PROGRAMMING AREA (OPTIONAL)
PROGRAM
ADDRESS NO .
040
SAMPLE
PROGRAM DATA
PROGRAM CODES AND DESCRIPTIONS
1
0 #
Day code number (1 - 9)
2
0 E
Signal time
1
0 #
Day code number (1 - 9)
2
0 E
Signal time
1
0 #
Day code number (1 - 9)
2
0 E
Signal time
043 1
0 #
Day code number (1 - 9)
2
0 E
Signal time
1
0 #
Day code number (1 - 9)
2
0 E
Signal time
1
0 #
Day code number (1 - 9)
2
0 E
Signal time
1
0 #
Day code number (1 - 9)
2
0 E
Signal time
1
0 #
Day code number (1 - 9)
2
0 E
Signal time
1
0 #
Day code number (1 - 9)
2
0 E
Signal time
1
0 #
Day code number (1 - 9)
2
0 E
Signal time
1
0 #
Day code number (1 - 9)
2
0 E
Signal time
041
042
044
045
046
047
048
049
050
(HHMM)
(HHMM)
(HHMM)
(HHMM)
(HHMM)
(HHMM)
(HHMM)
(HHMM)
(HHMM)
(HHMM)
(HHMM)
IMPORTANT : UPON COMPLETION OF THE SIGNAL PROGRAMMING AREA, BE SURE
TO PRESS THE
I
l KEY TO SAVE THE DATA INTO MEMORY .
- Turn key back to "NORMAL" mode
[P 17]
PROGRAMMING GUIDE
* CALCULATION RULES PROGRAMMING AREA
- To Enter Program Area - Turn The Key and Press
PROGRAM
ADDRESS NO .
100
SAMPLE
PROGRAM DATA
IM F
PROGRAM CODES AND DESCRIPTIONS
1
3 #
Pay period code number :
0 = Weekly (Front side of card only)
1 = Weekly - Using both sides of time card
(Programmed week is the front side)
2 = Weekly - Using both sides of time card
(Programmed week is the back side)
3 = Bi-Weekly (Pay period ends next week
4 = Bi-Weekly (Pay period ends this week
5 = Semi-Monthly
6 = Monthly
2
7 #
Pay ending day or date depends on pay period
selected in previous address .
For Weekly or Bi-Weekly pay period enter
pay ending DAY code number :
1 = Monday
2 = Tuesday
3 = Wednesday
4 = Thursday
5 = Friday
6 = Saturday
7 = Sunday
- For Weekly press E to move to next
address (101) .
- For Bi-Weekly press # to move to next
step (3) .
For Semi-Monthly pay period :
- Enter the earlier of the 2 pay ending
dates and press # . The pay ending date
is automatically calculated 15 days from
the date that you enter in .)
(Ex :
If the pay period ends on the 10th
and 25t , enter 1 0 # )
EXCEPTION :
If the pay period ends on
the 15th and the end of the month
This ensures
always enter 3 1 # .
proper calculation for shorter months .
For Monthly pay period :
- Enter the pay ending date and press # .
(Ex : If the pay period ends at the
end of the month, enter 3 1 #)
[P 18]
PROGRAMMING GUIDE
* CALCULATION RULES PROGRAMMING AREA
PROGRAM
ADDRESS NO .
SAMPLE
PROGRAM DATA
(cont'd) 3
0 E
PROGRAM CODES AND DESCRIPTIONS
Overtime calculation period :
For Bi-Weekly pay period :
0 = Weekly overtime
1 = Bi-Weekly overtime (8/80)
For Semi-Monthly or Monthly pay periods :
-Enter the work week ending day to be
used for overtime calculation and press E :
1 = Monday
2 = Tuesday
3 = Wednesday
4 = Thursday
5 = Friday
6 = Saturday
7 = Sunday
101 1
8
0
0 #
Overtime Category A - (Daily Overtime)
- Enter the amount of daily hours that must
be worked before being sorted to overtime
category A .
0 E
Overtime Category B - (Daily Overtime)
- Enter the amount of daily hours that must
be worked before being sorted to overtime
category B .
0 #
Overtime Category A - (Weekly Overtime)
- Enter the amount of weekly hours that
must be worked before being sorted to
overtime category A .
2
0 E
Overtime Category B - (Weekly Overtime)
- Enter the amount of weekly hours that
must be worked before being sorted to
overtime category B .
103 1
0 E
Line
0 =
1 =
2 =
3 =
5 #
Paid break time
after punching
- If paid break
will make "#"
2
102 1
104 1
4
0
0
1
skip after each IN/OUT pair
Do not skip any lines
Skip 1 line
Skip 2 lines
Skip 3 lines
[P 19]
Using "#" key before or
or break)
(00-60 min)
is not used, enter 0 . This
key inactive .
PROGRAMMING GUIDE
* CALCULATION RULES PROGRAMMING AREA
PROGRAM
ADDRESS NO .
SAMPLE
PROGRAM DATA
PROGRAM CODES AND DESCRIPTIONS
(cont'd) 2
1
5
0 #
Pay rate multiplier for overtime category A .
(Valid range is 0000-0255 . Decimal point is
assumed two places .
Used to calculate dollar
amounts on reports from pay rates in employee
master file)
3
2
0
0 E
Pay rate multiplier for overtime category B .
(Valid range is 0000-0255 . Decimal point is
assumed two places .
Used to calculate dollar
amounts on reports from pay rates in employee
master file)
Non-working day codes :
1 = Monday
2 = Tuesday
3 = Wednesday
4 = Thursday
5 = Friday
6 = Saturday
7 = Sunday
105
1
6 #
First non-working day
2
7 #
Second non-working day (Ex : Sunday)
3
0 E
Pay category code for hours worked on above
non-working days AND public holidays .
CODE
0
1
2
3
4
5
106
1
0 #
= NON-WORK
= Overtime
= Overtime
= Overtime
= Regular
= Regular
= Regular
DAY
A
A
B
(Ex : Saturday)
& HOLIDAY
& Overtime
& Overtime
& Overtime
& Regular
& Overtime
& Overtime
B
A
B
A
B
Day change override code :
0 = Allows employees to work thru day change
time up to 12 hours and 59 minutes from
the last IN punch .
1 = Does not allow employees to work thru
day change time .
(OUT time crossing
day change time will be considered a
new day .)
2 = Allows employees to work thru day change
time up to 17 hours and 59 minutes from
the last IN punch .
[P 2 0 )
PROGRAMMING GUIDE
* CALCULATION RULES PROGRAMMING AREA
PROGRAM
ADDRESS NO .
SAMPLE
PROGRAM DATA
(cont'd) 2
1
0
0 E
107
6
2
(EX : 1 AM)
0
0 #
Daily worked hours
3
0 E
Amount of break time to be deducted
108
Automatic break deduction by number of daily
hours worked - 2 :
1
1
0
2
0
0 #
Daily worked hours
3
0 E
Amount of break time to be deducted
0 #
Day change mode :
0 = At or after midnight
1 = Before midnight
1
2
1
3
5 #
5 E
110
1
1
2
5 #
8 E
111
1
1
2
112
Day change time
Automatic break deduction by number of daily
hours worked - 1 :
1
109
PROGRAM CODES AND DESCRIPTIONS
1
3
0
5 #
Break net roundin
Rounding unit (00-60 minutes)
Rounding forward break point (00-60 min .)
IN punch roundin
Rounding unit (00-60 minutes)
Rounding forward break point (00-60 min .)
OUT punch rounding
Rounding unit (00-60 minutes)
8 E
Rounding forward break point (00-60 min .)
0 #
Minimum off hours for split shift calculation
- Enter the minimum off hours to separate
calculations for different work sifts .
EX1 :
7 hrs REG
8 :00
15 :00
4 hrs REG
19 :00
I
23 :00
l
19 :00 - 15 :00 = 4 :00 which exceeds the
3 :00 programmed amount .
The calculations
are separated as if two different shifts
were worked .
[P 21]
PROGRAMMING GUIDE
* CALCULATION RULES PROGRAMMING AREA
PROGRAM
ADDRESS NO .
SAMPLE
PROGRAM DATA
(cont'd)
PROGRAM CODES AND DESCRIPTIONS
EX2 :
7 hrs REG
8100
15100
+
1 hr REG + 3 hrs OT
17100
23100
I
17 :00 - 15 :00 = :00 which is less than 3 :00
programmed amount .
The calculations will be
considered as if one shift was worked .
2
1 #
Lock out if previous day's OUT punch was
missed :
0 = No lock out for today's 1st IN punch
1 = Lock out for today's 1st IN punch
3
5 E
Individual lock out
(00-60 minutes)
- (same as repeat punch protection)
PROGRAM
ADDRESS NO .
113
SAMPLE
PROGRAM DATA
1
1 E
PROGRAM CODES AND DESCRIPTIONS
Selection for type of zone :
0 = Lock out zone only
1 = Red print zone only
The following tvoe of punch code numbers apply for
addresses 114 - 119 :
0 = Not used
1 = 1st IN punch
2 = OUT punch
3 = IN punch (other than 1st IN)
114
115
1
1
Type of punch code number (0 - 3)
2
8
0
8 #
Start time of zone
(HHMM)
3
8
2
9 E
End time of zone
(HHMM)
2 #
Type of punch code number (0 - 3)
1
2
1
1
3
0 #
Start time of zone
(HHMM)
3
1
1
5
9 E
End time of zone
(HHMM)
[P 22]
PROGRAMMING GUIDE
* CALCULATION RULES PROGRAMMING AREA
PROGRAM
ADDRESS NO .
116
117
118
119
SAMPLE
PROGRAM DATA
1
PROGRAM CODES AND DESCRIPTIONS
3 #
Type of punch code number
2
1
4
0
1 #
Start time of zone
(HHMM)
3
1
4
2
9 E
End time of zone
(HHMM)
2 #
Type of punch code number
1
2
1
6
4
5 #
Start time of zone
(HHMM)
3
1
6
5
9 E
End time of zone
(HHMM)
1
0 #
Type of punch code number
2
0 #
Start time of zone
(HHMM)
3
0 E
End time of zone
(HHMM)
1
0 #
Type of punch code number
2
0 #
Start time of zone
(HHMM)
3
0 E
End time of zone
(HHMM)
(0 - 3)
(0 - 3)
(0 - 3)
(0 - 3)
The following tvDe of punch code numbers apply for addresses 120 - 149 :
0 = Not used
REVISION ZONES
1 = 1st IN punch
2 = OUT punch
3 = IN punch
--->
<----->
GRACE ZONES
4 = 1st IN punch
5 = OUT punch
6 = IN punch
<----->
<---
FIXED BREAK ZONE
7 = Unpaid zone (Cannot be programmed if
automatic break deduction is programmed
in addresses 107 and/or 108)
[P 23]
PROGRAMMING GUIDE
* CALCULATION RULES PROGRAMMING AREA
PROGRAM
ADDRESS NO .
120
121
122
SAMPLE
PROGRAM DATA
1
PROGRAM CODES AND DESCRIPTIONS
1 #
Type of punch code number
2
7
3
0 #
Start time of zone
(HHMM)
3
8
0
0 E
End time of zone
(HHMM)
2 #
Type of punch code number
1
2
1
7
0
0 #
Start time of zone
(HHMM)
3
1
7
3
0 E
End time of zone
(HHMM)
4 #
Type of punch code number
1
2
8
0
0 #
Start time of zone (HHMM)
3
8
1
0 E
End time of zone
1
0 #
Type of punch code number
2
0 #
Start time of zone
(HHMM)
3
0 E
End time of zone
(HHMM)
1
0 #
Type of punch code number
2
0 #
Start time of zone (HHMM)
3
0 E
End time of zone
125 1
0 #
Type of punch code number
2
0 #
Start time of zone
(HHMM)
3
0 E
End time of zone
(HHMM)
1
0 #
Type of punch code number
2
0 #
Start time of zone
(HHMM)
3
0 E
End time of zone
(HHMM)
1
0 #
Type of punch code number
2
0 #
Start time of zone
(HHMM)
3
0 E
End time of zone
(HHMM)
123
124
126
127
[P 24]
(0 - 7)
(0 - 7)
(0 - 7)
(HHMM)
(0 - 7)
(0 - 7)
(HHMM)
(0 - 7)
(0 - 7)
(0 - 7)
PROGRAMMING GUIDE
* CALCULATION RULES PROGRAMMING AREA
PROGRAM
ADDRESS NO .
128
129
130
131
132
133
134
135
SAMPLE
PROGRAM DATA
PROGRAM CODES AND DESCRIPTIONS
1
0 #
Type of punch code number
2
0 #
Start time of zone
(HHMM)
3
0 E
End time of zone
(HHMM)
1
0 #
Type of punch code number
2
0 #
Start time of zone
(HHMM)
3
0 E
End time of zone
(HHMM)
1
0 #
Type of punch code number
2
0 #
Start time of zone
(HHMM)
3
0 E
End time of zone
(HHMM)
1
0 #
Type of punch code number
2
0 #
Start time of zone
(HHMM)
3
0 E
End time of zone
(HHMM)
1
0 #
Type of punch code number
2
0 #
Start time of zone
(HHMM)
3
0 E
End time of zone
(HHMM)
1
0 #
Type of punch code number
2
0 #
Start time of zone
(HHMM)
3
0 E
End time of zone
(HHMM)
1
0 #
Type of punch code number
2
0 #
Start time of zone
(HHMM)
3
0 E
End time of zone
(HHMM)
1
0 #
Type of punch code number
2
0 #
Start time of zone
(HHMM)
3
0 E
End time of zone
(HHMM)
[P 25]
(0 - 7)
(0 - 7)
(0 - 7)
(0 - 7)
(0 - 7)
(0 - 7)
(0 - 7)
(0 - 7)
PROGRAMMING GUIDE
* CALCULATION RULES PROGRAMMING AREA
PROGRAM
ADDRESS NO .
136
137
138
139
140
141
142
143
SAMPLE
PROGRAM DATA
PROGRAM CODES AND DESCRIPTIONS
1
0 #
Type of punch code number
2
0 #
Start time of zone
(HHMM)
3
0 E
End time of zone
(HHMM)
1
0 #
Type of punch code number
2
0 #
Start time of zone
(HHMM)
3
0 E
End time of zone
(HHMM)
1
0 #
Type of punch code number
2
0 #
Start time of zone
(HHMM)
3
0 E
End time of zone
(HHMM)
1
0 #
Type of punch code number
2
#
3
Start time of zone
(HHMM)
0 E
End time of zone
(HHMM)
1
0 #
Type of punch code number
2
0 #
Start time of zone
(HHMM)
3
0 E
End time of zone
(HHMM)
1
0 #
Type of punch code number
2
0 #
Start time of zone
(HHMM)
3
0 E
End time of zone
(HHMM)
1
0 #
Type of punch code number
2
0 #
Start time of zone (HHMM)
3
0 E
End time of zone
1
0 #
Type of punch code number
2
0 #
Start time of zone
(HHMM)
3
0 E
End time of zone
(HHMM)
[P 26]
(0 - 7)
1
(0 - 7)
(0 - 7)
(0 - 7)
(0 - 7)
(0 - 7)
(0 - 7)
(HHMM)
(0 - 7)
PROGRAMMING GUIDE
* CALCULATION RULES PROGRAMMING AREA
PROGRAM
ADDRESS NO .
144
145
146
147
148
149
SAMPLE
PROGRAM DATA
PROGRAM CODES AND DESCRIPTIONS
Type of punch code number
1
#
2
0 #
Start time of zone
(HHMM)
3
0 E
End time of zone
(HHMM)
1
0 #
Type of punch code number
2
0 #
Start time of zone
(HHMM)
3
0 E
End time of zone
(HHMM)
1
0 #
Type of punch code number
2
0 #
Start time of zone
(HHMM)
3
0 E
End time of zone
(HHMM)
1
0 #
Type of punch code number
2
0 #
Start time of zone
(HHMM)
3
0 E
End time of zone
(HHMM)
1
0 #
Type of punch code number
2
0 #
Start time of zone
(HHMM)
3
0 E
End time of zone
(HHMM)
1
0 #
Type of punch code number
2
0 #
Start time of zone
(HHMM)
0 E
End time of zone
(HHMM)
(0 - 7)
(0 - 7)
(0 - 7)
(0 - 7)
(0 - 7)
IMPORTANT : UPON COMPLETION OF THE CALCULATION RULES PROGRAMMING AREA,
f
BE SURE TO PRESS THE © KEY TO SAVE THE DATA INTO MEMORY .
- Turn key back to "NORMAL" mode,
[P 27]
PROGRAMMING GUIDE
*
PROGRAM PRINT OUT
-
Turn key to "FUNCTION" mode
-
Press
-
E
N
There are three pages available
The display will show P-0 .
2
TO PRINT ALL PAGES
(P-0,
for printing
(P-0,
P-1 and P-2) .
P-1 and P-2) :
-
Insert a PROGRAM CHECK CARD . When the first page (P-0) is finished
printing the card will automatically be ejected . Remove the card
and the display will show (P-1) .
Reinsert the card on the back side
to print the second page . When the second page is finished printing
the card will automatically be ejected . Remove the card and the
display will show (P-2) .
Insert a new card . When the third page is
finished printing the card will automatically be ejected . Remove
the card when printing is finished .
-
Turn key back to "NORMAL" mode
TO PRINT THE SECOND PAGE ONLY (P-1) :
-
Press 'E' to advance to P-1 on the display .
-
Insert a PROGRAM CHECK CARD . When the second page (P-1) is finished
printing the card will automatically be ejected . Remove the card
when printing is finished .
-
Turn key back to "NORMAL" mode
TO PRINT THE THIRD PAGE ONLY
- Press
(P-2) :
'E' to advance to P-2 on the display .
-
Insert a PROGRAM CHECK CARD . When the third page (P-2) is finished
printing the card will automatically be ejected . Remove the card
when printing is finished .
-
Turn key back to "NORMAL" mode
[P 28]
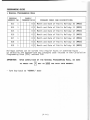
USER GUIDE
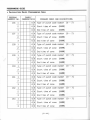
* USER SETUP PROCEDURES FOR TRADITIONAL ASSIGNMENT METHOD
TRADITIONAL ASSIGNMENT METHOD
USER INITIAL SETUP CHART AND PAY PERIOD ROUTINE
STEP
1
USER
ACCESS CODE
WHAT TO DO
Remove time cards, write employees'
names on cards and place in card rack .
-----
PAGE
----
The follow User Access Codes ARE
AVAILABLE :
* Individual Time Card Summary
- Current Pay Period
- Previous Pay Period
3 E
4 E
U 24
U 24
* Accumulated Period Hours Report
- Current Pay Period
- Previous Pay Period
40 E
41 E
U 25
U 25
* Yesterday's Hours Report
48 E
U 28
* Today's Hours Report
50 E
U 29
* Approaching Overtime Report
52 E
U 30
* Punched IN Report
53 E
U 31
* Punched OUT Report
55 E
U 32
* Data Corrections
- Current Pay Period
- Previous Pay Period
1 E
2 E
* Maintenance
- Memory Test
- Printer Test
- Sensor Test
90 E
91 E
92 E
[U 1 ]
U21-U22
U22-U23
U 34
U 36
U 37
USER GUIDE
* USER SETUP PROCEDURES FOR TRADITIONAL ASSIGNMENT METHOD
TRADITIONAL ASSIGNMENT METHOD
USER INITIAL SETUP CHART AND PAY PERIOD ROUTINE
STEP
1
USER
ACCESS CODE
WHAT TO DO
Remove time cards, write employees'
names on cards and place in card rack .
-----
PAGE
----
The follow User Access Codes ARE
AVAILABLE :
* Individual Time Card Summary
- Current Pay Period
- Previous Pay Period
3 E
4 E
U 24
U 24
* Accumulated Period Hours Report
- Current Pay Period
- Previous Pay Period
40 E
41 E
U 25
U 25
* Yesterday's Hours Report
48 E
U 28
* Today's Hours Report
50 E
U 29
* Approaching Overtime Report
52 E
U 30
* Punched IN Report
53 E
U 31
* Punched OUT Report
55 E
U 32
* Data Corrections
- Current Pay Period
- Previous Pay Period
1 E
2 E
* Maintenance
- Memory Test
- Printer Test
- Sensor Test
90 E
91 E
92 E
[U 1 ]
U21-U22
U22-U23
U 34
U 36
U 37
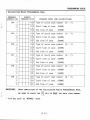
USER GUIDE
* USER SETUP PROCEDURES FOR EMPLOYEE MASTER FILE USING THE SAME CARD
NUMBER
EMPLOYEE MASTER FILE USING THE SAME CARD NUMBER ASSIGNMENT METHOD
USER INITIAL SETUP CHART
STEP
USER
ACCESS CODE
WHAT TO DO
PAGE
1
ADD department file numbers
72 E
U 10
2
PRINT LIST of department file
numbers on report card
73 E
U 10
3
ADD employee master files
61 E
U 12
4
PRINT LIST of employee master files
on report card
62 E
U 12
64 E
U 13
83 E 88 E
U 15
83 E 99 E
U 16
85 E
U 17
80 E 1 E
U 18
-
AND / OR -
PRINT LIST of employee master files
with PAY RATES on report card
5
CURRENT PAY PERIOD :
AUTOMATICALLY ASSIGN DIFFERENT time
card numbers to ALL employee master
files for the current pay period
-
AND / OR -
NEXT PAY PERIOD :
AUTOMATICALLY ASSIGN DIFFERENT time
card numbers to ALL employee master
files for the next pay period
6
7
PRINT LIST of assigned time card
numbers on report card
CURRENT PAY PERIOD :
PRINT employee name on ONE side of
the time card OR PRINT employee name on BOTH sides of
the time card
(continued next page)
[U 2 ]
80 E 2 E
U18-U19
USER GUIDE
* USER SETUP PROCEDURES FOR EMPLOYEE MASTER FILE USING THE SAME CARD
NUMBER
EMPLOYEE MASTER FILE USING THE SAME CARD NUMBER ASSIGNMENT METHOD
PAY PERIOD ROUTINE
STEP
5*
WHAT TO DO
continued from previous page)
or NEWLY added employees :
CURRENT PAY PERIOD :
ASSIGN SPECIFIC CARD NUMBER to an
individual employee for the current
pay period .
-
7
PAGE
84 E 88 E
U 16
AND / OR -
NEXT PAY PERIOD :
ASSIGN SPECIFIC CARD NUMBER to an
individual employee for the next
pay period .
6*
USER
ACCESS CODE
PRINT LIST of assigned time card
numbers on report card
For ALL emptoyees :
CURRENT PAY PERIOD :
PRINT employee name on ONE side of
the time card
OR PRINT employee
- name on BOTH sides of
the time card
84 E 99 E
U16-U17
85 E
U 17
80 E 1 E
U 18
80 E 2 E
U18-U19
- AND / OR NEXT PAY PERIOD :
PRINT employee name on ONE side of
the time card OR PRINT employee name on BOTH sides of
the time card
8
Place ALL employee time cards in the
time card racks and you're ready to
begin .
81 E 1 E
U 19
81 E 2 E
U 20
-----
* These steps are only required if you are adding NEW information for
the pay period .
[U 4 ]
USER GUIDE
* USER SETUP PROCEDURES FOR EMPLOYEE MASTER FILE USING NEW CARD NUMBER
EMPLOYEE MASTER FILE USING NEW CARD NUMBER ASSIGNMENT METHOD
USER INITIAL SETUP CHART
STEP
USER
ACCESS CODE
WHAT TO DO
PAGE
1
ADD department file numbers
72 E
U 10
2
PRINT LIST of department file
numbers on report card
73 E
U 10
3
ADD employee master files
61 E
U 12
4
PRINT LIST of employee master files
on report card
62 E
U 12
64 E
U 13
83 E 88 E
U 15
83 E 99 E
U 16
85 E
U 17
80 E 1 E
U 18
-
AND / OR -
PRINT LIST of employee master files
with PAY RATES on report card
5
CURRENT PAY PERIOD :
AUTOMATICALLY ASSIGN DIFFERENT time
card numbers to ALL employee master
files for the current pay period
-
AND / OR -
NEXT PAY PERIOD :
AUTOMATICALLY ASSIGN DIFFERENT time
card numbers to ALL employee master
files for the next pay period
6
7
PRINT LIST of assigned time card
numbers on report card
CURRENT PAY PERIOD :
PRINT employee name on ONE side of
the time card OR PRINT employee name on BOTH sides of
the time card
(continued next page)
[U 5 ]
80 E 2 E
U18-U19
USER GUIDE
* USER SETUP PROCEDURES FOR EMPLOYEE MASTER FILE USING NEW CARD NUMBER
EMPLOYEE MASTER FILE USING NEW CARD NUMBER ASSIGNMENT METHOD
USER INITIAL SETUP CHART
STEP
7
USER
ACCESS CODE
WHAT TO DO
PAGE
(continued from previous page)
- AND / OR NEXT PAY PERIOD :
PRINT employee name on ONE side of
the time card OR PRINT employee name on BOTH sides of
the time card
8
Place ALL employee time cards in the
time card racks and you're ready to
begin .
81 E 1 E
U 19
81 E 2 E
U 20
-----
EMPLOYEE MASTER FILE USING NEW CARD NUMBER ASSIGNMENT METHOD
PAY PERIOD ROUTINE
STEP
USER
ACCESS CODE
WHAT TO DO
PAGE
1*
ADD any NEW department file numbers
72 E
U 10
2*
PRINT LIST of department file
numbers on report card
73 E
U 10
3*
ADD any NEW employee master files
61 E
U 12
4*
PRINT LIST of employee master files
on report card
62 E
U 12
64 E
U 13
-
AND / OR -
PRINT LIST of employee master files
with PAY RATES on re ort card
(continued next page
* These steps are only required if you are adding NEW information for
the pay period .
[U 6 ]
USER GUIDE
* USER SETUP PROCEDURES FOR EMPLOYEE MASTER FILE USING NEW CARD NUMBER
EMPLOYEE MASTER FILE USING NEW CARD NUMBER ASSIGNMENT METHOD
PAY PERIOD ROUTINE
STEP
5
USER
ACCESS CODE
PAGE
83 E 88 E
U 15
82 E 88 E
U 15
83 E 99 E
U 16
AUTOMATICALLY ASSIGN SAME time card
numbers to ALL employee master files
for the next pay period
82 E 99 E
U 15
PRINT LIST of assigned time card
numbers on report card
85 E
U 17
80 E 1 E
U 18
WHAT TO DO
continued from previous page)
or ALL employees EVERY pay period :
CURRENT PAY PERIOD :
AUTOMATICALLY ASSIGN DIFFERENT time
card numbers to ALL employee master
files for the current pay period
- OR AUTOMATICALLY ASSIGN SAME time card
numbers to ALL employee master files
for the current pay period
- AND / OR NEXT PAY PERIOD :
AUTOMATICALLY ASSIGN DIFFERENT time
card numbers to ALL employee master
files for the next pay period
- OR -
6
7
For ALL emp toyees :
CURRENT PAY PERIOD :
PRINT employee name on ONE side of
the time card OR PRINT employee name on BOTH sides of
the time card
80 E 2 E
U18-U19
- AND / OR NEXT PAY PERIOD :
PRINT employee name on ONE side of
the time card OR PRINT employee name on BOTH sides of
the time card
[U 7 ]
81 E 1 E
U 19
81 E 2 E
U 20
USER GUIDE
* USER SETUP PROCEDURES FOR EMPLOYEE MASTER FILE USING NEW CARD NUMBER
EMPLOYEE MASTER FILE USING NEW CARD NUMBER ASSIGNMENT METHOD
PAY PERIOD ROUTINE
STEP
8
USER
ACCESS CODE
WHAT TO DO
Place ALL employee time cards in the
time card racks and you're ready to
begin .
PAGE
-----
* These steps are only required if you are adding NEW information for
the pay period .
[U s]
USER GUIDE
* DEPARTMENT NUMBER FILE MAINTENANCE
The following User Access Codes will allow you to add up to fifty
department numbers (per clock), print a list, delete individual
department numbers and delete all department numbers .
7
2
E
=
ADD Department Numbers
- Turn key to "FUNCTION" mode
- Press '7 2 E'
FOR EACH DEPARTMENT :
Type in a valid six digit department number
(00001 - 999999)
- Press 'E'
TO SORT NUMBERS AND SAVE TO MEMORY :
- Press 'I'
- Turn key to "NORMAL" mode
M
nn
PRINT A LIST of Department Numbers
- Turn key to "FUNCTION" mode
- Press '7 3 E'
- Insert a report card . Remove when finished
printing .
- Turn key to "NORMAL" mode
DELETE INDIVIDUAL Department Numbers
- Turn key to E "FUNCTION" mode
- Pres
7s
FOR EACH DEPARTMENT :
- Type in an existing department number
- Press 'E'
TO DELETE, RESORT, AND SAVE :
- Press 'I'
- Turn key to "NORMAL" mode
[U 1 0 ]
USER GUIDE
* DEPARTMENT NUMBER FILE MAINTENANCE
nnnnn~
DELETE ALL Department Numbers
- Turn key to E "FUNCTION" mode
- Pres
7s
- The clock will delete the department file
AND scroll through all employee file numbers
(000-249 changing their department numbers
to 00000 .
- Turn key to "NORMAL" mode
[U 1 1 ]
USER GUIDE
* EMPLOYEE MASTER FILE MAINTENANCE
The following User Access Codes will allow you to add up to 250
employees (per time clock), print lists for all departments or
specific departments with or without pay rates, delete individual
employee master files and delete all employee master files .
n=n
ADD Employee Master Files
- Turn key to "FUNCTION" mode
- Press '6 1 E'
FOR EACH EMPLOYEE MASTER FILE THERE ARE 5 STEPS :
Step 1 = File Number
- Type in a valid file number (000 - 249)
- Press '#' to advance to step 2
Step 2 = Employee ID#
- T y p e 9 inn9uu p ) to a 10 digit ID# (0000000000 - Press '#' to advance to step 3
Step 3 = Employee Name
Type in employee name by entering in the
ASCII code equivalent for each letter .
(refer to appendix) .
- Press '#' to advance to step 4
Step 4 = Department Number
- Type in a valid existing department number
- Press '#' to advance to step 5
Step 5 = Pay Rate
- Type in employee's pay rate
- Press 'E'
- Insert a report card to print and verify
information OR press 'E' to save .
- Enter next employee or turn key back to
'NORMAL' mode when finished .
PRINT A LIST of Employee Master Files (ALL DEPARTMENTS)
- Turn key to "FUNCTION" mode
- Press '6 2 E'
- Insert a report card . Remove when finished printing .
- Turn key to "NORMAL" mode
[U 1 2 ]
USER GUIDE
* EMPLOYEE MASTER FILE MAINTENANCE
6 3 E
=
PRINT A LIST of Employee Master Files
(SPECIFIC DEPARTMENTS)
- Turn key to "FUNCTION" mode
- Press '6 3 E'
- Type in a valid existing department number
- Press 'E'
Insert a report card . Remove when finished
printing .
- Turn key to "NORMAL" mode
6
4
E
n nn
X
[E]
PRINT A LIST WITH PAY RATES of Employee
(ALL DEPARTMENTS)
Master Files
- Turn key to "FUNCTION" mode
- Press '6 4 E'
- Type in the valid password number and
press 'E'
- Insert a report card . Remove when
finished printing .
- Turn key to "NORMAL" mode
= PRINT A LIST WITH PAY RATES of Employee
Master Files
(SPECIFIC DEPARTMENTS)
- Turn key to "FUNCTION" mode
- Press '6 5 E'
- Type in the valid password number and
press 'E'
- Type in a valid existing department .number
- Press 'E'
- Insert a report card . Remove when
finished printing .
- Turn key to "NORMAL" mode
[U 1 3 ]
USER GUIDE
* EMPLOYEE MASTER FILE MAINTENANCE
E
6
7 7
E =
0
DELETE INDIVIDUAL employee's accumulated hours
AND time card number assignment for previous,
current and next pay periods .
-
Turn key to "FUNCTION" mode
Press ' 6 0 E 7 7 E'
Type the employee master file number you wish to delete .
Press 'E' to accept entry
Press 'I' to delete ONLY the accumulated hours AND time
card number assignment for previous, current and next pay
periods for the selected employee .
- Turn key to "NORMAL" mode
61
0
DELETE INDIVIDUAL employee's entire master
file (includes file number, employee number,
employee name, department number, pay rate, AND
accumulated hours AND time card number asst nment
for previous, current and next pay periods .}?
E 8 8 E =
-
Turn key to "FUNCTION" mode
Press '6 0 E 8 8 E'
Type the employee master file number you wish to delete .
Press 'E' to accept entry
Press 'I' to delete entire master file from memory for
.
the selected employee
- Turn key to "NORMAL" mode
n
0 E
7 7
E X X
X
- DELETE ALL employees' accumulated
X E= hours AND time card number
assignment for previous, current
and next pay periods .
- Turn key to E "FUNCTION" mode
- Press
0
Type in the valid password number and press 'E'
- The clock will delete all employee master files
- When display screen goes blank, turn the key to
"NORMAL" mode
n
0 E 8 8 E
X X X X
DELETE ALL employee's entire master
E= files (includes file number,
employee number, employee name,
department number, pay rate, AND
accumulated hours AND time card
number assignment for previous,
current and next pay periods .)
- Turn key to E " 8
FUNCTION" mode
Press Type in the valid password number and press 'E'
- The clock will delete all employee master files
- When display screen goes blank, turn the key to
"NORMAL" mode
[U 1 4 ]
USER GUIDE
* TIME CARD NUMBER ASSIGNMENT
The following User Access Codes will allow you to automatically
assign the same time card number or a different time card number for
the current or next pay period, manually assign individual time cards
for the current or next pay period and print a list of card numbers .
nn
E
8 8 E
X
X
1111[1
AUTOMATICALLY ASSIGN SAME CARD NUMBERS to
all employee master files for the current pay
period
tE
- Turn key to "FUNCTIONmode
- Press
8 8 - Type in the valid password number and press 'E
- Wait approximately 4 seconds until display
screen goes blank
- Turn key to "NORMAL" mode
ll1H99nnXnXE=
AUTOMATICALLY ASSIGN SAME CARD NUMBERS to
all employee master files for the next pay period
t
- Turn key to
E "FUNCTIONmode
- Press
9 9
- Type in the valid password number and press 'E'
- Wait approximately 4 seconds until display
screen goes blank
- Turn key to "NORMAL" mode
3
E
8
8
E
n
X
X
X
E_
AUTOMATICALLY ASSIGN DIFFERENT CARD NUMBERS to
all employee master files for the current pay
period .
tE
- Turn key to "FUNCTIONmode
- Press
8 8 - Type in the valid password number and press 'E'
- Type in the starting time card number and press
E
The time card number and file numbers will
be displayed as they are being assigned in
sequential order .
- When display screen goes blank, turn key to
"NORMAL" mode
[U 15]
USER GUIDE
* TIME CARD NUMBER ASSIGNMENT
n
3
E
9 9 E
n
X
E_
I--II--1
AUTOMATICALLY ASSIGN DIFFERENT CARD NUMBERS to
all employee master files for the next pay
period .
- Turn key to E " 9FU NNCTION" mode
- Press
- Type in the valid password number and press 'E'
T
e in the starting time card number and press
'r
' .
The time card number and file numbers will
be displayed as they are being assigned in
sequential order .
- Turn key to "NORMAL" mode
J
n
LJ
nuu
ASSIGN SPECIFIC CARD NUMBER to an individual
employee for the current pay period .
- Turn key to "FUNCTION" mode
- Press ' 8 4 E 8 8 E'
- Press 'F' and then type in the employee
master file number (for the em loyee you wish
to assi gn the time card number .
- Press 'E'
- Insert time card . (The clock will check the
memory to see if that time card number is
already being used) . The time card number
will then be saved in memory and the clock
will automatically increment to the next file
number .
- Assign next time card number or turn key
back to "NORMAL" mode when finished
8 4 E
I-II-I
E = ASSIGN SPECIFIC CARD NUMBER to an individual
employee for the next pay period .
- Turn key to E "~FU N
NCTION" mode
- Press
- Press 'F' and then type in the employee
master file number (for the em loyee you wish
to assign the time card number .
- Press 'E'
[U 1 6 ]
USER GUIDE
* TIME CARD NUMBER ASSIGNMENT
-
Insert time card . (The clock will check the
memory to see if that time card number is
already being used) . The time card number
will then be saved in memory and the clock
will automatically increment to the next file
number .
- Assign next time card number or turn key
back to "NORMAL" mode when finished
R nn
= PRINT LIST of assigned time card numbers
- Turn key to "FUNCTION" mode
- Press '8 5 E'
- Insert a report card . Remove when finished
printing .
- Turn key to "NORMAL" mode
[U 1 7 )
USER GUIDE
* TIME CARD NAME PRINTING
The following User Access Codes will allow you to print the employee
name, pay ending date, ID#, department number, file number and time
card number on one or both sides of the time card for the current
or next pay period .
E
= NAME PRINTING for the current pay period on
ONE SIDE of the time card .
- Turn key to "FUNCTION" mode
- Press '8 0 E 1 E'
- Press 'F' and then type in the employee
master file number (for the em loyee you wish
to assi gn the time card number .
Press 'E'
- The employee master file number will appear in
the right hand corner of the display screen and
the time card number will appear in the upper
left hand corner . Verify that the ACTUAL time
card number is the same as the time card number
displayed .
- Insert the time card UPSIDE DOWN ON SIDE 1
(When finished printing the card will
automatically be ejected .) Remove card .
- The display will automatically advance to the
next available file number and card number .
- Insert the next card for the next employee and
continue until all name printing is complete .
- When finished name printing for all employees,
turn key to "NORMAL" mode .
81
nnnn
NAME PRINTING for the current pay period on
= BOTH SIDES of the time card .
- Turn key to "FUNCTION" mode
- Press '8 0 E 2 E'
- Press 'F' and then type in the employee
master file number (for the employee you wish
to assi gn the time card number) .
- Press 'E'
- The employee master file number will appear in
the right hand corner of the display screen and
the time card number will appear in the upper
left hand corner . Verify that the ACTUAL time
card number is the same as the time card number
displayed .
[U 1 8 ]
USER GUIDE
* TIME CARD NAME PRINTING
- Insert the time card UPSIDE DOWN ON SIDE 1
(When finished printing the card will
automatically be ejected .) Remove card .
- Reinsert the time card UPSIDE DOWN ON SIDE 2
(When finished printing the card will
automatically be ejected .) Remove card .
- The display will automatically advance to the
next available file number and card number .
- Insert the next card for the next employee and
continue until all name printing is complete .
- When finished name printing for all employees,
turn key to "NORMAL" mode .
81111IEII111E
= NAME PRINTING for the next pay period on
ONE SIDE of the time card .
- Turn key to "FUNCTION" mode
- Press ' 8 1 E 1 E'
- Press 'F' and then type in the employee
master file number (for the employee you wish
to assign the time card number) .
- Press 'E'
- The employee master file number will appear in
the right hand corner of the display screen and
the time card number will appear in the upper
left hand corner . Verify that the ACTUAL time
card number is the same as the time card number
displayed .
- Insert the time card UPSIDE DOWN ON SIDE 1
(When finished printing the card will
automatically be ejected .) Remove card .
- The display will automatically advance to the
next available file number and card number .
- Insert the next card for the next employee and
continue until all name printing is complete .
- When finished name printing for all employees,
turn key to "NORMAL" mode .
[U 1 9 ]
USER GUIDE
* TIME CARD NAME PRINTING
8
n n
E
E
= NAME PRINTING for the next pay period on
BOTH SIDES of the time card .
- Turn key to "FUNCTION" mode
- Press '8 1 E 2 E'
- Press 'F' and then type in the employee
master file number (for the employee you wish
to assign the time card number) .
- Press 'E'
- The employee master file number will appear in
the right hand corner of the display screen and
the time card number will appear in the upper
left hand corner .
Verify that the ACTUAL time
card number is the same as the time card number
displayed .
- Insert the time card UPSIDE DOWN ON SIDE 1
(When finished printing the card will
automatically be ejected .)
Remove card .
- Reinsert the time card UPSIDE DOWN ON SIDE 2
(When finished printing the card will
automatically be ejected .)
Remove card .
- The display will automatically advance to the
next available file number and card number .
- Insert the next card for the next employee
and continue until all name printing is
complete .
- When finished name printing for all employees,
turn key to "NORMAL" mode .
[U 2 0 ]
USER GUIDE
* DATA CORRECTION
The following User Access Codes will allow you to correct accumulated
hours on an employee's time card for the current or previous pay
All corrections will be printed in red . If the clock is
periods .
set up to calculate in regular minutes then the correction data
should be entered in regular minutes ( :00- :59) .
If the clock is set
up to calculate in hundredths then the correction data should be
entered in hundredths of an hour
( .00- .98) .
nil
INDIVIDUAL DATA CORRECTION for current pay period
- Turn key to "FUNCTION" mode
- Press '1 E'
- Type the employee master file number for the
employee you wish to correct .
(refer to the employee list for the employee
master file number)
- Press 'E'
THERE ARE 5 PAY CATEGORIES FOR CORRECTION :
(The category number will appear in the upper left
hand corner on the display and the amount of
hours in that category will also be displayed .)
1 = DAILY NET HOURS - to adjust hours for the
current day .
** Hours entered here will automatically
be sorted into regular and overtime pay
categories (based on the programmed amount
of daily hours in address 101) and added
to the weekly net hours category .
2 = WEEKLY NET HOURS - to adjust hours for the
current week .
** Hours entered here will automatically
be sorted into regular and overtime pay
categories (based on the programmed amount
of weekly hours in address 102) .
For bi-weekly 8/40, semi-monthly and monthly
pay periods, sorting of the corrected hours
will be based on the hours calculated during
the last week of the pay period .
[U 211
USER GUIDE
* DATA CORRECTION
a3 = REGULAR HOURS - to adjust hours in the
ccumulated regular hours pay category ONLY,
for the current week .
** Hours entered here will be added directly to
the REGULAR hours pay category .
No other
pay categories will be affected .
OVERTIME
a4=
A HOURS - to adjust hours in the
ccumulated overtime A h ours pay category ONLY,
for the current week .
** Hours entered here will be added directly to
No other
the OVERTIME A hours pay category .
pay categories will be affected .
OVERTIME
a5=
B HOURS - to adjust hours in the
ccumulated overtime B h ours pay category ONLY,
for the current week .
** Hours entered here will be added directly to
the OVERTIME B hours pay category .
No other
pay categories will be affected .
- Type in the amount of hours for the correction
- Press '+' to add or '-' to subtract
- Press 'E' to store and advance to next category
- When finished making corrections for this employee
insert their time card
for the current pay period
and the corrections will
rint in red .
- Enter next employee master file number or turn key
back to 'NORMAL' mode when finished .
2
E
= INDIVIDUAL DATA CORRECTION for previous pay period
- Turn key to "FUNCTION" mode
- Press '2 E'
- Type the employee file number for the
employee you wish to make the correction to .
(refer to the employee list for the employee
master file number)
- Press 'E'
[U 2 2 ]
USER GUIDE
* DATA CORRECTION
THERE ARE 4 PAY CATEGORIES FOR CORRECTIONS :
(The category number will appear in the upper left
hand corner on the display and the amount of
hours in that category will also be displayed .)
1 = WEEKLY NET HOURS - to adjust hours for the
previous week .
** Hours entered here will automatically
be sorted into regular and overtime pay
categories (based on the programmed amount
of weekly hours in address 102) .
This category will only be available for
weekly and bi-weekly 8/80 pay periods .
a2=
REGULAR
HOURS - to adjust hours in the
ccumulated regular h ours pay category ONLY,
for the previous week .
** Hours entered here will be added directly to
the REGULAR hours pay category .
No other
pay categories will be affected .
3 = OVERTIME A HOURS - to adjust hours in the
accumulated overtime A hours pay category ONLY,
for the previous week .
** Hours entered here will be added directly to
the OVERTIME A hours pay category .
No other
pay categories will be affected .
OVERTIME
a4=
B HOURS - to adjust hours in the
ccumulated overtime B h ours pay category ONLY,
for the previous week .
** Hours entered here will be added directly to
the OVERTIME B hours pay category .
No other
pay categories will be affected .
- Type in the amount of hours for the correction
- Press '+' to add or '-' to subtract
- Press 'E' to store and advance to next category
- When finished making corrections for this employee
insert their time card (from the previous pay
- Enter next employee master file number or turn key
back to 'NORMAL' mode when finished .
[U 2 3 ]
USER GUIDE
* INDIVIDUAL TIME CARD SUMMARY
The following User Access Codes will allow you to print a summary
of total, regular and overtime hours worked on the employee's time
card for the current or previous pay periods . The same summary can
also be printed in dollars . (Hours worked x employee's pay rate .)
311E
INDIVIDUAL TIME CARD SUMMARY for current pay period .
- Turn key to "FUNCTION" mode
- Press '3 E'
- Insert employee's time card . Remove when finished
printing .
- Turn key to "NORMAL" mode
4
E
INDIVIDUAL TIME CARD SUMMARY for previous pay period .
- Turn key to "FUNCTION" mode
- Press '4 E'
- Insert employee's time card . Remove when finished
printing .
- Turn key to "NORMAL" mode
n
E
X X X X
E= INDIVIDUAL TIME CARD SUMMARY WITH DOLLARS
for the current pay period .
- Turn key to "FUNCTION" mode
- Press '5 E'
- Type in the valid password number and
press 'E'
- Insert employee's time card . Remove when
finished printing .
- Turn key to "NORMAL" mode
6 E
nnnn
E= INDIVIDUAL TIME CARD SUMMARY WITH DOLLARS
for the previous pay period .
- Turn key to "FUNCTION" mode
- Press '6 E'
- Type in the valid password number and
press 'E'
- Insert employee's time card . Remove when
finished printing .
- Turn key to "NORMAL" mode
[U 2 4 ]
USER GUIDE
* REPORTS - ACCUMULATED PERIOD HOURS
The following User Access Codes will allow you to print detail
reports that include each employee's accumulated total, regular and
overtime hours within a department along with department subtotals
and a grand total . Reports can be selected by ALL departments or by
specific departments for the current or previous pay periods .
4 0 E
=
PRINT ACCUMULATED PERIOD HOURS DETAIL REPORT for the
current pay period .
(ALL DEPARTMENTS)
- Turn key to "FUNCTION" mode
- Press '4 0 E'
- Insert a report card . Remove when finished printing .
- Turn key to "NORMAL" mode
4
1
n
PRINT ACCUMULATED PERIOD HOURS DETAIL REPORT for the
(ALL DEPARTMENTS)
previous pay period .
- Turn key to "FUNCTION" mode
- Press '4 1 E'
- Insert a report card . Remove when finished printing .
- Turn key to "NORMAL" mode
PRINT ACCUMULATED PERIOD HOURS DETAIL REPORT for the
(SPECIFIC DEPARTMENTS)
current pay period .
- Turn key to "FUNCTION" mode
- Press '4 2 E'
- Type in a valid existing department number
- Press 'E'
- Insert a report card . Remove when finished printing .
- Turn key to "NORMAL" mode
4
3
E
PRINT ACCUMULATED PERIOD HOURS DETAIL REPORT for the
(SPECIFIC DEPARTMENTS)
Drevious pay period .
- Turn key to "FUNCTION" mode
- Press '4 3 E'
- Type in a valid existing department number
- Press 'E'
- Insert a report card . Remove when finished printing .
- Turn key to "NORMAL" mode
[U 25]
USER GUIDE
* REPORTS
-
ACCUMULATED PERIOD DOLLARS
The following User Access Codes will allow you to print detail
reports that include each employee's accumulated total, regular and
overtime dollars within a department along with department subtotals
and a grand total . Reports can be selected by ALL departments or by
specific departments for the current or previous pay periods .
4 4
H lll11
- 1[
i]
I -I
RPRINT
DETAIL
EPORT A forM theT cuu rrent OpayOperiiod
(ALL DEPARTMENTS)
- Turn key to "FUNCTION" mode
- Press '4 4 E'
- Type in the valid password number and
press 'E'
- Insert a report card . Remove when
finished printing .
- Turn key to "NORMAL" mode
E
H1r1Hx
X[E
PRINT ACCUMULATED PERIOD DOLLARS DETAIL
REPORT for the previous pay period .
(ALL DEPARTMENTS)
- Turn key to "FUNCTION" mode
- Press '4 5 E'
- Type in the valid password number and
press 'E'
- Insert a report card . Remove when
finished printing .
- Turn key to "NORMAL" mode
4
6
E
X
X
X
X
E
PRINT ACCUMULATED PERIOD DOLLARS DETAIL
REPORT for the current pay period .
(SPECIFIC DEPARTMENTS ;
- Turn key to "FUNCTION" mode
- Press '4 6 E'
- Type in the valid password number and
press 'E'
- Type in a valid existing department numbe
- Press 'E'
- Insert a report card . Remove when
finished printing .
- Turn key to "NORMAL" mode
[U 2 6 ]
USER GUIDE
* REPORTS - ACCUMULATED PERIOD DOLLARS
4
UuU U U U U
PRINT ACCUMULATED PERIOD DOLLARS DETAIL
REPORT for the previous pay period .
(SPECIFIC DEPARTMENTS)
- Turn key to "FUNCTION" mode
- Press '4 7 E'
- Type in the valid password number and
press 'E'
- Type in a valid existing department number
- Press 'E'
- Insert a report card . Remove when
finished printing .
- Turn key to "NORMAL" mode
[U 2 7 ]
USER GUIDE
* REPORTS
-
YESTERDAY'S HOURS / DOLLARS
The following User Access Codes will allow you to print reports that
include yesterday's total, regular and overtime hours worked or
dollars sorted by department number .
411811E
=
PRINT YESTERDAY's HOURS REPORT
- Turn key to "FUNCTION" mode
- Press '4 8 E'
- Insert a report card . Remove when finished
printing .
- Turn key to "NORMAL" mode
X
= PRINT YESTERDAY'S DOLLARS REPORT
H
- Turn key to "FUNCTION" mode
- Press '4 9 E'
- Type in the valid password number and
press 'E'
- Insert a report card . Remove when
finished printing .
- Turn key to "NORMAL" mode
[U 2 8 ]
USER GUIDE
* REPORTS
-
TODAY'S HOURS / DOLLARS
The following User Access Codes will allow you to print reports that
include today's total, regular and overtime hours worked or dollars
sorted by department number .
PRINT TODAY's HOURS REPORT
- Turn key to "FUNCTION" mode
- Press '5 0 E'
- Insert a report card . Remove when finished
printing .
- Turn key to "NORMAL" mode
J U U[
LJ
L=J
J LJ [
j
PRINT TODAY'S DOLLARS REPORT
- Turn key to "FUNCTION" mode
- Press '5 1 E'
- Type in the valid password number and
press 'E'
- Insert a report card . Remove when
finished printing .
- Turn key to "NORMAL" mode
[U 2 9 ]
USER GUIDE
* REPORTS
- APPROACHING OVERTIME
The following User Access Codes will allow you to print an
approaching overtime report by specifying a minimum amount of hours
employees have worked before appearing on the report .
5
2
E
PRINT APPROACHING OVERTIME REPORT
- Turn key to "FUNCTION" mode
- Press '5 2 E'
- Type in the amount of weekly worked hours limit
for the pay period . (All employees that have worked
greater than that amount will print out on report .)
- Press 'E'
- Insert a report card . Remove when finished
printing .
- Turn key to "NORMAL" mode
[U 3 0 ]
USER GUIDE
* REPORTS
-
PUNCHED IN
The following User Access Codes will allow you to print a punched in
report that will include all employee's currently punched in on the
clock and the time that they punched in .
5
3
E
PRINT PUNCHED IN REPORT
(ALL DEPARTMENTS)
- Turn key to "FUNCTION" mode
- Press '5 3 E'
- Insert a report card . Remove when finished printing .
- Turn key to "NORMAL" mode
PRINT PUNCHED IN REPORT
(SPECIFIC DEPARTMENTS)
- Turn key to "FUNCTION" mode
- Press '5 4 E'
- Type in a valid existing department number
- Press 'E'
- Insert a report card . Remove when finished
printing .
- Turn key to "NORMAL" mode
[U 3 1 ]
USER GUIDE
* REPORTS
-
PUNCHED OUT
The following User Access Codes will allow you to print a punched out
report that will include all employee's currently punched out on the
clock and the time that they punched out .
5
=
PRINT PUNCHED OUT REPORT
(ALL DEPARTMENTS)
- Turn key to "FUNCTION" mode
- Press '5 5 E'
- Insert a report card . Remove when finished printing .
- Turn key to "NORMAL" mode
5
[j H
=
PRINT PUNCHED OUT REPORT
(SPECIFIC DEPARTMENTS)
- Turn key to "FUNCTION" mode
- Press '5 6 E'
- Type in a valid existing department number
- Press 'E'
- Insert a report card . Remove when finished
printing .
- Turn key to "NORMAL" mode
[U 3 2 ]
USER GUIDE
* PASSWORD MAINTENANCE
The following User Access Code will allow you to change your
existing password .
1 1 E
Password Maintenance
- Turn key to "FUNCTION" Mode
- Press ' 1 1 E'
- Type in the valid existing password number
- Press 'E'
- Type in the new password number (up to 4 digits)
- Press '#'
- Retype in the new password number to confirm
- Press 'E'
- Turn key to "NORMAL" mode
[U 3 3 ]
MAINTENANCE
*
DIAGNOSTICS
JU
LJ
- MEMORY TEST
= MEMORY TEST for ALL areas of memory on the main
printed circuit board, keypad and display screen .
- Turn the key to "FUNCTION" mode
- Press '9 0 E'
• The clock will begin checking area 0 :
This is a RAM work area where all calculations
take place .
The display screen will start scrolling backwards
from 100 down to 0 on the left while displaying
0 on the right .
• The clock will then begin checking area 1 :
This is the RAM BANKO where all of the programming
data, department numbers, and part of the employee
master files and accumulated hours are stored .
The display screen will start scrolling backwards
from 100 down to 0 on the left while displaying
1 on the right .
• The clock will then begin checking area 2 :
This is the RAM BANK1 where part of the employee
master files and accumulated hours are stored .
The display screen will start scrolling backwards
from 100 down to 0 on the left while displaying
2 on the right .
• The clock will then begin checking area 3 :
This is the RAM BANK2 where part of the employee
master files and accumulated hours are stored .
The display screen will start scrolling backwards
from 100 down to 0 on the left while displaying
3 on the right .
** IF ANY PROBLEMS ARE DETECTED THE DISPLAY WILL
STOP ON THE NUMBER WHERE THE PROBLEM LIES .
CALL YOUR
AMANO REPRESENTATIVE IMMEDIATELY FOR PROPER SERVICE .
[U 3 4 ]
MAINTENANCE
*
DIAGNOSTICS
-
MEMORY TEST
* When the memory test is completed, the clock will
test the employee master file numbers :
The display screen will start scrolling backwards
from 249 down to 000 on the upper left hand corner .
When finished scrolling every available item on
the display screen will be turned on for approximately
4 seconds .
- When the display goes blank, test the keypad by
pressing each key in the order presented :
'F'
'E'
'#'
'CL '
key
key
key
key
displays
displays
displays
displays
'
'
'
'
F '
E '
d
C '
'9'
'6'
'3'
11
key
key
key
key
key
key
key
key
displays
displays
displays
displays
displays
displays
displays
displays
'
'
'
'
'
'
'
'
9
6
3
b
8
5
2
A
'8'
'5'
'2'
'+'
'
'
'
'
'
'7' key displays ' 7 '
'4' key displays ' 4 '
'1' key displays ' 1 '
'0'
key displays ' 0
'I'
'II'
'III'
'IV'
key
key
key
key
displays
displays
displays
displays
'
' L
two half sized lines .
the bottom half of a zero .
' P
'
- After the 'IV' key is pressed the display will go blank
and then the card symbol will appear on the bottom .
- Insert a report card to print the sensor test .
(Refer to page U 37 to compare results)
- Turn the key back to "NORMAL" mode
[U
35]
MAINTENANCE
*
DIAGNOSTICS -
1
I-I
[E]
PRINTER TEST
= PRINTER TEST for dot matrix printer and ribbon cartridge .
- Turn the key to "FUNCTION" mode
- Press '9 1 E'
- Insert report card . The clock will print in black
on one line and then in red on the line beneath it
making sure that all available characters print on
every print position on the card . The card will
automatically continue to a ect and be pulled back
into card transport until the entire card is full .
You may remove the card at anytime .
- Turn the key back to "NORMAL" mode
[U 3 6 ]
MAINTENANCE
*
DIAGNOSTICS
I-I 2
n
-
SENSOR TEST
= SENSOR TEST for home sensor, timing sensor, and card
sensor and card reader .
- Turn the key to "FUNCTION" mode
- Press '9 2 E'
-
Insert a report card . The sensor levels will be
printed and the card will automatically eject .
Remove the card and compare to the normal sensor
levels :
H T C
Y X 0 1 2 3 4 5 6 7 8 9
7 7 5
4 4 4 4 4 4 4 4 4 4 4 4
H = Home Sensor : assures that the print head starts
at the left most position .
T = Timing Sensor : assures that the punch is printed
in the proper position on the time
card .
C = Card Sensor : senses when a card is inserted into
the clock .
Y-9 = Card Reader : Reads the holes on the bottom
of the time card to identify
employee punching in or out .
If your printout looks different, you should call
your Amano Representative to clean or replace the
sensor(s) .
- Turn the key back to "NORMAL" mode
[U 3 7 ]
MAINTENANCE
*
REPLACING RIBBON CARTRIDGE
When the printing on the time card becomes too light replace the
ribbon cartridge :
1 . Insert the key into the keyhole on the front of the cover case
and turn to the right to unlock . Remove the cover case .
2 . Remove the white thumb screw (1) located below the keypad panel .
3 . Lift up the keypad panel (2) .
Rotate the black gear (3) located on
the right hand side of the frame, until the ribbon cartridge moves
to the right side slightly .
4 . To remove the ribbon cartridge, raise the end up and lift it out .
5 . Place the new cartridge in the cartridge casing in a slanted
position and make sure the protrusions on both ends snap into
position .
6 . Slowly lower the front portion of the cartridge while turning the
knob on the cartridge . Ensure that the ribbon is in the ribbon
guide .
7 . To check for proper printing, run a printer test by placing the
key in the keyhole next to the card pocket . Turn the key to
the right into "FUNCTION" mode . Press '9 1 E' and insert a
report card .
8 . Once printing has been verified, turn the key back to "NORMAL" mode
and remove from the keyhole .
9 . Replace cover case and lock .
(2)
VW
[U 3 8 ]
ERROR CODES
* MJR-8000 ERROR CODE LIST / SOLUTION
ERROR CODE
0 - 01
REASON
Inserted time card
facing the wrong side .
SOLUTION
Reinsert time card
facing the correct
side .
1) Time card number has
already been assigned .
1) Insert an unassigned
time card .
2) Inserted wrong time
card for printing of
correction hours .
2) Insert correct time
card .
0 - 08
0 - 12
Inserted time card during
lock out period .
1) Employee master file
number does not exist .
1 - 20
2) Invalid user access code
3) Approaching overtime
limit for report is out
of range .
1 - 22
1 - 30
Incorrect card inserted
during card assignment,
name printing or card
assignment .
Improper time card .
(Too Short)
[U 4 0 ]
Override lock out by
using lock out release
card, if authorized .
1) Enter correct
employee master file
number .
2) Enter correct user
access code .
3) Enter a valid limit
00 :00 - 60 :00 .
Insert correct time
card .
Reissue proper size,
properly coded, time
card .
ERROR CODES
* MJR-8000 ERROR CODE LIST / SOLUTION
ERROR CODE
REASON
SOLUTION
1 - 31
Improper time card .
(Too Long)
Reissue proper size,
properly coded, time
card .
2 - 01
Incorrect password .
Enter correct password .
2 - 10
Department buffer full .
Cannot enter any more
department numbers .
A maximum of 50
departments can be
stored in memory .
2 - 11
Department number already
exists .
Enter a different
department number .
2 - 12
Department number doesn't
exist .
Enter an existing
department number .
Department and/or file
number is out of valid
range .
Enter a valid dept .
number (000001-999999)
or enter a valid
employee file number
(000-249) .
2 - 13
[U 4 1 )
ERROR CODES
* MJR-8000 ERROR CODE LIST / SOLUTION
ERROR CODE
2 - 14
REASON
Access Code entered is
not available for the
traditional time card
number assignment method .
SOLUTION
Input an available
Access Code .
Refer
to pages P8 and P9 .
8 - 80
x
Incorrect data programmed .
8 - 85
x
Individual data file
reading error .
Turn key switch to
"FUNCTION" mode . Press
CL key to clear .
Re-enter data as needed
8 - 88
x
CPU (memory) defect .
Turn key switch to
"FUNCTION" mode . Press
CL key to clear .
I
9 - 50
x
9 - 60
x
Clear program memory
of applicable area
and reprogram .
Inserted time card for
printing earlier than
previously printed time .
Press CL key . Make
sure the clock is set
to the current date
and time .
Temporary defect of
software caused by noise
or surge from outside
power source .
Resets automatically
in 3 seconds after
error display .
[U 4 2 ]
ERROR CODES
* MJR-8000 ERROR CODE LIST / SOLUTION
ERROR CODE
REASON
SOLUTION
9 - 61
x
Temporary defect of CPU
caused by noise or surge
from outside power source .
Resets automatically
in 3 seconds after
error display .
9 - 70
x
Hardware problem .
(printer timing impulse,
sensor, motor, etc .)
Clear entry by CL key
and clean sensors .
9 - 90
x
Card reading failure .
Press CL key and call
service .
9 - 91
x
Card sensor level defect .
Press CL key and call
service .
[U 4 3 ]
APPENDIX
*
ASCII TABLE CHARACTER TRANSLATION
UPPER CASE LETTERS
CHARACTER
CODE
A
B
C
D
E
65
66
67
68
69
F
G
H
I
J
70
71
72
73
74
K
L
M
N
0
75
76
77
78
79
P
Q
S
T
80
81
82
83
84
U
V
W
X
Y
85
86
87
88
89
Z
90
OTHER CHARACTERS :
CHARACTER
Comma (,)
Space
Period ()
Apostrophe (')
CODE
44
32
46
39
[U 4 4 ]