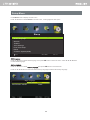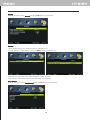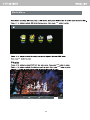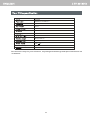
1
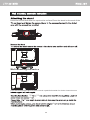
16” HD LED TV with DVB-T/CI
LTV 2016HD
1
PREFACE
3
2
SAFETY
PRECAUTIONS
3
3
IN THE CARTON
5
4
FRONT AND
BACK
CONNECTIONS
OF THE TV
6
5
Power Cord Connection
7
Antennas Connection
7
AV Connection
8
YPbPr Connection
8
BASIC
INSTALLATION
9
9
10
10
6
7
REMOTE CONTROL
OSD menu
Remote control setup
14
Select Input Source
15
DTV Menu
16
Picture Menu
16
Sound Menu
18
Channel Menu
20
Lock Menu
23
Setup Menu
25
ATV/SCART/HDMI/AV/YPbPr/PC Menu
28
Media (Multimedia)Menu
29
1
8
If you're having
problems
32
9
Your TV's
specification
34
10
Wall mounting
assembly
instruction
35
2
1. PREFACE
Thank you for buying this TV ! Please read this manual throughly before operating the TV.
Make sure the TV was not damaged in transit. Should the TV is damaged, do not install it and contact
your dealer. Check that you have all the accessories according to the model.
2. SAFETY PRECAUTIONS
Put the TV on a stable surface.
Do not place any material on the TV.
Do not use the TV with fixtures other than those provided or
suggested by the manufacturer.
Do not block or cover the ventilation openings on the TV.
If you have a wall mount, check that it is steady.
Power cord and cables must be properly routed and protected to prevent
people from stepping on them and causing the TV to fall.
3
Keep the TV dry and away from humidity.
Keep the TV away from heat sources .
Unplug the TV before cleaning it. Do not use solvent or liquid to clean
the TV.
Only clean the TV with a soft and dry cloth.
In case of troubleshooting, do not use spare parts other than those
suggested by the manufacturer. Using inadequate spare parts can
lead to electric shocks, short-circuits fire or other incidents.
Unplug the TV during lightening storms or when unused for long periods
of time.
4
3. IN THE CARTON
DTV
PC
AUDIO
SLEEP
ASPECT
Remote Control
TV SET
User Manual
User Manual
Switch Adaptor
5
4.FRONT AND BACK CONNECTIONS OF LED TV
Coax
RF
HDMI
USB
CI
VOL+
VOLCH+
CHMENU
SOURCE
STANDBY
DC IN
Head
PC
phone Audio
VGA
YPbPr
SCART
1.DC IN:Main power input.
2.Headphone:Connect the earphone.
3.PC AUDIO: Connect the Audio output jack of PC.
4.VGA: Connect the PC-RGB output jack of PC.
5.YPbPr: Connect the YPbPr output jack of DVD.
6.SCART: Connect the SCART jack of VCR or DVD.
7.Video: Connect the VIDEO output jack of DVD.
8 .R/L: Connect the R/L audio output jack of DVD.
6
Video
R
L
9 .Coax:Connect the SPDIF a suitable amplifier.
1 0 .RF: Connect the antenna.
11.HDMI: Connect the HDMI output jack of DVD.
12.USB: Connect to portable USB device.
13.CI: Connect to the CI card.
5. BASIC INSTALL ATION
Power Cord Connection
DC IN
- Connect the power cord and AC adaptor correctly as shown.
- Press the STANDBY switch of your TV to switch the unit on. The power indicator on the
front panel lights up in green or blue.
AC Adaptor
POWER Cord
Antennas Connection
To ensure good picture and sound, TV antenna system needs to be installed. The antenna system as
shown can be sourced from TV equipment shops, which will provide service for correct installation
and connection. After installation, insert the 75-OHM antenna plug into the antenna jack as shown.
7
Connect the VIDEO and AUDIO output jack of the DVD or VCR to the AV IN jacks on the set using
the RCA cable (Yellow [video], White and RED [left & Right audio]).
Select the AV input source using the SOURCE button on the remote control.
DC IN
Head
phone
PC
Audio
VGA
YPbPr
SCART
Video
R
L
Connect the YPbPr/YCbCr output of the DVD or VCR to the YPbPr input on the set.The picture
quality is improved compared to connecting a regular VCR to the video input. Connect the Audio output of
the DVD or VCR to the Audio input jacks on the set using the RCA cable.(3.5mm plug-2 X RCA plug)
Match the jacks colours: Y is green, Pb is blue, Pr is red, Audio left is white and Audio right in red.
Select YPbPr input source using the SOURCE button on the remote control.
DC IN
Head
phone
PC
Audio
VGA
YPbPr
SCART
8
Video
R
L
Connect the RGB output of the PC to the VGA jack on the set. Connect the AUDIO output of the PC to the PC
AUDIO jack on the set. Select the PC input source using SOURCE button on the remote control.
DC IN
Head
phone
PC
Audio
VGA
YPbPr
SCART
Video
R
L
HDMI connection allows the user to transfer both audio and video control signals through one cable only.
These signals are transferred in digital.
Coax
RF
HDMI
USB
CI
9
SCART Connection
Connect the SCART connector on the external video device to the SCART connector on the LED TV
using a SCART cable.
DC IN
Head
phone
PC
Audio
VGA
YPbPr
SCART
Video
MEDIA Connection
USB: Connect to portable usb device.
Coax
RF
HDMI
USB
CI
10
R
L
6. REMOTE CONTROL
Remote control instructions
Remote control instruction in TV mode
STANDBY
Press "STANDBY" button to turn standby mode on or off.
DTV
PC
AUDIO
SLEEP
MUTE
Press to mute the sound. Press again or press V+ to
unmute the TV.
SOURCE
Press to cycle through the input source.
DTV
Press to select DTV mode.
PC
Press to select PC mode.
I/II
Press to search the NICAM modes.
SLEEP
Select amount of time. Let your TV turn off automatically.
NUMBER BUTTONS
Press 0-9 to select a TV channel directly when you are
watching TV. The channel change after 2 seconds.
Return to the previous channel viewed.
DISPLAY
Press to display the source and channel’s information.
THUMBSTICK(▲/▼/◄/►/OK)
Allows you to navigate the on-screen menus and
adjust the system settings to your preference.
MENU
Brings up the main TV menu to the screen.
EXIT
Exit the main TV menu to the screen.
VOL+/VOLPress to increase/decrease the sound level.
CH+/CHPress to scan through channels.
ASPECT
Press this button to chang the aspect of your TV.
11
Remote control instructions
Remote control instruction in TELETEXT mode
DTV
PC
AUDIO
SLEEP
NUMBER BUTTONS
Press 0-9 to select a teletext page.
TEXT
Press to switch between TV and Teletext mode.
SUBTITLE
To display subtitle.
HOLD
Freeze the current page.
SIZE
Change the picture size.
REVEAL
Reveal or hide the hidden words.
INDEX
Request index page when index link is valid.
SUBPAGE
TELETEXT Subpage.
12
Remote control instructions
Remote control instruction in DTV mode
NUMBER BUTTONS
Press 0-9 to select a channel.
DTV
PC
AUDIO
SLEEP
TV MENU
Brings up the main DTV menu to the screen.
DISPLAY
Press to display the source and channel’s information.
THUMBSTICK(▲/▼/◄/►/OK )
Allows you to navigate the on-screen menus and
adjust the system settings to your preference.
CH+/CHWhen watching a channel, changes the channel.
COLOUR BUTTONS
Colour buttons ( respectively red, green, yellow and blue )
used in a few sub-menus.
SUBTITLE
To display subtitle.
SIZE
Change the picture format.
FAV
Press to increase/decrease your favourite program in
DTV mode.
TV/RADIO
Select TV or Radio modes.
PLAY/PAUSE in TIMESHIFT and MEDIA mode.
Jump to previous and next track in MEDIA mode.
Fast reverse and forward key in MEDIA mode.
Stop in MEDIA mode or exit the REC or TIMESHIFT mode.
13
Remote control setup
1. Open the cover.
2. Your remote requires 2X AAA Batteries. When inserting the batteries, make sure correct polarity
marks"+"and "-" on the batteries match the diagram as shown within the battery compartment.
3. Replace the battery cover.
To prevent battery leakage which may result in bodily injury or damage to the remote:
1. Install all batteries correctly, and as marked on the remote control.
2. Do not mix batteries: (OLD and NEW or CARBON and ALKALINE, etc)
Remove batteries when the remote is not used for a long time.
3. Recommended use ALKALINE type batteries.
14
Select Input Source
SOURCE
DTV
ATV
SCART
AV
YPbPr
HDMI
PC
USB
SOURCE:Exit
Basic Operation
Press SOURCE button on the remote control to display the input source list .
Press ▼ / ▲ button to select the input source you want to watch.
Press OK button to enter the input source.
Press EXIT button to quit.
15
Picture Menu
Press MENU button to display the main menu.
Press ◄ / ► button to select PICTURE in the main menu,it will highlight the first option.
Picture
Picture Mode
Standard
Brightness
50
50
Contrast
Sharpness
50
50
Saturation
Hue
0
Color Temp
Standard
Full
Aspect Ratio
Move
MENU:Return
Adjust
EXIT : Exit
1. Press ▼ / ▲ button to select the option that you want to adjust in the PICTURE menu.
2. Press ◄ / ► button to adjust.
3. After finishing your adjustment, Press MENU button to return back to the previous menu.
Picture Mode
Press ▼ / ▲ button to select Picture Mode, then press OK button to enter sub-menu.Press ▼ / ▲ button to select.
(Available Picture mode: Dynamic, Standard,Mild,Personal).
You can change the value of contrast, brightness, color and sharpness when the picture is in Personal mode.
TIPS: You can press PMODE button on the remote control to change the Picture Mode directly.
Brightness
Press ▼ / ▲ button to select Brightness,then press
Contrast
Press ▼ / ▲ button to select Contrast,then press
OK button to enter sub-menu.Press
OK button to enter sub-menu.Press
◄ / ► button to adjust.
◄ / ► button to adjust.
Sharpness
Press ▼ / ▲ button to select Sharpness,then press ◄ / ► button to adjust.
Saturation
Adjust the saturation of the color based on your own like.
Hue
Use in compensating color changed with the transmission in the NTSC code.
Color Temp
Press ▼ / ▲ button to select Color Temperature,then press ◄ / ► button to select. (Available Color Temperature:
Standard,Cool,Warm).
Aspect Ratio
Press ▼ / ▲ button to select Aspect Ratio ,then press ◄ / ► button to select. (Available Aspect Ratio:Full,Zoom1,Zoom2,4:3).
16
Advanced Settings
Advanced Settings
NR
Medium
MPEG NR
Medium
Medium
Dynamic Contrast
Move
Adjust
EXIT : Exit
MENU:Return
NR(Noise Reduction)
Press ▼ / ▲ button to select NR(Noise Reduction),then press ◄ / ► button to select.(Available options: Off,Weak,
Medium,Strong).
MPEG NR(Noise Reduction)
Press ▼ / ▲ button to select MPEG NR(Noise Reduction),then press ◄ / ► button to select. (Available options:
Off,Weak,Medium,Strong).
Dynamic Contrast
Press ▼ / ▲ button to select Dynamic Contrast ,then press ◄ / ► button to select. (Available options: Off,Weak
,Medium,Strong).
17
Sound Menu
Press MENU button to display the main menu.
Press ◄ / ► button to select Sound in the main menu,it will highlight the first option.
SOUND
Sound Mode
Standard
Treble
0
Bass
0
Balance
0
Surround Sound
Off
EQ Setting
AVL
Off
SPDIF
PCM
Move
Adjust
MENU:Return
EXIT : Exit
1. Press ▼ / ▲ button to select the option that you want to adjust in the SOUND menu.
2. Press ◄ / ► button to adjust.
3. After finishing your adjustment, Press MENU button to return back to the previous menu.
Sound Mode
Press ▼ / ▲ button to select Sound Mode, then press OK button to enter sub-menu.Press ▼ / ▲ button to select.
(Available Sound mode: Standard,Music,Movie,Personal).
You can change the value of Treble and Bass when the sound is in Personal mode.
TIPS: You can press SMODE button on the remote control to change the Sound Mode directly.
Treble
Press ▼ / ▲ button
to select Treble,then
to enter sub-menu.Press ◄ / ► button to adjust.
Backpress OK button
Adjust
Select
Bass
Press ▼ / ▲ button to select Bass,then press OK button to enter sub-menu.Press ◄ / ► button to adjust.
Balance
Press ▼ / ▲ button to select Balance,then press OK button to enter sub-menu.Press ◄ / ► button to adjust.
Surround Sound
Press ▼ / ▲ button to select Surround Sound ,then press ◄ / ► button to select On or Off.
18
EQ Setting
Press ▼ / ▲ button to select EQ Setting, then press OK / ►button to enter submenu.
EQ Setting
AVL
Press ▼ / ▲ button to select AVL ,then press ◄ / ► button to select On or Off.
SPDIF
Press ▼ / ▲ button to select SPDIF ,then press ◄ / ► button to select Off,Auto,PCM.
Audio Description
Press ▼ / ▲ button to select Audio Description , then press OK / ►button to enter submenu.
Audio Description
Sound Type
Press ▼ / ▲ button to select Sound Type ,then press ◄ / ► button to select .
19
Channel Menu
Press MENU button to display the main menu.
Press ◄ / ► button to select CHANNEL in the main menu,it will highlight the first option.
Channel
Auto Scan
Manual Scan
Channel Edit
Common Interface
Signal Information
OK : Select
Move
MENU:Return
EXIT : Exit
1. Press ▼ / ▲ button to select the option that you want to adjust in the CHANNEL menu.
2. Press ◄ / ► button to adjust.
3. After finishing your adjustment,Press MENU button to return back to the previous menu.
Tuner Type
Press ▼ / ▲ button to select Tuner Type ,then press ◄ / ► button to select Air or Cable.
Auto Scan
Press ▼ / ▲ button to select Auto Scan , then press
(The default password is 0000)
OK / ►button to enter submenu.
Auto Scan
Country
Italy
DTV+ATV
Mode
Start
Move
Adjust
MENU:Return
EXIT : Exit
20
Manual Scan
Press ▼ / ▲ button to select Manual Scan , then press OK / ►button to enter submenu.
Manual Scan
Digital Manual Scan
Analog Manual Scan
OK : Select
Move
MENU:Return
EXIT : Exit
Digital Manual Scan
Press ▼ / ▲ button to select Digital Manual Scan, then press OK / ► button to enter submenu.
Digital Manual Scan
CH21
Digital Scan
Start
Frequency
474.00 MHz
0
Strength
Move
Adjust
0-9: Input
EXIT : E xit
MENU:Return
Analog Manual Scan
Press ▼ / ▲ button to select Analog Manual Scan , then press OK / ► button to enter submenu.
Analog Manual Scan
Analog Scan
855.20MHz
Channel to Save
Color System
CH005
PAL
Sound System
AFC
Start
Move
Off
Fine tune
0-9: Input
MENU:Return
EXIT : Exit
21
Channel Edit
Press ▼ / ▲ button to select Channel Edit , then press OK / ►button to enter submenu.
Channel Edit
001 BBC ONE
002 BBC TWO
003 SBS ONE
007 BBC CHOICE
010 BBC TEXT
011 BBC NEWS 24
030 SBS HD
Delete
Move
Skip
Page
Move
OK: Select
MENU:Return
EXIT : Exit
The three colored key is the shortcut key for programming the channel.
First press ▼ / ▲ to highlight the channel you want to delete or move or skip, then:
Press the Red button to delete the channel.
Press the Green button to skip the select channel.
(Your TV set will skip the channel automatically when using CH+/- to view the channels.)
Press the Blue button to to set the channel to moving state. then press ▼ / ▲ to move
it to the position you want to put.
Common interface
Press ▼ / ▲ button to select Common interface , then press OK / ►button to enter submenu.
Only available when there is Cl card under DTV.
Signal lnformation
Press ▼ / ▲ button to select Signal Information, then press the OK button to see the detail information
about the signal. Only available when there is signal under DTV.
22
Lock Menu
Press MENU button to display the main menu.
Press ◄ / ► button to select LOCK in the main menu,it will highlight the first option.
LOCK System
Enter Password
Enable
On
Channel Locks
Lock Keypad
On
Hotel mode
New Password
Clear Lock
Move
Adjust
MENU:Return
EXIT : Exit
1. Press ▼ / ▲ button to select the option that you want to adjust in the LOCK menu.(Default Password:0000)
2. Press ◄ / ► button to adjust.
3. After finishing your adjustment, Press MENU button to return back to the previous menu.
Enter Password
Press ▼ / ▲ button to select Enter Password , then press OK button to make the following 4 options valid.
(Default password is ‘0000’.)
Enable
Press ▼ / ▲ button to select Enable ,then press ◄ / ► button to select On or Off.
Channel Locks,Parental Rating and Lock Keypad are available when Enable is On
Channel Locks
Press ▼ / ▲ button to select Channel Locks , then press ok / ►button to enter submenu.
LOCK System
Select channel(s) to lock .
001 BBC ONE
002 BBC TWO
003 SBS ONE
007 BBC CHOICE
010 BBC TEXT
011 BBC NEWS 24
030 SBS HD
Move
Page
OK: Select
MENU:Return
EXIT : E xit
23
Lock Keypad
Set to prevent it from being used by young child ren,or other unexpected usage.
Press ▼ / ▲ button to select Lock Keypad , then press◄ / ► button to selec On or Offt.
Hotel Mode
Press ▼ / ▲ button to select Hotel Mode , then press OK / ►button to enter submenu.
Hotel Mode
Active Hotel Mode
On
Max Vol.
100
Default Vol.
20
Source Lock
Default Source
DTV
Default Dtv Program
001
01
Default Atv Program
Backup To USB
Restore From USB
Recall
Move
Adjust
EXIT : Exit
New Password
Press ▼ / ▲ button to select New Passwor,,then enter a 4-digital number you want to set twice
Clear Lock
Press ▼ / ▲ button to select Clear Lock , then press ◄ / ► button to select.
24
Setup Menu
Press MENU button to display the main menu.
Press ◄ / ► button to select SETUP in the main menu, it will highlight the first option.
Steup
OSD Language
English
Audio Language
Subtitle
Teletext
Time Settings
First Time Setup
Reset
Software Update(USB)
Move
MENU:Return
EXIT : Exit
OSD Language
Press ▼ / ▲ button to select OSD Language , th en press OK button to enter sub-menu . Press ▼ / ▲ /◄ / ►button
to select OSD Language .
Audio Language
Press ▼ / ▲ button to select Audio Language, then press OK button to enter submenu.
Press ▼ / ▲ /◄ / ► button to select the Audio Primary Language and Audio Secondary Language
Audio Language
Italiano
25
Subtitle
Press ▼ / ▲ button to select Subtitle, then press OK button to enter submenu.
Subtitle
Italiano
Teletext
Adjust Teletext settings. Only availa ble under DTV and ATV source.
Press ▼ / ▲ button to select Teletext, then press OK /► button to enter submenu.
Teletext
Teletext
Italiano
Italiano
Under DTV source,press◄ / ►button to select Digital Teletext Language
Under ATV source,press◄ / ► button to select Decoding Page Language
Time Settings
Press ▼ / ▲ button to select Time Settings, then press OK button to enter submenu.
Time Settings
26
First Time Setup
Press ▼ / ▲ button to select First time Setup, then press OK button to enter . (Default Password:0000)
First Time Setup
OSD Language
Country
Auto Scan
English
Italy
DTV+ATV
Start
Move
Adjust
MENU:Return
EXIT : Exit
Reset
Press ▼ / ▲ button to select Reset, then press OK button to enter
If you are sure to reset,press Yes to reset
Software Update(USB)
This menu lets you install the software/firmware onto the television.
27
28
Media Menu
ok
OK
OK
OK
1/43
12.jpg
OK Slide Show/SingleView
Previous/Next
Rotate
EXIT Back
29
Quick Menu
ok
ok
Music
USB1/seasons in the sun.mp3
Move
CH+/- FileList
Quick Menu
OK Select
EXIT Return
ok
ok
30
ok
ok
Text
USB1/TEXE/10 Most Unique Fall Date Ideas TXT.txt
10 Most Unique Fall Date Ideas TXT.txt
FRENCH TXT.txt
10 Most Unique Fall Date Ideas
If you are been dating your boyfriend
for over a year,it might be difficult to spice
up your date nights.Romantic dinners
and strolling down the streets hand in hand
are great,but your boyfriend and you may
want to try something more exciting.
Move
Move
Previous/Next
Change Page
Change
Page
OK: Select
OK Select
0-9: Goto Page
Quick Menu
Quick Menu
Quick Menu
31
EXIT Return
EXIT Return
EXIT Back
If you're having problems
If you are having problems with your TV, carry out the following checks first.
If you are still having problems, unplug your TV and contact the service centre.
Problems and how to fix them
There is no sound and no picture coming from my TV.
-Check that you have connected the TV power cord properly and switched the wall socket on.
-Check that the power switch at the rear of the TV is set to "ON " .
-Check that you have turned on the POWER button on your TV.
-Check the picture contrast and brightness setting.
There is a normal picture but no sound coming from my TV.
-Check that your TV is not muted or has the volume down.
-Switch the channel, the problem may be with the channel you're on, not the TV.
-Check that your audio cable input has been plugged in properly. If you are using an
external a mplifier .
The remote control does not work.
-Check to see if there is any object between your TV (such as a piece of furniture) that
could block the remote control from connecting with the sensor on your TV.
-Have you put the batteries into the remote control the right way? ( So + to + and - to -)
-Correct remote operating mode was set (such as TV or VCR).
-The TV is not positioned in bright sunlight .
-Try fitting new batteries if none of the above work.
The TV has turned off suddenly.
-Check that you have not set the sleep timer.
-Check that you have not set the timer to control the socket which has your TV power
cord on.
-Check that you have not set auto standby with the broadcast signal source which is
connected to your TV.
The picture on my TV appears slowly after I have switched it on.
This is normal. The image takes a few seconds to appear after you have switched the
TV on. Please contact your service centre if picture has not appeared after five minutes.
There is no or poor quality colour or a poor picture on my TV.
-Change the colour setting on the PICTURE MENU.
-Keep a distance between your TV and any VCR you may be using
-Try watching another channel. The problem may be with the channel you're watching.
-Are the video cables installed properly?
-Change the setting of picture brightness on PICTURE MENU.
There are horizontal and vertical bars on the screen, the picture is shaking.
-Check if any signal interference activities is going on nearby, such as an electrical
appliance or power tool is in operation.
The reception is poor on some channels.
-The TV channel you're watching may be having problems. Change to another channel
and see if the same is happening.
-TV broadcasting signal is weak or has been interrupted.
-Check whether signal sources have any possible interference.
There are lines or streaks on the pictures.
-Check if there is any damage to the aerial on the roof, try to change the direction of the
aerial to receive a better signal.
One of the TV's speakers does not work.
-Check the sound balance setting on SOUND MENU.
32
If you're having problems
Note: This page only refer to Video Graphics adaptor (VGA) problems.
Problems and how to fix them
The signal is out of range.
-Change the resolution,horizontal or vertical frequency of your source(PC etc.).
-Check whether the signal cable is connected from the PC to your TV properly.
-Check the signal input source is connected properly.
There is a vertical bar or stripe on my TV screen.
-Turn on the auto configure or change the horizontal or vertical frequency position.
Screen colours aren't appearing as they should be or single colour.
-Check if the video signal cable is connected properly.
-Reinstall your PC video card if the signal source is from your computer.
Maintaining your TV
If you clean your TV carefully and regularly, it helps your TV to last longer. Make sure
you turn the power off and unplug the power cord on your TV before you begin to
clean it.
Cleaning the screen
1 . Here's a great way to keep the dust off your screen. Wet a soft cloth in a mixture of
lukewarm water and a small amount of fabric softener or washing-up liquid. Wring
the cloth until it's almost dry and then use it to wipe the screen.
2 . Make sure there is no excess water on your TV when you have finished cleaning it.
Cleaning the plastic parts of your TV
Wipe the plastic parts of your TV with a soft, dry, lint-free cloth. Do not use a wet cloth.
If you are going to be away for a while
If you are not going to use your TV for a while (such as when you go on
holiday), you should unplug the power cord from the socket and disconnect
your aerial to protect your TV against possible damage from lightning or
power surges.
33
Your TV's specification
Panel
16 inch
0.252( H)x 0.252 (V)
1366 x 768
16: 9
16.7M
500:1
200 cd / m
5 ms
90( H)/50(V)
50,000 hours
12V
Power consumption
2A
24 W
2x3 W
This manual is only for your reference, any change to the design and specification will not
be advised.
34
Place the device face down on a protective surface.Place the stand on the neck of the
Wall-mounting the device
75mm
75mm
If you are mounting the device,place consult a qualified installer for further insturctions on
75
6
75
6
6
35