1
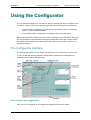
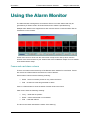
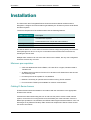
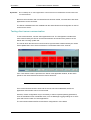
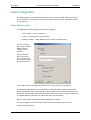
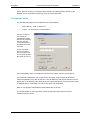
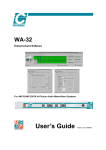
WA-E Integrated Client/Server Remote Control and Alarm Monitor Software for E-Series In-Picture Audio Meter/Alarm Systems User’s Guide Version 1.0 06/05/03 Chromatec E-Series Alarm Monitor Software Michael Stevens & Partners Ltd. has made every effort to ensure the accuracy of information contained within this document which is nevertheless supplied for information purposes only and does not constitute any form of warranty or guarantee. All trademarks acknowledged. The information in this document is subject to change without notice. Michael Stevens & Partners Ltd Invicta Works Elliott Road Bromley Kent BR2 9NT Tel: +44 (0)20 8460 7299 Fax: +44 (0)20 8460 0499 Email: [email protected] web site: www.michael-stevens.com www.chromatec.com 2009 Michael Stevens & Partners Ltd Version 1.0 Chromatec E-Series Alarm Monitor Software Contents INTRODUCTION Main Features System architecture USING THE CONFIGURATOR THE CONFIGURATOR INTERFACE Using the menu bar Using the Tool Bar Active fields AUDIO METER CONFIGURATIONS Bar-graph modes Monitoring modes METER LEVELS AND DYNAMICS Saving and assigning audio meter configurations Deleting audio meter configurations EDIT ALARM ASSIGNMENTS All Alarm Settings Saving and assigning alarm settings Deleting alarm settings MANAGING SCHEDULES USING THE ALARM MONITOR Frame and card alarm colours Checking communication with the Server Viewing the log Resetting alarms Detecting frame power loss Alarm Monitor priority INSTALLATION Minimum pre-requisites: Cabling E-Series frames Installing the WA-E software RUNNING THE SERVER FOR THE FIRST TIME Testing client server communication SERVER CONFIGURATION Selecting the Configurator mode Selecting the IP port 2009 Michael Stevens & Partners Ltd 1 1 2 3 3 5 6 6 8 8 9 11 12 12 13 15 15 16 16 17 17 18 18 18 19 19 20 20 20 22 23 25 26 26 27 Version 1.0 Chromatec E-Series Alarm Monitor Software Message logging settings Configuring the Alarm Client update rate Viewing E-Series card status Selecting the E-Series serial communication port CLIENT CONFIGURATION Alarm Monitor setup Configurator setup TROUBLE SHOOTING Trouble shooting client/server communication on the server PC Trouble shooting network communication Sample problems and their solutions 2009 Michael Stevens & Partners Ltd 28 29 29 30 31 31 32 33 33 33 34 Version 1.0 Chromatec E-Series Alarm Monitor Software Introduction Introduction The Chromatec WA-E Integrated Remote Control and Alarm Monitor software suite is designed to monitor alarms generated by the E-Series In-picture Audio Meter and Alarm System. The Chromatec E-Series suite of programs consists of the Chromatec E-Series Server, which can connect with up to 32 E-Series frames, and two client packages, the Alarm monitor and the Configurator remote control and setup scheduler. Client packages can be run on any PC in the same network environment as the Server, including the Server itself. Multiple Alarm monitors are supported, but only one Configurator may be active at any one time. The PC running the WA-E server must be fitted with a security device or ‘dongle’. However, any number of client PCs may be connected to the server without the need for additional licensing or security devices. There is no limit for the number of E-Series cards to which a single license applies, except that a single server cannot address more than 512 cards in 32 linked 3U E-Server frames. The WA-E software will run on Windows 98 Second Edition, Windows NT4 and Windows 2000. It will not run on Windows 95 or Windows 98 First Edition. Main Features • Live or non-scheduled mode to re-configure any card in any frame with a click of a mouse • Schedule mode to allow unlimited preset alarm and system configurations to be recalled at set times on a 24 hour repeating basis • Save and recall unlimited alarm and audio meter configurations • See at a glance Alarm monitor watches for up to twenty four alarm categories for card-assigned alarms • Monitor card status and alarms on multiple PCs • Configure an E-Series system from any PC on the network • One-button frame reset • Installed card type status • View up to 500 logged system events and alarms 2009 Michael Stevens & Partners Ltd 1 Version 1.0 Chromatec E-Series Alarm Monitor Software Introduction System architecture The Server application communicates with Chromatec E-Series frames via a PC RS232 serial port. If 3U E-Series frames are used, up to 32 frames can be linked to create a system with up to 512 E-Series cards. The Alarm and Configurator may reside on either a client or server PC, but only one Configurator may be active at any one time. There is no limit to the number of PCs running Alarm monitor clients, but heavy network traffic may require alarm updates to be sent less frequently. Notes: This manual should be read in conjunction with the appropriate Chromatec E-Series user manual. 2009 Michael Stevens & Partners Ltd 2 Version 1.0 Chromatec E-Series Alarm Monitor Software Using the Configurator Using the Configurator The Configurator is designed to work with the Server to manage the setup of E-Series cards in E-Series frames. There are two operational modes, selected within Server preferences: • Schedule Mode: configuration and settings only uploaded to system at scheduled times – no manual upload available • Non-schedule mode: configuration and settings may be uploaded directly Both modes allow alarm settings and audio meter configuration to be changed for each card, but only Schedule mode allows selected System Configurations (all of the currently loaded alarm/audio meter settings for all cards and for all frames) to be uploaded to the Server at predetermined times. The Configurator interface The Configurator interface is very flexible with pull-down menu commands, one-click icons on the Tool Bar and intuitive methods to assign different settings and configurations to individual cards (including drag-and-drop). Card settings and configurations Each card can be assigned an Audio Meter configuration and an Alarm setting. 2009 Michael Stevens & Partners Ltd 3 Version 1.0 Chromatec E-Series Alarm Monitor Software Using the Configurator There is no limit to the number of card settings and configurations that may be applied or saved and recalled from the hard disk of the PC on which the Configurator resides or from any location available on the network. System Configurations A System Configuration consists of all of the alarm settings and audio meter configurations for all of the cards in a frame or in several frames in a linked-frame system. The handling of these system configurations differs slightly between Schedule and Non-schedule modes. In Non-schedule mode, the server will look for and load the most recent System Configuration that matches the configuration of cards in attached frames when it first runs. In Schedule mode, selected System Configurations can be programmed against a time line to be implemented at predetermined times on a 24 hour repeating basis. In both Schedule and Non-schedule modes, the current state of all the alarm and audio meter settings can be named as a System Configuration and saved to the server and loaded from the file menu. Notes: The Configurator must be able to connect to the Server on the network to access cards in connected frames. There may be a delay in establishing a connection if the Server has only just been started. The Server and Configurator MUST be restarted after mode changes. 2009 Michael Stevens & Partners Ltd 4 Version 1.0 Chromatec E-Series Alarm Monitor Software Using the Configurator Using the menu bar The available pull-down menus vary slightly depending on the operational mode. Note: Manage Schedules will be greyed out in Non-schedule mode. File menu The File menu provides access to the following: • Preferences – Server location and IP port, refer to Installation chapter • Load Saved System Configuration – load from a list of System Configurations saved at the server • Save Selected Configuration – save highlighted Audio Meter configuration to chosen directory • Save Selected Alarm Settings – save highlighted alarm settings to chosen directory • Import Settings File – import either Alarm or Audio Meter settings file • Exit – exit application Setups The Setups menu provides access to the following: • Set all configurations to a highlighted Audio Meter configuration • Set all alarm setups to a highlighted alarm setting • Save schedule at server – save current schedule to server • Store System Config as… - store all card assignments in all frames as a System Configuration • Manage Schedules – bring up schedule manager window 2009 Michael Stevens & Partners Ltd 5 Version 1.0 Chromatec E-Series Alarm Monitor Software Using the Configurator View Use the View menu to control tool and status bars: • Toolbar – click to hide or show the tool bar • Status Bar – click to hide or show the status bar Help Use the Help menu for general or specific help: • Help Topics – on screen help manual • What’s This – context specific help Using the Tool Bar Ensure that Tool Bar is ticked under the View menu to use the tool bar. The Tool Bar icons act as short cuts for file menu commands. Active fields The System Configuration Name is an Active Field. Although this normally display the assigned system configuration name, it is also possible to type directly into it. 2009 Michael Stevens & Partners Ltd 6 Version 1.0 Chromatec E-Series Alarm Monitor Software Using the Configurator To create a new System Configuration in Non-schedule mode and make it active proceed as follows: • Type a new name in the System Configuration Name box – taking care not to use illegal characters • Click on the arrow in the Tool Bar The same procedure will work in Schedule mode, but the new System Configuration will not become active until it has been scheduled. To create a new System Configuration (without making it active) in either Schedule or Nonschedule mode use ‘Store System Config as…’ in the Setups menu to store all card assignments as a System Configuration. 2009 Michael Stevens & Partners Ltd 7 Version 1.0 Chromatec E-Series Alarm Monitor Software Using the Configurator Audio meter configurations To create a new Audio Meter configuration click on ‘New Config’. To edit an existing configuration click on ‘Edit Config’ in the Audio Meter Configuration window. E-Series hardware is capable of displaying up to four bars at the same time, which may be positioned anywhere on screen either fully overlaid or cross-faded with the video. The bars have adjustable colours, heights and widths with optional peak level and anti-phase indication. A simulation of the bar style and location is shown to the right of the Fade Level control, but without the peak hold or phase indicators. Bar-graph modes The system will display up to four bars on-screen at the same time providing information about one or two pairs of channels. Select the channels to be monitored by clicking the ‘Chan 1/2’ or ‘Chan 3/4’ boxes. If both boxes are selected then some of the available selections will be greyed out, as it would require more than four bars to monitor some combinations. 2009 Michael Stevens & Partners Ltd 8 Version 1.0 Chromatec E-Series Alarm Monitor Software Using the Configurator Monitoring modes Once bargraph sizes have been chosen, the monitoring modes can be selected: Monitoring mode Description LR Monitor the level of the selected left and right audio channels LRMS Monitor the levels of the audio channels selected and the mono sum and the difference. This option is not available if ‘Chan 1/2’ and ‘Chan 3/4’ are selected MS Monitor the mono sum and the difference of the audio channels selected. Sum Only monitor the mono sum of the channels selected. LR+Sum Monitor the levels of the audio channels selected and the mono sum. This option is not available if "Chan 1/2" and "Chan 3/4" are selected Bar Height and Width The height and width of the on-screen bars can be selected. The bar height is selected in relation to the height of the screen, the width in pixels. Bar Position and Colour The location of the bars are managed and displayed by the bar display simulation. This shows most of the bar parameters of the current selected mode as follows: • The number of bars • Position on the screen • Bar width and colour • The amount that the bars are faded into the background video or internal black The bars may be moved to any position on the screen by clicking on the bars and dragging them to a new location. If the bars are not visible in the meter display (and the E-Series card video output), the fade control may be set to the bottom. Raise the fade level to show the bars. The fade level control on the left of the bar display simulation cross-fades between the bars and the background image. To change the upper and lower parts of each bar click in the appropriate area with the mouse to bring up the Select Bar Colour dialogue. 2009 Michael Stevens & Partners Ltd 9 Version 1.0 Chromatec E-Series Alarm Monitor Software Using the Configurator Phase Indicators and peak hold If selected an indicator is shown on the top of the bar display. This indicator is activated if the audio channels are detected to be out of phase. The timeout of the peak hold indicators can be selected, or the indicators disabled. The colour of the phase indicator and the peak hold bar can be selected from the eight available colours, by clicking on the associated colour patch. The Select Bar Colour panel is used to select upper and lower bar colour as well as peak hold and anti phase bars. Bar behaviour when alarm present Bars can be made to flash when an alarm is present or displayed only if an alarm is present. For more information on enabling alarms see Edit Alarm Assignments. 2009 Michael Stevens & Partners Ltd 10 Version 1.0 Chromatec E-Series Alarm Monitor Software Using the Configurator Meter levels and dynamics. Meter level dynamics are selected in the left-hand area of the Edit Audio Meter Configuration window. Audio Select Determine which embedded audio group or external audio (analogue or AES/EBU) is displayed and assigns alarm functions to that group when activated. Select from External or SDI Group 1, SDI Group 2, SDI Group 3, SDI Group 4. Analogue Scale Select between standard analogue scales and ballistics. See the page on Meter Ballistics for a view of each of the options Select from BBC, DIN, VU, Extd VU, or Nordic. Video Mode Select from Auto, Internal or External. • AUTO - displays the bar-graph on external video, reverting to internal black if the external video is lost • INTERNAL PAL - displays bar-graphs on internal black only (PAL) • INTERNAL NTSC - displays bar-graphs on internal black only (NTSC) • EXTERNAL - displays bar-graphs only in the presence of external video Digital Scale Select either the standard AES/EBU digital scale or ballistics or various analogue scales and ballistics. See the page on Meter Ballistics for a view of each of the options Select from BBC, DIN, VU, Extd VU, Nordic, AES/EBU Analogue reference level Select the analogue input level reference from -10dB to +12dB in 1dB steps Analogue Colour Transition Point Set the transition point between upper and lower parts of each analogue bargraph when it is displaying an analogue source. Adjustable from -10dB to 10dB in 1dB steps. To set the colours for each bar, click on the appropriate area in the simulated bargraph. 2009 Michael Stevens & Partners Ltd 11 Version 1.0 Chromatec E-Series Alarm Monitor Software Using the Configurator Digital Colour Transition Point Sets the colour transition point of the upper and lower parts of each bargraph when it is displaying a digital source from 0dB to -30dB in 1dB steps To set the colours for each bar, click on the appropriate area in the simulated bargraph. NTSC Pedestal This turns on/off the NTSC Pedestal of a card in NTSC Mode. Saving and assigning audio meter configurations To save the edited or newly created audio meter configuration click on OK. If a new configuration is selected, .chg is added by default to the (highlighted) name in the Select Audio Meter Configuration window of the main Configurator interface. To save a configuration with a chosen name, type it in the ‘Audio Meter Configuration Name’ window before clicking on OK. To assign the configuration to a card proceed as follows: • Drag&Drop – click on the configuration and drag it to the Audio Meter configuration window next to a chosen card • Card button – highlight the configuration and click on the appropriate card button To assign the configuration to ALL cards proceed as follows: • Click on the ‘C’ icon or choose ‘Set all configurations to the [highlighted configuration]’ in the Setups menu Deleting audio meter configurations To delete an unwanted audio meter configuration highlight it and click on delete. It is not possible to delete audio meter configurations that have been assigned to a card. Assign a different audio meter configuration before attempting to delete it. Deleting audio meter configurations from the card assignments in the main Configurator window does NOT delete the audio meter configuration file from network or local storage. 2009 Michael Stevens & Partners Ltd 12 Version 1.0 Chromatec E-Series Alarm Monitor Software Using the Configurator Edit Alarm Assignments An alarm may be routed to any of the 8 outputs available from an E-Series frame. To configure alarm settings select an alarm set name on the main screen and then select ‘Edit Alarm Set’. Once an alarm type has been selected for an individual output the Configurator will show the appropriate settings for the selected alarm type. It is important that settings are appropriate otherwise an alarm may not trigger when expected. For example: if ‘SDI VIDEO LOSS’ is selected the Configurator will present a check-box labelled ‘SDI Loss Enabled’. This must be enabled for the alarm to be triggered and thus routed to the selected output. Moreover, an alarm that has been enabled that relates to individual audio channels must have the channel alarms routed for at least the same channels. For example if ‘AUDIO OVER - Channel 3+4’ is selected for routing to an alarm output, then in the alarm settings either ‘Channels 3+4’ or ‘All Channels’ must be selected. If ‘Channels 1+2’ is selected there will be no output. 2009 Michael Stevens & Partners Ltd 13 Version 1.0 Chromatec E-Series Alarm Monitor Software Using the Configurator Alarms that may be routed are: SDI Freeze If the SDI picture does not change for the selected time or longer, the SDI Freeze alarm is activated. Picture Loss If SDI video is present but the picture luminance value remains at a low level for the Picture Loss Timeout or longer, the Picture Loss alarm is activated. (Not available with composite input cards) Sync Loss If video sync is lost, the Sync Loss alarm is activated. The card then switches to black. AES Loss If the AES/EBU feed is lost the AES loss alarm is activated. Audio Loss Selecting relevant channels activates the audio loss alarm according to the parameters set: • Channels: - select the channels that will be monitored for audio loss • Set Time: - the time before the audio loss alarm is activated • Analogue audio detect level: - the threshold level of the analogue audio loss alarm • Digital audio detect level: - the threshold level of the digital audio loss alarm Audio Over Selecting relevant channels activates the audio over level alarm according to parameters set: • Channels: - select the channels that will be monitored for audio over • Set Time: - the time before the audio over alarm is activated • Analogue audio detect level: - the threshold level of the analogue audio over alarm • Digital audio detect level: - the threshold level of the digital audio over alarm Anti-Phase Activated by sustained anti-phase between the selected incoming channels. • Set Time: - the time period before the Anti-Phase alarm is activated 2009 Michael Stevens & Partners Ltd 14 Version 1.0 Chromatec E-Series Alarm Monitor Software Using the Configurator Any Alarm This will route an alarm if any of the above alarms are activated. Press the ‘Adjust All Settings’ button to go to adjust all relevant settings from one menu. All Alarm Settings The alarm settings menu provides a convenient means of adjusting all alarm settings. Note: Alarms must be routed to an alarm output from the Alarm Assignments page to be active. Saving and assigning alarm settings To save the edited or newly created alarm setting click on OK in the main edit alarm application. If a new Alarm Setting is selected, .chg is added by default to the (highlighted) name in the Select Alarm Settings window of the main Configurator interface. Note: It is not currently possible to rename Alarm Settings. To assign the setting to a card proceed as follows: • Drag&Drop – click on the setting and drag it to the Alarm Setting window next to a chosen card • Card button – highlight the setting and click on the appropriate card button 2009 Michael Stevens & Partners Ltd 15 Version 1.0 Chromatec E-Series Alarm Monitor Software Using the Configurator To assign the setting to ALL cards proceed as follows: • Click on the ‘A’ icon or choose ‘Set all settings to the [highlighted setting]’ in the Setups menu Deleting alarm settings To delete an unwanted alarm setting highlight it and click on delete. It is not possible to delete alarm settings that have been assigned to a card. Assign a different alarm setting before attempting to delete it. Deleting alarm settings from the card assignments in the main Configurator window does NOT delete the alarm setting file from network or local storage. Managing schedules To enabled saved System Configurations for use by the Scheduler, click on Manage Schedules in the Setups menu. This will allow any of the saved System Configurations to be enabled and assigned a time during the day when it will be uploaded to an active system. Once enabled and given a start time, the Previous and Next buttons on the main Configurator form can be used to cycle through the day’s schedule. Note: To delete a System Configuration, highlight it, then click on Delete Item. 2009 Michael Stevens & Partners Ltd 16 Version 1.0 Chromatec E-Series Alarm Monitor Software Using the Alarm Monitor Using the Alarm Monitor The Alarm Monitor is designed to work with the Server to monitor alarms that may be generated by E-Series cards in E-Series frames and to read the operational log. Multiple Alarm Monitors are supported but each must be able to contact the WA-E Server somewhere on the network. All the main control is done from the main screen except for the Set Up which sets the location of the server and the IP port. Please refer to the Installation chapter for more details of the Alarm Monitor setup. Frame and card alarm colours There is one button shown at the top of the Monitor Alarm window for each frame. If there are more than 8 frames then there will be two rows of buttons. Frame button colours have the following meaning: • Black - there is no alarm present on any card in the frame • Red - at least one card has generated an alarm Click on a frame button to show the status of all the cards in the frame. Card colours have the following meaning: • Grey - cards that are present • Black – cards not detected or not installed • Red - cards with alarms The text on the button indicates the nature of the alarm(s). 2009 Michael Stevens & Partners Ltd 17 Version 1.0 Chromatec E-Series Alarm Monitor Software Using the Alarm Monitor A frame button with a white surround is the frame that is currently active and has the information about its cards displayed. Checking communication with the Server The moving ‘server present’ bar in the lower left of the screen shows how much time to the next alarm refresh. This time is set by the server. When the bar is full, the information has just been refreshed. If the bar remains completely empty then contact with the server has been lost. If the server settings in the setup dialog are correct restart the Alarm Monitor to re-establish contact. Viewing the log The View log button displays the server log. This is a simple text display of the information logged at the server. Resetting alarms At the bottom of the screen are two buttons to reset the alarms. ‘Reset Frame Alarms’ will reset the alarms on the active frame (the one currently displayed). The ‘Reset All Alarms’ button resets all the alarms on all the frames. To reset an individual card alarm or to mute alarms in a particular frame, access the appropriate frame’s front panel controls. Refer to the appropriate E-Series manual for further information. 2009 Michael Stevens & Partners Ltd 18 Version 1.0 Chromatec E-Series Alarm Monitor Software Using the Alarm Monitor Detecting frame power loss The WA-E software only detects frames correctly when they are powered when the Server runs for the first time. However, if a frame loses power, all alarms will be asserted, even if they have been disabled. Alarm Monitor priority The Alarm Monitor window can be made to have the highest priority on the desktop in the event of an alarm, by checking the ‘Restore on Alarm’ setting in the Alarm Monitor Setup. This will ensure that the Alarm Monitor window appears on top of any other application windows on the desktop, even if the Alarm Monitor had been minimised, when an alarm is detected. Refer to the Installation chapter for further details of Alarm Monitor setup. 2009 Michael Stevens & Partners Ltd 19 Version 1.0 Chromatec E-Series Alarm Monitor Software Installation Installation The Chromatec WA-E Integrated Remote Control and Alarm Monitor software suite is designed to configure and monitor alarms generated by the E-Series In-picture Audio Meter and Alarm System. The three components of the software suite have the following features: WA-E Component Description Server Communicates via RS232 serial port with E-Series frame or linked frame systems. Communicates over TCP/IP with client software. Configurator Remote control and setup scheduler. Alarm Remote alarm monitor The Server MUST run on the same PC that the E-Series unit(s) are physically connected to. Client packages can be run on any PC in the same network environment as the Server, including the Server itself. Multiple Alarm monitors can run at the same time on the network, but only one Configurator should be active at any one time. Minimum pre-requisites: • A PC with Windows 98 Second Edition, NT4 with SP 5 or higher, Windows 2000 or Windows XP • An RS232 serial connection from the PC to at least one E-Series frame with at least one monitoring card • PC serial port must be capable of 115,200 Baud • Network connectivity to optional client machines running TCP/IP software • Four successive TCP/IP ports available for network communication Cabling E-Series frames E-Series frames should be installed in accordance with the instructions in the appropriate E-Series user manual. If frames have been linked using the Link-In and Link-Out ports to create a multi-channel system, connect the PC running the Server to the RS232 port of the first frame. Since the RS232 port operates at 115,200 Baud, the RS232 cable length should be limited to 15m. The total length of any RS422 multi-drop cable used to link multiple 3U E-Series frames should not exceed 150 metres. 2009 Michael Stevens & Partners Ltd 20 Version 1.0 Chromatec E-Series Alarm Monitor Software Installation Serial cable The serial cable wiring is as follows: Cable from E-Series RS232 port to PC RS232 port Note: E-Series RS232 9 pin female ‘D’ connector RS232 PC port 9 pin female ‘D’ connector RS232 PC port 25 pin female ‘D’ connector 2 2 3 3 3 2 7 7 4 5 5 7 A standard screened serial cable (but not null-modem cable) should be adequate however pin numbers not shown do not need to be wired. The screen is normally wired to ground via the ‘D’ connector metalwork. Power down any E-Series or PC equipment whilst inserting RS232 cables to avoid damaging serial ports. 2009 Michael Stevens & Partners Ltd 21 Version 1.0 Chromatec E-Series Alarm Monitor Software Installation Installing the WA-E software To install the WA-E software proceed as follows: • Fit the supplied parallel port ‘dongle’ to the PC chosen to run the server • To view all of the application window, set graphics resolution to at least 1024 x 768 • Log on as administrator (NT4, Windows 2000, XP) • Remove any previous version of the WA-E software using the Add/Remove Programs application in the Windows Control Panel • Insert the WA-E CD and the installation should start immediately – if it does not, run the setup.exe file on the CD The installer will prompt for user information in the form of User and Company Name and whether the software is for the installing user or all users. The next prompt will ask which of the three applications are to be installed. 1. Alarm application: Alarm monitor 2. Client applications: Alarm and Configurator 3. Server and Client: Server, Alarm and Configurator • Chose one or more programs from the WA-E suite to install • Obey any installation program prompts and restart the PC if prompted If successful, the installation program will install a Chromatec E-Series program group. Run the desired program from the program group using Start>Programs>Chromatec E-Series. Please see the Operation chapter for an explanation of program features. Note: THE DK2 DESKey driver for the security key (dongle) will also be installed if a server installation is chosen. Choose ‘This Machine’ if prompted to say where the DK2 DESKey security Key is fitted. 2009 Michael Stevens & Partners Ltd 22 Version 1.0 Chromatec E-Series Alarm Monitor Software Installation Running the server for the first time Before running the Server ensure that any connected frame or linked-frame system is already populated with E-Series cards, cabled correctly and powered. The server may need to be configured the first time it is run. By default, the Server automatically searches for connected frames using the PCs first RS232 port, Com 1. If the PC Comm Port is other than the default of port 1, a warning box will appear: To assign the Comm Port used to connect to the E-Series frames or frame system click on Preferences at the bottom of the Server application window. If the Server initialisation does not complete the Loading Complete check box at the bottom of the Server application window will remain unchecked. Note: Tip: The Report Log Output also shows that no connected frame was found and the Select Frame spin box has remained at ‘0’. If a powered frame is found at the selected Com port, the Select Frame spin box will show ‘1’ and any installed cards will be listed. Ensure that any connected frames are powered before running the Server. 2009 Michael Stevens & Partners Ltd 23 Version 1.0 Chromatec E-Series Alarm Monitor Software Installation Use the Com Port spin box menu in the Server Preferences form to select the correct port The new com port setting will not take effect until the Server has been exited and restarted. Providing a powered frame with E-Series cards is connected to the selected com port when the Server is restarted, the Server main application should run normally. E-Series cards in any attached Frames will be detected and listed in the upper Card Status window. When the Server finishes loading frame data, the ‘Loading Complete’ check box will be automatically checked and detected cards in the selected frame (default 1) will be listed. The Recent Log Output will confirm this status and may go on to list detected alarms. This process may take some time to complete. 2009 Michael Stevens & Partners Ltd 24 Version 1.0 Chromatec Important: E-Series Alarm Monitor Software Installation Do not attempt to run client applications until the Server has established communication with connected frames. Now that communication with connected frames has been tested, communication with client applications can be confirmed. The Server installation will have installed both the Alarm Monitor and Configurator on the PC chosen as the server. Testing client server communication To test communication, run both client applications now. The Configurator should list the same cards found by the Server and the Alarm Monitor should show the presence of the Server with a moving ‘update’ bar. The rate at which the blue bar moves from left to right and back is determined by the ‘Alarm Client Update Rate’ set in Server Preferences. The default value is five seconds. If the ‘Test Alarms’ button is pressed in the Server main application window, all the Alarm panels for the cards detected should turn red for all frames. Once communication between client and the server has been established, the Server application main window can be run minimised. However, further configuration may be necessary to select required operating parameters, such as Scheduled or Non-scheduled mode, or to set Message Logging settings or to set IP ports and Server location for client applications. The next sections deals with Server and Client configuration in more detail. 2009 Michael Stevens & Partners Ltd 25 Version 1.0 Chromatec E-Series Alarm Monitor Software Installation Server configuration Server preferences provides access to the following: • Schedule or non-scheduled mode • Server/client communication port range • Log message configuration • Alarm client update rate • Com port for RS232 communication with E-Series frame or linked-frame systems Click on the Preferences button at the bottom of the main Server application window: Use the Com Port spin box menu in the Server Preferences form to select the correct port Selecting the Configurator mode The Configurator is designed to work with the Server to manage the setup of E-Series cards in E-Series frames. There are two operational modes, selected within Server preferences: • Schedule Mode: configuration and settings only uploaded to system at scheduled times – no manual upload available • Non-Schedule: configuration and settings may be uploaded directly Both modes allow alarm settings and audio meter configuration to be changed for each card, but only Schedule mode allows selected System Configurations (all of the currently loaded alarm/audio meter settings for all cards) to be uploaded to the Server at predetermined times. 2009 Michael Stevens & Partners Ltd 26 Version 1.0 Chromatec E-Series Alarm Monitor Software Installation To select the Schedule mode check the ‘Use Scheduling for system setups’ check box. To use the Non-scheduling mode ensure that the ‘Use Scheduling for system setups’ check box is unchecked. Note: The new mode setting will not take effect until the Server has been exited and restarted. Selecting the IP port The IP port used for client server communication can normally be left at the default setting of 3534, unless a fire-wall on the network has specifically blocked it. In this case, consult your system administrator to find a suitable port number. To enter a new IP port number uncheck ‘Use default 3534’ and enter the new number in the box marked ‘Custom Port’. The Server uses a range of four successive ports. If the default port of 3534 is used, the port range is: 3534 Used by the server to listen for the Configurator to connect 3535 Used by the Server to listen for the Alarm monitor applications to connect 3536 Used by an Alarm monitor application to listen for alarm data from the Server 3537 Used by the Server to listen for log read requests If a new port is used in the Preferences dialogue, the ports used by the applications will be renumbered in sequence. Note: If the port is changed in Preferences, ports must be changed in client applications accordingly. New port settings will not take effect until the Server has been exited and restarted. 2009 Michael Stevens & Partners Ltd 27 Version 1.0 Chromatec E-Series Alarm Monitor Software Installation Message logging settings The number and type of messages shown in the Server list-box may be selected using the Server preferences ‘Messages to Log’ form. Server preferences – Messages to log The number of messages to show in the List Box (Recent Log Output) can be selected from 10 to 500. Check the appropriate tick boxes to log entries for Alarms Raised, Alarm resets, User activity and configuration updates. The following Log Output shows typical messages just after a successful connection to a single E-Series frame with one card generating alarms: Recent logged messages Note: This log output only lists current frame and card events if there is valid connection to a powered frame. 2009 Michael Stevens & Partners Ltd 28 Version 1.0 Chromatec E-Series Alarm Monitor Software Installation Configuring the Alarm Client update rate The rate at which the alarm clients are updated with new information is also set within Server preferences. The default of 5 seconds is normally sufficient. Reduce the update rate number to update alarm clients more frequently and increase it to update them less frequently. If there is heavy network traffic and a large number of alarm clients, increase the update rate number to reduce the load on the server. Viewing E-Series card status The status of all functioning cards in a connected frame can be viewed at the top of the main Server application window. The card status list is a useful way of confirming the card types installed in individual frames. This list will only be populated if there is valid connection to a frame. If a linked-frame system is connected an individual frame can be selected by using the Select Frame spin box. Tip: If the Select Frame spin box shows ‘0’ (zero) a powered frame was not found when the Server first ran. First ensure that a powered frame is connected to the correct Com port, then exit from and restart the Server and a frame should be found (default is always frame 1). 2009 Michael Stevens & Partners Ltd 29 Version 1.0 Chromatec E-Series Alarm Monitor Software Installation Selecting the E-Series serial communication port By default, the Server automatically searches for connected frames using the PCs first RS232 port, Com 1. If the PC Com port selected is not connected to a powered E-Series frame or linked-frame system, a warning box will appear: To change the Com port click on Preferences at the bottom of the Server application window. The control for selecting a new com port is at the bottom right of the Preferences form. Use the ‘Select ComPort’ spin box to chose a valid RS232 com port for the Server PC to communicate with an attached E-Series frame or linked-frame system. Note: Important: The new Com port setting will not take effect until the Server has been exited and restarted. Do not attempt to run client applications until the Server has established communication with connected frames (Log Output will say ‘Loading from frames complete’ and installed cards will be listed). 2009 Michael Stevens & Partners Ltd 30 Version 1.0 Chromatec E-Series Alarm Monitor Software Installation Client configuration The Alarm Monitor and Configurator should be set to communicate with either a remote PC over a network or to the same PC as the Server when client and server applications reside on the same PC. Alarm Monitor setup The Alarm Monitor setup provides access to the following: • Select Server – local or remote PC • IP port - for client/server communication • Restore on alarm – Alarm Monitor opens up when an alarm occurs There is no limit to the number of Alarm Monitor clients running over the network. If only one WA-E Server is present, they must all be set to communicate with the same Server PC. For an Alarm client on the same PC as the server, check ‘This PC’ as the Server. For a Remote Alarm Monitor, check ‘Remote PC’ and enter either a name (in the format machine.mydomain.com), into the top box or the IP address of the remote machine into the bottom box. If the domain is the same as the PC running the Server, only the machine name is required and the ‘mydomain.com’ part of the name may be omitted. Refer to your System Administrator if these details are not known. The IP Port MUST be set to the same number as the named WA-E Server uses to communicate with clients. 2009 Michael Stevens & Partners Ltd 31 Version 1.0 Chromatec E-Series Alarm Monitor Software Installation Check ‘Restore on Alarm’ to make the Alarm Monitor the highest priority window on the desktop, even if it had been minimised, when an alarm is detected. Configurator setup The Configurator preferences provides access to the following: • Select Server – local or remote PC • IP port - for client/server communication There is no limit to the number of Configurator clients that can be installed, but only one can communicate with a WA-E Server at any one time. If only one WA-E Server is present, they must all be set to communicate with the same Server PC. For a Configurator client on the same PC as the server, check ‘This PC’ as the Server. For a Remote Configurator, check ‘Remote PC’ and enter either a name (in the format machine.mydomain.com), into the top box or the IP address of the remote machine into the bottom box. If the domain is the same as the PC running the Server, only the machine name is required and the ‘mydomain.com’ part of the name may be omitted. Refer to your System Administrator if these details are not known. The IP Port MUST be set to the same number as the named WA-E Server uses to communicate with clients. 2009 Michael Stevens & Partners Ltd 32 Version 1.0 Chromatec E-Series Alarm Monitor Software Trouble shooting Trouble shooting Trouble shooting client/server communication on the server PC If either the Alarm or Configurator does not appear to be able to communicate and yet the Server Log Output clearly shows ‘Loading from frames complete’, and ‘Loading Complete’ is checked, perform the following checks: Check that both the Alarm Monitor and the Configurator ‘Select Server’ settings should be set to ‘This PC’. Refer to the Client software configuration chapter for more information. Check that the default IP port range for all applications is set to the same value (default is 3534. Try restarting the client applications. If this fails, restart the Server, but do not restart the client applications until the Server has completed initialising. If communication is still not occurring, it may be that one or more of the IP ports used for client/server communication is being blocked by firewall software present on the Server PC. Trouble shooting network communication Check first that client/server communication works correctly between the Alarm Monitor, the Configurator and the Server on the server PC. If this works correctly, but client applications on the network cannot access the server proceed as follows: Ensure that the client PCs can be accessed from the server and that normal network communication can take place. Check that the TCP/IP protocol is installed on all machines, even if the network works perfectly - it may use another protocol for general traffic such as NetBEUI, IPX/SPX or NetBIOS. Check that both the Alarm Monitor and the Configurator ‘Select Server’ settings are set to ‘Remote PC’ and the Server name and/or IP number is present. Check that the default IP port range for all applications is set to the same value (default is 3534). Refer to the Client/Server software configuration section for more information. Try restarting the client applications. If this fails, restart the Server, but do not restart the client applications until the Server has completed initialising. 2009 Michael Stevens & Partners Ltd 33 Version 1.0 Chromatec E-Series Alarm Monitor Software Trouble shooting If communication is still not occurring, it may be that one or more of the IP ports used for client/server communication is being blocked by an external firewall or by firewall software present on the client PC. Refer to your System Administrator for further assistance. Sample problems and their solutions Alarms reappear after applying a reset for the relevant frame Check that the condition that caused the alarm has been corrected. No alarms appear in the Alarm Monitor despite operator reported faults Check that alarms have been assigned for that card. Check that the appropriate frame is connected and communication established (the server present bar in the Alarm Monitor should always be moving). The Server application has ticked the ‘loading from frames’ box, but no cards are listed First ensure that a powered frame with E-Series cards is connected to the correct Com port, then exit from and restart the Server and a frame should be found (default is always frame 1) and cards listed. (If the spin box shows ‘0’ (zero) and no cards are listed, a powered frame was not found when the Server first ran.) Why is there no alarm for loss of power to a frame? The WA-E software only detects frames correctly if they are powered when the Server runs for the first time. If a frame loses power, all alarms will be asserted, even if they have been disabled. 2009 Michael Stevens & Partners Ltd 34 Version 1.0