1
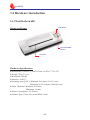
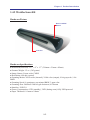
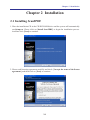
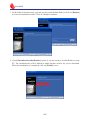
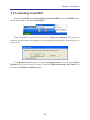
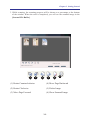
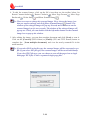
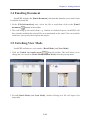
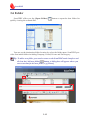
Penpower Scan2PDF & Scan2PDF Lite
User Manual
Version: Scan2PDF V2.2
Scan2PDF Lite V1.1
Release: March, 2011
Penpower Technology Ltd.
Software User License Agreement
You are licensed to legally use this software program (“the Software”) by Penpower
Technology Ltd (“Penpower”) under this license agreement (“The Agreement”). If you do
not agree with any of the provisions in this Agreement, please do not install, copy or use the
Software. By using the Software, you are deemed to fully understand and accept the provisions of this Agreement.
1. Intellectual Property
All intellectual property rights in the Software, together with all information and documents
included in the packaging for the Software (including but not limited to copyrights), are property
of Penpower, and are protected by relevant laws and regulations.
2. License to Use
You are authorized to use the Software on one (1) single computer only. You may not use the
Software on any other machines other than the said single computer.
3. Authority to Copy
The Software and all documents included with the Software, and copyright thereof, are property
of Penpower. You are licensed to make one (1) copy of the Software for your personal backup
purposes. All other acts of copying are strictly prohibited.
You may not sell, lease, dissemble, reverse engineer, copy, translate, adapt or derive the Software,
or obtain the source code of the Software by any other means. You may not use the Software for
any purposes other than those permitted under this Agreement.
4. Business Users
If you need to install or use the Software on more than one (1) computer, please contact Penpower
or our local distributor to purchase a license for the additional use.
5. Liability
You agree to indemnify Penpower against all losses, costs, debts, settlement payments or other
expenses (including but not limited to attorneys fees) arising from your breach of this Agreement,
and you agree to compensate Penpower for all of the abovementioned damages.
6. No Warranty
Effectiveness of a packaged software in handling information is closely related to its software and
hardware environment. The Software is published following careful development and product
testing by Penpower, but Penpower is not able to conduct tests based on all possible combinations
of software and hardware environment. Therefore, Penpower is unable to promise nor warrant
that there will be absolutely no risk of loss or damage of information, or any other kind of loss,
during installation and/or execution of the Software. You must be fully aware of your risks in using the Software.
Penpower will provide you with the Software and support services in respect of the Software to
the maximum extent permitted by law. However, Penpower does not warrant that the Software
and information included in the package of the Software contain no defects or errors. Penpower is
not liable for any indirect, special or incidental loss arising from the Software, including but not
limited to loss of profits, damage to business reputation, cessation of work, hardware malfunction
or damage, or any other commercial damage or loss arising from commercial use of the Software.
7. Limitation of Liability and Damages
The maximum amount of compensation payable by Penpower, in respect of any damage incurred
by you for any reason under this Agreement, is limited to the amount you have already paid to
Penpower in respect of the Software.
Under no circumstances will Penpower be held liable for the possibility of loss, notwithstanding
Penpower may be aware of the possibility of such loss.
8. Prohibition Against Sublicense
You are prohibited to assign the license in respect of the Software granted to you under this
Agreement, or to grant a sublicense to another person.
9. Jurisdiction
With regards to any disputes arising from this Agreement, Penpower and you agree that the court
having jurisdiction over the business location of Penpower will be the court in the first instance.
10. Miscellaneous
In the event that any provision of this Agreement is found to be invalid at law, such invalidity will
not affect the validity of any other provisions, or the legal enforceability of such other provisions.
In the event that the Software cannot be executed under conditions of normal use, due to any
damage to the original disk/s, Penpower will replace the disk/s free of charge.
11. iTextsharp
Copyright © 1999-2007 by Bruno Lowagie, Adolf Baeyensstraat 121, 9040 Gent, BELGIUM
iTextsharp is a free software; you can redistribute it and/or modify it under the terms of the GNU
Lesser General Public License as published by the Free Software Foundation; either version 2.1
of the License, or any later version.
This library is distributed in the hope that it will be useful, but WITHOUT ANY WARRANTY;
without even the implied warranty of MERCHANTABILITY or FITNESS FOR A PARTICULAR PURPOSE. See the GNU Lesser General Public License for more details.
You should have received a copy of the GNU Lesser General Public License along with this software program; if not, see http://www.gnu.org/licenses/lgpl-2.1.html
It was downloaded from : http://itextsharp.sourceforge.net/ or http://www.lowagie.com/iText/
Contents
Chapter 1 Product Introduction............................................................ 1-1
1.1 Product Introduction................................................................................... 1 - 1
1.2 Product Features......................................................................................... 1 - 1
1.3 System Requirements................................................................................. 1 - 1
1.4 Hardware Introduction............................................................................... 1 - 2
1.4.1 WorldocScan 600............................................................................... 1 - 2
1.4.2 WorldocScan 400 . ............................................................................ 1 - 3
Chapter 2 Installation............................................................................. 2-1
2.1 Installing Scan2PDF................................................................................... 2 - 1
2.3 Calibration.................................................................................................. 2 - 4
Chapter 3 Getting Started...................................................................... 3-1
3.1 User Interface............................................................................................. 3 - 1
3.2 Scanning Single Document........................................................................ 3 - 2
Step 1: Place a Document in the Scanner................................................... 3 - 2
Step 2: Document Settings......................................................................... 3 - 3
Step 3: Scanning......................................................................................... 3 - 6
Step 4: Verifying Image.............................................................................. 3 - 6
3.3 Scanning Multiple Documents................................................................... 3 - 7
Step 1: Place document in scanner............................................................. 3 - 7
Step 2: Document Settings......................................................................... 3 - 7
Step 3: Scan Editing................................................................................... 3 - 8
3.4 Emailing Document.................................................................................. 3-11
3.5 Switching View Mode.............................................................................. 3-11
3.6 Folder....................................................................................................... 3-12
3.7 Searching Files......................................................................................... 3-13
There may be newer versions of the software that was released during or after this
product’s manufacturing date. If the content in the User Manual differs from the onscreen interface, please follow the instructions on the on-screen interface instead of
the User Manual.
Chapter 1 Product Introduction
Chapter 1 Product Introduction
1.1 Product Introduction
The Scan2PDF offers the best solution for document management. The program allows you to scan and convert your paper documents into PDF, JPEG, or TIFF files within
seconds for easy management and editing.
1.2 Product Features
• Support resolution of 100-600 dpi
• OCR Language Support
• Searchable PDF file with password protection
• Scan page size setting and Scan setting(B/W, Gray, Color)
• File type (PDF, JPEG, or TIFF) and setting
• File management
• Send file by e-mail directly
1.3 System Requirements
• Intel Pentium III 300 or above
• Windows 7 / Vista / XP
• 512MB RAM
• 500 MB available hard disk space
• CD-ROM drive
• USB port
Note:Scan2PDF Lite supports WorldocScan 600 and Scan2PDF supports
WorldocScan 400, respectively. Scan2PDF Lite and Scan2PDF share
most functions. The major difference is that Scan2PDF Lite doesn’t support OCR languages. This user manual takes Scan2PDF as example to
introduce the functions for you.
1-1
Scan2PDF
1.4 Hardware Introduction
1.4.1 WorldocScan 600
Hardware Picture
Scan Button
Run Scan2PDF
Button
Scan Slot
Hardware Specifications
● Dimensions (LxWxH): 175x45x75 mm (6.88"x1.77"x2.95")
● Weight: 216g (7.6 oz.)
● Resolution: 600 dpi
● Interface: USB 1.1
● Scanning Area (LxW ): Minimum: 2x3 inches (5.1x7.6 mm)
Maximum: 4.2x5.8 inches (108x148 mm)
● Paper Thickness: Minimum: 0.05 mm
Maximum: 1.0 mm
● Power Consumption: 5V, 500mA
● Scanner Type: Color/ Gray-scale/Black- white
1-2
Chapter 1 Product Introduction
1.4.2 WorldocScan 400
Hardware Picture
Run Scan2PDF
Button
Scan Slot
Hardware Specifications
● Dimension(LxWxH): 11.7” x 2” x 1.7” (296mm x 51mm x 42mm)
● Scanner Weight: 12 oz. (345 grams)
● Image Sensor: Linear color CMOS
● Resolution: 600 dpi (optical)
● Scanning Modes: 48-bit color (internal), 24-bit color (output), 8-bit grayscale, 1-bit
B&W
● Scanning Speed: 6 ppm(pages per minute)B&W; 3 ppm color
● Scanning Area: Business card to legal document, A4 format
● Interface: USB 2.0
● Power Consumption: 0.2W (standby), 2.0W (during scan), fully USB powered.
● Paper Thickness: 0.1mm to 0.8mm
1-3
Scan2PDF
1-4
Chapter 2 Installation
Chapter 2 Installation
2.1 Installing Scan2PDF
1. Place the installation CD in the CD/DVD-ROM drive and the system will automatically
run Setup.exe. Please click on [Install Scan2PDF] to begin the installation process.
And then click [Next] to continue.
2. Please read licensing agreement carefully and check [I accept the terms of the license
agreement], and then click on [Next] to continue.
2-1
Scan2PDF
3. At the folder selection screen, you can use the system default folder or click on [Browse]
to select an installation folder. Click on [Next] to continue.
4. Check [Download Acrobat Reader] option, if you do not have Acrobat Reader in your
PC. The installation kit will be linked to Adobe Reader website for you to download.
When the installation is completed, click on [Finish] to exit.
2-2
Chapter 2 Installation
2.2 Launching Scan2PDF
Run the Scan2PDF from [Start/All Programs/Scan2PDF] or the Scan2PDF shortcut on the desktop to launch the Scan2PDF.
When Scan2PDF runs for the first time, the [Register reminder] will pop up to
remind you registering your product at www.penpower.net/reg.html for ensuring the warranty service
Click [Register now] to register. If you click [Register later], you may go to [About/
Register] when you are ready to register. Check the [Hide the message next time] to do
not show the [Register reminder] again.
2-3
Scan2PDF
2.3 Calibration
Calibration is necessary to ensure that your computer monitor matches the image
quality of Scan2PDF. When Scan2PDF runs for the first time, the calibration wizard will
appear to guide you through the process.
Note: If you use the scanner on another computer, you need to calibrate the scanner
again.
1.Run the Scan2PDF.
2. Place the blank side of the calibration card with face-dwon in the scanner and then
click the [Calibrate scanner]
button on the toolbar.
Tip: The calibration card is included in the box. If you lose it, you can use a same
size of blank paper instead.
3.In the [Calibrate scanner] dialog box, click on the [Calibration] button and
scanner calibration will begin.
4. Click the [OK] button when the calibration process is finished.
Tip: If there is any color indifference after scanning, you can calibrate the scanner
by clicking [Calibrate scanner]
button on the toolbar.
2-4
Chapter 3 Getting Started
Chapter 3 Getting Started
3.1 User Interface
1
2
3
4
5
6
7
8
9
10
11
(1) Scan document
(7) Search files with keyword
(2) Scan multiple documents
(8) About
(3) Calibrate scanner
(9) Folder
(4) Email document
(10) File Information
(5) Switch view mode
(11) Preview Area
(6) Open folder
Note: When you run Scan2PDF for the first time, the following Scan Guide window will
display to guide you to click the “Scan” button to start scanning. You may select
the [Do not display next time] checkbox, and the Scan Guide window will not be
displayed the next time you start Scan2PDF.
3-1
Scan2PDF
3.2 Scanning Single Document
Step 1: Place a Document in the Scanner
1.Place the document or photo you wish to scan face-down and align it to the right side
of the scanner slot.
2.Click on the [Scan single document]
box.
button to open the [Scan document] dialog
Note:
1. When paper inserted into the scanner, it will be automatically loaded into the scanner.
Do not attempt to force a document into the scanner.
2. Please remove all objects attached to the paper before scanning including labels, post-it
notes and staples to avoid damage to your scanner or poor scanning quality.
3-2
Chapter 3 Getting Started
Step 2: Document Settings
Scan settings
1. Document Color: Scan2PDF offers you a variety of scanning output types, including
[B/W Document], [Gray Scale Document] and [Color Document].
2. Paper Size: Scan2PDF supports a variety of page size settings, including Letter
(8.5”*11.0”), Legal(8.5”*14.0”), A4 (8.3”*11.7”), Junior Legal(8.0”*5.0”), A5
(5.8”*8.3”), B5 (7.2”*10.1”), Business Card (3.5”*2.2”), Photo (4.”*3”), Large Photo
(6”*4”) and Custom. If your scanner is WorldocScan 600, you can choose a variety
of page size setting, including -A6 size( 4.1”* 5.8”), Business Card(3.5”*2.2”), Photo
4*3(4”*3”), Photo 6*4(6”* 4”), and Custom.
3. DPI Setting: DPI setting allows you to set custom values according to the document
size or resolution requirements. Scan2PDF supports resolutions of between 100~600
dpi. By default, the software is set to 300 dpi.
4.Advance Setting: This allows you to adjust the Brightness, Contrast, Gamma value,
Detect End of Page, Invert Image, Auto Crop and Auto deskew functions. You can
always click on the [Reset] button to restore to the factory defaults.
Note: The [Auto deskew] function only can be check when the [Invert Image] function is
checked.
5. Edit Image after Scan: This function can let you verify and rotate the scanned image.
3-3
Scan2PDF
Note: WorldocScan 600 doesn’t support Advance Setting.
Save File Settings
1. File Type: This function allows you to choose the document format as a PDF
document, a JPG image, or a TIFF file. If one file type is selected, the other two file
type settings can not be edited. For example, if the file type is PDF, the [JPEG Setting]
field and the [TIFF Setting] field below cannot be edited.
2.Document Names: Scan2PDF allows you to quickly process large numbers of
documents using the date and order as their file name. For example, [2008_0716.
Pdf] is the first document, [2008_0716(2).Pdf] is the second document, and so on. By
naming the files after the date and scanning order, this allows you to scan documents
quickly. Besides, you can also manually enter a file name.
3. Specify a Path: Scan2pDF allows you to specify a path to save the scanned files.
Folders such as [My Scanned Docs], [Company], [Private] and [Friend] will be
automatically created under the new specified path. The scanned files will be saved
under the [My Scanned Docs] folder by default.
4. Open Document after Scanning: Click [Open Document after Scanning] to open
the document after scanning.
3-4
Chapter 3 Getting Started
PDF Settings
1. Document Security: Offer a password-lock function for protecting the confidential
documents. You can check the [Set a Password] option in the [PDF Setting] field and
enter a custom password in the field.
2. OCR Language Support: If you wish to make your scanned document searchable
by software applications such as Acrobat Reader, please check the [Make Searchable
PDF] option and select the language of the document. This will allow you to quickly
search through the document text. You can also adjust the PDF document quality by
moving the sliding bar.
Note: Because Scan2PDF Lite doesn’t support OCR languages, it cannot create searchable PDF files. Only WorldocScan 400 supports the“Make Searchable PDF” function.
JPEG Setting
If you set the File type as JPG, you can adjust the image quality by moving the sliding bar of the JPEG Setting. The higher quality you set the bigger file size will be and
vice versa.
Auto detect Paper
Check [Auto detect paper] to scan the document once you place the paper to the
scanner.
3-5
Scan2PDF
Step 3: Scanning
Once all settings in the [Scan single document] dialog box have been set, click on
the [Scan] button to start scanning.
Tip: When the scan process is begun, a progress bar will be displayed under the
Scan status section.
Note: WorldocScan 600 doesn’t allow you to stop the scanning process while it is scanning.
Step 4: Verifying Image
If the Edit Image after Scan under the Scan Setting is checked, a Verifying Image
dialog box shows up after scanning. You can revolve the scanned document by clicking
the Rotate Counterclockwise
or Rotate Clockwise
button. If you do not wish
to display the Verifying Image dialog box next time, uncheck [Display this window
next time]. Click [OK], when you have done the verification.
3-6
Chapter 3 Getting Started
3.3 Scanning Multiple Documents
Step 1: Place document in scanner
1.Place the document or photo you wish to scan face-down and align it to the right side
of the scanner slot.
2.Click on the [Scan multiple documents]
dialog box will show up.
button, the [Scan multiple documents]
Note:
1. When paper inserted into the scanner, it will be automatically loaded into the scanner.
Do not attempt to force a document into the scanner.
2. Please remove all objects attached to the paper before scanning including labels, post-it
notes and staples to avoid damage to your scanner or poor scanning quality.
Note: Only WorldocScan 400 supports the“Make Searchable PDF” function.
Step 2: Document Settings
Scan Settings
You can choose the Document Color, Paper Size, DPI and Advance Settings in
the Scan Setting section. Please refer to the Step 2 of the section 3.2 Scanning Single
Document.
3-7
Scan2PDF
Save File Settings
You can set the File Type, Name of Document and Open Document after Scanning here. Please refer to the Step 2 of the section 3.2 Scanning Single Document.
PDF Setting
If you select PDF as the file type, you can set a password and make the searchable
PDF in the PDF Setting section. You can also set the PDF file quality. Please refer to the
Step 2 of the section 3.2 Scanning Single Document.
JPEG Setting
If you select Jpg as the file type, you can set the JPEG file quality in the JPEG Setting
section. Please refer to the Step 2 of the section 3.2 Scanning Single Document.
Step 3: Scan Editing
1. Once all settings have been set, click on the [Next] button to start scanning.
2. At the [Scan Image to...] dialog box, click on the [Scan] button to start scanning.
Tip: If you check [Auto detect paper], the scanner will start to scan the document
once you insert paper.
Scanned File Buffer
Auto detect paper
3-8
Chapter 3 Getting Started
3. While scanning, the scanning progress will be shown as a percentage at the bottom
of the window. When the scan is completed, you will see the scanned image in the
[Scanned File Buffer].
1
2
3
4
5
6
(1) Rotate Counterclockwise
(4) Move Page Backward
(2) Rotate Clockwise
(5) Delete Image
(3) Move Page Forward
(6) Show Scanned Image
3-9
Scan2PDF
4. To edit the scanned image, click on the file's icon then use the toolbar below for
Rotate Counterclockwise , Rotate Clockwise , Move Page Forward , Move Page
Backward , Delete Image and Show Scanned Image .
Tip: There are ways to enlarge the scanned image. First, choose the image icon
that you want to enlarge and click [Show Scanned Image]
button. The
window of the enlarged image will pop up. Second, move the cursor on the
scanned image icon for two seconds. The window of the enlarged image will
pop up too. Third, you can double click the left mouse button on the scanned
image icon to pop up the window.
5. After editing the image, you can place another document and click [Scan] to scan it.
Click on the [Convert] (PDF format) or [Finish] (JPG and TIFF format) button to
complete the [Scan multiple documents] and view the newly scanned file in the
main interface.
Tip: If you select PDF as the file type, the scanned images will be converted to one
file. If you select JPG file type, the scanned images will be saved individually.
If you slect TIFF file type, you can choose to save all the pages into a single
mult-page TIFF file, or into a separated single-page files.
3-10
Chapter 3 Getting Started
3.4 Emailing Document
Scan2PDF includes the [Email Document] function that launches your email client
to send the selected file.
1.In the [File Information] area, select the file to send then click on the [Email
document]
button in the toolbar.
2.This will bring up the email client, e.g. Outlook or Outlook Express. Scan2PDF will
have already included the selected file as an attachment to the email. You can send the
email once you specify the recipient and subject.
3.5 Switching View Mode
Scan2PDF includes two view modes: [Detail Mode] and [Icon Mode].
1.Click the [Switch view mode arrow]
from the toolbar. This will allow you to
change the view mode to [Detail Mode] or [Icon Mode] from the pop-up menu.
Icon Mode
Detail Mode
2.In both [Detail Mode] and [Icon Mode], double clicking on a file will open it for
inspection.
3-11
Scan2PDF
3.6 Folder
Scan2PDF offers you the [Open Folder]
quickly viewing the scanned files.
button to open the data folder for
You can set the destination folder location by select the folder name. Scan2PDF provides four initial folders including Company, Friend, Private and UnCategory.
Tip: To add a new folder, you need to return to the Scan2PDF main interface and
click on the [Add new folder]
button. A dialog box will appear where you
can set a name for the new folder, e.g. [Photo].
1
2
3-12
Chapter 3 Getting Started
3.7 Searching Files
Scan2PDF provides [Search files with keyword]
searchable PDF files by the keyword.
1.Click the [Search files with keyword]
files with keyword] window.
button that can you search
button from the toolbar to open the [Search
2. Check the folders you want to search.
Tip: You can check the root folder to select all folders under the root folder.
Note: The available folders include the default folder: My Documents\My Scanned Docs
and the folders under default folder: Company, Friend, Private and UnCategory.
3. You can input the keyword under 30 characters.
Note: Because only WorldocScan 400 supports the“Make Searchable PDF” function, the
function of keyword search in content won’t appears if you use WorldocScan 600.
4. Prescribe the file name when needed.
5. Click the [Search] button to begin searching the searchable PDF files that include the
keyword.
Tip: You can click [Advanced] button to prescribe the creation time of the files.
3-13
Scan2PDF
6. The searched file will be shown in the main interface. You can click any file from the
[File Information] area to preview it.
7. Click the
button to exit the [Search files with keyword] function.
3-14
Appendix: OCR Languages
Note: If you are using WorldocScan 600, please note that Scan2PDF Lite
doesn't support OCR languages.
Abkhaz
Adyghe
Afrikaan
Agul
Albanian
Altai
Armenian (Eastern)
Armenian (Grabar)
Armenian (Western)
Avar
Aymara
Azerbaijani (Cyrillic)
Azerbaijani (Latin)
Bashkir
Basque
Belarusian
Bemba
Blackfoot
Breton
Bugotu
Bulgarian
Buryat
Catalan
Cebuano
Chamorro
Chechen
Chukchee
Chuvash
Corsican
Crimean Tatar
Croatian
Crow
Czech
Dakota (Sioux)
Danish
Dargwa
Dungan
Dutch (Belgium)
Dutch (Netherlands)
English
Eskimo (Cyrillic)
Eskimo (Latin)
Estonian
Even
Evenki
Faroese
Fijian
Finnish
French
Frisian
Friulian
Gagauz
Galician
Ganda
German
German (Luxembourg)
German (new spelling)
Greek
Guarani
Hani
Hausa
Hawaiian
Hungarian
Icelandic
Indonesian
Ingush
Irish
Italian
Jingpo
Kabardian
Kalmyk
Karachay-balkar
Karakalpak
Kasub
Kawa
Kazakh
Khakass
Khanty
Kikuyu
Kirghiz
Kongo
Koryak
Kpelle
Kumyk
Kurdish
Lak
Latin
Latvian
Lezgi
Lithuanian
Luba
Macedonian
Malagasy
Malay (Malaysian)
MalinkeMaltese
Mansi
Maori
Mari
Maya
Miao
Minangkabau
Mohawk
Moldavian
Mongol
Mordvin
Nahuatl
Nenets
Nivkh
Nogay
Norwegian (Bokmal)
Norwegian (Nynorsk)
Nyanja
Ojibway
OldEnglish
OldFrench
OldGerman
OldItalian
OldSpanish
Ossetian
Papiamento
Polish
Portuguese (Brazil)
Portuguese (Portugal)
Provencal
Quechua
Rhaeto-Romanic
Romanian
Romany
Rundi
Russian
Russian (Old Spelling)
Rwanda
Sami (Lappish)
Samoan
Scottish Gaelic
Selkup
Serbian (Cyrillic)
Serbian (Latin)
Shona
Slovak
Slovenian
Somali
Sorbian
Sotho
Spanish
Sunda
Swahili
SwedishTabasaran
Tagalog
Tahitian
Tajik
Tatar
Tok Pisin
Tongan
Tswana
Tun
TurkishTurkmen
Tuvinian
Udmurt
Uigur (Cyrillic)
Uigur (Latin)
UkrainianUzbek (Cyrillic)
Uzbek (Latin)
Welsh
Wolof
XhosaYakut
Zapotec
Zulu
Esperanto
Ido
Interlingua
Occidental
Arabic numbers
Arabic-Indian numbers
Basic
C/C++
COBOL
Fortran
JAVA
Pascal
Simple chemical formulas
CE Conformity and FCC Statement
This equipment has been tested and found to comply with the limits of the European
Council Directive on the approximation of the member states relating to electromagnetic
compatibility according to EN 55022/55024 Part 15 B.
This equipment has been tested and found to comply with the limits for a Class B
digital device, pursuant to Part 15 of the FCC Rules. These limits are designed to provide
reasonable protection against harmful interference in a residential energy and, if not
installed and used in accordance with the instructions, may cause harmful interference
to radio communications. However, there is no guarantee that interference will not occur
in a particular installation. If this equipment does cause harmful interference to radio or
television reception, which can be determined by turning the equipment off and on, the user
is encouraged to try to correct the interference by one or more of the following measures:
• Reorient the receiving antenna
• Increase the separation between the equipment and receiver
• Move the computer away from the receiver
• Connect the equipment into an outlet on a circuit different from that to which the receiver
is connected
User Manual
Scan2PDF & Scan2PDF Lite
Manufacturer: Penpower Technology Ltd.
Version: Scan2PDF V2.2
Scan2PDF Lite V1.1
Release: March, 2011