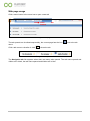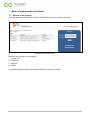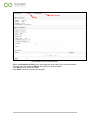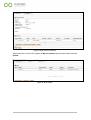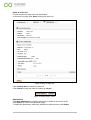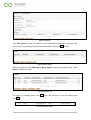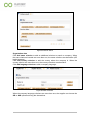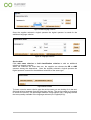
1
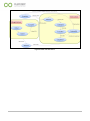
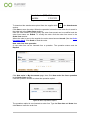
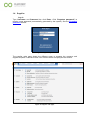
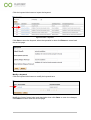
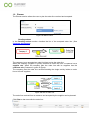
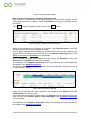
5111/1C-MED12.10 COEFFICIENT COllaborative framework for energy EFFICIENT SME systems Networking eService User Manual TABLE OF CONTENTS DOCUMENT CONVENTIONS....................................................................................................................... 7 WEB PAGE USAGE ..................................................................................................................................... 9 ORDER LINE STATE CHART .................................................................................................................................. 10 1 BASIC COMMUNICATION FUNCTIONS ............................................................................................. 12 1.1 ACCESS TO THE SYSTEM ....................................................................................................................... 12 1.2 CASUAL USER ..................................................................................................................................... 13 1.3 CUSTOMER ........................................................................................................................................ 16 Log in ....................................................................................................................................................... 16 My documents ........................................................................................................................................ 17 1.4 SUPPLIER ........................................................................................................................................... 27 Log in ....................................................................................................................................................... 27 1.5 MY CATALOGUE ................................................................................................................................. 28 Service list ............................................................................................................................................... 28 1.6 CUSTOMERS ...................................................................................................................................... 42 Customer list ........................................................................................................................................... 42 Customer documents ............................................................................................................................. 46 1.7 SUPPLIERS ......................................................................................................................................... 51 Supplier list ............................................................................................................................................. 51 Supplier document ................................................................................................................................. 51 Partner search......................................................................................................................................... 51 Imported term translation ...................................................................................................................... 55 DISTRIBUTED PLANNING FUNCTIONS ................................................................................................................... 57 1.8 PROCESSES ........................................................................................................................................ 57 Process activities ..................................................................................................................................... 57 Process models ....................................................................................................................................... 59 Process to service ................................................................................................................................... 61 1.9 PLANNER ........................................................................................................................................... 64 Pending actions ....................................................................................................................................... 64 2 Figure index Figure 1-Web page. ........................................................................................................................................... 9 Figure 2-Tab opened.......................................................................................................................................... 9 Figure 3-Tab selection list. ............................................................................................................................... 10 Figure 4-Filter. ................................................................................................................................................. 10 Figure 5-Order line state chart. ....................................................................................................................... 11 Figure 6-Access to the system ......................................................................................................................... 12 Figure 7-Company main page .......................................................................................................................... 13 Figure 8-Log in ................................................................................................................................................. 14 Figure 9-Information form............................................................................................................................... 14 Figure 10-Registration correctly done. ............................................................................................................ 15 Figure 11-Login ................................................................................................................................................ 15 Figure 12-Customer log in. .............................................................................................................................. 16 Figure 13-Customer menu index. .................................................................................................................... 16 Figure 14-My documents section. ................................................................................................................... 17 Figure 15-Filter. ............................................................................................................................................... 18 Figure 16-Filter documents. ............................................................................................................................ 18 Figure 17-My documents buttons. .................................................................................................................. 18 Figure 18-Select a document. .......................................................................................................................... 18 Figure 19-New quotation button. ................................................................................................................... 19 Figure 20-New quotation tab. ......................................................................................................................... 19 Figure 21-Type a new quotation. .................................................................................................................... 19 Figure 24-Operation done. .............................................................................................................................. 20 Figure 27-New Oder ........................................................................................................................................ 21 Figure 28-New order configuration. ................................................................................................................ 21 Figure 29-New order line. ................................................................................................................................ 21 Figure 30-New order line tab. ......................................................................................................................... 21 Figure 31-General information updated. ........................................................................................................ 22 Figure 32-Quotation replied. ........................................................................................................................... 22 Figure 33-Select a quotation replied. .............................................................................................................. 22 Figure 34-New order line from quotation. ...................................................................................................... 23 Figure 35-New order line inserted. ................................................................................................................. 24 Figure 36-Order issued. ................................................................................................................................... 24 Figure 37-Abort an order line. ......................................................................................................................... 25 Figure 38-Confirm abort, Cancel. .................................................................................................................... 25 Figure 39-Attachments. ................................................................................................................................... 26 3 Figure 40-Supplier log in. ................................................................................................................................. 27 Figure 41-Supplier main page. ......................................................................................................................... 27 Figure 42-My catalogue menu......................................................................................................................... 28 Figure 43-Service list. ...................................................................................................................................... 28 Figure 44-Select a service. ............................................................................................................................... 28 Figure 45-Service details.................................................................................................................................. 29 Figure 46-General information section. .......................................................................................................... 29 Figure 47-Publish a service. ............................................................................................................................. 30 Figure 48-Service name from the vocabulary. ................................................................................................ 30 Figure 49-Service vocabulary........................................................................................................................... 30 Figure 50-Search vocabulary. .......................................................................................................................... 31 Figure 51-Type a keyword. .............................................................................................................................. 31 Figure 52-Search results. ................................................................................................................................. 31 Figure 53-Import a service name from the vocabulary. .................................................................................. 31 Figure 54-Functional parameter buttons. ....................................................................................................... 32 Figure 55-New numeric parameter. ................................................................................................................ 32 Figure 56-Search results. ................................................................................................................................. 33 Figure 57-New enumerative parameter button. ............................................................................................. 33 Figure 58-Options. ........................................................................................................................................... 34 Figure 59-New option. ..................................................................................................................................... 34 Figure 60-Options list. ..................................................................................................................................... 34 Figure 61-Save an option. ................................................................................................................................ 34 Figure 62-New text parameter. ....................................................................................................................... 35 Figure 63-Parameters details. ......................................................................................................................... 35 Figure 64-Modify a parameter. ....................................................................................................................... 36 Figure 65-Search vocabulary. .......................................................................................................................... 36 Figure 66-Search results. ................................................................................................................................. 37 Figure 67-New classification. ........................................................................................................................... 37 Figure 68-Taxonomy reference. ...................................................................................................................... 38 Figure 69-Select a classification....................................................................................................................... 38 Figure 70-Keyword section. ............................................................................................................................. 39 Figure 71-Add a keyword. ............................................................................................................................... 39 Figure 72-Search vocabulary. .......................................................................................................................... 39 Figure 73-Select a keyword. ............................................................................................................................ 40 Figure 74-Save a keyword............................................................................................................................... 40 Figure 75-Depending on section. .................................................................................................................... 41 4 Figure 76-Insert attachment............................................................................................................................ 41 Figure 77-Download attachments. .................................................................................................................. 41 Figure 78-Customers menu. ............................................................................................................................ 42 Figure 79-Customer list. .................................................................................................................................. 42 Figure 80-Filter customer by name. ................................................................................................................ 42 Figure 81-Select a customer name. ................................................................................................................. 43 Figure 82-Customer tab sections..................................................................................................................... 43 Figure 83-Customer information. .................................................................................................................... 44 Figure 84-Discount list. .................................................................................................................................... 45 Figure 85-Installed plants. ............................................................................................................................... 45 Figure 86-Customer documents. ..................................................................................................................... 46 Figure 87-Insert a quotation. ........................................................................................................................... 47 Figure 88-Send request. .................................................................................................................................. 47 Figure 89-New order. ...................................................................................................................................... 47 Figure 90-Type a customer name. ................................................................................................................... 48 Figure 91-New order. ...................................................................................................................................... 48 Figure 92-New order line. ................................................................................................................................ 48 Figure 93-New order. ...................................................................................................................................... 49 Figure 94-General information updated. ........................................................................................................ 49 Figure 95-Send reply. ....................................................................................................................................... 50 Figure 96-Supplier menu ................................................................................................................................. 51 Figure 97-Filter a supplier................................................................................................................................ 51 Figure 98-Partner search ................................................................................................................................. 52 Figure 99-Filter criterions ................................................................................................................................ 52 Figure 100-Add language criterion .................................................................................................................. 53 Figure 101-Language criterions ....................................................................................................................... 53 Figure 102-Service data ................................................................................................................................... 53 Figure 103-Add service name criterion ........................................................................................................... 54 Figure 104-Classification name criterion ......................................................................................................... 54 Figure 105-Search partner ............................................................................................................................... 55 Figure 106-Imported term translation. ........................................................................................................... 56 Figure 107-Distributed planning menu. .......................................................................................................... 57 Figure 108-Processes menu............................................................................................................................. 57 Figure 109-Process activity type. ..................................................................................................................... 58 Figure 110-Supplier assignments. ................................................................................................................... 58 Figure 111-New process model. ...................................................................................................................... 59 5 Figure 112-Add process activity. ..................................................................................................................... 59 Figure 113-Process model activities. ............................................................................................................... 60 Figure 114-Complete a new process activity. ................................................................................................. 60 Figure 115-Activity precedence. ...................................................................................................................... 61 Figure 116-Show activity precedence. ............................................................................................................ 61 Figure 117-Service list. .................................................................................................................................... 61 Figure 118-Process model list.......................................................................................................................... 62 Figure 119-Fix value parameter....................................................................................................................... 62 Figure 120-Mapping parameters. .................................................................................................................... 63 Figure 121-Open parameter. ........................................................................................................................... 63 Figure 122-Planner menu. ............................................................................................................................... 64 Figure 123-Order line accepted. ...................................................................................................................... 64 Figure 124-Plan an order line. ......................................................................................................................... 64 Figure 125-Plan a pending request.................................................................................................................. 65 Figure 126-Assign a supplier to a process activity. .......................................................................................... 65 Figure 127-Process activity planned. ............................................................................................................... 65 6 Document Conventions Consistent use of typographic conventions in documentation helps users locate and interpret information easily. The following guidelines present some specific typographic conventions. Menu names Bold My catalogue menu Dialog box options Bold Click Forgotten password? Graphical user interface title elements Bold Change password check box Country drop-down list box check-box: drop-down list box: Graphical user interface elements Italic Text box: Buttons Bold Click New order 7 Hyperlink Bold, blue 8 Document Conventions Web page usage Click a menu button in the menu bar to open a new tab. menu buttons bar Figure 1-Web page. The tab opened are visualised sequentially, the current page has the icon name. Click a tab name to visualise it, click next to the tab to close the tab. Figure 2-Tab opened. The Navigation tab link appears when there are many tabs opened. The tab name opened and visible are in black, the tab name opened and hidden are in blue. 9 Figure 3-Tab selection list. Click the Filter header to open the document filter. Figure 4-Filter. Type the information required then click the button to confirm to filter the list. Order line state chart The Order line state chart shows the order document life cycle. Once saved the order status is Edited, as long as the order status is Edited the order can be modified and it is saved locally by the user. Once sent the order status is Issued. If there isn’t the scheduler the order status changes from Issued to Planned. If there is the scheduler, once scheduled the order status changes from Issued to Accepted then to Planned. When the order status is Planned, the company supplier complete the order details (order cost, start and end date). If there isn’t the scheduler the supplier company type the detail fields manually, if there is the scheduler module the detail fields are pre-compiled on the basis of the scheduler algorithm results (the values pre-compiled are suggestions, the company supplier can modify the value inserted by the scheduler module). Once inserted the order details the company supplier confirms the order, the order status changes in Confirmed. The order status changes in Execution on the basis of the order calendar (Start date, End date). The order execution can be suspended and planned again. If there is the scheduler module the order status from Suspended changes in Planned, if there isn’t the scheduler module the order status changes from Execution to Planned. Both the supplier and the customer can abort the order or create an order exception. 10 Figure 5-Order line state chart. 11 1 Basic communication functions 1.1 Access to the system The initial page presents the user with the services offered by the company selected. Figure 6-Access to the system Different user profiles are envisaged: 1. Casual user; 2. Customer; 3. Supplier; 4. Admin. In the following we analyse the interface details for each user profile. 12 1.2 Casual user In the company main page a casual user can visualize information about the company as: the company location; the company e-mail for information; the services offered. Figure 7-Company main page Each service is identified by the service Name, the service Description and the Trade name. Click a column header to sort the services available in: Ascending alphabetical order Descending alphabetical order A casual user can access to the system by registering to provide the information of his organization and define his personal login account. Click Not registered yet? to provide the information to become a customer. 13 Figure 8-Log in Fill the form about the company information and the account information. Figure 9-Information form * The text boxes with are mandatory to complete the registration, type the text boxes with the information required, click Register to complete the registration. The message User registration correctly done confirms the registration. 14 Figure 10-Registration correctly done. Type Username e password, then click Enter. Figure 11-Login 15 1.3 Customer Log in Type Username e password, then click Enter. Figure 12-Customer log in. The main page of the customer presents the menu index. Click a menu header to open a tab. Figure 13-Customer menu index. 16 My documents In My documents tab a customer can visualise his documents. Each document is described by: A number (The document number starts with: Q if it’s a quotation, O if it’s an order); A document type; Status; A supplier; The date of last change. Figure 14-My documents section. 17 Filter Click the Filter header to open the document filter. Figure 15-Filter. The documents can be filtered by: Document type; Supplier; Interval dates; Type the text boxes then click Apply to filter the documents. Figure 16-Filter documents. Click the Filter header or the blu arrow to open or close the Filter panel. Filter open; Filter closed; To create a new quotation or a new order, see the New quotation section and the New Order section. Figure 17-My documents buttons. If the document status is Edited, the document can be modified and deleted. Click the document number to modified the document. Select the document check-box, then click Delete to cancel the document. Figure 18-Select a document. 18 New quotation Click New quotation to create a new service quotation. Figure 19-New quotation button. The New Quotation tab will appear next to the other opened tabs. Figure 20-New quotation tab. The New quotation page has a: General information section; Service configuration section. The General information section summarises the Supplier name and the supplier Contact person. In the Service configuration section the customer can define the service detail. Select the service Name from the drop-down list box, type the Address, the City, the Zip code and the Country you want the service selected. Select the network type from the drop-down list box and the network dimension. The network dimension has a range between square brackets, the range indicates a suggestion, the customer can type a value out the range interval and indicates in the Notes free text box some additional information. Type the Expected price in Euro and the Expected duration in days. If the supplier uploaded a document, click to download the attachment. Figure 21-Type a new quotation. 19 Figure 22-Operation done. In My documents tab the quotation status is Edited. As soon as the quotation status is Edited the service quotation can be modified. To modify the quotation edited see My Documents tab. Once saved the quotation name starts with “Q”. Click Send Request to send the service quotation to the supplier. In My documents tab the quotation status is Issued (See the Order line state chart). Once sent the quotation name starts with “Q”. 20 New order Click New order to create a new service order. Figure 23-New Oder The new order tab name start with “O”. The new order sections are: General information section; Order lines section; Attachments section. Figure 24-New order configuration. New order line To insert a new order line click New order line in the Order lines section. Figure 25-New order line. The new order line tab is opened next to the other tabs. Order line/01 Order line Figure 26-New order line tab. See Service configuration in the New quotation section to create a new order line. The General information section is updated with the service configuration edited. 21 Figure 27-General information updated. To download the attachments upload from the supplier click in the Attachments section. Click Save to save the order. When the operation is done the new order line is saved in the order tab in the Order lines sections. Until the order edited is saved locally the order lines saved can be modified and the order lines status are Edited. To modify the order click the order line name in the Order lines section. When the order is sent to the supplier the order status become Issued (See the Order line state chart). Click Send to send the order. New order line from quotation A new order line can be inserted from a quotation. The quotation status must be Replied. Figure 28-Quotation replied. Click New order in My documents page, then Click New order line from quotation in the Order lines section. Click the quotation number to select the quotation replied. Figure 29-Select a quotation replied. The quotation replied is now inserted as order line. Type the Due date and Notes then click Save to insert the order line. 22 Order line/01 Order Figure 30-New order line from quotation. When the Operation is Done in the order page the new order line is correctly inserted. The new order line status in Edited, the order line can be modified. Click Save to save locally the order. Click Send to send the order to the supplier. 23 Figure 31-New order line inserted. When the order is sent to the supplier in My documents page the order status become Issued. Figure 32-Order issued. 24 Abort an order line In each moment the order sent can be aborted. In the order line page click Abort to abort the order line. Figure 33-Abort an order line. Click Confirm abort to abort the order line. Click Cancel to keep the order line status as Issued. Figure 34-Confirm abort, Cancel. Attachments Click New Attachment to upload a document to attach to the service order. Click Return to return to the quotation page. To delete the attachment, select the attachment check-box then click Delete. 25 To download the attachment, select the attachment check-box then click Figure 35-Attachments. 26 . 1.4 Supplier Log in Type Username and Password the click Enter. Click Forgotten password? to receive a new password (automatically generated by the system). See the Forgotten password section. Figure 36-Supplier log in. The supplier main page shows the different menu to manage the customer and supplier requests. Pass the mouse over a menu button to display the sub-menus. Figure 37-Supplier main page. 27 1.5 My catalogue Figure 38-My catalogue menu. Service list In My catalogue menu list select Service List. The service list tab shows the available services offered to the customers, each service line has a Name, a Trade name, a Status and a Depending on attribute. The service list section allows the supplier to define the services offered. Figure 39-Service list. Click the service name to open a new tab with the service details. Figure 40-Select a service. The new tab is displayed next the previous one. The tab name is the service name; the selected service has different sections as: General information section; Functional parameters section; Classification section; Keyword section; Depending on section; Attachments section. Click to open a service detail section. 28 Figure 41-Service details. General information The General information section shows the service Trade name (given by the supplier to identify the service), the service Name (more exhaustive term selected from a common vocabulary, see Common vocabulary), a service Status and some service options as: Use for contracts: service used for maintenance contracts; Use for company offer: service used for quotation requests and orders; Require customer location: request the customer address during the service definition; Allow multiple quantities: for items that required multiples quantities. The options are not exclusive, a supplier during the service definition can select more than one service option check-boxes. See in the Contract menu the Plants section to visualise how to use the Use for contracts check-box. Click Save to store the service information, click Unpublish to keep the service locally saved and hidden from the customer account. Figure 42-General information section. If the service status is Hidden, click Publish to broadcast the service to the customers. 29 Figure 43-Publish a service. Common vocabulary Click the service name to visualise the common vocabulary. Figure 44-Service name from the vocabulary. The service vocabulary has a local section and a lingua franca section. The local terms are in the user language, the lingua franca terms are the local translations into the English language. Each term has a Label (synthetic description) and a Description (Exhaustive description). Type the lingua franca terms to modify the service name and description. Click Save to store the service name, click Return to maintain the old settings. Figure 45-Service vocabulary. To modify the service name a user can type directly the text boxes or search a term into the common vocabulary. Click to open the Search vocabulary. 30 Figure 46-Search vocabulary. Type a keyword you want to search in the text box, select the language from the dropdown list box in which the search results will be displayed. Click Search to start searching the terms. Figure 47-Type a keyword. The terms found are displayed in a list. Each term has the translation in the local language and the corresponding translation in the lingua franca. The Local language flag shows the user local language. Figure 48-Search results. Click the Label(local) name to import the service name. Figure 49-Import a service name from the vocabulary. Click Save to store the service name, click Return to maintain the old settings. 31 Functional parameters There are three types of functional parameters: 1. Numeric parameters; 2. Enumerative parameters; 3. Text parameters; Numeric parameter Click New numeric parameter to create a new parameter. Figure 50-Functional parameter buttons. Type the information required in the text boxes then click Save to store the information, or Return to come back the previous page. Figure 51-New numeric parameter. 32 To search an existing term click in the Search vocabulary header. Type a keyword of the parameter you are looking for in the text box, select from the drop-down list box Parameter term (if you are searching a term name) or Unit of measurement term (if you are looking for a unit of measurement). Select the language from the drop-down list box (local language or lingua franca), then click Search. Figure 52-Search results. To import a term click the Label (local) name, then click Save to store the parameter, then click Return to come back the service tab. To unsaved the changes click Return without saving. Enumerative parameter Click New enumerative parameter to create a new parameter. Figure 53-New enumerative parameter button. Type the information required then click Save, or click Search vocabulary to import an existing term from the vocabulary. Once saved an Options section is visible. 33 Figure 54-Options. Click New option to add an element to the enumerative parameter. Type the new option term (local and lingua franca) in the text boxes, then click to save. Figure 55-New option. Select an option the click Move up or Move down to change the options order. Click Delete to cancel an option. Figure 56-Options list. To modify an existing option click click . Type the changes in the text boxes then . Figure 57-Save an option. 34 New text parameter Click New text parameter to create a new text parameter. Type the label and the description in the local language and in lingua franca then click Save. Use the Search vocabulary section to search an existing term. Figure 58-New text parameter. Modify an existing parameter Click the parameter label(local) name to open the parameter details. Figure 59-Parameters details. To modify the parameter, type the lingua franca translation in the term text boxes, then click Save. 35 Figure 60-Modify a parameter. To import a term from the vocabulary, click in the Search vocabulary header. Figure 61-Search vocabulary. Type a keyword of the parameter you are looking for in the text box, select from the drop-down list box Parameter term (if you are searching a term name) or Unit of measurement term (if you are looking for a unit of measurement). Select the language from the drop-down list box (local language or lingua franca), then click Search. 36 Figure 62-Search results. To import a term click the Label (local) name, then click Save to store the parameter, then click Return to come back the service tab. To unsaved the changes click Return without saving. Classification The company classification is useful for the partner search. The terms used to classify a company can be selected from taxonomy of terms. Click New taxonomy reference to search a classification term. Select an existing classification then click Delete to cancel the classification. Figure 63-New classification. The taxonomy shows the areas available. 37 Figure 64-Taxonomy reference. A plus sign next to a folder indicates that it can be expanded to show more folders, a minus sign indicates that it can be collapsed. Select a classification among the available, more than one classification can be add to the company. Figure 65-Select a classification. To store the company classification click Save, when the operation is done click Return to come back the service tab. To come back the service tab click Return without saving. 38 Keyword The company keyword is useful for the partner search. The terms inserted in the keyword section are hidden from the user but are useful for the search algorithms. Figure 66-Keyword section. Type a new keyword Click New keyword to add a company keyword. Type the labels and descriptions both in local language and in lingua franca then click Save. When the operation is done click Return to come back the service page. Figure 67-Add a keyword. Search a keyword Type the keyword you want to search in the Text text-box, select the language from the drop-down list box then click Search. Figure 68-Search vocabulary. 39 Click the keyword label name to import the keyword. Figure 69-Select a keyword. Click Save to store the keyword, when the operation is done click Return to come back the service page. Figure 70-Save a keyword. Modify a keyword Click the keyword label name to modify the keyword term. Modify the lingua franca label and description then click Save to store the changes, click Return to come back the service page. 40 Depending on In the Depending on section select the services to which the current service depends. Click Update dependencies to store the dependencies. Figure 71-Depending on section. Attachment Click New attachment to upload an attachment. Figure 72-Insert attachment. Click to download an attachment uploaded. Select an attachment row then click Delete to cancel the attachment uploaded. Figure 73-Download attachments. 41 1.6 Customers Figure 74-Customers menu. Customer list In the customer list tab are listed the customers of the company. Click New customer to add manually a new customer. Select a customer then click Delete to cancel the customer information. Figure 75-Customer list. In a distributed context of company collaboration, in the Pending received invitations section are listed the request of invitation received from hypothetical customers. See distributed context. Click to open the Filter section, type the customer name you are looking for in the Name text-box, and then click Apply. Click Reset to cancel the text edited. Figure 76-Filter customer by name. Click the customer name to open the customer information tab. 42 Figure 77-Select a customer name. The customer tab has three sections: 1. General information; 2. Discount list; 3. Installed plants. Click to open a section. Figure 78-Customer tab sections. 43 General information In the General information section are resumed the customer company information, and there are two hyperlinks to: 1. Customer documentation; 2. Contracts. Figure 79-Customer information. Modify the general information then click Save to store the changes. Click Customer documents to open the list of documents related to the customer selected, see Customer documents. Click Contracts to open the contract document page, see Contracts. Discount list The Discount list section shows the discount applied to the customer selected. Click to modify an existing discount row. Click New discount to add a discount list. Select a discount row then click Delete to cancel a discount. 44 Figure 80-Discount list. Installed plants The installed plants section shows the plant installed for the customer selected. Click New plant to add a plant. Select a plant check-box then click Delete to cancel the plant. Figure 81-Installed plants. 45 Customer documents The customer documents list shows the quotations and the orders. Click the document list. to filter Figure 82-Customer documents. See Reply to a quotation and Reply to an order to reply to quotations and orders. If the customer contacts the supplier by telephone, the supplier can insert a quotation or an order in this section. Click New quotation to insert a new quotation related to the customer selected, click New order to insert a new order related to the customer selected. New quotation Type the information required in the General information section and in the Service configuration section. In the service configuration Name in the drop-down list box are available the services loaded from the supplier, see the Service list section. To save the configuration edited among the configurations available click Save configuration. Click Load configuration to load a configuration saved. Click Save to store the quotation as Edited (the quotation can be modified). 46 Figure 83-Insert a quotation. Once saved, click Send request to send the quotation. Figure 84-Send request. When the operation is done, the quotation status is Requested. See in the Scheduler menu the Pending actions section. From the Customer documents tab click New order to insert an order for a customer. Figure 85-New order. The Customer name test-box is an auto-complete text-box that helps the supplier looking for a customer name. Type the Customer name then click Save. 47 Figure 86-Type a customer name. The new order tab name start with “O”. The new order sections are: General information section; Order lines section; Attachments section. Figure 87-New order. To insert a new order line click New order line in the Order lines section. Figure 88-New order line. 48 The new order line tab is opened next to the other tabs. Figure 89-New order. The General information section in the order tab will be updated with the service configuration edited. Figure 90-General information updated. To download the attachments upload from the supplier click in the Attachments section. Click Save to save the order line. When the operation is done the new order line is saved in the order tab in the Order lines sections. Until the order edited is saved locally the order lines saved can be modified and the order lines status are Edited. To modify the order click the order line name in the Order lines section. When the order is sent to the supplier the order status become Issued (See the Order line state chart). Click Send in the order tab to send the order. 49 Reply to an order Click the order name in the Customer documents tab to open the order received (The order status is Issued). Click Acquire to acquire the order, then edit the order line typing the Price, the Duration days, then click Confirm to send the order. When the operation is done the order status is Confirmed. Figure 91-Send reply. 50 1.7 Suppliers The Suppliers menu allows the supplier management. Click the Suppliers menu then select a sub-menu from the list. Figure 92-Supplier menu Supplier list In the supplier list tab are listed the suppliers of the company. Click to open the Filter section, type the supplier name you are looking for in the Name text-box, and then click Apply. Click Reset to cancel the text edited. Figure 93-Filter a supplier In a distributed context of company collaboration, in the Pending sent invitations section are listed the request of invitation sent to hypothetical supplier. See distributed context and Customer list. Supplier document The supplier documents list shows the quotations and the orders. Click to filter the supplier list. See Customer documents, See Reply to a quotation and Reply to an order to reply to quotations and orders. The supplier can insert manually a quotation or an order in this section. Click New quotation to insert a new quotation related to the supplier selected, click New order to insert a new order related to the supplier selected. See New quotation. Partner search In a distributed context of company collaboration a supplier can search a partner node. Among the supplier list is always listed also the supplier itself because a company can assign to its internal resource an activity. Click to open the Filter section, type the organisation criterion you are looking for. Click Delete to cancel the text edited and the criterion. The search can be done by Organisation data and/or by Service data. 51 Figure 94-Partner search Organisation data Click Add name criterion to add an additional criterion to search a company. When the name criterions inserted are more than one, the name criterions are alternative (OR logical operator). Click Add country criterion to add the country where the company is. When the country criterion are more than one, the country criterions are alternative. Click Add language criterion to add a company language. Figure 95-Filter criterions When the company language criterions are more than one, the supplier can choose the OR or AND operator among the alternatives. 52 Figure 96-Add language criterion Once the supplier selected a logical operator the logical operator is saved for the additional language criterion. Figure 97-Language criterions Service data Click Add name criterion or Add classification criterion to add an additional criterion to search a service. When the criterions are more than one, the supplier can choose the OR or AND operator among the alternatives. Once the supplier selected a logical operator the logical operator is saved for the additional criterions of the same type. Figure 98-Service data To insert a service name criterion type the service name you are looking for in the textfield and select a language from the drop-down list box. The service name is a keyword to search the service. The percentage between round bracket near a language shows the term quantity available in the language selected (Ex. English(92%)) . 53 Figure 99-Add service name criterion To insert a classification criterion click a classification name in the taxonomy. A plus sign next to a folder indicates that it can be expanded to show more folders, a minus sign indicates that it can be collapsed. See Classification to see the service classification available. Figure 100-Classification name criterion Click Search to apply the search criterion inserted. Click the partner company name found to visualise the partner general information and the services offered. Select a partner company check-box then click Send invitation to invite the company to join the supplier network. 54 Figure 101-Search partner If the company found is already a partner the check-box is not available, an icon indicates that the company is a partner. Imported term translation In the Imported term translation section are listed the vocabulary label and description translations available. The terms available can be translated from the lingua franca (English EU) into the user local language. Type the Label (local) and the Description (local) in the text-field then click save. to To share the translation activity among users with the same local language, once saved the local translation, the labels and the descriptions are distributed and propagated to all the users (with the same local language). 55 Figure 102-Imported term translation. 56 Distributed planning functions The Distributed planning section allows the company to manage The activities in a process model The orders received from customers and plan them among the suppliers available for a particular service. Figure 103-Distributed planning menu. 1.8 Processes In the Processes section the user can create a new activity and can associate the activity to a service offered by a supplier. Figure 104-Processes menu. Process activities Click Process activities in the Processes menu, and then click New activity. In the New process activity tab type the activity name and description in the text-field, and select an activity type from the drop-down list box: At customer: the activity location is at customer site; Custom: the activity type can be customised on the basis of the customer order; Standard: the activity duration and cost are already knew from the supplier; Latency: the activity is between other activities, the latency activity delay the next activity. Click Save to store the activity general information. 57 Figure 105-Process activity type. Once saved the General information, the Supplier assignments section is available. Click to assign a supplier to the activity. Select a supplier among the available from the drop-down list box, select a service offered by the supplier selected. Edit the recharge cost in percentage on the final service cost offered to a potential customer. Click to save the assignment. Click New assignment to add a new supplier to the activity. Select the assignment check-box then click Delete to cancel the assignment saved. Figure 106-Supplier assignments. 58 Process models A process model is composed by activities. Click Process models in the Processes menu, and then click New process model to create a process description. In the New process model tab type the model name and description in the text-field. Click Save to store the model general information. Figure 107-New process model. In the process activity section click Add activity to select an activity among the available. Click Save to insert the activity in the process model. Figure 108-Add process activity. Once saved the process activity selected is inserted in the process model activities. 59 Figure 109-Process model activities. Click a process activity name to visualise the activity details. Type the activity duration in the Duration text-box, the duration time edited is an estimate of the activity duration. The real duration is automatically updated on the basis of the supplier feed-back about the activity duration. Type the activity cost in the Cost text-box, the cost edited is an estimate of the activity cost. The real cost is automatically updated on the basis of the supplier feed-back about the activity cost. Type the number of time the activity must be done in the process in the Quantity testbox. If the activity selected is the first activity to be done in the process check the First check-box, else click New precedence and add the activity to be done before. Figure 110-Complete a new process activity. The activities can be sequentially and in parallel. If two activities have the same activity precedence the activities are in parallel. Click Preview to visualise the activity precedence schema. 60 Figure 111-Activity precedence. The preview shows the activity precedence. Click Close preview to close the schema. Figure 112-Show activity precedence. Process to service In the Process to service section are listed the services offered. See Service list in My catalogue section to change the service status. Click to open the process model list. Figure 113-Service list. Select the process model to assign, edit the recharge cost in percentage, and select the priority. The priority is a process model choice coefficient that indicate the process model the company prefer. Then click Save. 61 Figure 114-Process model list. Click Set mappings to map the service parameter with the service parameters of the suppliers. Click a parameter name to map the parameter. Select an option among: Fix value, Map, Open. Fix value Select fix value to have always a fixedcharacteristic. In the example the server fixed value is always Apache. Click Save to store the information. Figure 115-Fix value parameter. Map Select Map, then click New mapping to associate the service parameters to the supplier service parameters. Click Save to store the mapping. 62 Figure 116-Mapping parameters. Open Select Open, to associate the supplier parameter to the service parameters. If the service parameter is not defined the company parameter will coincide with the supplier parameter. Figure 117-Open parameter. 63 1.9 Planner The Planner section allows the user to plan the order line received and accepted. Figure 118-Planner menu. Pending actions In the Pending actions section visualise the list of the accepted order line. (See Customer documents) Figure 119-Order line accepted. The company (once accepted an order line) has to plan the order line. When the company (Supplier in green) receives an order line from a customer has a supplier role. When the company plan the order line with its suppliers has the customer role (Customer in green in figure). The company plan the order line received sending the single activity inside an order line to his own suppliers. Figure 120-Plan an order line. The order line received from a customer and accepted by the supplier can be planned. Click Plan to plan manually the order line, 64 Figure 121-Plan a pending request. Plan an order line manually (Company_Customer side) Each activity is composed by one or more processes. In the process activity section assign each process to a supplier, select the Enabled check-box to include the activity to the plan. Click to assign a supplier to the process, click to save. Figure 122-Assign a supplier to a process activity. When all the processes are assigned to a supplier, click Generate plan to send the first process activity to the first supplier selected. If the supplier selected has accepted the process activity sent by the customer, the supplier have to schedule the process activity in the Internal scheduling section. See Reply to an order and Scheduler for more details. Once a supplier accepted and schedule an order activity, the Duration in hours, the Start time, the End time are sent to the customer. The customer in the Supplier documents section can visualise the order accepted by the supplier. See Supplier document. The second order line is sent automatically to the second supplier selected, and so on for each process activity. Figure 123-Process activity planned. When all the activities have been replied by the suppliers, click Planned and click Confirm plan to confirm the plan. In the customer documents the order status is in Planned, click the order then click the order line and click Confirm, Abort or Raise Exception. See Customer documents for more details. The customer in the Supplier documents section can visualise the order accepted by the supplier. See Supplier document. 65 The second order line is sent automatically to the second supplier selected, and so on for each process activity. In the customer documents the order status is in Planned, click the order then click the order line and click Confirm, Abort or Raise Exception. See Customer documents for more details. 66