1
E.L.I. sprl
Orion version 6
High Resolution, 32 bits PCI Image Grabbing System
For Windows
2000, XP and Seven
User’s Manual Part 1: Description of the Basic Package
Release 6G, February 1st, 2010
E.L.I. sprl, Belgium
Orion 6 for Windows
2
INDEX
1. INTRODUCTION .................................................................................. 4
2. OPTIONAL SOFTWARE MODULES .............................................................. 6
2.1. GRAPHIC TOOLS ...................................................................................................................................................... 7
2.2. MACRO COMMANDS ................................................................................................................................................ 8
2.3. ANAGLYPHS............................................................................................................................................................. 9
2.4. RS 232 FOR LEO DSM ....................................................................................................................................... 10
2.5. EDX MAPPING MIXER ........................................................................................................................................... 10
3. SYSTEM DESCRIPTION .........................................................................12
3.1. SOFTWARE ORGANIZATION AND SYSTEM USERS .............................................................................................. 12
3.2. DESCRIPTION OF THE GRABBING PROCESS ......................................................................................................... 12
3.3. SEM SCANNING CHARACTERISTICS AND DRIVER FILE ..................................................................................... 13
3.4. ADDITIONAL SYSTEM FUNCTIONS ..................................................................................................................... 14
3.5. PC SYSTEM REQUIREMENTS ................................................................................................................................ 14
4. THE ORION MAIN TOOLBAR ...................................................................15
4.1. RUNNING THE ORION SYSTEM ............................................................................................................................ 15
4.2. DESCRIPTION OF THE MAIN MENU ..................................................................................................................... 15
4.2.1. Icons description................................................................................................................................. 16
4.2.2. Structure of the drop-down menu of the main toolbar ............................................................. 17
4.3. MAIN TOOLBAR ORGANIZATION OF THE BASIC VERSION ................................................................................ 19
5. ACQUIRING AN IMAGE .........................................................................20
5.1. HOW TO ACQUIRE AN IMAGE IN SLOW SCAN ("VISUAL", "RECURRENT") MODE? ............................................ 20
5.1.1 Grab in slow scan, must SYNC with SEM speed ........................................................................... 22
5.1.3. Grabbing in photo (record) modes .................................................................................................. 24
5.1.4 Commands available during grabbing ............................................................................................... 25
5.1.4.1. In visual modes only ................................................................................................................................................... 25
5.1.4.2. In record modes only.................................................................................................................................................. 26
6. AFTER GRABBING … .............................................................................27
6.1. HOW TO GET ACCESS TO THE AVAILABLE COMMANDS? ..................................................................................... 27
6.2. DESCRIPTION OF THE IMAGE WINDOW DROP-DOWN MENU (WHEN AVAILABLE) ............................................ 28
6.3. LET’S SAVE THE IMAGE ON DISK ! ....................................................................................................................... 29
6.4. TRANSFER IT TO ANOTHER APPLICATION THROUGH THE CLIPBOARD ... .......................................................... 30
6.5. CHANGING THE DEFAULT IMAGE SIZE ON SCREEN AFTER ACQUISITION .................................................................... 30
7. HOW TO CONTACT US ? .......................................................................31
Orion 6 for Windows
3
Preliminary notes :
The Orion system is a real-time grabbing system.
This means that it has to track the scanning of your SEM and
catch the lines and pixels as they are generated by the SEM.
It’s not recommended to run any other program while grabbing,
as these jobs use processing time and thus can prevent the Orion system to function correctly.
Please turn off your screen saver, as it can interfere with this software.
The “stand by” mode of the PC has also to be turned off.
Orion 6 for Windows
4
1. Introduction
The PCI design uses Plug and Play features for allocating memory spaces and the IRQ
channel used by the board.
The Orion software consists in two levels:
- The BASE version offers the following functions:
•
•
•
•
-
image grabbing in slow scan (visual modes) and photo modes
image details zooming
pixel interpolation for noise reduction
image save with access to all popular formats
The “Modules”: they allow the customer to add specific functions corresponding to
his specific requirements. There are 5 different modules:
•
•
•
•
•
Graphic tools
Macro commands
EDX mappings
3D Vision (Anaglyphs)
RS 232 remote control for DSM
To make a module available, just give us your board serial number when ordering it.
This key file (size is only 1kbytes) unlocks the purchased options. Please refer to chapter 2
for more details.
Orion 6 has been created to be fully 32-bits compliant and compatible with Win 95,
98, Me, 2000 and XP. The board design is radically different from the ISA design in that it
has a local coprocessor, uses hardware pixel integration and uses interrupts. The layout of
the user interface has been optimized by reducing the number of mouse clicks, and the
technical setup has been enhanced to provide the installer more comfort and possibilities in
optimizing the grabbing characteristics.
During grabbing, you can now use the mouse instead of the function keys.
Any image size from 16 x 16 up to 8,192 x 8,192 pixels is available, depending on the
scanning characteristics, which limit the size of the image you can get from your SEM. Up to
64 different image sizes can be defined in a SEM driver. Images are grabbed and stored
with 256 gray levels per pixel. When integrating frames in visual mode, 16 bits (2 bytes) are
allocated per pixel in order to maintain full pixel gray level resolution even when 256 frames
have to be integrated; in this case the pixel depth is reset to 8 bits after grabbing.
Orion 6 for Windows
5
When an image is calibrated (i.e. when a reference distance has been manually
defined or selected from the internal list, your Orion system has the ability of constructing
a new micron bar in the extracted image – this is very useful because usually the calibration
information is lost when extracting an area.
Please refer also to our Internet site for downloading
new updates of the Orion package:
http://www.OrionMicroscopy.com
Minor changes can be made to the Orion package in order to enhance it.
This manual will be updated accordingly when required.
Orion 6 for Windows
6
2. Optional software modules
In order to optimize the system to the user requirements, we have decided to
distribute the system functions between the “Basic” system and optional modules. You can
start with the “base” version and upgrade it with any option any time or ask for a limited
time of evaluation of other options. It is required to have a special initialization file to unlock
the options. This file is available from your system installer or E.L.I. Belgium
([email protected]).
Please refer to your Orion system installer or email us at [email protected]
for any information you could require on these options.
Orion 6 for Windows
2.1. Graphic Tools
This option gives access to several very useful functions that will help you
handling and evaluating your images after grabbing:
-
Printing (with preview capability)
Distance measurement (line segments overplayed or burned in pixel layer)
Image annotation
Area extraction
Brightness / contrast adjustment after grabbing
Image resize
Palette processing and histogram analysis
Automatic Micron bar creation in extracted images
Email capability right after grabbing
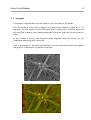
This an example of the automatic scale bar generation in an extracted area :
-
image from which the extraction was made :
-
extracted area :
7
Orion 6 for Windows
8
2.2. Macro commands
Orion includes a powerful, optional macro command editor and processor. This
extension allows you create and /or change the function of 30 buttons (3 rows of 10) in the
main toolbar, to automatically execute macro command files. Powerful commands also save
and restore work variables to disk. It is possible to automate grabbing tasks, by using the
GrabSlowScan or GrabPhoto commands and tell the system to automatically execute image
filtering commands after grabbing.
This option is a new way of optimizing the Orion system configuration for each user:
you can create new buttons that will execute your specific sequence of actions.
This is done by selecting a user at startup from a list. Each user in the list is linked to a
macro command initialization file. This file is executed when the user is selected. The macro
file can include functions like changing the main menu, initializing buttons with automatic
grabbing and printing functions, or even selecting the default folder where all users’ images
will be saved.
The macro command option is required to use this feature, because the user selection
menu can be called only if the macro function has been enabled.
The “Options” handbook fully describes these commands, with extensive examples, and
the way to implement them.
In the following example, two screen dumps were made of the main tool bar:
-
the default toolbar
-
the same toolbar, in which the user added two new buttons with his code (in this
case, one for grabbing in record mode and automatically resample the image right
after grabbing, and the second one, for extracting an area of a constant size –
here 800x600 pixels):
Orion 6 for Windows
9
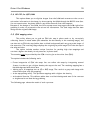
2.3. Anaglyphs
This option is required when the user needs to “see” the depth of his sample.
This 3D extension mixes stereo images (i.e. grabbed when sample is tilted by 5… 10
degrees). The two images are mixed and the result is red/green or red/blue coded. As
with the EDX extension, the resulting image has 24 bits per pixel and can be printed in
colors.
It also includes a tool for semi-automatic image alignment. With this utility, you can
compensate small stage drift during tilt.
Here is an example of the difference between a normal view and a stereo view (special
red/green or red/blue pair of glasses is required):
Orion 6 for Windows
10
2.4. RS 232 for LEO DSM
This option allows you to digitize images from the DSM and reconstruct the correct
micron bar information in the image, by interrogating the DSM through the RS232 interface.
You can remote start the photo mode or any slow scan mode from the computer.
Because of the design of the DSM, the Orion system must interrogate the DSM right after
grabbing in order to reconstruct the micron bar information. The final image has the same
design as the original DSM image.
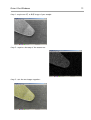
2.5. EDX mapping mixer
This utility allows you to grab an EDX dot map in photo mode or by recursively
collecting frames in visual mode (this enhances the dot density in the resulting image). You
can also mix an EDX dot map (white dots on black background) with any gray scale image of
the same size. The resulting image displays the original gray scale image PLUS the dot map in
the selected color.
The option includes another unique function for packing high size mappings and
retrieve a higher dot density in only one scan, in photo mode.
The scanning must be provided by the SEM circuitry (no active drive from EDX)
The option includes the following tools:
• Frame integration of EDX dot maps. You can collect dot maps by integrating several
frames, in order to get a higher density dot map at the end. The resulting mapping has a
black background with white dots.
• Mixing up to 16 mappings into an SE or BSE image. The result is a gray scale image with
colored dots (one color per mapping).
• A dot map packing utility. This produces mappings with a higher dot density.
• A threshold function. This delivers white dots on a black background even if the contrast
or brightness is not ideal during grabbing.
The following page shows the result of such a process:
Orion 6 for Windows
Step 1 : acquire an SE- or BSE image of your sample:
Step 2 : acquire a dot map of the same area :
Step 3 : mix the two images together :
11
Orion 6 for Windows
12
3. System description
3.1. Software organization and system users
The main menu displays all the global system commands. Some of them are accessible
both from the drop-down menu and from a dedicated button, like for example the grabbing
commands. Many others, which are specific to the selected image, are also available from the
drop-down menu in the image window or by right clicking in the image.
When an image is acquired from the SEM, it is automatically stored in computer
memory and is immediately available for storage, pasting to clipboard, filtering...
All popular files formats are available: .TIF, .BMP, SUN raster, JPEG compressed and
many others; the future image use will usually define which image format has to be used for
storage. For example, when image processing is required after storage, an uncompressed
format must be used because the compression / decompression algorithm modifies the pixel
value.
3.2. Description of the grabbing process
The grabbing process transforms the analog video signal produced by the SEM into an
array of gray levels that represents the image. Depending on the scanning mode (photo or
visual), the system synchronizes differently, but the image is in both cases stored in the PC
RAM memory and is immediately available after grabbing.
During the grabbing process, the system is synchronized with the SEM scanning and
tracks every line produced by the SEM; the pixels of the current line are displayed,
averaged if required and stored in memory in real time (i.e. at the time the line is scanned by
the SEM).
The photo (or record) modes are generally defined by a slower scan speed (i.e. a
higher number of ms per line, between 10 and 100 ms or more), a higher number of scanning
lines (it can be several thousands, usually between 1000 and 4000), and there is only one
scan; the resulting image contains less noise and has a higher resolution.
The slow scan (or visual) modes are defined by a faster scan speed (usually between 1
and 15 ms) and a lower number of lines (from 256 to 1000), but the scanning process is
endless, which allows for example frame integration or averaging for noise reduction.
The ultra high resolution of Orion for Windows allows transparent pixel oversampling
during grabbing; this means that the Orion card can take several measures of the same
sample area during the grabbing process. This feature is made in real time and does not
Orion 6 for Windows
13
cause any delay in the grabbing process. The big advantage is that the amplitude of the noise
in the image is reduced by the square root of the oversampling factor.
It is a good practice to digitize the biggest possible image (i.e. with the highest
possible number of pixels and lines), because image size reduction with interpolated
pixels will give you noise-free and very high quality images. After reduction, you can
close the original image to gain memory space. This is possible because of the ultra high
resolution offered by Orion during grabbing.
3.3. SEM scanning characteristics and driver file
As every existing SEM has its own scanning characteristics (number of lines, screen
form factor and line time), it is required to adapt the grabbing characteristics to each scan
mode of every SEM. This is done by checking the SEM scanning characteristics during the
installation process. A SEM driver file stores all these parameters.
In the Orion system, all driver files are located in a special folder (« …\drivers ») and
have the « .SEM » extension. A driver file defines up to 72 different image sizes, with
maximum 8 sizes per visual scanning speed (i.e. for each SEM scanning speed) and 8 different
scanning speeds. The driver also stores information for up to eight image sizes in photo
modes. But the number of really definable image sizes is in fact a function of the scanning
capabilities of the SEM. Everything is explained in the technical manual, which is reserved to
the installers trained by E.L.I. Belgium.
The whole system is designed to deliver images with square pixels.
The sensitivity of your Orion board (i.e. contrast and brightness) has been set up
during the installation phase, by a trained engineer who is responsible for the installation.
Usually the board sensitivity is adjusted in order to match the one of the photo device. So
the adjustments for grabbing an image are the same as when taking a picture. The grabbing
process does not interfere with your SEM photo device.
Orion 6 for Windows
14
3.4. Additional system functions
The “Graphic Tools” optional module also includes a number of functions in direct
relation with the work at the SEM:
•
•
•
•
•
•
•
•
•
image filtering : low- and high pass, median, Sobel, contrast equalization ...
image sizes reduction with interpolated pixels
image extraction. Orion creates a new micron bar in the extracted image.
image inclusion for mosaic creation
Option to create a micron marker (for example when connected to a LEO DSM)
draw colored texts, lines and rectangles in an image, as overlays or buried in pixels
compress images on disk : CMP (optimized JPEG), JPEG, JTIF, JFIF formats are available
printing
during grabbing, the user can use the mouse for changing acquisition parameters.
Additional menus are displayed while grabbing.
3.5. PC system requirements
Since grabbing is essentially a real-time process (SEM scanning data must be grabbed and
stored as they are produced by the scanning, otherwise they are lost), it is required to fulfill
the following minimum requirements:
• the processor must be at least a Pentium 500 MHz, with 128 Mbytes RAM ( 512 MB are
recommended, specially with 2000 or XP)
• MS-Windows (R) version 95, 98, Me, 2000 or XP
• A full-length PCI slot (the PCI board measures 260x100 mm, excluding the PCI
connector)
• supported Windows graphic modes are 1024 x 768, 1152x864, 1280x1024 and 1600 x 1200
pixels only (any number of colors; the best setting is 16,7 Mcolors in order to get 256
true gray levels on screen)
• a graphic board with min. 8 MB is required with PCI or (better) AGP bus interface
• a high capacity hard drive.
Orion 6 for Windows
15
4. The Orion main toolbar
This chapter describes how to start Orion and the main menu. It explains the
functions attached to the main menu icons and the data displayed in the main menu.
4.1. Running the Orion system
The following icon has been created during the installation process and has to be
double-clicked in order to start Orion:
Once started, the main menu will be displayed at its latest position used before or at
the top of the screen (depending on the startup option described later).
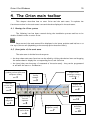
4.2. Description of the main menu
The main menu is divided into three parts:
• the drop-down main menu functions can be called by clicking the desired text and dropping
the mouse down to display the corresponding list of sub-functions
• the icons (they are shortcuts of commands of the main menu) - they can be programmed
at will with the macro « InitButton ».
These two buttons open the
grabbing utilities (slow scan
and photo modes)
See
Graphic tools
(drawings, overlays,
extraction …)
Display the
overlay
manager
3
See
See
9
Save the
current image
on drive
See
Display the
calibration list
See
2
Open an
image file
See
1
8
Copy the image
into the
clipboard
See
See
Email the image.
See
5
Display the
macro editor
6
9
Display the image
magnifier (zoom)
See
7
11
Display the
annotation
utility.
See
10
Orion 6 for Windows
16
4.2.1. Icons description
1
Saves an image on disk The image that will be saved is the selected image (its
window caption is displayed in the bottom line of the main menu - it is the last one you have
clicked in).
2
Loads an image from disk. The image to load will be displayed in a separate,
independent window.
3
Displays the slow scan grabbing window.
4
Displays the photo mode grabbing window.
5
Copies the image to the clipboard.
6
This button displays the macro command editor (when the option is installed). If the
option is not available, then this button is gray and inactive. The macro command editor is a
text editor, optimized for editing .CMD files and executing macro commands step by step.
7
This button displays a zoom window that displays the area around the cursor position.
Depending on the zoom settings, an area of 64x64, 128x128 or 256x256 pixels is magnified.
The size of the zoomed area changes the magnification factor. You can also resize the zoom
window by dragging its lower-right corner.
8
This one displays what we are calling the “Graphic Tools” utility. This is a set of
functions (which are now easily accessible through small shortcut icons at the bottom of
each image window). This button is active only if the corresponding optional module has been
installed and is available in your system.
9
The “Overlay Manager” allows you to hide, show or delete image overlays. An overlay
can be a rectangle, a line of a free drawing that you draw on the image. The overlay color can
be selected either through the “Graphic Tools” utility, or by hitting the “O” icon in blue at
the bottom of the image. Black or white colors will let you burn the line in the image pixels,
while any other color will let you draw the next line as an overlay (i.e. as a part of your screen
rather than a part of the image pixels).
Orion 6 for Windows
10
17
The annotation utility allows you to write a one-line text in the image pixels, in black
or white. You can choose different sizes and use a text background or not. If you push le
left button of your mouse and drag it in the image, the system draws a line between the text
and the subject in the image.
11
With this utility, you can email an image right after grabbing. This is a simple way of
sending a document; you don’t have to save the image and spend time retrieving it from your
drive.
12
13
This button displays the main help window.
This button closes the Orion application.
4.2.2. Structure of the drop-down menu of the main toolbar
The base version includes only the command marked with an « * ».
-
File
-
-
Edit
-
-
New (create a new, blank image)
Open (load an image from disk) *
Save (save an image on disk) *
Save As (saves an image under a name to specify)
Create folder (create a new directory) *
Dump desktop (copy screen to clipboard) *
Printer setup (modify printer characteristics) *
Print*
Exit (quit the application) *
Copy to clipboard *
Paste from clipboard *
Duplicate (make a copy of selected image) *
Modify brightness/contrast
Resize image *
SEM
-
Digitize in slow scan mode *
Digitize in photo mode *
Orion 6 for Windows
- Image
-
Interpolate pixels (create a new image with interpolated pixels) *
Annotate (write text in image)
Calibrate (define a reference distance)
Extract area (create a new image from an extracted area)
Mark extraction area (write a rectangle around the extracted area)
Infos (display technical information)
Linear palette (modify the image’s palette of grey levels)
Drawing color (set the color used for overlaying data)
-
-
Overlays
-
-
Reorganize the screen*
Iconize all images (reduce them all at the bottom of the screen) *
Close all images *
Macros
-
-
Delete all
Hide
Show
Display list
Gallery
-
-
Yellow
Red
Green
Blue
Navy
Acqua
Black
White
Display Fast Executor (execute only one line at a time)
Display macro editor (with full editing capabilities)
Display macro options
Startup macro file (file to execute at startup)
Users
- Select a user at startup
- Select another system user
Options
18
Orion 6 for Windows
-
-
-
19
Language (-> English, French…) *
Preferences
- Printer setup
- Setup *
- Resolutions *
- Change default image resolution (number of DPI) *
- Main toolbar layout (button size…) *
- Miscellaneous *
- Display tips at startup *
System setup
- Orion technical configuration *
- Create system backup *
- Install system options *
- Adjust your screen X/Y ratio *
Help
-
on Orion system *
on grabbing *
on macros *
How to upgrade … *
About (version info and how to contact us) *
4.3. Main toolbar organization of the basic version
The active buttons and drop-down menu commands are : file open, file save, grabbing
in visual mode, grabbing in photo mode and zoom display. To interpolate the image pixels, go
to File / Interpolate in the image window.
When you need to upgrade to the full level, go to Options / System setup / Install
system options, and open the option file you can get from your system installer or E.L.I.
Belgium (our email address is [email protected] ).
Orion 6 for Windows
20
5. Acquiring an image
To acquire an image from the SEM, the Orion system synchronizes with the SEM
scanning circuitry and reads the analog video signal produced by the SEM. A copy of the
image is stored in memory while it is displayed during grabbing. The digitizing process
requires that the SEM contrast and brightness first be adjusted on the SEM before
grabbing (i.e. the Orion board contrast and brightness is set during the installation, to be
the same as your photo record tube).
Paragraph 5.1.4 is important: it shows which commands are available during grabbing.
5.1. How to acquire an image in slow scan ("visual", "recurrent") mode?
The system can display three grabbing windows:
In slow scan modes:
-
Type 1 : a window for grabbing image in slow scan (“visual”, or “recurrent”) mode only
Type 2 : a window for grabbing in photo modes only (all SEMs except DSMs with
RS232) – see par. 3.1.3
Type 3 : a window specifically designed for the LEO DSMs series, with the RS232
connection – see par. 3.1.4
If you are connected to a LEO DSM with an RS232 connection, the best choice is to use type
3, because this allows the system to automatically interrogate the DSM after grabbing and
get the micron bar information for the new image.
Orion 6 for Windows
21
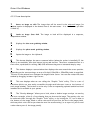
To select the window type: in the main toolbar, go to Options … Preferences.
This displays the following utility:
Page 1, “General”
This allows you to set the
scale bar parameters, when
the system automatically
generates a micron bar in an
extracted image and when
the “mother” image is
calibrated.
This value influences the file
compression ratio; the
effective compression ratio
depends on the image
(details, noise…)
Page 2, “Grabbing”
This setting is used during
grabbing. It forces the
system to replace the
extreme gray levels with
colors, for a better
appreciation of the image
contrast and brightness.
This changes the grabbing
window displayed when you
click the SEM button in the
main toolbar (third from left).
Some options are SEMspecific and linked to the
technical configuration.
This new option is displayed only when
grabbing window type 1 is selected. It
allows you to let the system track the SEM
scanning speed automatically, or to do it
yourself by clicking the « Sync » button.
Orion 6 for Windows
22
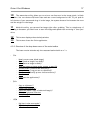
5.1.1 Grab in slow scan, must SYNC with SEM speed
Click the following icon in the main toolbar to display the slow scan grabbing window:
The image sizes available
for grabbing are displayed
here (up to 8 per scan
speed). Click on the tabs
below to select.
Displays the current
SEM visual scanning
speed (after clocking
the “Sync” button)
Click here to
start grabbing
(only when system
is « SYNC »ed!
Selects the grabbing method (direct,
slow- or fast averaging, or frame
integration (from 2 to 256 frames)
Click here to first
synchronize the Orion board
with the SEM scanning speed.
This selects the set of max. 8
image sizes to grab.
The same window is displayed below, when the “AutoSync” feature is enabled. In this
case, the Orion system detects any visual speed change and updates the useable grabbing
formats on the left. To activate/deactivate the “AutoSync” feature, go in the main toolbar
to Options / Preferences /Miscellaneous. Select the second page called Grabbing. Select
Slow scan grabbing window type 1 and select the automatic sync method (refer to the
previous chapter for the corresponding screen dump).
Orion 6 for Windows
23
This window displays the image formats that are currently available for the current
scanning speed. In the first version, clicking the “SYNC” button checks the SEM speed.
When this button is pressed, the SEM scanning speed is measured and compared with the
contents of the driver file.
If the current speed was programmed in the SEM driver, then the available image
sizes for this speed will be displayed on the left and the line time displayed in a green area.
Selected the appropriate image size in the left list.
If the scanning speed was not set up, « no sync! » is displayed in a red area.
Other parameters have to be set before grabbing. They are:
• the video input used for grabbing this selection is useful only when the 2 inputs are wired
to the SEM. The default is input number 1.
• the grabbing method used: direct refresh, slow- and fast averaging, or frame integration.
If the area is green, click « OK » to start grabbing.
The grabbing process first creates a blank window on screen, then synchronizes with
the SEM scanning, and fills the displayed window with the live SEM image.
Orion 6 for Windows
24
5.1.3. Grabbing in photo (record) modes
First make any necessary adjustment on the SEM in order to get a correct image
(contrast, brightness, astigmatism ...). In particular, adjust brightness and contrast as for
taking a photo (the Orion card sensitivity should have been adjusted to be the same as your
photo device).
Click the fourth icon from the left in the main toolbar to display the photo mode
grabbing window (please refer to par. 4.2 to locate it). The following window will then either
be displayed or activated if iconized (the example below is valid for JEOLs 6300, 6400 and
6340 SEMs):
This window displays the image formats that are available for grabbing in the PHOTO
modes. The SEM speed is not checked before grabbing, so it is your responsibility to select
an image size that matches the photo mode you will start at the SEM. A set of up to 8 image
sizes is available in the left list.
Select the appropriate image size and click « OK » to start grabbing.
The grabbing process first creates a blank window on screen, then synchronizes with
the SEM scanning, and fills the displayed window with the live SEM image. Wait for
initialization process to finish (you get a black rectangle in the grabbing window) then push
the “photo” button on your SEM.
Orion 6 for Windows
25
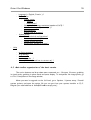
5.1.4 Commands available during grabbing
5.1.4.1. In visual modes only
The Orion uses full mouse control and displays specific menus for controlling the grabbing process. In
visual mode, the system displays this window:
Selects the frame acquisition method
(frame integration must be selected
before grabbing)
Activate / deactivate saturation
display in false colors
Aborts grabbing and trashes the
image
Stops grabbing, leave the image on
screen
Stops at the end of the current scan
Terminates current scan and
automatically enters the file save
utility. File name counter is
automatically updated.
Orion 6 for Windows
5.1.4.2. In record modes only
Like for the visual modes, the Orion system uses full mouse control and displays a specific menu for
controlling the grabbing process. In record mode, the system displays this window:
Activates / deactivates
display of white and
black in false colors
When checked, causes
the system to
automatically save the
image after grabbing
Stops grabbing
immediately and trashes
the image
Stops grabbing. The
image stays on screen.
26
Orion 6 for Windows
27
6. After grabbing …
The images are stored in PC RAM memory. Only one image is active at a time, and the
selected image is the active image that will be processed and its « name » is displayed in the
main Orion menu.
When you have many images opened at the same time, it becomes interesting either to
show them all on the screen or to reduce them all to icons, in order to clear the screen.
These commands are available from the main menu (see paragraph 2.2.2. above).
Many of the image functions can be accessed different ways: from the main dropdown menu, from the icons of the main toolbar, from the popup menu available in the image
window when you right-click with the mouse, or from the image drop—down menu.
6.1. How to get access to the available commands?
There are basically four ways to get access to the image commands:
•
•
•
•
from the main menu (drop down text menu)
from the icons in the main menu
by right-clicking in the image window with the mouse.
From the image drop-down menu.
The selected command will apply to the currently selected image, because clicking in
the window makes that image the selected (current) one. When you select a command from
the main menu, the target image is the one whose caption bar is highlighted.
Orion 6 for Windows
28
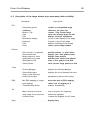
6.2. Description of the image window drop-down menu (when available)
Commands
Description
- File
- Interpolate pixels
- Calibrate
- Rotate / Flip
- Save
- Info
- Recalibrate display
- Duplicate
- Print
- Close
creates an interpolated image
calibrates the pixel size
rotates / flip current image
saves the selected image on disk
displays technical information
forces a clean display of the image
Creates a copy of the image
makes a hardcopy of the bitmap
closes current image window
-
Edit contrast / brightness
Show saturations
Reset palette to linear
Apply palette to pixels
Open palette file
Savve palette
modifies palette or pixel values
displays red / blue palette limits
displays linear palette
modifies pixel values from palette
loads a color palette from disk
saves current image palette to disk
-
Overlay Manager
Show Calibrations
Show / Hide Overlays
Delete all overlays
displays the Overlay Manager
displays the list of known pixel sizes
- Palette
- Tools
- EDX
permanently removes all overlays
- Mix EDX mapping w/ image
- pack mapping
- Threshold dots levels
mixes the with an EDX mapping
reduce size of mapping by 2
makes a thresholding
- Mark reference location
- Align image from reference
- Combine views
sets a ref point for alignment
makes the alignment
creates the anaglyph from 2 views
- 3D
- Help . . . . . . . . . . . . . . . . . . . . . . . . . . . . . . . . . .
Displays help
Orion 6 for Windows
29
6.3. Let’s save the image on disk !
The image save function can be called the four following ways:
• by clicking the corresponding icon in the main menu
• by selecting the File | Save command in the main menu
• by right-clicking with the mouse in the image window and selecting the File |
Save command ( see paragraph 4.2. here above )
• by using the SelectFolder / SaveImage macro commands
There are a number of available formats for saving the image on disk. Select the right
format in relation with your future image use: .TIFF / .BMP for general use, .JPG or .CMP for
archiving with compression, SUN raster format when the image needs to be transferred to a
SUN SPARC workstation ...
The supported formats are:
1. LEAD .CMP compress format. It delivers a much smaller file size and better image
quality than other compression techniques, including JPEG.
2. JFIF (JPEG File Interchange Format with full color spacing (YUV 4:4:4)
3. JFIF (JPEG File Interchange Format with YUV 4:2:2 color spacing, to produce a
smaller JFIF file
4. JFIF (JPEG File Interchange Format with YUV 4:1:1 color spacing, to produce the
smallest JFIF file
5. JTIF (JPEG Tagged Interchange Format with full color spacing (YUV 4:4:4)
6. JFIF (JPEG Tagged Interchange Format with YUV 4:2:2 color spacing, to produce a
smaller JTIF file
7. JFIF (JPEG Tagged Interchange Format with YUV 4:1:1 color spacing, to produce
the smallest JTIF file
8. TrueVision TGA (Targa), uncompressed format created by TrueVision Inc.
9. TIFF. This is a tag-based field format designed to promote universal interchange
of digital image data.
10.Windows Bitmaps (BMP). This is a file format created for Microsoft Windows.
Some BMP images are compressed with an RLE type compression.
11. SUN Raster. Created and used by SUN on the workstations.
Orion 6 for Windows
30
6.4. Transfer it to another application through the clipboard ...
It is often very useful to transfer an image between applications. There are four ways
to copy the image to the clipboard:
1.
2.
3.
4.
by
by
by
by
right-clicking in the image window and selecting File | Copy to clipboard
selecting Edit | Copy to clipboard in the main menu
clicking the Copy button in the main toolbar
using the ToClipboard macro command
After execution of the command, the file becomes available in the Windows clipboard
to any other application that accepts images.
Note
In some situations, it is necessary to consider the image size .For example a 2048 x
2048 pixels image takes 4 Mbytes and it can require some time to copy to the clipboard and
load it in Microsoft Word 6 or any other word processing package. Such a density of pixels is
not necessary in this case. It can slow the system down.
6.5. Changing the default image size on screen after acquisition
By default the Orion software uses a fixed ratio between the bitmap size and your
desktop resolution, in order to avoid aliaising effects and visual artefacts.
You can change this by going to Settings / Preferences / Miscellaneous. Select the
“After Acquisition” page.
For example, choosing … 50% will cause the largest border of the window (either
horizontal or vertical) to be 50% of the (width or height of) the desktop.
Orion 6 for Windows
31
7. How to contact us ?
We are at your disposal for more information on sales and support:
E.L.I. sprl - sales services
Rue Gaston Dancot, 55
B 5310 Eghezee - Belgium
Tel: (32) 81 512008 - Fax: (32) 71 302 312 - Email: [email protected]
E.L.I. sprl - technical services
Rue du Vieux Château, 17
B – 6567 - Labuissière - Belgium
Tel: (32) 71 30 98 17 - Fax: (32) 71 302 312 - Email: [email protected]
Visit our WEB site
http://www.OrionMicroscopy.com