1
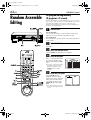
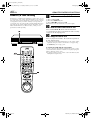
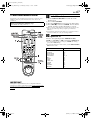
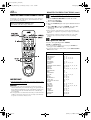
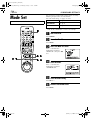
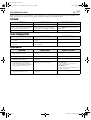
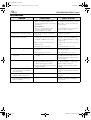
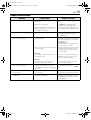
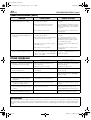
Filename [VS30U_3-EN.fm]
Masterpage:Right-NoTitle0
VS30U_3-EN.fm Page 63 Thursday, January 31, 2002 3:40 PM
EN
A Make connections.
Connect the player’s VIDEO OUT or S-VIDEO OUT and
AUDIO OUT connectors to your VCR’s VIDEO or
S-VIDEO and AUDIO input connectors.
B Set the VCR’s input mode.
Press AUX (number key “0”) and/or CH +/– to select
“F-1” (or “L-1” if you use the connectors on the rear).
● When using S VIDEO connector, set “FRONT AUX INPUT” (or
“REAR AUX INPUT” if you use the connectors on the rear) to
“S-VIDEO”. (墌 pg. 71, 73)
● When using VIDEO connector, set “FRONT AUX INPUT” (or
“REAR AUX INPUT”) to “VIDEO”. (墌 pg. 71, 73)
C Select the recording deck.
Press S-VHS or DV.
● When using the DV deck as the recording deck, press
so
that the video and audio signals from the VIDEO/S-VIDEO and
AUDIO L + R input connectors can be recorded. The dubbing
direction indicator (
S-VHS) lights.
D Prepare the recording cassette.
For the VHS deck
Load the recording cassette into the VHS deck, and play
it back to determine the edit-out point (the end of the
segment to be replaced) using the ADVANCED JOG dial,
or pressing w e and PAUSE (9).
Then press C.RESET to reset the counter.
For the DV deck
Load the recording cassette into the DV deck.
E Locate the start point.
Determine the edit-in point (the beginning of the segment
to be replaced) using the ADVANCED JOG dial, or
pressing w e and PAUSE (9).
● Be sure to engage the Still mode at the edit-in point.
F Engage the Insert Editing mode.
Press INSERT.
● Your VCR enters the Insert Pause mode. (“o”, “u” and “i”
light up on the front display panel.)
● The TV screen changes from the still picture to the input
source you are going to record.
Page 63
63
G Start Editing.
Load the source cassette and play back the segment that
is to be inserted. When you reach the start of the section
of the source tape that you wish to insert, press PLAY (4)
to start the tape in your VCR; Insert Editing begins at this
point.
● “o” and “u” are displayed on the front display panel.
H End Insert Editing.
For the VHS deck
At counter “0:00:00”, Insert Editing will stop
automatically while the tape continues running in the
Play mode. If you wish to stop Insert Editing before the
specified edit-out point, press C.RESET.
For the DV deck
Press STOP (8) to stop recording on the DV deck.
AV Insert Editing (VHS deck only)
If you want to replace the picture, Hi-Fi audio soundtrack
and normal audio soundtrack all at the same time ...
... In step 6, after you press INSERT, press A.DUB also.
(“o” and “u” blink and “i” lights up on the front display
panel.)
NOTES:
● Once the Insert Editing starts, you can not use the other deck.
● All necessary cables can be obtained from your dealer.
● Insert Editing cannot be performed on a VHS (or S-VHS)
cassette that has had its record safety tab removed, or on a
Mini DV cassette that has had its erase protection switch set to
“SAVE”.
● When Insert Editing is performed on a tape that has been
recorded on another VCR, the inserted portion may appear
distorted.
● In Insert Editing, the recording speed (SP/EP) is determined by
the previous recording to be replaced. If the previous
recording’s speed changes within a single edit, the inserted
picture will be distorted at the switching point. (VHS deck
only)
● A small portion of the recording which precedes an insert edit
may become erased.
● Insert Editing is also possible using the rear panel connectors.
When using these connectors, be sure to set “REAR AUX
INPUT” to the appropriate mode. (墌 pg. 71)
● Insert Editing is not possible using the DV IN/OUT connector.
● Insert Editing is not possible on a blank portion of the tape.
January 31, 2002 3:40 pm
Filename [VS30U_3-EN.fm]
Masterpage:Left
VS30U_3-EN.fm Page 64 Saturday, February 23, 2002 6:02 PM
64 EN
EDITING (cont.)
Random Assemble
Editing
64-program Editing Memory
(8 programs x 8 scenes)
By using the Random Assemble Editing function, you can select
up to 8 scenes from a previously recorded Mini DV cassette and
automatically dub them onto a VHS (or S-VHS) cassette.
Random Assemble Editing is possible only when dubbing from
the DV deck to the VHS deck.
A Load cassettes.
For the VHS deck
Insert a VHS (or S-VHS) cassette with the record safety
tab intact, or cover the hole using adhesive tape.
1
3
2
For the DV deck
Insert a Mini DV cassette with the erase protection switch
set to “SAVE”.
B Select the DV deck.
Press DV.
C Access the R.A.Edit screen.
Press R.A.EDIT. The R.A.Edit screen appears.
T
D Select the program.
W
1
2
3
4
5
6
7
8
9
2
0
1
4
DV
3
S-VHS
Press rt to move the arrow
to select one program you
want to edit, then press OK
or e.
● To remove a program from the
R.A.EDIT screen, select the
program number, then press
CANCEL for more than 2
seconds.
E Locate the start point.
Press PLAY (4) to start
playback. Find the edit-in
point on the source tape from
where you want the edited
scene to begin by pressing
PAUSE (9), then press IN/
OUT.
● The edit-in point is registered
in memory and appears on the
screen.
Page 64
February 23, 2002 6:01 pm
Filename [VS30U_3-EN.fm]
Masterpage:Right-NoTitle0
VS30U_3-EN.fm Page 65 Thursday, January 31, 2002 3:40 PM
EN
F
Locate the end point.
Press PLAY (4) to start
playback. Find the edit-out
point where you want the
edited scene to end by
pressing PAUSE (9), then
press IN/OUT.
● The edit-out point is registered
in memory and appears on the
screen.
● The total time of the edited
scenes is displayed to the right
of “TOTAL”.
● Repeat steps 5 and 6 for each
additional scene.
G Prepare the source tape.
Rewind the tape in the DV deck to the beginning of the
scene you want to edit.
H Prepare the VHS deck for dubbing.
A Press S-VHS.
B Search for the point where you want to start dubbing
by pressing PLAY (4), FF (5) or REW (3) then
press STOP (8).
C Press REC (7), then the VHS deck enters the Record
Pause mode.
65
To Make Corrections ...
... in step 5 or 6, you can cancel registered in and out points by
pressing CANCEL. Each time you press, the preceding point is
erased.
● If, for example, you have registered 5 sets of in and out points
and want to reset the first set, you have to press CANCEL until
all points after the first set have been erased. Reenter them
after you have repaired the first set of points.
NOTES:
● When Random Assemble Editing does not work, press
,
then perform Random Assemble Editing again.
● To cancel the registered scene, press CANCEL. Each time
CANCEL is pressed, the latest registered scene is erased.
● When the source tape has more than 2 identical time codes
(墌 pg. 41), the VCR may not find the edit-in point you set and
a malfunction may occur.
● When choosing a scene, set edit-in and edit-out points so that
there's a relatively large difference between them.
● If the search time for an in-point exceeds 5 minutes, the VHS
deck's Record-Pause mode will be cancelled and editing will
not take place.
● If there are blank portions before or after the edit-in and editout points, a blue-backed screen may be included in the
edited version.
● Since time codes register time only as accurately as seconds,
the time code total time may not match the total program time
exactly.
● To use Random Assemble Editing consecutively for two or
more programs, press START for each program.
When dubbing from another Mini DV cassette, change the
Mini DV cassette first, and then press START.
I Start Random Assemble Editing.
Press START (or OK).
● Automatic editing begins; all the specified scenes are copied
to the VHS deck in the order they were registered.
● The on-screen display remains while your VCR searches for
each scene (blinking cursor indicates scene currently being
searched for), but disappears during actual editing.
● During scene search, the VHS deck automatically enters its
Record-Standby mode.
● When all registered scenes have been edited, the DV deck
enters the Pause mode, the VHS deck enters its Record Pause
mode, and “– : – – : – –” blinks at the next available number.
J End Random Assemble Editing.
Press R.A.EDIT twice to return to the normal screen.
Press STOP (8) to stop the VHS deck’s Record Pause
mode.
Press DV, then press STOP (8) to stop the DV deck’s Pause
mode.
Page 65
January 31, 2002 3:40 pm
Filename [VS30U_3-EN.fm]
Masterpage:Left
VS30U_3-EN.fm Page 66 Saturday, February 23, 2002 6:02 PM
66 EN
REMOTE CONTROL FUNCTIONS
Remote A/B Code Switching
This Remote is capable of transmitting two control codes; one set
to respond to A code control signals and another set to respond
to B code control signals. This Remote control is preset to send A
code signals because your VCR is initially set to respond to A
code signals. You can easily modify your VCR and the Remote to
respond to B code signals. When using two JVC VCRs, set two
VCRs and their Remotes to different codes, so that you can
operate these VCRs separately.
A Set the remote control code for Remote.
A Press and hold A/B.
B Press the number key “2”.
C Press STOP (8), and release A/B.
● The Remote now can transmit B code control signals.
B Check the remote control code for VCR.
Press and hold PLAY (4) on the VCR for more than
5 seconds while the VCR is turned off. The code currently
set appears on the display panel.
C Change the code for VCR.
Press any key on the Remote. The VCR now responds to
B code control signals.
1
3
2
● To set the Remote and the VCR back to A code control signals,
repeat the same procedure as shown above except pressing
the number key “1” in step B of 1.
To control two VCRs with the same Remote
T
You can control two JVC VCRs by switching the remote control
code for the Remote between A and B (墌 step 1), keeping two
VCRs to different control codes.
● To change only the remote control code for the Remote, DO
NOT perform steps 2 and 3.
W
1
2
3
4
5
6
7
8
9
2
0
1
4
DV
S-VHS
3
Page 66
February 23, 2002 6:02 pm
Filename [VS30U_3-EN.fm]
Masterpage:Right-NoTitle0
VS30U_3-EN.fm Page 67 Thursday, January 31, 2002 3:40 PM
EN
TV Multi-Brand Remote Control
Your Remote can operate the basic functions of your TV set. In
addition to JVC TVs, other manufacturer’s TVs can also be
controlled.
Before performing the following steps:
Turn ON the TV using its Remote.
67
A Set the TV brand code.
A Set the VCR/TV/CABLE/DBS switch on the VCR's
Remote to TV.
B Press and hold POWER.
C Press the number keys to enter your TV’s brand code.
D Press STOP (8), and release POWER. The TV should
turn off. If it does, try other operation (墌 step 2).
● Once you have set the Remote to operate the TV, you do not
have to repeat this step until you replace your Remote’s
batteries.
● Some brands of TV have more than one code. If the TV does
not function with one code, try entering another.
T
B Operate the TV.
W
1
2
3
4
5
6
7
8
9
2
0
1
4
DV
S-VHS
3
Press the corresponding button: POWER, TV/VCR,
TV CH +/–, TV VOL+/–, ^ (TV Muting), number keys.
● For some brands of TV, you must press ENTER after having
pressed the number keys.
● To return the Remote to VCR control, Set the VCR/TV/CABLE/
DBS switch to VCR.
BRAND NAME
CODE
JVC
HITACHI
MAGNAVOX
MITSUBISHI
PANASONIC
RCA
SHARP
SONY
SAMSUNG
SANYO
SEARS
TOSHIBA
ZENITH
01, 03
10
02
03
04, 11
05
06
07
12
13
13
08
09
IMPORTANT
Although the supplied Remote unit is compatible with JVC
televisions, as well as many other models, it may not work with
your TV, or in some instances, may have limited function
capability.
Page 67
January 31, 2002 3:40 pm
Filename [VS30U_3-EN.fm]
Masterpage:Left
VS30U_3-EN.fm Page 68 Thursday, January 31, 2002 3:40 PM
68 EN
REMOTE CONTROL FUNCTIONS (cont.)
Cable Box Multi-Brand Remote Control
Your Remote can operate the basic functions of your cable box
set. In addition to JVC cable boxes, other manufacturer’s cable
boxes can also be controlled.
Before performing the following steps:
Turn ON the cable box using its Remote.
A Set the Cable Box brand code.
A Set the VCR/TV/CABLE/DBS switch on the VCR's
Remote to CABLE/DBS.
B Press and hold POWER.
C Press the number keys to enter your cable box’s brand
code.
D Press STOP (8), and release POWER. The cable box
should turn off. If it does, try other operations
(墌 step 2).
● Once you have set the Remote to operate the cable box, you
do not have to repeat this step until you replace your Remote’s
batteries.
● Some brands of cable box have more than one code. If the
cable box does not function with one code, try entering
another.
T
W
1
2
3
4
5
6
7
8
9
2
0
1
4
DV
IMPORTANT
It may not work with your cable box, or in some instances, may
have limited function capability.
● You must set the cable box brand for your Remote and the
cable box brand for your Controller (墌 pg. 21) separately. The
list of cable box brands that can be controlled by your Remote
is different from the list of brands that can be controlled by
your controller.
● It's not possible to set the Remote for both your cable box and
a DBS receiver at the same time. You can only set the Remote
to operate one of these units at a time.
Page 68
Press the corresponding button: POWER,
TV CH +/–, number keys.
● For some brands of cable box, you must press ENTER after
having pressed the number keys.
● To return the Remote to VCR control, Set the VCR/TV/CABLE/
DBS switch to VCR.
S-VHS
3
NOTES:
B Operate the Cable Box.
BRAND NAME
CODE
ARCHER
CABLETENNA
CABLEVIEW
CITIZEN
CURTIS
DIAMOND
GC BRAND
GEMINI
GENERAL INSTRUMENTS
HAMLIN
JASCO
JERROLD
NOVAVISION
OAK
PANASONIC
PULSER
RCA
REGAL
REMBRANDT
SAMSUNG
SCIENTIFIC ATLANTA
SIGMA
SL MARX
SPRUCER
STARGATE
TELEVIEW
TOCOM
UNIKA
UNIVERSAL
VIDEOWAY
ZENITH
01, 05, 17
01, 17
15, 16, 17, 21, 25
15, 16, 17, 21, 25
02
01, 17
15, 16, 17, 21, 25
15
01, 04, 06, 11, 12, 15, 28
10, 18, 23
15
01, 04, 06, 11, 12, 15, 28
02
07
13, 14
15, 16, 17, 21, 25
13, 14
10, 18, 23
01, 16, 17
05, 16, 24
02
07
05, 16, 17, 24, 25
13, 14
05, 15, 16, 17, 21, 24, 25
05, 16, 24
01, 04, 16
01, 17
16, 17, 25
03, 09, 22
03, 09, 22
January 31, 2002 3:40 pm
Filename [VS30U_3-EN.fm]
Masterpage:Right-NoTitle0
VS30U_3-EN.fm Page 69 Thursday, January 31, 2002 3:40 PM
EN
DBS Receiver Multi-Brand Remote
Control
Your Remote can operate the basic functions of your DBS (Direct
Broadcast Satellite) receiver set. In addition to JVC DBS
receivers, other manufacturer’s DBS receivers can also be
controlled.
Before performing the following steps:
Turn ON the DBS receiver using its Remote.
69
A Set the DBS receiver brand code.
A Set the VCR/TV/CABLE/DBS switch on the VCR's
Remote to CABLE/DBS.
B Press and hold POWER.
C Press the number keys to enter your DBS receiver’s
brand code.
D Press STOP (8), and release POWER. The DBS
receiver should turn off. If it does, try other operations
(墌 step 2).
● Once you have set the Remote to operate the DBS receiver,
you do not have to repeat this step until you replace your
Remote’s batteries.
● Some brands of DBS receiver have more than one code. If the
DBS receiver does not function with one code, try entering
another.
T
B Operate the DBS receiver.
W
1
2
3
4
5
6
7
8
9
2
0
1
4
DV
S-VHS
Press the corresponding button: POWER,
TV CH +/–, number keys.
● For some brands of DBS receiver, you must press ENTER after
having pressed the number keys.
● To return the Remote to VCR control, Set the VCR/TV/CABLE/
DBS switch to VCR.
BRAND NAME
CODE
JVC (DISH Network)
ECHOSTAR (DISH Network)
SONY (DSS)
RCA (DSS)
51
51
41
40
NOTES:
3
● You must set the DBS receiver brand for your Remote and the
DBS receiver brand for your Controller (墌 pg. 24) separately.
● It's not possible to operate a DBS receiver that is not equipped
with a remote control sensor.
● It's not possible to set the Remote for both your DBS receiver
and a cable box at the same time. You can only set the Remote
to operate one of these units at a time.
IMPORTANT
Although the supplied Remote unit is compatible with JVC DBS
receivers, as well as many other models, it may not work with
your DBS receiver, or in some instances, may have limited
function capability.
Page 69
January 31, 2002 3:40 pm
Filename [VS30U_4-EN.fm]
Masterpage:Left
VS30U_4-EN.fm Page 70 Thursday, January 31, 2002 3:45 PM
70 EN
SUBSIDIARY SETTINGS
You can change various mode settings on TV screen by
following the procedure described below.
For each mode setting, see pages 71 to 76.
Mode Set
Turn on the TV and select the AV mode.
MODE SET
墌 pg. 71
VHS MODE SET
墌 pg. 72
DV MODE SET
墌 pg. 76
● The procedure shows how to set “SUPERIMPOSE” to
“ON” on the “MODE SET” screen as an example.
T
W
1
2
3
4
5
6
7
8
9
2
0
4
A Turn on the VCR.
Press POWER.
B Access the Main Menu screen.
Press MENU.
1
DV
S-VHS
C Access the Mode Set screen.
Press rt to move the
highlight bar (arrow) to
“MODE SET”, then press OK
or e.
3
D Select the mode.
Press rt to move the
highlight bar (arrow) to
“SUPERIMPOSE”.
E Select the mode setting.
Press OK or e.
F Return to the normal screen.
Press MENU.
Page 70
January 31, 2002 3:45 pm
Filename [VS30U_4-EN.fm]
VS30U_4-EN.fm Page 71 Thursday, January 31, 2002 3:45 PM
Masterpage:Right-Full-NoTitle0
EN
MODE SET
8 REAR AUX INPUT
VIDEO
S-VIDEO
8 2ND AUDIO RECORD
ON
OFF
71
* The default setting is bold in the table below.
Select the appropriate mode depending on the connector being used on the rear
panel.
To use the VIDEO input connector on the rear panel.
VIDEO:
To use the S-VIDEO input connector on the rear panel.
S-VIDEO:
● When this function is set to “ON”;
If a SAP program is received, the SAP audio is recorded on both the normal and HiFi tracks. The main audio is not recorded.
If a non-SAP program is received, the main audio is recorded on both the Hi-Fi and
normal tracks.
● When this function is set to “OFF”, the SAP audio cannot be recorded.
NOTES:
When the channel is changed on the VCR;
● The “STEREO” indicator appears on the screen for about 5 seconds if the program is a
stereo broadcast.
● The “SAP” indicator appears on the screen for about 5 seconds if the program is a SAP
broadcast.
● Both indicators appear when a stereo program is accompanied by SAP sound.
8 AUTO TIMER
ON
OFF
When this function is set to “ON”, the timer is automatically engaged when the
VCR power is turned off, and automatically disengaged when the VCR is powered
back on.
NOTE:
For safety, when “AUTO TIMER” is set to “OFF”, all other VCR functions are disabled while
the Timer mode is engaged. To disengage the timer, press TIMER.
8 SUPERIMPOSE
ON
OFF
When this function is set to “ON”, various operational indicators appear on the TV
screen. Messages appear in the selected language (墌 pg. 15).
NOTES:
● When you use this VCR as the source player for editing, be sure to set “SUPERIMPOSE” to
“OFF” before starting.
● During playback, the operation mode indicators may be disturbed depending on the type
of tape being used.
Page 71
January 31, 2002 3:45 pm
Filename [VS30U_4-EN.fm]
Masterpage:Left-FullCol
VS30U_4-EN.fm Page 72 Thursday, January 31, 2002 3:45 PM
72 EN
SUBSIDIARY SETTINGS (cont.)
VHS MODE SET
8 S-VHS ET
ON
OFF
* The default setting is bold in the table below.
You can record on VHS cassettes with S-VHS picture quality. Tapes recorded using
this function can be played back on a VCR equipped with the S-VHS ET function.
When this function is set to “ON”, the S-VHS indicator lights up on the front
display panel.
NOTES:
● You can activate the S-VHS ET function only before you start recording on a VHS cassette.
● Before recording, make sure that “VIDEO CALIBRATION” is set to “ON”. (墌 pg. 73)
● You cannot activate the S-VHS ET function ...
... while recording is in progress.
... while timer-recording or Instant Timer Recording (墌 pg. 32) is in progress.
... while Video Calibration (墌 pg. 35) is in progress.
● The S-VHS ET function does not work with S-VHS cassettes.
● To keep the highest quality recording and playback pictures over a long period of time,
S-VHS recording on S-VHS cassettes is recommended.
● Use of high grade tapes is recommended for S-VHS ET recordings. On some tapes, picture
quality will not improve even if the S-VHS ET function is used. Check the recording quality
before you start important recordings.
● You can play back a tape recorded using the S-VHS ET function on most of S-VHS VCRs and
of VHS VCRs equipped with SQPB (S-VHS QUASI PLAYBACK) function. (Notice some
VCRs are not compatible with the S-VHS ET function.)
● While playing back a tape recorded using the S-VHS ET function on some VCRs, noise may
appear. (If playback picture becomes blurred or interrupted, use a cleaning cassette.)
● In the high-speed search, still, slow-motion or frame-by-frame playback modes (墌 pg. 28),
noise may appear. If these modes are performed frequently on a tape recorded using the
S-VHS ET function, the tape may be damaged and the picture may be deteriorated.
8 S-VHS MODE
ON
OFF
Your VCR can record in S-VHS (Super VHS), S-VHS ET or VHS.
● To record in S-VHS:
Set “S-VHS MODE” to “ON”. Then, insert a cassette marked “S-VHS”. The S-VHS
indicator lights up on the front display panel.
The S-VHS recording mode is selected.
● To record in S-VHS ET on a VHS cassette:
Set “S-VHS ET” to “ON”. (墌 See above.) Then, insert a cassette marked “VHS”.
The S-VHS indicator lights up on the front display panel.
● To record in VHS:
Insert a cassette marked “VHS”.
Set “S-VHS ET” to “OFF”. (墌 See above.)
● To record in VHS on an S-VHS cassette:
Insert a cassette marked “S-VHS”. The S-VHS indicator lights up on the front
display panel. Then, set “S-VHS MODE” to “OFF”. The S-VHS indicator goes off.
The VHS recording mode is selected.
NOTE:
When playing back a tape that has been recorded in S-VHS or S-VHS ET, the S-VHS indicator
lights up on the front display panel regardless of the “S-VHS MODE” setting.
Page 72
January 31, 2002 3:45 pm
Filename [VS30U_4-EN.fm]
VS30U_4-EN.fm Page 73 Thursday, January 31, 2002 3:45 PM
Masterpage:Right-Full-NoTitle0
EN
VHS MODE SET (cont.)
8 VIDEO CALIBRATION
ON
OFF
8 PICTURE CONTROL
AUTO
EDIT
SOFT
SHARP
73
* The default setting is bold in the table below.
When this function is set to “ON”, this VCR checks the condition of the tape in use
during playback and recording, and compensates to provide the highest-possible
pictures. This takes place whenever you play back a tape or start recording after
inserting a tape. (墌 pg. 35)
This feature helps you to adjust the playback picture quality according to your
preference. Normally select “AUTO”.
Provides the optimized picture benefits of the VIDEO
AUTO:
CALIBRATION Picture System.
Minimizes picture degradation during editing (recording and
EDIT:
playback).
Reduces image coarseness when viewing overplayed tapes
SOFT:
containing a lot of noise.
Clearer, sharper-edged picture when viewing images with lots of
SHARP:
flat, same-coloured surfaces such as cartoons.
NOTES:
● When you select “EDIT”, “SOFT” or “SHARP”, the selected mode will not change until you
select another mode.
● When you select “EDIT” to dub tapes, be sure to select “AUTO” after you finish dubbing
the tapes.
● When “VIDEO CALIBRATION” is “OFF”, “PICTURE CONTROL” switches automatically
from “AUTO” to “NORM”.
8 FRONT AUX INPUT
VIDEO
S-VIDEO
Page 73
Select the appropriate mode depending on the connector being used on the front
panel.
To use the VIDEO input connector on the front panel.
VIDEO:
To use the S-VIDEO input connector on the front panel.
S-VIDEO:
January 31, 2002 3:45 pm
Filename [VS30U_4-EN.fm]
Masterpage:Left-FullCol
VS30U_4-EN.fm Page 74 Thursday, January 31, 2002 3:45 PM
74 EN
SUBSIDIARY SETTINGS (cont.)
VHS MODE SET (cont.)
8 AUTO SP]EP TIMER
ON
OFF
* The default setting is bold in the table below.
When this function is set to “ON”, the VCR automatically switches to EP mode to
allow complete recording if there is not enough tape to record the entire program
while timer-recording in SP mode.
For Example . . .
Recording a program of 140 minutes in length onto a 120-minute tape
Approximately 110 minutes
Approximately 30 minutes
SP mode
EP mode
Total 140 minutes
Make sure you set this function to “ON”, before the timer-recording starts.
NOTES:
● If you have programed the VCR to timer-record 2 or more programs, the second program
and those thereafter may not fit on the tape if you set “AUTO SP]EP TIMER” to “ON”. In
this case, make sure the mode is not engaged, then set the tape speed manually during
timer programing.
● In order to ensure that the recording fits on the tape, this feature may leave a slight nonrecorded section at the end of the tape.
● There may be some noise and sound disturbance at the point on the tape where the VCR
switches from SP to EP mode.
● The Auto SP]EP Timer feature is not available during ITR (Instant Timer Recording), and
the feature will not work properly on the following tapes: T(ST)-30, T(ST)-60, T(ST)-90, and
T(ST)-120.
8 BLUE BACK
ON
OFF
When this function is set to “ON”, the TV screen becomes all blue when receiving
a channel not in use.
NOTE:
When you want to receive an unstable channel with poor signals, set this function to “OFF”.
8 DIGITAL TBC/NR
ON
OFF
Your VCR is equipped with the Digital TBC (Time Base Corrector) that removes
jitter from fluctuating video signals to deliver a stable picture even with old tapes
and rental cassettes.
The on/off of Digital 3-DNR (Noise Reduction) which cuts noise and enables clear
picture reproduction is also linked to this function.
We recommend that you set “DIGITAL TBC/NR” to “ON” when ...
... playing back a tape recorded on a camcorder.
... playing back a tape repeatedly used.
... using this VCR as the source player for editing.
NOTES:
● If you play back a tape recorded under poor TV reception condition, the picture may
become more stable with Digital TBC/NR set to off.
● When “DIGITAL TBC/NR” is set to “ON”, if you play back a tape where certain types of
signals are recorded (using a PC or some character generators), the playback picture may
be distorted. If this is the case, set “DIGITAL TBC/NR” to “OFF”.
Page 74
January 31, 2002 3:45 pm
Filename [VS30U_4-EN.fm]
VS30U_4-EN.fm Page 75 Thursday, January 31, 2002 3:45 PM
Masterpage:Right-Full-NoTitle0
EN
VHS MODE SET (cont.)
8 VIDEO STABILIZER
ON
OFF
75
* The default setting is bold in the table below.
When this function is set to “ON”, you can automatically correct vertical vibration
in the picture when playing back unstable recordings made on another VCR.
NOTES:
● When you finish viewing a tape, be sure to set this function to “OFF”.
● Regardless of the setting, this function has no effect during recording and during special effects
playback.
● The on-screen display may jitter vertically when this function is set to “ON”.
● To watch recordings with close-caption, set this function to “OFF”.
● Video Stabilizer and Digital TBC/NR cannot be used at the same time. If you activate Digital
TBC/NR when “VIDEO STABILIZER” is set to “ON”, Video Stabilizer will be automatically
turned “OFF”.
8 DIGITAL R3
ON
OFF
When this function is set to “ON”, the Digital R3 picture system applies edge
correction to the luminance signal to enhance details.
NOTES:
● Normally it is recommended to keep “DIGITAL R3” set to “ON”.
● Depending on the type of tape being used, picture quality may be better with “DIGITAL
R3” set to “OFF”.
● If you use the VCR as the source player for editing, be sure to set “DIGITAL R3” to “OFF”
before starting.
8 AUDIO MONITOR
HI-FI
HI-FI L
HI-FI R
NORM
MIX
This VCR can record two sound tracks simultaneously (normal and Hi-Fi) on a Hi-Fi
stereo tape. You can select the sound track(s) to listen to while playing back a Hi-Fi
stereo tape. In addition, when playing back a prerecorded tape containing two
separate audio programs on the Hi-Fi tracks, you can choose either one by
selecting either “HI-FI L” or “HI-FI R”.
HI-FI:
HI-FI L:
HI-FI R:
NORM:
MIX:
Normally select this. Hi-Fi sound is played back.
Sound on the left Hi-Fi channel is played back.
Sound on the right Hi-Fi channel is played back.
Sound on the normal track is played back.
Both sounds on the Hi-Fi track and normal track are mixed and
played back.
NOTES:
● While playing back a monaural tape, sounds on the normal track will be heard regardless of
this setting.
● You can also use the A. MONITOR button on the Remote to select the desired monitor
sound. (墌 pg. 31)
Page 75
January 31, 2002 3:45 pm
Filename [VS30U_4-EN.fm]
VS30U_4-EN.fm Page 76 Friday, February 1, 2002 1:20 PM
76 EN
SUBSIDIARY SETTINGS (cont.)
DV MODE SET
8 SOUND MODE
12BIT
16BIT
8 12BIT MODE
SOUND1
SOUND2
FULL
Masterpage:Left-FullCol
* The default setting is bold in the table below.
Select the appropriate mode before recording on a Mini DV tape.
Enables Audio Dubbing later.
12BIT:
Audio Dubbing is impossible but the recorded sound quality is
16BIT:
higher than “12BIT”.
Select the appropriate mode when playing back an audio-dubbed Mini DV tape.
Original recorded sound
SOUND1:
Audio-dubbed sound
SOUND2:
Original recorded sound and Audio-dubbed sound
FULL:
NOTES:
● When “12BIT MODE” is set to “FULL”, both the main and sub audio will be audible.
● To select only the main audio or only the sub audio of bilingual tapes, set “12BIT MODE”
to “SOUND1”.
8 TIME CODE
ON
OFF
Page 76
When this function is set to “ON”, the time code always appears on the TV screen
while the DV deck is being selected.
When this function is set to “OFF”, the time code appears on the TV screen only by
pressing – –:– –. (墌 pg. 11, 41)
February 1, 2002 1:20 pm
Filename [VS30U_4-EN.fm]
Masterpage:Right
VS30U_4-EN.fm Page 77 Thursday, January 31, 2002 3:45 PM
EN
TROUBLESHOOTING
77
Before requesting service for a problem, use this chart and see if you can repair the trouble yourself. Small problems are
often easily corrected, and this can save you the trouble of sending your VCR off for repair.
POWER
SYMPTOM
POSSIBLE CAUSE
CORRECTIVE ACTION
1. No power is supplied to the VCR.
● The AC power cord is disconnected.
2. The clock is functioning properly, but
the VCR cannot be powered.
● “#” is displayed on the front display
Press the TIMER button to turn the “#”
panel with “AUTO TIMER” set to “OFF”. indicator off.
3. The Remote won’t function.
● The batteries are discharged.
Connect the AC power cord.
Replace the dead batteries with new ones.
TAPE TRANSPORT
SYMPTOM
POSSIBLE CAUSE
CORRECTIVE ACTION
1. The tape does not run during
recording.
● “i” is displayed on the front display
panel.
Press PLAY (4) to turn the “i” indicator
off.
2. The tape will not rewind or fastforward.
● The tape is already fully rewound or
fast-forwarded.
Check the cassette.
PLAYBACK
SYMPTOM
POSSIBLE CAUSE
CORRECTIVE ACTION
1. The playback picture does not appear
while the tape is running.
● The TV receiver is not set to the AV
mode.
2. Noise appears during visual search.
● This is normal.
3. Noise appears during normal
playback. (VHS deck only)
● The automatic tracking mode is
engaged.
Try manual tracking. (墌 pg. 31)
4. The playback picture is blurred or
interrupted while TV broadcasts are
clear or “USE CLEANING CASSETTE”
message appears on the screen.
● The video heads may be dirty.
For the VHS deck
Use a dry cleaning cassette TCL-2, or
consult your JVC dealer.
For the DV deck
Use a dry cleaning cassette M-DV12CL, or
consult your JVC dealer.
5. Breaks are noticeable in Hi-Fi
soundtrack. (VHS deck only)
● The automatic tracking mode is
engaged.
Try manual tracking. (墌 pg. 31)
Page 77
Set the TV to its AV mode.
January 31, 2002 3:45 pm
Filename [VS30U_4-EN.fm]
Masterpage:Left
VS30U_4-EN.fm Page 78 Saturday, February 23, 2002 6:03 PM
78 EN
TROUBLESHOOTING (cont.)
RECORDING
SYMPTOM
1. Recording cannot be started.
POSSIBLE CAUSE
CORRECTIVE ACTION
● For the VHS deck
There is no cassette loaded, or the
cassette loaded has had its record safety
tab removed.
Insert a VHS (or S-VHS) cassette, or using
adhesive tape, cover the hole where the
tab was removed.
● For the DV deck
There is no cassette loaded, or the
cassette loaded has had its erase
protection switch set to “SAVE”.
Insert a Mini DV cassette, or set the erase
protection switch set to “REC”.
2. TV broadcasts cannot be recorded.
● “L-1” or “F-1” has been selected as the
input mode.
Set to the desired channel.
3. Tape-to-tape editing using another
component is not possible.
● The components have been incorrectly
connected, or correct video connector
(S-VIDEO or VIDEO) is not selected.
Connect the components correctly
(墌 pg. 56 – 62) or check “REAR AUX
INPUT” or “FRONT AUX INPUT” setting.
(墌 pg. 71, 73)
● All necessary power switches have not
been turned on.
Confirm that all units’ power switches are
turned on.
● The input mode is not correct.
Set the input mode to “L-1” or “F-1”.
● The camcorder has not been properly
connected.
Confirm that the camcorder is properly
connected. (墌 pg. 56)
● The input mode is not correct.
Set the input mode to “L-1” or “F-1”.
5. “[” on the front display panel won’t
stop blinking.
● The end of the tape was reached during
recording.
The program may not have been recorded
in its entirety. Next time make sure you
have enough time on the tape to record
the entire program.
6. Audio dubbing is not possible.
For the DV deck
● “SOUND MODE” had been set to
“16BIT” at the original recording.
Set “SOUND MODE” to “12BIT” at the
original recording. (墌 pg. 76)
● The tape speed had been set to LP at the
original recording.
Set the tape speed to SP at the original
recording.
7. Monitoring the audio-dubbed sound is
not possible during audio dubbing
using the DV deck.
● This is normal.
Set “12BIT MODE” to “SOUND 2” or
monitor the sound using the connected
devices.
8. The programed memory of Random
Assemble Editing is disappeared.
● The memory backup time has expired.
Perform Random Assemble Editing again.
(墌 pg. 64)
9. When performing Normal Dubbing,
the beginning of the dubbing start
point is not dubbed.
● This is normal.
Locate the start point a little before the
point where you want to start dubbing.
(墌 pg. 54, 55)
4. Camcorder recording is not possible.
Page 78
February 23, 2002 6:03 pm
Filename [VS30U_4-EN.fm]
Masterpage:Right-NoTitle0
VS30U_4-EN.fm Page 79 Thursday, January 31, 2002 3:45 PM
EN
79
TIMER RECORDING
SYMPTOM
POSSIBLE CAUSE
CORRECTIVE ACTION
● The clock and/or the timer have been set
incorrectly.
Re-perform the clock and/or timer
settings.
● The timer is not engaged.
Press TIMER and confirm that “#” is
displayed on the front display panel.
● Timer recording may not work when the
VCR’s input mode is set to “F-1” for
recording on the DV deck.
Set the channel position other than “F-1”
before engaging to Timer-Standby mode.
2. Timer programing is not possible.
● Timer recording is in progress.
Timer programing can’t be performed
while a timer recording is in progress.
Wait until it finishes.
3. “#” and “[” on the front display
panel won’t stop blinking.
● The timer is engaged but there’s no
cassette loaded.
For the VHS deck
Insert a VHS (or S-VHS) cassette with the
record safety tab intact, or cover the hole
using adhesive tape.
For the DV deck
Insert a Mini DV cassette with the erase
protection switch set to “REC”.
● The end of the tape was reached during
timer recording.
The program may not have been recorded
in its entirety. Next time make sure you
have enough time on the tape to record
the entire program.
1. Timer recording won’t work.
● VHS deck
The loaded cassette has had its record
safety tab removed.
● DV deck
The loaded cassette has had its erase
protection switch set to “SAVE”.
Remove the cassette and cover the hole
with adhesive tape, or insert a cassette
with the record safety tab intact.
Remove the cassette and set the erase
protection switch to “REC”.
4. “#” blinks for 10 seconds and the
Timer mode is disengaged.
● TIMER has been pressed when there are
no programs in memory, or the timer
record information has been programed
incorrectly.
Check the programed data and reprogram as necessary, then press TIMER
again.
5. The VCR Plus+ system does not timerrecord properly.
● The VCR’s channel positions have been
set incorrectly.
Refer to “Guide Channel Number Set”
(墌 pg. 44) and re-perform the procedure.
6. The power shuts off and “[” won’t
stop blinking.
● The end of the tape was reached during
Instant Timer Recording.
The program may not have been recorded
in its entirety. Next time make sure you
have enough time on the tape to record
the entire program.
Page 79
January 31, 2002 3:45 pm
Filename [VS30U_4-EN.fm]
Masterpage:Left
VS30U_4-EN.fm Page 80 Thursday, January 31, 2002 3:45 PM
80 EN
TROUBLESHOOTING (cont.)
TIMER RECORDING (cont.)
SYMPTOM
7. Cable channels are not automatically
switched during timer recording.
8. Satellite channels are not
automatically switched during timer
recording.
9. Timer recording begins as scheduled,
but the channel is always incorrect.
POSSIBLE CAUSE
CORRECTIVE ACTION
● The Controller is not properly
connected to the VCR.
Connect the Controller correctly
(墌 pg. 20).
● The output channel selected in the
Cable Box Set screen is incorrect.
After confirming your cable box’s output
channel number, re-access the Cable Box
Set screen and select the correct number
(墌 pg. 21).
● The cable box is turned off.
Make sure the power is on before timer
recording starts.
● The Controller is not properly
connected to the VCR.
Connect the Controller correctly
(墌 pg. 23).
● The output channel selected in the DBS
Receiver Set screen is incorrect.
After confirming your DBS receiver’s
output channel number, re-access the
DBS Receiver Set screen and select the
correct number (墌 pg. 24).
● The VCR is not set correctly to control
the DBS receiver.
Set the correct DBS receiver brand code
(墌 pg. 24).
● The DBS receiver is turned off.
Make sure the power is on before timer
recording starts.
● Even though you do not use an external
cable box or DBS receiver, “CABLE BOX
SET” is set to “ON” or “DBS RECEIVER
SET” is set to “ON”.
Set “CABLE BOX SET” to “OFF”
(墌 pg. 21) or “DBS RECEIVER SET” is set
to “OFF” (墌 pg. 24).
POSSIBLE CAUSE
CORRECTIVE ACTION
OTHER PROBLEMS
SYMPTOM
● The camcorder’s microphone is too
close to the TV.
Position the camcorder so its microphone
is away from the TV.
● The TV’s volume is too high.
Turn the TV’s volume down.
2. When scanning channels, some of
them are skipped over.
● Those channels have been designated to
be skipped.
If you need the skipped channels, restore
them (墌 pg. 19).
3. The channel cannot be changed.
● Recording is in progress.
Press PAUSE (9) to pause the recording,
change channels, then press PLAY (4) to
resume recording.
4. Channel settings that were made
manually seem to have changed or
disappeared.
● After the manual settings were made,
Auto Channel Set was performed.
Perform manual setting again.
5. The Remote will not operate your TV
or cable box or DBS receiver.
● The brand codes are set incorrectly.
Reset the correct brand codes (墌 pg. 67,
68, or 69).
6. Even though Auto or Semiauto Clock
Set has been performed, the clock is
incorrect.
● The clock setting data received from the
host channel is incorrect.
Select a different host channel during
“Semiauto Clock Set” (墌 pg. 17), or
perform “Manual Clock Set” (墌 pg. 17).
1. Whistling or howling is heard from the
TV during camcorder recording.
7. No picture appears when you connect
a device to DV IN/OUT connector.
Turn off the VCR or the connected
appliance once, then turn it on again.
ATTENTION
This VCR contains microcomputers. External electronic noise or interference can cause microcomputer to malfunction. If the VCR
does not operate correctly switch its power off and unplug the AC power cord from the AC supply. Wait for a while and then plug
the power cord back in. Eject and check the condition of the cassette. If everything appears normal, you can operate the VCR as
usual.
Page 80
January 31, 2002 3:45 pm
Filename [VS30U_4-EN.fm]
Masterpage:Right
VS30U_4-EN.fm Page 81 Saturday, February 23, 2002 6:04 PM
EN
QUESTIONS AND ANSWERS
81
PLAYBACK
TIMER RECORDING
Q. What happens if the end of the tape is reached
during playback or search?
A. The tape is automatically rewound to the
beginning.
Q. “o” and “#” remain lit on the front display
panel. Is there a problem?
A. No. This is a normal condition for a timer
recording in progress.
Q. Can the VCR indefinitely remain in the Pause
mode?
A. No. It stops automatically after 5 minutes on the
VHS deck, 3 minutes on the DV deck to protect
the heads.
Q. Can I program the timer while I’m watching a
tape or a TV broadcast?
A. You won’t see the picture as it is replaced by the
on-screen menu, but the audio from the
program or tape you’re viewing can be heard.
Q. When returning from variable-speed search to
normal playback, the picture is disturbed.
Should I be concerned about this?
A. No, it is normal.
Q. Noise bar appear during variable-speed search.
What’s the problem?
A. This is normal.
Q. Sometimes, during Index Search, the VCR can’t
find the program I want to see. Why not?
A. There may be index codes too close together.
RECORDING
Q. When I pause and then resume a recording, the
end of the recording before the pause is
overlapped by the beginning of the
continuation of recording. Why does this
happen?
A. This is normal. It reduces distortion at the pause
and resume points.
Q. Can the VCR indefinitely remain in the RecordPause mode?
A. No. The VCR goes to its Stop mode
automatically after 5 minutes to protect the
heads.
Q. What happens if the tape runs out during
recording?
A. The VCR stops recording, and “[” on the front
display panel won’t stop blinking.
Page 81
February 23, 2002 6:04 pm
Filename [VS30U_4-EN.fm]
Masterpage:Left
VS30U_4-EN.fm Page 82 Thursday, January 31, 2002 3:45 PM
82 EN
SPECIFICATIONS
GENERAL
TUNER
Power requirement : AC 120 Vd, 60 Hz
Power consumption
Power on
: 35 W
Power off
: 4.4 W
Temperature
Operating
: 5°C to 40°C (41°F to 104°F)
Storage
: –20°C to 60°C (–4°F to140°F)
Operating position : Horizontal only
Dimensions (WxHxD)
: 435 mm x 106 mm x 380 mm
(17-³/16” x 4-³/16” x 15”)
Weight
: 5.1 kg
(11.2 lbs)
Input/Output
: RCA connectors:
IN x 2, OUT x 2
S-Video connectors:
IN x 2, OUT x 2
DV connector:
IN/OUT x 1 (4-pin, IEEE1394
conformity, digital input/output)
Tuning system
Channel coverage
VHF
UHF
CATV
VHS DECK VIDEO/AUDIO
Signal system
: NTSC-type color signal and EIA
monochrome signal, 525 lines/
60 fields
Recording system : DA4 (Double Azimuth) head helical
scan system
Format
: S-VHS/VHS NTSC standard
Signal-to-noise ratio: 45 dB
Horizontal resolution
: 230 lines (VHS)
400 lines (S-VHS)
Frequency range : 70 Hz to 10,000 Hz (Normal audio)
20 Hz to 20,000 Hz (Hi-Fi audio)
Maximum recording time
(SP)
: 210 min. with ST-210 video cassette
(EP)
: 630 min. with ST-210 video cassette
DV DECK VIDEO/AUDIO
Signal system
: NTSC-type colour signal, 525 lines
60 fields
Recording system : Digital Component Recording
Format
: DV format (SD mode)
Cassette
: Mini DV Cassette
Maximum recording time
(SP)
: 80 min. with M-DV80ME cassette
(LP)
: 120 min. with M-DV80ME cassette
Audio recording system
: PCM 48 kHz, 16 bit (2 ch)/
32 kHz, 12 bit (4 ch)
Page 82
: Frequency synthesized tuner
: Channels 2–13
: Channels 14–69
: 113 Channels
TIMER
Clock reference
Program capacity
: Quartz
: 1-year programmable timer/
6 programs each on the VHS and
DV deck
Memory backup time
: Approx. 10 min.
ACCESSORIES
Provided accessories
: RF cable (F-type),
BNC/RCA adapter x 2,
Audio/Video cable,
S-Video cable (4-pin),
Controller,
Infrared remote control unit,
“AA” battery x 2
Specifications shown are for SP mode unless otherwise specified.
E.& O.E. Design and specifications subject to change without
notice.
This equipment has been tested and found to comply with
the limits for a Class B digital device, pursuant to Part 15 of
the FCC Rules. These limits are designed to provide
reasonable protection against harmful interference in a
residential installation. This equipment generates, uses, and
can radiate radio frequency energy and, if not installed and
used in accordance with the instructions, may cause harmful
interference to radio communications. However, there is no
guarantee that interference will not occur in a particular
installation. If this equipment does cause harmful
interference to radio or television reception, which can be
determined by turning the equipment off and on, the user is
encouraged to try to correct the interference by one or more
of the following measures:
Reorient or relocate the receiving antenna.
Increase the separation between the equipment and
receiver.
Connect the equipment into an outlet on a circuit
different from that to which the receiver is connected.
Consult the dealer or an experienced radio/TV
technician for help.
January 31, 2002 3:45 pm
Filename [VS30U_1-ENIX.fm]
Masterpage:Right
VS30U_1-ENIX.fm Page 83 Saturday, February 23, 2002 6:05 PM
EN
INDEX
83
A
N
Active Video Calibration ........................................... 35
Advantages of S-VHS video recorders ............................ 59
Audio Dubbing ...................................................... 60
AUDIO MONITOR ................................................. 75
Auto Channel Set .................................................... 18
AUTO SP]EP TIMER .............................................. 74
AUTO TIMER ........................................................ 71
AV Insert Editing ..................................................... 63
Next Function Memory ....................................... 30, 40
Normal Dubbing (from DV to VHS) .............................. 54
Normal Dubbing (from VHS to DV) .............................. 55
B
BLUE BACK
.......................................................... 74
C
Cable box ............................................................. 20
Cable Box Control Setting ......................................... 20
Cable Box Multi-Brand Remote Control ......................... 68
Changing VCR Plus+ Setting ...................................... 44
Check, cancel and change programs ............................ 50
Clock Set .............................................................. 16
Controller ....................................................... 20, 23
®
D
DBS receiver ......................................................... 23
DBS Receiver Control Setting ..................................... 23
DBS Receiver Multi-Brand Remote Control .................... 69
DIGITAL R3 .......................................................... 75
DIGITAL TBC/NR ................................................... 74
E
EDITING .............................................................. 52
Elapsed Recording Time Indication .............................. 33
Express Timer Programming ....................................... 46
F
FRONT AUX INPUT
................................................ 73
G
Guide Channel Number Set
................................. 43, 44
H
High-Speed (Turbo) Search (On the Remote) ............. 29,
High-Speed (Turbo) Search (On the VCR) ................ 28,
39
38
I
Index Search ......................................................... 30
Insert Editing ......................................................... 62
Instant Timer Recording (ITR) ............................... 32, 41
ON-SCREEN DISPLAY (for DV deck) ............................ 11
ON-SCREEN DISPLAY (for VHS deck) ........................... 10
P
PICTURE CONTROL ................................................ 73
PLAYBACK/RECORDING ON DV DECK ....................... 36
PLAYBACK/RECORDING ON VHS DECK ...................... 26
Plug & Play Set ....................................................... 14
R
Random Assemble Editing ......................................... 64
REAR AUX INPUT ................................................... 71
Record One Program While Watching Another .......... 32, 41
Recording Resume Function ................................. 32, 41
Remote A/B Code Switching ....................................... 66
Repeat Playback ..................................................... 30
Retake ................................................................. 34
S
Second Audio Recording ..................................... 34, 41
Semiauto Clock Set .................................................. 17
Slow Motion (On the Remote) .............................. 29, 39
Slow Motion (On the VCR) .................................. 28, 38
SOUND MODE ...................................................... 76
Soundtrack Selection .......................................... 31, 40
Still Picture/Frame-By-Frame Playback (On the Remote) 29, 39
Still Picture/Frame-By-Frame Playback (On the VCR) ... 28, 38
SUPERIMPOSE ....................................................... 71
S-VHS ET .............................................................. 72
S-VHS MODE ........................................................ 72
T
Tape Dubbing (from DV to VHS) ................................. 52
Tape Dubbing (from VHS to DV) ................................. 53
Tape Position Indicator ............................................. 10
Tape Remaining Time .............................................. 33
Time Code ................................................ 11, 41, 76
TIMER RECORDING ................................................ 42
Timer Warning Display ....................................... 10, 11
Tuner Set .............................................................. 18
TV Multi-Brand Remote Control .................................. 67
V
L
Language
O
............................................................. 15
M
Manual Channel Set ................................................ 19
Manual Clock Set ................................................... 17
Manual Tracking .................................................... 31
Mode Set .............................................................. 70
Variable Speed Search (On the Remote) ................... 29, 39
Variable Speed Search (On the VCR) ...................... 28, 38
VCR Plus+ Timer Programing ..................................... 42
VIDEO CALIBLATION .............................................. 73
VIDEO STABILIZER ................................................. 75
®
W
When programs overlap each other
.............................. 51
12BIT MODE ......................................................... 76
24HR Quick Programing ........................................... 48
2ND AUDIO RECORD ............................................. 71
Page 83
February 23, 2002 6:05 pm
Filename [VS30U_Cov4-EN.fm]
VS30U_Cov4-EN.fm Page 84 Saturday, February 23, 2002 6:06 PM
EN
VCR TV CA
A/B
1
4
DBS
7
C. RESE
CANCEL
START
1
PROG
REW
REC
TV
VOL
Ð
ME N
Printed in Japan
0302MNV ID VP
* *
Page 84
February 23, 2002 6:06 pm