1
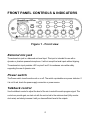
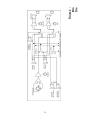
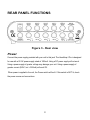
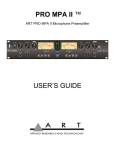
HeadAmp 4 Pro
Five Channel Headphone Amp with Listen and
Talkback
Project Series
User’s Manual
IMPORTANT SAFETY INSTRUCTIONS – READ FIRST
This symbol, wherever it appears,
alerts you to the presence of uninsulated
dangerous voltage inside the enclosure. Voltage
that may be sufficient to constitute a risk of shock.
This symbol, wherever it appears, alerts
you to important operating and maintenance
instructions in the accompanying literature.
Please read manual.
Read instructions:
Retain these safety and operating instructions for future reference. Heed all warnings printed here and on the equipment.
Follow the operating instructions printed in this user guide.
Do not open:
There are no user serviceable parts inside. Refer any service work to qualified technical personnel only.
Power sources:
Only connect the unit to mains power of the type marked on the rear panel.
Power cord:
Use the power cord with the mains plug appropriate for your local mains supply as provided with the equipment. If the provided
plug does not fit into your outlet consult your service agent. Route the power cord so that it is not likely to be walked on,
stretched or pinched by items placed upon or against.
Ventilation:
Do not position the unit where the air required for ventilation is impeded. If the unit is to be operated in a rack, case or other
furniture, ensure that it is constructed to allow adequate ventilation.
Moisture:
To reduce the risk of fire or electrical shock do not expose the unit to rain, moisture or use in damp or wet conditions. Do not
place a container of liquid on it, which may spill into any openings.
Heat:
Do not locate the unit in a place close to excessive heat or direct sunlight, as this could be a fire hazard. Locate the unit away
from any equipment, which produces heat such as: power supplies, power amplifiers and heaters.
Environment:
Protect from excessive dirt, dust, heat, and vibration when operating and storing. Avoid tobacco ash, drink spillage and smoke,
especially that associated with smoke machines.
Handling:
To prevent damage to the controls and cosmetics avoid rough handling and excessive vibration. Protect the controls from
damage during transit. Use adequate padding if you need to ship the unit. To avoid injury to yourself or damage to the
equipment take care when lifting, moving or carrying the unit.
Servicing:
Switch off the equipment and unplug the power cord immediately if it is exposed to moisture, spilled liquid, objects fallen into
opening, or the power cord or plug becomes damaged during a lightning storm or if smoke odor or noise is noted. Refer
servicing to qualified technical personnel only.
Installation:
Install the unit in accordance with the instructions printed in the user guide.
I
TABLE OF CONTENTS
IMPORTANT SAFETY INSTRUCTIONS – READ FIRST ................................. I
INTRODUCTION ............................................................................................... 1
OVERVIEW ....................................................................................................... 2
SETTING UP ..................................................................................................... 2
UNPACKING .................................................................................................................2
AC POWER HOOKUP .....................................................................................................2
POWERING UP ..............................................................................................................3
FRONT PANEL CONTROLS & INDICATORS ................................................ 4
EXTERNAL MIC JACK......................................................................................................4
POWER SWITCH ............................................................................................................4
TALKBACK CONTROL .....................................................................................................4
OUTPUT CONTROLS ......................................................................................................5
TALK SWITCHES ............................................................................................................7
TALK ALL SWITCH .........................................................................................................7
LISTEN SWITCHES .........................................................................................................7
LISTEN ALL SWITCH ......................................................................................................7
REAR PANEL FUNCTIONS ............................................................................. 8
POWER .......................................................................................................................8
MAIN INPUTS ................................................................................................................9
AUX INPUTS .................................................................................................................9
LISTEN INPUT ...............................................................................................................9
LISTEN OUTPUT ............................................................................................................9
HEADPHONE OUTPUTS ................................................................................................ 10
TALKBACK FOOTSWITCH.............................................................................................. 10
APPLICATIONS.............................................................................................. 11
RECORDING ............................................................................................................... 11
EXPANDING YOUR SYSTEM WITH MULTIPLE HEADAMP 4 PRO'S ........................................ 11
INSTRUCTION ............................................................................................................. 12
WARRANTY INFORMATION:........................................................................ 13
SERVICE: ....................................................................................................... 14
SPECIFICATIONS: ......................................................................................... 15
TABLE OF FIGURES
FIGURE 1 - FRONT VIEW ....................................................................................... 4
FIGURE 2 - BLOCK DIAGRAM ................................................................................ 6
FIGURE 3 - REAR VIEW ......................................................................................... 8
II
INTRODUCTION
Thank you for purchasing Applied Research and Technology’s HeadAmp 4 Pro. After getting
familiar with the HeadAmp 4 Pro, you’ll realize what a great investment you’ve just made.
The HeadAmp 4 Pro is a unique product. It contains five high quality headphone amps and
adds talkback to any one or all of the outputs as well as the ability to monitor or mix any input to
a special output. The HeadAmp 4 Pro was designed and constructed with the best components,
assuring a lifetime of quiet, reliable performance.
The HeadAmp 4 Pro offers:
•
Five high quality headphone amplifiers
•
1/4” TRS stereo inputs and outputs
•
Talkback to 1 or more outputs
•
Listen to one or more inputs
•
Optional external talkback mic
•
Phantom power for external mic
•
Remote talkback footswitch jack
•
Expandable architecture
•
Custom rugged extruded aluminum chassis
1
OVERVIEW
The HeadAmp 4 Pro is a multi-purpose tool for audio engineering and recording. Enclosed in a
tabletop chassis are five headphone amps with talkback capability. Up to five of the inputs can
be monitored at once. The HeadAmp 4 Pro is designed to work seamlessly with any classroom,
recording, sound-reinforcement, or electronic instrument setup. The HeadAmp 4 Pro maintains
exceptional signal integrity and extremely low noise. Each 1/4" input accepts line level signals
that can be adjusted for level.
SETTING UP
Unpacking
Your HeadAmp 4 Pro was packed with care at the factory. The shipping carton was designed to
protect it during initial shipment. Please retain this carton for use in transporting the HeadAmp 4
Pro, or in the unlikely event that you need to return your HeadAmp 4 Pro for servicing.
AC power hookup
The HeadAmp 4 Pro has an external power supply designed to minimize noise and operate at
100 to 125VAC, 50 to 60Hz.
The unit requires a 9VAC power supply rated for at least 1000mA.
Audio connections
1/4" Audio connections to and from the HeadAmp 4 Pro are stereo 1/4" TRS (except for the
Main Right input which can accepts a single channel only).
2
The external mic jack is designed for low impedance balanced mics. This input provides
phantom power for mic that need it and can be safely used with mics that do not require it.
We recommend using only high quality cables equipped with the appropriate connectors.
Powering up
When power is applied, the Power switch will illuminate indicating the unit is on. It is important
to remember to turn the HeadAmp 4 Pro output controls to minimum before connecting to any
of the outputs. The HeadAmp 4 Pro has the ability to add gain to its' input signal. This can
cause the HeadAmp 4 Pro to produce a “thump” on power up and power down.
3
FRONT PANEL CONTROLS & INDICATORS
Figure 1 - Front view
External mic jack
The external mic jack is a balanced mic level input. This input is intended for use with a
dynamic or phantom powered microphone. It will not accept line level inputs without clipping.
The external mic input provides +48V on pins 2 and 3 for condenser mics while safely
supporting the use of dynamic mics.
Power switch
The Power switch turns the entire unit on or off. The switch cap doubles as a power indicator. If
it is not lit red, check the power supply connection or power source.
Talkback control
Use the talkback control to adjust the level of the mic to match the audio program signal. This
control can provide gain, so start out with the control set to the minimum level (fully counter
clock wise) and slowly increase it until you have sufficient level at the outputs.
4
Output controls
Each output control provides level adjustment from 10dB of gain to completely
muted for each output channel. The audio used for Listen is selected before this control so you
can adjust the headphone levels without worrying about changing the listen buss levels.
5
6
Figure 2 Blo
Dia
Talk switches
The four Talk switches are used to direct the talkback mic to individual channels. These
switches are momentary and slightly mute their respective input signal when passing through
the talkback audio.
Talk All switch
Depressing the Talk All switch is the same as depressing ALL of the Talk switches plus it
enables talkback into the Listen output. The Listen output's normal audio signal is completely
muted while the talkback signal is passed on when this switch is depressed.
The Talkback Footswitch jack activates the talk all function when a footswitch closure is
detected.
Listen switches
The Listen switches located on each of the four outputs select the corresponding output
channel's source (pre fader) and sums it into the Listen output.
Each switch has an adjacent LED indicating that the audio from the source of each output is
sent to the listen buss. Pushing and releasing the switch will change the state (push-push vs.
the momentary Talk switches). Note that he state of the listen function is reset when power is
lost.
Listen All switch
The Listen All function activates all of the listen channels in parallel. All of the input signals
for Out 1 through Out 4 are mixed together and sent to the Listen output. The previous state of
the Listen switches is maintained when the Listen All function is no longer active.
7
REAR PANEL FUNCTIONS
Figure 3 - Rear view
Power
Connect the power supply provided with your unit to this jack. The HeadAmp 4 Pro is designed
for use with a 9V AC power supply rated at 1000mA. Using a DC power supply will not work.
Using a power supply of greater voltage may damage your unit. Using a power supply of
greater current (9VAC, but >1000mA) will work OK.
When power is applied to the unit, the Power switch will be lit. If this switch is NOT lit, check
the power source and connections.
8
Main inputs
The Main Inputs are stereo (TRS) or mono (TS) input jacks that accept line or headphone level
signals. The Main Inputs are the audio source for all of the outputs that do NOT have audio
connected to the Aux Input jacks. Use the Left (stereo) input if you have a stereo TRS cable.
Use both the Left and Right input if you have mono (TS) cables for each input. If you plug a
cable into the Right (mono) input jack only, the signal on the tip of the connector will be the
source for both left and right audio.
Since this audio is used if no other audio is inserted into an Aux input or Listen input, the Main
audio will be monitored when using the listen function.
Aux inputs
The Aux inputs are stereo (TRS) input jacks that accept line or headphone level signals. Using
the Aux input on a channel will override using the Main input audio for its' output. This audio will
be directly passed on to the listen buss if the listen function is active.
Listen Input
The Listen input is stereo (TRS) and accepts line or headphone level signals. Using the Listen
Input will override using the Main input audio for the listen output. This audio will be directly
passed on to the listen buss at all times. This audio is muted if the Talk All button or the
Talkback Footswitch input is active.
Listen output
The Listen output jack can drive headphones as well as line level inputs. The Listen control on
the front of the unit controls the volume of all of the audio present on this output.
This output contains either the Main input audio or the Listen input signal if this jack is used. It
also carries the audio present on Aux inputs with a lit Listen LED. If the Talkback Footswitch or
the Talk All switches are active, only talkback audio is present.
9
Headphone outputs
The Out jacks can drive headphones as well as line level inputs. The Out controls on the front
of the unit adjust the volume of all of the audio present on the corresponding output.
Each output contains either the Main input audio or the Aux input signal for that channel if the
jack is used. If the Talkback Footswitch or the Talk All switch are active, the Main or Aux audio
are muted (by about 30 dB) and talkback audio is present.
Talkback Footswitch
The Talkback Footswitch jack provides "hands free" access to the Talk All switch. When it
senses a switch closure (between the tip and ground connection of the jack) it activates the
Talk All function of the HeadAmp 4 Pro.
This input is designed to be used with a momentary footswitch that is closed when depressed.
You can use it with a "latching" switch, but you will have to push and release the switch every
time you want to change the talkback all status. The Talkback Footswitch function is designed
to work with pedals without an LED.
10
APPLICATIONS
Recording
The HeadAmp 4 Pro is at home in the modern studio. Since most current setups have little in
the way of analog processing like a mixer, The HeadAmp 4 Pro fills in the gap. The talkback
feature allows everyone to keep the headphones on and still communicate. The main mix is
connected to the main input and is supplied to all channels. Individual headphone mixes are
sent to the Aux inputs, which override the main input. The addition of the listen feature allows
you to tweak individual monitor mixes on the fly.
Expanding your system with multiple HeadAmp 4
Pro's
You can use more than one HeadAmp 4 Pro at a time and still take advantage of all of the
features with creative patching.
Connecting a stereo cable from the output of the first Listen output to the next unit's Listen
input will allow you to monitor all units' listen audio. Make sure that the Listen control is set to 12
o'clock to pass the first banks' audio through at unity gain for all but the last HeadAmp 4 Pro.
You will use the last unit's Listen output as a monitor.
If you need to maintain the individual talkback feature, you will have to use a "Y" cable on an
external mic.
The talk all feature can only be done if you use a footswitch and a "Y" cable from the footswitch
to all Talkback Footswitch jacks.
11
Instruction
Individual instruments are patched in through the Aux inputs. They can then be monitored and
you can provide individual feedback using the talkback function available on each output. Using
the talk all function, you can address the entire group.
Using multiple HeadAmp 4 Pro's, you can have each student use one unit as a mixer with up to
four inputs. The student uses the Listen output for his headphones. Each student unit's Main
Input is connected to the teacher's unit. This patching also provides a talkback path.
12
WARRANTY INFORMATION:
Limited Warranty (USA only):
Applied Research and Technology will provide warranty and service for this unit in accordance
with the following warrants:
Applied Research and Technology, (A R T) warrants to the original purchaser that this product
and the components thereof will be free from defects in workmanship and materials for a period
of three years from the date of purchase. Applied Research and Technology will, without
charge, repair or replace, at its option, defective product or component parts upon prepaid
delivery to the factory service department or authorized service center, accompanied by proof
of purchase date in the form of a valid sales receipt.
Exclusions:
This warranty does not apply in the event of misuse or abuse of the product or as a result of
unauthorized alterations or repairs. This warranty is void if the serial number is altered, defaced,
or removed.
A R T reserves the right to make changes in design or make additions to or improvements upon
this product without any obligation to install the same on products previously manufactured.
A R T shall not be liable for any consequential damages, including without limitation damages
resulting from loss of use. Some states do not allow limitations of incidental or consequential
damages, so the above limitation or exclusion may not apply to you. This warranty gives you
specific rights and you may have other rights, which vary from state to state.
The warrantee terms listed above are only valid within the United States of America. For units
purchased outside the United States, an authorized distributor of Applied Research and
Technology will provide service. For information on warranty and service policies outside the
U.S., please contact your local distributor.
13
SERVICE:
The following information is provided in the unlikely event that your unit requires service.
1) Be sure that the unit is the cause of the problem. Check to make sure the unit has power, all
cables are connected correctly, and the cables themselves are in working condition. You may
want to consult with your dealer for assistance in troubleshooting or testing your particular
configuration.
2) If you believe that the ART unit is at fault, go to www.artproaudio.com.
Select “Support”, then “Return Authorization Request” to request a return authorization number.
3) If you are returning the unit for service, pack the unit in its original carton or a reasonable
substitute. The original packaging may not be suitable as a shipping carton, so consider putting
the packaged unit in another box for shipping. Print the RA number clearly on the outside of the
shipping box. Print your return shipping address on the outside of the box.
4) Include, with your unit, a note with the RA number and your contact information, including a
return shipping address (we cannot ship to a P.O. box) and a daytime phone number, and a
description of the problem, preferably attached to the top of the unit. Also include a copy of your
purchase receipt.
14
SPECIFICATIONS:
Input Connections: ........................................................................................1/4" stereo TRS (except Main Right input
which is TS only)
Input Impedance: 1/4" ....................................................................................>10K Ohms
XLR input........................................................................................................2K Ohm
Maximum Input Level: 1/4".............................................................................+18 dBu
Maximum external mic input .......................................................................... +2dBu (balanced)
Output Connections: .....................................................................................1/4" stereo
Output Impedance: ........................................................................................47 Ohms
Max Output Level: ..........................................................................................+15dBu unloaded, 100mW/channel @ 30 to
100 Ohm load
Frequency Response: ....................................................................................10 Hz – 60 kHz +1 dB
Maximum Gain line in to any output: .............................................................+13 dB
Maximum external mic gain ...........................................................................+58dB
THD: ...............................................................................................................<.02% @ 20-20kHz, <0.005% @ 1k Hz
Equivalent Input Noise: ..................................................................................-100 dBu typical (“A” wtd., gain @ max)
Phantom Power:.............................................................................................+48Volts DC, filtered, current limited
Chassis Type: ................................................................................................All aluminum black anodized with integral
rubber sides
Power Requirements: ....................................................................................9VAC @ 1000mA (external)
Dimensions: ...................................................................................................1.75”H x 5.9”W x 6.5”D (44.5mm x 150mm x
165mm)
Weight: ...........................................................................................................2.9 lbs. (1.32 kg) with power supply and
packaging
Note: 0 dBu = 0.775Vrms
15
www.artproaudio.com
E-mail: [email protected]
HeadAmp 4 Pro
HP4-5004-101