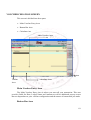
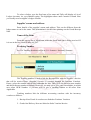
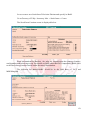
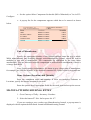
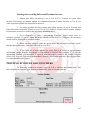
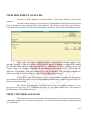
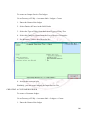
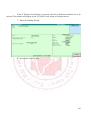
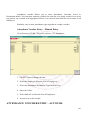
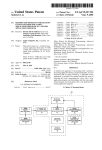
1
Chapter
1
Introduction Tally 9.0
Tally Solutions has released a new version of its Tally 9 software. It is most
popular software for accounts and inventory management. It offers different feature for
maintaining accounts. Tally 9 is integrated with a lot of advanced feature like better data
migrating, fast data speed, payroll management, TDS, TCS, job costing and point- of sale
invoicing etc.
Tally 9, a synchronized multilingual integrated business accounting software,
enables to maintain accounts in any Indian language, view it in other and print it in yet other
language of their choice. Targeted at SMBs, Tally 9 offers greater reliability, scalability,
accuracy and speed. It supports Unicode data which helps companies maintain data in any of the
Unicode supported languages.
Tally 9 program also has features including tax compliance features for value
added tax (VAT), service tax and excise for traders.
FEATURES IN TALLY 9
1. Easy calculation of TDS (Tax Deducted at Source)
Using Tally 9 you can calculate TDS appropriately.
2. Negative Stock Warning in Journal Voucher
Create a stock item with an opening balance of considerable units and pass a
delivery note against it. using a Journal Voucher to record a sales transaction tracking the
delivery note would display a warning message of negative stock even through a considerable
amount of stock was left over. The same has been addressed appropriately in Journal voucher.
3. Performance in Networking Environment
Tally 9 can work efficiently in a networking environment, if the Server has
Windows XP and Clients have Windows 98 as the operating system, Tally performs efficiently
with improved data stability.
4. Interest calculation in Forex
1
A Sales transaction created using Forex currency and Interest calculation,
calculates the Outstanding Forex Interest accurately.
5. Ledger Account
Tally now prints the address of the Sundry Debtor/ Creditor ledgers, while printing
a ledger account.
6. Ratio Analysis
If the Net Profit is lesser than the Return on Investment% or Return on Working
Capital, Tally displays the values with a negative sign.
7. Maintain balances bill by bill
Altering a ledger created under Sundry Debtors or Sundry Creditors, by setting
Maintain balances bill to Yes affects only the selected ledger and not the Group.
8. Migration Tool
Users may now migrate data to Tally 9, using the Tally Data Migration Tool on
Tablet PCs and Desktop computers of higher processor speed.
9. Stock Journal
The value in the rate field of a Stock Journal (Transfer of Materials) appears
appropriately.
10. Purchase/Sales Order
The list of Party or Customer ledgers is displayed appropriately, while creating a
Purchase/ Sales order respectively.
11. Inventory Report
The Godown – wise Inventory reports mow displays accurate balance values
whereas multiple Godowns are maintained.
12. VAT (Value Added Tax)
You can calculate value added tax in tally 9.
13. FIFO Perpetual
2
Tally introduces a new method of inventory valuation FIFO Perpetual, which is
similar to LIGO Perpetual. The Normal FIFO treats the opening balance of the financial year as
the terminating rate to apply for residual stock. FIFO Perpetual takes all existing past data. Both
LIFO and FIFO Perpetual are capable of changing the valuation when the company is split
unlike their ‘Annual’ versions, which are consistent.
14.
Payroll
It has been integrated with accounts, in order to simplify Payroll processing.
Payroll can be configured to suit the requirements of various types of organization.
You can now configure, align and automate simple to complex payroll processes.
You can print pay slips, maintain salary/ wages and attendance/leave/overtime registers, and
generate Gratuity and Expat reports. You can also configure Payroll Data with cost centre
reports for business analysis.
15.
POS Invoicing
POS Invoicing in Tally is equipped with ease of use and advanced capability to
simplify your retail operations. It efficiently automates the ‘check – out’ process, and allows you
to create invoices and collect payments from customers, in a matter of moments.
16.
Multilingual Support
Tally comes with the World’s First Concurrent Multilingual Business Accounting
& Inventory Management Software for small and medium businesses. The user interface for the
software is available in Hindi, Marathi, Gujarati, Bengali, Kannada, Tamil, Telugu, Malayalam,
Hinglish (colloquial English) and Punjabi, and in Bahasa Melayu and Bahasa Indonesia
allowing you to interact with Tally, in a language of your choice.
INSTALLING TALLY 9
When you install Tally, a folder named Tally is created by default, where the
program files will reside. You can specify a different folder name, if you wish.
System Requirements
To install Tally, your system must meet the following minimum requirements.
System Requirements
Configuration
3
Processor
Intel Pentium IV and higher or equivalent
Memory
Free Hard Disk Space
256 MB RAM or more
40 MB Minimum (excluding the data)_
Monitor Resolution
Recommended 1024*768 or higher
Note: For better performance Tally Multilingual needs more memory (about
40MB of Free Hard Disk Space)
To install Tally in Windows NT/2000/XP/2003/XP SP2/VISTA Workstation,
1. You need to have administrator/all rights (to create, write, update, modify and
delete) on the Application. Data, Configuration and Language directory.
2. Ensure that the Operating System you use supports Tally for Multilingual
support.
You can install Tally using one of the given methods.
Method 1:
• Double click install.exe form the CD.
Method 2:
• Click START from Windows.
• Select RUN.
• TYPE<CD drive>:/INSTALL.
• Press ENTER key.
Follow the instructions on your screen to install Tally.
1. The Tally Setup Wizard is displayed.
4
2. Click Next to continue
3. The Installation wizard displays the License Agreement. Read the license
agreement before you proceed. Click I Agree to continue. Click I Decline to stop setup or click
Back to go to the pervious screen.
5
4. In the Installation screen, you may accept the suggested directories. Else click
Change Application Directory or Change data Directory or Change Configuration Directory or
Change Language Directory the change the respective directory paths. Use Tab or the mouse to
change the path in any of the directories.
APPLICATION DIRECTORY
The tally program files reside in this directory.
Data Directory
The Tally data resides in Data directory.
The default directory where data is stored is C:/Tally/Data. To change click on
Change Data Directory button and enter the new directory.
When Tally is installed in a directory with an earlier version, it detects and retains
the data configuration path of the previous installation.
Configuration Directory
Tally configuration files reside in this directory. Specify the path of the directory
where configuration files should be saved. It is usually the same path as that of the Application
directory.
6
Language Directory
Tally Language files (.dct) reside in this directory.
Specify the path of the directory where the Language files will be maintained. It is
usually the same path as that of the Application Directory.
Note: If you are a multi-License User, select the Run Tally License Server at
Windows Startup check box.
During installation, you are prompted to specify the path and the OS files to install
the Indic languages.
5. Click Install Operating System Language Support to enable Language Support.
6. Select your Country name is Country Selection.
7. Select the Initial Startup Language from the list. When you start Tally for the
first time, Tally will appear in the language selected as the Initial Startup Language (screen).
8. Once you select the Initial Startup Language, Click Install to proceed with the
installation.
9. The installation progress startup is displayed as shown below.
7
10. Insert Windows CD to install language or Browse for the i386 folder in your
system.
Note: You will be prompted to install the i386 language support folder only if it is
not available in your system.
11. Click Finish to complete Setup.
After completing installation, double click Tally icon on the desktop to start
working on Tally.
MULTILINGUAL FEATURE IN TALLY9
8
Tally comes with the World’s First Concurrent Multilingual Business Accounting
& Inventory Management Software for small and medium business. The use interface for the
software is available in Hindi, Marathi, Gujarati, Bengali, Kannada, Tamil, Telugu, Malayalam,
Hinglish (colloquial English) and Punjabi, and in Bahasa Melayu and Bahasa Indonesia
allowing you to interact with Tally, in a language of your choice.
Thus, Tally gives you tremendous freedom to maintain accounts, as well as view
and print in any of the above mentioned Indian languages.
Tally enables you to enter data in one language and have it transliterated into
different languages. You can generate invoices, purchase orders or delivery notes in different
languages after entering data for the same in a different language.
Features of Tally Multilingual
Tally is a concurrent Multilingual software that
• Can display Tally in any language that the user chooses from any screen in
Tally.
• Supports Translation of Pre-Defined Masters
• Support Translation for the allowed languages.
• Can capture data entered using the phonetic language or system language.
• Can capture language specific Names and Aliases.
• Can print and display Report, Vouchers and Invoices in any language.
• Can copy text from Tally to Windows and vice versa. Use Ctrl + Alt + C to
copy and Ctrl + Alt + V to paste.
User Interface in Tally
The Tally interface displays in the language selected as Initial Startup Language,
at the time of installation. For example, if you have selected Hindi as Initial Startup Language,
the Tally interface displays as shown
9
Company Information
The first step to get started in Tally, is to Create a Company. The initial screen
appears as shown:
The Gateway of Tally screen is separated into six sections, namely Title Area,
Horizontal Button Bar, Main Area (Ctrl + M), calculator Area (Ctrl + N), Button Bar and the
Bottom Pane.
The elements of the Gateway of Tally screen are explained below:
Title Area
10
Title Area contains the Tally Cop0ytight and Tally website link. You can access
the Tally website directly from the Tally screen. You must have access to the Internet and
Internet Explorer Web browser installed on your computer.
Click on the http://www.tallysolutions.com link on the top frame of the screen to
enter our website. The link appears in all screen of Tally.
The Product type (Tally Gold, Tally Sliver, Tally Bronze or Educational) and
Tally Serial Number appears on the upper-right corner. The software serial number is usually a
unique number.
Horizontal Button Bar
The Button, Print (Alt + P), Export (Alt + M), Upload (Alt + O), Language (Ctrl +
L), Keyboard (Ctrl + K) and Help (Alt + H) can be seen in the Horizontal Button Bar.
Bottom Pane
The Bottom Pane contains the Version number, Release details (every ti8me a new
release of Tally is made, it is identified with a different release name like Release 3.14) and the
Current Date (the date configured in the computer). The name of the day, date, month and year
is displayed in DD, MM and YYYY format on the right- hand side.
System time (the time configured in the computer) appears on the lower-right
corner in Hour: Seconds: Minutes (HH/MM/SS) format.
The Pate appears in the lower left corner in the Bottom pane.
Close Button
The Close Button in the upper right corner functions similar to the use of ‘Esc’ in
Tally. It brings you to back to the Gateway of Tally from any screen.
Minimise Button
The Minimise button performs the standard Windows Operating System’s
function (windows 95onwords), allowing you to minimize Tally and work on other applications.
To restore Tally, click on the Tally icon on the taskbar.
Main Area (Gateway of Tally)
The Main Area is separated into two:
11
1.
Left-hand side area
2.
Right-hand side area
The left-hand side provides information on Current Period, Current Date and List
of Selected Companies (Name of the company and the date when last entry has been made).
The right-hand side displays the Company Information menu such as Select a
Company, Create a Company, Backup a Company or Restore a Company and so on.
Hot Keys
Hot keys are capitalized and are red in color on all the menu screens. Using the
Hot Keys in the Company Info Screen will take you to that particular screen or display the sub –
menus within that Option.
Calculator Area
Press [Ctrl + N] to activate the calculator. Calculator Area is used for calculator
functions. Any type of independent calculation can also be done using the calculator.
Button Bar
The buttons are designed to make the work easier and faster and faster and vary
from one screen to another based on the screen functionality. They appear on the right hand side
so the Tally screen and the inactive buttons are greyed out. You can either click these buttons or
press the shortcut keys to access the relevant screen.
The following are some of the buttons and their functions:
Help (Alt + H) – To access Tally’s online context-sensitive help
F1: Select Cmp – To select the company from the list of companies and access
data from other data directories on the local system or through the network. You can also access
the Directory field by pressing [Backspace].
F12: Configure – To access the configuration settings to manage the
information entered in Tally. For example, you can access the General Configuration to set
country specific defaults, before creating a company.
Button where a character or function key is underlined indicates that you have to
press underlined character or the function key along with [ALT] key.
12
Button where a character or function key is double underlined indicates, you have
to press the character or the function key along with [CTR;] key.
• F1: Press the shortcut function key [E1] to select a company.
• F1: Press [ALT +F1] to shut a company
• F8: Press [CTRL + F8] to select the Credit Note voucher
• Ctrl + M: Press Ctrl + M to access the Gateway of Tally.
• Ctrl + N: Press Ctrl + N to access the Calculator/ODBC Server frame.
Country Specific Configuration
The options available are Country Details, Style of Names, Style of Dates,
Configuration of Numbers and Other Options.
Go to Gateway of Tally > F12: Configure> General
The configuration settings of Country Details, Style of Name, Style of Dates and
Configuration of Numbers are self-explanatory. The prime differences are in the use of terms
like VAT in Europe and Sales Tax in Asia and American that have to be configured before
creating a company.
13
CREATING A COMPANY
Creating a Company involves providing basic information about the company
whose books of accounts are to maintained in Tally.
Go to Gateway of Tally > (Alt + F3) Company info. > Create Company
Above is displayed an International Company Creation Screen. Note that the State
and PIN Code fields are not available.
The screen for India/SAARC would be:
14
A detailed explanation on each field is given:
Directory
The data path where you want the company to be created is specified in the
Directory field.
This field is skipped by default when you create the company in the data path
given in the Tally.INI file. If you want to change it, use the backspace key and modify it to th
path require.
This is referred to as the Tally Anywhere concept – which is the ability to
create/load companies in separate directories. The Directory field is displayed while selecting
Select, Create, Backup, Restore and Rewrite options for a company. By default, the cursor will
skip the field, presuming that you wish to use the default data directory for your work. You may
press Backspace to give a new path and work from there.
For example, the default Tally data directory could be C:/TALLY/DATA. You
may now wish to create a new company on C:/TALLY/PERSONAL, and some other companies
on C:/TALLY/BRANCHES. The next time, the default directory displays C:/TALLY/DATA,
and if you wish to work on the data of your branches, press Backspace and enter
C:/TALLY/BRANCHES for the directory name. This displays the companies whose data is
stored in that location in the List of Companies. You can even give the path of a network server
or any other storage device.
Name
Enter the name of the company whose books are being opened. If you are a
professional accountant and are maintaining the books of your clients, give the Client
Company’s name.
Mailing Name and Address
In addition to the Company Name, Tally provides the facility to enter the Mailing
Name field. It displays the Company Name by default. You may change it as required, if the
mailing name is different form the Company Name,. the mailing name and address details are
picked up for inclusion in any report that needs the company name and address as heading. For
example: Balance Sheets, Statement of Accounts, and so on.
Tally’s reports print the mailing name and address as given:
15
Tally does NOT restrict the number of lines for the address details. Tally
accommodates all the entered information and vertically compresses the same.
Note:
1. In the space provided for the Address details, observe the vertical compression
as compared to the Mailing Name field where there is horizontal compression.
2. You can specify any length for the mailing name and you are permitted to give
any number of lines for the address. The information is completely visible.
3. Tally handles compressed information correctly while printing. It adjusts the
reports accordingly.
Statutory compliance for
Select the Country from the List of Countries. The Statutory Features and Base
Currency Symbol are enabled in accordance with the country selected. For example, if the
accounts belong to a company in India, the base currency would be Indian Rupees. The Base
Currency will appear with respect to the Country selected.
Selecting India from the List of Countries brings up a State, pin code and
Telephone No. field.
State
You can select the appropriate state from the predefined list.
PIN Code
Specify the PIN Code (Postal Index Number) of the specified address.
Telephone
Enter the Telephone number.
E-mail Address
16
Enter the E-mail address that will be used to e-mail documents, reports and data
from Tally.
Currency
Currency symbol is the symbol of the base currency, that is, the currency that will
be used to maintain the books of account.
The symbol Rs. appears by default for India/SAARC Companies and the field is
left blank for International Companies.
Maintain
Tally displays a drop down for the Type of Company with two options Accounts
only and Accounts with Inventory.
Select Accounts only if you do not have any inventory transactions (suitable for
professionals and corporate offices).
However, at a later data (if required) you can choose to alter the information as
Accounts–with–Inventory. Select Accounts– with – Inventory, to maintain both financial
accounts and inventory.
Financial Year From
In most countries, the books of accounts of a company are maintained for a
stipulated period liked, 12 months, 15 months, and so on. This stipulated period is referred to as
the Financial Year.
The stipulated period of the financial year is 12 months in most countries. Tally
automatically considers 12 months from the date you give here as the Financial Year.
For example, if you enter April 1, 2005 as the date, the Financial Year will be
from April to March ending with March 31, 2006. If you enter October 1, 2005 as the Financial
Year From then the financial year will be from October 2005 to September 2006 ending with
30th of September every year.
Tally allows you to maintain data for multiple years by changing the period (Alt +
F2) at the Gateway of Tally. In addition, you can also specify the date of actual establishment of
th company (date of incorporation )
Books Beginning From
17
Tally presumes that you wish to maintain books from the beginning of the
financial year. Hence, Tally displays the date given in Financial Year From field automatically.
The date for Books beginning from can be changed, in case of companies, which
are incorporated in the middle of the year. If your company is new, you can opt to start the
books of accounts from the date of actual establishment of the company (date of incorporation)
but close books according to the Financial Year as specified by you. Tally provides the required
flexibility in such a case by allowing you to give the date when the books of accounts actually
began. Tally will open books from this date and close as on the last day of the Financial Year.
For example, if your company is established on August 19, 2005, the opening
balances for all the accounts can be given as on August 19, 2005 even though the Financial Year
given is April 1, 2005 (April to March Financial year). The company’s books will begin on
August 19, 2005 and close on March 31, 2006, which ensures smooth transition to the next year.
This concept can be applied even when you are migrating to Tally from any other
system or from a manual accounting system on any day during the Financial Year. Close books
in that other system on the previous day and start books on Tally from this day. You are allowed
to give opining balances of all Ledger accounts including Revenue accounts.
Tally Vault Password
Tally Vault is an enhanced security system, which allows for encryption of the
company data. Encryption involves converting normally accessible Tally information into
unrecognizable information, which can only be reconverted by authorized persons.
Give a password here and repeat the same in the Repeat field. This basically
results in the creation of an encrypted company whose information is not accessible to users
other than the password holder.
Use Security control?
Set this to Yes, if you want to initiate a password-protected system to control
access to Tally data. Else, set this to No.
If you opt for security control, tally offers a comprehensive password based access
control to different features to Tally based on authority list created by the Administrator. (The
section on Security Control under Administer Tally contains details on authority lists)
18
Name of Administrator, Password, Repeat
Assuming the Tally Vault Password and Use Security Control is set to Yes enter
the Name of Administrator, Password and Repeat in the respective fields.
Use Tally Audit Features
Tally Audit allows the administrator or an auditor profile user to track changes in
accounting information. If you wish to use this facility, select Yes. Tally Audit will be available
only to the administrator/auditor, through Display of Statements of Accounts. It will be
discussed in greater detail under the Security Control section in Administer Tally.
On accepting the company creation screen, if you have specified Tally Vault
password, Tally prompts you to enter the Tally Vault password as appears:
Then Tally prompts you to enter the Name of User and Password (if any).
19
After verification Tally imports the latest statutory masters. Wait till the screen
shows that 100% of import is complete.
This completes the Company Creation process in Tally
An explanation on the field on the bottom of the Company creation screen follows.
Base Currency Information
The Base Currency Information is found in the bottom frame of the Company
creation Screen. Base Currency is the currency in which your accounts would be maintained.
Financial statements are prepared in the base currency by default and these are normally
required to be submitted to local statutory authorities. The Base Currency information in Tally
varies with the country selected for Statutory Compliance.
You can recode transactions and raise invoices in foreign currency; and also
maintain bank accounts or ledgers in foreign exchange, exchange, when required.
Base Currency Symbol
The currency symbol given earlier in the Company Creation screen is displayed
here automatically.
20
Tally uses this currency symbol in reports, wherever necessary.
Formal Name
Formal Name is the full name of the currency specified.
The Formal Name for the base currency is set to Indian Rupees for Indian
Companies.
Number of decimal places
The number of decimal places for the base currency is set to 2 by default.
However, you have the option of specifying up to 4 decimal places. Indian currency has 2
decimal places whereas certain other countries require 3 decimal place and so on.
Show Amounts in Millions
This is useful for companies, which require reporting the financial statements in
millions. This is possible only if Allow Multi- Currency is enabled in F11: Features.
Is System Suffixed to Amounts
For countries, which specify the symbol after the amount (value) – this facility is
provided. For example, Yen is specified after the amount (5000 Yen) unlike in India where the
symbol is specified before the amount (Rs.5000).
Put a space between Amounts and Symbol
This facility is provided to users who require a space between the amount and the
symbol. However, putting a space between the amount and symbol could give an opportunity for
misuse incase of cheque printing. Hence, the flexibility to turn option on and off as required is
provided.
Symbol for Decimal Portion
Enter the symbol for decimal portion.
Decimal Places for Printing Amounts in Words
You can specify the number of decimal places for printing the amount in words.
This number should be equal to or lesser than the number specified in Number of Decimal
places field in company creation or currency master screen which will appear in Invoice and
Cheque printing screen
21
For example, if the currency is expressed upto 3 decimal places, the numeric to be
printed in words can be restricted to 2 decimal places
Note: The Name of the Company, cannot be translated or transliterated but will
appear in the Language created.
LOADINGA COMPANY
A newly created company loads automatically. However, for subsequent working,
you must load or select the company you want to work with from the List of Companies. (Select
and Load are synonymous). A company can be loaded in two ways:
1.
2.
Automatically by Tally.
Using the Select Company option
Tally Loading the Company Automatically
When creating a company, Tally creates a sub-directory under its\DATA directory
for the company. The directory is allotted a number in serial order starting with 0001 (example –
10001, 10002…10009….10020, etc these are system generated codes for the company).
In order to automatically load a company, Tally has to be configured appropriately
by setting the Tally.ini file (available in the Tally directory).
Ensure that Default Companies is set to Yes and specify the company number
which has to be loaded automatically, for example, Load = 10000
Note: You can specify any number here as per the information available in the
data directory (10000 or 10002 or 10003, etc)
Example of sub-directories created by Tally for different companies:
22
LOADINGA COMPANY USING THE SELECT COMPANY
OPTION
In order to load a company using the Select Company option, disable the default
loading of a company in Tally.ini file. Set Default Companies to No OR place a semi-colon
before Load = 0001 (company number – placing a semicolon means that the words following it
in that line would not be executed. Each line is a separate command).
On double –clicking the Tally icon, the appears as:
You can use the Select Company option in two ways, from the Company Info.
Menu OR by using the button F1: Select Cmp (available on the Gateway of Tally screen).
Select Company
Press Enter on Select Company or use the button F1: Select Cmp. Tally displays
this screen.
23
Tally displays
1. Company Name (All the companies created are displayed)
2. System – generated code for each company displayed
3. The Financial Year information relating to the number of years data present in
the company.
Note: The system-generated code for each company is displayed to assist you in
identifying which company you wish to work on in case you have multiple companies with the
same name (as displayed in the above screen).
Select the required company to go to the Gateway Of Tally for that company.
GATEWAY OF TALLY
Gateway of Tally is the screen that appears on selecting a company. The Gateway
of Tally menu differs based on the type of company selected. An Accounts-with-Inventory
Company.
Gateway of Tally of an Account Only Company
The Gateway of Tally menu of an Accounts Only company appears as shown
below:
The Gateway of Tally screen is separated into four sections- Title Area, Main Area
(Ctrl+M), Calculator Area (Ctrl+N) and the Button Bar.
24
Main Area
The left side of the Main Area gives information on:
1. Current Period – which is the currently loaded company’s accounting period.
2. Current Date – This is the date of the last Voucher Entry for the selected
company.
3. List of Selected Companies – This displays the name of the loaded company
The Main Area gives information on:
1. Creation of Accounting Master and Importing Master information
2. Creation of Accounting Vouchers and Importing transaction information
3. Viewing and printing financial reports using the information given in Master
and Transactions,
Button Bar
The Button Bar displays the following buttons (keys):
1. Help (Alt + H) – To access Tally’s online context-sensitive help
2. F1: Select Cmp – To select a company
3. F1: Shut Cmp – To shut of close the company
4. F2: Date – To change the current date
5. F2: Period – To change the period
6. F3: Company- To select a different company
7. F3: Cmp Info – To access the Company Info. Menu
8. F11: Features – To access the Company features for a company
9. F12: Configure – To access the configuration settings
Note: You cannot load companies with the same name at the same time. The
loaded or selected company will have to be shut first in order to load the other company.
25
Gateway of Tally of an Accounts-with-Inventory Company
The Gateway of Tally menu of an Accounts-with Inventory company appears as
shown below:
Company Info. Menu
The Company Info. (Information) menu appears as shown below::
The menu options in the Company Info. are as follows
Select Company
26
Allows you to Select or load a company.
Shut Company
Allows you to shut a company.
Create Company
Allows you to create a company.
Alter
Allows you to alter a company.
Change Tally Vault
Allows you to secure the data by providing a Tally Vault password
Backup
Allows you to take a backup of the company data.
Restore
Allows you to restore a data backup.
SHUT A COMPANY
Shut a Company is to unload it. It does not mean that you have deleted it. Simply
select it again to load and work on it again.
You can shut a company in two ways- either using the button F1: Shut Cmp (Alt +
F1) or pressing Enter on Shut Company menu option on the Company Info. Menu
The screen appears as shown below:
27
Select the company to be shut from the List of Primary Companies.
ALTER A COMPANY
You can modify any information at any time that is set while creating a company.
1. Go t o Gateway of Tally
2. Select F3: Cmp Info. (ALT+F3) from the button bar
3. Select Alter and press Enter and the screen appears as shown below:
Make the necessary changes in the required fields. To change the password if Use
Security Control is set to Yes:
4. Enter the Name of Administrator.
5. Enter the new password.
28
6. Re-enter the password in the Repeat field to confirm.
7. Enter the Old Password and Accept the screen to alter the company
DELETE A COMPANY
To delete a company, you have to load the company first.
1. Select F3: Cmp Info. (ALT+F3) from the Gateway of Tally to proceed to the
Company Information menu.
2. Select Alter and press Enter.
3. Select the company to be deleted. The Company Alteration screen is displayed.
4. Use Alt + D to delete. Tally will prompt for a confirmation on deleting the
company.
5. Press enter to delete the company.
Note: Deletion of a company is irreversible. The company is permanently deleted
from the system
29
Chapter
2
Administration in Tally
SECURITY CONTROL
In an ideal company scenario, there will be more than one person working on
Tally. In such a case, not every person needs to be given the full access. The head of the
department/Administrator should be able to create different users and assign their rights to them.
Tally has a very customizable security system. You can set up Security Levels and
users who are placed at these levels. The authority levels or Types of Security decides the rights
of the users while using Tally.
To create Security Levels
1. Go to Gateway of Tally, select F3: Cmp Info.> Create/Alter Company
2. In the Company Creation screen set Use Security Control to Yes.
3. Enter the Name of the Administrator.
4. Enter your Password and reenter the password for verification. The password is
not displayed for security reasons.
5. Accept Yes to save the changes made
USERS AND PASSWORDS
To create different users who belong to one or more different Security Levels of
Types of Security
Go to Gateway of Tally, select F3: Cmp Info > Security Control > Users and
Passwords.
The List of Users for Company screen is displayed.
30
A brief description of all the fields in the List of Users for Company screen
follows:
Name: The selected company name is displayed here automatically.
Name of User: Enter the name of the user.
Password (if any): Enter the password if required.
Security Level: Select the security level form the Security List.
Note: You need to create Security Levels before creating users or the default
security levels available viz. Owner and Date Entry.
ALTERING/DISPLAYING USERS AND PASSWORDS AND
TYPES OF SECURITY
There is no separate menu option to alter or display Users and Passwords and
Types of Security options. Use the same menu to display or alter user or security level set-up.
To delete a User, delete the Name of User and Password and Accept, Yes to save. Do the same
for deleting a security level. if you have defined a user under a security level, then the security
level cannot be deleted before deleting the users under it.
TALLY AUDIT
Tally Audit provides the capability to the administrator/auditor to track changes in
the accounts following his previous review. Changes of two areas are very important – changes I
Transactions or Vouchers and changes in Ledger Master. Only changes that affect the integrity
of a transaction are considered. For e.g. a change in the narration does not affect the integrity of
a transaction and will not e considered as a change. Any material change in a voucher is logged.
The name of a ledger account if changed is material and hence it would be tracked.
31
Tally Audit feature should be enabled while creating the Company and creating
Security levels. Only a user designated as an auditor or the administrator can view the audit list
and act upon it.
BACKUP AND RESTORE
Backup
Tally has a flexible backup mechanism where in you can take a backup of the data
from virtually any storage medium into any other medium.
The more commonly used media are floppy drive, hard disk drive, zip drive, tape
drive, etc – installed either locally or on a network. In the screen, the source of the backup and
the destination of where it has to be stored have to be given and Tally will do as required.
Taking a Backup
The procedure for taking a backup is as follows
1. Go to Gateway of Tally, select F3: Cmp Info > Backup
2. The Backup Companies on Disk screen is displayed.
3. To change either the Source or the Destination paths, use the [Backspace] key
and change the path as required. Specify the paths of the Source and Destination drives. Incase
we want to take a backup onto another system on the network the Destination path will be
\\machinename\drivename\directoryname. The process of backing up data begins when at least
on company is selected for the same from the List of Companies. To stop selecting companies,
select the option End of List, which appears at the top of the selection list.
4. The backup file is stored as TBK900.001. If the backup is taken in a medium
likely to extend more than one- for example, floppy, then the extension digits (10001,10002 and
so on) will be stored accordingly.
The Backup screen appears as:
32
Note” If Tally Vault password is enables for a company, Tally will allow you to
select only one company at a time from the list for a backup.
BACKUP PRECAUTIONS
Data on a computer is vulnerable to all types of difficulties. Considering the same,
it is important that we do not overlook the importance of regular backing-up of data regardless
of the stability of the database. With a little planning and forethought, we can ensure that
maintenance of the important data is continuous and hassle-free.
Depending on the volume of data entry, an appropriate backup mechanism will
have to be devised. One method of achieving it will be by maintaining a backup directory in the
local hard disk or the server (external storage media such as the floppy disk, zip diskette can also
be used). We can have sub-directories for every day of the week under the main backup
directory and regularly take data backup in the following manner depending on the day of the
week.
Monday – C:\TallyBackup\Monday
Tuesday – C:\TallyBackup\Tuesday and so on till Saturday.
Note: Tally backup facility is not limited to the Hard Disk drive alone. You can
backup data not other storage devices also
The above procedure ensures that there exists a reliable data backup at any given
time. In order to use that reliable data backup or bring back the data from that existing data
backup you have to use the Restore option.
Important: It is preferable NOT to restore a backup onto the original data directory
primarily to ensure that No data is overwritten unintentionally.
Restore
Restore literally means to bring back. Similar to backing up of data, Tally allows
restoring of data from any medium into any other storage medium. The Restore Companies on
Disk screen is displayed as shown below:
33
RESTORING DATA
The procedure for restoring data is as follows
1. Go to Gateway or Tally, select F3: Cmp Info > Restore
2. The Restore Companies on Disk screen appears.
3. The Source and Destination paths displayed in the screen are those that were
used last.
4. The Source field has to have the appropriate path. It is the path form which you
intend to bring back the previous data. Accepting the path will read the contents of the particular
file and will then display the list of companies available.
5. Select as required and restore the data accordingly.
RESTORE PRECAUTIONS
It is preferable NOT to restore a backup onto the original data directory primarily to
ensure that No data is overwritten unintentionally.
Activate Company Features (F11: Features)
The different features of a company can be selected or modified by F11: Features
button. This button is available in almost all screens of Tally as you might wish to modify it as
your requirements change. Unlike F12: Configure, F11: Company Features is specific to the
current company only. Therefore, each company may have different features active. For
example, a company in your group may need multi-currency where as another company may
not. Configuration options, on the other hand, affect all companies maintained in the same Tally
34
directory and setting configuration for one company will affect other companies in that data
directory.
Note: Certain features like multi-currency and multi-locations, once set to Yes,
cannot be modified if the feature has been used. However, other features like Cost Centers and
Bill-wise details can be modified ever if they are used. If you reset the options after having used
the feature in transactions, it is advisable to rewrite the company by using CTRL + ALT + R.
Go to Gateway of Tally > F11: Features
The F11: Features menu displays as shown
The menu consists of the following options.
“
“
“
Accounting Features
Inventory Features
Statutory & Taxation
There are various setting available under Accounting Features, Inventory Features
and Statutory & Taxation Features in Company Operations Alteration screen, which determine
the information to be keyed in during transaction entire
35
Chapter
3
Managing Groups
Ledgers and Vouchers
Accounts Info menu lists the masters through which you can provide Tally the
details of your company’s accounts. You can also manage Groups, Ledger and Vouchers from
this menu.
Go to Gateway of Tally > Accounts Info.
INTRODUCTION TO GROUPS
Tally follows the modern way of managing accounts called ‘Single Ledger’
concept of accounting. This is in direct contrast to subsidiary Ledger Accounting. All financial
entries are made using ledgers or account heads. Ledger accounts are created to identify
transactions.
The single ledger concept avoids the need for sub-ledgers and corresponding
control accounts in General Ledger. Tally allows you to group ledger information to generate
meaningful reports that are compliant with laws. Groups in Tally classify and identify account
heads according to their nature. This helps in presenting summarized information.
36
Gateway of Tally > Accounts Info.>Groups
CLASSIFICATION OF ACCOUNT HEADS
Usually, grouping of accounts is dome only when reports are needed. This may
result in delay in preparing the reports. Tally allows you set up chart of accounts.
You can group the ledger accounts while creating them. Tally will enable your
reports and statements to reflect the desired classification at any point. In Tally, you can also regroup the ledgers (with some minimal restrictions) if re-classification is necessary. Re-grouping
becomes necessary whenever there is a change in the nature of information, however, regrouping cab be done only by users who have authorised rights.
At the highest level of grouping, accounts are classified are classification into
capital or revenue – specifically into assets, liabilities, income and expenditure. Based on
mercantile accounting principles, Tally provides a set of reserved groups and allows you to
modify their names or create subgroups.
Sub-Groups
A sub-Group behaves exactly like a group and is created under a group.
37
Concept of Sub-Groups
Groups have a hierarchical structure. The main group of accounts that determine
the entire accounting and their presentation are the asset, liability, income or the expenditure.
There main groups ascertain whether a ledger affects Profit & Loss Account as a revenue item
or if it affects the Balance Sheet.
The Reserved Primary Groups and subgroups are:
Primary Groups of Capital Nature
1. Capital Account
a) Reserves and Surplus [Retained Earnings]
2. Current Assets
a) Bank Accounts
b) Cash-in hand
c) Deposits (Asset)
d) Loans & Advances (Asset)
e) Stock-in-hand
f) Sundry Debtors
3. Current Liabilities
a) Duties and Taxes
b) Provisions
c) Sundry Creditors
d) Fixed Assets
4. Investments
5. Loans (Liability)
• Bank OD Accounts [Bank OCC Accounts]
38
a) Secured Loans
b) Unsecured Loans
6. Suspense Account
7. Miscellaneous Expenses (Asset)
8. Branch/Divisions
9. Sales Account
10. Purchase Accounts
11. Direct Income[Income Direct]
12. Indirect Income [Income Indirect]
13. Direct Expenses [Expanses Direct]
14. Indirect Expenses [Expanse Indirect
Note: Aliases for the groups are given in square brackets [].
A Discussion no Each of the Reserved Groups
1. CAPITAL ACCOUNT
This records the Capital and Reserves of the company. The ledgers that belong to
Capital Accounts are Share Capital, Partners’ Capital A/c, Proprietor’s Capital Account and so
on.
Reserves and Surplus [Retained Earnings]
This contains ledgers like Capital Reserve, General Reserve, Reserve for
Depreciation and so no.
2. CURRENT ASSETS
Current Assets record the assets that do not belong to either Bank Accounts or
Case-in-Hand sub-groups.
39
Bank Accounts
Current account, savings account, short tern deposit accounts and so on.
Cash-in-hand
Tally automatically creates Cash A/c in this group. You can open more than one
each account if necessary.
Note: An account under Cash-in-hand group or Bank Account/Bank OCC A/c
group is printed as separate Cash Book in the traditional Cash Book format and does not form
part of the Ledger.
Deposits (Asset)
Deposits contain Fixed Deposits, Security Deposits or any deposit made by the
company (not received by the company, which is a liability).
Loans & Advances (Asset)
This records all loans given by the company and advances of a non-trading nature
(example: advance against salaries) or even for purchase of Fixed Assets. We do not recommend
you to open advances to Suppliers’ account under this Group.
Stock-in-hand
This group contains accounts like Raw Materials, Work-in-Progress and Finished
Goods. The balance control depends on whether you have selected Integrated Account-cumInventory option while creating the company.
Integrated Accounts-cum-Inventory
This option has a significant effect on the Balance Sheet and Profit & Loss
Account. If set to Yes, it brings the stock/inventory balance figures from the inventory records
and provides a drill down to the Stock registers from the Balance Sheet.
You are not allowed to directly change the closing balance of an account under
this group. You are allowed to pas transactions in Inventory records and the account balances
are automatically reflected in the Balance Sheet as Closing Stock.
Non- Integrated Accounts-cum-Inventory
40
If integrated Account-cum-Inventory option is set to No, it ignores the inventory
books figures and picks up manually entered closing stock balances from the ledger account
created. This provides th facility to maintain accounts separately and inventory separately.
You are not allowed to pass transactions if your accounts that come under this
Group. It allows you to hold opening and closing balance only. Since no vouchers can be passed
for these accounts, they are the only accounts for which the closing balances can be directly
altered (by an authorised user only).
3. CURRENT LIABILITIES
Accounts like Outstanding Liabilities, Statutory Liabilities and other minor
liabilities can be created directly under this group. Sub- groups under Current Liabilities are
Duties and Taxes, Provisions and sundry Creditors
Duties and Taxes
Duties and Taxes contain all tax accounts like VAT, MODVAT, Excise, Salas and
other trade taxes and the total liability (or asset in case of advances paid) and the break-up of
individual items.
Provisions
Accounts like Provision for Taxation, Provision for Depreciation and so on are
recorded under Provisions.
4. INVESTMENTS
Group your investment accounts like Investment in Shares, Bonds, Govt.
securities, long term Bank deposit accounts and so on. This allows you to view the total
investments made by the company.
5. LOANS (LIABILITY)
Loans that a company has borrowed, typically long-terms loans.
Bank OD Accounts [Bank OCC Accounts]
Tally provides you with distinct types of Bank Accounts,
Bank OCC A/c
41
To record the company’s overdraft accounts with banks. For example, Bill
Discounted A/cs and Hypothecation A/cs etc.
Note: An account under Bank OCC A/c group is printed as separate Cash Book in
the traditional Cash Book format and does not form part of the Ledger.
Secured Loans
Term loans or other long/medium term loans, which are obtained against security
of some asset. Tally does not verify the existence of the security. Typical accounts are
Debentures, Term Loans, and so on.
Unsecured Loans
Loans obtained without any security. Example: Loans from Directors/partners or
outside parties.
6. SUSPENSE ACCOUNT
In modern accounting, many large corporations use Suspense Ledger to track the
money paid or recovered, the nature of which is not yet known. The most common example is
money paid for Traveling Advance whose details will be known only upon submission of the
TA bill. Some companies may prefer to open such accounts under Suspense Account.
Loans and Advances (Asset) group.
The Suspense Account is a Balance Sheet item. Any expense account even if it has
‘suspense’ in its name, it should be opened under Revenue group like Indirect Expenses and not
under Suspense Account group.
7. MISCELLANEOUS EXPENSES (ASSET)
This group is typically used for legal disclosure requirements such as Schedule VI
of the Indian Companies Act. If should hold incorporation and per-operative expenses.
Companies would write off a permissible portion of the account every year. A balance remains
to an extent that cannot be written off in Profit & Loss Account. Tally does not show loss,
carried forward in the Profit & Loss Account, under this group. The Profit & Loss Account
balance is displayed separately in the Balance Sheet
8. BRANCH/DIVISIONS
42
This maintains ledger accounts of all your company’s branches, divisions,
affiliates, sister concerns, subsidiaries and so on. Tally permits Sales and Purchase transactions
to take place with accounts. Just treat them as any other party accounts. If you wish to maintain
the books of a branch/division on your computer, you must open a separate company. (Tally
allows maintenance of multiple company accounts).
Revenue- Primary Groups
9. SALES ACCOUNT
You can classify your sales accounts based on Tax slabs or type of slabs or type of
sales. This also becomes a simple mechanism for preparation of Tax returns.
Examples:
•
•
Domestic Sales
Export Sales
Now under Domestic Sales open the following ledgers:
•
•
•
Sales (10%)
Sales (5%)
Sales (exempt)
You can even open an account as Sales Returns under the group Domestic Sales to
view your net sales after returns (or the returns may be directly passed through Journal against
the specific Sales account).
10. PURCHASE ACCOUNT
This is similar to sales accounts, except for the type of transactions.
11. DIRECT INCOME [INCOME DIRECT]
These are Non-trade income accounts that affect Gross Profit. All trade income
accounts fall under Sales Accounts. You may also user this group for accounts like Servicing,
Contract Change that follow sales of equipment.
For a professional services company, you may not use Sales Account group at all.
Instead, open accounts like Professional Fees under this group.
43
12. INDIRECT INCOME [INCOME INDIRECT]
These are miscellaneous non-sale income accounts. Example: Rent Received and
Interest Received.
13. DIRECT EXPENSES [EXPENSES DIRECT]
These are manufacturing or direct trading expenses. These accounts determine the
Gross Profit of the company.
14. INDIRECT EXPENSES [EXPENSES INDIRECT]
All administrative, selling or non-direct expenses.
Profit & Loss Account is a reserved primary account in Tally. You can use this
account to pass adjustment entries through journal vouchers. For example, transfer of profit or
loss account to Capital or Reserve account.
Creating a Group
You can create multiple or single group from create option. In multiple group
creation, the sub-groups will automatically inherit the characteristics of their parent groups.
Go to Gateway of Tally > Accounts Info.> Groups > Create (under Single Group)
The Group Creation screen displays
Name of Group
Enter the name of the Group to be created. For example, Administrative Expenses
Alias
Enter an alias name to allow access to the group using the Alias in addition to its
name of leave it blank. For example, for Administrative expenses, you can enter Office Expense
or even an alphanumeric code, say E001, as an alias.
Under
44
Specify under which existing (Parent) group the sub-classification is required. If it
is a new primary group, select Primary (requirement of a new primary group is very rare, but the
option exists). You can also create a new Parent Group by using Alt+C.
Note: Creation of new Primary Group is not allowed if an Allow Advanced entry
in Masters is set to No in F12: Configure.
Additional Information
If a group (e.g. Printing) is created under Primary, you must select the appropriate
option from the list whether it is an asset, liability, income or expenses. If you select an income
or expenses you should specify whether it will affect the gross profits or not by suitably setting
the option Does it affect Gross Profits? to Yes/No
You can use this concept when you wish to segregate your profits into Operative
Profit and Net Profit. This helps you when you want to consider other revenue accounts in
addition to Direct instead of Gross and Net Profit).
Normally, Tally calculates Gross Profit using Opening Stock, Purchase Accounts,
Direct Expenses, Sales Accounts, Direct Incomes and Closing Stock only. To make other
accounts contribute to this, without classifying under these reserved heads, set this option to
Yes.
Group behaves like sub-ledger?
This option is applicable to Sundry Debtors group, you can set this to Yes to
display Sundry Debtors without Ledger break-up in statements. Normally, Sundry Debtors will
have a large number of ledger accounts under it and it can be expanded during display to show
ledger balances. To disable this detailed display set this option to No.
Net Debit/Credit Balances for Repotting?
Setting this option to Yes will display either the net debit or credit balance in the
report (whichever is higher). If this is set to No, both debit and credit balances will displayed in
the report.
Used for Calculation (e.g. taxes, discounts)?
Set this option to Yes if ledgers under this group would have percentages for
discounts/taxes to be used for invoice entry. This gets reflected while passing voucher entry in
Invoice mode, it uses the automatic calculation capability.
Method to allocate when used in purchase invoice
45
Select the appropriate allocation method from the list, this is used to allocate the
expense of the Item in the ratio of the quantity or value.
Buttons in single group screens
F3: Company
This button helps you to open a different company. In the creation mode, you can
create groups in the other company. In alter mode, you can copy the information by accepting
the screen (enter or Ctrl+A). The old company’s information remains. This feature is not
available in Display mode.
Groups, Ledgers, Cost Categories, Cost Centers, Voucher Types,
Currency, Budgets
This button enables you to switch to the appropriate area without quitting from the
current screen.
F11: Features
This allows you to set or modify the company features.
F12: Configure
This enables you to set or modify configuration of the master screen.
Note: Configuration changes affect all companies and changes made in Features
affect only the current company.
Displaying and Altering Group
You can display and alter the Group in Single mode or Multiple mode.
Displaying a Single Group
Go to Gateway of Tally > Accounts Info. > Group > Display (under Single Group)
Select the name of the Group from the List of Items. You cannot make any
changes in Display mode.
Altering a Single Group
Go to Gateway of Tally > Accounts Info. > Group > Alter (under Single Group)
46
Select the Group that you wish to alter from the List of Groups. Make the
necessary changes and click Yes to save the changes.
Displaying Multiple Groups
Go to Gateway of Tally > Accounts Info. > Group > Display (under Multiple
Group)
Select the Group from the List of Groups to display all the Groups under the
selected Group or select All Items to display all Groups. The Multi Group Display screen lists
Groups and the corresponding details of the Groups.
Altering Multiple Group
Go to Gateway of Tally > Accounts Info. > Group > Alter (under Multiple Group)
Select the Group for which you want to alter from the List of Groups. In Multi
Group Alteration screen, make the necessary changes and click Yes to save changes.
Deleting a Group
Gateway of Tally > Accounts Info > Groups > Single/Alter
The Delete function is performed through the single alteration mode. You cannot
delete groups form the Multiple Alteration mode.
1. Select the group to be deleted.
2. Press Alt+D to delete.
Note: You cannot delete a group if it is a reserved group or a group has sub-groups
or ledgers in it.
Note: A new group created under primary will not reflect in reports until you pass
masters/transactions for that group.
Introduction to Ledgers
A Ledger is the actual account head to which you identify a transaction. In Tally,
you pass all accounting vouchers using Ledgers. However, all Ledgers have to be classified into
Groups. Hence a thorough understanding of account classifications is important for working
with Ledgers.
47
Go to Gateway of Tally > Accounts Info. > Ledgers
Creating a Ledger
Ledgers can be created in single and multiple modes. In multiple mode you can
create multiple ledgers at a time.
Creating a Single Ledger
The creation of Ledger depends on the features you opt for in the F11: Configure
screen before creating any Ledgers. You may configure or set your Ledgers to enable or disable
advanced mode.
Tally automatically creates two Ledger accounts namely, Cash (Under Cash-inHand) and Profit and Loss Account (direct Primary Account). You need to create all other
accounts heads. There are no restrictions in Ledger creation except that you cannot create
another Profit & Loss A/C. Any number of Cash Accounts may be created in any other name
like Petty Cash.
Creating a Ledger Accounts with minimal information:
Go to Gateway of Tally > Accounts Info. > Ledgers > Create (under Single
Ledger)
Name
Enter the Name of the account. You can provide the full name of the account.
Tally fits it all in. Press Enter to move to the next field. Tally does not allow entry of duplicate
names. the uniqueness check is made here itself.
Note that punctuation and other non-relevant information are ignored by Tally in
its recognition of a name. Thus, CST, C.S.T. and C.S.T. are all considered as same.
Tally converts the first letter of all relevant words to upper case, which helps you;
speed up data entry. You need not bother about changing the case every time it is a different
word.
Alias
Enter an alias name if required. You can access the Ledgers using the original
name or the alias name.
Under
48
All accounts must be classified under their appropriate Groups. Select the Group
under which the Ledger is created from the List of Groups. To create a new Group from this
field press [ALT+C]
A Group is not important by itself, but because it controls the usage of Ledger
accounts. A wrong classification would affect the treatment of the Ledger account in final
statements and during voucher entry.
You can, alter a Ledger account to change its group classification at any time.
Opening Balance
If yours is an existing company whose books you are entering onto Tally, Opening
Balance would be applicable in circumstances such as when the Ledger is an asset or a liability
and if it has a balance in the account as on the date of beginning of books in Tally.
Tally recognises normal accounting principles of debit balances for Assets and
credit balances for Liabilities. It accepts the reverse for obverse balances. Revenue accounts
normally do not have balances. Tally, however, permits you to give balances even for such
accounts – You may be transferring your books on to Tally in the middle of the year and may
not have closed them in your earlier system. Hence, you may specify whether the balance is
Debit or Credit. Simply D or C also would suffice.
Note: Use Ctrl + A at the field following which the information in other fields do
not need to be changed.
Creating Multiple Ledgers
You can create multiple Ledgers at a time in this mode. You can first create a
Ledger under each group in single Ledger mode and then the rest of the Ledgers in multiple
mode. Tally will set the settings of the Ledger created as default for other Ledger to be created
in multiple mode.
Go to Gateway of Tally > Accounts Info. > Ledgers > Create (under Multiple
Ledger)
49
The Multiple Ledger Creation screen is displayed. A brief description on each of
the fields in the Multiple Ledger Creation screen follows:
Under Group
Select the name of the group under which you want to create the Ledgers from the
List of Groups.
Below this field, the other fields are arranged in a table. The cursor rests at the
field Name of Ledger.
The other fields in the column are:
S. No
This is auto generated.
Name of Ledger
Enter the name of the Ledger
Under
This field defaults to the parent group selected in Under Group. The selected
group in Under Group gets displayed here automatically and the cursor skips this column.
However, if you select All Items in Under Group field, the cursor does not skip this column and
you have the option to select the group. You can even create a new group from this field by
pressing Alt+C.
Opening Balance
This is the balance remaining when you first enter your books on Tally, i.e., the
date of beginning of books. If you have opted to maintain balances bill-by-bill, you must give
the bill details.
Dr
Specify whether the Opening Balance is Debit or Credit. Tally follows the normal
accounting principals of accounting.
Note: While creating Ledgers in multiple mode, the field Cost Centers are
applicable, is set to Yes for Revenue accounts and No for Non-Revenue accounts by default.
The field Inventory values are affected is set to Yes for Sales and Purchase Accounts and No for
the others by default.
50
Method of Calculation
There are four methods of calculating a duty.
1. Duty Based on Items – Tax based on Item Rate
2. Additional Duty
3. On Total Sales
4. Surcharge on Tax
Tax or Duty Based on Items Rate (or Excise Duty)
This type of account is suitable in cases where there are differential rates of
duty/tax on items. In India, excise duty accounts would normally adopt this method. In the UK,
VAT accounts would do likewise. When creating your Inventory item masters, you might
specify Rate of Duty for each item. In your account books, you would open a ledger for the
duty, possibly by the name VAT 17.5%or Excise Duty 12.5%. You will select this method to
instruct Tally to pick up the Rate of Duty specified in your Inventory item master during master
during invoice entry. If one or more items exist with the same rate of duty, then the amount is
calculated using the total. Otherwise, it is calculated on total sales. For example,
Your invoice lists,
Item A (Rate 10%) for 10000/Item B (Rate 12%) for 15000/Item c (Rate 10%) for 18000/Duty (VAT or Excise) will be calculated as follows:
Additional Duty
When excise duty is not enabled for invoicing purposes in Company Features
[F11] (as applicable for many products in India), Additional Duty and Surcharge function alike.
51
In case it is enabled, then Additional Duty is added to the ‘Duty Based on Items’ in the invoice
to reflect the ‘Table Duty payable’. Its method of calculation is explained under ‘Surcharge’.
On Total Sales
As the type suggests, duty will be calculated on the total of individual values of
the items. It does not consider the Rate of Duty specified for each item in your inventory
masters.
It does not calculate duty on the current sub-total unless you have specifically
opted for it in the company features. Hence, the two scenarios could be as follows:
When you have not opted for calculation on current sub-total:
Assuming that there are two items in the invoice:
Item A 10000/Item B 15000/Tax 2% will be calculated at 2% on total sales of 25000/- = 500/- tax amount
following which you obtain a current sub-total of 25500/-.
If you now add another line, Tax 4%, it will calculate 4% also on 25000/- (on total
sales) giving another 1000/- as tax.
If you opt for calculating on current sub-total:
The above Tax 4% will be calculated on 25500/- (25000+500) giving 1020/-.
Surcharge on Tax
Surcharge and Additional Duty are charged on the immediately preceding entry. A
surcharge is treated as a percentage of the duty levied. Tally expects the preceding line in the
invoice to be the duty on which surcharge is to be calculated.
Hence, in the above example if you have added a line Surcharge 10% it will
appear as:
Item A
Item B
Tax 2%
10000/15000/25000/500/52
Surcharge 10%
50/- (10% of 500)
If your invoice is as below:
Item A
Item B
Tax 2%
Surcharge 10%
Addl. Surcharge8%
10000/15000/25000/500/50/-(10% of 500)
4/- (8% of 50)
During invoice creation, this figure is used to calculate tax amount based on the
method of calculation as well as specified in invoicing configuration
([F12] configure > Invoice Entry > Calculate tax on current sub-total?).
Though invoicing has been discussed separately in greater detail, we shall touch
upon relevant aspects here.
Calculate tax on current sub-total: (Yes/No)
Tax here refers to VAT or sales tax. During voucher entry in Invoicing mode, you
may enter additional ledger accounts after giving the list of items in the invoice. Typically, the
ledgers would pertain to duties, taxes, delivery charges, other charges and discounts. Sales Tax
may be calculated on the total of item values, viz., Inventory sub-total, or you may specify it to
calculate on the immediately preceding sub- total. In the latter case, the immediately preceding
sub-total could include any entry that you may have passed, e.g. Delivery Charges. Tally does
not make any presumptions and would not verify its appropriateness or otherwise.
Normally, you would not answer Yes to this option. The facility of Surcharge
being available, the need to calculate on current sub-total is fulfilled by it. Hence, use it
sparingly, maybe only when you have both Excise Duty and Sales Tax (on Excise Duty)
applicable on an.
Display or Alter a Ledger Account
Information in display and alter is the same, hence only alter is discussed. Display
option does not permit any modification. Alter option is accessible only to authorised users.
Gateway of Tally > Accounts Info.>Ledgers > Single Alter > select
ledger
53
You are allowed to alter any information of the ledger master with the exception
of the Closing Balance of a ledger account, if any, other than closing balance of accounts under
the group ‘stock –in-hand’.
Deleting a ledger account
You can delete a ledger from the alteration mode by pressing <Alt>+<D>. Tally
does not allow deletion of accounts that have transactions. Therefore, should you wish to delete
an account, which has transactions, you must first delete all its voucher entries.
Interest Calculations
Tally allows you to obtain reports on interest calculated by Tally based on the
instructions you furnish. Interest figures are typically desired in the following situations:
1. On outstanding balance amounts
2. On outstanding bills/invoices/transactions (Received and payable)
Tally gives you an exhaustive capability to obtain interest implications on both.
Activate Interest Calculations
Interest is a legitimate return on money invested and chargeable in the business
world on loans and also on delayed payments. Interest can be calculated on the basis of Simple
or Compound Interest.
54
Tally allows you to obtain reports on interest calculated based on the instructions
you furnish. Interest figures are typically desired in the following situations:
• On Outstanding Balance amounts.
• On Outstanding Bills/Invoices /Transactions (Receivables and Payables)
The Activate Interest Calculation field is displayed in the Ledger Creation screen
only if Activate Interest Calculations is set to Yes in F11: Features.
Set this field to Yes for each specific ledger account for which interest is to be
calculated.
Simple Mode (Where advanced parameters are not applicable)
To calculate Interest in the Simple Mode:
1. Go to Gateway of Tally > F11: Features > Set Activate Interest Calculation to
Yes.>Set Use Advanced Parameters to No.
2. In the Ledger Creation screen set Activate Interest Calculation to Yes.
3. The Interest Parameters sub screen is displayed. Enter the Rate and select the
interest style from the list.
Interest calculations on outstanding balances
Enter Interest details in Vouchers (only in case of transaction by transaction/Billby-bill). View Interest reports.
You will have to alter existing ledger accounts to permit interest calculations on
them. The same operation will apply when creating a new ledger account.
Interest calculation on outstanding balances is allowed for any ledger account.
You simply specify the interest rate and style of calculation. Nothing is required to be done for
interest during voucher entry.
Let’s take an example: Interest calculated on Outstanding Balances
1. Go to Gateway of Tally> Accounts Info.> Ledgers> Alter (Single)> Bank Ltd
(bank account)
55
2. Set Activate4 interest Calculation to Yes.
3. On activation, the Interest Parameters must be set. It is the basis on which
interest will be calculated for this Ledger account.
4. Rate: This is the rate at which the interest has to be calculated. In this case,
specify 15%.
5. Interest Style: It is the basis on which the rate is applied. Of the four options,
select 365-Day Year.
6. Accept the screen.
You can now view the amount of interest that could be charged by the Bank.
Report on Interest Calculated on outstanding balances.
The Interest Calculations Report can be displayed and printed.
Go to Gateway of Tally> Display> Statements of Accounts> Interest
Calculations> Ledger> Bank Account
Interest calculation transaction by transaction
Activate and specify interest calculations in ledger masters.
Transaction by transaction or Bill-by-bill interest calculation is permitted for
‘Party’ accounts like accounts falling under the groups Sundry Debtors and Sundry Creditors.
For example:
1. Alter a Customer account (under the group Sundry Debtors or one of its subgroups).
2. Set Activate Interest Calculation to Yes. In the Interest Parameters now you
have three lines to answer.
3. Set Calculate Interest Transaction-by-transaction to Yes.
4. Set Over-ride Parameters for each transaction to No.
If set to No, you are not allowed to change interest parameters in voucher/invoice
entry. If set to Yes, you can change the interest parameters during entry.
Report on Interest Calculated on outstanding transactions/bills
56
To view the Interest calculated
Go to Gateway of Tally> Display> Statements of Accounts> Interest
Calculations> Ledger> CP Ltd
The report is similar to the Bill-wise Outstanding Statement. The last column
gives the interest amount on the transaction. Select the line to be viewed in detail for its
calculations.
How to enter the calculated interest amounts?
Use Debit/Credit Note with Voucher Classes
Use Debit notes for Interest receivable and Credit Notes for Interest Payable.
Interest is calculated on Simple or Compound basis and separate classes should be used for
them.
Set-up Debit/Credit Note Classes for interest entries
Set up Debit Notes. Credit Notes will behave the same way.
Go to Gateway of Tally > Accounts Info.> Voucher Types> Create/Alter
1. Alter the Voucher Type Debit Note.
2. Tab down to the field Class.
3. Type the name of the Class.
4. Type Simple Interest.
Likewise, create a Class – Compound Interest and set Yes to Amounts to be
treated as Compound Interest.
Accept the Voucher Type and return to the Gateway of Tally. Create a ledger
account Interest Received under Group Indirect Income.
Voucher Entry for booking Interest
1. Go to Gateway of Tally> Accounting Voucher> Voucher Entry
2. Select F7: Journal > Debit Note
57
3. A Cost Centre Class is also selected if required. Marketing Expenses Class has
been selected here.
4. There are two situations for interest adjustment:-
Billwise interest
• Simple Interest – Interest amounts are not debited onto the same bills.
Create a fresh reference for it.
• Compound Interest – Amounts are auto-debited to the selected bills. Billwise details will not appear in this case.
5. Interest on balances only
Bill-wise interest entry
Debit CP Ltd
Credit Interest Received
When you debit the party account, a list of bills for which interest is applicable
pops up. Select the bills to adjust. Note that even cleared bills appear.
Select the respective interest bills from the list. The debit amount is filled up with
the total. Select New Ref in the bill-wise allocations. In the interest sub-screen, ensure that the
rate of interest is 0. Now Credit Interest Received. The amount is already filled in.
Your voucher will resemble the one below:
58
Entries for compound interest are exactly the same as for Simple Interest where all
you do is select the Voucher Class Compound Interest. Also the Bill-wise details popup subscreen does not come up as the amounts are added onto the bills.
Select Demo from the list and complete a Debit Note.
Now display Outstanding for CP Ltd
Note the contents:
The Bill reference Demo/28/01 and Demo/31/01d are invoices onto which interest
has been compounded.
A new Reference no 2 has been created for Simple Interest due from CP Ltd.
Entries for Interest on Balances only
Again, the issues are Simple and Compound Interest
Compound Interest
Make the following entries in a Debit note with Compound Interest. Voucher
Class Debit Bank Ltd the amount is automatically filled up with the calculated interest
Credit Interest Received
And nothing needs to be dome! The Bank Account has been increased by the
amount of inte4rest due and the Income account of Interest Received also credited.
Simple Interest
Make the same entry as above.
However, since it has the effect of increasing the Bank Ltd account with the
amount due (compound effect), you must make a journal entry to reverse it. the reversal entry
would be something like this:
Debit Interest Receivable (a current asset account)
Credit Bank Ltd
Use a normal Journal voucher for this entry.
59
We have to necessary go this route to take advantage of the auto filling of the
interest amount which can appear only when we use the Bank Ltd account in Debit Note in the
first place.
Interest Calculation Reports
Interest Calculation report are automatically produced if the feature is activated In
F11: Features and the parameters are set for individual ledger accounts.
There are two types of reports, one pertaining to interest on balances of accounts
like loans, and the other interest on overdue invoices.
Interest reports are available for individual ledger accounts as well as for Groups
Interest Calculation on Ledger Balances (e.g. Loans)
You can get a report on the Ledger balances for the interest calculated.
Go to Gateway of Tally> Display> Statements of Accounts> Interest
Calculations> Ledger
Select Account E.g. Bank Loan Account.
Interest is re-calculated with every change in balance outstanding. The Cr in the
interest amount should not be confused to resemble an Income. It only means that it is payable
and is a Liability.
To ease interest recording, Tally has an interest template, a special voucher class
in Debit Note and Credit Notes.
Specifying Closing Stock Values
Closing stock values have to be specified when accounts and inventory are not
integrated. Tally allows you to specify closing stock values even if your books are integrated. It
would simply ignore the specified figure so long as you maintain the integration. If and when
you select to separate the books, the specified values would automatically be considered.
To enter the closing stock as on a specific date, you must alter the ledger account.
Simply follow the ledger alteration procedure or go from the Balance Sheet via Current Assets.
Go to Gateway of Tally> Balance Sheet> Current Assets> Group Summary
(Or)
60
Go to Gateway of Tally> Accounts Info.> Ledgers> Alter (Single)
Assuming that you had a ledger account ‘Stock’ under the group Stock-in-hand the
information would be as follows
You are allowed to alter the opening balance as well as specify/alter closing
balances on different dates. You would typically specify Balance Sheet dates so that the Balance
Sheet reflects the amount of that date.
Effective Date for Reconciliation (Bank Accounts only)
The Effective Date for Reconciliation is given for accounts falling under the Bank
Accounts Group (or Bank OCC a/c). By default it is the books beginning date.
This is the date from which you can reconcile your bank account in your books
with the bank statements. Normally, it would be the books beginning date.
However, you can import data from a previous version of Tally or from any other
system (where the reconciliation process was not available or was different). In that case, you
may not need to reconcile the bank account with your bank statements from the very beginning.
Give the date from which you want the reconciliation facility to be activated. Then, previous
entries will not appear for reconciliation.
61
Indirect Expenses
DISPLAYING AND ALTERING LEDGERS
Displaying and Altering Ledgers can be done in Single mode and Multiple mode.
The Multiple mode allows you to display and alter multiple Ledgers at a time.
62
Displaying and Altering a Single Ledger
You can view the details of the Ledger Masters in Display mode. Display does not
permit any modification. However you can make changed to Ledger Masters in Alter mode.
Displaying a Single Ledger
Go to Gateway of Tally> Accounts Info.> Ledgers> Display (under Single
Ledger.)
Select the Ledger from the List of Ledgers. The Ledger Display screen in
displayed. You will be able to view the details of the selected Ledger Master.
Altering a Single Ledger
Select the Ledger from the List of Ledgers. The Ledgers Alteration screen is
displayed.
You are allowed to alter any information. Make the necessary changes and Accept
Yes to save.
Specifying Closing Stock Values of a Ledger account the group
Stock in Hand
This is possible only in Ledger alteration mode. Closing stock values have to be
specified when accounts and inventory are not integrated. Tally allows you to specify closing
stock values even if your books are integrated. It would simply ignore the specified figure so
long as you maintain the integration. If and when you select to separate the books, the specified
values would automatically be considered.
To enter the closing stock as on a specific date, you must alter the ledger account.
Simply follow the ledger alteration procedure or go from the Balance Sheet via Current Assets.
Go to Gateway of Tally > Balance Sheet> Current Assets> Group Summary
Assuming that you had a ledger account Stock under the group Stock-in-hand the
information would be as follows:
63
You are allowed to alter the opening balance as well as specify closing balances
on different dates. You would typically specify Balance Sheet dates so that the Balance Sheet
reflects the amount of that date.
DELETING SINGLE LEDGER
You can delete a Ledger account from the Ledger Alteration screen by pressing
ATL+D Tally does not allow deletion of accounts that have transactions. Therefore, should you
wish to delete an account, which has transactions, you must first delete all its voucher entries.
64
DISPLAYING AND ALTERING MULTIPLE LEDGERS
DISPLAYING MULTIPLE LEDGERS
Go to Gateway of Tally> Accounts Info.> Ledgers> Display (under Multiple
Ledger.
Select All Items from the List of Groups to view the details of all the Ledgers in
Tally. If you want to view the details of all the Ledgers created under a Group select the Group
from the List of Groups. The Multiple Ledger Display screen is displayed.
Altering Ledgers in Multiple Mode
Go to Gateway of Tally> Accounts Info.> Ledgers> Alter (under Multiple
Ledger.)
Select any Group or All Items from the List of Groups. The Multi Ledger
Alteration screen is displayed. Make the necessary changes and Accept Yes to save.
Note: You are not allowed to delete a ledger from this mode. Select single alter
mode to delete.
Explanation on Buttons
F3: Company: To work with a different company. In the creation mode, you
can create cost categories in the other company. In alter mode, you can copy the information by
accepting
the
screen
(<enter> or <Ctrl>+<A>). The old company’s information remains. Not available in Display
mode.
F3: New Cmp: To work on the same report of another company. Available
only in display mode.
F4: Parent: To move the cursor to the field ‘Under Group’
F4: New Parent: To bring up the list of Groups to select a new parent Group.
Zero Op Bal: To nullify (change to zero) all opening balances in this group.
F6: Skip names: For faster data entry when you do not need to the names of
ledgers. The cursor will not go to that column ‘Under’. Toggle to ‘Edit Parent’.
65
F7: Skip Parent: For faster data entry when you do not need to alter the parent
Group. The cursor will not go to the column ‘Under’. Toggle to ‘Edit Parent’.
F8: Skip Details: the cursor will not go to the columns Opening Balance and
Dr/Cr. Toggle to ‘Edit Details’.
F9: Show Closing: Closing Balances replace Opening Balances. This is
available only in alter mode. Closing balance is not alterable and the cursor skips the field.
F10: Chg Sort: To display a column of sorting position indices. Toggle to
‘Skip Sort’. You may change display positions of ledger accounts under the group.
Groups, Ledger, Cost Categories, and Cost Centres: To enable you to switch to
these areas without having to quit from the current screen.
66
Chapter
4
Cost Centres and
Cost Categories
A Cost Centre is any unit of an organization to which transactions (generally,
revenue) can be allocated. When only costs or expenses are allocated to these units, they are
referred to as Cost Centres. When profits are also allocated to these units, they become Profit
Centres. You can now obtain a Profit and Loss account of each such Profit Centre.
Cost Centre in Tally allows an additional dimension to a transaction where a
Ledger account indicates the nature of thee transaction. It does not readily disclose, except in the
narration field, which part of the organization was involved in the transaction.
By providing Cost Centres, a transaction can be allocated to it, which would then
enable extraction of all transactions for a Cost Centre. Tally gives you the Cost Centre break-up
of each transaction as well as details of transactions for each Cost Centre.
Some examples of Cost Centers are
• Departments of an organization – Finance, Manufacturing, Marketing, and so
on.
• Products of a company.
• Individuals such as Salesman A, Salesman B.
USE OF COST CENTRES
You can classify Cost Centres just as how you classified Group/Ledger accounts.
You can have Primary Cost Centres and several levels of Cost Centres under each Primary Cost
Centre.
Consider the following example.
Primary Cost Centres - Finance, Manufacturing, Marketing.
Under Marketing, classify the company’s sales executives as Cost Centres. This
will help you track a sales executive’s performance, in terms of cost and revenue generated.
67
You will then have the following Cost Centre structure (shown here only for the
Marketing Department):
Primary Cost Centre – Marketing
Under Marketing:
Salesman A
Salesman B
Salesman C
Allocate expenditure incurred on sales by the salesmen, as well as the sales
generated by them, directly to their Cost Centres. The allocation is done online at the time of
tr4ansaction entry. This prevents allocation problems at the end of the period, when you find a
large number of transactions not allocated.
By allocating expenses and sales transactions to the salesman, you are setting up a
valuable information system that tracks the performance of your salesmen.
CREATING A SINGLE COST CENTRE
To create a Cost Centre, set Maintain Cost Centres to Yes in F11: Features. It is
advisable not to set More than ONE Payroll/Cost Category to Yes, unless required.
By default, Tally activates the Cost Centre feature for Ledger accounts under Sales
Accounts, Purchase Accounts, Expense and Income groups.
Go to Gateway of Tally> Accounts Info.> Cost Centres> Create (Single Cost
Centre)
The Cost Centre Creation screen displays.
68
A brief explanation on each of the fields in the Cost Centre Creation screen
follows.
Name
Enter the name of the Cost Centre in this field. For example, Bangalore.
Alias
Enter an alternative name, if required. For example, the Cost Centre Bangalore can
be referred to as Head Office or by a code number.
Under
Select the parent Cost Centre under which the Cost Centre needs to be created
from the list of Cost Centres. If you want the Cost Centre to be a Primary Cost Centre, select
primary from the list.
Note: Unlike Groups, you can allocate transactions to Primary Cost Centre.
However, you should do so when you do not have Sub Cost Centres under the Primary Cost
Centre. It is suggested that you allocate transactions to the lowest levels (similar to ledgers).
DISPLAYING A SINGLE COST CENTRE
To display the details of Cost Centre masters
Go to Gateway of Tally> Accounts Info.> Cost Centres> Create (Under Single
Cost Centre)
The Cost Centre Display screen appears. It is not possible to make any
modifications to the Cost Centre master in the Display mode. You can only view the details in
this mode.
Altering a Cost Centre
To alter an existing Cost Centre
Go to Gateway of Tally> Accounts Info.> Alter > Create (Under Single Cost
Centre)
The Cost Centre Alteration screen appears. Make the necessary changes and
Accept to save.
Deleting a Cost Centre
69
You can delete a Cost Centre from the Cost Centre Alteration screen by pressing
ALT+D.
You can delete a Cost Centre only if
• It does not have any Cost Centres created under it.
• It is not used in any transactions.
EXPLANATION ON BUTTONS FOR COST CENTRES IN
SINGLE MODE
Groups, Ledger, Voucher Types
It enables you to switch to these areas without having to quit from the current
screen.
F11: Features
To change company features.
F12: Configure
To change the configuration of master information.
Note: Configuration changes affect all companies in the data directory. Whereas
Features changes affect the current company only.
Altering a Cost Centre
To alter an existing Cost Centre
Go to Gateway of Tally> Accounts Info.> Alter > Create (Under Single Cost
Centre)
The Cost Centre Alteration screen appears. Make the necessary changes and
Accept to save.
Deleting a Cost Centre
You can delete a Cost Centre from the Cost Centre Alteration screen by pressing
ALT+D.
70
You can delete a Cost Centre only if
• It does not have any Cost Centres created under it.
• It is not used in any transactions.
COST CATEGORY
Cost Categories are useful for organizations that require allocation of resources to
parallel sets of Cost Centres. Such organizations would usually be project oriented.
Most organizations would not need Cost Categories. The proper use of Cost
Centres itself would offer the same benefits. Cost Categories could increase data entry work and
make it more complicated. Hence, before opting for Cost Categories, evaluate whether you
actually need this option. Always attempt to first use Cost Centres.
Use of Cost Categories
By using cost Categories you may allocate, in parallel, a transaction to more than
one set of Cost Centres. The following example illustrates the use of Cost Categories.
The Primary Cost Centres such as Marketing, Finance and Manufacturing can now
be-long to a category – Departments.
The Salesman A, Band C can be Cost Centres under a Category – Executives.
Similarly, you can create4 a new Cost Category ‘Projects’ under which Cost
Centres such as Airport construction, Road construction and Buildings may be created. The
classification appears as in the following matrix.
Cost
Categories:
Departments
Executives
Projects
Cost Centres:
Marketing
Manufacturing
Finance
Salesman A
Salesman B
Salesman C
Airports cont.
Roads const.
Buildings
Specify a Cost Category to allow allocation of only revenue items or items of both
revenue and capital nature. In this example, allow both for Departments and Projects Categories
and only revenue for Executives.
Salesman A incurs conveyance expenses of Rs. 1000. If he has incurred it for
marketing, allocate this amount to the Cost Centre – Marketing and his own Cost Centre71
Salesman A. (Allocate this while entering a payment voucher debiting Conveyance and
crediting Cash.). If the salesman now incurs expense for the project Buildings, allocate to the
Cost Centres – Salesman A and Buildings.
Allocate an expense to one or more Cost Centres. It is not essential to always
allocate expenses to all Cost Centres. If you did not create Cost Categories, you would have
been able to allocate the expense to either the Project Buildings cost centre or Salesman A, not
to both.
You can obtain details of conveyance expenses incurred by Salesman A on
Marketing as well as on the Buildings project when you have Cost Categories.
You cannot, however, extract a single report giving details of marketing expensed
incurred by Salesman A on the Project Buildings. These are different Cost Categories and
cannot be merged. If such reports are required, you must create ledgers such as ConveyanceMarketing which will help you generate the desired report.
By allocating expenses to parallel Cost Centres under different categories, you are
simply assigning the amounts to them; the amount does not increase. In the above example, the
conveyance of Rs. 1000 remains an expense of Rs. 1000 only. Tally performs an automatic
reconciliation on real- time basis, saving you the effort of reconciling Ledgers and Cost Centres.
Note: Transactions are not allocated to Cost Categories but to Cost Centres only.
GREATING A SINGLE COST CATEGORY
To create a Cost Category, set Maintain Cost Centres to Yes in F11: Features and
the set More then ONE Payroll/Cost Category to Yes.
By default, it is set to No. Tally creates a single Cost Category called Primary Cost
Category and allocates all Cost Centres created, prior to enabling this feature, to this category.
You can create new cost categories, and alter the existing Cost Centres to allocate them under
required Cost Categories.
72
To create a Cost Category
Go to Gateway of Tally> Accounts Info.> Cost Categories> Create (Under Single
Cost Centre)
The Cost Category Creation screen displays.
A brief description on each of the fields in the Cost Category Creation screen
follows.
Name
Enter the name of the Cost Category. For example, Products.
Note: There is no sub-classification of Cost Categories and hence you do not find
an Under option. Though there is a Primary Cost Category, it is not a parent of other categories.
(Alias)
Enter an alias if you wish to call the Category by another name or even by a code
number. this field displays only if you set Allow ASVANCED entries in Masters in Gateway of
Tally > F12: Configure> Accts/Inv Info. to Yes.
ALLOCATE REVENUEITEMS
Set this options to Yes, to allocate all sales, purchase, expenses and income related
transactions to Cost Centres that you create under the Cost Category. Normally, you would
enable this option. However, should you need to allocate only capital/non-revenue items only to
Cost Centres in that cost category, set this to No.
ALLOCATE NON-REVENUEITEMS
73
You would, usually, disable this options by setting it to No as most Cost Centres
need only revenue allocation. However, should you wish to allocate items of non-revenue
(capital) or Balance Sheet items, you may set it to Yes. Organizations increasingly incurred on
Cost Centres and measure them against revenue earned. Recognizing this trend, Tally has
provided this option.
Note: Enable either revenue or non-revenue items, or both. Do not disable both.
Tally sets Yes, by default, for revenue items and No for Non-revenue items.
DISPLAYING SINGLE COST CATEGORY
To view the details of the selected Cost Category masters from this mode
Go to Gateway of Tally> Accounts Info.> Cost Categories> Display (Under
Single Cost Category)
Select a Cost Category form the List of Categories. The Cost Category Display
screen displays.
You cannot make any changes to the fields in the Display mode.
ALTETING SINGLE COST CATEGORY
To alter and existing Cost Category
Go to Gateway of Tally> Accounts Info.> Cost Categories> Alter (Under Single
Cost Category)
Select a Cost Category form the List of Categories. The Cost Category Alteration
screen displays. Make the changes in the required fields and Accept to save.
Deleting a Cost Category
You may delete a Cost Category that does not have any cost centre under it from
the Cost Category Alteration screen. Use ALT+D to delete it. tally does not allow deletion of a
Cost Category that has Cost Centres.
Buttons in Single Cost Category screens
Groups, Ledgers, Voucher Types
It enables you to switch to these areas without having to quit from the current
screen.
74
F11: Features
To change company features. A detailed explanation on features has been given in
the earlier section under Gateway of Tally.
Note: Configuration changes affect all companies, whereas Features changes
affect only the current company.
75
Chapter
5
Introduction to Budgets
A budget is a plan prepared for the flow of funds in an organization. It contains
financial guidelines for the future plan of action for a selected period of time.
A budget helps to refine goals and use funds efficiently. It provides accurate
information for evaluation of financial activities, aids in decision making and provides a
reference for future planning.
• Multiple budgets can be created for specific porpoises in Tally. Budgets for
Banks, Head offices, Optimistic budgets, Realistic budgets, Pessimistic budgets, and so on can
be created. Departmental budgets like Marketing Budgets, Finance Budgets, and so on, can also
be created. Budget figures can be used in Tally to compare actuals and variances.
In Tally, you can create, alter and delete a budget.
ACTIVATING BUDGETS FEATURE
To activate the Budgets feature in Tally:
• Select F11: Features > Accounting Features
• Set Maintain Budgets and Controls? to Yes.
• Accept to save.
CREATING A BUDGET
To create a Budget in Tally
• Go to Gateway of Tally > Accounts Info> Budgets> Create
• In the Budget Creation screen enter a Name for your budget.
• Select from the List of Budgets for Under field. You can have a hierarchical
setup for budgets. In the List of Budgets, Primary is at the top of the hierarchy and you can
create more primary budgets. Sub-budgets can be created under Primary budgets.
76
• Enter the period of the budget in the From and To fields. The period entered
can be a month, a year or any other period.
• In Set/Alter Budgets of, select
• Groups – To create a budget for a Group of ledger accounts.
• Ledgers – To create a budget for Ledgers.
• Cost Centres – To create a budget for Cost Centers.
• Accept to save.
BUDGET FOR GROUPS
Set Yes in the Groups field in the Budget Creation/ Alterations screen to set
budgets for a group or group of ledgers.
In the Group Budget screen, select a Group from the List of Groups and enter
Account Name.
Enter the cost center for a group in Cost Centre. Select Not Applicable, if the
budget is not for a particular cost centre, but for th company.
In Type of Budget, select from the following two types.
1. On Nett Transactions
77
Select this option to monitor the transaction amounts, not the balances. Nett is not
of debits and credits for the specified period. For example, Nett transactions for Indirect
Expenses are the debit amount for the specified period after reducing the credits for the same
period. Opening and closing balances are not considered.
2. On Closing Balance
Select this option to monitor the balance of the accounts, not the transactions. For
example, balances of bank accounts, balances of debtors.
Enter the budget amount in the Amount field.
BUDGET FOR LEDGER ACCOUNTS
Set Yes in the Ledgers field in the Budget Creation/ Alteration screen to set
budgets for ledgers.
In the Ledger Budget screen, select a Ledger from the List of Ledgers and enter
Account Name.
Enter the cost centre foe a group in Cost Centre. Budgets can be created for ledger
accounts pertaining to a cost centre. For example, Accountancy Fees for Finance Group.
Accountancy Fees can be repeated for another cost centre such as a Branch. Select Not
Applicable if the budget is not for a particular cost centre, but for the company.
In Type of Budget, select from the following two types.
1. On Nett Transactions
78
Select this option to monitor the transaction amounts, not the balances. Nett is not
of debits and credits for the specified period. You do not expect to have a negative figure in
Revenue items which reflect the transacted amounts. If there are negative figures, they are
adjustments. For example, an expense account like travel always has debit entries unless there is
a reversal due to error or change to a customer.
Caution: When using Nett Transactions, the Budget Closing Balances actually get
adjusted even if you have not selected this type. The figures in the Profit & Loss Account reflect
the Closing Balance figures.
Note: To compare transactions against budgets, especially revenue income and
expenses, select On Nett Transactions.
2. Closing
Balance
Select this option to monitor the balance of the accounts, not the transactions. For
example, balances of bank accounts, balances of debtors.
Note: To compare closing balance figures in final statements, especially Balance
Sheet items like assets and liabilities, select Closing Balances.
Enter the budget amount in the Amount field.
Apportionment of budget specified for periods more than a month
• Ledger Budgets are apportioned for each month on the basis of number of
days.
• Group Budgets do not get apportioned. Hence, Budget for Current Assets does
not automatically flow to sub- groups.
79
• Closing Balances Budget: Each month will have the same budget value except
that the actual Opening Balance is taken into account.
• Nett transactions Budgets specified for a period get equally apportioned over
the period.
• Enter the budget amount for the specific ledger.
• You can set the Budget for as many ledger accounts as required and accept to
save.
• Use Columns and Variance options to compare budget figures with actuals in
most statements.
BUDGETS FOR COST CENTRES
The purpose of a budget is to control expenditure. You can create multiple budgets
in Tally, each for a specific purpose such as for the Bank, for the Bank, for the Head Office,
Marketing budgets, Finance budgets, and so on.
• Set Yes in the Cost Centres field in the Budget Creation/ Alteration screen to
set budgets for cost centres.
• In the Cost Centre Budget screen, select a Cost Centre from the List of Cost
Centres and enter Cost Centre.
• Enter a budget figure in Expenses for the cost centre.
• Enter a budget figure in Income for the cost centre.
• Enter Closing Balance.
• Enter more cost centres, if required, and acci0pt to save.
80
ALTER A BUDGET
You can modify a budget, using the alter option.
• Go to Gateway of Tally> Accounts Info> Budgets> Alter
• In the Budget Alteration screen, modify the fields as required. Change the
period or change budgets of Groups, Ledgers and Cost Centers.
Note: Set/Alter Budget is set to No by default. Set this option to Yes to alter.
DELETING A BUDGET
To delete a budget
• Go to Gateway of Tally> Accounts Info> Budgets> Alter
• Press Alt+D.
BUDGET VARIANCE
Trial Balance and Group Summary have a feature called Budget Variance. The
Budget Variance button (Alt+B) is active if Budgets feature is enable and at least one budget
created. Budget Variance displays Budgets, Actuals with percentage and Variance from the
budget with percentage.
1. Budget Variance can be accessed from:
• Gateway of Tally> Display> Trial Balance to display the Trial Balance screen.
81
• Gateway of Tally> Display> Account Books> Group Summary and select a
group form List of Groups to display th Group Summary screen.
2. Click on Budget Variance (Alt+B) from the toolbar to display the Budget
Analysis screen.
3. Select from the List of Budgets for Budgets/Scenario.
4. Three columns display Budget, Actuals and Budget Variance, respectively.
82
Chapter
6
Introduction to voucher
A voucher is the primary online document for recording transactions. Transactions
recording and analysis are greatly facilitated by having specific formats for different types of
transactions. Tally provides 16 different predefined voucher formats or what it calls predefined
types of vouchers. These are used for recording various transactions. A payment voucher is used
for all types of payments, a receipt voucher for all types of money receipts, a sales voucher for
recording sales transactions, and so on.
These predefined vouchers fulfill your normal transaction needs. They pertain to
both accounting and inventory. Some of these vouchers can also be used differently according to
the situation, e.g., sales vouchers can be used as invoices, vouchers can be post-dated, etc. Such
use can be decided at the time of voucher entry by selecting the appropriate button.
The predefined voucher types can be displayed as follows:
Gateway of Tally> Display> List of Accounts> <Ctrl>+<V> [Voucher Types]
83
Tally acknowledges the special requirements of some users for more voucher
types. These arise in cases like when you need the same voucher but in different names or
separate series of numbers.
Examples include Cash Payment Vouchers and Bank Payment vouchers where the
relevant predefined voucher is Payment Voucher. You may have two or more sets of Sales
Vouchers for different kinds of also transactions e.g. Credit Sales, Cash Sales, etc.
You would need to alter a voucher type to change default setting for different
information appearing in vouchers. Using F12: Configure, you can further configure a voucher.
ALTER A PREDEFINED VOUCHER TYPE
Even if you do not need extra voucher types, you would normally alter the
predefined voucher types to customize them according to your needs, e.g., to control their
numbers.
Display or alter each voucher type (by pressing enter or double clicking) after
Gateway of Tally> Display> List of Accounts> Ctrl+V Voucher Types
We shall create a new voucher type to explain the different features. It would also
be applicable to alteration of voucher types including predefined types.
CREATING A VOUCHER TYPE
Go to Gateway of Tally> Accounts Info.>Voucher Type> Create
Note: A new voucher type must assume the functions of a predefined voucher type
The Voucher Type creation screen is divided into three sections depending on the
various setting.
84
Name
Give the name of the new voucher type, e.g., Sales Invoice.
General
Type of Voucher
The type of voucher should be any one of the predefined voucher types (already
listed in introduction). The new voucher type would inherit the properties of this predefined
voucher type. It would function exactly like the predefined voucher.
Abbreviation
An abbreviation is required particularly for unformatted reports, which do not use
compressing techniques. (Tally allows printing of both formatted and unformatted reports).
Event if the Abbreviation is not specified, Tally automatically sets a default name to the
Voucher. In this example, give ‘Purch’ as the abbreviation. Though there is no restriction on the
length of the abbreviation, it should preferably be five characters or less.
Method of Voucher Numbering
This is, perhaps, one reason for your opting for a new voucher type. There are
three methods available:
None
This will disable numbering of such vouchers. If you select this method, no further
information is required.
Manual
This method will allow you to number vouchers of this type your self. It does not
check for sequence of the numbers and permits you to specify anything you wish in the voucher
number field. However, you may choose to prevent entry of duplicate numbers. If you do,
enable the next field ‘Prevent Duplicates’.
1. Prevention of Duplicates is possible if you enable the option at the time of
creation. You may enable it later (by alteration) only if there are no transactions of this voucher
type.
2. If you face difficulty because transactions now exist, simple create another
voucher type for preventing duplicates of subsequent voucher number
85
No further information is required for manual numbering method.
Automatic
This method is both flexible and exhaustive. Use it carefully to give you your
desired numbering system. Select this option to let Tally number the vouchers automatically for
you.
Use Advance Configuration
If the Method of Voucher Numbering is set to Automatic, then an additional field
to set the advanced configuration for the Voucher type appears. Setting this field to Yes,
Voucher Type Creation (Secondary) screen appears.
A further discussion on these options is necessary.
Use EFFECTIVE dates for vouchers?
Select Yes if you want to enter effective dates for vouchers. You would opt for
this if you have instances where a transition under consideration for overdue/ageing analysis is
recorded currently but will take effect from another date. If effective date is entered, the
overdue/ageing will be considered from the effective date and not from voucher date.
Make Optional as Default
Setting this option to Yes, will set your Voucher to Optional Voucher by default.
Use common narration?
Select Yes to give a common narration for the entire voucher. Tally vouchers can
have multiple entries. Hence, you may wish to give a common narration for all the entries of the
voucher or a separate narration for each entry or both. Select Yes even when you want both.
Select No if you do not want a common narration.
Example of common narration in a voucher:
86
Narrations for each entry
Select Yes if you want to give a separate narration for each entry of a voucher.
This would be applicable for a multiple entry voucher where you want separate details for each
entry. Select Not if you do not want separate narration for each entry.
Note: The option to create an Excise Voucher type appears in the General section
if, the Excise feature is enabled in F11 features.
PRINTING
Print after saving voucher?
87
If you want to print every voucher after entering it, select Yes, else select No. This
is suitable for an online environment where you use the Tally printed voucher as the formal
voucher. Remember, however, that the transaction is already recorded and posted and should
you wish to make corrections to the printed voucher, you must alter the Tally voucher online
and print it out again.
Note: Depending on the Type of Voucher you have selected to create or alter,
different printing features appear in this field.
Name of Class
You can create classes by entering the class name in this section
If the Method of Voucher Numbering is set to Automatic, then and additional field
to set the advanced configuration for the Voucher type appears. Setting this field to Yes,
Voucher Type Creation (Secondary) screen appears.
Starting number
Give the number for the first voucher. Usually it is 1. You can set it to any number
you want. Tally will auto-increment from this number for subsequent vouchers. However, the
numbering of vouchers also depends on other variables supplied by you, which follow hereafter.
Width of Numerical Part
88
You may leave it blanks to let Tally automatically adjust the width according to th
number. however, for more aesthetically aligned look in reports, you may keep a fixed width,
e.g., 3.
Prefill with ZERO?
When the width is specified, the digits before the number is blank if ‘No’ and
zeroes if ‘Yes’
E.g. 001 1
O10 10
PEU/001/06-07
PEU/1/06/07
PEU/1/06/07
Restart Numbering
Voucher Numbering may be restarted with the starting number (as specified) at
intervals selected by you- Daily, Monthly, Never, Weekly or Yearly. You must give the date
whence numbering should restart under the field Application from. The date must be the first
day of the month. You may specify more than one Restart dates. For example, should you wish
to renumber your vouchers form o1 June 06 on yearly basis, you must specify it in the next
field. this would retain the numbering system in the period. If, however, you want to change the
numbers from the beginning from monthly to yearly basis, simple alter the first field itself.
Prefix Details
If you want the voucher numbers to be prefixed with some fixed information, give
the information here. Examples of prefix details are:
1. month of the voucher as given above-‘April/’
2. company info like ‘TSPL/’
3. even fixed number series like ’1000’
Note: The numeric portion begins immediately after the prefix information.
Therefore, be sure to give a space or a slash ’/’ or some such character should you want a
separation, e.g. we have specified April/. The slash would cause the voucher number to appear
as April/001. other-wish it would be April001. This facilitates simple usage for fixed number
series appearing as 200100001 where 2001 is the prefix, and 00001 is the starting number with a
width of 5, and with leading zeros.
89
You can choose different prefix information for different periods or let one
continue. The prefix continues from the date you mention under ‘Applicable from ‘till the next
date that you may give under ‘Applicable from’. Hence, we have chosen to change the prefix
from April to May when the month changes. Please note, however, that if we omit to change the
prefix for the subsequent months (i.e. do not give ‘Applicable form’ date for the month), your
voucher numbers for even June, July etc would contain the prefix ‘May/’.
Suffix Details
You can also give fixed suffix information for the voucher number. The same
rules and effects as for Prefix Details apply.
VOUCHER CLASSES
Voucher Classes are available for all major voucher types and the Cost Centres
can be allocated if classes are used. Automation of cost centre allocation has met the need of
‘percentage allocation’ based on predefined figures.
Cost centre classes affect all voucher types.
Voucher Classes for Payment, Receipt and Contra Vouchers
The primary intention of using classes for payment, receipt and contra vouchers is
to enable data input in ‘single entry’ or list rather than in Tally’s traditional double entry mode.
You can also use it to have a separate from for each cash and bank account.
Let us take an example of a Payment Voucher.
You can either alter the existing Payment Voucher Type or create a new voucher
type based on it.
(From Gateway of Tally> Account Info> Voucher Types)
The item Name of Class is below Effective Dates for Voucher and above the
Numbering Table.
Give a name to the class by simply typing it, e.g. Barclays Band Payment. You
may create more than one class. Hence, you might want to have one more for Cash Payment.
The Class Table
Exclude these Groups
90
Groups other than Bank or Cash groups should not be selected. This is used to
exclude Cash or Bank Groups that are not to be used in this class to pay out the money. In out
example, we want to exclude Cash and Credit Cards.
Exclude these Groups
Groups other than Bank or Cash groups should not be selected. You might exclude
a top level group but include its sub-group.
Ledger Name
Selecting the ledger account that will be used to pay out the money will eliminate
the need to select it during entry. In title case, it is BareSlays Bank. In a receipt voucher, you
will select the ledger account into which monies will be received. You may even select ‘Not
Applicable ‘. The purpose of selecting ‘Not Applicable’ will be to permit Single Entry mode and
at the same time relaining the option of selecting the account during entry.
Note: Exclude or include Groups are irrelevant when you specify a Ledger Name
for which the class is created. They are useful when you select ‘Not Applicable’.
In case you do not require split payments, you could create only one class with
nothing in include/exclude Groups and without any ledger Name. A single class does not require
class selection and is a rapid way of using Single Entry mode with full functionality of all
ledgers available.
Accept the class table and the voucher type alteration. You may use [CTRL] + [A]
combination.
PAYMENT VOUCHER ENTRY WITH CLASSES
Select Voucher Entry at the Gateway of Tally. Press F5: Payment. You have to
select a class or Not Applicable if no class is desired for this entry. If Cost Centre Class has been
set, it can be selected too.
The entries will be made as
PURCHASE ENTRIES INVOICE MODE (WITHOUT CLASSES)
Purchase Voucher can now be created in Invoice mode. You can enter the
suppliers’ invoices in the same way as they physically appear.
Set-up Invoice Mode entry for Purchase transactions
91
1. Select F11: Company Features.
2. Select F1: Accounting Features.
3. Set the option ‘Allow Invoicing’ to Yes.
4. Enter Purchases in Invoice Format? Set it to Yes.
5. Accept the screen using Ctrl+A.
ENTRY OF PURCHASE VOUCHERS IN INVOICE MODE
Select F9: Purchase. Select As Invoice button or use CTRL+V. This button is a
toggle for Invoice and Voucher modes. You may want to use the voucher mode for more
complex entries.
Entries are exactly like sales invoices and hence are not discussed.
The treatment of additional cost of purchase needs elaborating.
ADDITONAL COST OF PURCHAESE
If it is desired to add the other purchase expenses like freight and import duty to
the cost of the item, you would have activated the option in F11: Company Features ‘Track
92
Additional Costs of Purchases’. In voucher mode, the additional cost details have to be filled in
after the allocation of each purchase item.
In Invoice mode, the treatment of additional costs on stock items is automated by
altering the parent group master details of the expenses.
In Invoice mode, than one item is purchased where the expense that is incurred for
them is charged as a lump-sum. However, to give an effective cost including the expense to each
purchased item, you would earlier give additional costs of purchase for each item. That method
though very flexible and practical could be tedious. That process is now automated and
allocation of the expense to stock item can be done on a predefined basis.
The following set-up activity is required to be carried out:
1. Alter the Parent Group of the expense ledger accounts, e.g. Direct Expenses.
You will find a new option – Method to Allocate when used in Purchase Invoice. If you want to
appropriate the ledger accounts under this group to stock items by either Quantity or value, you
must select the option. Select Appropriate by Qty for out example.
Now if freight belongs to the group Direct Expenses, the amount will be
apportioned by quantity, i.e., in the ratio of 1:5. If however, the parent group does not have and
allocation method or is set to No Appropriation or Not Applicable, the amount of freight will not
be apportioned to the items and will simply remain in the financial books as expense.
Note: In Invoice mode, Purchases can be allocated to Cost Centres only when Cost
Centre classes are used, i.e., you have to auto- allocate purchases to cost centres if you are using
the invoice mode of entry. Using the voucher mode of entry for purchases allows manual
allocation of purchase to cost centres.
93
Chapter
7
Currencies
(Multiple currencies and foreign exchange)
Many Organizations have transactions in more than one currency. Such
transactions have to be recorded either in the base (home) currency or in the foreign currency. If
the transactions are recorded in home currency, the rate at which the foreign currency is
exchanged should be recorded as well. At times you need to record the transaction in the foreign
currency itself when you maintain the balance of the concerned account in foreign currency.
Tally uses the tern base currency for the currency in which your account books are kept. Foreign
Exchange is used interchangeably with foreign currency. The base currency is specified while
creating the company.
Tally makes it easy to manage multiple currencies, automatic calculations of
exchange rates, automatic conversion of any currency used to record a transaction to the
currency of the account, etc.
The Balance Sheet and Profit & Loss Account of the company is maintained in the
base currency. Conversion of foreign currency account balances is done as per rules set by you.
ENABLING MULTIPLE CURRENCY IN TALLY
Enable Multi-Currency feature to view and enter transactions in multiple
currencies.
1. Go to Gateway of Tally
2. Select F11: Features > Accounting Features> to display the Company
Operations Alteration screen
3. Set Allow Multi-Currency? to Yes
4. Accept to Save.
Multi Currency feature is now enabled.
CURRENCIES MENU
94
View the Currencies menu from Gateway of Tally > Accounts Info > Currencies.
Creating a Currency
Use ASCII Special Characters with [Alt] key combination if our keyboard does
not have the symbol. Utilities like Character Map (Start>All Programs>Accessories> System
Tools) in Windows shows the key combination for most symbols. This might be different on
some notebook computers, refer to the computer’s user manual or the vendor.
You cannot assign a duplicate currency symbol for a company in Tally.
The Key combinations for a few currency symbols are given below:
1. Alt + 156 – Pound Sterling - £
2. Alt + 0165 – Japanese Yen - ¥
3. Alt + o128 – Euro - €
4. Use the Dollar and the Rs. Symbol from the keyboard.
To create a foreign currency
1. Go to Gateway of Tally > Accounts Info.> Currencies> Create
2. Enter the currency symbol in Symbol. This symbol appears in your reports
wherever applicable.
3. Enter the name of the currency in Formal Name.
95
A formal name is required to distinguish different currencies with the same
symbols. For e.g. you have created two companies (ABC and PQR) in Tally. ABC and PQR
have different set of currencies. ABC uses symbol $ for Australian Dollars and PQR uses the
symbol $ for U.S. Dollars. The formal name. distinguishes two different currencies with the
same symbol when you compare accounts of two companies.
The company that is loaded first retains the original symbol for display purposes.
The other company’s currency symbol will be prefixed with the first letter/first letters (to make
it unique) of the formal name. Here, if ABC is loaded first then the symbol $ is for Australian
Dollars and in PQR (loaded next) the symbol $ is prefixed with the letter U (first letter of its
formal name).
e.g., US Dollars, Pound Sterling, Indian Rupees, Omani Rial, etc.
Note: You cannot assign a dup0licate Formal Name for a company in Tally.
4. Enter the number of decimal places for the currency in Number of Decimal
Places. E.g. Currencies with 2 decimal places like paisa and currencies with three decimal places
like diner. There are currencies that do not have decimal places, e.g., Vietnamese Dong
5. Tally has two formats for displaying an amount, viz., in millions and in lakhs.
1000000 (one followed by six zeroes) in millions format would appear as 1,000,000 and lakhs
would appear as 10, 00,000.
Selecting No means you want amounts to appear in lakhs.
Note: You can always specify the appearance of numbers in specific reports, e.g.
In Profit & Loss Account display, press [F12]: Configure to change scale factors for values.
6. Set Is Symbol SUFFEXED to Amounts? to Yes for the symbol to appear after
the amount. Set to No for the symbol to be prefixed to the amount.
7. Set Put a SPACE between Amount and symbol? to Yes to apply a space
between amounts and symbol.
8. Enter the symbol for decimal portion of currency in Symbol for Decimal
Portion of Amount. E. g. Ps. For Paisa.
9. Enter the number of decimal places for printing the amounts in words in
Decimal Places for Printing Amounts in Words. This number should be equal to or lesser than
the number specified in Number of Decimal Places field.
Note: The Currency cannot be translated or transliterated but will appear in
the Language created.
96
ALTER CURRENCY
You can modify or delete a currency master using the Alter option. Rates of
Exchange can also be altered from here.
To alter a currency master:
1.
Go to Gateway of Tally > Accounts Info.> Currencies> Alter
2. Select a Currency from the Currencies list (displayed if there is more than 1
currency)
3. In the Currency Alteration screen alter details as required. For details see
Creating a Currency Master
DISPLAYING A CURRENCY
The currency Display screen displays the details and rates of exchange for a
selected currency.
To display the Currency screen.
1. Go to Gateway of Tally > Accounts Info.> Currencies> Display
2. Select a Currency from Currencies list (displayed if there is more than 1
currency)
3. Enter to view the details
DELETING A CURRENCY
97
To delete a Currency
1. Go to Gateway of Tally > Accounts Info.> Currencies> Alter
2. Select a currency from the Currencies list (displayed if there is more than 1
currency)
3. Press Alt + D in the Currency Alteration screen to delete
Note: You cannot delete a Currency that has been used in a voucher
transaction.
RATES OF EXCHANGE
Rate of Exchange is a feature wherein you can enter the rate of foreign currency
for a specific date. Foreign exchange variations occur every day with different selling and
buying rates. Rate of Exchange helps you apply the rate for the given date in your transactions.
To open Rates of Exchange:
1. Go to Gateway of Tally > Accounts Info.> Currencies> Rates of Exchange
2. The Multi-Currency Alteration screen is displayed
3. Enter the date for which the exchange rate is applicable
98
4. Enter the Standard Rate (optional) which is used to calculate variances from
the actual transaction rates
5. Enter the Setting Rate (your setting rate)
6. Enter the Buying Rate (your buying rate)
7. Accept to Save
Note: Last Voucher Rate is displayed if any voucher has been entered earlier.
SELLING RATE – SPECIFIED RAT
Setting rate is your selling rate (as opposed to bank’s selling rate) used for receipt
voucher entry where you receive foreign exchange.
This is the rate obtained from the daily newspaper or your banker. If you input this
rate before any transaction entry, while entering a foreign transaction, this rate will be brought
up by default. (You can still change the actual rate).
The actual rate at which the currency was last used is displayed and cannot be
changed.
The specified rate is used for calculating foreign exchange variances only in case
there is no standard rate.
BUTING RATE – SPECIFIED RATE
Buying Rate is your buying rate (as opposed to bank’s buying rate) used in
payment vouchers.
The actual rate at which the currency was last used is displayed and cannot be
changed.
The specified rate is used for calculating foreign exchange variances only in case
there is no standard rate.
Note: Tally calculates Gain Loss in foreign exchange transactions automatically
using the standard rates, specified rates and actual transaction rates
99
Chapter
8
Inventory information
The Inventory Info menu lists the masters, through which you can provide Tally
the details of your company’s inventory.
Go to Gateway of Tally > Inventory Info.
Note: The Inventory Info menu is displayed in Gateway of Tally, only select
Maintain Accounts with Inventory forma the Type of Company list in the Company Creation
screen.
STOCK GROUPS
Stock Groups in Inventory are similar to Groups in Accounting Masters. They are
helpful in the classification of Stock Items. Classifications is based on some common behaviour.
Stock Group enable easy identification and reporting of Stock Items in statements.
You can group Stock Items under different Stock Group to reflect their
classification based on some common functionality. Grouping enables you to locate Stock Items
easily and report their details in statements.
You can group the items of a particular brand to extract stock of all items of that
brand.
Consider that the Stock Items in your inventory are Sony 3.5” disks, Maxell 3.5”
disks, Sony tapes, Maxell tapes, and so on. Create Stock Groups, Sony and Maxell, and classify
Sony products under the group Sony and Maxell products under Maxell. You now have ready
details of all Sony and Maxell products, duly classified.
Create sub-groups under Stock Groups for deeper analysis.
Go to Gateway of Tally> Inventory Info.> Stock Groups
CREATING A STOCK GROUP
Go to Gateway of Tally> Inventory Info.> Stock Groups > Create (under Single
Stock Group)
100
The Stock Group Creation screen displays.
A brief description on each of the fields in the Stock Group Creation screen
follows.
Name
Enter the name of the Stock Group to be created. For example, Building Materials.
Under
Specify whether it is a primary group or a sub-group of another group, by
selecting from the list. For example, Primary.
Press Alt + C to create a parent group, if you do not have it in the list.
CAN QUANTITES OF ITEMS BE ADDED?
This field pertains to information on measuring the units of the Stock Items that
you would categories under the Stock Group.
The Stock Items categorized under the group should have similar units for them to
be added up. You cannot add quantities in Kgs to quantities in Pcs.
Note: You can always go back and reset this option after assessing the units of the
items in the group.
Buttons in single mode stock group creation
101
From the Stock Group Creation screen, you can create any of the Masters listed
below with a single click.
Category
Items
Units
Godown
Vch Types
The buttons. Currency and Budget are available only if you opted for the same in
F11: Features.
CREATIN MULTIPLE STOCK GROUPS
Go to Gateway of Tally> Inventory Info.> Stock Groups > Create (under Multiple
Stock Groups)
Select the parent groups under which you want you want the new groups to be
created from the List of Groups. The group selected is displayed in the Under Group field.
A brief description on each of the fields in the Multi Stock Group Creation screen
follows.
Name of Stock Group
102
Enter the name of the Stock Group.
Under
If you select any group other than All Items in the Under Group field, then this
column is filled in automatically with the selected Group name and the cursor skips this column.
This speeds up data entry.
If you select All Items in the Under Group field, the cursor does not skip this field
and allows you to enter the parent group of each of them.
Items are Addable? (Y/N)
This pertains to information on the Stock Items that you would create under this
Stock Group. The Stock Items created under the group should have similar units to be ‘addable’.
Buttons specific to Multi Stock Group Creation screen
F4: Parent
To change the parent entered in the field Under Group when you have sub- groups
created under it. the change affects all the sub-groups created under the parent, meaning, they
would now belong to the new parent.
F8: Skip Details
If Items are addable is to remain the default, that is, remain the same as specified
for the parent Stock Group, and use this button. The cursor skips that column which speeds up
data entry.
From the Multi Stock Group Creation screen, you can create any of the Masters
listed below with a single click.
• Category
• Items
• Godown
DISPLAYING AND ALTERING STOCK GROUPS
You can display and alter Stock Group in Single mode and Multiple mode.
103
Displaying Single Stock Group
Go to Gateway of Tally> Inventory Info.> Stock Groups > Display (under Single
Stock Group)
Select the Stock Group whose particulars you want to display from the List of
Groups. The Stock Group Display screen is displayed. This gives information only on the Stock
Group Master and not on any of the balances.
Altering Single Stock Group
Go to Gateway of Tally> Inventory Info.> Stock Groups > Alter (under Single
Stock Group)
Select the Stock Group from the List of Groups. The Stock Group Alteration
screen displays. Make the necessary changes and accept Yes to save.
You can delete a Stock Group only from the Stock Group Alteration screen. Select
a stock group from the list and press ALT+D to delete it.
Note: You cannot delete a Stock Group if it has any sub groups or Stock Items
created under it. You need to first delete the sub groups and Stock Items to delete the Stock
Group.
Displaying Multiple Stock Groups
Go to Gateway of Tally> Inventory Info.> Stock Groups > Display (under
Multiple Stock Group)
Select the Stock Group from the List of Groups. The Multi Stock Group Display
screen displays. It displays the entire sub groups of the selected Group. If you select All Items
from the List of Groups, all the groups and sub Group created are displayed.
Altering Multiple Stock Groups
Go to Gateway of Tally> Inventory Info.> Stock Groups > Alter (under Multiple
Stock Group)
The Multi Stock Group Alteration screen displays. Make the necessary changes
and accept Yes to save.
Note: You cannot delete a Stock Group from multiple mode
104
Stock Categories
The concept of Stock Categories is similar to that of Cost Categories. Refer the
section on Cost Categories to understand the similarity/differences.
Note: This option becomes available in the Inventory Info. Menu only if you Set
Maintain Stock Categories to Yes in F11: Features.
Stock Categories offers a parallel classification of Stock Items. You can create
Stock Categories like Floppy Disks and Floppy Drivers.
Consider the example given in the Stock Groups. You would know bow many 3.5
“floppies of Sony and Maxell are in stock. To know the total stock of floppy disks or any
alternative item that could be used, Stock Categories would be the best option to use. Create a
Stock Category called Floppy Disks and classify both Sony 3.5” diskettes as well as Maxell 3.5”
diskettes under the same. Since the items are substitutes of each other, if one is out of stock, you
can offer the other of the same category.
Stock Query option available under Statements of Inventory (Gateway of Tally >
Display) revels the strength of Stock Categories.
Note: While configuring F12: Configure and setting F11: Features do not enable
features that you do not need.
Go to Gateway of Tally> Inventory Info> Stock Categories
Note: This option is displayed in the Inventory Info. menu only if you set Maintain
Cost Categories to Yes in F11: Features.
CREATING A STOCK CATEGORY
You can create Stock Categories and sub categories of Stock Categories to
organize your information.
Go to Gateway of Tally> Inventory Info.> Stock Categories >Create (under Single
Stock Categories)
The Stock Category Creation screen displays.
105
A brief description on each of the fields in the Stock Category Creation screen
follows.
Name
Enter the name of the Stock Category. Eg: Tablets.
Under
Specify whether it is a primary category or a sub-category of another category.
Select Primary from the list, if you do not have a parent group. Use ALT+C to create a parent if
you do not have the required category in the list.
Buttons in single mode stock category creation
• Groups
• Items
• Godown
• Budget
• Vch Types
• Units
• Currency
106
From the Stock Categories Creation screen, you can create any of the Masters
listed above with a single click.
CREATING MULTIPLE STOCK CATEGORIES
Go to Gateway of Tally> Inventory Info.> Stock Categories >Create (under Single
Stock Categories)
A brief description on each of the fields in the Multi Stock Category Creation
screen follows.
UNDER CATEGORY
Select the parent category under which you want the new categories to be created.
If you select any category other then All Items, all the categories being created will be created
under the selected category. The column Under is filled in automatically with the selected
category and the cursor skips this column, which in turn speeds up data entry.
Selecting All Items gives you the flexibility of specifying the parent of each new
category created.
S No.
The serial number of the stock category is auto generated.
Name of the category
Specify the name of the Stock Category.
Under
107
If you have selected All Items in Under Category, you must specify a parent
category in this column.
Buttons specific to Multi Stock Category screen
F4: Parent
To change the parent entered in the field Under Category when you have subCategories created under it. The change affects all the sub- Categories created under the parent,
meaning, they would now belong to the new parent.
F8: Skip Details
If the field under is to remain the same as specified for the parent Stock category,
and use this button. The cursor skips that column which speeds up data entry.
From the Multi Stock Category Creation screen, you can create any of the Masters
listed below with a single click.
• Groups
• Items
• Godown
DISPLAYING AND ALTERING STOCK CATEGORIES
You can display and alter Stock Categories from Single and Multiple mode.
Displaying Single Stock Category
Go to Gateway of Tally> Inventory Info.> Stock Categories> Display (under
Single Stock Group)
Select the Category for which you want to view the display details from the List of
categories.
The Stock Category Display screen displays for you to view the details entered in
Stock Category Master.
Altering Single Stock Category
108
Go to Gateway of Tally> Inventory Info.> Stock Categories> Alter (under Single
Stock Categories)
Select the Category for which you want to alter from the List of Categories. The
Stock Category Alteration screen displays. Make the necessary changes and accept Yes to save.
Deleting a Stock Category
You can delete a Stock Category only if it does not have any sub categories or
Stock Items under it.
Select a Stock Category from the list and press ALT+D to delete it.
Displaying Multiple Stock Categories
Go to Gateway of Tally> Inventory Info.> Stock Categories> Display (Under
Multiple Stock Categories)
Select the Category for which you want to view the details or select All Items to
view the details of all the Categories created, form the List of Categories.
The Multi Stock Category screen displays. You can view the entire details of the
Category and that of sub categories if any, in this screen.
Altering Multiple Stock Categories
Go to Gateway of Tally> Inventory Info.> Stock Categories> Alter (under
Multiple Stock Categories)
Select the Category for which you want to alter form the List of Categories. The
Multi Stock Category Alteration screen displays. You can make changes in the Masters of the
selected Category and also of the sub categories. Select All Item to make changes in any desired
Category Master as all the Categories created are displayed in this screen.
Note: You cannot delete a Stock Category from multiple mode.
Delete a Stock Category
You can delete a stock category only if it does not have any children under it. The
children could be stock category or stock item or both.
Gateway of Tally > Inventory Info> Stock Categories> Single Alter
109
Press [Alt] + [D] to delete the stock category
Note: You cannot delete a stock category form multiple mode.
Stock Items
Stock Item refers to goods that you manufacture or trade. It is the primary
inventory entity and the lowest level of information on your inventory. You have to create a
Stock Item in Tally for each inventory item that you want to account for. In other words, you
have to create a stock ledger account for each item and Tally calls it Stock Item.
Go to Gateway of Tally< Inventory Info. > Stock Items
Creating a Stock Item
If you are creating Stock Items for the first time, it is advisable to configure the
F12: Configure screen before creation any items. You may configure your groups to enable/
disable advanced mode.
Go to Gateway of Tally> Inventory Info> Stock Item> Single Create (under Single
Stock Item).
A brief description on each of the fields in the Stock Category Creation screen
follows
Name
110
Specify the name of the Stock Item.
Under
Select the group from the List of Groups. If you do not want to categories it under
any particular group that you created, choose Primary.
Press Alt+C to create a parent Group from this field.
Units
Give the units of measurement of the item in this field. You would normally use
this unit for trading this item.
Use Alt+C to create a new unit, if you do not have one in the list.
Opening Balance
If you already have stock of this item at the time of creating its account in Tally,
specify its balance particulars, i.e., quantity, rate and value.
Buttons in single mode stock item creation
F3: Companies
To switch to another loaded company to create Stock Item.
• Groups
• Category
• Godown
• Budget
• Vch Types
• Units
• Currency
You may choose to create any of the masters listed above with a single click of the
buttons.
111
CREATING MULTPLE STOCK ITEMS
You can create multiple Stock items at a time using this option.
Go to Gateway to Tally> Inventory Info> Stock Items > Multi Create (under
Multiple Stock Items)
Under Group
Select the parent group under which you want the new items to be created. If you
select any category other than All Items, than all the new items being created, will be created
under this Group. Selecting All Items gives you the flexibility of specifying the parent of each
new item created.
S No.
The serial number is auto generated.
Name of Item
Specify the name of the stock item. For example, HP Leasrjet
Under
If you select All Items in Under Group field, you must specify a parent group here.
Use Alt+C to create a new parent from. If you select a Group in Under Group field, that group
displays automatically in this column.
Opening Balance
112
If you already have stock of this item at the time of creating its account in Tally,
specify the balance particulars, i.e., quantity, rate and value.
Buttons in Multi Stock Item Creation screen
F4: Parent
To change the parent entered in the field Under Group when you have items
categories under it. The change affects all the items created under the Parent, meaning they
would now belong to the new parent.
F8: Skip Details
To avoid the cursor entering the field Opening Qty, use this button. It toggles with
Edit Details, which allows you to enter the opening details.
F9: Skip Category
Use this button to avoid the cursor entering the Category field. it toggles with Edit
Category, which allows entry of Category details.
From the Multi Stock Group Creation screen, you can create any of the Masters
listed below with a single click.
• Groups
• Category (if activated)
• Godown
DISPLAYING AND ALTERING STOCK ITEMS
You can display and alter Stock Items in Single mode and Multiple mode.
Displaying a Single Stock Item
Go to Gateway to Tally< Inventory Info.> Stock Items> Display (under Single
Stock Item)
Select the name of the Stock Item from the List of Items. The Stock Item Display
screen display. You cannot make any changes in this screen.
113
DIPALYING MULTIPLE STOCK ITEMS
Go to Gateway to Tally< Inventory Info.> Stock Items> Display (under Multiple
Stock Items)
Select a Group from the List of Groups to display all the Stock Items under the
selected Group, or select All Items to display all the Stock Items, as the case may be. The Multi
Stock item Display screen displays, listing the Stock Items and the corresponding details of the
Stock Items.
ALTERING A SINGLE STOCK ITEM
Go to Gateway to Tally< Inventory Info.> Stock Items> Alter (under Single Stock
Item)
Select the Stock item you want to alter from the List of Items. The Stock Item
Alteration screen displays. Make the necessary changes and accept Yes to save.
You can delete a Stock Item only if you have not used it in any transaction entry.
Press ALT+D from the Stock Item Alteration screen to delete the Stock Item.
Altering Multiple Stock Items
Go to Gateway to Tally< Inventory Info.> Stock Items> Alter (under Single Stock
Item)
Select a Group to alter the Stock Item under the selected group. The Multi Stock
Item Alteration screen displays. Make the necessary changes and accept Yes to save.
Note: You cannot delete a Stock Item from multiple mod.
Recorder Levels
Reorder Levels signifies the quantity of a Stock Item in hand. After reaching
which you must place orders for your supplies. The importance of Reorder Level arises from the
desire to have sufficient stocks to service customer orders and, at the same time, not to
unnecessarily accumulate stock.
Therefore, the points to be considered while deciding the reorder levels are as
follows.
• The lead-time for supplies to deliver the stock
114
• The delivery time specified by the customer.
• The stock-in-hand to satisfy orders in the meantime.
In simple mode, Tally accepts the quantities that you specify. In advanced mode. It
considers the past consumption patterns to suggest reorder levels. You can however, choose to
define your own reorder levels. You may also specify the minimum quantity of the item to be
ordered, either in simple or advanced mode.
The purpose of specifying reorder levels is to obtain a report that indicates the
quantity of a Stock Item that you must order.
SPECIFYING REORDER LEVELS
Go to Gateway of Tally> Inventory Info> Reorder Levels
Select a group of Stock Items from the List of Groups, to specify Reorder Levels
for the Stock Items in the Specify Recorder Levels screen.
For each item in stock you can define a Reorder Level and th Minimum Order
Quantity. If you click Simple Recorder button, the consumption alternatives will not be
available and hence you have to input the quantities.
Note: The Option Reorder Levels is displayed in the Inventory Info. menu only if
Allow Purchase Order Processing is enabled in F11: Features.
The Reorder level screen appears as follows:
The options that you have while defining Reorder Level and Minimum Order Quantity
for individual stock items are as follows.
115
Reorder Level/Quantity
Enter the level/quantity in this field.
Advance Parameter for Reorder Level (Consumption for the Late)
This field lets Tally calculate the reorder level/order quantity based on the total
consumption in the past for a chosen period.
Period
The choices for periods are: Days, Weeks, Months and Years. Note that it is not
the average consumption for the period but total consumption. Enter zero (0), if you do not want
Tally to calculate the reorder level based on the consumption of the item in the past.
Criteria
Choose whether you want the higher/lower of the two, i.e., input/calculated
level/quantity.
Rounding Method
Specify whether the calculated level/quantity must be rounded and also the
method of rounding.
Minimum order quantity
You can specify the minimum order quantity required.
ALTERING REORDER LEVELS AND MINIMUM QUANTITES
There are two ways of altering the Reorder Levels and the Minimum Order
Quantities defined earlier.
1. Go to Gateway of Tally> Inventory Info> Reorder Levels
Select the Group of the Stock Items from the List of Groups to display the Specify
Reorder Levels screen. Make the necessary changes and accept Yes to save.
OR
2. Go to Gateway of Tally> Display> Statements of Inventory> Reorder Status
116
Select the Group of the Stock Items for which you want to make changes to
display the Inventory Reorder Status screen. Drill down the fields Recorder Level/Minimum
Order Quantity to display the Specify Reorder Levels screen. Make the necessary changes and
accept Yes to save.
OBTAIN REORDER STATUS AND QUANTITIES TO ORDER
Go to Gateway of Tally> Display> Statements of Inventory> Reorder Status
Select a Group of Stock Items from the List of Groups. The Inventory Reorder
Status screen displays.
This report gives you the reorder status of Stock Items categorized under the
selected Group.
Click the button A: Reorder Only to remove those items for which there are no
orders to be placed.
A part form identifying the quantity to be ordered, you can move your cursor on
the fields and drill down for more information.
Name of Item
Press Enter on this field for information on suppliers of this Stock Item and the
details of their previous supplies.
117
Closing Stock
Drill down of Item Monthly Summary (Inwards and Outwards) and other details.
Pure Orders Pending
Press Enter on this field for details on the pending purchase orders.
Sales Orders Due
Drill down to know the details on the sales orders, which are due, in other words,
free stock available for sale.
Reorder Level
Drill down by pressing [Enter] to display the Reorder Level Specification screen
for the Stock Item.
Short fall
Tally calculates this value.
Min Reorder Quantity
Drill down by pressing [Enter] to display the Reorder Level Specification screen
for the Stock Item.
LOCATIONS/GODOWNS
Locations/Godowns are places where Stock Items are stored. You can specify
names where Stock Items are stored such as warehouse, shelf, and so on. In a business, it always
becomes necessary to distinguish between the stock held onsite and in the warehouse. You can
do this by creating two separate godowns. Tally had a default Godown named Main Location.
You may even alter Tally’s default godown. Tally permits creating any number of godowns,
which you can group and subgroup to match the structure you need.
Go to Gateway of Tally> Inventory Info.> Locations/Godowns
Note1: The term Locations is displayed in the Inventory Info. menu if
International is selected in Use Accounting Terminology of in Gateway of Tally> F12:
Configure screen. If India/SAARC is selected, the term Godowns displays.
118
Note2: You can create Locations/Godowns only if Maintain Multiple Godowns is
enabled in F11: Features.
CREATING LOCATIONS/GODOWNS
You can create Locations/Godowns in Single mode and Multiple mode
Creating a Single Location/Godown
Go to Gateway of Tally> Inventory Info.> Locations/Godowns > Create (under
Single Godown)
The Location/Godown Creation screen displays:
A brief explanation on each of the fields in Location/Godown Creation screen
follows.
Name
Specify the name of the Location/Godown.
Alias
Enter an alias name for the Location/Godown name, if required.
Under
Specify the Location/Godown under which the Location/Godown is to be
categorized. Use Alt + C to create the parent Location/Godown if it is not in the list. Select
Primary, if it is not a sub Location/Godown of any Location/Godown.
119
Allow Storage of Materials
Tally permits you to create a Location/Godown, where you may not store
materials but treat it as a virtual Location/Godown is useful in cases like Head Office, which
may have many different stock points under it that store materials. Hence, Head Office acts like
a primary Godown. For instance, designate London as a virtual Godown with Wimbledon
Warehouse, Harrow Warehouse and Brixton Warehouse as sub-Godowns. These sub-Godowns
will allow storage of materials.
CREATING MULTIPLE LOCATIONS/GODOWNS
Go to Gateway of Tally>Inventory Info.> Locations/Godowns> Create (under
Multiple Godowns)
The Multi Godown Creation screen displays:
Under
Select the parent group under which you want the new Godown to be created. If
you select any Godown other than All Items, than all the new Godown being created, will be
created under this Godown. Selecting All Items gives you the flexibility of specifying the parent
of each new Godown created.
S No
The serial number is auto generated.
Name
120
Specify the name of the Godown.
Under
If you select All Items in Under field at the top, you must specify a parent
Godown hers. Use All + C to create a new parent from this field. if you select a Godown in
Under field, that Godown displays automatically in his column.
DISPLAYING AND ALTERING STOCK LOCATIONS
You can display/alter the Godown in single and multiple modes. It is similar to
Displaying/Altering Stock Groups in single and multiple modes.
To display a single stock Lactation/Godown
Go to Gateway of Tally>Inventory Info.> Locations/Godowns> Display (under
Single Location/Godown)
To display a Multiple stock Lactation/Godowns at a time
Go to Gateway of Tally>Inventory Info.> Locations/Godowns> Display (under
Multiple Location/Godowns)
To alter a single stock Lactation/Godown
Go to Gateway of Tally>Inventory Info.> Locations/Godowns> Alter (under
Single Location/Godown)
To alter a Multiple stock Lactation/Godowns at a time
Go to Gateway of Tally>Inventory Info.> Locations/Godowns> Alter (under
Multiple Location/Godowns)
You can delete a stock location via Single Location Alter by pressing [Alt] + [D].
However, you cannot delete a stock location with sub-locations. The lower levels must be
deleted first.
UNITS OF MEASURE
Stock items are purchased or sold on the basis of quantity. The quantity is
measured by Units. Hence, it is necessary to create Units of Measure. You need to create Units
of Measure for all the Stock Items. You can have simple units such as numbers, meters,
kilograms, and pieces or compound units like box, where, say, one box equals ten pieces.
121
Go to Gateway of Tally > Inventory Info.> Units of Measure
CREATING A UNIT OF MEASURE
Go to Gateway of Tally > Inventory Info.> Units of Measure > Create
The Unit Creation screen displays
A brief explanation on each of fields in Unit Creation screen follows.
Type
Symbols are of two types: Simple and Compound.
Simple units are considered as specified by you; Tally just checks for duplication.
Tally defaults to Simple, and if you want to change to Compound, use [Backspace] to go back
and select Compound from the Types of Units list.
122
Symbol
Define the symbol of the unit, e.g., Nos. This symbol is used in all displays and
printouts.
Formal Name
Specify the formal name of the symbol, e.g. Numbers. This explains the symbol,
which is also used during the consolidation of data of different companies, where the symbols
might be the same but are assigned to different units. The formal name will be used to match
them.
Number of decimal places
If you want to use the unit in fractions, say for a kilogram you may have to use
grams as well, specify the number of decimal places. For kilogram, you would give three
decimal places to accommodate up to 999 grams. You do not normally want a decimal place for
units like numbers; you can specify 0 in such cases.
Note: You can specify 0 to 4 decimal places. The Unit of Measure cannot be
translated or transliterated but will appear in the Language created.
Compound Units
A Compound Units is a relation between two Simple Units. Hence, before you
create a Compound unit, ensure that you have already created two Simple Units. For example,
there are two Simple Units Nos (Numbers) and Doz (Dozen). Now define the relation between
Nos and Doz, as one dozen equals twelve numbers.
Note: Use the Up arrow or Backspace key to highlight the Type field. Select
Compound from the popup menu.
123
Select Compound from the Types of Units in the Type field. Select Doz in the
First Unit from the Units list. Enter 12 in the Conversion field and select Nos in the Second Unit
field. Accept Yes to save.
DISPLAYING AND ALTERING UNITS OF MEASURE
To display Units of Measure.
Go to Gateway of Tally > Inventory Info.> Units of Measure> Display
Select the Unit of Measure you would like to view from the Units list. You can
select a compound unit or a simple unit from the list. The unit Display screen displays. In
display mode it is not possible to make any changes.
To alter Units of Measure
Go to Gateway of Tally > Inventory Info.> Units of Measure> Alter
Select the Unit of Measure you want to alter from the Units list. The Unit
Alteration screen displays. Make the necessary changes and accept Yes to save.
You can delete a Unit of Measure from this screen by pressing Alt + D. However,
you cannot delete a Unite of Measure that is part of a compound measure. You must delete the
compound measure first.
Price List
Price Lists are useful for orders and invoices. An up-to-date price list helps in
decision making even at the lower levels of the organization and quickens the sales process.
Tally assists in creating quantity based pricing with complex discount structure. Price Lists are
available only for inventory items and hence the feature is available only for inventory and
invoicing are activated for the company.
You can have one or more price lists. You require more than one price list, when
you have different price structures/levels for different purposes, usually, different groups of
customers requiring different discounts or dealing in different products.
PRICE LEVELS
In Tally, you can assign specific price lists called Price Levels to customers, so
that only the relevant prices are used during entry of orders and invoices.
124
Before you begin to create Price Lists, you should decide whether you want
different price levels. You might want different price levels for various purposes, such as
different types of customers like wholesale customers, retail customers, and export customers
and so on. Each customer type could have a different discount structure.
Creating Price Levels
Ensure that you have set the company for Accounts with Inventory.
Set the following fields to Yes in F11: Features > F2: Inventory screen.
1. Allow Invoicing (If you do not set this field to Yes, the options for Price Lists
will not be available.)
2. Set Use Multiple Price Levels to Yes.
3.
Type out the price levels, one by one, in the Company Price Levels screen.
4. Press CTRL + A to accept the screen and return to the Company Operations.
Alteration screen (F11: Features). Set the other options as required and accept yes to save.
ALTER PRICE LEVEL NAMES
Follow the same procedure to alter the name of a price level. You can simply
overwrite the names you specified previously and save the changes.
125
ASSIGNING LEDGER ACCOUNTS TO PRICE LEVELS
Creating Price Lists in Tally provides an option in party (debtor and creditor)
ledger accounts, with the help to which you can assign/tag a specific Price Level to the account.
You can assign only one Price Level to an account.
You can choose the Price Level that you want to assign to the Ledger by selecting
the Price Level from the Price Levels list in the Pricing Level Applicable field. Select Not
Applicable if you do not want to assign any Price Levels to the Ledger.
If you want assign Price Levels to ledgers created earlier, alter the ledger account,
tab down to Pricing Level Applicable field and select the applicable Price level form the list.
Tab down to Pricing Level Applicable and select Export. Set the other options
required. Accept Yes to save.
The Pricing Level can be changed to reflect the current circumstances. For this,
simply alter the ledger account and ledger account and select a different Pricing Level option.
CREATING AND USING PRICE LISTS
The Price List option appears in the Inventory Info. menu only if you have already
created Price Levels.
Go to Gateway of Tally > Inventory Info.>Price List
Select a group from the List of Groups.
126
Under Group
This is the Stock group of the Stock Items for which you want to define the Price
Lists.
Price Level
Select a Price Level to assign to the Stock Group.
Applicable From
Specify the date from which the Price List is applicable
.
The columns you see are as follows.
Sl. No
This column has auto-generated serial numbers to track the number of items in the
Price List.
Name of Item
This column has the name of the Stock Item. You can define the Price List for
each item.
Quantities – From & Less Than
These fields are repeated for an item and begin with a blank for 0 items and end
with a blank for any number of items. This is useful for quantity based pricing and discounts.
You can create a staggered quantity price structure, if required.
If you do not require quantity based pricing, leave From and Less Than fields
blank.
Rate & Discount (if any)
For each quantity band, give a specific price or maintain the same price for all
bands, but define differnt5 discounts. You can use different methods for different items.
Historical Details (Rate and Disc %)
If you have a different Price List on a date before the Applicable From date, Tally
displays it here.
127
Cost Price
In this column, the Cost Price (based on the Costing Method set for it) of the item
is displayed to help decide the prices.
Price Levels in Voucher Entry – Invoicing
The price levels that you define automate the invoice pricing and help to avoid
errors. You can configure the entry so as to prevent the usage of a different price list than the
one that is set.
To configure for preventing changes made to the price level settings in a voucher
Go to Gateway of Tally> F12: Configure> Invoice/Orders Entry
Set Allow modification of ALL fields during entry to No to prevent changes made
to prices. If you set it to Yes, you can override the price already defined.
Consider the following example
1. Go to Gateway of Tally> Accounting Vouchers> F8: Sales
128
2. Select As Invoice
During voucher creation, there is an additional field Price Level and it is already
set for the selected party on the basis of assignment made earlier (the cursor skips the field). if
you had not assigned any Price Level for the ledger earlier, the cursor moves to this field,
allowing you to make a choice. On selecting the stock item and the quantity, the price is filled in
automatically and the cursor skips the Rate and Amount fields also.
129
Chapter
9
Voucher Entry
A Voucher is a document that contains details of a financial transaction. For every
transaction, you can use appropriate Tally Voucher to enter the details into the ledgers and
update the financial position of the company.
Mainly there are two types of Voucher Entry:
• Accounting Vouchers
• Inventory Vouchers
You can set the configuration for entry to allow only those features, which you
require while entering vouchers.
In the Voucher entry configuration, Selectively set only those features to Yes.
(This is further explained under advanced usage).
Go to Gateway of Tally> F12: Configure> Voucher Entry
130
VOUCHER CREATION SCREEN
This screen is divided into three parts
• Main Voucher Entry Area
• Button Bar Area
• Calculator Are
Main Voucher Area
Button
Toolbar
Area
calculator Area
Main Voucher Entry Area
The Main Voucher Entry Area is where you enter all your transaction. This area
provides fields for Date, Ledger Name and Amount as well as additional pop-up screen
that are dependent on your voucher configuration and the nature of transaction you make.
Button Bar Area
131
The Button Bare Area displays buttons that provide quick interaction with Tally.
Buttons that are relevant to current task are enabled and the other buttons are disabled.
Calculator Area
The Calculator area provides the calculator functions where you can enter any
number of mathematical formulae for complex calculations.
Mouse conventions
Command
Click
Double-click
Choose
Select
press
Action
Press the left mouse button
Press and release the left mouse button twice, without
moving the mouse pointer off the item
Position the mouse pointer on the items and click the left
mouse button.
Position the mouse pointer on the item and double-click the
left mouse button.
Use the keys on the keyboard in the combination shown
Switching between Screen Areas
The Main Voucher Entry Area is the active area by default on the Voucher
Creation screen. Press Ctrl+No to navigate to the Calculator Area and press Crtl+M to toggle
back to Main Voucher entry Area. A green bar highlights the active area of the screen.
Note: Press Alt+C to use calculator when at amount field.
SPECIAL KEYS FOR VOUCHER NARRATION FIELD
ALT+R: Recalls the Last narration saved for the first ledger in the voucher,
irrespective of the voucher type.
CTRL+R: Recalls the Last narration saved for a specific voucher type, irrespective
of the ledger.
Checking the accuracy of the vouchers
To check the accuracy of the vouchers that you have entered:
1. Go to Gateway of the vouchers that you have entered:
132
2. Select F2: Period from Button Bar and enter the period for which you want to
view Vouchers.
Note: It defaults to the current date only but you may display all the transactions
for a particular period.
3. Select F1: Detailed
You can check the vouchers for correctness. Toe correct a mistake, position the
cursor on the item where you have found the error and press Enter. Tally displays the voucher
details for alteration. The alteration facility is subject to security and access rights. All
alterations are available for audit.
TYPES OF VOUCHERS
Tally is pre=programmed with a variety of accounting vouchers, each designed to
perform a different job.
The standard vouchers are:
1. Payment Voucher
2. Receipt Voucher
3. Contra Voucher
4. Sales Voucher
• Sales Orders
• Sales Vouchers/Invoices
• Delivery Notes
• Rejection In
5. Purchase Voucher
• Purchase Orders
• Purchase Voucher
• Goods Receipt Notes
133
• Rejection Out
6. Journal Voucher
• Credit Notes
• Debit Note
• Journal
• Memo Voucher
• Reversing Journal
• Stock Journal
• Physical Stock
You can alter these vouchers to suit your requirement and also create new
vouchers.
For example, if you wish to distinguish between cash and bank payment you can
create vouchers to do this.
The function of each voucher type is explained.
CONTRA ENTRY (F4)
According to accounting rules, Contra Entry is a transaction indicating transfer of
funds from:
• Cash account to Bank account
• Bank account to Cash account
• Bank account to Bank account
To view the Contra Voucher Entry Screen:
1. Go to Gateway of Tally > Accounting Vouchers
2. Select F4: Contra from the button bar or press F4
134
Note:
1. Use the buttons on the right-hand side of the screen to Explore the Potential of
Tally.
2. Press [Enter] wherever the cursor is placed to know the Depth of Tally!
CONTRA ENTRY – SINGLE ENTRY MODE
Contra Voucher creation screen appears in Single Entry Mode by default. You are
prompted to choose the account, which will receive the amount (the ledger that has to be
debited).
To view Contra Voucher creation screen in Single Entry mode
Go to Gateway of Tally> Accounting Voucher > Select F4: Contra
For example, to transfer funds from Cash Account to Bank Account:
1. Debit the Bank Account
2. Credit the Cash Account
The entry appears as shown.
The ledger selected in Account State Bank of India is the destination ledger and it
is debited
135
Advantages of Single Entry Mode:
1. Faster data entry.
2. Selection of:
• Multiple Ledgers (to be credited ) with a Single Ledger (to be Debited) OR
• Multiple Ledgers (to be debited ) with a Single Ledger (to be Credited)
CONTRA ENTRY – DOUBLE ENTRY MODE
To select multiple Debit and Credit ledgers in the Double entry mode, set Use
Single Entry Mode for Payment/Receipt/Contra to No in F12: Configure.
Entering in Double Entry Mode
1. Go to Gateway of Tally > Accounting Vouchers
2. Select F4: Contra from the Button Bar or press F4.
The entry displayed in Single Mode appears as follows in Double entry mode:
Here cash is transferred from Cash account to Bank account.
136
Use F2: Date to change the date of the voucher.
If you require Dr/Cr instead of To/By -> as explained in the Configuration section,
activate the required feature in F12: Configure.
1. In the above example, we have changed the date to 2nd April 2001 and we have
Dr/Cr instead of To/By.
2. As the Contra voucher is active, the Buttons of the other voucher types of
Payment, Receipt, Journal, Sales and Purchase are visible
PAYMENT ENTRY (F5)
To view the Payment Voucher entry screen:
1. Go to Gateway of Tally > Accounting Vouchers
2. Select F5: Payment from the Button Bar or press F5
By Default, the Payment Entry screen appears in Single Entry Mode (The option
Use Single Entry mode for Pymt/Rcpt/Contra is set to Yes in F12: Configure).
For example, the company settles expenses of conveyance, staff welfare, postage
and stationery through cash all in one voucher. The entry appears as shown below.
137
You are prompted to choose the cash or bank ledger, which will pay the amount
(the credit ledger).
PAYMENT ENTRY – DOUBLE MODE
If you want the payment entries to be entered in double entry mode, then set Use
Single Entry Mode for Payment/Receipt/Contra to No in F12: Configure
To entry the payment entry in Double Entry Mode,
Go to Gateway of Tally > Accounting Vouchers > F5: Payment
A Payment entry entered in double entry mode appears as shown,
138
Advantages of Double Entry Mode
• You can select any number of ledgers of ledgers to be debited and credited in
the payment voucher.
• You can view on the screen whether a ledger is debited or credited thus
allowing you to cross- verify.
PAYMENT ENTRY – SINGLE NATTATION
If you want the narration details for every ledger you debit or credit (Single
narration), you can configure Tally’s Narration details accordingly.
To do so,
1. Go to Gateway of Tally >Accounting Information > Voucher Types > Alter
2. Select the required Voucher Type.
3. Enable the option Narrations for each Entry and accept the details.
4. Return to Accounting Vouchers on Gateway of Tally and enter a payment
voucher as required.
Give below is an example of a Payment transaction with narrations for each entry:
139
The entry consists of both common narration and narrations for each entry. In case
of multiple debit/credit entries, you can give single line narrations separately for every ledger
account selected.
PAYMAENT / RECEIPT AS CONTRA
The Contra Voucher is used to indicate transfer of funds from
• Bank account to Cash account
• Bank account to Bank account
• Cash account to Bank account
However, for users who wish to use the Payment and Receipt vouchers for this
nature of transaction, Tally has the flexibility of defining Payment and Receipt behaviour as per
Contra voucher.
1. Go to Gateway of Tally > Accounting Vouchers
2. Select F5: Payment from the Button Bar or press F5.
3. Activate the option Use Payment/Receipt as Contra to Yes in F12:
Configuration screen.
4. Accept the screen and save.
The Screen appears as shown.
140
If Use Payment/ Receipt as Contra option is set to No in F12: Configure screen,
the each and bank accounts will not be displayed.
WARN ON NEGATIVE CASH BALANCE
You can configure Tally to prompt you with a warning when the Cash ledger
reaches a negative balance.
To activate Warning on Negative Cash Balance:
1. Go to Gateway of Tally > Accounting Vouchers
2. Activate the option Warn on Negative Cash Balance to Yes on the F12:
Configure screen.
3. Accept the screen to save.
Example:
Let us assume a cash balance of Rs. 54000 and you need to make a payment of Rs.
55000 towards advertising expenses. This results in a negative balance.
The entry is displayed as:
141
Tally prompts you with a box that displays the warning and also the credit cash
balance in RED colour. This will help you decide whether to proceed with the entry or not.
CHEQUE PRINTING
You can choose to print cheques directly from Tally. Cheques will be printed
while printing a Payment Voucher.
Enabling Cheque Printing
1. Go to Gateway of Tally > F11: Features > Accounting Features
2. Set Enable Cheque Printing and Set/Alter Cheque Printing Configuration to
Yes.
Company Operations Alteration screen appears as shown.
Once the option Set/Alter Cheque Printing Configuration is activated to Yes, you
will get the following screen.
142
Company Name on Chaque:
To print the company name on the cheque for signature purposes, mention the
name of the Company (for example, ABC Company). If you do not want Tally to print the
name, you can leave it blank. Many banks give cheques with your company name printed.
Name of Banks
Select the Bank from the Bank accounts list
You will have to fill in the dimensions of th cheque. Tally accepts user defined
cheque dimensions. Take the bank’s cheque book and measure the dimensions of a cheque leaf
carefully in millimeters and fill in the above form. You may need to correct it after trying out a
couple of cheques so that the positioning is accurate. The placing of the cheque in the printer
also determines the printing. To avoid mistakes trial could be made on photocopies of a cheque
before using an actual cheque leaf.
143
Note: Salutation fields are for signatures and naturally follow the Company name
(for example, Director)
Note: All dimensions must be more than 0 for cheques to be successfully printed.
For ABC & Company
Director
If your cheque has two signatories, both can specified. Both could be the same
salutation or different. For example, one could be Director, the other could be Secretary.
Give details of whatever you are using currently. Many banks will pre-print both
the company name and the salutation in which case you can leave them blank.
You are now ready to print the cheque. Remember that this option is available
only for the banks for which you have Ledger account.
PRINTING CHEQUES
After making the desired setting to print the cheque,
Go to Gateway of Tally > Voucher Entry > F5: Payment
Note: Cheque Printing option is available only forms Payment Voucher.
Name on the Cheque
You debit the party and give the bill reference details if any. Credit the bank for
which the cheque dimensions were set up. In this example it is the State Bank of India. The
name of the Debited party account appears next to the field Name on the cheque by default. You
can change the name on the cheque if necessary.
Cross Cheque using
This is filled in by the most common words used- Account payee. You may
change it if required.
144
Enter the Cheque Number (Ch. No.) and save the save the Voucher. Then, you
will get the Cheque Printing sub-screen appears as shown below:
Select Yes to print the cheque.
RECEIPT ENTRY (F6)
Transactions accounting for money received are entered into Tally through the
receipt voucher.
To view the Receipt Entry screen:
1. Go to Gateway of Tally > Accounting Vouchers
2. Select F6: Receipt from the button bar or press F6
145
Similar to Payment and Contra Vouchers, the Single Entry Mode appears for
Receipt Entry as well.
For example, if your company receives money from a customer for an earlier
transaction:
• Credit the customer account and debit the Cash account, if you receive cash or
•
• Debit the Bank account where you need to deposit the money, if you receive
cheque.
The entry in double-entry mode is displayed as shown below:
JOURNAL ENTRY (F7)
Journal entries are used to adjust the debit and credit amounts without involving
the cash or bank accounts. Hence, they are referred to as adjustment entries. To go to the Journal
Entry Screen:
1. Go to Gateway of Tally > Accounting Vouchers
2. Click on F7: Journal on th Button Bar or press F7 key
For example, there may be entries made for interest accrued or interest to be paid.
If a party is involved in such a transaction the entry will be:
1. Debit the Party
2. Credit the Interest Account
146
The entry appears as shown below:
Note: Journal entries are usually used for finalization of accounts.
CASH ACCOUNTS IN JOURNALS
Journals are adjustment entries, which do not involve Cash account and Bank
account. However in many cases companies use journal to account for day-to-day transactions
where Cash or Bank accounts are required.
1. Set Allow Cash Accounts in Journals to Yes in F12: Configuration.
2. Go to Gateway of Tally > Accounting Vouchers> Select F7: Journal
3. Press the spacebar at the Debit or Credit fields.
147
Note: All Cash accounts and Bank accounts are displayed in the List of Ledger
Accounts. Accordingly the journal entry has to be mode.
SALES ENTRY (F8)
Sales vouchers are used when the company sells some goods to customers.
To view the Sales Voucher Creation Screen:
Go to Gateway of Tally > Accounting Vouchers >Select F8: Sales.
For example, the company sells some software on credit. In this case, the company
has to account for Sales Tax separately, if tax has been collected on the transaction.
The screen appears as shown below:
When a sales transaction is made, a document detailing the transaction (item
name, text etc) has to be given to the buyer or debtor of purchase by him. This document is
called “Invoice” or “Bill” or “Cash Memo”. Tally provides the options creating Invoices.
ENABLING INVOICING
1. Set Allow Invoicing to Yes in F11: Features
2. The Sale Voucher Creation Screen appears as Invoice by default.
148
3. Go to Gateway of Tally > Accounting Vouchers > select F8: Sales
Sales entries can be made in the Voucher as well as Invoice Formats.
Invoicing and sales invoicing are almost the same as sales voucher entry. The
advantage of using the invoice format for sales entry is that it allows automatic calculations of
taxes and duties (ledger accounts classified under the group ‘Duties & Taxes’).
To enable automatic calculations of taxes and duties:
1. Set Calculate Tax on Current Sub-total to Yes in F12: Configure on the sales
invoice screen
2. Accept the screen to save the voucher.
The default Sales Invoice screen appears as shown below.
When you start entering the voucher, Tally prompts for the Sales Ledger to be
allocated.
Any number of stock items or account ledgers can be selected one after another to
enable faster data entry. To activate this:
1. Set Use Common Ledger A/c for Item Allocation to Yes in F12: Configure on
the invoice entry screen.
2. Accept the screen to save the voucher.
TYPES OF INVOICE
149
There are two types of Invoices:
Sales Item Invoice – allows you to select Items for invoicing
Sales Account Invoice – allows you to select Ledger for invoicing
SALES ITEM INVOICE
Invoicing is generally used for sale of stock where the details of the items sold are
listed. Selecting the Item Invoice allows you to select the stock items that need to be invoiced.
Trading and manufacturing organizations commonly use this format.
On the Sales invoice screen, click on the button Item Invoice which is displayed
on the Button Bar on the right side of the screen and the Sales Item Invoice appears as the own
below:
Tally’s Item Invoice mode displays the list of stock items, which can be invoiced
as required.
Note: The Item Invoice button toggle with Account Invoice.
SALES ACCOUNT INVOICE
Sales Account Invoice is generally used by professionals such as doctors and
consultants who require to invoice for certain services provided such as consultancy charges,
professional fees.
150
Trading and manufacturing organizations also use the Account Invoice for
invoicing service changes.
On the Sales entry screen, click on Acct Invoice button which is displayed on the
Button Bar on the right-hand side of the screen to display the Sales Account Invoice screen as
shown.
Tally’s Account Invoice mode displays the list of ledger accounts, which can be
invoiced as required. This is unlike Item Invoice where Tally displays the list of stock items.
Note: The Acct Invoice button toggles with Item Invoice.
SALES AND PURCHASE VOUCHER ENTRY
In Accounts-with-Inventory Companies where Tracking Numbers is NOT
activated
You do not get the voucher types Receipt Note and Delivery note in the Sales and
Purchase Voucher sub-menus.
In addition to the above particulars that are applicable for all types of vouchers,
sales and purchase vouchers have special inventory considerations for accounts-with inventory
companies.
Sales and Purchase ledger accounts must have the option Are Inventory Values
Affected set to Yes for this section. Unless this option is set to Yes in the Ledger creation
screen, it is not possible to make a Sales entry or a Purchase details.
151
Similarly, sales and Purchase accounts affect inventory. Hence, when you enter a
Sales or a Purchase Voucher, an Inventory Allocations for sub-screen pops up as soon as you
enter the ledger requiring you to give inventory item details.
The inventory details that you mention in an accounting voucher (like Sales and
Purchase Voucher), affects stocks by immediately updating them, only if Tracking Numbers are
not activated in [F11]: Features.
The information that you need to give in the inventory allocation sub-screen
depends upon the features enables for the company.
UNCONVENTIONAL VOUCHERS
Unconventional Vouchers are the special vouchers that are used to record
provisional or non-accounting transactions. Use unconventional vouchers to remove
unnecessary entries from the main books of accounts and make information available. These
vouchers enable valuable reports in terms of provisional accounts and forecasting.
MEMO VOUCEHR
This is a non-accounting voucher and the entries made using memo voucher will
not affect your accounts. In other words, Tally does not post these entries to ledgers but stores
them in a separate Memorandum Register.
Uses of Memo Vouchers
Making suspense payments
Consider a company gives its employee cash to buy office supplies, the exact
nature and cost of which are unknown. For this transaction you can enter a voucher for the petty
cash advance, a voucher to record the actual expenditure details when they are known, and
another voucher to record the return of surplus cash.
However, a simpler way of doing it is to enter a Memo voucher when the cash is
advanced, and then turn it into a Payment voucher for the actual amount spent, when the details
are known.
Consider the following Example.
The Company pays its employed Rs. 500 as petty cash advance for Office
Expenses.
The following entry has to be passed.
152
1. Enter Date
2. Debit office supplies
Vouchers not verified at the time of entry
If you do not understand the details of a voucher you are entering, you can enter it
as a Memo voucher and amend it later when the details are available.
Items given on approval
Generally completed sales are entered into books. Items are given on approval, use
a Memo voucher to track and convert it into a proper Sales voucher. You can delete the memo
voucher if the sale is not made.
MEMORANDUM VOUCHER REGISTER
To view all the memorandum vouchers:
Go to Gateway to Tally > Display> Exception Reports > Memorandum Vouchers.
153
Note: You can also view memorandum vouchers from the Day Book.
You can alter and convert a Memo voucher into a regular voucher when you
decide to consider the entry into your books. Use Scenarios to see the effect of Memo entries on
reports and statements.
OPTIONAL VOUCHER
This is also a non-accounting voucher. Unlike a Memo voucher, this is not a
separate voucher type. You can mark an existing voucher (for example, a payment voucher or a
receipt voucher) as Optional. Press CTRL + L or click on Optional from the Button Bar. This
button toggles with Regular. By marking a voucher Optional, the voucher does not get posted
anywhere but remains in the Optional Register
You can make a voucher type default to Optional if you need to create a new
voucher type or alter an existing voucher type.
Go to Gateway of Tally> Accounts Info > Voucher Types> select a Voucher
Type> Set Make Optional as default to Yes.
Enabling Optional Vouchers
1. Go to Gateway of Tally
2. Select F11: Features> Accounting Features to display Company Operations
Alteration screen
154
3. Set Use Rev. Journals & Optional Vouchers? to Yes.
4. Accept the screen to save.
Use of Optional Vouchers
• If you do not want a transaction that is incomplete t affect the accounts, you
can mark this as an Optional Voucher. Once the transaction is complete, modify the voucher and
post it as Regular Voucher. For example, Performs sales invoice. In fact, an optional sales
invoice prints as a Performa Invoice.
• Optional Vouchers allow you to see the impact of transactions without actually
posting them.
• Optional Vouchers can be used to forecast future sales. For example, create a
New Voucher Type – Sales Forecast. Record future sales projections using this voucher type
Let us consider the following example.
On 30th June you want to view the Balance Sheet as of today but June rent is not
due for payment until the first week of July. This liability is not reflected in the Balance Sheet.
To overcome this, enter an Optional Voucher dated 30th June. The above entry is made as shown
below
1. Enter Date
2. Select Optional from the button bar
3. Debit Rent account
155
When you view the Balance Sheet, generate a report with the Optional Voucher
included. The Optional Voucher should be already defined as a Scenario. The voucher affects
the report temporarily. Once you quit the report, Tally does not retain the Scenario details. The
next time you view the balance sheet, it will not include the effect of the Optional Voucher
unless you include it.
Note: Use Scenarios to see the effect of Optional voucher entries on reports and
statements.
OPTIONAL VOUCERS REGISTER
You can view all optional vouchers in the Optional Voucher Register
Go to Gateway of Tally> Display> Exception Reports> Optional Vouchers
Note: You can view them from the Day Book as well.
REVERSING JOURNALS
Reversing Journals are special journals that are automatically reversed after a
specified date. They exist only till that date and are effective only when they are included in
reports like the Balance Sheet. These are used in interim reporting in the course f the financial
year where accruals are to be reported. These accruals are usually short term and are cleared in
the subsequent period. However, to get a proper perspective, decision makes require the reports
with full impact of all aspects and transaction.
Activating Reversing Journals
To activating Reversing Journals
1. Go to Gateway of Tally
2. Select F11: Features> Accounting Features to display Company Operations
Alteration screen.
3. Set Yes in Use Rev. Journals & Optional Vouchers?
4. Accept the screen to save.
An example is – the provision for depreciation. Depreciation is usually provided
for at the end of the year. However, including it for monthly reporting would give a more
accurate status.
156
Let us take another example:
On 30th June you want to view the Balance Sheet as of today but June salaries are
not paid until the first week of July. There is, therefore, a large liability, which would not be
reflected in the Balance Sheet. To overcome this you enter a Reversing Journal Voucher dated
30th June, which would look like this:
When you view the Balance Sheet, Tally displays the report with the reversing
journals included. The voucher affects the report only for that day, 30th June.
Application up to
This is the date up to which the Reversing Journal is available for inclusion in a
scenario report. The Revering Journal can be created as of a particular date and made Applicable
up to a different date. For example the depreciation entry could be dated October 1, 2005 and
applicable up to October 31, 2005. The journal will be available for inclusion in a scenario for
any day from October 1, 2000 till October 31, 2000. It will not exist before 1st Oct and will be
reversed automatically after 31st Oct and consequently unavailable.
REVERSING JOURNAL REGISTER
157
All vouchers are maintained in a Reversing Journal Register. These are no posted
to any books of accounts and cannot be included in regular report. They can only be seen
through a scenario.
Go to Gateway of Tally> Display> Exception Reports> Reversing Journals
POST-DATED VOUCHERS
While entering vouchers, you can mark them as post dated. Tally will not update
the vouchers in ledgers until the specified date is approached. This is useful to enter transactions
that take place on a regular basis. For example, if you pay for something by installments, you
can set up the payments in advance, and Tally will only enter them in the ledgers as they fall
due.
Mark vouchers Post Dated by using CTRL+T or click on Post dated button from
the Button Bar. This button toggles with Current.
Post-dated Vouchers Register
All Post-dated vouchers are maintained in a Post-dated voucher Register.
Go to Gateway of Tally> Display> Exception Reports> Post-Dated Vouchers.
Difference in the treatment of Post-dated Vouchers and other Unconventional
vouchers
The major difference between post dated vouchers and other Unconventional
vouchers is that post dated Vouchers affect regular books of accounts on the date of the voucher.
Post-dated vouchers are not available for selection in Scenarios.
CREATING ACCOUNTING VOUCHERS IN TALLY
To view the Accounting Vouchers screen:
Go to Gateway of Tally> Accounting Vouchers
Note: The Voucher Entry screen display depends on the Voucher Configuration.
To go to the next voucher screen you can simply switch the vouchers using the buttons from the
Button Bar or by using the Function keys.
Consider a simple payment voucher screen.
158
Type of Voucher
You need to check whether you are using the right voucher for the transaction.
You change the voucher type by selecting the new type from the Button Bar.
In some cases, Sales, Punchers and Journal, as well as where you have created
your own voucher types. For example, under Payment, Tally will display a List of Vouchers for
the type you select, from which you make a further choice.
Voucher Number
If you have set Method of Voucher Numbering to Automatic in Voucher Type
screen, Tally will automatically enter the voucher number enter the voucher number and if you
have set Method of Voucher Numbering to Manual, Tally allows you to enter the voucher
number manually.
Reference
You can enter a reference such as Purchase Order Number or Invoice Number in
the Ref: Field.
Note: Reference is not available for receipt and payment vouchers.
159
Date of Voucher
The date of the voucher you enter is displayed at the top-right of the Voucher
Creation screen. The date is taken initially from the Current Date in the Gateway of Tally.
However, you can change the date to ensure vouchers are entered with the appropriate date
using the F2: Date button.
Note: You change the date using the F2: Date button from the button bar.
NARRATIONS
You can type any comment that is appropriate for the transaction in Narrations.
You can configure Tally’s Narration details as per the type of narration for the transaction. The
types of Narrations are:
• Common Narration – Common narration details for the entire Voucher at the
end.
• Single Narration – Narration details for every debit or credit transactions made.
Enabling Narrations
Common Narration is enabled by default in Tally.
To activate Narrations on the voucher screen
1. Go to Gateway of Tally> Accounts Information> Voucher Type> Alter
2. Select the required Voucher
3. set the option Narrations for each Entry to Yes
4. Accept the details.
5. Return to Accounting Vouchers on Gateway of Tally and make a payment
voucher entry as required.
Following examples demonstrate a Payment transition that has both common
narration and narrations for each entry. The advantage of this being that you cha give single line
narration separately for every ledger account selected in case of multiple debit/credit entries.
160
PARITCULRS TO/BY OR DR/CR
To/By or Dr/Cr
By default Tally displays To/By which can be changed to Dr/Cr.
1. Set Use Cr/Dr instead of To/By which can be changed to Dr/Cr.
2. Accept to Save
Each voucher line displays a prompt of Dr/By for debit entries or Cr/To for
credits.
Note: Depending on the voucher type, Tally selects either Dr or Cr/ To or By.
Thereafter, you can change the prompt (if required) by typing over it with a D or C / T or B.
PARTCULARS – LEDGER NAME AND AMOUNT
Ledger name and amount
After To/By or Dr/Cr, you enter the ledger names that are already created and the
debit and credit amounts. To select a ledger, type the first letter of its name and Tally displays a
List of Ledger Accounts. The ledgers starting with the typed letter are highlights. Only ledgers
suitable for the voucher type are displayed. As you continue typing, the highlights reduce until a
match is found.
The first ledger name prompt depends upon the voucher type.
161
For example, in a Payment Voucher you have to first debit a personal account like
a creditor or a nominal account like Rent. Hence you are not allowed to enter Cash or Bank as
that would determine money received.
Note: In special case where in you have activated the option Allow
Payment/Receipt as Control in the Voucher Configuration you are permitted to do so.
Likewise, in a Sales Voucher, you must first debit a personal account name like a
customer and not a nominal account name.
When you select the ledger, the current balance is displayed (only if F12:
Configure is configured). When you enter the amount, the revised current balance is shown.
After selecting the next ledger, Tally suggests the balancing amount as the value to enter, which
may be accepted or typed over. You cannot complete the voucher entry until the debit is equal to
the credit.
VOUCHER CLASSES
Voucher Class is a method of automating accounting allocations during Invoice
entry. It is a table for predefining the entries to make invoice entry a simple task. This is
particularly useful in sales invoicing where the nominal ledger accounts, to be credited for each
item of sale is defined once. During voucher entry, the accounting credits for items sold are done
automatically. Additional accounting entries like Tax, Freight and other charges can also be
predefined to be brought up during actual invoicing.
This will have restriction on a data entry operator to alter or modify the vouchers.
the total control tests with senior management to set the class parameters. It also reduces
chances of errors during voucher entry. You can still continue to use Tally as before without
classes if you do not require it.
Classes can also be used to automate the rounding off the values. The rounding –
off method can be preset when defining a class for a line or for the entire voucher or invoice.
Voucher Class Permits:
1. Automation of entries to predefined ledger accounts.
2. Automatic rounding off to preset value limits.
INVENTORY VOUCHERS
INVENTORU Vouchers perform the same function in the inventory system just as
accounting vouchers do in the accounting system. Inventory Vouchers are also means of
162
entering transaction. Inventory vouchers record the receipt and issue of goods/stock, the transfer
of stock between locations and physical stock adjustments.
If you have not integrated accounts with inventory, inventory vouchers will not
have any impact on the Balance Sheet stock figures. They will maintain the stock balances
separately.
To view Inventory Vouchers:
Go to Gateway of Tally > Inventory Vouchers
Configuration on Tally
Set the option Integrate Accounts and Inventory to Yes in F11: Features.
You can trace an entire transaction from the beginning i.e., goods transfer stage to
the financial accounting irrespective of integration status.
For example, the purchase of stock can be tracked from the purchase voucher
through the receipt note, through invoice from the supplier and also through eventual payment.
TYPES OF INVENTORY VOUCHERS
Tally is pre-programmed with Inventory Vouchers of Various natures, each
designed to perform a different task. The following table displays the standard Accounting
Vouchers provided in Tally and their corresponding activation key combination and buttons.
You can either use the key combination given in the table below or the buttons on the Button
Bar.
Key Combination
Buttons
Voucher Type
ALT+F9
ALT+F8
ALT+F6
CTRL+F6
ALT+F7
ALT+10
ALT+F5
ALT+F4
F9: Rcpt Note
F8: Dely Note
F6: Rej.Out
F6: Rej.In
F7: Stk Jrnl
F10: Phys Stk
F5: Sales Order
F4: Purc. Order
Receipt Note Voucher
Delivery Note
Rejections Out
Rejections In
Stock Journal Voucher
Physical Stock
Sales Order
Purchase Order
163
Set the option Use Tracking Numbers to Yes in F11: Company Features to
activate Goods In Receipt Note and Goods Out Delivery Note vouchers. Tally will assume that
goods are received along with Purchase Vouchers and Goods are delivered along with Sales
Vouchers/Invoices. Activating Tracking Numbers denote that you may receive goods that are
not accompanied by a Supplier’s invoice, i.e. the invoice will arrive separately and that you may
not deliver the goods along with the invoice but will invoice it later.
Note: In a voucher you are allowed to select Not Applicable when the Tracking
Number sub-screen appears. This would update inventory immediately between delivery notes
for stock delivered from different locations you can create vouchers to do this.
RECEIPT NOTE VOUCEHR
This voucher type is used for recording goods received.
To view the Receipt Note Voucher:
1. Go to Gateway of Tally > Inventory Vouchers
2. Press the button Alt+F9 or Select the button F9: Rcpt Note from the button bar.
For example, consider the company receives new stock items from a supplier. If a
Purchase Order exists for that Supplier, select the Order Number from the List of Orders pop up
menu to bring up the order particulars automatically.
Receipt Note
Description
Records receipt of new stock from suppliers
Details Recorded
Reference, Ledger Account, Supplier’s Name, Address and
Dispatch Details (If Accept supplementary Details option is set
to Yes in F12: configure), Name of Stock Item, Tracking
Details, Godown, Quantity, Rate (Optional), Amount
(Optional), Narration.
REJECTIONS-IN VOUCHER (SALES RETURNS)
A Rejections In Voucher is used to record goods that are rejected and returned
back by the customer:
To view the Rejections In Voucher
164
1. Go to Gateway of Tally > Inventory Vouchers
2. Press the Ctrl + F6
Rejections In Voucher
Description
Records receipt of goods from customers.
Details Recorded
Ledger Account, Customer’s Name, Address (If Accept
supplementary Details option is set to Yes in F12: configure),
Name of Stock Item, Tracking Details, Order details, Godown,
batch details, Quantity, Rate (Optional), Amount (Optional),
Narration.
DELIVERY NOTE VOUCHER
The delivery Note Voucher is used for recording goods delivered to a customer.
To view the Delivery Note Voucher
1. Go to Gateway of Tally > Inventory Vouchers
2. Press the Alt + F8 or select the button F8: Dely Note from the button bar.
For Example, the company delivers goods from Stock to a customer. If a Sales
Order exists for that customer, selecting the appropriate Order Number from the List of Orders
pop-up menu will automatically bring up the relevant particulars
.
Delivery Note
Description
Records the delivery of goods to customers
Details Recorded
Reference, Ledger Account, Customer’s Name, Address and
Despatch Details (If Accept supplementary Details option is set
to Yes in F12: configure), Name of Stock Item, Tracking
Details, Godown, Quantity, Rate (Optional), Amount
(Optional), Narration.
REJECTIONS-IN VOUCHER (PURCHASE RETURNS)
165
The Rejections out Voucher record goods that are rejected and returned to
supplier.
To view the Rejections out Voucher
1. Go to Gateway of Tally > Inventory Vouchers
2. Press the Ctrl + F6 or Select the button F6: Raj. Out from the Button Bar
For example, the company returns items that had previously been taken into stock
from the supplier.
Rejections Out Voucher
Description
Records return of goods to suppliers
Details Recorded
Ledger Account, Supplier’s Name, Address and Dispatch
Details (If Accept supplementary Details option is set to Yes in
F12: configure), Name of Stock Item, Tracking Details,
Godown, Quantity, Rate (Optional), Amount (Optional),
Narration
STOCK JOURNAL VOUCHER
Stock Journal Voucher is used to record stock transfers from one location to
another.
To view the Stock Journal Voucher:
1. Go to Gateway of Tally > Inventory Vouchers
2. Press the buttons Alt + F7 or Select the button F7: Stk Jrnl from the Button Bar
For example, the company transfers items of stock from the warehouse to the
shop.
Stock Journal Voucher
Description
Records the transfer of stock from one Location to another
166
Details Recorded
Reference, Name of Source and Destination Locations, Name
of Stock Item, Godown. Batch, Quantity, Rate, Amount,
Narration
PHTSICAL STOCK VOUCHER
Physical Stock Voucher is used for recording actual stock physically verified or
counted.
To view the Physical Stock Voucher
1. Go to Gateway of Tally > Inventory Vouchers
2. Select the button F10: Phys Stk form Button Bar or Press Alt + F10
For example, Physical Stock is the stock found on conducting a stock check. It is
not unusual that the company finds a discrepancy between actual stock and computer stock
figure. Physical vouchers will be useful for recording purposes only if you have configured
inventory vouchers to ignore physical stock differences. If you have configured the vouchers so
that physical stock difference is not ignored, than all transactions subsequent to the physical
stock voucher will use the balance as mentioned in that voucher.
Physical Stock Voucher
Description
Records the physical stock count as the new stock balance
Details Recorded
Stock Item, Locations, Batch details and Quantity.
ENTERING PURE INVENTORY VOUCEHRS IN TALLY
Selecting and Entering the Voucher
There are five kinds on inventory vouchers:
• Receipt Notes and Delivery Notes
167
• Reception - in and Rejections – Out
• Sales Order and Purchase Order
• Stock journal
• Physical stock
Note: Vouchers involving pop-up screens depend upon configuration settings and
it will be assumed that these settings have been activated.
The basic procedure to enter voucher is:
1. Go to Gateway of Tally > Inventory Vouchers
2. Change the date if necessary.
3. Select the Voucher type form the Button Bar
ENABLEING F11: FEATURES
• Set Use Tracking Numbers to Yes to activate Delivery Note and Receipt Note
vouchers.
• Set Use Rejection Notes to Yes to activate Rejections In and Rejections Out
vouchers.
• Set Allow Purchase Order Processing and Allow Sales Order Processing to yes
to activate Purchase Order and Sales Order vouchers.
A typical Receipt Note inventory voucher screen appears as shown below:
168
The screen is divided into three sections:
1. The Type, Reference and Date of the Voucher.
2. Party’s Particulars and Ledger Account.
3. Inventory Item Details.
You can change the voucher type by selecting the required type from the Button
Bar.
Note: In some cases such as Receipt Notes (where you have opted for Use
rejection notes in F11) you will see a pop-up screen from which you select the right voucher.
Type of Voucher
Select the Voucher required form the Button bar.
Prior to making a voucher entry, ensure that you are using the right voucher. You
can change the voucher type by selecting the new type from the Button Bar. In some cases, like
receipt notes (where you have opted for Use Rejection notes in F11: Features) you will see a
pop-up screen fro, which you can select the appropriate voucher.
Voucher number
Voucher numbering by default is automatic. It can be entered manually by setting
it in Voucher Types.
Reference number
This is optional. You can enter a reference such as Purchase Order Number or
Supplier’s Delivery Note Number.
Date of voucher
The date of the voucher you are entering is displayed at the top-right of the
Voucher Creation screen. By default, this will be the Current Date. You can change the date to
the transaction date.
Note: you can change the date using the F2: Date button on the Button Bar.
Ledger Account
There are no To/By or Dr/Cr in inventory vouchers.
169
To select a ledger, type the first letter of its name and Tally will display a List of
Ledger Accounts. As you continue typing. The highlights reduce until a match is found. Here
you usually need a supplier’s ledger account.
Supplier’s name and address
Enter details of the supplier’s name and address. This can be different from the
ledger name or can be the same. This information is useful when printing out the Goods Receipt
Note.
Name of the Item
From the pop-up list of Stock Item, select the Stock Item that is being received. If
it is not in the list, create it using ALT+C.
Tracking Number
Set Use Tracking Numbers to Yes in F11: Features> Inventory Features
The Tracking number is used to link the Receipt Note with the Supplier’s Invoice
that will be received later. (Supplier’s Invoice is recorded through the Purchase Voucher).
Hence, select the number which helps maintain the link. Tally gives the Receipt note number
and the Reference number as default. However’ you may opt to give your own number, in which
case select NEW Number. if you not wish to give a tracking number at all select Note
Applicable.
Tracking numbers link the different accounting vouchers with the inventory
vouchers as follows:
1. Receipt Note/Goods In vouchers are linked to Purchase Vouchers
2. Goods Out/Delivery Note are linked to Sales Voucher/Invoice.
170
3. Rejections-In is linked to Credit Note
4. Rejections-Out is linked to Debit Note
New Number
Enter a new number that is not in the list. You can use this number to reconcile,
while making a Purchase Voucher entry.
Not Applicable
You can select Not applicable if you do not want tracking number. this may be
resorted in cases where you want to update stocks immediately with this entry and no goods
inward entry is needed.
If you select Not Applicable in an inventory voucher it will update stocks and you
need not make a separate accounting/invoice entry.
Uses of the option Not Applicable
• If you need to raise a sales voucher/invoice that accompanies the goods and do
not want to pas Goods Out entry, Not Applicable will update stocks without the Goods Out
entry.
• When you record a purchase voucher and wish to update inventory without a
separate Goods In entry, select Not Applicable for the tracking number.
• The same applies to Debit Notes-Rejection Out and Credit Note-Rejection In.
• When you send out samples for approval, where you do not want to raise an
invoice.
• When you receive samples, but no invoice will be forthcoming.
CREATING A STOCK JOURNAL
A Stock Journal is used to transfer materials or stock from one location to another
location. Stocks can also be shown as consumed. It can only be produced without consumption
and production. Hence, it is not like other journals where debits and credits match.
You can specify quantities that are moved, their rates and amounts. If standard
rates are entered in the Stock Item masters, they will appear. In the target location, you can
specify additional costs incurred without actually affecting accounting at all. Only the stock
171
value goes up. Hence, it is technically correct where an expense incurred on production or
inward has been accounting for in th cost of that item.
To create a Stock Journal Voucher
1. Go to Gateway of Tally > Inventory Vouchers
2. Select the button F7: Stk Jrnl form the button bar or press Alt+F7
The Stock Journal Screen has three parts1. The part at the top accepts general information.
2. The left-hand side accepts the Source Godown or Consumption Part.
3. The right-hand side accepts the Destination Godown or the Production Part.
You must furnish the common information required in the field that appears at the
top. You may elect to give information for only the left or the right part or both.
COMMON INFORMATION
Reference, date and voucher number
Reference field will be displayed if this is option is activated for the voucher. Give
a reference number, if required. Voucher number depends upon the settings in Voucher Type.
172
Source (consumption)
Select the name of the Stock Item and the Godown from which it moves or where
it is consumed as well as the Quantity, rate and amount. If the rate is specified in the Stock Item
master it will be displayed when you indicate the Item name.
Note: the effect of entry in this part is to reduce stock of the Items specified.
Destination (Production)
Mention the name of the item and the Godown to which the item is moved. If is
not necessary that the item names should match the names in the source part. This is because a
totally new Item could be produced out of the materials consumed. You can specify the rate of
the Item, Quantity and amount. If the rate is specified in the Stock Item master, it will be
brought up when you indicate the Item name.
Note: The effect of entry in the Destination Part is of increasing the stock of the
Items specified in this part.
Additional cost details
This is another interesting facility is available for the Destination Godown
(Production). You can specify what additional costs were incurrent in moving goods to the
Godown or for producing them. Thought these costs are strictly accounting heads, they do not
get posted in the relevant nominal ledger accounts but add to the cost of the Item. In the target
Godown, you can specify additional costs incurred without actually affecting accounting. Only
the stock value goes up. Hence, it is technically correct where and expense incurred on
production or inward has been accounted for in the cost of that item.
After entering the amount for and Item, the following Additional Cost Details
entry box pops up.
You may specify additional costs for transferring or producing the item. The
typically additional costs are wages, power, and freight and so on. Ensure that you have ledger
accounts opened for the additional cost. Moreover, additional costs entered for the ledgers, do
not reflect in the relevant ledger with the amount but only add to cost of the item.
Percentage (%-age)
You can specify the additional cost in percentage of the cost of the item, in which
case enter the number, for example, 2 for 2% of the cost of the item. You may, alternatively,
skip the percentage field and input an amount directly.
173
Actuals
This displays the total additional cost for the item and the effective cost per unit of
item/product produced.
HILL OF MATERIALS
A Bill of Materials is a list of constituent items along with quantity details that can
be allotted towards manufacturing a certain product, by-product or likewise. This facilitates
immediate reduction in stock of the item automatically. This process of listing the items that
make up another item is made possible in Tally by enabling the Bill of Materials Facility.
Enabling Bill of Materials
This is useful for manufacturing organizations and can be set up through F12:
Configure. The Bill of Materials option now appears in the Stock Item Creation screen only after
entering a unit of measure in Units field.
1. Go to Gateway of Tally > F12: Configure
2. Select Accts/Inv Info from the Configuration Menu
3. Set Allow Component List Details (Bill of Materials) to Yes
174
A Bill of Material should be available while manufacturing an item. This is done
through a stock journal. It is advisable to create a new voucher type, say, Mfg Journal which is
based on Stock Journal
Stock Journal as Manufacturing Journal
Stock Journal vouchers have an options Use as a Manufacturing Journal, in the
Voucher Type Creation screen which has to be set to Yes.
1. Go to Gateway of Tally
2. Select Accounts Info. > Voucher Types > Alter
3. Select the Stock Journal Voucher from the Voucher Types
4. Set the option Use as a Manufacturing Journal to Yes
When you use a Stock Journal as a Manufacturing Journal, the Stock Journal
voucher entry screen will be modified to accept Name and Quantity of the product being
manufactured, its list of components and additional costs of manufacture associated with it. for
and end-product item, if you have specified a bill of material that contains the list of
components, this list will be brought up automatically and filled in for the quantity of the end
product
CREATING A BILL OF MATERIAL
Bill of Material (BoM) is created only for those4 items that are being assembled
in-house. For trading items, you do not need a BoM. Therefore, you need to specify a BoM at
the time of creating a Stock Item or when altering its master.
175
Let us create a new Stock Item Television Flatiron and specify its BoM.
Go to Gateway of Tally> Inventory Info. > Stock Items > Create
The Stock Item Creation screen is displayed below.
Some information like Batches, Alt. units etc. depend upon the company features,
configuration and invoicing set-up. For details on fields other than Set Components (BoM) refer
to the Stock Item Creation section under Inventory Information.
The different for India/SAARC would be in the field Rate of VAT and
MRP/Marginal.
176
• Set the option Allow Component list details (Bill of Materials) to Yes in F12:
Configure.
• A pop-up list for the components appears which has to be entered as shown
below.
Unit of Manufacture
Specify the appropriate number of the finished product items hat will be made.
While manufacturing and recording through stock/manufacturing journal, record the item in
multiples of this unit of manufacture. The components are multiplied by the same factor
automatically. You are allowed to alter the components to reflect actual consumption, if there is
a change from BoM.
Note: Under certain circumstances, it is better to give a larger unit of manufacture,
for example, per 1000 Pcs of nails, as raw material consumed for 1 piece of nail is in significant.
Item, Godown (Location) and Quantity
Enter the component name and quantity. If there are multiples Godowns or
Locations, specify the storage location for the item.
Enter the options for all appropriate fields for the stock item and accept the screen.
MANUFACTURING JOURNAL ENTEY
1. Go to Gateway of Tally > Inventory Vouchers
2. Select the button F7: Stk. Jrnl or press Alt +F7
If you are creating a new voucher type Manufacturing Journal, a pop-up menu is
displayed with the options default Stock Journal and Manufacturing Journal.
177
Select Manufacturing Journal and the following; screen will be displayed.
INPUT FIELDS
Reference Number
Enter a reference number, if required.
Name of Product
Enter the name of the Stock Item to be manufactured.
Location
Enter the location where the Item is manufactured. This location will show the
stock.
Quantity
Enter the quantity of the item to be manufactured.
Component (Consumption)
178
The component list for manufacturing the product and the proportionate quantity
of each component (based on the quantity specified for the product in BOM) is produced. For
each component, the default location is given as specified in the BoM. The entire component list
can be altered, components added or removed and locations amended.
Note: Any change made during this entry will not affect the original Bill of
Material for this product. If you want to make permanent change to the Bill of Material, alter the
Stock Item master information of the product.
Cost of components
The base cost of the components are automatically added and displayed on the
screen.
Additional cost components
Specify additional costs for producing an item. These are typically wages, power,
and freight. Creating ledger accounts for the additional costs is a must. Moreover, additional
costs entered for the ledgers are not reflected in the relevant ledger with the amount, but these
additional costs only add to the cost of the item.
% age
Additional costs can be entered in terms of percentage of cost of components. For
example, 2 for 2% of the cost of components. You can also skip the percentage field and enter
an amount directly.
Total additional cost
This field displays the total additional cost for an Item.
Effective cost
This is the sum of the total cost of components and additional costs.
Effective rate
Effective cost per unit of item/product produced.
PURCHASE AND SALES ORDERS
Order Processing
179
Order processing is the placing of orders with suppliers for purchase to be made
from the or receive orders from customers for the purpose of selling. In Tally, Order Processing
is linked to Inventories. This allows tracking of the order position for a Stock Item. Using this
you can track arrival of goods ordered and also whether the ordered Stock Item are delivered on
time etc.
You can create Purchase and Sales Orders in Tally. Purchase Orders (PO) can be
created, printer and sent to suppliers. Goods received are linked with the POs and Invoices.
Outstanding Purchase Orders should be monitored. Stock Summary displays order position of
any item. The Purchase Order Book lists out all the Purchase Orders Placed.
Likewise, Sales Orders received are recorded in Sales Order Entry screen. These
details will be available during Delivery Note and Invoicing. The order position in the Stock
Summary can be viewed. The Sales Order Book lists all Sales Order received.
Enabling Purchase and Sales Orders
To enable Sales Order and Purchase Order vouchers, activate the following in
F11: Features.
1. Set Allow Purchase Order Processing and Allow Sales Order Processing to
Yes.
2. Enable Use Tracking Numbers
CREATING A PURCHASE ORDER
Purchase Order details depend on configuration settings.
To create a Purchase Order:
Go to Gateway of Tally > Inventory Vouchers> F4: Purc. Order
180
Party’s A/c Name
Select the Supplier’s name form the List of Ledger Accounts. Use Alt + C to
create a new account.
Order No
Enter the purchase order number. Configure the voucher type through Accounts
Info > Voucher Types to set prefixes and suffixes for Purchase Orders. This particular Order No.
field is an additional field to record order number if it is different from the voucher number. The
voucher number is automatically displayed here; it is also possible to change this number if
needed.
Name of the Item
Select the Stock Item that needs to be purchased from the List of Stock Items. The
Item Allocations sub-screen is displayed. Enter the details as show below.
181
Due on
Enter the due date for delivery to the item. This monitors outstanding deliveries.
The order can be split for delivery on different dates. If the order is split, give the due date of the
first lot to be delivered. After selecting the respective Godown and entering the Quantity, Rate
and Amount, specify the due date for the second lot. If the whole lot is delivered at a time, Press
Enter in the Due on field to return to the Voucher Creation screen.
The cursor the returns to the Item field once again. Now enter another item. If no
other item is required, press Enter in the blank field to navigate to the next field. Press the space
bar to display the List of Ledger Accounts.
You can also specify other expenses like freight, tax to be charged if any in the
Purchase Order. The Tax and Expense has to exist as a ledger account or it may be created using
Alt + C.
Location
This field should be entered with required details if multiple-location feature is
enabled, otherwise it does not appear.
Quantity, Rate and Amount
Enter the quantity of the item required and its rate. The amount is calculated, but it
can be modified to enable rounding off.
Additional Cost Details
Enter any additional cost incurred on the item here. This can be either entered as a
percentage of th item cost or a fixed amount. If not, select End of List. Additional costs increase
the value of the item, but they do not appear independently in the nominal ledger account or
expense.
Next Item
The cursor comes to the Item field once again and you can enter another item to
order. If no other item is required, press enter on the blank field to take the cursor to the
tax/expense field.
Expense/Tax
Once the item details have been entered, specify tax to be charged and other
expenses like freight, if any. The tax or expense has to exist as a ledger account if they do not
exist, create it using Alt + C. Here, consider tax @ 17.5% that is charged on the item values.
182
The order entry screen appears as shown below.
Narration
ALTERING A PURCHASE ORDER
To alter a Purchase Order
• Go to Gateway of Tally > Display > Day Book
OR
• Go to Gateway of Tally > Display > Inventory Books > Purchase Order Book
Make the necessary alterations and save.
DELETE A PURCHASE ORDER
To delete a Purchase Order Press Alt + D in the Purchase Order alteration screen
This filed is optional. Enter necessary particulars about the order.
CREATING SALES ORDERS
Sales order entry is exactly like the Purchase Order Entry. Sales Order details will
also depend on configuration settings.
To create a Sales Order:
183
Go to Gateway of Tally > Inventory Voucher> F5: Sales Order
Party’s A/c Name
Select the Customer’s name. press Alt + C to create a new account.
Order No
The voucher number is automatically displayed. You can change this number if
required. Enter the sales order number.
Name of the Item
Select the Item for which th order is to be placed from the List of Stock Items.
Here, the Item Allocations sub-screen is displayed.
Enter the details as shown below:
Due on
184
Enter the due date for delivery to the item. This monitors outstanding deliveries.
The order can be split for delivery on different dates. If the order is split, give the due date of the
first lot to be delivered. After selecting the respective Godown and entering the Quantity, Rate
and Amount, specify the due date for the second lot. If the whole lot is delivered at a time, Press
Enter in the Due on field to return to the Voucher Creation screen.
The cursor the returns to the Item field once again. Now enter another item. If no
other item is required, press Enter in the blank field to navigate to the next field. Press the space
bar to display the List of Ledger Accounts.
You can also specify other expenses like freight, tax to be charged if any in the
Purchase Order. The Tax and Expense has to exist as a ledger account or it may be created using
Alt + C.
Location
In case multiple location features are active this field has to be mentioned.
Otherwise it does not appear.
Quantity, Rate and Amount
Enter the quantity of the item required and its rate. The amount is calculated, but it
can be modified to round it off.
Additional Cost Details
There are no additional cost details for sales orders. They exist only for Purchases
as the values are added to the cost price. In case of sales, additional cost needs to be entered
below the line along with tax.
Next Item
After completion of entering the first item, the cursor comes to Item field once
aging and you can enter another item to order. If there is no other item, press Enter in the blank
field to take the cursor to the tax/expense field.
Expense/Tax
Once the item details have been entered, specify tax to be charged and other
expenses like freight, if any. The tax or expense has to exist as a ledger account if they do not
exist, create it using Alt + C. Here, consider tax @ 17.5% that is charged on the item values.
The Sales order entry screen appears as shown below.
185
Narration
This field is optional. You can give some particulars about the order.
INVOICE ENTRY
Invoicing or sales invoicing is almost similar to sales voucher entry. You will use
the same voucher but select As Invoice option to turn it into a sales invoice. Purchase invoices
are recorded through normal Purchase Voucher entry and it does not have the provision of being
converted into an invoice format for entry purposes, similarly, you can print the Purchase
voucher as a Purchase Invoice or even a Purchase Order.
The advantage of using the invoice format for sales and purchase voucher entry is
that is enables automatic calculations of taxes and duties. This is possible for only those groups
for which used for Calculation is enabled under the group Duties and Taxes. This is also
possible for other groups for which the field Used for Calculation is enabled in the Group
Creation screen.
In recording both sales and purchase invoice details, you can adjust accounting
and inventory balances and account for Taxes simultaneously.
The default invoice formats has various configuration options. Use them to print
your invoices as per requirements. It is not necessary to create new invoice formats. It is
recommended that you configure the default invoice as per requirements. You can also design a
new invoice using Tally’s Definition Language (TDL) Report Designer. TDL is quite and
advanced language with which you can create new reports and screens. You can even modify
existing reports and screens.
186
Settings for creating Sales and Purchase Invoice
1. Ensure that Allow Invoicing is set to Yes in F11: Features to create sales
invoice. This brings up another option. Set Separate Discount Column invoices to Yes if you
want a separate column for discounts in invoices.
2. To create purchase invoices, ensure that Allow Invoices is set to Yes and also
Enter Purchases in Invoice Format is set to Yes in F11: Features. If you want a separate column
for discounts in invoices, follow the procedure described above.
3. Go to Gateway of Tally > Accounting Vouchers. Select either sales or
purchase voucher. If you set Show Inventory Details to Yes in F12: Configure, all inventory
details will be displayed on voucher screen.
4. While creating Ledgers under the group Sales and Purchase Accounts, ensure
that the option Inventory values are affected is set to Yes.
5. If you want tax accounts (under the group Duties & Taxes) to use automatic
calculation, ensure that the Percentage of Calculation is entered (For example, 17.5) and the
appropriate Method of Calculation is selected from the pop-up menu in the Ledger Creation
screen. If it is to use Tax based on Item Rate, then the Stock Item must have the rate specified.
For more details refer Ledgers.
PRINTING INVOICES AND VOUCHERS
To print any voucher or invoice, press ALT+P or click on the button Print. You
can configure the voucher type to print automatically after saving the voucher.
187
Note: You can configure the printing options be selecting the appropriate buttons.
You can give additional information. Change titles. Print additional pages, change printer
settings.
The buttons Pre-Printer and Quick Format toggles for Plain Paper and Neat
Format respectively. These are print specifications that you set. Pre-printed is for per- printed
stationery. Quick Format does not give fonts or other niceties but is ideal for fast printing. Select
copies and give the number of copies to be printed. By default this is set to one copy. You can
set the number of copies in Invoice Printing Configuration.
Go to Gateway of Tally> F12: Configure> Printing
View invoice as voucher and vice-versa
Once you create the invoice, you can view it as a voucher by simply displaying it
and clicking on the toggle button [As invoice] / [As Voucher] or pressing CTRL+V. The same
can be done with a sales voucher to be brought up as an invoice
Display/Alter a Voucher/Invoice
You can display a voucher or alter it (subject to authority), by simply drilling
down any display screen.
For example, from the Balance Sheet, press Enter on the group Sundry Debtors,
then on the particular ledger, which brings up its monthly summary. Continue the selection
process till you see the list of vouchers and then the voucher itself. You may to alter a voucher
by going through the ledger display screen or the Day Book.
Note: If you do not have the authority to alter a voucher, the voucher would be
brought up for display only.
188
Chapter
10
Displaying Information from Tally
Tally’s Display of information is designed to allow a user get the maximum
benefit of the data that is entered. A user gets a holistic picture of the data and is also able to
present information using different options. The purpose of compiling data is present it in
comprehensible accounting reports. On entering the vouchers, Tally uses the same data and
provides you with the management control reports in addition to all books and statements.
The display screens of Tally are dynamic and interactive. They are not spooled
print files but are specially designed for the screen. Whatever you see on the screen can be
printed as well depending upon your printer’s capabilities.
To view the Display Menu:
Go to Gateway of Tally> Display
The following screen displays
189
Gateway of Tally displays only the Balance Sheet and Profit & Loss Account
directly as these statements are considered the most important. All the other Tally reports are
classified into two broad categories, namely. Accounting reports and Inventory reports
conforming to the two major areas of operations. Each area is further grouped into books and
statements.
The Cash and Funds Flow display too has not been grouped under Statements of
Accounts.
Trial Balance provides you a report on the account balances sorted by groups, for
all the accounts of the selected company. In other words, the Trial balance displays a collection
of main groups and their closing balances.
The Stock Summary is a statement of stock-in-hand on a particular date and gets
updated every transaction so as to provide the current stock position.
The Ratio Analysis Statement is a single sheet report indicating the company’s
performance based on values and key indicators, over a selected period. This report gives a
manager an idea of the company’s financial condition and where it is going in the short-term.
The Day Book contains all vouchers for the day, including inventory vouchers. Its
purpose is to show you a day’s transactions, though you can display a report for any period
using Change period option.
The List of Accounts gives the tree structure of all your masters, namely, Groups,
Ledgers, Stock items, Cost Centers, Currencies, etc.
Exception Reports are those reports that track unusual transactions or balances.
BASIC FEATURES OF DISPLAYING REPORTS
Tally creates the books of accounts and the financial statement based on the
vouchers entered till date. You can then customize the appearance of reports as required.
For example, you can compare different companies, periods of the financial year,
groups and ledgers.
Press Enter after highlighting the item in a report, to navigate to the next level of
detail till you reach an individual voucher. Similarly, you can navigate back to higher levels by
pressing Esc. The special features available for a displayed report are indicated on the button
bar, which can be operated by a single- click of the mouse.
Accessing reports
190
The Gateway of Tally menu provides access to all the financial reports listed in the
Display Menu.
For example, if you want to view the Sales Register,
Go to Gateway of Tally > Display > Account Books > Sales Register. Tally will
display the report for the currently selected period.
Modifying Reports
On selecting a report, the screen displays. Modify the display to suit you
requirements using the appropriate buttons form th button bar.
If you select the buttons using the keyboard, the conventions are:
F (n):- Press the F (n) key
F (n):- Press Alt + F (n)
F (n):-Press Ctrl + F (n)
Note: Here n is used as an example of a function key (Eg. F1, F2 and so on).
(Alt + F1) F1: - Detailed/Condensed
Adds a further level of detail to the report, or condenses the report.
F2: Period
You can change the period of the report by specifying From/To dates.
F3: Company
If you have more than one company select, this button enables you to switch
among them to display the new company data in the current screen format.
191
F4: to F10:
The functions performed by these buttons vary from report to report.
F11: Company Features
This button is not related to displaying reports but to setting the options that affect
the voucher entry.
F12: Configure
This button is very relevant to displaying reports and enables you to define the
report specific options.
For example, depending on the report displayed you can specify whether it should
be in horizontal or vertical format, show percentages, show gross profit, show opening and/or
closing balances, change the periodicity, change the sorting method, and so on.
For instance, if you want to view graphs with monthly reports:
1. Select the F12: Configure Button while in the Gateway of Tally screen and you
will be taken to the Configuration menu.
2. select General and by default Show Monthly Reports with Graphs under Other
Options is set to Yes. If this option is No set it to Yes.
192
(Alt + F12) F12: Range
This button enables you to filter the information displayed based on monetary
values.
For example, you can specify that you want Tally to display only Vouchers having
Batch Names greater than $5,000 in Day Book.
(Ctrl + F12) F12: Value
This button enables you to filter vouchers.
For example, you can specify that you want vouchers having EmployeeAttendance Entries with their Designation containing all the details about the employee
193
New Column (Alt +c)
This button enables you to add and display another column in the report to
compare information.
Alter Column (Alt + a)
This button enables you to alter the details of a new column added previously, for
example, the date range. Select the column to be altered by positioning the cursor on it.
Del Column (Alt + d)
Use this button to delete the column, which you no longer wish to have in the
report
Auto Column (Alt + n)
Use this button to add multiple columns to a report.
For example, add columns for each month, or to accommodate other companies if
more than one company has been selected. You can also have a total column.
194
Report Specific options
Report specific options, if any are displayed at the bottom-half of the screen and
can be amended as per requirements.
DISPLAY ACCOUNT BOOKS AND STATEMENTS
Books of account
Books of account record the transaction details as entered. Although items are
posted too many different ledgers, Tally brings all the transactions of a particular category
together into a book of account for viewing and printing.
For example, Cash Book records all the transactions affecting cash and the Sales
Book records all sales transactions.
Statement of Accounts
These pertain to cost centres and outstanding analysis. The Statements of Account
are derived from individual transactions but are not statutory requirements.
Financial Statements
Financial Statements though derived from individual transaction tend to show
summary totals, ratios and statistics, analyzing a company’s financial data in a wide variety of
ways. Financial statements include Balance Sheet, Profit & Loss A/c, and Cash Flow Analysis
and form part of the statutory requirements in most countries.
195
1. All books are displayed as a monthly summary with opening and closing
balances.
2. Select a month and press Enter to display all transactions for the month. The
opening and closing balances as well as the total of all transactions are displayed.
3. Select a transaction to bring up the voucher. The voucher displays either in
alteration mode or simply displays depending on your access rights.
Let us see some typical examples of how to display the books of account and
financial statements. You will then be able to experiment with other statements for yourself
VIEWING CASH/BANK BOOKS
To view the Cash/Bank Summary
1. Go to Gateway of Tally > Display > Account Books > Cash/Bank Book (s)
2. If you have more than one bank account, select one bank account. Press Enter
to display the Ledger Monthly Summary.
3. Select F12: Configuration and activate the option Show with Graph to Yes.
196
4. Highlight a month, press Enter and the Ledger Vouchers screen displays.
5. All the vouchers for the selected month are listed. Press Esc to return to the
Ledger Monthly Summary screen.
197
6. Select F12: Value to bring up the Value to Calculate in Report screen.
a) Select Voucher Type from the Particulars menu.
b) In the Particulars menu, select Narration.
c) In the Range of Info. Menu select equal to.
d) Type Contra in the next field and press Enter.
e) In the Condition menu select End of List and press Enter twice.
7. In the display of the Ledger Monthly Summary the figure are now reduced as
they show only Contra vouchers. To check this, position th highlight bar over the July figures
and press Enter to display the details.
8. Press Esc until you return to the Gateway of Tally menu.
DISPLAY BALANCE SHEET
The Balance Sheet is a report on the status of the financial affairs of a company at
a given date. To view Balance Sheet:
198
Go to Gateway of Tally > Balance Sheet
Press F12: Configuration and set the required parameters to display the Balance
Sheet accounting to yore preferences.
Note: Balance Sheet gets updated instantly with every transaction voucher that is
entered and saved.
HORIZONTAL FORM OF BALANCE SHEET
The Balance Sheet screen is displayed in the Horizontal form. See it in a Vertical
form by activating Show Vertical Balance Sheet to Yes in F12: Configuration
199
Extract information form the Balance sheet using options available in the Button
Bar.
1. Select F1: - Detailed/Condensed to explode the summarized information.
2. Change the date of the Balance Sheet using F2: Period.
3. Add up new columns and
1. Display a Balance Sheet for a different date to compare with current one
2. Display the Balance Sheet in a different currency
3. Display Budget figures and analyse the variances or
4. See the effect of different Stock Valuations on the Balance Sheet
INTERGRATE ACCOUNTS WITH INVENTORY
Effect on Balance Sheet and Profit & Loss Account
Integrate Accounts with Inventory in F11: Features has a significant effect on the
Balance Sheet and Profit & Loss Account.
200
• If Accounts with Inventory is set to Yes in F11: Features, it has stock/inventory
balance figures are updated from the inventory records, which in turn enables you to drill down
to the Stock Registers from the Balance Sheet.
• If the option Accounts with Inventory is set to No in F11: Features, the
inventory books figures are ignored and closing stock balances are entered manually.
Note: Stock records often contain compensating errors caused by wrong allocation
to items. This feature of Tally enables the finalization of financial books without waiting for
reconciliation of stock that might take time.
DISPLAY PROFIT & LOSS ACCOUNT
The Profit and Loss Account shows the operational results over a given period. It
lists out the Incomes and Expenditures based on the Primary Groups of Tally and the Profit &
Loss Account in Tally is updated instantly with every transaction voucher that is entered and
saved.
To view the Profit & Loss Account
Go to Gateway of Tally > Profit & Loss Account
Note: The Profit & Loss Account is displayed according to the configuration set
up for it in F12: Configure.
HORIZONTAL FORM OF PROFIT & LOSS ACCOUNT
The sample screen shown is in horizontal form which is the default display. You
can also set it up to display in vertical form.
201
Using options in the Button Bar
1. Select F1: Detailed/Condensed to display more information or condense.
2. Change the date of the Profit & Loss Account using F2: Period.
3. Add new columns to
1. Display a Profit & Loss Account for a diffe3rnet period to compare with
the current one
2. display the Profit & Loss Account in a different currency
3. Display a column with Budget figures and analyse variances
4. See the effect of different Stock Valuations on the Profit/Loss account.
5. Select and compare Profit & Loss of different companies.
INCOME/EXEPENSE STMT INSTEAD OF P&L?
Account statements for Non-Trading Organizations
For Non-Trading accounts (e.g. Accounts of Charitable Organizations), the
Trading and Profit & Loss Statement are inappropriate.
In such cases, you may use Income & Expenditure Account by setting
Income/Expense Stmt instead of P&L to Yes in F11: Features.
The Income & Expenditure Statement displays as shown.
202
DISPLAY TRIAL BALANCE
Trial Balance is a report of all account balance for the company sorted by groups,
i.e., it is displayed in a grouped form, comprising main groups and their closing balances. You
can see that the debit and credit balance match.
In Tally, the matching of the Trial Balance is a foregone conclusion since all
voucher entries are in Debit – Credit format and must balance at the entry point
To view the Trial Balance
Go to Gateway of Tally > Display > Trial Balance
Note: As per accounting principles, the Trial Balance does not list Closing Stock.
• Select F1: Detailed to break down the grouped information or simply drill
down a Group of further detail.
The screen appears as shown
203
• Select F5: Led-wise to list all ledgers and their closing balances.
The screen appears as shown
• Select New Column to bring up the closing balances for another date
The screen appears as shown
204
DAY BOOK
To view Day Book
Go to Gateway of Tally > Display> Daybook
The Day Book lists all transactions made over a particular day and by default
displays the last voucher entry date of a regular voucher. It could also be set up to list all the
transactions made over a period.
Press F2: Period on the button bar or press the keys Alt+F2.
All the transactions include all financial vouchers, reversing and memorandum
journals as well as inventory vouchers.
Consider an example:
Day Book for current date
205
Day Book for a period
You can also filter the list so as to display the transactions of a particular voucher
type using F4: Chg Vch button from the button bar.
The screen appears as shown:
206
BOOKS AND REGISTERS
The objective of having books and registers in Tally is to pile up similar entries
into a single entity so that they are meaningful, e.g., all cash entries in the Cash Book, all sales
entries in the Sales Day Book (called Sales Register).
The Tally transaction flow
A part from the subsidiary books, entries are also filed under each Voucher Type.
Therefore, there will be as many registers as there are voucher types.
JOURNALS, DAY BOOK AND REGISTERS
Journal, Sales Register, Purchase Register, Debit Note Register, Credit Note
Register, Payment Register, Receipts Register, etc. are the different kinds of Registers.
There are three ways to view various types of registers:
1. From the Display menu
2. By changing the type of voucher from within a register
3. From the Statistics page
Consider the Sales Register which includes most of the options.
SALES REGISTER (SALES DAY BOOK)
207
Go to Gateway of Tally > Display > Account books > Sales Register
The following screen displays.
By default, all registers display Monthly Summary with transactions and closing
balances. For Balance Sheet Accounts, opening balance is displayed at the top of the screen.
Select a month and press Enter to see the Sales Voucher Register.
A list of all sales vouchers pertaining to the month you selected displays. You can
use the options in the button bar to change the display according to your preferences. You can
change the period of the report as well as the depth of information.
Use F12: Configure to see the report with some or all of the following
information, namely Narrations, Bill –wise details, Cost Centre details and Inventory details.
Click on F1: Detailed to view the report in detailed format.
INVOICE PROFITABILITY
Display the Sales Voucher Register for a period by drilling down a month and
change the period if required.
Select F2: Show Profit or activate the option Show Gross Profit estimates to Yes
in F12: Configure.
208
The report now displays each invoice with
Transaction Value – Invoice value including taxes
Gross Revenue- Actual sale value minus taxes
Cost – Book cost of the product
Gross Profit – Amount of profit or loss on the sale
EXTRACT OF SALES REGISTER
When you are in the Sales Voucher Register, select F6: Extract from the button
bar.
The following screen displays.
209
The Extract gives a break-down of the sales vouchers and groups them to provide
totals for each group and ledger used in all sales vouchers for the period. The information is
useful, when you want to know how much each group of customers bought, what is the tax
component or what is the total value of each sales ledger.
Inventory- wise Extract of Sales Register
“
“
in the Sales Voucher Register select F6: Extract from the button bar
Go to F12: Configure.
“ Set Show Inventory-wise Extract to Yes to view the report of the details on
quantity and value.
The following screen display.
MONTHLY SUMMARY
When drilling down from a statement into any Group, Ledger, Stock item or Cost
center the screen displayed first is the Monthly summary. Monthly Summary can also be
accessed from a voucher level screen with the help of the button Monthly. The monthly
summary shows the opening balance for the year, and then lists cash month’s total transactions,
inclusive of both debit (inwards for stocks) and credit (outwards for stocks) and finally each
month’s closing balance. Below the monthly summary, is a bar chart showing the movement of
account.
210
Use F12: Configure to display the monthly summary accounting to your
requirements.
The options available on the button bar are very useful for configuring managerial
reports.
E. g. Use the New Column button to bring up the Monthly Summary of another
ledger or object or the same object in another company.
Press the button F5: Quarterly, to view the summarized quarterly figures.
Use the options in F12: Configure to view the details on percentages, averages and
so on.
Ledger Voucher Monthly Summary
The Ledger Voucher Monthly summary screen is displayed as shown.
COST CATEGORY MONTHY SUMMARY
The cost category monthly summary is displayed as shown. You can place the
cursor on any particular month, say October and drill down for more details.
211
Stock Item Monthly summary
The screen will be displays as follows. If you want to view the details for any
particular month you have to place the cursor on the month and drill down.
Cash and Funds Flow
Cash management is essential for any business. Many companies, as they go into
liquidation, continue to make profits because of insolvency. Businesses shut down because of
lack of cash despite being profitable. Cash and Fund Flow Statements aid in cash management
and are an important component of the management accounts.
212
Cash Flow
Cash Flow Statement is a chronological account of the movement of cash in and
out of the business and includes all cash transactions made with banks also. When used with
banks also. When used with the Balance Sheet and Profit & Loss Account, the Cash Flow
Statement helps to assess the reasons for the differences between net income and net cash flow
as well as the effect of cash/non-cash investing and financing transactions.
To access the Cash Flow:
1. Go to Gateway of Tally > Display > Cash/Funds Flow> Cash Flow
2. A Monthly Cash Flow Summary that shows the Cash Movement – inflow and
outflow for each month and the Nett Flow, displays.
3. Select a month and Press Enter to drill down. Select the button F1: Detailed
form the button bar to see the cash flow for that month.
For Quarterly Cash Flow:
• Change Period by pressing F2: Period and set the period, e.g., 1-4-05 to 1-1205.
• Select the option Auto Column from the button bar.
• You can also select Quarterly (or Monthly or any other period) form the list
Columnar Cash Flow Statement
213
FUNDS FLOW
While Cash Flow Statement is concerned only with cash, Funds Flow takes into
account, the movement of the entire working capital. It includes rise4 and fall in inventories,
creditors and debtors apart from cash and bank. The statement reveals the Sources of Funds and
how they were applied.
To access the Funds Flow:
1. Go to Gateway of Tally > Display > Cash/Funds Flow > Funds Flow
2. A Monthly Funds Flow Summary with the movement of working capital for
each month displays. It shows the Opening and Closing Balances of each month with a column
for Funds Flow.
214
3. Select a month and press Enter to drill down.
4. Select F1: Detailed to see the funds flow for the selected month.
5. The Bottom of the screen displays the movement in Working Capital.
You can drill down any line for further detail.
For Quarterly Funds Flow:
1. Change the period by pressing F2: Period
2. Set the period e.g., 1.1.04 to 1.5.04.
3. Select the button Auto Column from the button bar.
4. Else Select Quarterly (or Monthly or any other period) from the list
Reconciliation of Bank accounts
Reconciling the company’s bank accounts with the banker’s statement is a regular
task of accounting. In Tally, Reconciliation of Bank Accounts facilitates the following:
Ability to ‘check back’ the correctness of reconciliation
Tally uses Bank Date to mark against the voucher.
Fro instance, if you issue a cheque on 8th April and your bank clears it on 19th
April; you would set the Bank Date for the voucher as 19th April. This means that when you
215
need to ‘check back’ later, whether th entry made by you is correct, you will only need to verify
the bank statement of the 19th.
Recovering the reconciliation of any date
This is of crucial importance in Auditing. The Bank Reconciliation is one of the
per-requisites of auditing and verification of the correctness of accounts at the year end.
However, it is not a ‘real-time’ task, meaning auditors do not do it on the first day of the next
year.
For e.g., the reconciliation made on 31st March, should be ‘viewable’ even in
August, by when almost all the cheques would have subsequently been marked Reconciled.
Tally provides you with a facility of achieving this also.
Bank accounts may have a different Starting Date for reconciliation purpose.
When you create a bank account, you are prompted to give an Effective Date for Reconciliation.
Normally, this would be the Books Beginning from date itself. However, you could have
imported data from a pervious version of Tally or from any other system (where the
reconciliation process was not available or was different). In that case, you may not want to
reconcile the bank account with your bank statements from the very beginning. Give the date
from which you want the reconciliation facility to be active. Once you do this, pervious entries
would not appear for reconciliation, but would be taken as a reconciled Opening Balance.
A quick experiment with Reconciliation will show you what it all means. Here is
how you go about it:
1. Bring up the monthly summary of any bankbook.
(You can choose a bank book form any of the following: Balance Sheet, Trial
Balance, Display > Account Books > Cash/Bank Books).
2. Bring the cursor to the first month (typically April), and press Enter. This
brings up the vouchers for the month of April. Since this is a bank account, you can see an
additional button F5: Reconcile on the button bar to the right. Press F5.
3. The display goes to the Reconciliation mode, which can be edited. The primary
component of the current screen is the column for Bankers Date.
4. The Reconciliation found at the bottom of the screen shows:
1. Balance as per Company Books
2. Amounts not reflected in Bank
216
3. Balance as per Bank
The Balance as per Company Books reflects the balance as on the last date (in the
example, it is 30th April).
The Amounts not reflected in Bank are the debit and Credit sums of all those
vouchers, whose Bank Date is either BLANK, or LATER than 30-Apr (i.e. these vouchers have
not yet been reflected in the bank statement).
The Balance as per Bank is the net effect to the Book Balance offset by the
amounts not reflected in the Bank – which must equal the balance in the bank statement.
Note: Some discrepancies may persist due to entries made in the bank statement,
which you have not yet entered in your book. You would reconcile these manually, and print
your reconciliation.
As you mark the individual vouchers by setting the Bank Date, you will notice that
the Reconciliation at the bottom of the screen keeps updating the changes. Once this process is
complete, press Ctrl + A or Enter as many times as necessar4y to skip over the unmarked
vouchers and accept the screen.
The next time you opt for reconciliation; the screen displays only those vouchers
that remain unrecognized. You can also display vouchers that are already marked as reconciled,
in case you need to edit the marking, by using F12: Configure.
Set Show Reconciled Vouchers also to Yes to see the reconciled vouchers.
Note: It is not possible to reconcile opening balance and can be done only with
available physical transactions.
217
Set Allow back dated Reconciliation to Yes to enter bank dates which are lesser
than the Voucher date.
Press Alt + P or click on the Print button to print your reconciliation report.
Display Inventory Reports & Statements
Inventory in Tally operates in the same way as accounting with regard to
displaying, modifying and printing reports. Tally generates inventory report based on the
vouchers entered to date. You can use the customized reports to compare inventory data
between different companies, periods of the financial year, and so on.
Highlight the item and press Enter to step down to the next level of detail in a
report. Report this process till you reach an individual voucher. Similarly, step back to higher
levels by pressing Esc. The special features available for the currently displayed report are
indicated on the button bar and can be selected with a single click of the mouse.
This section highlights some special inventory screens and illustrates a basic level
of customization.
VIEWING STOCK SUMMARY
Stock Summary is a statement of stock-in-hand as on a particular date. It is
updated with every transaction in real time and provides the current stock position.
The statement can be drilled-down, as with all Tally reports, and configured to
enable you to view different details, for instance, the total flow of total flow of stock can be
viewed with a single report.
Tally treats Stock Summary as one of the Primary statements and makes it
accessible directly form the Gateway of Tally.
To view Stock Summary
1. Go to Gateway of Tally > Stock Summary
2. The default display is of Stock Group balances.
3. Select Detailed to show another level of detail.
The detailed report will include sub-groups or Stock Items (in cases where there
are no sub-groups), display as shown:
218
In the above illustration the stock groups Hardware and Software contain stock
items and have closing balances.
The Stock Groups displays total quantities, as the unit of measure is the same for
all the stock items added. A grand total is also available as there is a single unit of measure for
all ‘addable’ items. If there were different units of measure, then the grand total would not be
calculated and displayed.
STOCK FLOW (RECONCLIATION)
You can configure the Stock Summary Statement to display the flow of goods.
1. Select F12: Configure while on the Stock Summary screen.
2. Set the Configuration as shown.
219
The Stock Summary displays the flow of stock, i.e. Opening Stock, Goods
Inwards, Goods Outward and Closing Stock, as shown.
The report is quantitatively reconciled, i.e., Opening quantity + Inward Quantity Outward Quantity = Closing Stock Quantity. However, this is incorrect for the values as the
Outward value displays Sale Values, not Cost. The Closing Stock Value is, however, based on
Cost and the Cost Method adopted for each item. Value Reconciliation is possible if you are
using Consumption figures instead of Sales Value.
STOCK VALUCATION METHODS
The Stock Summary report with stock valuation methods can be used to view the
effects of different methods on the value of stock. Each stock item can be set up to have a
different stock valuation method. In some instances, a particular method of valuation may be
required, for example, to assess the replacement value or saleable value of stock. Tally displays
stocks in any or all th valuation methods dynamically and simultaneously, without any
complicated procedure.
Suppose you want to use Last Purchase Cost method to assess the replacement
value and the Last Sale Price method for realizable (saleable) value.
In the Stock Summary screen, select the New Column button on the button bar or
press Alt+C. The screen appears as shown below.
Select Last Sale Price from the Stock Valuation Methods list.
220
The Stock summary report with Last Sale Price column displays as shown:
VIEWING STOCK ITEMS
1. Go to Gateway of Tally > Display > Inventory Books> Stock Item
You can also use the Stock Summary to view Stock Items. Place the cursor on the
item and press Enter.
2. Select an item from the List of Items.
3. Select F12: Configure. Tab down the Configuration menu to Show with
Graph? Type y and press Enter
Select Bar and No. the particulars display with a graph of Goods Inwards and
Outwards (red for inwards, blue for outwards).
221
STOCK QUERY
Stock Query report provides you all the information about a particular item.
To create Stock Query:
1. Go to Gateway of Tally > Display > Statements of Inventory > Stock Query
2. Select an Item from the List of Items. Tally uses the Stock Category to display
Items of the same Category. This feature helps you to ascertain the availability and location of
alternative products to offer your customer.
222
3. Select F4: Item to switch to another Item.
Additional Information:
1. Go to the Group Summary, select Software and press F12: Range to limit the
display to Stock Groups having Closing Balance greater than 3000.
2. Explore the Locations report. Select On-site, click F1: Detailed, change the
period: 1-5-05 to 31-7-05, and use Auto Column to bring up the month-by-month figures
3. Auto Column feature gives you the facility to check the stock status using
different periods.
4. Bring up the initial display of each report and use Enter and Esc to drill-down
through the levels of detail and back again.
ANALYSIS OF INVENTORY MOVEMENTS
The Analysis of Inventory Movements is generated for accounted transactions
only, unlike Stock Summaries and other statements, where Goods Received but Bills not
Received and Goods Dispatched but Bills not Raised are also considered. Thus Analysis
statements, are used generally for a comparative study, and not considered authentic for
Accounts or Inventory records.
Go to Gateway of Tally > Display > Inventory Books > Movement Analysis
223
Analyse stock movements by stock groups, categories, financial group or ledger.
MOVEMENT ANALYSIS (STOCK GROUP ANALYSIS)
Movement Analysis of a selected stock group displays the Total Inward and
Outward movement of all the items in a selected Stock Group. The quantities displayed are
Actual Quantities of movement (which, in some cases, may be different from the Billed Qty in
the transactions.) The ‘Inward’ detail displays the Effective Rate or Final Landed Cost of the
materials, after considering all overhead costs (see ‘Valuation of Purchases’). If the Effective
Rate varies from the Basic Invoice Rate of the materials, it is highlighted. The Outward detail
displays the Basic Invoice Rate and Value of goods sold/transferred out.
224
ITEM MOVEMENT ANALYSIS
Gateway of Tally>Display >Inventory Books > Movement Analysis> Stock Item
Analysis.
Item Movement Analysis is the next level of information (press Enter on the Stock
Item or Display Inventory Books Stock Item Analysis). This brings up the Party-wise/Transferwise detail of Movements. The Inward detail displays the Basic Invoice Rate and Effective Rate.
This report helps you compare Purchase Costs across different suppliers. For
example, supplier A may have a lower Basic Invoice Rate as Compared to Supplier B, though
the Effective Rate may be higher (perhaps due to differences in Taxes, Packing Costs, and
Freight Costs etc). Suppose a material is manufactured in-house as well as purchased, the
difference in Purchase Costs and In-house Costs can be checked. Select multiple columns for
different periods, to view the changes in the Effective Rate for purchases.
Press Enter on the Party Name or Stock Journal Name to display the transactionlevel details on Date of goods received/sold, Quantities, Basic Rates, Addl.Costs, and Effective
Rate for each transaction.
The default screen displays the Addl.Costs (if any), in a single column. To view
the spread of costs, press F12: Configure and select to view Show Addl.Costs. This brings up
the bifurcation of all Additional Costs.
ITEM VOUCHER ANALYSIS
This report gives the value details of all transactions for a selected stock item from
a particular supplier or to a particular customer. It is obtained from Movement Analysis Report
of a stock item.
225
1. Go to Gateway of Tally> Display> Inventory Books > Movement Analysis.
2. Select Item from List.
3. Select a Supplier (or Customer) from the item Movement Analysis.
The report displays every purchase from Tally Solutions. Bangalore during the
period specified with break-down of Basic Value and Additional Cost. To view full details of
Additional Cost, Press F12: Configure and set the option.
The Item Voucher Analysis considers only billed transactions, not ones for which
invoices have not been raised.
Use F12: Configure foe more details.
STOCK CATEGORY ANALYSIS – MOVEMENT ANALYSIS
1. Go to Gateway of Tally > Display > Inventory Books > Movement Analysis >
Category Analysis.
2. Select a category, for example, spreadsheets.
3. Change period, if necessary
The Stock Category Analysis statement displays the movement of Stock Items of a
selected Stock Category.
The Inward and Outward movement of these two items are summarized in the
Summary. Drill-down to bring up the Item Movement Analysis for the selected item.
226
LEDGER ANALYSIS
Ledger Analysis is similar to Movement Analysis, except that you can view
movements of the items for the selected Ledger (Party). Thus, you get an ‘analyses of all
purchases made from a supplier, or all items sold to a customer. The next level of information
brings up the transaction level details.
TRANSFER ANALYSIS
When using different Stock Journals for each transaction, transfer Analysis gives
the movement details for each type of Stock Journal. This is a very useful costing and waster
analysis tool. In non-manufacturing set ups, which have Multiple Godowns, this report becomes
a quick check to verify that all transfer entries have entered correctly.
PRINTING REPORTS
Reports and documents generated through Tally’s extensive display capabilities
can also be printed.
Printing is possible in two ways:
1. Using the Print (Alt + P) button and
2. Multi-Account Printing
Using the Print (Alt + P) button
You can choose to print directly from the screen currently displayed by selecting
the button PRINT (top-most button on the right-hand side of the screen). This brings up the Print
Configuration screen for the report and new button options on the right-hand side of the screen.
You can change and alter the settings in the print configuration screen
Printer – Click Alt + S (Select Printer) to change printer settings. This also
displays the default paper size that you have set for the printer.
No. of Copies- Click Alt + C (Copies) to specify the number of copies to be
printed.
Print Language – Set Enable Multilingual Support to Yes in F12: Configure and
click Alt + L (Print Language) to print in the language of your choice.
227
Method – Click Alt + F (Print Format) to select the print format. A pop-up list
displaying the printing formats available in Tally. The formats provide are, dot-Matrix Format,
Near Format and Quick (Draft) Format. Here you can select either the per-printed or plain paper
to print out your reports.
Pre-Printed / Plain Paper:
By default, the Printing Configuration screen is set to print on plain paper. The
print-out displays as shown.
To print on a per-printed invoice/ report, select Pre-printed (Alt+ R) and the Print
Preview screen display as shown.
Tally enables you to print the company details on the invoice/ report. You can
toggle between the two options to print using either method.
Page Range – Click Alt + G (Page Nos) to select the starting page number
and the page number range.
Paper Type – The paper Type can be set after you select the printer.
Paper Size – By default, the paper size in Tally is set at 8.50 X 10.98 or 216mm X
279mm.
To alter the paper size to your requirements, select Alt+S (Select Printer).
A list of printers displays.
EXPORT OF DATA
Use Export option to export data (reports and statements) from Tally. The
exported data can be rearranged on a spreadsheet, published on the web or exported to another
company using Tally.
228
Go to a repot or a statement and click on the Export button or use ALT+E. The
export screen displays Export? Yes or No.
Press Backspace or No to navigate through the fields and alter the parameters
Language
This option enables you to export your report in English or any of the Indian
languages.
On selecting Default (All Languages) you can export your reports in any of the
Indian languages. However, the display language has to be set to the respective Indian language.
On Selecting Restricted (ASCII Only) you can export your reports in English.
229
Note: If you have used the option Restricted (ASCII Only) to export reports of a
company created in any of the Indian language, then the exported data will appear with question
marks.
Format
Tally has three formats for export of data from E-mail, Export and Upload options:
• ASCII
• HTML
• XML
By default, the exported file will be saved in the Tally folder on your computer.
To export to a different folder enter the path of the drive and folder in Output File Name.
Another program can be used to import the content from the exported file or used as it is.
EXPORT FORMATS
Tally has three formats for export of data from E-mail, Export and Upload options:
• ASCII (Comma-delimited)
• HTML (Web- publishing)
• XML (Data-interchange)
230
ASCII
American Standard code for Information Interchange (ASCII) is a plain-text
format, without any special formatting or fonts, in which data is separated using commas.
Commonly used for email and all email programs, ASCII data can also be easily worked upon
by other programs.
HTML
Reports in Hyper Text Markup Language (HTML) format retain their formatting
and fonts. They can be read using an HTML enabled program, or using browsers such as
Microsoft Internet Explorer.
Resolution (Only in HTML format)
Resolution is based on the pixels used to format the report. A higher resolution
gives a better quality of output. The Resolution option is available only in HTML format in
Tally.
XML
Extensible Markup Language (XML) is an extension of HTML, but the data can
be imported by other XML- aware systems. Using XML, Tally allows the user to exchange
information even with systems that do not run Tally. An XML file from Tally has as XML
envelope and is formatted with XML tags, to enable import into other systems. The destination
system requires reformatting of XML Style Sheets (XSLT), based on the inherent style used in
Tally before importing the data. When two systems are running different versions of Tally,
XML data can be directly imported using the import menu option, without any re-formatting.
Data from Tally in XML format can be imported by another system with ease in
lesser time.
231
XML is fast emerging as the de facto standard for information exchange all over
the world. This format helps the user to collaborate and share information with others.
By default, the exported file will be saved in the Tally folder on your computer.
To export to a different folder enter the path of the drive and folder in Output File Name.
Another program can be used to import the content form the exported file or used as it is.
IMPORT OF DATA
Data can be imported to Tally from other users of Tally. Tally can also be
programmed to import data from other systems to be used as an integrated system.
Fro example, a Customer Contact Management Program, with details such as
status of an order and last contact established, can be imported to Tally. This imported data can
be merged into a report containing outstanding balances. When data is changed in the other
system, the change is also reflected in Tally.
To import data, Go to Gateway of Tally > Import of Data
IMPORT FORMATS
Only the Tally XML format is supported for import of Data in Tally.
232
Tally (XML) Format
This option imports data in XML format. More on XML.
SYNCHORONIZATION
Synchronization is the replication of data between two or more locations that use
Tally. Data can be sent over the Internet, or in a private network system. Tally offers control
over the frequency of replication. Data can be replicated after each transaction or updated at
specific intervals.
Synchronization takes place in a Client-Server environment and can be initiated
only by the client. Data from the client is transferred to the server and from the server to the
client.
Replicating data is a single-click activity in Tally once Synchronization is set up
between a server and its clients.
233
Chapter
11
Introduction to Taxation
TEX DEDUCTED AT SOURCE (TDS)
Tax Deducted at Source (TDS) is one of the modes of collecting income tax. The
buyer (Deductor) deducts the tax from the payment made to the seller (Deductee) and remits the
tax to the Income Tax Department within the stipulated time.
The buyers (Corporate and Non-Corporate) make payment (such as Salary, Rent,
interest on securities, Dividends, Insurance Commission, Professional Fees, Commission on
Brokerage, Commission on Lottery Tickets, etc) to the sellers (Services) and deduct the requisite
amount form such payments towards tax.
The buyer files the TDS returns containing details of the seller and the bank,
where the TDS amount is deposited to the Income Tax Department (TDS).
The Income Tax Department has prescribed the formats for filling these returns
electronically, which the buyer does in a CD/floppy.
TDS IN TALLY
TDS (Tax Dedicated at Source) in Tally provides and easy-to-use and flexible
interface. It helps you to handle intricate cases and calculate the tax payable to the Income Tax
Department.
Tally calculates the tax of all parties/suppliers where TDS deduction is mandatory.
It calculates the TDS automatically and prints Form16A certificates, Forms 26Q, 26, 27 and
27A (Cover Note) for Quarterly / Annual Returns as per statutory requirement.
It allows the user to view and print various TDS reports, Challans and TDS
Outstanding statements.
FEATURES OF TES IN TALLY
The TDS functionality in Tally supports the following features:
234
1. Simple and user-friendly
2. Quick and easy to set up and use
3. Accounting for tax on partial/full payment of bills
4. Flexibility for auto and manual calculation of TDS
5. Complete tracking of each transaction from deduction to
Payment.
6. Challan management and printing for prompt and accurate filling of tax
7. The Auto allocation feature prevents error-prone data entry and helps track the
transactions faster.
8. From 16A management:
9. Can be printed for a transaction
10. Can be printed yearly
11. Allows multi-Party printing
12. Exporting of data in NSDL compliant TDS file format.
13. Electronic format (e-TDS return) with Form 26Q, Form 27 and Form 27A
which will be validated by the utility, provided by the government.
14. Generates Form 16A, TDS Challan, TDS Computation and TDS Payable
reports.
TDS REPORTS
TDS Reports in Tally display the tax amount of the concerned party/supplier.
Tally generates Form 16A and Form 27A and also provides the printing option to print this
form. You can export the e-TDS forms (Form 26/Form 27/Form 26Q/Form 27Q) from Tally.
The exported file will be saved in the defined path specified in the Output file name.
You can get the e-TDS file validated through NSDL freely downloadable utility,
File Validation Utility (FVU) to verify whether the e-TDS return file prepared by the deductors
conform to the prescribed format.
Go to Gateway of Tally> Display> Statutory Reports>TDS Reports.
235
Click on the TDS Reports option to display the following
MIS REPORTS
The MIS Reports provide you with the TDS Outstanding.
To view the TDS Outstandings,
Go to Gateway of Tally >Display> Statements of Accounts> TDS Outstandings
TDS COMPUTATION
To view the TDS Computation report,
Go to Gateway of Tally> Display > Statements of Accounts> TDS Outstandings>
TDS Computations
236
1. The Particulars column provides you with the Name of the Party and its TDS
ledger names.
2. Amount Paid/Payable Till Date column displays the total amount of the Bills
accounted or Payment made to the party
3. The Tax column provides the amount of TDS computed as per the rate
specified in the tax column, which is displayed below the TDS amount.
4. Surcharge is the total surcharge value computed as per the rate specified in this
column, which is displayed below the surcharge amount
5. Addl. Surcharge (Cess) column displays the amount of Education Cess
applicable as per the rate specified in this column, which is displayed below the Education Cess
amount
6. Addl. Education Cess column displays the amount of Additional Education
Cess @ 1% as computed
7. Total TDS column displays the total TDS amount including all additional taxes
8. Less: TDS Deducted Till Date column provides the TDS amount deducted till
date
9. Net TDS to Deduct column displays the TDS amount yet to be deducted form
the bills accounted or payment made. If TDS is deducted using TDS journal and if the complete
amount of TDS due is deducted. This column will not display any balance. Partial amount
deducted will display the balance amount of TDS to be deducted in this column
237
Press F12 or Click on the F12: Configure button.
In Show Party TDS PAN Number field enter yes, to display the party’s PAN
number in the report.
Click on the Print button or use ALT+P to Print the TDS Computation report. This
brings up the Printing TDS Computation configuration sub-form by which the user can
customize the appearance of the Ledger report.
Accept the TDS Computation configuration sub-form to view the TDS
Computations report in print preview mode.
If the TDS payment is made to the government then such payment will not be
displayed in TDS Computation drill down report
TCS INTRODUCTION
TCS is the Tax Collected at Source by the seller (collector) from the buyer/lessee
(collectee/payee). The goods are as specified under section 206C of the Income Tax Act, 1961.
238
If the purchase value of goods is , the amount payable by the buyer is X+Y, where
Y is the value of tax at source. The seller deposits Y (tax collected at source) at any designated
branch of banks authorised to receive the payment.
The seller, lessor or licensor, is responsible for the collection of tax from the
buyer, lessee or licensee. The tax is collected for sale of goods, on transactions, receipt of
amount from the buyer in cash or issue of cheque, draft or any other mode, whichever is earlier.
Classification of Seller for TCS
Under TCS, a seller is defined as any of the following:
• Central Government
• State Government
• Any Local Authority
• Any Statutory Corporation or Authority
• Any Company
• Any partnership Firm
• Any Co-operative Society
• Any individual/HUF whose total sales or gross receipts exceed the prescribed
monetary limits as specified under section 44AB during the previous year
Classification of Buyer for TCS
A buyer is classified as a person who obtains goods or the right to receive goods in
any sale, auction, tender or any other mode. The following are not included:
• Public Sector Companies
• Center Government
• State Government
• Embassy of High Commission, Consulate and other Trade Representation of a
Foreign State
• Any Club, such as social clubs, sports clubs and the like
INTRODUCTION TO VAT
239
VAT is a system of indirect taxation, which has been introduced in lieu of sales
tax. It is the tax paid by the producers, manufactures, retailers or any other de4aler who ad value
to the goods and that is ultimately passed on to the consumer. VAT has been introduced in India
to ensure a fair and uniform system of taxation. It is efficient, transparent, revenue-neutral,
globally acceptable and easy to administer taxation system. It benefits the common man
(consumer), businessman and the Government.
VAT enhances competitiveness by removing the cascading effect of taxes on
goods and makes the levy of tax simple and self-regulatory, ensuring flexibility to generate large
revenues.
The cascading effect is brought about by the existing structure of taxation where
inputs are taxed before a commodity is produced and the output is taxed after it is produced.
This causes an unfair double- taxation. However, in VAT, a set-off is given for input tax (tax
paid on purchases). This results in the overall tax burden being rationalized and a fall in prices
of goods.
VAT makes the tax structure simple, hassle-free and export-oriented. The
integration of VAT with Tally will help you in the smooth functioning of your business and
eliminate the complications that might otherwise arise in VAT.
CONCEPT OF VAT
The essence of VAT is in providing set-off for input tax and this is applied
through the concept of input credit/rebate.. This input credit in relation to any period means
setting off the amount of input tax by a registered dealer against the amount of his output tax.
Value Added Tax (VAT) is based on the value addition to the goods, and the related VAT
liability of the dealer is calculated by deducting the input credit from the tax collected on sales
during the payment period.
This concept is explained with an example, in the Computation of VAT section.
VAT works in two different ways:
1. If VAT-registered business receives more output tax than the taxes paid as
input, they will need to pay the difference to the Commissioner of Taxes (State).
2. If the input tax paid is more than the output tax collected,
• You can carry forward the Input credit and adjust it against the output tax in
the subsequent months.
• You can have the Input Credit refunded to you by the Government at her end
of the current or following year.
240
• You can receive refunds for Input Credit on exports within a period of three
months.
General terminologies used in VAT
Term
Description
Input tax
This is a tax paid on purchase
Output tax
This is a tax charged on sales
Input Credit
The amount of Input tax that is permitted to be set off against
Output tax.
Composite
Dealers
Dealers with annual gross turnover not exceeding a certain
threshold (threshold-decided by the respective State
Government) can opt for a composition scheme whereby they
will pay tax as a small percentage of their gross turnover.
However, retailers opting for this composition schema will not
be entitled to Input Credit.
The State Governments fix the periods and the procedures for
the payment of the lump sum.
JUSTIFICATION OF VAT
VAT was adopted because the Sales Tax system is complex and induces noncompliance. It has been found to be a hindrance in the economic growth of Industry, State and
the Country. This causes a huge loss of revenue to the government.
VAT also helps in eliminating the dreaded cascading effect of Tax.
For instance, in the existing structure, inputs are taxed before a commodity is
produced and the output is taxed after it is produced. This causes an unfair double taxation with
cascading effects. However, in VAT, as a set-off is given for input tax as well as tax paid on
previous purchases, overall tax burden will be rationalized and prices in general will fall. VAT
thus makes the tax system simple and transparent.
241
Advantages of VAT over Sales Tax
• As VAT is a multi-point tax with set-off for tax paid on purchases, it prevents
repeated taxation of the same product.
• Simple and Transparent: In the Sales tax system the amount of tax levied on
the goods at all stages is not known. However, in VAT, the amount of tax would be known at
each and every stage of goods sale or purchase.
• VAT has the flexibility to generate large and buoyant revenues, as it levies tax
on value additions.
• Zero rating of tax on exports is possible in case of VAT
• Fair and Equitable: VAT introduces uniform tax rates across the state so that
unfair advantage cannot be taken while levying the tax.
• Procedure of simplification: Procedures related to filling of returns, payment of
tax, furnishing declaration and assessment are simplified under the VAT system so as to
minimize any interface between the tax payer and the tax collector.
• Ability to provide same revenue to the Government with lower rates of tax.
• Tax does not become a cost of doing business/.
VAT Rates
According to the White Paper, there are 550 categories of goods under the VAT
system. They are classified into the following four groups, depending on the VAT rate:
VAT @ 4%
The largest number of goods (270) comprising of basic necessity items such as
drugs and medicines, agricultural and industrial inputs, capital goods and declared goods are
under 4% VAT rate.
EXEMPTED FORM VAT
There are about 46 commodities under the exempted category. This includes a
maximum of 10 commodities that each stat would be allowed to select, from a broader approved
list for VAT exemption. The exempted commodities include natural and unprocessed products
in unorganized sector as well as items. Which are legally barred from taxation.
242
VAT @1%
This is for a specific category of goods like gold, silver etc.
VAT @12.5%
The remaining commodities are under the general VAT rate of 12.5%.
Note: The few goods that are outside VAT as a matter of policy would include
liquor lottery, tickets, petroleum products, as the prices of these items are not fully marketdetermined. These items will continue to be taxed under the sales tax act of the respective states.
COMPUTATION OF VAT AND PROFIT
Raw Material
supplier
Price of Raw Materials
Input Tax Paid
Setting Price
=Rs.100
=Rs. 10
=Rs.110
Supplier collects Rs.110 from the manufacture
and pays Rs.10 to the Government.
Manufacturer
243
A. Cost of gods
B. Input tax paid
C.
Total Purchase Cost
=Rs.100
= Rs. 10
=Rs.110
D. Product Price
E. Output Tax Charged
F.
Total Selling Price
=Rs.120
=Rs. 12
=Rs. 132
G. VAT payable (E-B)
Profit (F-G-C)
=Rs. 2
=Rs. 20
Retailer
A. Cost of gods
B. Input tax paid
C.
Total Purchase Cost
=Rs.120
= Rs. 12
=Rs.132
D. Product Price
E. Output Tax Charged
F.
Total Selling Price
=Rs.150
=Rs. 15
=Rs. 165
G. VAT payable (E-B)
Profit (F-G-C)
=Rs. 3
=Rs. 30
Consumer
The above diagram depicts computation of (10%) VAT at each stage of business.
Hence, it is not the manufactures and retailers but only the consumer who has paid 10% VAT to
the government. The profits for manufactures and retailers thus remain unaffected.
VAT IN TALLY
244
Features of VAT in Tally
VAT is completely integrated with Tally. The VAT functionality in Tally supports
the following features, making it easier for computation:
• Quick & easy setup
• Fast & error-free voucher entry
• Pre-defined list of sales & purchase classifications
• Complete tracking of each transaction till annual returns.
• Printing of Tax invoice
• VAT computation report
• Better VAT-returns management
• Monthly Return
ENABLING VAT
Go to Gateway of Tally >Accounts info.> F11: Features > Statutory & Taxation.
Set Enable Value Added Tax (VAT) and Set/Alter VAT Details to Ye
On enabling Set /Alter VAT Details to Yes, Tally will prompt with VAT Details
Screen.
245
VAT Details
• Select the State name.
• Set Type of Dealer? to Regular
• Enter the Regular VAT Application From date.
• Accept the screen to save.
Note: All Classification and Statutory forms shown here are based on the
Karnataka State Model.
CONFIGURING LEDGER FOR VAT REPORTING
VAT Classification
The VAT Classification is a list of VAT rates, which describes the nature of the
Business Activity and the type of transaction. There are in-built in the system and will e updated
if and when any statutory changes take place.
• Input VAT @ 4%
• Input VAT @ 1%
• Input VAT @ 12.5%
• Output VAT @ 1%
• Output VAT @ 4%
246
• Output VAT @ 12.5%
• Purchases-Capital Goods
• Purchases-Exempt
• Purchases from unregistered dealers
Depending on the type of the business, type of transaction, and the statutory
requirements of your State, you will need to select the appropriate classifications from the list
during Ledger creations, vouchers entries, etc.
The Sales and Purchase transactions are segregated based upon the classification
selected during voucher entry and shown in the VAT computation. In the VAT Computation
you can view the classification-wise VAT and Nett Values.
LEDGER MASTERS
The VAT Classification will be displayed as a drop down list in the Ledger
Masters. Tally gives the flexibility to the user, to either have the classification selected in the
Ledger Master tagged to all transactions. Or, select different classifications each time during
voucher entries. This in explained in detail in the Vouchers and Transactions section.
The Ledgers that are affected by VAT are:
• Purchase Ledger
• Sales Ledger
• Duties and Taxes Ledger
• Direct Expenses/Income
CREATING A PURCHASE LEDGER FOR VAT
The following additional fields pertaining to VAT can be seen in the Ledger entry
screen.
Go to Gateway of Tally > Accounts Info > Ledger> Create/Alter
247
Used in VAT Return
Set this to Yes if you wish to select VAT/Tax class for this Ledger.
Note: Tally gives the flexibility to he user to either have the classification selected
in the Ledger Master tagged to all transactions Or select different classification each time during
voucher entries. For more details refer Vouchers and Transactions.
The rest of the Ledger creation process is the same as in default Tally.
In the above example we have selected a VAT classification of 4%.
VAT CLASSIFICATION-PURCHASE-EXEMPT
Let us take an example of a VAT exempted transaction below.
248
Used in VAT Returns
Set this to Yes and select Purchases-Exempt form VAT/Tax class for this Ledger.
Accept the screen to save.
Creating a Supplier ledger
Create a ledger for the Supplier form whom you are buying the VAT exempted
item:
249
Note: The TIN or Sales Tax number of the creditor whichever applicable needs to
be entered in the Ledger.
If VAT is not enabled for your company, the TIN/Sales Tax No. field will be
replaced by Sales Tax No.
To learn about the actual transaction, refer to Creating Purchase Voucher (As
Invoice) for VAT section.
Creating a Sales Ledger for VAT
Like in the Purchase Ledger Screen, select the required VAT/Tax classification in
the Sales Ledger as well.
Go to Gateway of Tally > Accounts Info > Ledger > create/Alter.
250
Used in VAT Return
Set this to Yes if you wish to select VAT/Tax class for this Ledger.
Note: Tally gives the flexibility to the user to either have the classification selected
in the Ledger Master tagged to all transactions Or select different classifications each time
during voucher entries. For more details refer Vouchers and Transactions.
The rest of the Ledger Creation process is the same as in default Tally.
In the above example we have selected a VAT class of 4%.
The rest of the settings are the same as in default Tally.
Creating a VAT Ledger under Duties and Taxes
The ledger for Input VAT is shown below:
251
Type of Duty/Tax
On the selection of group Duties and Taxes, the list of Tax Types CST, others and
VAT, is displayed. Select VAT for VAT related transactions.
Note: If you have VAT and TDS enabled, the list will also include TDS.
VAT/Tax Class
Like in the Purchase4 and Sales Ledger, this is a drop down list containing the
VAT classifications. Select the appropriate classification or select Not Applicable if you wise to
select the classifications at the Voucher level.
Percentage of calculation
This field will display the VAT rate that you selected in the VA/Tax class field.
Method of calculation
This will display On VAT Rate if you have selected VAT under Type of
Duty/Tax.
Output VAT
On selection of CST
252
Type of Duty/Tax
On selection of CST for Type of Duty/Tax, you can select either Inter-State
Purchases or Inter-State Sales for Tax Class. Once you select this, you need to manually enter
the Percentage of Calculation.
Method of Calculation
Once you enter the Percentage of calculation, select the Type of Duty from the
drop down list.
CREATING
A
VAT
EXPENSES/INCOME
LEDGER
UNDER
DIRECT
Direct Expenses/Income
The VAT/Tax Classification is selected in the same manner as for the Sales and
Purchase Ledger screen.
253
The VAT related fields in the Direct Expense ledger is the same as for Purchase
and Sales Ledger.
The VAT related fields are same for Direct Income Ledger as well.
Vouchers and Transactions
The entire Data entry and Reporting architecture is based upon VAT
Classifications selected during voucher entry.
The Vouchers that are affected by VAT are as follows:
•
•
•
•
•
Purchase
Sales
Debit Note
Credit Note
Journals
Creating a Purchase Voucher (As Invoice) for VAT
Invoice can be classified into As Item Invoice and As Accounts Invoice. The VAT
functionality though, is the same for both.
Give below are examples of transactions in Item Invoice with implementation of
VAT.
254
As Item Invoice
The selection and display of the VAT classifications in the voucher differ
according to the settings in the F12: Configuration screen.
F12: Configuration screen
Use Common Ledger A/c for Item Allocation-NO
If you wish to use more than one ledger during a voucher transaction, you have to
set this to No. this way; you need to select a ledger for every item during voucher entry. When
you set this to No, you can see the VAT/Tax Class at the header region of the screen if the
Allow Selection of VAT/Tax Class during entry field is set to Yes.
Allow Selection of VAT/Tax Class during entry?-YES
Once you select Yes, you have the option to select the VAT classifications in the
field VAT/Tax Class which is in header region of the Voucher Screen. If it is set to No, the
VAT/Tax Class will not be displayed in the voucher screen and the classifications will be taken
from the Ledgers.
Consider the following examples
255
• Example 1 : Purchase @4%
The following is the entry the purchase of item 1 when VAT classification is
Purchase @ 4%. This classification is selected from a drop down list at the header region of the
screen as shown below.
Note: In the VAT/Tax Class field, there is an option called Note Application. You
can select this option if you need different classifications for each item during voucher entry.
You will to select the Duties and Taxes ledger after you are done with the entry of
all items
256
It will now calculate the VAT amount and add it to the Amount to give you the
total.
F12: Configuration screen
Use Common Ledger A/c for Item Allocation-Yes
When you wish to use the same Ledger for all items in a transaction, you can set
this to Yes. Thus, you need not select a Ledger each time you enter an item during the voucher
transaction.
The following example to demonstrate the functioning of Assessable Value is
shown by setting this field to Yes.
Assessable Value: It is the value on which VAT is to be calculated. The value is
arrived at after making proper deductions towards Trade discounts if any, and adjustments
towards Excise/ED Cess payable. It is up to the user to calculate this and enter it under the
Assessable Value column. This manual entry gives flexibility to the user to make the
calculations as per the local statutory requirements.
As this example does not include discount or Excise/ED Cess taxes, the
Assessable Value will be Rs. 5000, which is retrieved from the Amount column.
257
Let us assume we have:
• A discount of Rs.200 on purchases
• Excise tax of Rs.800 (16% of 5000)
• ED Cess of Rs. 16 (2% of 800)
1. Subtracting the discount amount: 5000-200=4800
2. Adding the Excise tax amount:4800+800=5600
3. Adding the ED Cess amount : 5600+16=5616
Therefore, our Assessable Value amount is Rs. 5616.
VAT is now calculated on this amount automatically on the selection of the tax
ledger (Rs,224), as shown below.
The entrie3s are to be passed similarly for Sales Voucher and Credit/Debit notes.
• Example 2: Purchase-Exempt
This example is to demonstrate the working of Tally in the VAT exempted
transactions and also to show the type and patterns of reports generated for such transactions.
We are passing the following entry for the purchase of the VAT exempted item.
258
As it is exempt form VAT, this particular transaction does not affect the VAT
amount in any way. Similarly for Inter-state Sales/Purchases.
Note: In the Voucher mode there is no option for selection of the VAT
classification at the header region. Therefore, the VAT classification selected in the Ledgers will
apply always.
CREATING A SALES VOUCHERS (AS INVOICE) FOR VAT
Functionality of Sales Voucher is similar to that explained in the Purchase
Voucher. However, in order to understand the calculation of VAT, let us take the following
example:
259
Assessable Value: The calculation is similar to that explained in Purchase voucher.
Printing Configuration
Printing Configuration screen after the addition of new features will appear as
follows:
Tax Invoice
You will see the following new sections pertaining to VAT in the Invoice:
Title of Document
This field prints the title entered in the Voucher Type Master.
E-mail
The e-mail address of your Company (as specified in the Company Master) will
also be printed in the Sales Invoice, Just below the address.
VAT %
This column can be enabled by setting Print VAT % to Yes in the Printing
Configuration screen. The rate of VAT form the VAT classification selected during voucher
entry is printed in this column.
VAT Analysis
260
This field prints the VAT amount on the total Net Value. That is, Rate of VAT,
Assessable Value and VAT Amount is printed at the bottom right of the screen.
VAT Amount (In words)
Prints the VAT amount in words
Company’s TIN/LST No.
Prints the Company’s TIN or LST number.
Company’s CST No.
Prints the CST number entered in the Company master.
Buyer’s TIN/Sales Tax No.
Prints the buyer’s TIN or Sales Tax number, as the case may be
Date & Time
The field Print Date & Time in the Printing Configuration screen needs to be set to
Yes in order to print the date. However, in case Excise details are enabled the Date & Time is
printed regardless of the setting in the Printing Configuration screen.
Declaration
The declaration entered in the Sales Voucher type Master will be printer. If it is
not entered in the Sales Voucher type, Tally will print the following line by default:
“We declare that this invoice shows the actual price of the goods described and
that all particulars are true and correct”.
If you do not require this, you can set Print declaration to No in the Printing
Configuration screen shown above.
Generated by
By default the Generated by field will display This is a Computer Generated
Invoice. However, you can change it if required. This is printed at the bottom of the Invoice.
Copies of the Invoice
261
For five or more copies of the Invoice, each copy will be marled as follows:
Original-Original Buyer’s Copy
Duplicate-Duplicate Seller’s Copy
Triplicate – Triplicate Transporter’s Copy
Quadruplicate-Extra copy
Fifth and above-Extra Copy
Creating / Altering Sales Voucher Type Master for VAT
New Fields
The following are the new fields added in the Sales Voucher Type Master.
Go to Gateway of Tally > Accounts Info> Voucher Types> Alter
Default Print Title
You can set the title the Tax Invoice in the Default Print Title field. This is helpful
since you need not change the title in Print configuration each time you use set it as Tax Invoice
for Local Sales and Bill of Sale for Retail Invoice.
Is Tax Invoice
If Is Tax Invoice is set to Yes and the number of copies to be printed is more than
one then the copy type is printed as follows:
1. Original – Buyer’s Copy
2. Duplicate – Seller’s Copy
3. Triplicate – Transporter’s Copy
4. Quadruplicate – Extra Copy
5. Extra Copy
If Is Tax Invoice is set to No, and the number of copies to be printed is more than
one, then the copy type is printed as follows:
262
1. Original
2. Duplicate
3. Triplicate
4. Quadruplicate – Extra Copy
5. Extra Copy
Declaration
Provision is made to enter the Statutory declaration if applicable. The same will be
printed in the Tax Invoice.
Note: If the declaration field is left blank, Tally’s default declaration will get
printed in the Invoice.
Item Master
Consider the Item Master shown below:
PAYMENT OF VAT IN TALLY
The Journal and Payment Voucher entries for the payment of VAT can be
demonstrated with the example shown below.
263
As shown in the screen above, the Output Tax is Rs. 700.00 and Input Tax is
Rs.424.64. The VAT payable is Rs. 25.6.
Journal entry
Note: The VAT payable Ledger is under the group Duties and Taxes.
Payment Voucher Entry
264
The VAT payable Rs.275.36 is transferred to the Cash or Bank account.
CREATING DEBIT NOTE/CREDIT NOTE FOR VAT
Punchers Returns-Debit Note
This is a Purchases Returns entry and you have to use the Debit Note Voucher.
Sales Returns – Credit Note
Let us take the example of a Sales Return. Here you have to use the Credit Note
voucher.
265
CREATING JOURNAL VOCUHER FOR VAT
If you need the Journal transactions for VAT Computation (for example,
adjustment of Input credit, output tax, etc) you will need to make the following settings:
Go to Gateway Tally> Accounts Info> Voucher type> Create/Alter
The following screen is displayed
Name of Class
You have to name the voucher class.
In the above example, we have named it as VAT Adjustment Class. Once you
press Enter, the following screen is displayed.
266
Use Class for VAT Adjustments
Enable the option Use Class for VAT Adjustments to Yes, if you want the journal
entries to be included in VAT Computation.
JOURNAL ENTRIES
Let us consider a Purchase transaction and then a reverse entry for adjustment of
Input credit.
The following screen displays a typical Purchase Transaction.
Typical Purchase transaction
Reversal of Input Credit
1. Go to Journal voucher screen by selecting the button F7: Journal from the
button bar, which is on the right side of the screen or by pressing the F7 key.
2. You will see the following screen where you need to select the Voucher class
created before.
3. Once you select this you can pass the typical reversal entry as display below:
267
Once you select this you can pass the typical reversal entry as shown below
VAT Computation Report
The VAT Computation report will be displayed as shown below.
Note: Rs.50 of the Input credit is reversed and only the balance of Rs.50 can be
claimed.
Input Credit Adjustment for Capital Goods
Input Credit for Capital goods is available over a maximum period of 36 monthly
installments (States have the option to reduce the number of installments).
The entry for the Purchase of Capital Goods is the same as in default Tally.
268
Let us consider the following example for the adjustment of the Input credit.
Purchase of Capital Goods for Rs. 500,000.
The Input Credit is Rs. 20,000, which will be available over a period of 36
monthly installments.
That is, (20,000/36) =555.56
Hence, Rs.555.56 can be claimed in the first installment as Input credit.
The Journal entry for this is passed as shown below.
INPUT CREDIT ADJUSTMENT FOR OPENING STOCK
Sales Tax paid on unsold stock at the end of financial year, i.e. prior to
commencement of VAT, is eligible to receive input credit on submission of the required
documents by the dealer. For this, a claim is to be made to the VAT/ sub-VAT officer within 30
days of implementation of the Act. Once the assessing officer verifies it, the credit may be
adjusted or refunded in equal installments over six months.
JOURNAL ENTRIES
269
In order to write off the Sales Tax incurred on closing stock in the next financial
year, it is necessary to eliminate the tax change from the stock value of the current year.
Assuming the local purchases amount to Rs. 57000 where Purchases @ 4% and Purchases @
12.5% are Rs. 2000 and Rs. 37500 respectively, the transaction can be journalized as follows,
selecting VAT Adjustment Class. (For more details on VAT adjustment class refer Journal)
Debit the Current Assets account Tax Recoverable A/c and credit the purchase
accounts.
Following the grant of relief by the Assessing officer, you can pass a journal entry
every month in the next financial (VAT) year, to adjust the sales tax paid in the previous year.
To claim the installment credit at the end of each month, pass a journal entry upon
selecting VAT Adjustment Class.
270
The amount of Rs. 57500 is broken into six equal installments of Rs. 9583.33 and
claimed at the end of each month.
VAT REPORTS
As per VAT Act, every registered dealer is required to maintain proper Books of
Accounts and records for all sale, purchase and production. And also VAT account-containing
details of Input and Output tax.
VAT Reports in Tally
VAT reports in Tally
• Statutory Reports
SALES REGISTER
Sales Register reports provide complete information on sales turnover achieved for
a specific period.
To view the Sales Register screen
Go to Gateway of Tally> Display > Account Books> Sales Register
Click on Columnar button or press the F5 key to re-define the columns and set the
required parameters of reports, ledgers or groups to be shown individually or in a common
column.
Set Show Party’s’ Tax Regn. No. to Yes.
The Columnar Sales Register displays as below:
TIN/Sales Tax No.
The TIN Or the Sales Tax No. (Central or Local) of the Party is displayed here. As
there is only a need to enter either the TIN or the Sales Tax No. (Central or Local) at any point
of the transaction, and not both, one single field serves the purpose for all transactions (with or
without VAT). Thus, the TIN or Sales Tax number, whichever applicable, is entered in the
TIN/Sales Tax No. (Central or Local) field in the Party Ledger Master. This is picked up in the
Tax Invoice and displayed as shown above in the Sales Columnar Register.
If VAT is not enabled for your company, the TIN/Sales Tax No/ column will be
replaced by Sales Tax No.
271
VAT COMPOSITION RETURNS
• Introduction to Service Tax
Service tax is an indirect tax levied on certain category of services provided by a
person, firm, agency, etc. The Government of India has marked a set of services as taxable under
the service tax structure. The seller provides a service and the responsibility of paying the
service tax to the government rests with the seller.
Information on service tax
Currently, the rate of service tax on all the taxable services is 12%. Presently,
service tax is applicable on 97 categories of services. A few of the listed services have an
abatement facility Service tax returns are to be filed to the Commissionerate of Services Tax for
the fiscal half-year. Information on the registration, rules, list of services, rate of service tax,
forms, etc can be found on the official website for service tax-http://www.servicetax.gov.in/
SERVICE TAX FLOW
When you buy and sell services?
A person/firm providing a service that comes under the service tax category has to
pay service tax. Service tax is to be shown separately in the invoice and is payable based on the
payment realized and not on the total amount shown in the invoice. Similarly, when you bus a
service that falls under service tax category, you avail service tax credit based on the payment
made. So, you pay service tax on the services that you sell and get credit on the service tax
payable when you buy a service.
Adjusting credit?
While you pay service tax on sale of services that come under the service tax
category, you can adjust service tax credit availed on purchase of services (Buyer). This
deduction is called adjusting credit against service tax. The difference between the service tax
that you have to pay for selling services and the service tax credit on purchases that can be
adjusted is the payable service tax.
Service tax (sales) that is adjustable against service tax credit (purchases) is also
called availing input credit. Let us look at an example.
272
Adjusting 100% credit & 20% credit
If your input service e (Purchase) can be directly related to the outpu8t service
(Sales) then you can use 100% credit adjustment on the service tax payable. For example: If you
are providing a consultancy service over the phone, then you can use the input credit from the
telephone charges to adjust against 100& of the service tax payable on your consultancy
service. If the input service is not solely used for the output service, then 20% credit adjustment
is applicable.
Input service e tax credit can be adjusted to both output service tax and output cess
(surcharge on tax). But input cess credit can be adjusted only towards output cess.
Assessable value
Service tax is calculated on the assessable value. The assessable value is the
service charge value minus abatement and expenses.
Abatement
The government has given a deduction on the value to be considered for service
tax on a few categories of services. For example, some categories of services include material
value. A caterer has to procure materials to prepare food products and sell services. Service tax
273
is charged on the total amount for the service and does not include the rate of the materials
procured. Hence a deduction is provided. This deduction from the service charges to be
considered for service tax is called abatement. Abatement is either a percentage of the service
charges or a lump sum value.
Example:
a. Charge on Service
b. If an abatement of 30% is applied, then abatement
c. Here, the assessable value is (a-b)
Therefore, service tax @ 12% on Rs.7, 000/-
Rs. 10,000/Rs. 3,000/Rs. 7,000/Rs. 840/-
Expenses
Expenses can be deducted from the total service charge to get the taxable amount.
E.g. A technical consultant might travel to different locations with respect to work.
The invoice is prepared as ‘consultancy’ and the travel expenses are included in
the total service charges. If supported by records, you can deduct the travel expenses are
included in the total service charges. If supported by records, you can deduct the travel expenses
from the total service charge to derive the assessable value on which service tax is applicable.
FEATURES OF SERVICE TAX IN TALLY
Service tax integrated in Tally takes care of your service tax transactions. It
eliminates error-prone information, incorrect remittance, penalties, interests, compliance issues,
etc. Service Tax in Tally needs a one-time configuration for service tax features to be activated.
• Tally tracks bill-wise (bill-by-bill) detail and automatically calculates service
tax payable and input credit with the flexibility to make adjustments later.
• Service tax is part of a regular transaction. Information on service tax is
maintained and produced category-wise, which is mandatory in service tax returns.
• Adjusts input credit towards service tax payable.
• Accounts for abatement and expenses
• Provision for exemption notification details.
• Built-in assessable value feature on which service tax is calculated
274
• Transfer earlier pending service tax payable and available service tax input
credit in to Tally
• Reports are generated as per government suggested format. Print and file
reports:
• Management Information Services (MIS) reports: Service Tax Payable Report
and Input Credit Form.
EMABLING SERVICE TAX IN TALLY
To enable Service Tax,
Go to Gateway of Tally>F11: Features> Statutory & Taxatio
Set Enable Service Tax to Yes
Set Set/Alter Service Tax Details to Yes to enter the Company Service Tax Details
COMPANY SERVICE TAX DETAILS
The Company Service Tax Details screen in where you will enter the service tax
details. The name of the company is displayed at the top followed by different fields.
275
Company Service Tax Details
Service Tax Registration No. - Enter the registration number allotted to you by
the Service-Tax Department.
Date of Registration – Enter the date of registration of Service Tax for your
service.
Assessee Code- Enter the code given to your company by in Service Tax
Department.
Type of Organization – In this field select the type of your organization from
the List of Organizations menu.
276
Major Service Category Name-Here you will find options for different categories
that come under the service tax net. You might be providing two or more services in a company.
In such a situation, select the service category that is the mainstay or forms the major part of
your business.
Select the relevant option from the List of Service Categories that applies to your
company.
Credit Adjustment (%) – By default this field is set to 20. Enter the
percentage of credit adjustment that you would like to avail.
Division
Code-Enter the code of the division in which your company falls.
Name – Enter name of the Division under which your company falls.
277
Range
Code-Enter the code of the range of your company.
Name-Enter the name of the range under which your company falls.
Commissionerate
Code- This is the code of the Commissionerate of Service Tax under whose range
the address of your registered premise falls.
Focal Bank Details
Focal Bank Code- The Commissionerate of Service Tax allots a code to banks
nominated for payment of service tax in a particular area. This code is available with the
Commissionerate of Service Tax.
Focal Bank Name- This is the name of bank nominated by the Commissionerate of
Service Tax to receive service tax payments in a particular area. This information is available
with the Commissionerate of Service Tax.
Focal Bank Address- Enter the address of the branch of the focal bank.
CREATING SALES LEDGERS FOR SERVICES
Go to Gateway of Tally > Accounts Info > Ledgers > Create
1. Enter the Name of the Sales Ledger
2. Select the Group Sales Accounts in the field Under
3. Set Inventory Values are affected to Yes
Note: Set the Inventory Values are affected field to Yes, if you are maintaining
service as item. For example: You sell consultancy changed by the number of hours.
4. Set Is Service Tax Applicable to Yes
278
5. Select the Category Name from the List of Service Categories.
6. Accept the screen to save.
Note: Create a Service Tax ledger for each service category. For Example, if you
purchase services in two categories and sell services in three categories, create five service tax
ledgers
CREATING OUTPUT SERVICE TAX LEDGER
279
To create an Output Service Tax ledger:
Go to Gateway of Tally > Accounts Info> Ledger> Create
1. Enter the Name of the ledger
2. Select Duties & Taxes in the field Under
3. Select the Type of Duty from the List of Types of Duty/Tax.
4. Select the Category Name from the List of Service Categories
5. Set Inventory Values are affected to No.
6. Accept the screen to save
Similarly, you can create ledgers for Input Service Tax
CREATING A CUSTOMER LEDGER
To create a Customer ledger:
Go to Gateway of Tally > Accounts Info > Ledgers > Create
1. Enter the Name of the ledger
280
2. Select the group from the List of Groups
3. Set Maintain Balances Bill by Bill to Yes. Enter the Default Credit Period, if
any
4. Set Inventory Values are affected to No
5. Set Is Service Tax Applicable to Yes
6. Select the Type of Classification in the Exemption Details screen.
281
Note: If Exempt classification is selected, then the Notification number has to be
entered. The number will appear in the ST3 Half Yearly return of exempt section
7. Enter the Mailing Details
8. Accept the screen to save.
282
Chapter
12
Introduction
To payroll
Tally Payroll is integrated with Accounting to give the user the benefits of
simplified Payroll processing and accounting.
Tally Payroll enables users to set up and implement salary structures, ranging from
simple to complex, as per the organization’s requirements. Yes can also align and automate
payroll processes and directly integrate them with main stream accounting applications. Payroll
data can be viewed as part of the existing and configurable cost centre reports for business
analysis.
Tally Payroll also supports configurable formats for payslip printing; flexible
salary/wage, attendance, leave and overtime registers; gratuity and Expat reports.
FEATURES OF TALLY PAYROLL
In keeping also supports configurable formats for payslip printing; salary/wage.
Attendance, leave and overtime registers; gratuity and expat requirements of small to large
business enterprises.
• It allows seamless integration with Tally Accounts. There are no disconnects
between Payroll and Accounts.
• It offers Employee Groups – unlimited classification and sub-classification of
employees.
• I offer Pay Structures-ease of conformity, faster entry and flexibility of nondependence.
• It offers Pay Components- user –definable earnings, deductions and others.
• It offers a unique Auto-Manual payroll processing Facility.
• It is independent of processing period restrictions.
283
• It offers Employee Groups, Pay structures and Pay components.
• It offers a unique Auto-Manual payroll processing facility.
• It allows Arrears Calculation.
• It computes salary based on Attendance, Time, and Unit of Production.
• Tally Payroll helps in tracking of Loans and Advances.
• It provides calculation of Gratuity.
• It allows you to drill down from any summary report to detailed levels, and till
the origination transaction, for a particular Pay component value.
• It provides configurable report formats.
• You can also process Payroll using the Multilingual feature in Tally.
Enabling Payroll in Tally
To enable Payroll in Tally
Go to Gateway of Tally>F11: Features>Accounting Features.
• Set Maintain Payroll to Yes
• You can set More than ONE Payroll/ Cost Category to Yes if you wish to
process payroll for multi group of Employees.
FOUR EASY STEPS TO GENERATEA PAYSLIP
284
The new enhanced Payroll in Tally requires minimal effort for accurate
processing. Setting up Pay Heads, Employee Group, Employees, Salary Details and
attendance/Production Type is now a simple process with Tally’s Four easy steps to generate a
payslip.
Step 1
Create Pay Heads
The components of structured salary are created under Pay Head
Create the salary structure components in Pay head. The Pay head creation in tally
is very user friendly. Tally allows creating any complex type of pay head.
Step 2
Create Employee Masters
Create an Employee master. Enter the requisite Employee Details & Employee
group by grouping employees under the function they perform; their department or designation.
Step 3
Create Salary Details
Create the applicable Salary Details for both Employee Groups as well as
Individual Employees with earnings, deductions and basis of computation.
Step 4
Process Payroll and Generate the Payslip
Pass a Payroll voucher to enter all Earnings and Deductions in Payroll transactions
that are paid along with the salary Payslip for all employees
Generate the Payslip that provides employee as well as attendance details, itemizes
each component of the employee’s earnings and deductions, and displays the net amount paid to
him for a given pay period. It also provides information to the employees to how the net amount
was arrived at.
PAYROLL CONFIGURATION
285
The Payroll Configuration can be enabled as shown below:
Gateway of Tally> F12: Configure> Payroll Configuration
In the above screen;
• The option Show NI Number (for International companies only) and Show
Statutory Details (for India/SAARC Companies only) can be set to Yes to enter the NI
details/PF, ESI and PF PAN details in the Employee details form and print the same information
in the Employee Payslip.
• The options, Show Passport & Visa Details and Show Contract Details, should
be set to Yes as shown, to display the Passport, Visa and Contact Details in the Expat Reports. If
these options are set to No, then the Expat Reports menu will not be displayed under Payroll
Reports. Some of the Information related to Employee passport such as Passport Number,
Passport Expiry date, Visa Number, Visa Expiry date, contract Start and Expiry dates will not be
displayed at the creation of the Employee.
PAYROLL INFO.
The Payroll Info. allows you to set up the employee defaults and standard payroll
information with common payroll fields used for calculating earning and deductions.
Go to Gateway of Tally > Payroll Info.
286
PAY HEADS
The salary components constituting Pay Structures are called Pay Heads. A Pay
Head may be an earning, which is paid to an employee, or a deduction, which is recovered from
his/her salary. The value of these Pay Heads could be either fixed or variable, for each Payroll
period.
Pay Head Type
A Pay Head is categorized as Allowances, Deductions or Reimbursements
In Tally Payroll, Pay Head types are provided in a natural language for ease of
use, as follows:
1. Earning for Employees
2. Deduction from Employees
3. Employer’s Statutory deductions
4. Employer’s Statutory Contribution
5. Gratuity
6. Loans and Advances
287
7. Reimbursement to Employees
While creating the salary payable ledger you can use Not Applicable type which
will be used to post appropriate accounting entries.
CALCULATION TYPES
The Calculation of the Pay Head is bases on its Calculation Type.
Tally payroll allows following calculation methods
Note: The formula defined in Calculation Type will be used for computation only
while using Payroll Auto Fill functionality in the Payroll Voucher, and not in Manual entry
mode of Payroll voucher.
The following computational models are supported in Calculation Types.
As Flat Rate
As Flat Rate is a Calculation where the value of the Payroll head is a fixed amount
for a period. Pro-rated. In Tally the attendance can be of Payable days (Present) or loss of pay
(Absent) type.
On Production
On production calculation type is used to calculate the Production incentive type
of Pay head. The production date can be entered in Attendance voucher against a Production
type.
As Computed Value
As Computed Value is used if the Pay Head value is based on a dependent
component. You will be able to define the dependent component by specifying the formula or
using the current sub- total or current earning or deduction total. You can also define the slab
either by percentage to value or the combination in a slab.
Example:
HRA as 40% of Basic Salary
As User defined Value
288
As User defined Value allows you to manually enter the value at the time of
processing the salary. This calculation type is useful for Pay Heads that have variable values and
are not related to any attendance/production data.
CREATING AN EARNING PAY HEAD
To create an Earning Pay Head, Basic Salary, under Indirect Expenses:
Go to Gateway of Tally > Payroll Info. > Pay Heads > Create
1. Enter the Name of the Earning Pay Head.
2. Select Earning for Employees as the Pay Head Type form the List of Pay Head
Types.
3. Select the respective Pay Head Group Earnings from the list for the field
Under.
4. select Yes from the list if you want the Pay head to affect the net salary.
5. The Pay Head name entered in the Name field will appear in this field. You
can change the same, if required. The name entered in this field will appear on the payslip.
6. Select Flat Rate from the List of Calculation Types.
7. Select the Calculation Period Type from the list.
289
8. Based on the Calculation Period Type, you can select and enter the details for
Per Day Calculation Basis.
9. Select the Rounding Method from the list if applicable.
10. Accept to save the Pay Head.
Similarly, you can crate Earning Pay Heads for HRA, Conveyance and so on…
CREATING A DEDUCTION PAY HEAD
To create a Deduction Pay Head, Professional Tax under Employees’ Statutory
Deductions:
Go to Gateway of Tally > Pay roll Info. > Pay Head > create
1. Enter the Name of the Deduction Pay Head.
2. Select the Pay Head Type from the List of Pay Head Types.
3. Select the Group from the List of Groups.
4. select Yes from the list if you want the Pay Head to affect the net salary.
5. The Pay Head name entered in the Name field will appear in this field. You
can change the same, if required. The name entered in this field will appear on the payslip.
290
6. Select the Calculation Type from the List of Calculation.
7. On selecting the Calculation type to ‘As Computed Value, a new field
Calculation Period appears which will be set to Months automatically.
8. Select On Current Earnings Total from the list to be Computed On.
9. Specify the Slab Rate.
10. Select the Rounding Method from the list if applicable.
11. Accept to save the Pay Head.
Similarly, you can create a Deduction Pay Head for Provident Fund and so on
Note: If you are using any Pay Head component having Calculation Type As
Computed Value and Compute: On Current Earning Total, while defining Salary Detail, the
sequence of the component has to be selected accordingly.
Creating Salary Payable Ledger
A Salary Payable account under the group Current Liabilities is used to credit the
total of Net Payable salary of all employees. When salary is disbursed, this account is debited
and Cash or Bank account is credited.
To Create Salary Payable Pay Head under the group Indirect Expenses:
Go to Gateway of Tally > Payroll info. > Pay Heads > Create
291
1. Enter the Name of the Pay Head
2. Select Note Applicable from the List of Pay Head Types
3. Select Current Liabilities from the list
4. Accept to save the Pay Head
CREATING GRATUITY PAY HEAD
To create a Pay Head Gratuity under Current Liabilities:
Go to Gateway of Tally > Payroll Info. > Pay Head > Create
1. Enter the Name of the Pay Head
2. Select Gratuity from the List of Pay Head Types
3. Enter the Slab Rate Details for Gratuity Calculation in the sub-screen
292
4. Select Current Liabilities from the list
5. Accept to save the Pay Head
Note: To use the Earning Pay Head for Gratuity calculation, set Use for Gratuity?
Field to Yes in the ledger creation screen (for Pay Heads such as Basic Salary, HRA, and so on,
created under Indirect Expenses).
EMPLOYEE GROUP
Tally allows you to set up default (common) information for employees. An
Employee Group allows you to group employees in a logical manner.
The Salary structure can be defined at the Employee Group level. Referring to this
Group as a template and changing accordingly will ease building all your employee records on
it.
For example, by department or function such as Production, Salas, Administration
and so on, or by designation such as Managers, supervisors, Workers and so on.
CREATING AN EMPLOYEES GROUP
To create Sales as an Employee Group,
Go to Gateway of Tally> Payroll Info.> Employee Groups> Create (Single Group)
293
• Enter the Name of the Employee group.
• Select the group from the List of Employee Groups.
• Accept to save the Employee Group.
Creating Multiple Employee Groups
You can create multiple Employee Groups in this mode.
Go to Gateway of Tally> Payroll Info.> Employees> Create (under Multiple
Groups)
The Multi Employee Group Creation screen displays.
EMPLOYEE
294
The Employee Creation screen allows you to enter basic setup information that
applies to the employees. Enter General Information, Payment Details and Passport & Visa
Details.
CREATING AN EMPLOYEE
Creating single Employee
To create an Employee under the Employee group, Sales:
Go to Gateway of Tally> Payroll Info.> Employees> Create (Single Employees)
“Enter the Name of the Employee; Select the Employee Group in the field Under,
Enter the Date of Joining, the Employee General Information, Payment Details, Passport & Visa
Details and Accept to save.
CREATING MULTIPLE EMPLOYEES
You can create multiple Employees in this mode.
Go to Gateway of Tally> Payroll Info.> Employees> Create (under Multiple
Employee)
295
Salary Details
Salary Details is used to define a Pay Structure to an Employee or to an Employee
Group to speed up the entry of Individual Employee’s Pay Structure.
Select the basic Pay Heads that applies most for your employees and create as an
Employee Group. However, it is not compulsory for all employees to have the same
compensation structures as of the Employee Group. If required, a Pay Head element or its value
may be added, deleted or altered at Individual Employee level.
Note: If the slab rate is not defined in the Pay Head then you will get the full value
CREATING SALARY DETAILS FOR AN EMPLOYEE
To create Salary Details for an Employee:
Go to Gateway of Tally> Payroll Info.> Salary Details> create> Select the
Employee from the List of Employees/Group
296
1. Enter the Effective From date.
2. In the Pay Head field, the Start Type list displays two option namely, copy
From Parent Value and Start Afresh.
3. If you select Copy From Parent Value, the Salary Details defined for the
Employee Group to which the Employee belongs will appear in the screen.
Note: If the Pay-Head details are available in the parent group then you will get
Copy from parent value, else you will get only Start Afresh.
4. If you select Start Afresh, you have to select the Pay Heads from the List of
Pay Heads and enter the User Defined rates if required.
UNITS (WORK)
A Unit in Tally Payroll is similar to the Unit of Measure in Tally’s Inventory
module. In Payroll, Units are used to facilitate calculation of a Pay Head value based on
Production, which in turn would be linked to Units such as Time, Work or Quantity.
Go to Gateway of Tally > Payroll Info. > Unit (Work)
297
Creating Units (Work)
In the Units Creating screen, select the Type of unit from the list. Select the
Symbol from the list.
A Simple Unit in Tally is a Single independent unit and has no relationship with
other units, while a Compound Unit refers to two Simple Units having an arithmetical
relationship and is not a distinct unite.
In the case of Overtime, whose value is computed based on Overtime Hours put in
by an employee, you would need to define Hr- Hours and Min- minutes as Simple Units and Hr
of 60 Min as a Compound Unit and set this unit in Overtime Pay Head.
ATTENDANCE/PRODUCTION TYPE
The Attendance / Production type is used to record the attendance and production
data. Bases on the component (Pay head) structure, you can define multiple attendance /
production types.
Examples for attendance / production types are No. of days present or conversely,
No. of days Absent and production based such as Hours worked, Number of Pieces produced.
Attendance/Production Type is associated with the Pay Head in employee’s Pay
structure. The variable data is entered in the Attendance voucher for the payroll period.
Attendance/Production Type may also be defined in hierarchical groups whereby
Types having a common Unit are combined under logical groups.
The Attendance/Production Type may be Attendance/leave with pay, Leave
without Pay (if salary is to be paid based on number of days attended) Paid Leave, Unpaid
Leave, Absent and Production type which can be based on Piece Production, Overtime House,
and so on.
298
CREATING AN ATTENDANCE/PRODUCTION TYPE
Creating an Attendance/Production Type for Attendance/Leave
with Pay
Go to Gateway of Tally > Payroll Info. > Attendance/Production Types > Create
1. Enter the Name of the Attendance Type
2. Select Primary from the list for the field Under.
3. Select Attendance/Leave with Pay as the Attendance Type.
4. The Period Type appears automatically.
5. Accept to save the Attendance Type.
Similarly, you can create an unpaid Leave grouped under Leave without Pay.
CREATING AN ATTENDANCE/PRODUCTION TYPE FOR
PRODUCTION
Go to Gateway of Tally > Payroll Info. > Attendance/Production Types > Create
1. Enter the Name of the Attendance Type
2. Select Primary from the list for the field Under.
3. Select Production as the Attendance Type.
299
4. The Unit field will appear, select the appropriate type of unit from the list.
5. Accept to save the Attendance Type.
Similarly, you can create Box Production Attendance Type
VOUCHER TYPES IN TALLY PAYROLL
Tally Payroll provides you with Payroll, Attendance and Payment Voucher Types.
You may define a template called Voucher Class in order to automate and control usage of
ledger accounts and computed values to be posted. It is a powerful and configurable option that
enables you be define the rules of voucher entry for a particular voucher type. It also helps in
speeding up the process and minimizes data entry for posting a voucher. However, creating a
Voucher Class is not mandatory.
PAYROLL VOUCHERS
In addition to the existing voucher types in Accounting and Inventory module, two
new Voucher Types Attendance and Payroll are enabled when Payroll Feature is activated in
F11: Features.
Go to Gateway of Tally> Payroll vouchers
Attendance voucher is used to record employees’ Attendance / Production data for
the Attendance / Production Types creates in Payroll Masters. Such data may be entered as a
single Attendance voucher per payroll period or multiple vouchers as and when required within
a payroll period.
While generating the Payroll voucher, Tally automatically picks up required data,
based on the period selected and computes the corresponding value of Pay Heads, which are
linked to such Attendance / Production types.
Payroll voucher is a document to manually enter one-time/ad-hoc payroll
transactions for individual employees; as well as Payroll processing activity for all or selected
employees, using Auto Fill functionality.
Payroll Buttons
If Maintain Payroll option is set to Yes in F11; Features, the payroll Buttons will
appear along with Accounts and Inventory buttons in Voucher Creation screen on the button bar.
ATTENDANCE VOUCHERS
300
Attendance voucher allows you to enter Attendance, Overtime, Leave or
Production details. You can enter separate vouchers for each day or a single voucher for a given
pay period, say a month, with aggregated Values. You can also enter data for one or more or all
employees.
Similarly, one or more attendance types together in a single voucher.
Attendance Voucher Entry – Manual Entry
Go to Gateway of Tally > Payroll Vouchers > F5: Attendance
1. Click F2: Date to change the date
2. Select the Employee from the List of Employees
3. Select the Attendance/Production Type from the List
4. Enter the Value
5. Select End of List from the List of Employees.
6. Accept to save the voucher
ATTENDANCE VOUCHER ENTRY – AUTO FILL
301
In the attendance voucher, you can use the A : Payroll Auto Fill button to speed up
data entry process.
Auto Fill enables the user to fill all employees of a selected Cost Category (if
more than one Cost Category is enabled) and/or a selected employee group and enter value data
for selected type of Attendance/Production Type for these employees.
Go to Gateway of Tally > Payroll Vouchers> F5: Attendance
1. Click F2: Date to enter the date.
2. Click A: Attd Auto Fill.
3. In the Attendance Auto Fill screen, select the Cost Category, if applicable.
4. Select the Employee/Group from the List of Group/Employees.
5. Select the Attendance/Production Type from the list.
6. Enter the Value against the Employee name.
302
7. Accept to save the Attendance voucher.
Note: Days with Loss of Pay (LOP) are treated as a Deductible with respect to an
Earning Pay Head type and as a Payable with respect to a deduction component. For Example:
An LOP is deducted from Basic salary which is an Earning Pay Head. However, with respect to
a Deduction Component such as canteen expenses, it is tr3eated as a payable.
PAYROLL VOUCHER
Payroll voucher is used to record Employees’ Payroll related transactions. This
voucher may be used in two ways – Manual Entry and Automated Entry.
Payroll Voucher entry – Manual Salary
To Crate a Payroll voucher manually,
Go to Gateway of Tally > Payroll Vouchers > Payroll Voucher
303
1. Change the Voucher date.
2. Select Salary Payroll from the List of Ledger Accounts.
3. Select the Employee from the List of Employees in the field Particular
4. Select the Pay Heads and Enter the appropriate values
5. Select End of List and Accept the voucher.
Payroll Voucher – Auto Fill
To create a Payroll Voucher using the button A: Payroll Auto Fill,
Go to Gateway of Tally > Payroll Vouchers > Payroll voucher
1. Select the Ledger Account (Cash/Bank/Salary Payable) From the list
2. Click A: Payroll Auto Fill
Note: Yes can calculate the Payroll Voucher for a week or fortnight.
3. Enter the From and To date in the Employee Filter Screen
4. Select the Employee/Group from the List of Group/Employees
5. Enter the User defined values if required
304
6. Accept to save the voucher
Note: A single payroll voucher can be used to pass entries fro upto 100 employees
efficiently. For a company with more than 100 employees, create a multiple payroll voucher for
every 100 employees.
PAYROLL REPORTS
To view Payroll Reports
Go to Gateway of Tally > Display > Payroll Reports
305
The Payroll Repots menu displays:
• Statement of Payroll
• Attendance Sheet
• Attendance Register
• Gratuity Report
• Export Report
STATEMENTS OF PAYROLL
Go to Gateway of Tally > Display > Payroll Report > Statements of Payroll
• Payslip
• Pay Sheet
• Payroll Statement
306
• Payroll Advice
• Payroll Register
• Employee Ledger Breakup
• Ledger Employee Breakup
PAYSLIP
A Payslip is a document issued to an employee that itemizes each component of
earnings and deductions, and the net amount paid to an employee for a given pay period. It
provides visibility to an employee of how the net amount has been arrived at.
In Tally Payroll, the Payslip option of Display, Payroll reports menu provides
users the facility to View the Payslip, configure content and appearance bases on the
requirement and then Print the Payslip.
Go to Gateway of Tally > Display > Payroll Reports > Statement of Reports >
Payslip
CONFIGURATION OPTIONS IN PAYSLIP
307
Click on F12: Configure button in the Payslip to display a configuration sub-form,
using which the user can customize the display/printing content and appearance to the Payslip.
The default settings for the configuration options are shown above. These options
are self-explanatory. The options, which are set to Yes, will become visible in he Payslip. Select
No to exclude information, which is not required to be on the Payslip.
Configuration options in: Pay Slip
Show Vertical Payslip-Set this option to Yes to align Deduction Part below the
Earning. Set it No to align them side-by-side.
Show Employee Details – Set this option to Yes to display Employee Details
as entered in the employee master.
308
Show Passport Details – Set this option to Yes to display the Passport Details.
Show Visa Expiry Date- Set this option to Yes to display the Visa Expiry
Date.
Show Attendance/Production Details – Set this option to Yes to display
Attendance/Production data.
Show Attendance/Production Groups – Set this option to Yes to display
grouping of the Attendance/Production data as defined while Types creation.
Display Attendance/Production Type in Tail Units? – For compound
units used in Attendance/Production Type, set this flag to Yes to display value of the
Attendance/Production Data in Tail unit and set the same to No to display data in Main unit.
Show Year To Date Values – Set this option to Yes to display cumulative
value of Attendance/Production data or Earning and Deduction data for the current Financial
Year.
Remove Zero Entries – Set this option to Yes to remove Earning/Deduction
data with Zero value from the Pay Slip
For Attendance/Production Also – Set this option to Yes to remove
Attendance data with 0 values from the Pay Slip.
Appearance of Name- You can select the appropriate appearance of name
from the Name Style list.
DETAILED/CONDENSED BUTTON
Click on Detailed button or press ALT+F1 to view source details of individual
Attendance and Pay Head values. This view displays the Attendance or Payroll vouchers from
which the data is picked in the current Payslip. Voucher Number, Date and the Value of the
attendance or earning or deduction value is displayed. This is useful when multiple
attendance/payroll vouchers are entered during the same payroll period. The user can drill down
to the corresponding voucher directly from the Payslip screen.
Click the Condensed button or press ALT+F1 again to return to the normal mode.
Period Button
309
By default, when you bring up the Payslip view, the Period of Payslip –
Attendance and Payroll Vouchers data is set to current month, and in most cases you don’t have
to change it. However, if required, you can change the period of data and include multipleperiod payroll information to view/print a consolidated Payslip. As in all other Tally reports,
there is a great flexibility in terms of Period of Payroll processing as well as in the printing of
Payslip.
EMPLOYEE BUTTON
Using Employee Button (F4 Key), you can view another employee’s Payslip from
the existing Payslip display screen.
PRINTING SINGLE PAYSLIP
Click on Print button or Press ALT+P from the Payslip display screen to print
currently displayed Payslip. Tally will print the Payslip in the format that is configured for
display.
PAYSHEET
Pay Sheet is a matrix report with category, group and employees cascading in
rows, and Pay Heads appears as columns. The default report contains all earnings and deduction
details for a given month or period with a number of options t configure appearance of rows and
columns. Format of the Pay sheet report may be configured to serve as a Salary/Wage register as
required by the organization. The selection of data may be filtered for given category or group
of employees.
Go to Gateway of Tally> Display> Payroll Reports> Statement of Reports> Pay
Sheet
310
CONFIGURATION OPTIONS IN PAY SHEET REPORT
F12: Configure button in the Pay Sheet brings up a configuration sub-form by
which the user can customize the display/printing content and appearance of the Pay Sheet
report.
• Show ‘Net Pay’ Column – Set the option to Yes to display the Net
Payable Column.
• Show Column Subtotals – Set this option to Yes to display the Sub-totals
of Earnings/Deduction columns.
• Remove Zero Entries
Earning/Deduction data with Zero value.
– Set this option to Yes to remove
• Show Payslip Names for Ledgers – Set this option to Yes to display the
Name to Appear in Payslip, defined in Ledger, as the column headings. Setting this to No will
display Ledger name.
• Include Employee Groups & Categories – Set this option to Yes to
display rows showing Category and Groups. Set this to No to list only employee information.
• Show Category/Group Total – Set this option to Yes to display
Category and Group wise Totals.
311
• Show Grand Total – Set this option to Yes to display Grand total at the
bottom of the report.
• Format – You can choose either Detailed or Condensed.
• . Show Employee Number – Set this option to Yes to display employee
number along with the Name
• Expand all levels in Detailed format? – Set this option to Yes to
expand all levels and display Employee details. Set the same to No, to display summary report
for Category/Group
• Appearance of Name – You can select the appropriate appearance of
name from the Name Style list.
• Sorting Method – You can select the appropriate sorting method from the
list.
BUTTON FUNCTIONALITIES IN PAY SHEET REPORT
Detailed/Condensed Button
Use this toggle button (F1) to quickly change the report view from detailed to
summary and vice versa.
Period button
Using Period (F2) button, you can change the period for which the report is
viewed. Using this functionality, you can display the report any period such as Day, Week,
Fortnight, Month, Quarter, Half-Year or entire Year.
Employee Filter Button
Similar to Payroll and Payment vouchers, using Employee Filter button or clicking
on F7: Employee Filters button, the user can quickly select employee/groups to be displayed in
the pay sheet report.
F4: Change Currency:
Click on F4: Change Currency button or press F4 key to change the currency.
New Column
312
Use this button (ALT+A), to add a column for any other Pay Head not part of the
default Pay Slip format. Such new column is added on the right-hand side of the existing
columns.
Alter Column
Use this button (ALT+A), to replace an existing column in the report with a new
Pay Head column. The cursor should be positioned in the column to be replaced.
Delete Column
Use this button (ALT+D), to replace and existing column in the report with a new
Pay Head column. The cursor should be positioned on the column to be deleted.
Use above column buttons to customize the appearance of various Pay Heads as
columns as per requirement.
Printing Pay Sheet Report
Printing of Pay Sheet is done in a similar way as any other report in Tally, by
Pressing ALT+P from the report display screen.
While printing the Pay Sheet report, choose an option to Increase the Line Height
(for each employee line) for he purpose of obtaining signature of employee or fixing a stamp,
and use the printed report for manual salary disbursement or any other similar purpose.
PAYROLL STATEMENT
While Pay Sheet report gives you a readily available set of earning/deduction
columns and format, Payroll Statement Report allows you to generate the report for a specific
Pay Head/Ledger.
Go to Gateway of Tally > Display > Payroll Reports > Statement of Reports >
Payroll Statement
313
Note: The button Functionalities in Payroll Statement report is similar to Pay
Sheet report.
Configuration options in Payroll Statement report
F12: Configure button in the Payroll Statement brings up a configuration Subform using which the user can customize the display/printing content and appearance of the
Payroll statement report.
314
Remove Zero Entries: Set this option to Yes to remove Earning/Deduction
data with Zero value.
Show Payslip Names for Ledgers – Set this option to Yes to pick the name
entered in the Name to Appear in Payslip field in Ledger master screen. Set this option to No to
pick the name entered in the Name field of the Ledger master screen.
Include Employee Groups & Categories – Set this option to Yes will
display rows showing Category and Groups. Setting this to No will list only employee
information.
Show Category/Group Total – Set this option to Yes to display Category
and Group wise Totals.
Show Grand Total – Set this option to Yes to display Grand total at the
bottom of the report.
Format – Detailed or Condensed
Show Employee PF Account Number – Set this option to Yes to display
employee PF Account number.
Show Employee IT PAN- Set this option to Yes to display employee IT PAN
number.
Show Employee Bank Details – Set this option to Yes to display employee
bank details.
Show Employee Number – Set this option to Yes to display employee
number along side the Name
Show Employee ESI Number- Set this option to Yes to display employee
ESI number.
Show Employee Passport Details – Set this option to Yes to display
employee passport details.
Show Employee Visa Expiry Date – Set this option to Yes to display
employee Visa Expiry date.
315
Expand all levels in Detailed format – Set this option to Yes to expand all
levels and display Employee details. Set the same to No, to display summary report for
Category/Group.
Appearance of Name – You can Select the appropriate appearance of name
from the Name Style list.
Sorting Method – You can select the appropriate sorting method from the list.
PAYMENT ADVICE
The Payment Advice repot is used to generate Payment Advice / Bank Transfer
letters for a specific bank account based on the Salary Payment vouchers posted to the account
Go to Gateway of Tally> Display > Payroll Reports> Statement of Reports >
Payment Advice
Click Yes to display the screen.
PAYROLL REGISTER
Payroll register is a month- wish transaction summary report displaying vouchers
month-wise, akin to Display Statistics in the accounting module. Though the register primarily
displays Payroll vouchers, you can customize to add any other voucher type by adding a new
column.
316
Go to Gateway of Tally > Display > Payroll Reports > Statement of Report >
Payroll Register
Press F12: Configure button and set the Appearance of Names and the Periodicity
to use as shown
You can drill down to a List of Payroll Voucher reports for a month and then to a
specific voucher, if required.
317
ATTENDANCE SHEET
The Attendance Sheet is similar to Pay Sheet report, and displays a pre-formatted
report with columns, related to your attendance/production data.
Go to Gateway of Tally > Display > Payroll Reports > Attendance Sheet
Configuration options in Attendance Sheet report
318
Configuration button, F12 in the Attendance Sheet, brings up a configuration subform by which the user can customize the display/printing content and appearance of the
Attendance Sheet report.
Include Group Attendance/Production Types- Set this option to Yes to Include
Group Attendance/Production Types in Attendance Sheet report.
Display Attendance/Production Types in Tail Units? – Set this option to Yes to
display the Attendance/Production Types in Tail Units.
ATTENDANCE REGISTER
This report is similar to Payroll register and displays the summary report of the
Attendance vouchers. The configuration and button functionality are the same as in other Payroll
Register reports.
Go to Gateway of Tally > Display > Payroll Reports> Attendance Register
319
Press F12: Configure button and set the Appearance of Names and the Periodicity
to use as shown:
Shortcut keys in Tally
The shortcut keys appear in button names in the button bar (right side of the Tally
screen). You can either click the button from the button bar or pres the relevant function key or
character underlined/double-underlined.
The buttons have a function key before the button names (Eg: F1: Select Cmp)
which means you need to press F1 key (Function Key) to select the ‘Select Company’ screen
The buttons have an underlined character (Eg: F3: Cmp Info), which means you
need to press ALT +F3 to select the ‘Company Info’ screen.
320
Some buttons have a double-underlined character (Eg: V: As Voucher) which
means you need to press CTRL + V to select the ‘Voucher’ in voucher mode.
Function Key Combination
Windows
Functionality
F1
F1
To select a company
To select the Account Button
F1 (ALT+F1)
F1 (CTRL+F1)
F2
F3
F4
F5
F6
F7
F8
F8 (CTRL+F8)
F9
F9 (CTRL+F9)
Availability
At all masters menu screen
At the Accounting Voucher
creation and alteration screen
To select the Inventory Button
At the Inventory/ Payroll
Voucher creation and alteration
screen
To select Payroll Vouchers to alter At the Accounting/ Inventory
voucher creation or alteration
screen.
To change the current date
At almost all screens in TALLY
To select company inventory At the F11: Features screen
features
To select the company
At almost all screens in TALLY
To select Company Statutory & At F11: Features screen
Taxation features
To select the Contra voucher
At Accounting / Inventory
Voucher creation and alteration
screen
To select the Payment voucher
At Accounting / Inventory
Voucher creation and alteration
screen
To select the Receipt voucher
At Accounting / Inventory
Voucher creation and alteration
screen
To select the Journal voucher
At Accounting / Inventory
Voucher creation and alteration
screen
To select the Sales voucher
At Accounting / Inventory
Voucher creation and alteration
screen
To select the Credit Note voucher
At Accounting / Inventory
Voucher creation and alteration
screen
To select the Purchase voucher
At Accounting / Inventory
Voucher creation and alteration
screen
To select the Debit Note voucher
At Accounting / Inventory
321
F10
F10(CTRL+F10)
F11
F12
Voucher creation and alteration
screen
To select the Reversing Journal At Accounting / Inventory
voucher
Voucher creation and alteration
screen
To select the Memorandum
At Accounting / Inventory
Voucher creation and alteration
screen
To select the Functions and At almost all screen in TALLY
Features screen
To select the Configure screen
At almost all screen in TALLY
Special Key Combination
Window
Functionality
ALT+2
To Duplicate a voucher
ALT+A
ALT+C
Availability
At list of Voucher – creates a
voucher similar to the one
where you positioned the
cursor and used this key
combination
To Add a voucher
At list of Voucher – creates a
voucher similar to the one
To Alter the column in columnar where you positioned the
report
cursor and used this key
combination
To create a master at a voucher
screen (if it has not been already
assigned a different function, as
in report like Balance Sheet,
where it adds a new column to the
report)
To access Auto Value Calculator
in the amount field during
voucher entry
Alters the column in all the
reports which can be viewed in
columnar format
At voucher entry and alteration
screens, at a field where you
have to select a master from a
list. If the necessary account
has not been created already,
use this key combination to
create the master without
quitting from the voucher
screen.
322
ALT+D
ALT+E
ALT+1
ALT+L
ALT+K
ALT+O
ALT+L
ALT+M
ALT+N
At all voucher entry screens in
the Amount field
To delete a voucher
At Voucher and Master
To delete a master
(Single) alteration screens.
To delete a column in any Masters can be deleted subject
columnar report
to conditions, as explained in
(if it has not been already the manual.
assigned a different function, as
explained above)
All the reports screen which
can be viewed in columnar
format
To export the report in ASCII,
To insert a voucher
To toggle between item and
Accounting invoice
To
select
the
Language
Configuration
To
select
the
Keyboard
Configuration
To upload the report at your
website
To select language for Tally
interface
To Email the report
ALT+P
To view the report in automatic
columns
To print the report
ALT+R
To remove a line in a report
ALT+S
To bring back a line you removed
using ALT+R
To retrieve the last line which is
deleted using Alt+R
From Invoice screen to being
Stock Journal screen
ALT+U
ALT+V
At all reports screen in TALLY
At List of Voucher – insert a
voucher before the one where
you positioned the cursor and
used this key combination.
At creation of sales and
purchase invoice
At almost all screens in
TALLY.
At almost all screens in
TALLY.
At almost all screens in
TALLY.
At almost all screens in
TALLY.
At almost all screens in
TALLY.
At all the reports where
columns can be added
At almost all screens in
TALLY.
At almost all screens in
TALLY.
At almost all screens in
TALLY.
At almost all screens in
TALLY.
At Invoice screen -> Quantity
Field -> Press Alt +V to select
the Stock Journal.
323
ALT+W
To view the Tally Web browser.
ALT+X
To cancel a voucher in Day
Book/List of Vouchers
To Register Tally
ALT+R
CTRL+A
CTRL+B
CTRL+ALT+B
CTRL+C
To accept a form-whe3rever you
use this key combination, that
screen or report gets accepted as
it is.
To select the Budget
At almost all screens in
TALLY.
At almost all screens in
TALLY.
At almost all screens in
TALLY.
At almost all screens in
TALLY, except where a
specific details has to be given
before accepting.
At Groups/ Ledger / Cost
Centres /Budgets /Scenarios/
Voucher
Types/Currencies
(Accounts Info) creation and
alteration screen
At all the menu screens
To check the Company Statutory
details
To select the Cost Centre
At Groups/ Ledger / Cost
To select the Cost Centre
Centres /Budgets /Scenarios/
Voucher
Types/Currencies
(Accounts Info) creation and
alteration screen
At Stock Groups/ Stock
Categories/
stock
Items/
Reorder Levels/ Godowns/
Voucher Types/ Units of
Measure ( Inventory info)
creation/ alteration screen
At Groups/ Ledger / Cost
Centres /Budgets /Scenarios/
Voucher
Types/Currencies
(Accounts Info) creation and
alteration screen
CTRL+E
To select Currencies
CTRL+G
To select the Group
At Groups/ Ledger / Cost
Centres /Budgets /Scenarios/
Voucher
Types/Currencies
(Accounts Info) creation and
alteration screen
CTRL+I
To select the Stock Items
At Groups/ Ledger / Cost
Centres /Budgets /Scenarios/
Voucher
Types/Currencies
324
(Accounts Info) creation and
alteration screen
CTRL+ALT+I
CTRL+L
To import statutory masters
To select the Ledger
To mark a Voucher as Optional
CTRL+O
To select the Godowns
CTRL+Q
CTRL+R
CTRL+ALT+R
CTRL+S
CTRL+U
CTRL+V
At all menu screens
At Groups/ Ledger / Cost
Centres /Budgets /Scenarios/
Voucher
Types/Currencies
(Accounts Info) creation and
alteration screen
At Stock Groups/ Stock
Categories/
stock
Items/
Reorder Levels/ Godowns/
Voucher Types/ Units of
Measure ( Inventory info)
creation/ alteration screen
To abandon a form- wherever you At almost all screens in
use this key combination, it quits TALLY
that screen without making any
changes to it.
To repeat narration in the same At Creation/ alteration of
voucher type
voucher screen
Rewrite data for a Company
From Gateway of Tally screen
Allows you to alter Stock Item At Stock Voucher Report and
master
Godown Voucher Report
To select the Units
At Stock Groups/ Stock
Categories/
stock
Items/
Reorder Levels/ Godowns/
Voucher Types/ Units of
Measure ( Inventory info)
creation/ alteration screen
To select the Voucher Types
At Stock Groups/ Stock
To toggle between Invoice and Categories/
stock
Items/
Voucher
Reorder Levels/ Godowns/
Voucher Types/ Units of
Measure ( Inventory info)
creation/ alteration screen
At creation of Sales/ Purchase
Voucher screen
Special Function Key Combination
325
Windows
Functionality
Availability
ALT+F1
To close a company
At all menu screens
To view detailed report
At almost all report screen
ALT+F3
ALT+F4
ALT+F5
ALT+F6
ALT+F7
ALT+F8
ALT+F9
ALT+F10
To explode a line into its At almost all screens in TALLY
details
At you Inventory / payroll
To
select
Inventory voucher creation or alteration
vouchers to alter
screen.
To select the company info At Gateway of Tally screen
menu
To
create/alter/shut
a
Company
To select the Purchase Order At Accounting / Inventory
Voucher Type
Voucher creation and alteration
screens
To select the Sales Order At Accounting / Inventory
Voucher Type
Voucher creation and alteration
screens
To view monthly and
quarterly report
At almost all report screen in
TALLY
To select the Rejection Out At Accounting / Inventory
Voucher Type
Voucher creation and alteration
screens
To change the Sales Order
Voucher
To select the Stock Journal At Accounting / Inventory
Voucher Type
Voucher creation and alteration
screens
To accept all the Audit lists
At Tally Audit Listing screen
To select the Delivery Note At Accounting / Inventory
Voucher Type
Voucher creation and alteration
screens
To view the Columnar
report
At Ledger Voucher screen
To select the Receipt Note At Accounting / Inventory
Voucher Type
Voucher creation and alteration
screens
To select the Physical Stock At Accounting / Inventory
Voucher Type
Voucher creation and alteration
326
ALT+F12
CTRL+F1
CTRL+ALT+12
screens
To filter the information At almost all report screens
based on monetary value
To select payroll voucher for At Accounting / Inventory
alteration
Voucher creation and alteration
screens
Advanced config
At Gateway of Tally
Key Combination used for navigation
Windows
Functionality
Availability
ENTER
To accept anything you type You have to use this key at
into a field.
most areas TALLY
At the receivables report –
press Enter a pending bill to
To get a report with further get transaction relating to this
details of an item in a report.
bill ( e.g. original sale bill,
receipts
and
payments
against this bill, etc)
To remove what you typed into At almost all screens in
a field
TALLY.
To accept a voucher or master
ESC
To come out of a screen
SHIFT+ENTER
SHIFT+ENTER
To indicate you do not want to
accept a voucher or master.
Collapse next level details
AT Voucher Register screen
and Trial Balance report
To explode a line into its details In almost all Reports:
At
a
Group/Stock
Group/Cost
Category
/Godown/Stock
Categorydisplays Sub Groups and
Ledgers/Stock Items/ Cost
Centres/
Secondary
Godowns/ secondary Stock
Categories
At a Voucher-displays its
entries and narration
327
At a Stock Item – displays
the next level details
At Voucher Register screen –
displays the next level details
CTRL+ENTER
At Trial Balance report –
displays the next level details
To alter a master while making At Voucher entry and
an entry or viewing a report
alteration screens
At all reports
328